direct merchant smart deposit - first bank · chapter 1 deployment smart deposit user guide 9...
TRANSCRIPT

Release 4.0.1 01/29/10
Direct Merchant Smart DepositUser Guide

If you have any comments about this document, please send them to the Manager of Information Development at the following address:
Oklahoma Solutions CenterMetavante Corporation1200 Sovereign RowOklahoma City, OK 73108United States of America
Metavante® is a registered trademark of Metavante Corporation.
Adobe® Acrobat® and Reader® are registered trademarks of Adobe Systems Incorporated in the United States and/or other countries. Microsoft®, Windows®, and Windows NT® are registered trademarks; and Windows Server™ and Windows Server System™ are trademarks of Microsoft Corporation in the United States and/or other countries. Other product and service names are used for identification purposes only and are the property of their respective owners.
Copyright: This document is protected under the trade secret and copyright laws as the property of Metavante Corporation. Year of first distribution: 2007. Copying or other reproduction, or any other disclosure to third parties, is strictly prohibited.
Original Publication 03/08Latest Revisions 02/09
05/0911/0901/10
ii Direct Merchant Smart DepositSD4011001U

Table of Contents
Direct Merchant Smart Deposit
Smart Deposit User Guide
Chapter 1Deployment . . . . . . . . . . . . . . . . . . . . . . . . . . . . . . . . . . . . . . . . . . . . . . . . . . . . . . . . . . . . . . . . . . . . . . 7
Getting Started. . . . . . . . . . . . . . . . . . . . . . . . . . . . . . . . . . . . . . . . . . . . . . . . . . . . . . . . . . . . . . . . . . . . . . . . . . . . . . . . . . 7Client Hardware Requirements . . . . . . . . . . . . . . . . . . . . . . . . . . . . . . . . . . . . . . . . . . . . . . . . . . . . . . . . . . . . . . . 8Client Software Requirements . . . . . . . . . . . . . . . . . . . . . . . . . . . . . . . . . . . . . . . . . . . . . . . . . . . . . . . . . . . . . . . 8Scanner Requirements . . . . . . . . . . . . . . . . . . . . . . . . . . . . . . . . . . . . . . . . . . . . . . . . . . . . . . . . . . . . . . . . . . . . . . 9
Client PC Installation. . . . . . . . . . . . . . . . . . . . . . . . . . . . . . . . . . . . . . . . . . . . . . . . . . . . . . . . . . . . . . . . . . . . . . . . . . . 10Microsoft .NET 2.0 SP1 Installation . . . . . . . . . . . . . . . . . . . . . . . . . . . . . . . . . . . . . . . . . . . . . . . . . . . . . . . . . . 10Scanner Installation . . . . . . . . . . . . . . . . . . . . . . . . . . . . . . . . . . . . . . . . . . . . . . . . . . . . . . . . . . . . . . . . . . . . . . . . 15
Direct Merchant Smart Deposit Installation. . . . . . . . . . . . . . . . . . . . . . . . . . . . . . . . . . . . . . . . . . . . . . . . . . . . . . 16Web Deployment Installation . . . . . . . . . . . . . . . . . . . . . . . . . . . . . . . . . . . . . . . . . . . . . . . . . . . . . . . . . . . . . . . 16All Users CD Installation . . . . . . . . . . . . . . . . . . . . . . . . . . . . . . . . . . . . . . . . . . . . . . . . . . . . . . . . . . . . . . . . . . . . 19Security . . . . . . . . . . . . . . . . . . . . . . . . . . . . . . . . . . . . . . . . . . . . . . . . . . . . . . . . . . . . . . . . . . . . . . . . . . . . . . . . . . . 23
Chapter 2Using Direct Merchant Smart Deposit . . . . . . . . . . . . . . . . . . . . . . . . . . . . . . . . 25
Introduction . . . . . . . . . . . . . . . . . . . . . . . . . . . . . . . . . . . . . . . . . . . . . . . . . . . . . . . . . . . . . . . . . . . . . . . . . . . . . . . . . . 26
Login . . . . . . . . . . . . . . . . . . . . . . . . . . . . . . . . . . . . . . . . . . . . . . . . . . . . . . . . . . . . . . . . . . . . . . . . . . . . . . . . . . . . . . . . . 26Network Proxy Authentication . . . . . . . . . . . . . . . . . . . . . . . . . . . . . . . . . . . . . . . . . . . . . . . . . . . . . . . . . . . . . . 27Encryption of Files Stored on Local PC . . . . . . . . . . . . . . . . . . . . . . . . . . . . . . . . . . . . . . . . . . . . . . . . . . . . . . . 28Non-Secure Connection Warning . . . . . . . . . . . . . . . . . . . . . . . . . . . . . . . . . . . . . . . . . . . . . . . . . . . . . . . . . . . 28Multi-Factor Authentication . . . . . . . . . . . . . . . . . . . . . . . . . . . . . . . . . . . . . . . . . . . . . . . . . . . . . . . . . . . . . . . . 29
MFA Enrollment . . . . . . . . . . . . . . . . . . . . . . . . . . . . . . . . . . . . . . . . . . . . . . . . . . . . . . . . . . . . . . . . . . . . . . . 29MFA Registration . . . . . . . . . . . . . . . . . . . . . . . . . . . . . . . . . . . . . . . . . . . . . . . . . . . . . . . . . . . . . . . . . . . . . . 38
Offline Mode . . . . . . . . . . . . . . . . . . . . . . . . . . . . . . . . . . . . . . . . . . . . . . . . . . . . . . . . . . . . . . . . . . . . . . . . . . . . . . 42
Password Messages. . . . . . . . . . . . . . . . . . . . . . . . . . . . . . . . . . . . . . . . . . . . . . . . . . . . . . . . . . . . . . . . . . . . . . . . . . . . 43Invalid User or Password . . . . . . . . . . . . . . . . . . . . . . . . . . . . . . . . . . . . . . . . . . . . . . . . . . . . . . . . . . . . . . . . . . . 43Non-conforming Password . . . . . . . . . . . . . . . . . . . . . . . . . . . . . . . . . . . . . . . . . . . . . . . . . . . . . . . . . . . . . . . . . 44New Account Reset . . . . . . . . . . . . . . . . . . . . . . . . . . . . . . . . . . . . . . . . . . . . . . . . . . . . . . . . . . . . . . . . . . . . . . . . 44Administrative Password Reset . . . . . . . . . . . . . . . . . . . . . . . . . . . . . . . . . . . . . . . . . . . . . . . . . . . . . . . . . . . . . 45Password Expired . . . . . . . . . . . . . . . . . . . . . . . . . . . . . . . . . . . . . . . . . . . . . . . . . . . . . . . . . . . . . . . . . . . . . . . . . . 45Password Expires in X Number of Days . . . . . . . . . . . . . . . . . . . . . . . . . . . . . . . . . . . . . . . . . . . . . . . . . . . . . . 46Reset Password . . . . . . . . . . . . . . . . . . . . . . . . . . . . . . . . . . . . . . . . . . . . . . . . . . . . . . . . . . . . . . . . . . . . . . . . . . . . 46
Smart Deposit User Guide iiiSD4011001U

Table of Contents
Re-Registration . . . . . . . . . . . . . . . . . . . . . . . . . . . . . . . . . . . . . . . . . . . . . . . . . . . . . . . . . . . . . . . . . . . . . . . . . . . . . . . . 47
Home Page . . . . . . . . . . . . . . . . . . . . . . . . . . . . . . . . . . . . . . . . . . . . . . . . . . . . . . . . . . . . . . . . . . . . . . . . . . . . . . . . . . . 48Main Menu . . . . . . . . . . . . . . . . . . . . . . . . . . . . . . . . . . . . . . . . . . . . . . . . . . . . . . . . . . . . . . . . . . . . . . . . . . . . . . . . 49Toolbar . . . . . . . . . . . . . . . . . . . . . . . . . . . . . . . . . . . . . . . . . . . . . . . . . . . . . . . . . . . . . . . . . . . . . . . . . . . . . . . . . . . . 50Information Pane . . . . . . . . . . . . . . . . . . . . . . . . . . . . . . . . . . . . . . . . . . . . . . . . . . . . . . . . . . . . . . . . . . . . . . . . . . 50Deposit List Pane (“All Deposits”) . . . . . . . . . . . . . . . . . . . . . . . . . . . . . . . . . . . . . . . . . . . . . . . . . . . . . . . . . . . 50
Find Deposits . . . . . . . . . . . . . . . . . . . . . . . . . . . . . . . . . . . . . . . . . . . . . . . . . . . . . . . . . . . . . . . . . . . . . . . . . . 51Deposit Details Pane . . . . . . . . . . . . . . . . . . . . . . . . . . . . . . . . . . . . . . . . . . . . . . . . . . . . . . . . . . . . . . . . . . . . . . . 53Status Bar . . . . . . . . . . . . . . . . . . . . . . . . . . . . . . . . . . . . . . . . . . . . . . . . . . . . . . . . . . . . . . . . . . . . . . . . . . . . . . . . . 54
Security Status . . . . . . . . . . . . . . . . . . . . . . . . . . . . . . . . . . . . . . . . . . . . . . . . . . . . . . . . . . . . . . . . . . . . . . . . . 54Scanner Status . . . . . . . . . . . . . . . . . . . . . . . . . . . . . . . . . . . . . . . . . . . . . . . . . . . . . . . . . . . . . . . . . . . . . . . . . 54Scanner Information . . . . . . . . . . . . . . . . . . . . . . . . . . . . . . . . . . . . . . . . . . . . . . . . . . . . . . . . . . . . . . . . . . . 55Connection Status . . . . . . . . . . . . . . . . . . . . . . . . . . . . . . . . . . . . . . . . . . . . . . . . . . . . . . . . . . . . . . . . . . . . . 55
Tools Menu Options . . . . . . . . . . . . . . . . . . . . . . . . . . . . . . . . . . . . . . . . . . . . . . . . . . . . . . . . . . . . . . . . . . . . . . . . . . . 56Registration . . . . . . . . . . . . . . . . . . . . . . . . . . . . . . . . . . . . . . . . . . . . . . . . . . . . . . . . . . . . . . . . . . . . . . . . . . . . . . . 57Reset Duplicate History . . . . . . . . . . . . . . . . . . . . . . . . . . . . . . . . . . . . . . . . . . . . . . . . . . . . . . . . . . . . . . . . . . . . . 57Reset Password . . . . . . . . . . . . . . . . . . . . . . . . . . . . . . . . . . . . . . . . . . . . . . . . . . . . . . . . . . . . . . . . . . . . . . . . . . . . 58
New Deposit . . . . . . . . . . . . . . . . . . . . . . . . . . . . . . . . . . . . . . . . . . . . . . . . . . . . . . . . . . . . . . . . . . . . . . . . . . . . . . . . . . 59
Mark Items . . . . . . . . . . . . . . . . . . . . . . . . . . . . . . . . . . . . . . . . . . . . . . . . . . . . . . . . . . . . . . . . . . . . . . . . . . . . . . . . . . . . 59
Reports . . . . . . . . . . . . . . . . . . . . . . . . . . . . . . . . . . . . . . . . . . . . . . . . . . . . . . . . . . . . . . . . . . . . . . . . . . . . . . . . . . . . . . . 60Deposit Detail Report . . . . . . . . . . . . . . . . . . . . . . . . . . . . . . . . . . . . . . . . . . . . . . . . . . . . . . . . . . . . . . . . . . . . . . 61All Deposits Detail Report . . . . . . . . . . . . . . . . . . . . . . . . . . . . . . . . . . . . . . . . . . . . . . . . . . . . . . . . . . . . . . . . . . 62Deposit Summary Report . . . . . . . . . . . . . . . . . . . . . . . . . . . . . . . . . . . . . . . . . . . . . . . . . . . . . . . . . . . . . . . . . . . 63Deposit Image Report . . . . . . . . . . . . . . . . . . . . . . . . . . . . . . . . . . . . . . . . . . . . . . . . . . . . . . . . . . . . . . . . . . . . . . 64Item Detail Data Report . . . . . . . . . . . . . . . . . . . . . . . . . . . . . . . . . . . . . . . . . . . . . . . . . . . . . . . . . . . . . . . . . . . . 65Export Data File by Layout . . . . . . . . . . . . . . . . . . . . . . . . . . . . . . . . . . . . . . . . . . . . . . . . . . . . . . . . . . . . . . . . . . 65Pending and Rejected Deposits Summary Report . . . . . . . . . . . . . . . . . . . . . . . . . . . . . . . . . . . . . . . . . . . . 67Report Toolbar . . . . . . . . . . . . . . . . . . . . . . . . . . . . . . . . . . . . . . . . . . . . . . . . . . . . . . . . . . . . . . . . . . . . . . . . . . . . . 68
Find Items . . . . . . . . . . . . . . . . . . . . . . . . . . . . . . . . . . . . . . . . . . . . . . . . . . . . . . . . . . . . . . . . . . . . . . . . . . . . . . . . . . . . 69
Chapter 3Working With Deposits . . . . . . . . . . . . . . . . . . . . . . . . . . . . . . . . . . . . . . . . . . . . . . . . . . . . . 73
Creating a New Deposit . . . . . . . . . . . . . . . . . . . . . . . . . . . . . . . . . . . . . . . . . . . . . . . . . . . . . . . . . . . . . . . . . . . . . . . . 74
Capturing Items . . . . . . . . . . . . . . . . . . . . . . . . . . . . . . . . . . . . . . . . . . . . . . . . . . . . . . . . . . . . . . . . . . . . . . . . . . . . . . . 76Batch Grouping . . . . . . . . . . . . . . . . . . . . . . . . . . . . . . . . . . . . . . . . . . . . . . . . . . . . . . . . . . . . . . . . . . . . . . . . . . . . 78Capturing Without Virtual Batch Tickets . . . . . . . . . . . . . . . . . . . . . . . . . . . . . . . . . . . . . . . . . . . . . . . . . . . . . 80Capturing With Virtual Batch Tickets . . . . . . . . . . . . . . . . . . . . . . . . . . . . . . . . . . . . . . . . . . . . . . . . . . . . . . . . 80
Correcting Items . . . . . . . . . . . . . . . . . . . . . . . . . . . . . . . . . . . . . . . . . . . . . . . . . . . . . . . . . . . . . . . . . . . . . . . . . . . . . . 82Intelligent Keying . . . . . . . . . . . . . . . . . . . . . . . . . . . . . . . . . . . . . . . . . . . . . . . . . . . . . . . . . . . . . . . . . . . . . . . . . . 85
Balancing . . . . . . . . . . . . . . . . . . . . . . . . . . . . . . . . . . . . . . . . . . . . . . . . . . . . . . . . . . . . . . . . . . . . . . . . . . . . . . . . . . . . . 85Account Balance - Add Accounts (Split Deposits) . . . . . . . . . . . . . . . . . . . . . . . . . . . . . . . . . . . . . . . . . . . . . 88
Transmitting . . . . . . . . . . . . . . . . . . . . . . . . . . . . . . . . . . . . . . . . . . . . . . . . . . . . . . . . . . . . . . . . . . . . . . . . . . . . . . . . . . 93
iv Direct Merchant Smart DepositSD4011001U
Table of Contents
Submitting. . . . . . . . . . . . . . . . . . . . . . . . . . . . . . . . . . . . . . . . . . . . . . . . . . . . . . . . . . . . . . . . . . . . . . . . . . . . . . . . . . . . 95Deposit Dates and Times . . . . . . . . . . . . . . . . . . . . . . . . . . . . . . . . . . . . . . . . . . . . . . . . . . . . . . . . . . . . . . . . . . . 97
Modifying Existing Deposits . . . . . . . . . . . . . . . . . . . . . . . . . . . . . . . . . . . . . . . . . . . . . . . . . . . . . . . . . . . . . . . . . . . . 97Adding Items to a Previously Opened Deposit . . . . . . . . . . . . . . . . . . . . . . . . . . . . . . . . . . . . . . . . . . . . . . . 97Deposit Statuses with Deposit Approval Enabled . . . . . . . . . . . . . . . . . . . . . . . . . . . . . . . . . . . . . . . . . . . . . 98Rejected Deposits . . . . . . . . . . . . . . . . . . . . . . . . . . . . . . . . . . . . . . . . . . . . . . . . . . . . . . . . . . . . . . . . . . . . . . . . . . 99
ACH Opt - out . . . . . . . . . . . . . . . . . . . . . . . . . . . . . . . . . . . . . . . . . . . . . . . . . . . . . . . . . . . . . . . . . . . . . . . . . . . . . . . . 101Workflow . . . . . . . . . . . . . . . . . . . . . . . . . . . . . . . . . . . . . . . . . . . . . . . . . . . . . . . . . . . . . . . . . . . . . . . . . . . . . . . . . 102
Coupon Capture. . . . . . . . . . . . . . . . . . . . . . . . . . . . . . . . . . . . . . . . . . . . . . . . . . . . . . . . . . . . . . . . . . . . . . . . . . . . . . 105Correcting Items . . . . . . . . . . . . . . . . . . . . . . . . . . . . . . . . . . . . . . . . . . . . . . . . . . . . . . . . . . . . . . . . . . . . . . . . . . 105Reconciliation . . . . . . . . . . . . . . . . . . . . . . . . . . . . . . . . . . . . . . . . . . . . . . . . . . . . . . . . . . . . . . . . . . . . . . . . . . . . 106
Appendix ATechnical References . . . . . . . . . . . . . . . . . . . . . . . . . . . . . . . . . . . . . . . . . . . . . . . . . . . . . . . 109
Deposit Time Stamp Updated During Transmission . . . . . . . . . . . . . . . . . . . . . . . . . . . . . . . . . . . . . . . . . . . . . 109
Smart Deposit User Guide vSD4011001U

Table of Contents
vi Direct Merchant Smart DepositSD4011001U

Direct Merchant Smart Deposit
User Guide
Chapter 1Deployment
Topics
Getting Started
Client PC Installation
Direct Merchant Smart Deposit Installation
Getting Started
This manual provides instructions for the installation and use of Direct Merchant Smart Deposit.
Before using Smart Deposit, acquire valid login credentials (i.e. username and password) from the service provider or financial institution who distributes this application.
Smart Deposit should be installed on a Client Workstation which meets the minimum recommended system requirements for hardware, software and scanners listed in the following paragraphs:
Client Hardware Requirements
Client Software Requirements
Scanners Supported
Smart Deposit User Guide 7SD4011001U

Chapter 1 Deployment
Client Hardware Requirements
Pentium 4 2.0 GHz or Core 2 Duo 1.86 GHz processor (Recommend Pentium 3.0 GHz or Core 2 Duo 2.33 GHz due to processing required for the Amount Recognition Engine)
1 GB RAM
2 GB of free hard drive
Network card
Broadband internet access
Screen resolution 1024 x 768
USB 2.0 port
Client Software Requirements
One of the following Operating Systems
Windows 2000, Service Pack 4 (32 bit)
Windows XP, Service Pack 2 (32 bit) (Service Pack 3 supported)
Windows Vista, Service Pack 1 (32 bit)
Windows Vista, Service Pack 1 (64 bit)
.NET 2.0 SP1 (installed with the Install Shield package)
NOTE
For optimal performance, particularly with scanners faster than 30 dpm, additional RAM is recommended. Further performance improvements may be achieved using computers with dual-core processors.
8 Direct Merchant Smart DepositSD4011001U

Chapter 1 Deployment
Scanner Requirements
Smart Deposit supports the following check scanners:
Supported Scanners
Manufacturer ModelWindows
XPWindows Vista 32
bit
Windows Vista 64
bit
Canon CR-25 Yes Yes No
CR-55 Yes Yes No
CR-180/180 II Yes Yes No
CTS LS-100 Yes Yes Yes
LS-515 Yes No No
Digital Check CX-30 Yes Yes Yes
TS-215 Yes Yes Yes
TS-220/220e Yes Yes Yes
TS-230 Yes Yes Yes
TS-240 Yes Yes Yes
TS-300 Yes Yes No
TS-350 Yes Yes No
TS-400ES Yes Yes No
TS-4120 Yes Yes Yes
Epson TM-S1000 (Capture One) Yes Yes No
TM-J9000 Yes No No
TM-J9001 Yes No No
Magtek Excella Yes Yes Yes
Excella STX Yes Yes Yes
Panini/Unisys MyVisionX and MyVisionX ROHS
Yes Yes Yes
Panini I:Deal Yes Yes No
VisionX Yes Yes Yes
VisionX 1F Yes Yes Yes
VisionX AGP Yes Yes Yes
VisionX P Yes Yes Yes
RDM/Unisys ec7000i Yes Yes No
Unisys SourceNDP Yes Yes No
WebSourceNDP Yes Yes No
Smart Deposit User Guide 9SD4011001U

Chapter 1 Deployment
Client PC Installation
Microsoft .NET 2.0 SP1 Installation
Before installing Direct Merchant Smart Deposit, the PC must have Microsoft.NET 2.0 SP1 installed. If the PC is installed with the All Users option, .NET 2.0 SP1 is installed during installation.
1. Launch the web browser and access: http://www.microsoft.com/downloads/details.aspx?FamilyID=0856EACB-4362-4B0D-8EDD-AAB15C5E04F5&displaylang=en.
2. The Microsoft .NET Framework Version 2.0 SP1 Redistribution Package (X86) web page displays. Click the Download icon.
NOTE
This list is accurate as of the publication date of this document, but is not guaranteed to be comprehensive of all certified devices after release. Device certification and testing is ongoing and more recent updates or additions may be available.
NOTE
The service provider should provide the appropriate URLs to install Microsoft .NET 2.0 SP1, scanner drivers and Smart Deposit.
10 Direct Merchant Smart DepositSD4011001U

Chapter 1 Deployment
Smart Deposit User Guide 11SD4011001U
Chapter 1 Deployment
3. Click the Run button.
4. Click the Run button.
12 Direct Merchant Smart DepositSD4011001U

Chapter 1 Deployment
5. The .NET Framework wizard launches and displays. Click the Next button. When it is finished, Click the I accept the terms of the License Agreement check box, then click the Install button.
6. Click the I accept the terms of the License Agreement check box, then click the Install button. The installation is now complete.
Smart Deposit User Guide 13SD4011001U
Chapter 1 Deployment
7. Click the Finish button.
14 Direct Merchant Smart DepositSD4011001U
Chapter 1 Deployment
Scanner Installation
To install scanner drivers, follow the steps listed below.
1. Launch the Deployment web page provided by the service provider.
2. Click the appropriate scanner link.
3. Click the Save button.
4. Choose a download location for the driver, then click Save.
5. Extract the contents of the downloaded file.
6. Launch the setup.exe file and follow the instructions to complete installation.
7. Upon completion of the installation process, click Finish.
NOTE
The process of installing a scanner must be performed using a Windows Administrator Account.
NOTE
Verify with the service provider that the correct certified drivers for the scanner and Operating System are accessed.
CAUTION
The installation Wizard and procedures vary by scanner, so follow every step carefully. It is especially important to note when to physically connect the scanner to power or to the PC.
Smart Deposit User Guide 15SD4011001U

Chapter 1 Deployment
Direct Merchant Smart Deposit Installation
Web Deployment Installation
1. To begin the installation, click the Smart Deposit link from the Deployment web page.
NOTE
The following Deployment web page is a sample. The actual Deployment page configured and used by the service provider can appear different from the sample provided.
16 Direct Merchant Smart DepositSD4011001U
Chapter 1 Deployment
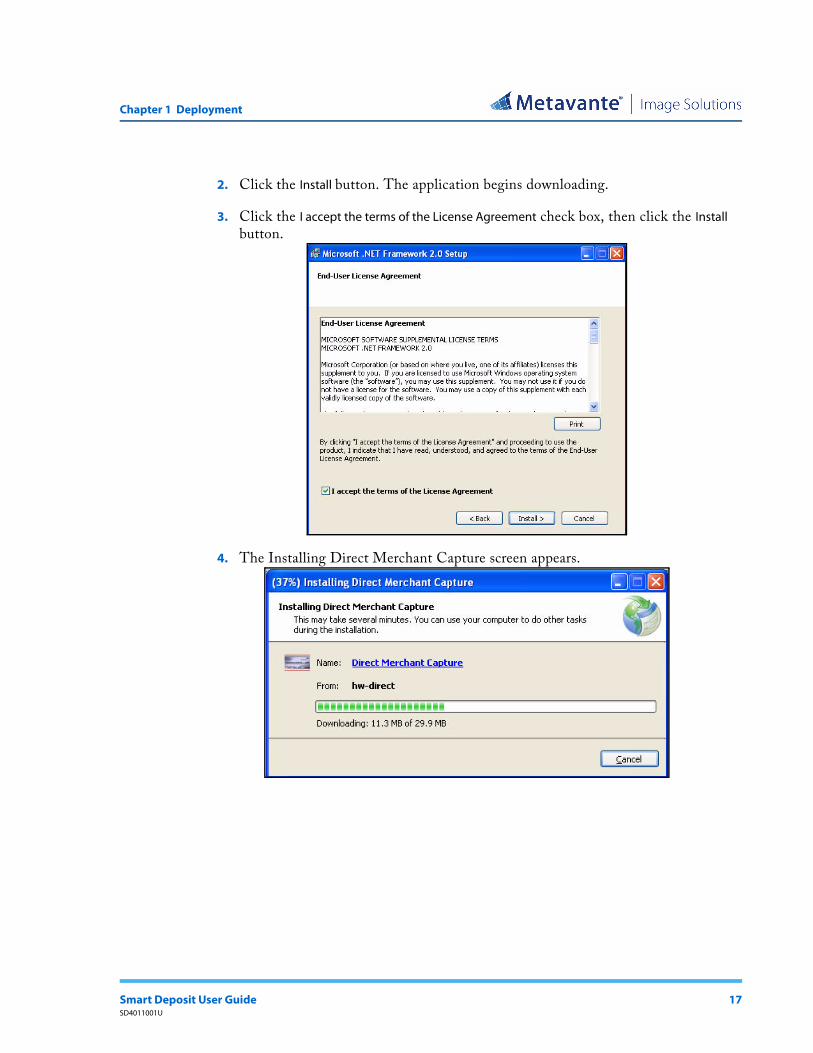
2. Click the Install button. The application begins downloading.
3. Click the I accept the terms of the License Agreement check box, then click the Install button.
4. The Installing Direct Merchant Capture screen appears.
Smart Deposit User Guide 17SD4011001U

Chapter 1 Deployment
5. Once the application has downloaded successfully for the first time, login to the remote deposit server for registration. Enter the username and password provided by the service provider.
6. Once authorized, select a Location and a Scanner from each drop-down list, then click Register Client.
18 Direct Merchant Smart DepositSD4011001U

Chapter 1 Deployment
7. After successful registration, the application begins downloading the Amount Recognition software.
8. When complete, Smart Deposit launches.
All Users CD Installation
The Smart Deposit All Users installation allows multiple Windows users the ability to access and launch the application from a single instance. This prevents the need for multiple installations on a single PC for different Windows users. Unlike the Click-Once installation, the All Users installation can only be installed via a CD. The installation CD is configured by the service provider and distributed to each merchant.
To complete the All Users installation follow the procedures outlined below:
1. Insert the CD into the computer.
2. Accept the contents of the CD and launch MerchantCaptureSmartDeposit.msi to initiate the Installation Wizard.
NOTE
If Microsoft .NET 2.0 SP1 is not installed, the install application recognizes this and prompts for installation.
The Windows account which installs the All Users installation must have administrator privileges.
When utilizing the All Users Installation of the Smart Deposit, Merchant Users with the Depositor role will have access to and be able to transmit deposits created by any user on the local PC. Alternatively, when utilizing the ClickOnce Deployment of Smart Deposit, Merchant Users with the Depositor role only have access to deposits created while signed in as the same Windows User. If each Merchant User has their own unique Windows User ID in the end user environment, Depositors see only their own deposits under the ClickOnce version, but would see all deposits on a local PC under the “All Users” version. The Depositor role is the only role capable of transmitting deposits in any version of Smart Deposit.
Smart Deposit User Guide 19SD4011001U

Chapter 1 Deployment
3. Click the Next button.
4. Click the I accept the terms of the license agreement check box, then click the Next button.
20 Direct Merchant Smart DepositSD4011001U
Chapter 1 Deployment
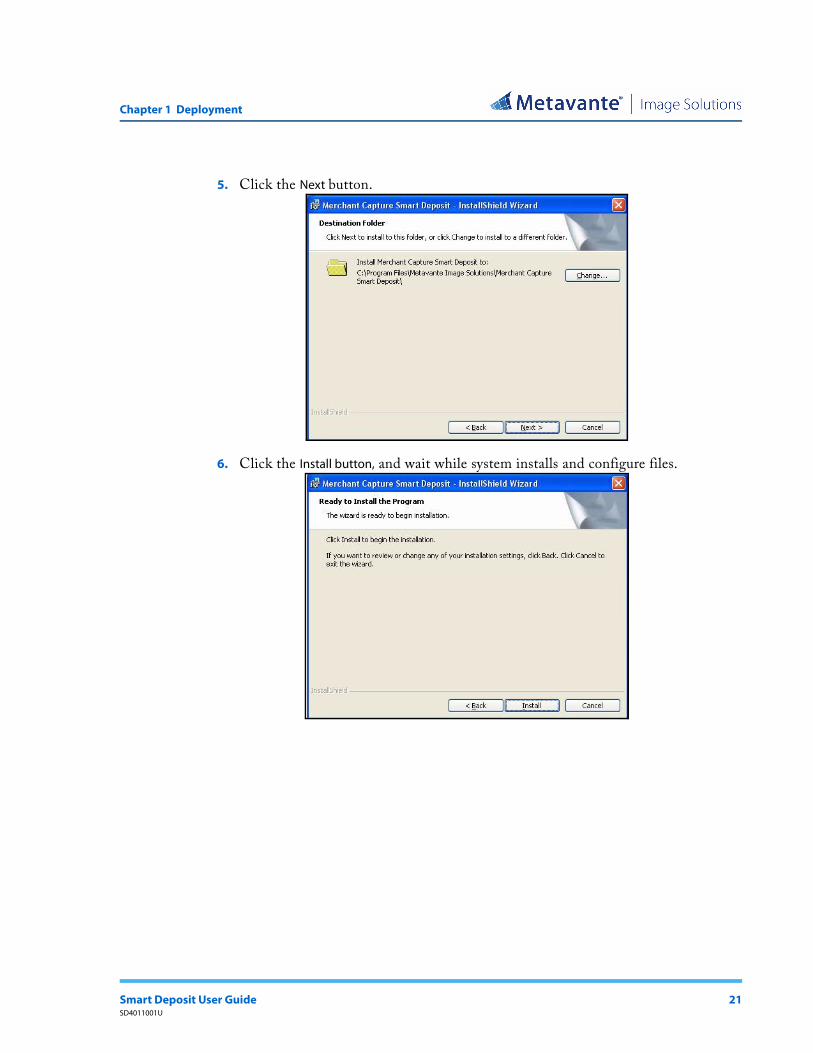
5. Click the Next button.
6. Click the Install button, and wait while system installs and configure files.
Smart Deposit User Guide 21SD4011001U
Chapter 1 Deployment
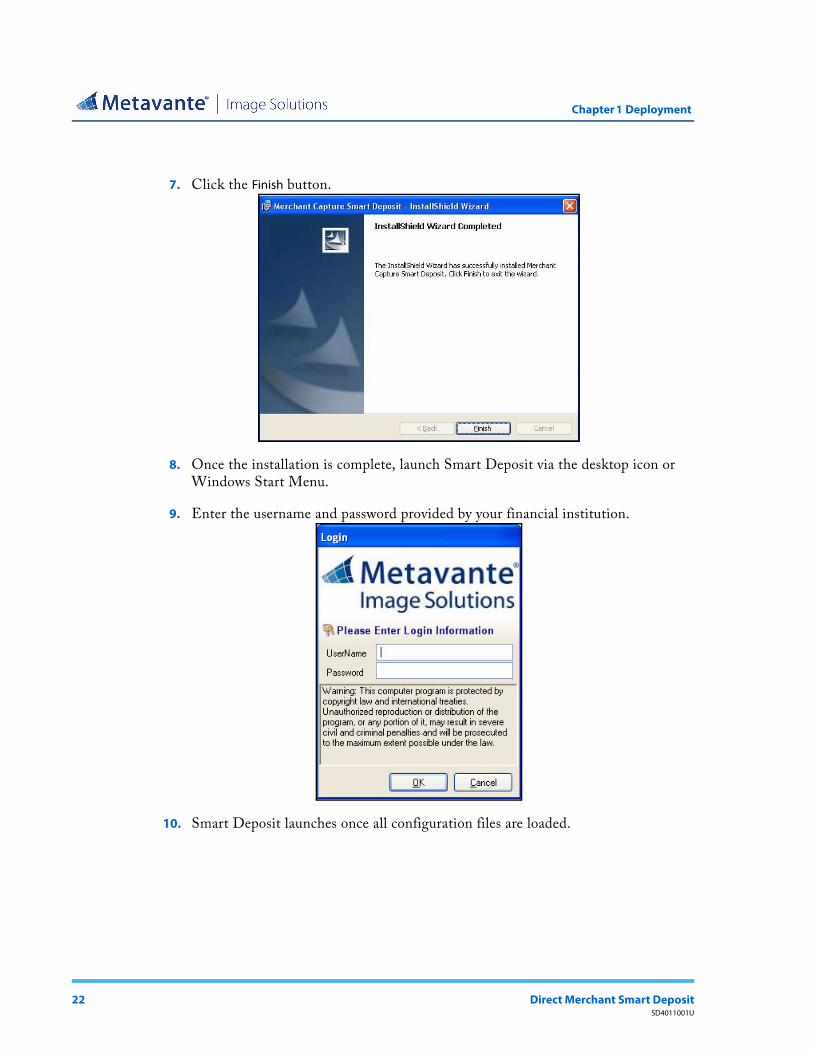
7. Click the Finish button.
8. Once the installation is complete, launch Smart Deposit via the desktop icon or Windows Start Menu.
9. Enter the username and password provided by your financial institution.
10. Smart Deposit launches once all configuration files are loaded.
22 Direct Merchant Smart DepositSD4011001U
Chapter 1 Deployment
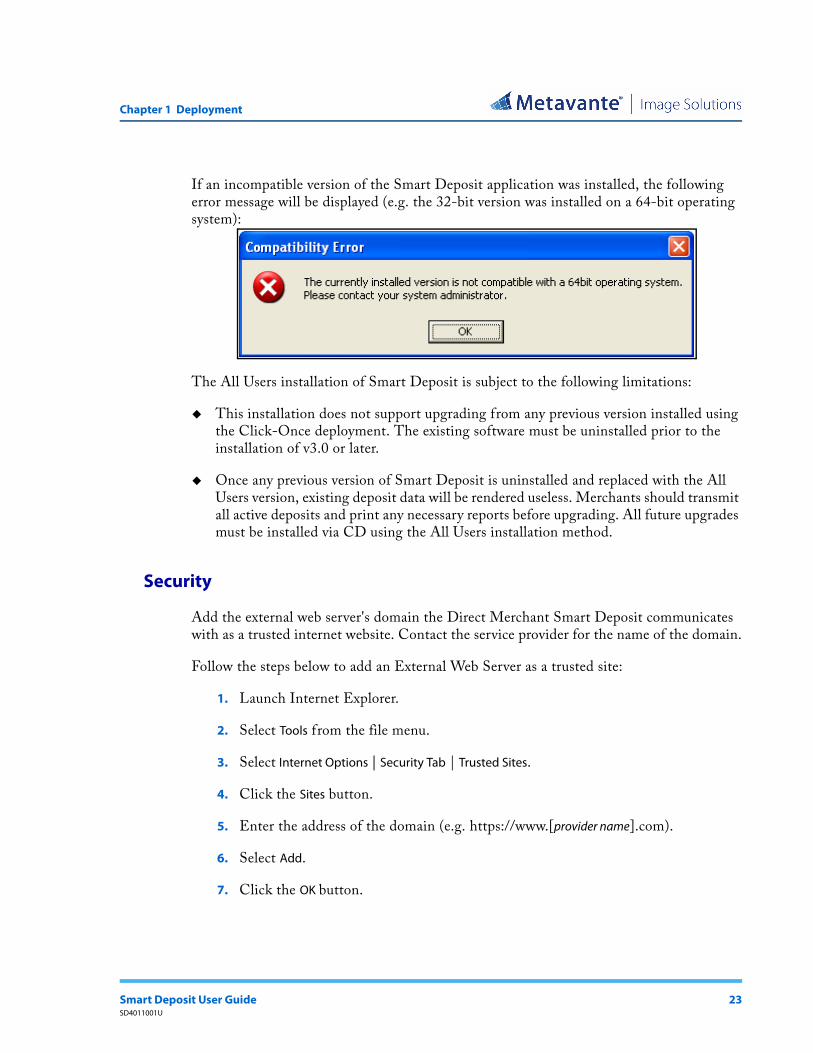
If an incompatible version of the Smart Deposit application was installed, the following error message will be displayed (e.g. the 32-bit version was installed on a 64-bit operating system):
The All Users installation of Smart Deposit is subject to the following limitations:
This installation does not support upgrading from any previous version installed using the Click-Once deployment. The existing software must be uninstalled prior to the installation of v3.0 or later.
Once any previous version of Smart Deposit is uninstalled and replaced with the All Users version, existing deposit data will be rendered useless. Merchants should transmit all active deposits and print any necessary reports before upgrading. All future upgrades must be installed via CD using the All Users installation method.
Security
Add the external web server's domain the Direct Merchant Smart Deposit communicates with as a trusted internet website. Contact the service provider for the name of the domain.
Follow the steps below to add an External Web Server as a trusted site:
1. Launch Internet Explorer.
2. Select Tools from the file menu.
3. Select Internet Options | Security Tab | Trusted Sites.
4. Click the Sites button.
5. Enter the address of the domain (e.g. https://www.[provider name].com).
6. Select Add.
7. Click the OK button.
Smart Deposit User Guide 23SD4011001U

Chapter 1 Deployment
24 Direct Merchant Smart DepositSD4011001U
Direct Merchant Smart Deposit
Smart Deposit User Guide
Chapter 2Using Direct Merchant Smart Deposit
Topics
Introduction
Login
Password Messages
Re-Registration
Home Page
Tools Menu Options
New Deposit
Mark Items
Reports
Find Items
Smart Deposit User Guide 25SD4011001U
Chapter 2 Using Direct Merchant Smart Deposit
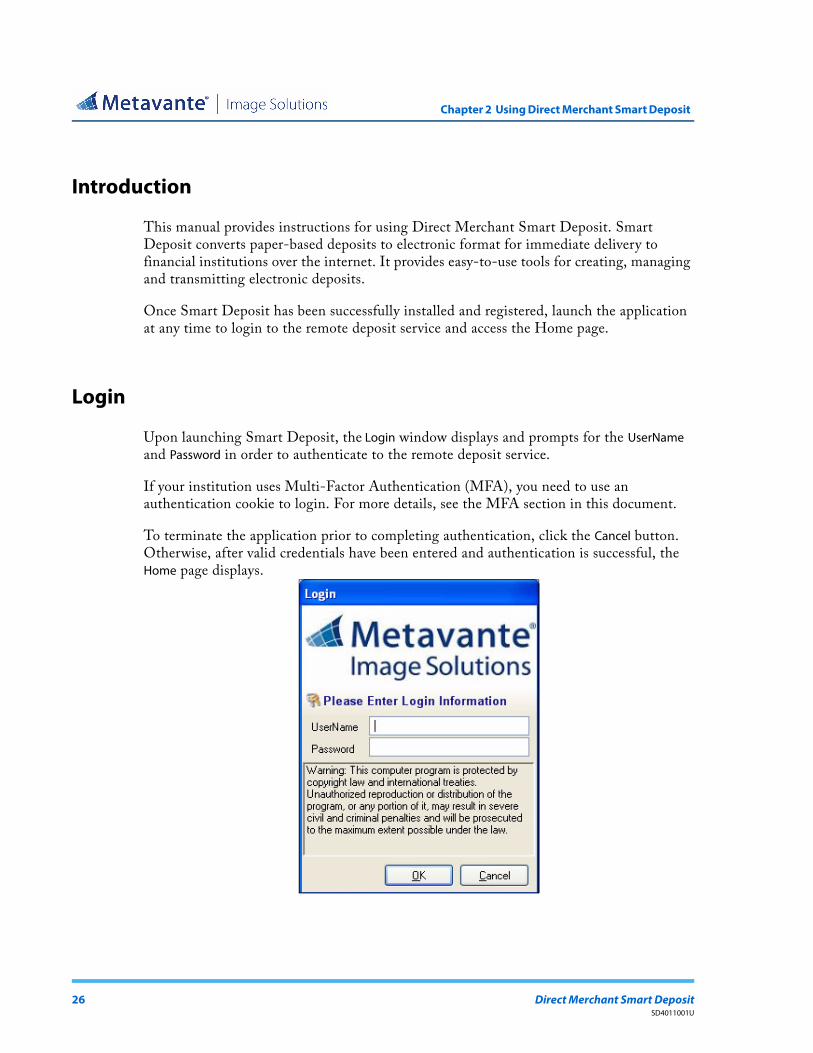
Introduction
This manual provides instructions for using Direct Merchant Smart Deposit. Smart Deposit converts paper-based deposits to electronic format for immediate delivery to financial institutions over the internet. It provides easy-to-use tools for creating, managing and transmitting electronic deposits.
Once Smart Deposit has been successfully installed and registered, launch the application at any time to login to the remote deposit service and access the Home page.
Login
Upon launching Smart Deposit, the Login window displays and prompts for the UserName and Password in order to authenticate to the remote deposit service.
If your institution uses Multi-Factor Authentication (MFA), you need to use an authentication cookie to login. For more details, see the MFA section in this document.
To terminate the application prior to completing authentication, click the Cancel button. Otherwise, after valid credentials have been entered and authentication is successful, the Home page displays.
26 Direct Merchant Smart DepositSD4011001U

Chapter 2 Using Direct Merchant Smart Deposit
To login to Smart Deposit, perform the following steps:
1. Launch the application.
2. Enter your username and password.
3. Click the OK button.
Network Proxy Authentication
Smart Deposit provides additional support for the detection of authenticating proxy servers (an additional security measure used to authorize traffic on some networks). If an Authenticating Proxy is detected between the Workstation and the remote deposit server prior to the login process and the current Windows user credentials are not sufficient for proxy authentication, Smart Deposit prompts for additional Proxy credentials (similar to most web browsers). If the Windows user credentials are sufficient for proxy authentication, they are automatically used and Smart Deposit proceeds with the normal login process.
NOTE
This may be a necessary requirement for some networks.
Smart Deposit User Guide 27SD4011001U
Chapter 2 Using Direct Merchant Smart Deposit
When attempting to login to Smart Deposit from a network requiring additional proxy authentication as described on the previous page, the following steps occur:
1. Launch the application.
2. Enter the proxy credentials when prompted.
a. If the supplied credentials are invalid, a re-prompt is displayed until valid credentials are supplied or the Cancel button is chosen and exits the application.
b. Upon successful proxy authentication, the Smart Deposit Login window displays.
3. Proceed with the normal login procedures.
Encryption of Files Stored on Local PC
Smart Deposit encrypts data and images that are stored on local PCs so that they are protected against unauthorized use. The only way to access the data and images is through the application.
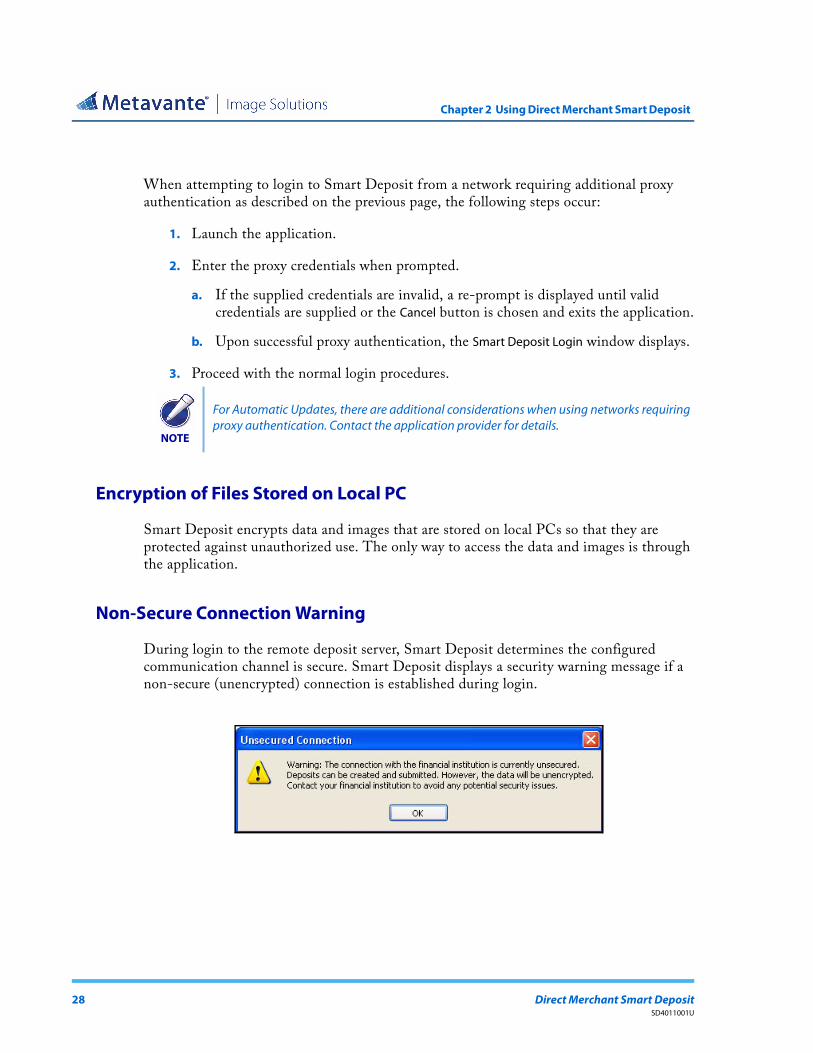
Non-Secure Connection Warning
During login to the remote deposit server, Smart Deposit determines the configured communication channel is secure. Smart Deposit displays a security warning message if a non-secure (unencrypted) connection is established during login.
NOTE
For Automatic Updates, there are additional considerations when using networks requiring proxy authentication. Contact the application provider for details.
28 Direct Merchant Smart DepositSD4011001U

Chapter 2 Using Direct Merchant Smart Deposit
Multi-Factor Authentication
The service provider may require Multi-Factor Authentication to provide additional security and prevent unauthorized access to Smart Deposit. If the service provider has MFA enabled, you must complete MFA enrollment and registration on your workstation prior to login.
Enrollment: The MFA enrollment process is a one-time only event that allows you to select additional security identifiers that are unique to you. The information provided during enrollment remains and will not be required again once you have initially enrolled. The only circumstance under which you would need to re-enroll is if you are instructed by your service provider.
Registration: The MFA registration process verifies that the current workstation you are using is valid for you. The registration is only valid for your username and the machine you are currently using. Each time you use a different user or workstation, you must complete an additional registration.
MFA Enrollment
1. Launch the Smart Client. If a warning displays, click the link to enroll/register for Multi-Factor Authentication.
Smart Deposit User Guide 29SD4011001U

Chapter 2 Using Direct Merchant Smart Deposit
2. The first page of enrollment displays. Enter your User ID, then click the Login button.
30 Direct Merchant Smart DepositSD4011001U
Chapter 2 Using Direct Merchant Smart Deposit
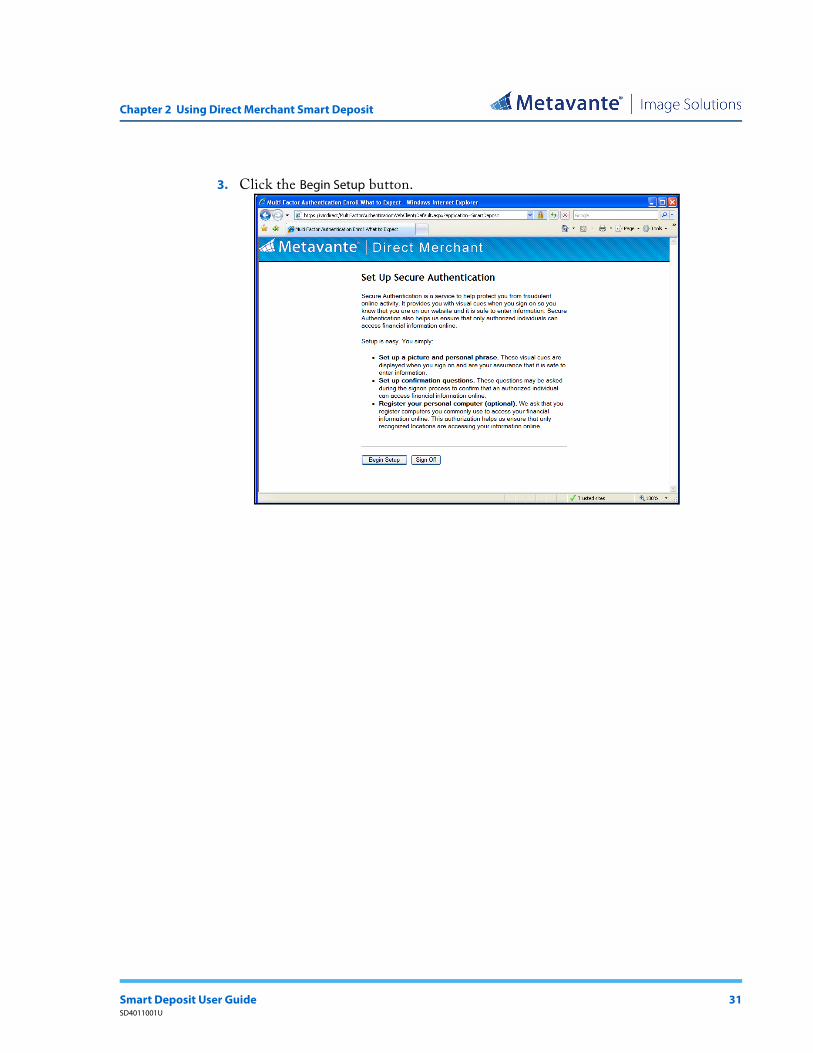
3. Click the Begin Setup button.
Smart Deposit User Guide 31SD4011001U

Chapter 2 Using Direct Merchant Smart Deposit
4. Select a Category, then click an image.
32 Direct Merchant Smart DepositSD4011001U

Chapter 2 Using Direct Merchant Smart Deposit
5. Type a Personal Phrase, then click the Continue Setup button.
Smart Deposit User Guide 33SD4011001U
Chapter 2 Using Direct Merchant Smart Deposit
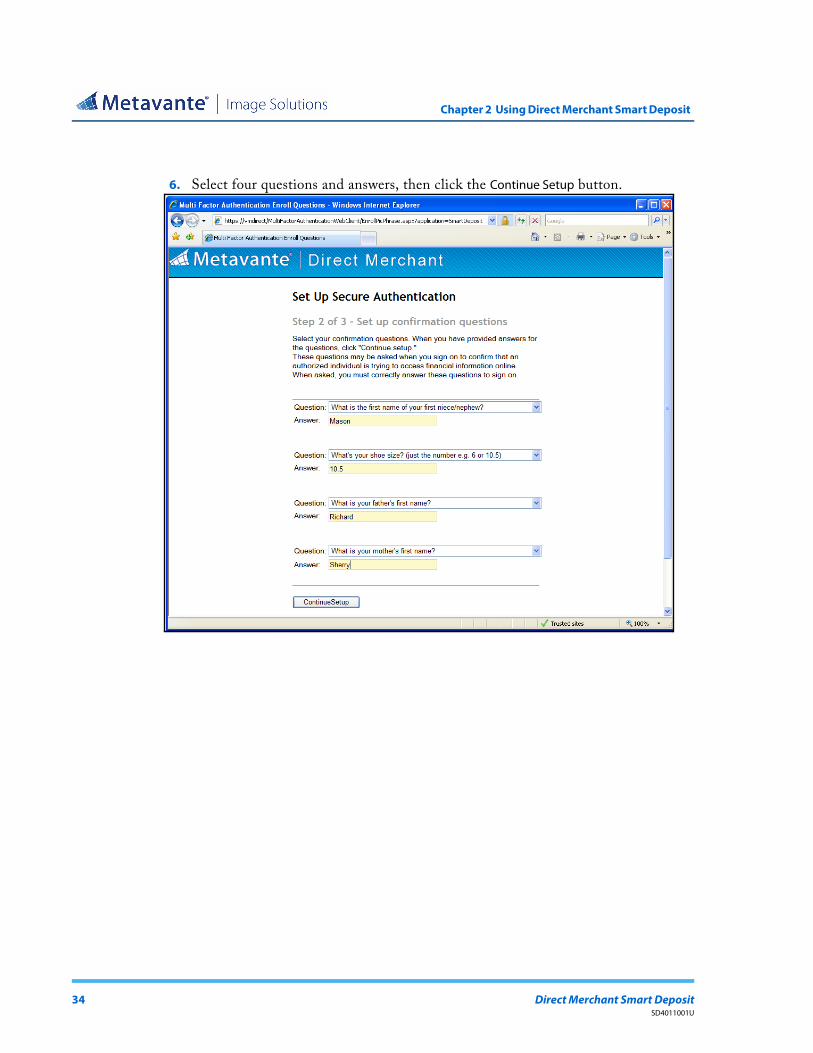
6. Select four questions and answers, then click the Continue Setup button.
34 Direct Merchant Smart DepositSD4011001U
Chapter 2 Using Direct Merchant Smart Deposit
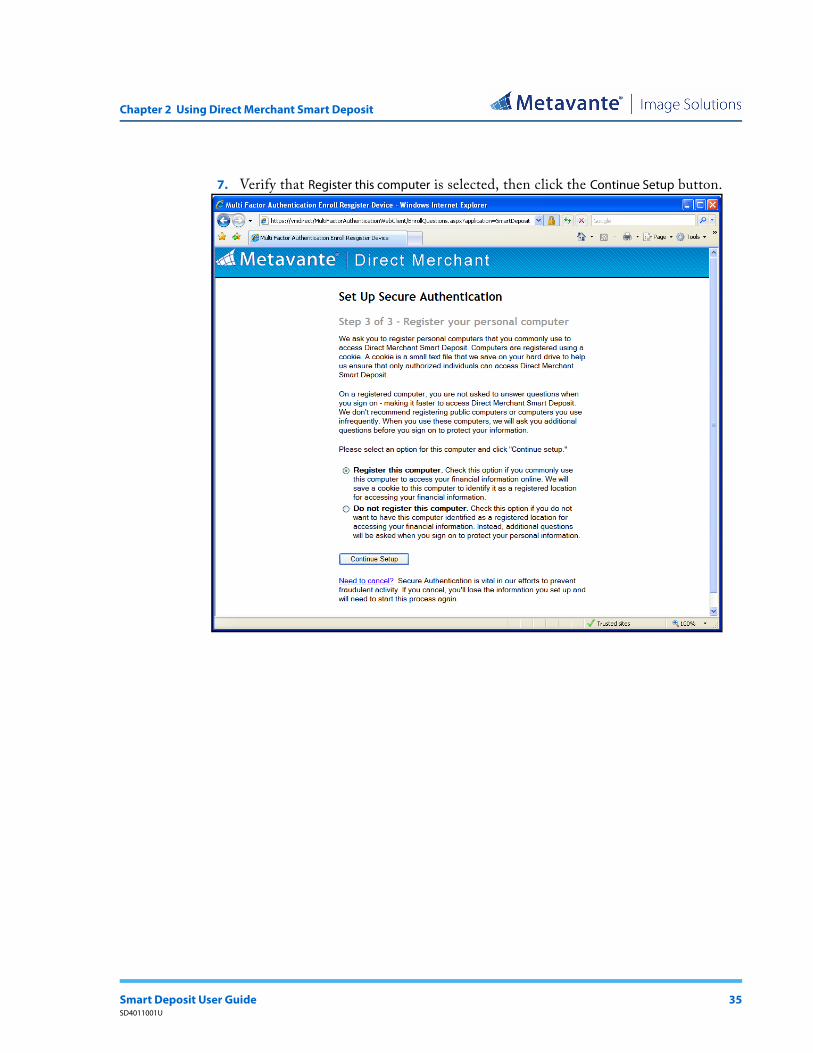
7. Verify that Register this computer is selected, then click the Continue Setup button.
Smart Deposit User Guide 35SD4011001U

Chapter 2 Using Direct Merchant Smart Deposit
8. Verify the registration settings; enter your password, then click the Submit button.
36 Direct Merchant Smart DepositSD4011001U

Chapter 2 Using Direct Merchant Smart Deposit
9. Close the Enrollment/Registration Confirmation window.
Smart Deposit User Guide 37SD4011001U
Chapter 2 Using Direct Merchant Smart Deposit
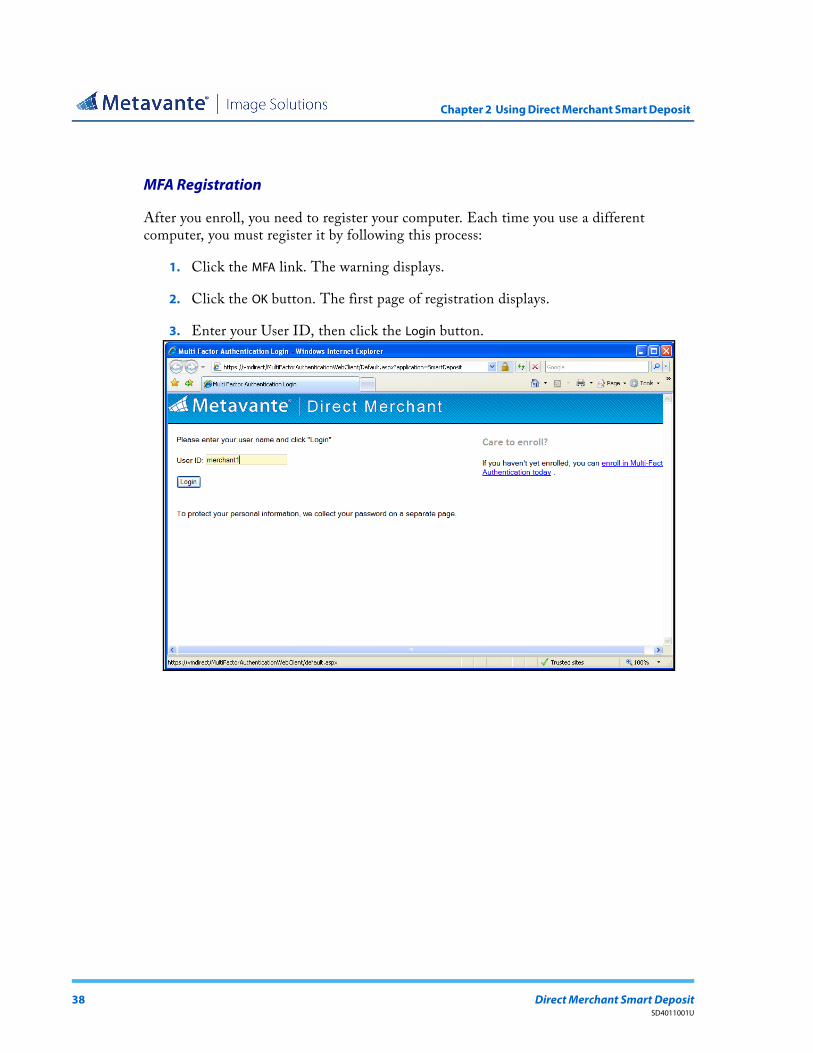
MFA Registration
After you enroll, you need to register your computer. Each time you use a different computer, you must register it by following this process:
1. Click the MFA link. The warning displays.
2. Click the OK button. The first page of registration displays.
3. Enter your User ID, then click the Login button.
38 Direct Merchant Smart DepositSD4011001U
Chapter 2 Using Direct Merchant Smart Deposit
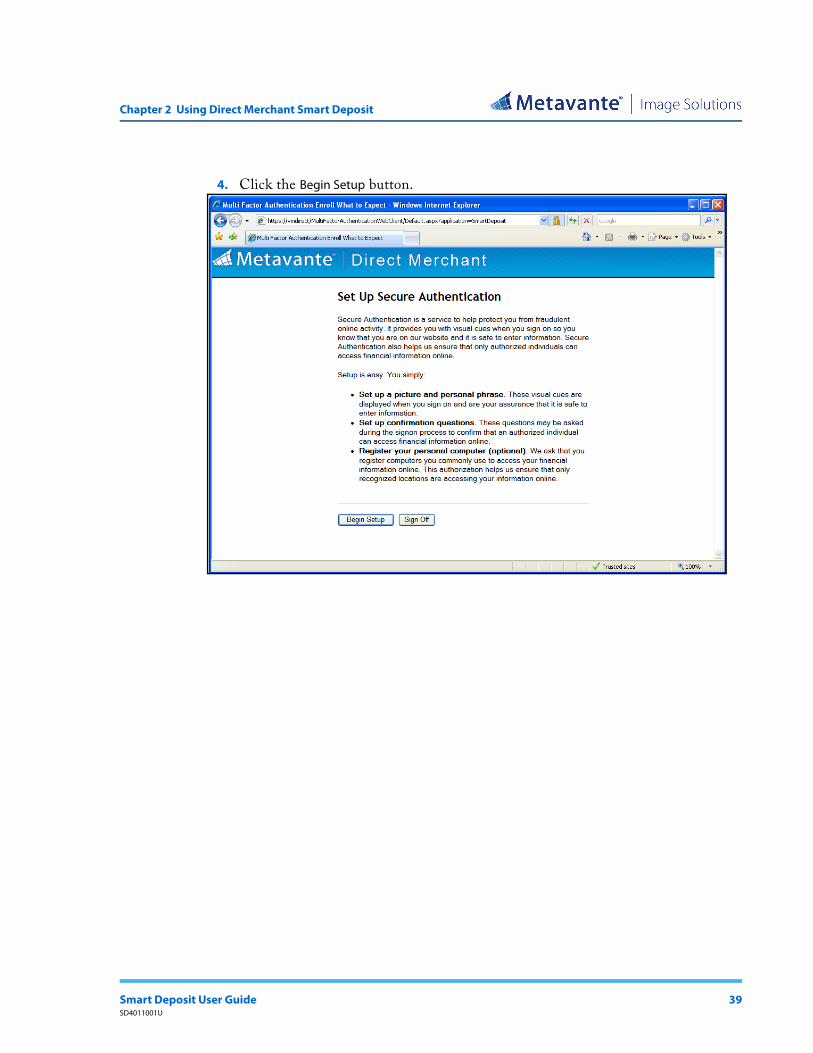
4. Click the Begin Setup button.
Smart Deposit User Guide 39SD4011001U

Chapter 2 Using Direct Merchant Smart Deposit
5. Verify the Image and Personal Phrase, then enter your answers to the Security Questions. Make sure the check box beside Register this Computer is checked. Click the Continue button.
40 Direct Merchant Smart DepositSD4011001U

Chapter 2 Using Direct Merchant Smart Deposit
6. Enter your Password, then click the Login button.
Smart Deposit User Guide 41SD4011001U

Chapter 2 Using Direct Merchant Smart Deposit
7. Close the Enrollment/Registration Confirmation window.
Offline Mode
If a connection could not be established with the remote deposit server during login but Smart Deposit has been successfully registered and authenticated during a previous connection and the credentials match the last set of valid authorized credentials, the application can run offline.
NOTE
Refer to Security Status in the Status Bar section for additional details about the status indicator for Secure/Non-secure connections.
NOTE
Refer to Connection Status in the Status Bar section for more details on working offline.
42 Direct Merchant Smart DepositSD4011001U
Chapter 2 Using Direct Merchant Smart Deposit
Password Messages
During the login process, Smart Deposit displays the appropriate alert or warning message whenever any of the following password events occur:
Invalid User or Password (Alert)
Non-Conforming Password (Alert)
New Account Reset (Alert)
Administrative Password Reset (Alert)
Password Expired (Alert)
Password Expires in X Number of Days (Warning)
After receiving any of the password alert notifications, a mandatory Create New Password or Reset Password window displays. For warning messages, Reset Password is an optional choice.
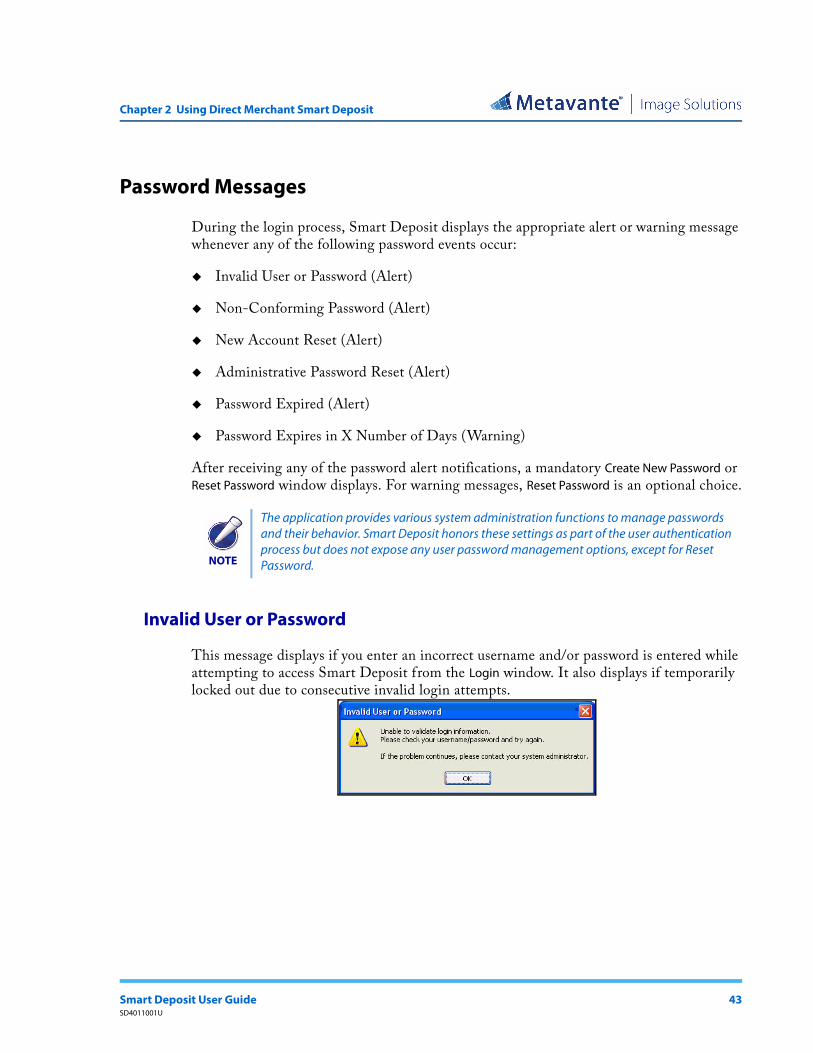
Invalid User or Password
This message displays if you enter an incorrect username and/or password is entered while attempting to access Smart Deposit from the Login window. It also displays if temporarily locked out due to consecutive invalid login attempts.
NOTE
The application provides various system administration functions to manage passwords and their behavior. Smart Deposit honors these settings as part of the user authentication process but does not expose any user password management options, except for Reset Password.
Smart Deposit User Guide 43SD4011001U
Chapter 2 Using Direct Merchant Smart Deposit
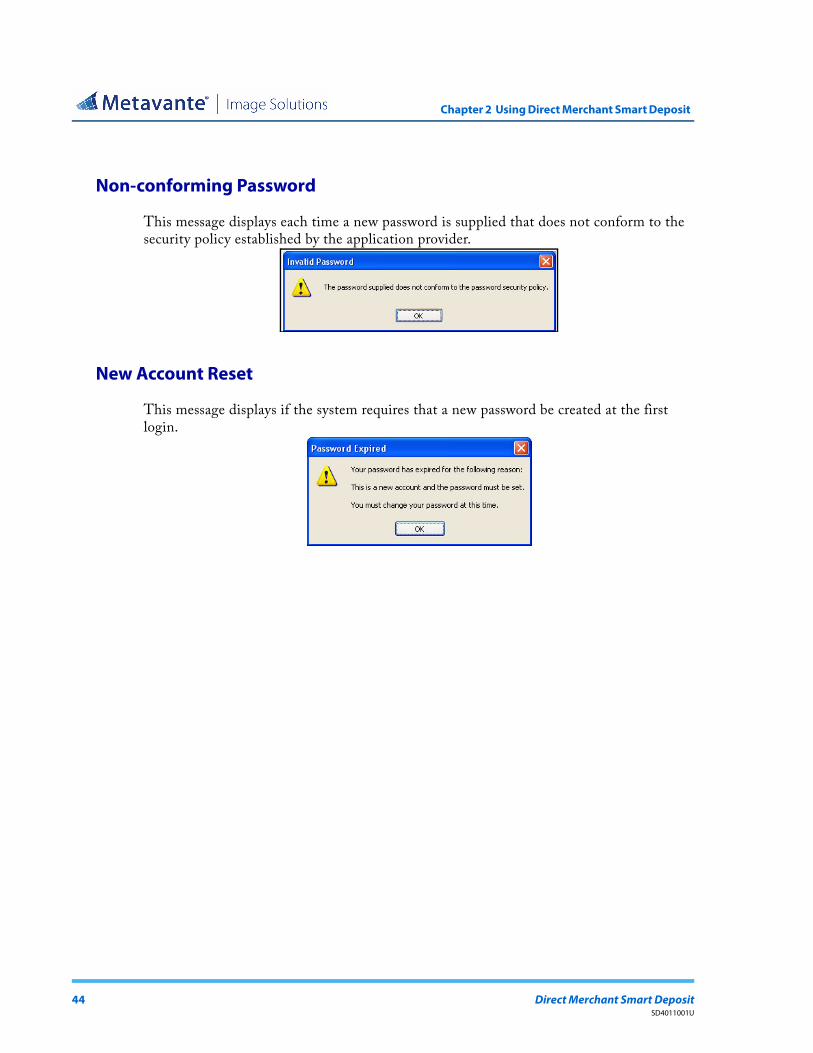
Non-conforming Password
This message displays each time a new password is supplied that does not conform to the security policy established by the application provider.
New Account Reset
This message displays if the system requires that a new password be created at the first login.
44 Direct Merchant Smart DepositSD4011001U
Chapter 2 Using Direct Merchant Smart Deposit
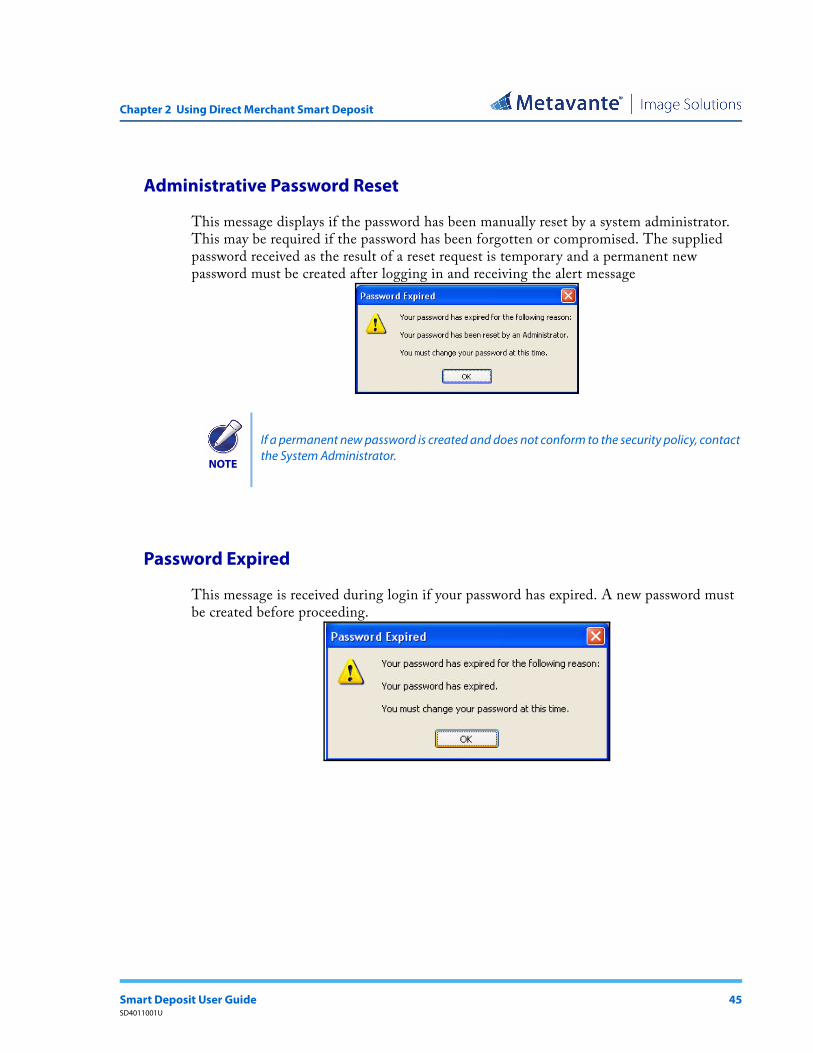
Administrative Password Reset
This message displays if the password has been manually reset by a system administrator. This may be required if the password has been forgotten or compromised. The supplied password received as the result of a reset request is temporary and a permanent new password must be created after logging in and receiving the alert message
Password Expired
This message is received during login if your password has expired. A new password must be created before proceeding.
NOTE
If a permanent new password is created and does not conform to the security policy, contact the System Administrator.
Smart Deposit User Guide 45SD4011001U
Chapter 2 Using Direct Merchant Smart Deposit
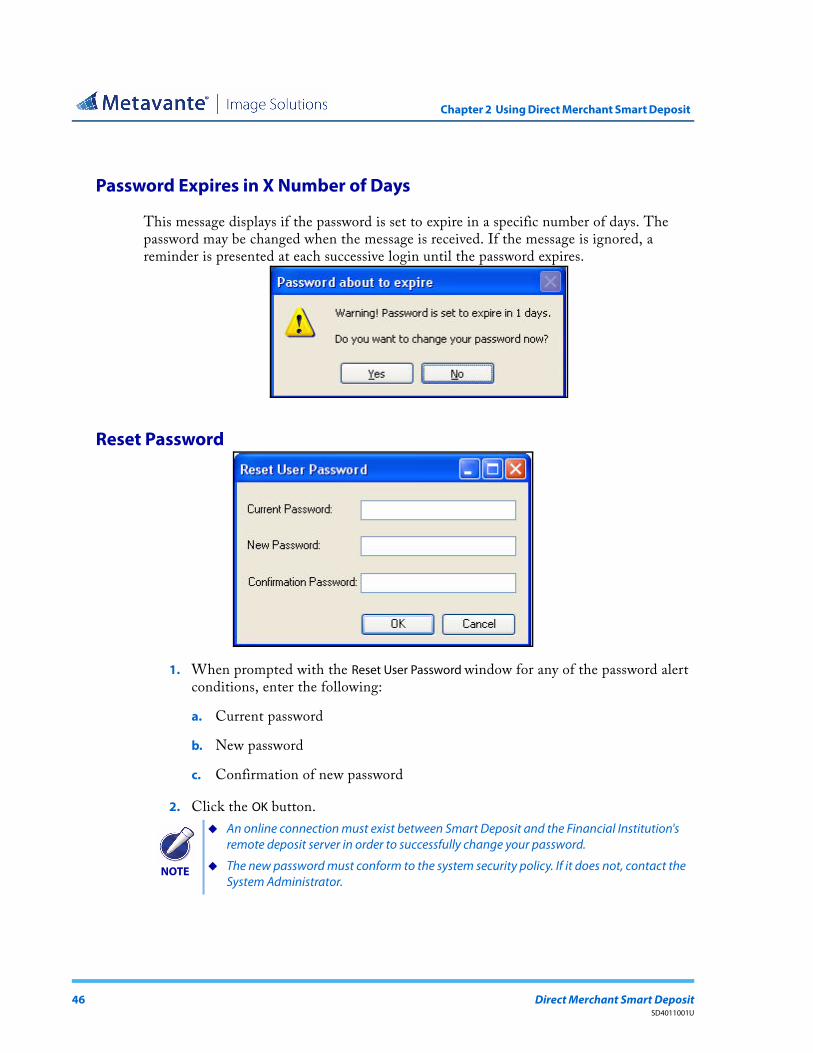
Password Expires in X Number of Days
This message displays if the password is set to expire in a specific number of days. The password may be changed when the message is received. If the message is ignored, a reminder is presented at each successive login until the password expires.
Reset Password
1. When prompted with the Reset User Password window for any of the password alert conditions, enter the following:
a. Current password
b. New password
c. Confirmation of new password
2. Click the OK button.
NOTE
An online connection must exist between Smart Deposit and the Financial Institution's remote deposit server in order to successfully change your password.
The new password must conform to the system security policy. If it does not, contact the System Administrator.
46 Direct Merchant Smart DepositSD4011001U

Chapter 2 Using Direct Merchant Smart Deposit
Re-Registration
After login to Smart Deposit, the system ensures the currently selected location is still valid. If it is not, the following error message displays:
Select the location from the drop-down list, then click OK. The system saves the new location, and deposits can now be processed.
If the system does not allow registration, the application closes. Contact the system administrator.
Smart Deposit User Guide 47SD4011001U

Chapter 2 Using Direct Merchant Smart Deposit
Home Page
The Home page displays after each successful login. From here, quick access is provided to all the available features within the application for creating and managing electronic deposits.
The page is organized into five areas, from top to bottom, as follows:
Main Menus and Toolbar
Information Pane
Deposit List Pane (All Deposits, by default)
48 Direct Merchant Smart DepositSD4011001U
Chapter 2 Using Direct Merchant Smart Deposit
Deposit Details Pane
Status Bar
The Main Menu, Toolbar, and the Status Bar are always visible when the application is running.
Main Menu
The Main Menu provides access to the following functionality:
Name Function
File | Home Select this option to return to the Smart Deposit Home page from anywhere in the application.
File | New Deposit Select this option to create a new deposit. See Chapter 3: Working With Deposits for details.
File | Exit Select this option to exit Smart Deposit.
Tools | Mark Items Select this option to access the Mark Items function to endorse an additional printed message on captured deposit items using supported scanners. The default message is PROCESSED ELECTRONICALLY.
Tools | Reports Select this option to access the Reports page.
Tools | Find Items Select this option to search for captured items in previous electronic deposits.
Tools | Update Approval Status
Select this option to check manually the status of Pending deposits which you created.
Tools | Scanner Information
Select this option to display the Scanner Information dialog.
Tools | Register Select this option to display the Client Registration dialog, which allows you to register a new scanner if necessary.
Tools | Reset Duplicate History
Select this option to reset all local Duplicate Item History.
Tools | Reset Password
Select this option to reset your current login password at any time.
Help | Contents Select this option to launch the User Guide for viewing and searching on Help topics.
Help | About Select this option to display the current Deployment and Application versions of Smart Deposit.
Smart Deposit User Guide 49SD4011001U

Chapter 2 Using Direct Merchant Smart Deposit
Toolbar
The Main Toolbar provides quick access to the following options:
Home - Select to return to the Home page.
New Deposit... - Select to begin a new electronic deposit.
Mark Items... - Select to endorse physical items to show they have been processed.
Reports - Select to access the Reports page.
Find Items... - Select to search for captured items in previous electronic deposits.
Information Pane
This area is used by the service provider to display branding/logo information or a webpage with useful information and links.
Toggle the Hide/Show Info Pane link on the top right to hide the Information Pane to enlarge the viewing area for the Deposit List Pane below.
Likewise, toggle the Hide/Show Deposits link to increase the viewing area of the Information Pane.
Deposit List Pane (“All Deposits”)
This section of the Home Page lists all the local deposits created using Smart Deposit based on the selected filter (the default is All Deposits). This includes deposits that have been submitted, are ready for submission or are currently active.
The Show drop-down list on the Deposits List pane allows the presented deposits to be filtered based on the following options:
All Deposits (default) - Displays all local deposits.
Approval Pending (only if Deposit Approval is enabled)
Approval Rejected (only if Deposit Approval is enabled)
Open Deposits
Ready
Transmitted
50 Direct Merchant Smart DepositSD4011001U

Chapter 2 Using Direct Merchant Smart Deposit
Pending deposits are read-only; they display only as confirmation that they have been submitted but have not yet been processed by an Approver. Rejected deposits have been processed by an Approver and require correction. These deposits must be re-opened and corrected before re-submitting for approval.
Use the Deposit List to delete or return to Active Deposits (Open or Ready), review Transmitted deposits or submit selected Ready deposits.
Double-click selected deposit to re-open the deposit in the Deposit Wizard (see Chapter 3) or use the Delete Selected Deposit, Submit Selected Deposits or Open Selected Deposit buttons at the bottom of the page, which are enabled based on the status of the selected deposit(s). For example, a Transmitted deposit cannot be deleted or submitted so those buttons are disabled when a Transmitted deposit is selected.
Find Deposits
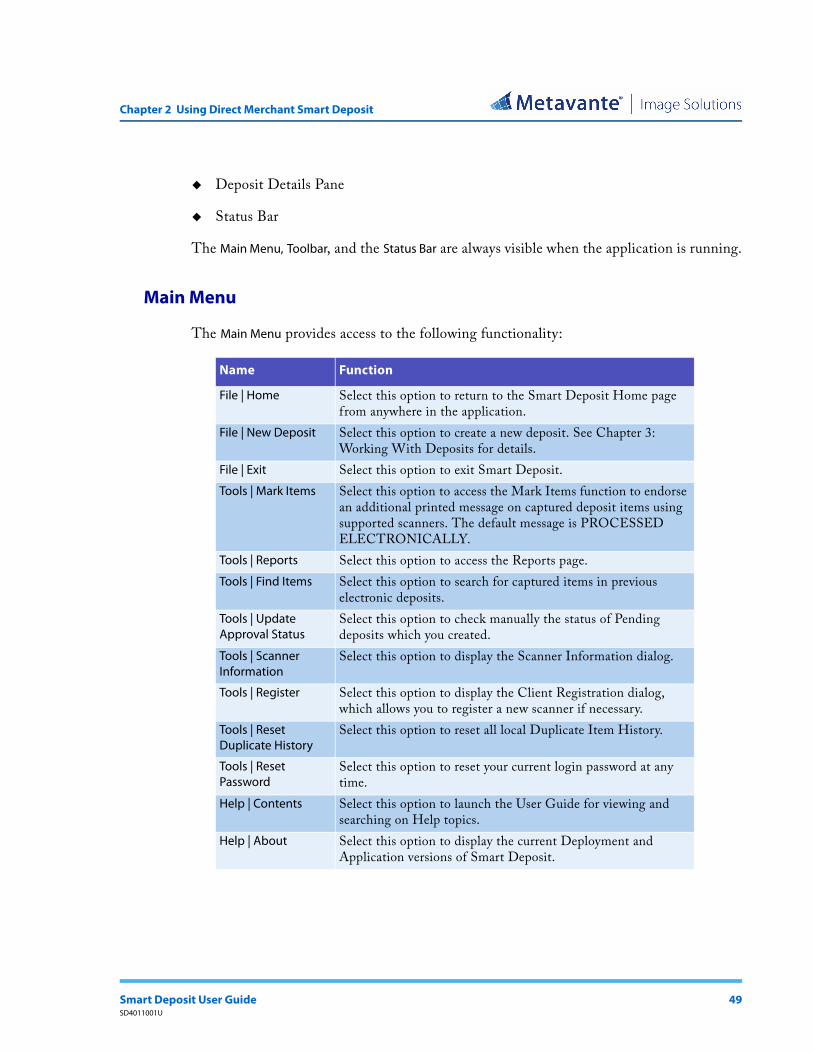
Use the Find Deposits button to search for a single deposit or subset of deposits based on available match criteria which become the current Show filter when used.
Field Description
Creation Date Range Optional setting to concentrate the search within specific dates. Check this option to enable it then select the appropriate Start and End dates of the query. If this option is not selected, the query is performed on all locally stored deposits. These dates correspond to when the deposits were created successfully on the Aggregator.
Status Limits the search to All, Open or Transmitted deposits.
Check Item Total Specifies a current calculated Deposit Amount Total.
# Items Specifies the number of items (Credit and Debit) in the deposit.
Account Specifies the Deposit Account Number used. [Is this going to be Primary Deposit Account?]
Transit Routing Specifies the Deposit Transit Routing Number used.
Deposit Tracking # Specifies the Deposit Tracking Number of a single deposit.
User Name Specifies the name of the user who created the deposits.
Clear Resets the fields described above.
Search Performs the query.
Smart Deposit User Guide 51SD4011001U

Chapter 2 Using Direct Merchant Smart Deposit
Cancel Exits the window without saving the changes.
Additional Fields Depending on configuration, additional search fields may be present. Possible data types are: Dates, Currency, Numeric, String, or Pick List.
Dates - Use the Calendar feature or type a range of dates.
Currency and Numeric values - Type your values, and choose any of the following operators:
Equals
Not Equal
Greater Than
Less Than
Greater Than or Equals
String– Exact match and supports the equal and not equal operators.
Pick List – Provides a dropdown list of available values and supports the equal and not equal operators.
Field Description
52 Direct Merchant Smart DepositSD4011001U
Chapter 2 Using Direct Merchant Smart Deposit
Deposit Details Pane
This area displays detailed information for the currently selected deposit in the Deposit List pane. A description of each field is shown below:
NOTE
To return to the previous Deposit List view, use the Show drop-down control.
Field Description
Account The account credited for the deposit amount [Is this going to be Primary Deposit Account?]
# of Items Number of items (credit and debits) in the deposit
Date Date the deposit was created on the Aggregator
Control $ The expected deposit amount total
Check Item $ The current calculated deposit amount total
Difference The difference between the Control $ and the Check Item $
Deposit Ticket $ The total of the deposit ticket, if one exists
Smart Deposit User Guide 53SD4011001U
Chapter 2 Using Direct Merchant Smart Deposit
Toggle the Hide/Show Details link on the top right of the Deposit List to hide the Deposit Details Pane in order to enlarge the viewing area for the Deposit List above.
Status Bar
The Status Bar always provides the following information:
Security Status - Displays the current security status of the network connection to the remote deposit server.
Scanner Status - Displays the registered scanner's current operational state.
Connection Status - Displays the network connection status to the remote deposit capture server.
Current Time - Displays the current local workstation system time.
Security Status
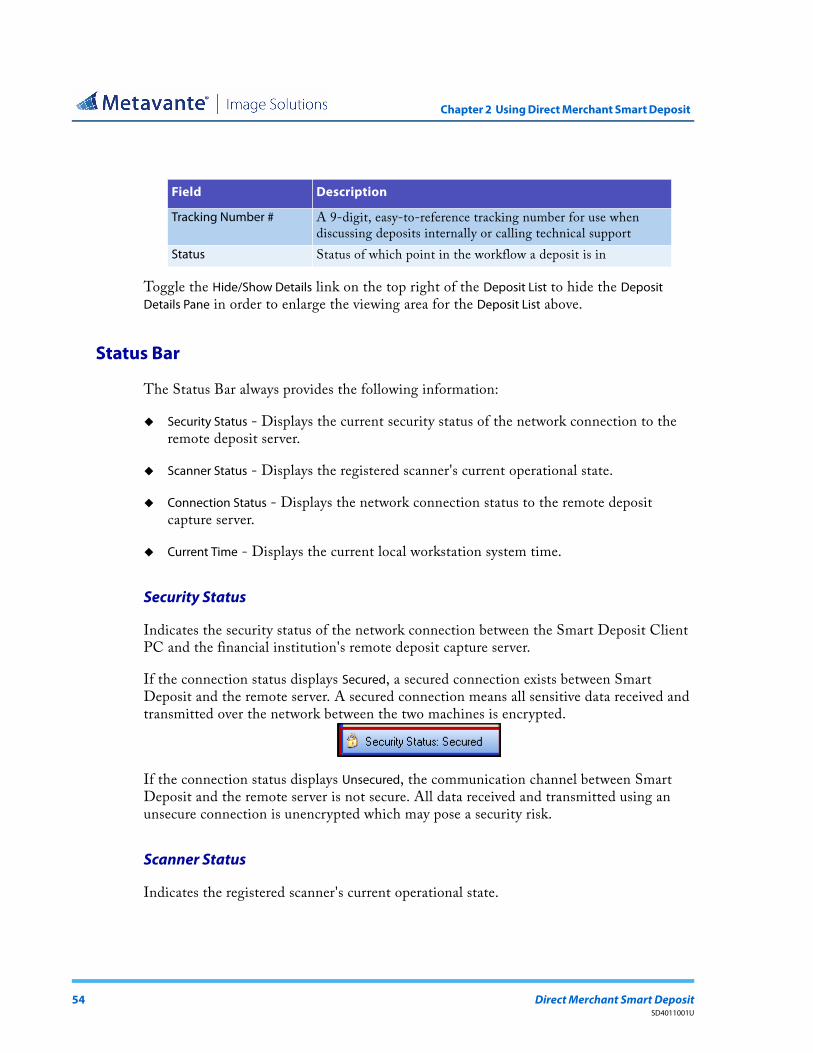
Indicates the security status of the network connection between the Smart Deposit Client PC and the financial institution's remote deposit capture server.
If the connection status displays Secured, a secured connection exists between Smart Deposit and the remote server. A secured connection means all sensitive data received and transmitted over the network between the two machines is encrypted.
If the connection status displays Unsecured, the communication channel between Smart Deposit and the remote server is not secure. All data received and transmitted using an unsecure connection is unencrypted which may pose a security risk.
Scanner Status
Indicates the registered scanner's current operational state.
Tracking Number # A 9-digit, easy-to-reference tracking number for use when discussing deposits internally or calling technical support
Status Status of which point in the workflow a deposit is in
Field Description
54 Direct Merchant Smart DepositSD4011001U

Chapter 2 Using Direct Merchant Smart Deposit
A scanner can have one of two states: ready or unknown. A ready status indicates the scanner is fully operational and ready to capture items in a deposit. An unknown status indicates a complication with the scanner. Anytime an unknown status exists, items cannot be captured.
Scanner Information
This opens the Scanner Information window, which provides information about the current installed/connected scanner device and the option to reset it, if needed.
Connection Status
Indicates network connection status to the remote deposit capture server.
If the Connection Status displays Online, Smart Deposit has successfully established a network connection with the remote deposit capture server. An Online connection means the server is responding and Smart Deposit can successfully transmit deposits and receive configuration updates.
If the Connection Status displays Offline, Smart Deposit is unable to establish a connection or receive a response from the remote deposit capture server. In this scenario, as long as Smart Deposit has been successfully registered and authenticated using a previous connection, Offline operation is available.
NOTE
Contact the System Administrator or Service Provider in order to resolve an unknown scanner status.
Smart Deposit User Guide 55SD4011001U

Chapter 2 Using Direct Merchant Smart Deposit
When running the application in Offline mode, all normal deposit capture functionality is available except for the following:
Cannot submit deposits
Cannot reset the password.
Tools Menu Options
In addition to providing access to the Mark Items, Reports and Find Items links, which are directly available from the main toolbar, the Tools menu displays the following additional options:
Scanner Properties provides detailed information about the connected scanner.
Name - Identifies the scanner name.
Brand - Identifies the brand of the scanner.
Model - Identifies the model of the scanner.
Library - Identifies the driver used to control the scanner.
Scanner Status provides information about the connected scanner's operational readiness for use with Smart Deposit.
Current Status - Identifies the operational state of the scanner for use with Smart Deposit. A scanner can have one of two states: ready or unknown.
NOTE
Connection Status is not updated after login. If this status changes from online to offline or vice versa, an alert of this change will not be received. In order to display the updated status, exit the application and login again.
56 Direct Merchant Smart DepositSD4011001U

Chapter 2 Using Direct Merchant Smart Deposit
Reset Scanner - Allows for the re-initialization of the scanner if a problem occurs during usage (e.g. unplugged, etc.) or if the scanner never initialized during startup. This should prevent the need for a reboot of Smart Deposit if the scanner fails to initialize.
Registration
Tools | Register allows for a scanner to be registered for capture to the local client PC. If the scanner models are changed, re-registration is required.
To register a scanner, perform the following steps:
1. From the file menu, select Tools | Register.
2. Select the name of the current location.
3. Select the name of the scanner attached to the PC.
4. Select Tools | Register to complete the registration process.
Reset Duplicate History
This option allows the duplicate item history to be reset and a new series of inputs for duplicate detection errors to begin.
Smart Deposit User Guide 57SD4011001U

Chapter 2 Using Direct Merchant Smart Deposit
Reset Password
If enabled, use this menu option to change the password at any time while online without assistance from the application provider.
To change the password, follow these steps:
1. Login to Smart Deposit.
2. Click the Tools menu.
3. Select Reset Password.
4. When prompted with the Reset User Password window, enter the following:
a. Current password
b. New password
c. Confirmation of new password
5. Click the OK button.
NOTE
An online connection must exist between Smart Deposit and the Financial Institution's remote deposit server in order to successfully change the password.
The new password must conform to the system security policy. If it does not, contact the system administrator.
58 Direct Merchant Smart DepositSD4011001U
Chapter 2 Using Direct Merchant Smart Deposit
New Deposit
Select New Deposit to initiate a new electronic deposit. For detailed information on creating and managing deposits, refer to Chapter 3: Working With Deposits.
Mark Items
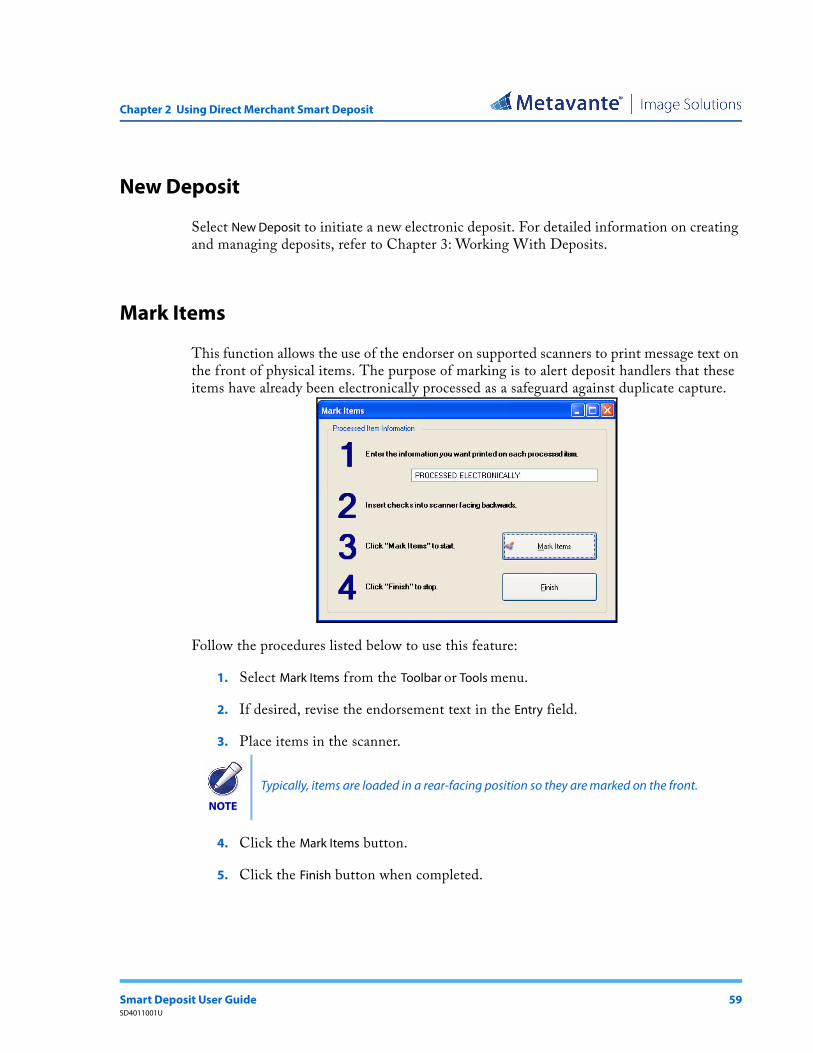
This function allows the use of the endorser on supported scanners to print message text on the front of physical items. The purpose of marking is to alert deposit handlers that these items have already been electronically processed as a safeguard against duplicate capture.
Follow the procedures listed below to use this feature:
1. Select Mark Items from the Toolbar or Tools menu.
2. If desired, revise the endorsement text in the Entry field.
3. Place items in the scanner.
4. Click the Mark Items button.
5. Click the Finish button when completed.
NOTE
Typically, items are loaded in a rear-facing position so they are marked on the front.
Smart Deposit User Guide 59SD4011001U
Chapter 2 Using Direct Merchant Smart Deposit
Reports
The following reports are currently available for use with Smart Deposit:
Deposit Detail Report
All Deposits Detail Report
Deposit Summary Report
Deposit Image Report
Deposit Image Report (Front Only)
Deposit Image Report (1X3)
Item Detail Data Report
Export Data File by Layout
Pending and Rejected Deposits Summary Report
NOTE
Batch data is maintained locally on the Client PC and is available in each report. Reports generated from Web Deposit do not contain virtual batch tickets.
60 Direct Merchant Smart DepositSD4011001U

Chapter 2 Using Direct Merchant Smart Deposit
Deposit Detail Report
This report contains details for a specifically selected deposit in the specified date range. (The default is for the current day’s deposits only.)
To run this report, perform the following:
1. Select the Deposit Detail Report.
2. Select the Deposit.
3. Enter the Start Date and End Date, if required.
Smart Deposit User Guide 61SD4011001U
Chapter 2 Using Direct Merchant Smart Deposit
4. Optional: Click the Include Custom Fields checkbox to display all relevant custom field data in your report.
5. Select Generate Report.
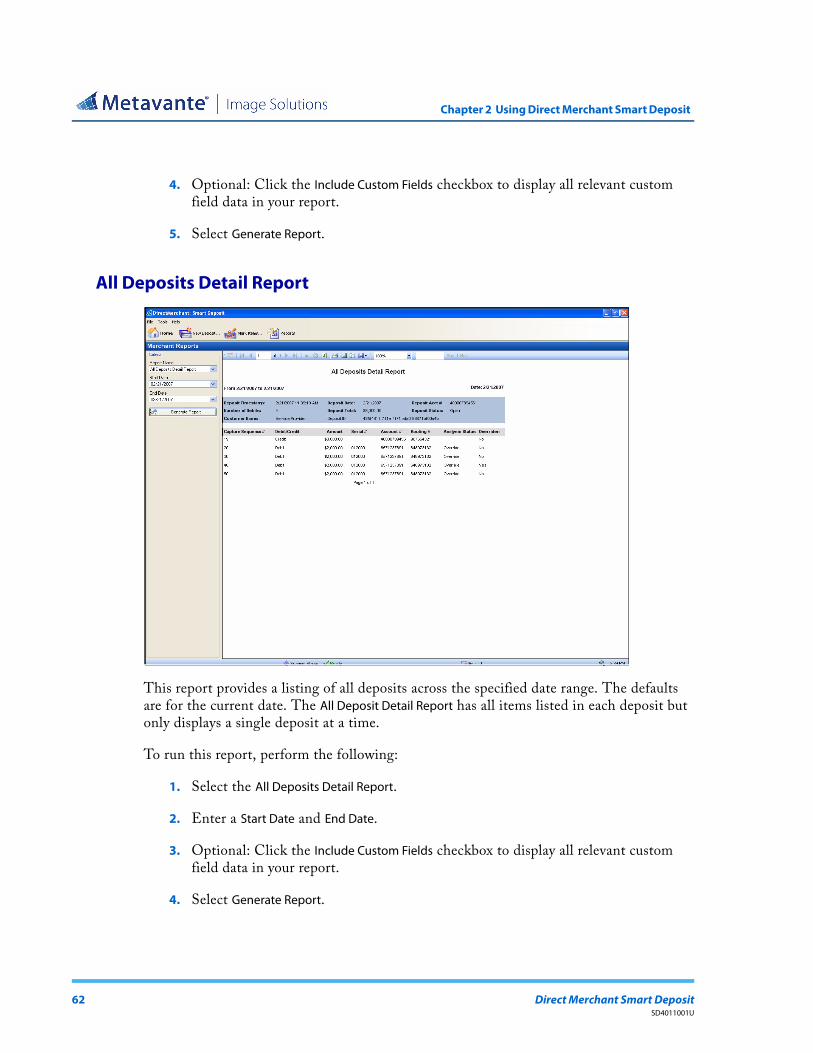
All Deposits Detail Report
This report provides a listing of all deposits across the specified date range. The defaults are for the current date. The All Deposit Detail Report has all items listed in each deposit but only displays a single deposit at a time.
To run this report, perform the following:
1. Select the All Deposits Detail Report.
2. Enter a Start Date and End Date.
3. Optional: Click the Include Custom Fields checkbox to display all relevant custom field data in your report.
4. Select Generate Report.
62 Direct Merchant Smart DepositSD4011001U

Chapter 2 Using Direct Merchant Smart Deposit
Deposit Summary Report
The Deposit Summary Report provides a summary of deposits for a specified account in the selected date range. This report requires that the Account Number Field is populated.
To run this report, perform the following:
1. Select the Deposit Summary Report.
2. Select the Account Number.
3. Enter a Start Date and End Date.
4. Optional: Click the Include Custom Fields checkbox to display all relevant custom field data in your report.
5. Select Generate Report.
Smart Deposit User Guide 63SD4011001U

Chapter 2 Using Direct Merchant Smart Deposit
Deposit Image Report
This report provides a detailed summary of an individual deposit, including images. The default layout is front and back images in a 2-column, 3-row (2 x 3) layout. The Front Only option displays front images only in the (2 x 3) layout, and the (1 x 3) option displays front images only in a 1-column, 3-row layout (providing larger images per page).
To run this report, perform the following:
1. Select the desired Deposit Image Report layout option.
2. Enter a Start Date and End Date, if required.
3. Select the specified Deposit.
4. Select Generate Report.
64 Direct Merchant Smart DepositSD4011001U

Chapter 2 Using Direct Merchant Smart Deposit
Item Detail Data Report
This report is designed to list all available item field data associated with captured items in the specified date range.
To run this report, perform the following:
1. Select Item Detail Data Report.
2. Select Start Date and End Date, if needed.
3. Select an Account.
4. Select Generate Report.
The Custom Fields option, includes all additional deposit and item fields established by the service provider within the report. The data in the report can be exported using the Report Toolbar export option or the Export Report button.
Export Data File by Layout
This is a special report that creates a CSV or an OFX (QuickBooks) formatted file, based on the selected layout. This report option is only available if export data layouts have been defined by the application provider. To create the export, perform the following:
Smart Deposit User Guide 65SD4011001U

Chapter 2 Using Direct Merchant Smart Deposit
1. Select Export Data File by Layout from the Reports list.
2. Select an Export Layout.
3. Select an Account.
4. Enter a Start Date and End Date.
5. For QuickBooks only: Select an Account Type. Valid values for Account Type are Checking, Savings, Money Market, or Creditline and reflect the type of account in QuickBooks.
6. Select Export Report.
7. Select a save location.
66 Direct Merchant Smart DepositSD4011001U

Chapter 2 Using Direct Merchant Smart Deposit
Pending and Rejected Deposits Summary Report
This report summarizes all locally generated deposits that currently require user intervention due to a pending or rejected status.
To run this report, select Pending and Rejected Deposits Summary Report. The top section of the report contains the Rejected Deposits, and the bottom section of the report contains the Pending Deposits. Deposits are listed by Submit Date (oldest first), then by Deposit Total (largest first).
The following columns are used in this report:
Deposit Tracking Number - 9 digit number assigned to every deposit
Submit Date - Date deposit was submitted for approval
Operator - Merchant user name who created the deposit
Rejected Date - Date when the deposit was rejected by an approver
Approver - Merchant user name who rejected the deposit
Number of Debits - Number of debit items in the deposit
Smart Deposit User Guide 67SD4011001U
Chapter 2 Using Direct Merchant Smart Deposit
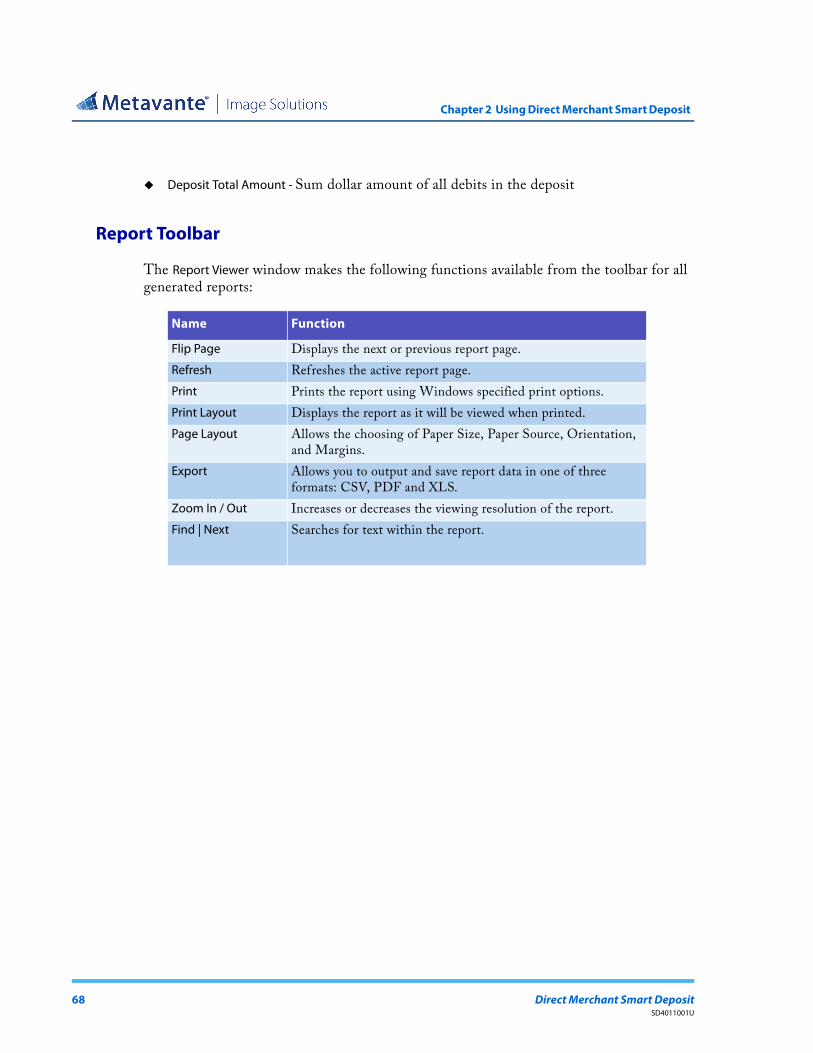
Deposit Total Amount - Sum dollar amount of all debits in the deposit
Report Toolbar
The Report Viewer window makes the following functions available from the toolbar for all generated reports:
Name Function
Flip Page Displays the next or previous report page.
Refresh Refreshes the active report page.
Print Prints the report using Windows specified print options.
Print Layout Displays the report as it will be viewed when printed.
Page Layout Allows the choosing of Paper Size, Paper Source, Orientation, and Margins.
Export Allows you to output and save report data in one of three formats: CSV, PDF and XLS.
Zoom In / Out Increases or decreases the viewing resolution of the report.
Find | Next Searches for text within the report.
68 Direct Merchant Smart DepositSD4011001U

Chapter 2 Using Direct Merchant Smart Deposit
Find Items
Find Items provides an interface that allows search criteria to be specified in order to find a list of items within the current local deposit history.
The available search fields are the following:
Name Function
Creation Date Range Activates an optional date range. Select the appropriate Start Date and End Date. If not selected, date range defaults to current day. These dates correspond to when the deposits were created successfully on the Aggregator.
Item Type Allows for the selection of a check (debit) or deposit ticket (credit).
Amount Specifies a captured item's amount.
Serial Specifies a captured item's serial.
Account Specifies a captured item's account number. [Primary Deposit Account?]
Transit Routing Specifies a captured item's transit routing number.
Sequence Specifies a captured item's sequence number.
User Name Specifies the user's name that captured the item(s).
Clear Clears entered text from all fields.
Smart Deposit User Guide 69SD4011001U

Chapter 2 Using Direct Merchant Smart Deposit
Search Executes the search for the desired items.
Cancel Exits the Find Items dialogue window.
Additional Fields Depending on configuration, additional search fields may be present. Possible data types are: Dates, Currency, Numeric, Less Than or EqualString, or Pick List.
Dates - Use the Calendar feature or type a range of dates.
Currency and numeric values - Type your values and choose any of the following operators:
Equals
Not Equal
Greater Than
Less Than
Greater Than or Equals
Less Than or Equals
String – Exact match and supports the equal and not equal operators.
Pick List – Provides a drop-down list of available values and supports the equal and not equal operators.
TIP
The Find Items windows always remember the last set of search criteria attempted. To start over with a completely new set of criteria, click the Clear button.
Name Function
70 Direct Merchant Smart DepositSD4011001U
Chapter 2 Using Direct Merchant Smart Deposit
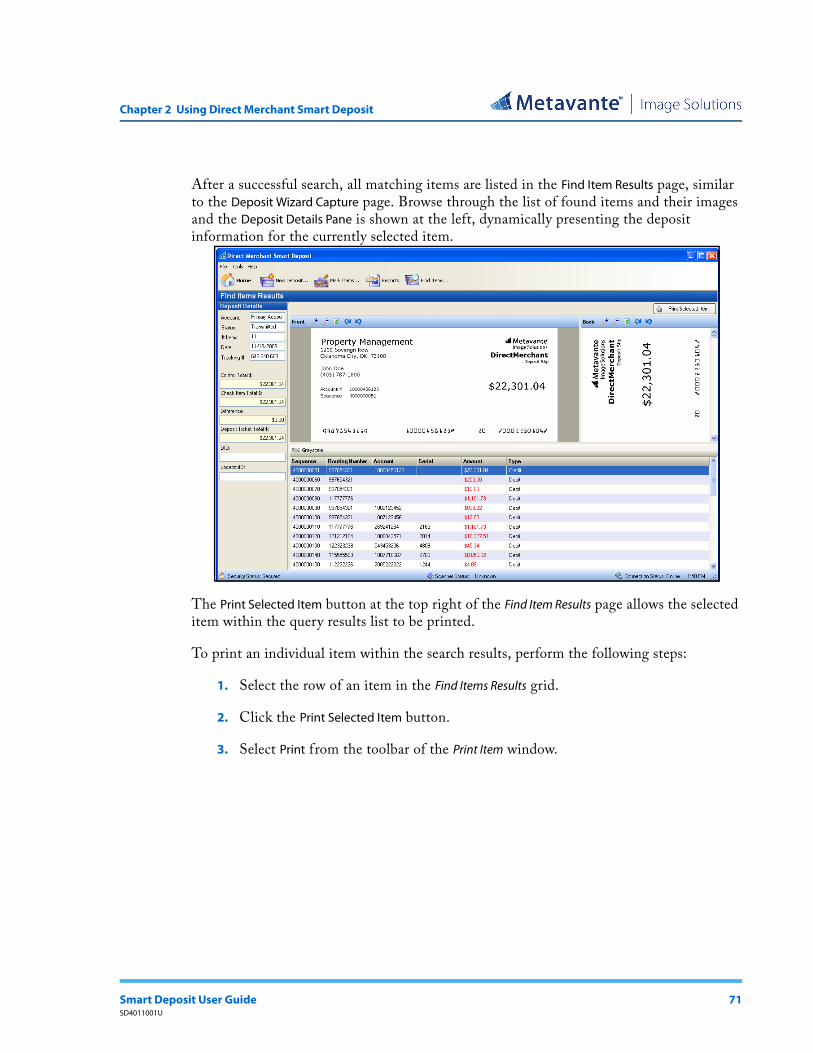
After a successful search, all matching items are listed in the Find Item Results page, similar to the Deposit Wizard Capture page. Browse through the list of found items and their images and the Deposit Details Pane is shown at the left, dynamically presenting the deposit information for the currently selected item.
The Print Selected Item button at the top right of the Find Item Results page allows the selected item within the query results list to be printed.
To print an individual item within the search results, perform the following steps:
1. Select the row of an item in the Find Items Results grid.
2. Click the Print Selected Item button.
3. Select Print from the toolbar of the Print Item window.
Smart Deposit User Guide 71SD4011001U

Chapter 2 Using Direct Merchant Smart Deposit
72 Direct Merchant Smart DepositSD4011001U

Direct Merchant Smart Deposit
Smart Deposit User Guide
Chapter 3Working With Deposits
Topics
Creating a New Deposit
Capturing Items
Correcting Items
Balancing
Transmitting
Submitting
Modifying Existing Deposits
ACH Opt - out
Coupon Capture
Smart Deposit User Guide 73SD4011001U

Chapter 3 Working With Deposits
Creating a New Deposit
Once the physical items in the deposit have been prepared for submission to the financial institution, the deposit can be captured and transmitted electronically using Smart Deposit and the registered scanner.
All electronic deposits submitted by Smart Deposit are initiated with the New Deposit option.
To create a new deposit, follow these steps:
1. Click New Deposit on the toolbar. The Create New Deposit window displays.
TIP
Creating a New Deposit is the required first step before beginning to scan items.
NOTE
A deposit can only be created if a Deposit Account is selected and a Deposit Total is entered.
74 Direct Merchant Smart Deposit SD4011001U

Chapter 3 Working With Deposits
2. Select Primary Deposit Account - Select the appropriate Primary Deposit Account from the Account drop-down menu. The account numbers are listed low to high. Begin typing the account number and the system will provide a narrowed-down list of accounts from which to choose.
a. If Coupon Capture is available from the service provider, a Work Type of Check Only or Coupon & Check must be selected. Refer to the Coupon Capture section of this guide for additional information.
3. Enter Deposit Information - Calculate the deposit total and enter the amount into the Deposit Total field. This is the expected total for the deposit and is required.
a. Fill in any additional Deposit Information, if applicable.
b. If Virtual Batch tickets are enabled, information may be required for the first batch of items. (See Batch Grouping below.)
NOTE
If the required Deposit Account is not available in this list, contact the System Administrator.
NOTE
Additional Deposit information may or may not be required, based on the configuration established by the service provider.
Fields displayed in yellow are required and must be populated. Fields displayed in white are optional and can be left blank.
Smart Deposit User Guide 75SD4011001U

Chapter 3 Working With Deposits
4. Proceed to Capture Items; Click Capture Items to begin the document capture process.
Capturing Items
Once a new deposit has successfully been created, the Capture screen displays, where scanning items in the deposit occurs. Capture is the first step in the Deposit Wizard, which guides you through the necessary workflow to prepare the electronic deposit for transmission.
76 Direct Merchant Smart Deposit SD4011001U
Chapter 3 Working With Deposits
The Capture screen is separated into three areas: Image Display, Data Display, and Deposit Details.
The Image Display area shows both the front and rear image of a selected deposit item and provides basic options for zooming in/out and rotating the displayed image.
The Data Display area presents detail data values specific to each captured item. Data is presented in a spreadsheet-style format, where each row represents a specific item (e.g. check) and each column represents a data field value associated with the item (e.g. amount, serial, etc.).
Use the image and data display areas to verify the scanned items in the deposit are correct.
The Deposit Details pane maintains detail information specific to the current active deposit.
The following information is displayed in the Deposit Details pane:
Account - Assigned deposit account number.
Status - Current state of the deposit:
Capture - The deposit is currently in the process of capturing items (or has more items pending capture).
Correct - The deposit is currently in the process of correcting any errors or prompting for additional item data values.
Balance - The deposit is currently in the process of balancing the Control Total Amount with that of the Sum Amount of all captured items.
Ready - The deposit has reached a stage where it can be transmitted to the Financial Institution. This status requires that the deposit is balanced and reconciled with the Control Total (including generations of virtual credits, when required).
Transmitted - The deposit has been successfully transmitted to the Financial Institution. A deposit cannot be modified once it has been submitted.
# of Items - Number of captured items within the deposit.
Date - Current date and time of deposit creation.
NOTE
The Deposit Details pane displays throughout every phase of the Deposit Wizard Workflow.
Smart Deposit User Guide 77SD4011001U
Chapter 3 Working With Deposits
Tracking # - Deposit's tracking number.
Control Total - Deposit total entered during deposit creation.
Check Item Total - Combined amount of all debit items in the deposit.
Difference - Amount discrepancy between the deposit total and the item total.
Deposit Ticket Total - Amount of the virtual deposit ticket.
Modify - Update the Deposit Account, Control Total and any additional deposit information (where applicable) during the deposit workflow (after the deposit has been created, but before transmission).
Batch Grouping
In order to facilitate enhanced reconciliation prior to submitting deposits, Smart Deposit manages batch groups within a deposit. Each group is separated by a virtual batch ticket. These items are generated one of two ways: automatically or manually.
Virtual batch tickets configured for automatic insertion are inserted into a deposit after a defined number of physical items are captured (e.g. each time a group of 25 items are captured, a virtual batch ticket is inserted).
Virtual batch tickets configured for manual insertion can be inserted by a user during capture whenever desired.
NOTE
Information within the # of Items, Check Item Total and Deposit Ticket Total fields is updated during item capture.
An existing virtual deposit ticket does not reflect a Deposit Account change. If a virtual deposit ticket exists, it must be deleted and re-created in order to reflect any subsequent changes.
If Virtual Payee Endorsement is enabled, changing the Deposit Account for an active deposit is not allowed.
NOTE
Batch grouping is an optional feature activated and configured by the application provider.
78 Direct Merchant Smart Deposit SD4011001U

Chapter 3 Working With Deposits
A few additional facts regarding virtual batch tickets and Batch Grouping:
In addition to entering deposit information when creating a new deposit, you may also be required to enter batch information, depending on the configuration.
Only manually inserted batch tickets support field data-entry per ticket.
Tickets can only be manually inserted in the Capture screen.
Tickets can only be manually inserted when the scanner is not in the process of capturing items.
Tickets are not subject to CAR/LAR, Duplicate Detection, DREAM and IQA (both image quality and usability) processing.
Tickets can be removed from a deposit, but only in the Balance stage.
If every captured item within a batch is removed from a deposit, that batch ticket is automatically removed as well.
Anytime a batch ticket is the last item in a deposit, it will be automatically removed when advancing to a different stage of the capture process (e.g. exiting the Capture phase and entering the Correction phase).
Smart Deposit User Guide 79SD4011001U
Chapter 3 Working With Deposits
The amount of a virtual batch ticket cannot be manually modified by a user. This amount is only updated when the sum amount of the debits associated with the batch is modified.
Tickets are used for reconciliation purposes and are omitted from transmitted deposits.
Deposit e-mail notifications will not contain any batch ticket related information (e.g. batch tickets are not included in the total item count).
Capturing Without Virtual Batch Tickets
To capture items without virtual batch tickets, follow the procedures listed below:
1. Load items for capture into the scanner (if they have not been loaded already).
2. The scanner begins feeding items automatically. Click the Stop Scanner/Start Scanner button at any time to stop or resume capturing items.
3. When item capture is complete, click the Next button to proceed to the next required step in the deposit workflow.
Capturing With Virtual Batch Tickets
To capture items with virtual batch tickets using the manual insertion configuration, follow the procedures listed below:
1. Load a batch of items for capture into the scanner (if they have not been loaded already).
2. The scanner begins feeding items automatically. Click the Stop Scanner/Start Scanner button at anytime to either stop or resume capturing items.
3. Click the Insert Batch button to manually insert a virtual batch ticket in the deposit.
NOTE
The Insert Batch button is only present for configurations that use manual batch ticket insertion. If present, this button is only active when the scanner is not processing items.
80 Direct Merchant Smart Deposit SD4011001U
Chapter 3 Working With Deposits
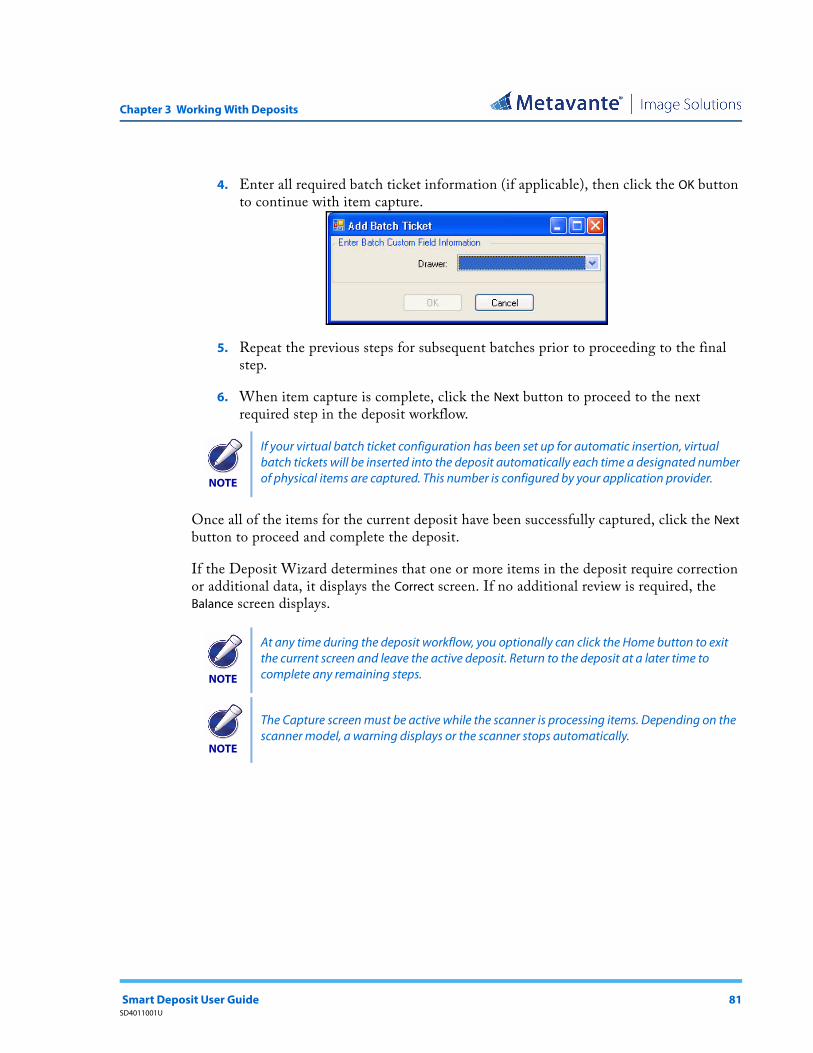
4. Enter all required batch ticket information (if applicable), then click the OK button to continue with item capture.
5. Repeat the previous steps for subsequent batches prior to proceeding to the final step.
6. When item capture is complete, click the Next button to proceed to the next required step in the deposit workflow.
Once all of the items for the current deposit have been successfully captured, click the Next button to proceed and complete the deposit.
If the Deposit Wizard determines that one or more items in the deposit require correction or additional data, it displays the Correct screen. If no additional review is required, the Balance screen displays.
NOTE
If your virtual batch ticket configuration has been set up for automatic insertion, virtual batch tickets will be inserted into the deposit automatically each time a designated number of physical items are captured. This number is configured by your application provider.
NOTE
At any time during the deposit workflow, you optionally can click the Home button to exit the current screen and leave the active deposit. Return to the deposit at a later time to complete any remaining steps.
NOTE
The Capture screen must be active while the scanner is processing items. Depending on the scanner model, a warning displays or the scanner stops automatically.
Smart Deposit User Guide 81SD4011001U

Chapter 3 Working With Deposits
Correcting Items
The Correct screen displays all items in the deposit that have reported a failure during capture and/or require additional keyed information. Items needing attention are presented for review one at a time, with options to be repaired, updated or excluded from the deposit.
This screen also allows an item type to be changed from a coupon to a check. To do this, all coupon-related field values are removed. Transactions are also re-evaluated and grouped accordingly.
Items which typically require repair are those with imperfections which cause them to be prohibited from the deposit based on threshold criteria from the application provider. Exclusions are usually items processed more than once (duplicates) or items that cannot be read or are not allowed (rejects). Rejection criteria are also defined by the application provider.
If supported, associated payment coupons are also presented for verification or data entry. Refer to the Coupon Capture section of this guide for additional information.
The Correct screen displays information for one item at a time and is divided into three different sections containing information and action options for the current item: Analysis Results, Image Display and the Item Correction panel.
82 Direct Merchant Smart Deposit SD4011001U
Chapter 3 Working With Deposits
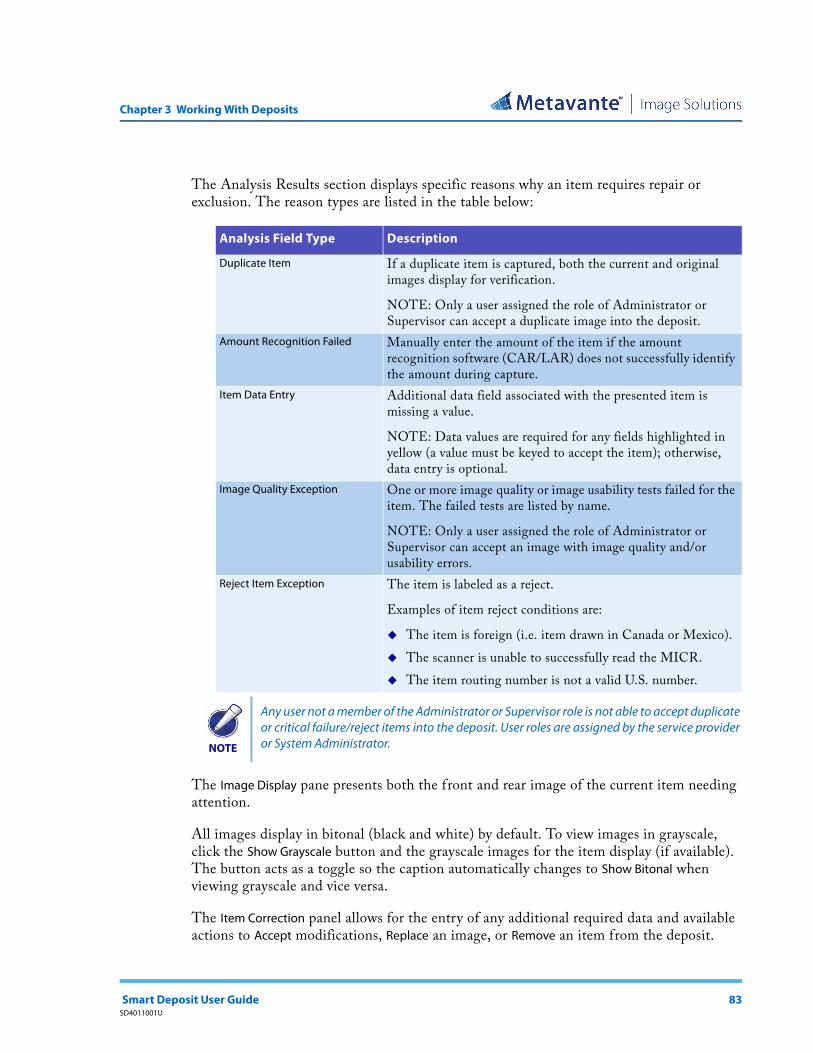
The Analysis Results section displays specific reasons why an item requires repair or exclusion. The reason types are listed in the table below:
The Image Display pane presents both the front and rear image of the current item needing attention.
All images display in bitonal (black and white) by default. To view images in grayscale, click the Show Grayscale button and the grayscale images for the item display (if available). The button acts as a toggle so the caption automatically changes to Show Bitonal when viewing grayscale and vice versa.
The Item Correction panel allows for the entry of any additional required data and available actions to Accept modifications, Replace an image, or Remove an item from the deposit.
Analysis Field Type Description
Duplicate Item If a duplicate item is captured, both the current and original images display for verification.
NOTE: Only a user assigned the role of Administrator or Supervisor can accept a duplicate image into the deposit.
Amount Recognition Failed Manually enter the amount of the item if the amount recognition software (CAR/LAR) does not successfully identify the amount during capture.
Item Data Entry Additional data field associated with the presented item is missing a value.
NOTE: Data values are required for any fields highlighted in yellow (a value must be keyed to accept the item); otherwise, data entry is optional.
Image Quality Exception One or more image quality or image usability tests failed for the item. The failed tests are listed by name.
NOTE: Only a user assigned the role of Administrator or Supervisor can accept an image with image quality and/or usability errors.
Reject Item Exception The item is labeled as a reject.
Examples of item reject conditions are:
The item is foreign (i.e. item drawn in Canada or Mexico).
The scanner is unable to successfully read the MICR.
The item routing number is not a valid U.S. number.
NOTE
Any user not a member of the Administrator or Supervisor role is not able to accept duplicate or critical failure/reject items into the deposit. User roles are assigned by the service provider or System Administrator.
Smart Deposit User Guide 83SD4011001U

Chapter 3 Working With Deposits
An explanation of each button in this section is provided below:
Show Bitonal/Grayscale - Toggles between bitonal (black and white) and grayscale image views.
Accept - Accepts all modifications and proceeds to the next item.
Replace Image - Allows the current image of the item displayed to be replaced. When you click this button, the system displays the Capture screen. From here, the item must be recaptured in order to replace its image.
Remove - Removes the displayed item from the deposit. Selecting this option prompts for confirmation. Once the item is removed, it cannot be recalled without physically re-capturing the item.
Completing a corrective action automatically advances to the next item for review. Once all corrections are complete, the Deposit Wizard automatically advances to the Balance screen.
To repair an item within a deposit, follow these steps:
1. Review each analysis explanation.
2. If necessary, enter the appropriate data for each required input field.
3. Click the Accept button.
4. Click the OK button on the confirmation message to proceed to the next deposit capture phase.
NOTE
Any item removed can be recaptured. If the recaptured item continues to fail and is unable to be accepted, it must be deposited through traditional means (i.e. within a paper deposit).
NOTE
Click Capture from the toolbar to capture additional items to the current deposit.
84 Direct Merchant Smart Deposit SD4011001U
Chapter 3 Working With Deposits
To replace an item's image, follow these steps:
1. Click the Replace Image button.
2. Click the OK button on the confirmation message.
3. Load the item into the scanner.
To remove an item within a deposit follow these steps:
1. Click the Remove button.
2. Click the Yes button on the confirmation message.
Intelligent Keying
If enabled by the service provider, intelligent keying saves field values associated with the routing and account number for each captured item. The next time an item with the same routing and account number is captured, the saved values are automatically populated during item correction. This decreases repetitive data entry for routinely captured item values within a deposit.
When a field is populated with a previous value, the value can either be accepted or a new value can be entered that replaces the one previously saved. Saved values are removed from the system after a configured number of days. Intelligent keying also supports populating associated fields for single-single coupon check transactions.
Balancing
Once all the items in the deposit have been captured and corrected, begin balancing using the Balance screen, which is the final step in the Deposit Wizard before deposit transmission.
The Balance screen also allows for amount editing, deposit editing and item removal.
Smart Deposit User Guide 85SD4011001U

Chapter 3 Working With Deposits
The Balance screen is divided into two primary areas: an Image window (displaying the front image of the selected item only) and a Data Display area, similar to the Capture screen, which lists all the items included in the deposit. Below the list of items, the following deposit summary information is also displayed:
The number of credits (i.e. deposit tickets)
The total sum of the credits
The number of debits (i.e. checks)
The total sum of the debits
NOTE
The columns displayed in the item display list are configured by the application provider.
86 Direct Merchant Smart Deposit SD4011001U

Chapter 3 Working With Deposits
An additional toolbar between the image display and item list provides the following controls:
Amount - Allows the editing of an item's amount.
Remove - Allows the removal of a selected item.
Grayscale/Black & White - Toggles between black and white and grayscale image views.
At the bottom of the data display area, there are two buttons:
Back - Returns the deposit to the previous screen in the Deposit Wizard.
Balance - If the deposit is currently out of balance, displays the Balance Adjustment - Update Deposit Ticket window, which allows the Deposit Control Total to be adjusted. If the deposit is already in balance, the Deposit Ready window displays.
When a deposit first reaches the Balance screen and the Deposit Item Total is equivalent to the Deposit Control Total, the Deposit Ready window is displayed. This screen shows the created deposit ticket and deposit summary on the right side of the window:
This window allows the final Deposit Ticket to be confirmed and the deposit electronically submitted to the financial institution (refer to the Balance the Deposit if it is Unbalanced section later in this chapter for additional details on deposit transmission).
NOTE
If you have Split Deposits enabled, after you click the Proceed button, the Account Balance - Add Accounts Window displays. See the section below for information on using this window.
Smart Deposit User Guide 87SD4011001U
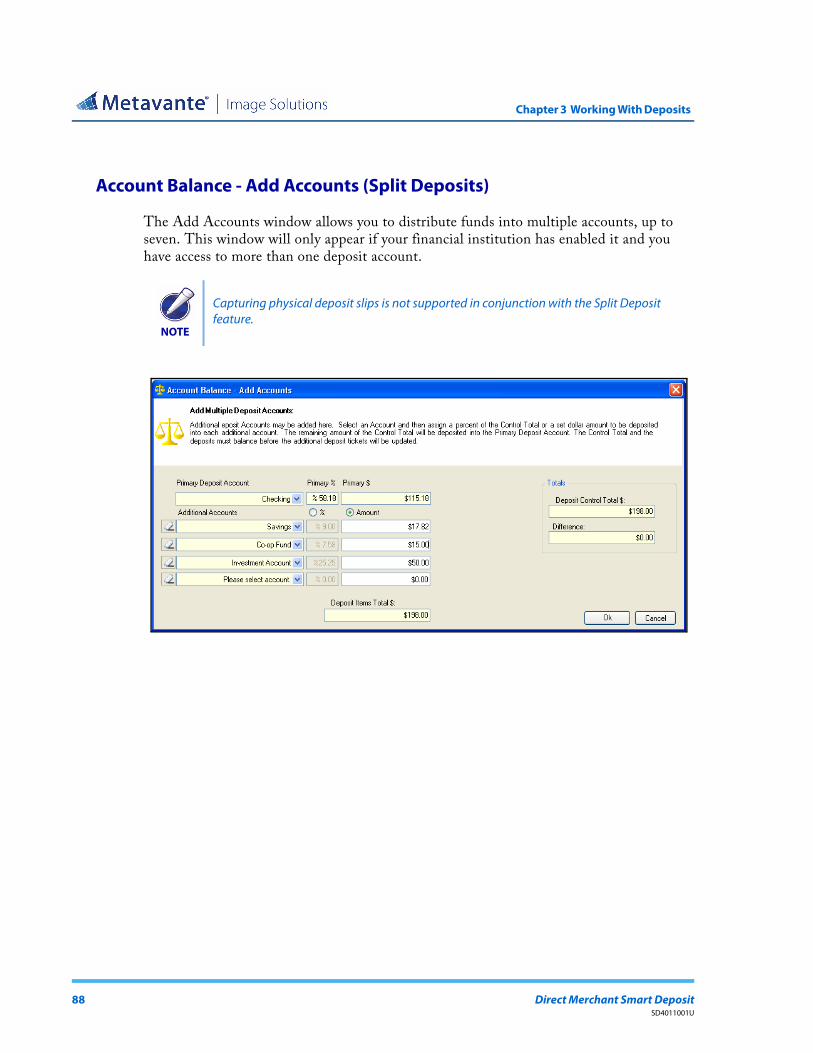
Chapter 3 Working With Deposits
Account Balance - Add Accounts (Split Deposits)
The Add Accounts window allows you to distribute funds into multiple accounts, up to seven. This window will only appear if your financial institution has enabled it and you have access to more than one deposit account.
NOTE
Capturing physical deposit slips is not supported in conjunction with the Split Deposit feature.
88 Direct Merchant Smart Deposit SD4011001U

Chapter 3 Working With Deposits
1. Distribute your deposit, using the controls and parameters described in the table below. You can use up to seven accounts.
Field/Control Function
Primary Deposit Account drop-down By default this is the Primary Deposit Account you chose when creating the deposit. At any time on this page you can use the drop-down to select another Primary Deposit Account.
Remaining Amount field This field displays the amount to be deposited in your Primary Deposit Account and is not editable. As you distribute funds this amount adjusts accordingly. There must always be at least .01 in the Remaining Amount field of your Primary Deposit account.
Additional Accounts drop-down A number of drop-down menus display based on the number of additional accounts to which you have access, up to seven. The default is Account. Use these menus to select the accounts to which you wish to distribute funds.
% radio button / column For each account, you can choose to distribute by % or $ Amount. You can use percentages and enter decimals up to two positions between 0.1 through 99.99, and the percent sign is inserted automatically. When you press Enter or click outside the cell, the Remaining Amount field updates automatically.
$ Amount radio button / column You can use decimals to indicate currency up to two positions for positive numbers between .01 through 99,999,999.999. When you press Enter or click outside the cell, the Remaining Amount field updates automatically.
Deposits field This field displays the total of the primary deposit account amount and all additional account amounts. It is updated as amounts are entered or edited.
Deposit Control Total field This field displays the Deposit Control Total and cannot be edited.
Difference This field displays the amount of your deposit left to be distributed to accounts and cannot be edited. If this amount is less than $0.00, it displays in red. This field updates as you edit or update amounts.
Smart Deposit User Guide 89SD4011001U
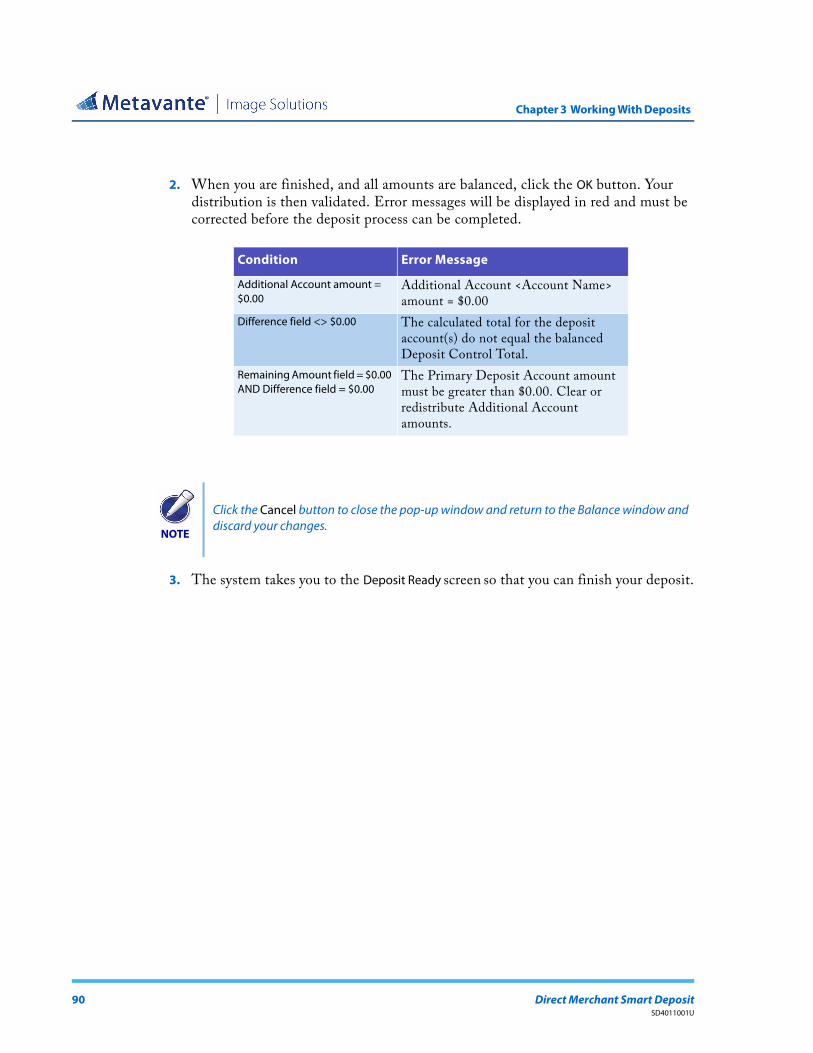
Chapter 3 Working With Deposits
2. When you are finished, and all amounts are balanced, click the OK button. Your distribution is then validated. Error messages will be displayed in red and must be corrected before the deposit process can be completed.
3. The system takes you to the Deposit Ready screen so that you can finish your deposit.
Condition Error Message
Additional Account amount = $0.00
Additional Account <Account Name> amount = $0.00
Difference field <> $0.00 The calculated total for the deposit account(s) do not equal the balanced Deposit Control Total.
Remaining Amount field = $0.00 AND Difference field = $0.00
The Primary Deposit Account amount must be greater than $0.00. Clear or redistribute Additional Account amounts.
NOTE
Click the Cancel button to close the pop-up window and return to the Balance window and discard your changes.
90 Direct Merchant Smart Deposit SD4011001U

Chapter 3 Working With Deposits
For users who have the Operator role, but not the Depositor role, you have the option to Submit Now or Submit Later as opposed to Transmit. The user is instructed that someone with the Depositor role must finish the deposit.
If the use of manual virtual batch tickets is configured, the Deposit Ready window is not automatically presented for a balanced deposit when the Balance Screen is activated.
However, if the deposit's Item Total and Control Total differ, the deposit is out of balance and the Balance Adjustment - Update Deposit Ticket window displays.
To resolve an out-of-balance deposit, perform the following steps:
1. Access the Balance Adjustment - Update Deposit Ticket window which is automatically presented the first time the Balance screen is reached or by clicking the Balance button.
2. Adjust the Deposit Control Total to equal the Deposit Items Total to resolve the difference.
3. Select Generate Deposit Ticket to create the virtual deposit ticket.
If the difference between Deposit Item Total and Deposit Control Total requires an investigation, follow the procedures listed below:
1. Click the Cancel button to exit the Deposit Ready window.
2. Search for any discrepancies using the item detail list and image display.
3. Resolve the discrepancies by either modifying an item's amount or removing an item.
Smart Deposit User Guide 91SD4011001U

Chapter 3 Working With Deposits
4. When all discrepancies are resolved, click the Balance button to balance the deposit.
To edit the amount of an item:
1. Click the item’s row in the item detail list.
2. Edit the amount by using the Amount textbox in the toolbar or modifying the value directly in the item detail list Amount column.
To remove an item within a deposit:
1. Select the item in the item detail list.
2. Click the Remove button.
3. Click the Yes button in the confirmation message.
To capture additional items to a deposit follow these steps:
1. Return to Capture in the Deposit Wizard.
2. Place the item(s) to be added into the scanner. The item(s) automatically begin to feed through the scanner and be captured within the current deposit.
3. Stop the scanner and proceed to the next phase once scanning is complete.
4. Correct any errors that might exist.
5. Balance the deposit if it is unbalanced.
NOTE
If a batch ticket is deleted, its former items and their amounts are applied to the preceding batch tickets.
If all items are removed within a batch, the virtual batch ticket is automatically deleted.
NOTE
Refer to the Coupon Capture Balancing section of this guide for additional information related to Coupon Capture workflow.
92 Direct Merchant Smart Deposit SD4011001U

Chapter 3 Working With Deposits
Transmitting
Once a deposit has been balanced, it is ready to be electronically transmitted to the financial institution for processing.
An explanation of each button in the Deposit Ready window is provided below.
Transmit Now - Initiates the submission of the deposit
Transmit Later - Exits the Balance and returns to the Home screen
Cancel - Exits this window
Smart Deposit User Guide 93SD4011001U

Chapter 3 Working With Deposits
To transmit the deposit electronically, follow these steps:
1. Select Transmit Now.
2. The Transmit Deposit progress window displays.
3. Once the transmission is complete, the Transmission Summary window displays. This window lists all deposits transmitted. Each deposit in the list displays with the deposit total, the account, the tracking number, and the transmission status.
NOTE
When transmitting a deposit from the Deposit Wizard, this list contains only the deposit just completed. However, it is possible to transmit multiple deposits from the Home screen Deposit List using the Transmit Selected Deposits button.
94 Direct Merchant Smart Deposit SD4011001U

Chapter 3 Working With Deposits
4. Click either the View Deposit Receipt button or the Close button.
a. Click the View Deposit Receipt button to display the Deposit Detail Report for the selected deposit. This report provides an overall summary of the deposit and each captured item.
b. Click the Close button to exit the Transmission Summary window and return to the Home screen.
Once the deposit has been successfully transmitted and the Home screen displays, the deposit is listed under All Deposits with a status of Transmitted. If the deposit was not or could not be transmitted, it is still listed under All Deposits with its current status and can be returned to later, even if Smart Deposit exits.
Submitting
Once a deposit has been balanced, it is ready to be electronically submitted to the financial institution for processing.
An explanation of each button in the Deposit Ready window is provided below.
Submit Now - Initiates the submission of the deposit.
Submit Later - Exits the Balance and returns to the Home screen.
NOTE
Unlike virtual deposit tickets, virtual batch tickets are not included within a transmitted deposit. Each deposit received by the financial institution contains only the captured items and deposit tickets.
Smart Deposit User Guide 95SD4011001U
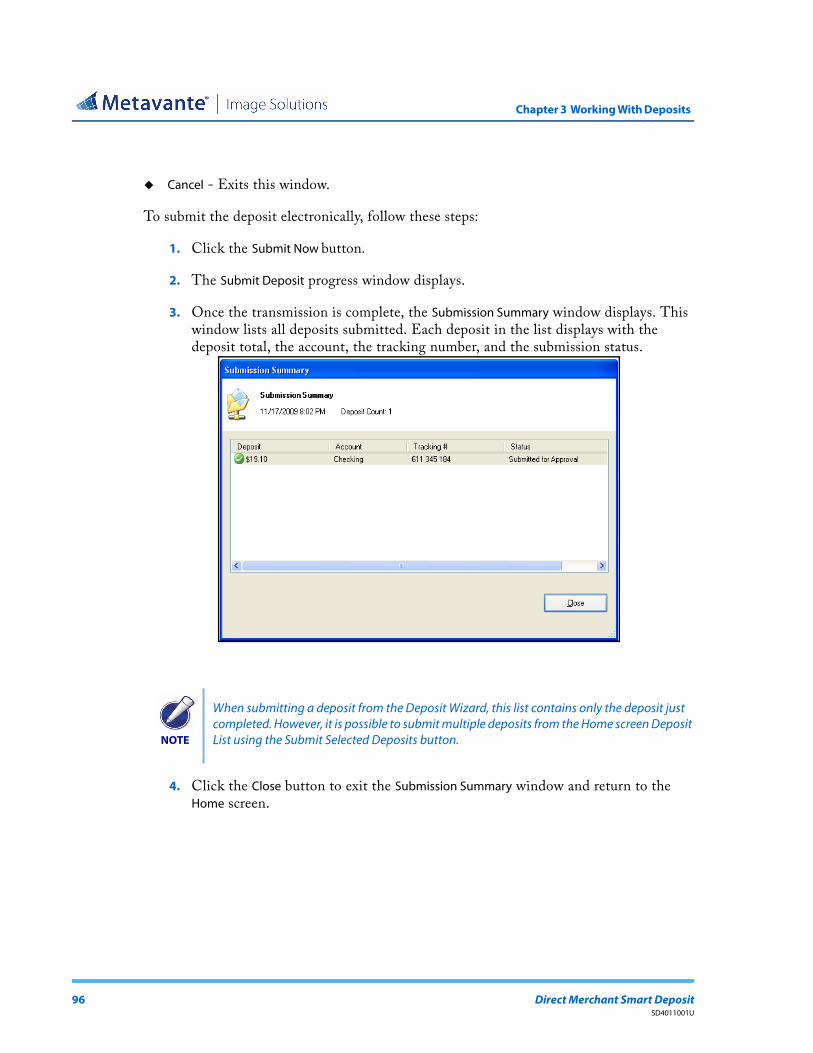
Chapter 3 Working With Deposits
Cancel - Exits this window.
To submit the deposit electronically, follow these steps:
1. Click the Submit Now button.
2. The Submit Deposit progress window displays.
3. Once the transmission is complete, the Submission Summary window displays. This window lists all deposits submitted. Each deposit in the list displays with the deposit total, the account, the tracking number, and the submission status.
4. Click the Close button to exit the Submission Summary window and return to the Home screen.
NOTE
When submitting a deposit from the Deposit Wizard, this list contains only the deposit just completed. However, it is possible to submit multiple deposits from the Home screen Deposit List using the Submit Selected Deposits button.
96 Direct Merchant Smart Deposit SD4011001U

Chapter 3 Working With Deposits
Once the deposit has been successfully submitted and the Home screen displays, the deposit is listed under All Deposits with a status of Pending. If the deposit was not or could not be submitted, it is still listed under All Deposits with its current status and can be returned to later, even if Smart Deposit exits.
Deposit Dates and Times
A deposit’s timestamp is updated with the time configured at the designated financial institution upon successfully transmitting the deposit. For more information, see Appendix A of this guide.
Modifying Existing Deposits
Any deposit that exists in the All Deposits section of the Home screen can be modified, as long as it does not have a status of Transmitted. When a deposit is modified, individual items can be added, removed and/or edited. Opening an existing deposit on the Home screen will go to the deposit's last completed state in the Deposit Wizard. Refer to the previous sections in this chapter for the available options.
Adding Items to a Previously Opened Deposit
1. Double-click the existing deposit within the Home screen to re-open the deposit in the Deposit Wizard.
2. Click Capture to go back to the Capture screen (if necessary).
NOTE
Unlike virtual deposit tickets, virtual batch tickets are not included within a submitted deposit. Each deposit received by the financial institution contains only the captured items and deposit tickets.
NOTE
Altering a deposit (such as adding or removing items) after balancing but before transmitting results in a message box informing you the existing virtual credit will be deleted and the deposit will require re-balancing. A new virtual credit with accurate information is created and displayed during re-balancing.
When using virtual payee endorsements, the ability to modify a deposit account is disabled after the deposit has been created. The deposit must be deleted and the items re-captured under the correct account in this scenario.
Smart Deposit User Guide 97SD4011001U

Chapter 3 Working With Deposits
3. Place the item(s) to be added into the scanner. The item(s) automatically begins to feed through the scanner and be captured within the current deposit.
4. Continue with the deposit as described in the Capturing Items section.
Deposit Statuses with Deposit Approval Enabled
When Deposit Approval is enabled, and you log in to Smart Deposit, the client checks on the status of pending deposits to see if the status of any of them has changed to Approved or Rejected. The Tools menu at the top of the screen contains an Update Approval Status option so that you can manually check for updates as well:
When you manually check the status a window displays, showing you the progress of the communication with the server:
98 Direct Merchant Smart Deposit SD4011001U
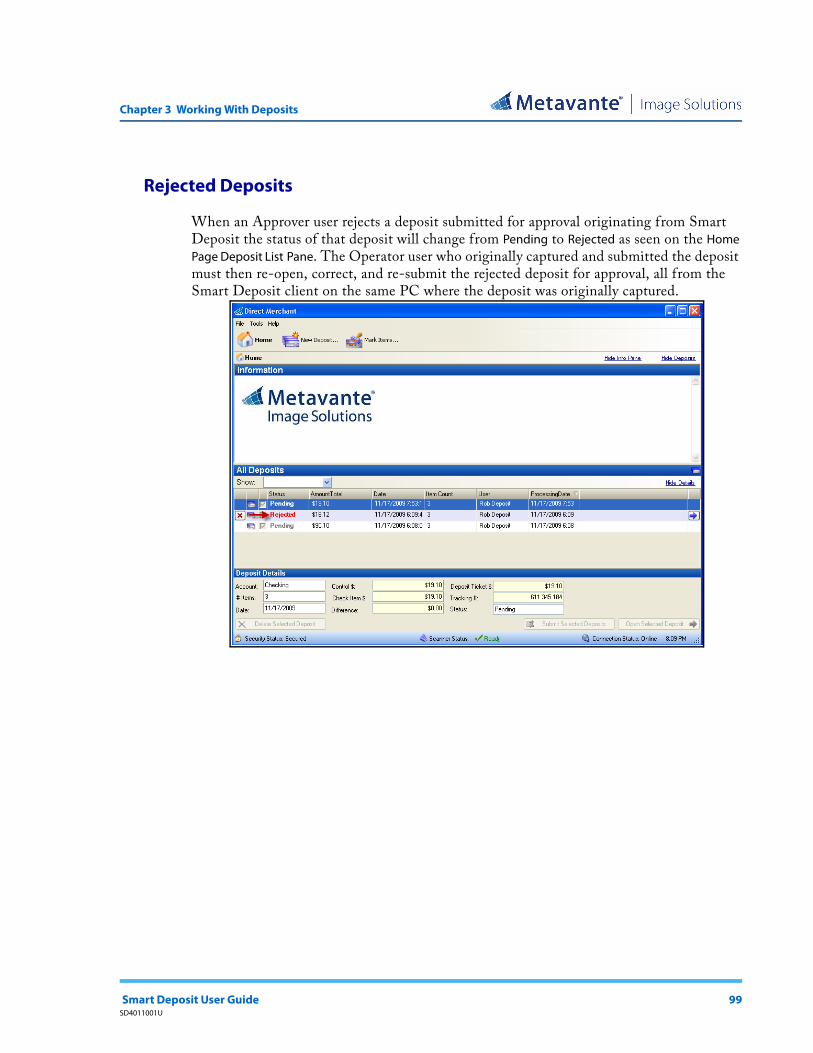
Chapter 3 Working With Deposits
Rejected Deposits
When an Approver user rejects a deposit submitted for approval originating from Smart Deposit the status of that deposit will change from Pending to Rejected as seen on the Home Page Deposit List Pane. The Operator user who originally captured and submitted the deposit must then re-open, correct, and re-submit the rejected deposit for approval, all from the Smart Deposit client on the same PC where the deposit was originally captured.
Smart Deposit User Guide 99SD4011001U

Chapter 3 Working With Deposits
When the Operator user re-opens a rejected deposit, the workflow starts over at the capture phase of the Deposit Wizard. The standard Deposit Wizard workflow still applies, except now there are Deposit Approval comments visible on the left-hand side towards the bottom of the Deposit Details Pane throughout the workflow. These comments should explain why the deposit was rejected and indicate how to correct the problem. If needed, additional items may be captured at this point in the Deposit Wizard.
100 Direct Merchant Smart Deposit SD4011001U

Chapter 3 Working With Deposits
Upon clicking the Next button, the Correction phase will be presented if additional items were captured that require correction followed by the Balance phase. After balancing a new Deposit Approval Comments dialog displays as part of the pop-up dialogs used to complete the deposit.
The Operator user must enter comments describing how the deposit has been corrected before submitting the deposit for approval. This way the Approver will know what to look for when re-evaluating the deposit. Lastly, after clicking the OK button on the Comments section, the Submit for Approval dialog displays as described in the Submitting section of this document.
ACH Opt - out
This feature gives merchants the ability to exclude items from Back Office Conversion (BOC), if provided. When this option is enabled by the service provider, Smart Deposit displays the required fields so merchants can flag items from customers selecting to opt-out of the ACH conversion process.
Opt-out (Exclusion) is available at both the deposit-level (all items) and the individual item-level.
Provides the ability to designate a deposit for which all items are opt-out items.
OR
Smart Deposit User Guide 101SD4011001U

Chapter 3 Working With Deposits
Provides the ability to designate specific items within a deposit (as opposed to designating the entire deposit) to be excluded from ACH conversion.
Workflow
1. When creating a New Deposit, the option of marking the entire deposit (all items) to be excluded from conversion is available.
102 Direct Merchant Smart Deposit SD4011001U
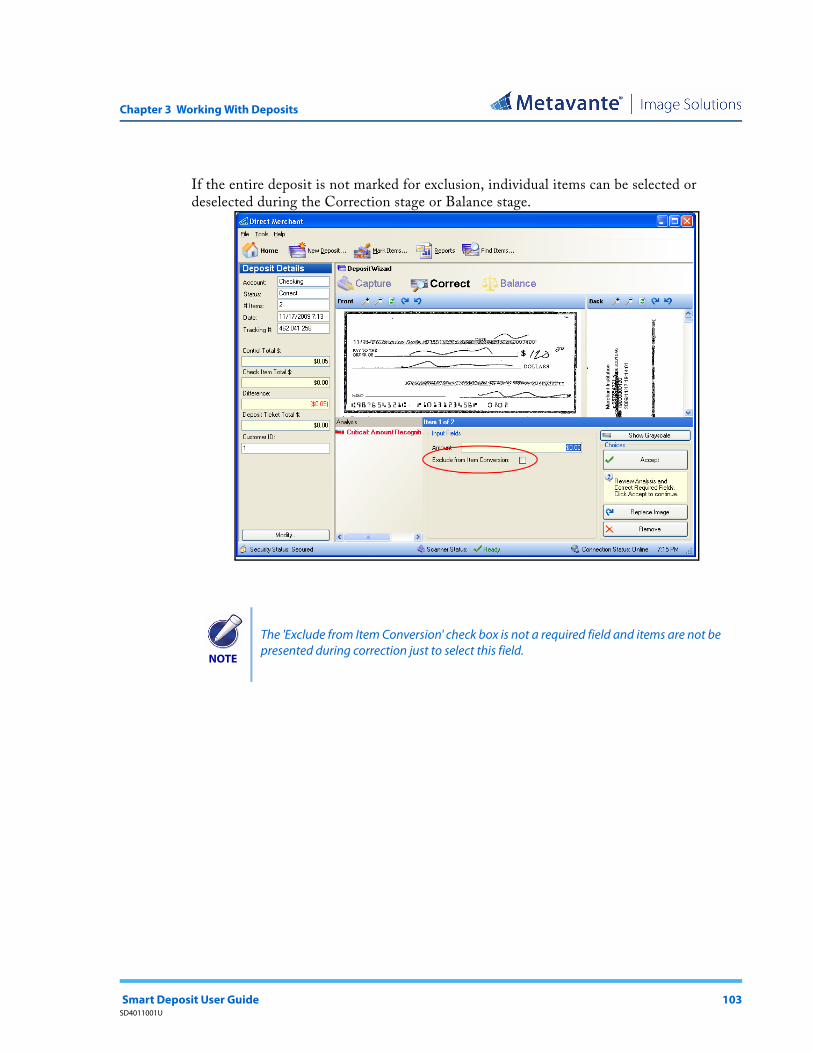
Chapter 3 Working With Deposits
If the entire deposit is not marked for exclusion, individual items can be selected or deselected during the Correction stage or Balance stage.
NOTE
The 'Exclude from Item Conversion' check box is not a required field and items are not be presented during correction just to select this field.
Smart Deposit User Guide 103SD4011001U

Chapter 3 Working With Deposits
2. Individual items can be selected or deselected for exclusion during the Balance stage.
3. The opt-out flag will be used for excluding items from being ACH conversion candidates when the deposit is received by the financial institution.
NOTE
The 'Exclude from Item Conversion' flag can be modified for an item at any time until the item is transmitted.
104 Direct Merchant Smart Deposit SD4011001U

Chapter 3 Working With Deposits
Coupon Capture
If supported by the service provider, Coupon Capture workflow allows associated payment coupons to be scanned along with checks for each deposit. When creating a new deposit, the option to scan Checks Only or to scan Coupons and Checks is available. When choosing Coupons and Checks, any item that does not contain a MICR line is interpreted as a coupon by the system.
Correcting Items
During the Correction phase, captured coupons are also presented for verification and data entry. Similar to check correction, some input fields may be required. There is the ability to select the item type (Check or Coupon) in cases where the item may have been identified incorrectly.
Intelligent keying is supported, as long as there is a one-to-one correspondence between a coupon and check. Depending on the configuration, amount reconciliation of coupons and checks may be enforced.
Smart Deposit User Guide 105SD4011001U

Chapter 3 Working With Deposits
Reconciliation
Smart Deposit visually indicates the reconcile status of coupons and checks and applies several definitions:
The transaction is not reconciled if the sum of all check amounts does not equal the sum of all coupon amounts. Conversely, the transaction is reconciled if the sum of check amounts equals the sum of coupon amounts.
If a transaction is not reconciled, the Reconcile field is shown in red for all items in the transaction. If the transaction is reconciled, the Reconcile field is shown in green.The Reconcile field contains an icon representing the state of the transaction.
Smart Deposit visually groups items by transaction.
106 Direct Merchant Smart Deposit SD4011001U

Chapter 3 Working With Deposits
Smart Deposit allows the amount field of both coupon and check items to be changed.
NOTE
If the System Administrator has set up Enforced Coupon Reconciliation, a deposit cannot transmit until all transactions are reconciled.
Smart Deposit User Guide 107SD4011001U

Chapter 3 Working With Deposits
108 Direct Merchant Smart Deposit SD4011001U
Direct Merchant Smart Deposit
Smart Deposit User Guide
Appendix ATechnical References
Deposit Time Stamp Updated During Transmission
Deposits are processed by your Financial Institution based upon the timestamp created when a deposit arrives at the server. When a deposit is successfully received by the Institution’s server the effective deposit time and date are set. This deposit timestamp will be reflected in all systems and reports at the Institution. In addition, the deposit timestamp will be updated within the Smart Deposit application on your PC. The date and time managed by your PC operating system will not be affected. The deposit time and date within Smart Deposit will be reflect when the deposit was received by your institution but translated into your local time zone.
Here are a few points to remember regarding the date and time of deposit transmission:
A deposit's timestamp within the application on the local PC is altered when the designated financial institution receives the transmitted deposit. This altered date and time reflects when the financial institution received the deposit.
The deposit's timestamp is displayed within Smart Deposit.
A successful deposit transmission will not alter the system date and time of your client PC.
If a deposit's timestamp is altered, then the updated time will reflect the local client PC's time zone.
If a deposit transmission fails, then the deposit's timestamp is not altered.
If you are configured for Deposit Approval, the date represents when the deposit was submitted for approval, and not when the deposit was approved.
Smart Deposit User Guide 109SD4011001U
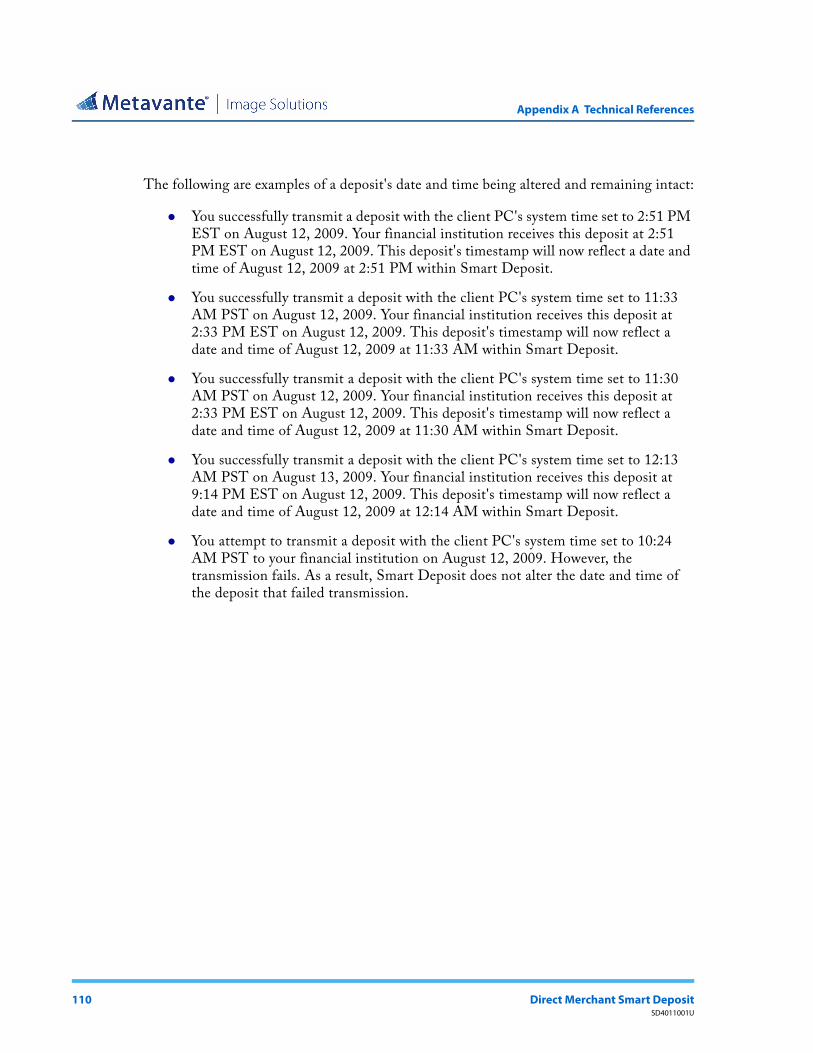
Appendix A Technical References
The following are examples of a deposit's date and time being altered and remaining intact:
You successfully transmit a deposit with the client PC's system time set to 2:51 PM EST on August 12, 2009. Your financial institution receives this deposit at 2:51 PM EST on August 12, 2009. This deposit's timestamp will now reflect a date and time of August 12, 2009 at 2:51 PM within Smart Deposit.
You successfully transmit a deposit with the client PC's system time set to 11:33 AM PST on August 12, 2009. Your financial institution receives this deposit at 2:33 PM EST on August 12, 2009. This deposit's timestamp will now reflect a date and time of August 12, 2009 at 11:33 AM within Smart Deposit.
You successfully transmit a deposit with the client PC's system time set to 11:30 AM PST on August 12, 2009. Your financial institution receives this deposit at 2:33 PM EST on August 12, 2009. This deposit's timestamp will now reflect a date and time of August 12, 2009 at 11:30 AM within Smart Deposit.
You successfully transmit a deposit with the client PC's system time set to 12:13 AM PST on August 13, 2009. Your financial institution receives this deposit at 9:14 PM EST on August 12, 2009. This deposit's timestamp will now reflect a date and time of August 12, 2009 at 12:14 AM within Smart Deposit.
You attempt to transmit a deposit with the client PC's system time set to 10:24 AM PST to your financial institution on August 12, 2009. However, the transmission fails. As a result, Smart Deposit does not alter the date and time of the deposit that failed transmission.
110 Direct Merchant Smart DepositSD4011001U