digitel user guide final · 3 introduction this digitel user manual is designed to guide you...
TRANSCRIPT

Revised 3/2011
DIGITEL SYSTEMS USER MANUAL

2
Contents
INTRODUCTION....................................................................................................... .3
Understanding the Workspace.................................................................... ....................................3
FEATURES............ .................... .................... .................... .................... ................ ..4
Features ...........................................................................................................................................4
Recording Calls on the System........................................................... ..............................................5
Setting up Classes of Services............................................................ ..............................................6
Setting up Conference Calls ..................................................... .......................................................7
Setting up Feature Codes .............................................................. ..................................................8
Setting up Hunt Groups ................................................................... ..... .........................................9
Setting up IVR Menus........................................................... ............ ..............................................10
Setting up Mailboxes ...................................................................... ... ............................................10
Adding/Deleting People (Users)....................................................... ...............................................11
Setting up Pickup Groups ................................................................ . ..............................................13
Setting up Public Numbers ............................................................. . ..............................................14
Setting up a Queue.......................................................................... ................................................15
Remote Accessing the System......................................................... ................................................16
Adding a New Telephone................................................................. ................................................16
Adding a Time Group...................................................................... .................................................18
SETTINGS ........... .................... .................... .................... .................... ..................19
Settings................................................................................................... .........................................19
Editing Customer Settings................................................................ ...............................................19
Editing Payment Settings................................................................. ................................................21
REPORTS ............ .................... .................... .................... ... .................... ............. ..22
Viewing Reports ................................................................................................................................22
VOICEMAIL .................... .................... .................... ............... .................... ............23
Accessing Voicemail ..........................................................................................................................23
TRANSFERRING AND CONFERENCING……….................... ....... ........................ .......... ..24
Transferring and Conferencing..........................................................................................................24

3
Introduction
This Digitel User Manual is designed to guide you through all the features and procedures that are available to you the user. The features you have available to you when you login depends on the plan you have purchased from Digitel.
It works like this:
Your user account lets you see only those features that you have permission to use.
If you need something that does not appear on your screen when you login, contact your salesman to request the service you require.
Understanding the Workspace Your personal user home page shows only those features that you are allowed to access.
There are three sections of the screen that are important:
1. The top right of the screen displays your user login name.
2. The center screen displays specific instructions that are relevant to you.
3. The menus to the left of the screen contain shortcuts that you need to perform your user functions.

4
Features
Understanding the Features Menu Digitel Systems features are grouped under the Features menu. You can view the available features by clicking Features from the list of menus to the left of the Reseller main workspace.

5
Recording Calls on the System To record a Call on the system:
1. Go to Features | Call Recording
2. Click
The New Record Group dialog appears.
1. 3. Name the group, fill in the fields and save.0.
Note: In some features of the system—such as Public Numbers and Telephones—
there is a field to designate a Record group. Once you pick a group all the calls on
that Telephone (for example) will be recorded, based on the parameters you have
set up for the recording group. Recorded calls are saved on the system. If you go
again to Features | Call recording, you can click on the Recordings link to the right
and see the list of your recordings, sort, listen and download them.
One convenient way of recording calls is to set up a Remote Access account (see
below) and then add a Recording group to the Remote Access account. That way
you can call into the system from any phone, get a dial tone, make a call and the
call is recorded. This is great for people on the road.

6
Setting up Classes of Services Classes of service allow you to control which numbers telephones may call. The called number is matched against the prefixes in the class of service, and the longest matching prefix is used. For example, calls to international numbers can be barred except for a single number which is specifically permitted. Alternatively, a single number can be barred if an employee is making unauthorized calls to it.
To set up a new class of service: 1. Go to Features | Classes of Service.
2. Click
The New Class of Service dialog opens.
3. Name the group, enter a description, and choose to allow/refuse internal
and external calls.
4. Click The new class of service is saved to the reseller user account.

7
Setting up Conference Calls To set up a new conference:
1. Go to Features | Conferences.
2. Click
The Conferences dialog opens.
PINs are found in the top half of the screen.
Note: You can require PINs for every participant; however, you must have a PIN for at least one participant.
In the bottom half of the page you can set the system to dial people when the conference is scheduled to start.
3. Select a Public Number (for more details on setting up a public number, see below).
4. Click the Public Number and go to the Default routing menu.
5. In the Features field, choose the Conference login.0.
Now anyone who dials that Public Number will be prompted to login to a conference. Give all participants the Conference code so they can login. In this way you can use a single access number for all conferences.
6. Click

8
Setting up Feature Codes Feature Codes are shortcuts that are specific to your users and let them access features easily such as voicemail.
To set up a new Feature Code (shortcut): 1. Go to Features | Feature Codes.
2. Click
The New Feature Code dialog opens.
3. Give the feature a code with an asterisk such as *770. Select from the
menus what you want as the default destination for the feature code. As a default all systems have these Feature codes activated (they do not appear on the list on the web interface.)
*1: Voicemail direct access.
*2: Voicemail login.
*3: Conference login.
*4: Auto-attendant.
*5: Number routing menu.
**: Group pickup
4. Click

9
Setting up Hunt Groups
Hunt Groups allow more than one destination to ring at once. Within a Hunt Group, destinations are arranged into levels. All destinations within a level are rung at once. If none answer, they stop ringing, and all destinations in the next level are rung, and so on.
To set up a Hunt group:
1. Go to Features | Hunt groups.
2. Click
The New Hunt Group dialog opens.
3. Enter the following:
A name for the Hunt Group.
How long each level rings for.
The Hunt Group type, which controls the order the levels are rung in.
The record group if you have any.
Add the destination to route calls to this hunt group to if none of the levels that you will define below answer.
4. Click the "Save" link. The new Hunt Group is saved.
5. Return to the list of Hunt Groups and select the Hunt Group you have just created.
6. Click the "Add a destination" link.
7. Choose the level and destination.
8. Click
9. (Optional) Repeat for other destinations as desired.0.

10
Setting up IVR Menus IVR menus present a menu to callers and invite them to press a key. It then forwards them to the destination you set for the key. Destinations can be other IVR menus, thereby allowing multiple levels of menu.
For the procedure for setting up IVR menus see: Virtual Switchboard Quick Start.
Setting up Mailboxes To set up a new a new mailbox:
1. Go to Features | Mailboxes.
Click
2. The New Mailbox dialog opens.
3. Enter the Mailbox number, description, owner, and PIN.
4. Click
5. The new Mailbox is saved to the reseller user account.

11
Adding/Deleting People (Users) To add a new Person:
1. Go to Features | People.
Click
2. The New Person dialog opens.
3. Enter the required information in the fields provided.
Note: Most of the fields are self-explanatory. The Customer pull-down
list includes User ID numbers currently assigned in the system.
4. Click
5. The new Person is saved.0.

12
To delete a Person:
1. Go to Features | People.
The People screen opens, displaying a list of people currently defined in your user account
2. Select the Person(s) you wish to delete.
3. Click
4. The selected Person(s) are deleted from your user account.0.
To edit a Person:
1. Open the People list.
2. Click on the name of the Person whose account you wish to edit.
3. Edit the details in the fields provided.
4. Click
The edited details for the Person are stored.0.
13
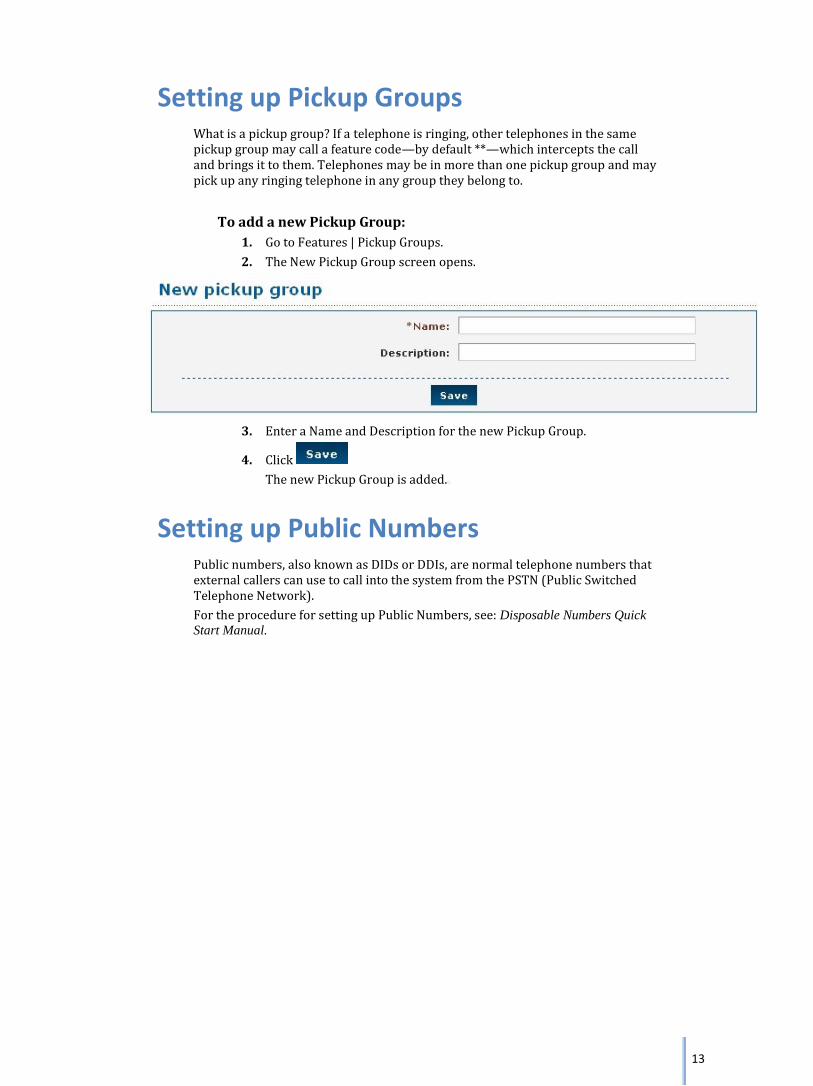
Setting up Pickup Groups What is a pickup group? If a telephone is ringing, other telephones in the same pickup group may call a feature code—by default **—which intercepts the call and brings it to them. Telephones may be in more than one pickup group and may pick up any ringing telephone in any group they belong to.
To add a new Pickup Group:
1. Go to Features | Pickup Groups.
2. The New Pickup Group screen opens.
3. Enter a Name and Description for the new Pickup Group.
4. Click
The new Pickup Group is added.0.
Setting up Public Numbers Public numbers, also known as DIDs or DDIs, are normal telephone numbers that external callers can use to call into the system from the PSTN (Public Switched Telephone Network).
For the procedure for setting up Public Numbers, see: Disposable Numbers Quick
Start Manual.
14
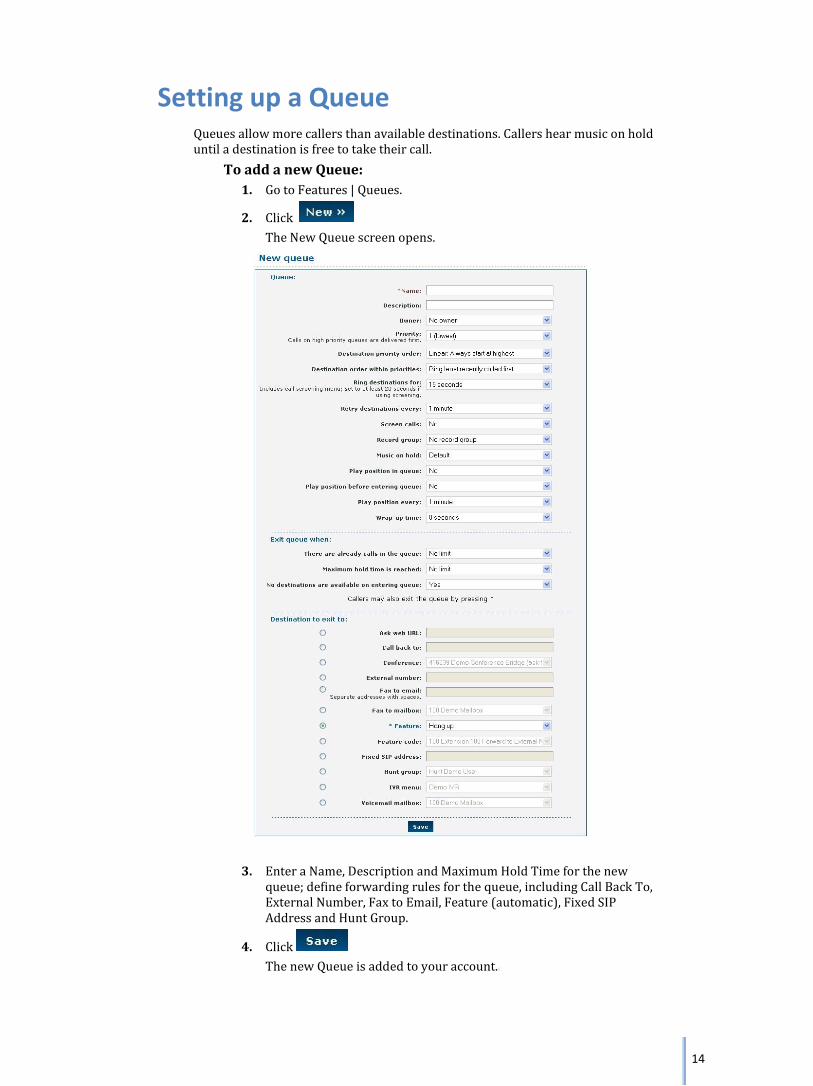
Setting up a Queue Queues allow more callers than available destinations. Callers hear music on hold until a destination is free to take their call.
To add a new Queue:
1. Go to Features | Queues.
2. Click
The New Queue screen opens.
3. Enter a Name, Description and Maximum Hold Time for the new queue; define forwarding rules for the queue, including Call Back To, External Number, Fax to Email, Feature (automatic), Fixed SIP Address and Hunt Group.
4. Click
The new Queue is added to your account.0.

15
Remote Accessing the System A Remote Access account allows you to call into the system and then to make calls out. This takes one of three forms: A Public number that you call, and a menu then asks you for a number to call.
This is the most common use for remote access; if in doubt use this type.
The system calls you back. You dial the remote access number from the number specified, and hang up once you hear it ring. The system will then call you at the number specified. Once you answer, you are asked for a number to call.
The system directly calls the number you dialed after stripping off the authentication prefix. This type is only used to accept outbound calls from customers' SIP devices that cannot use normal SIP authentication. In this case, the device can add a secret prefix to the called number. This option is usually not relevant.
For the procedure for creating a Remote Access account, see: Disposable Numbers
Quick Start Manual.
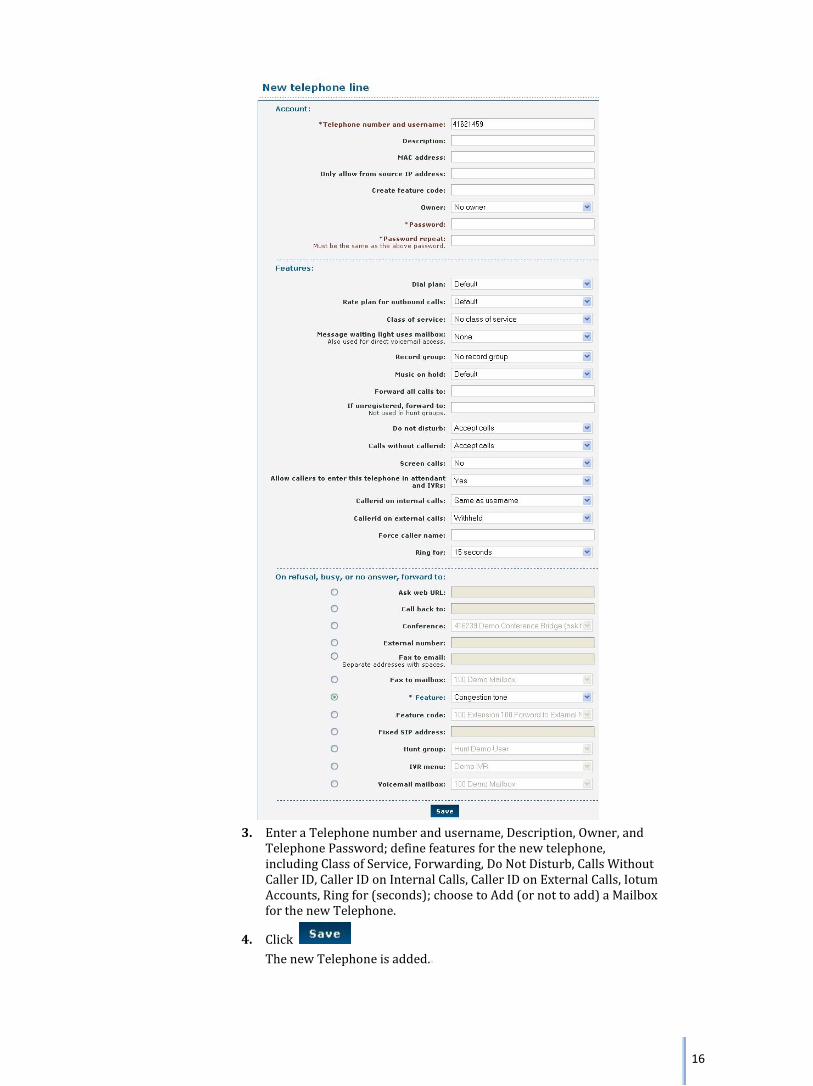
Adding a New Telephone Telephone accounts allow you to register an SIP telephone on the system and to make and receive calls.
To add a new Telephone:
1. Go to Features | Telephone Lines.
2. Click
The New Telephone screen opens.
16
3. Enter a Telephone number and username, Description, Owner, and Telephone Password; define features for the new telephone, including Class of Service, Forwarding, Do Not Disturb, Calls Without Caller ID, Caller ID on Internal Calls, Caller ID on External Calls, Iotum Accounts, Ring for (seconds); choose to Add (or not to add) a Mailbox for the new Telephone.
4. Click
The new Telephone is added.0.

17
Adding a Time Group Time Groups allow public numbers and feature codes to be routed to different destinations at different times of the day or days of the week
To add a new Time Group:
1. Go to Features | Times and Dates.
2. Click
The New Time Group screen opens.
3. Enter a Name, Description, and Priority for the new Time Group.
4. Click
The new Time Group is added.0.

18
Settings
Settings Users are able to set up global commercial settings via the functions contained in the Settings menu.
Editing Customer Settings To edit your customer settings:
1. Go to Settings | Customer.
The Customer Settings screen appears.

19
2. Enter a Primary Contact, Tax Reference Number and Invoice Currency.
(Optional)
3. Enter Low Balance actions: Email when balance drops below..., and
Automatically top up balance when this happens by ...
4. Enter Billing Address in the fields provided.
5. Click
6. The edited customer settings are saved.0.

20
Editing Payment Settings
To edit your payment settings:
1. Go to Settings | Payment.
The Edit Your Payment Details screen opens.
2. Enter Credit Card Details in the fields provided: Credit card type, Name on credit card, Credit card number, Card expires, and Verification number.
3. Click
The edited payment details are saved to the Reseller user account.0.

21
Reports
Viewing Reports The user is provided with a number of preset reports.
To view reports:
1. Go to Reports.
The List of Reports opens.
The reports can be understood as follows:
Active Calls— Shows calls in progress when the page is loaded. By default, this shows calls for telephones in your own customer. If you are logged in as a reseller, you can also view calls for your customers
Call History — Shows calls which have finished. It has the same options for customers as active calls, plus options to select customers by billing type.
Invoices — Shows invoices which have been saved permanently.
Transactions — Shows any changes to customers' balances which are not associated with calls.
View Rate Plan — This report has no filter or sort options.
2. Select the report you wish to view.0.

22
Voicemail
Voicemail Structure Dial into Voicemail: 1: Listen to voicemail messages
3: Advanced options
1: Reply
3: Envelope
4: Play previous message
5: Repeat current message
6: Play next message
7: Delete current message
8: Forward message to another mailbox
9: Save message in a folder
*: Help; rewind during message playback
#: Exit; skip forward during message playback
2: Change folders
A menu is then played of existing folders
#: Exit
3: Advanced options
5: Leave a message
*: Return to the main menu
0: Mailbox options
1: Record your unavailable greeting
2: Record your busy greeting
3: Record your name
4: Record your temporary greeting
5: Change your password
*: Return to the main menu
*: Help
#: Exit
To create the temporary greeting: 1. Dial *1 from your phone.
2. Press 0
3. Press 4
4. Record temporary greeting and follow instructions. Press #.
5. Press 1
6. Hang up

23
To delete the temporary greeting:
1. Dial *1 from your phone.
2. Press 0
3. Press 4
4. Press 2
5. Hang up
To access your messages via telephone:
1. Dial the voicemail access feature code (*1 by default). If your telephone
forwards to a mailbox you will be logged in automatically. If not, you will be
asked for a mailbox and password. Alternatively, dial
the voicemail login feature code, and you will always be asked for a mailbox
and password.
2. Follow the prompts to navigate the menus.
To access your messages via remote location (i.e.: cell phone, home
phone, etc.) 1. Dial into your office
2. During greeting (Thank you for calling….) enter *864 (*VOI- a good way to
remember).
3. Enter mailbox number (your extension)
4. Enter PIN

24
Transferring and Conferencing
Transferring To transfer a call: (Caller is announced prior to transfer)
1. Press Transfer
2. Dial Number
3. Press Transfer again after announcing the transfer.
To blind-transfer a call: (Caller is not announced prior to transfer)
1. Press Transfer
2. Press Blind Transfer
3. Dial Number
Conferencing To conference a call:
1. After call is accepted/dialed press Conference
2. Dial Number
3. Press Conference again.
4. Conference timer will now appear.