digitek - innovative energy ideas
TRANSCRIPT

1
DIGITEK
MOTOR CONTROLLER For Standard 60 Hz AC and Squirrel-cage Motors
Technical Handbook
DIGITEK-IIIAC CC-16556
For Air Compressors
SOFT START ENERGY SAVING
MOTOR PROTECTION
Innovative Energy Ideas
www.ienergyideas.com 800.234.1877

2
TABLE OF CONTENTS
1. About DIGITEK 2. Features 3. Specifications 4. Models 5. Installation 5.1 Safety Guideline 5.2 Notes on Installation 5.3 Installation Diagrams 5.3.1 Conventional Air Compressor with Air Tank 5.3.2 Air Compressor with DIGITEK-IIIAC 5.3.3 Wiring Diagram for Control Wires 6. Setup and Operation 6.1 LCD Display 6.2 Choice of Parameters 6.3 Setup Procedures 6.4 Operation Procedures 6.5 Phase Loss Protection 6.6 Over Current Protection 6.7 Energy Saving Adjustments
Appendices Appendix A: Horse Power, Kilowatt, Rated Voltage and Rated Current of a Motor Appendix B: Hex Numbers VS Decimal Numbers

3
1. About DIGITEK
Rapid development of industry and luxurious raise of living standard make the energy shortage a worldwide concern. Even worse, much of the energy is wasted. The energy consumed by induction motors is one of the vivid examples that a lot of energy is unnecessary wasted. As early as 1977, it was already pointed out by NASA scientists that an induction motor often consumes more energy than needed.
Since its inception, Digitek has focused its resources on developing energy saving devices for induction motors. With our strong multinational research and development team, we began to have our basic energy saving device available in the market. Though, our products had been quickly accepted in the market in a very short time, we understood the need to further develop more specialized products for better applications. Our first successful unit was that for the oil pump jack. With the help of many oil companies worldwide, we had developed a special unit for oil pump jack. This unit is now widely used in many oil fields. Currently we are working on a new oil pump jack energy saving device, DIGITEK-IIIOP, for wider range of application.
We had then further developed a unit suitable for single-phase coolers and freezers. This unit was designed by taking into account of the operational features of refrigeration compressors. This unique unit can save energy more than 20%, depending on the design of the coolers and freezers. The application of this unit is rapidly growing. It not only helps saving energy, but also provides many protections for refrigeration compressors. As a result, some of the traditional protection devices are not needed. This design has patents from the United States and many other countries. Many of the well-known companies including many distributors of Coca Cola in many regions have already installed this unit in their coolers, in order to save energy, to enhance their ecology protection image, and to strengthen their market competition power.
We have now developed a three-phase motor control device, DIGITEK-IIIGS, with features including soft start, energy saving, phase loss protection, low and high voltage protection, over current protection, remote motor start-stop control and external bypass. The patent for this design is under pending in many countries. Based on this sophisticated system, we now have further developed a most efficient energy saving control system, DIGITEK-IIIAC, for three-phase medium size air compressors with air reservoir. When the motor is running with air compressor loaded, DIGITEK-IIIAC saves energy according to the load of the motor. On the

4
other hand, when the motor is running with the compressor unloaded, instead of keeping the motor running as in the conventional case, DIGITEK-IIIAC stops the motor completely. The soft start allows a compressor to start and stop frequently. This design has patents from the United States and many other countries.
In addition to motor controllers described above, we have developed energy saver specifically for fluorescent and HID lighting system. For power supply at rated voltage, this device can save energy 15 % or more. With this energy saving device, DIGITEK-ILT, the luminosity is kept to that required by lighting system designed. It also prolongs the life span of the lighting devices. This design is under patent pending in many countries.
Digitek Technology is a company committed to the development of best energy saving motor control system. We emphasize on energy saving devices for specific applications in order to enhance the energy saving efficiency, the motor protection capability and the power supply stability. We have strong research and development team, efficient production facilities and rapid growing of worldwide marketing network.
2. Features
DIGITEK-IIIAC is specially designed for three-phase medium size air compressors, mainly in the range of 30 to 100 hp or 22 KW to 75 KW, depending on the voltages, with extensive unloaded time. When a compressor has a very long unloaded time, it might be stopped completely. However, there are compressors loaded and unloaded a few time per hour with extensive unloaded time. To avoid inrush current contamination on the power network, the compressors are usually left running unloaded. The DIGITEK-IIIAC can automatically stop the motor when the maximum pressure is reached and restart the motor with soft-start when the pressure is below the minimum pressure. By doing so, the power consumption during the unloaded period is 100% saved without power network contamination.
In addition to the feature of complete stop during the loaded period, DIGITEK-IIIAC also has the general features of the DIGITEK-IIIGS, such as low voltage protection, high voltage protection, over current protection, phase loss protection, but without remote motor start-stop control and external bypass.
Energy saving Soft-start Low voltage protection
High voltage protection Over current protection Phase loss protection

5
3. SPECIFICATIONS
Input power voltage: Three Phase 220V / 380V / 440V / 480V ±10% Rated current: 60A / 90A / 120A / 180A / 250A
Input power frequency: 60Hz ±10% Ambient temperature: -40ºF ~ 113ºF (-40ºC ~ 45ºC) Low voltage protection:
Rated Voltage Low Voltage Resuming Saving V
220V 195V 205V
380V 345V 355V
440V 405V 415V
480V 440V 450V
*When the input voltage is equal or below the low voltage specified above, the output voltage is the same as the input voltage and there is no saving.
High voltage protection:
Rated Voltage High Voltage
220V 290V
380V 490V
440V 570V
480V 620V
*When the input voltage is equal or higher than the high voltage, DIGITEK-III stops the output and stops the motor. The motor will not be restarted automatically again.
6
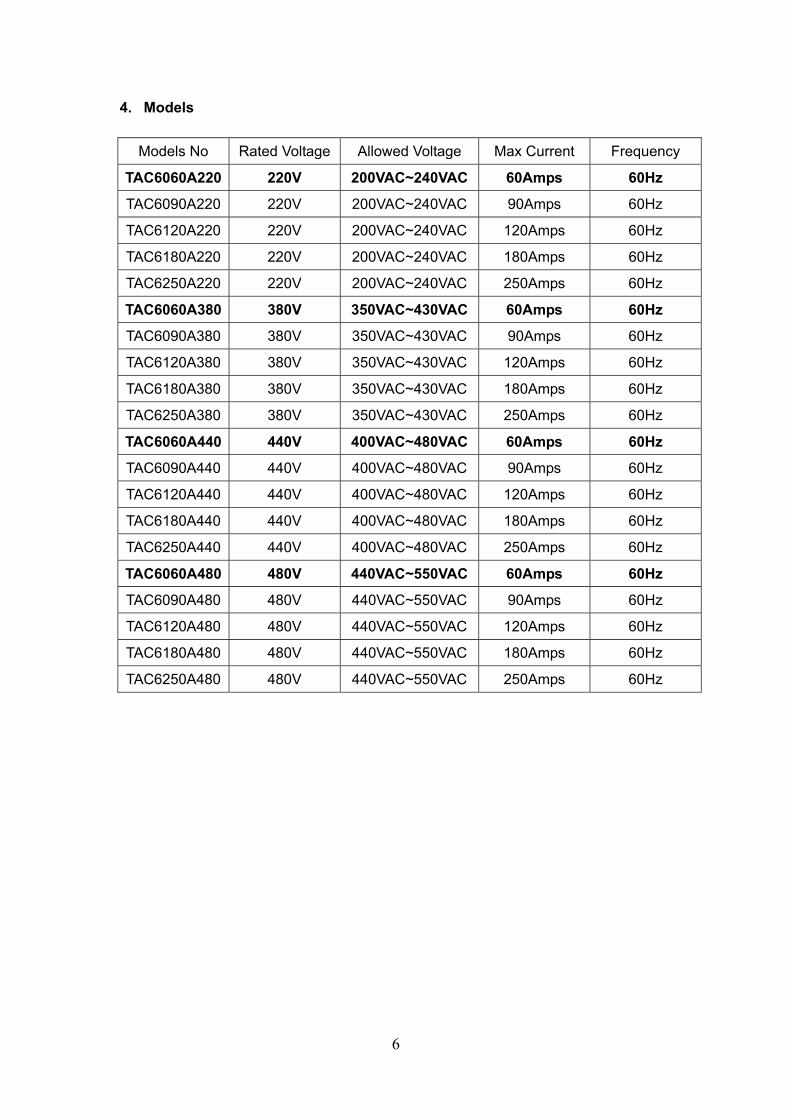
4. Models
Models No Rated Voltage Allowed Voltage Max Current Frequency
TAC6060A220 220V 200VAC~240VAC 60Amps 60Hz
TAC6090A220 220V 200VAC~240VAC 90Amps 60Hz
TAC6120A220 220V 200VAC~240VAC 120Amps 60Hz
TAC6180A220 220V 200VAC~240VAC 180Amps 60Hz
TAC6250A220 220V 200VAC~240VAC 250Amps 60Hz
TAC6060A380 380V 350VAC~430VAC 60Amps 60Hz
TAC6090A380 380V 350VAC~430VAC 90Amps 60Hz
TAC6120A380 380V 350VAC~430VAC 120Amps 60Hz
TAC6180A380 380V 350VAC~430VAC 180Amps 60Hz
TAC6250A380 380V 350VAC~430VAC 250Amps 60Hz
TAC6060A440 440V 400VAC~480VAC 60Amps 60Hz
TAC6090A440 440V 400VAC~480VAC 90Amps 60Hz
TAC6120A440 440V 400VAC~480VAC 120Amps 60Hz
TAC6180A440 440V 400VAC~480VAC 180Amps 60Hz
TAC6250A440 440V 400VAC~480VAC 250Amps 60Hz
TAC6060A480 480V 440VAC~550VAC 60Amps 60Hz
TAC6090A480 480V 440VAC~550VAC 90Amps 60Hz
TAC6120A480 480V 440VAC~550VAC 120Amps 60Hz
TAC6180A480 480V 440VAC~550VAC 180Amps 60Hz
TAC6250A480 480V 440VAC~550VAC 250Amps 60Hz

7
5. Installation
5.1 Safety Guidelines
a. Before installing the DIGITEK-IIIAC Motor Controller, make a thorough visual inspection of the unit for signs of damages as a result of shipping or handling.
b. Verify that proper circuit breakers (fuses) required for protecting the wiring and load are installed on the AC Input side of the unit. The DIGITEK-IIIAC motor controller starts the output to start the motor 3 seconds after the input power is switched on. As a consequence the possible damage on the contactor at close due to the high inrush current can be avoided.
c. The DIGITEK-IIIAC should be installed and adjusted by qualified technicians. d. Before switching on the power, all the wiring should be thoroughly inspected to
make sure that all of the wirings are properly and correctly connected.
5.2 Notes on Installation
a. Choose the right DIGITEK-IIIAC model according to the size of the motor of the air compressor. The rated current of the DIGITEK-IIIAC motor controller should be higher than that of the motor of the air compressor.
b. Mount DIGITEK-IIIAC at a proper location sturdily with good ventilation. c. Use copper connection wires for better signal transmission. d. Adhere to all requirements applicable to this type of installation as specified in
National Electrical Code (NEC). Strict compliance to state and local codes should also be observed.
e. DIGITEK-IIIAC should be installed as close to the motor as possible to retain clear signal transmission.
f. Avoid electronic devices between the DIGITEK-IIIAC and the motor to avoid signal interference. All control wires should be connected before DIGITEK-IIIAC or should have independent power supply in order to maintain proper voltage supply to the contactors.
g. DIGITEK-IIIAC should not be used with inverter to avoid serious damage. h. The energy saving percentage is larger at lower load. The same machines
with the same load might result in different energy savings.

8
5.3 Installation diagrams 5.3.1 Conventional air compressor with air tank
Fig.5.a
Fig. 5.b As shown in Fig. 5.a, a conventional air compressor usually has a pressure relieve valve. When the maximum pressure is reached, the relieve valve opens and the compressor stops pumping air into the tank. However the motor continues to run with compressor unloaded. As shown in Fig. 5.b, a solenoid pressure relieve valve controlled by a pressure switch can also be used.
.
.M
R S T
Air Tank
Pressure Relieve Valve
AC
P
Check Valve
M
.
R S T
. Air Tank
Solenoid PressureRelieve Valve
P Pressure Switch
Check Valve

9
5.3.2 Air compressor with DIGITEK-IIIAC
Fig. 5.c For the case of Fig. 5.a
a. Disconnect the pressure controlled relieve valve from the inlet pipe to the tank.
b. Replace the pressure controlled relieve valve with solenoid pressure relieve valve.
c. Connect the control wires of the solenoid pressure relieve valve to the DIGITEK-IIIAC as shown Fig. 5.d.
d. Install a pressure switch to the inlet pie to the tank. e. Connect the open-close control wires of the pressure switch to
the DIGITEK-IIIAC as shown in Fig. 5.d. For the case of Fig. 5.b
Simply connect the solenoid pressure relive valve and the pressure switch separately to the DIGITEK-IIIAC as shown in Fig. 5.d.
M
.
R S T
. Air Tank
Solenoid Pressure Relieve Valve
AC
P
DIGITEK-IIIAC
Pressure Switch
Check Valve

10
5.3.3 Wiring diagram for the control wires
Fig. 5.d
SPRV: Solenoid pressure relieve valve Type of SPRV :
a. When the pressure switch is open(off), the pressure relieve valve is open ― A connection.
b. When the pressure switch is open(off), the pressure relieve valve is closed ― B connection.
PS: Pressure switch
Air Compressor
R S T
R S T
R S T
DIGITEK-IIIAC
AC IN
SPRV PS
AC input forSPRV
CT
CT
CT
A B

11
6. Setup and Operation
6.1 LCD Display
Page Function Range Default Setting
Front Page Software No. CC-16556
Status 1 Status Indication 1
Status 2 Status Indication 2
P01 Soft Start Set On Off Off
P02 Start Voltage 10 54 32
P03 Soft Start Time 01 3C 05
P04 *Kick Set
P05 *Kick Voltage
P06 *Kick Time
P07 Power On Time 05 FF 05
P08 *Soft Stop Set
P09 *Stop Voltage
P10 *Soft Stop Time
P11 Optimum Autosave 58 78 60
P12 Max Voltage Drop 30 54 54
P13 Semiauto V Drop 05 54 05
P14 *Ext Bypass Set
P15 Full V Current 14 20 20
P16 Low Voltage 46 6E 5C
P17 Over Voltage 6E 96 84
P18 **Pressure Switch
P19 *Over Load Bypass
P20 **Rapid V Recovery
P21 **C I Sensitivity
P22 **Auto S Response
*All parameters are IN hex system: 00, 01, 02, 03, 04, 05, 06, 07, 08, 09, 0A, 0B, 0C, 0D, 0E, 0F 10, 11, 12, 13, 14, 15, 16, 17, 18, 19, 1A, 1B, 1C, 1D, 1E, 1F and so on. *Features P04, P05, P06, P08, P09, P10, P14 and P19 are not applicable for DIGITEK-IIIAC. ** P18, P20, P21 and P22 are preset and can not be altered.

12
6.2 Choice of Parameters Frontage:
XXX A ~ Rated current of DIGITEK-IIIAC, f. g., 120 A is for DIGITEK-IIIAC with rated current 120 A.
Status 1:
S ~ Set Soft Start On. P ~ Set Power On Time On. R ~ Pressure switch function is preset to On and can not be changed. Lv ~ Lv appears when input voltage is over low (P16) and disappears when voltage
returns to saving mode. Fc ~ Fc appears when the current is under full voltage operation (P15) and
disappears when saving mode is resumed. Ci ~ Ci appears when current is rapidly increased (P21). Pl ~ Pl appears when there is phase loss and disappears when the phase loss is
corrected whitin 30 seconds.
Status 2:
F=XX ~ Input power frequency, f. g., for input power frequency of 60, it shows F=3C. Ov ~ Ov appears when the motor is stopped due to over high voltage (P17). Oc ~ Oc appears when the motor is stopped due to over current. Ps ~ Ps appears 30 seconds after phase loss occurred.

13
Pr ~ Pr appears when the air compressor pumping air into air tank.
P01: Soft Start Set
Set at On to start the motor with soft-start. Default setting: Off.
P02: Start Voltage
a. The range for start voltage: 10 ~ 54. b. Default setting: 32. c. The smaller the parameter is, the large the starting voltage is. The choice of
this parameter depends on the size of the motor and the load of the motor at start. Usually 40 with some fine adjustment might be good for motors under 100 Hp without load or with low load.
d. When the starting voltage is too low, the initial torque might be too small to start the motor. On the other hand, when the starting voltage is too high, it reduces the soft start effect and the starting current might not as low as wanted.
P03: Soft Start Time
a. Range for soft start time setting: 01 ~3C. b. Default setting: 05. c. 01 means 1 second for soft start time. Each increment is for 1 second up to

14
60 seconds. The soft start time should be enough for completing the soft start. Usually 5 to 10 second should be enough.
P04: Kick Set
No applicable for DIGITEK-IIIAC.
P05: Kick Voltage
No applicable for DIGITEK-IIIAC.
P06: Kick Time
No applicable for DIGITEK-IIIAC.
P07: Power On Time
a. Range for Power On Time setting: 00 ~ FF. b. Default setting: 05. c. After the soft start is completed, one can have the power on time for the motor

15
to run smoothly before entering into saving mode. Each increment is 1 second up to 225 seconds. For example, 05 means that 5 seconds after the completion of the soft start it enters the saving mode. i. 1 ~ 30 seconds: increase 1 increment, i.e. 1 second, at a time. ii. 30 ~ 255 seconds: increase 2 increments, i.e.2 seconds, at a time.
d. After the completion of soft start, the air compressor starts to pump air into the air tank.
e. If the Power On Time is set 00, i.e. no power on time, the pressure relieve valve can not be closed and the air compressor will not pump air into the air tank.
P08: Soft Stop Set
No applicable for DIGITEK-IIIAC.
P09: Soft stop voltage
No applicable for DIGITEK-IIIAC.
P10: Soft Stop Time
No applicable for DIGITEK-IIIAC.

16
P11: Optimum Autosave
a. This is for optimum saving adjustment in the automatic saving mode. b. Range for optimum Autosaving setting: 58 ~ 78. c. Default value: 60. d. On the automatic saving mode, one can make a fine-tuning to get the overall
best saving. For lower “Optimum Autosave” parameter the energy saving is better for all loads. However, to ensure the motor operates smoothly, one may set it at the 60.
P12: Maximum Voltage Drop
a. Range for maximum voltage drop: 30 ~ 54. b. Default setting: 54. c. The maximum voltage drop is the maximum voltage drop at the lowest load.
Usually we allow the output voltage to drop as much as possible in order to obtain the largest saving. Sometime when the maximum voltage is set too low, it might not function properly at high load.
d. For air compressor application, use of default value 54 is suggested.
P13: Semiauto V Drop
a. Range for Voltage drop setting at semiautomatic saving mode: 05 ~54.
b. Default setting: 05. c. This is the output voltage setting for semiautomatic saving mode.

17
When the load is far from full load when the air compressor is at pumping mode, one may set the voltage drop to get the best energy saving. The larger the parameter is, the larger the voltage drop is. When the voltage is lower, the current is also lower and so the energy saving is larger. However, if the voltage drop is too large, instead of decreasing accordingly, the current will increase. Then instead of saving energy, it might consume more energy.
P14: Ext Bypass Set
Not applicable for air compressor application.
P15: Full V Current
a. Range for full voltage current setting: 14 ~20. b. When the load is close to full, there is small possibility for energy saving. To
make sure that the motor will continue to operate smoothly near full load, the motor operates with full voltage near full load.
c. Full load current in hex system is 20, equivalent to 32 in decimal system. Default full voltage current setting is 20 in hex system, equivalent to 32 in decimal system or rated current of the DIGITEK-IIIGS unit. In most of the cases this should be a good setting.
d. When the motor is running with full voltage current Fc appears. Otherwise Fc disappears.

18
P16: Low Voltage
a. Range for Low voltage protection setting: 46 ~6E. b. Default setting: 5C. c. When voltage is below the low voltage value, the saving mode will be switched
off and the output voltage will be the same as the input voltage. One may alter the low voltage setting by increase or decrease the parameter. However, to alter the low voltage value it is important to consult with qualified technician. When the input voltage returns to the resuming voltage or higher, it reenters into the saving mode.
Rated Voltage Low Voltage Resuming Saving V
220V 195V 205V
380V 345V 355V
440V 405V 415V
480V 440V 450V
P17: Over Voltage
a. Range for over voltage protection setting: 6E ~ 96. b. Default setting: 84. c. When the input voltage is higher than the high voltage DIGITEK-IIIGS will stop
the output and stop the motor immediately. The motor will not be automatically restarted when the voltage is returned to the voltage lower than the high voltage.
19
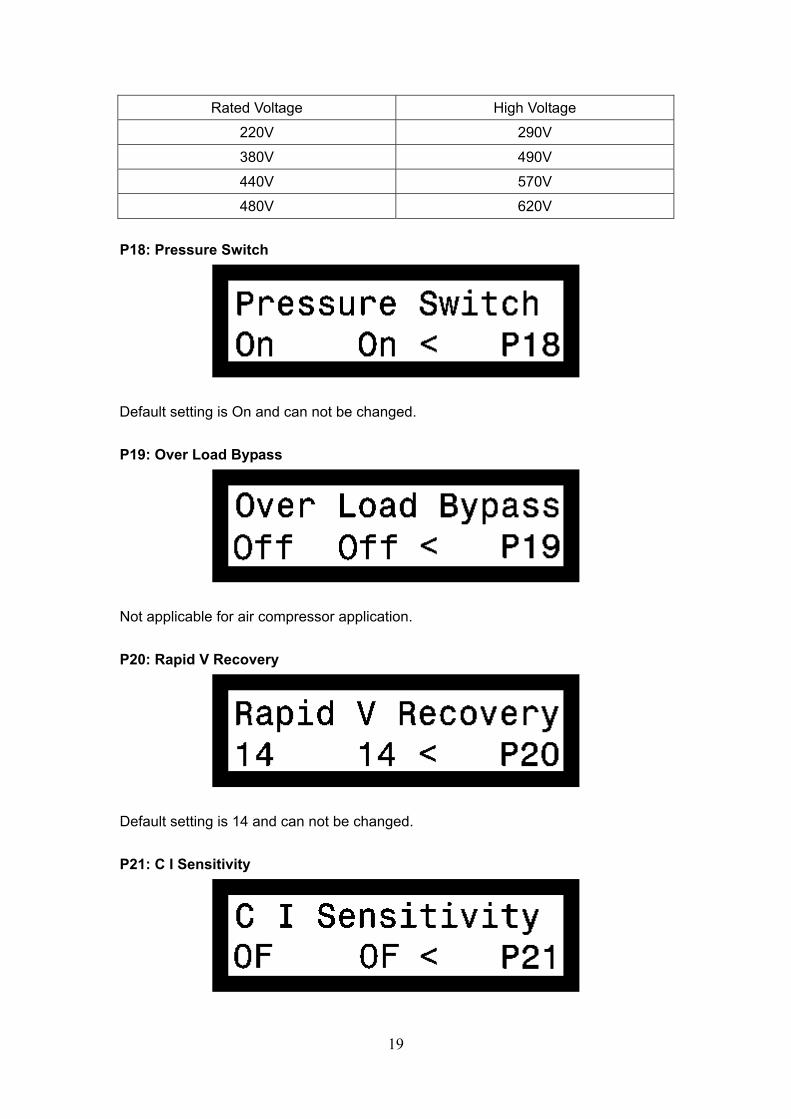
Rated Voltage High Voltage
220V 290V
380V 490V
440V 570V
480V 620V
P18: Pressure Switch
Default setting is On and can not be changed.
P19: Over Load Bypass
Not applicable for air compressor application.
P20: Rapid V Recovery
Default setting is 14 and can not be changed.
P21: C I Sensitivity

20
Default setting is 0F and can not be changed.
P22: Auto S Response
Default setting is 01 and can not be changed.
6.3 Setup Procedures Control keyboard:
AUTO\MANUAL:
When the AUTO\MANUAL is keyed in and the LED light on the far left is on, the motor will be started automatically by switching on the DIGITEK-IIIAC input power: After the DIGITEK-IIIAC input power is switched on, key in “Auto\manual” to automatic starting mode, i.e. the LED light on the far left is on, then hit “START” key to start the motor. The motor will be stopped as the input power is switched off. When the input power is switched on again, the motor will be restarted automatically again.
START: At automatic start mode, key in “START” for the first time start after the input power is switched on. When the motor is stopped by turning off the input power,
STATUS ENTER FULL V
DIGITEK ON
START AUTO
MANUAL
SAUTOMANUAL
PR VALVE CLOSE
DIGITEK
MOTOR CONTROLLER
DIGITEK-IIIAC
LCD
LED

21
it can be restarted automatically by turning on the input power.
PR VALVE CLOSE:
a. At manual starting mode, use this key to check if the loading and unloading of the pressure relieve valve work properly.
b. At manual starting mode, set the “PR VALVE CLOSE” ON to close the pressure relieve valve and the air compressor pumps air into the air tank. On the other hand, set the “PR VALVE CLOSE” OFF to open the pressure relieve valve and the air compressor does not pump air into the air tank. In doing this test, it is not necessary to start the motor.
SAUTO\MANUAL:
Hit “SAUTO\MANUAL” for automatic saving or semiautomatic saving. When the LED at the far left is on, it is at the automatic saving mode, otherwise it is on the semiautomatic saving mode. In this unit only automatic saving mode is operative.
DIGITEK ON:
a. At automatic starting mode, set “DIGITEK ON” on, i.e. the LED is on, to start the motor and set the “DIGITEK ON” TO STOP THE MOTOR.
b. When the motor is running, the LED of “DIGITEK ON” is always on. One can place “DIGITEK ON” to turn off the LED and stop the motor.
c. Automatic start and manual stop: To stop the motor manually, while the motor was started with automatic starting mode, set ”AUTO\MANUAL” off to switch from automatic starting mode to manual starting mode, and then set “DIGITEK ON” off.
FULL V:
When this key is hit with the LED on the left on, the output is always with full voltage, the same as the input voltage.
STATUS:
Hit this key to go to the status page.

22
ENTER:
After the new parameter value is selected, hit ENTER for the new parameter setting.
⇒ : Hit this key to go to previous page. ⇐ : Hit this key to go to the next page. ⇑ : Hit this key to increase the parameter value. ⇓ : Hit this key to decrease the parameter value.
Notations:
【AUTO\MANUAL】~ On Automatic start mode, LED on.
(AUTO\MANUAL) ~ On manual starting mode, LED off. 【SAUTO\MANU】~ On automatic saving mode, LED on.
(SAUTO\MANU) ~ On manual saving mode, LED off. 【START】~ Hit the “Start” to start the motor on automatic starting mode.
【DIGITEK ON】~ LED is on and the motor is running.
(DIGITEK ON) ~ LED is off and the motor is stopped. When the motor is running, one can stop the motor by switching off “DIGITEK ON”. In this case, the motor will be restarted with full voltage by switching on “DIGITEK ON” again.
【PRESSURE SWITCH】 ~ Pressure switch is on.
(PRESSURE SWITCH) ~ Pressure switch is off.
Setup procedures:
a. Soft start parameter setup: Different air compressor can have different parameter setting for soft start, therefore the soft start parameters should be adjusted first. i. Set starting mode at manual, (AUTO\MANUAL). At manual starting mode,
the open and close of the pressure relieve valve are controlled by “PR Valve Close”. Set “PR Valve Close” at off to keep the pressure relieve valve open.
ii. Set soft start parameters: Based on the required starting current limit adjust the starting voltage and the starting time. Smaller soft start current requires lower starting voltage and longer soft start time. The soft start time should be enough to complete the soft start. If the soft start time is not enough to complete the soft start, then after the soft start time the motor will continue the starting process under full voltage with higher current. Whether the motor starts

23
smoothly or not during the starting process can tell if the soft start time is enough or not.
Fig. 6.a Soft start without enough soft start time
Fig. 6.b Soft start with enough soft start time
iii. Set pressure relieve open (PR VALVE CLOSE at OFF) and start the motor by setting “DIGITEK ON” on, and observe if the current during the soft start is under the requirement.
iv. If the current is too big, adjust the starting voltage smaller. On the other hand, if the starting current is too small and has difficulty to start the motor or the current is too small and it takes too long to complete the start, adjust the starting voltage bigger.
b. After soft start parameters are set, test the whole system operation and make sure: i. At automatic starting mode with “PR Valve” off, switch on “DIGITEK ON” to
start the motor. The air compressor should be at unloaded state. Switch on “PR Valve Close” on, The air compressor should be at loaded state. Attention: The pressure switch is not operative under manual start and the load/unload is controlled by “PR Valve Close”, therefore in checking the load/unload operation, it is important to make sure that pressure in the air tank is below the maximum pressure.
ii. Start the motor at automatic starting mode. After the soft start is completed, the air compressor starts to pump the sire into the air tank and
0 28
68 I Rated Current
t
44
0 28 44
I Rated Current
t

24
enters the saving mode after power on time. iii. After the maximum pressure is reached, the pressure switch switches off,
the pressure relieve valve opens, and the motor stops. iv. When the pressure in the air tank reaches the minimum pressure, the
motor starts with soft start while the pressure relieve valve is open. After the soft start, the relieve valve is closed and the air is pumped into the air tank. After the power on time, it further switches into saving mode.
c. For energy saving fine adjustment see Sec. 6.7.
6.4 Operation procedures
Automatic start + automatic saving: i. First time start: 【AUTO\MANUAL】+ 【SAUTO\MANU】+ 【START】 ii. Stop motor: The motor can be stopped in three ways,
a) Switch off input power. b) Manual stop: Set the “AUTO\MANUAL” at manual, i.e. the
“AUTO\MANUAL” LED is off, then turn off “DIGITEK ON” off. After switching from automatic start mode to manual start mode, the motor can’t be started automatically anymore.
iii. Restart motor: When it is at the automatic starting mode, the motor can be restarted automatically by switching on DIGITEK-IIIAC input power.
6.5 Phase loss protection
a. Phase loss protection works only when the running current is 1/10 or higher of the rated current.
b. Input power phase loss: 60 seconds after the phase loss occurs, the motor stops.
c. Motor phase loss: 60 seconds after the phase loss occurs, the motor stops.
d. DIGITEK input or output phase loss: 60 seconds after the phase loss occurs, the motor stops.
6.6 Over current
a. When the current is over the rated current continuously for 300 seconds, the motor will be stopped.
b. The higher the over current is, the faster the motor will be stopped.

25
6.7 Energy saving adjustment
a. Semiautomatic saving mode: At semiautomatic saving mode, one may adjust the semiauto V drop (Voltage drop at semiautomatic saving mode) in P13. When the value is larger, the voltage and the current will be dropped more, and one get larger energy saving. However, when the parameter is set too large, the voltage can continue to drop but the current might increase. In this case the voltage drop is too big and one should set the parameter smaller such that the current will not increase as the voltage drops. For air compressor with current much less than rated current of the motor during the pumping, one may use the semiauto saving mode and adjust the voltage drop to get the best energy saving during air pumping.
b. Automatic saving mode: i. Optimum Autosave: On automatic saving mode, the voltage and current
increase as the load increases and vise versa. On the automatic saving mode, one can make a fine-tuning to get the overall best saving. For lower “Optimum Autosave” parameter the energy saving is better for all load. However, to ensure the motor operates smoothly, one may set it at the 60.
ii. Maximum voltage drop: This is a parameter for setting the maximum voltage drop. In principle, one would like to have the voltage drop as much as possible at low load. Set this parameter at 54 should be a good choice. However, to ensure a smooth operation of the motor one might set the parameter smaller to have smaller maximum voltage drop.
iii. For most of the air compressors, the current is very close to rated current of the motor. In this case, use of autosaving mode is adequate.

26
Appendices
Appendix A: Horse Power, KW, and Rated Voltage and Rated Current
Three-Phase 220V 380V 440V
HP KW Current (A) Current (A) Current (A)
1 0.75 3.5 2 1.8
1.5 1.1 5 2.6 2.5
2 1.5 6.5 3.5 3.3
3 2.2 9 5 4.5
4 3 12 6.6 6
5 3.7 15 8.5 7.5
7.5 5.5 22 11.5 11
10 7.5 27 15.5 14
15 11 40 22.5 20
20 15 52 30 26
25 18.5 64 38 32
30 22 78 43 39
40 30 104 57 52
50 37 125 72 63
60 45 150 85 75
75 55 187 104 93
100 75 250 142 125
125 90 312 169 156
150 110 375 204 187
175 130 437 250 218
200 150 500 300 250
250 185 625 355 312
300 225 750 420 375
400 300 1000 560 500

27
Appendix B: Hex Numbers VS Decimal Numbers
Hex Decimal Hex Decimal Hex Decimal Hex Decimal Hex Decimal
10 16 30 48 50 80 70 112 90 144
11 17 31 49 51 81 71 113 91 145
12 18 32 50 52 82 72 114 92 146
13 19 33 51 53 83 73 115 93 147
14 20 34 52 54 84 74 116 94 148
15 21 35 53 55 85 75 117 95 149
16 22 36 54 56 86 76 118 96 150
17 23 37 55 57 87 77 119 97 151
18 24 38 56 58 88 78 120 98 152
19 25 39 57 59 89 79 121 99 153
1A 26 3A 58 5A 90 7A 122 9A 154
1B 27 3B 59 5B 91 7B 123 9B 155
1C 28 3C 60 5C 92 7C 124 9C 156
1D 29 3D 61 5D 93 7D 125 9D 157
1E 30 3E 62 5E 94 7E 126 9E 158
1F 31 3F 63 5F 95 7F 127 9F 159
20 32 40 64 60 96 80 128 A0 160
21 33 41 65 61 97 81 129 A1 161
22 34 42 66 62 98 82 130 A2 162
23 35 43 67 63 99 83 131 A3 163
24 36 44 68 64 100 84 132 A4 164
25 37 45 69 65 101 85 133 A5 165
26 38 46 70 66 102 86 134 A6 166
27 39 47 71 67 103 87 135 A7 167
28 40 48 72 68 104 88 136 A8 168
29 41 49 73 69 105 89 137 A9 169
2A 42 4A 74 6A 106 8A 138 AA 170
2B 43 4B 75 6B 107 8B 139 AB 171
2C 44 4C 76 6C 108 8C 140 AC 172
2D 45 4D 77 6D 109 8D 141 AD 173
2E 46 4E 78 6E 110 8E 142 AE 174
2F 47 4F 79 6F 111 8F 143 AF 175