digital storytelling with photo story 3
DESCRIPTION
TRANSCRIPT
Digi ta l Story te l l ing wi th Photo Story 3
Jackie Gilmartin Technology Staff Developer Technology Department Port Washington UFSD
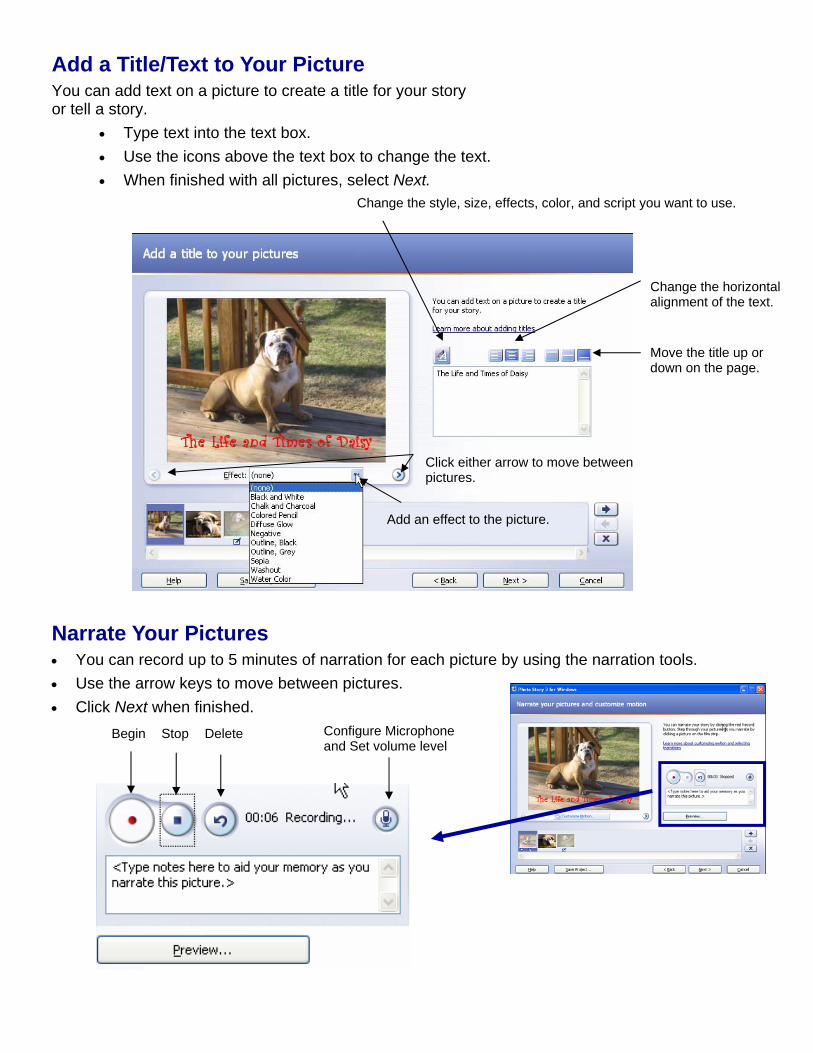
Add a Title/Text to Your Picture You can add text on a picture to create a title for your story or tell a story.
• Type text into the text box. • Use the icons above the text box to change the text. • When finished with all pictures, select Next.
Narrate Your Pictures • You can record up to 5 minutes of narration for each picture by using the narration tools. • Use the arrow keys to move between pictures. • Click Next when finished.
Change the style, size, effects, color, and script you want to use.
Change the horizontal alignment of the text.
Move the title up or down on the page.
Add an effect to the picture.
Click either arrow to move between pictures.
Begin Stop Delete Configure Microphone and Set volume level
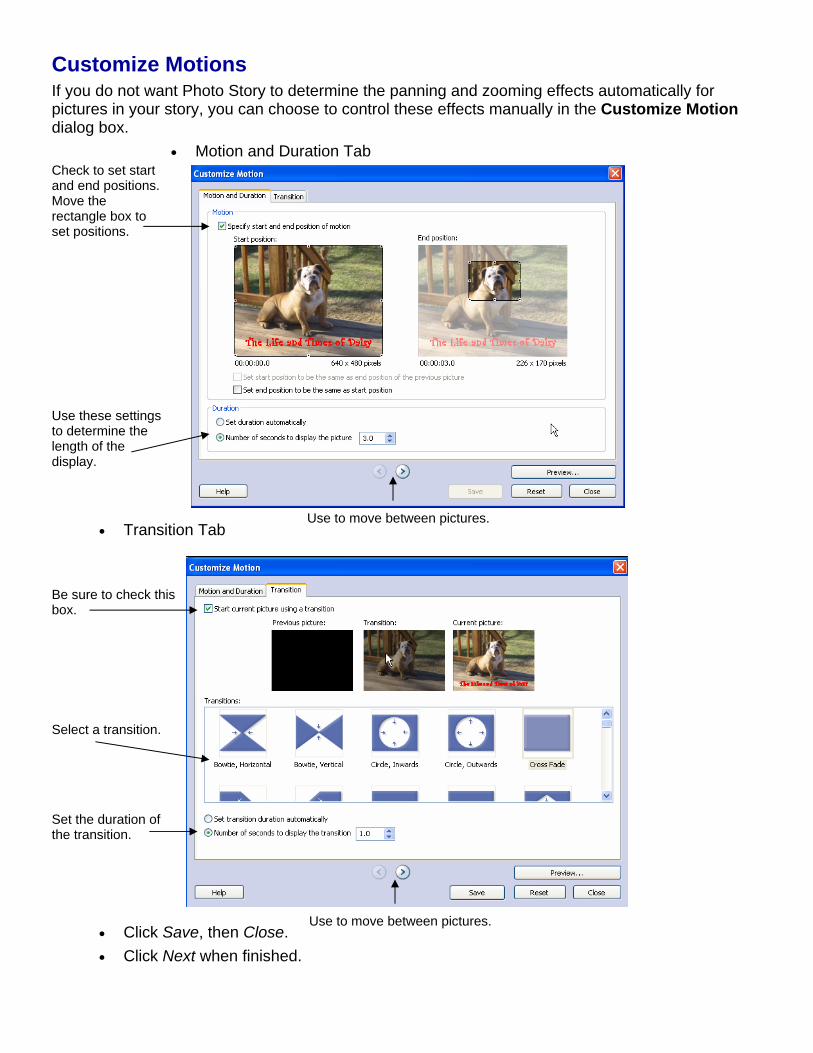
Customize Motions If you do not want Photo Story to determine the panning and zooming effects automatically for pictures in your story, you can choose to control these effects manually in the Customize Motion dialog box.
• Motion and Duration Tab
• Transition Tab
• Click Save, then Close. • Click Next when finished.
Be sure to check this box.
Select a transition.
Set the duration of the transition.
Use to move between pictures.
Check to set start and end positions. Move the rectangle box to set positions.
Use these settings to determine the length of the display.
Use to move between pictures.
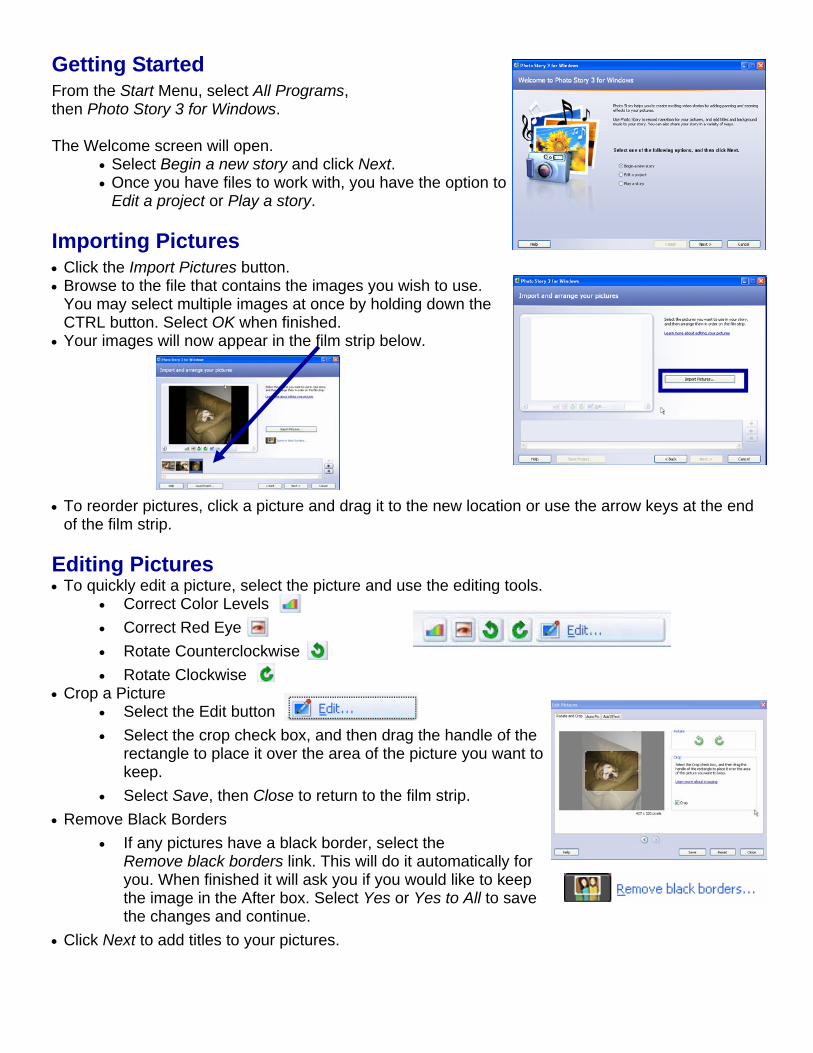
Getting Started From the Start Menu, select All Programs, then Photo Story 3 for Windows. The Welcome screen will open.
• Select Begin a new story and click Next. • Once you have files to work with, you have the option to
Edit a project or Play a story. Importing Pictures • Click the Import Pictures button. • Browse to the file that contains the images you wish to use.
You may select multiple images at once by holding down the CTRL button. Select OK when finished.
• Your images will now appear in the film strip below. • To reorder pictures, click a picture and drag it to the new location or use the arrow keys at the end
of the film strip. Editing Pictures • To quickly edit a picture, select the picture and use the editing tools.
• Correct Color Levels • Correct Red Eye • Rotate Counterclockwise • Rotate Clockwise
• Crop a Picture • Select the Edit button • Select the crop check box, and then drag the handle of the
rectangle to place it over the area of the picture you want to keep.
• Select Save, then Close to return to the film strip. • Remove Black Borders
• If any pictures have a black border, select the Remove black borders link. This will do it automatically for you. When finished it will ask you if you would like to keep the image in the After box. Select Yes or Yes to All to save the changes and continue.
• Click Next to add titles to your pictures.
Add Background Music • The Select Music option lets you choose a piece of music
from your computer, a network folder, or the Internet. • The Create Music option lets you customize prerecorded
pieces and styles of music by selecting the genre, style, bands, mood, tempo, and intensity of the music.
• To select the music for your story, select a picture. Then select a piece of music to start playing when the picture is displayed in your story.
• The picture you select is the anchor image, and indicates where you want the music to start playing. The anchor image is indicated by a musical note displayed beneath the picture in the film strip.
• The music you select plays until one of the following
events occurs:
• The music ends. • An anchor image that specifies a new piece of
music be played is encountered. • The story ends.
• Click Next when finished.
Save Your Story • While you are working on your project, select Save Project at the bottom of any screen.
This will allow you to edit it in the future.
• When you finish your project, choose from the list of activities from the Save your story screen.
• Click Next to save your story.
• When finished, you can View Your Story or Create Another Story. Your saved story will play in Windows Media Player when finished.
Browse to change location and file name.