digital storytelling instructions...
TRANSCRIPT

- 37 -
MOVIE MAKER
Before you use Movie Maker: • Windows Movie Maker is a program that is free with any machine operating
Windows XP (which is, basically, the sort of machine that Year Up uses with its students). It can be found through your start menu, as shown in the image below:
• All students should have recorded their narrations.
• All files—including narrations and images—must be transferred from the S drive
to the proper file folders on each student’s desktop before this phase of the Digital Storytelling project can begin.
• Though not definitive, it might be easiest to consider the vocabulary you use when
your class has reached the Movie Maker phase. At this point, as you will be working with audio and images, it might be best to refer to the Movie Maker files as “projects.”
• Establish a file Movie Maker file system with students—within the “Projects”
folder of their Digital Storytelling files, students should be saving their files very often (at least 3 times per class period). For example, in one class period I might save my project the moment that I import my narration and all of my images as “Stephanie 1.” Once I give myself a preliminary sequence of images set to my narration, I would save my project as “Stephanie 2” etc.
• When you and your students are saving your files, under the “File” menu of
MovieMaker, save your file as a project rather than a movie:
Saving your file as a movie will take you through the rendering process earlier than you are supposed to!
- 38 -
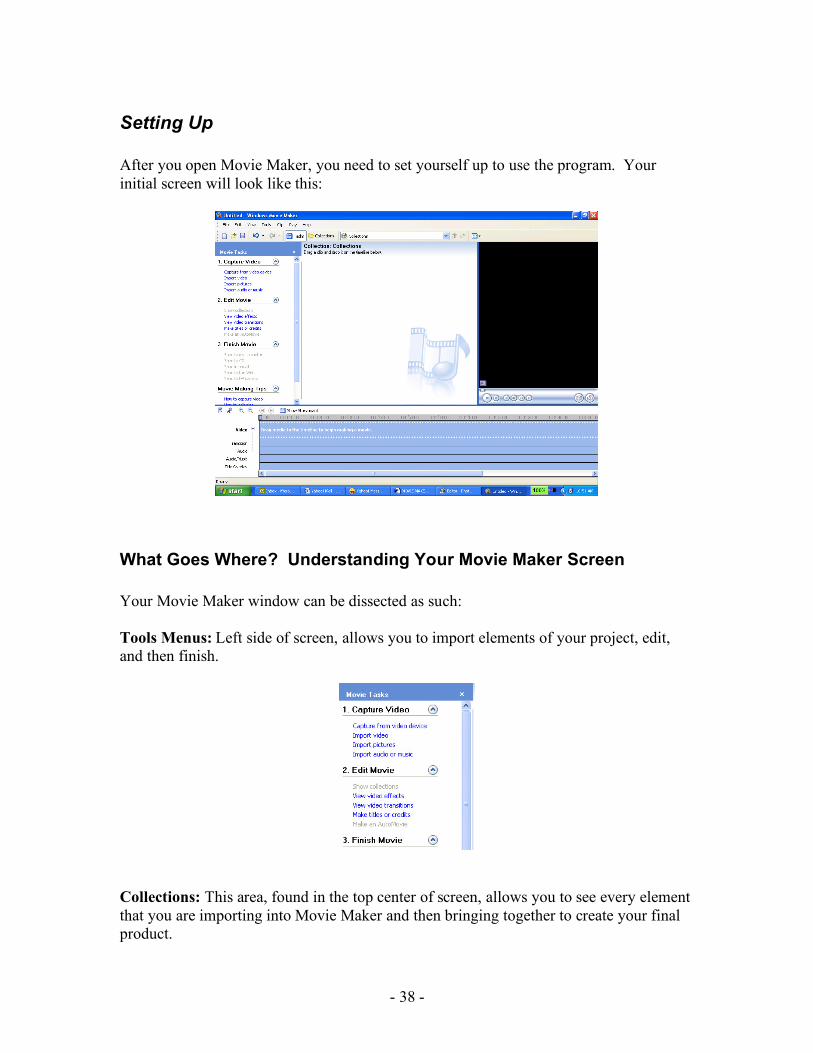
Setting Up After you open Movie Maker, you need to set yourself up to use the program. Your initial screen will look like this:
What Goes Where? Understanding Your Movie Maker Screen Your Movie Maker window can be dissected as such: Tools Menus: Left side of screen, allows you to import elements of your project, edit, and then finish.
Collections: This area, found in the top center of screen, allows you to see every element that you are importing into Movie Maker and then bringing together to create your final product.
- 39 -
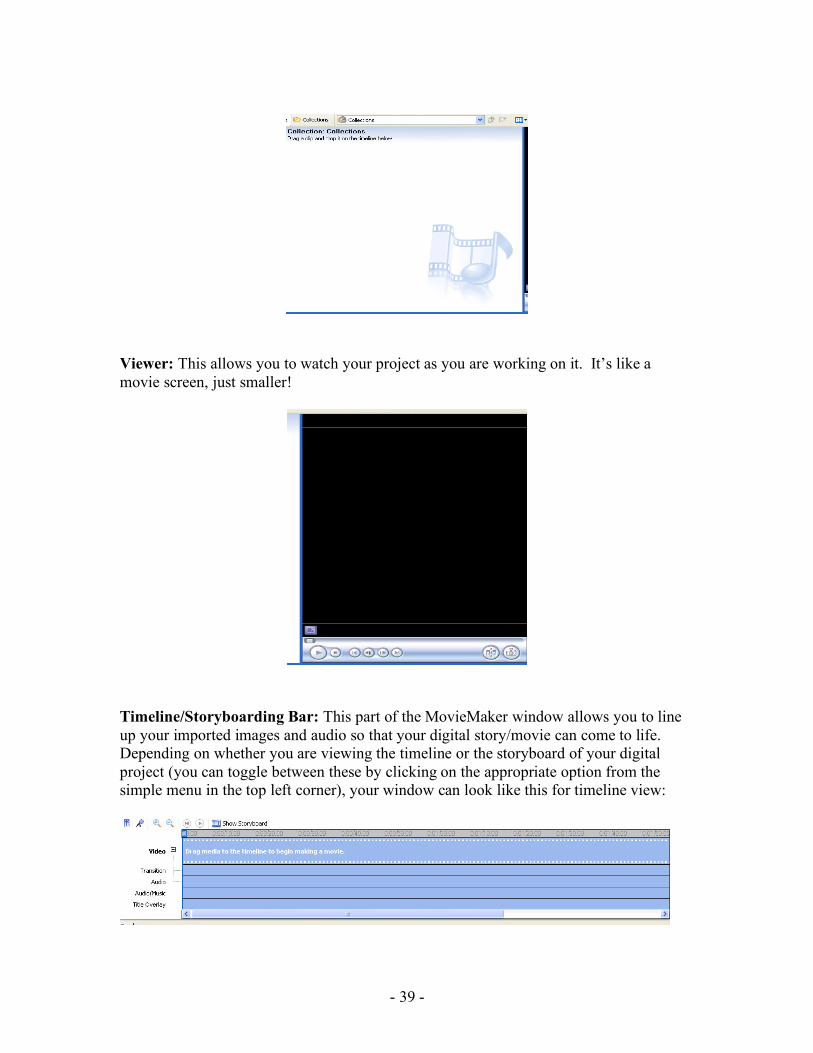
Viewer: This allows you to watch your project as you are working on it. It’s like a movie screen, just smaller!
Timeline/Storyboarding Bar: This part of the MovieMaker window allows you to line up your imported images and audio so that your digital story/movie can come to life. Depending on whether you are viewing the timeline or the storyboard of your digital project (you can toggle between these by clicking on the appropriate option from the simple menu in the top left corner), your window can look like this for timeline view:

- 40 -
or like this for storyboard view:
So now that you understand the work that each area of your Movie Maker window is supposed to do, now it’s time to figure out how to use this beast!
Using Movie Maker First thing’s first—importing your audio file and images. In order to do this, you will need to focus on the Movie Tools Menu.
Importing Your Audio Files
1. Under “Capture Video,” first import your audio by clicking on the words “Import Audio or Music”
2. When the file selection window pops up, trace the path back to your audio files
within your digital storytelling folder and choose the appropriate audio file, as illustrated below:

- 41 -
3. Choose the appropriate file and click on “Import.” 4. Your audio file will appear in the collections window of your Movie Maker
screen:
5. Once your audio file is imported into Movie Maker, it’s time to insert it into the timeline bar and begin putting the pieces of your Digital Story together. To do this, click your mouse button down on top of your audio file and drag it down into the timeline bar. Make sure, as you drag your audio into the timeline bar, that you insert your file so that it is flush with the left-most
Once your file is dragged into the timeline, it will appear as a beige colored strip next to the words, “Audio/Music.” This is your audio track for your Digital Story. It looks like this:
Tip: As you drag your audio in here, make your file flush with the left-most boundary of the timeline! This will ensure that your narration begins RIGHT when your movie begins!

- 42 -
Now you are ready to import your images!
Importing Image Files To import images, you want to go do the exact same thing you did to bring your audio file into the Movie Maker window (Steps 1-3). Once you import all of your images, your Movie Maker Collections should look like this:
Once all of your images are imported into Movie Maker, you are ready to assemble your project!
A Marriage Made In Heaven: Bringing Image and Audio Together Bringing together your images and your audio file into a movie format is quite easy. From the directions above on importing audio, you should already have your file inserted into the movie timeline as such:
Note: Once you have reached this phase of the movie-compilation process, you and your students should work, first and foremost, off of the storyboards you have created. A set of headphones should also be plugged into each work station.
- 43 -
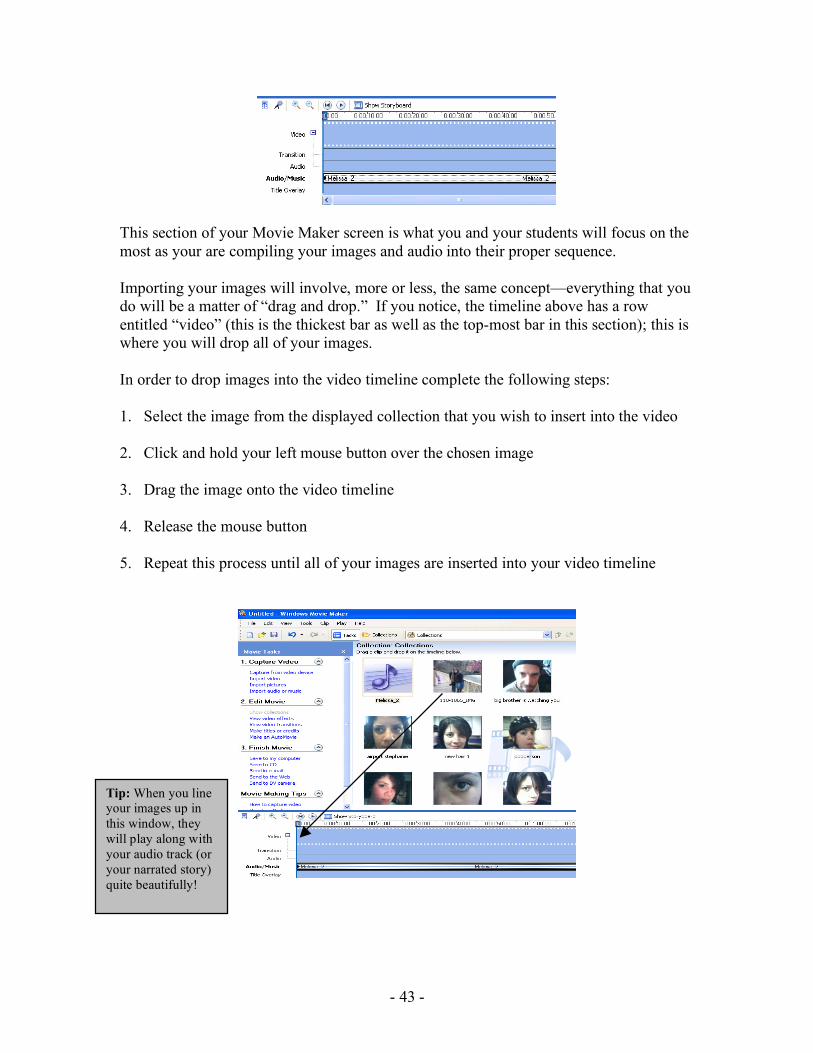
This section of your Movie Maker screen is what you and your students will focus on the most as your are compiling your images and audio into their proper sequence. Importing your images will involve, more or less, the same concept—everything that you do will be a matter of “drag and drop.” If you notice, the timeline above has a row entitled “video” (this is the thickest bar as well as the top-most bar in this section); this is where you will drop all of your images. In order to drop images into the video timeline complete the following steps: 1. Select the image from the displayed collection that you wish to insert into the video 2. Click and hold your left mouse button over the chosen image 3. Drag the image onto the video timeline 4. Release the mouse button 5. Repeat this process until all of your images are inserted into your video timeline
Tip: When you line your images up in this window, they will play along with your audio track (or your narrated story) quite beautifully!
- 44 -
Ultimately, your dragged images will line up and your timeline will look like this:
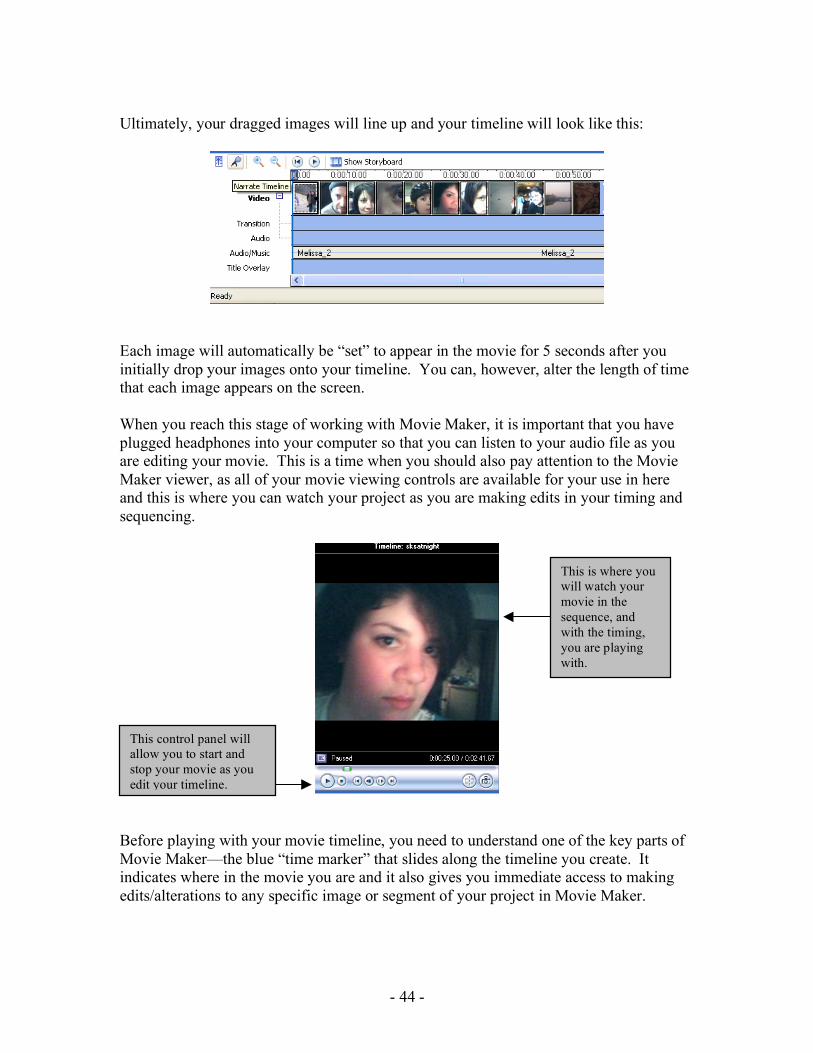
Each image will automatically be “set” to appear in the movie for 5 seconds after you initially drop your images onto your timeline. You can, however, alter the length of time that each image appears on the screen. When you reach this stage of working with Movie Maker, it is important that you have plugged headphones into your computer so that you can listen to your audio file as you are editing your movie. This is a time when you should also pay attention to the Movie Maker viewer, as all of your movie viewing controls are available for your use in here and this is where you can watch your project as you are making edits in your timing and sequencing.
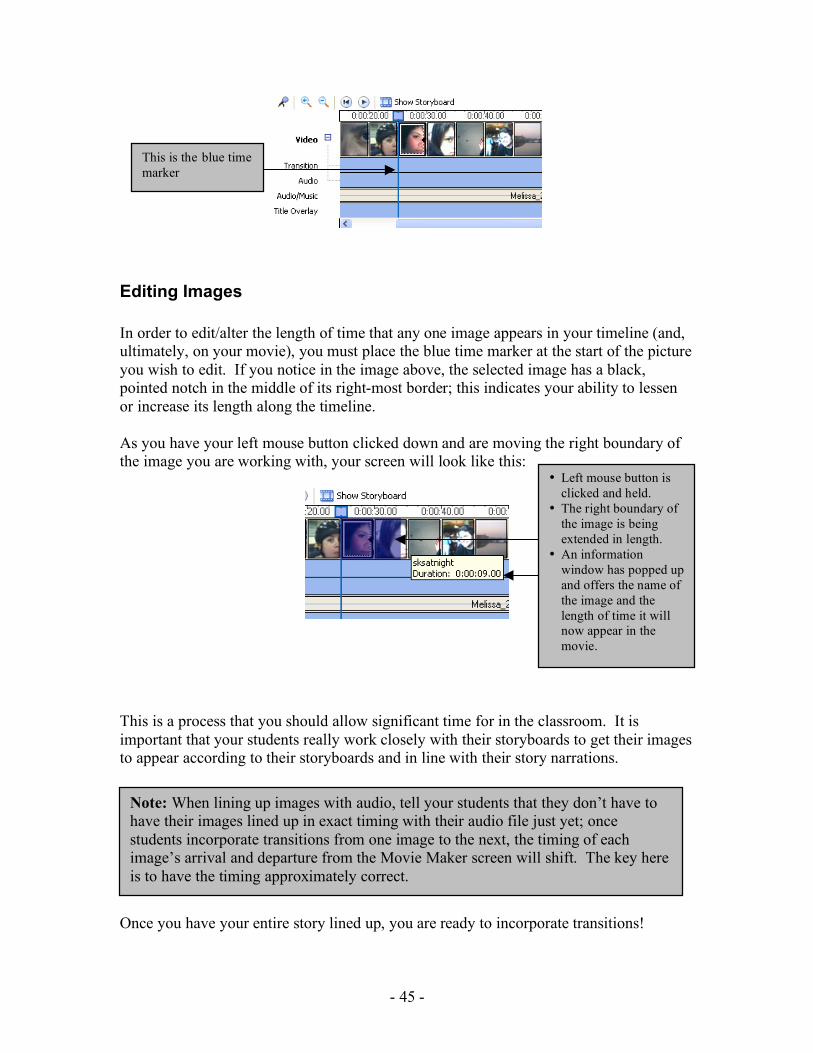
Before playing with your movie timeline, you need to understand one of the key parts of Movie Maker—the blue “time marker” that slides along the timeline you create. It indicates where in the movie you are and it also gives you immediate access to making edits/alterations to any specific image or segment of your project in Movie Maker.
This is where you will watch your movie in the sequence, and with the timing, you are playing with.
This control panel will allow you to start and stop your movie as you edit your timeline.
- 45 -
Editing Images In order to edit/alter the length of time that any one image appears in your timeline (and, ultimately, on your movie), you must place the blue time marker at the start of the picture you wish to edit. If you notice in the image above, the selected image has a black, pointed notch in the middle of its right-most border; this indicates your ability to lessen or increase its length along the timeline. As you have your left mouse button clicked down and are moving the right boundary of the image you are working with, your screen will look like this:
This is a process that you should allow significant time for in the classroom. It is important that your students really work closely with their storyboards to get their images to appear according to their storyboards and in line with their story narrations. Once you have your entire story lined up, you are ready to incorporate transitions!
This is the blue time marker
• Left mouse button is clicked and held.
• The right boundary of the image is being extended in length.
• An information window has popped up and offers the name of the image and the length of time it will now appear in the movie.
Note: When lining up images with audio, tell your students that they don’t have to have their images lined up in exact timing with their audio file just yet; once students incorporate transitions from one image to the next, the timing of each image’s arrival and departure from the Movie Maker screen will shift. The key here is to have the timing approximately correct.
- 46 -
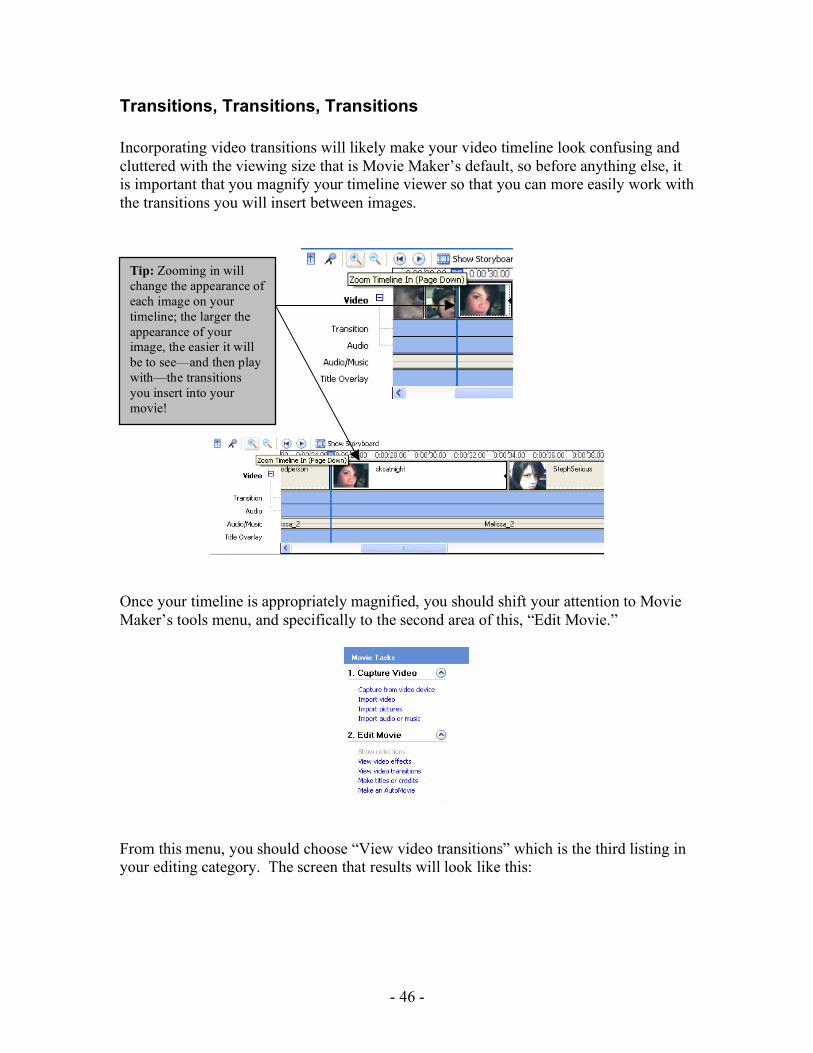
Transitions, Transitions, Transitions Incorporating video transitions will likely make your video timeline look confusing and cluttered with the viewing size that is Movie Maker’s default, so before anything else, it is important that you magnify your timeline viewer so that you can more easily work with the transitions you will insert between images.
Once your timeline is appropriately magnified, you should shift your attention to Movie Maker’s tools menu, and specifically to the second area of this, “Edit Movie.”
From this menu, you should choose “View video transitions” which is the third listing in your editing category. The screen that results will look like this:
Tip: Zooming in will change the appearance of each image on your timeline; the larger the appearance of your image, the easier it will be to see—and then play with—the transitions you insert into your movie!
- 47 -
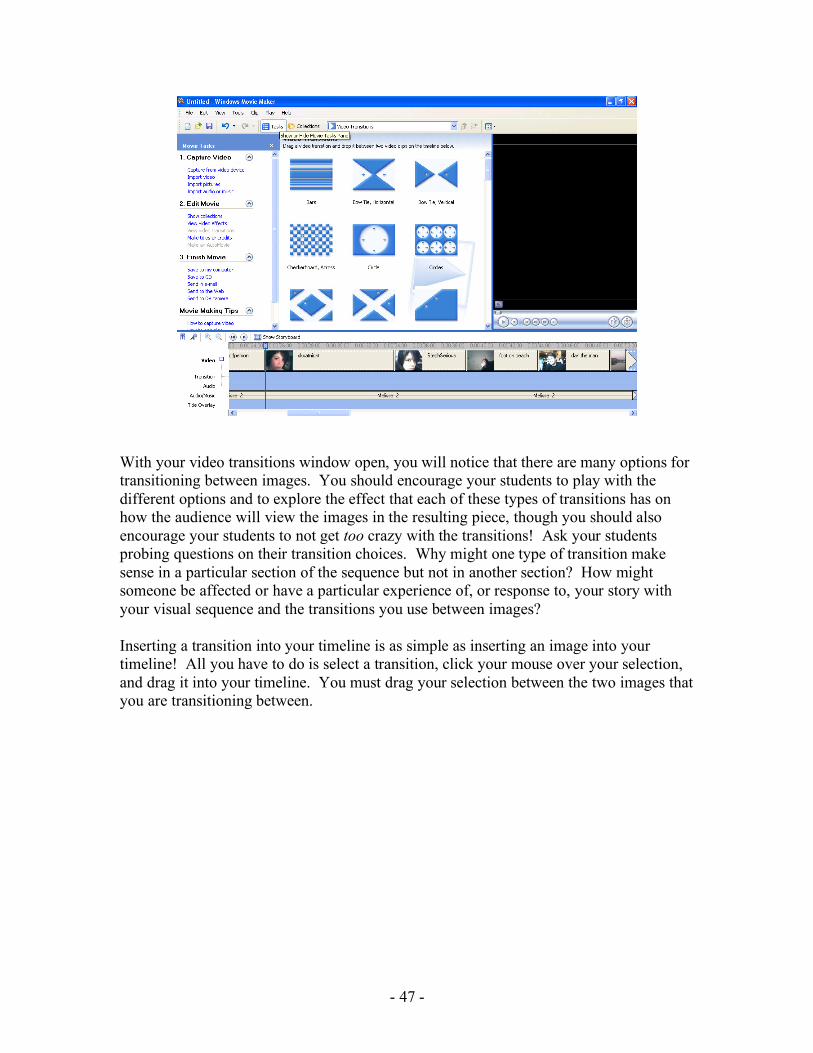
With your video transitions window open, you will notice that there are many options for transitioning between images. You should encourage your students to play with the different options and to explore the effect that each of these types of transitions has on how the audience will view the images in the resulting piece, though you should also encourage your students to not get too crazy with the transitions! Ask your students probing questions on their transition choices. Why might one type of transition make sense in a particular section of the sequence but not in another section? How might someone be affected or have a particular experience of, or response to, your story with your visual sequence and the transitions you use between images? Inserting a transition into your timeline is as simple as inserting an image into your timeline! All you have to do is select a transition, click your mouse over your selection, and drag it into your timeline. You must drag your selection between the two images that you are transitioning between.

- 48 -
For instance, if you are choosing to “Fade” between two images, you will select the transition titled “Fade”:
And then you will drag it into the timeline:
Note: Your transition will appear on this small bar beneath your images bar. Just as you can edit the length of time each image appears in your movie, you can edit when your transitions between images begin and end. The steps you take are exactly the same!
- 49 -
This is the part of the video compilation process where your students will need to keep focused on the exact start and end of each image and how this is aligned with their narration.
Teaching Points: • Movie Maker will likely be the most time-consuming part of the Digital Storytelling
lesson. Students might get the most frustrated with this because of this program requires a very acute level of attention to detail.
• Though it is important to spend the time it takes to expertly bring the elements of each story together, for time management and classroom management purposes, it might be best to restrict Movie Maker time to 3 classrooms, total—one classroom for importing information and lining up images with audio, one classroom for editing the video and incorporating transitions, and one “extra” classroom to finish this process. Encourage students to stay after school if they need more time or to work on their projects over their lunch break.
• For every step of Movie Maker—teaching the parts of the program, importing audio, importing images, inserting elements into your timeline, and then editing—you will need to demonstrate the process with your laptop plugged into the overhead projector.
• Aligning images with audio is a process that becomes so much easier once you have
a detailed storyboard. A sample storyboard, along with sample images and a sample audio file, could provide the classroom with a good and interactive demonstration on lining things up carefully before each student focuses on his or her own project.
• Do not forget headphones for each computer! Imagine the orchestra or stories you
will hear otherwise!
• Remind students to save their projects frequently. • Before editing the video and inserting transitions, it would be extremely valuable to
view a couple digital stories and to discuss the role of transitions—what different types of transitions do to a story. (Good examples: Kelly’s story on her grandmother, as she uses some of the fancier transitions and Ellen’s story on food as she uses almost no transitions)
• Remind students that they do not need to have transitions for each image in their
digital story; this is just one tool that they can use to enhance their story. It is preferred that they use some transitions and that they are conscientious of the transitions they choose, but they need to consider the overall aesthetic of their stories and how they want to communicate their messages first and foremost.