digital pen & usb flash drive user guide - … and usb... · 5 the digital pen up close the...
TRANSCRIPT

December 2006 1
Digital Pen & USB Flash Drive
User Guide

2
Table of Contents
Introduction ....................................... .......................................................4
The Digital Pen Up Close ........................... ..............................................5 The Pen..........................................................................................................5 Installing Your Digital Pen's Batteries .............................................................6 The USB F lash Receiver ..........................................................................7
Installation Guide ................................. ....................................................8 Installing the Software.....................................................................................8 Using the Digital Pen ....................................................................................14 Writing with the Digital Pen ...........................................................................14
1. Clip the Receiver to the Sheet .............................................................................14 2. Turn on the Receiver ...........................................................................................15 3. Begin Writing........................................................................................................15 4. Viewing the Files on your Computer....................................................................15
Viewing & Editing your files...........................................................................16 Accessing the applications............................................................................16
Pen & Ink Editor................................... ...................................................17 Introduction...................................................................................................17
Pen & Ink Editor Main Window ................................................................................18 To set up the page: ..................................................................................................23 Margins and Grids ...................................................................................................24
Editing ..........................................................................................................25 Editing the Ink Properties..............................................................................25
Changing the Ink Color ............................................................................................26 Changing the Ink Thickness ....................................................................................27 Moving ink................................................................................................................27 Erasing Ink ...............................................................................................................27 Delete Selected Ink..................................................................................................28 Recognizing Ink .......................................................................................................28 Insert an Image........................................................................................................29 Inserting a New Page ..............................................................................................30 Deleting the Current Page .......................................................................................30 Find Text or Ink ........................................................................................................31
Navigating.....................................................................................................32 Moving from Page to Page within a Document .......................................................32

3
Opening a New or Existing Document .......................................................... 33 Saving .......................................................................................................... 35 Printing a Document..................................................................................... 37 Emailing a Document ................................................................................... 38 Export the Document.................................................................................... 39 Rotate Ink..................................................................................................... 40 Play Page Data ............................................................................................ 41
Pen & Ink Viewer ................................... .................................................42 Introduction .................................................................................................. 42
Pen & Ink Viewer Main Window ..............................................................................43 Opening a Document ................................................................................... 46 Saving .......................................................................................................... 47 Printing a Document..................................................................................... 49 Emailing a Document ................................................................................... 50 Rotate Ink..................................................................................................... 51
Troubleshooting .................................... .................................................52 Installation Guide.......................................................................................... 52 Using the Digital Pen.................................................................................... 52

4
Introduction Welcome to the Digital Pen & USB Flash Drive User Guide.
Everything you need to know about the Digital Pen and Digital Pen-compatible applications are found within this manual, which is divided into the following sections.
Section Main Topic Covered
The Digital Pen Up Close
How to use/write with the Digital Pen
Installation Guide The installation process
Pen&Ink Editor
How to create and edit drawings and documents using the Pen&Ink Editor application
Pen&Ink Viewer
How to view your files on any computer without the need to install the software
Troubleshooting
Lists the most common issues that arise, organized according to the same sections as this manual is

5
The Digital Pen Up Close The Digital Pen is comprised of the Pen itself and the Receiver.
The Pen Take a moment to familiarize yourself with its various parts, especially the rocker switch.

6
Installing Your Digital Pen's Batteries The Digital Pen comes with batteries, which you will need to insert before you can set up the pen.
To install the Digital Pen batteries:
1. Unscrew the top of the pen.
2. Insert the batteries as shown.
3. Screw the pen top back on.
Note: Please do not disassemble the Digital Pen in any wa y that is not described in this User Guide. Improper use may caus e the Digital Pen to cease functioning.
7
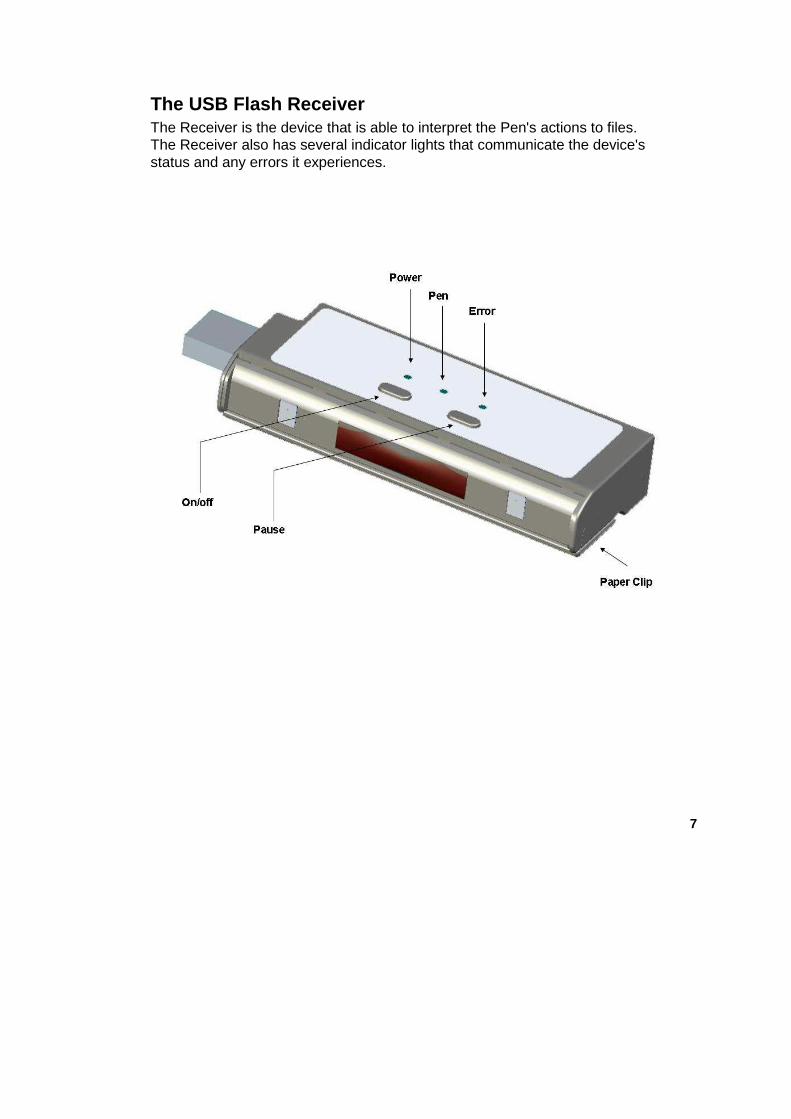
The USB Flash Receiver The Receiver is the device that is able to interpret the Pen's actions to files. The Receiver also has several indicator lights that communicate the device's status and any errors it experiences.

8
Installation Guide In order to use your Digital Pen & USB Flash Drive, you need to install the Digital Pen & USB Flash Drive Software. The instructions detailed below are for the default settings. Advanced users may wish to set up their system differently.
Installing the Software 1. Insert the Installation CD. A Software Component Installation screen
appears.
Note : Microsoft Tablet PC Recognizer 2005 Installation.
1. The Microsoft Tablet PC Handwritten Recognition engine can be installed only on The following Operation Systems: Windows 20 00 Professional sp4, Windows XP Professional SP2 and Windows 2003 s erver. There is no support for Windows XP Home Edition Ope ration System.
2. Please make sure that you first install the Digital Pen USB Flash Drive and then install the Microsoft Tablet PC Recognizer 2005 .

9
2. Click on Install Digital Pen USB Flash Drive, The InstallShield Wizard is opened.
Note : Installation prerequisites.
In order to successfully install and operate Digit al Pen USB Flash Drive Software, Installation program will update your sys tem with required components : Microsoft MSI Installer Update and Tab letPC SDK 1.7. Installation program will check presence of these c omponents, and will install them if necessary. Upon system update computer rest art may be required.

10
3. Click Next to continue. The License Agreement screen appears.
11
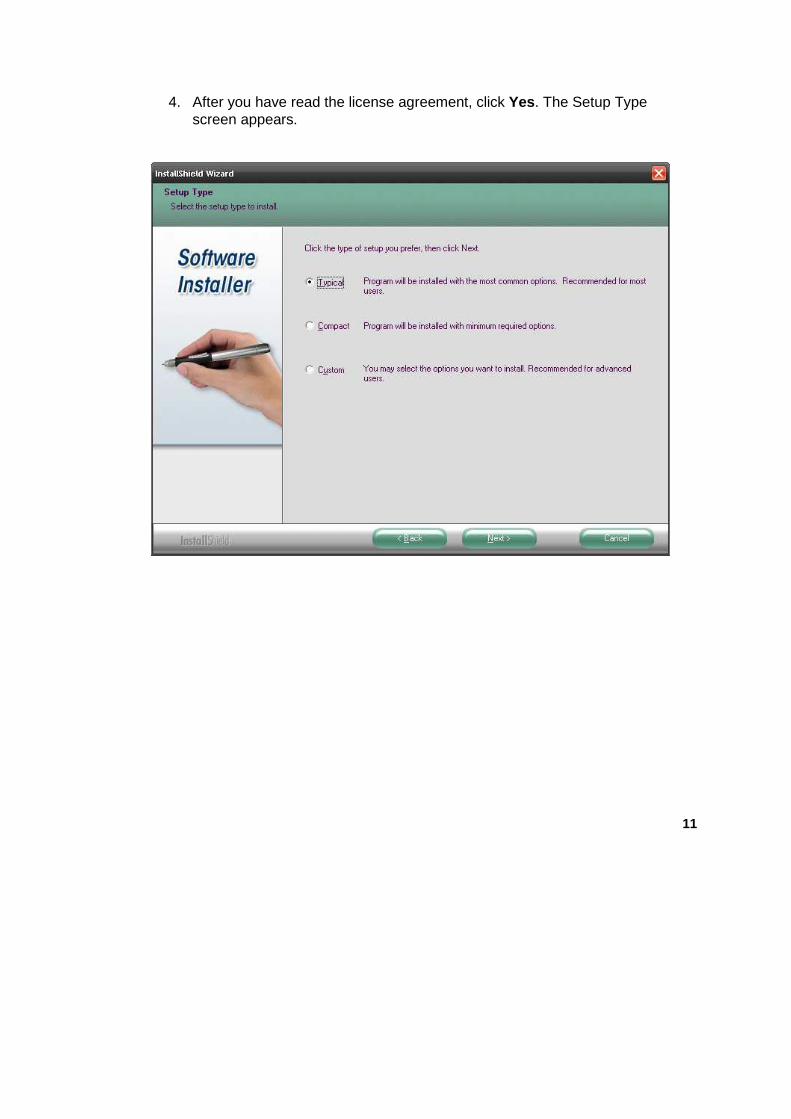
4. After you have read the license agreement, click Yes. The Setup Type screen appears.

12
5. Click Next to continue. Setup begins the installation.

13
6. When the installation is complete, click Finish .
The set up is now complete.

14
Using the Digital Pen Using the Digital Pen you can write and sketch on a sheet of paper and have it stored as files on the USB Flash drive receiver. You can view and edit those files on your PC.
Writing with the Digital Pen In order to write with the Digital Pen you must perform the following steps.
1. Clip the Receiver to the Sheet Press on the Clip button, the clip will open and then clip the Receiver to an A4 paper at. The required position is on the top middle of A4 in portrait layout.

15
2. Turn on the Receiver Press on the on/off button to turn on the Receiver, all the Receiver indication leds will turn on and when the power led will turn red and stop blinking the receiver is ready to record the Digital Pen.
3. Begin Writing Now you are ready to write anywhere. As you write the data is stored as files on the Receiver. To Add a new page, simply press the clip button and replace the page. The softwarec will automatically add a new virtual page in the flash memory. Now you can continue writing. In case you want to have pause in your writing, you can press the pause button, which will give additional 10 minutes to the receiver before entering standby mode
When you finish writing your document press continuously on the on/off button till all the leds stop blinking and turn off.
Note : Drawing straight lines
To draw straight lines, keep the pen in the same an gle and move your hand. Make sure that you are not blocking the line of sight to the receiver.
4. Viewing the Files on your Computer Turn off the Receiver and then connect it through the USB interface to your computer, the Receiver is recognized as a Mass Storage Device.
To open your files, navigate to the MyNotes directory and open the relevant directory for your date and then open the files with .ELI extension.
16
Viewing & Editing your files In order view & edit your files two applications are provided:
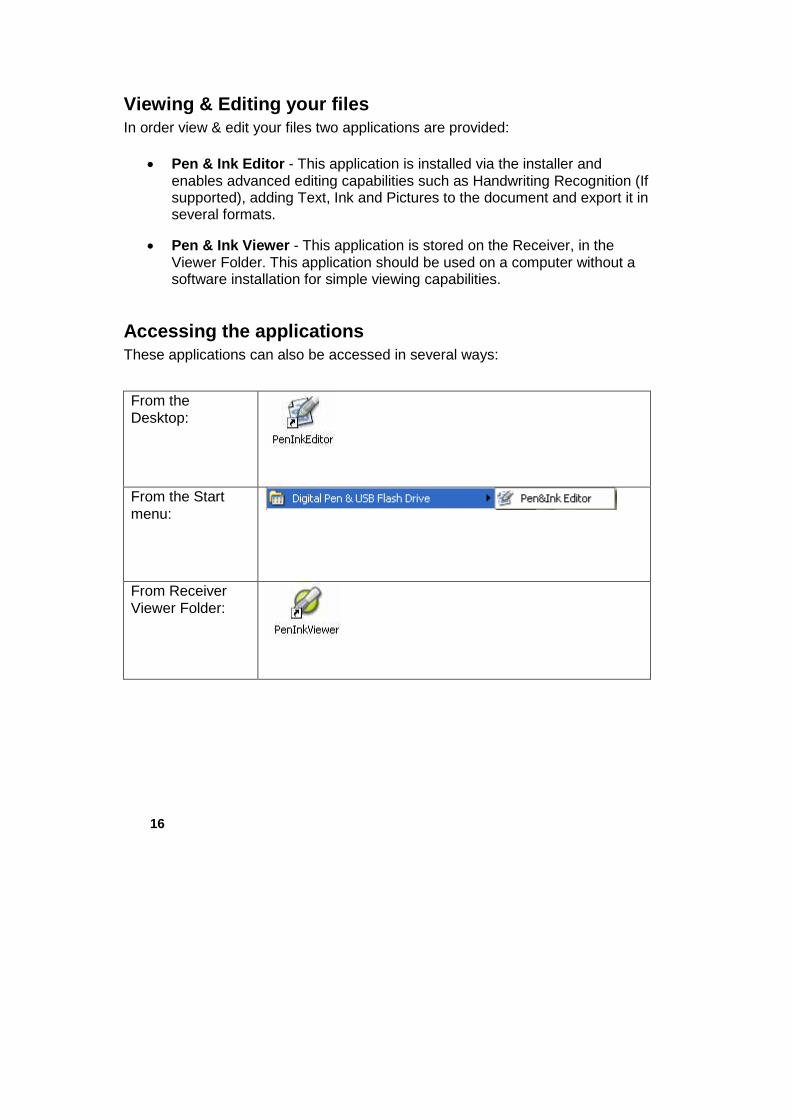
• Pen & Ink Editor - This application is installed via the installer and enables advanced editing capabilities such as Handwriting Recognition (If supported), adding Text, Ink and Pictures to the document and export it in several formats.
• Pen & Ink Viewer - This application is stored on the Receiver, in the Viewer Folder. This application should be used on a computer without a software installation for simple viewing capabilities.
Accessing the applications These applications can also be accessed in several ways:
From the Desktop:
From the Start menu:
From Receiver Viewer Folder:
17
Pen & Ink Editor
Introduction The Pen&Ink Editor application is the main software component of the Digital Pen & USB Flash Drive. It is easy-to-use and enables you to quickly edit the files that you created on the Receiver.
In this guide you will find everything you need to know about how to use Pen&Ink Editor.
Feel free to read this guide from cover to cover, or only those sections which apply to your immediate need.
The chapters that follow explain how to use the software’s various features and functions.
18
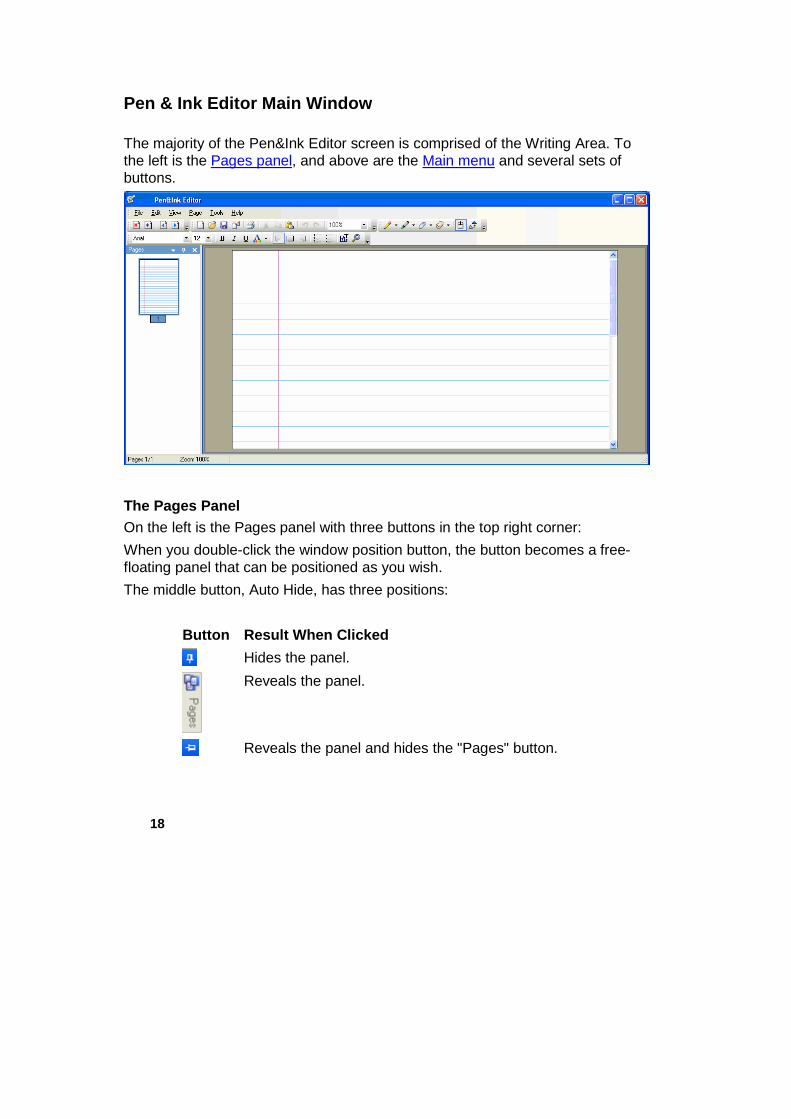
Pen & Ink Editor Main Window The majority of the Pen&Ink Editor screen is comprised of the Writing Area. To the left is the Pages panel, and above are the Main menu and several sets of buttons.
The Pages Panel On the left is the Pages panel with three buttons in the top right corner:
When you double-click the window position button, the button becomes a free-floating panel that can be positioned as you wish.
The middle button, Auto Hide, has three positions:
Button Result When Clicked
Hides the panel.
Reveals the panel.
Reveals the panel and hides the "Pages" button.

19
The far left button closes the panel.
The Main Menu All of the Pen&Ink Editor’s features and functions are found under the main menu headings. Because most of these features and functions can also be accessed by the single click of a button, the instructions will always default to clicking on buttons (Click Delete Page ) instead of the location on the main menu (Page > Delete Page ) or keyboard shortcuts (Ctrl+D ).
The Buttons The most common tasks and features can be accessed with the single click of a button. The following are the available buttons, their function, and the keyboard shortcut for them:
Pages Toolbar
Icon Name Shortcut Function
Delete Page Ctrl+D Deletes the page
Insert Page Ctrl+I Adds a new page to the end of the document
Previous Page PgUp Previous Page
Next Page PgDn Next Page

20
Design Toolbar
Icon Name Shortcut Function
Pen Chooses the Pen Tool
Marker Chooses the Marker tool
Eraser Erases the clicked on portion of the page
Color Changes the current tool color (Pen/Marker)
Mouse Changes the current tool to regular Mouse
Pattern Recognizer
Changes the current tool to Pattern Recognizer

21
Standard Toolbar
Icon Name Shortcut Function
New Document Ctrl+N Opens a new document
Open Ctrl+O Opens a file
Save Ctrl+S Saves the file
Email Emails the document through your default
email program in PDF format
Print Ctrl+P Prints the document
Cut Ctrl+X Cuts a selected area of the document
Copy Ctrl+C Copies a selected area of the document
Paste Ctrl+V Pastes the cut or copied portion of the document
Undo Ctrl+Z Undo/remove the last action performed
Redo Ctrl+Y Redo the last action performed
Zoom Resizes the view to a specified percentage
22
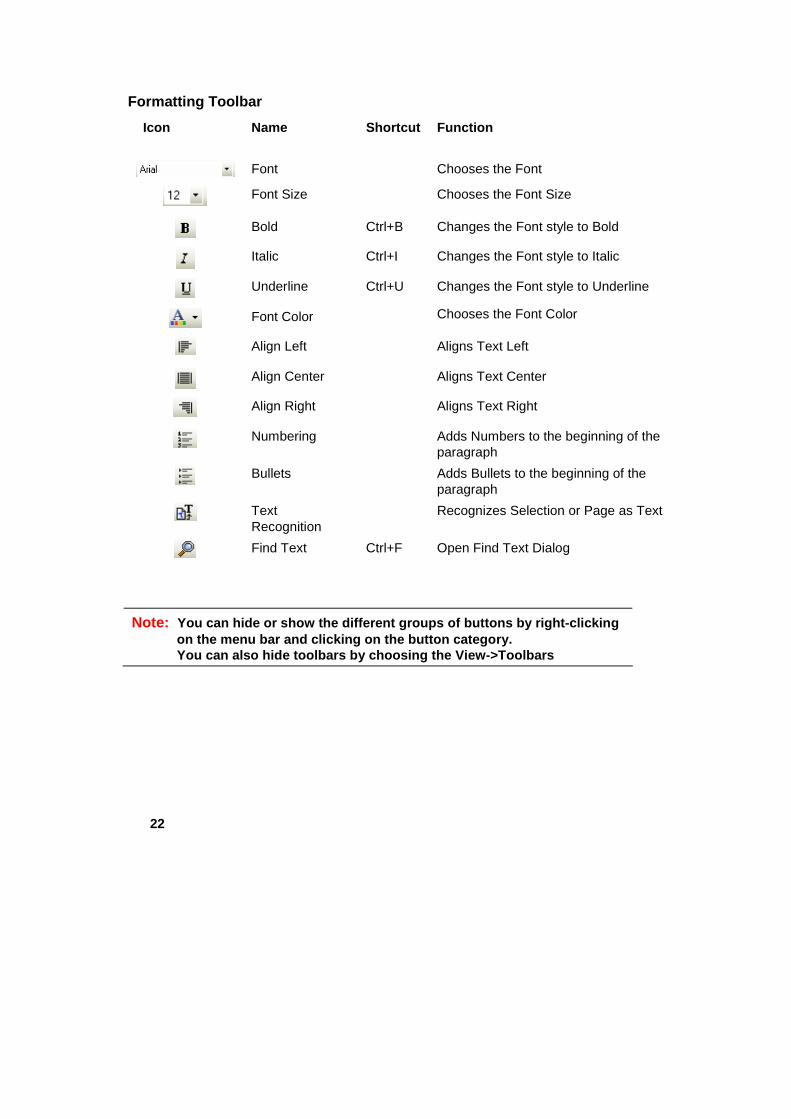
Formatting Toolbar
Icon Name Shortcut Function
Font Chooses the Font
Font Size Chooses the Font Size
Bold Ctrl+B Changes the Font style to Bold
Italic Ctrl+I Changes the Font style to Italic
Underline Ctrl+U Changes the Font style to Underline
Font Color Chooses the Font Color
Align Left Aligns Text Left
Align Center Aligns Text Center
Align Right Aligns Text Right
Numbering Adds Numbers to the beginning of the paragraph
Bullets Adds Bullets to the beginning of the paragraph
Text Recognition
Recognizes Selection or Page as Text
Find Text Ctrl+F Open Find Text Dialog
Note: You can hide or show the different groups of button s by right-clicking on the menu bar and clicking on the button category . You can also hide toolbars by choosing the View->To olbars

23
To set up the page:
1. From the main menu select Page > Page Setup or Tools > Preferences .
The Preferences dialog box opens with the Page Setup tab on top.
2. Modify the settings to reflect the page that is clipped to the Receiver or whatever page you need. You can specify each of the following:
Page Color Size and dimensions Measurement units (millimeters or inches) Orientation (portrait or landscape)
To set the page color:
1. In the Preferences dialog box under the Page tab, click the Page Color drop-down arrow and select from the listed colors.
2. Click OK.

24
Margins and Grids Like a physical sheet of paper, you can select the Pen&Ink page to have both grids (or lines) and margins.
To set up the page grid:
1. From the main menu select View > Grid .
2. Click the Grid setting.
To set up a page margin:
1. From the main menu select View > Margin .
2. Click the Margin setting.

25
Editing The Pen & Ink Editor lets you edit drawings stored on your USB Receiver. You can perform, Handwritten Recognition (If supported), move, delete, add lines, add pictures, change colors, and so much more. Pen&Ink Editor lets you customize your document quickly and easily, by the line or by the page:
Ink Properties Page Properties
• Changing the Ink Color • Changing the Page Color
• Changing the Ink Thickness • Adding a New Page
• Moving Ink • Deleting the Current Page
• Erasing Ink • Rotate Ink
• Deleting Ink • Play Page Data
• Recognizing Ink • Find
Editing the Ink Properties There are several ways that you can edit drawn lines in Pen&Ink Editor:
• Changing the Ink Color
• Changing the Ink Thickness
• Moving Ink
• Erasing Ink
• Deleting Ink
• Recognizing Ink
26
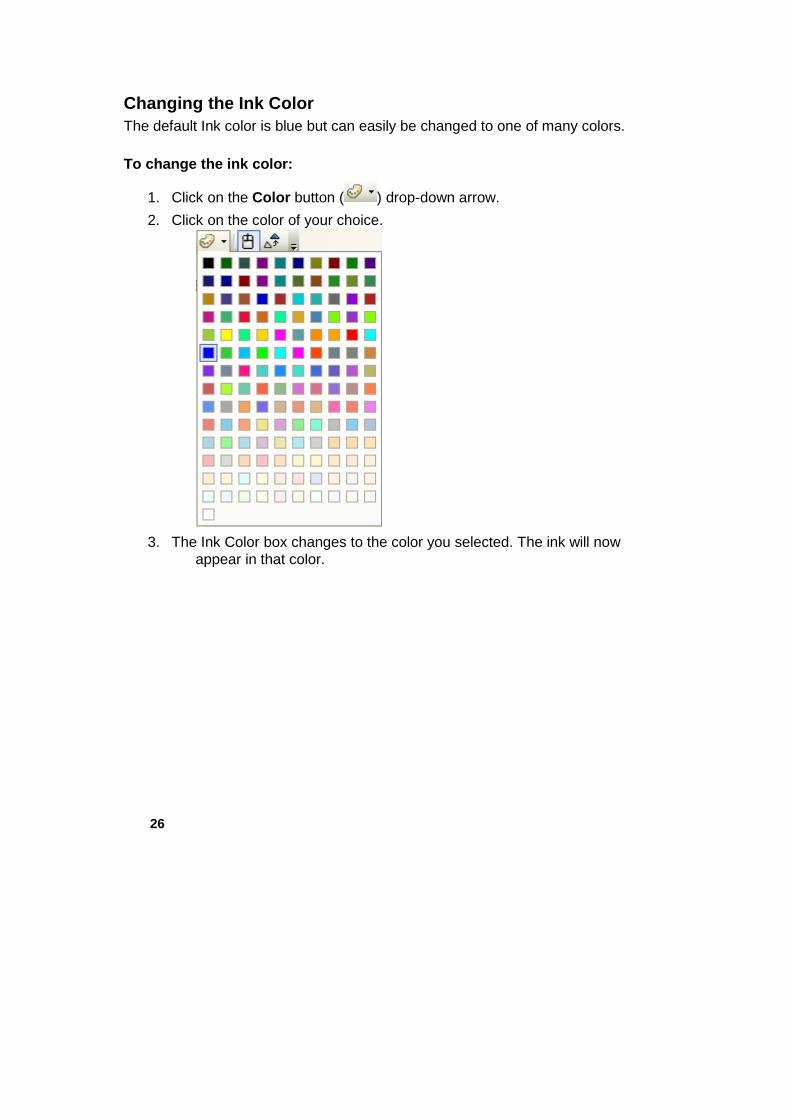
Changing the Ink Color The default Ink color is blue but can easily be changed to one of many colors.
To change the ink color:
1. Click on the Color button ( ) drop-down arrow.
2. Click on the color of your choice.
3. The Ink Color box changes to the color you selected. The ink will now
appear in that color.

27
Changing the Ink Thickness By default, the ink thickness is set to 1 pixel. You can easily modify this setting so that the line can be as thin as a ballpoint pen tip, or as thick as a marker.
To change the ink thickness:
1. Click on the pen or marker drop-down arrow.
2. Select the line thickness.
The pen or marker now draws lines according to your new thickness setting.
Moving ink Pen&Ink Editor combines the free-flowing ease of writing on a page with the versatility of being a digital image. This is perhaps most apparent in the way you can move a portion of a page’s content from one place to another.
To move ink:
1. Select the area you want to move in one of the following ways:
2. Place the mouse in the selected area , a hand icon will appear and then move the selected area to the wanted location
Erasing Ink Like regular pens, the Digital Pen does not have an eraser, but Pen&Ink Editor does. For large areas, however, it is easier to use to select and use the delete function.

28
To erase ink:
1. Click the Eraser . You can also click the Eraser drop-down arrow and choose the Eraser thickness.
2. Move the eraser icon over the line or area you want to erase.
Note: If you unintentionally erase an area you can undo t he erasure by selecting Edit > Undo from the Main Menu, or use the shortcut Ctrl+Z
Delete Selected Ink Pen&Ink Editor lets you easily delete any ink you have drawn.
To delete selected ink: 1. Select the area you want to delete.
2. Press Delete or select Edit > Delete from the Main Menu, or press on Del button.
Recognizing Ink Pen&Ink Editor lets you easily recognize ink as text,
To Recognize selected ink: 1. Select the area you want to recognize.
2. Press ( ) or select Edit > Convert To Text from the Main Menu.

29
Insert an Image Although the default page color is white, you can change the color, or add a background image for a specific page. The image may be subtle and give the look and feel of stationary, or it might be a scanned image that you can mark up.
To insert an image:
1. From the menu bar select Edit -> Insert Picture .
The Open File dialog box opens.
Select the image file you want to use as your background.
2. Click Open . The image now appears on the page.

30
Inserting a New Page Each Pen&Ink Editor document starts with just a single page, but you can easily add additional pages.
To insert a new page:
Click on the Insert New Page ( button. This operation Will insert a page after the marked page.
Deleting the Current Page There are times when you may wish to keep the document, but remove one of its pages. You can also repeat this process to remove several pages, one after the other.
To delete the current page:
• Click on the Delete Current Page ( ) button.

31
Find Text or Ink In case you want to search for a recognized ink or a text you entered on the document you can use the Find Dialog.
To find Text or Ink:
• Click on the Find ( ) button or from the Menu Edit->Find .
• Type your search phrase and click on Find Next button.

32
Navigating There are several levels of navigation within Pen&Ink Editor: within the page, within the document, and between documents. Each of these levels is explored in each of the following sections:
• Moving from Page to Page within the Document
• Opening a New or Existing Document
Moving from Page to Page within a Document Your document starts out as a single page, and if necessary you can insert page after page. There are two ways to jump from one page to another.
The Previous and Next Buttons
Pen&Ink Editor has Previous and Next buttons that will jump from the current page to the previous or next one.
The Pages Panel
Down the left side is the Pages Panel. Each page is displayed as a thumbnail. Click on a thumbnail to jump to the corresponding page.

33
Opening a New or Existing Document When you first open Pen&Ink Editor, you automatically start with a new document/. You can also open a previously saved document or, at a later time, start from scratch with a new, blank document.
To create a new document:
• Click on the New ( ) button.
A new document opens.
Note: If you click on the New button while working in an unsaved document, you will be prompted to first save your current fil e. If you click Yes, you will be asked to give your current document a n ame and file location. If you click No then a new file will open and the old one will be lost.

34
To open an existing document:
1. Click the Open ( ) button.
2. In the Open dialog box select the document. Select Files of type: .ant or .ELI.
3. Click Open .
The document now appears in the Writing Area.

35
Saving Pen&Ink Editor allows you to save changes you made on an ELI or .ant file. Both files will be saved as an .ant file. Pen&Ink Editor allows you to save your document in the following ways:
• Save
• Save As
• Save the Current Page As a Picture
To save the document:
• Click on the Save ( ) button.
To save the document under a new name:
1. From the main menu select File > Save As .
2. Enter a name for your file.
3. Click Save.
To save the current page as a picture:
4. From the main menu select Page > Save Page As .
Note: This feature saves only the current page as a pictu re. If you have a multiple-paged document and you want to save each p age as a picture, you will have to select each page and then select Save Current Page to Picture.

36
5. In the File name field enter your name for the picture.
6. The default file type is JPEG (.jpg). You can click on the Save as type drop-down arrow and select a different file.
7. Click Save.

37
Printing a Document You can print a hard copy of a Pen&Ink Editor file or you can email it to someone as pictures.
To print the file:
1. Click on the Print ( ) button.
2. In the Print dialog box, set up the printing job as necessary and click OK.
38
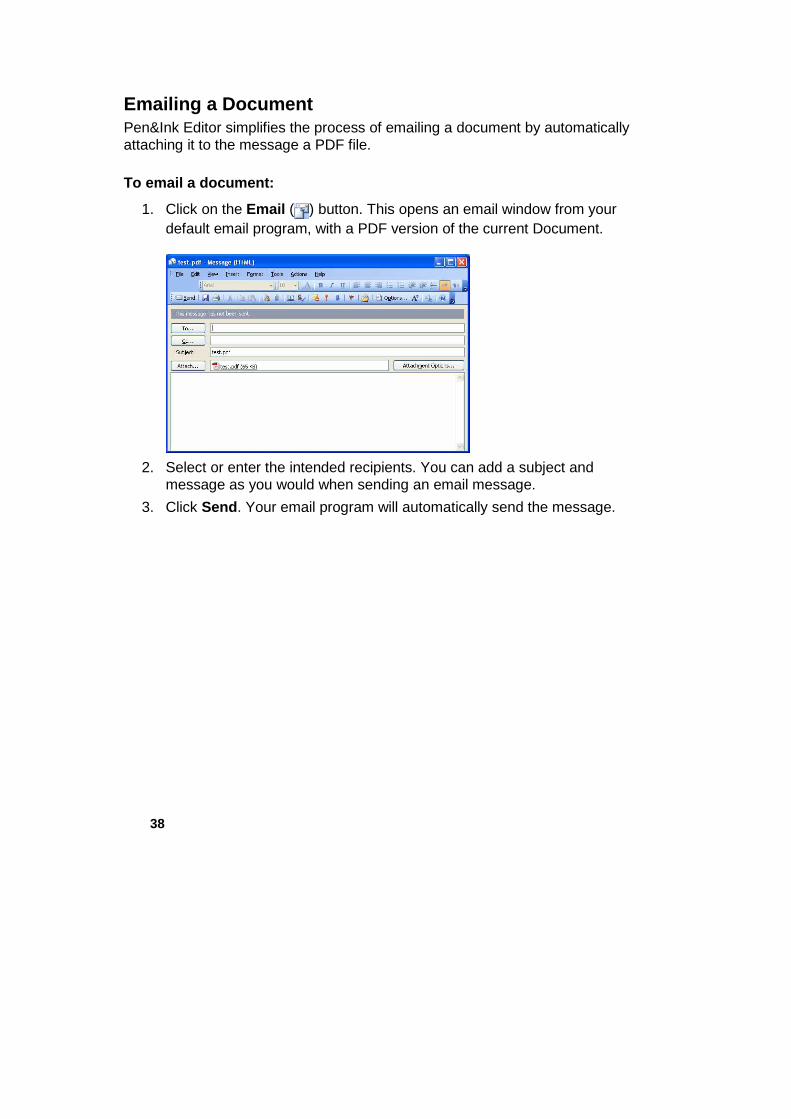
Emailing a Document Pen&Ink Editor simplifies the process of emailing a document by automatically attaching it to the message a PDF file.
To email a document:
1. Click on the Email ( ) button. This opens an email window from your default email program, with a PDF version of the current Document.
2. Select or enter the intended recipients. You can add a subject and
message as you would when sending an email message.
3. Click Send . Your email program will automatically send the message.

39
Export the Document Pen&Ink Editor has an ability to export your notes in several file formats. The supported file formats are: PDF, RTF and TXT.
To export a document:
1. From the main menu select File > Export .
2. The Save As dialog box appears.
3. In the File name field enter your name for the document.
You can click on the Save as type drop-down arrow and select a different file.
4. Click Save.

40
Rotate Ink Pen&Ink Editor enables you to rotate the ink of the current document.
To rotate ink:
1. From the main menu select Edit > Rotate Ink
2. Enter the requested angle.
3. Select the required page range.
4. Click on OK.

41
Play Page Data Pen&Ink Editor enables you to replay writing sequence in case you accidentally didn't press on the New Page button and Multi-Layered page was created.
The Play Data reproduces writing sequence made while writing the document.
Note: This feature works only on files in ELI format (The native format of the USB Receiver).
To Play Data:
1. From the main menu select Page > Play Data
2. Move the Data slider to the requested position, the document data
should appear till this location on the Writing Area.
3. Press on the Insert New Page button to add a new page if needed and then play the rest of the data.
4. Repeat Step 3 as much as needed.
5. Click on OK.
42
Pen & Ink Viewer
Introduction The Pen&Ink Viewer application is a simplified version of Pen&Ink Viewer software which enables viewing of ELI files without the need to install any software.
In this guide you will find everything you need to know about how to use Pen&Ink Viewer.

43
Pen & Ink Viewer Main Window The majority of the Pen&Ink Viewer screen is comprised of the Paper Area. To the left is the Pages panel, and above are the Main menu and several sets of buttons.
The Pages Panel On the left is the Pages panel in the top right corner.
When you click on a page thumbnail, it is displayed in the main window.
The Main Menu All of the Pen&Ink Viewer's features and functions are found under the main menu headings.

44
The Buttons The most common tasks and features can be accessed with the single click of a button. The following are the available buttons, their function, and the keyboard shortcut for them:
File Toolbar
Icon Name Shortcut Function
Open Ctrl+O Opens a file
Print Ctrl+P Prints the document
Email Ctrl+M Emails the document through your default email program in Jpeg format
Edit Toolbar
Icon Name Shortcut Function
Undo Ctrl+Z Undo/remove the last action performed
Redo Ctrl+Y Redo the last action performed

45
Pages Toolbar
Icon Name Shortcut Function
Previous Page PgUp Previous Page
Next Page PgDn Next Page
Zoom Toolbar
Icon Name Shortcut Function
Zoom Out Decreases the Zoom
Zoom In Increases the Zoom
Zoom Resizes the view to a specified percentage
46
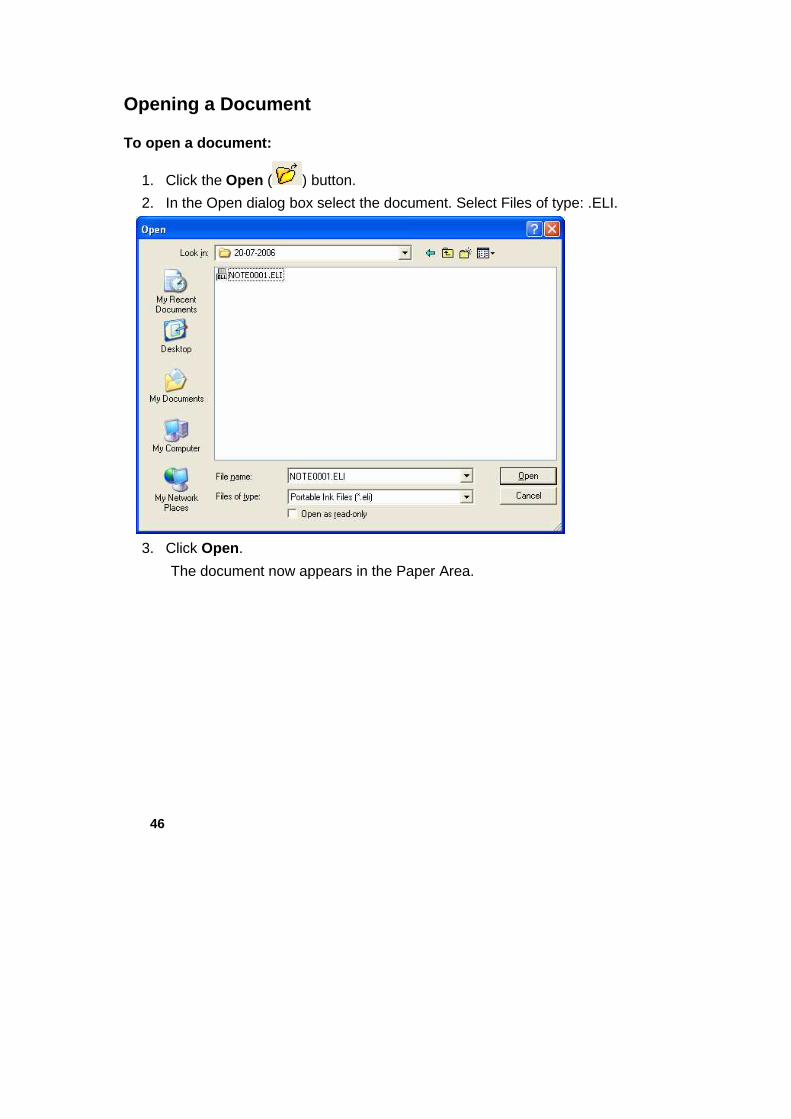
Opening a Document
To open a document:
1. Click the Open ( ) button.
2. In the Open dialog box select the document. Select Files of type: .ELI.
3. Click Open .
The document now appears in the Paper Area.
47
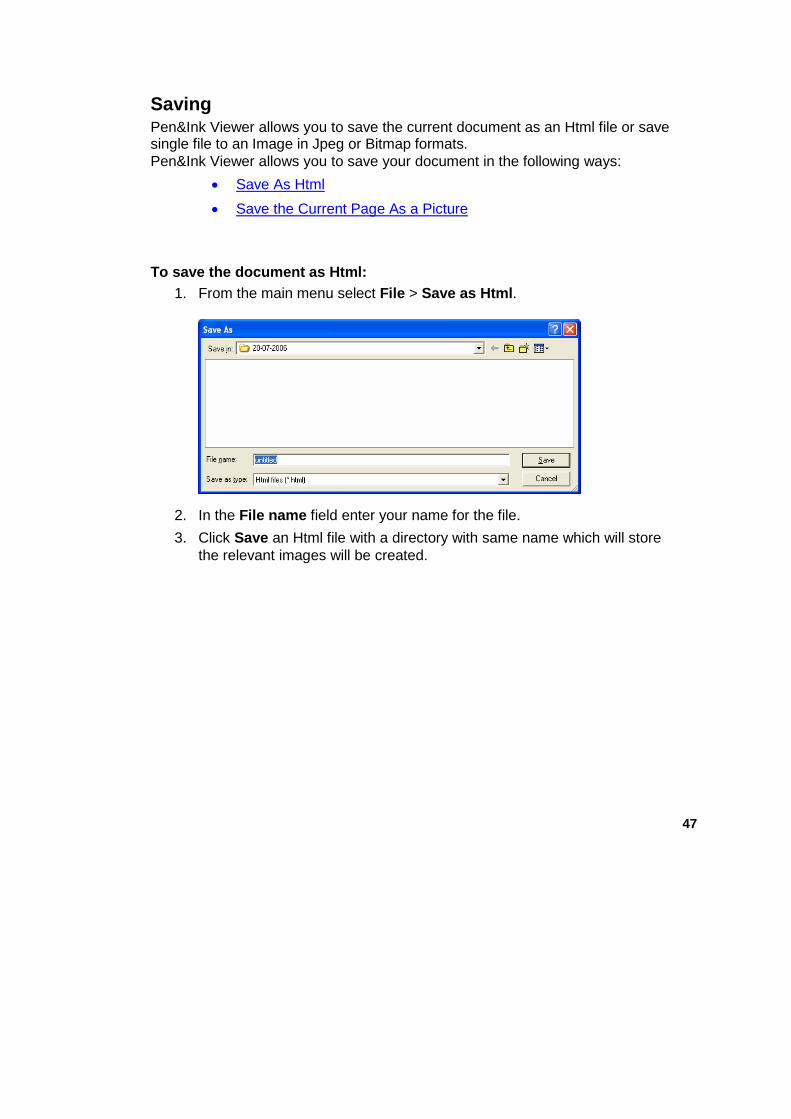
Saving Pen&Ink Viewer allows you to save the current document as an Html file or save single file to an Image in Jpeg or Bitmap formats. Pen&Ink Viewer allows you to save your document in the following ways:
• Save As Html
• Save the Current Page As a Picture
To save the document as Html: 1. From the main menu select File > Save as Html .
2. In the File name field enter your name for the file.
3. Click Save an Html file with a directory with same name which will store the relevant images will be created.

48
To save the current page as a picture:
1. From the main menu select Page > Save Page As .
Note: This feature saves only the current page as a pictu re. If you have a multiple-paged document and you want to save each page as a picture, you will have to select each page and then select Save Current Page to Picture.
2. In the File name field enter your name for the picture.
3. The default file type is JPEG (.jpg). You can click on the Save as type drop-down arrow and select a different file.
4. Click Save.

49
Printing a Document You can print a hard copy of a Pen&Ink Editor file or you can email it to someone as pictures.
To print the file:
1. Click on the Print ( ) button.
2. In the Print dialog box, set up the printing job as necessary and click OK.
Note: • Printing large files at a high quality requires more time. You can
change the quality (and speed) through the Quality slider, which is accessed by selecting Tools > Preferences , and then clicking on the Printing tab.
• Before printing a landscape orientated page, you need to change the page orientation from the Print dialog.

50
Emailing a Document Pen&Ink Editor simplifies the process of emailing a document by automatically attaching it to the message a PDF file.
To email a document:
1. Click on the Send Email ( ) button. This opens an email window from your default email program, with each Pen&Ink Editor document page attached as an (JPEG) image.
2. Select or enter the intended recipients. You can add a subject and
message as you would when sending an email message.
3. Click Send . Your email program will automatically send the message.
To email a page:
1. From the main menu select Page > Email Current Page
2. Select or enter the intended recipients. You can add a subject and message as you would when sending an email message.
3. Click Send . Your email program will automatically send the message

51
Rotate Ink Pen&Ink Viewer enables you to rotate the ink of the current document.
To rotate ink:
5. From the main menu select Edit > Rotate Ink
6. Enter the requested angle.
7. Select the required page range.
8. Click on OK.
52
Troubleshooting This section lists the more common issues or problems you may encounter, and how to resolve them.
Installation Guide
Why does my PC ask (sometimes) to restart at the end of the installation process?
If necessary, Windows Installer (MSI) will be installed before DIGITAL PEN &USB FLASH DRIVE software, restart may be required
I cannot activate recognizer
Recognizer is not included with the installation. you can go to Microsoft site ( link attached) to get the latest version (http://www.microsoft.com/downloads/details.aspx?familyid=080184dd-5e92-4464-b907-10762e9f918b&displaylang=en#QuickInfoContainer )
.
Using the Digital Pen The Receiver does not "see" my Digital Pen. What ca n I do?
There are several factors that affect the reception and signal between the Receiver and the Digital Pen. First of all, there must be a clear line of sight between the two devices. This means that there cannot be any object in between them that might block the infrared signal. Also, look to see how you write. If you hold the pen with your fingers curled around in such a way that blocks the line of sight, then the Receiver will no longer detect the Digital Pen. Loud noises can also affect reception.

53
How do I replace the Digital Pen's batteries?
Please replace the batteries as instructed in "Installing Your_Digital_Pen's Battery" in the Installation Guide, using 393 (watch) batteries.
High CPU usuage while using Microsoft Tablet PC Rec ogniser with Pen&Ink Editor
Handwrittent recognition is a very CPU consuming feature and while using it in Pen&Ink Editor it consumes a lot of CPU resources
High memory consumption while playing data in Pen&I nk Editor
The Play Data operation requires a lot of memory resources. Upon closing the Play data dialog these memory resources will be released and memory consumption will return to normal level
If the new page button was not active
In order to have the "new page" active the pen should be in receive range
Some of the data in the beginning was not saved
Start writing only when left led (Power) stops blinking and is red.
High CPU usage while using Microsoft Tablet PC Reco gnizer with Pen & Ink Editor?
Handwritten recognition is a very CPU consuming feature and while using it in Pen&Ink Editor it consumes a lot of CPU.
High memory consumption while Playing data in Pen & Ink Editor?
The Play Data operation requires a lot of memory resources. Upon closing the Play Data dialog these memory resources will be freed and the Memory consumption will return to a normal level.