digital libraries and technology- enhanced … · the deliverable is therefore split into two...
TRANSCRIPT
1
DIGITAL LIBRARIES AND TECHNOLOGY-ENHANCED LEARNING
TARGET Transformative, Adaptive, Responsive and enGaging EnvironmenT
European Commission Seventh Framework Project (IST 231717)
Deliverable D8.3:
Training Methodology and Materials
Document ID: 8.3
Workpackage: 8
Version: V 1.0
Author(s): Stefano Bocconi (Cyntelix), João Costa Fernandes (INESC), Charlene Jennett (UCL), Simone Kopeinik (TUG), Elisabetta Parodi (ELS), Sobah Petersen (Sintef), Martin Ruskov (UCL), Guilherme Santos (INESC), Stefano Travelli (Cyntelix)
Main Contributor(s): Michael Bedek (TUG), Linda Cathrine Hald (Sintef), João Madeiras Pereira (INESC), Hans Torvatn (Sintef), Matthias Zimmermann (Atos)
Date: 10-02-2012
Status: final
Dissemination Level: PU

231717 D8.3 – Training Methodology and Materials
Revision History
Date Version Author/Contributor Comments
12.12.2011 V0.1 ELS Initial structure of the deliverable
20.01.2012 V0.2 ELS Updated structure
20.01.2012 V0.3 ELS, Sintef Refined structure
31.01.2012 V0.4 Cyntelix, ELS, INESC, Sintef, TUG,
UCL
Added content, early reviews
01.02.2012 V0.5 Cyntelix, ELS, Sintef, TUG, UCL
Last polishing and refinements
10.02.2012 V1.0 SINTEF Correction of typing errors, upgrading of version number
Disclaimer This document contains material, which is copyright of certain TARGET consortium parties and may not be reproduced or copied without prior written permission. The information contained in this document is the proprietary confidential information of the TARGET consortium parties and may not be disclosed except in accordance with the consortium agreement. The commercial use of any information in this document may require a licence from the proprietor of that information. Neither the TARGET consortium as a whole, nor a certain party of the TARGET consortium warrant that the information contained in this document is capable of use, nor that use of the information is free from risk, and accepts no liability for loss or damage suffered by any person using the information. This document does not represent the opinion of the European Community, and the European Community is not responsible for any use that might be made of its content.

231717 D8.3 – Training Methodology and Materials
TABLE OF CONTENTS
1 Introduction .................................................................................................................................. 11
1.1 Objective of this Document ...................................................................................................... 11
1.2 Approach to training ................................................................................................................. 11
1.3 Overview of the Deliverable ..................................................................................................... 11
2 Training Methodology ................................................................................................................... 14
2.1 Theoretical Background ............................................................................................................ 14
2.2 Target Audiences ...................................................................................................................... 15
2.3 Training Modalities ................................................................................................................... 15
2.4 Training for Evaluation Studies ................................................................................................. 16
3 TARGET Learning Process .......................................................................................................... 18
4 User Guide .................................................................................................................................... 21
4.1 Installation ................................................................................................................................ 21
4.2 TARGET Manager (TM).............................................................................................................. 26 4.2.1 Purpose ................................................................................................................................................. 26 4.2.2 Interface ............................................................................................................................................... 26 4.2.3 Tutorial ................................................................................................................................................. 30
4.3 Competence Analyzer (CA) ....................................................................................................... 33 4.3.1 Purpose ................................................................................................................................................. 33 4.3.2 Interface ............................................................................................................................................... 34 4.3.3 Tutorial ................................................................................................................................................. 36
4.4 Lounge ....................................................................................................................................... 41 4.4.1 Purpose ................................................................................................................................................. 41 4.4.2 Interface ............................................................................................................................................... 41 4.4.3 Tutorial ................................................................................................................................................. 43
4.5 Knowledge Ecosystem Navigator (KEN) .................................................................................... 43 4.5.1 Purpose ................................................................................................................................................. 43 4.5.2 Interface ............................................................................................................................................... 44 4.5.3 Tutorial ................................................................................................................................................. 49
4.6 Game ......................................................................................................................................... 50 4.6.1 Purpose ................................................................................................................................................. 50 4.6.2 Interface ............................................................................................................................................... 50 4.6.3 Tutorial ................................................................................................................................................. 69
4.7 Competence Performance Assessment (CPA) .......................................................................... 70 4.7.1 Purpose ................................................................................................................................................. 70 4.7.2 Interface ............................................................................................................................................... 70

231717 D8.3 – Training Methodology and Materials
4.7.3 Tutorial ................................................................................................................................................. 73
5 Conclusions ................................................................................................................................... 74
6 References .................................................................................................................................... 75
7 Bibliography .................................................................................................................................. 76

231717 D8.3 – Training Methodology and Materials
LIST OF FIGURES
Figure 1 - Main Activities in the TARGET system shown as a flow diagram. ........................................ 19
Figure 2 - Learning Process. .................................................................................................................. 20
Figure 3 - TM installation screen 1. ....................................................................................................... 22
Figure 4 - TM installation screen 2. ....................................................................................................... 23
Figure 5 - TM installation screen 3. ....................................................................................................... 24
Figure 6 - TM installation screen 4. ....................................................................................................... 24
Figure 7 - TM installation screen 5. ....................................................................................................... 25
Figure 8 - TM installation screen 6. ....................................................................................................... 26
Figure 9 - TM initial screen. ................................................................................................................... 27
Figure 10 - TM login window. ............................................................................................................... 27
Figure 11 - TM displays advanced information. .................................................................................... 28
Figure 12 - TM registration window...................................................................................................... 28
Figure 13 - Overview of the Learning Plan Window. ............................................................................ 29
Figure 14 - Expanded Learning Plan. ..................................................................................................... 29
Figure 15 - TM User Profile. .................................................................................................................. 30
Figure 16 - Pop-up listing not available services. .................................................................................. 30
Figure 17 - Learning Strategy pop-up window, showing the Community Generated Knowledge option. ................................................................................................................................................... 31
Figure 18 - Black overlay window showing the competences defined in the Learning Plan. ............... 33
Figure 19 - In this picture you can see the CA framework that provides basic and common functionality to competence visualizations. ......................................................................................... 34
Figure 20 - The Competence Structure Editor of the CA tool provides an interface to create competences and competence structures. .......................................................................................... 35
Figure 21 - Shows the Tabular View of the CA – Tool. .......................................................................... 36
Figure 22 - UCP and TCP visualization. .................................................................................................. 37
Figure 23 - Competence Analyzer with pop-up menu item to edit competences. .............................. 38
Figure 24 - Hasse Diagram Visualization of a Competence Structure. ................................................. 39

231717 D8.3 – Training Methodology and Materials
Figure 25 - Creating a prerequisite relation between “Openness” and “Creativity”. ........................... 40
Figure 26 - Possibly resulting Competence Structure. .......................................................................... 41
Figure 27 - Personal Organizer: Chat function (A) and Teleport function (B). ...................................... 41
Figure 28 - Messenger Interface. .......................................................................................................... 42
Figure 29 - Chat Interface. .................................................................................................................... 43
Figure 30 - Overview of KEN interface. ................................................................................................. 45
Figure 31 - Story Interface. ................................................................................................................... 46
Figure 32 - Background Interface. ......................................................................................................... 46
Figure 33 - Roles Interface. ................................................................................................................... 47
Figure 34 - Experience Interface. .......................................................................................................... 47
Figure 35 - Comments Interface. .......................................................................................................... 48
Figure 36 - Tutorial of lounge. ............................................................................................................... 49
Figure 37 - Game screen: office. ........................................................................................................... 50
Figure 38 – Briefing: background. ......................................................................................................... 51
Figure 39 - Briefing: WBS. ..................................................................................................................... 52
Figure 40 - Briefing: characters. ............................................................................................................ 53
Figure 41 – Briefing: help. ..................................................................................................................... 54
Figure 42 - Gantt tool. ........................................................................................................................... 55
Figure 43 - Gantt tool: create/edit task. ............................................................................................... 56
Figure 44 - Location market tool. .......................................................................................................... 57
Figure 45 - Account tool. ....................................................................................................................... 58
Figure 46 - Market tender tool. ............................................................................................................ 59
Figure 47 - Market sales order tool....................................................................................................... 60
Figure 48 - Inventory tool. .................................................................................................................... 61
Figure 49 - Teleport tool. ...................................................................................................................... 62
Figure 50 - Interaction with characters. ................................................................................................ 63
Figure 51 - Examine tool. ...................................................................................................................... 64
Figure 52 - Chat tool. ............................................................................................................................. 65
231717 D8.3 – Training Methodology and Materials
Figure 53 - Interpreted chat window. ................................................................................................... 66
Figure 54 - End game. ........................................................................................................................... 67
Figure 55 - Self-assessment. ................................................................................................................. 68
Figure 56 - Tutorial of game. ................................................................................................................. 69
Figure 57 - Sample CPA screen. ............................................................................................................ 70
Figure 58 - User's information area. ..................................................................................................... 71
Figure 59 - Experience Replay. .............................................................................................................. 71
Figure 60 - Competences Graph. .......................................................................................................... 72
Figure 61 - Graph settings. .................................................................................................................... 73

231717 D8.3 – Training Methodology and Materials
LIST OF TABLES
Table 1 - Requirements for the TARGET Platform Client. ..................................................................... 21

231717 D8.3 – Training Methodology and Materials
GLOSSARY
AM Artificial Mentor
CA Competence Analyzer
CPA Competence Performance Analyzer
DM Didactical Modeller
KE Knowledge Ecology
KEN Knowledge Ecology Navigator
LS Learning Strategy
CGK [LS] Community Generated Knowledge [Learning Strategy]
CbKST [LS] Competence-based Knowledge Space Theory [Learning Strategy]
OM Overload Manager
PPAC Psycho-Physiological Assessment Component
TM TARGET Manager
TN TARGET Navigator

231717 D8.3 – Training Methodology and Materials
EXECUTIVE SUMMARY
This deliverable documents the Training Methodology and Materials used to support the use of the TARGET platform by key stakeholders, namely teachers, students, HR, employees and support staff.
The TARGET platform is a complex system made up by a number of modules and subsystems, which cannot be expected to be mastered at first attempt without any training. In this document we present background knowledge about TARGET training and a collection of materials to assist training someone on TARGET. The contents of this deliverable will also provide the basis for developing specific training material. The deliverable is therefore split into two parts:
1. In Part I, Training methodology, we present the theoretical basis behind the TARGET training planning. We briefly describe the different training modalities and target audiences possible, and then we give an overview of the training methodology that will be used in the TARGET summative evaluation studies.
2. In Part II, Training materials, we present the actual training means available to end users. First we describe the TARGET learning process, which is the flow of activities that a user or learner may go through as s/he uses the TARGET system. Then we present the user guides, where we describe the capabilities that are offered by the TARGET system. The user guide includes instructions for: installation, TARGET Manager (TM), Competence Analyzer (CA), Lounge, Knowledge Ecology Navigator (KEN), Game, and Competence Performance Analyzer (CPA). The content of this deliverable is aimed at a general audience that may include various target groups as well as training for different purposes.
In addition, it is planned that training videos will be created to demonstrate the main components of TARGET which may also serve as complementary material for training.

231717 D8.3 – Training Methodology and Materials
1 INTRODUCTION
1.1 Objective of this Document
This deliverable concerns the training about the TARGET learning process and platform usage. The adopted training methodology has been described. The overall TARGET learning process is also summarized, as it is extensively detailed by other deliverables. The training content that supports training about the platform usage, namely installation and user guides, has been documented as much as possible, with the description of each single module divided in three sub-parts: purpose of the module, presentation of the graphical interface and usage guide. This document therefore outlines the general training principles and gathers together all the training documents for the different modules of the TARGET platform. The contents of this deliverable come indeed from partners responsible for evaluations and training and from software development partners.
1.2 Approach to training
Training is essentially the instructing of others in information new to them and its application. The process of training in the TARGET platform can be rooted in two of the theories TARGET is being grounded on: cognitive load theory and variation theory, as explained into the following. We identified five training principles to be implemented in TARGET training: guidance, avoiding overload, individualized explanations, active learning and worked examples. The identified target audience belongs to one out of corporate or academic environment. Training modalities are tailored time by time depending on the specific context settings.
1.3 Overview of the Deliverable
This deliverable is organized into two major parts. The first part (chapter 2) describes the training methodology. The second part (chapters3-4) contains the training materials, namely an introduction to the TARGET learning process and installation and user guides for the TARGET platform components as from the following:
• Section 4.2 TARGET Manager (TM)
• Section 4.3 Competence Analyzer (CA)
• Section 4.4 Lounge
• Section 4.5 Knowledge Ecosystem Navigator (KEN)
• Section 4.6 Game
• Section 4.7 Competence Performance Assessment (CPA)

231717 D8.3 – Training Methodology and Materials
The description of each single module divided in three sub-parts: purpose of the module, presentation of the graphical interface and usage guide. Conclusions, references and bibliography close the document.

231717 D8.3 – Training Methodology and Materials
PART I Training Methodology

231717 D8.3 – Training Methodology and Materials
2 TRAINING METHODOLOGY
Training is essentially the instructing of others in information new to them and its application. It may, and often does, involve the teaching of new skills, methods and procedures. In this chapter we will cover the following:
• Theoretical background – including training principles;
• Target audiences and their training needs;
• Training modalities – offline versus online;
• Training for the TARGET evaluation studies.
2.1 Theoretical Background
The process of training in the TARGET platform can be rooted in two of the theories TARGET is being grounded on: cognitive load theory and variation theory. There are epistemological differences between the two theories; however both agree that training is important for learners because acquainted to its use this will allow them to concentrate on the actual content being learned. In terms of cognitive load theory, the purpose of dedicated training about the environment before the actual learning is related to reducing the extraneous cognitive load related to using the TARGET platform (Merriënboer & Sweller, 2005). In terms of variation theory, dedicated training on the TARGET platform allows learners to draw their focal awareness away from usability of the software and focus on content (Marton & Booth, 1997).
We identified 5 training principles that will be implemented in TARGET training:
• Guidance. Users need clear direction and clear guidance on the steps they take (Heath & Heath, 2010). By developing a systematic plan for each training session, identifying what the training session should contain, this will ensure consistency in TARGET training across contexts.
• Avoiding overload. The training program must be designed to avoid the trainee’s cognitive overload (Merriënboer & Sweller 2005). In the context of interactive systems this is often being achieved through incremental introduction of different aspects of complexity. By making learners acquainted with using the software during the training session, it will reduce extraneous cognitive load when the learner later uses the platform for learning.
• Individualised explanations. Being able to personalise training for individual organisations should make the training more relevant to learners, and more engaging as a result. A recent study suggests that individualised explanations lower the incidence of clarifying questions, deepens understanding, and reduces the number of false beliefs about newly learned concepts (Wittwer et al, 2010).

231717 D8.3 – Training Methodology and Materials
• Active learning. It is important that trainees are given the opportunity to interact with the software during training. In contrast to a traditional lecture where students passively receive information from the trainer, active learning involves student activity and engagement in the learning process (see Prince, 2004 for a review of active learning research). Learners should be encouraged to interact with the learning material – i.e. gaining some “hands on” experience of the TARGET platform - and to engage in a discussion with the trainer.
• Worked examples. Worked examples are instructional devices that provide an expert’s problem solution for the learner to study (Atkinson et al., 2000). Worked examples are associated with early stages of skill development, and are especially useful when a learner is encountering software for the first time. By having experiences of other users in the KEN, the TARGET platform provides examples for users that they can observe and learn from.
2.2 Target Audiences
We foresee mainly two kinds of environment for TARGET deployment, corporate and academic.
Within these environments, there are several possible training target audiences for TARGET:
• Universities: teachers, students, support staff.
• Industry: HR, employees, support staff.
Training for other users (teachers, HR, support staff) differs from training for learners, in the sense that training is more intended to allow them to effectively facilitate the learning process. Their training would be more specific to their role in the user’s learning. For example, the HR manager might set up target job profiles for their employees in the CA. The teacher might help the learner interpret their performance indicators in the CPA. Training teachers, HR and support staff is outside the scope of the TARGET evaluation studies, and as a result the training materials in Part II of this deliverable are directed to learners only. However it is important to note these other potential users, for the future scope of the TARGET platform.
2.3 Training Modalities
Due to the early development stage of the product, training will need to be conducted in face-to-face sessions, encouraging users to actively participate and to ask for further clarifications when necessary. Training documentation (see Part II) will be provided to the user in paper form during and after the training session.
For the future scope of TARGET, it is beneficial to create also online training for when face-to-face training is not possible. Work Package 9 will be creating training videos to demonstrate the main components of TARGET. These will be showcased in a later deliverable.

231717 D8.3 – Training Methodology and Materials
2.4 Training for Evaluation Studies
The training methodology will be implemented within the summative evaluation studies of the TARGET platform (see D8.1 for more detailed description of planned evaluations). The summative evaluation studies will be conducted from M40 onwards and will be described in D8.2. Two of these studies are planned in university classrooms, and one is planned in an enterprise context. For all summative evaluation studies, it is planned that training will be provided in the first session and training materials will be disseminated.
The training session will be organised as follows:
1. The trainer will begin with a short narrative about the pedagogical paradigm that TARGET adopts, making sure that learners understand the epistemological position of social constructivism and game-based learning.
2. There will be a short interactive demonstration of the software, emphasizing the two main approaches towards the platform: goal-oriented learning or self-directed learning (detailed further in D1.1, Chapter 4). Participants will be guided through the main features of the TARGET learning process, which will involve setting up their first learning plan, and moving around the lounge and game environment. See Chapter 3 of this deliverable for more information about the TARGET learning process. They will be given the opportunity to ask questions during the demonstration.
3. During the session, participants will be given the user manual. Relevant sections of the user manual will be referred to during the demonstration when necessary. All participants will be able to take this user manual away with them after the session and to read it in their own time. See Chapter 4 of this deliverable for the user manual.
4. Along with the user manual, participants will be given the email contact details of the trainer. If necessary they can contact the trainer with any further questions they have about using the game or any problems that they come across.
It will be the role of the trainer to check that the institution has the necessary requirements to run the TARGET platform client (see installation instructions, section 4.1). Trainers are expected to adapt the training methodology to the respective trainees that they are addressing. Depending on the time constraints of the classroom/ workplace, the training session will be planned to last for 20 minutes to 1 hour. Ideally the classroom teacher/ work manager will be present during the training session, to provide additional encouragement to participants.

231717 D8.3 – Training Methodology and Materials
PART II Training Materials

231717 D8.3 – Training Methodology and Materials
3 TARGET LEARNING PROCESS In this chapter we will present the flow of activities that a user or learner may go through as s/he uses the TARGET system. The contents of this chapter are based on the TARGET Learning Process, described in the deliverable D2.2 and the user scenario introduced in the deliverable D1.3 Conceptual Framework, chapter 2 and described as a process in section 10.6 of that deliverable. The motivation for including this chapter is to present the process-view in using TARGET, which will provide the input for conducting needs and tasks analyses in designing specific training material. Then in the chapter that follows (Chapter 4) we will describe the functionalities that are offered by the TARGET system.
The TARGET learning Process is presented from the user's perspective, where a workflow approach has been taken to show the activities that can take place in the TARGET platform.
The modalities of access to the TARGET platform are depicted by Figure 1. Once the user creates an account and log-ins, he can then proceed to do any of the following activities:
• Manage learning plans (TARGET Manager, 2D mode)
• Manage the learner profile (CA, 2D mode)
• Navigate through the knowledge (Lounge/KEN, 3D mode)
• Communication, virtual meetings and presence awareness ( Lounge, 3D mode)
When the user enters the Game component, more specifically the TARGET Lounge, he has two possibilities: communicate and socialise with the other users or to navigate through the knowledge in the Knowledge Ecology Navigator (KEN).This is described in Figure 2. When the user chooses to navigate through the KEN, the user can then proceed to play the game by either selecting stories vicariously or by following a learning plan suggested by the system. The user is able to change the learning plans by adapting the competence profile.
An overview of the capabilities was provided in the deliverable D1.3 Conceptual Framework. Note that the respective components of the TARGET architecture that implement the specific capabilities are listed alongside the capabilities.
The user accesses the components for the game by navigating through the knowledge and proceeds to play the game and comment on an experience through the KEN.

19
Figure 1 - Main Activities in the TARGET system shown as a flow diagram.
In Figure 1 the circles represent start and end events, the diamonds represent decision points or choice of functionalities, the rounded shadowed boxes represent the high level functionalities and the coloured rectangular boxes represent other low-level functionalities that are used by the learner in the scenario.

231717 D8.3 – Training Methodology and Materials
Figure 2 - Learning Process.
In Figure 2 the circles represent start and end events, the diamonds represent decision points or choice of functionalities, the rounded shadowed boxes represent the high level functionalities and the coloured rectangular boxes represent other low-level functionalities that are used by the learner in the scenario.

231771 D7.3 – TARGET Integrated Platform
21
4 USER GUIDE
This chapter describes the TARGET functionalities in detail. The functionalities of the TARGET platform can be described based on the main components of the platform and the capabilities supported by each component. In this chapter we will cover the following:
• Installation;
• TARGET Manager (TM);
• Competence Analyzer (CA);
• Lounge;
• Knowledge Ecology Navigator (KEN);
• Game;
• Competence Performance Analyzer (CPA).
4.1 Installation
An installer procedure is provided in order to install the client components needed to run the platform software. TARGET Platform Client components have the following requirements, see Table 1.
Table 1 - Requirements for the TARGET Platform Client.
Requirement Minimum Recommended
CPU Intel Pentium D 3,0 GHz or AMD Athlon 64 X2 3800 +.
INTEL Core2 QUAD CORE Q9300
Memory 2GB 4 GB
Hard-disk 1 GB free space 5 GB free space
Graphics Graphics card with 256 MB of VRAM and pixel shaders or 4 texture units. Any card made in this millennium should work
NVIDIA GTX 460
Operating System Windows XP SP2 or later, with version DirectX 9.0c and .NET framework 4.0 or later
Windows XP SP2 or later, with version DirectX 9.0c and .NET framework 4.0 or later
Internet access Firewall access on TCP/UDP protocols and ports between 10600 and 10700
Firewall access on TCP/UDP protocols and ports between 10600 and 10699

231717 D8.3 – Training Methodology and Materials
The minimum version of the operating system is Windows XP SP2, however the recommended version and the one where the platform is fully tested is Windows 7. Installed executables are 32bit and will run on both 32 and 64 bit version of the operating system.
The current version of the TARGET Platform won't run on Apple Mac OS/X or in GNU/Linux systems.
Windows 7 users can quickly identify if their system meets the graphic card requirements, in that if the system is able to run the Aero interface, then it can run the TARGET Platform. As shown above, a further requirement is that users have the .NET framework installed in their system. For license reason, .NET cannot be included in the TARGET Platform installer and needs to be installed on the system before running the latter.
Special attention should be paid to the network (Internet access) requirements. No inbound connection is needed by the software and running in a private network behind a NAT is also feasible.
However, both TCP and UDP ports in range 10600-10699 should be open for outbound connections.
Once the requirements are met, the installation procedure can be launched double clicking on the installer executable.
The installer procedure guides the user through the set-up of the components in a familiar way, like many other software installer for the Windows operating system. It is composed a few steps, most of them with informative purposes. See Figure 3 for the first screen.
Figure 3 - TM installation screen 1.

231717 D8.3 – Training Methodology and Materials
The second screen asks the user to accept the license with which the software is distributed, that is the General Public License version 3. Installation won't proceed without checking the "I accept the terms in the license agreement", see Figure 4.
Figure 4 - TM installation screen 2.
The next screen allows the user to choose the server the client should connect to, see Figure 5. Default value points to "demo.reachyourtarget.org", that is the official demo server. It should be left unchanged unless a platform administrator directs otherwise.

231717 D8.3 – Training Methodology and Materials
Figure 5 - TM installation screen 3.
After that, the installation proceeds with a progress bar indicating the various operations, see Figure 6.
Figure 6 - TM installation screen 4.

231717 D8.3 – Training Methodology and Materials
At the end of the procedure the user is asked to press the finish button, see Figure 7.
Figure 7 - TM installation screen 5.
With this action the installation will proceed with the last step, which is the TARGET Manager setup, see Figure 8.

231717 D8.3 – Training Methodology and Materials
Figure 8 - TM installation screen 6.
The TARGET Manager is an Adobe AIR reusable widget that requires a separate setup. Depending on the Adobe AIR version installed in the user PC, an upgrade or an install of the Adobe AIR runtime might take place. All these steps are managed automatically.
At the end of the procedure the "TARGET Manager" icon will be on the computer desktop.
4.2 TARGET Manager (TM)
4.2.1 Purpose
The TARGET Manager (TM) is the entry point to the TARGET platform, providing the user with the possibility to log in into the system or register an account if one has not been created yet. The TM supports the following processes:
• Login, which includes the creation of a user account.
• Management of learning plans, which include the creation, deletion, change and visualisation of a learning plan (see D3.2.1. for more information about learning plans).
• View an experience, which is the possibility to access a game that you played earlier and view that experience. (This functionality differs from the KEN, in that you can only view your own experiences – not the experiences of others.)
Once logged in, the TM allows the user to create one or more Learning Plans, by defining: • what Learning Strategy to use (there are currently 2 Learning Strategies defined) • what the current competence profile of the user is and what the target competence profile
should be (launching an external component, the Competence Analyzer) Once a Learning Plan has been created, the user can play the first story in the plan, as determined by the Learning Strategy. Stories that have been already played are also shown, which the associated experiences. Experiences can be visualized (the video of the story can be played) or analyzed (by launching the Competence Performance Analyzer). The user can also access the 3D environment by launching the Lounge, regardless whether he has created a Learning Plan. In case the user has chosen a set of stories to play by creating a playlist in the Knowledge Ecosystem Navigator, the playlist is shown as a last item in the Learning Plan list. If the user logs in for the first time, he should fill in the profile, although this is not mandatory in order to make a Learning Plan.
4.2.2 Interface
In this section we describe the interface of the TM. A step by step guide on how to use it will be described in the next section “Tutorial”.

231717 D8.3 – Training Methodology and Materials
The interface implements the functionality described above. After having launched the TM, the user sees an initial screen shown in Figure 9. The TM has currently a fixed size and cannot be maximized or resized.
Figure 9 - TM initial screen.
The login window is shown in Figure 10. The user needs to input username and password and press “Sign in”.
Figure 10 - TM login window.
The Advanced button allows the user to see to what server and port the TM is connecting, as shown in Figure 11.

231717 D8.3 – Training Methodology and Materials
Figure 11 - TM displays advanced information.
If the user does not have an account yet, he can register one by clicking on “Create account”. The TM shows a registration window (see Figure 12).
Figure 12 - TM registration window.
Once logged in, the TM shows the tab in which the user can create a Learning Plan, shown in
Figure 13.

231717 D8.3 – Training Methodology and Materials
Figure 13 - Overview of the Learning Plan Window.
As the user logs in several times, playing several stories and generates competencies a learning plan would be created to show this. An expanded LP is shown in Figure 14.
Figure 14 - Expanded Learning Plan.
The items under the LP indicate the chosen Learning Strategy, the competences and the stories. Under the item “Stories” a story is shown (“Stakeholder Management”) with the associated experiences (i.e. games you played earlier).
Clicking on the “Lounge “ button launches the Lounge.
Clicking on the “Profile” tab the TM shows the user profile (see Figure 15).

231717 D8.3 – Training Methodology and Materials
Figure 15 - TM User Profile.
4.2.3 Tutorial
This section represents a step by step guide to using the TM.
After launching the TM, the user is presented with the screen shown in Figure 9, in case all services used by the TM are available. In case some are not, a pop-up window is displayed with the list of not available services, see Figure 16.
Figure 16 - Pop-up listing not available services.

231717 D8.3 – Training Methodology and Materials
The user is offered the possibility of continuing, but this should be left to experienced user that can judge whether the TM can function depending on exactly which services are not available. Normal users should just quit the program and seek assistance. Among the reasons that can cause services to be not available the most common are:
• The server the TM is trying to connect to is down
• The TM is behind a firewall that does not allow communication to the server
If all services are available, the user needs to click on the “Enter now!” message to get to the login screen. When presented with the login window (Figure 10), the user can login with the registered username and password. In case the user needs to register, he can click on the “Create account” button and fill in the form shown in Figure 12. Once the user clicks again on “Create account”, the account is made and the user is shown the login window again. The user can also just get back to the login window without creating an account by pressing “Back”.
In the login window there is the possibility to see the server the TM is connecting to by clicking on the “Advanced” button. These settings are determined by the installer and cannot be modified. The information is therefore only meant to be useful for advanced users.
Once logged in, the user is shown the Learning Plan tab (see Figure 13). If this is the first time the user logs in or if he has not create any Learning Plan yet, the list of Learning Plans (LPs) will be empty (unlike in the figure where a LP has already been created). The user can click on the “+” sign to create one LP. The TM shows a pop-up window (see Figure 17) that allows the user to select a Learning Strategy and give a name to the LP.
Figure 17 - Learning Strategy pop-up window, showing the Community Generated Knowledge option.
The Learning Strategies are:
• Community Generated Knowledge (CGK): this Learning Strategy uses expert-defined Learning Plans as a starting point and tailors them on a particular user. This is done by exploiting knowledge acquired from previous learning experiences of similar users.
• Competence-based Knowledge Space Theory (CbKST): this Learning Strategy generates Learning Plans by examining the relations between the competences the user has and the ones he wishes to acquire (target competences). Learning Plans are built considering that

231717 D8.3 – Training Methodology and Materials
each competence that is a prerequisite to any of the target competences needs to be learned before the relative target competence.
After the user has chosen his/her LS, the TM launches the Competence Analyzer to define the User Current Competence profile and the Target Competence profile, as explained in the next chapter.
Once the LP has been created, the user can expand the item by clicking on the little triangle to the left of the LP name. Any item that is expandable has a little triangle on the left that can be clicked to expand the item. To play the first story of the LP, the user can click on the “play” icon next to the “Stories” sub-item. The TM launches the game with the story that the LS has determined the user should play to reach the Target Competence profile. In Figure 14 the story selected by the LS is the “Stakeholder Management”. Since this story has already been played, there are experiences associated to it. Hovering on each experience name the user can visualize two icons:
• A play icon to play the video associated to the experience. Clicking on this icon an external video player is launched.
• A magnifier icon to analyze the experience by launching the Competence Performance Analyzer, described elsewhere in this document.
See Figure 14 for examples of the play and magnify icons.
Some items have associated a textual description that can be visualized by clicking on them. These are:
• Competences defined under the “Current competences” item can be visualized either succinctly by clicking on the text “Current competences” (see Figure 18) or by clicking the magnifier icon. The last action launches the Competence Analyzer for a more in-depth view.
• Stories under the “Stories” item have an associated description that can be visualized by clicking on the title of each story (same window appears as in Figure 18).
• Experiences under each story have an associated description that can be visualized by clicking on the title of each experience (same window appears as in Figure 18).

231717 D8.3 – Training Methodology and Materials
Figure 18 - Black overlay window showing the competences defined in the Learning Plan.
Learning Plans can be renamed by clicking on their name. A pop-up window is shown where the user can enter the new name.
Although not mandatory, each user should fill in a profile for the TARGET platform to know who its users are. This can be done by clicking on the profile tab. The profile tab is shown in Figure 15. Some fields can be filled in with free text, while others have a drop-down box since the user needs to choose among predefined categories, such as “Job title” and “Affiliation Type”. The information can be saved by clicking on the “Update” button.
At all moment the user can refresh the display by clicking on the “arrows” icon on the left bottom of the TM.
4.3 Competence Analyzer (CA)
4.3.1 Purpose
The Competence Analyzer (CA) is an almost stand-alone tool (initialized by the TM) that allows the user to create the initial competence analysis data to be used within a learning plan. The first part of the CA provides the user with an interface to create and modify a User Competence Profile (UCP) and a Target Competence Profile (TCP). The UCP represents what the users knows now (their current competences) and the TCP represents what they user wishes to learn (their target competences). The difference between these profiles results in the Gap Competence Profile (GCP) that is computed and visualized by the CA. For the modelling of the UCP and the TCP a list of competences and alternatively, predefined competence profiles are available. Usable profiles supply a mapping of desired competences in relation to a specific role.

231717 D8.3 – Training Methodology and Materials
The second part of the CA forms the Competence Structure Editor. It is supposed to be used by domain experts or instructors to model the competence domain consisting of competences and their interrelations (prerequisite relations). Both, the competence structure and the competence profiles are stored in the Knowledge Ecosystem. In this sense, they can be easily reloaded by other components like the CbKST-LS that use this information as input data. A more detailed description of the CA can be found in D 4.2.
4.3.2 Interface
The graphical user interface of the CA consists of two main frames addressing two different tasks. One can switch between the Competence Analyzer View (see Figure 19) and the Competence Structure Editor View (see Figure 20) using the Combo Box [CA2] in the left upper corner.
Figure 19 - In this picture you can see the CA framework that provides basic and common functionality to competence visualizations.
The following paragraph explains the views in more detail.
a) Competence Analyzer View (see Figure 20) consist of:
A list of competences [CA3] Competences presented in the list are modeled in the Competence Structure and available to define the Competence Profiles.

231717 D8.3 – Training Methodology and Materials
A list of Job-Profiles [CA4] Profiles are a list of competences that a specific job/position might ask for.
A panel to define the UCP [CA5] Competences drawn into this panel will be part of the UCP.
A panel to define the TCP [CA6] Competences drawn into this panel will be part of the TCP.
A panel that visualizes the GCP [CA7] Competences displayed within this panel are form the GCP, presenting the difference between TCP and UCP.
Update Gap Button [CA8] Updates the presentation of the GCP.
Save Profiles Button [CA9] Saves UCP and TCP into the KE. The profiles are always assigned to a specific learning plan.
Figure 20 - The Competence Structure Editor of the CA tool provides an interface to create competences and competence structures.
b) Competence Structure Editor View (see Figure 21) consist of:

231717 D8.3 – Training Methodology and Materials
Prerequisite Editor [CSE1] Editor to create/edit competences and model their interrelations.
Closure View [CSE2] This panel shows the competence structure constructed using the prerequisite editor. The closure view provides a more detailed representation also including transitive connections.
Tabular View (see Figure 21) [CSE3] This presentation provides a view on the competence structure in form of a table.
Filter and Edit Panels [CSE4] Are part of all three views and can be used to search and edit competences.
Figure 21 - Shows the Tabular View of the CA – Tool.
4.3.3 Tutorial
Part 1 – Competence Analyzer The main menu of the CA contains File Menu Item and a Help Menu Item (see Figure 19 [CA1]). The File Menu Item enables you to close the application. The Help Menu contains the functionality to display the version number of the CA and to enable/disable the log view. On the Top Left, beneath the Menu there is the Competence Analyzer /Structure Editor Chooser (see Figure 19 [CA2]). This drop-Down box changes between the Competence Analyzer and the Competence Structure Editor view.

231717 D8.3 – Training Methodology and Materials
Beneath the chooser, there is a panel named Competence (see Figure 19 [CA3]). The competence panel contains all competences available in the competence structure. That is, competences TARGET can teach the user. Also the competence panel does a tree like layout which, in this case, is based on the inferences available from the Competence Structure Editor and the semantics of a Prerequisite Relation. The competence panel implements drag and drop functionality from the panel to a visualization. Therefore simply drag a competence from the competence panel to the visualization and it will be displayed there.
The Profiles pane contains predefined job profiles (see Figure 19 [CA4]). The drag and drop functionality is the same as for the competences from the competence pane. On the very bottom you can see the Save Profiles button. By clicking this button the results of the CA gap analysis are saved to the knowledge ecosystem.
For the gap analysis we have the User Competence Profile (UCP), the Target Competence Profile (TCP) and the Gap Competence Profile (GCP) Visualization.
Figure 22 - UCP and TCP visualization.
Figure 22 shows the detailed view of a competence profile. This visualization includes a competence, its proficiency level and the user’s comment on it. In this visualization, the text label colored with black near a vertex is the name of a competence and the text label colored with grey is the user’s comment on the competence. The number written on each vertex represents the proficiency level of its corresponding competence.
User Manipulations: In order to visualize a competence profile, a user picks some competences from the competence list to the visualization pane by drag-and-drop operation. The proficiency level of the newly added competence is initialized to 0. When a user picks a competence vertex by right-clicking, a pop-up menu appears. Then, a user can input a proficiency level and comments of the picked competence through a dialog window (see Figure 23).

231717 D8.3 – Training Methodology and Materials
Figure 23 - Competence Analyzer with pop-up menu item to edit competences.
Main Functionality:
• Any competence can be selected by clicking on it. The competence then turns yellow. • Any selected competence can be directly moved with the mouse. • The right mouse click on a vertex displays a context menu. • One can scroll in and out of a view using the mouse wheel.
Step by step tutorial on creating a Competence Profile:
1. Create a User Competence Profile (UCP) a. Select competences form the Competence List [CA3] and drag and drop them to the
UCP Panel [CA5] b. Delete wrongly added competences by
i. Select the competence in the UCP Panel and press the Delete key ii. Right click on the competence in the UCP Panel and select Delete in the
appearing menu c. Edit competences through right click on the competence and using the edit menu
that appears. i. Select proficiency level using the slight bar
ii. Add personal comment using the text fields.
2. Create a Target Competence Profile (UCP) a. Select a competence profile from the Profile Panel [CA4] and drag and drop it to the
TCP Panel [CA6] b. If required, select competences form the Competence List [CA3] and drag and drop
them to the TCP Panel [CA6] c. Delete wrongly added competences by

231717 D8.3 – Training Methodology and Materials
i. Select the competence in the TCP Panel and press the Delete key ii. Right click on the competence in the TCP Panel and select Delete in the
appearing menu d. Edit competences through right click on the competence and using the edit menu
that appears. i. Select proficiency level using the slight bar
ii. Add personal comment using the text fields. 3. Click the Update Gap button to visualize the resulting Competence Gap in the GCP Panel
[CA7]
4. Click Save Profiles [CA9] to store the created competence profiles as in the KE
Part 2 – Competence Structure Editor In this section we describe the Competence Structure Editor view which was implemented as a prototype to show how expert users can be supported to create knowledge / competence structures. In this context, a competence structure is defined as a prerequisite relation on a set of competences. A prerequisite relation between two competences in this context means: “If a person has shown that he/she has competence x, he/ she has competence y too. Therefore, the competence y is a prerequisite competence for competence x.” More detailed information and references can be found in D4.2.
Figure 24 - Hasse Diagram Visualization of a Competence Structure.
The Competence Structure Editor View provides not only a tool to create competences and their interrelations but also to visualize a previously constructed competence structure as a modified Hasse diagram (see Figure 24). The main difference to a standard Hasse diagram is the visualization of the connectedness of a vertex by increasing the diameter of the vertex. This visualization should

231717 D8.3 – Training Methodology and Materials
make the information contained in the knowledge structure more meaningful and insights more intuitive.
The Hasse diagram is made directly editable by mouse events. Every mouse editing event is thus only accepted if it does not contradict the Hasse diagram. A contradiction can e.g. occur if a cycle is introduced or by trying to add edges which are already indirectly inferred by the Hasse diagram. For calculating the transitive reduction of the graph as needed by the Hasse diagram visualization, a simple algorithm which basically calculates the transitive closure of the graph was implemented. So to speak for every valid editing action the transitive reduction and the topological order of the underlying graph data structure get updated. The visualization itself was created with the Jung Framework (Madadhain et al., 2005).
Main Functionality to create and edit a competence structure (see Figure 20): • Create a new competence by double clicking within the Prerequisite Editor Panel [CSE1] • Select a single competence by clicking at the according circle with the left mouse button.
The selected competence can be relocated. • Select a group of competences by holding the left mouse to rectangle the competences.
Competences can then be relocated. • Delete selected competences from Diagram. • Edit competences using the Filter and Edit Panel on the right hand side. • Read a short definition of the competence by moving the mouse pointer over a
competence vertex. • Create prerequisite relations between two competences by using Control (Ctrl) and the
left mouse button. • Scroll in and out using the mouse wheel
Step by step tutorial on creating a Competence Structure:
1. Create a new structure by selecting New in the Structure menu 2. Enter according competences to the structure by double clicking in the Prerequisite Editor
Panel [CSE1] 3. Add pre-requisite relations between the competences if existing.
a. If you assume that, for example, “Openness” is a prerequisite competence of “Creativity”, you have to press “Ctrl” while clicking on “Openness” and connecting the arrow to “Creativity” (see Figure 25).
b. And the last possible opportunity would be that you assume that there exists no prerequisite relation between these two competences. In this case, you have not to create a connection between the two competences.
Figure 25 - Creating a prerequisite relation between “Openness” and “Creativity”.

231717 D8.3 – Training Methodology and Materials
4. Edit the competence properties within the Filter/Edit Panel [CSE4] on the right side. 5. Check the created competence structure using the different views [CSE1, CSE2, CSE3].
Figure 26 - Possibly resulting Competence Structure.
6. Choose Save form the Structure menu to save the competence structure in the KE
4.4 Lounge
4.4.1 Purpose
Lounge is a collaborative virtual world through which TARGET users can access to the The Knowledge Ecosystem Navigator (KEN) and communicate with each other using the social tools.
4.4.2 Interface
As showed in Figure 27 - Personal Organizer, all functionalities are accessible through the personal organizer. Currently there are two functionalities: (1) the Chat function, which allows the user to communicate with other online users (see Figure 27a); and (2) the Teleport function, which allows the user to teleport his/her avatar to a specific point in the virtual world (see Figure 27b). The user can navigate between functionalities by clicking the arrow.
Figure 27 - Personal Organizer: Chat function (A) and Teleport function (B).

231717 D8.3 – Training Methodology and Materials
When the user clicks the Chat function, this opens up the messenger interface, and the chat interface.
Messenger Interface (Figure 28) – In this interface information is available about the online users, each user is represented by a button that when pressed starts a chat with the user. Chat Interface (Figure 29)– In this interface it is possible to chat with other users as well as add new users to that chat, creating a group chat, or enable voice conversation by clicking the correspondent buttons.
Figure 28 - Messenger Interface.

231717 D8.3 – Training Methodology and Materials
Figure 29 - Chat Interface.
When the user clicks the Teleport function, they can select to teleport to one out of four locations – meeting rooms, West beach, East beach, and KEN.
4.4.3 Tutorial When the user enters the lounge his avatar is in the center of the virtual world, to move his avatar the user can use the arrow keys.
Using the personal organizer the user can open his messenger and start chat or voice conversations with other online users. Or open the teleport interface in order to teleport his avatar to different parts of the virtual world.
To activate the KEN the user should use the correspondent teleport or move towards the blue glass in the centre of the virtual world. Then he can activate the KEN by clicking the glass.
4.5 Knowledge Ecosystem Navigator (KEN)
4.5.1 Purpose
In TARGET, the Knowledge Ecosystem is where all the knowledge is collated together, thus allowing the different stakeholders of the community to create and manage the knowledge.

231717 D8.3 – Training Methodology and Materials
For the interaction amongst the stakeholders, the main knowledge asset is the Story-based knowledge assets (as described in D3.1 – TARGET Integrative Framework, section 5.6.2), which is composed of three distinct layers. The first corresponds to Story, which outlines the situated context where a particular set of competences are needed to successfully complete the scenario.
The Knowledge Ecosystem Navigator (KEN) aims to enable the learner to search the repositories for the stories that have the best fit in addressing a particular competence profile. The retrieval takes into account the perceived effectiveness of the various stories. The result can constitute part of a self-directed learning plan.
The KEN uses the services from other TARGET components, namely the TARGET Navigator, which is a service available as part of the Knowledge Ecosystem that provides recommendations on the data stored in the repositories based on the definition of a particular need or problem. The matching function draws upon the social data of the communities that annotate, rate and link knowledge within the TARGET Knowledge Repository.
4.5.2 Interface
The two dimensional interface design of KEN is captured by Figure 30. The navigation of KEN revolves around Knowledge Assets based on stories, which are identified with a name and are represented by thumbnail images.
The adopted interface paradigm is based on radiant thinking (Buzan, 2006), where the focus viewpoint is anchored on the story as its centre. The nodes have a physical behaviour, meaning they can move around in the graph. The user can explore the knowledge repository using the mouse, either by dragging individual nodes or by dragging the whole graph. By dragging a node with the mouse, connected nodes will be dragged too, as if connected by a spring.

231717 D8.3 – Training Methodology and Materials
Figure 30 - Overview of KEN interface.
After dragging the nodes, they will rearrange themselves.
Certain nodes can be collapsed by pressing the red Close (‘x’) Button into the node they originated from.
Nodes can be select, and doing so locks the node in place, meaning the physics simulation will not interfere with its movement. The graph can be zoomed in on or out of to better understand the contents of a particular node or its relation to other nodes.
The main components in KEN are Stories (e.g. “Stakeholder Management”) and Experiences (videos associated with that story). You can access the Experiences of a Story through the Story nodes. The Experiences, when requested, will appear connected to the Story node, surrounding it. Experience nodes are closer to the Story they originated from than other Stories.

231717 D8.3 – Training Methodology and Materials
Figure 31 - Story Interface.
Story Node Interface (Figure 31) – In this interface is information available about the available stories in the KE. The interface shows a thumbnail of the story and 5 buttons are available: Background (that displays the information about the background of a story), Roles (that displays the information about the characters present on the story and their roles), Comments (that allow user to comment the story), Experiences (that opens all the experiences associated with that story) and Play (allowing the user to experience the story).
Figure 32 - Background Interface.
Background Interface (Figure 32) – In this interface is information available about the background of a story. This interface can be closed by clicking the close button on the top right corner.

231717 D8.3 – Training Methodology and Materials
Figure 33 - Roles Interface.
Roles Interface (Figure 33) – In this interface is information available about each character available on the story.
Figure 34 - Experience Interface.
Experience Interface (Figure 34) – In this interface is information available about an experience. In the centre of the node it’s possible to re-play the video of the experience. It is also possible to rate the experience between one to five stars, launch the CPA and also comment on the experience.

231717 D8.3 – Training Methodology and Materials
Figure 35 - Comments Interface.
Comments Interface (Figure 35) – In this interface is possible to comment both experiences and stories.

231717 D8.3 – Training Methodology and Materials
4.5.3 Tutorial
Figure 36 - Tutorial of lounge.

231717 D8.3 – Training Methodology and Materials
4.6 Game
4.6.1 Purpose
In TARGET, the game component is responsible for executing a story associated with a given scenario. To play the game, the player navigates through the virtual world, interacts with other characters and uses multiple graphical tools to manage the simulation.
4.6.2 Interface
User interface and navigation – the game’s user interface (see Figure 37) shows three important elements: the toolbar at the bottom of the screen that contains the available shortcuts to other tools and the current simulation date; the breadcrumbs that helps the player to locate himself in the stack of opened windows; and the view into the 3D world.
The player can use the cursor keys to easily navigate through the 3D world and use the mouse’s cursor to interact with other objects or use the available tools.
Figure 37 - Game screen: office.
Briefing – when a player starts playing the story, the briefing tool is presented. The main purpose of the briefing, is to give background information about the scenario he’s about to play. The briefing is

231717 D8.3 – Training Methodology and Materials
divided into four panels: Background, Work breakdown Structure, Characters and Help. The briefing tool can be accessed from the left most button in the main toolbar.
Briefing Background – In this interface (see Figure 38) it is shown information regarding the story background and what it needs to be done to complete the game. It can be accessed by clicking on the top left button “Background”.
Figure 38 – Briefing: background.

231717 D8.3 – Training Methodology and Materials
Briefing Work Breakdown Structure – This interface (see Figure 39) shows the schematics and the phases in which the player has to accomplish to complete with success the project he is leading. Specific information about each objective can be viewed by clicking on the project blocks on the left. This information can be accessed by clicking on the top second button from the left “Work Breakdown Structure”.
Figure 39 - Briefing: WBS.

231717 D8.3 – Training Methodology and Materials
Briefing Characters – This interface shows useful information on the characters present in the experience, see Figure 40). For each character it shows its name, picture, roles and description. To start playing the experience the player can choose the character he/she will be controlling by pressing the “Play as <character’s name>” button. It can be accessed by clicking on the top second button from the right “Characters”.
Figure 40 - Briefing: characters.

231717 D8.3 – Training Methodology and Materials
Briefing help – This interface shows useful information on how to control the player’s movement and actions in the game, see Figure 41. It can be accessed by clicking on the top right button “Help”.
Figure 41 – Briefing: help.

231717 D8.3 – Training Methodology and Materials
Gantt tool – The Gantt tool can be accessed by clicking on the third button from the left in the main toolbar. This tool shows the overall project schedule and is the main interface to control the simulation activities necessary to complete his project, see Figure 42. On the top of the window we can change between the Gantt information and the Work Breakdown Structure (please refer to the ‘Briefing Work Breakdown Structure’ for more information.) Right below these buttons is the project’s information. On the left we can see all the tasks that are assigned to the project or add a new task by clicking the “Add task” button (please refer to the ‘Gantt tool - Create/Edit Task’ for more information). On the right is the schedule (start, duration and completed percentage) for each corresponding task on the right. It is also possible to edit or delete tasks by clicking the corresponding buttons right after each task name. Each task is represented by a blue line that represents the player estimative for accomplish the corresponding activity. The green bar represents the activity and the real time it takes to execute. To close this window click on the close button at the bottom or the X button in the top right corner.
Figure 42 - Gantt tool.
231717 D8.3 – Training Methodology and Materials
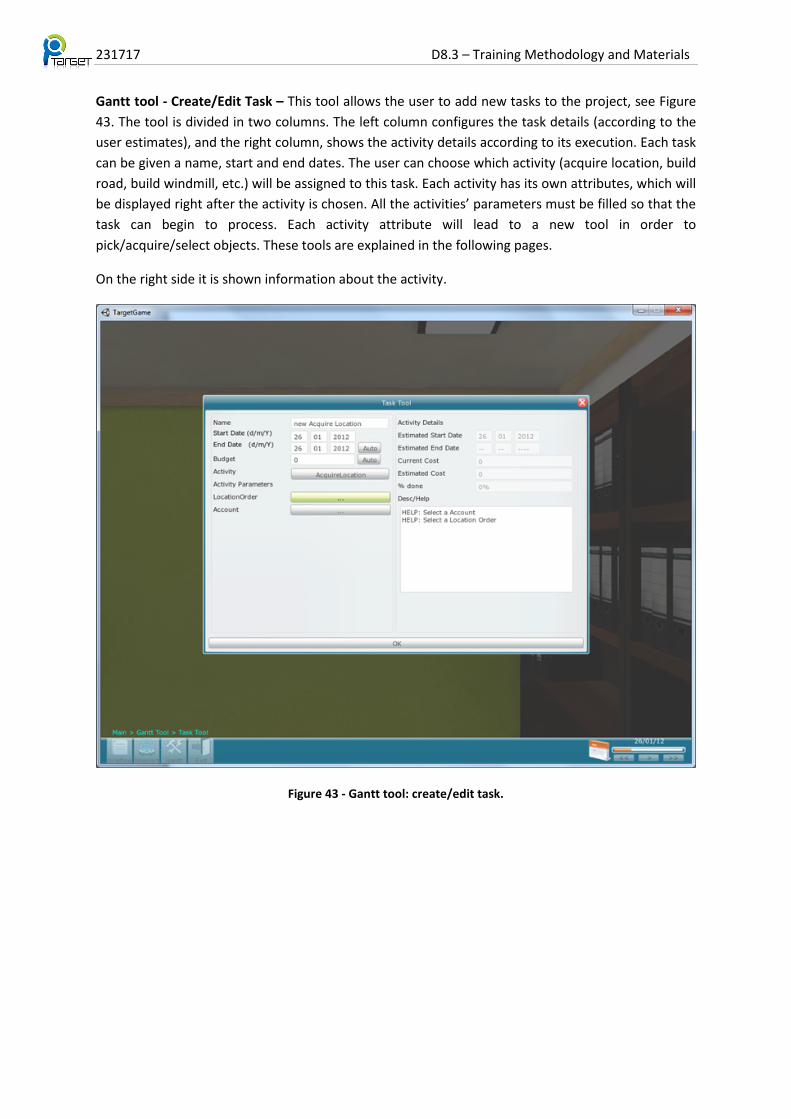
Gantt tool - Create/Edit Task – This tool allows the user to add new tasks to the project, see Figure 43. The tool is divided in two columns. The left column configures the task details (according to the user estimates), and the right column, shows the activity details according to its execution. Each task can be given a name, start and end dates. The user can choose which activity (acquire location, build road, build windmill, etc.) will be assigned to this task. Each activity has its own attributes, which will be displayed right after the activity is chosen. All the activities’ parameters must be filled so that the task can begin to process. Each activity attribute will lead to a new tool in order to pick/acquire/select objects. These tools are explained in the following pages.
On the right side it is shown information about the activity.
Figure 43 - Gantt tool: create/edit task.
231717 D8.3 – Training Methodology and Materials
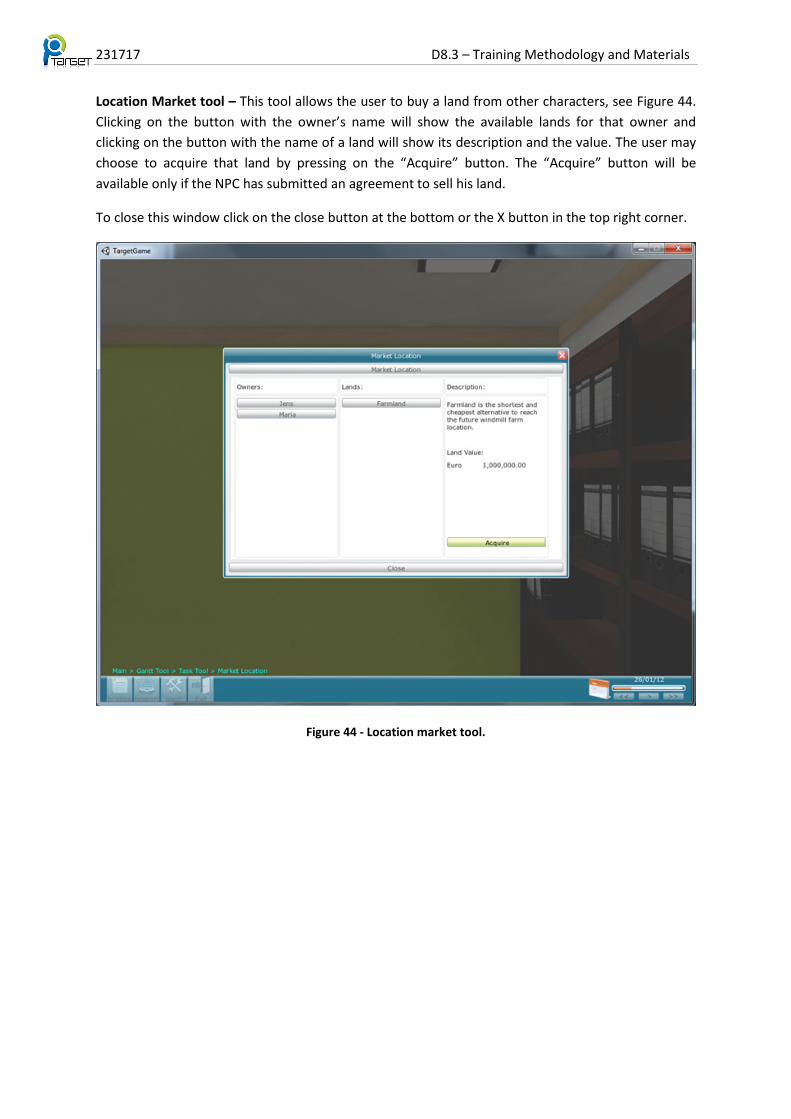
Location Market tool – This tool allows the user to buy a land from other characters, see Figure 44. Clicking on the button with the owner’s name will show the available lands for that owner and clicking on the button with the name of a land will show its description and the value. The user may choose to acquire that land by pressing on the “Acquire” button. The “Acquire” button will be available only if the NPC has submitted an agreement to sell his land.
To close this window click on the close button at the bottom or the X button in the top right corner.
Figure 44 - Location market tool.

231717 D8.3 – Training Methodology and Materials
Account tool – This tool allows the user to see information and/or pick an account to be assigned to a purchase, see Figure 45. The available accounts are shown by clicking on the button besides the label accounts. The information for each account that is chosen can be seen below. To pick/assign the account click the OK button. If the user chooses to close the window by hitting the Cancel button or the X button, the account won’t be assigned.
Figure 45 - Account tool.

231717 D8.3 – Training Methodology and Materials
Market Tender tool – This tool allows the user to acquire products by tender offers, see Figure 46. Clicking on the tender name button will show the current available bids and the user can select each bid to see a detailed description. If the player decides that that bid is the best, he/she can click on acquire to accept the sellers bid.
To close this window click on the close button at the bottom or the X button in the top right corner.
Figure 46 - Market tender tool.

231717 D8.3 – Training Methodology and Materials
Market Sales Order tool – This tool allows the user to acquire products directly from suppliers, see Figure 47. Clicking on the supplier name button will show the current available products and the user can select each product to see a detailed description. The player can fill the information about how many products he/she will acquire and buy them by clicking on the Acquire button on the bottom left.
To close this window click on the close button at the bottom or the X button in the top right corner.
Figure 47 - Market sales order tool.

231717 D8.3 – Training Methodology and Materials
Inventory tool – The inventory tool allows the user to select a resource from a list of resources, see Figure 48. The resources may not be available from the beginning of the experience. For example, when the experience starts, the player doesn’t have any location resource because he/she hasn’t acquired one yet. As soon as the tasks get completed the resources will become available in the inventory tool.
To close this window click on the close button at the bottom or the X button in the top right corner.
Figure 48 - Inventory tool.

231717 D8.3 – Training Methodology and Materials
Teleport tool – The teleport tool can be accessed by clicking on the second button from the left in the main toolbar. This tool allows the player to jump from the current location to any other location available by clicking on the buttons in the tool, see Figure 49. Each button has a picture and location name to inform where the player will be teleported.
To close this window click on the close button in the bottom or the X button in the top right corner.
Figure 49 - Teleport tool.

231717 D8.3 – Training Methodology and Materials
Interaction with characters – The actions popup menu is shown by clicking with the left mouse button on any NPC, see Figure 50. The player can choose to chat with that NPC or to examine it. The chat option will open a new window with the chat tool (please refer to Figure 52) and the examine option will also open a new window with the examine tool (please refer to Figure 51).
Figure 50 - Interaction with characters.

231717 D8.3 – Training Methodology and Materials
Examine tool – To activate this tool click on the character and pick “Examine” from the popup actions menu shown in the previous page. This tool gives a brief explanation about the character that the player just clicked, Figure 51.
To close the window click on the close button at the bottom or the X button in the top right corner.
Figure 51 - Examine tool.

231717 D8.3 – Training Methodology and Materials
Chat tool – The dialogue tool allows the player to talk to a NPC, see Figure 52. At the left we can see the pictures of each character in the conversation (top left the NPC, and bottom left the player’s character). On the top centre of the interface we can read the conversation. It shows both NPC and character’s names and the corresponding phrase. The function of the button on the right is explained in the next page. On the bottom of the interface is the textbox where the player can write his/her messages.
When the user starts typing a list with possible phrases will be shown to help with the conversation. The user can use the mouse or the arrow keys and enter to choose a phrase from the list. The current selected phrase is shown in red. The player can also ignore this drop down box and continuing typing their own phrase. To send a message press enter key or click the send button.
To close the dialogue tool, click on the X button in the top right corner.
Figure 52 - Chat tool.

231717 D8.3 – Training Methodology and Materials
Interpreted chat window – This window can be accessed by clicking on the button in the right side of a NPC conversation line in the dialogue tool. This window displays what was interpreted by the NPC if the player writes something that doesn’t exactly match the NPC’s knowledge base, see Figure 53. The user can enter an alternative response to try to correct any mistake the NPC might have made. To close this window click on the cancel button or the X button in the top right corner.
Figure 53 - Interpreted chat window.

231717 D8.3 – Training Methodology and Materials
End game – This interface informs the player that the game (experience) has ended showing the reason why it ended, see Figure 54. The player can either reach the end of the game by completing all his (her) tasks or if he (she) runs out of time.
Figure 54 - End game.

231717 D8.3 – Training Methodology and Materials
Self-assessment – In this interface (see Figure 55) the user can rate the level of difficulty of his experience, from 1 star (easy) to 9 stars (hard) and he/she can also rate about the usefulness of this experience, from 1 star (useless) to 9 stars (very useful). It is also possible to leave additional comments for the reviewers by filling the comments’ box. The back button takes the user to the “end level” window and the “Show CPA and return to Lounge” button closes the game and opens the CPA window and the Lounge.
Figure 55 - Self-assessment.

231717 D8.3 – Training Methodology and Materials
4.6.3 Tutorial
Figure 56 - Tutorial of game.

231717 D8.3 – Training Methodology and Materials
4.7 Competence Performance Assessment (CPA)
4.7.1 Purpose
At the end of the game session, the learner and mentor are provided with the means to analyse and reflect upon the game experience. This is made available by the Competence Performance Assessment (CPA) module. Here the game session can be played-back and a graph representing various levels of performance indicators is super-imposed to the video stream.
4.7.2 Interface
The CPA Graphical Interface (CPA GUI) is depicted in Figure 57.
Figure 57 - Sample CPA screen.
As from Figure 57, the CPA GUI has 4 distinct areas:

231717 D8.3 – Training Methodology and Materials
Figure 58 - User's information area.
• User’s information (Figure 58) - in this area generic information about the “owner” of experience is available, such as username, age, email, rating of the experience. This panel is useful for other players when experiences are shared. While a learner does not need to see his own profile information, it is a good idea to use a consistent format so that learners understand what others see when they share and there are no surprises that may raise privacy concerns about the system in general. This panel has been moved to the right to allow having the video and the graph aligned one above the other. Furthermore, to save space, information like role, age and email are now accessible via a button.
Figure 59 - Experience Replay.
• Experience Replay (Figure 59) - in this area the player can play-back his game session. The control of the play-back is done in the same way as in the YouTube player. This means that the play button functions both as play and pause button and by clicking on a particular point of the progress bar it makes the play-back start on that point.
The replay of the experience with related data (i.e. the actual date when the experience was recorded) is presented into top left panel and the competences graph is positioned right below of the video, so that the graph and the video timeline can be aligned, as this helps linking the timing of the video with the graph data. The right side of the interface presents

231717 D8.3 – Training Methodology and Materials
some information about the player and settings controls for the graph; this area can be hidden in order to gain space for the left area.
The video recording of the experience within the serious game is offered with play/pause/stop controls. Upon the video space, it is now shown the experience title, while the story title is added within brackets. As reading the chat text from the video window could be not feasible (too small text), a separate window, displaying the conversation in clear text, has been added on the right of the video area.
Figure 60 - Competences Graph.
• Competence Graph (bottom left)- in this area the player can see a graph showing how his performance evolve along the time for each competence involved in the game scenario. As explained in previous sections, for each competence there is a set of behaviour indicators. If the player wishes to see for a particular competence what are the values for its behaviour indicators he can click that competence and that will cause a new graph to be loaded and correspondent information. The same happens if the player clicks a behaviour indicator - it will load the graph and information for its performance indicators.
The y axis indicates which end is good and which is bad via a “traffic light” –style background: it is quite intuitive that while into the red stripe the performance is not very good, while into the yellow stripe it indicates an average performance and into the green section is a good one.

231717 D8.3 – Training Methodology and Materials
Figure 61 - Graph settings.
Graph settings (Figure 61) - this area is a kind of legenda for the graph, here indeed competences and performance indicators shown into the graph are also listed with the respective color-code. The Level of Detail bar sets the time interval for data into the graph.
4.7.3 Tutorial
A player can access the CPA just after playing an experience into the Game or accessing past experiences from KEN. As soon as the CPA is run, into the left upper part a video is played, showing what the player did during the Game. Synchronously, on the right side of the video the chat sentences are shown, for a better readability; and at the same time the lower panel shows how the performance of the player was assessed, depending on what happened at that time into the Game. If the player wishes to focus attention on specific competences and/or performance indicators, he can select/deselect consequently from the low right panel, via the related checkboxes. For changing the frequency of data sampling, it I enough to drag the cursor from the right lower bar “Level of Detail”. User’s information about the experience owner (and player) is made available by the right upper panel. This is useful especially for experienced re-played from the KEN, when the CPA player can be an user different from the one who played the experience.

231717 D8.3 – Training Methodology and Materials
5 CONCLUSIONS
This deliverable documents the Training Methodology and Materials used to support the use of TARGET platform by key stakeholders, namely teachers, students, HR, employees, support staff. The training methodology was presented with its principles and foreseen modalities. The TARGET learning process was recalled. Training sessions will be part of the summative evaluation studies, planned for M40 (April 2012) onwards. User tutorials for the different components of the TARGET platform are reported as developed so far. Additional training materials in video format are expected to be produced and made available. As it will be up to individual researchers training users and running demonstrations, tailoring to the specific context and audience, the training materials in this deliverable are directed at learners only.

231717 D8.3 – Training Methodology and Materials
6 REFERENCES Atkinson, R. K., Derry, S. J., Renkl, A., and Wortham, D. (2000). Learning from examples: Instructional principles from the worked examples research. Review of Educational Research, 70(2):181-214.
Buzan, R. (2006). The Mind Map Book. BBC Active.
Prince, M. (2004). Does active learning work? A review of the research. Journal of Engineering Education, 93(3).
Wittwer, J., Nückles, M., Landmann, N., and Renkl, A. (2010). Can tutors be supported in giving effective explanations? Journal of Educational Psychology, 102(1):74-89.
Heath, C. and Heath, D. (2010). Switch: How to Change Things When Change Is Hard. Crown Business, 1 edition.
Madadhain, J., Fisher, D., Smyth, P., White, S. & Boey, Y. B.,. (2005). Analysis and visualization of network data using JUNG. Journal of Statistical Software, 10, 2005, 1-35.
Marton, F. and Booth, S. (1997). Learning and Awareness (Educational Psychology Series). Routledge.
van Merriënboer, J. J. G. and Sweller, J. (2005). Cognitive load theory and complex learning: Recent developments and future directions. Educational Psychology Review, 17(2):147-177.

231717 D8.3 – Training Methodology and Materials
7 BIBLIOGRAPHY Buzan, R. &. (2006). The Mind Map Book. BBC Active.
Deepa, L. (2002). Writing a user manual. Retrieved from http://www.devshed.com/c/a/Practices/Writing-A-User-Manual-part-1/
FAO. (n.d.). Principles and Methods of Training. Retrieved 12 2010, from http://www.fao.org/docrep/w8088e/w8088e03.htm
J. W. Sender, J. E. (1965). An Investigation of the Visual Sampling Behavior of Human Observers. NASA CR 434.
Jonhson, K. (n.d.). How to write a user guide. Retrieved from http://greatdocuments.net/how-to-write-a-user-guide/
Klariti. (n.d.). User guide tutorial. Retrieved from http://www.klariti.com/technical-writing/User-Guides-Tutorial.shtml
Techscribe. (n.d.). How to write user documentation. Retrieved from http://www.techscribe.co.uk/ta/how-to-write-user-documentation.htm