digital hd video máy quay hd kỹ thuật số camera recorder · thậm chí khi máy quay đã...
TRANSCRIPT

HDR-CX130E/CX160E/CX180E
Digital HD Video Camera RecorderOperating Guide
4-271-483-11(1)
Table of contents
Getting started
Recording/Playback
Advanced operations
Saving movies and photos with a computer
Saving images with an external device
Customizing your camcorder
Additional information
Quick reference
HDR-CX130E/CX160E/CX180E
Máy Quay HD Kỹ Thuật SốNội dung
Khởi động
Ghi hình/phát lại
Các thao tác nâng cao
Lưu phim và hình ảnh trong máy tínhLưu hình ảnh với thiết bị ngoàiTùy chỉnh máy quay của bạnThông tin bổ sung
Tham khảo nhanh
Hướng dẫn sử dụng

VN2�GB
Read this first
Before operating the unit, please read this manual thoroughly, and retain it for future reference.
WARNING
To reduce fire or shock hazard, do not expose the unit to rain or moisture.
Do not expose the batteries to excessive heat such as sunshine, fire or the like.
CAUTION
Battery packIf the battery pack is mishandled, the battery pack can burst, cause a fire or even chemical burns. Observe the following cautions.
Do not disassemble.Do not crush and do not expose the battery pack to any shock or force such as hammering, dropping or stepping on it.Do not short circuit and do not allow metal objects to come into contact with the battery terminals.Do not expose to high temperature above 60°C (140°F) such as in direct sunlight or in a car parked in the sun.Do not incinerate or dispose of in fire.Do not handle damaged or leaking lithium ion batteries.Be sure to charge the battery pack using a genuine Sony battery charger or a device that can charge the battery pack.Keep the battery pack out of the reach of small children.Keep the battery pack dry.Replace only with the same or equivalent type recommended by Sony.Dispose of used battery packs promptly as described in the instructions.
Replace the battery with the specified type only. Otherwise, fire or injury may result.
AC AdaptorDo not use the AC Adaptor placed in a narrow space, such as between a wall and furniture.
Use the nearby wall outlet (wall socket) when using the AC Adaptor. Disconnect the AC Adaptor from the wall outlet (wall socket) immediately if any malfunction occurs while using your camcorder.
Even if your camcorder is turned off, AC power source (mains) is still supplied to it while connected to the wall outlet (wall socket) via the AC Adaptor.
Note on the power cord (mains lead)The power cord (mains lead) is designed specifically for use with this camcorder only, and should not be used with other electrical equipment.
Notice for customers in the United Kingdom
A moulded plug complying with BS 1363 is fitted to this equipment for your safety and convenience.Should the fuse in the plug supplied need to be replaced, a fuse of the same rating as the supplied one and approved by ASTA or BSI to BS 1362, (i.e., marked with an or
mark) must be used. If the plug supplied with this equipment has a detachable fuse cover, be sure to attach the fuse cover after you change the fuse. Never use the plug without the fuse cover. If you should lose the fuse cover, please contact your nearest Sony service station.
Xin quý khách vui lòng đọc kĩ nội dung sách hướng dẫn trước khi sử dụng máy và giữ lại để tham khảo về sau.
Đề phòng cháy nổ và nguy hiểm, chú ý không để máy quay tiếp xúc với mưa hoặc nơi ẩm ướt.
Không để pin gần các nguồn nhiệt như ánh nắng mặt trời, đám cháy…
Bộ chỉnh lưu AC Không để bộ chỉnh lưu AC ở nơi chật hẹp như khoảng cách giữa bức tường và đồ đạc. Sử dụng bộ chỉnh lưu AC với ổ cắm tường gần. Nếu có vấn đề nào đó xảy ra trong quá trình sử dụng bộ chỉnh lưu, ngay lập tức ngắt nguồn điện bằng cách rút phích cắm ra khỏi ổ cắm nguồn (ổ cắm tường).
Thậm chí khi máy quay đã tắt, nguồn điện AC (dây dẫn chính) vẫn cung cấp cho máy khi có kết nối với ổ cắm tường thông qua bộ chỉnh lưu AC.
Chú ý đối với dây nguồn (dây dẫn chính)Dây nguồn được thiết kế chuyên biệt sử dụng cho máy quay này, không nên dùng nó với thiết bị điện khác.
Đọc thông tin này trước
CẢNH BÁO
KHUYẾN CÁO
Chú ý dành cho các khách hàng ở Vương quốc Anh
PinNếu pin không được bảo quản tốt, pin có thể nổ do lửa hoặc thậm chí do hóa chất. Hãy tuân theo các cảnh báo sau.• Không tháo rời.• Không đè và không để pin ở bất cứ nơi nào bị va chạm hoặc chịu lực như đập, làm rớt và dẫm quá mạnh lên pin.• Không làm đoản mạch và không để các vật kim loại tiếp xúc với các cực của pin• Không để pin ở nơi có nhiệt độ cao trên 60oC (140oF) như phơi trực tiếp dưới ánh sáng mặt trời hoặc để trong xe đậu dưới ánh sáng mặt trời. • Không đốt hoặc vứt vào lửa.• Không được cầm các pin Lithium-Ion bị hỏng hoặc rò rỉ.• Đảm bảo sạc pin bằng bộ sạc pin chính hãng của Sony hoặc thiết bị có thể sạc được loại pin này.• Để pin tránh xa tầm tay của trẻ em.• Giữ pin luôn khô ráo.• Chỉ thay thế đúng loại pin hoặc loại tương đương được Sony khuyên dùng.• Thải bỏ pin đã qua sử dụng ngay như mô tả trong hướng dẫn.
Chỉ thay thế loại pin phù hợp với máy, nếu không sẽ dễ gây thương tích hay cháy nổ.
Máy này sử dụng phích cắm đúc theo tiêu chuẩn BS 1363 nhằm đảm bảo sự an toàn và tiện lợi cho người sử dụng. Nếu cầu chì trong phích cắm cần thay thế thì phải dùng cầu chì cùng định mức như cầu chì đã được cung cấp và chứng nhận bởi ASTA hoặc BSI đến BS 1362 (chẳng hạn được đánh dấu bằng kí hiệu
hoặc ). Nếu phích cắm được cung cấp kèm theo thiết bị cầu chì có thể tháo ra, hãy đảm bảo rằng bạn đã đóng cầu chì sau khi bạn thay cầu chì. Không bao giờ sử dụng phích cắm không có nắp cầu chì. Nếu bạn mất nắp cầu chì, xin vui lòng liên hệ với trạm dịch vụ Sony gần nhất.
�GB
FOR CUSTOMERS IN EUROPE
Notice for the customers in the countries applying EU DirectivesThe manufacturer of this product is Sony Corporation, 1-7-1 Konan Minato-ku Tokyo, 108-0075 Japan. The Authorized Representative for EMC and product safety is Sony Deutschland GmbH, Hedelfinger Strasse 61, 70327 Stuttgart, Germany. For any service or guarantee matters please refer to the addresses given in separate service or guarantee documents.
ATTENTIONThe electromagnetic fields at the specific frequencies may influence the picture and sound of this unit.This product has been tested and found compliant with the limits set out in the EMC Directive for using connection cables shorter than 3 meters (9.8 feet).
NoticeIf static electricity or electromagnetism causes data transfer to discontinue midway (fail), restart the application or disconnect and connect the communication cable (USB, etc.) again.
Disposal of Old Electrical & Electronic Equipment (Applicable in the European Union and other European countries with separate collection systems)
This symbol on the product or on its packaging indicates that this product shall not be treated as household waste. Instead it shall be handed over to the applicable collection point for the recycling of electrical and electronic equipment.By ensuring this product is disposed of correctly, you will help prevent potential negative consequences for the environment and human health, which could otherwise
be caused by inappropriate waste handling of this product. The recycling of materials will help to conserve natural resources.For more detailed information about recycling of this product, please contact your local Civic Office, your household waste disposal service or the shop where you purchased the product.
Disposal of waste batteries (applicable in the European Union and other European countries with separate collection systems)
This symbol on the battery or on the packaging indicates that the battery provided with this product shall not be treated as household waste.On certain batteries this symbol might be used in combination with a chemical symbol. The chemical symbols for mercury (Hg) or lead (Pb) are added if the battery contains more than 0.0005% mercury or 0.004% lead.By ensuring these batteries are disposed of correctly, you will help prevent potentially negative consequences for the environment and human health which could otherwise be caused by inappropriate waste handling of the battery. The recycling of the materials will help to conserve natural resources.In case of products that for safety, performance or data integrity reasons require a permanent connection with an incorporated battery, this battery should be replaced by qualified service staff only. To ensure that the battery will be treated properly, hand over the product at end-of-life to the applicable collection point for the recycling of electrical and electronic equipment.For all other batteries, please view the section on how to remove the battery from the product safely. Hand the battery over to the applicable collection point for the recycling of waste batteries.For more detailed information about

VN3
�GB
Read this first
Before operating the unit, please read this manual thoroughly, and retain it for future reference.
WARNING
To reduce fire or shock hazard, do not expose the unit to rain or moisture.
Do not expose the batteries to excessive heat such as sunshine, fire or the like.
CAUTION
Battery packIf the battery pack is mishandled, the battery pack can burst, cause a fire or even chemical burns. Observe the following cautions.
Do not disassemble.Do not crush and do not expose the battery pack to any shock or force such as hammering, dropping or stepping on it.Do not short circuit and do not allow metal objects to come into contact with the battery terminals.Do not expose to high temperature above 60°C (140°F) such as in direct sunlight or in a car parked in the sun.Do not incinerate or dispose of in fire.Do not handle damaged or leaking lithium ion batteries.Be sure to charge the battery pack using a genuine Sony battery charger or a device that can charge the battery pack.Keep the battery pack out of the reach of small children.Keep the battery pack dry.Replace only with the same or equivalent type recommended by Sony.Dispose of used battery packs promptly as described in the instructions.
Replace the battery with the specified type only. Otherwise, fire or injury may result.
AC AdaptorDo not use the AC Adaptor placed in a narrow space, such as between a wall and furniture.
Use the nearby wall outlet (wall socket) when using the AC Adaptor. Disconnect the AC Adaptor from the wall outlet (wall socket) immediately if any malfunction occurs while using your camcorder.
Even if your camcorder is turned off, AC power source (mains) is still supplied to it while connected to the wall outlet (wall socket) via the AC Adaptor.
Note on the power cord (mains lead)The power cord (mains lead) is designed specifically for use with this camcorder only, and should not be used with other electrical equipment.
Notice for customers in the United Kingdom
A moulded plug complying with BS 1363 is fitted to this equipment for your safety and convenience.Should the fuse in the plug supplied need to be replaced, a fuse of the same rating as the supplied one and approved by ASTA or BSI to BS 1362, (i.e., marked with an or
mark) must be used. If the plug supplied with this equipment has a detachable fuse cover, be sure to attach the fuse cover after you change the fuse. Never use the plug without the fuse cover. If you should lose the fuse cover, please contact your nearest Sony service station.
Bộ chỉnh lưu AC Không để bộ chỉnh lưu AC ở nơi chật hẹp như khoảng cách giữa bức tường và đồ đạc. Sử dụng bộ chỉnh lưu AC với ổ cắm tường gần. Nếu có vấn đề nào đó xảy ra trong quá trình sử dụng bộ chỉnh lưu, ngay lập tức ngắt nguồn điện bằng cách rút phích cắm ra khỏi ổ cắm nguồn (ổ cắm tường).
Thậm chí khi máy quay đã tắt, nguồn điện AC (dây dẫn chính) vẫn cung cấp cho máy khi có kết nối với ổ cắm tường thông qua bộ chỉnh lưu AC.
Chú ý đối với dây nguồn (dây dẫn chính)Dây nguồn được thiết kế chuyên biệt sử dụng cho máy quay này, không nên dùng nó với thiết bị điện khác.
Chú ý dành cho các khách hàng ở Vương quốc Anh
Máy này sử dụng phích cắm đúc theo tiêu chuẩn BS 1363 nhằm đảm bảo sự an toàn và tiện lợi cho người sử dụng. Nếu cầu chì trong phích cắm cần thay thế thì phải dùng cầu chì cùng định mức như cầu chì đã được cung cấp và chứng nhận bởi ASTA hoặc BSI đến BS 1362 (chẳng hạn được đánh dấu bằng kí hiệu
hoặc ). Nếu phích cắm được cung cấp kèm theo thiết bị cầu chì có thể tháo ra, hãy đảm bảo rằng bạn đã đóng cầu chì sau khi bạn thay cầu chì. Không bao giờ sử dụng phích cắm không có nắp cầu chì. Nếu bạn mất nắp cầu chì, xin vui lòng liên hệ với trạm dịch vụ Sony gần nhất.
�GB
FOR CUSTOMERS IN EUROPE
Notice for the customers in the countries applying EU DirectivesThe manufacturer of this product is Sony Corporation, 1-7-1 Konan Minato-ku Tokyo, 108-0075 Japan. The Authorized Representative for EMC and product safety is Sony Deutschland GmbH, Hedelfinger Strasse 61, 70327 Stuttgart, Germany. For any service or guarantee matters please refer to the addresses given in separate service or guarantee documents.
ATTENTIONThe electromagnetic fields at the specific frequencies may influence the picture and sound of this unit.This product has been tested and found compliant with the limits set out in the EMC Directive for using connection cables shorter than 3 meters (9.8 feet).
NoticeIf static electricity or electromagnetism causes data transfer to discontinue midway (fail), restart the application or disconnect and connect the communication cable (USB, etc.) again.
Disposal of Old Electrical & Electronic Equipment (Applicable in the European Union and other European countries with separate collection systems)
This symbol on the product or on its packaging indicates that this product shall not be treated as household waste. Instead it shall be handed over to the applicable collection point for the recycling of electrical and electronic equipment.By ensuring this product is disposed of correctly, you will help prevent potential negative consequences for the environment and human health, which could otherwise
be caused by inappropriate waste handling of this product. The recycling of materials will help to conserve natural resources.For more detailed information about recycling of this product, please contact your local Civic Office, your household waste disposal service or the shop where you purchased the product.
Disposal of waste batteries (applicable in the European Union and other European countries with separate collection systems)
This symbol on the battery or on the packaging indicates that the battery provided with this product shall not be treated as household waste.On certain batteries this symbol might be used in combination with a chemical symbol. The chemical symbols for mercury (Hg) or lead (Pb) are added if the battery contains more than 0.0005% mercury or 0.004% lead.By ensuring these batteries are disposed of correctly, you will help prevent potentially negative consequences for the environment and human health which could otherwise be caused by inappropriate waste handling of the battery. The recycling of the materials will help to conserve natural resources.In case of products that for safety, performance or data integrity reasons require a permanent connection with an incorporated battery, this battery should be replaced by qualified service staff only. To ensure that the battery will be treated properly, hand over the product at end-of-life to the applicable collection point for the recycling of electrical and electronic equipment.For all other batteries, please view the section on how to remove the battery from the product safely. Hand the battery over to the applicable collection point for the recycling of waste batteries.For more detailed information about
Dành cho các khách hàng ở Châu Âu
GHI CHÚ
Tiêu hủy thiết bị điện và điện tử cũ (áp dụng cho Liên Minh Châu Âu và các quốc gia khác ở Châu Âu có hệ thống thu gom riêng biệt)
Tiêu hủy pin đã qua sử dụng (áp dụng cho Liên Minh Châu Âu và các quốc gia khác ở Châu Âu có hệ thống thu gom riêng biệt)
Chú ý
Chú ý dành cho khách hàng ở các quốc gia áp dụng quy định của EUNhà sản xuất sản phẩm này là tập đoàn Sony, 1-7-1 Konan Minato-ku Tokyo, 108-0075 Nhật Bản. Đại diện ủy quyền cho EMC và các sản phẩm an toàn là Sony Deutschland GmbH, Hedelfinger Strasse 61, 70327 Stuttgart, Đức. Nếu có bất cứ vấn đề gì về dịch vụ hoặc bảo hành, vui lòng tham khảo các địa chỉ đã cho trong các tài liệu về dịch vụ hoặc về các thông tin bảo hành.
Trường điện từ tại các tần số riêng biệt có thể làm ảnh hưởng đến hình ảnh và âm thanh của thiết bị này. Sản phẩm này đã được kiểm tra và xác định tuân theo các giới hạn trong quy định EMC dành cho việc sử dụng các dây cáp kết nối ngắn hơn 3 mét (9.8 feet).
Nếu tĩnh điện hoặc điện từ làm cho việc truyền dữ liệu bị đứt quãng (lỗi), hãy khởi động lại trình ứng dụng hoặc tháo ra và gắn lại dây cáp dữ liệu (USB, v..v…)
Biểu tượng này trên sản phẩm hoặc vỏ hộp cho biết sản phẩm này không được xử lý như rác thải trong gia đình. Thay vào đó, nó phải được xử lý bằng phương pháp đặc biệt để tái sử dụng thiết bị Điện và Điện tử. Hãy đảm bảo rằngthiết bị này được xử lý đúng, bạn sẽ ngăn chặn trước những hậu quả xấu cho môi trường và sức khỏe con người mà có thể xảy ra nếu phương pháp xử lý không thích hợp đối với sản phẩm này. Việc tái sử dụng nguyên vật liệu sẽ
giúp bảo tồn tài nguyên thiên nhiên. Để có thông tin chi tiết về việc tái sinh sản phẩm này, vui lòng liên hệ văn phòng Đô thị địa phương dịch vụ tiêu hủy rác hộ gia đình hoặc cửa hàng nơi bạn mua sản phẩm này.
Biểu tượng này trên pin hoặc vỏ hộp cho biết sản phẩm này không được xử lý như rác thảihộ gia đình. Trên mỗi pin cụ thể biểu tượng này có thể sử dụng kết hợp với biểu tượng hóa chất. Biểu tượng hóa chất này cho biết trong pin có chứa thủy ngân (Hg) hoặc chì (Pb), với nồng độ lớn hơn 0.0005% hoặc lớn hơn 0.004%tương ứng. Bằng cách đảm bảo các pin này được xử lý đúng, bạn sẽ ngăn chặn trước những hậu quả xấu cho môi trường và sức khỏe con người mà có thể xảy ra nếu phương pháp xử lý không thích hợp đối với pin đã qua sử dụng. Việc tái sử dụng nguyên vật liệu sẽ giúp bảo tồn tài nguyên thiên nhiên. Để bảo đảm an toàn trong khi sử dụng hoặc bảo toàn dữ liệu, sử dụng pin thích hợp. Pin này chỉ được thay thế bởi nhân viên có chuyên môn. Để đảm bảo pin đã được xử lý đúng, thu gom các sản phẩm đã sử dụng đến địa điểm thích hợp để tái chế thiết bị điện và điện tử. Đối với các pin khác, vui lòng đọc kỹ phần hướng dẫn cách tháo pin khỏi sản phẩm một cách an toàn. Thu gom pin đã qua sử dụng đến địa điểm thích hợp để tái chế pin. Để biết thông tin chi tiết vệ việc tái sử dụng sản phẩm này, vui lòng liên hệ văn phòng Đô thị địa phương, dịch vụ tiêu hủy rác trong nhà hoặc cửa hàng nơi bạn mua sản phẩm này.

VN4
Dành cho khách hàng ở Mỹ
Thông tin điều chỉnh
Lưu ý
Chú ý
Nếu có bất cứ thắc mắc nào về sản phẩm này, bạn có thể liên hệ với Trung tâm thông tin khách hàng của Sony 1-800-222-SONY (7669)Số bên dưới chỉ dành cho những vấn đề có liên quan đến FCC.
Nếu có bất kỳ thay đổi hay sửa đổi nào không được thông qua trong hướng dẫn này, bạn có thể mất quyền điều khiển thiết bị.
Thiết bị này đã được kiểm tra và xác định tuân theo các giới hạn dành cho thiết bị kỹ thuật số loại B theo đúng Khoản 15 của luật FCC.Các giới hạn này được đặt ra nhằm bảo vệ chống lại sự gây nhiễu có hại cho môi trường xung quanh nơi sử dụng máy ảnh. Thiết bị này phát ra, sử dụng và có thể phân tán năng lượng tần số sóng radio và, nếu không được lắp đặt và sử dụng theo đúng hướng dẫn, nó có thể gây nhiễu cho sóng radio. Tuy nhiên, không đảm bảo rằng nhiễu sẽ không xuất hiện trong các lắp đặt riêng biệt. Nếu thiết bị này gây nhiễu có hại cho các thiết bị thu sóng radio hoặc truyền hình, mà có thể xác định bằng việc tắt hay mở thiết bị, người sử dụng có thể thử làm mất nhiễu bằng một hoặc nhiều biện pháp sau: - Xoay hoặc định vị lại ăng ten thu sóng. - Để máy cách xa thiết bị thu sóng. - Nối máy vào ổ cắm trên mạch điện khác với mạch được nối vào bộ thu. - Tham khảo ý kiến đại lý hoặc các kỹ thuật viên có kinh nghiệm về các thiết bị thu sóng radio và truyền hình để được trợ giúp.
Cáp nối đi kèm phải được sử dụng cho thiết bị này để tuân theo các giới hạn dành cho thiết bị kỹ thuật số theo đúng phần phụ B Khoản 15 của luật FCC.
Khai báo về sự phù hợpThương hiệu: SONYSố model: HDR-CX130E, HDR-CX160ECông ty chịu trách nhiệm: Sony Electron-ics Inc.Địa chỉ: 16530 Via Esprillo,San Diego, CA 92127 U.S.A.Số điện thoại: 858-942-2230Thiết bị này tuân theo Khoản 15 của luật FCC. Các thao tác tuân theo hai điều kiện sau: (1) Thiết bị này không thể gây ra nhiễu có hại, và (2) thiết bị này Có thể chấp nhận bất kỳ nhiễu nào đã nhận kể cả nhiễu có thể gây ra hoạt động không mong muốn.
PinThiết bị này tuân theo Khoản 15 của Luật FCC. Hoạt động của sản phẩm tuân theo hai điều kiện sau: (1) Thiết bị này không thể gây ra nhiễu có hại, và (2) thiết bị này phải chấp nhận bất kỳ nhiễu nào đã nhận được bao gồm nhiễu có thể gây ra hoạt động không mong muốn.

VN5
Chú ý
�GB
Supplied itemsThe numbers in ( ) are the supplied quantity. AC Adaptor (1) Power cord (Mains lead) (1) Component A/V cable (1) A/V connecting cable (1) USB connection support cable (1)
Use this cable when the Built-in USB Cable of the camcorder (p. 11) is too short for connection.
Rechargeable battery pack NP-FV50 (1) CD-ROM “Handycam” Application Software (1) (p. 34)
“PMB” (software, including “PMB Help”)“Handycam” Handbook (PDF)
“Operating Guide” (This manual) (1)
This camcorder has a built-in software application called “PMB Portable” (p. 37).See page 18 for the memory card you can use with this camcorder.
Using the camcorderDo not hold the camcorder by the following parts, and also do not hold the camcorder by the jack covers.
LCD Screen Battery pack
Built-in USB Cable
The camcorder is not dustproofed, dripproofed or waterproofed. See “Precautions” (p. 61).
Menu items, LCD panel, and lensA menu item that is grayed out is not available under the current recording or playback conditions.The LCD screen is manufactured using extremely high-precision technology, so over 99.99% of the pixels are operational for effective use. However, there may be some tiny black points and/or bright points (white, red, blue, or green in color) that appear constantly on the LCD screen. These points are normal results of the manufacturing process and do not affect the recording in any way.
Exposing the LCD screen or the lens to direct sunlight for long periods of time may cause malfunctions.Do not aim at the sun. Doing so might cause your camcorder to malfunction. Take images of the sun only in low light conditions, such as at dusk.
About language settingThe on-screen displays in each local language are used for illustrating the operating procedures. Change the screen language before using the camcorder if necessary (p. 16).
On recordingTo ensure stable operation of the memory card, it is recommended to format the memory card with your camcorder before the first use. formatting the memory card will erase all the data stored on it and the data will be irrecoverable. Save your important data on your PC etc.
Black pointsWhite, red, blue or green points
Phụ kiện kèm theo
Về sử dụng máy quay
Màn hình LCD Pin
Cáp USB bên trong
Số trong ( ) là số lượng được cung cấp.
Cáp này được sử dụng trong trường hợp cáp USB bên trong máy quay quá ngắn để kết nối.
• Máy quay này có một phần mềm ứng dụng có tên ““PMB Portable” (p. 37).• Xem trang 18 để biết thêm về loại thẻ nhớ bạn có thể sử dụng cho máy quay này.
• Máy quay không được dính bụi, không được để ẩm hoặc nhiễm nước. Xem phần “Đề phòng” (tr.61)
Các mục Menu, màn hình LCD và ống kính • Mục menu nào có màu xám nhạt là mục không hoạt động dưới các điều kiện phát lại hay ghi hình hiện tại.• Màn hình LCD được sản xuất sử dụng công nghệ có độ chính xác cực cao, trên 99.99% điểm ảnh cho hiệu quả sử dụng cao. Tuy nhiên, một vài chấm nhỏ màu đen hoặc màu sáng (trắng, đỏ, xanh da trời hay xanh lá) có thể xuất hiện trên màn hình LCD. Những chấm này là bình thường, nó không ảnh hưởng tới việc ghi hình.
• Để màn hình LCD hay ống kính trực tiếp dưới ánh nắng mặt trời trong thời gian dài có thể gây hỏng máy. • Không quay trực tiếp mặt trời vì nó có thể làm máy của bạn bị hỏng. Chỉ chụp mặt trời trong điều kiện ánh sáng yếu, ví dụ như lúc hoàng hôn hoặc bình minh.
Về cài đặt ngôn ngữ• Các hiển thị ngôn ngữ địa phương trên màn hình được hiển thị cho việc mã hóa các thao tác. Thay đổi ngôn ngữ hiển thị trước khi sử dụng máy quay nếu thấy cần thiết.(tr 16)
Đối với việc ghi hình• Để đảm bảo thẻ nhớ hoạt động ổn định, bạn nên định dạng lại thẻ nhớ trước khi sử dụng lần đầu. Định dạng lại thẻ nhớ sẽ xóa tất cả các dữ liệu chứa bên trong và dữ liệu đó sẽ không thể khôi phục. Lưu lại các dữ liệu quan trọng vào trong máy tính cá nhân của bạn hay vào các thiết bị khác.
• Không cầm máy quay bằng các phần theo sau và bằng nắp đậy khe cắm.
Các chấm đen
Các chấm trắng, đỏ, xanh da trời hoặc xanh lá
Bộ chỉnh lưu AC (1)Dây nguồn (Dây chính) (1)Cáp A/V đa dụng (1)Cáp nối A/VCáp hỗ trợ kết nối USB (1)
Pin có thể sạc lại NP-FV50 (1)CD –ROM phần mềm ứng dụng “Handy
Hướng dẫn sử dụng (Sách hướng dẫn này) (1)
cam” (1) (tr.34)-“PMB” (phần mềm, gồm ”PMB Help”-Sổ tay “Handycam” (PDF)
AB
C

VN6
• Trước khi bắt đầu quay, hãy thực hiện quay thử để chắc chắn hình ảnh và âm thanh được ghi lại mà không gặp bất cứ trục trặc nào.• Không có chế độ bồi thường đối với các nội dung được ghi, thậm chí đối với trường hợp không thể quay phim hoặc xem lại do một lỗi chức năng của máy quay, phương tiện ghi hình,…• Hệ thống màu của TV khác nhau tùy theo quốc gia / vùng. Để xem phim bạn đã quay trên TV, bạn cần một TV có hệ PAL.• Các chương trình TV, phim, băng hình và các tài liệu khác có thể được bảo vệ bản quyền. Phim ảnh lậu từ các tài liệu trên có thể trái với luật bản quyền. • Sử dụng máy quay tuân theo các quy định của địa phương.
Lưu ý khi phát lại• Bạn không thể xem lại hình ảnh đã được ghi trong máy quay của bạn với các thiết bị khác theo cách thông thường. Bạn cũng không thể xem lại hình ảnh đã được ghi trong các thiết bị khác thông qua thiết bị này. • Chuẩn STD về chất lượng hình ảnh trong các thước phim được ghi lại trên thẻ nhớ SD không cho phép xem trên các thiết bị AV của nhà sản xuất khác.
DVD đã ghi với chất lượng hình ảnh có độ sắc nét cao HD• DVD có chất lượng hình ảnh với độ nét cao (HD) có thể xem lại trên các thiết bị tương thích với chuẩn AVCHD. Bạn không thể xem đĩa được ghi với chất lượng hình ảnh có độ nét cao (HD) trên đầu đĩa hoặc máy ghi âm DVD nếu như chúng không tương thích với định dạng AVCHD. Nếu bạn muốn mở một đĩa với định dạng AVCHD (chất lượng hình ảnh với độ nét cao (HD) vào đầu đĩa hoặc máy ghi âm DVD, có thể bạn không thể lấy được đĩa ra.
Lưu lại tất cả dữ liệu hình ảnh bạn đã quay
• Để tránh bị mất dữ liệu, nên thường xuyên lưu chúng vào các thiết bị ngoại vi. Để lưu dữ liệu vào máy tính của bạn, xem hướng dẫn ở trang 33, và để lưu dữ liệu vào các thiết bị ngoại vi khác, xem hướng dẫn trang 40..• Loại đĩa hoặc chương trình chạy mà hình ảnh được lưu phụ thuộc vào chế độ [ REC] được chọn khi ghi hình. Những đoạn phim quay với chế độ [50p Quality ] đươc lưu trên các phương tiện ngoài (tr.42) Những đoạn phim quay với chế độ [Highest Quality ] có thể lưu trên các phương tiện ngoại vi hoặc trên đĩa Blu-ray.
Chú ý về bộ pin/ Bộ chỉnh lưu AC• Đảm bảo rằng máy quay đã tắt khi tháo bộ pin hoặc bộ chỉnh lưu AC ra khỏi máy, giữ cả máy quay và giắc cắm DC.
Chú ý về nhiệt độ của máy quay/ pin • Khi nhiệt độ của máy quay/ pin quá cao hoặc quá thấp, có thể bạn sẽ không thể quay hoặc phát lại hình ảnh trên máy quay do tính năng bảo vệ của máy được kích hoạt trong những trường hợp như vậy. Trong trường hợp này, một chỉ dẫn sẽ xuất hiện trên màn hình LCD.
Khi máy quay kết nối với máy tính hoặc phụ kiện• Không cố gắng định dạng phương tiện ghi hình của máy quay thông qua máy tính. Nếu bạn làm vậy, máy quay của bạn có thể không hoạt động chính xác.• Khi kết nối máy quay với một thiết bị khác sử dụng dây kết nối, đảm bảo cắm nối một cách chính xác. Nếu đẩy giắc cắm quá mạnh có thể làm hỏng các thiết bị đầu cuối và có thể dẫn đến làm hỏng máy quay.• Khi máy quay kết nối với thiết bị khác thông qua cổng USB và nguồn điện của máy quay được bật, không được đóng màn hình LCD. Dữ liệu hình ảnh quay trước đó có thể bị mất.

VN7 �
GB
If you cannot record/play back images, perform [Format]
If you repeat recording/deleting images for a long time, fragmentation of data occurs on the recording media. Images cannot be saved or recorded. In such a case, save your images on some type of external media first, and then perform [Format] by touching (MENU) [Setup] [ (Media Settings)] [Format] the desired medium (HDR-CX160E/CX180E) .
Notes on optional accessoriesWe recommend using genuine Sony accessories.Genuine Sony accessories may not be available in some countries/regions.
About this manual, illustrations and on-screen displays
The example images used in this manual for illustration purposes are captured using a digital still camera, and therefore may appear different from images and screen indicators that actually appear on your camcorder. And, the illustrations of your camcorder and its screen indication are exaggerated or simplified for understandability. In this manual, the internal memory (HDR-CX160E/CX180E) and the memory card are called “recording media.”In this manual, the DVD disc recorded with high definition image quality (HD) is called AVCHD recording disc.Design and specifications of your camcorder and accessories are subject to change without notice.
Confirm the model name of your camcorder
The model name is shown in this manual when there is a difference in specification between models. Confirm the model name on the bottom of your camcorder. The main differences in specification of this series are as follows.
Recording media
Capacity of internal
recording media
HDR-CX130E Memory card —
HDR-CX160E Internal memory + memory card
16 GB
HDR-CX180E 32 GB
Notes on use
Do not do any of the following. Otherwise, the recording media may be damaged, recorded images may be impossible to play back or may be lost, or other malfunctions could occur.
ejecting the memory card when the access lamp (p. 19) is lit or flashingremoving the battery pack or AC Adaptor from the camcorder, or applying mechanical shock or vibration to the camcorder when the
(Movie)/ (Photo) lamps (p. 21) or the access lamp (p. 19) are lit or flashing
When using a shoulder belt (sold separately), do not crash the camcorder against an object.
Nếu bạn không thể quay/ xem lại hình ảnh hãy thực hiện [Format] Xác nhận tên của dòng máy quay
của bạn
Chú ý trong việc lựa chọn phụ kiện
Về những hướng dẫn, minh họa này và các hiển thị trên màn hình
• Nếu bạn lặp lại việc ghi hình/ xóa hình trong thời gian dài, phân đoạn của dữ liệu sẽ tiếp tục xuất hiện trên phương tiện ghi hình. Hình ảnh sẽ không được lưu hoặc ghi lại. Trong trường hợp này, hãy lưu dữ liệu sang một số loại phương tiện ngoại vi trước, sau đó chọn [Format] bằng cách chạm (MENU) [Setup] [ (Media Settings)] [Format] chọn phương tiện mong muốn (HDRCX160E/ CX180E) .
• Chúng tôi khuyên bạn nên sử dụng các loại phụ kiện chính hãng của Sony.• Ở một số quốc gia/khu vực có thể không có phụ kiện chính hãng của Sony.
• Ví dụ hình ảnh được sử dụng trong hướng dẫn này với mục đích minh họa được chụp từ máy ảnh kỹ thuật số, vì vậy có thể xuất hiện khác biệt với hình ảnh và thông số màn hình hiển thị trên máy quay của bạn. Và, những minh họa của máy quay cùng với các thông số màn hình được phóng đại hoặc đơn giản hóa cho dễ hiểu.• Trong hướng dẫn này, bộ nhớ trong (HDRCX160E/CX180E) và thẻ nhớ được gọi là “phương tiện ghi hình”.• Theo hướng dẫn này, đĩa DVD được ghi với chất lượng hình ảnh độ nét cao (HD) được gọi là đĩa ghi hình AVCHD.• Thiết kế và thông số của máy quay và phụ kiện có thể thay đổi mà không thông báo.
• Tên của dòng máy quay được chỉ ra trong hướng dẫn này khi có sự khác biệt về thông số giữa các dòng máy. Xác định tên của dòng máy quay phía dưới đáy máy quay của bạn.• Sự khác biệt cơ bản về thông số của loạt máy như sau:
• Không được làm những việc sau, nếu không, phương tiện ghi hình bị phá hỏng, hình ảnh đã quay có thể không thể phát lại bị mất hoặc trục trặc khác có thể xảy ra. - Việc đẩy thẻ nhớ khi đèn truy cập (tr. 19) sáng hoặc nhấp nháy, - Tháo bộ pin hoặc bộ chỉnh lưu AC khỏi máy quay, hoặc áp dụng giật hoặc rung máy quay khi đèn (Phim)/ (Ảnh) (tr.21) hoặc đèn truy cập (tr. 19) sáng hoặc nhấp nháy.• Khi sử dụng dây đeo vai (được bán riêng), chú ý không va đập máy quay vào vật khác.
Phương tiện ghi hình
Bộ nhớ trong + thẻ nhớ
Thẻ nhớ
Dung lượng của phương tiện ghi
hình trong
Chú ý khi sử dụng

VN8
�GB
Table of contents
Read this first . . . . . . . . . . . . . . . . . . . . . . . . . . . . . . . . . . . . . . . . . . . . . . . . . . . . . . . . . . . . . . . . . . . . . . . . . . . . . . . . . . . . . . . 2
Getting startedStep 1: Charging the battery pack . . . . . . . . . . . . . . . . . . . . . . . . . . . . . . . . . . . . . . . . . . . . . . . . . . . . . . . . . . . . 10
Charging the battery pack abroad . . . . . . . . . . . . . . . . . . . . . . . . . . . . . . . . . . . . . . . . . . . . . . . . . . 13Step 2: Turning the power on, and setting the date and time . . . . . . . . . . . . . . . . . . . . . . . . . . 14
Changing the language setting . . . . . . . . . . . . . . . . . . . . . . . . . . . . . . . . . . . . . . . . . . . . . . . . . . . . . . 16Step 3: Preparing the recording media . . . . . . . . . . . . . . . . . . . . . . . . . . . . . . . . . . . . . . . . . . . . . . . . . . . . . . 17
To check the recording media settings . . . . . . . . . . . . . . . . . . . . . . . . . . . . . . . . . . . . . . . . . . . . . 17Copying movies and photos (HDR-CX160E/CX180E) . . . . . . . . . . . . . . . . . . . . . . . . . . . . 19
Recording/PlaybackRecording . . . . . . . . . . . . . . . . . . . . . . . . . . . . . . . . . . . . . . . . . . . . . . . . . . . . . . . . . . . . . . . . . . . . . . . . . . . . . . . . . . . . . . . . . . 20
Selecting the recording mode . . . . . . . . . . . . . . . . . . . . . . . . . . . . . . . . . . . . . . . . . . . . . . . . . . . . . . . 24Playback on the camcorder . . . . . . . . . . . . . . . . . . . . . . . . . . . . . . . . . . . . . . . . . . . . . . . . . . . . . . . . . . . . . . . . . . . . 25
Performing Highlight Playback . . . . . . . . . . . . . . . . . . . . . . . . . . . . . . . . . . . . . . . . . . . . . . . . . . . . . . 28Playing images on a TV . . . . . . . . . . . . . . . . . . . . . . . . . . . . . . . . . . . . . . . . . . . . . . . . . . . . . . . . . . . . . . . . . . . . . . . . . 29
Advanced operationsDeleting movies and photos. . . . . . . . . . . . . . . . . . . . . . . . . . . . . . . . . . . . . . . . . . . . . . . . . . . . . . . . . . . . . . . . . . . 32
Saving movies and photos with a computerUseful functions available if you connect the camcorder to a computer (Windows) . . . . . . . . . . . . . . . . . . . . . . . . . . . . . . . . . . . . . . . . . . . . . . . . . . . . . . . . . . . . . . . . . . . . . . . . . . . . . . . . . . . . . . . . . 33Preparing a computer (Windows) . . . . . . . . . . . . . . . . . . . . . . . . . . . . . . . . . . . . . . . . . . . . . . . . . . . . . . . . . . . . 34
When using a Macintosh . . . . . . . . . . . . . . . . . . . . . . . . . . . . . . . . . . . . . . . . . . . . . . . . . . . . . . . . . . . . . . 34Starting PMB (Picture Motion Browser) . . . . . . . . . . . . . . . . . . . . . . . . . . . . . . . . . . . . . . . . . . . . . . . . . . . . . . 37Uploading images to a network service . . . . . . . . . . . . . . . . . . . . . . . . . . . . . . . . . . . . . . . . . . . . . . . . . . . . . 37
Nội dung
Các thao tác nâng cao
Lưu phim và hình ảnh vào máy tính
Ghi hình/phát lại
Khởi động
Đọc thông tin này trước
Bước 1: Sạc pin..................................................................................................... Sạc pin ở nước ngoài..............................................................................
Phát lại trên máy quay........................................................................................... Phát lại phần bôi đen...................................................................................
Phát hình ảnh trên TV............................................................................................
Bước 2: Bật nguồn và cài đặt ngày giờ................................................................. Thay đổi cài đặt ngôn ngữ.......................................................................
Bước 3: Chuẩn bị phương tiện ghi hình................................................................ Kiểm tra cài đặt phương tiện ghi hình...................................................... Sao chép phim và ảnh (HDR - CX160E/CX180E)................................
Các chức năng hữu dụng hoạt động khi bạn kết nối máy quay với máy tính cá nhân (Windows)...................................................................................................Chuẩn bị máy tính (Windows)..............................................................................Khi sử dụng máy tính Macintosh..........................................................................Khởi động PMB (Picture Motion Browser)............................................................Tải hình ảnh lên một dịch vụ mạng......................................................................
Xóa phim và hình ảnh............................................................................................
�
Table of contents
GB
Saving images with an external deviceSelecting a method for saving images with an external device . . . . . . . . . . . . . . . . . . . . . . . . 40Saving images on an external media device . . . . . . . . . . . . . . . . . . . . . . . . . . . . . . . . . . . . . . . . . . . . . . . 42Creating a disc with the DVD writer, DVDirect Express . . . . . . . . . . . . . . . . . . . . . . . . . . . . . . . . . . . 45Creating a high definition image quality (HD) disc with a DVD writer, etc., other than DVDirect Express . . . . . . . . . . . . . . . . . . . . . . . . . . . . . . . . . . . . . . . . . . . . . . . . . . . . . . . . . . . . . . . . . . . . . . . . . . 48Creating a standard definition image quality (STD) disc with a recorder, etc. . . . . . . . 49
Customizing your camcorderUsing menus . . . . . . . . . . . . . . . . . . . . . . . . . . . . . . . . . . . . . . . . . . . . . . . . . . . . . . . . . . . . . . . . . . . . . . . . . . . . . . . . . . . . . . 51Getting detailed information from the “Handycam” Handbook . . . . . . . . . . . . . . . . . . . . . . . . 55
Additional information Troubleshooting . . . . . . . . . . . . . . . . . . . . . . . . . . . . . . . . . . . . . . . . . . . . . . . . . . . . . . . . . . . . . . . . . . . . . . . . . . . . . . 56
Recording time of movies/number of recordable photos . . . . . . . . . . . . . . . . . . . . . . . . . . . . . . . 58Precautions . . . . . . . . . . . . . . . . . . . . . . . . . . . . . . . . . . . . . . . . . . . . . . . . . . . . . . . . . . . . . . . . . . . . . . . . . . . . . . . . . . . . . . . . 61Specifications . . . . . . . . . . . . . . . . . . . . . . . . . . . . . . . . . . . . . . . . . . . . . . . . . . . . . . . . . . . . . . . . . . . . . . . . . . . . . . . . . . . . . 63
Quick referenceScreen indicators . . . . . . . . . . . . . . . . . . . . . . . . . . . . . . . . . . . . . . . . . . . . . . . . . . . . . . . . . . . . . . . . . . . . . . . . . . . . . . . . . 66Parts and controls . . . . . . . . . . . . . . . . . . . . . . . . . . . . . . . . . . . . . . . . . . . . . . . . . . . . . . . . . . . . . . . . . . . . . . . . . . . . . . . . 67Index . . . . . . . . . . . . . . . . . . . . . . . . . . . . . . . . . . . . . . . . . . . . . . . . . . . . . . . . . . . . . . . . . . . . . . . . . . . . . . . . . . . . . . . . . . . . . . . . 69
Ghi hình................................................................................................................ Chọn chế độ ghi hình...................................................................................

VN9
�GB
Table of contents
Read this first . . . . . . . . . . . . . . . . . . . . . . . . . . . . . . . . . . . . . . . . . . . . . . . . . . . . . . . . . . . . . . . . . . . . . . . . . . . . . . . . . . . . . . . 2
Getting startedStep 1: Charging the battery pack . . . . . . . . . . . . . . . . . . . . . . . . . . . . . . . . . . . . . . . . . . . . . . . . . . . . . . . . . . . . 10
Charging the battery pack abroad . . . . . . . . . . . . . . . . . . . . . . . . . . . . . . . . . . . . . . . . . . . . . . . . . . 13Step 2: Turning the power on, and setting the date and time . . . . . . . . . . . . . . . . . . . . . . . . . . 14
Changing the language setting . . . . . . . . . . . . . . . . . . . . . . . . . . . . . . . . . . . . . . . . . . . . . . . . . . . . . . 16Step 3: Preparing the recording media . . . . . . . . . . . . . . . . . . . . . . . . . . . . . . . . . . . . . . . . . . . . . . . . . . . . . . 17
To check the recording media settings . . . . . . . . . . . . . . . . . . . . . . . . . . . . . . . . . . . . . . . . . . . . . 17Copying movies and photos (HDR-CX160E/CX180E) . . . . . . . . . . . . . . . . . . . . . . . . . . . . 19
Recording/PlaybackRecording . . . . . . . . . . . . . . . . . . . . . . . . . . . . . . . . . . . . . . . . . . . . . . . . . . . . . . . . . . . . . . . . . . . . . . . . . . . . . . . . . . . . . . . . . . 20
Selecting the recording mode . . . . . . . . . . . . . . . . . . . . . . . . . . . . . . . . . . . . . . . . . . . . . . . . . . . . . . . 24Playback on the camcorder . . . . . . . . . . . . . . . . . . . . . . . . . . . . . . . . . . . . . . . . . . . . . . . . . . . . . . . . . . . . . . . . . . . . 25
Performing Highlight Playback . . . . . . . . . . . . . . . . . . . . . . . . . . . . . . . . . . . . . . . . . . . . . . . . . . . . . . 28Playing images on a TV . . . . . . . . . . . . . . . . . . . . . . . . . . . . . . . . . . . . . . . . . . . . . . . . . . . . . . . . . . . . . . . . . . . . . . . . . 29
Advanced operationsDeleting movies and photos. . . . . . . . . . . . . . . . . . . . . . . . . . . . . . . . . . . . . . . . . . . . . . . . . . . . . . . . . . . . . . . . . . . 32
Saving movies and photos with a computerUseful functions available if you connect the camcorder to a computer (Windows) . . . . . . . . . . . . . . . . . . . . . . . . . . . . . . . . . . . . . . . . . . . . . . . . . . . . . . . . . . . . . . . . . . . . . . . . . . . . . . . . . . . . . . . . . 33Preparing a computer (Windows) . . . . . . . . . . . . . . . . . . . . . . . . . . . . . . . . . . . . . . . . . . . . . . . . . . . . . . . . . . . . 34
When using a Macintosh . . . . . . . . . . . . . . . . . . . . . . . . . . . . . . . . . . . . . . . . . . . . . . . . . . . . . . . . . . . . . . 34Starting PMB (Picture Motion Browser) . . . . . . . . . . . . . . . . . . . . . . . . . . . . . . . . . . . . . . . . . . . . . . . . . . . . . . 37Uploading images to a network service . . . . . . . . . . . . . . . . . . . . . . . . . . . . . . . . . . . . . . . . . . . . . . . . . . . . . 37
�
Table of contents
GB
Saving images with an external deviceSelecting a method for saving images with an external device . . . . . . . . . . . . . . . . . . . . . . . . 40Saving images on an external media device . . . . . . . . . . . . . . . . . . . . . . . . . . . . . . . . . . . . . . . . . . . . . . . 42Creating a disc with the DVD writer, DVDirect Express . . . . . . . . . . . . . . . . . . . . . . . . . . . . . . . . . . . 45Creating a high definition image quality (HD) disc with a DVD writer, etc., other than DVDirect Express . . . . . . . . . . . . . . . . . . . . . . . . . . . . . . . . . . . . . . . . . . . . . . . . . . . . . . . . . . . . . . . . . . . . . . . . . . 48Creating a standard definition image quality (STD) disc with a recorder, etc. . . . . . . . 49
Customizing your camcorderUsing menus . . . . . . . . . . . . . . . . . . . . . . . . . . . . . . . . . . . . . . . . . . . . . . . . . . . . . . . . . . . . . . . . . . . . . . . . . . . . . . . . . . . . . . 51Getting detailed information from the “Handycam” Handbook . . . . . . . . . . . . . . . . . . . . . . . . 55
Additional information Troubleshooting . . . . . . . . . . . . . . . . . . . . . . . . . . . . . . . . . . . . . . . . . . . . . . . . . . . . . . . . . . . . . . . . . . . . . . . . . . . . . . 56
Recording time of movies/number of recordable photos . . . . . . . . . . . . . . . . . . . . . . . . . . . . . . . 58Precautions . . . . . . . . . . . . . . . . . . . . . . . . . . . . . . . . . . . . . . . . . . . . . . . . . . . . . . . . . . . . . . . . . . . . . . . . . . . . . . . . . . . . . . . . 61Specifications . . . . . . . . . . . . . . . . . . . . . . . . . . . . . . . . . . . . . . . . . . . . . . . . . . . . . . . . . . . . . . . . . . . . . . . . . . . . . . . . . . . . . 63
Quick referenceScreen indicators . . . . . . . . . . . . . . . . . . . . . . . . . . . . . . . . . . . . . . . . . . . . . . . . . . . . . . . . . . . . . . . . . . . . . . . . . . . . . . . . . 66Parts and controls . . . . . . . . . . . . . . . . . . . . . . . . . . . . . . . . . . . . . . . . . . . . . . . . . . . . . . . . . . . . . . . . . . . . . . . . . . . . . . . . 67Index . . . . . . . . . . . . . . . . . . . . . . . . . . . . . . . . . . . . . . . . . . . . . . . . . . . . . . . . . . . . . . . . . . . . . . . . . . . . . . . . . . . . . . . . . . . . . . . . 69
Lưu hình ảnh vào một thiết bị ngoại vi
Tùy chỉnh máy quay của bạn
Thông tin bổ sung
Tham khảo nhanh
Lựa chọn một phương pháp để lưu hình ảnh với một thiết bị ngoại vi...........................Lưu hình ảnh trên một thiết bị truyền thông ngoại vi.......................................................Tạo đĩa với đầu ghi DVD, DVDirect Express....................................................................Tạo ra một đĩa có chất lượng hình ảnh độ nét cao (HD) với đầu ghi DVD, khác DVDi-rect Express......................................................................................................................Tạo một đĩa (STD) có chất lượng hình ảnh đạt tiêu chuẩn với một thiết bị ghi, vv.......
Sử dụng menu..................................................................................................................Xem thông tin chi tiết từ sổ tay “Handycam”.....................................................................
Khắc phục sự cố.........................................................................................................Ghi lại thời gian quay phim / số lượng hình ảnh ghi.........................................................Đề phòng..........................................................................................................................Thông số kỹ thuật.............................................................................................................
Chỉ dẫn trên màn hình.....................................................................................................Các bộ phận và điều khiển...............................................................................................Danh mục..........................................................................................................................
Nội dung

VN1010
GB
Getting started
Step 1: Charging the battery pack
You can charge the “InfoLITHIUM” battery pack (V series) after attaching it to your camcorder.
NotesYou cannot attach any “InfoLITHIUM” battery pack other than the V series to your camcorder.
1 Turn off your camcorder by closing the LCD screen.
2 Attach the battery pack by sliding it in the direction of the arrow until it clicks.
3 Connect the AC Adaptor and the power cord (mains lead) to your camcorder and the wall outlet (wall socket).
The CHG (charge) lamp lights up and charging starts. The CHG (charge) lamp turns off when the battery pack is fully charged.
Battery pack
CHG (charge) lamp
DC IN jack
To the wall outlet (wall socket)
AC Adaptor
DC plug
Power cord (Mains lead)
Align the mark on the DC plug with that on the DC IN jack.
Khởi động
Pin
Đen CHG (sạc)
Tắt máy quay bằng cách đóng màn hình LCD lại.
Lắp pin bằng cách trượt nó theo hướng mũi tên cho đến khi nókhớp lại.
Nối bộ chỉnh lưu AC và dây nguồn (dây nguồn chính) với máy quay và ổ cắm trên tường (ổ cắm điện).
Phích cắm DC
Canh vị trí trên phích cắm DC với giắc DC IN.
Tới ổ cắm trên tường (ổ cắm
điện)
Dây điện (dây nguồn chính)
Giắc cắm DC IN
Bộ chỉnh lưu AC
Bước 1: Sạc pin
Bạn có thể sạc pin “InfoLITHIUM” (V series) sau khi gắn nó vào máy quay.
Chú ý• Không được gắn bất cứ loại pin nào khác pin “InfoLITHIUM” (V series) vào máy quay của bạn.
• Đèn CHG (sạc) sáng lên và bắt đầu quá trình sạc pin. Đèn CHG (sạc) sẽ tắt khi pin được sạc đầy.
11GB
Getting started
4 When the battery is charged, disconnect the AC Adaptor from the DC IN jack of your camcorder.
To charge the battery using your computerThis method is useful when the AC Adaptor is not available. Turn off the camcorder and attach the battery pack to the camcorder. Connect the camcorder to a running computer using the Built-in USB Cable.
When the battery is fully charged, disconnect the camcorder from the computer (p. 36).
NotesOperation with all computers is not assured.If you connect the camcorder to a laptop computer that is not connected to a power source, the battery of the laptop computer will continue to use up its charge. Do not leave the camcorder connected to a computer in this manner.Charging with a personally assembled computer, with a converted computer, or through a USB hub are not guaranteed. The camcorder may not function correctly depending on the USB device which is used with the computer.
TipsYou can charge the battery by connecting the Built-in USB Cable to a wall outlet (wall socket) using an AC-U501AD/AC-U50AG USB charger/AC Adaptor (sold separately). You cannot use a Sony CP-AH2R or CP-AL portable power supply device (sold separately) to charge the camcorder.The USB charger/AC Adaptor may not be available in some countries/regions.The CHG (charge) lamp may not light up when the remaining battery power is too low. In such a case, charge the battery using the supplied AC adaptor.
To the wall outlet (wall socket)

VN1110
GB
Getting started
Step 1: Charging the battery pack
You can charge the “InfoLITHIUM” battery pack (V series) after attaching it to your camcorder.
NotesYou cannot attach any “InfoLITHIUM” battery pack other than the V series to your camcorder.
1 Turn off your camcorder by closing the LCD screen.
2 Attach the battery pack by sliding it in the direction of the arrow until it clicks.
3 Connect the AC Adaptor and the power cord (mains lead) to your camcorder and the wall outlet (wall socket).
The CHG (charge) lamp lights up and charging starts. The CHG (charge) lamp turns off when the battery pack is fully charged.
Battery pack
CHG (charge) lamp
DC IN jack
To the wall outlet (wall socket)
AC Adaptor
DC plug
Power cord (Mains lead)
Align the mark on the DC plug with that on the DC IN jack.
Tới ổ cắm trên tường (ổ cắm
điện)
Dây điện (dây nguồn chính)
• Không được gắn bất cứ loại pin nào khác pin “InfoLITHIUM” (V series) vào máy quay của bạn.
• Đèn CHG (sạc) sáng lên và bắt đầu quá trình sạc pin. Đèn CHG (sạc) sẽ tắt khi pin được sạc đầy.
11GB
Getting started
4 When the battery is charged, disconnect the AC Adaptor from the DC IN jack of your camcorder.
To charge the battery using your computerThis method is useful when the AC Adaptor is not available. Turn off the camcorder and attach the battery pack to the camcorder. Connect the camcorder to a running computer using the Built-in USB Cable.
When the battery is fully charged, disconnect the camcorder from the computer (p. 36).
NotesOperation with all computers is not assured.If you connect the camcorder to a laptop computer that is not connected to a power source, the battery of the laptop computer will continue to use up its charge. Do not leave the camcorder connected to a computer in this manner.Charging with a personally assembled computer, with a converted computer, or through a USB hub are not guaranteed. The camcorder may not function correctly depending on the USB device which is used with the computer.
TipsYou can charge the battery by connecting the Built-in USB Cable to a wall outlet (wall socket) using an AC-U501AD/AC-U50AG USB charger/AC Adaptor (sold separately). You cannot use a Sony CP-AH2R or CP-AL portable power supply device (sold separately) to charge the camcorder.The USB charger/AC Adaptor may not be available in some countries/regions.The CHG (charge) lamp may not light up when the remaining battery power is too low. In such a case, charge the battery using the supplied AC adaptor.
To the wall outlet (wall socket)
Khi pin đã được sạc, hãy ngắt bộ chỉnh lưu AC ra khỏi giắc cắm DC IN của máy quay.
Sạc pin bằng cách sử dụng máy tính Phương pháp này rất hữu ích khi bộ chỉnh lưu AC không có sẵn.
Tắt máy quay và lắp pin vào máy quay.Kết nối máy quay với một máy tính đang chạy bằng cách sử dụng cáp USB liền.
• Không đảm bảo có thể thao tác được với tất cả các máy tính.• Nếu bạn kết nối máy quay với một máy tính xách tay mà không được kết nối với một nguồn điện, pin của máy tính xách tay sẽ tiếp tục sử dụng năng lượng của máy quay. Không để các máy quay kết nối với một máy tính theo cách này.• Không đảm bảo sạc được pin với một máy tính được lắp đặt một cách cá nhân, một máy tính đã được chuyển đổi hoặc thông qua môt cổng USB. Máy quay có thể không hoạt động chính xác tùy thuộc vào thiết bị USB được sử dụng với máy tính.
• Bạn có thể sạc pin bằng cách kết nối cáp USB liền vào ổ cắm trên tường (ổ cắm điện) sử dụng sạc AC-U501AD/AC-U50AG USB / Bộ chỉnh lưu AC (được bán riêng). Bạn không thể sử dụng một thiết bị cung cấp điện di động CP-AH2R hoặc CP-AL (được bán riêng) của Sony để sạc máy quay.• Bộ sạc USB bộ chỉnh lưu AC không có sẵn ở một số quốc gia/khu vực.• Đèn CHG (sạc) không sáng lên khi pin còn lại là quá thấp. Trong trường hợp này, sạc pin bằng cách sử dụng bộ chỉnh lưu AC được cung cấp.
Khi pin được sạc đầy, ngắt kết nối với máy quay từ máy tính (tr 36).
Ổ cắm trên tường(ổ cắm điện)
Chú ý
Mẹo nhỏ
Khởi động

VN121�GB
Charging timeApproximate time (min.) required when you fully charge a fully discharged battery pack.
Battery packCharging time
AC Adaptor Built-in USB Cable*
NP-FV50 (supplied) 155 315NP-FV70 195 600NP-FV100 390 1050
The charging times shown in the table above are measured when charging the camcorder at a temperature of 25 C (77 °F). It is recommended that you charge the battery in a temperature range of 10 C to 30 C (50 °F to 86 °F).
* The charging times are measured without using the USB Connection support cable.
TipsSee page 58 on recording and playing time.When your camcorder is on, you can check the approximate amount of remaining battery power with the remaining battery indicator at the upper right on the LCD screen.
To remove the battery packClose the LCD screen. Slide the BATT (battery) release lever () and remove the battery pack ().
To use a wall outlet (wall socket) as a power sourceMake the same connections as “Step 1: Charging the battery pack” (p. 10). Even if the battery pack is attached, the battery pack is not discharged.
Thời gian sạcKhoảng thời gian (tối thiểu) yêu cầu để sạc đầy một pin cạn hoàn toàn.
• Các lần sạc pin hiển thị trong bảng trên được tính khi sạc máy quay ở nhiệt độ là 25 oC (77 °F). Bạn nên sạc pin trong một phạm vi nhiệt độ 10 oC đến 30 oC (50 °F đến 86 °F).• Các lần sạc pin được đo mà không cần sử dụng cáp USB hỗ trợ kết nối.
• Xem trang 58 về thời gian ghi và thời gian phát.• Khi máy quay bật, bạn có thể kiểm tra gần đúng lượng pin còn lại với các chỉ báo pin còn lại ở góc phải phía trên của màn hình LCD.
Đóng màn hình LCD. Trượt đòn bẩy phát BATT (pin) ( 1 ) và tháo pin ( 2 ).
Để sử dụng ổ cắm trên tường (ổ cắm điện) như là một nguồn năng lượng
Thực hiện các kết nối tương tự như “Bước 1: Sạc pin” (tr 10). Ngay cả khi pin được gắn, bộ pin không bị cạn.
Pin Thời gian sạcBộ chỉnh lưu AC
(Kèm theo)Cáp USB trong máy*
Mẹo nhỏ
Chú ý đối với pin
Chú ý về bộ chỉnh lưu AC
• Khi bạn tháo pin hay ngắt kết nối bộ chỉnh lưu AC, tắt máy quay đi và đảm bảo rằng rằng đèn báo (Phim) / (Ảnh) (tr.21), các đèn truy cập (tr.19) đều được tắt. Đèn (sạc) CHG nhấp nháy khi sạc với các điều kiện sau: - Pin không được lắp chính xác. - Pin bị hư hỏng. - Nhiệt độ của pin thấp. Hãy tháo pin khỏi máy quay và đặt nó ở một nơi ấm. - Nhiệt độ của pin cao. Tháo pin khỏi máy quay và đặt nó ở một nơi mát mẻ.• Chúng tôi không khuyên bạn sử dụng NP-FV30, mà chỉ cho phép thời gian ghi âm và thời gian phát ngắn, với máy quay này.• Trong cài đặt mặc định, nguồn sẽ tự động tắt nếu bạn không thao tác máy quay trong khoảng 5 phút, để tiết kiệm pin ([A. Shut Off]).
• Sử dụng ổ cắm trên tường gần nhất (ổ cắm điện) khi sử dụng bộ chỉnh lưu AC. Rút bộ chỉnh lưu AC ra khỏi ổ cắm trên tường (ổ cắm điện) ngay lập tức nếu sự cố xảy ra trong khi sử dụng máy quay của bạn.• Không sử dụng bộ chỉnh lưu AC đặt trong một không gian hẹp, chẳng hạn như giữa một bức tường và đồ nội thất.• Không làm chập mạch các phích DC của bộ chỉnh lưu AC hoặc thiết bị đầu cuối pin với bất kỳ vật thể kim loại nào. Điều này có thể gây hỏng máy.
1�GB
Getting started
Notes on the battery packWhen you remove the battery pack or disconnect the AC Adaptor, turn the camcorder off and make sure that the (Movie)/ (Photo) lamps (p. 21), the access lamp (p. 19) are turned off.The CHG (charge) lamp flashes during charging under the following conditions:
The battery pack is not attached correctly.The battery pack is damaged.The temperature of the battery pack is low.Remove the battery pack from your camcorder and put it in a warm place.The temperature of the battery pack is high.Remove the battery pack from your camcorder and put it in a cool place.
We do not recommend using an NP-FV30, which only allows short recording and playback times, with your camcorder.In the default setting, the power turns off automatically if you leave your camcorder without any operation for about 5 minutes, to save battery power ([A. Shut Off]).
Notes on the AC AdaptorUse the nearby wall outlet (wall socket) when using the AC Adaptor. Disconnect the AC Adaptor from the wall outlet (wall socket) immediately if any malfunction occurs while using your camcorder.Do not use the AC Adaptor placed in a narrow space, such as between a wall and furniture.Do not short-circuit the DC plug of the AC Adaptor or battery terminal with any metallic objects. This may cause a malfunction.
Charging the battery pack abroadYou can charge the battery pack in any countries/regions using the AC Adaptor supplied with your camcorder within the AC 100 V - 240 V, 50 Hz/60 Hz range.
Do not use an electronic voltage transformer.
Tháo pin ra

VN131�
GB
Charging timeApproximate time (min.) required when you fully charge a fully discharged battery pack.
Battery packCharging time
AC Adaptor Built-in USB Cable*
NP-FV50 (supplied) 155 315NP-FV70 195 600NP-FV100 390 1050
The charging times shown in the table above are measured when charging the camcorder at a temperature of 25 C (77 °F). It is recommended that you charge the battery in a temperature range of 10 C to 30 C (50 °F to 86 °F).
* The charging times are measured without using the USB Connection support cable.
TipsSee page 58 on recording and playing time.When your camcorder is on, you can check the approximate amount of remaining battery power with the remaining battery indicator at the upper right on the LCD screen.
To remove the battery packClose the LCD screen. Slide the BATT (battery) release lever () and remove the battery pack ().
To use a wall outlet (wall socket) as a power sourceMake the same connections as “Step 1: Charging the battery pack” (p. 10). Even if the battery pack is attached, the battery pack is not discharged.
Khoảng thời gian (tối thiểu) yêu cầu để sạc đầy một pin cạn hoàn toàn.
• Các lần sạc pin hiển thị trong bảng trên được tính khi sạc máy quay ở nhiệt độ là 25 oC (77 °F). Bạn nên sạc pin trong một phạm vi nhiệt độ 10 oC đến 30 oC (50 °F đến 86 °F).• Các lần sạc pin được đo mà không cần sử dụng cáp USB hỗ trợ kết nối.
• Xem trang 58 về thời gian ghi và thời gian phát.• Khi máy quay bật, bạn có thể kiểm tra gần đúng lượng pin còn lại với các chỉ báo pin còn lại ở góc phải phía trên của màn hình LCD.
Đóng màn hình LCD. Trượt đòn bẩy phát BATT (pin) ( ) và tháo pin ( ).
Để sử dụng ổ cắm trên tường (ổ cắm điện) như là một nguồn năng lượng
Thực hiện các kết nối tương tự như “Bước 1: Sạc pin” (tr 10). Ngay cả khi pin được gắn, bộ pin không bị cạn.
Chú ý đối với pin
Chú ý về bộ chỉnh lưu AC
• Khi bạn tháo pin hay ngắt kết nối bộ chỉnh lưu AC, tắt máy quay đi và đảm bảo rằng rằng đèn báo (Phim) / (Ảnh) (tr.21), các đèn truy cập (tr.19) đều được tắt. Đèn (sạc) CHG nhấp nháy khi sạc với các điều kiện sau: - Pin không được lắp chính xác. - Pin bị hư hỏng. - Nhiệt độ của pin thấp. Hãy tháo pin khỏi máy quay và đặt nó ở một nơi ấm. - Nhiệt độ của pin cao. Tháo pin khỏi máy quay và đặt nó ở một nơi mát mẻ.• Chúng tôi không khuyên bạn sử dụng NP-FV30, mà chỉ cho phép thời gian ghi âm và thời gian phát ngắn, với máy quay này.• Trong cài đặt mặc định, nguồn sẽ tự động tắt nếu bạn không thao tác máy quay trong khoảng 5 phút, để tiết kiệm pin ([A. Shut Off]).
• Sử dụng ổ cắm trên tường gần nhất (ổ cắm điện) khi sử dụng bộ chỉnh lưu AC. Rút bộ chỉnh lưu AC ra khỏi ổ cắm trên tường (ổ cắm điện) ngay lập tức nếu sự cố xảy ra trong khi sử dụng máy quay của bạn.• Không sử dụng bộ chỉnh lưu AC đặt trong một không gian hẹp, chẳng hạn như giữa một bức tường và đồ nội thất.• Không làm chập mạch các phích DC của bộ chỉnh lưu AC hoặc thiết bị đầu cuối pin với bất kỳ vật thể kim loại nào. Điều này có thể gây hỏng máy.
1�GB
Getting started
Notes on the battery packWhen you remove the battery pack or disconnect the AC Adaptor, turn the camcorder off and make sure that the (Movie)/ (Photo) lamps (p. 21), the access lamp (p. 19) are turned off.The CHG (charge) lamp flashes during charging under the following conditions:
The battery pack is not attached correctly.The battery pack is damaged.The temperature of the battery pack is low.Remove the battery pack from your camcorder and put it in a warm place.The temperature of the battery pack is high.Remove the battery pack from your camcorder and put it in a cool place.
We do not recommend using an NP-FV30, which only allows short recording and playback times, with your camcorder.In the default setting, the power turns off automatically if you leave your camcorder without any operation for about 5 minutes, to save battery power ([A. Shut Off]).
Notes on the AC AdaptorUse the nearby wall outlet (wall socket) when using the AC Adaptor. Disconnect the AC Adaptor from the wall outlet (wall socket) immediately if any malfunction occurs while using your camcorder.Do not use the AC Adaptor placed in a narrow space, such as between a wall and furniture.Do not short-circuit the DC plug of the AC Adaptor or battery terminal with any metallic objects. This may cause a malfunction.
Charging the battery pack abroadYou can charge the battery pack in any countries/regions using the AC Adaptor supplied with your camcorder within the AC 100 V - 240 V, 50 Hz/60 Hz range.
Do not use an electronic voltage transformer.
Sạc pin ở nước ngoàiBạn có thể sạc pin ở bất kỳ quốc gia / vùng lãnh thổ bằng cách sử dụng bộ chỉnh lưu AC được cung cấp cho máy quay của bạn trong giới hạn dòng điện AC 100 V - 240 V, 50 Hz 60Hz.• Không sử dụng một máy biến áp điện áp điện tử.

VN141�GB
Step 2: Turning the power on, and setting the date and time
1 Open the LCD screen of your camcorder.
Your camcorder is turned on and the lens cover is opened.To turn on your camcorder when the LCD screen is open, press POWER.
2 Select the desired language, then touch [Next].
3 Select the desired geographical area with / , then touch [Next].
To set the date and time again, touch (MENU) [Setup] [ (Clock Settings)] [Date & Time Setting] [Date & Time]. When an item is not on the screen, touch / until the item appears.
MODE lamp
POWER button
Touch the button on the LCD screen
Bước 2: Khởi động nguồn, và cài đặt ngày và giờ
Mở màn hình LCD của máy quay của bạn.
Chọn ngôn ngữ mong muốn, sau đó chạm [Next].
Chọn khu vực địa lý mong muốn bằng / , sau đó chạm [Next].
Bật máy quay lên và mở nắp ống kính.• Để bật máy quay của bạn khi màn hình LCD mở, nhấn POWER.
Chạm vào nút trên màn hình LCD
Đèn MODE
Nút POWER
• Để thiết lập ngày và thời gian một lần nữa, chạm (MENU) [Setup] [(Clock Settings)] [Date & Time Setting] [Date & Time]. Khi một mục không có trên màn hình, chạm / cho đến khi mục đó xuất hiện.
1�GB
Getting started
4 Set [Summer Time], then touch [Next].
If you set [Summer Time] to [On], the clock advances 1 hour.
5 Select the date format, then touch [Next].
6 Select the date and time, touch / to set the value, then touch [Next] *.* The confirmation screen appears only when you set the clock for the first time.
The clock starts.
NotesThe date and time does not appear during recording, but they are automatically recorded on the recording media, and can be displayed during playback. To display the date and time, touch (MENU) [Setup] [ (Playback Settings)] [Data Code] [Date/Time] .You can turn off the operation beeps by touching (MENU) [Setup] [ (General Settings)] [Beep] [Off] .If the button you touch does not react correctly, calibrate the touch panel.

VN15
1�GB
Step 2: Turning the power on, and setting the date and time
1 Open the LCD screen of your camcorder.
Your camcorder is turned on and the lens cover is opened.To turn on your camcorder when the LCD screen is open, press POWER.
2 Select the desired language, then touch [Next].
3 Select the desired geographical area with / , then touch [Next].
To set the date and time again, touch (MENU) [Setup] [ (Clock Settings)] [Date & Time Setting] [Date & Time]. When an item is not on the screen, touch / until the item appears.
MODE lamp
POWER button
Touch the button on the LCD screen
Bước 2: Khởi động nguồn, và cài đặt ngày và giờ
Bật máy quay lên và mở nắp ống kính.• Để bật máy quay của bạn khi màn hình LCD mở, nhấn POWER.
• Để thiết lập ngày và thời gian một lần nữa, chạm (MENU) [Setup] [(Clock Settings)] [Date & Time Setting] [Date & Time]. Khi một mục không có trên màn hình, chạm / cho đến khi mục đó xuất hiện.
1�GB
Getting started
4 Set [Summer Time], then touch [Next].
If you set [Summer Time] to [On], the clock advances 1 hour.
5 Select the date format, then touch [Next].
6 Select the date and time, touch / to set the value, then touch [Next] *.* The confirmation screen appears only when you set the clock for the first time.
The clock starts.
NotesThe date and time does not appear during recording, but they are automatically recorded on the recording media, and can be displayed during playback. To display the date and time, touch (MENU) [Setup] [ (Playback Settings)] [Data Code] [Date/Time] .You can turn off the operation beeps by touching (MENU) [Setup] [ (General Settings)] [Beep] [Off] .If the button you touch does not react correctly, calibrate the touch panel.
Cài đặt [Summer Time], sau đó chạm [Next].
Chọn định dạng ngày, sau đó chạm [Next].
Chọn ngày và thời gian, chạm / để thiết lập giá trị, sau đó chạm[Next] .
• Nếu bạn đặt [Summer Time] ở [On], đồng hồ tăng 1 giờ.
• Màn hình xác nhận chỉ xuất hiện khi bạn đặt đồng hồ cho lần đầu tiên.
• Ngày và thời gian không xuất hiện trong quá trình ghi, nhưng chúng sẽ được ghi lại tự động trên phương tiện ghi âm, và có thể được hiển thị trong quá trình phát lại. Để hiển thị ngày tháng và thời gian, chạm (MENU) [Setup] [ (Playback Settings)] [Data Code] [Date/Time] .• Bạn có thể tắt tiếng bíp bằng cách chạm (MENU) [Setup] [( General Settings)] [Beep] [Off] .• Nếu các nút bạn chạm không phản ứng một cách chính xác, hãy hiệu chỉnh bảng điều khiển cảm ứng.
Đồng hồ khởi động.
Chú ý
Khởi động

VN16
1�GB
To turn off the powerClose the LCD screen.The (Movie) lamp flashes for a few seconds and the camcorder is turned off.
TipsYou can turn off the camcorder also by pressing POWER.When [Power On By LCD] is set to [Off], turn off your camcorder by pressing POWER.
Changing the language settingYou can change the on-screen displays to show messages in a specified language.Touch (MENU) [Setup] [ (General Settings)] [Language Setting] a desired language .
Tắt nguồn
Thay đổi cài đặt ngôn ngữ
Đóng màn hình LCD.Đèn (Movie) nhấp nháy vài giây và máy quay được tắt.
• Bạn có thể tắt các máy quay cũng bằng cách nhấn POWER.• Khi [Power On By LCD] cài đặt ở chế độ [Off], tắt máy quay của bạn bằng cách nhấn POWER.
Bạn có thể thay đổi các hiển thị trên màn hình để hiển thị tin nhắn trong một ngôn ngữ cụ thể.Chạm (MENU) [Setup] [ (General Settings)] [Language Setting] (ngôn ngữ mong muốn) .
Mẹo nhỏ
1�GB
Getting started
Step 3: Preparing the recording media
The recording media that can be used differs depending on your camcorder. The following icons are displayed on the screen of your camcorder.
HDR-CX130EMemory card
HDR-CX160E/CX180E *Internal memory Memory card
* In the default setting, both movies and photos are recorded on this recording media. You can perform recording, playback and editing operations on the selected medium.
TipsSee page 59 for the recordable time of movies.See page 60 for the number of recordable photos.
Selecting recording media (HDR-CX160E/CX180E)
Touch (MENU) [Setup] [ (Media Settings)] [Media Select].
The [Media Select] screen appears.
Touch the desired recording medium, then touch .
Both movies and photos are recorded on the selected medium.
To check the recording media settingsIn either movie recording mode or photo recording mode, the media icon of the selected recording media is displayed at the top right corner of the screen.
The icon displayed may vary depending on your model.
Recording media icon

VN17
1�GB
To turn off the powerClose the LCD screen.The (Movie) lamp flashes for a few seconds and the camcorder is turned off.
TipsYou can turn off the camcorder also by pressing POWER.When [Power On By LCD] is set to [Off], turn off your camcorder by pressing POWER.
Changing the language settingYou can change the on-screen displays to show messages in a specified language.Touch (MENU) [Setup] [ (General Settings)] [Language Setting] a desired language .
• Bạn có thể tắt các máy quay cũng bằng cách nhấn POWER.• Khi [Power On By LCD] cài đặt ở chế độ [Off], tắt máy quay của bạn bằng cách nhấn POWER.
1�GB
Getting started
Step 3: Preparing the recording media
The recording media that can be used differs depending on your camcorder. The following icons are displayed on the screen of your camcorder.
HDR-CX130EMemory card
HDR-CX160E/CX180E *Internal memory Memory card
* In the default setting, both movies and photos are recorded on this recording media. You can perform recording, playback and editing operations on the selected medium.
TipsSee page 59 for the recordable time of movies.See page 60 for the number of recordable photos.
Selecting recording media (HDR-CX160E/CX180E)
Touch (MENU) [Setup] [ (Media Settings)] [Media Select].
The [Media Select] screen appears.
Touch the desired recording medium, then touch .
Both movies and photos are recorded on the selected medium.
To check the recording media settingsIn either movie recording mode or photo recording mode, the media icon of the selected recording media is displayed at the top right corner of the screen.
The icon displayed may vary depending on your model.
Recording media icon
Bước 3: Chuẩn bị phương tiện ghi hình
Các phương tiện ghi có thể được sử dụng khác nhau tùy thuộc vào máy quay của bạn. Cácbiểu tượng sau đó được hiển thị trên màn hình của máy quay của bạn.
• Trong các cài đặt mặc định, cả phim và hình ảnh được ghi lại trên phương tiện ghi hình này. Bạn có thể thực hiện ghi hình, phát lại và chỉnh sửa trên phương tiện đã chọn.
• Xem trang 59 về thời gian ghi của bộ phim.• Xem trang 60 về số lượng ảnh có thể chụp.
Cả phim và hình ảnh đều được ghi lại trên các phương tiện đã lựa chọn.
Trong cả hai chế độ quay phim hoặc chế độ ghi hình ảnh, biểu tượng phương tiện ghi đã chọn được hiển thị ở phía trên cùng bên góc phải màn hình
• Các biểu tượng này được hiển thị có thể khác nhau phụ thuộc vào dòng máy của bạn.
Biểu tượng phương tiện ghi
Thẻ nhớ
Thẻ nhớBộ nhớ trong
Mẹo nhỏ
Chạm (MENU) [Setup] [ (Media Settings)] [Media Select].Màn hình [Media Select] xuất hiện.
Chạm phương tiện ghi mong muốn, sau đó chạm [OK]
Kiểm tra các cài đặt về phương tiện ghi
Chọn phương tiện ghi (HDR-CX160E/CX180E)
Khởi động

VN18
1�GB
Inserting a memory card
NotesSet the recording medium to [Memory Card] to record movies and/or photos on a memory card (HDR-CX160E/CX180E).
Types of memory card you can use with your camcorder
SD Speed Class Described in this manual
“Memory Stick PRO Duo” media (Mark2)
—“Memory Stick PRO Duo” media“Memory Stick PRO-
HG Duo” media
SD memory card
Class 4 or faster SD cardSDHC memory card
SDXC memory card
Operation with all memory cards is not assured.“Memory Stick PRO Duo” media, half the size of “Memory Stick”, or standard size SD cards can be used for this camcorder.Do not attach a label or the like on memory card or memory card adaptor. Doing so may cause a malfunction.“Memory Stick PRO Duo” media of up to 32 GB and SD cards of up to 64 GB have been verified to operate with your camcorder.
NotesA MultiMediaCard cannot be used with this camcorder.Movies recorded on SDXC memory cards cannot be imported to or played back on computers or AV devices not supporting the exFAT* file system by connecting the camcorder to these devices with the USB cable. Confirm in advance that the connecting equipment is supporting the exFAT system. If you connect an equipment not supporting the exFAT system and the format screen appears, do not perform the format. All the data recorded will be lost.* The exFAT is a file system that is used for SDXC memory cards.
Lắp thẻ nhớ
Chú ý
Loại tốc độ SD Mô tả trong hướng dẫn này
Thẻ nhớ SD
Thẻ nhớ “Memory Stick PRO Duo”
Loại 4 hoặc nhanh hơn
Thẻ nhớ “Memory Stick PRODuo” (Mark2)
Thẻ nhớ “Memory Stick PRO-HG Duo”
Thẻ nhớ SD
Thẻ nhớ SDHC
Thẻ nhớ SDHX
• Cài đặt phương tiện ghi [Memory Card] để quay phim và / hoặc hình ảnh trên thẻ nhớ (HDR-CX160E/CX180E).
Các loại thẻ nhớ bạn có thể sử dụng với máy quay của bạn
• Không đảm bảo có thể hoạt động với tất cả các thẻ nhớ.• Thẻ nhớ “Memory Stick PRO Duo” bằng một nửa kích thước của “Memory Stick”, hoặc thẻ SD kích thước tiêu chuẩn có thể được sử dụng cho máy quay.• Không đính kèm một nhãn hiệu hoặc các vật tương tự trên thẻ nhớ hoặc bộ chuyển đổi thẻ nhớ. Làm như vậy có thể gây hỏng.• Thẻ nhớ “Memory Stick PRO Duo” 32 GB và thẻ SD 64 GB đã được kiểm chứng có thể hoạt động với máy quay của bạn.
• Một thẻ đa phương tiện không thể được sử dụng với máy quay này.• Phim được ghi lại trên thẻ nhớ SDXC không thể đưa vào hoặc phát lại trên máy tính hoặc các thiết bị AV không hỗ trợ hệ thống tập tin exFAT* bằng cách kết nối máy quay với các thiết bị này thông qua một dây cáp USB. Phải xác nhận trước rằng các thiết bị kết nối được hỗ trợ hệ thống exFAT. Nếu bạn kết nối một thiết bị không hỗ trợ hệ thống exFAT và màn hình định dạng xuất hiện, không thực hiện định dạng. Tất cả các dữ liệu được ghi sẽ bị mất.• ExFAT là một hệ thống tập tin được sử dụng cho thẻ nhớ SDXC.
1�GB
Getting started
Open the cover, and insert the memory card with the notched edge in the direction as illustrated until it clicks.Close the cover after inserting the memory card.
The [Preparing image database file. Please wait.] screen appears if you insert a new memory card. Wait until the screen disappears.
Close the cover.
NotesIf [Failed to create a new Image Database File. It may be possible that there is not enough free space.] is displayed, format the memory card.Confirm the direction of the memory card. If you forcibly insert the memory card in the wrong direction, the memory card, memory card slot, or image data may be damaged.Do not open the cover during recording.When inserting or ejecting the memory card, be careful so that the memory card does not pop out and drop.
To eject the memory cardOpen the cover and lightly push the memory card in once.
Copying movies and photos (HDR-CX160E/CX180E)You can copy movies and photos from the internal recording media to the memory card.Touch (MENU) [Edit/Copy] [Copy], then follow the instructions that appear on the screen.
Access lamp
Note the direction of notched corner.

VN19
1�GB
Inserting a memory card
NotesSet the recording medium to [Memory Card] to record movies and/or photos on a memory card (HDR-CX160E/CX180E).
Types of memory card you can use with your camcorder
SD Speed Class Described in this manual
“Memory Stick PRO Duo” media (Mark2)
—“Memory Stick PRO Duo” media“Memory Stick PRO-
HG Duo” media
SD memory card
Class 4 or faster SD cardSDHC memory card
SDXC memory card
Operation with all memory cards is not assured.“Memory Stick PRO Duo” media, half the size of “Memory Stick”, or standard size SD cards can be used for this camcorder.Do not attach a label or the like on memory card or memory card adaptor. Doing so may cause a malfunction.“Memory Stick PRO Duo” media of up to 32 GB and SD cards of up to 64 GB have been verified to operate with your camcorder.
NotesA MultiMediaCard cannot be used with this camcorder.Movies recorded on SDXC memory cards cannot be imported to or played back on computers or AV devices not supporting the exFAT* file system by connecting the camcorder to these devices with the USB cable. Confirm in advance that the connecting equipment is supporting the exFAT system. If you connect an equipment not supporting the exFAT system and the format screen appears, do not perform the format. All the data recorded will be lost.* The exFAT is a file system that is used for SDXC memory cards.
Lắp thẻ nhớ
Thẻ nhớ SD
• Cài đặt phương tiện ghi [Memory Card] để quay phim và / hoặc hình ảnh trên thẻ nhớ (HDR-CX160E/CX180E).
Các loại thẻ nhớ bạn có thể sử dụng với máy quay của bạn
• Không đảm bảo có thể hoạt động với tất cả các thẻ nhớ.• Thẻ nhớ “Memory Stick PRO Duo” bằng một nửa kích thước của “Memory Stick”, hoặc thẻ SD kích thước tiêu chuẩn có thể được sử dụng cho máy quay.• Không đính kèm một nhãn hiệu hoặc các vật tương tự trên thẻ nhớ hoặc bộ chuyển đổi thẻ nhớ. Làm như vậy có thể gây hỏng.• Thẻ nhớ “Memory Stick PRO Duo” 32 GB và thẻ SD 64 GB đã được kiểm chứng có thể hoạt động với máy quay của bạn.
• Một thẻ đa phương tiện không thể được sử dụng với máy quay này.• Phim được ghi lại trên thẻ nhớ SDXC không thể đưa vào hoặc phát lại trên máy tính hoặc các thiết bị AV không hỗ trợ hệ thống tập tin exFAT* bằng cách kết nối máy quay với các thiết bị này thông qua một dây cáp USB. Phải xác nhận trước rằng các thiết bị kết nối được hỗ trợ hệ thống exFAT. Nếu bạn kết nối một thiết bị không hỗ trợ hệ thống exFAT và màn hình định dạng xuất hiện, không thực hiện định dạng. Tất cả các dữ liệu được ghi sẽ bị mất.• ExFAT là một hệ thống tập tin được sử dụng cho thẻ nhớ SDXC.
1�GB
Getting started
Open the cover, and insert the memory card with the notched edge in the direction as illustrated until it clicks.Close the cover after inserting the memory card.
The [Preparing image database file. Please wait.] screen appears if you insert a new memory card. Wait until the screen disappears.
Close the cover.
NotesIf [Failed to create a new Image Database File. It may be possible that there is not enough free space.] is displayed, format the memory card.Confirm the direction of the memory card. If you forcibly insert the memory card in the wrong direction, the memory card, memory card slot, or image data may be damaged.Do not open the cover during recording.When inserting or ejecting the memory card, be careful so that the memory card does not pop out and drop.
To eject the memory cardOpen the cover and lightly push the memory card in once.
Copying movies and photos (HDR-CX160E/CX180E)You can copy movies and photos from the internal recording media to the memory card.Touch (MENU) [Edit/Copy] [Copy], then follow the instructions that appear on the screen.
Access lamp
Note the direction of notched corner.
Mở nắp và lắp thẻ nhớ với mặt trong hướng như minh họa cho đến khi khớp.
Đóng nắp.
• Đóng nắp sau khi lắp thẻ nhớ.
Đèn truy cập
Chú ý hướng của góc khuyết.
[Preparing image database file. Please wait.] sẽ xuất hiện trên màn hình nếu bạn lắp một thẻ nhớ mới. Hãy chờ cho đến khi màn hình biến mất.
Mở nắp và nhẹ nhàng đẩy thẻ nhớ một lần.
• Nếu [Failed to create a new Image Database File. It may be possible that there is not enough free space.] được hiển thị, định dạng thẻ nhớ.• Xác nhận hướng của thẻ nhớ. Nếu bạn lắp thẻ nhớ sai hướng, thẻ nhớ, khe cắm thẻ nhớ, hoặc dữ liệu hình ảnh có thể bị hư hỏng.• Không mở nắp trong quá trình ghi.• Khi lắp hoặc tháo thẻ nhớ, hãy cẩn thận để các thẻ nhớ không bật ra và thả.
Bạn có thể sao chép phim và hình ảnh từ các phương tiện ghi âm nội bộ vào thẻ nhớ.Chạm (MENU) [Edit/Copy] [Copy], sau đó làm theo hướng dẫn hiển thịtrên màn hình.
Chú ý
Để tháo thẻ nhớ
Sao chép phim và hình ảnh (HDR-CX160E/CX180E)
Khởi động

VN20�0
GB
Recording/Playback
RecordingIn the default setting, movies and photos are recorded on the following media. Movies are recorded with high definition image quality (HD).HDR-CX130E: Memory cardHDR-CX160E/CX180E: Internal recording media
TipsTo change the recording media, see page 17 (HDR-CX160E/CX180E).
1 Fasten the grip belt.
2 Open the LCD screen of your camcorder.
Your camcorder is turned on and the lens cover is opened.
Ghi hình / Phát lại
Vặn chặt đai kẹp.
Mở màn hình LCD của máy quay của bạn.
Trong các thiết lập mặc định, phim và hình ảnh được ghi lại trên các phương tiện sau đây. Phim đượcghi với chất lượng hình ảnh độ nét cao (HD).HDR-CX130E: Thẻ nhớHDR-CX160E/CX180E: Phương tiện ghi bên trong
• Để thay đổi các phương tiện ghi âm, xem trang 17 (HDR-CX160E/CX180E).
• Máy quay của bạn được bật và nắp ống kính được mở ra.
Ghi hình
Mẹo nhỏ
�1GB
Recording/Playback
Recording movies
Press MODE to turn on the (Movie) lamp.
Press START/STOP to start recording.
To stop recording, press START/STOP again.
To display items on the LCD screen againTouch anywhere on the screen except the buttons on the LCD screen so that you can use items. You can change the settings using the [Display Setting] menu.
To capture smilesIn the default setting, a photo is automatically recorded when the camcorder detects the smile of a person during movie recording (Smile Shutter). When the camcorder detects faces during movie recording, image quality is automatically adjusted ([Face Detection]).
MODE button
(Movie): When recording a movie (Photo): When recording a photo
[STBY] [REC]START/STOP button
about 4sec after
Face Detection frame (White)
Smile Detection frame (Orange)
Capturing a photo

VN21�0
GB
Recording/Playback
RecordingIn the default setting, movies and photos are recorded on the following media. Movies are recorded with high definition image quality (HD).HDR-CX130E: Memory cardHDR-CX160E/CX180E: Internal recording media
TipsTo change the recording media, see page 17 (HDR-CX160E/CX180E).
1 Fasten the grip belt.
2 Open the LCD screen of your camcorder.
Your camcorder is turned on and the lens cover is opened.
Trong các thiết lập mặc định, phim và hình ảnh được ghi lại trên các phương tiện sau đây. Phim đượcghi với chất lượng hình ảnh độ nét cao (HD).HDR-CX130E: Thẻ nhớHDR-CX160E/CX180E: Phương tiện ghi bên trong
• Để thay đổi các phương tiện ghi âm, xem trang 17 (HDR-CX160E/CX180E).
• Máy quay của bạn được bật và nắp ống kính được mở ra.
�1GB
Recording/Playback
Recording movies
Press MODE to turn on the (Movie) lamp.
Press START/STOP to start recording.
To stop recording, press START/STOP again.
To display items on the LCD screen againTouch anywhere on the screen except the buttons on the LCD screen so that you can use items. You can change the settings using the [Display Setting] menu.
To capture smilesIn the default setting, a photo is automatically recorded when the camcorder detects the smile of a person during movie recording (Smile Shutter). When the camcorder detects faces during movie recording, image quality is automatically adjusted ([Face Detection]).
MODE button
(Movie): When recording a movie (Photo): When recording a photo
[STBY] [REC]START/STOP button
about 4sec after
Face Detection frame (White)
Smile Detection frame (Orange)
Capturing a photo
Nhấn MODE để bật đen (Phim).
Để hiển thị các mục trên màn hình LCD
Để chụp nụ cười
Nhấn START / STOP để bắt đầu ghi.Để ngừng quay, nhấn START / STOP một lần nữa.
Khoảng sau 4 giây
Chạm bất cứ nơi nào trên màn hình ngoại trừ các nút trên màn hình LCD để bạn có thể sử dụngcác mục. Bạn có thể thay đổi các thiết lập bằng cách sử dụng menu [Display Setting].
Trong các thiết lập mặc định, hình ảnh được ghi lại tự động khi máy phát hiện thấy nụ cườicủa một người trong quá trình quay phim (Smile Shutter). Khi máy quay phát hiện khuôn mặt trong khi quay phim, chất lượng hình ảnh được điều chỉnh tự động ([Face Detection]).
Nút MODENút START/STOP
(Phim): Khi đang quay phim
Chụp nụ cười
(Trắng)Khung Nhận diện khuôn mặt
Khung Nhận diện nụ cười (Cam)
(Ảnh): Khi đang quay hình ảnh Ghi hình/phát lại
Quay phim
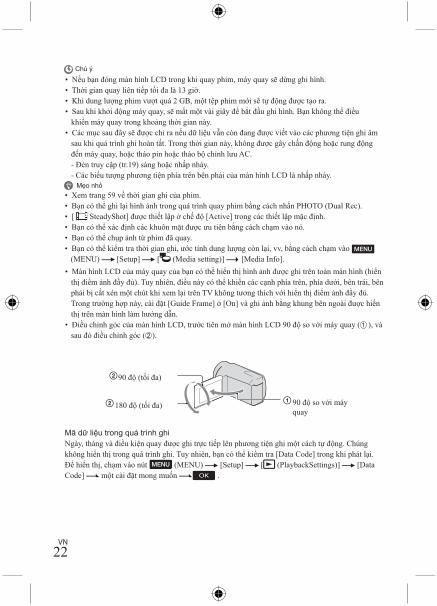
VN22��GB
NotesIf you close the LCD screen while recording movies, the camcorder stops recording.The maximum continuous recordable time of movies is about 13 hours.When a movie file exceeds 2 GB, the next movie file is created automatically.It will take several seconds until you can start recording after you turn on the camcorder. You cannot operate your camcorder during this time.The following states will be indicated if data is still being written onto the recording media after recording has finished. During this time, do not apply shock or vibration to the camcorder, or remove the battery or AC Adaptor.
Access lamp (p. 19) is lit or flashingThe media icon in the upper right of the LCD screen is flashing
TipsSee page 59 on the recordable time of movies.You can record photos during movie recording by pressing PHOTO fully (Dual Rec).[ SteadyShot] is set to [Active] in the default setting.You can specify the priority face by touching it.You can capture photos from recorded movies.You can check the recordable time, estimated remaining capacity, etc., by touching (MENU) [Setup] [ (Media Settings)] [Media Info].The LCD screen of your camcorder can display recording images across the entire screen (full pixel display). However, this may cause slight trimming of the top, bottom, right and left edges of images when played back on a TV which is not compatible with full pixel display. In this case, set [Guide Frame] to [On], and record images using the outer frame displayed on the screen as a guide.To adjust the angle of the LCD panel, first open the LCD panel 90 degrees to the camcorder (), and then adjust the angle ().
Data code during recordingThe recording date, time and condition are recorded automatically on the recording media. They are not displayed during recording. However, you can check them as [Data Code] during playback. To display them, touch (MENU) [Setup] [ (Playback Settings)] [Data Code] a desired setting .
90 degrees (max.)
180 degrees (max.) 90 degrees to the camcorder
Chú ý
Mẹo nhỏ
• Nếu bạn đóng màn hình LCD trong khi quay phim, máy quay sẽ dừng ghi hình. • Thời gian quay liên tiếp tối đa là 13 giờ. • Khi dung lượng phim vượt quá 2 GB, một tệp phim mới sẽ tự động được tạo ra. • Sau khi khởi động máy quay, sẽ mất một vài giây để bắt đầu ghi hình. Bạn không thể điều khiển máy quay trong khoảng thời gian này. • Các mục sau đây sẽ được chỉ ra nếu dữ liệu vẫn còn đang được viết vào các phương tiện ghi âm sau khi quá trình ghi hoàn tất. Trong thời gian này, không được gây chấn động hoặc rung động đến máy quay, hoặc tháo pin hoặc tháo bộ chỉnh lưu AC. - Đèn truy cập (tr.19) sáng hoặc nhấp nháy. - Các biểu tượng phương tiện phía trên bên phải của màn hình LCD là nhấp nháy.
• Xem trang 59 về thời gian ghi của phim.• Bạn có thể ghi lại hình ảnh trong quá trình quay phim bằng cách nhấn PHOTO (Dual Rec).• [ SteadyShot] được thiết lập ở chế độ [Active] trong các thiết lập mặc định.• Bạn có thể xác định các khuôn mặt được ưu tiên bằng cách chạm vào nó.• Bạn có thể chụp ảnh từ phim đã quay.• Bạn có thể kiểm tra thời gian ghi, ước tính dung lượng còn lại, vv, bằng cách chạm vào (MENU) [Setup] [ (Media setting)] [Media Info].
Mã dữ liệu trong quá trình ghiNgày, tháng và điều kiện quay được ghi trực tiếp lên phương tiện ghi một cách tự động. Chúng không hiển thị trong quá trình ghi. Tuy nhiên, bạn có thể kiểm tra [Data Code] trong khi phát lại. Để hiển thị, chạm vào nút (MENU) [Setup] [ (PlaybackSettings)] [Data Code] một cài đặt mong muốn .
��GB
Recording/Playback
Shooting photos
When disappears, the photo is recorded.
Press MODE to turn on the (Photo) lamp.
The LCD screen display switches for photo recording mode, and the screen aspect ratio becomes 4:3.
Press PHOTO lightly to adjust the focus, then press it fully.
TipsSee page 60 on the recordable number of photos.To change the image size, touch (MENU) [Image Quality/Size] [ Image Size] a desired setting .You cannot record photos while is displayed.
MODE button
(Movie): When recording a movie(Photo): When recording a photo
Flashes Lights upPHOTO button
90 độ (tối đa)
180 độ (tối đa) 90 độ so với máy quay
• Màn hình LCD của máy quay của bạn có thể hiển thị hình ảnh được ghi trên toàn màn hình (hiển thị điểm ảnh đầy đủ). Tuy nhiên, điều này có thể khiến các cạnh phía trên, phía dưới, bên trái, bên phải bị cắt xén một chút khi xem lại trên TV không tương thích với hiển thị điểm ảnh đầy đủ. Trong trường hợp này, cài đặt [Guide Frame] ở [On] và ghi ảnh bằng khung bên ngoài được hiển thị trên màn hình làm hướng dẫn. • Điều chỉnh góc của màn hình LCD, trước tiên mở màn hình LCD 90 độ so với máy quay ( 1 ), và sau đó điều chỉnh góc ( 2 ).
��GB
NotesIf you close the LCD screen while recording movies, the camcorder stops recording.The maximum continuous recordable time of movies is about 13 hours.When a movie file exceeds 2 GB, the next movie file is created automatically.It will take several seconds until you can start recording after you turn on the camcorder. You cannot operate your camcorder during this time.The following states will be indicated if data is still being written onto the recording media after recording has finished. During this time, do not apply shock or vibration to the camcorder, or remove the battery or AC Adaptor.
Access lamp (p. 19) is lit or flashingThe media icon in the upper right of the LCD screen is flashing
TipsSee page 59 on the recordable time of movies.You can record photos during movie recording by pressing PHOTO fully (Dual Rec).[ SteadyShot] is set to [Active] in the default setting.You can specify the priority face by touching it.You can capture photos from recorded movies.You can check the recordable time, estimated remaining capacity, etc., by touching (MENU) [Setup] [ (Media Settings)] [Media Info].The LCD screen of your camcorder can display recording images across the entire screen (full pixel display). However, this may cause slight trimming of the top, bottom, right and left edges of images when played back on a TV which is not compatible with full pixel display. In this case, set [Guide Frame] to [On], and record images using the outer frame displayed on the screen as a guide.To adjust the angle of the LCD panel, first open the LCD panel 90 degrees to the camcorder (), and then adjust the angle ().
Data code during recordingThe recording date, time and condition are recorded automatically on the recording media. They are not displayed during recording. However, you can check them as [Data Code] during playback. To display them, touch (MENU) [Setup] [ (Playback Settings)] [Data Code] a desired setting .
90 degrees (max.)
180 degrees (max.) 90 degrees to the camcorder

VN23
��GB
NotesIf you close the LCD screen while recording movies, the camcorder stops recording.The maximum continuous recordable time of movies is about 13 hours.When a movie file exceeds 2 GB, the next movie file is created automatically.It will take several seconds until you can start recording after you turn on the camcorder. You cannot operate your camcorder during this time.The following states will be indicated if data is still being written onto the recording media after recording has finished. During this time, do not apply shock or vibration to the camcorder, or remove the battery or AC Adaptor.
Access lamp (p. 19) is lit or flashingThe media icon in the upper right of the LCD screen is flashing
TipsSee page 59 on the recordable time of movies.You can record photos during movie recording by pressing PHOTO fully (Dual Rec).[ SteadyShot] is set to [Active] in the default setting.You can specify the priority face by touching it.You can capture photos from recorded movies.You can check the recordable time, estimated remaining capacity, etc., by touching (MENU) [Setup] [ (Media Settings)] [Media Info].The LCD screen of your camcorder can display recording images across the entire screen (full pixel display). However, this may cause slight trimming of the top, bottom, right and left edges of images when played back on a TV which is not compatible with full pixel display. In this case, set [Guide Frame] to [On], and record images using the outer frame displayed on the screen as a guide.To adjust the angle of the LCD panel, first open the LCD panel 90 degrees to the camcorder (), and then adjust the angle ().
Data code during recordingThe recording date, time and condition are recorded automatically on the recording media. They are not displayed during recording. However, you can check them as [Data Code] during playback. To display them, touch (MENU) [Setup] [ (Playback Settings)] [Data Code] a desired setting .
90 degrees (max.)
180 degrees (max.) 90 degrees to the camcorder
• Nếu bạn đóng màn hình LCD trong khi quay phim, máy quay sẽ dừng ghi hình. • Thời gian quay liên tiếp tối đa là 13 giờ. • Khi dung lượng phim vượt quá 2 GB, một tệp phim mới sẽ tự động được tạo ra. • Sau khi khởi động máy quay, sẽ mất một vài giây để bắt đầu ghi hình. Bạn không thể điều khiển máy quay trong khoảng thời gian này. • Các mục sau đây sẽ được chỉ ra nếu dữ liệu vẫn còn đang được viết vào các phương tiện ghi âm sau khi quá trình ghi hoàn tất. Trong thời gian này, không được gây chấn động hoặc rung động đến máy quay, hoặc tháo pin hoặc tháo bộ chỉnh lưu AC. - Đèn truy cập (tr.19) sáng hoặc nhấp nháy. - Các biểu tượng phương tiện phía trên bên phải của màn hình LCD là nhấp nháy.
• Xem trang 59 về thời gian ghi của phim.• Bạn có thể ghi lại hình ảnh trong quá trình quay phim bằng cách nhấn PHOTO (Dual Rec).• [ SteadyShot] được thiết lập ở chế độ [Active] trong các thiết lập mặc định.• Bạn có thể xác định các khuôn mặt được ưu tiên bằng cách chạm vào nó.• Bạn có thể chụp ảnh từ phim đã quay.• Bạn có thể kiểm tra thời gian ghi, ước tính dung lượng còn lại, vv, bằng cách chạm vào (MENU) [Setup] [ (Media setting)] [Media Info].
Mã dữ liệu trong quá trình ghiNgày, tháng và điều kiện quay được ghi trực tiếp lên phương tiện ghi một cách tự động. Chúng không hiển thị trong quá trình ghi. Tuy nhiên, bạn có thể kiểm tra [Data Code] trong khi phát lại. Để hiển thị, chạm vào nút (MENU) [Setup] [ (PlaybackSettings)] [Data Code] một cài đặt mong muốn .
��GB
Recording/Playback
Shooting photos
When disappears, the photo is recorded.
Press MODE to turn on the (Photo) lamp.
The LCD screen display switches for photo recording mode, and the screen aspect ratio becomes 4:3.
Press PHOTO lightly to adjust the focus, then press it fully.
TipsSee page 60 on the recordable number of photos.To change the image size, touch (MENU) [Image Quality/Size] [ Image Size] a desired setting .You cannot record photos while is displayed.
MODE button
(Movie): When recording a movie(Photo): When recording a photo
Flashes Lights upPHOTO button
Chụp ảnh
Nhấn MODE để bật đen (Ảnh).
Nhấn nhẹ PHOTO để điều chỉnh lấy nét, sau đó nhấn hoàn toàn.
• máy quay của bạn được bật và nắp ống kính được mở ra.
Khi biến mất, ảnh được chụp.
(Phim) : Khi quay phim
Nút MODENút PHOTO Nhấp nháy Sáng lên
(Ảnh) : Khi chụp ảnh
Hiển thị màn hình LCD kích hoạt cho chế độ chụp ảnh, và tỷ lệ khung hình là 4:3.
• Tham khảo trang 60 về số lượng ảnh có thể chụp. • Để thay đổi kích cỡ ảnh, chạm vào (MENU) [Image Quality/Size] [ Image Size] cài đặt mong muốn .• Bạn không thể chụp ảnh trong khi đang hiển thị.
Mẹo nhỏ
Ghi hình/phát lại• Màn hình LCD của máy quay của bạn có thể hiển thị hình ảnh được ghi trên toàn màn hình (hiển
thị điểm ảnh đầy đủ). Tuy nhiên, điều này có thể khiến các cạnh phía trên, phía dưới, bên trái, bên phải bị cắt xén một chút khi xem lại trên TV không tương thích với hiển thị điểm ảnh đầy đủ. Trong trường hợp này, cài đặt [Guide Frame] ở [On] và ghi ảnh bằng khung bên ngoài được hiển thị trên màn hình làm hướng dẫn. • Điều chỉnh góc của màn hình LCD, trước tiên mở màn hình LCD 90 độ so với máy quay ( ), và sau đó điều chỉnh góc ( ).
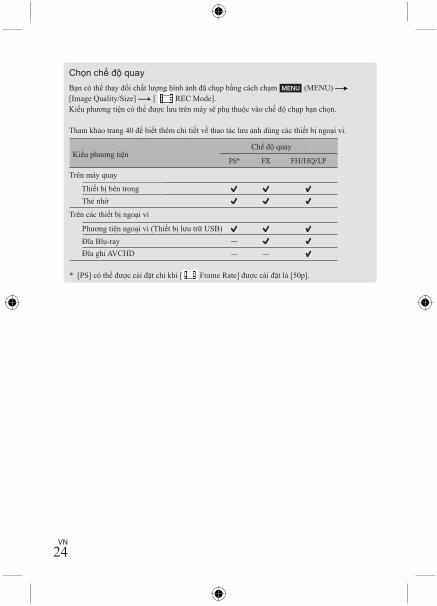
VN24
��GB
Selecting the recording modeYou can change the quality of the image that you record by touching (MENU) [Image Quality/Size] [ REC Mode].The types of media that images can be saved on will depend on the recording mode selected.For details on a save operation using the external devices, see page 40.
Types of mediaRecording mode
PS* FX FH/HQ/LP
On this camcorder
Internal recording mediaMemory card
On external devices
External media (USB storage devices)Blu-ray discs —AVCHD recording discs — —
* [PS] can be set only when [ Frame Rate] is set to [50p].
Chọn chế độ quay Bạn có thể thay đổi chất lượng hình ảnh đã chụp bằng cách chạm (MENU) [Image Quality/Size] [ REC Mode].Kiểu phương tiện có thể được lưu trên máy sẽ phụ thuộc vào chế độ chụp bạn chọn.
Tham khảo trang 40 để biết thêm chi tiết về thao tác lưu ảnh dùng các thiết bị ngoại vi.
Kiểu phương tiện
Trên máy quay
Trên các thiết bị ngoại vi
* [PS] có thể được cài đặt chỉ khi [ Frame Rate] được cài đặt là [50p].
Thiết bị bên trongThẻ nhớ
Phương tiện ngoại vi (Thiết bị lưu trữ USB)Đĩa Blu-rayĐĩa ghi AVCHD
Chế độ quay
��GB
Recording/Playback
Playback on the camcorder
You can enjoy the playback of images with powerful sound through the stereo speakers built into the camcorder.In the default setting, movies and photos that are recorded on the following recording media are played.HDR-CX130E: Memory cardHDR-CX160E/CX180E: Internal recording media
Tips To change the recording media, see page 17 (HDR-CX160E/CX180E).The camcorder displays recorded images as an event automatically based on the date and time.
1 Open the LCD screen of your camcorder.
Your camcorder is turned on and the lens cover is opened.
2 Press (View Images).
The Event View screen appears after some seconds.
3 Touch / to select the desired event ().
To the MENU screen Events / : To the previous/next event Event name
Highlight Playback button

VN25
��GB
Selecting the recording modeYou can change the quality of the image that you record by touching (MENU) [Image Quality/Size] [ REC Mode].The types of media that images can be saved on will depend on the recording mode selected.For details on a save operation using the external devices, see page 40.
Types of mediaRecording mode
PS* FX FH/HQ/LP
On this camcorder
Internal recording mediaMemory card
On external devices
External media (USB storage devices)Blu-ray discs —AVCHD recording discs — —
* [PS] can be set only when [ Frame Rate] is set to [50p].
��GB
Recording/Playback
Playback on the camcorder
You can enjoy the playback of images with powerful sound through the stereo speakers built into the camcorder.In the default setting, movies and photos that are recorded on the following recording media are played.HDR-CX130E: Memory cardHDR-CX160E/CX180E: Internal recording media
Tips To change the recording media, see page 17 (HDR-CX160E/CX180E).The camcorder displays recorded images as an event automatically based on the date and time.
1 Open the LCD screen of your camcorder.
Your camcorder is turned on and the lens cover is opened.
2 Press (View Images).
The Event View screen appears after some seconds.
3 Touch / to select the desired event ().
To the MENU screen Events / : To the previous/next event Event name
Highlight Playback button
Phát lại trên máy quay
Bạn có thể xem lại hình ảnh với âm thanh tốt thông qua loa stereo bên trong máy quay.Trong chế độ mặc định, phim và ảnh được ghi trong các phương tiện ghi dưới đây sẽ được sẽ phát
Thẻ nhớPhương tiện ghi bên trong
• Để thay đổi phương tiện ghi, xem trang 17 (HDR-CX160E/CX180E). • Máy quay hiển thị hình ảnh đã ghi tự động như một sự kiện dựa trên ngày và giờ.
Mẹo nhỏ
Máy quay của bạn được bật và nắp ống kính mở.
Màn hình Event View xuất hiện trong một vài giây.
Nút phát lại bôi đen
Đến màn hình MENUCác sự kiện
Tới sự kiện trước đó/kế tiếpTên sự kiện
Mở màn hình LCD của máy quay.
Nhấn (Xem ảnh).
Chạm / để chọn sự kiện mong muốn.
Ghi hình/phát lại

VN26��GB
Change to the movie/photo recording mode Time-line barHighlight Playback button*Change Event Scale button* Appears only when the image quality is set to [ HD Quality].The Event Index screen appears when you touch the event that is displayed on the center.
You can also choose an event by touching on the time-line bar.Touch (Change Event Scale) on the bottom right of the screen so that you can change the time range of the time-line bar from one and a half years to three months, which changes the number of the events that can be displayed on the time-line bar.
4 Touch an image you want to view.
Touch to select the image type to be displayed in the index from [ MOVIE] (movies only), [ PHOTO] (photos only), or [ MOVIE/PHOTO] (movies and photos mixed).
To go back to the Event View screen / : Displays the previous/next page (Touching and holding the button
scrolls the index screen.)Change to the movie/photo recording mode Event title Switch Image Type buttonMovie Photo
appears with the movie or photo that was most recently played or recorded. If you touch the movie or photo with , you can continue playback from the previous time.
Thay đổi chế độ quay phim hoặc ghi hình
Để trở lại màn hình Event View
Thay đổi chế độ quay phim/ghi hìnhTiêu đề sự kiện Nút thay đổi loại hình ảnh PhimẢnh
/ Hiển thị trang trước đó/kế tiếp (chạm và giữ các nút trên màn hình chỉ số)
Thanh thời gian lịch trìnhNút phát lại Hightlight*Nút thay đổi tỷ lệ sự kiện
* Xuất hiện chỉ khi chất lượng hình ảnh được cài đặt ở chế độ [ HD Quality]. Màn hình Event Index xuất hiện khi chạm vào sự kiện được hiển thị ở giữa màn hình.• Bạn có thể chọn một sự kiện bằng cách chạm vào trên thanh thời gian lịch trình. • Chạm vào (Change Event Scale) trên phía bên phải trên cùng của màn hình để bạn có thể thay đổi các khoảng thời gian trên thanh thời gian lịch trình từ một năm rưỡi thành 3 tháng, điều này thay đổi số lượng sự kiện hiển thị trên thanh thời gian lịch trình.
Chạm E Để chọn loại hình ảnh hiển thị trong mục chỉ số từ [ MOVIE] (chỉ phim ), [ PHOTO] (chỉ hình ảnh), hoặc [ MOVIE/PHOTO] (cả phim và hình ảnh).
• xuất hiện với phim hoặc hình ảnh được quay hoặc ghi mới nhất. Nếu bạn chạm vào hình ảnh hoặc phim với bạn có thể tiếp tục phát lại theo thời gian trước đó.
Chạm vào hình ảnh bạn muốn xem.
��GB
Recording/Playback
Operating the camcorder while playing a movie
You can use the functions shown in the figure below while the camcorder is playing a movie. The figure below will be displayed when you select [ MOVIE/PHOTO] (the default setting) or [ MOVIE] by touching the Switch Image Type button on the Event Index screen.
* These buttons can be used only when the camcorder is playing a movie.
NotesYou may not be able to play back the images with other devices than camcorder.
TipsTouching the button on the playback screen displays functions you can currently use, and allows you to use those functions easily.When playback from the selected image reaches the last image, the screen returns to the INDEX screen.Touch / during pause to play back movies slowly.As you repeat touching / during playback, movies are played as fast as about 5 times about 10 times about 30 times about 60 times.The recording date, time, and shooting conditions are recorded automatically during recording. This information is not displayed during recording, but you can display it during playback by touching (MENU) [Setup] [ (Playback Settings)] [Data Code] a desired setting
.In the default setting, a protected demonstration movie is pre-recorded (HDR-CX160E/CX180E).
To adjust the sound volume of moviesWhile playing back movies, touch adjust with / .
To pause*/play
To fast-forward*
Delete
Next
To fast-reverse*
To stop*
Previous
Volume adjustment
Context
Điều chỉnh âm lượng
Xóa
Bối cảnh
Để dừng*Trước đó
Để quay lại nhanh*
��GB
Change to the movie/photo recording mode Time-line barHighlight Playback button*Change Event Scale button* Appears only when the image quality is set to [ HD Quality].The Event Index screen appears when you touch the event that is displayed on the center.
You can also choose an event by touching on the time-line bar.Touch (Change Event Scale) on the bottom right of the screen so that you can change the time range of the time-line bar from one and a half years to three months, which changes the number of the events that can be displayed on the time-line bar.
4 Touch an image you want to view.
Touch to select the image type to be displayed in the index from [ MOVIE] (movies only), [ PHOTO] (photos only), or [ MOVIE/PHOTO] (movies and photos mixed).
To go back to the Event View screen / : Displays the previous/next page (Touching and holding the button
scrolls the index screen.)Change to the movie/photo recording mode Event title Switch Image Type buttonMovie Photo
appears with the movie or photo that was most recently played or recorded. If you touch the movie or photo with , you can continue playback from the previous time.

VN27
��GB
Change to the movie/photo recording mode Time-line barHighlight Playback button*Change Event Scale button* Appears only when the image quality is set to [ HD Quality].The Event Index screen appears when you touch the event that is displayed on the center.
You can also choose an event by touching on the time-line bar.Touch (Change Event Scale) on the bottom right of the screen so that you can change the time range of the time-line bar from one and a half years to three months, which changes the number of the events that can be displayed on the time-line bar.
4 Touch an image you want to view.
Touch to select the image type to be displayed in the index from [ MOVIE] (movies only), [ PHOTO] (photos only), or [ MOVIE/PHOTO] (movies and photos mixed).
To go back to the Event View screen / : Displays the previous/next page (Touching and holding the button
scrolls the index screen.)Change to the movie/photo recording mode Event title Switch Image Type buttonMovie Photo
appears with the movie or photo that was most recently played or recorded. If you touch the movie or photo with , you can continue playback from the previous time.
* Xuất hiện chỉ khi chất lượng hình ảnh được cài đặt ở chế độ [ HD Quality]. Màn hình Event Index xuất hiện khi chạm vào sự kiện được hiển thị ở giữa màn hình.• Bạn có thể chọn một sự kiện bằng cách chạm vào trên thanh thời gian lịch trình. • Chạm vào (Change Event Scale) trên phía bên phải trên cùng của màn hình để bạn có thể thay đổi các khoảng thời gian trên thanh thời gian lịch trình từ một năm rưỡi thành 3 tháng, điều này thay đổi số lượng sự kiện hiển thị trên thanh thời gian lịch trình.
• xuất hiện với phim hoặc hình ảnh được quay hoặc ghi mới nhất. Nếu bạn chạm vào hình ảnh hoặc phim với bạn có thể tiếp tục phát lại theo thời gian trước đó.
��GB
Recording/Playback
Operating the camcorder while playing a movie
You can use the functions shown in the figure below while the camcorder is playing a movie. The figure below will be displayed when you select [ MOVIE/PHOTO] (the default setting) or [ MOVIE] by touching the Switch Image Type button on the Event Index screen.
* These buttons can be used only when the camcorder is playing a movie.
NotesYou may not be able to play back the images with other devices than camcorder.
TipsTouching the button on the playback screen displays functions you can currently use, and allows you to use those functions easily.When playback from the selected image reaches the last image, the screen returns to the INDEX screen.Touch / during pause to play back movies slowly.As you repeat touching / during playback, movies are played as fast as about 5 times about 10 times about 30 times about 60 times.The recording date, time, and shooting conditions are recorded automatically during recording. This information is not displayed during recording, but you can display it during playback by touching (MENU) [Setup] [ (Playback Settings)] [Data Code] a desired setting
.In the default setting, a protected demonstration movie is pre-recorded (HDR-CX160E/CX180E).
To adjust the sound volume of moviesWhile playing back movies, touch adjust with / .
To pause*/play
To fast-forward*
Delete
Next
To fast-reverse*
To stop*
Previous
Volume adjustment
Context
Bạn có thể sử dụng chức năng hiển thị trên công cụ bên dưới khi đang xem phim.Biểu tượng bên
dưới sẽ được hiển thị khi bạn chọn [ MOVIE/PHOTO] (cài đặt mặc định) hoặc [ MOVIE] bằng cách chạm vào nút Switch Image Type trên màn hình Event Index.
* Chỉ sử dụng các nút này khi chạy chương trình phim.
Điều chỉnh âm lượng
Kế tiếp
Để chuyển tiếp nhanh
Để tạm dừng*/phát
Xóa
Bối cảnh
Để dừng*Trước đó
Để quay lại nhanh*
• Có thể bạn không xem lại hình ảnh với các thiết bị khác ngoài máy quay.
• Chạm vào nút trên màn hình hiển thị chức năng bạn đang sử dụng, và cho phép bạn sử dụng những chức năng này một cách dễ dàng. • Khi chức năng xem lại xem đến hình ảnh cuối, màn hình trở lại màn hình INDEX. • Chạm / trong khi tạm dừng để xem lại phim từ từ.• Khi bạn chạm liên tục vào / trong khi phát lại phim sẽ được phát lại với tốc độ nhanh gấp khoảng 5 lần khoảng 10 lần khoảng 30 lần khoảng 60 lần.• Ngày giờ ghi và các điều kiện liên quan được ghi lại một cách tự động trong quá trình ghi. Thông tin này không được hiển thị trong quá trình ghi, nhưng bạn có thể hiển thị nó bằng cách chạm vào (MENU) [Setup] [ (Playback Settings)] [Data Code] một chế độ cài đặt mong muốn .• Trong cài đặt mặc định, một phim được bảo vệ được ghi lại trước (HDR-CX160E/CX180E).
Để điều chỉnh âm lượng của phim
Trong khi phát lại phim, chạm điều chỉnh bằng / .
Chú ý
Mẹo nhỏ
Ghi hình/phát lại
Sử dụng máy quay trong khi xem phim

VN28��
GB
Viewing photos
You can use the functions shown in the figure below while you are viewing photos. The figure below will be displayed when you select [ PHOTO] by touching the Switch Image Type button on the Event Index screen.
TipsTo repeat Slideshow, touch [Slideshow Set].
Performing Highlight PlaybackPress Touch / to select the desired event, then touch [ Highlight].
Touch [ Scenario Save] on the screen after the Highlight Playback is finished so that you can save the Highlight Playback scenario.
To start/stop slide show
NextPrevious
Delete
Context
Xem ảnhBạn có thể sử dụng các chức năng hiển thị trong hình dưới đây khi xem ảnh. Hình bên dưới sẽ hiển thị khi bạn chọn [ PHOTO ] bằng cách chạm vào nút Switch Image Type trên màn hình Event Index.
Mẹo nhỏ
Bắt đầu/dừng trình chiếu hình
• Để lặp lại Trình chiếu, chạm vào [Slideshow Set].
Thao tác Phát lại Highlight
• Chạm vào [ Scenario Save] trên màn hình sau khi phần Phát lại Highlight kết thúc để ghi lại kịch bản Phát lại Highlight.
Nhấn chạm nút / để chọn sự kiện mong muốn, sau đó chạm nút [ Highlight].
Xóa
Bối cảnh
Trước Kế tiếp

VN29��
GB
Recording/Playback
Playing images on a TV
Connection methods and the image quality (high definition (HD) or standard definition (STD)) viewed on the TV screen differ depending on what type of TV is connected, and the connectors used.
Output connectors on the camcorder
1 Switch the input on the TV to the connected jack.
Refer to the instruction manuals of the TV.
2 Connect the camcorder to a TV.
Use the supplied AC Adaptor as the power source (p. 12).
3 Play a movie or a photo on the camcorder (p. 25).
List of connection
Connecting to a high definition TVWhen the recording quality is high definition image quality (HD), the movies are played back in high definition image quality (HD). When the recoding quality is standard image quality (STD), the movies are played back in standard definition image quality (STD).
HDMI OUT jack
A/V Remote Connector
(Green) Y(Blue)PB/CB
(Red)PR/CR
(White)(Red)
Component A/V Cable (supplied)
HDMI Cable (sold separately)
Chiếu hình ảnh trên TVCách thức kết nối và chất lượng hình ảnh (độ nét cao (HD) hay độ nét tiêu chuẩn (STD)) hiện trên màn hình TV không đồng nhất tùy theo loại TV nào được kết nối và công cụ kết nối được dùng. Kết nối với TV độ nét cao
Khi chất lượng ghi hình là chất lượng hình ảnh độ nét cao (HD), phim được chiếu lại với chất lượng hình ảnh độ nét cao (HD). Khi chất lượng ghi hình là chất lượng hình ảnh tiêu chuẩn (STD), phim được chiếu lại với chất lượng hình ảnh tiêu chuẩn (STD).
Dây cáp thành phần A/V (được cung cấp kèm theo)
Dây cáp HDMI (Bán riêng)
Bộ kết nối từ xa A/V
(Xanh lá cây)Y
(Xanh da trời)PB/CB
(Đỏ) PR/CR
(Trắng)
(Đỏ)
Kết nối ngoài trên máy quayGiắc cắm HDMI OUT
Chuyển đầu vào trên TV tới giắc cắm đã kết nối.• Tham khảo sách hướng dẫn sử dụng của TV.
Bật phim hay ảnh trên máy quay (tr.25).
Kết nối máy quay với TV.• Sử dụng bộ chỉnh lưu AC kèm theo làm điện nguồn (tr.12).
Danh sách kết nối
��GB
Viewing photos
You can use the functions shown in the figure below while you are viewing photos. The figure below will be displayed when you select [ PHOTO] by touching the Switch Image Type button on the Event Index screen.
TipsTo repeat Slideshow, touch [Slideshow Set].
Performing Highlight PlaybackPress Touch / to select the desired event, then touch [ Highlight].
Touch [ Scenario Save] on the screen after the Highlight Playback is finished so that you can save the Highlight Playback scenario.
To start/stop slide show
NextPrevious
Delete
Context
Xem ảnhBạn có thể sử dụng các chức năng hiển thị trong hình dưới đây khi xem ảnh. Hình bên dưới sẽ hiển thị khi bạn chọn [ PHOTO ] bằng cách chạm vào nút Switch Image Type trên màn hình Event Index.
Bắt đầu/dừng trình chiếu hình
• Chạm vào [ Scenario Save] trên màn hình sau khi phần Phát lại Highlight kết thúc để ghi lại kịch bản Phát lại Highlight.
Ghi hình/phát lại

VN30�0GB
Connecting to a non-high-definition 16:9 (wide) or 4:3 TVWhen movies are recorded with high definition image quality (HD), they are played back in standard definition image quality (STD). When movies are recoded with standard image quality (STD), they are played back in standard definition image quality (STD).
When you connect with component A/V cable
If you connect only component video plugs, audio signals are not output. Connect the white and red plugs to output audio signals.Select the [Component] setting for the component input jack you are using. Touch
(MENU) [Setup] [ (Connection)] [Component] a desired setting to make the setting.
When you connect with HDMI cableUse an HDMI cable with the HDMI logo.Use an HDMI mini connector on one end (for the camcorder), and a plug suitable for connecting your TV on the other end.Copyright-protected images are not output from the HDMI OUT jack of your camcorder.Some TVs may not function correctly (e.g., no sound or image) with this connection.Do not connect the camcorder HDMI OUT jack to an external device HDMI OUT jack, as malfunction may result.
To set the aspect ratio according to the connected TV (16:9/4:3)
Set [TV Type] to [16:9] or [4:3] according to your TV.
When you connect with A/V connecting cable with S-Video
When the S VIDEO plug (S VIDEO channel) is connected, audio signals are not output. To output audio signals, connect the white and red plugs to the audio input jack of your TV.This connection produces higher resolution images compared with the A/V connecting cable.
When your TV is monaural (When your TV has only one audio input jack)
Connect the yellow plug of the A/V connecting cable to the video input jack and connect the white (left channel) or red (right channel) plug to the audio input jack of your TV or VCR.
(Green) Y(Blue)PB/CB
(Red)PR/CR
(White)(Red)
(Yellow)
(White)(Red)
(White)(Red)
(Yellow)
Component A/V Cable (supplied)
A/V connecting cable with S VIDEO (sold separately)
A/V connecting cable (supplied)
Kết nối với TV không phải độ nét cao 16:9 (rộng) hay 4:3 Khi phim được ghi hình với chất lượng hình ảnh độ nét cao (HD), phim được chiếu lại với chất lượng hình ảnh độ nét tiêu chuẩn (STD). Khi phim được ghi hình với chất lượng hình ảnh tiêu chuẩn (STD), phim được chiếu lại với chất lượng hình ảnh tiêu chuẩn (STD).
Khi kết nối với cáp thành phần A/V • Nếu bạn chỉ kết nối thành phần đầu cắm video, tín hiệu audio không phát ra. Kết nối đầu cắm màu trắng và đỏ để phát ra tín hiệu audio. • Chọn cài đặt [Component] cho thành phần giắc đầu vào bạn đang sử dụng. Chạm nút (MENU) [Setup] [ (Connection)] [Component] cài đặt mong muốn để thiết lập cài đặt.
Khi bạn kết nối với cáp HDMI• Sử dụng cáp HDMI với biểu tượng HDMI.• Sử dụng kết nối HDMI mini một đầu (dành cho máy quay) và một đầu cắm thích hợp để kết nối tới TV của bạn ở đầu kia.• Ảnh được bảo vệ bản quyền sẽ không phát ra từ giắc cắm HDMI OUT trên máy quay của bạn.• Một số TV có thể hoạt động không chính xác (ví dụ: không âm thanh hay hình ảnh) với loại kết nối này.• Không được kết nối giắc cắm HDMI OUT tới giắc cắm HDMI OUT của thiết bị ngoài, sự cố có thể xảy ra.
Để đặt tỷ lệ khung hình theo TV đã kết nối (16:9/4:3)• Cài đặt [TV Type] là [16:9] hay [4:3] theo TV của bạn.
Khi bạn kết nối cáp A/V với S-Video• Khi đầu cắm S VIDEO (kênh S VIDEO) được kết nối, tín hiệu audio không được phát ra. Để phát ra tín hiệu audio, kết nối đầu cắm trắng và đỏ tới giắc đầu vào của TV.• Loại kết nối này tạo ra hình ảnh có độ phân giải cao hơn so với kết nối bằng cáp A/V.Khi TV của bạn là đơn âm (Khi TV của bạn chỉ có một giắc cắm audio đầu vào) Kết nối đầu cắm vàng của cáp A/V tới giắc cắm đầu vào video và kết nối đầu trắng (kênh trái) hay đầu đỏ (kênh phải) tới rãnh cắm audio đầu vào của TV hay VCR.
Dây cáp kết nối A/V (được cung cấp)
Cáp kết nối A/V với S VIDEO (bán dời)
Dây cáp kết nối A/V (được cung cấp kèm theo)
Dây cáp HDMI (Bán dời)
(Xanh lá cây)Y
(Xanh da trời)PB/CB
(Đỏ) PR/CR
(Xanh lá cây)
(Xanh da trời)
(Đỏ)
(Trắng)
(Đỏ)
(Trắng)
(Đỏ)
(Vàng)

VN31
�0GB
Connecting to a non-high-definition 16:9 (wide) or 4:3 TVWhen movies are recorded with high definition image quality (HD), they are played back in standard definition image quality (STD). When movies are recoded with standard image quality (STD), they are played back in standard definition image quality (STD).
When you connect with component A/V cable
If you connect only component video plugs, audio signals are not output. Connect the white and red plugs to output audio signals.Select the [Component] setting for the component input jack you are using. Touch
(MENU) [Setup] [ (Connection)] [Component] a desired setting to make the setting.
When you connect with HDMI cableUse an HDMI cable with the HDMI logo.Use an HDMI mini connector on one end (for the camcorder), and a plug suitable for connecting your TV on the other end.Copyright-protected images are not output from the HDMI OUT jack of your camcorder.Some TVs may not function correctly (e.g., no sound or image) with this connection.Do not connect the camcorder HDMI OUT jack to an external device HDMI OUT jack, as malfunction may result.
To set the aspect ratio according to the connected TV (16:9/4:3)
Set [TV Type] to [16:9] or [4:3] according to your TV.
When you connect with A/V connecting cable with S-Video
When the S VIDEO plug (S VIDEO channel) is connected, audio signals are not output. To output audio signals, connect the white and red plugs to the audio input jack of your TV.This connection produces higher resolution images compared with the A/V connecting cable.
When your TV is monaural (When your TV has only one audio input jack)
Connect the yellow plug of the A/V connecting cable to the video input jack and connect the white (left channel) or red (right channel) plug to the audio input jack of your TV or VCR.
(Green) Y(Blue)PB/CB
(Red)PR/CR
(White)(Red)
(Yellow)
(White)(Red)
(White)(Red)
(Yellow)
Component A/V Cable (supplied)
A/V connecting cable with S VIDEO (sold separately)
A/V connecting cable (supplied)
Khi kết nối với cáp thành phần A/V • Nếu bạn chỉ kết nối thành phần đầu cắm video, tín hiệu audio không phát ra. Kết nối đầu cắm màu trắng và đỏ để phát ra tín hiệu audio. • Chọn cài đặt [Component] cho thành phần giắc đầu vào bạn đang sử dụng. Chạm nút (MENU) [Setup] [ (Connection)] [Component] cài đặt mong muốn để thiết lập cài đặt.
�1GB
Recording/Playback
When connecting to your TV via a VCRConnect your camcorder to the LINE IN input on the VCR using the A/V connecting cable. Set the input selector on the VCR to LINE (VIDEO 1, VIDEO 2, etc.).
NotesWhen you play back standard definition image quality (STD) movies on a 4:3 TV that is not compatible with the 16:9 signal, record movies with 4:3 aspect ratio. Touch (MENU) [Image Quality/Size] [ Wide Mode] [4:3] .When the A/V connecting cable is used to output movies, movies are output with standard definition image quality (STD).
If your TV/VCR has a 21-pin adaptor (EUROCONNECTOR)Use a 21-pin adaptor (sold separately) to view playback pictures.
TipsIf you connect your camcorder to the TV using more than one type of cable to output images, the order of priority of the TV input jacks is as follows: HDMI component S VIDEO videoHDMI (High Definition Multimedia Interface) is an interface to send both video/audio signals. The HDMI OUT jack outputs high quality images and digital audio.
On “Photo TV HD”This camcorder is compatible with the “Photo TV HD” standard. “Photo TV HD” allows for highly-detailed, photo-like depiction of subtle textures and colors. By connecting Sony’s Photo TV HD-compatible devices using an HDMI cable* or the component AV cable**, a whole new world of photos can be enjoyed in breathtaking full HD quality.* The TV will automatically switch to the
appropriate mode when displaying photos.** Setup of the TV will be necessary. Please refer
to the instructions of your Photo TV HD-compatible TV for details.
TV/VCR
Khi kết nối tới TV của bạn qua máy VCR • Kết nối máy quay của bạn tới đầu vào LINE IN trên VCR sử dụng cáp kết nối A/V. Đặt chọn lựa đầu vào trên VCR là LINE (VIDEO 1, VIDEO 2, v.v…)
Trên “Photo TV HD” Máy quay này tương thích với tiêu chuẩn “Photo TV HD”. “Photo TV HD” cho phép mô tả các kết cấu tinh tế và màu sắc một cách chi tiết, giống như ảnh.Bằng cách kết nối thiết bị Photo TV HD tương thích của Sony sử dụng cáp HDMI * hoặc cáp AV thành phần **, có thể tận hưởng hình ảnh mới với chất lượng HD tuyệt đối một cách ngoạn mục.
* TV sẽ tự động chuyển tới chế độ thích hợp khi hiển thị ảnh chụp.** Việc cài đặt TV sẽ cần thiết. Xin hãy xem hướng dẫn của TV tương thích với Photo TV HD để biết chi tiết.
• Nếu bạn kết nối máy quay tới TV sử dụng hơn một loại cáp để phát hình ảnh, thứ tự ưu tiên của giắc đầu vào TV như sau: HDMI component S VIDEO video• HDMI (giao diện đa phương tiện độ nét cao) là giao diện phát ra cả tín hiệu video / âm thanh. Các giắc cắm HDMI OUT cho hình ảnh và âm thanh kỹ thuật số chất lượng cao.
• Khi phát lại phim chất lượng hình ảnh độ nét tiêu chuẩn (STD) trên TV 4:3 mà không tương thích với tín hiệu 16:9, ghi phim với tỉ lệ 4:3. Chạm vào (MENU) [Image Quality/Size] [ Wide Mode] [4:3] .)
Mẹo nhỏ
Chú ý
Ghi hình/phát lại
• Khi cáp kết nối A/V được dùng để chiếu phim được chiếu với chất lượng hình ảnh độ nét tiêu chuẩn (STD).
Nếu TV/VCR của bạn có bộ chỉnh lưu 21 chấu (EUROCONNECTOR) Sử dụng bộ chỉnh lưu 21 chấu (bán riêng) để xem ảnh phát lại.
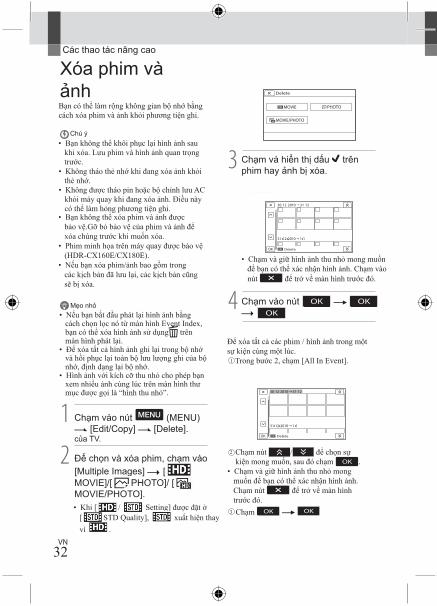
VN32��
GB
Advanced operations
Deleting movies and photosYou can free media space by deleting movies and photos from recording media.
NotesYou cannot restore images once they are deleted. Save important movies and photos in advance.Do not remove the battery pack or the AC Adaptor from your camcorder while deleting the images. It may damage the recording media.Do not eject the memory card while deleting images from the memory card.You cannot delete protected movies and photos. Undo the protection of the movies and photos to delete them, before you try to delete them.The demonstration movie on your camcorder is protected (HDR-CX160E/CX180E).If you delete movies/photos that are included in saved scenarios, the scenarios will also be deleted.
TipsIf you start playing back an image by selecting it from the Event Index screen, you can delete the image using on the playback screen.To delete all images recorded in the recording media, and recover all the recordable space of the media, format the media.Reduced-size images which enable you to view many images at the same time on an index screen are called “thumbnails.”
1 Touch (MENU) [Edit/Copy] [Delete].
2 To select and delete movies, touch [Multiple Images] [ MOVIE]/[ PHOTO]/ [ MOVIE/PHOTO].
When [ / Setting] is set to [ STD Quality], appears instead of .
3 Touch and display the mark on the movies or photos to be deleted.
Touch and hold the desired thumbnail so that you can confirm the image. Touch
to return to the previous screen.
4 Touch .
To delete all movies/photos in an event at one time In step 2, touch [All In Event].
Touch / to select the desired event, then touch .
Touch and hold the desired thumbnail so that you can confirm the image. Touch
to return to the previous screen. Touch .
Các thao tác nâng cao
Xóa phim và ảnhBạn có thể làm rộng không gian bộ nhớ bằng cách xóa phim và ảnh khỏi phương tiện ghi.
• Bạn không thể khôi phục lại hình ảnh sau khi xóa. Lưu phim và hình ảnh quan trọng trước.• Không tháo thẻ nhớ khi đang xóa ảnh khỏi thẻ nhớ. • Không được tháo pin hoặc bộ chỉnh lưu AC khỏi máy quay khi đang xóa ảnh. Điều này có thể làm hỏng phương tiện ghi. • Bạn không thể xóa phim và ảnh được bảo vệ.Gỡ bỏ bảo vệ của phim và ảnh để xóa chúng trước khi muốn xóa. • Phim minh họa trên máy quay được bảo vệ (HDR-CX160E/CX180E). • Nếu bạn xóa phim/ảnh bao gồm trong các kịch bản đã lưu lại, các kịch bản cũng sẽ bị xóa.
• Nếu bạn bắt đầu phát lại hình ảnh bằng cách chọn lọc nó từ màn hình Event Index, bạn có thể xóa hình ảnh sử dụng trên màn hình phát lại.• Để xóa tất cả hình ảnh ghi lại trong bộ nhớ và hồi phục lại toàn bộ lưu lượng ghi của bộ nhớ, định dạng lại bộ nhớ. • Hình ảnh với kích cỡ thu nhỏ cho phép bạn xem nhiều ảnh cùng lúc trên màn hình thư mục được gọi là “hình thu nhỏ”.
Mẹo nhỏ
Chạm vào nút (MENU) [Edit/Copy] [Delete].
của TV.
Chạm và hiển thị dấu trên phim hay ảnh bị xóa.
Chạm vào nút
Để chọn và xóa phim, chạm vào [Multiple Images] [ MOVIE]/[ PHOTO]/ [ MOVIE/PHOTO].• Khi [ / Setting] được đặt ở [ STD Quality], xuất hiện thay vì .
• Chạm và giữ hình ảnh thu nhỏ mong muốn để bạn có thể xác nhận hình ảnh. Chạm vào nút để trở về màn hình trước đó.
Chạm nút / để chọn sự kiện mong muốn, sau đó chạm . • Chạm và giữ hình ảnh thu nhỏ mong muốn để bạn có thể xác nhận hình ảnh. Chạm nút để trở về màn hình trước đó.
Chạm
Để xóa tất cả các phim / hình ảnh trong một sự kiện cùng một lúc. Trong bước 2, chạm [All In Event].
��GB
Saving movies and photos w
ith a computer
Saving movies and photos with a computer
Useful functions available if you connect the camcorder to a computer (Windows)
The software PMB stored in the CD-ROM (supplied) includes functions that enable you to do more with the images recorded with the camcorder.
Easy uploading when away from homeWith PMB Portable, which is pre-installed on the camcorder, you can play back or upload your images to the Web by connecting your camcorder to a computer away from home.
View
Edit
Save on a disc Upload
Calendar
DVD/Blu-ray
Joining image files
Network services
Chú ý
1
2
3
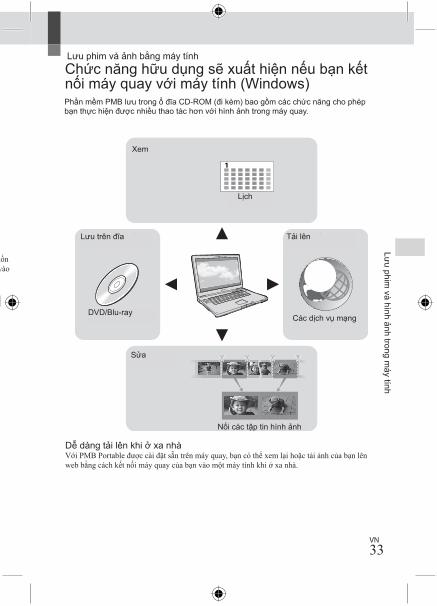
VN33��
GB
Advanced operations
Deleting movies and photosYou can free media space by deleting movies and photos from recording media.
NotesYou cannot restore images once they are deleted. Save important movies and photos in advance.Do not remove the battery pack or the AC Adaptor from your camcorder while deleting the images. It may damage the recording media.Do not eject the memory card while deleting images from the memory card.You cannot delete protected movies and photos. Undo the protection of the movies and photos to delete them, before you try to delete them.The demonstration movie on your camcorder is protected (HDR-CX160E/CX180E).If you delete movies/photos that are included in saved scenarios, the scenarios will also be deleted.
TipsIf you start playing back an image by selecting it from the Event Index screen, you can delete the image using on the playback screen.To delete all images recorded in the recording media, and recover all the recordable space of the media, format the media.Reduced-size images which enable you to view many images at the same time on an index screen are called “thumbnails.”
1 Touch (MENU) [Edit/Copy] [Delete].
2 To select and delete movies, touch [Multiple Images] [ MOVIE]/[ PHOTO]/ [ MOVIE/PHOTO].
When [ / Setting] is set to [ STD Quality], appears instead of .
3 Touch and display the mark on the movies or photos to be deleted.
Touch and hold the desired thumbnail so that you can confirm the image. Touch
to return to the previous screen.
4 Touch .
To delete all movies/photos in an event at one time In step 2, touch [All In Event].
Touch / to select the desired event, then touch .
Touch and hold the desired thumbnail so that you can confirm the image. Touch
to return to the previous screen. Touch .
Chạm và hiển thị dấu trên phim hay ảnh bị xóa.
Chạm vào nút
• Chạm và giữ hình ảnh thu nhỏ mong muốn để bạn có thể xác nhận hình ảnh. Chạm vào nút để trở về màn hình trước đó.
Chạm
��GB
Saving movies and photos w
ith a computer
Saving movies and photos with a computer
Useful functions available if you connect the camcorder to a computer (Windows)
The software PMB stored in the CD-ROM (supplied) includes functions that enable you to do more with the images recorded with the camcorder.
Easy uploading when away from homeWith PMB Portable, which is pre-installed on the camcorder, you can play back or upload your images to the Web by connecting your camcorder to a computer away from home.
View
Edit
Save on a disc Upload
Calendar
DVD/Blu-ray
Joining image files
Network services
Lưu phim và ảnh bằng máy tínhChức năng hữu dụng sẽ xuất hiện nếu bạn kết nối máy quay với máy tính (Windows)Phần mềm PMB lưu trong ổ đĩa CD-ROM (đi kem) bao gồm các chức năng cho phép bạn thực hiện được nhiều thao tác hơn với hình ảnh trong máy quay.
Xem
Lưu trên đĩa
DVD/Blu-ray
Tải lên
Các dịch vụ mạng
Sửa
Nối các tập tin hình ảnh
Lịch
Dễ dàng tải lên khi ở xa nhàVới PMB Portable được cài đặt sẵn trên máy quay, bạn có thể xem lại hoặc tải ảnh của bạn lên web bằng cách kết nối máy quay của bạn vào một máy tính khi ở xa nhà.
Lưu phim
và hình ảnh trong máy tính

VN34��GB
Preparing a computer (Windows)
Step 1 Checking the computer system
OS*1
Microsoft Windows XP SP3*2/Windows Vista SP2*3/Windows 7CPU*4
Intel Core Duo 1.66 GHz or faster, or Intel Core 2 Duo 1.66 GHz or faster (Intel Core 2 Duo 2.26 GHz or faster is required when processing FX or FH movies, and Intel Core 2 Duo 2.40 GHz or faster is required when processing PS movies.)However, Intel Pentium III 1 GHz or faster is sufficient for the following operations:
Importing the movies and photos to the computerOne Touch Disc BurnCreating a Blu-ray disc/AVCHD recording disc/DVD-video (Intel Core Duo 1.66 GHz or faster is required when creating a DVD video by converting high definition image quality (HD) to standard definition image quality (STD).)Copying a discProcessing only the movies with standard definition image quality (STD)
ApplicationDirectX 9.0c or later (This product is based on DirectX technology. It is necessary to have DirectX installed.)MemoryFor Windows XP: 512 MB or more (1 GB or more is recommended.) However, 256 MB or more is sufficient for processing only the movies with standard definition image quality (STD).For Windows Vista/Windows 7: 1 GB or moreHard diskDisk volume required for installation: Approximately 500 MB (10 GB or more may be necessary when creating AVCHD recording discs. 50 GB maximum may be necessary when creating Blu-ray discs.)
DisplayMinimum 1,024 × 768 dotsOthersUSB port (this must be provided as standard, Hi-Speed USB (USB 2.0 compatible)), Blu-ray disc/DVD burner (CD-ROM drive is necessary for installation) Either NTFS or exFAT file system is recommended as the hard disk file system.
*1 Standard installation is required. Operation is not assured if the OS has been upgraded or in a multi-boot environment.
*2 64-bit editions and Starter (Edition) are not supported. Windows Image Mastering API (IMAPI) Ver.2.0 or newer is required to use disc creation function, etc.
*3 Starter (Edition) is not supported.*4 Faster processor is recommended.
NotesOperation with all computer environments is not assured.
When using a MacintoshThe supplied software “PMB” is not supported by Macintosh computers. To import the movies and photos to the computer, please contact Apple Inc.
Step 2 Installing the supplied software “PMB”
Install “PMB” before connecting your camcorder to a computer.
NotesIf a version of “PMB” under 5.0.00 has been installed on your computer, you may be unable to use some functions of those “PMB” when installing the “PMB” from the supplied CD-ROM. Also, “PMB Launcher” is installed from
Chuẩn bị một máy tính (Windows)
Microsoft Windows XP SP3*2/Windows VistaSP2*3/Windows 7
Tối thiểu 1,024 × 768 điểm
Cổng USB (phải được cung cấp theo tiêu chuẩn, Hi-Speed USB (USB 2.0 tương thích)), tạo đĩa Bluray / DVD (cần ổ đĩa CD-ROM để cài đặt) Hệ thống file NTFS hoặc exFAT được
Intel Core Duo 1,66 GHz hoặc nhanh hơn, hoặc Intel Core 2 Duo 1,66 GHz hoặc nhanh hơn (In-tel Core 2 Duo 2,26 GHz hoặc nhanh hơn được yêu cầu khi xử lí phim FX hoặc FH và Intel Core 2 Duo 2,40 GHz hoặc nhanh hơn được yêu cầu khi xử lí phim PS).Tuy nhiên, Intel Pentium III 1 GHz hoặc nhanh hơn là đủ cho các thao tác sau: -Nhập phim và hình ảnh vào máy tính-Tạo đĩa bằng một cái chạm-Tạo một đĩa Blu-ray / đĩa ghi AVCHD/ DVD-video (Intel Core Duo 1,66 GHzhoặc nhanh hơn được yêu cầu khi tạo một đĩa video DVD bằng cách chuyển đổi hình ảnh chất lượng độ nét cao (HD) sang hình ảnh chất lượng độ nét tiêu chuẩn (STD).)-Sao chép đĩa-Chỉ xử lí những bộ phim với chất lượng hình ảnh độ nét tiêu chuẩn (STD)
*1Cài đặt tiêu chuẩn được yêu cầu. Hoạt động không đảm bảo nếu hệ điều hành đã được nâng cấp hoặc trong một môi trường đa khởi động.*2 Phiên bản 2 64-bit và Starter (Phiên bản) không được hỗ trợ. Windows Image Mastering API (IMAPI) phiên bản 2.0 hoặc mới hơn là cần thiết để sử dụng chức năng tạo đĩa, vv*3 Starter (Phiên bản) không được hỗ trợ.*4 Bộ vi xử lý nhanh hơn được khuyên dùng.
• Hoạt động với tất cả các môi trường máy tính không được đảm bảo.
Cài đặt “PMB” trước khi kết nối máy quay của bạn vào máy tính.
Nếu một phiên bản của “PMB” dưới 5.0.00 đã được cài đặt trên máy tính của bạn, bạn có thể không sử dụng được một số chức năng của các “PMB” khi cài đặt “PMB” từ CD-ROM kèm theo.Ngoài ra, “ PMB Launcher “ được cài đặt từ đĩa CD-ROM kèm theo và bạn có thể khởi động
Chú ý
Chú ý
khuyến cáo là hệ thống tập tin đĩa cứng .
DirectX 9.0c hoặc cao hơn (sản phẩm này được dựa trên công nghệ DirectX. Cần thiết phải cài đặt DirectX).
Đối với Windows XP: 512 MB trở lên (1 GB hoặc nhiều hơn được khuyến khích.)Tuy nhiên, 256 MB trở lên đủ để xử lí chỉ những phim với chất lượng hình ảnh tiêu chuẩn (STD).Đối với Windows Vista / Windows 7: 1 GB hoặc hơn
Dung lượng đĩa cần thiết để cài đặt:Khoảng 500 MB (10 GB hoặc hơn có thể cần thiết khi tạo đĩa ghi AVCHD. 50 GB tối đa có thể cần thiết khi tạo đĩa Blu-ray) .
Bước 1 Kiểm tra hệ thống máy tính
Bước 2: Cài đặt phần mềm “PMB” kem theo
OS*1
Hiển thị
Khác
Ứng dụng
Bộ nhớ
Ổ cứng
Khi sử dụng máy tính MacintoshPhần mềm “PMB” kèm không được hỗ trợ bởi các máy tính Macintosh. Đểnhập phim và hình ảnh vào máy tính, xin vui lòng liên hệ với công ty Apple.
��GB
Saving movies and photos w
ith a computer
the supplied CD-ROM and you can start “PMB” or other software by using the “PMB Launcher.” Double-click the “PMB Launcher” short-cut icon on the computer screen to start “PMB Launcher.”
Confirm that your camcorder is not connected to the computer.
Turn on the computer.
Log on as an Administrator for installation.Close all applications running on the computer before installing the software.
Place the supplied CD-ROM in the disc drive of your computer.
The installation screen appears.If the screen does not appear, click [Start] [Computer] (in Windows XP, [My Computer]), then double-click [SONYPMB (E:)] (CD-ROM)*.
* Drive names (such as (E:)) may vary depending on the computer.
Click [Install].
Select the country or region.
Select the language for the application to be installed, then proceed to the next screen.
Read the terms of the license agreement carefully. If you agree to the terms, change to , and then click [Next] [Install].
Follow the instructions that appear on the computer screen to continue the installation.
You may be required to install some other applications included on the disc at the same time. If the installation display appears, follow the instructions that appear on the screen.When you are required to restart the computer, follow the instructions that appear on the screen and restart it.Connect the camcorder to the computer when you are instructed to do so.
Connect the camcorder to the computer using the Built-in USB Cable, then touch [USB Connect] on the LCD screen of the camcorder.
When the installation is completed, remove the CD-ROM from the computer.
Click (PMB icon) that appears on the desktop of the computer to start up the software.
“PMB” hoặc phần mềm khác bằng cách sử dụng “PMB Launcher”. Nhấp đúp vào biểu tượng “ PMB Launcher” trên màn hình máy tính để khởi động “ PMB Launcher”.

VN35
��GB
Preparing a computer (Windows)
Step 1 Checking the computer system
OS*1
Microsoft Windows XP SP3*2/Windows Vista SP2*3/Windows 7CPU*4
Intel Core Duo 1.66 GHz or faster, or Intel Core 2 Duo 1.66 GHz or faster (Intel Core 2 Duo 2.26 GHz or faster is required when processing FX or FH movies, and Intel Core 2 Duo 2.40 GHz or faster is required when processing PS movies.)However, Intel Pentium III 1 GHz or faster is sufficient for the following operations:
Importing the movies and photos to the computerOne Touch Disc BurnCreating a Blu-ray disc/AVCHD recording disc/DVD-video (Intel Core Duo 1.66 GHz or faster is required when creating a DVD video by converting high definition image quality (HD) to standard definition image quality (STD).)Copying a discProcessing only the movies with standard definition image quality (STD)
ApplicationDirectX 9.0c or later (This product is based on DirectX technology. It is necessary to have DirectX installed.)MemoryFor Windows XP: 512 MB or more (1 GB or more is recommended.) However, 256 MB or more is sufficient for processing only the movies with standard definition image quality (STD).For Windows Vista/Windows 7: 1 GB or moreHard diskDisk volume required for installation: Approximately 500 MB (10 GB or more may be necessary when creating AVCHD recording discs. 50 GB maximum may be necessary when creating Blu-ray discs.)
DisplayMinimum 1,024 × 768 dotsOthersUSB port (this must be provided as standard, Hi-Speed USB (USB 2.0 compatible)), Blu-ray disc/DVD burner (CD-ROM drive is necessary for installation) Either NTFS or exFAT file system is recommended as the hard disk file system.
*1 Standard installation is required. Operation is not assured if the OS has been upgraded or in a multi-boot environment.
*2 64-bit editions and Starter (Edition) are not supported. Windows Image Mastering API (IMAPI) Ver.2.0 or newer is required to use disc creation function, etc.
*3 Starter (Edition) is not supported.*4 Faster processor is recommended.
NotesOperation with all computer environments is not assured.
When using a MacintoshThe supplied software “PMB” is not supported by Macintosh computers. To import the movies and photos to the computer, please contact Apple Inc.
Step 2 Installing the supplied software “PMB”
Install “PMB” before connecting your camcorder to a computer.
NotesIf a version of “PMB” under 5.0.00 has been installed on your computer, you may be unable to use some functions of those “PMB” when installing the “PMB” from the supplied CD-ROM. Also, “PMB Launcher” is installed from
*1Cài đặt tiêu chuẩn được yêu cầu. Hoạt động không đảm bảo nếu hệ điều hành đã được nâng cấp hoặc trong một môi trường đa khởi động.*2 Phiên bản 2 64-bit và Starter (Phiên bản) không được hỗ trợ. Windows Image Mastering API (IMAPI) phiên bản 2.0 hoặc mới hơn là cần thiết để sử dụng chức năng tạo đĩa, vv*3 Starter (Phiên bản) không được hỗ trợ.*4 Bộ vi xử lý nhanh hơn được khuyên dùng.
• Hoạt động với tất cả các môi trường máy tính không được đảm bảo.
Cài đặt “PMB” trước khi kết nối máy quay của bạn vào máy tính.
Nếu một phiên bản của “PMB” dưới 5.0.00 đã được cài đặt trên máy tính của bạn, bạn có thể không sử dụng được một số chức năng của các “PMB” khi cài đặt “PMB” từ CD-ROM kèm theo.Ngoài ra, “ PMB Launcher “ được cài đặt từ đĩa CD-ROM kèm theo và bạn có thể khởi động
��GB
Saving movies and photos w
ith a computer
the supplied CD-ROM and you can start “PMB” or other software by using the “PMB Launcher.” Double-click the “PMB Launcher” short-cut icon on the computer screen to start “PMB Launcher.”
Confirm that your camcorder is not connected to the computer.
Turn on the computer.
Log on as an Administrator for installation.Close all applications running on the computer before installing the software.
Place the supplied CD-ROM in the disc drive of your computer.
The installation screen appears.If the screen does not appear, click [Start] [Computer] (in Windows XP, [My Computer]), then double-click [SONYPMB (E:)] (CD-ROM)*.
* Drive names (such as (E:)) may vary depending on the computer.
Click [Install].
Select the country or region.
Select the language for the application to be installed, then proceed to the next screen.
Read the terms of the license agreement carefully. If you agree to the terms, change to , and then click [Next] [Install].
Follow the instructions that appear on the computer screen to continue the installation.
You may be required to install some other applications included on the disc at the same time. If the installation display appears, follow the instructions that appear on the screen.When you are required to restart the computer, follow the instructions that appear on the screen and restart it.Connect the camcorder to the computer when you are instructed to do so.
Connect the camcorder to the computer using the Built-in USB Cable, then touch [USB Connect] on the LCD screen of the camcorder.
When the installation is completed, remove the CD-ROM from the computer.
Click (PMB icon) that appears on the desktop of the computer to start up the software.
“PMB” hoặc phần mềm khác bằng cách sử dụng “PMB Launcher”. Nhấp đúp vào biểu tượng “ PMB Launcher” trên màn hình máy tính để khởi động “ PMB Launcher”.
Thực hiện theo các hướng dẫn hiển thị trên màn hình máy tính để tiếp tục cài đặt.
Bạn có thể phải cài đặt một sốcác ứng dụng khác kèm theo trên đĩa cùng một lúc. Nếu màn hình cài đặtxuất hiện, thực hiện theo các hướng dẫn hiển thị trên màn hình.Khi bạn được yêu cầu khởi động lạimáy tính, hãy làm theo các hướng dẫn
Đặt đĩa CD-ROM kem theo vào ổ đĩa máy tính của bạn.
Nhấp [Install].
Chọn nước hoặc khu vực.
Chọn ngôn ngữ cho ứng dụng sẽ được cài đặt, sau đó chuyển tới màn hình kế tiếp.
Hãy đọc các điều khoản của giấy phép thỏa thuận một cách cẩn thận. Nếu bạn đồng ý với các điều khoản, đổi thành sau đó nhấp [Next] [Install].
Bật máy tính.
Đảm bảo rằng máy quay của bạn không được kết nối với máy tính.
Đăng nhập vào với tư cách quản trị đểcài đặt.Đóng tất cả các ứng dụng chạy trênmáy tính trước khi cài đặt phần mềm.
Nếu màn hình không xuất hiện, nhấp vào[Start] [Computer] (trong WindowsXP, [My Computer]), sau đó kích đúp[SONYPMB (E:)] (CD-ROM) *.Tên ổ đĩa (như (E:)) có thể khác nhautùy thuộc vào máy tính.
Màn hình cài đặt xuất hiện.
xuất hiện trên màn hình và khởi động lại.
Kết nối máy quay với máy tínhkhi bạn được hướng dẫn làm như vậy.
Kết nối máy quay tới máy tính sử dụng cáp USB tích hợp bên trong, sau đó chạm [USB Con-nect] trên màn hình LCD của máy quay.
Khi cài đặt xong, tháo đĩa CD-ROM khỏi máy tính.
Nhấp (biểu tượng PMB) xuất hiện trênmàn hình máy tính để khởi động phần mềm.
Lưu phim
và hình ảnh trong máy tính

VN36
��GB
NotesTo create discs or use other functions on Windows XP, Image Mastering API v2.0 for Windows XP should be installed. If Image Mastering API v2.0 for Windows XP has not been installed yet, select it from required programs on the installation screen and install it following the procedures displayed. (The computer must be connected to the internet for the installation.) You may install Image Mastering API v2.0 for Windows XP in response to the message displayed when you try to start those functions.Operation is not guaranteed if you read or write video data from or to the camcorder using software other than the supplied “PMB.” For the information on the compatibility of the software you are using, consult the manufacturer of the software.
To disconnect your camcorder from the computer Click the icon at the bottom right of the
desktop of the computer [Safely remove USB Mass Storage Device].
Touch [Cancel] [Yes] on the camcorder screen.
Disconnect the USB cable.If you are using Windows 7, the icon may not appear on the desktop of the computer. In this case, you can disconnect the camcorder from your computer without following the procedures described above.
NotesDo not format the internal recording media of the camcorder using a computer. If you do this, the camcorder will not operate correctly.Do not insert AVCHD recording discs that have been created using the “PMB” software to DVD players or recorders, as these devices do not support the AVCHD standard. If you do, you
may not be able to remove the disc from these devices.This camcorder captures high definition footage in the AVCHD format. Using the enclosed PC software, high definition footage can be copied onto DVD media. However, DVD media containing AVCHD footage should not be used with DVD based players or recorders, as the DVD player/recorder may fail to eject the media and may erase its contents without warning.When you access the camcorder from the computer, use the supplied software “PMB” or the pre-installed software “PMB Portable.” Do not modify the files or folders on the camcorder from the computer. The image files may be damaged or may not be played back.Operation is not guaranteed, if you operate the data on the camcorder from the computer.The camcorder automatically divides an image file that exceeds 2 GB or larger and saves the parts as separate files. All image files may be shown as separate files on a computer, however, the files will be handled properly by the import function of the camcorder or the “PMB” software, and also by the playback function of the “PMB Portable” software.Use the supplied “PMB” software when you import long movies or edited images from the camcorder to a computer. If you use other software, the images may not be imported correctly.When you delete image files, follow the steps on page 32.You can create a Blu-ray disc by using a computer with a Blu-ray disc burner. Install the BD Add-on Software for “PMB.”
Để tạo đĩa hoặc sử dụng các chức năng khác trên Windows XP, Image Mastering API v2.0 cho Windows XP cần được cài đặt. Nếu Image Mastering API v2.0 cho Windows XP chưa được cài đặt, hãy chọn nó từ các chương trình yêu cầu trên màn hình cài đặt và cài đặt nó theo các bước hiển thị. (Máy tính phải được kết nối với internet để cài đặt). Bạn có thể cài đặt Image Mastering API v2.0 cho Windows XP lúc đáp lại thông báo hiển thị khi bạn cố khởi động những chức năng này.
Không đảm bảo hoạt động nếu bạn đọc hoặc ghi dữ liệu video từ hoặc tới máy quay sử dụng các phần mềm khác ngoài “PMB” kèm theo. Thông tin về tính tương thích của phần mềm bạn đang sử dụng, tham khảo ý kiến các nhà sản xuất phần mềm.
• Không định dạng phương tiện ghi bên trong của máy quay sử dụng máy tính. Nếu bạn định dạng, máy quay sẽ không hoạt động đúng cách. • Không chèn đĩa AVCHD được tạo ra bằng cách sử dụng phần mềm PMB cho máy ghi và máy phát, vì những thiết bị này không hỗ trợ tiêu chuẩn AVCHD. Nếu bạn làm như vậy, có thể bạn sẽ không lấy được đĩa ra khỏi thiết bị.
Nhấp vào biểu tượng ở đáy bên phải của màn hình máy tính [Safely remove USB Mass Storage Device].
Nếu bạn đang sử dụng Windows 7, biểu tượng có thể không xuất hiện trên màn hình của máy tính. Trong trường hợp này, bạn có thể ngắt kết nối với máy quay khỏi máy tính của bạn mà không theo các bước được mô tả ở trên.
Máy quay này ghi lại cảnh quay độ nét cao trong định dạng AVCHD. Sử dụng phần mềm máy tính kèm theo, cảnh quay độ nét cao có thể được sao chép vào đĩa DVD. Tuy nhiên, bộ nhớ DVD chứa cảnh quay AVCHD không được sử dụng với đầu DVD hay trên máy ghi âm bởi vì đầu chạy/ghi DVD có thể không nhả đĩa ra và có thể xóa nội dung của nó mà không cảnh báo.
Hoạt động không được bảo đảm nếu bạn xử lí dữ liệu trên máy quay từ máy tính.Máy sẽ tự động phân chia một tập tin hình ảnh vượt quá 2 GB hoặc lớn hơn và lưu các phần như các tập tin riêng biệt. Tất cả các tập tin hình ảnh có thể được hiển thị như các tập tin riêng biệt trên máy tính, tuy nhiên, các tập tin sẽ được xử lý đúng theo chức năng nhập tin của máy quay hay phần mềm “PMB” và đồng thời bởi chức năng phát lại của phần mềm “PMB Portable”.
Sử dụng phần mềm “PMB” kèm theo khi bạn nhập những phim dài hay hình ảnh đã được chỉnh sửa từ máy quay vào máy tính. Nếu bạn sử dụng phần mềm khác, các hình ảnh có thể không được nhập vào chính xác.
Khi bạn xóa các tập tin hình ảnh, làm theo các bước trong trang 32.Bạn có thể tạo một đĩa Blu-ray bằng cách sử dụng máy tính với một ổ ghi đĩa Blu-ray. Cài đặt Phần mềm BD thêm vào cho “PMB”.
Khi bạn truy cập vào máy quay từmáy tính, sử dụng phần mềm “PMB” kèm theo hoặc phần mềm “PMB Portable” cài đặt sẵn. Không sửa đổi các tập tin hoặc thư mục trên máy quay từ máy tính. Các tập tin hình ảnh có thể bị hỏng hoặc không thể được phát lại.
Chạm [Cancel] [Yes] trên màn hình máy quay.Tháo cáp USB.
Để ngắt kết nối máy quay của bạn khỏimáy tính
Chú ý
Chú ý
��GB
Saving movies and photos w
ith a computer
Starting PMB (Picture
Motion Browser)
1 Double-click the “PMB” short-cut icon on the computer screen.
The PMB software starts up.
2 Double-click the “PMB Help” short-cut icon on the computer screen to see how to use “PMB.”
NotesIf the icon is not displayed on the computer screen, click [Start] [All Programs] [ PMB] the desired item.
TipsDouble-click “PMB Launcher” on the desktop of the computer. This allows you to start the desired function (application) by selecting one from a list of “PMB” functions.
Uploading images to a network serviceThe application software “PMB Portable” is pre-installed in the camcorder. You can enjoy the following functions using the “PMB Portable.”
Uploading images to network services such as blogs with easeUploading by a network connected computer while away from homeRegister network services (such as blogs) to use frequently
Click the [Help] button on the upper right of the computer screen after the “PMB Portable” software starts up, and then you can view the details on how to use the software.
Starting up “PMB Portable”
Turn on your camcorder, then connect the camcorder to the computer using the Built-in USB Cable.
The [USB Select] screen appears on the camcorder screen.

VN37
��GB
NotesTo create discs or use other functions on Windows XP, Image Mastering API v2.0 for Windows XP should be installed. If Image Mastering API v2.0 for Windows XP has not been installed yet, select it from required programs on the installation screen and install it following the procedures displayed. (The computer must be connected to the internet for the installation.) You may install Image Mastering API v2.0 for Windows XP in response to the message displayed when you try to start those functions.Operation is not guaranteed if you read or write video data from or to the camcorder using software other than the supplied “PMB.” For the information on the compatibility of the software you are using, consult the manufacturer of the software.
To disconnect your camcorder from the computer Click the icon at the bottom right of the
desktop of the computer [Safely remove USB Mass Storage Device].
Touch [Cancel] [Yes] on the camcorder screen.
Disconnect the USB cable.If you are using Windows 7, the icon may not appear on the desktop of the computer. In this case, you can disconnect the camcorder from your computer without following the procedures described above.
NotesDo not format the internal recording media of the camcorder using a computer. If you do this, the camcorder will not operate correctly.Do not insert AVCHD recording discs that have been created using the “PMB” software to DVD players or recorders, as these devices do not support the AVCHD standard. If you do, you
may not be able to remove the disc from these devices.This camcorder captures high definition footage in the AVCHD format. Using the enclosed PC software, high definition footage can be copied onto DVD media. However, DVD media containing AVCHD footage should not be used with DVD based players or recorders, as the DVD player/recorder may fail to eject the media and may erase its contents without warning.When you access the camcorder from the computer, use the supplied software “PMB” or the pre-installed software “PMB Portable.” Do not modify the files or folders on the camcorder from the computer. The image files may be damaged or may not be played back.Operation is not guaranteed, if you operate the data on the camcorder from the computer.The camcorder automatically divides an image file that exceeds 2 GB or larger and saves the parts as separate files. All image files may be shown as separate files on a computer, however, the files will be handled properly by the import function of the camcorder or the “PMB” software, and also by the playback function of the “PMB Portable” software.Use the supplied “PMB” software when you import long movies or edited images from the camcorder to a computer. If you use other software, the images may not be imported correctly.When you delete image files, follow the steps on page 32.You can create a Blu-ray disc by using a computer with a Blu-ray disc burner. Install the BD Add-on Software for “PMB.”
Máy quay này ghi lại cảnh quay độ nét cao trong định dạng AVCHD. Sử dụng phần mềm máy tính kèm theo, cảnh quay độ nét cao có thể được sao chép vào đĩa DVD. Tuy nhiên, bộ nhớ DVD chứa cảnh quay AVCHD không được sử dụng với đầu DVD hay trên máy ghi âm bởi vì đầu chạy/ghi DVD có thể không nhả đĩa ra và có thể xóa nội dung của nó mà không cảnh báo.
Hoạt động không được bảo đảm nếu bạn xử lí dữ liệu trên máy quay từ máy tính.Máy sẽ tự động phân chia một tập tin hình ảnh vượt quá 2 GB hoặc lớn hơn và lưu các phần như các tập tin riêng biệt. Tất cả các tập tin hình ảnh có thể được hiển thị như các tập tin riêng biệt trên máy tính, tuy nhiên, các tập tin sẽ được xử lý đúng theo chức năng nhập tin của máy quay hay phần mềm “PMB” và đồng thời bởi chức năng phát lại của phần mềm “PMB Portable”.
Sử dụng phần mềm “PMB” kèm theo khi bạn nhập những phim dài hay hình ảnh đã được chỉnh sửa từ máy quay vào máy tính. Nếu bạn sử dụng phần mềm khác, các hình ảnh có thể không được nhập vào chính xác.
Khi bạn xóa các tập tin hình ảnh, làm theo các bước trong trang 32.Bạn có thể tạo một đĩa Blu-ray bằng cách sử dụng máy tính với một ổ ghi đĩa Blu-ray. Cài đặt Phần mềm BD thêm vào cho “PMB”.
Khi bạn truy cập vào máy quay từmáy tính, sử dụng phần mềm “PMB” kèm theo hoặc phần mềm “PMB Portable” cài đặt sẵn. Không sửa đổi các tập tin hoặc thư mục trên máy quay từ máy tính. Các tập tin hình ảnh có thể bị hỏng hoặc không thể được phát lại.
��GB
Saving movies and photos w
ith a computer
Starting PMB (Picture
Motion Browser)
1 Double-click the “PMB” short-cut icon on the computer screen.
The PMB software starts up.
2 Double-click the “PMB Help” short-cut icon on the computer screen to see how to use “PMB.”
NotesIf the icon is not displayed on the computer screen, click [Start] [All Programs] [ PMB] the desired item.
TipsDouble-click “PMB Launcher” on the desktop of the computer. This allows you to start the desired function (application) by selecting one from a list of “PMB” functions.
Uploading images to a network serviceThe application software “PMB Portable” is pre-installed in the camcorder. You can enjoy the following functions using the “PMB Portable.”
Uploading images to network services such as blogs with easeUploading by a network connected computer while away from homeRegister network services (such as blogs) to use frequently
Click the [Help] button on the upper right of the computer screen after the “PMB Portable” software starts up, and then you can view the details on how to use the software.
Starting up “PMB Portable”
Turn on your camcorder, then connect the camcorder to the computer using the Built-in USB Cable.
The [USB Select] screen appears on the camcorder screen.
Khởi động PMB (Picture Motion Browser)
Tải hình ảnh lên một dịch vụ mạng
Nhấp đúp vào biểu tượng “PMB” trên màn hình máy tính.
Nhấp đúp vào biểu tượng “PMB Help“ trên màn hình máy tính để xem cách sử dụng “PMB”.
Khởi động “PMB Portable”
Chú ý
Phần mềm PMB khởi động.
Mẹo nhỏ
Nếu biểu tượng không hiển thị trên màn hình máy tính, nhấp [Start] [All Programs]
[ PMB] mục mong muốn.
Nhấp đúp “PMB Launcher “ trên màn hình của máy tính. Điều này cho phép bạn khởi động chức năng mong muốn (ứng dụng) bằng cách chọn một từ danh sách các chức năng của “PMB”.
Phần mềm ứng dụng “PMB Portable”được cài đặt sẵn trong máy quay. Bạn có thể tận hưởng những chức năng sau đây khi dùng “PMB Portable”.
Tải hình ảnh lên các dịch vụ mạng như blog một cách dễ dàngTải lên bởi một máy tính kết nối mạng trong khi xa nhà
Nhấp vào nút [Help] ở phía trên bên phải của màn hình máy tính sau khi phần mềm PMB Portable “ khởi động, sau đó bạn có thể xem chi tiết về cách sử dụng phần mềm.
Đăng ký dịch vụ mạng (như blog) để sử dụng thường xuyên
Màn hình [USB Select] xuất hiện trên màn hình máy quay.
Bật máy quay của bạn, sau đókết nối máy quay tới máy tính sử dụng cáp USB tích hợp trong.
Lưu phim
và hình ảnh trong máy tính
��GB
Saving movies and photos w
ith a computer
Starting PMB (Picture
Motion Browser)
1 Double-click the “PMB” short-cut icon on the computer screen.
The PMB software starts up.
2 Double-click the “PMB Help” short-cut icon on the computer screen to see how to use “PMB.”
NotesIf the icon is not displayed on the computer screen, click [Start] [All Programs] [ PMB] the desired item.
TipsDouble-click “PMB Launcher” on the desktop of the computer. This allows you to start the desired function (application) by selecting one from a list of “PMB” functions.
Uploading images to a network serviceThe application software “PMB Portable” is pre-installed in the camcorder. You can enjoy the following functions using the “PMB Portable.”
Uploading images to network services such as blogs with easeUploading by a network connected computer while away from homeRegister network services (such as blogs) to use frequently
Click the [Help] button on the upper right of the computer screen after the “PMB Portable” software starts up, and then you can view the details on how to use the software.
Starting up “PMB Portable”
Turn on your camcorder, then connect the camcorder to the computer using the Built-in USB Cable.
The [USB Select] screen appears on the camcorder screen.

VN38��GB
If the AutoPlay wizard does not appear when you are using Windows XP or Windows Vista, click [Start] [Computer] (in Windows XP, [My Computer]) [PMBPORTABLE], then double click [PMBP_Win.exe].If the “Device Stage” does not start up when you are using Windows 7, click [Start], then double click the camera icon for this camcorder the medium icon on which the desired images are stored [APPLICATION] [PMBP_MTP.exe].If you are using Windows 7, the Device Stage start-up window (which does not contain the information about the specific device) may appear, depending on the computer settings. In such a case, follow the instructions on the screen and download the latest information about the system.If you are using Windows 7, the [USB Connect Setting] (USB transfer mode) will be changed to [Mass Storage] automatically when you start up “PMB Portable.”When you upload images via Internet, as in the case of with the camcorder, cache files may be stored in the computer you are using depending on the service provider to upload the image to.If a problem occurs to “PMB Portable” or if you wrongly delete the software, you can download the “PMB Portable” installer from the Web to repair.
Touch [USB Connect] on the camcorder screen.
When using Windows 7: The Device Stage* window opens.When using Windows XP/Windows Vista: The AutoPlay wizard is displayed.
If the[USB Select] screen does not appear, touch (MENU) [Setup] [ (Connection)] [USB Connect].
* “Device Stage” is a menu of Windows 7, that is used to manage devices (camcorder, camera, etc.) that are connected to the computer.
Click “PMB Portable.”
The license agreement screen appears.
Select the desired language and click [OK].
The area select screen appears.
Select [Region] and [Country/Area] and click [OK].
The license agreement screen appears.
Read the agreement well and click [I Agree].
“PMB Portable” starts up.
NotesWhen using “PMB Portable,” make sure to connect the camcorder to the network.Set [USB LUN Setting] to [Multi] (p. 54).If the “PMB Portable” does not start up, set [USB Connect Setting] to [Mass Storage] (p. 54) and try reconnecting.
��GB
Saving movies and photos w
ith a computer
Notes on “PMB Portable”
You can download the URLs of some websites from a server administered by Sony (hereinafter referred to as the “Sony server”) using “PMB Portable.”You must agree to the following in order to utilize the image uploading service (herein after referred to as “the service”) provided by various websites including those using “PMB Portable.”
Depending on the website, registration and fees may be required for use of the service. Use the service in accordance with the terms stipulated by the website.The service can be suspended or altered without notice by the website organizer. In these, as well as other cases, Sony shall not be liable in any way for any loss, damages or trouble between you and a third party which arose from the use of the service.You will be redirected to the websites by the Sony server. However, you may not be able to access the websites for some reason such as server maintenance.If Sony decides to terminate server operation, it will be announced in advance on Sony’s website, etc.Such information as URL address of the site you are redirected to from the Sony server may be recorded in order to improve products and services Sony offers in the future. However, personal information will not be recorded.
Chạm [USB Connect] trên màn hình máy quay.
Nhấp vào “PMB Portable.”Màn hình thỏa thuận cấp phép xuất hiện.
Chọn ngôn ngữ mong muốn vànhấp [OK].Màn hình chọn khu vực sẽ xuất hiện.
Chọn [Region] và [Country/Area] và nhấp [OK].Màn hình thỏa thuận cấp phép xuất hiện.
Đọc thỏa thuận kĩ càng và nhấp vào [I Agree].“PMB Portable” sẽ khởi động.
Khi sử dụng Windows 7: Cửa sổ DeviceStage*sẽ mở ra.Khi sử dụng Windows XP / WindowsVista: Phần AutoPlay sẽ hiển thị.
Khi sử dụng “PMB Portable,” hãy đảm bảo kết nối máy quay vào mạng.Đặt [USB LUN Setting] ở [Multi] (tr. 54).Nếu “PMB Portable” không khởi động, cài đặt [USB Connect Setting] ở [Mass Storage] (tr.54) và thử kết nối lại.
Nếu trình hướng dẫn AutoPlay không xuất hiện khi bạn đang sử dụng Windows XP hoặc Windows Vista, hãy nhấp vào [Start]
[Computer] (trong Windows XP, [My Computer]) [PMBPORTABLE], sau đó kích đúp vào [PMBP_Win.exe].Nếu các “ Device Stage “ không khởi động khi bạn đang sử dụng Windows 7, nhấp [Start] sau đó kích đúp vào biểu tượng máy ảnh cho máy quay này biểu tượng trung gian trên đó những hình ảnh mong muốn được lưu trữ
[APPLICATION] [PMBP_MTP.exe].
Nếu bạn đang sử dụng Windows 7, cửa sổ Device Stage khởi động (không bao gồm thông tin về thiết bị cụ thể) có thể xuất hiện, tùy thuộc vào cài đặt máy tính.Trong trường hợp này, hãy làm theo các hướng dẫn trên màn hình và tải xuống thông tin mới nhất về hệ thống.Nếu bạn đang sử dụng Windows 7, [USB Connect Setting] (chế độ chuyển USB) sẽ tự động đổi thành [Mass Storage] khi bạn khởi động “PMB Portable.”
Khi bạn tải hình ảnh lên thông qua Internet, trong trường hợp với máy quay, các tập tin cache có thể được lưu trữ trong máy tính bạn đang sử dụng tùy thuộc vào nhà cung cấp dịch vụ để tải các hình ảnh lên.Nếu có vấn đề xảy ra với “PMB Portable” hoặc nếu bạn xóa nhầm phần mềm, bạn có thể tải bộ cài đặt “PMB Portable” từ trên mạng để sửa.
Nếu màn hình [USB Select] không xuất hiện, chạm nút (MENU) [Setup]
[ (Connection)] [USB Connect].“Device Stage”là một thư mục của Windows 7 được sử dụng để quản lý thiết bị (máy quay, máy ảnh, vv) được kết nối với máy tính.
Chú ý

VN39
��GB
If the AutoPlay wizard does not appear when you are using Windows XP or Windows Vista, click [Start] [Computer] (in Windows XP, [My Computer]) [PMBPORTABLE], then double click [PMBP_Win.exe].If the “Device Stage” does not start up when you are using Windows 7, click [Start], then double click the camera icon for this camcorder the medium icon on which the desired images are stored [APPLICATION] [PMBP_MTP.exe].If you are using Windows 7, the Device Stage start-up window (which does not contain the information about the specific device) may appear, depending on the computer settings. In such a case, follow the instructions on the screen and download the latest information about the system.If you are using Windows 7, the [USB Connect Setting] (USB transfer mode) will be changed to [Mass Storage] automatically when you start up “PMB Portable.”When you upload images via Internet, as in the case of with the camcorder, cache files may be stored in the computer you are using depending on the service provider to upload the image to.If a problem occurs to “PMB Portable” or if you wrongly delete the software, you can download the “PMB Portable” installer from the Web to repair.
Touch [USB Connect] on the camcorder screen.
When using Windows 7: The Device Stage* window opens.When using Windows XP/Windows Vista: The AutoPlay wizard is displayed.
If the[USB Select] screen does not appear, touch (MENU) [Setup] [ (Connection)] [USB Connect].
* “Device Stage” is a menu of Windows 7, that is used to manage devices (camcorder, camera, etc.) that are connected to the computer.
Click “PMB Portable.”
The license agreement screen appears.
Select the desired language and click [OK].
The area select screen appears.
Select [Region] and [Country/Area] and click [OK].
The license agreement screen appears.
Read the agreement well and click [I Agree].
“PMB Portable” starts up.
NotesWhen using “PMB Portable,” make sure to connect the camcorder to the network.Set [USB LUN Setting] to [Multi] (p. 54).If the “PMB Portable” does not start up, set [USB Connect Setting] to [Mass Storage] (p. 54) and try reconnecting.
��GB
Saving movies and photos w
ith a computer
Notes on “PMB Portable”
You can download the URLs of some websites from a server administered by Sony (hereinafter referred to as the “Sony server”) using “PMB Portable.”You must agree to the following in order to utilize the image uploading service (herein after referred to as “the service”) provided by various websites including those using “PMB Portable.”
Depending on the website, registration and fees may be required for use of the service. Use the service in accordance with the terms stipulated by the website.The service can be suspended or altered without notice by the website organizer. In these, as well as other cases, Sony shall not be liable in any way for any loss, damages or trouble between you and a third party which arose from the use of the service.You will be redirected to the websites by the Sony server. However, you may not be able to access the websites for some reason such as server maintenance.If Sony decides to terminate server operation, it will be announced in advance on Sony’s website, etc.Such information as URL address of the site you are redirected to from the Sony server may be recorded in order to improve products and services Sony offers in the future. However, personal information will not be recorded.
Nếu trình hướng dẫn AutoPlay không xuất hiện khi bạn đang sử dụng Windows XP hoặc Windows Vista, hãy nhấp vào [Start]
[Computer] (trong Windows XP, [My Computer]) [PMBPORTABLE], sau đó kích đúp vào [PMBP_Win.exe].
Bạn có thể tải các URL của một số trang web từ một máy chủ quản lý bởi Sony (sau đây gọi tắt là “máy chủ Sony”) bằng cách sử dụng “PMB Portable.” Bạn phải đồng ý những điều sau đây để sử dụng các dịch vụ tải hình ảnh (sau đây được gọi là “dịch vụ”) cung cấp bởi trang web khác nhau bao gồm cả những trang sử dụng “PMB Portable”.
• Tùy thuộc vào trang web, đăng ký và lệ phí có thể được yêu cầu cho việc sử dụng dịch vụ. Sử dụng dịch vụ theo các điều khoản quy định bởi trang web.• Dịch vụ này có thể bị đình chỉ hoặc sửa đổi không cần thông báo bởi tổ chức trang web. Trong trường hợp này, cũng như các trường hợp khác, Sony sẽ không chịu bất kỳ trách nhiệm nào cho bất kỳ tổn thất, thiệt hại hoặc sự cố giữa bạn và bên thứ ba phát sinh từ việc sử dụng dịch vụ.• Bạn sẽ được chuyển đến các trang web bởi máy chủ Sony. Tuy nhiên, bạn có thể không truy cập được các trang web vì một số lý do như bảo trì máy chủ.• Nếu Sony quyết định chấm dứt hoạt động máy chủ, điều này sẽ được công bố trước trên trang web của Sony, v.v…• Những thông tin như địa chỉ URL của các trang web mà bạn được chuyển hướng đến từ máy chủ Sony có thể được ghi lại nhằm cải tiến sản phẩm và dịch vụ Sony cung cấp trong tương lai. Tuy nhiên, thông tin cá nhân sẽ không được ghi lại.
Nếu các “ Device Stage “ không khởi động khi bạn đang sử dụng Windows 7, nhấp [Start] sau đó kích đúp vào biểu tượng máy ảnh cho máy quay này biểu tượng trung gian trên đó những hình ảnh mong muốn được lưu trữ
[APPLICATION] [PMBP_MTP.exe].
Nếu bạn đang sử dụng Windows 7, cửa sổ Device Stage khởi động (không bao gồm thông tin về thiết bị cụ thể) có thể xuất hiện, tùy thuộc vào cài đặt máy tính.Trong trường hợp này, hãy làm theo các hướng dẫn trên màn hình và tải xuống thông tin mới nhất về hệ thống.Nếu bạn đang sử dụng Windows 7, [USB Connect Setting] (chế độ chuyển USB) sẽ tự động đổi thành [Mass Storage] khi bạn khởi động “PMB Portable.”
Khi bạn tải hình ảnh lên thông qua Internet, trong trường hợp với máy quay, các tập tin cache có thể được lưu trữ trong máy tính bạn đang sử dụng tùy thuộc vào nhà cung cấp dịch vụ để tải các hình ảnh lên.Nếu có vấn đề xảy ra với “PMB Portable” hoặc nếu bạn xóa nhầm phần mềm, bạn có thể tải bộ cài đặt “PMB Portable” từ trên mạng để sửa.
Chú ý đối với “PMB Portable”
Lưu phim
và hình ảnh trong máy tính

VN40�0GB
Saving images with an external device
Selecting a method for saving images with an external deviceYou can save high definition image quality (HD) movies using an external device. Select the method to be used according to the device.
External devices Connecting cable Page
External media deviceSaving images on an external media device with high definition image quality (HD).
USB Adapter cable VMC-UAM1 (sold separately)
42
DVDirect Express DVD writerSaving images on a DVD disc with high definition image quality (HD).
Built-in USB cable of the DVDirect Express 45
DVD writer other than DVDirect ExpressSaving images on a DVD disc with high definition image quality (HD) or with standard definition image quality (STD).
Built-in USB Cable 48
Hard disk recorder, etc. Saving images on a DVD disc with standard definition image quality (STD).
A/V connecting cable (supplied) 49
Movies that are recorded with standard definition image quality (STD)Use the A/V connecting cable to connect the camcorder to an external device in which images are saved.
NotesThe AVCHD recording disc can be played back only on AVCHD format compatible devices.Discs with high definition image quality (HD) images recorded should not be used in DVD players/recorders. Because DVD players/recorders are not compatible with the AVCHD format, DVD players/recorders may fail to eject the disc.Delete the demonstration movie when copying or creating discs. If it is not deleted, the camcorder may not operate correctly. However, you cannot recover the demonstration movie once you delete it.
Lưu hình ảnh với thiết bị ngoài
Thiết bị ngoài Kết nối cáp Trang
Chọn một phương pháp để lưu hình ảnh với thiết bị ngoài
Bạn có thể lưu phim chất lượng độ nét cao (HD) bằng cách sử dụng một thiết bị ngoài. Chọn phương pháp sẽ dùng tùy theo thiết bị.
Thiết bị truyền thông ngoàiLưu hình ảnh trên thiết bị truyền thông ngoài với chất lượng độ nét cao (HD).
Đầu ghi đĩa DVDirect Express DVDLưu hình ảnh trên đĩa DVDvới chất lượng hình ảnh độ nét cao (HD).
Đầu ghi đĩa DVD khác DVDirect ExpressLưu hình ảnh trên một DVDvới chất lượng hình ảnh độ nét cao (HD) hoặc với chất lượng hình ảnh độ nét tiêu chuẩn(STD).
Thiết bị ghi ổ cứng, vvLưu hình ảnh trên một đĩa DVDvới hình ảnh độ nét tiêu chuẩnchất lượng (STD).
Phim được ghi với chất lượng hình ảnh độ nét tiêu chuẩn (STD)Sử dụng cáp kết nối A/V để kết nối máy quay tới một thiết bị ngoài trong đó hình ảnh được lưu.
Cáp chuyển đổi USBVMC-UAM1 (bán riêng)
Cáp USB tích hợp trong của DVDirect Express 45
Cáp USB tích hợp trong
Cáp kết nối A/V (kem theo)
�1GB
Saving images w
ith an external device
The types of media on which images are savedRefer to “Selecting the recording mode” on page 24.
The devices on which the created disc can be played back
DVD disc with high definition image quality (HD)AVCHD format playback devices, such as a Sony Blu-ray disc player or a PlayStation3.
DVD disc with standard definition image quality (STD)Ordinary DVD playback devices, such as a DVD player.
NotesAlways maintain your PlayStation3 to use the latest version of the PlayStation3 system software.The PlayStation3 may not be available in some countries/regions.
• Đĩa ghi AVCHD có thể được phát lại chỉ trên các thiết bị định dạng AVCHD tương thích.• Đĩa với hình ảnh chất lượng ảnh độ nét cao (HD) được ghi lại không nên dùng trong đầu đĩa/máy ghi DVD. Bởi vì đầu đĩa/máy ghi không tương thích với định dạng AVCHD, đầu đĩa/ máy ghi DVD có thể không nhả đĩa ra.• Xóa phim minh họa khi sao chép hoặc tạo đĩa. Nếu không bị xóa, máy quay có thể không hoạt động chính xác. Tuy nhiên, bạn không thể phục hồi phim minh họa một khi bạn xóa nó.
Chú ý

VN41�0
GB
Saving images with an external device
Selecting a method for saving images with an external deviceYou can save high definition image quality (HD) movies using an external device. Select the method to be used according to the device.
External devices Connecting cable Page
External media deviceSaving images on an external media device with high definition image quality (HD).
USB Adapter cable VMC-UAM1 (sold separately)
42
DVDirect Express DVD writerSaving images on a DVD disc with high definition image quality (HD).
Built-in USB cable of the DVDirect Express 45
DVD writer other than DVDirect ExpressSaving images on a DVD disc with high definition image quality (HD) or with standard definition image quality (STD).
Built-in USB Cable 48
Hard disk recorder, etc. Saving images on a DVD disc with standard definition image quality (STD).
A/V connecting cable (supplied) 49
Movies that are recorded with standard definition image quality (STD)Use the A/V connecting cable to connect the camcorder to an external device in which images are saved.
NotesThe AVCHD recording disc can be played back only on AVCHD format compatible devices.Discs with high definition image quality (HD) images recorded should not be used in DVD players/recorders. Because DVD players/recorders are not compatible with the AVCHD format, DVD players/recorders may fail to eject the disc.Delete the demonstration movie when copying or creating discs. If it is not deleted, the camcorder may not operate correctly. However, you cannot recover the demonstration movie once you delete it.
�1GB
Saving images w
ith an external device
The types of media on which images are savedRefer to “Selecting the recording mode” on page 24.
The devices on which the created disc can be played back
DVD disc with high definition image quality (HD)AVCHD format playback devices, such as a Sony Blu-ray disc player or a PlayStation3.
DVD disc with standard definition image quality (STD)Ordinary DVD playback devices, such as a DVD player.
NotesAlways maintain your PlayStation3 to use the latest version of the PlayStation3 system software.The PlayStation3 may not be available in some countries/regions.
Loại phương tiện trên đó hình ảnh được lưu lạiHãy tham khảo “Lựa chọn chế độ ghi” trong trang 24.
Đĩa DVD với chất lượng ảnh độ nét cao (HD)Các thiết bị phát lại định dạng AVCHD, chẳng hạn như máy đĩa Blu-ray Sony hoặc máy PlayStation ® 3.
Đĩa DVD với chất lượng hình ảnh độ nét tiêu chuẩn (STD)Thiết bị phát lại DVD thông thường, như một đầu DVD.
Thiết bị có thể phát lại đĩa được tạo
• Luôn duy trì máy PlayStation®3 của bạn sử dụng phần mềm hệ thống phiên bản mới nhất của PlayStation®3.• PlayStation ® 3 có thể không có tại một số quốc gia / khu vực.
Chú ý
Lưu hình ảnh với thiết bị ngoài

VN42��GB
Saving images on an external media deviceYou can save movies and photos on an external media device (USB storage devices), such as an external hard disk drive. You can also play back images on the camcorder or another playback device.
NotesFor this operation, you need the USB Adaptor Cable VMC-UAM1 (sold separately).The USB Adaptor Cable VMC-UAM1 may not be available in some countries/regions.Connect your camcorder to the wall outlet (wall socket) using the supplied AC Adaptor (p. 12).Refer to the instruction manual supplied with the external media device.
TipsYou can import images saved on the external media device to your computer by using the supplied software “PMB.”
Functions available after saving images on an external media device
playback of images through the camcorder (p. 44)importing images to “PMB”
Devices that cannot be used as an external media device
You cannot use the following devices as an external media device.
media devices with a capacity exceeding 2 TBordinary disc drive such as CD or DVD drivemedia devices connected via a USB hubmedia devices with built-in USB hubcard reader
NotesYou may not be able to use external media devices with a code function.The FAT file system is available for your camcorder. If the storage medium of the external device was formatted for the NTFS file system, etc., format the external media device using the camcorder before use. The format screen appears when an external media device is connected to your camcorder. Make sure that
important data has not previously been saved on the external media device before you format it using the camcorder.Operation is not assured with every device satisfying requirements for operating.For details on available external media devices, go to the Sony support website in your country/region.
1 Connect the AC Adaptor and the power cord (mains lead) to the DC IN jack of your camcorder and the wall outlet (wall socket).
2 If the external medium device has the AC power cable, connect it to the wall outlet (wall socket).
3 Connect the USB Adaptor Cable to the external media device.
4 Connect the USB Adaptor Cable to the (USB) jack of your camcorder.Make sure not to disconnect the USB cable while [Preparing image database file. Please wait.] is displayed on the LCD screen. If [Repair Img. DB F.] is displayed on the camcorder screen, touch .
Các chức năng xuất hiện sau khi lưu hình ảnh trên một thiết bị truyền thông ngoài
Các thiết bị không được sử dụng như là thiết bị truyền thông ngoài
Lưu hình ảnh trên một thiết bị truyền thông ngoài
Kết nối bộ chỉnh lưu AC và cácdây nguồn (dây chính) vào giắc DC IN máy quay của bạn và ổ cắm trên tường (ổ cắm điện).
Nếu thiết bị trung gian ngoàicó cáp điện AC, kết nối nó vào ổ cắm trên tường (ổ cắm điện).
Kết nối cáp bộ chỉnh lưu AC với các thiết bị truyền thông bên ngoài.
Kết nối cáp bộ chỉnh lưu USB vào giắc cắm (USB) của máy quay.
Bạn có thể lưu các bộ phim và hình ảnh trên một phương tiện truyền thông ngoài (thiết bị lưu trữ USB), chẳng hạn một ổ đĩa cứng rời. Bạn cũng có thể phát lại hình ảnh trên máy quay hay thiết bị phát lại khác.
• Đối với thao tác này, bạn cần có cáp bộ bộ chỉnh lưu AC USB VMC-UAM1 (bán riêng).• Cáp bộ chỉnh lưu AC USB VMC-UAM1 có thể không có tại một số quốc gia / khu vực.• Kết nối máy quay của bạn vào ổ cắm trên tường (ổ cắm điện) sử dụng bộ chỉnh lưu AC kèm theo (tr.12).• Tham khảo sách hướng dẫn kèm theo với các thiết bị truyền thông ngoài.
• Bạn có thể nhập hình ảnh lưu trên thiết bị truyền thông ngoài vào máy tính của bạn bằng cách sử dụng phần mềm “PMB” kèm theo.
• Bạn không thể sử dụng các thiết bị sau đây như là thiết bị truyền thông ngoài. - các thiết bị truyền thông có công suất quá 2 TB - ổ đĩa thông thường như ổ đĩa CD hoặc DVD - các thiết bị truyền thông được kết nối qua bộ chia USB - thiết bị truyền thông với bộ chia USB tích hợp trong- đầu đọc thẻ
Hãy đảm bảo cáp USB không bị ngắt trong khi [Preparing image database file. Please wait.] được hiển thị trên màn hình LCD. Nếu [Repair Img. DB F.] hiển thị trên màn hình máy quay, chạm nút .
bảo rằng dữ liệu quan trọng không được lưu trước đó trên thiết bị truyền thông ngoài trước khi bạn định dạng nó sử dụng máy quay.• Không đảm bảo hoạt động với mọi thiết bị đáp ứng yêu cầu vận hành. Để biết chi tiết về các thiết bị truyền thông ngoài sẵn có, truy cập các trang web hỗ trợ của Sony trong nước / khu vực của bạn.
• Bạn có thể không sử dụng được thiết bị truyền thông ngoài với chức năng mã hóa.• Hệ thống tập tin FAT có sẵn cho máy quay của bạn. Nếu phương tiện lưu trữ của thiết bị ngoài đã được định dạng cho hệ thống tập tin NTFS, vv, định dạng thiết bị truyền thông ngoài bằng cách sử dụng máy quay trước khi sử dụng. Màn hình định dạng• xuất hiện khi một thiết bị truyền thông ngoài được kết nối với máy quay của bạn. Hãy đảm
- phát lại các hình ảnh thông qua máy quay (tr.44)- nhập hình ảnh vào “PMB”
Chú ý
Chú ý
Mẹo nhỏ
��GB
Saving images w
ith an external device
You cannot use the Built-in USB Cable for this type of connection.
5 Connect the external media device and touch [Copy.] on the camcorder screen.HDR-CX130E:Movies and photos that are stored in the memory card (inserted in the camcorder), and that have not yet been saved on to external media device can be saved on the connected media device at this time.HDR-CX160E/CX180E:Movies and photos that are stored on one of the camcorder’s recording media selected in [Media Select], and that have not yet been saved on external media device can be saved on the connected media device at this time.
This operation is available only when there are newly recorded images.
6 After operation is completed, touch on the camcorder screen.
When connecting an external media deviceThe images saved in the external media device are displayed on the LCD screen. Images saved on the connected external media device appear on the LCD screen. When an external media device is connected, the USB icon will appear on the Event View screen, etc.
You can make menu settings of the external media device such as deleting images. Touch (MENU) [Edit/Copy] on Event View.
To disconnect the external media device Touch while the camcorder is in
the playback standby mode ([Event View] or Event Index is displayed) of the external media device.
Disconnect the USB Adaptor Cable.
NotesThe number of scenes you can save on the external media device are as follows. However, even if the external media device has free space, you cannot save scenes exceeding the following number.
High definition image quality (HD) movies: Max. 3,999Standard definition image quality (STD) movies: Max. 9,999Photos: Max. 40,000
The number of scenes may be smaller depending on the type of images recorded.
USB Adaptor Cable
VMC-UAM1 (sold separately)
��GB
Saving images on an external media deviceYou can save movies and photos on an external media device (USB storage devices), such as an external hard disk drive. You can also play back images on the camcorder or another playback device.
NotesFor this operation, you need the USB Adaptor Cable VMC-UAM1 (sold separately).The USB Adaptor Cable VMC-UAM1 may not be available in some countries/regions.Connect your camcorder to the wall outlet (wall socket) using the supplied AC Adaptor (p. 12).Refer to the instruction manual supplied with the external media device.
TipsYou can import images saved on the external media device to your computer by using the supplied software “PMB.”
Functions available after saving images on an external media device
playback of images through the camcorder (p. 44)importing images to “PMB”
Devices that cannot be used as an external media device
You cannot use the following devices as an external media device.
media devices with a capacity exceeding 2 TBordinary disc drive such as CD or DVD drivemedia devices connected via a USB hubmedia devices with built-in USB hubcard reader
NotesYou may not be able to use external media devices with a code function.The FAT file system is available for your camcorder. If the storage medium of the external device was formatted for the NTFS file system, etc., format the external media device using the camcorder before use. The format screen appears when an external media device is connected to your camcorder. Make sure that
important data has not previously been saved on the external media device before you format it using the camcorder.Operation is not assured with every device satisfying requirements for operating.For details on available external media devices, go to the Sony support website in your country/region.
1 Connect the AC Adaptor and the power cord (mains lead) to the DC IN jack of your camcorder and the wall outlet (wall socket).
2 If the external medium device has the AC power cable, connect it to the wall outlet (wall socket).
3 Connect the USB Adaptor Cable to the external media device.
4 Connect the USB Adaptor Cable to the (USB) jack of your camcorder.Make sure not to disconnect the USB cable while [Preparing image database file. Please wait.] is displayed on the LCD screen. If [Repair Img. DB F.] is displayed on the camcorder screen, touch .
��GB
Saving images w
ith an external device
You cannot use the Built-in USB Cable for this type of connection.
5 Connect the external media device and touch [Copy.] on the camcorder screen.HDR-CX130E:Movies and photos that are stored in the memory card (inserted in the camcorder), and that have not yet been saved on to external media device can be saved on the connected media device at this time.HDR-CX160E/CX180E:Movies and photos that are stored on one of the camcorder’s recording media selected in [Media Select], and that have not yet been saved on external media device can be saved on the connected media device at this time.
This operation is available only when there are newly recorded images.
6 After operation is completed, touch on the camcorder screen.
When connecting an external media deviceThe images saved in the external media device are displayed on the LCD screen. Images saved on the connected external media device appear on the LCD screen. When an external media device is connected, the USB icon will appear on the Event View screen, etc.
You can make menu settings of the external media device such as deleting images. Touch (MENU) [Edit/Copy] on Event View.
To disconnect the external media device Touch while the camcorder is in
the playback standby mode ([Event View] or Event Index is displayed) of the external media device.
Disconnect the USB Adaptor Cable.
NotesThe number of scenes you can save on the external media device are as follows. However, even if the external media device has free space, you cannot save scenes exceeding the following number.
High definition image quality (HD) movies: Max. 3,999Standard definition image quality (STD) movies: Max. 9,999Photos: Max. 40,000
The number of scenes may be smaller depending on the type of images recorded.
USB Adaptor Cable
VMC-UAM1 (sold separately)

VN43��
GB
Saving images on an external media deviceYou can save movies and photos on an external media device (USB storage devices), such as an external hard disk drive. You can also play back images on the camcorder or another playback device.
NotesFor this operation, you need the USB Adaptor Cable VMC-UAM1 (sold separately).The USB Adaptor Cable VMC-UAM1 may not be available in some countries/regions.Connect your camcorder to the wall outlet (wall socket) using the supplied AC Adaptor (p. 12).Refer to the instruction manual supplied with the external media device.
TipsYou can import images saved on the external media device to your computer by using the supplied software “PMB.”
Functions available after saving images on an external media device
playback of images through the camcorder (p. 44)importing images to “PMB”
Devices that cannot be used as an external media device
You cannot use the following devices as an external media device.
media devices with a capacity exceeding 2 TBordinary disc drive such as CD or DVD drivemedia devices connected via a USB hubmedia devices with built-in USB hubcard reader
NotesYou may not be able to use external media devices with a code function.The FAT file system is available for your camcorder. If the storage medium of the external device was formatted for the NTFS file system, etc., format the external media device using the camcorder before use. The format screen appears when an external media device is connected to your camcorder. Make sure that
important data has not previously been saved on the external media device before you format it using the camcorder.Operation is not assured with every device satisfying requirements for operating.For details on available external media devices, go to the Sony support website in your country/region.
1 Connect the AC Adaptor and the power cord (mains lead) to the DC IN jack of your camcorder and the wall outlet (wall socket).
2 If the external medium device has the AC power cable, connect it to the wall outlet (wall socket).
3 Connect the USB Adaptor Cable to the external media device.
4 Connect the USB Adaptor Cable to the (USB) jack of your camcorder.Make sure not to disconnect the USB cable while [Preparing image database file. Please wait.] is displayed on the LCD screen. If [Repair Img. DB F.] is displayed on the camcorder screen, touch .
��GB
Saving images w
ith an external device
You cannot use the Built-in USB Cable for this type of connection.
5 Connect the external media device and touch [Copy.] on the camcorder screen.HDR-CX130E:Movies and photos that are stored in the memory card (inserted in the camcorder), and that have not yet been saved on to external media device can be saved on the connected media device at this time.HDR-CX160E/CX180E:Movies and photos that are stored on one of the camcorder’s recording media selected in [Media Select], and that have not yet been saved on external media device can be saved on the connected media device at this time.
This operation is available only when there are newly recorded images.
6 After operation is completed, touch on the camcorder screen.
When connecting an external media deviceThe images saved in the external media device are displayed on the LCD screen. Images saved on the connected external media device appear on the LCD screen. When an external media device is connected, the USB icon will appear on the Event View screen, etc.
You can make menu settings of the external media device such as deleting images. Touch (MENU) [Edit/Copy] on Event View.
To disconnect the external media device Touch while the camcorder is in
the playback standby mode ([Event View] or Event Index is displayed) of the external media device.
Disconnect the USB Adaptor Cable.
NotesThe number of scenes you can save on the external media device are as follows. However, even if the external media device has free space, you cannot save scenes exceeding the following number.
High definition image quality (HD) movies: Max. 3,999Standard definition image quality (STD) movies: Max. 9,999Photos: Max. 40,000
The number of scenes may be smaller depending on the type of images recorded.
USB Adaptor Cable
VMC-UAM1 (sold separately)
• Bạn không thể sử dụng cáp USB tích hợp trong cho loại kết nối này.
Cáp chuyển đổi USB
(bán riêng)
Kết nối thiết bị truyền thông ngoài và chạm nút [Copy.] trên màn hình máy quay.
Khi kết nối một thiết bị truyền thông ngoài
HDR-CX130E:Phim và ảnh lưu trữ trên thẻ nhớ (lắp vào máy quay) và chưa được lưu trên thiết bị truyền thông ngoài có thể được lưu trên thiết bị truyền thông đã kết nối vào lúc này.HDR-CX160E/CX180E:Phim và ảnh lưu trữ trên một trong những phương tiện truyền thông ghi âm của máy quay chọn trong [Media Select] và chưa được lưu trên thiết bị truyền thông ngoài có thể được lưu trên thiết bị truyền thông đã kết nối vào lúc này.• Thao tác này chỉ xuất hiện khi hình ảnh mới được ghi lại.
Các hình ảnh lưu trong thiết bị truyền thông ngoài được hiển thị trên màn hình LCD. Hình ảnh lưu trên thiết bị truyền thông ngoài đã kết nối xuất hiện trên màn hình LCD. Khi một thiết bị truyền thông ngoài được kết nối, biểu tượng USB sẽ xuất hiện trên màn hình Event View v.v…
Chạm nút khi máy quay trongchế độ chờ phát lại ([EventView] hay Event Index hiển thị) củathiết bị truyền thông ngoài.
Ngắt kết nối cáp chuyển đổi USB.
Bạn có thể thiết lập thư mục của thiết bị truyền thông ngoài như xóa ảnh.Chạm nút (MENU) [Edit/Copy] trên Event View.
Chú ý
Lưu hình ảnh với thiết bị ngoài
Số lượng cảnh bạn có thể lưu trênthiết bị truyền thông ngoài như sau. Tuy nhiên, ngay cả khi thiết bị truyền thông ngoài có không gian trống, bạn không thể lưu lại những cảnh vượt quá con số sau đây.- Phim chất lượng hình ảnh độ nét cao (HD):Tối đa 3,999- Phim chất lượng hình ảnh tiêu chuẩn (STD): Tối đa 9,999- Hình ảnh: Tối đa 40,000Số lượng các cảnh có thể nhỏ hơn tùy thuộc vào loại ảnh ghi lại.
Để ngắt kết nối thiết bị truyền thông ngoài
��GB
Saving images w
ith an external device
You cannot use the Built-in USB Cable for this type of connection.
5 Connect the external media device and touch [Copy.] on the camcorder screen.HDR-CX130E:Movies and photos that are stored in the memory card (inserted in the camcorder), and that have not yet been saved on to external media device can be saved on the connected media device at this time.HDR-CX160E/CX180E:Movies and photos that are stored on one of the camcorder’s recording media selected in [Media Select], and that have not yet been saved on external media device can be saved on the connected media device at this time.
This operation is available only when there are newly recorded images.
6 After operation is completed, touch on the camcorder screen.
When connecting an external media deviceThe images saved in the external media device are displayed on the LCD screen. Images saved on the connected external media device appear on the LCD screen. When an external media device is connected, the USB icon will appear on the Event View screen, etc.
You can make menu settings of the external media device such as deleting images. Touch (MENU) [Edit/Copy] on Event View.
To disconnect the external media device Touch while the camcorder is in
the playback standby mode ([Event View] or Event Index is displayed) of the external media device.
Disconnect the USB Adaptor Cable.
NotesThe number of scenes you can save on the external media device are as follows. However, even if the external media device has free space, you cannot save scenes exceeding the following number.
High definition image quality (HD) movies: Max. 3,999Standard definition image quality (STD) movies: Max. 9,999Photos: Max. 40,000
The number of scenes may be smaller depending on the type of images recorded.
USB Adaptor Cable
VMC-UAM1 (sold separately)
Sau khi hoàn tất thao tác,chạm vào trên màn hình máy quay.

VN44
��GB
Saving desired movies and photos
You can save desired images in the camcorder to the external media device.
Connect the camcorder to the external media device and touch [Play without copying.].
Event View of the external medium is displayed.
Touch (MENU) [Edit/Copy] [Copy] .
Follow the instructions that appear on the screen to select the recording media (HDR-CX160E/CX180E), image selection methods and type of the image.
You cannot copy images from an external media device to the internal recording medium on the camcorder.
When you selected [Multiple Images], touch the image to be saved.
appears.
Press and hold the image down on the LCD screen to confirm the image. Touch
to return to the previous screen.If you select [All In Event], select the event to copy with / . You cannot select multiple events.
Touch on the camcorder screen.
Playing back images in the external media device on the camcorder
Connect the camcorder to the external media device and touch [Play without copying.].
Event View of the external media device is displayed.
Select the image you want to view and play back the image (p. 25).
You can also view images on a TV connected to your camcorder (p. 29).You can play back the high definition image quality (HD) movies on your computer using [Player for AVCHD]. Start [Player for AVCHD], and select the drive where the external media device is connected with [Settings].
To perform [Direct Copy] manuallyYou can perform [Direct Copy] manually while the camcorder is connected to an external media device. Touch (MENU) [Edit/Copy] [Direct Copy] on the [Event View] screen of the external media device.
Touch [Copy images that have not been copied.].
Touch .
Lưu lại phim và hình ảnh mong muốn
Phát lại hình ảnh trong thiết bị truyền thông ngoài trên máy quay
Bạn có thể lưu hình ảnh mong muốn trong máy quay vào thiết bị truyền thông ngoài.
Nhấn và giữ hình ảnh trên màn hình LCD để xác nhận hình ảnh. Chạm nút để trở về màn hình trước đó.
Nếu bạn chọn [All In Event], chọn các sự kiện để sao chép với / . Bạn không thể chọn nhiều sự kiện.
Bạn cũng có thể xem hình ảnh trên TV đã kết nối tới máy quay của bạn (tr.29).
Chạm (MENU) [Edit/Copy] [Direct Copy] trên màn hình [Event View]
của thiết bị truyền thông ngoài.
Chạm .
Bạn có thể xem lại phim chất lượng hình ảnh độ nét cao (HD) trên máy tính của bạnsử dụng [Player for AVCHD].Khởi động [Player for AVCHD] và chọnổ đĩa mà thiết bị truyền thông ngoài đã kết nối với [Settings].
xuất hiện.
Kết nối máy quay tới thiết bị truyền thông ngoài và chạm nút [Play without copying].Event View của phương tiện trung gian ngoài được hiển thị.
Kết nối máy quay tới thiết bị truyền thông ngoài phương tiện và chạm [Play without copying].Event View của phương tiện trung gian ngoài được hiển thị.
Thực hiện theo các hướng dẫn xuất hiện trên màn hình để chọn phương tiện ghi (HDRCX160E / CX180E), phương pháp lựa chọn ảnh và loại ảnh.Bạn không thể sao chép hình ảnh từ phương tiện truyền thông ngoài tới phương tiện ghi nội bộ trong máy quay.
Chạm nút (MENU) [Edit/Copy] [Copy].
Chọn hình ảnh bạn muốn xem và phát lại hình ảnh (tr.25).
Để thực hiện [Direct Copy] thủ côngBạn có thể thực hiện [Direct Copy] thủ công trong khi máy quay được kết nối với một thiết bị truyền thông ngoài.
Chạm trên màn hình máy quay.
Khi bạn đã chọn [MultipleImages], chạm vào hình ảnh sẽ lưu.
Chạm [Copy images that have not beencopied.].
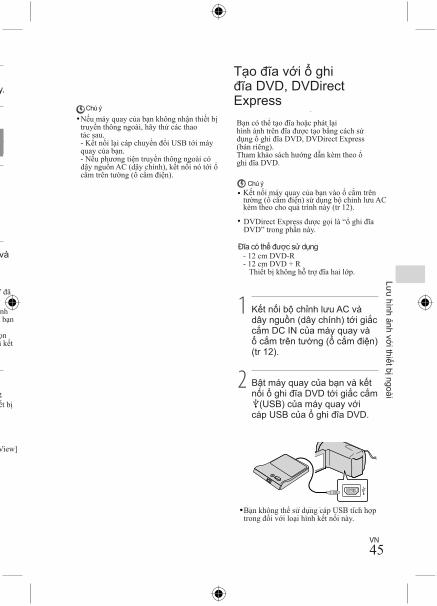
VN45
��GB
Saving desired movies and photos
You can save desired images in the camcorder to the external media device.
Connect the camcorder to the external media device and touch [Play without copying.].
Event View of the external medium is displayed.
Touch (MENU) [Edit/Copy] [Copy] .
Follow the instructions that appear on the screen to select the recording media (HDR-CX160E/CX180E), image selection methods and type of the image.
You cannot copy images from an external media device to the internal recording medium on the camcorder.
When you selected [Multiple Images], touch the image to be saved.
appears.
Press and hold the image down on the LCD screen to confirm the image. Touch
to return to the previous screen.If you select [All In Event], select the event to copy with / . You cannot select multiple events.
Touch on the camcorder screen.
Playing back images in the external media device on the camcorder
Connect the camcorder to the external media device and touch [Play without copying.].
Event View of the external media device is displayed.
Select the image you want to view and play back the image (p. 25).
You can also view images on a TV connected to your camcorder (p. 29).You can play back the high definition image quality (HD) movies on your computer using [Player for AVCHD]. Start [Player for AVCHD], and select the drive where the external media device is connected with [Settings].
To perform [Direct Copy] manuallyYou can perform [Direct Copy] manually while the camcorder is connected to an external media device. Touch (MENU) [Edit/Copy] [Direct Copy] on the [Event View] screen of the external media device.
Touch [Copy images that have not been copied.].
Touch .
Phát lại hình ảnh trong thiết bị truyền thông ngoài trên máy quay
Bạn cũng có thể xem hình ảnh trên TV đã kết nối tới máy quay của bạn (tr.29).
Chạm (MENU) [Edit/Copy] [Direct Copy] trên màn hình [Event View]
của thiết bị truyền thông ngoài.
Chạm .
Bạn có thể xem lại phim chất lượng hình ảnh độ nét cao (HD) trên máy tính của bạnsử dụng [Player for AVCHD].Khởi động [Player for AVCHD] và chọnổ đĩa mà thiết bị truyền thông ngoài đã kết nối với [Settings].
Kết nối máy quay tới thiết bị truyền thông ngoài phương tiện và chạm [Play without copying].Event View của phương tiện trung gian ngoài được hiển thị.
Chọn hình ảnh bạn muốn xem và phát lại hình ảnh (tr.25).
Để thực hiện [Direct Copy] thủ côngBạn có thể thực hiện [Direct Copy] thủ công trong khi máy quay được kết nối với một thiết bị truyền thông ngoài.
Chạm trên màn hình máy quay.
Chạm [Copy images that have not beencopied.].
��GB
Saving images w
ith an external device
NotesIf your camcorder does not recognize the external media device, try the following operations.
Reconnect the USB Adaptor Cable to your camcorder.If the external media device has the AC power cord (mains lead), connect it to the wall outlet (wall socket).
Creating a disc with the DVD writer, DVDirect ExpressYou can create a disc or play back the images on a created disc by using the DVD writer, DVDirect Express (sold separately).Refer also to the instruction manual supplied with the DVD writer.
NotesConnect your camcorder to the wall outlet (wall socket) using the supplied AC Adaptor for this operation (p. 12).DVDirect Express is referred to as “DVD writer” in this section.
Discs that can be used12 cm DVD-R12 cm DVD+R The device does not support two-layered discs.
1 Connect the AC Adaptor and the power cord (mains lead) to the DC IN jack of your camcorder and the wall outlet (wall socket) (p. 12).
2 Turn on your camcorder, and connect the DVD writer to the (USB) jack of your camcorder with the USB cable of the DVD writer.
You cannot use the Built-in USB Cable for this type of connection.
Tạo đĩa với ổ ghi đĩa DVD, DVDirect Express
Chú ý
Đĩa có thể được sử dụng
Chú ý
Nếu máy quay của bạn không nhận thiết bịtruyền thông ngoài, hãy thử các thao tác sau. - Kết nối lại cáp chuyển đổi USB tới máy quay của bạn.- Nếu phương tiện truyền thông ngoài có dây nguồn AC (dây chính), kết nối nó tới ổ cắm trên tường (ổ cắm điện).
Bạn có thể tạo đĩa hoặc phát lạihình ảnh trên đĩa được tạo bằng cách sử dụng ổ ghi đĩa DVD, DVDirect Express (bán riêng).Tham khảo sách hướng dẫn kèm theo ổ ghi đĩa DVD.
Kết nối máy quay của bạn vào ổ cắm trên tường (ổ cắm điện) sử dụng bộ chỉnh lưu AC kèm theo cho quá trình này (tr 12).
- 12 cm DVD-R- 12 cm DVD + R Thiết bị không hỗ trợ đĩa hai lớp.
DVDirect Express được gọi là “ổ ghi đĩa DVD” trong phần này.
Bạn không thể sử dụng cáp USB tích hợp trong đối với loại hình kết nối này.
Kết nối bộ chỉnh lưu AC và dây nguồn (dây chính) tới giắc cắm DC IN của máy quay và ổ cắm trên tường (ổ cắm điện) (tr 12).
Bật máy quay của bạn và kết nối ổ ghi đĩa DVD tới giắc cắm (USB) của máy quay với cáp USB của ổ ghi đĩa DVD.
Lưu hình ảnh với thiết bị ngoài
��GB
Saving images w
ith an external device
NotesIf your camcorder does not recognize the external media device, try the following operations.
Reconnect the USB Adaptor Cable to your camcorder.If the external media device has the AC power cord (mains lead), connect it to the wall outlet (wall socket).
Creating a disc with the DVD writer, DVDirect ExpressYou can create a disc or play back the images on a created disc by using the DVD writer, DVDirect Express (sold separately).Refer also to the instruction manual supplied with the DVD writer.
NotesConnect your camcorder to the wall outlet (wall socket) using the supplied AC Adaptor for this operation (p. 12).DVDirect Express is referred to as “DVD writer” in this section.
Discs that can be used12 cm DVD-R12 cm DVD+R The device does not support two-layered discs.
1 Connect the AC Adaptor and the power cord (mains lead) to the DC IN jack of your camcorder and the wall outlet (wall socket) (p. 12).
2 Turn on your camcorder, and connect the DVD writer to the (USB) jack of your camcorder with the USB cable of the DVD writer.
You cannot use the Built-in USB Cable for this type of connection.

VN46��GB
3 Insert an unused disc into the DVD writer, and close the disc tray.
4 Press (DISC BURN) on the DVD writer.HDR-CX130E Movies that are stored in the memory card (inserted in the camcorder), and that have not yet been saved on any disc can be saved on the disc at this time. HDR-CX160E/CX180E Movies that are stored on one of the camcorder’s recording media selected in [Media Select], and that have not yet been saved on any discs can be saved on the disc at this time.When there are unsaved high definition (HD) and standard definition (STD) image quality movies, they will be saved on individual discs according to the image quality.If the files you want to copy do not fit onto one disc, replace the disc in the DVD writer with an unused one and repeat the operation.
5 After the operation is completed, touch (the tray opens) remove the disc touch on the camcorder screen.
6 Touch , then disconnect the USB cable.
TipsIf the total memory size of movies to be burnt by the DISC BURN operation exceeds that of the disc, disc creation stops when the limit is reached. The last movie on the disc may be cut off.
Performing [DISC BURN OPTION]
Perform this operation in the following cases:
When copying a desired imageWhen creating multiple copies of the same disc
Connect the camcorder to the DVD writer and touch [DISC BURN OPTION].
Select the recording media containing the movie(s) you want to save (HDR-CX160E/CX180E) and touch [Next].
• HDR-CX130E Phim được lưu trong thẻ nhớ (đã lắp vào máy quay) và chưa được lưu trên bất kì đĩa nào có thể được lưu trên đĩa vào lúc này. HDR-CX160E/CX180E Phim được lưu trên một trong những bộ nhớ của máy quay được chọn trong [Media Select] và chưa được lưu trên bất kỳ đĩa nào có thể được lưu trên đĩa vào lúc này.• Khi có phim chất lượng hình ảnh độ nét cao (HD) và độ nét tiêu chuẩn (STD) chưa được lưu, chúng sẽ được lưu lại trên từng đĩa riêng biệt tùy thuộc theo chất lượng hình ảnh.• Nếu các tập tin bạn muốn sao chép không chứa vừa một đĩa, thay thế đĩa trong ổ ghi DVD với một đĩa chưa sử dụng và lặp lại thao tác.
• Nếu tổng dung lượng bộ nhớ của phim sẽ được tạo bởi quá trình DISC BURN vượt trội so với đĩa, việc tạo đĩa sẽ dừng lại khi đạt giới hạn đó. Phim cuối cùng trên đĩa có thể bị cắt bỏ.
Thực hiện quá trình này trong các trường hợp sau: - Khi sao chép một hình ảnh mong muốn - Khi tạo nhiều bản sao của cùng một đĩa
Lắp một đĩa không sử dụng vào ổ ghi đĩa DVD và đóng khay đĩa lại.
Kết nối máy quay tới ổ ghi đĩa DVD và chạm [DISC BURN OPTION].
Chọn bộ nhớ có chứa phim (các phim) mà bạn muốn lưu (HDR-CX160E/CX180E) và chạm nút [Next].
Chạm , sau đó ngắt kết nối cáp USB.
Bấm (DISC BURN) trên ổ ghi đĩa DVD.
Mẹo nhỏ
Thao tác [DISC BURN OPTION]
��GB
3 Insert an unused disc into the DVD writer, and close the disc tray.
4 Press (DISC BURN) on the DVD writer.HDR-CX130E Movies that are stored in the memory card (inserted in the camcorder), and that have not yet been saved on any disc can be saved on the disc at this time. HDR-CX160E/CX180E Movies that are stored on one of the camcorder’s recording media selected in [Media Select], and that have not yet been saved on any discs can be saved on the disc at this time.When there are unsaved high definition (HD) and standard definition (STD) image quality movies, they will be saved on individual discs according to the image quality.If the files you want to copy do not fit onto one disc, replace the disc in the DVD writer with an unused one and repeat the operation.
5 After the operation is completed, touch (the tray opens) remove the disc touch on the camcorder screen.
6 Touch , then disconnect the USB cable.
TipsIf the total memory size of movies to be burnt by the DISC BURN operation exceeds that of the disc, disc creation stops when the limit is reached. The last movie on the disc may be cut off.
Performing [DISC BURN OPTION]
Perform this operation in the following cases:
When copying a desired imageWhen creating multiple copies of the same disc
Connect the camcorder to the DVD writer and touch [DISC BURN OPTION].
Select the recording media containing the movie(s) you want to save (HDR-CX160E/CX180E) and touch [Next].
Sau khi quá trình hoàn tất, chạm (khay
mở ra) lấy đĩa ra chạm trên màn hình máy quay.

VN47
��GB
3 Insert an unused disc into the DVD writer, and close the disc tray.
4 Press (DISC BURN) on the DVD writer.HDR-CX130E Movies that are stored in the memory card (inserted in the camcorder), and that have not yet been saved on any disc can be saved on the disc at this time. HDR-CX160E/CX180E Movies that are stored on one of the camcorder’s recording media selected in [Media Select], and that have not yet been saved on any discs can be saved on the disc at this time.When there are unsaved high definition (HD) and standard definition (STD) image quality movies, they will be saved on individual discs according to the image quality.If the files you want to copy do not fit onto one disc, replace the disc in the DVD writer with an unused one and repeat the operation.
5 After the operation is completed, touch (the tray opens) remove the disc touch on the camcorder screen.
6 Touch , then disconnect the USB cable.
TipsIf the total memory size of movies to be burnt by the DISC BURN operation exceeds that of the disc, disc creation stops when the limit is reached. The last movie on the disc may be cut off.
Performing [DISC BURN OPTION]
Perform this operation in the following cases:
When copying a desired imageWhen creating multiple copies of the same disc
Connect the camcorder to the DVD writer and touch [DISC BURN OPTION].
Select the recording media containing the movie(s) you want to save (HDR-CX160E/CX180E) and touch [Next].
• Nếu tổng dung lượng bộ nhớ của phim sẽ được tạo bởi quá trình DISC BURN vượt trội so với đĩa, việc tạo đĩa sẽ dừng lại khi đạt giới hạn đó. Phim cuối cùng trên đĩa có thể bị cắt bỏ.
Thực hiện quá trình này trong các trường hợp sau: - Khi sao chép một hình ảnh mong muốn - Khi tạo nhiều bản sao của cùng một đĩa
Kết nối máy quay tới ổ ghi đĩa DVD và chạm [DISC BURN OPTION].
Chọn bộ nhớ có chứa phim (các phim) mà bạn muốn lưu (HDR-CX160E/CX180E) và chạm nút [Next].
Chạm , sau đó ngắt kết nối cáp USB.
Thao tác [DISC BURN OPTION]
��GB
Saving images w
ith an external device
Touch the movie you want to burn on the disc.
appears.
Touch and hold the desired thumbnail so that you can confirm the image. Touch
to return to the previous screen.
Touch on the camcorder screen.
To create another disc of the same contents, insert a new disc and touch [CREATE SAME DISC].
After the operation is completed, touch [Exit.] on the camcorder screen.
Disconnect the USB cable from your camcorder.
NotesDo not do any of the following when creating a disc.
Turn off the camcorderDisconnect the USB cable or the AC AdaptorSubject the camcorder to mechanical shock or vibrationEject the memory card from the camcorder
Play the created disc to make sure copying was performed correctly before deleting the movies on your camcorder.If [Failed.] or [DISC BURN failed.] appears on the screen, insert another disc into the DVD writer and perform the DISC BURN operation again.
TipsDisc creation time to copy movies to the limit of the disc is about 20 to 60 minutes. It may take more time depending on the recording mode or the number of scenes.
Playing back a disc on the DVD writer
Connect the AC Adaptor and the power cord (mains lead) to the DC IN jack of your camcorder and the wall outlet (wall socket) (p. 12).
Turn on your camcorder, and connect the DVD writer to the (USB) jack of your camcorder with the USB cable of the DVD writer.
You can play back movies on the TV screen by connecting the camcorder to a TV (p. 29).
Remaining Disc capacity
Chạm vào phim bạn muốn tạo ra đĩa.
xuất hiện.
Dung lượng đĩa còn lại
• Chạm và giữ hình thu nhỏ mong muốn để xác nhận hình ảnh. Chạm để trở về màn hình trước đó.
• Không làm bất kỳ điều nào dưới đây khi đang tạo đĩa: - Tắt máy quay - Ngắt kết nối cáp USB hoặc bộ chỉnh lưu AC - Làm sốc hay rung máy quay - Tháo thẻ nhớ khỏi máy quay
• Bạn có thể phát lại phim trên màn hình TV bằng cách kết nối máy quay tới TV (tr.29).
• Bật đĩa vừa tạo để chắc chắn việc sao chép đã được thực hiện một cách chính xác trước khi xóa phim trên máy quay của bạn.• Nếu [Failed.] hoặc [DISC BURN failed.] xuất hiện trên màn hình, lắp đĩa khác vào ổ ghi đĩa DVD và thực hiện lại quá trình Ghi đĩa.
• Thời gian tạo đĩa để sao chép phim tới giới hạn của đĩa là khoảng 20 đến 60 phút. Có thể mất nhiều thời gian hơn tùy thuộc vào chế độ ghi hoặc số cảnh quay.
Chạm trên màn hình máy quay.Để tạo đĩa khác cùng một nội dung, lắp đĩa mới và chạm [CREATE SAME DISC].
Sau khi quá trình hoàn tất, chạm [Exit.] trên màn hình máy quay.
Kết nối bộ chỉnh lưu AC và dây nguồn (dây chính) tới giắc cắm DC IN của máy quay và ổ cắm trên tường (ổ cắm điện) (tr 12)
Ngắt kết nối cáp USB từ máy quay của bạn.
Chú ý
Mẹo nhỏ
Bật lại đĩa trên ổ ghi đĩa DVD
Lưu hình ảnh với thiết bị ngoài
��GB
Saving images w
ith an external device
Touch the movie you want to burn on the disc.
appears.
Touch and hold the desired thumbnail so that you can confirm the image. Touch
to return to the previous screen.
Touch on the camcorder screen.
To create another disc of the same contents, insert a new disc and touch [CREATE SAME DISC].
After the operation is completed, touch [Exit.] on the camcorder screen.
Disconnect the USB cable from your camcorder.
NotesDo not do any of the following when creating a disc.
Turn off the camcorderDisconnect the USB cable or the AC AdaptorSubject the camcorder to mechanical shock or vibrationEject the memory card from the camcorder
Play the created disc to make sure copying was performed correctly before deleting the movies on your camcorder.If [Failed.] or [DISC BURN failed.] appears on the screen, insert another disc into the DVD writer and perform the DISC BURN operation again.
TipsDisc creation time to copy movies to the limit of the disc is about 20 to 60 minutes. It may take more time depending on the recording mode or the number of scenes.
Playing back a disc on the DVD writer
Connect the AC Adaptor and the power cord (mains lead) to the DC IN jack of your camcorder and the wall outlet (wall socket) (p. 12).
Turn on your camcorder, and connect the DVD writer to the (USB) jack of your camcorder with the USB cable of the DVD writer.
You can play back movies on the TV screen by connecting the camcorder to a TV (p. 29).
Remaining Disc capacity
Bật máy quay của bạn và kết nối ổ ghi đĩa DVD tới giắc cắm (USB) của máy quay với cáp USB của ổ ghi đĩa DVD.
��GB
Saving images w
ith an external device
Touch the movie you want to burn on the disc.
appears.
Touch and hold the desired thumbnail so that you can confirm the image. Touch
to return to the previous screen.
Touch on the camcorder screen.
To create another disc of the same contents, insert a new disc and touch [CREATE SAME DISC].
After the operation is completed, touch [Exit.] on the camcorder screen.
Disconnect the USB cable from your camcorder.
NotesDo not do any of the following when creating a disc.
Turn off the camcorderDisconnect the USB cable or the AC AdaptorSubject the camcorder to mechanical shock or vibrationEject the memory card from the camcorder
Play the created disc to make sure copying was performed correctly before deleting the movies on your camcorder.If [Failed.] or [DISC BURN failed.] appears on the screen, insert another disc into the DVD writer and perform the DISC BURN operation again.
TipsDisc creation time to copy movies to the limit of the disc is about 20 to 60 minutes. It may take more time depending on the recording mode or the number of scenes.
Playing back a disc on the DVD writer
Connect the AC Adaptor and the power cord (mains lead) to the DC IN jack of your camcorder and the wall outlet (wall socket) (p. 12).
Turn on your camcorder, and connect the DVD writer to the (USB) jack of your camcorder with the USB cable of the DVD writer.
You can play back movies on the TV screen by connecting the camcorder to a TV (p. 29).
Remaining Disc capacity

VN48��GB
Insert a created disc into the DVD writer.
The movies on the disc appear on the index screen on the camcorder.
Press the play button on the DVD writer.
You can also operate by the camcorder screen.
After the operation is completed, touch on the camcorder screen and remove the disc when the tray is open.
Touch and disconnect the USB cable.
Creating a high definition image quality (HD) disc with a DVD writer, etc., other than DVDirect ExpressUse the USB cable to connect your camcorder to a disc creation device, which is compatible with high definition image quality (HD) movies, such as a Sony DVD writer. Refer also to the instruction manuals supplied with the device to be connected.
NotesConnect your camcorder to the wall outlet (wall socket) using the supplied AC Adaptor for this operation (p. 12).Sony DVD writer may not be available in some countries/regions.
1 Connect the AC Adaptor and the power cord (mains lead) to the DC IN jack of your camcorder and the wall outlet (wall socket) (p. 12).
2 Turn on your camcorder, and connect a DVD writer, etc. to your camcorder with the Built-in USB Cable.
Lắp đĩa đã tạo vào ổ ghi đĩa DVD.Các phim trên đĩa xuất hiện trên màn hình của máy quay.
Bấm nút bật trên ổ ghi đĩa DVD.• Bạn cũng có thể thao tác bằng màn hình máy quay.
Sau khi thao tác hoàn tất, chạm trên màn hình máy quay
và tháo đĩa khi khay mở ra.
Chạm và ngắt kết nối cáp USB.
Tạo đĩa chất lượng hình ảnh độ nét cao (HD) với ổ ghi đĩa DVD, vv, khác loại với DVDirect ExpressSử dụng cáp USB để kết nối máy quay của bạn tới một thiết bị tạo đĩa, tương thích với phim chất lượng hình ảnh độ nét cao (HD), chẳng hạn như ổ ghi đĩa DVD Sony. Tham khảo sách hướng dẫn kèm theo thiết bị được kết nối.
• Kết nối máy quay của bạn vào ổ cắm trên tường (ổ cắm điện) sử dụng bộ chỉnh lưu AC kèm theo cho quá trình này (tr 12).• Ổ ghi đĩa DVD có thể không có tại một số quốc gia / khu vực.
Chú ý
Kết nối bộ chỉnh lưu AC và dây nguồn (dây chính) tới giắc cắm DC IN của máy quay và ở cắm trên tường (ổ cắm điện) (tr.12)
Bật máy quay của bạn và kết nối ổ ghi đĩa DVD, v.v với máy quay của bạn bằng cáp USB tích hợp trong.
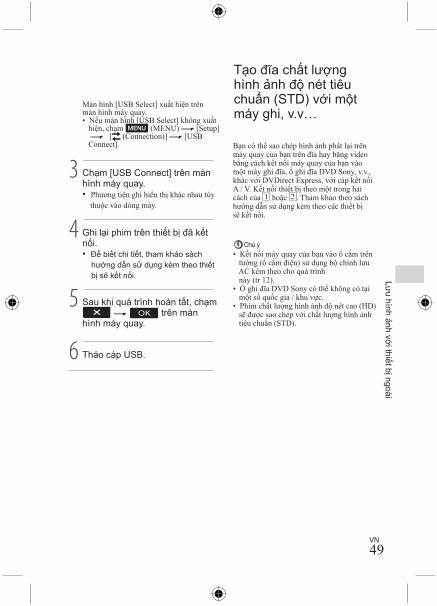
VN49
��GB
Insert a created disc into the DVD writer.
The movies on the disc appear on the index screen on the camcorder.
Press the play button on the DVD writer.
You can also operate by the camcorder screen.
After the operation is completed, touch on the camcorder screen and remove the disc when the tray is open.
Touch and disconnect the USB cable.
Creating a high definition image quality (HD) disc with a DVD writer, etc., other than DVDirect ExpressUse the USB cable to connect your camcorder to a disc creation device, which is compatible with high definition image quality (HD) movies, such as a Sony DVD writer. Refer also to the instruction manuals supplied with the device to be connected.
NotesConnect your camcorder to the wall outlet (wall socket) using the supplied AC Adaptor for this operation (p. 12).Sony DVD writer may not be available in some countries/regions.
1 Connect the AC Adaptor and the power cord (mains lead) to the DC IN jack of your camcorder and the wall outlet (wall socket) (p. 12).
2 Turn on your camcorder, and connect a DVD writer, etc. to your camcorder with the Built-in USB Cable.
��GB
Saving images w
ith an external device
The [USB Select] screen appears on the camcorder screen.
If the [USB Select] screen does not appear, touch (MENU) [Setup] [ (Connection)] [USB Connect].
3 Touch [USB Connect] on the camcorder screen.
The displayed recording media differ depending on the model.
4 Record movies on the connected device.
For details, refer to the instruction manuals supplied with the device to be connected.
5 After the operation is completed, touch on the camcorder screen.
6 Disconnect the USB cable.
Creating a standard definition image quality (STD) disc with a recorder, etc.You can copy images played back on your camcorder on a disc or video cassette, by connecting your camcorder to a disc recorder, a Sony DVD writer, etc., other than DVDirect Express, with the A/V connecting cable. Connect the device in either way of or . Refer also to the instruction manuals supplied with the devices to be connected.
NotesConnect your camcorder to the wall outlet (wall socket) using the supplied AC Adaptor for this operation (p. 12).Sony DVD writer may not be available in some countries/regions.High definition image quality (HD) movies will be copied with standard definition image quality (STD).
Màn hình [USB Select] xuất hiện trênmàn hình máy quay. • Nếu màn hình [USB Select] không xuất hiện, chạm (MENU) [Setup] [ (Connection)] [USB Connect].
Chạm [USB Connect] trên màn hình máy quay. • Phương tiện ghi hiển thị khác nhau tùy thuộc vào dòng máy.
Sau khi quá trình hoàn tất, chạm trên màn
hình máy quay.
Tháo cáp USB.
Ghi lại phim trên thiết bị đã kết nối. • Để biết chi tiết, tham khảo sách hướng dẫn sử dụng kem theo thiết bị sẽ kết nối.
Tạo đĩa chất lượng hình ảnh độ nét tiêu chuẩn (STD) với một máy ghi, v.v…
Bạn có thể sao chép hình ảnh phát lại trên máy quay của bạn trên đĩa hay băng videobằng cách kết nối máy quay của bạn vào một máy ghi đĩa, ổ ghi đĩa DVD Sony, v.v., khác với DVDirect Express, với cáp kết nối A / V. Kết nối thiết bị theo một trong hai cách của 1 hoặc 2 . Tham khảo theo sách hướng dẫn sử dụng kèm theo các thiết bị sẽ kết nối.
• Kết nối máy quay của bạn vào ổ cắm trên tường (ổ cắm điện) sử dụng bộ chỉnh lưu AC kèm theo cho quá trình này (tr 12).• Ổ ghi đĩa DVD Sony có thể không có tại một số quốc gia / khu vực.• Phim chất lượng hình ảnh độ nét cao (HD) sẽ được sao chép với chất lượng hình ảnh tiêu chuẩn (STD).
Chú ý
Lưu hình ảnh với thiết bị ngoài

VN50
�0GB
A/V connecting cable (supplied)
A/V connecting cable with S VIDEO (sold separately)By using this cable, higher quality images can be produced than with an A/V connecting cable. Connect the white and red plug (left/right audio) and the S VIDEO plug (S VIDEO channel) of the A/V connecting cable with an S VIDEO cable. If you connect the S VIDEO plug only, you will hear no sound. The yellow plug (video) connection is not necessary.
1 Insert the recording media in the recording device.
If your recording device has an input selector, set it to the input mode.
2 Connect your camcorder to the recording device (a disc recorder, etc.) with the A/V connecting cable (supplied) or an A/V connecting cable with S VIDEO (sold separately).
Connect your camcorder to the input jacks of the recording device.
3 Start playback on your camcorder, and record it on the recording device.
Refer to the instruction manuals supplied with your recording device for details.
4 When dubbing is finished, stop the recording device, and then your camcorder.
NotesSince copying is performed via analog data transfer, the image quality may deteriorate.You cannot copy images to recorders connected with an HDMI cable.To copy date/time information and camera data, touch (MENU) [Setup] [ (Playback Settings)] [Data Code] a desired setting .When the screen size of display devices (TV, etc.) is 4:3, touch (MENU) [Setup] [ (Connection)] [TV Type] [4:3] .When you connect a monaural device, connect the yellow plug of the A/V connecting cable to the video input jack, and the white (left channel) or the red (right channel) plug to the audio input jack on the device.
Input
S VIDEO
VIDEO
(Yellow)
(White)
AUDIO
Signal flow
(Yellow)
A/V Remote Connector
(Red)
Bộ kết nối từ xa A/V
Đầu vào
(Vàng)
Tín hiệu dòng chảy
Cáp kết nối A/V (kem theo)Cáp kết nối A/V với S VIDEO (bán riêng)Sử dụng cáp này, chất lượng hình ảnh cao hơn sẽ được phát ra với một cáp kết nối A/V. Kết nối đầu cắm màu trắngvà màu đỏ (âm thanh trái/phải) và đầu cắm S VIDEO (kênh S VIDEO) của cáp kết nối A/V với cáp S VIDEO. Nếu bạn chỉ kết nối đầu cắm S VIDEO, bạn sẽ nghe thấy tiếng. Kết nối đầu cắm màu vàng (video) không cần thiết.
(Vàng)(Trắng)
Đỏ
Lắp phương tiện ghi vào thiết bị ghi. • Nếu thiết bị ghi của bạn có mục chọn đầu vào, thiết lập nó sang chế độ đầu vào.
Kết nối máy quay của bạn tới thiết bị ghi (máy ghi đĩa, v.v.) với cáp kết nối A/V 1 (kem theo) hoặc một cáp kết nối A/V với S VIDEO 2 (bán riêng).• Kết nối máy quay của bạn tới giắc cắm đầu vào của thiết bị ghi.
Bắt đầu phát lại trên máy quay của bạn và ghi lại trên thiết bị ghi. • Hãy tham khảo sách hướng dẫn sử dụng kèm theo với thiết bị ghi của bạn để biết chi tiết.
Khi ghi xong, dừng thiết bị ghi lại, sau đó dừng máy quay.
Chú ý• Vì sao chép được thực hiện thông qua bộ chuyển dữ liệu tương tự, chất lượng hình ảnh có thể xấu đi.• Bạn không thể sao chép ảnh vào máy ghi kết nối với một cáp HDMI.• Để sao chép thông tin ngày/giờ và dữ liệu máy ảnh, chạm (MENU) [Setup] [ (Playback Settings)] [Data Code] cài đặt mong muốn • Khi kích thước màn hình của thiết bị hiển thị (TV, vv) là 4:3, chạm (MENU) [Setup] [ (Connection)] [TV Type] [4:03] • Khi bạn kết nối một thiết bị đơn âm, kết nối đầu cắm màu vàng của cáp kết nối A / V tới giắc cắm đầu vào video và đầu cắm màu trắng (kênh trái) hoặc đỏ (kênh phải) vào giắc âm thanh đầu vào trên thiết bị.
�1GB
Customizing your cam
corder
Customizing your camcorder
Using menusYou can enjoy using your camcorder more by making good use of menu operations.The camcorder has various menu items under each of 6 menu categories.
Shooting Mode (Items for selecting a shooting mode) p. 52
Camera/Mic (Items for customized shooting) p. 52
Image Quality/Size (Items for setting up image quality or size) p. 53
Playback Function (Items for playback) p. 53
Edit/Copy (Items for editing) p. 53
Setup (Other setup items) p. 53
Operating menus
Follow the procedures explained below to set the menu items.
The [Camera/Mic] and [Setup] menus have sub-categories. Touch the sub-category icon, and the screen changes to other sub-category menus.Grayed out menu items or settings are not available.
NotesYou may not be able to set some menu items, depending on the recording or playback conditions.Touch to finish setting the menu or to return to the previous menu screen.

VN51
�0GB
A/V connecting cable (supplied)
A/V connecting cable with S VIDEO (sold separately)By using this cable, higher quality images can be produced than with an A/V connecting cable. Connect the white and red plug (left/right audio) and the S VIDEO plug (S VIDEO channel) of the A/V connecting cable with an S VIDEO cable. If you connect the S VIDEO plug only, you will hear no sound. The yellow plug (video) connection is not necessary.
1 Insert the recording media in the recording device.
If your recording device has an input selector, set it to the input mode.
2 Connect your camcorder to the recording device (a disc recorder, etc.) with the A/V connecting cable (supplied) or an A/V connecting cable with S VIDEO (sold separately).
Connect your camcorder to the input jacks of the recording device.
3 Start playback on your camcorder, and record it on the recording device.
Refer to the instruction manuals supplied with your recording device for details.
4 When dubbing is finished, stop the recording device, and then your camcorder.
NotesSince copying is performed via analog data transfer, the image quality may deteriorate.You cannot copy images to recorders connected with an HDMI cable.To copy date/time information and camera data, touch (MENU) [Setup] [ (Playback Settings)] [Data Code] a desired setting .When the screen size of display devices (TV, etc.) is 4:3, touch (MENU) [Setup] [ (Connection)] [TV Type] [4:3] .When you connect a monaural device, connect the yellow plug of the A/V connecting cable to the video input jack, and the white (left channel) or the red (right channel) plug to the audio input jack on the device.
Input
S VIDEO
VIDEO
(Yellow)
(White)
AUDIO
Signal flow
(Yellow)
A/V Remote Connector
(Red)
Kết nối máy quay của bạn tới thiết bị ghi (máy ghi đĩa, v.v.) với cáp kết nối A/V (kem theo) hoặc một cáp kết nối A/V với S VIDEO (bán riêng).• Kết nối máy quay của bạn tới giắc cắm đầu vào của thiết bị ghi.
Bắt đầu phát lại trên máy quay của bạn và ghi lại trên thiết bị ghi. • Hãy tham khảo sách hướng dẫn sử dụng kèm theo với thiết bị ghi của bạn để biết chi tiết.
Khi ghi xong, dừng thiết bị ghi lại, sau đó dừng máy quay.
• Vì sao chép được thực hiện thông qua bộ chuyển dữ liệu tương tự, chất lượng hình ảnh có thể xấu đi.• Bạn không thể sao chép ảnh vào máy ghi kết nối với một cáp HDMI.• Để sao chép thông tin ngày/giờ và dữ liệu máy ảnh, chạm (MENU) [Setup] [ (Playback Settings)] [Data Code] cài đặt mong muốn • Khi kích thước màn hình của thiết bị hiển thị (TV, vv) là 4:3, chạm (MENU) [Setup] [ (Connection)] [TV Type] [4:03] • Khi bạn kết nối một thiết bị đơn âm, kết nối đầu cắm màu vàng của cáp kết nối A / V tới giắc cắm đầu vào video và đầu cắm màu trắng (kênh trái) hoặc đỏ (kênh phải) vào giắc âm thanh đầu vào trên thiết bị.
�1GB
Customizing your cam
corder
Customizing your camcorder
Using menusYou can enjoy using your camcorder more by making good use of menu operations.The camcorder has various menu items under each of 6 menu categories.
Shooting Mode (Items for selecting a shooting mode) p. 52
Camera/Mic (Items for customized shooting) p. 52
Image Quality/Size (Items for setting up image quality or size) p. 53
Playback Function (Items for playback) p. 53
Edit/Copy (Items for editing) p. 53
Setup (Other setup items) p. 53
Operating menus
Follow the procedures explained below to set the menu items.
The [Camera/Mic] and [Setup] menus have sub-categories. Touch the sub-category icon, and the screen changes to other sub-category menus.Grayed out menu items or settings are not available.
NotesYou may not be able to set some menu items, depending on the recording or playback conditions.Touch to finish setting the menu or to return to the previous menu screen.
Tùy chỉnh máy quay của bạn
Sử dụng các menu
Bạn có thể thích thú chiếc máy quay của mình hơn nếu tận dụng tối đa thao tác menu. Máy quay có các mục khác nhau dưới từng 6 hạng mục.
Làm theo các bước được giải thích bên dưới để cài đặt các mục.
Thư mục [Camera/Mic] và [Setup] có các hạng mục con. Chạm vào biểu tượng hạng mục con và màn hình đổi sang thư mục các hạng mục con khác.Các mục màu xám hoặc cài đặt không hiển thị.
• Bạn có thể không cài đặt được một số mục, tùy thuộc vào điều kiện ghi hay phát lại.• Chạm để hoàn thành cài đặt menu hoặc để trở về màn hình menu trước đó.
Shooting Mode (Các mục chọn chế độ chụp) tr.52 Camera/Mic (Các mục chụp tùy chỉnh) tr.52 Image Quality/Size (Các mục thiết lập chất lượng hình ảnh hoặc kích cỡ)
tr.53 Playback Function (Các mục cho phát lại) tr.53 Edit/Copy (Các mục để chỉnh sửa) tr.53 Setup (Các mục cài đặt khác) tr.53
Thao tác menu
Chú ý
Tùy chỉnh máy quay của bạn

VN52
Danh sách thư mục
Shooting Mode
(Cài đặt thủ công)
(Cài đặt Máy ảnh)
(Khuôn mặt)
(Micro)
(Hỗ trợ chụp)
Movie …………………………..Quay phim Photo …………………………..Chụp ảnhSmth Slw REC…………..........Ghi đối tượng di chuyển nhanh trong chuyển động chậm.0Golf Shot ................................Chia hai giây của chuyển động nhanh thành các khung hình sau đó được ghi lại thành một phim và ảnh.
White Balance.................Điều chỉnh cân bằng màu sắc tới độ sáng của môi trường ghi.Spot Meter / Fcs..............Điều chỉnh độ sáng và bắt nét đối tượng được lựa chọn liên tiếp.Spot Meter ......................Điều chỉnh độ sáng của hình ảnh theo một đối tượng mà bạn chạm vào trên màn hình.Spot Focus......................Bắt nét vào một đối tượng bạn chạm vào trên màn hình.Exposure.........................Điều chỉnh độ sáng của phim và hình ảnh.Focus …………………….Bắt nét bằng tayLow Lux…………………..Ghi ảnh màu sắc rực rỡ trong ánh đen mờ.
Face Detection ………… Điều chỉnh chất lượng hình ảnh của khuôn mặt (các khuôn mặt) tự động.Smile Shutter...................Tự động chụp ảnh bất cứ khi nào một nụ cười được phát hiện.Smile Sensitivity...............Cài đặt độ nhạy phát hiện nụ cười sử dụng chức năng chụp màn trập nụ cười.
BLT-in Zoom Mic .............Quay phim với âm thanh sống động phù hợp với vị trí phóng.Wind Noise Reduct..........Giảm nhiễu Micref Level.....................Thiết lập cấp độ micro.
Guide Frame....................Hiển thị các khung hình để đảm bảo đối tượng nằm ngang hoặc thẳng đứng.Display Setting.................Cài đặt thời gian các biểu tượng hoặc chỉ báo được hiển thị trên màn hình LCD.
Scene Selection...............Lựa chọn cài đặt ghi phù hợp theo loại cảnh, chẳng hạn cảnh ban đêm hoặc bãi biển.
Fader …………….....Mờ cảnh.Self-Timer.................Cài đặt tự hẹn giờ khi máy quay của bạn đang ở chế độ ghi ảnh.
Tele Macro ......................Chụp bắt nét một đối tượng với nền bị nhòe đi.SteadyShot...............Cài đặt chức năng chống rung khi quay phim.SteadyShot...............Cài đặt chức năng chống rung khi chụp ảnh.
Digital Zoom.....................Cài đặt mức độ phóng to tối đa của phóng kỹ thuật số vượt quá mức độ phóng của bộ phận phóng.
Conversion Lens..............Cài đặt loại ống kính chuyển đổi kem theo (bán riêng). Tối ưu hoá chức năng SteadyShot và bắt nét dựa vào ống kính kem theo.Auto Back Light................Điều chỉnh độ phơi sáng tự động cho các chủ thể ánh sáng hắt sau.

VN53
Danh sách thư mục
Movie …………………………..Quay phim Photo …………………………..Chụp ảnhSmth Slw REC…………..........Ghi đối tượng di chuyển nhanh trong chuyển động chậm.0Golf Shot ................................Chia hai giây của chuyển động nhanh thành các khung hình sau đó được ghi lại thành một phim và ảnh.
White Balance.................Điều chỉnh cân bằng màu sắc tới độ sáng của môi trường ghi.Spot Meter / Fcs..............Điều chỉnh độ sáng và bắt nét đối tượng được lựa chọn liên tiếp.Spot Meter ......................Điều chỉnh độ sáng của hình ảnh theo một đối tượng mà bạn chạm vào trên màn hình.Spot Focus......................Bắt nét vào một đối tượng bạn chạm vào trên màn hình.Exposure.........................Điều chỉnh độ sáng của phim và hình ảnh.Focus …………………….Bắt nét bằng tayLow Lux…………………..Ghi ảnh màu sắc rực rỡ trong ánh đen mờ.
Face Detection ………… Điều chỉnh chất lượng hình ảnh của khuôn mặt (các khuôn mặt) tự động.Smile Shutter...................Tự động chụp ảnh bất cứ khi nào một nụ cười được phát hiện.Smile Sensitivity...............Cài đặt độ nhạy phát hiện nụ cười sử dụng chức năng chụp màn trập nụ cười.
BLT-in Zoom Mic .............Quay phim với âm thanh sống động phù hợp với vị trí phóng.Wind Noise Reduct..........Giảm nhiễu Micref Level.....................Thiết lập cấp độ micro.
Guide Frame....................Hiển thị các khung hình để đảm bảo đối tượng nằm ngang hoặc thẳng đứng.Display Setting.................Cài đặt thời gian các biểu tượng hoặc chỉ báo được hiển thị trên màn hình LCD.
Scene Selection...............Lựa chọn cài đặt ghi phù hợp theo loại cảnh, chẳng hạn cảnh ban đêm hoặc bãi biển.
Fader …………….....Mờ cảnh.Self-Timer.................Cài đặt tự hẹn giờ khi máy quay của bạn đang ở chế độ ghi ảnh.
Tele Macro ......................Chụp bắt nét một đối tượng với nền bị nhòe đi.SteadyShot...............Cài đặt chức năng chống rung khi quay phim.SteadyShot...............Cài đặt chức năng chống rung khi chụp ảnh.
Digital Zoom.....................Cài đặt mức độ phóng to tối đa của phóng kỹ thuật số vượt quá mức độ phóng của bộ phận phóng.
Conversion Lens..............Cài đặt loại ống kính chuyển đổi kem theo (bán riêng). Tối ưu hoá chức năng SteadyShot và bắt nét dựa vào ống kính kem theo.Auto Back Light................Điều chỉnh độ phơi sáng tự động cho các chủ thể ánh sáng hắt sau.
REC Mode ...........................Cài đặt chế độ để ghi phim. Khi ghi đối tượng di chuyển nhanh, chất lượng hình ảnh cao được khuyến cáo.
Frame Rate...........................Cài đặt tỷ lệ khung hình để ghi phim./ Setting....................Cài đặt chất lượng hình ảnh cho việc ghi, phát lại hoặc
chỉnh sửa phim.Wide Mode...........................Cài đặt tỷ lệ ngang sang dọc khi ghi phim với chất
lượng hình ảnh tiêu chuẩn (STD).x.v.Color ..............................Ghi lại phạm vi màu sắc rộng hơn.Image Size.......................... Cài đặt kích cỡ ảnh.
Event View...................................Hiển thị màn hình xem Sự kiện.Highlight Movie............................Khởi động Phát lại Highlight.Scenario......................................Khởi động bật Kịch bản Highlight đã được lưu lại.
Delete ..........................................Xóa phim hoặc hình ảnh.Protect..........................................Bảo vệ phim hoặc hình ảnh để tránh bị xóa.Copy*............................................Sao chép hình ảnh từ phương tiện ghi nội bộ đã lựa chọn tới thẻ nhớ đã lắp vào.Direct Copy...................................Sao chép hình ảnh được lưu trữ trên phương tiện ghi nội bộ hoặc trên một thẻ nhớ tới một số loại phương tiện truyền thông ngoài.
Media Select*...........................Cài đặt loại hình phương tiện truyền thông được sử dụng để ghi phim hoặc ảnh (tr.17).Media Info................................Hiển thị thông tin trên phương tiện ghi, chẳng hạn như không gian trống.Format.....................................Xóa tất cả dữ liệu trên phương tiện ghi nội bộ hoặc thẻ nhớRepair Img. DB F.....................Sửa chữa cơ sở dữ liệu tệp hình ảnh trên phương tiện ghi nội bộ hoặc thẻ nhớ (tr.57).File Number.............................Cài đặt cách chỉ định số tệp tin.
Data Code...............................Cài đặt ngày và giờ.Volume.....................................Điều chỉnh âm lượng của âm thanh phát lại (tr.27).
TV Type...................................Chuyển đổi tín hiệu tùy thuộc vào TV đã kết nối (tr.29)Component..............................Chọn tùy chọn này khi bạn kết nối máy quay của bạn tới TV với giắc cắm đầu vào thành phần (tr.30).HDMI Resolution.....................Chọn độ phân giải hình ảnh đầu ra khi kết nối máy quay của bạn tới TV với một cáp HDMI (bán riêng).CTRL FOR HDMI.....................Cài đặt Lệnh điều khiển từ xa của TV có được dùng hay không khi máy quay được kết nối tới một TV “BRAVIA” Sync tương thích với cáp HDMI (bán riêng).USB Connect...........................Lựa chọn loại hình phương tiện truyền thông trên máy quay được sẽ được dùng khi máy quay được kết nối tới một thiết bị ngoài thông qua cổng USB.
Playback Function
Edit/Copy
Setup
(Cài đặt truyền thông)
(Cài đặt Phát lại)
(Kết nối)
Tùy chỉnh máy quay của bạn

VN54
USB Connect Setting ….... Cài đặt chế độ kết nối khi máy quay được kết nối tới một máy tính hoặc thiết bị USB.
USB LUN Setting...............Cài đặt máy quay để cải thiện tính tương thích của một kết nối USB bằng cách hạn chế một số chức năng USB.Disc Burn...........................Cho phép bạn lưu các hình ảnh lên đĩa bằng một lần bấm nút.
(Cài đặt thông thường)Beep ..................................Cài đặt hoạt động âm thanh máy quay kêu bíp hay không.LCD Brightness..................Điều chỉnh độ sáng của màn hình LCD A. Shut Off.........................Thay đổi cài đặt [A. Shut Off] (tr.13).Power On By LCD..............Cài đặt máy quay phim được bật lên hay tắt đi khi bạn mở và đóng màn hình LCD.
Language Setting...............Cài đặt ngôn ngữ hiển thị (tr.16).Calibration..........................Hiệu chuẩn bảng cảm ứng.Battery Info....................... .Hiển thị thông tin pin.Demo Mode..................... .Cài đặt minh họa có xuất hiện hay không.
(Cài đặt đồng hồ)Date & Time Setting...........Cài đặt [Ngày & Giờ], [Giờ Mùa he], hoặc [Định dạng Ngày & Giờ] (tr.14).Area Setting.......................Điều chỉnh sự khác biệt thời gian không cần dừng đồng hồ (tr.14).
��GB
Customizing your cam
corder
Getting detailed information from the “Handycam” HandbookThe “Handycam” Handbook is a user guide designed to be read on a computer screen. The “Handycam” Handbook is intended to be read when you want to know more about operating your camcorder.
1 To install the “Handycam” Handbook on a Windows computer, place the supplied CD-ROM in the disc drive of your computer.The installation screen appears.
If the screen does not appear, click [Start] [Computer] (in Windows XP, [My Computer]), then double- click [SONYPMB(E:)](CD- ROM)* [install.exe].
* Drive names (such as (E:)) may vary depinding on the computer.
2 Click [Handbook].
3 Click the desired language and the model name of your camcorder [Install], and follow the on- screen instructions to install “Handycam” Handbook.
The model name of your camcorder is printed on the bottom surface.
To view the “Handycam” Handbook, double-click the short-cut icon on the computer screen.
When using a Macintosh, open the [Handbook] – [GB] folder in the CD-ROM, then copy [Handbook.pdf].You need Adobe Reader to read “Handycam” Handbook. If it is not installed on your computer, you can download it from the Adobe Systems web page: http://www.adobe.com/Refer to “PMB Help” for details on the supplied software “PMB” (p. 34).
* HDR-CX160E/CX180E

VN55
USB Connect Setting ….... Cài đặt chế độ kết nối khi máy quay được kết nối tới một máy tính hoặc thiết bị USB.
USB LUN Setting...............Cài đặt máy quay để cải thiện tính tương thích của một kết nối USB bằng cách hạn chế một số chức năng USB.Disc Burn...........................Cho phép bạn lưu các hình ảnh lên đĩa bằng một lần bấm nút.
(Cài đặt thông thường)Beep ..................................Cài đặt hoạt động âm thanh máy quay kêu bíp hay không.LCD Brightness..................Điều chỉnh độ sáng của màn hình LCD A. Shut Off.........................Thay đổi cài đặt [A. Shut Off] (tr.13).Power On By LCD..............Cài đặt máy quay phim được bật lên hay tắt đi khi bạn mở và đóng màn hình LCD.
Language Setting...............Cài đặt ngôn ngữ hiển thị (tr.16).Calibration..........................Hiệu chuẩn bảng cảm ứng.Battery Info....................... .Hiển thị thông tin pin.Demo Mode..................... .Cài đặt minh họa có xuất hiện hay không.
(Cài đặt đồng hồ)Date & Time Setting...........Cài đặt [Ngày & Giờ], [Giờ Mùa he], hoặc [Định dạng Ngày & Giờ] (tr.14).Area Setting.......................Điều chỉnh sự khác biệt thời gian không cần dừng đồng hồ (tr.14).
��GB
Customizing your cam
corder
Getting detailed information from the “Handycam” HandbookThe “Handycam” Handbook is a user guide designed to be read on a computer screen. The “Handycam” Handbook is intended to be read when you want to know more about operating your camcorder.
1 To install the “Handycam” Handbook on a Windows computer, place the supplied CD-ROM in the disc drive of your computer.The installation screen appears.
If the screen does not appear, click [Start] [Computer] (in Windows XP, [My Computer]), then double- click [SONYPMB(E:)](CD- ROM)* [install.exe].
* Drive names (such as (E:)) may vary depinding on the computer.
2 Click [Handbook].
3 Click the desired language and the model name of your camcorder [Install], and follow the on- screen instructions to install “Handycam” Handbook.
The model name of your camcorder is printed on the bottom surface.
To view the “Handycam” Handbook, double-click the short-cut icon on the computer screen.
When using a Macintosh, open the [Handbook] – [GB] folder in the CD-ROM, then copy [Handbook.pdf].You need Adobe Reader to read “Handycam” Handbook. If it is not installed on your computer, you can download it from the Adobe Systems web page: http://www.adobe.com/Refer to “PMB Help” for details on the supplied software “PMB” (p. 34).
Xem thông tin chi tiết từ Sổ tay “Handycam” Sổ tay “Handycam” là sách hướng dẫn sử dụng được thiết kế để đọc trên màn hình máy tính.Sổ tay “Handycam” dành để đọc khi bạn muốn biết thêm về việc sử dụng máy quay của bạn.
• Để xem sổ tay “Handycam”, nhấp đúp vào biểu tượng trên màn hình máy tính.
• Khi sử dụng máy Macintosh, mở thư mục [Handbook] – [GB] trong CD-ROM, sau đó sao chép [Handbook.pdf].• Bạn cần có Adobe Reader để đọc Sổ tay “Handycam”. Nếu nó không được cài đặt trên máy tính của bạn, bạn có thể tải xuống từ trang web Adobe Systems: http://www.adobe.com/• Hãy tham khảo “PMB Help” để biết chi tiết về phần mềm “PMB” kèm theo (tr.34).
Chú ý
Để cài đặt Sổ tay “Handycam” trên máy tính Windows, lắp CD-ROM kem theo vào ổ đĩa máy tính của bạn.Màn hình cài đặt xuất hiện.• Nếu màn hình không xuất hiện, nhấp vào [Start] [Computer] (trong Windows XP, [My Computer]), sau đó kích đúp [SONYPMB (E:)] (CD-ROM) * [install.exe].• Tên ổ đĩa (như (E:)) có thể khác biệt tùy thuộc vào máy tính.
Nhấp vào ngôn ngữ mong muốn và tên các model máy quay của bạn [Install] và làm theo các hướng dẫn trên màn hình để cài đặt Sổ tay “Handycam”.• Tên model máy quay của bạn in trên mặt đáy của máy.
Nhấp [Handbook].
Tùy chỉnh máy quay của bạn

VN56��
GB
Additional information
TroubleshootingIf you run into any problems using your camcorder, follow the steps below.
Check the list (p. 56 to 58), and inspect your camcorder.
Remove the power source, attach the power source again after about 1 minute, and turn the camcorder on.
Press RESET (p. 67) using a pointed object, and turn the camcorder on.If you press RESET, all settings, including the clock setting, are reset.
Contact your Sony dealer or local authorized Sony service facility.
Your camcorder may be required to initialize or change the current internal memory (HDR-CX160E/CX180E) of your camcorder, depending on the problem. In the event of this, the data stored on the internal memory will be deleted. Be sure to save the data on the internal memory on other media (backup) before sending your camcorder for repair. We will not compensate you for any loss of internal memory data.During repair, we may check a minimum amount of data stored on the internal memory in order to investigate the problem. However, your Sony dealer will neither copy nor retain your data.See the “Handycam” Handbook (p. 55) for details on the symptoms of your camcorder, and “PMB Help” (p. 37) on connecting your camcorder to a computer.
The power does not turn on.
Attach a charged battery pack to the camcorder (p. 10).Connect the plug of the AC Adaptor to the wall outlet (wall socket) (p. 12).
The camcorder does not operate even when the power is set to on.
It takes a few seconds for your camcorder to be ready to shoot after the power is turned on. This is not a malfunction.Disconnect the AC Adaptor from the wall outlet (wall socket) or remove the battery pack, then reconnect it after about 1 minute. If your camcorder still does not work, press RESET (p. 67) using a pointed object. (If you press RESET, all settings, including the clock setting, are reset.)The temperature of your camcorder is extremely high. Turn off the camcorder and leave it for a while in a cool place.The temperature of your camcorder is extremely low. Leave the camcorder with the power turned on. If you still cannot operate your camcorder, turn off the camcorder and take it to a warm place. Leave the camcorder there for a while, then turn on the camcorder.
Your camcorder gets warm.
Your camcorder may become warm during operation. This is not a malfunction.
The power abruptly turns off.
Use the AC Adaptor (p. 12).Turn on the power again.Charge the battery pack (p. 10).
Pressing START/STOP or PHOTO does not record images.
Press MODE to turn on the (Movie) or (Photo) lamp.Your camcorder is recording the image you have just shot on the recording media. You cannot make any new recordings during this period.The recording media is full. Delete unnecessary images (p. 32).Total number of movie scenes or photos has exceeded the recordable capacity of your camcorder (p. 59). Delete unnecessary images (p. 32).
Thông tin bổ sung
Máy quay không hoạt động ngay cả khi nguồn điện đang bật.
Máy quay của bạn ấm lên.
Nguồn điện đột ngột tắt.
Nhấn START/STOP hoặc PHOTO không ghi lại hình ảnh.
Xử lý sự cốNếu bạn gặp bất kì vấn đề gì khi dùng máy quay, thực hiện theo các bước dưới đây.
Kiểm tra danh sách (tr.56-58) vàkiểm tra máy quay của bạn.
Liên hệ với đại lý của Sony hoặc trạm bảo hành ủy quyền địa phương của Sony.
Ngắt nguồn điện, gắn nguồn điện trở lại sau khoảng 1 phút và bật máy quay lên.
Bấm RESET (tr.67) bằng cách sử dụng một vật nhọn và bật máy quay lên.Nếu bạn bấm RESET, tất cả các cài đặt,bao gồm cài đặt đồng hồ, sẽ được đặt lại.
• Máy quay của bạn có thể được yêu cầu để khởi tạo hoặc đổi bộ nhớ nội bộ hiện hành (HDR-CX160E/CX180E) của máy, tùy thuộc vào sự cố. Trong trường hợp này, các dữ liệu được lưu trên bộ nhớ trong sẽ bị xóa. Hãy chắc chắn lưu lại dữ liệu vào bộ nhớ nội bộ trên phương tiện khác (sao lưu) trước khi gửi máy quay của bạn đi sửa. Chúng tôi sẽ không bồi thường bạn cho bất kỳ mất mát nào của bộ nhớ dữ liệu nội bộ.• Trong thời gian sửa chữa, chúng tôi có thể kiểm tra số lượng tối thiểu của dữ liệu lưu trên bộ nhớ trong để xem xét trục trặc. Tuy nhiên, đại lý Sony của bạn sẽ không sao chép hoặc giữ lại dữ liệu của bạn.• Xem Sổ tay “Handycam” (tr.55) về các chi tiết về triệu chứng của máy và “PMB Help ” (tr.37) về kết nối của máy quay phim tới máy tính.
• Phải mất một vài giây để máy quay của bạn sẵn sàng chụp sau khi nguồn điện được bật lên. Đây không phải là một hỏng hóc.• Ngắt kết nối bộ chỉnh lưu AC từ ổ cắm trên tường (ổ cắm điện) hoặc tháo pin ra, rồi bật lại sau khoảng 1 phút. Nếu máy quay của bạn vẫn không hoạt động, bấm RESET (tr.67) bằng cách sử dụng một vật nhọn. (Nếu bạn bấm RESET, tất cả các cài đặt, bao gồm cài đặt đồng hồ, sẽ được đặt lại.)• Nhiệt độ của máy quay của bạn quá cao. tắt máy và để ở một nơi mát mẻ trong một lúc.• Nhiệt độ của máy quay của bạn quá thấp. bật nguồn điện và để máy nghỉ một lúc. Nếu bạn vẫn không thể khởi động máy quay, hãy tắt máy quay và cầm nó đến một nơi ấm áp. Để máy quay ở đó một lúc, sau đó bật máy lên.
• Máy quay của bạn có thể trở nên ấm trong quá trình hoạt động. Đây không phải là một hỏng hóc.
• Sử dụng bộ chỉnh lưu AC (tr.12).• Bật điện một lần nữa.• Sạc pin (tr.10).
• Nhấn MODE để bật đèn (Phim) hoặc (Ảnh).• Máy quay của bạn đang ghi các hình ảnh bạn vừa chụp trên phương tiện ghi.Bạn không thể thực hiện bất kỳ việc ghi hình mới nào trong giai đoạn này.• Phương tiện ghi đã đầy. Xóa hình ảnh không cần thiết (tr.32).• Tổng số cảnh phim hay hình ảnh vượt quá dung lượng ghi của máy quay (tr.59). Xóa hình ảnh không cần thiết (tr.32).
Nguồn điện không bật lên.• Lắp pin đã sạc vào máy quay (tr.10).• Kết nối đầu cắm của bộ chỉnh lưu AC tới ổ cắm trên tường (ổ cắm điện) (tr.12).
��GB
Additional inform
ation
The recording stops.
The temperature of your camcorder is extremely high/low. Turn off your camcorder and leave it for a while in a cool/warm place.
“PMB” cannot be installed.
Check the computer environment or installation procedure required to install “PMB” (p. 34).
“PMB” does not work correctly.
Quit “PMB” and restart your computer.
The camcorder is not recognized by the computer.
Disconnect devices from the USB jack of the computer other than the keyboard, mouse, and your camcorder.Disconnect the USB cable from the computer and your camcorder, and restart the computer, then connect the computer and your camcorder again in an orderly manner.When both the built-in USB cable and other USB cable (that is connected to the USB port on the camcorder) are connected to external devices at the same time, disconnect the one that is not connected to a computer.
Self-diagnosis display/Warning indicators
If indicators appear on the LCD screen, check the following.If the problem persists even after you have tried to fix a couple of times, contact your Sony dealer or local authorized Sony service facility. In this case, when you contact them, give them all the numbers of the error code beginning with C or E.
C:04:The battery pack is not an “InfoLITHIUM” battery pack V series. Use an “InfoLITHIUM” battery pack (V series) (p. 10).Connect the DC plug of the AC Adaptor to your camcorder securely (p. 10).
C:06:The battery pack temperature is high. Change the battery pack or place it in a cool place.
C:13: / C:32:Remove the power source. Reconnect it and operate your camcorder again.
E::
Follow the steps from on page 56.
Battery power is low.
The battery pack temperature is high. Change the battery pack or place it in a cool place.
No memory card is inserted (p. 18).When the indicator flashes, there is not enough free space for recording images. Delete unnecessary images (p. 32), or format the memory card after storing the images on other media.The Image Database File is damaged. Check the data base file by touching (MENU) [Setup] [ (Media Settings)] [Repair Img. DB F.] the recording medium (HDR-CX160E/CX180E).
The memory card is damaged. Format the memory card with your camcorder (p. 53).
VN57��
GB
Additional information
TroubleshootingIf you run into any problems using your camcorder, follow the steps below.
Check the list (p. 56 to 58), and inspect your camcorder.
Remove the power source, attach the power source again after about 1 minute, and turn the camcorder on.
Press RESET (p. 67) using a pointed object, and turn the camcorder on.If you press RESET, all settings, including the clock setting, are reset.
Contact your Sony dealer or local authorized Sony service facility.
Your camcorder may be required to initialize or change the current internal memory (HDR-CX160E/CX180E) of your camcorder, depending on the problem. In the event of this, the data stored on the internal memory will be deleted. Be sure to save the data on the internal memory on other media (backup) before sending your camcorder for repair. We will not compensate you for any loss of internal memory data.During repair, we may check a minimum amount of data stored on the internal memory in order to investigate the problem. However, your Sony dealer will neither copy nor retain your data.See the “Handycam” Handbook (p. 55) for details on the symptoms of your camcorder, and “PMB Help” (p. 37) on connecting your camcorder to a computer.
The power does not turn on.
Attach a charged battery pack to the camcorder (p. 10).Connect the plug of the AC Adaptor to the wall outlet (wall socket) (p. 12).
The camcorder does not operate even when the power is set to on.
It takes a few seconds for your camcorder to be ready to shoot after the power is turned on. This is not a malfunction.Disconnect the AC Adaptor from the wall outlet (wall socket) or remove the battery pack, then reconnect it after about 1 minute. If your camcorder still does not work, press RESET (p. 67) using a pointed object. (If you press RESET, all settings, including the clock setting, are reset.)The temperature of your camcorder is extremely high. Turn off the camcorder and leave it for a while in a cool place.The temperature of your camcorder is extremely low. Leave the camcorder with the power turned on. If you still cannot operate your camcorder, turn off the camcorder and take it to a warm place. Leave the camcorder there for a while, then turn on the camcorder.
Your camcorder gets warm.
Your camcorder may become warm during operation. This is not a malfunction.
The power abruptly turns off.
Use the AC Adaptor (p. 12).Turn on the power again.Charge the battery pack (p. 10).
Pressing START/STOP or PHOTO does not record images.
Press MODE to turn on the (Movie) or (Photo) lamp.Your camcorder is recording the image you have just shot on the recording media. You cannot make any new recordings during this period.The recording media is full. Delete unnecessary images (p. 32).Total number of movie scenes or photos has exceeded the recordable capacity of your camcorder (p. 59). Delete unnecessary images (p. 32).
��GB
Additional inform
ation
The recording stops.
The temperature of your camcorder is extremely high/low. Turn off your camcorder and leave it for a while in a cool/warm place.
“PMB” cannot be installed.
Check the computer environment or installation procedure required to install “PMB” (p. 34).
“PMB” does not work correctly.
Quit “PMB” and restart your computer.
The camcorder is not recognized by the computer.
Disconnect devices from the USB jack of the computer other than the keyboard, mouse, and your camcorder.Disconnect the USB cable from the computer and your camcorder, and restart the computer, then connect the computer and your camcorder again in an orderly manner.When both the built-in USB cable and other USB cable (that is connected to the USB port on the camcorder) are connected to external devices at the same time, disconnect the one that is not connected to a computer.
Self-diagnosis display/Warning indicators
If indicators appear on the LCD screen, check the following.If the problem persists even after you have tried to fix a couple of times, contact your Sony dealer or local authorized Sony service facility. In this case, when you contact them, give them all the numbers of the error code beginning with C or E.
C:04:The battery pack is not an “InfoLITHIUM” battery pack V series. Use an “InfoLITHIUM” battery pack (V series) (p. 10).Connect the DC plug of the AC Adaptor to your camcorder securely (p. 10).
C:06:The battery pack temperature is high. Change the battery pack or place it in a cool place.
C:13: / C:32:Remove the power source. Reconnect it and operate your camcorder again.
E::
Follow the steps from on page 56.
Battery power is low.
The battery pack temperature is high. Change the battery pack or place it in a cool place.
No memory card is inserted (p. 18).When the indicator flashes, there is not enough free space for recording images. Delete unnecessary images (p. 32), or format the memory card after storing the images on other media.The Image Database File is damaged. Check the data base file by touching (MENU) [Setup] [ (Media Settings)] [Repair Img. DB F.] the recording medium (HDR-CX160E/CX180E).
The memory card is damaged. Format the memory card with your camcorder (p. 53).
Việc ghi sẽ dừng lại.
“PMB” không thể cài đặt được.
“PMB” không làm việc chính xác.
Máy quay không được nhận bởi máy tính.
• Nhiệt độ của máy quay của bạn cực kỳ cao/thấp. Tắt máy quay của bạn và để nguyên nó một thời gian ở một nơi mát/ấm.
• Pin không phải là pin “InfoLITHIUM” V. Sử dụng pin “InfoLITHIUM” (dòng V) (tr.10).• Kết nối đầu cắm DC của bộ chỉnh lưu AC tới máy quay của bạn một cách an toàn (tr.10).
• Nhiệt độ pin cao. Đổi pin hoặc đặt nó ở một nơi mát mẻ.
• Tháo nguồn điện. Kết nối lại và khởi động máy quay một lần nữa.
• Thực hiện theo các bước từ 2 trên tr.56.
• Pin yếu.
• Nhiệt độ pin cao. Đổi pin hoặc đặt nó ở một nơi mát mẻ.
• Thẻ nhớ bị hỏng. Định dạng thẻ nhớ với máy quay của bạn (tr.53).
• Kiểm tra môi trường máy tính hoặc các bước cài đặt cần thiết để cài đặt “PMB” (tr.34).
• Thoát “PMB” và khởi động lại máy tính của bạn.
• Ngắt kết nối các thiết bị từ các giắc cắm USB của máy tính ngoài bàn phím, chuột, và máy quay của bạn.• Ngắt kết nối cáp USB từ máy tính và máy quay của bạn, khởi động lại máy tính, sau đó kết nối máy tính và máy quay của bạn lại một lần nữa theo đúng trật tự.• Khi cả cáp USB tích hợp trong và cáp USB khác (đang kết nối tới cổng USB trên máy quay) được kết nối với các thiết bị ngoài cùng lúc, ngắt kết nối thiết bị không kết nối với máy tính.
Nếu chỉ báo xuất hiện trên màn hình LCD,kiểm tra các vấn đề sau.Nếu vấn đề vẫn còn ngay cả sau khi bạnđã cố gắng sửa chữa một vài lần, liên hệđại lý Sony hoặc trạm bảo hành địa phương ủy quyền của Sony. Trong trường hợp này, khi bạn liên hệ với họ, cung cấp tất cả số mã lỗi bắt đầu bằng C hoặc E.
Hiển thị tự chẩn đoán / Các chỉ báo
Thông tin bổ sung
• Không có thẻ nhớ được lắp vào (tr.18).• Khi chỉ báo nhấp nháy, không có đủ không gian để ghi ảnh. Xóa hình ảnh không cần thiết (tr.32) hoặc định dạng thẻ nhớ sau khi lưu trữ các hình ảnh trên phương tiện khác.• Tập tin cơ sở dữ liệu hình ảnh bị hỏng. Kiểm tra tập tin cơ sở dữ liệu bằng cách chạm vào (MENU) [Setup] [ (Media Settings)] [Repair Img. DB F.] phương tiện ghi (HDR-CX160E/ CX180E).

VN58��
GB
Incompatible memory card is inserted (p. 18).
The memory card is write-protected.Access to the memory card was restricted on another device.
The camcorder is unsteady. Hold the camcorder steady with both hands. However, note that the camera-shake warning indicator does not disappear.
The recording media is full. Delete unnecessary images (p. 32).Photos cannot be recorded during processing. Wait for a while, then record.When [ REC Mode] is set to [Highest Quality ] or [50p Quality ], you cannot capture photos while recording movies.
Recording time of movies/number of recordable photos“HD” stands for high definition image quality, and “STD” stands for standard image quality.
Expected time of recording and playback with each battery pack
Recording timeApproximate time available when you use a fully charged battery pack.
(unit: minute)Battery pack Continuous
recording timeTypical recording
time
Image quality HD STD HD STDNP-FV50(supplied)
150 165 75 80
NP-FV70 315 345 155 170NP-FV100 625 680 310 340
Each recording time is measured when the camcorder is recording high definition image quality (HD) movies with [ REC Mode] set to [Standard ].Typical recording time shows the time when you repeat recording start/stop, switching the MODE lamp, and zooming.Times measured when using the camcorder at 25 C (77 °F). 10 C to 30 C (50 °F to 86 °F) is recommended.The recording and playback time will be shorter when you use your camcorder in low temperatures.The recording and playback time will be shorter depending on the conditions under which you use your camcorder.
• Thẻ nhớ không tương thích được lắp vào (tr.18).
• Thẻ nhớ được bảo vệ ghi.• Truy cập vào thẻ nhớ đã bị hạn chế trên thiết bị khác.
• Máy quay này là không ổn định. Giữ máy quay ổn định với cả hai tay. Tuy nhiên, lưu ý rằng chỉ báo máy ảnh rung sẽ không biến mất.
• Phương tiện ghi đã đầy. Xóa các hình ảnh không cần thiết (tr. 32).• Hình ảnh không thể được ghi lại trong quá trình xử lý. Đợi một lúc, sau đó ghi lại.• Khi [REC Mode] được đặt sang chế độ [Highest Quality] hay [50p Quality], bạn không thể chụp ảnh trong khi quay phim.
Thời gian quay phim/số hình ảnh ghi được“HD” là viết tắt của chất lượng hình ảnh độ nét cao và “STD” là viết tắt của chất lượng hình ảnh tiêu chuẩn.
Khoảng thời gian có sẵn khi bạn sử dụngpin đã sạc đầy.
• Mỗi lần ghi được đo khi máy quay ghi phim chất lượng hình ảnh độ nét cao (HD) với [REC Mode] được đặt sang chế độ [Standard ].• Thời gian ghi điển hình cho thấy thời gian bạn lặp lại khởi động ghi/ dừng lại, chuyển đổi các đèn MODE và phóng to.• Thời gian được đo khi sử dụng máy quay ở 25°C (77°F). 10°C đến 30°C (50°F đến 86°F) được khuyến khích.• Thời gian ghi và phát lại sẽ bị ngắn hơn khi bạn sử dụng máy quay ở nhiệt độ thấp. Thời gian ghi và phát lại sẽ bị rút ngắn tùy thuộc vào điều kiện mà bạn sử dụng máy quay.
(đơn vị: phút)
Thời gian ghi dự kiến và phát lại với mỗi bộ pinThời gian ghi
Pin Thời gian ghi liên tục
Thời gian ghi điển hình
��GB
Additional information
NotesThe number in ( ) is the minimum recordable time.
TipsYou can record movies of a maximum of 3,999 scenes with high definition image quality (HD), and 9,999 scenes with standard definition image quality (STD).The maximum continuous recording time of movies is approximately 13 hours.If you want to record up to the maximum recording time indicated in the table, you need to delete the demonstration movie on your camcorder (HDR-CX160E/CX180E).Your camcorder uses the VBR (Variable Bit Rate) format to automatically adjust image quality to suit the recording scene. This technology causes fluctuations in the recording time of the media. Movies containing quickly moving and complex images are recorded at a higher bit rate, and this reduces the overall recording time.
Memory card
High definition image quality (HD)(unit: minute)
2 GB 4 GB 8 GB 16 GB 32 GB9
(9)15
(15)35
(35)75
(75)150
(150)10
(10)20
(20)40
(40)90
(90)180
(180)10
(10)30
(30)60
(60)120
(120)245
(245)25
(15)50
(40)105(80)
215(165)
440(330)
45(35)
90(75)
190(155)
380(310)
770(630)
Standard definition image quality (STD)(unit: minute)
2 GB 4 GB 8 GB 16 GB 32 GB25
(25)55
(50)110
(100)225
(210)460
(420)
Playing timeApproximate time available when you use a fully charged battery pack.
(unit: minute)Battery pack
Image quality HD STDNP-FV50(supplied)
240 280
NP-FV70 490 565NP-FV100 980 1120
Expected recording time of movies
Internal recording mediaHDR-CX160E/CX180E
High definition image quality (HD) in h (hour) and m (minute)
Recording mode Recording time
HDR-CX160E HDR-CX180E
[50p Quality ] 1 h 15 m(1 h 15 m)
2 h 35 m(2 h 35 m)
[Highest Quality ]
1 h 30 m(1 h 30 m)
3 h 5 m(3 h 5 m)
[High Quality ] 2 h 5 m(2 h 5 m)
4 h 15 m(4 h 15 m)
[Standard ] 3 h 40 m(2 h 45 m)
7 h 35 m(5 h 45 m)
[Long Time ] 6 h 25 m(5 h 15 m)
13 h 15 m(10 h 50 m)
Standard definition image quality (STD) in h (hour) and m (minute)
Recording mode Recording time
HDR-CX160E HDR-CX180E
[Standard ] 3 h 50 m(3 h 30 m)
7 h 55 m(7 h 15 m)
Chất lượng hình ảnh
(kèm theo)
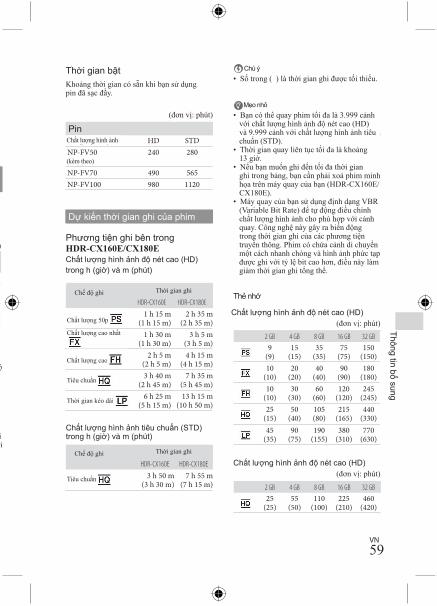
VN59
��GB
Incompatible memory card is inserted (p. 18).
The memory card is write-protected.Access to the memory card was restricted on another device.
The camcorder is unsteady. Hold the camcorder steady with both hands. However, note that the camera-shake warning indicator does not disappear.
The recording media is full. Delete unnecessary images (p. 32).Photos cannot be recorded during processing. Wait for a while, then record.When [ REC Mode] is set to [Highest Quality ] or [50p Quality ], you cannot capture photos while recording movies.
Recording time of movies/number of recordable photos“HD” stands for high definition image quality, and “STD” stands for standard image quality.
Expected time of recording and playback with each battery pack
Recording timeApproximate time available when you use a fully charged battery pack.
(unit: minute)Battery pack Continuous
recording timeTypical recording
time
Image quality HD STD HD STDNP-FV50(supplied)
150 165 75 80
NP-FV70 315 345 155 170NP-FV100 625 680 310 340
Each recording time is measured when the camcorder is recording high definition image quality (HD) movies with [ REC Mode] set to [Standard ].Typical recording time shows the time when you repeat recording start/stop, switching the MODE lamp, and zooming.Times measured when using the camcorder at 25 C (77 °F). 10 C to 30 C (50 °F to 86 °F) is recommended.The recording and playback time will be shorter when you use your camcorder in low temperatures.The recording and playback time will be shorter depending on the conditions under which you use your camcorder.
“HD” là viết tắt của chất lượng hình ảnh độ nét cao và “STD” là viết tắt của chất lượng hình ảnh tiêu chuẩn.
Khoảng thời gian có sẵn khi bạn sử dụngpin đã sạc đầy.
• Mỗi lần ghi được đo khi máy quay ghi phim chất lượng hình ảnh độ nét cao (HD) với [REC Mode] được đặt sang chế độ [Standard ].• Thời gian ghi điển hình cho thấy thời gian bạn lặp lại khởi động ghi/ dừng lại, chuyển đổi các đèn MODE và phóng to.• Thời gian được đo khi sử dụng máy quay ở 25°C (77°F). 10°C đến 30°C (50°F đến 86°F) được khuyến khích.• Thời gian ghi và phát lại sẽ bị ngắn hơn khi bạn sử dụng máy quay ở nhiệt độ thấp. Thời gian ghi và phát lại sẽ bị rút ngắn tùy thuộc vào điều kiện mà bạn sử dụng máy quay.
(đơn vị: phút)
Thời gian ghi dự kiến và phát lại với mỗi bộ pin
��GB
Additional information
NotesThe number in ( ) is the minimum recordable time.
TipsYou can record movies of a maximum of 3,999 scenes with high definition image quality (HD), and 9,999 scenes with standard definition image quality (STD).The maximum continuous recording time of movies is approximately 13 hours.If you want to record up to the maximum recording time indicated in the table, you need to delete the demonstration movie on your camcorder (HDR-CX160E/CX180E).Your camcorder uses the VBR (Variable Bit Rate) format to automatically adjust image quality to suit the recording scene. This technology causes fluctuations in the recording time of the media. Movies containing quickly moving and complex images are recorded at a higher bit rate, and this reduces the overall recording time.
Memory card
High definition image quality (HD)(unit: minute)
2 GB 4 GB 8 GB 16 GB 32 GB9
(9)15
(15)35
(35)75
(75)150
(150)10
(10)20
(20)40
(40)90
(90)180
(180)10
(10)30
(30)60
(60)120
(120)245
(245)25
(15)50
(40)105(80)
215(165)
440(330)
45(35)
90(75)
190(155)
380(310)
770(630)
Standard definition image quality (STD)(unit: minute)
2 GB 4 GB 8 GB 16 GB 32 GB25
(25)55
(50)110
(100)225
(210)460
(420)
Playing timeApproximate time available when you use a fully charged battery pack.
(unit: minute)Battery pack
Image quality HD STDNP-FV50(supplied)
240 280
NP-FV70 490 565NP-FV100 980 1120
Expected recording time of movies
Internal recording mediaHDR-CX160E/CX180E
High definition image quality (HD) in h (hour) and m (minute)
Recording mode Recording time
HDR-CX160E HDR-CX180E
[50p Quality ] 1 h 15 m(1 h 15 m)
2 h 35 m(2 h 35 m)
[Highest Quality ]
1 h 30 m(1 h 30 m)
3 h 5 m(3 h 5 m)
[High Quality ] 2 h 5 m(2 h 5 m)
4 h 15 m(4 h 15 m)
[Standard ] 3 h 40 m(2 h 45 m)
7 h 35 m(5 h 45 m)
[Long Time ] 6 h 25 m(5 h 15 m)
13 h 15 m(10 h 50 m)
Standard definition image quality (STD) in h (hour) and m (minute)
Recording mode Recording time
HDR-CX160E HDR-CX180E
[Standard ] 3 h 50 m(3 h 30 m)
7 h 55 m(7 h 15 m)
Thời gian bậtKhoảng thời gian có sẵn khi bạn sử dụngpin đã sạc đầy.
• Số trong ( ) là thời gian ghi được tối thiểu.
• Bạn có thể quay phim tối đa là 3.999 cảnh với chất lượng hình ảnh độ nét cao (HD) và 9.999 cảnh với chất lượng hình ảnh tiêu chuẩn (STD).• Thời gian quay liên tục tối đa là khoảng 13 giờ.• Nếu bạn muốn ghi đến tối đa thời gian ghi trong bảng, bạn cần phải xoá phim minh họa trên máy quay của bạn (HDR-CX160E/ CX180E).• Máy quay của bạn sử dụng định dạng VBR (Variable Bit Rate) để tự động điều chỉnh chất lượng hình ảnh cho phù hợp với cảnh quay. Công nghệ này gây ra biến động trong thời gian ghi của các phương tiện truyền thông. Phim có chứa cảnh di chuyển một cách nhanh chóng và hình ảnh phức tạp được ghi với tỷ lệ bit cao hơn, điều này làm giảm thời gian ghi tổng thể.
(đơn vị: phút)
(đơn vị: phút)
(đơn vị: phút)
Dự kiến thời gian ghi của phim
PinChất lượng hình ảnh
(kèm theo)
Phương tiện ghi bên trongHDR-CX160E/CX180EChất lượng hình ảnh độ nét cao (HD) trong h (giờ) và m (phút)
Chế độ ghi
Chế độ ghi
Thời gian ghi
Thời gian ghi
Chất lượng cao nhất
Chất lượng 50p
Chất lượng cao
Tiêu chuẩn
Tiêu chuẩn
Thời gian kéo dài
Chất lượng hình ảnh tiêu chuẩn (STD) trong h (giờ) và m (phút)
Chú ý
Mẹo nhỏ
Thẻ nhớ
Chất lượng hình ảnh độ nét cao (HD)
Chất lượng hình ảnh độ nét cao (HD)
Thông tin bổ sung

VN60�0GB
NotesThe recordable time may vary depending on the recording and subject conditions and [ REC Mode] and [ Frame Rate] (p. 53).The number in ( ) is the minimum recordable time.
Expected number of recordable photos
Internal recording media (HDR-CX160E/CX180E)You can record the maximum 40,000 photos.
Memory card
3.3M
2 GB 13004 GB 26008 GB 530016 GB 1050032 GB 21000
The selected image size is effective when the (Photo) lamp is lit.
The number of recordable photos of memory card shown is for the maximum image size of your camcorder. The actual number of recordable photos is displayed on the LCD screen during recording (p. 66).The number of recordable photos of memory card may vary depending on the recording conditions.
NotesThe unique pixel array of Sony’s ClearVid and the image processing system (BIONZ) allow still image resolution equivalent to the sizes described.
TipsYou can also use memory card with a capacity of under 1 GB for recording photos.The following list shows the bit rate, pixels and aspect ratio of each recording mode (movie + audio, etc.).
High definition image quality (HD):PS: Max. 28 Mbps 1,920 1,080 pixels/16:9FX: Max. 24 Mbps 1,920 1,080 pixels/16:9FH: Approx. 17 Mbps (average) 1,920 1,080
pixels/16:9HQ: Approx. 9 Mbps (average) 1,440 1,080
pixels/16:9LP: Approx. 5 Mbps (average) 1,440 1,080
pixels/16:9Standard definition image quality (STD):HQ: Approx. 9 Mbps (average) 720 576
pixels/16:9, 4:3The photo recording pixels and the aspect ratio.
Photo recording mode:2,112 1,584 dots/4:32,112 1,188 dots/16:91,600 1,200 dots/4:3640 480 dots/4:3Dual recording:2,304 1,296 dots/16:91,728 1,296 dots/4:3Capturing a photo from a movie:1,920 1,080 dots/16:9640 360 dots/16:9640 480 dots/4:3
• Thời gian ghi có thể khác nhau tùy thuộc vào việc ghi và điều kiện chủ đề và [ REC Mode] và [ Frame Rate] (tr.53).• Số trong ( ) là thời gian ghi được tối thiểu.
• Kích thước hình ảnh đã chọn có hiệu quả khi đèn (ảnh) sáng.• Số lượng ảnh ghi của thẻ nhớ được hiển thị là kích cỡ ảnh tối đa của máy quay của bạn. Số lượng ảnh ghi thực tế được hiển thị trên màn hình LCD trong khi ghi (tr.66).• Số lượng ảnh ghi của thẻ nhớ có thể thay đổi tùy thuộc vào điều kiện ghi.
• Mảng điểm ảnh độc đáo ClearVid của Sony và hệ thống xử lý hình ảnh (BIONZ) cho phép độ phân giải ảnh tĩnh tương đương với kích cỡ đã mô tả.
• Bạn cũng có thể sử dụng thẻ nhớ có dung lượng dưới 1 GB để ghi lại hình ảnh.
• Danh sách sau đây cho thấy tỷ lệ bit, điểm ảnh và tỷ lệ khung hình của mỗi chế độ ghi (phim + âm thanh, vv.)• - Chất lượng hình ảnh độ nét cao (HD): PS: Tối đa 28 Mbps 1.920 x 1.080 pixels/16: 9 FX: Tối đa 24 Mbps 1.920 x 1.080 pixels/16: 9 FH: Khoảng 17 Mbps (trung bình) 1920 x1080 pixels/16: 9 HQ: Khoảng. 9 Mbps (trung bình) 1440x1080 pixels/16: 9 LP: Khoảng. 5 Mbps (trung bình) 1440x1080 pixels/16: 9 - Chất lượng hình ảnh tiêu chuẩn (STD): HQ: Khoảng. 9 Mbps (trung bình) 720x576 pixels/16: 9, 4:3
• Điểm ảnh ghi hình và tỷ lệ khung hình. – Chế độ ghi ảnh:
2,112 x 1,584 điểm/4:3 2,112 x 1,188 điểm/16:9 1,600 x 1,200 điểm/4:3 640 x 480 điểm/4:3– Ghi kép: 2,304 x 1,296 điểm/16:9 1,728 x 1,296 điểm/4:3– Chụp ảnh từ phim: 1,920 x 1,080 điểm/16:9 640 x 360 điểm/16:9 640 x 480 điểm/4:3
Chú ý Mẹo nhỏ
Chú ý
Thẻ nhớ
Phương tiện ghi nội bộ (HDR-CX160E / CX180E)Bạn có thể ghi tối đa 40.000 hình ảnh.
Mẹo nhỏ
Dự kiến số lượng hình ảnh ghi được
�0GB
NotesThe recordable time may vary depending on the recording and subject conditions and [ REC Mode] and [ Frame Rate] (p. 53).The number in ( ) is the minimum recordable time.
Expected number of recordable photos
Internal recording media (HDR-CX160E/CX180E)You can record the maximum 40,000 photos.
Memory card
3.3M
2 GB 13004 GB 26008 GB 530016 GB 1050032 GB 21000
The selected image size is effective when the (Photo) lamp is lit.
The number of recordable photos of memory card shown is for the maximum image size of your camcorder. The actual number of recordable photos is displayed on the LCD screen during recording (p. 66).The number of recordable photos of memory card may vary depending on the recording conditions.
NotesThe unique pixel array of Sony’s ClearVid and the image processing system (BIONZ) allow still image resolution equivalent to the sizes described.
TipsYou can also use memory card with a capacity of under 1 GB for recording photos.The following list shows the bit rate, pixels and aspect ratio of each recording mode (movie + audio, etc.).
High definition image quality (HD):PS: Max. 28 Mbps 1,920 1,080 pixels/16:9FX: Max. 24 Mbps 1,920 1,080 pixels/16:9FH: Approx. 17 Mbps (average) 1,920 1,080
pixels/16:9HQ: Approx. 9 Mbps (average) 1,440 1,080
pixels/16:9LP: Approx. 5 Mbps (average) 1,440 1,080
pixels/16:9Standard definition image quality (STD):HQ: Approx. 9 Mbps (average) 720 576
pixels/16:9, 4:3The photo recording pixels and the aspect ratio.
Photo recording mode:2,112 1,584 dots/4:32,112 1,188 dots/16:91,600 1,200 dots/4:3640 480 dots/4:3Dual recording:2,304 1,296 dots/16:91,728 1,296 dots/4:3Capturing a photo from a movie:1,920 1,080 dots/16:9640 360 dots/16:9640 480 dots/4:3

VN61
�0GB
NotesThe recordable time may vary depending on the recording and subject conditions and [ REC Mode] and [ Frame Rate] (p. 53).The number in ( ) is the minimum recordable time.
Expected number of recordable photos
Internal recording media (HDR-CX160E/CX180E)You can record the maximum 40,000 photos.
Memory card
3.3M
2 GB 13004 GB 26008 GB 530016 GB 1050032 GB 21000
The selected image size is effective when the (Photo) lamp is lit.
The number of recordable photos of memory card shown is for the maximum image size of your camcorder. The actual number of recordable photos is displayed on the LCD screen during recording (p. 66).The number of recordable photos of memory card may vary depending on the recording conditions.
NotesThe unique pixel array of Sony’s ClearVid and the image processing system (BIONZ) allow still image resolution equivalent to the sizes described.
TipsYou can also use memory card with a capacity of under 1 GB for recording photos.The following list shows the bit rate, pixels and aspect ratio of each recording mode (movie + audio, etc.).
High definition image quality (HD):PS: Max. 28 Mbps 1,920 1,080 pixels/16:9FX: Max. 24 Mbps 1,920 1,080 pixels/16:9FH: Approx. 17 Mbps (average) 1,920 1,080
pixels/16:9HQ: Approx. 9 Mbps (average) 1,440 1,080
pixels/16:9LP: Approx. 5 Mbps (average) 1,440 1,080
pixels/16:9Standard definition image quality (STD):HQ: Approx. 9 Mbps (average) 720 576
pixels/16:9, 4:3The photo recording pixels and the aspect ratio.
Photo recording mode:2,112 1,584 dots/4:32,112 1,188 dots/16:91,600 1,200 dots/4:3640 480 dots/4:3Dual recording:2,304 1,296 dots/16:91,728 1,296 dots/4:3Capturing a photo from a movie:1,920 1,080 dots/16:9640 360 dots/16:9640 480 dots/4:3
• Bạn cũng có thể sử dụng thẻ nhớ có dung lượng dưới 1 GB để ghi lại hình ảnh.
• Danh sách sau đây cho thấy tỷ lệ bit, điểm ảnh và tỷ lệ khung hình của mỗi chế độ ghi (phim + âm thanh, vv.)• - Chất lượng hình ảnh độ nét cao (HD): PS: Tối đa 28 Mbps 1.920 x 1.080 pixels/16: 9 FX: Tối đa 24 Mbps 1.920 x 1.080 pixels/16: 9 FH: Khoảng 17 Mbps (trung bình) 1920 x1080 pixels/16: 9 HQ: Khoảng. 9 Mbps (trung bình) 1440x1080 pixels/16: 9 LP: Khoảng. 5 Mbps (trung bình) 1440x1080 pixels/16: 9 - Chất lượng hình ảnh tiêu chuẩn (STD): HQ: Khoảng. 9 Mbps (trung bình) 720x576 pixels/16: 9, 4:3
• Điểm ảnh ghi hình và tỷ lệ khung hình. – Chế độ ghi ảnh:
2,112 x 1,584 điểm/4:3 2,112 x 1,188 điểm/16:9 1,600 x 1,200 điểm/4:3 640 x 480 điểm/4:3– Ghi kép: 2,304 x 1,296 điểm/16:9 1,728 x 1,296 điểm/4:3– Chụp ảnh từ phim: 1,920 x 1,080 điểm/16:9 640 x 360 điểm/16:9 640 x 480 điểm/4:3
�1GB
Additional information
Precautions
On use and careDo not use or store the camcorder and accessories in the following locations:
Anywhere extremely hot, cold or humid. Never leave them exposed to temperatures above 60 C (140 °F), such as under direct sunlight, near heaters or in a car parked in the sun. They may malfunction or become deformed.Near strong magnetic fields or mechanical vibration. The camcorder may malfunction.Near strong radio waves or radiation. The camcorder may not be able to record properly.Near AM receivers and video equipment. Noise may occur.On a sandy beach or anywhere dusty. If sand or dust gets in your camcorder, it may malfunction. Sometimes this malfunction cannot be repaired.
Operate your camcorder on DC 6.8 V/7.2 V (battery pack) or DC 8.4 V (AC Adaptor).For DC or AC operation, use the accessories recommended in these operating instructions.Do not let your camcorder get wet, for example, from rain or sea water. If your camcorder gets wet, it may malfunction. Sometimes this malfunction cannot be repaired.If any solid object or liquid gets inside the casing, unplug your camcorder and have it checked by a Sony dealer before operating it any further.Avoid rough handling, disassembling, modifying, physical shock, or impact such as hammering, dropping or stepping on the product. Be particularly careful of the lens.Keep the camcorder turning off when you are not using your camcorder.Do not wrap your camcorder with a towel, for example, and operate it. Doing so might cause heat to build up inside.When disconnecting the power cord (mains lead), pull it by the plug and not the cord (lead).Do not damage the power cord (mains lead) such as by placing anything heavy on it.Do not use a deformed or damaged battery pack.
Keep metal contacts clean.If the battery electrolytic liquid has leaked:
Consult your local authorized Sony service facility.Wash off any liquid that may have contacted your skin.If any liquid gets in your eyes, wash with plenty of water and consult a doctor.
When not using your camcorder for a long time
To keep your camcorder in optimum state for a long time, turn it on and let it run by recording and playing back images about once a month.Use up the battery pack completely before storing it.
LCD screenDo not exert excessive pressure on the LCD screen, as it may cause damage.If your camcorder is used in a cold place, a residual image may appear on the LCD screen. This is not a malfunction.While using your camcorder, the back of the LCD screen may heat up. This is not a malfunction.
To clean the LCD screenIf fingerprints or dust make the LCD screen dirty, it is recommended that you use a soft cloth to clean it.
On handling the casingIf the casing is soiled, clean the camcorder body with a soft cloth lightly moistened with water, and then wipe the casing with a dry soft cloth.Avoid the following to avoid damage to the finish:
Using chemicals such as thinner, benzine, alcohol, chemical cloths, repellent, insecticide and sunscreenHandling the camcorder with above substances on your handsLeaving the casing in contact with rubber or vinyl objects for a long period of time
Đề phòng
Về sử dụng và chăm sóc• Không sử dụng hoặc cất trữ máy quay và phụ kiện tại các địa điểm sau đây: - Bất cứ nơi nào rất nóng, lạnh hay ẩm ướt. Không bao giờ để chúng tiếp xúc với nhiệt độ trên 60°C (140°F), chẳng hạn như dưới ánh sáng mặt trời trực tiếp, gần lò sưởi hoặc trong một chiếc xe đậu dưới mặt trời. Chúng có thể bị hỏng hoặc bị biến dạng. - Gần nơi từ trường mạnh hoặc rung cơ khí. Máy quay có thể hỏng. - Gần sóng vô tuyến mạnh hay bức xạ. Máy quay có thể không ghi lại chính xác. - Gần trạm thu AM và thiết bị video. Nhiễu có thể xảy ra. - Trên một bãi biển cát hoặc bất cứ nơi nào bụi bặm. Nếu cát hoặc bụi lọt vào trong máy quay của bạn, nó có thể bị hỏng. Đôi khi sự cố này không thể sửa chữa được.• Vận hành máy quay của bạn với DC 6,8 V V/7.2 (pin) hoặc 8,4 V DC (bộ chỉnh lưu AC).• Đối với thao tác DC hoặc AC, sử dụng các phụ kiện đề nghị trong hướng dẫn sử dụng này.• Đừng để máy quay của bạn bị ướt, ví dụ, từ mưa hoặc nước biển. Nếu máy của bạn bị ướt, nó có thể hỏng. Đôi khi sự cố này không thể sửa chữa được.• Nếu bất kỳ vật rắn hoặc lỏng lọt vào bên trong vỏ, rút phích cắm máy quay của bạn và đem kiểm tra bởi một đại lý Sony trước khi sử dụng nó thêm nữa.• Tránh cầm nắm thô bạo, tháo dỡ, sửa đổi, gây sốc, hoặc tác động như đập, làm rơi hoặc dẫm lên sản phẩm. Hãy đặc biệt cẩn thận với ống kính.• Tắt máy quay khi không sử dụng.• Không bọc máy quay với các vật như khăn và sử dụng, điều này có thể làm nhiệt độ bên trong máy tăng cao. Làm như vậy có thể gây ra nhiệt bị tăng bên trong.• Khi ngắt kết nối dây nguồn (dây chính), kéo ra bằng phích cắm, không phải dây (dây dẫn).• Không làm tổn hại dây nguồn (dây chính) chẳng hạn bằng cách đặt bất cứ vật gì nặng trên nó.• Không sử dụng pin bị biến dạng, hư hỏng.• Giữ phần tiếp xúc bằng kim loại sạch. Nếu chất lỏng điện phân trong pin bị rò rỉ: - Tham khảo ý kiến trạm bảo hành Sony địa phương được ủy quyền.
xúc với da của bạn. - Nếu chất lỏng vào trong mắt của bạn, rửa với thật nhiều nước và tham khảo ý kiến bác sĩ.
Khi không sử dụng máy quay của bạn trong một thời gian dài • Để giữ cho máy quay của bạn ở trạng thái tối ưu cho một thời gian dài, bật máy lên và để máy ghi và phát lại hình ảnh mỗi tháng một lần. • Hãy sử dụng hết pin trước khi cất đi.
Màn hình LCD • Không gây áp lực quá nhiều lên màn hình LCD vì có thể gây hỏng hóc. • Nếu máy quay của bạn được sử dụng ở một nơi lạnh lẽo, hình ảnh dư có thể xuất hiện trên màn hình LCD. Đây không phải là một hỏng hóc. • Trong khi sử dụng máy quay của bạn, mặt sau của màn hình LCD có thể nóng lên. Đây không phải là một hỏng hóc.
Để lau màn hình LCD • Nếu dấu vân tay hoặc bụi làm cho màn hình LCD bẩn, khuyến cáo rằng bạn sử dụng một miếng vải mềm để lau sạch nó.
Về xử lý vỏ • Nếu vỏ bị bẩn, làm sạch thân máy quay bằng vải mềm làm ẩm nhẹ với nước sau đó lau sạch vỏ với vải mềm khô.
• Tránh những điều sau đây để tránh bị bóc sơn: - Sử dụng hóa chất như dung môi,benzin, cồn, vải hóa chất, thuốc diệt bọ, thuốc trừ sâu và kem chống nắng - Cầm máy quay phim với các chất trên ở tay bạn - Để vỏ tiếp xúc với đồ cao su hoặc nhựa trong một thời gian dài
Thông tin bổ sung

VN62��GB
About care and storage of the lensWipe the surface of the lens clean with a soft cloth in the following instances:
When there are fingerprints on the lens surfaceIn hot or humid locationsWhen the lens is exposed to salty air such as at the seaside
Store in a well-ventilated location subject to little dirt or dust.To prevent mold, periodically clean the lens as described above.
On charging the pre-installed rechargeable batteryYour camcorder has a pre-installed rechargeable battery to retain the date, time, and other settings even when the camcorder is turned off. The pre-installed rechargeable battery is always charged while your camcorder is connected to the wall outlet (wall socket) via the AC Adaptor or while the battery pack is attached. The rechargeable battery will be fully discharged in about 3 months if you do not use your camcorder at all. Use your camcorder after charging the pre-installed rechargeable battery. However, even if the pre-installed rechargeable battery is not charged, the camcorder operation will not be affected as long as you are not recording the date.ProceduresConnect your camcorder to a wall outlet (wall socket) using the supplied AC Adaptor, and leave it with the LCD screen closed for more than 24 hours.
Note on disposal/transfer of the camcorder (HDR-CX160E/CX180E)Even if you delete all movies and still images, or perform [Format], data on the internal recording media may not be completely erased.When you transfer the camcorder, it is recommended that you perform [Empty] (See “Getting detailed information from the “Handycam” Handbook” on page 55.) to prevent the recovery of your data. Also, when you dispose of the camcorder, it is recommended that you destroy the actual body of the camcorder.
Note on disposal/transfer of memory cardEven if you delete data in the memory card or format the memory card on your camcorder or a computer, you may not delete data from the memory card completely. When you give the memory card to somebody, it is recommended that you delete data completely using data deletion software on a computer. Also, when you dispose of the memory card, it is recommended that you destroy the actual body of the memory card.
Về chăm sóc và bảo quản ống kính• Lau sạch bề mặt của ống kính bằng vải mềm trong các trường hợp sau đây: - Khi có dấu vân tay trên bề mặt ống kính - Trong các địa điểm nóng hoặc ẩm ướt - Khi ống kính tiếp xúc với không khí mặn như ở bên bờ biển• Bảo quản ở nơi thông thoáng để ít bụi bẩn, bụi. • Để ngăn ngừa nấm mốc, làm sạch định kỳ ống kính như mô tả ở trên.
Về sạc lại pin sạc đã được cài đặt sẵnMáy quay của bạn có một pin sạc được cài đặt sẵn để lưu giữ ngày, giờ và các cài đặt khác ngay cả khi máy quay đã được tắt. Pin sạc cài sẵn luôn được sạc khi khi máy quay của bạn được kết nối với ổ cắm trên tường (ổ cắm điện) thông qua bộ chỉnh lưu AC hoặc trong khi pin được gắn vào. Pin sạc sẽ bị hết trong khoảng 3 tháng nếu bạn không sử dụng máy quay của bạn. Dùng máy quay của bạn sau khi sạc lại pin sạc đã được cài đặt trước. Tuy nhiên, ngay cả khi pin sạc cài sẵn không được sạc, các hoạt động của máy quay sẽ không bị ảnh hưởng miễn là bạn không ghi ngày.
Các bướcKết nối máy quay của bạn vào một ổ cắm trên tường (ổ cắm điện) sử dụng bộ chỉnh lưu AC kèm theo và để nguyên với màn hình LCD đóng trong hơn 24 tiếng.
Lưu ý về việc thải bỏ/chuyển nhượng máy quay (HDR-CX160E/CX180E)Thậm chí nếu bạn xóa tất cả các phim và hình ảnh tĩnh, hoặc thực hiện [Format], dữ liệu trên phương tiện ghi nội bộ có thể không hoàn toàn bị xóa bỏ.Khi bạn chuyển nhượng máy quay phim, khuyến cáo bạn nên thao tác [Empty] (Xem “Thu thập thông tin chi tiết từ Sổ tay“Handycam” “ tr.55.) để ngăn chặn việc phục hồi các dữ liệu của bạn. Ngoài ra, khi bạn vứt bỏ máy quay, khuyến cáo rằng bạn nên phá hủy thân máy quay.
Lưu ý về việc thải bỏ/chuyển nhượng thẻ nhớ Ngay cả khi bạn xóa dữ liệu trong thẻ nhớ hoặc định dạng thẻ nhớ trên máy quay hay máy tính, bạn có thể không xóa dữ liệu khỏi thẻ nhớ hoàn toàn. Khi đưa thẻ nhớ choai đó, bạn nên xóa dữ liệu hoàn toàn bằng cách sử dụng phần mềm xóa dữ liệu trên máy tính. Ngoài ra, khi vứt bỏ thẻ nhớ, bạn nên phá hủy thẻ nhớ.

VN63
��GB
About care and storage of the lensWipe the surface of the lens clean with a soft cloth in the following instances:
When there are fingerprints on the lens surfaceIn hot or humid locationsWhen the lens is exposed to salty air such as at the seaside
Store in a well-ventilated location subject to little dirt or dust.To prevent mold, periodically clean the lens as described above.
On charging the pre-installed rechargeable batteryYour camcorder has a pre-installed rechargeable battery to retain the date, time, and other settings even when the camcorder is turned off. The pre-installed rechargeable battery is always charged while your camcorder is connected to the wall outlet (wall socket) via the AC Adaptor or while the battery pack is attached. The rechargeable battery will be fully discharged in about 3 months if you do not use your camcorder at all. Use your camcorder after charging the pre-installed rechargeable battery. However, even if the pre-installed rechargeable battery is not charged, the camcorder operation will not be affected as long as you are not recording the date.ProceduresConnect your camcorder to a wall outlet (wall socket) using the supplied AC Adaptor, and leave it with the LCD screen closed for more than 24 hours.
Note on disposal/transfer of the camcorder (HDR-CX160E/CX180E)Even if you delete all movies and still images, or perform [Format], data on the internal recording media may not be completely erased.When you transfer the camcorder, it is recommended that you perform [Empty] (See “Getting detailed information from the “Handycam” Handbook” on page 55.) to prevent the recovery of your data. Also, when you dispose of the camcorder, it is recommended that you destroy the actual body of the camcorder.
Note on disposal/transfer of memory cardEven if you delete data in the memory card or format the memory card on your camcorder or a computer, you may not delete data from the memory card completely. When you give the memory card to somebody, it is recommended that you delete data completely using data deletion software on a computer. Also, when you dispose of the memory card, it is recommended that you destroy the actual body of the memory card.
Lưu ý về việc thải bỏ/chuyển nhượng thẻ nhớ Ngay cả khi bạn xóa dữ liệu trong thẻ nhớ hoặc định dạng thẻ nhớ trên máy quay hay máy tính, bạn có thể không xóa dữ liệu khỏi thẻ nhớ hoàn toàn. Khi đưa thẻ nhớ choai đó, bạn nên xóa dữ liệu hoàn toàn bằng cách sử dụng phần mềm xóa dữ liệu trên máy tính. Ngoài ra, khi vứt bỏ thẻ nhớ, bạn nên phá hủy thẻ nhớ.
Thông số kỹ thuậtHệ thốngĐịnh dạng tín hiệu: màu sắc PAL, tiêu chuẩn CCIR HDTV 1080/50i, thông số 1080/50p.Định dạng quay phim HD: MPEG-4 AVC/H.264 AVCHD định dạng tương thích (1080 50p/định dạng gốc) STD: MPEG2-PSHệ thống ghi âm Dolby Digital 2ch Dolby Digital Stereo CreatorĐịnh dạng tập tin hình ảnh Tương thích DCF Phiên bản.2.0 Tương thích Exif Phiên bản.2.3 Tương thích MPF Baseline MPF Phương tiện ghi (Phim/Hình ảnh) Bộ nhớ trong HDR-CX160E: 16 GB HDR-CX180E: 32 GB Thẻ “Memory Stick PRO Duo” Thẻ SD (cấp 4 hoặc nhanh hơn)
Khi đo dung tích phương tiện, 1 GB bằng 1 tỷ byte, một tỷ lệ sử dụng cho quản lý hệ thống và/ hoặc các tập tin ứng dụng. Dưới đây là dung tích người dùng có thể sử dụng: HDR-CX160E: Khoảng 15.9 GB HDR-CX180E: Khoảng 31.9 GBThiết bị hình ảnh: Cảm biến CMOS 4.5 mm (loại 1/4) Điểm ảnh ghi (hình ảnh, 4:3): Tối đa. 3.3 mega (2 112 x 1 584) pixels*1 Tổng: khoảng. 4 200 000 pixels Hữu dụng (phim, 16:9)*2: Khoảng. 1 490 000 pixels Hữu dụng (hình ảnh, 16:9): Khoảng. 1 250 000 pixels Hữu dụng (hình ảnh, 4:3): Khoảng. 1 670 000 pixelsỐng kính: G 30 x (Quang học)*2, 42 x (Mở rộng)*3, 350 x (Kỹ thuật số) Đường kính bộ lọc: 37 mm (1 1/2 in.) F1.8 ~ 3.4 Độ dài trọng tâm: f=2.1 mm ~ 63.0 mm (3/32 in. ~ 2 1/2 in.) Khi chuyển đổi thành máy ảnh tĩnh a 35 mm Đối với phim*2: 29.8 mm ~ 894 mm (1 3/16 in. ~ 35 1/4 in.) (16:9) Đối với hình ảnh: 29.8 mm ~ 894 mm (1 3/16 in. ~ 35 1/4 in.) (4:3)Nhiệt độ hình ảnh: [Tự động], [Đẩy một lần], [Trong nhà] (3 200 K), [Ngoài trời] (5 800 K)
Chiếu sáng tối thiểu11 lx (lux) (trong chế độ cài đặt mặc định, Tốc độ chiếu sáng 1/50 giây)3 lx (lux) ([Low Lux] được cài đặt ở [On], Tốc độ ánh sáng 1/25 giây) *1 Tia điểm ảnh độc đáo của Sony’s ClearVid và hệ thống xử lý hình ảnh (BIONZ) cho phép cân bằng độ phân giải hình ảnh tĩnh ở các kích thước được mô tả. *2 [ SteadyShot] được cài đặt ở [Standard] hoặc [Off]. *3 [ SteadyShot] được cài đặt ở [Active].
Bộ kết nối ngõ vào/ngõ raBộ kết nối từ xa A/V: Thành phần/video và giắc ngõ ra âm thanh Giắc HDMI OUT : Bộ kết nối mini HDMI Giắc USB : mini-AB/Loại A (USB liền) (Chỉ ngõ ra)HDR-CX160E/CX180E: Giắc ngõ vào MIC: Giắc mini Stereo (O 3.5 mm)Màn hình LCD Hình ảnh: 7.5 cm (Loại 3.0, tỷ lệ khung 16:9)Tổng điểm ảnh: 230 400 (960 x 240)
Nguồn tổng quátYêu cầu năng lượng: DC 6.8 V/7.2 V (pin) DC 8.4 V (Bộ chỉnh lưu AC)Sạc USB: DC 5 V 500 mATiêu thụ năng lượng trung bình: Trong quá trình ghi sử dụng màn hình LCD ở chế độ chiếu sáng thông thường: HD: 2.5 W STD: 2.3 WNhiệt độ hoạt động: 0°C tới 40°C (32 °F tới 104 °F)Nhiệt độ bảo quản: –20°C tới + 60°C (‒4 °F tới +140 °F)Kích thước (xấp xỉ) 52.5 mm x 57 mm x 113.5 mm (2 1/8 in. × 2 1/4 in. × 4 1/2 in.) (w/h/d) bao gồm cả các phần nhô ra 52.5 mm x 57 mm x 123.5 mm (2 1/8 in. × 2 1/4 in. × 4 7/8 in.) (w/h/d) bao gồm các phần dự án và pin sạc lại được cung cấp kèm theo Khối lượng (xấp xỉ ) HDR-CX130E: 250 g (8.8 oz) chỉ thiết bị 300 g (10.6 oz) bao gồm pin sạc lại cung cấp kèm theo
Thông tin bổ sung

VN64
HDR-CX160E: 250 g (8.8 oz) chỉ thiết bị 300 g (10.6 oz) bao gồm pin sạc lại được cung cấp kèm theo HDR-CX180E: 250 g (8.8 oz) chỉ thiết bị 300 g (10.6 oz) bao gồm pin sạc lại được cung cấp kèm theo
Bộ chỉnh lưu AC AC-L200C/AC-L200DYêu cầu năng lượng : AC 100 V - 240 V, 50 Hz/60 HzTiêu thụ cường độ dòng điện: 0.35 A - 0.18 ATiêu thụ năng lượng : 18 WĐiên áp đầu ra: DC 8.4 V*Nhiệt độ hoạt động: 0°C tới 40°C (32 °F tới 104 °F)Nhiệt độ bảo quản: –20°C tới + 60°C (-4 °F tới +140 °F)Kích thước (xấp xỉ ): 48 mm x 29 mm x 81 mm (1 15/16 in. x 1 3/16 in. x 3 1/4 in.) (w/h/d) Không bao gồm các phần nhô ra Khối lượng (xấp xỉ): 170 g (6.0 oz) không bao gồm dây dẫn nguồn (dây chính).
• Xem nhãn trên bộ chỉnh lưu AC để biết thông số kỹ thuật. Pin có thể sạc lại NP-FV50Điện áp đầu ra tối đa: DC 8.4 VĐiện áp đầu ra: DC 6.8 VĐiện áp sạc tối đa: DC 8.4 VCường độ dòng điện sạc tối đa: 2.1 ADung tích Thông thường: 7.0 Wh (1 030 mAh) Tối thiểu : 6.6 Wh (980 mAh)Loại: Li-ion
Thiết kế và thông số của máy quay và phụ kiện có thể thay đổi không cần báo trước.• Được sản xuất theo giấy phép của Dolby Labo-ratories.
Thương hiệu • “Handycam” và là thương hiệu đã đăng ký của Tập đoàn Sony.• “AVCHD” và loại logo “AVCHD” là thương hiệu của Tập đoàn Panasonic và Tập đoàn Sony.• “Memory Stick” ,, “Memory Stick Duo,” “ ” “Memory Stick PRO Duo, “ ”, Memory Stick PRO-HG Duo, ”, MagicGate, “ ”, MagicGate Memory Stick và “MagicGate
Memory Stick Duo” là các thương hiệu hoặc thương hiệu đã đăng ký của Tập đoàn Sony.• “InfoLITHIUM” là thương hiệu của Tập đoàn Sony.• “x.v.Colour” là thương hiệu của Tập đoàn Sony.• “BIONZ” là thương hiệu của Tập đoàn Sony.• “BRAVIA” là thương hiệu đã đăng ký của Tập đoàn Sony.• “DVDirect” là thương hiệu của Tập đoàn Sony.• “Blu-ray Disc” và logo là các thương hiệu.• Dolby và biểu tượng đôi D là thương hiệu của Dolby Laboratories.• HDMI, logo HDMI và High-Definition Multimedia Interface là thương hiệu hay thương hiệu đã đăng ký của công ty HDMI Licensing tại Mỹ và các nước khác.• Microsoft, Windows, Windows Vista và DirectX là các thương hiệu hoặc thương hiệu đã đăng ký của Tập đoàn Microsoft tại Mỹ và/hoặc các nước khác.• Macintosh và Mac OS là thương hiệu đã đăng ký của công ty Apple tại Mỹ và các nước khác.• Intel, Intel Core và Pentium là thương hiệu hay nhãn hiệu đã đăng ký của Tập đoàn Intel hoặc chi nhánh của tập đoàn tại Mỹ và các nước khác.• “ ” và “PlayStation” là thương hiệu đã đăng ký của công ty Sony Computer Entertainment.• Adobe, logo của Adobe và Adobe Acrobat là thương hiệu đã đăng ký hoặc nhãn hiệu của tập đoàn Adobe Systems tại Mỹ và/hoặc các nước khác.• Logo SDXC là thương hiệu của công ty SD-3C.• MultiMediaCard là thương hiệu của Hiệp hội MultiMediaCard.
VN65
��GB
Additional information
All other product names mentioned herein may be the trademarks or registered trademarks of their respective companies. Furthermore, and are not mentioned in each case in this manual.
Add further enjoyment with your PlayStation 3 by downloading the application for PlayStation 3 from PlayStation Store (where available.)
The application for PlayStation 3 requires PlayStation Network account and application download.Accessible in areas where the PlayStation Store is available.
Tất cả tên những sản phẩm khác được đề cập ở đây có thể là các thương hiệu hoặc nhãn hiệu đã đăng ký của các công ty tương ứng. Hơn nữa, ™ và ® không được đề cập trong từng trường hợp trong sách hướng dẫn này.
Tận hưởng thêm nữa với PlayStation 3 bằng cách tải các ứng dụng cho PlayStation 3 từ cửa hiệu PlayStation (nơi có sẵn).
Các ứng dụng cho PlayStation 3 yêu cầutài khoản mạng PlayStation và tải ứng dụng.Có thể tiếp cận ở những nơi cửa hiệu PlayStation hiện diện.
Thông tin bổ sung

VN66��
GB
Quick reference
Screen indicators
LeftIndicator Meaning
MENU buttonSelf-timer recording
Wide Mode Fader
[Face Detection] set to [Off][Smile Shutter] set to [Off]
Manual focus
Scene Selection
White BalanceSteadyShot offTele Macrox.v.Color
Conversion LensDestination
Intelligent Auto (face detection/scene detection/camera-shake detection)
CenterIndicator Meaning
[STBY]/[REC] Recording statusSlide show set
Warning
Playback mode
RightIndicator Meaning
50i
Recording image quality (HD/STD), frame rate(50p/50i) and recording mode (PS/FX/FH/HQ/LP)
60min Remaining battery
Recording/playback/editing media
0:00:00 Counter (hour:minute:second)
00Min Estimated recording remaining time
Photo size
9999 9999
Approximate number of recordable photos and photo sizePlayback folder
100/112Current playing movie or photo/Number of total recorded movies or photo
BottomIndicator Meaning
View Images buttonMicref Level lowWind Noise Reduct.Blt-in Zoom MicLow LuxSpot Meter/Fcs / Spot Meter / Exposure
Intelligent AutoSlide show button
101-0005 Data file name
Protected image
Indicators and their positions are approximate and may differ from what you actually see.Some indicators may not appear, depending on your camcorder model.
Left RightCenter
Bottom
Tham khảo nhanh
Các chỉ báo trên màn hình
Trái
Trái
Phải
Đáy
Trung tâm
Chỉ báo
Chỉ báo
Chỉ báo
Chỉ báo
Ý nghĩa
Ý nghĩa
Ý nghĩa
Ý nghĩa
Nút MENU
Pin còn lại
Nút Xem ảnh
Micref cấp độ thấp
Giảm nhiễu
Tai nghe phóng tích hợp trong
Low Lux
Tự động thông minh
Nút trình chiếu
Tên tập tin dữ liệu
Hình ảnh được bảo vệ
• Các chỉ báo và vị trí của chúng là tương đối và có thể khác với những gì bạn thực sự thấy.• Một số chỉ báo có thể không xuất hiện, tùy thuộc vào kiểu máy quay của bạn.
Điểm đo / FCS / Điểm / Đo / Phơi sáng
Kích cỡ ảnh
Thư mục Phát lại
Phương tiện Ghi/xem lại/ chỉnh sửa
Ước tính số ảnh và kích cỡ hình có thể ghi
Phim hay hình ảnh đang chiếu / Tổng số phim hoặc hình ảnh đã ghi
Máy đo (giờ: phút: giây)
Ước tính thời gian thu còn lại
Ghi tự hẹn giờ
[Smile Shutter] đặt sang chế độ [Off]
Lấy nét bằng tay
Cân bằng trắng
Tắt Chụp không rung
Tele Macro
x.v.Color
Ống kính chuyển đổi
Điểm đến
Tình trạng ghi
Bộ trình chiếu
Cảnh báo
Chế độ phát lại
Chế độ rộng
Mờ dần
[Face Detection] đặt sang chế độ[Off]
Chọn cảnh
Tự động thông minh (phát hiện khuôn mặt / phát hiện cảnh / phát hiện máy rung)
Chất lượng ghi ảnh (HD / STD), tốc độ khung hình (50p/50i) và chế độ ghi (PS/FX/FH/HQ/LP)
PhảiTrung tâm
Đáy
��GB
Quick reference
Parts and controls
Figures in ( ) are reference pages.
Lens (G lens) Built-in microphone
LCD screen/Touch panelIf you rotate the LCD panel 180 degrees, you can close the LCD panel with the LCD screen facing out. This is convenient during playback operations.
(View Images) button (25) POWER button (14) Speaker RESET button
Press RESET using a pointed object.Press RESET to initialize all the settings including the clock setting.
MODE button (21) (Movie)/ (Photo) lamps (21) MIC (PLUG IN POWER) jack (HDR-
CX160E/CX180E) HDMI OUT jack (29) (USB) jack (42, 45)

VN67��
GB
Quick reference
Screen indicators
LeftIndicator Meaning
MENU buttonSelf-timer recording
Wide Mode Fader
[Face Detection] set to [Off][Smile Shutter] set to [Off]
Manual focus
Scene Selection
White BalanceSteadyShot offTele Macrox.v.Color
Conversion LensDestination
Intelligent Auto (face detection/scene detection/camera-shake detection)
CenterIndicator Meaning
[STBY]/[REC] Recording statusSlide show set
Warning
Playback mode
RightIndicator Meaning
50i
Recording image quality (HD/STD), frame rate(50p/50i) and recording mode (PS/FX/FH/HQ/LP)
60min Remaining battery
Recording/playback/editing media
0:00:00 Counter (hour:minute:second)
00Min Estimated recording remaining time
Photo size
9999 9999
Approximate number of recordable photos and photo sizePlayback folder
100/112Current playing movie or photo/Number of total recorded movies or photo
BottomIndicator Meaning
View Images buttonMicref Level lowWind Noise Reduct.Blt-in Zoom MicLow LuxSpot Meter/Fcs / Spot Meter / Exposure
Intelligent AutoSlide show button
101-0005 Data file name
Protected image
Indicators and their positions are approximate and may differ from what you actually see.Some indicators may not appear, depending on your camcorder model.
Left RightCenter
Bottom
Chất lượng ghi ảnh (HD / STD), tốc độ khung hình (50p/50i) và chế độ ghi (PS/FX/FH/HQ/LP)
��GB
Quick reference
Parts and controls
Figures in ( ) are reference pages.
Lens (G lens) Built-in microphone
LCD screen/Touch panelIf you rotate the LCD panel 180 degrees, you can close the LCD panel with the LCD screen facing out. This is convenient during playback operations.
(View Images) button (25) POWER button (14) Speaker RESET button
Press RESET using a pointed object.Press RESET to initialize all the settings including the clock setting.
MODE button (21) (Movie)/ (Photo) lamps (21) MIC (PLUG IN POWER) jack (HDR-
CX160E/CX180E) HDMI OUT jack (29) (USB) jack (42, 45)
Hình trong ( ) là các trang tham khảo.
Ống kính (ống kính G)Micro tích hợp trong
Nút (Xem ảnh) (25)Nút POWER (14)Loa
Nút MODE (21)
Giắc HDMI OUT (29)Giắc (USB) (42, 45)
Đèn (Phim)/ (Ảnh) (21)Giắc MIC (PLUG IN POWER) (HDR-CX160E/ CX180E)
Nút RESETBấm RESET bằng một vật nhọn.Bấm RESET để khởi tạo tất cả các thiết lậpbao gồm cài đặt đồng hồ.
Màn hình LCD / Bảng cảm ứngNếu bạn xoay màn hình LCD 180 độ, bạn có thể đóng màn hình LCD với màn hình LCD đối mặt ra ngoài. Rất thuận tiện trong quá trình phát lại.
Các bộ phận và điều khiển
Tham khảo nhanh
��GB
Quick reference
Parts and controls
Figures in ( ) are reference pages.
Lens (G lens) Built-in microphone
LCD screen/Touch panelIf you rotate the LCD panel 180 degrees, you can close the LCD panel with the LCD screen facing out. This is convenient during playback operations.
(View Images) button (25) POWER button (14) Speaker RESET button
Press RESET using a pointed object.Press RESET to initialize all the settings including the clock setting.
MODE button (21) (Movie)/ (Photo) lamps (21) MIC (PLUG IN POWER) jack (HDR-
CX160E/CX180E) HDMI OUT jack (29) (USB) jack (42, 45)

VN68
��GB
Power zoom lever PHOTO button (23) CHG (charge) lamp (10) Battery pack (10) START/STOP button (21) DC IN jack (10) A/V Remote Connector (29) Grip belt (20) Built-in USB Cable (11) Memory card access lamp (19)
While the lamp is lit or flashing, the camcorder is reading or writing data.
Tripod receptacle Memory card slot (19) BATT (battery) release lever (12)
Nút gạt phóng đại
Nút PHOTO (23)Đèn CHG (sạc) (10)
Pin (10)Nút START/STOP (21)
Giắc cắm DC IN (10)
Bộ kết nối điều khiển từ xa A/V (29)Quai đeo (20)
Cáp USB tích hợp trong
Chân giá dựng máy
Khe cắm thẻ nhớ (19)Nút gạt nhả (pin) BATT (12)
Đèn truy cập thẻ nhớ (19) Trong khi đèn sáng hoặc nhấp nháy, máy quay đang đọc hoặc ghi dữ liệu.
��GB
Quick reference
You will find the menu lists on pages 52 to 54.
Index
Media Select ................................17Media Settings .............................17Memory card ...............................18“Memory Stick” media ...............18“Memory Stick PRO-HG Duo” media ............................................18“Memory Stick PRO Duo” media ............................................18Menus ...........................................52Movies ....................................21, 27
P
Photos ....................................23, 28Playing..........................................25PMB (Picture Motion Browser) .......................................37Power on ......................................14Precautions ..................................61PS ..................................................24
R
Recording ....................................20Recording and playback time ...58Recording media.........................17Recording time of movies/number of recordable photos ....58Repair ...........................................56RESET ..........................................67
S
Saving images in external media ............................................42Screen indicators ........................66Self-diagnosis display .................57Setting the date and time ...........14Software .......................................34Specifications ..............................63Supplied items ...............................5
T
Thumbnail ...................................32Tripod...........................................68Troubleshooting ..........................56Turning the power on ................14TV .................................................29
U
USB cable ...............................45, 48
V
VBR ..............................................59
W
Wall outlet (wall socket) ............10Warning indicators .....................57Windows ......................................34
A
A/V connecting cable...........30, 50
B
Battery pack .................................10Built-in USB Cable .................5, 11
C
Care ..............................................61Charging the battery pack .........10Charging the battery pack abroad ..........................................13Clock Set ......................................14Computer.....................................34Computer system ........................34Connection ..................................29Copy .............................................19
D
Data Code ....................................15Date/Time ....................................15Delete ...........................................32Disc recorder ...............................49DVDirect Express .......................45DVD writer............................45, 48
E
Event Index ..................................25External media ............................42
F
Fully charged ...............................10
H
“Handycam” Handbook .............55Highlight Playback .....................28
I
Install ............................................34
L
Language Setting ........................16
M
Macintosh ....................................34Maintenance ................................61

VN69
��GB
Quick reference
You will find the menu lists on pages 52 to 54.
Index
Media Select ................................17Media Settings .............................17Memory card ...............................18“Memory Stick” media ...............18“Memory Stick PRO-HG Duo” media ............................................18“Memory Stick PRO Duo” media ............................................18Menus ...........................................52Movies ....................................21, 27
P
Photos ....................................23, 28Playing..........................................25PMB (Picture Motion Browser) .......................................37Power on ......................................14Precautions ..................................61PS ..................................................24
R
Recording ....................................20Recording and playback time ...58Recording media.........................17Recording time of movies/number of recordable photos ....58Repair ...........................................56RESET ..........................................67
S
Saving images in external media ............................................42Screen indicators ........................66Self-diagnosis display .................57Setting the date and time ...........14Software .......................................34Specifications ..............................63Supplied items ...............................5
T
Thumbnail ...................................32Tripod...........................................68Troubleshooting ..........................56Turning the power on ................14TV .................................................29
U
USB cable ...............................45, 48
V
VBR ..............................................59
W
Wall outlet (wall socket) ............10Warning indicators .....................57Windows ......................................34
A
A/V connecting cable...........30, 50
B
Battery pack .................................10Built-in USB Cable .................5, 11
C
Care ..............................................61Charging the battery pack .........10Charging the battery pack abroad ..........................................13Clock Set ......................................14Computer.....................................34Computer system ........................34Connection ..................................29Copy .............................................19
D
Data Code ....................................15Date/Time ....................................15Delete ...........................................32Disc recorder ...............................49DVDirect Express .......................45DVD writer............................45, 48
E
Event Index ..................................25External media ............................42
F
Fully charged ...............................10
H
“Handycam” Handbook .............55Highlight Playback .....................28
I
Install ............................................34
L
Language Setting ........................16
M
Macintosh ....................................34Maintenance ................................61
Bạn sẽ tìm thấy danh sách thư mục trên các trang 52-54.
Danh mụcTham
khảo nhanh
VN70

VN71

GB
Printed in China 2011 Sony Corporation
Additional information on this product and answers to frequently asked questions can be found at our Customer Support Website.
http://www.sony.net/
Printed on 70% or more recycled paper.
Bạn có thể xem thêm các thông tin về sản phẩm và phần trả lời các câu hỏi thường gặp tại trang web Hỗ Trợ Khách Hàng của chúng tôi.
Được in trên giấy tái sinh 70% hoặc hơn.
© 2011 Tập đoàn Sony In tại Việt Nam
VN