diesel cylinder head teardown and rebuild · diesel cylinder head teardown and rebuild ford 6.0l...
TRANSCRIPT
78 OCT-DEC 2015 engine professional
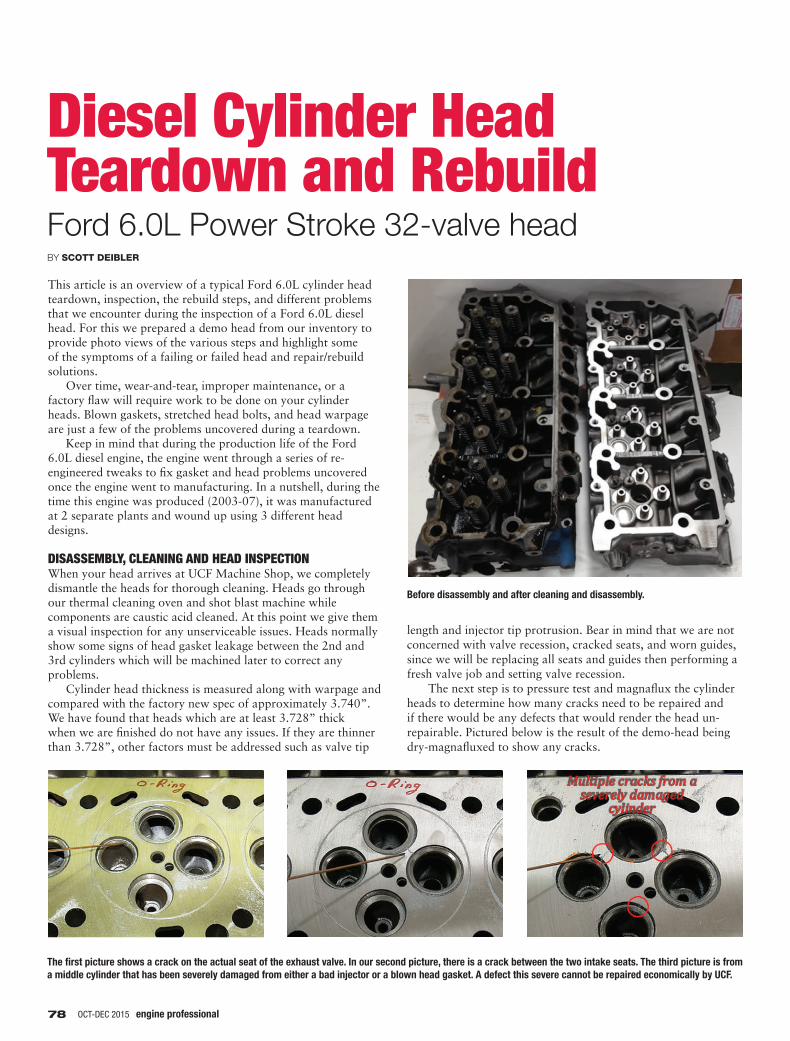
This article is an overview of a typical Ford 6.0L cylinder head teardown, inspection, the rebuild steps, and different problems that we encounter during the inspection of a Ford 6.0L diesel head. For this we prepared a demo head from our inventory to provide photo views of the various steps and highlight some of the symptoms of a failing or failed head and repair/rebuild solutions.
Over time, wear-and-tear, improper maintenance, or a factory flaw will require work to be done on your cylinder heads. Blown gaskets, stretched head bolts, and head warpage are just a few of the problems uncovered during a teardown.
Keep in mind that during the production life of the Ford 6.0L diesel engine, the engine went through a series of re-engineered tweaks to fix gasket and head problems uncovered once the engine went to manufacturing. In a nutshell, during the time this engine was produced (2003-07), it was manufactured at 2 separate plants and wound up using 3 different head designs.
DISASSEMBLY, CLEANING AND HEAD INSPECTIONWhen your head arrives at UCF Machine Shop, we completely dismantle the heads for thorough cleaning. Heads go through our thermal cleaning oven and shot blast machine while components are caustic acid cleaned. At this point we give them a visual inspection for any unserviceable issues. Heads normally show some signs of head gasket leakage between the 2nd and 3rd cylinders which will be machined later to correct any problems.
Cylinder head thickness is measured along with warpage and compared with the factory new spec of approximately 3.740”. We have found that heads which are at least 3.728” thick when we are finished do not have any issues. If they are thinner than 3.728”, other factors must be addressed such as valve tip
length and injector tip protrusion. Bear in mind that we are not concerned with valve recession, cracked seats, and worn guides, since we will be replacing all seats and guides then performing a fresh valve job and setting valve recession.
The next step is to pressure test and magnaflux the cylinder heads to determine how many cracks need to be repaired and if there would be any defects that would render the head un-repairable. Pictured below is the result of the demo-head being dry-magnafluxed to show any cracks.
Diesel Cylinder Head Teardown and RebuildFord 6.0L Power Stroke 32-valve headBY SCOTT DEIBLER
Before disassembly and after cleaning and disassembly.
The first picture shows a crack on the actual seat of the exhaust valve. In our second picture, there is a crack between the two intake seats. The third picture is from a middle cylinder that has been severely damaged from either a bad injector or a blown head gasket. A defect this severe cannot be repaired economically by UCF.

www.engineprofessional.com 79
REPLACE FUEL INJECTOR AND GLOW-PLUG SLEEVESOnce the head castings are deemed useable for remanufacture, the OEM fuel injector sleeves and glow-plug sleeves are swapped out with new OEM replacements.
INSPECTING VALVES AND SPRINGSNext we inspect the valves, measure the valve stems for wear and overall length, and then test valve spring pressure. Any components worn beyond specification are replaced.
Qualifying valve stem for reuse, left; qualifying valve spring for reuse, right.
Injector Hole Sleeve - Post Installation
MACHINE AND INSTALL LONG CUPOur first step in machining the heads is in order to install a longer stainless steel injector cup to prevent the “fuel in coolant” issue which is prone to develop in 6.0L heads (AERA TB-2577). We have these repair sleeves specially made for us to install into the number 4 and 5 cylinder injector holes which develop the cracks leading to entering the fuel rail in the head from the coolant passages.
REPAIR CRACKS WITH PINSCracks that will not be machined out during valve seat installation are repaired with Lock-N-Stitch repair pins. While we have not found deck surface crack leaks on 6.0L heads, we still machine them out as a preventive measure.
Lock-N-Stitch Repair Pin
Lock-N-Stitch Repair Pin After Installation and Peening
Lock-N-Stitch Repair Pin After Resurfacing

80 OCT-DEC 2015 engine professional
DIESEL HEAD TEARDOWN AND REBUILDBY SCOTT DEIBLER
MACHINE VALVE GUIDE Next we machine the cylinder head to accept new oil retaining replacement valve guides which we have made exclusively for our use in 6.0L heads. Below are 3 different steps in the process of the new valve guide installation. Also note the demo head has a newly installed valve seat insert and a counterbore cutout for new seat as well as the deck machined with O-ring wire receiver grooves.
A new machined valve guide for seal. Several stages of re-man process.
EXHAUST VALVE SEATSWe then machine the cylinder heads to accept new hardened exhaust valve seat inserts. The exhaust valve seat is cut out to have a new valve seat insert installed.
INTAKE VALVE SEATSThen, the intake valve seat is cut out and a new seat is inserted. This picture shown lower left has the seat insert already installed.
REPRESSURE TESTFollowing installation of the new valve seat inserts and valve guides, the heads are pressure tested again to check for coolant leaks and fuel rail tested for fuel leaks.
MACHINE CYLINDER HEAD DECKWe machine the deck of the cylinder head with our Precision CBN resurfacing mill. This creates the proper Ra finish for the M.L.S style gasket used in these engines.
Milling the deck surface flat.
Above, machined exhaust seat counterbore. New intake valve seat installed, pictured below.
82 OCT-DEC 2015 engine professional
DIESEL HEAD TEARDOWN AND REBUILDBY SCOTT DEIBLER
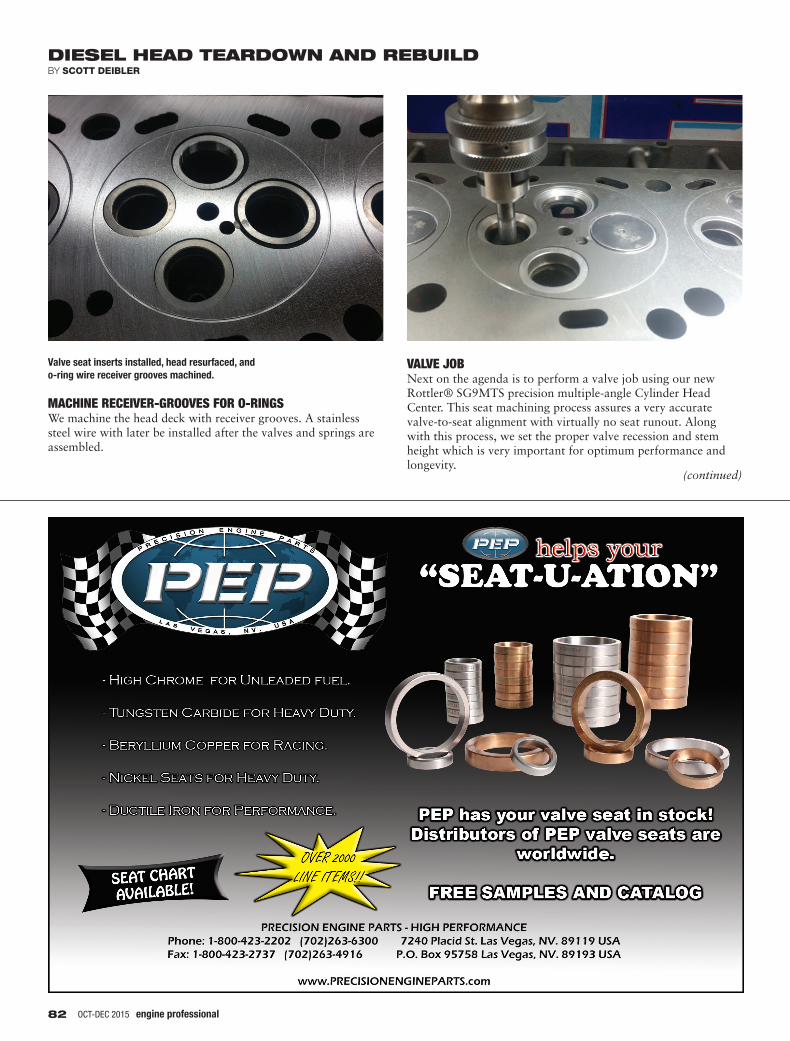
Valve seat inserts installed, head resurfaced, and o-ring wire receiver grooves machined.
MACHINE RECEIVER-GROOVES FOR O-RINGSWe machine the head deck with receiver grooves. A stainless steel wire with later be installed after the valves and springs are assembled.
VALVE JOBNext on the agenda is to perform a valve job using our new Rottler® SG9MTS precision multiple-angle Cylinder Head Center. This seat machining process assures a very accurate valve-to-seat alignment with virtually no seat runout. Along with this process, we set the proper valve recession and stem height which is very important for optimum performance and longevity.
(continued)

84 OCT-DEC 2015 engine professional
CLEANING & FINAL ASSEMBLY After all the machining operations are done, the head goes through our hot acid jet-wash and final cleaning processes then the cylinder heads are assembled with new valve seals and we install our custom-fit O-Ring wire.
The head is placed on the bench for final inspection. Once it passes final inspection the head is painted with high-temperature corrosion resistant paint and nicely packed for shipping/delivery.
Finished product ready for packaging.
Finished product includes —
All heads have had the following remanufacture operations completed:
• Completely disassembled and thoroughly inspected • Thermal cleaned and shot blasted• Cooling and fuel system pressure tested• Magna-fluxed for cracks• An injector hole repair sleeve is installed in cylinders #4 & #5• Cracks are repaired with Lock-N-Stitch pins• All valve guides replaced with oil retaining spiral core guides• All intake valve seats replaced, using high grade cobalt/iron
material• All exhaust seats replaced, using Nickle, Cobalt non-magnetic
material• Resurface of the deck• O-Ring receiver grooves machined into deck• Multi angle performance valve job with radius cut for
improved flow• Set spring pressure, spring height, stem height, and valve
recession
• New Viton® valve stem seals installed and assemble head• O-Ring wire installed, head inspected, painted, and prepared
for shipping
While some may want to shy away from working on 6.0L heads due to past experiences or the engines reputation, we have found that if their issues are properly addressed their reliability can be greatly enhanced and potential problems minimized. This is one case where people get what they pay for.
We also suggest for a longer lasting repair to install a stud kit for the cylinder head fastener locations — doing so greatly increases the clamping load and provides a longer lasting gasket seal.n
Scott Deibler started working in an engine machine shop in the mid-1980s. He was a mechanic in the Army, has held various positions in the automotive service industry, earned a BS in Sociology with a minor in Psychology from Penn State University, and is currently employed by UCF Machine Shop as office manager and sales consultant. For more information about these and other diesel heads contact Scott at [email protected], go to ucfmachineshop.com or call 717-249-8517.
DIESEL HEAD TEARDOWN AND REBUILDBY SCOTT DEIBLER
Final Inspection for Rocker Bridge Fitment
The source for information
To maintain an edge in the engine building industry, you need resources you can depend on. AERA is a specialized network of professional engine builders, rebuilders, production engine remanufacturers and installers with the expertise and connections to get you the information you need, when you need it.
Join online today! www.aera.org
AERA – Engine Builders Association500 Coventry Lane, Suite 180Crystal Lake, IL 60014 U.S.A.
toll-free 888-326-2372 / 815-526-7600www.aera.org • email: [email protected]