dictionary app builder: building apps - sil...
TRANSCRIPT
Building Apps
Last updated: 12 June 2017
2
Contents
1. Preparing content for your app ............................................................................. 3
1.1. Preparing your lexicon file .................................................................................... 3
1.2. Preparing images .................................................................................................. 3
1.3. Preparing audio .................................................................................................... 3
2. How to build your first app ................................................................................... 4
3. App Creation Basics .............................................................................................. 7
3.1. How should I choose the app package name? ..................................................... 7
3.2. Do I have to create a new keystore for each app, or can I reuse the same keystore for several of my apps? ......................................................................... 7
3.3. Can I build apps when I do not have internet access? .......................................... 7
3.4. Can I build an app from the command line? ......................................................... 8
4. Fonts .................................................................................................................. 10
4.1. What is 'Grandroid', referred to on the Fonts setup page? ................................ 10
4.2. When do I need to include the Grandroid libraries? ........................................... 10
5. Audio ................................................................................................................. 11
5.1. How do I distribute the audio MP3 files with the app? ...................................... 11
6. Analytics ............................................................................................................. 13
7. Distribution ........................................................................................................ 14
3
1. Preparing content for your app Before you build an app with Dictionary App Builder (DAB), you need to get your content (lexicon file, images and audio) into formats that DAB can handle.
1.1. Preparing your lexicon file
DAB can read two types of lexicon database file: LIFT and XHTML.
• Lexical Interchange FormaT (LIFT) LIFT files can be exported from any of the following SIL dictionary programs: FieldWorks Language Explorer (FLEx), WeSay or Lexique Pro.
In FLEx, select File ➢ Export, then choose 'Full Lexicon (LIFT)'.
• XHTML DAB supports XHTML files which have been exported from FieldWorks Language Explorer (FLEx). XHTML files generated from other sources are not supported.
In FLEx, select File ➢ Export, then choose 'Configured Dictionary (XHTML)'.
You will also need to export a Reversal XHTML file for each index language. To do this, select File ➢ Export, then choose 'Reversal Index (XHTML)'.
For more information about SIL dictionary software, please refer to the following websites:
LIFT https://code.google.com/p/lift-standard/
FLEx http://fieldworks.sil.org/flex/
WeSay http://wesay.palaso.org/
Lexique Pro http://lexiquepro.com/
1.2. Preparing images
Images should be in JPEG or PNG format.
Keep the image size small enough so that they display well on a small screen and will not make the app size too large. DAB will allow you to resize the images after you have added them to the app project.
1.3. Preparing audio
If you want to include audio files in your app, these need to be in MP3, WAV or 3GP audio format.
Keep the audio files at a size where the quality is good enough for a phone and where the file size is not too large.
4
2. How to build your first app To build your first app with Dictionary App Builder:
1. Launch Dictionary App Builder from its icon on the desktop. 2. Click New App on the toolbar. The New App wizard will appear.
3. On the first page of the wizard titled Lexicon Database, click Browse… and select
the lexicon data file you want to display in the app.
Click Next to move to the next page.
4. On the next page of the wizard titled Lexicon Details, you will see the number of entries and the languages found in the lexicon.
Click Next to move to the next page.
5. If your lexical database is an XHTML file, the next page of the wizard will be titled Reversal Indexes. Click Add Reversal Index File… and select one or more reversal index files that you have exported from FLEx.
Click Next to move to the next page.
6. On the page of the wizard titled App Name, specify the App Name, such as “Dogon Dictionary”, “Mamara Lexicon”, etc.
This is the main title of your app and will be seen by the user. Do not include underscores or hard to understand abbreviations.
Click Next to move to the next page.
7. On the page of the wizard titled Package, specify the Package Name, a dot-
separated string which uniquely identifies your app.
For testing, try something like:
com.example.myapp1 com.example.myapp2, etc.
(More details about choosing a good package name can be found in section 3.1. How should I choose the app package name?)
Click Next to move to the next page.
8. On the page of the wizard titled Indexes, select the languages for which you would like to see an index tab in the app.
Click Next to move to the next page.

5
9. On the page of the wizard titled Fonts, choose the font for each language. You
can either select from the given list of fonts or click Other to specify a different TrueType font file.
Click Next to move to the next page.
10. On the page of the wizard titled Grandroid, choose whether or not to enable
Grandroid font rendering.
In general, you will need Grandroid if you have a non-Roman script (e.g. Arabic, Thai, Hindi, etc.), or if you use a Roman script with combining diacritics. For more details, please refer to section 3 of this manual.
Click Next to move to the next page.
11. On the page of the wizard titled Icon, choose the application launcher icon. You
can select one of the images in the table or if you have your own PNG image files for the icon, click Browse and select them.
Click Next to move to the next page.
12. On the page of the wizard titled Signing, you need to specify the keystore and
alias to use to sign the app. An app must be signed in this way so that it can installed on an Android device.
If you do not already have a keystore file (which you are unlikely to have if this is your first time using the program):
i. Click Create New KeyStore Wizard. ii. Enter a new filename for the keystore, such as “test” or something like
that. Specify a password.
iii. Click Next to continue.
iv. Enter an alias name for a key to create within your new keystore, such as “testkey”. Specify a password and enter at least one piece of information in the fields below.
v. Click Next to continue.
vi. A new keystore will be created for you. Click Close.
13. Back on the Signing page of the New App wizard, you need to specify the
keystore password, select the alias and enter the alias password (just as you entered them in the step above).

6
Click Next to continue.
14. On the page of the wizard titled Project, you can enter modify the project name and add an optional description of the app project. Neither of these will be visible to the user of your app. They are just for your own use and might help you distinguish between multiple app projects.
Click Next to continue. The New App wizard will close and the app definition will be added to the tree view on the left of the screen.
15. Take a look at each of the app configuration pages by selecting them in the tree
view on the left. Look in each of the tabs on each page to verify that you have the settings you want. You can always go back to them later to change them if you find you need to make modifications to fonts, colors, styles, etc.
16. When you have finished configuring the app, click on Build App.
If something isn’t configured correctly for the build to work, you will be notified of this.
17. A black command box will appear. Wait about a minute while the app is
compiled.
The first time the build process is run, the compiler needs to connect to the internet to download some files. After this, subsequent app builds will not require internet access. See Tools ➢ Settings… ➢ Build Settings to turn on offline mode after the first app build.
18. If the build succeeds, you will have a new apk file – the installation file for an
app. Copy this .apk file onto your phone or tablet and click on it to install it.
This can be done automatically. See Tools ➢ Settings… ➢ Build Settings to install and launch the app on the attached device when the build finishes.
7
3. App Creation Basics
3.1. How should I choose the app package name?
The standard for an app package name is to begin with the reversed web address of the publishing organisation, e.g. if it is SIL, the package name could begin with:
org.sil
and will be followed by something identifying the language and type of publication, e.g.
org.sil.myk.lexicon where xyz is the language code. If you work for a university or linguistics organisation, you might have standards to follow for package names, so please contact your digital publications coordinator for advice on this. Once you publish your app on an app store, you cannot change its package name later if you want users to continue to receive updates. The package name uniquely identifies the app in the Android world. Those who install the app will be able to find its package name on their device. It will also appear in the web address for your app if you make it available on Google Play. If you are building apps for test purposes on your devices, you can use a package name beginning with com.example, e.g. com.example.test.app123 But remember to change it before you publish the app.
3.2. Do I have to create a new keystore for each app, or can I reuse the same keystore for several of my apps?
You can use the same keystore and key alias for all or several of your apps. See here for more details:
http://developer.android.com/tools/publishing/app-signing.html
3.3. Can I build apps when I do not have internet access?
The first time you build an app, you will need to be connected to the internet otherwise the compiler will fail. After that you can set the 'offline' version in Settings so you can work offline.

8
3.4. Can I build an app from the command line?
Yes, Dictionary App Builder has a command line interface which allows you to create a new app and build it, or load an existing app and build it.
The command line tool is named dab and can be found in the Program Files folder, usually c:\Program Files (x86)\SIL\Dictionary App Builder.
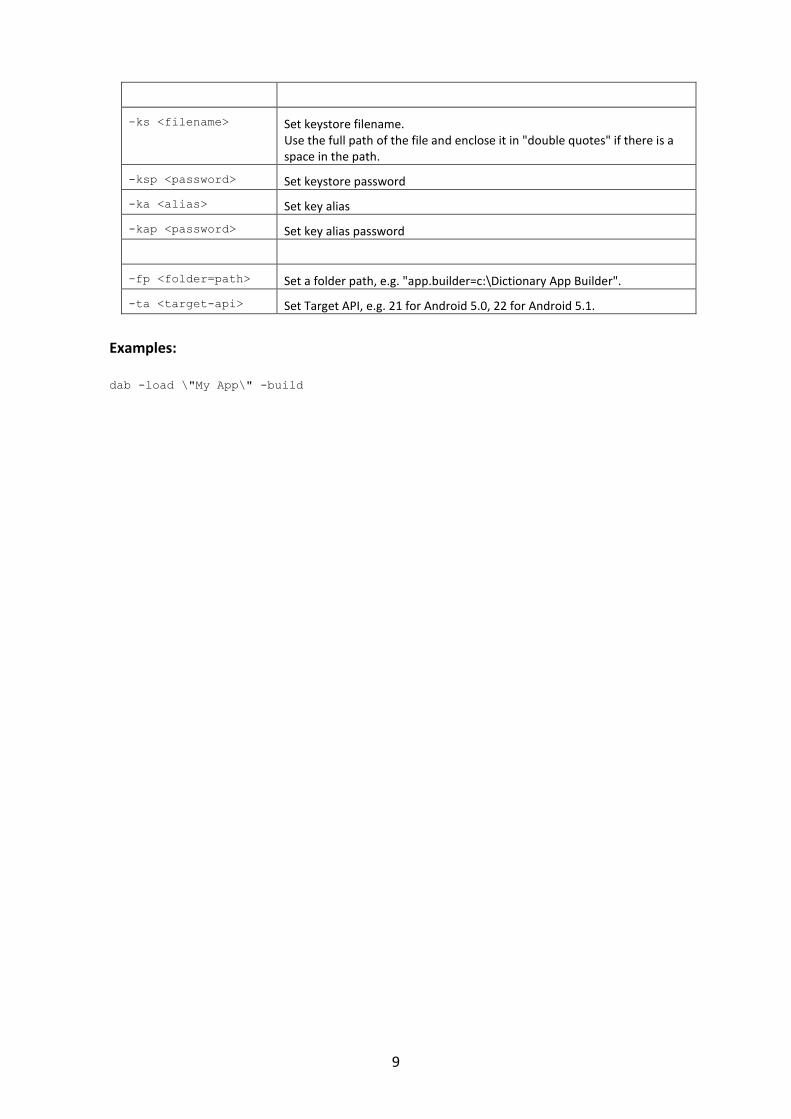
dab takes the following parameters:
Option Description
-new Create a new app project
-load <project> Load an existing app project
-build Build app project (use with either -new or -load)
-no-save Do not save changes to app (use with -load)
-? Show command line help
-n <app-name> Set app name. Enclose the name in "double quotes" if it contains spaces.
-p <package-name> Set package name, e.g. com.myorg.language.appname
-i <filename> Include additional parameters file. Use the full path of the file and enclose it in "double quotes" if there is a space in the path.
-a <filename> Set about box text, contained in text file. Use the full path of the file and enclose it in "double quotes" if there is a space in the path.
-f <fontname> Set font name or filename, e.g. "Charis SIL Compact", "c:\fonts\myfont.ttf" The font name must be one of the items in the list of fonts in the New App wizard. For other fonts, specify the full path to the font filename.
-g Use Grandroid
-ic <filename> Add launcher icon (one or more .png files). Use the full path of the files and enclose them in "double quotes" if there is a space in the path.
-l <lang-code> Set language for menu items and settings, e.g. en, fr, es
-ft <feature=value> Set a feature.
-vc <integer> Set version code, e.g. 1, 2, 3, or +1 to increment the current version code by 1.
-vn <string> Set version name, e.g. 1.0, 2.1.4, or use +1, +0.1, +0.0.1 to increment the current value.
9
-ks <filename> Set keystore filename. Use the full path of the file and enclose it in "double quotes" if there is a space in the path.
-ksp <password> Set keystore password
-ka <alias> Set key alias
-kap <password> Set key alias password
-fp <folder=path> Set a folder path, e.g. "app.builder=c:\Dictionary App Builder".
-ta <target-api> Set Target API, e.g. 21 for Android 5.0, 22 for Android 5.1.
Examples:
dab -load \"My App\" -build
10
4. Fonts
4.1. What is 'Grandroid', referred to on the Fonts setup page?
Grandroid (Graphite for Android) is a collection of native libraries from SIL Non-Roman Script Initiative (NRSI). They can be packaged within the app, enabling Android devices to make use of Graphite font rendering features. Grandroid is not only about Graphite. It also fixes a few of the font display problems in recent versions of Android. You can find more information about Graphite here: http://scripts.sil.org/cms/scripts/page.php?site_id=projects&item_id=graphite_home
You can find more information about Grandroid here: https://github.com/silnrsi/grandroid
4.2. When do I need to include the Grandroid libraries?
This will depend on the font and special characters you need to display. The more complex your script, the more likely you are to need Grandroid support. Please note that if a font displays correctly on your own phone without Grandroid, it does not mean it will display correctly on all phones and Android versions. As well as testing your app on the latest version of Android, it would be a good idea to test it on a phone running Android 4.2 or 4.3 (which have known font display problems) and the older 2.3 (which has limited built-in complex font support). You will almost certainly need to include the Grandroid libraries:
• If you have a non-Roman script, e.g. Greek, Cyrillic, Armenian, Hebrew, Arabic, Syriac, Thaana, Devanagari, Grumukhi, Oriya, Tamil, Telugu, Kannada, Malayalam, Sinhala, Thai, Lao, Tibetan, Myanmar, Georgian, Hangul, Ogham, Runic, Khmer, Ethiopic or NKo.
• If you have a Roman script which makes use of combining diacritics, such as separate acute accents or tone marks (e.g. ɔ,́ which is composed of two characters, but not é which is a single character).
You are unlikely to need to use Grandroid:
• If you have a simple Roman script which does not make use of combining diacritics. So that means a-z, plus other IPA characters such as ɛ, ɔ, ɲ, ŋ, etc. as long as they are not being combined with tone marks or accents.
If you try and display a complex script without Grandroid, you might find the following problems:

11
• Lack of Right-to-Left support - on Android 2.3 (Gingerbread).
• The system font being used rather than the font you specify - on Android 4.2 and 4.3 (Jelly Bean).
• Lines with combining diacritics being displayed in the system font, while other lines are being displayed correctly - on Android 4.2 and 4.3 (Jelly Bean).
• A blank screen where there should be text - on Android 4.2 and 4.3 (Jelly Bean). If you want to display complex fonts, including Right-to-Left scripts, on Android 2.3 (Gingerbread), it helps if the font is Graphite-enabled since Android 2.3 has limited handling of OpenType for font rendering.
5. Audio
5.1. How do I distribute the audio MP3 files with the app?
There are 3 ways of including audio files in your app: assets, external folder or internet download. You can use a single audio source for all of the files in an app or you can combine two or more audio sources in an app.
To specify the audio source(s) in Dictionary App Builder, you need to visit the following two tabs on the Audio page. This page can be found in the apps tree view just under Analytics on the top level of app pages.
1. The Audio Files tab, which lists the audio files with their corresponding audio source.
To change the audio source for a file or files, select the rows you want to change and select Change Audio Source.
2. The Audio Source tab, which defines the available audio sources.
You can modify, add and remove audio sources here.
The follow sections describe the different audio source types.
1. Assets The mp3 files will be packaged inside the apk file for the app. This is the easiest method for a few files (e.g. one book) and requires no permissions. But be beware that the apk will get very large if you have several books of audio. The maximum size of an apk that can be uploaded to the Google Play store is 100 MB.
12
2. External Folder No audio files are packaged within the app, so the apk is small. The app will look in a specified SD card folder to find the audio mp3 files it needs. If you are distributing the app via SD card, you include the folder of audio files on the SD card together with the apk. This method requires the 'Read external storage' permission but not internet access. You can place the mp3 files inside sub-folders and sub-sub-folders in the specified SD card folder, using any folder names you choose. Alternatively, you can place all the audio files in a single folder without using any sub folders. If the app does not find audio files in the specified folder or its sub-folders, it will also search the other folders on the device to see if it can find them there. For example, if the specified folder name is ‘Audio 123’ but the files are located in the ‘Audio 456’ folder instead, the app should find them. Once it has found a folder with a needed audio file, it will keep a note of it so it knows where to look next time.
3. Internet Download Like method 2, no audio files are packaged within the app, so the apk is small. The app will look in a specified SD card folder to find the mp3 files it needs. If it doesn't find them there, it will look in all the other folders on the device. If it still cannot find them, the app can download the files one by one when it needs them from a website of your choice. This method requires the 'Read external storage', 'Write external storage', 'Connection state' and 'Internet' permissions.
Audio filenames The internet download works best if your audio filenames do not include any spaces. A filename of the form “african-elephant.mp3” is better than “african elephant.mp3”.
Http or https The download manager in Android 2.3 (Gingerbread) cannot handle downloads from secure https addresses, so if you want to support these phones, use an http:// address instead of https://.
Audio file hosting Recommended storage locations for the files on the internet include:
1. A language-specific website
If you have a language-specific website for making resources available for download, you could place the audio files in a folder on the website.
For example, if your website is called ‘www.ourlanguage.org’, you could upload the audio files to a folder called ‘audio’. The http address for your audio files would then be: http://www.ourlanguage.org/audio
Your website administrator should be able to help you do this.
13
2. Internet Archive
Archive.org (http://www.archive.org) is a non-profit library where you can create a free account and upload your audio files. As well as being accessible to your app, the files will be freely available on the archive.org website for users to view and download.
3. Cloud Storage Services
Amazon S3 (Simple Storage Service): http://aws.amazon.com/s3/ Google Cloud Storage: https://cloud.google.com/storage/
These cloud storage services are designed for fast, reliable and secure online storage. Once you have created an account, you create a 'bucket' in which to place your mp3 files. When you add the files, you need to make them public and make a note of the web address link to use to access them, e.g. http://s3.amazonaws.com/yourbucketname
You will get some months of free storage before there is a charge according to the bandwidth used, i.e. how many MB of audio users download. It might be easiest to organise this kind of cloud storage at an organisational level rather than creating a new account for each language.
6. Analytics If you enable Analytics, the app will connect to the internet from time to time to send app usage information to a given Google Analytics account. This will give you an idea of the extent to which people are interacting with the app. The information sent will include the model of the device (such as ‘Google Nexus 7’, ‘Samsung Galaxy S4’), the Android version (such as ‘4.2’), the mobile network provider and an approximate location (city/country). No personal information is included. To sign up for Google Analytics, ensure you have a Google account, and go to:
https://www.google.com/analytics You will need to:
1. Create an analytics account 2. Create a ‘Mobile App’ property for this account.
You will be given a tracking id, of the form UA-1234567-1 which you should copy into the Tracking ID field in Dictionary App Builder.
14
7. Distribution Apps built with Dictionary App Builder can be published on the Google Play store, distributed by memory card, shared by Bluetooth or Wi-Fi transfer, uploaded to websites, or sent out by email. For more information, please see the user manual: Distributing Apps.