device user guide sybase mobile sales for sap crm 1
TRANSCRIPT
Device User Guide
Sybase Mobile Sales for SAP®
CRM 1.1
Windows Mobile

DOCUMENT ID: DC01179-01-0110-01LAST REVISED: June 2010Copyright © 2010 by Sybase, Inc. All rights reserved.This publication pertains to Sybase software and to any subsequent release until otherwise indicated in new editions ortechnical notes. Information in this document is subject to change without notice. The software described herein is furnishedunder a license agreement, and it may be used or copied only in accordance with the terms of that agreement.To order additional documents, U.S. and Canadian customers should call Customer Fulfillment at (800) 685-8225, fax (617)229-9845.Customers in other countries with a U.S. license agreement may contact Customer Fulfillment via the above fax number. Allother international customers should contact their Sybase subsidiary or local distributor. Upgrades are provided only atregularly scheduled software release dates. No part of this publication may be reproduced, transmitted, or translated in anyform or by any means, electronic, mechanical, manual, optical, or otherwise, without the prior written permission of Sybase,Inc.Sybase trademarks can be viewed at the Sybase trademarks page at http://www.sybase.com/detail?id=1011207. Sybase andthe marks listed are trademarks of Sybase, Inc. ® indicates registration in the United States of America.Java and all Java-based marks are trademarks or registered trademarks of Sun Microsystems, Inc. in the U.S. and othercountries.Unicode and the Unicode Logo are registered trademarks of Unicode, Inc.All other company and product names mentioned may be trademarks of the respective companies with which they areassociated.Use, duplication, or disclosure by the government is subject to the restrictions set forth in subparagraph (c)(1)(ii) of DFARS52.227-7013 for the DOD and as set forth in FAR 52.227-19(a)-(d) for civilian agencies.Sybase, Inc., One Sybase Drive, Dublin, CA 94568.
Contents
CHAPTER 1: Sybase Mobile Sales for SAP CRM ........1Device Requirements ............................................................1Supported Languages ...........................................................2Installation Prerequisites ......................................................2
Creating a Notifications Messaging Folder .....................3Installing Mobile Sales on Your Windows Mobile Device
.............................................................................................4Upgrading ...............................................................................5Connection Settings ..............................................................5
CHAPTER 2: Starting Sybase Mobile Sales ..................7Running Mobile Sales in Demo Mode ..................................7Switching from Demo Mode to Live Mode ..........................8Checking Available Memory .................................................9
CHAPTER 3: Getting Started with Mobile Sales .........11Mobile Sales Home Screen .................................................11Data Status Indicators .........................................................11Mobile Sales Synchronization ............................................12Unsubscribing and Resubscribing to Mobile Sales .........13Personalization and Settings ..............................................13
Settings .........................................................................14Changing Your Password ..............................................15Personalizing a Fact Sheet ...........................................15
Notifications .........................................................................16Viewing Notifications .....................................................16Deleting and Clearing Notifications ...............................16
Device User Guide iii

CHAPTER 4: Searching ................................................19Performing an Advanced Search ........................................19Searching Using Online Lookup ........................................20Deleting an Online Search ..................................................20
CHAPTER 5: Maps ........................................................23Viewing an Address on a Map ............................................23
CHAPTER 6: Account Management ............................25Searching Accounts ............................................................25Viewing Accounts ................................................................26
Viewing Relationships for an Account ...........................26Viewing Activities for an Account ..................................26Viewing Leads for an Account ......................................27Viewing Opportunities for an Account ...........................27Viewing Account Interaction History .............................27Viewing the Account Web Page ....................................28Calling the Account Phone Number ..............................28E-mailing an Account ....................................................29
Creating a New Account .....................................................29Creating a Lead for an Account .........................................30Creating an Opportunity for an Account ...........................30Updating Account Details ...................................................30
Adding a Contact Relationship to an Account ..............31Creating or Editing a Note for an Account ....................31
CHAPTER 7: Contacts Management ...........................33Searching Contacts .............................................................33Viewing Contacts .................................................................34
Viewing and Editing Alternate Contact Information ......34Viewing Relationships for a Contact .............................34
Contents
iv Sybase Mobile Sales for SAP CRM

Viewing Activities for a Contact .....................................35Viewing Leads for a Contact .........................................35Viewing Opportunities for a Contact .............................35Viewing Contact Interaction History ..............................35Calling a Contact .......................................................... 36E-mailing a Contact ...................................................... 36
Updating Contact Details ....................................................37Creating a New Business Contact .....................................37Saving a CRM Contact as a Personal Contact ..................38Creating or Editing a Note for a Contact ...........................38
CHAPTER 8: Activity Management ..............................39Searching and Viewing Activities .......................................39Adding a New Activity for Account or Contact .................40Adding an Existing Activity to Account or Contact .........41Logging a Phone Call as an Activity ..................................41Logging an E-mail as an Activity .......................................42Updating an Activity ............................................................43
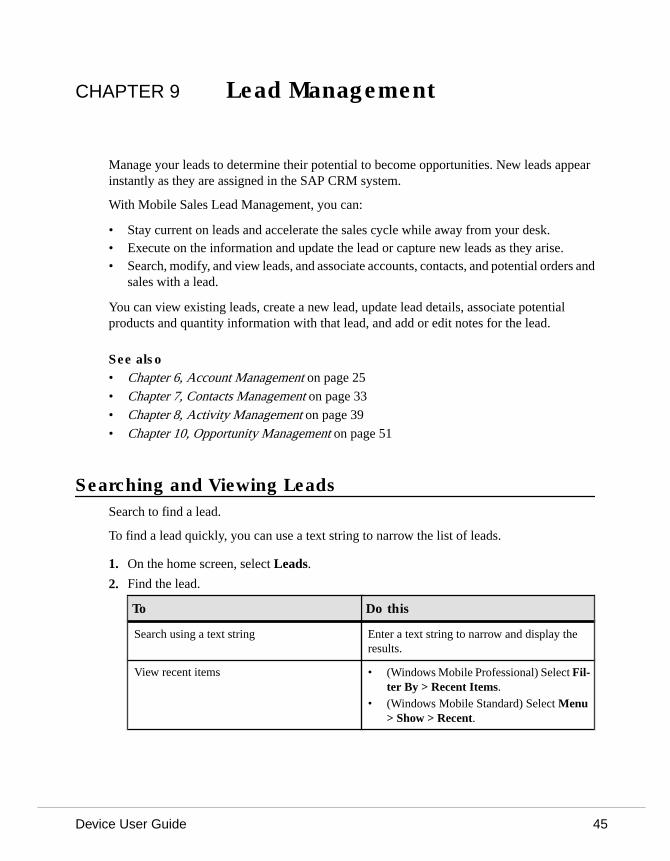
CHAPTER 9: Lead Management ..................................45Searching and Viewing Leads ............................................45Creating a New Lead ...........................................................46Updating Lead Details .........................................................47
Creating or Editing a Note for a Lead ...........................47Editing an Item for a Lead .............................................48Adding a New Item to a Lead ....................................... 48
CHAPTER 10: Opportunity Management ....................51Searching and Viewing Opportunities ...............................51Updating Opportunity Details .............................................52Creating an Opportunity .....................................................52Adding a New Line Item to an Opportunity .......................53Updating an Opportunity Line Item ...................................54
Contents
Device User Guide v

CHAPTER 11: Analytics ................................................55Pipeline Report ....................................................................56Top Opportunities Report ...................................................56Top Risk Opportunities Report ...........................................57Top Sales Order Report .......................................................58
CHAPTER 12: Sales Documents ..................................61Searching Sales Documents ..............................................61
CHAPTER 13: Device Data Integration With MobileSales ...........................................................................63
Adding a Personal Contact to Mobile Sales ......................64Adding a Calendar Entry as a Mobiles Sales Activity ......64
CHAPTER 14: Uninstalling Mobile Sales ....................65
CHAPTER 15: Troubleshooting ....................................67
Index ...........................................................................................71
Contents
vi Sybase Mobile Sales for SAP CRM

CHAPTER 1 Sybase Mobile Sales for SAPCRM
Sybase® Mobile Sales for SAP® CRM (Mobile Sales) provides anywhere, anytime access toSAP® Customer Relationship Management software from your smartphone. Whether at acustomer site or in an airplane, you will always have quick and reliable access to your CRMdata from your mobile device to maximize your productivity and effectiveness.
With Mobile Sales, you have full access to the specific SAP CRM data you need: accounts,contacts, leads, opportunities, activities, and analytics. Much of the functionality of yournative device integrates with Mobile Sales. You can work connected to the SAP server, oroffline, when you do not have an Internet connection.
With Mobile Sales, you can:
• Manage accounts and contacts – quickly access all information necessary to manage salesaccounts from a single, comprehensive view. Capture and track critical information aboutprospects, customers, and partners.
• Manage leads and opportunities – track and qualify leads. New leads and opportunitiesappear instantly as they are assigned in the SAP CRM system.
• Manage your sales activities – quickly access, create and modify planned activities withinthe Mobile Sales application or the native calendar.
• View all information necessary to manage your sales accounts.• View and monitor the status and progress of your interactions.• Inspect sales documents – access current information to gain a comprehensive view of
customers prior to a visit and to accurately position new products and offerings.• Access real-time reports – review charts and key reports to prioritize actions to achieve
sales objectives in the most efficient manner.
Device RequirementsSybase Mobile Sales for SAP CRM can run on these devices.
Supported Devices
• Windows Mobile 6.1.x Professional• Windows Mobile 6.1.x Standard• Windows Mobile 6.0.x Professional• Windows Mobile 6.0.x Standard
Device User Guide 1

Device Storage RequirementsMake sure you have the minimum free storage space before installing the Mobile Salesapplication on the device: 40MB internal storage. You may need more storage spacedepending on how much data you store on the device.
See also• Installation Prerequisites on page 2
• Installing Mobile Sales on Your Windows Mobile Device on page 4
Supported LanguagesMobile Sales labels and messages display in these supported languages.
• English• French• German• Spanish
Live ModeIf your device is set to a supported language, Mobile Sales labels and messages automaticallydisplay in that language. If your device is set to an unsupported language, the Mobile Salesdefault language is English; however, you can change to a different supported language afterlogin.
Demo ModeIf running Mobile Sales in Demo mode, the Mobile Sales data displays in English while theapplication labels and messages display in the selected supported language, or English forunsupported languages.
SAP System Messages and Field NamesMany SAP messages and field names are translated to your device's native language.However, in some cases, the SAP system messages and field names appear in the languagedefined for the SAP system. If the SAP system is set up for English, some warning messagesand field names appear in English, for example, when creating or updating an account,contact, or activity, or viewing and editing Analytics report options.
Installation PrerequisitesPerform the prerequisites before installing Sybase Mobile Sales for SAP CRM.
• Uninstall any existing version of Mobile Sales before installing a newer version.
2 Sybase Mobile Sales for SAP CRM

• See Device Requirements for information on supported devices and storage spacerequirements.
• (Skip this step if you plan to run Mobile Sales in Demo mode.) See your systemadministrator to obtain your SAP account and Sybase Unwired Platform connectioninformation.Be sure to note your user name, Unwired Server or Relay Server name, Unwired Server orRelay Server port number, activation code, and farm ID. Enter the connection informationin Sybase Settings before starting the Mobile Sales application.
• Create a messaging folder called Notifications.• Install Microsoft Compact Framework 3.5, NETCFSetupv35.msi. You can download
it from the Microsoft Web site at http://www.microsoft.com/downloads/details.aspx?displaylang=en&FamilyID=e3821449-3c6b-42f1-9fd9-0041345b3385.
• (Optional) Install Microsoft Compact Framework for Messaging,NETCFv35.Messages.EN.wm.cab if you want to view Windows Mobile errormessages for a specific locale. Without this file, Mobile Sales might not display somelocalized messages.
Note: After installing Microsoft Compact Framework, turn off the device, then turn it backon.
• (Optional) If your company is using Sybase Unwired Platform to provision the MobileSales application to your device, install Afaria client. If this step is necessary, you willreceive instructions from your system administrator.
See also• Installing Mobile Sales on Your Windows Mobile Device on page 4
• Device Requirements on page 1
Creating a Notifications Messaging FolderCreate a Notifications messaging folder before installing Sybase Mobile Sales for SAP CRMon your Windows Mobile device.
Note: The Notifications messaging folder collects notifications from the SAP system. It is notused as a regular e-mail account, so be sure to use a fictitious e-mail address and mail serverinformation.
1. Select Start > Messaging.
(Windows Mobile Standard) Select Start > Programs > Messaging.
2. Select Setup E-mail.
3. Enter a fictitious e-mail address, then select Next.
4. Unselect Try to Get E-mail Settings Automatically From the Internet, then selectNext.
5. Select Internet E-mail as your e-mail provider, then select Next.
CHAPTER 1: Sybase Mobile Sales for SAP CRM
Device User Guide 3
6. For Your Name, enter Notifications.
Enter it exactly as indicated here. Be sure to capitalize Notifications.
7. In Account Display Name, enter Notifications again, then select Next.
8. Enter a fictitious Incoming Mail Server, then select Next.
9. Enter a fictitious User Name, then select Next.
10. Enter a fictitious Outgoing Mail Server, then select Next.
11. Select Manually for Automatic/Send Receive, then select Finish.
You do not need to do anything else to maintain this account. You do not need to manuallyretrieve the e-mail.
Installing Mobile Sales on Your Windows Mobile DeviceInstall Sybase Mobile Sales for SAP CRM on your Windows Mobile device.
PrerequisitesPerform the required installation prerequisites.
Task
In many organizations, your system administrator will send you a notification that providesinstructions and includes a link that downloads the Mobile Sales application to your device.Alternately, you can copy the CAB files to your device, for example, using ActiveSync. Oncethe CAB files are on your device, you can install them. Depending on device storage space,you might need to delete each CAB file after installation.
1. Copy the Sybase Messaging CAB file to your device.
Use File Explorer to find the CAB file on the device, then select the CAB file to begin theinstallation process.
• SUPMessaging_ppc.cab for Windows Mobile Professional
• SUPMessaging_sp.cab for Windows Mobile Standard
2. Copy the Mobile Sales application CAB to your device, and then select it to install.
• SybaseMobileSales_Pro_<version>.CAB for Windows MobileProfessional
• SybaseMobileSales_Std_<version>.CAB for Windows Mobile Standard
3. Select OK as many times as required to complete the installation process.
4 Sybase Mobile Sales for SAP CRM

Next
• If running Mobile Sales in Live mode, specify the connection settings in Sybase Settingsbefore starting the application.
• If you are evaluating the Mobile Sales application, run it in Demo mode, which containssample data. You do not need to connect to the SAP system.
See also• Installation Prerequisites on page 2
• Device Requirements on page 1
• Upgrading on page 5
UpgradingBefore you can install a newer version of Mobile Sales, you must uninstall the existingversion.
1. Uninstall Mobile Sales. See Uninstalling the Mobile Sales Application.2. Once you uninstall the existing version of Mobile Sales, see Installing Mobile Sales on
Your Windows Mobile Device.
See also• Installing Mobile Sales on Your Windows Mobile Device on page 4
• Chapter 14, Uninstalling Mobile Sales on page 65
Connection SettingsView or change the connection and global application settings for the Sybase Mobile Sales forSAP CRM application. You must enter these settings before starting the application.
Enter Sybase SettingsSybase Settings enable to you to indicate the connection information to Unwired Server.Obtain this information from your system administrator and enter it before launching theapplication.
Note: You do not need to enter connection settings if running Mobile Sales in Demo mode.
From the home page, select Start > Programs > Sybase Settings.
CHAPTER 1: Sybase Mobile Sales for SAP CRM
Device User Guide 5

Table 1. Connection information
Option Description
Server Name Host name or IP address of Relay Server or Un-wired Server.
Server Port Message port number for Relay Server or Un-wired Server.
Farm ID Relay Server farm ID for the Unwired Server in-stallation.
User Name User name for your messaging device registra-tion. Your system administrator uses Sybase Con-trol Center to register your device.
Activation Code Activation code that your system administratorcreated for this messaging device user registra-tion.
Verify Connection to SAP SystemIn Sybase Settings, select Menu > Show Log. Look for the Connected to Servermessage.
6 Sybase Mobile Sales for SAP CRM

CHAPTER 2 Starting Sybase Mobile Sales
Once you install the Sybase Mobile Sales for SAP CRM application on your device, you canlaunch it and connect to the SAP system.
Prerequisites
Note: If you plan to run Mobile Sales in Demo mode for evaluation purposes, skip theseinstructions and refer to Running Mobile Sales in Demo Mode.
• Install Mobile Sales.• Enter Sybase Settings connection information before starting the Mobile Sales
application.• Be sure you have at least 20MB free process memory. If you do not have enough free
memory, shut down other applications that you are not currently using.
Task
1. Select Start > Programs > Mobile Sales.
2. Enter the SAP account and password.
If your device is set to a supported language, the Mobile Sales application messages andlabels display in the supported language specified for the device. If your device is set to anunsupported language, the Mobile Sales default language is English; however, you canselect a different supported language for Mobile Sales after you log in.
The Mobile Sales application begins synchronizing data with the SAP system. Theapplication home page appears after synchronization. It can take up to 30 minutes or longer toperform the initial synchronization with the SAP system, depending on the data set size foryour subscription. For best results and to avoid reduced performance, wait until the initial datadownload is complete before starting or using the Mobile Sales application. The applicationsplash screen shows the synchronization status while displaying what data is beingdownloaded to the device.
If you do not see data downloading from SAP server, verify your connection information iscorrect and that you are connected to the SAP system by viewing the Sybase Settings log.
Running Mobile Sales in Demo ModeYou can run Mobile Sales in Demo mode for evaluation purposes. Demo mode does notrequire you to be online or connected to the SAP system.
When you run in Demo mode, Mobile Sales creates test data. If you update any existing data orcreate new data, those changes are marked as pending. In Demo mode, the Mobile Sales data
Device User Guide 7
displays in English while the application labels and messages display in the selected supportedlanguage, or English for unsupported languages.
Your system administrator determines if the Mobile Sales application can run in Demo mode.
1. Select Start > Programs > Mobile Sales.
2. In the pop-up dialog, select Yes to Do You Want to Start in Demo Mode?.
If you select No, Mobile Sales assumes that you want to run the application in "Live"(online) mode. The Demo mode option becomes unavailable. This pop-up displays onlythe first time you start Mobile Sales.
3. Enter any User ID and Password, then select Login.
Note: Be sure to note the specified user ID and password because Mobile Sales requiresthat you use the same credentials for subsequent logins.
Switching from Demo Mode to Live ModeOnce you are finished evaluating Mobile Sales in Demo mode, you can switch to Live mode torun the application and download data from the SAP system.
Prerequisites
• Indicate Sybase Settings connection information.• View the Sybase Settings log to make sure Mobile Sales is connected to the SAP system.
Task
1. Exit the Mobile Sales application.
2. Start the Mobile Sales application.
3. In the Login screen, select Menu > Unsubscribe.
4. Select No in the pop-up dialog, Do You Wish to Continue in Demo Mode?.
5. Log in using your SAP user ID and password.
NextStart Sybase Mobile Sales.
See also• Chapter 2, Starting Sybase Mobile Sales on page 7
8 Sybase Mobile Sales for SAP CRM

Checking Available MemoryBefore starting the Mobile Sales application, make sure you have enough memory on yourWindows Mobile device.
You need at least 20MB free process memory to start Mobile Sales. If you do not have enoughfree memory, shut down other applications that you are not currently using.
1. Select Start > Settings.
2. (Windows Mobile Professional) Select the Systems tab, then select Memory.
(Windows Mobile Standard) Select About. You might need to select More to see theAbout option.
3. Make sure you have enough free memory.
• (Windows Mobile Professional) Look at the free memory in the Program column.• (Windows Mobile Standard) Scroll down to view available memory.
CHAPTER 2: Starting Sybase Mobile Sales
Device User Guide 9

10 Sybase Mobile Sales for SAP CRM

CHAPTER 3 Getting Started with MobileSales
Learn about the home screen, how the Mobile Sales application synchronizes with the SAPsystem, how to change application settings, and where to view important messages(notifications) from the SAP CRM system.
Mobile Sales Home ScreenThe Mobile Sales home screen is where you access the main features of the application.
Your system administrator determines which components (facets) you see, and may includethe following:
• Accounts – lists your Mobile Sales accounts.• Contacts – lists your Mobile Sales contacts.• Activities – lists your Mobile Sales activities.• Leads – lists your Mobile Sales leads.• Opportunities – lists your Mobile Sales opportunities.• Analytics – lists the available Mobile Sales reports.• Sales Documents• Today's activities – lists all activities for today. Select an activity from this view to view its
fact sheet.• (Windows Mobile Professional) Recents or (Windows Mobile Standard) Recent Items –
displays the recently viewed items for accounts, contacts, activities, leads, andopportunities. You can change how many recent items appear for each object throughMobile Sales Settings.
• Mobile Sales version information – select Menu > About.
Data Status IndicatorsWhen creating or editing CRM information (objects), the application displays icons toindicate important information.
For opportunities, the SAP server calculates their chance of success and displays an iconindicating the chance-of-success percentage with each opportunity.
When you create a new object or modify an existing objects, the changes are placed in apending state and wait for the SAP server to accept the changes. Until accepted by the SAP
Device User Guide 11

server, the changes are stored in the device database only. The SAP server replies in one ofthree ways:
• The SAP server accepts the changes. The pending icon disappears.• The pending icon changes to yellow triangle. You can choose to ignore (remove warning)
or manually fix the issues.• The pending icon changes to red error icon. You must fix or undo the changes.
If multiple users update a record simultaneously, the last valid change is updated on the SAPsystem.
Table 2. Data Status icons
Icon Description
Pending changes. If working offline, any new or updated information goesinto a queue until the device goes online. The Mobile Sales application tagsinformation in the queue with a Pending Changes icon. When an object haspending changes, you cannot edit it.
Yellow triangle indicator. SAP server indicates warning messages associatedwith the data. You can ignore the messages or manually fix them. If you donot make the required edits to fix the warning, the warning remains. Edit theobject to fix the issues that caused the warnings. To remove the warning, openthe fact sheet, then select Menu > Remove Warning. If you fix the issues, theobject is pending until synchronized with the SAP server.
Red error icon. SAP server has rejected the new or updated object. You mustfix or undo the changes to clear the error. View error messages in the object'sfact sheet. Select the message to view its details. To undo the changes, selectMenu > Undo Changes, or fix the errors by editing the object, then save it.
If a record is rejected because of incorrect login information, the applicationdisplays a window for you to enter your correct password. After you enter thecorrect login information, you must manually edit the affected record againand save it.
See also• Chapter 15, Troubleshooting on page 67
Mobile Sales SynchronizationAfter you initially connect to the SAP server and download CRM data, you can work online oroffline. To begin using Mobiles Sales, you must initially connect to the SAP server anddownload Mobile Sales data.
If you do not have network connectivity, you can work offline; however, you do not receivenew data from the SAP system, and your device cannot save any changes you make back to the
12 Sybase Mobile Sales for SAP CRM

SAP server. Once online, when creating new or updating existing information, the informationis synchronized with the SAP server. Once connected to the server, data is refreshedautomatically.
In Settings, you can determine how data is synchronized for contacts and calendar entries. Ifyou want to work offline, you can disable synchronization in Sybase Settings.
• Select Menu > Programs > Sybase Settings.• Select Connection, then select Menu > Disable.
Unsubscribing and Resubscribing to Mobile SalesYour system administrator may ask you to unsubscribe and resubscribe to the SAP systemfrom your device.
For example, you need to unsubscribe from your device before you can log in as a differentuser, or your system administrator may ask you to unsubscribe before uninstalling andupgrading to a new version of Mobile Sales. When you unsubscribe, all Mobile Sales data isdeleted from your device.
When you unsubscribe:
• You must have network connectivity. If you are offline when you unsubscribe, it occursonce you have network connectivity.
• Any pending updates are pushed to the SAP server.• Pending edits that have not been synchronized with the SAP server are canceled.• Any pending changes from the SAP server to your device are ignored.
1. Exit the Mobile Sales application.
2. Start the Mobile Sales application.
3. In the login screen, select Menu > Unsubscribe.
4. Select Yes to confirm you want to unsubscribe.
5. Exit the Mobile Sales application, restart it, then resubscribe with your new logininformation.
Personalization and SettingsPersonalize Sybase Mobile Sales for SAP CRM by modifying the default settings.
Before you can change settings, you must install the installation prerequisites, install theMobile Sales application, connect to Unwired Server, and complete the initial download ofMobile Sales data from the SAP system.
CHAPTER 3: Getting Started with Mobile Sales
Device User Guide 13

You can determine default application behavior, change your password, or personalize the factsheets by indicating which fields you see and their order for accounts, contacts, activities,leads, and opportunities.
SettingsView or change the settings for the Sybase Mobiles Sales for SAP CRM application.
On the home screen, select Menu > Options > Settings to view or change.
Table 3. Mobile Sales settings
Option Description
Show Last Name First Displays last name first for contacts in the con-tacts list.
Log Phone Call Indicates that the application displays a pop-up soyou can log the phone call as a Mobile Sales ac-tivity.
Recent Items Display Indicates how many recent items to display foraccounts, contacts, activities, leads, opportuni-ties, and sales documents.
Default Lead Duration (Days) Indicates the default duration for newly createdleads. The default is 30 days.
The default start date is the current date, and theend date is set n days from the start date, based onthis setting.
Default Opportunity Duration (Days) Indicates the default duration for newly createdopportunities. The default is 30 days.
The default start date is the current date, and theend date is set n days from the start date, based onthis setting.
Application Timeout (Minutes) Indicates how many minutes before the applica-tion times out and a password is required to regainaccess. If you select 0 (zero), the application nev-er times out.
Display Notification Bubble (Windows Mobile Professional only) Displays analert if you receive a notification when a lead,opportunity, or activity is created in the SAP sys-tem.
14 Sybase Mobile Sales for SAP CRM

See also• Viewing Notifications on page 16
Changing Your PasswordChange the password to access the Sybase Mobile Sales for SAP CRM application.
PrerequisitesAsk your system administrator to change your password in the SAP system before changing iton the device using this screen.
Task
1. Select Menu > Options > Change Password.
2. Click OK to close the warning message that indicates to change the password first on theSAP system.
3. Enter the new Password.
4. Select Save.
The password validates against the SAP server during the next synchronization.
See also• Chapter 15, Troubleshooting on page 67
Personalizing a Fact SheetPersonalize the fact sheets by indicating which fields you see and in what order.
You can personalize the fact sheets for accounts, contacts, activities, leads, and opportunities.
1. Select Accounts, Contacts, Activities, Leads, Opportunities, or Sales Documents.
2. Select an object to display the fact sheet.
3. Select Menu > Personalize.
4. Highlight a field.
To Do this
Hide the field Select Menu > Hide Item.
Move the field up Select Menu > Move Up.
Move the field down Select Menu > Move Down.
CHAPTER 3: Getting Started with Mobile Sales
Device User Guide 15

To Do this
Display a hidden field 1. Select Menu > Show Item.2. Select the item to unhide, then click Add.3. Position the item in the proper location us-
ing Move Up or Move Down.
Restore fact sheet defaults Select Menu > Restore Defaults.
5. Select Done.
NotificationsDisplays all new activities, leads, and opportunities that are assigned to you. Notifications alsodisplays login failure (invalid credential) messages during login to or synchronization with theSAP server for any updates, new activity creations, or new queries for reports.
You can view your notifications, delete an individual notification, or clear all notifications.Notifications display in descending date order, with the most recent on top.
Viewing NotificationsView your notifications, which list all new activities, leads, and opportunities assigned to you.You receive notifications only when the Mobile Sales application is running and is connectedto the SAP system.
For Windows Mobile Professional, if you selected Display Notification Bubble in the MobileSales Settings, you receive a bubble message when you receive a new notification.
1. Go to your Notifications messaging account.
2. Select a notification email to view its contents.
3. (Windows Mobile Professional) Select View in CRM to see the lead, opportunity, oractivity and all its details in the Mobile Sales application.
See also• Deleting and Clearing Notifications on page 16
• Settings on page 14
Deleting and Clearing NotificationsDelete an individual notification, or clear all notifications.
1. Go to your Notifications messaging account.
2. Delete a notification or clear all notifications.
16 Sybase Mobile Sales for SAP CRM
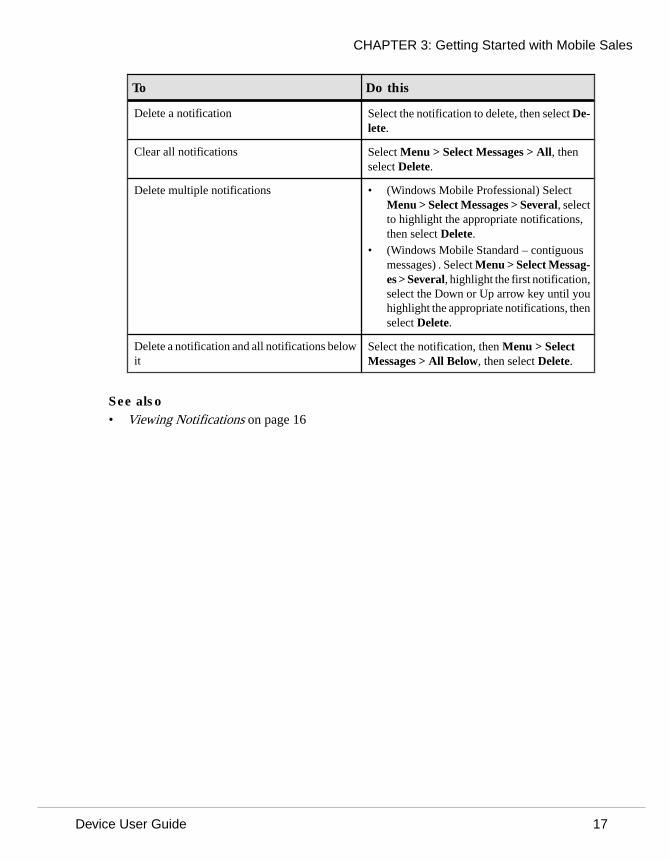
To Do this
Delete a notification Select the notification to delete, then select De-lete.
Clear all notifications Select Menu > Select Messages > All, thenselect Delete.
Delete multiple notifications • (Windows Mobile Professional) SelectMenu > Select Messages > Several, selectto highlight the appropriate notifications,then select Delete.
• (Windows Mobile Standard – contiguousmessages) . Select Menu > Select Messag-es > Several, highlight the first notification,select the Down or Up arrow key until youhighlight the appropriate notifications, thenselect Delete.
Delete a notification and all notifications belowit
Select the notification, then Menu > SelectMessages > All Below, then select Delete.
See also• Viewing Notifications on page 16
CHAPTER 3: Getting Started with Mobile Sales
Device User Guide 17

18 Sybase Mobile Sales for SAP CRM

CHAPTER 4 Searching
Sybase Mobile Sales for SAP CRM enables you to perform different searches so you canquickly find the data you need.
Search type Description
Search Enables you to search your device data for a re-cord in a list. You can enter a text string, whichfilters the results you see. You see results for anyfield displayed in the list.
Advanced search An advanced search enables you to further nar-row your search for data on your device by indi-cating a text string or specific values from a drop-down for some of the object's fields.
Online lookup An online lookup enables you to search recordson the SAP system. When performing an onlinesearch, you must use text with asterisk charactersinstead of a simple text string.
You can peform an online lookup for all objectsexcept contacts.
Performing an Advanced SearchAdvanced searches enable you to narrow the results list.
You can perform an advanced search on device data for accounts, contacts, activities, leads,opportunities, and sales documents. You can indicate a text string or select specific valuesfrom a drop-down for some of the object's fields.
1. On the Mobile Sales home page, select Accounts, Contacts, Activities, Leads,Opportunities, or Sales Documents.
2. Open the advanced search screen.
• For Windows Mobile Professional, select Menu > Advanced Search.• For Windows Mobile Standard, select Menu > Search > Advanced.
3. Enter a text string or select from the drop-down list to indicate search criteria.
You can leave fields blank to search on all values for that field.
4. Click OK.
Device User Guide 19
See also• Searching Using Online Lookup on page 20
• Deleting an Online Search on page 20
Searching Using Online LookupPerform an online lookup to search for records on the SAP system. You must have networkconnectivity to perform an online lookup.
You can create an online lookup for accounts, leads, activities, opportunities, and salesdocuments. Online lookup searches are automatically saved.
Note: The system can only return a maximum of 1MB of data, so broad searches may returnonly a subset of the data or return no data. To ensure you see the all results you want, limit thedata set by indicating additional search parameters.
1. On the Mobile Sales home screen, select Accounts, Activities, Leads, Opportunities, orSales Documents.
2. Open the online lookup screen.
• (Windows Mobile Professional) Select Menu > Online Lookup.• (Windows Mobile Standard) Select Menu > Search > Online Lookup.
3. Select New Search to create a new online lookup, or double-click a saved search.
4. If creating a new search, enter text with asterisks as the wildcard, or select values from thedrop-down lists for the appropriate fields.
Note: Categories are created in the SAP system. If you created the object in Mobile Sales,it does not have a category.
5. Click OK.
You can view only those searches that received data from the SAP system. If you perform anonline lookup without network connectivity, the online lookup returns in a pending state untilyou have network connectivity.
See also• Performing an Advanced Search on page 19
• Deleting an Online Search on page 20
Deleting an Online SearchDelete an online lookup search.
You can delete only those searches that received data from the SAP system.
20 Sybase Mobile Sales for SAP CRM

1. On the Mobile Sales home screen, click Accounts, Activities, Leads, Opportunities, orSales Documents.
2. Open the online lookup screen.
• (Windows Mobile Professional) Select Menu > Online Lookup.• (Windows Mobile Standard) Select Menu > Search > Online Lookup.
3. Highlight the online lookup to delete, then select Menu > Delete.
See also• Performing an Advanced Search on page 19
• Searching Using Online Lookup on page 20
CHAPTER 4: Searching
Device User Guide 21

22 Sybase Mobile Sales for SAP CRM
CHAPTER 5 Maps
Mobile Sales supports different map options for your smartphone.
For Windows Mobile, Mobile Sales integrates with Google Maps mapping service. Yourorganization must obtain a map key from Google to use this service.
Viewing an Address on a MapView the address for an account or a contact on a map.
1. On the home screen, select Accounts or Contacts.
2. Select the account or contact to view its fact sheet.
3. Select Show On Map to see the location on a map.
For Windows Mobile Standard, select Menu > View On Map.
4. (Optional) Adjust map display.
• (Windows Mobile Professional) Select Zoom or Rotate.• (Windows Mobile Standard) Select Menu, then Zoom In, Zoom Out, Rotate Left, or
Rotate Right.
5. Select OK when finished viewing map.
Device User Guide 23
24 Sybase Mobile Sales for SAP CRM

CHAPTER 6 Account Management
You can quickly access all information necessary to manage sales accounts from a single,comprehensive view.
With Mobile Sales Account Management, you can:
• Search, modify, and view accounts, as well as the activities, leads, opportunities, andrelationships associated with an account.
• Create new accounts.• Update account information.• Quickly contact an account: send an e-mail or place a call to the account main number or
mobile number, all from the account fact sheet.• Capture, monitor, and track critical information about prospects, customers, and partners.
See also• Chapter 7, Contacts Management on page 33
• Chapter 8, Activity Management on page 39
• Chapter 9, Lead Management on page 45
• Chapter 10, Opportunity Management on page 51
Searching AccountsNarrow the results to find a specific account.
To find an account quickly, you can use a text string to narrow the list of accounts, or filter orsort the list of accounts.
1. On the home screen, select Accounts.
2. Find the account.
To Do this
Search for the account using a text string Enter a text string to narrow and display theresults.
View recent accounts • (Windows Mobile Professional) Select Fil-ter By > Recent.
• (Windows Mobile Standard) Select Menu> Show > Recent.
Device User Guide 25

To Do this
Sort the accounts • (Windows Mobile Professional) SelectSort By, then All, Name, City, or State.
• (Windows Mobile Standard) Select Menu> Sort By, then select Name or City.
3. Select the account to view.
Viewing AccountsView existing accounts.On the home screen, select Accounts.
To Do this
View the account fact sheet, which displays ac-count details
Select the account.
View accounts that contain a specific text string Enter the text string.
Viewing Relationships for an AccountView the contacts who have a relationship with an account.
1. On the home screen, select Accounts.
2. Select an account to display the account fact sheet.
3. Near the bottom of the screen, select Relationships.
4. Select the relationship to view its details.
Viewing Activities for an AccountView the activities associated with an account.
1. On the home screen, select Accounts.
2. Select an account to view its fact sheet.
3. Near the bottom of the screen, select Activities.
4. (Optional) Narrow the activities list.
Option Description
Filter By Filters the activities list by activity type. ForWindows Mobile Standard, select Menu >Show, then the activity type.
26 Sybase Mobile Sales for SAP CRM
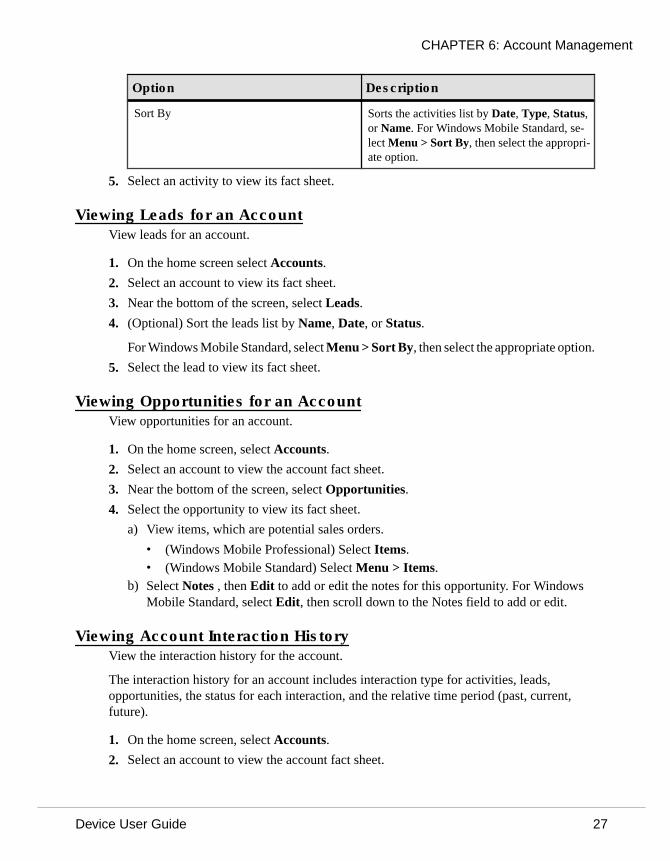
Option Description
Sort By Sorts the activities list by Date, Type, Status,or Name. For Windows Mobile Standard, se-lect Menu > Sort By, then select the appropri-ate option.
5. Select an activity to view its fact sheet.
Viewing Leads for an AccountView leads for an account.
1. On the home screen select Accounts.
2. Select an account to view its fact sheet.
3. Near the bottom of the screen, select Leads.
4. (Optional) Sort the leads list by Name, Date, or Status.
For Windows Mobile Standard, select Menu > Sort By, then select the appropriate option.
5. Select the lead to view its fact sheet.
Viewing Opportunities for an AccountView opportunities for an account.
1. On the home screen, select Accounts.
2. Select an account to view the account fact sheet.
3. Near the bottom of the screen, select Opportunities.
4. Select the opportunity to view its fact sheet.
a) View items, which are potential sales orders.
• (Windows Mobile Professional) Select Items.• (Windows Mobile Standard) Select Menu > Items.
b) Select Notes , then Edit to add or edit the notes for this opportunity. For WindowsMobile Standard, select Edit, then scroll down to the Notes field to add or edit.
Viewing Account Interaction HistoryView the interaction history for the account.
The interaction history for an account includes interaction type for activities, leads,opportunities, the status for each interaction, and the relative time period (past, current,future).
1. On the home screen, select Accounts.
2. Select an account to view the account fact sheet.
CHAPTER 6: Account Management
Device User Guide 27
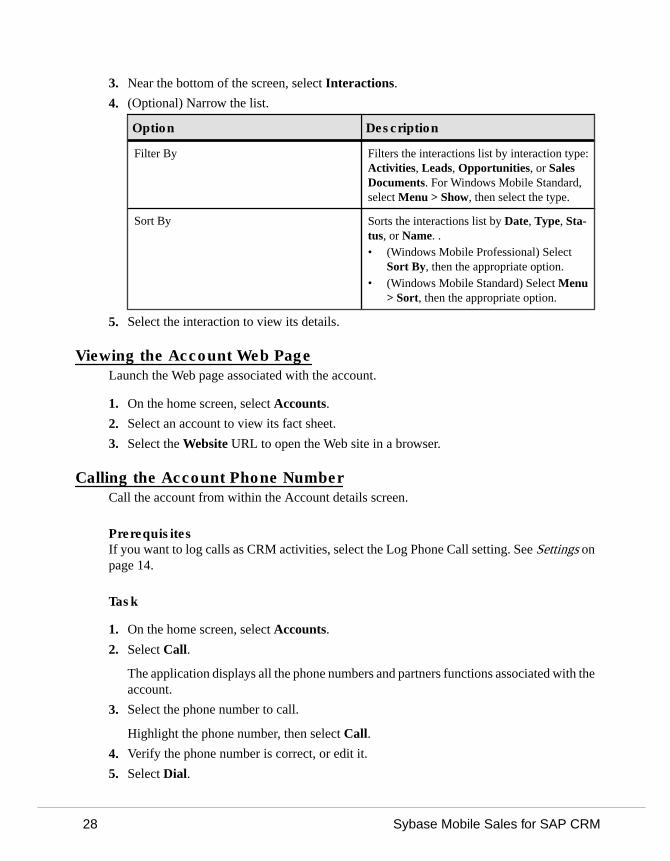
3. Near the bottom of the screen, select Interactions.
4. (Optional) Narrow the list.
Option Description
Filter By Filters the interactions list by interaction type:Activities, Leads, Opportunities, or SalesDocuments. For Windows Mobile Standard,select Menu > Show, then select the type.
Sort By Sorts the interactions list by Date, Type, Sta-tus, or Name. .• (Windows Mobile Professional) Select
Sort By, then the appropriate option.• (Windows Mobile Standard) Select Menu
> Sort, then the appropriate option.
5. Select the interaction to view its details.
Viewing the Account Web PageLaunch the Web page associated with the account.
1. On the home screen, select Accounts.
2. Select an account to view its fact sheet.
3. Select the Website URL to open the Web site in a browser.
Calling the Account Phone NumberCall the account from within the Account details screen.
PrerequisitesIf you want to log calls as CRM activities, select the Log Phone Call setting. See Settings onpage 14.
Task
1. On the home screen, select Accounts.
2. Select Call.
The application displays all the phone numbers and partners functions associated with theaccount.
3. Select the phone number to call.
Highlight the phone number, then select Call.
4. Verify the phone number is correct, or edit it.
5. Select Dial.
28 Sybase Mobile Sales for SAP CRM

6. If you selected the Log Phone Call setting, after you end the call, log the phone call as aCRM activity.
The applications displays a pop-up asking if you want to log the phone call as a CRMactivity.
a) Click Yes.b) Follow the screens to finish creating the activity.
See also• Logging a Phone Call as an Activity on page 41
E-mailing an AccountE-mail an account from the Account details screen.
1. On the home screen, select Accounts.
2. Select an account to view its fact sheet.
3. Select the E-mail address.
4. If prompted, select the e-mail account.
5. Enter the e-mail text, then select Send.
6. (Optional) Log this e-mail or another e-mail as a CRM activity.
a) For sent items, open the message in the Sent Items folder in the native e-mailapplication. For incoming e-mails, open the e-mail message.
b) Select Menu > Log as CRM Activity.
The application displays the New Activity screen, with the activity type as Outgoing E-mail or Incoming E-mail. The e-mail subject line is the description, and the e-mail bodybecomes the activity notes.
See also• Logging an E-mail as an Activity on page 42
Creating a New AccountCreate a new account.
1. Select Accounts.
2. Select Menu > Create Account.
3. Select Corporate Account or Individual Account, then click Next.
4. Enter the applicable account details, then click Save.
CHAPTER 6: Account Management
Device User Guide 29
Creating a Lead for an AccountCreate a new lead for an account.
1. Select Accounts.
2. Select an account to view the account fact sheet.
3. (Windows Mobile Standard). Select Leads.
4. Select Menu > Create Lead.
5. Select the Lead Type, then click Next.
6. Select the Partner Type, then click Next.
7. Enter the lead details, then select Next.
8. Select Save.
Creating an Opportunity for an AccountCreate a new opportunity for an account.
1. Select Accounts.
2. Select an account to view its fact sheet.
3. (Windows Mobile Standard). Select Opportunities.
4. Select Menu > Create Opportunity.
5. Select the Opportunity Type, then Next.
6. Select the Partner Type, then Next.
7. Enter the opportunity details, then Next.
8. Select Save.
Updating Account DetailsUpdate account details, such as address, phone numbers, fax number, e-mail, and Web siteinformation.
You cannot update accounts with pending changes.
1. On the home screen, select Accounts.
2. Select an account to view its fact sheet.
3. Select Edit for Windows Mobile Professional, or Menu > Edit Account for WindowsMobile Standard.
30 Sybase Mobile Sales for SAP CRM

4. Update the information in the appropriate fields.
5. Update the information, then select Save.
The account has pending changes until the device data is synchronized with the SAP system. Ifthe SAP system rejects the changes, you receive a warning message. You must fix or undo thechanges.
Adding a Contact Relationship to an AccountCreate a new contact or associate an existing contact to an account.
1. On the home screen, select Accounts.
2. Select an account to view the account fact sheet.
3. Near the bottom of the screen, select Relationships.
4. Select Menu Add Contact.
5. Select to choose an existing contact or create a new one.
Option Description
Select existing contact 1. For Windows Mobile Professional, selectSelect Existing Contact, then click ... toselect the contact from the contacts list. ForWindows Mobile Standard, the contacts listappears.
2. Highlight the contact, then click OK.
Create new contact 1. For Windows Mobile Professional, selectCould Not Find the Contact? ContinueWith Creating a New Contact, then Next.For Windows Mobile Standard, selectMenu > Create Contact.
2. Enter the work contact details, then selectNext.
3. Enter alternate contact details, then selectSave.
See also• Creating or Editing a Note for an Account on page 31
Creating or Editing a Note for an AccountCreate or edit a note for an account.
1. On the home screen, select Accounts.
2. Select an account to view its fact sheet.
3. Near the bottom of the screen, select Notes.
CHAPTER 6: Account Management
Device User Guide 31

4. Select Edit.
5. Enter the note text, then select Save.
See also• Adding a Contact Relationship to an Account on page 31
32 Sybase Mobile Sales for SAP CRM

CHAPTER 7 Contacts Management
Manage your Sybase Mobile Sales for SAP CRM contacts.
With Mobile Sales Contacts Management, you can:
• Search, modify, and view contacts, as well as activities, leads, opportunities, andrelationships associated with a contact.
• Update contact information.• Create a new contact.• Quicky contact your contact: send an e-mail or place a call to the account main or mobile
number, all from the contact fact sheet.
See also• Chapter 6, Account Management on page 25
• Chapter 8, Activity Management on page 39
• Chapter 9, Lead Management on page 45
• Chapter 10, Opportunity Management on page 51
Searching ContactsSearch to find a contact.
To find a contact quickly, you can use a text string to narrow the list of contacts.
1. On the home screen, select Contacts.
2. Find the contact.
To Do this
Search using a text string Enter a text string to narrow and display theresults.
View recent contacts • (Windows Mobile Professional) Select Fil-ter By > Recent Items.
• (Windows Mobile Standard) Select Menu> Show > Recent.
Sort the contacts by company • (Windows Mobile Professional) SelectSort By > Company.
• (Windows Mobile Standard) Select Menu> Sort By > Company.
Device User Guide 33

3. Select the contact to view.
Viewing ContactsView existing contacts.On the home screen, select Contacts.
To Do this
View contact details Select the contact.
View recently viewed contacts • (Windows Mobile Professional) Select FilterBy > Recent Contacts.
• (Windows Mobile Standard) Select Menu >Show > Recent.
View contacts that contain a specific text string Enter a text string to narrow and display the re-sults.
Viewing and Editing Alternate Contact InformationView alternative (personal) contact information.
If you converted the CRM contact to a personal contact, this information is the contact'salternate or personal information. If you change this alternate contact information, the MobileSales application synchronizes the information in both the Mobile Sales application and yournative contacts list.
1. On the home screen, select Contacts.
2. Select a contact to view the contact fact sheet.
3. Near the bottom of the screen, select Address.
4. (Optional) Select Edit to modify the information.
a) Select Next to skip work information and to view or edit alternate contact information.b) Select Save when finished.
Viewing Relationships for a ContactView the relationship details for a contact.
1. On the home screen, select Contacts.
2. Select a contact to view the contact fact sheet.
3. Select Relationships.
4. Select the relationship to view additional details.
34 Sybase Mobile Sales for SAP CRM

Viewing Activities for a ContactView the activities associated with a contact.
1. On the home screen, select Contacts.
2. Select a contact to view the contact fact sheet.
3. Near the bottom of the screen, select Activities.
4. Select an activity to view its fact sheet.
Viewing Leads for a ContactView leads for a contact.
1. On the home screen, select Contacts.
2. Select a contact to view the contact fact sheet.
3. Near the bottom of the screen, select Leads.
4. Select the lead to view its fact sheet.
Viewing Opportunities for a ContactView opportunities for a contact.
1. On the home screen, select Contacts.
2. Select a contact to view contact details.
3. Near the bottom of the screen, select Opportunities.
4. Select an opportunity to view its fact sheet.
a) Select Items to view potential sales orders and quantities. For Windows MobileStandard, select Menu > Items.
b) Select Menu > Add to add a new item, or select an existing item, then Edit to edit theitem information.
c) Select Notes to view the notes for this opportunity.
Viewing Contact Interaction HistoryView the interaction history for the contact.
The interaction history for an account includes interaction type (activities, leads,opportunities), the status for each interaction, and the relative time period (past, current,future).
1. On the home screen, select Contacts.
2. Select a contact to view the contact fact sheet.
3. Near the bottom of the screen, select Interactions.
CHAPTER 7: Contacts Management
Device User Guide 35

4. Select an item to view interaction details.
Calling a ContactCall a contact from within the Mobile Sales application.
PrerequisitesIf you want to log calls as CRM activities, select the Log Phone Call setting. See Settings onpage 14.
Task
1. On the home screen, select Contacts.
2. Select a contact to view the contact fact sheet.
3. Select the phone number to call.
4. Confirm the phone number, then select Dial.
5. If you selected the Log Phone Call setting, after you end the call, log the phone call as aCRM activity.
The applications displays a pop-up asking if you want to log the phone call as a CRMactivity.
a) Click Yes.b) Follow the screens to finish creating the activity.
See also• Logging a Phone Call as an Activity on page 41
E-mailing a ContactE-mail a contact from the Contact details screen.
1. On the home screen, select Contacts.
2. Select a contact.
3. Select Menu > Email.
4. If more than one e-mail address, select one, then select Email.
5. Select the e-mail account to use.
6. Enter the e-mail text, then select Send.
7. (Optional) Log this e-mail or another e-mail as a CRM activity.
a) For sent items, open the message in the Sent Items folder in the native e-mailapplication. For incoming e-mails, open the e-mail message.
b) Select Menu > Log as CRM Activity.
36 Sybase Mobile Sales for SAP CRM

The application displays the New Activity screen, with the activity type as Outgoing E-mail or Incoming E-mail. The e-mail subject line is the description, and the e-mail bodybecomes the activity notes.
See also• Logging an E-mail as an Activity on page 42
Updating Contact DetailsUpdate contact details, such as address, phone numbers, email, and Web site information.
You cannot update contacts with pending changes.
1. On the home screen, select Contacts.
2. Select the contact to view its fact sheet.
3. Select Edit.
4. Edit the work information, then select Next.
5. Edit the alternate contact information, then select Next.
6. Select Save when finished.
You can see the Pending Changes icon at the top of the fact sheet. The contact has pendingchanges until the device data is synchronized with the SAP system. If the SAP system rejectsthe changes, you receive a warning message. You must fix or undo the changes.
Creating a New Business ContactCreate a new CRM contact and associate it with an account.
1. On the home screen, select Contacts.
2. Select Create Contact.
3. Enter work information, then click Next.
You must enter a country.
4. (Optional) Enter alternate contact information, then click Save.
See also• Adding a Contact Relationship to an Account on page 31
CHAPTER 7: Contacts Management
Device User Guide 37
Saving a CRM Contact as a Personal ContactSave a CRM business contact as a personal contact.
1. On the home screen, select Contacts.
2. Select a contact to view its fact sheet.
3. Select Menu > Save As Personal Contact, then select OK.
Creating or Editing a Note for a ContactCreate or edit a note for a contact.
1. On the home screen, select Contacts.
2. Select a contact to view its fact sheet.
3. Near the bottom of the screen, select Notes.
4. Select Edit.
5. Enter the note text, then select Save.
38 Sybase Mobile Sales for SAP CRM

CHAPTER 8 Activity Management
Manage your schedule and activities from your mobile device. All information is seamlesslysynchronized with the SAP CRM back-end to ensure data consistency throughout theorganization.
With Mobile Sales Activity Management, you can:
• Quickly access, create and modify planned activities using Mobile Sales or the nativecalendar.
• Increase visibility into activities and customers by logging e-mails and phone calls asCRM activities.
• Search, view, and create activities, as well as accounts and contacts associated with anactivity.
• Log phone calls by creating CRM activities. If you selected Log Phone Call in Settings, adialog appears if you dialed an account or a contact phone number. If you select Yes to logthe call, Mobile Sales launches the Create Outgoing Call activity screen.
• Log e-mail messages by creating CRM activities. You can also log the e-mail as an activityfrom the email Inbox or Outbox. Open the e-mail, then select Menu > Create As Activity.The contents of the e-mail are added to the notes for the new activity.
See also• Chapter 6, Account Management on page 25
• Chapter 7, Contacts Management on page 33
• Chapter 9, Lead Management on page 45
• Chapter 10, Opportunity Management on page 51
Searching and Viewing ActivitiesSearch to find an activity.
To find an activity quickly, you can use a text string to narrow the list of activities.
1. On the home screen, select Activities.
2. Find the activity.
To Do this
Search using a text string Enter the text string.
Device User Guide 39

To Do this
Filter by activity type, or view recent activities • (Windows Mobile Professional) Select Fil-ter By, then the activity type.
• (Windows Mobile Standard) Select Menu> Show, then the activity type.
Sort the activities You can sort by Date, Type, Name, or Status.• (Windows Mobile Professional) Select
Sort By.• (Windows Mobile Standard) Select Menu
> Sort By.
3. Select the activity to view its fact sheet.
Adding a New Activity for Account or ContactAdd a new activity to an account or contact, or both.
1. On the home screen, select Activities.
2. Select Add New Activity for Windows Mobile Professional, or Create Activity forWindows Mobile Standard.
3. In the Create Activity screen, select the activity type, then Next .
• Appointment• Incoming Call• Incoming E-Mail• Meeting• Outgoing E-Mail• Outgoing Phone Call• Task
Your SAP system might have more or different choices.
4. Add a Description for the new activity.
5. (Optional) Change when the activity starts or ends.
6. (Optional) Add Notes for this activity.
For Windows Mobile Standard, select Next to continue.
7. Indicate the account or contacts associated with this activity.
The main activity partner is on top. The choices you see here depend on the choices in theSAP system.
40 Sybase Mobile Sales for SAP CRM

Option Description
Activity Partner Select one or more contacts as the activity part-ner.
Contact Person Select one or more contacts.
Attendee Select one or more contacts to include with thisactivity.
Employee Responsible Employee responsible for the activity.
8. Select Save.
NextYou can change the activity status, from the default Open, once it is saved on the SAP system.
Adding an Existing Activity to Account or ContactAdd an existing activity to an account or contact, or both.
1. On the home screen, select Activities.
2. Highlight the activity to edit.
3. Select Menu > Edit Activity.
4. Modify existing information, or add new activity partners, contacts, owner, or attendees.
For Windows Mobile Standard, select Next to continue.
5. Select Save.
Logging a Phone Call as an ActivityLog an incoming or outgoing phone call as a Mobile Sales activity.
If you selected Log Phone Call in Settings, a dialog appears if you dialed an account or acontact phone number. If you select Yes to log the call, Mobile Sales launches the CreateOutgoing Call activity screen.
1. On the home screen, select Activities.
2. Select Create Activity.
3. In the Create Activity screen, select Incoming Call or Outgoing Phone Call, thenNext.
4. Add a Description for the new activity, then select Done.
5. (Optional) Change when the activity starts or ends.
CHAPTER 8: Activity Management
Device User Guide 41

6. Indicate the account or contacts associated with this activity.
7. Select Save.
NextYou can change the activity status, from the default Open, once it is saved on the SAP system.
See also• Calling the Account Phone Number on page 28
• Calling a Contact on page 36
Logging an E-mail as an ActivityLog an incoming or outgoing e-mail as a Mobile Sales activity.
You can also log the e-mail as an activity from the email Inbox or Outbox. Open the e-mail,then select Menu > Create As Activity. The contents of the e-mail are added to the notes forthe new activity.
1. On the home screen, select Activities.
2. Select Create Activity.
3. In the Create Activity screen, select Incoming E-Mail or Outgoing E-Mail, thenNext .
4. Add a Description for the new activity, then select Done .
5. (Optional) Change when the activity starts or ends.
6. Indicate the account or contacts associated with this activity.
7. Select Save.
By default, the activity status is Complete.
NextYou can change the activity status, from the default Open, once it is saved on the SAP system.
See also• E-mailing an Account on page 29
• E-mailing a Contact on page 36
42 Sybase Mobile Sales for SAP CRM

Updating an ActivityEdit the details for an activity.
1. On the home screen, select Activities.
2. Highlight the activity to edit.
3. Select Menu > Edit Activity.
4. Make the appropriate changes.
(Windows Mobile Standard) Select Next to add or change activity partners.
5. Select Save.
CHAPTER 8: Activity Management
Device User Guide 43

44 Sybase Mobile Sales for SAP CRM
CHAPTER 9 Lead Management
Manage your leads to determine their potential to become opportunities. New leads appearinstantly as they are assigned in the SAP CRM system.
With Mobile Sales Lead Management, you can:
• Stay current on leads and accelerate the sales cycle while away from your desk.• Execute on the information and update the lead or capture new leads as they arise.• Search, modify, and view leads, and associate accounts, contacts, and potential orders and
sales with a lead.
You can view existing leads, create a new lead, update lead details, associate potentialproducts and quantity information with that lead, and add or edit notes for the lead.
See also• Chapter 6, Account Management on page 25
• Chapter 7, Contacts Management on page 33
• Chapter 8, Activity Management on page 39
• Chapter 10, Opportunity Management on page 51
Searching and Viewing LeadsSearch to find a lead.
To find a lead quickly, you can use a text string to narrow the list of leads.
1. On the home screen, select Leads.
2. Find the lead.
To Do this
Search using a text string Enter a text string to narrow and display theresults.
View recent items • (Windows Mobile Professional) Select Fil-ter By > Recent Items.
• (Windows Mobile Standard) Select Menu> Show > Recent.
Device User Guide 45

To Do this
Sort the leads You can sort leads by Name, Date, or Status.• (Windows Mobile Professional) Select
Sort By.• (Windows Mobile Standard) Select Menu
> Sort By.
3. Select the lead to view.
See also• Creating a New Lead on page 46• Updating Lead Details on page 47
Creating a New LeadCreate a new lead and associate contacts for that lead.
1. From the home screen, select Leads.
2. Create a new lead.
• (Windows Mobile Professional) Select Create Lead.• (Windows Mobile Standard) Select Menu > Create Lead.
3. Select the Lead Type, then Next.
4. Enter a Description.
5. (Optional) Change the Start or End dates.
The status remains Open until the the SAP system accepts the lead. Once the SAP systemaccepts the lead, you can edit the status.
6. (Optional) Add some Notes.
7. (Windows Mobile Standard) Select Next to continue.
8. Indicate the contacts associated with the lead.
Option Description
Sales Prospect Select one or more accounts or contacts.
Sales Employee Select one more contacts.
Contact Person Select one or more contacts.
Employee Responsible Select the employee responsible for the ac-count.
9. (Optional) Select Menu > Add to add an item (product) to a lead.
You can also search for the product by performing an online search. You must havenetwork connectivity to perform an online lookup. If you attempt an online lookup without
46 Sybase Mobile Sales for SAP CRM

network connectivity, the application hangs until you are connected with the network. Tocontinue working offline, cancel the search.
a) Enter a Description (including the required asterisk as a wildcard).b) Select Search By Description. The SAP server returns all products that match the
search criteria.c) Select a product.
10. Select Save.
See also• Searching and Viewing Leads on page 45
• Updating Lead Details on page 47
Updating Lead DetailsUpdate lead details, such as description, status, start and end dates, and notes.
You cannot update leads with pending changes.
1. On the home screen, select Leads.
2. Select a lead to view the lead fact sheet.
3. Select Edit.
4. Enter information in the fields you want to update.
5. (Windows Mobile Standard) Select Next to continue.
6. Select Save.
The lead has pending changes until the device data is synchronized with the SAP system. If theSAP system rejects the changes, you receive a warning message. You must fix or undo thechanges.
See also• Searching and Viewing Leads on page 45
• Creating a New Lead on page 46
Creating or Editing a Note for a LeadCreate or edit a note for a lead.
1. On the home screen, select Leads.
2. Select a lead to view its fact sheet.
3. Select Edit.
4. In the Notes box, add or edit text.
CHAPTER 9: Lead Management
Device User Guide 47

5. (Windows Mobile Standard) Select Next to continue.
6. Select Save.
See also• Editing an Item for a Lead on page 48• Adding a New Item to a Lead on page 48
Editing an Item for a LeadEdit an item for a lead.
1. On the home page, select Leads.
2. Select a lead to view the lead fact sheet.
3. View the existing items for the lead.
• (Windows Mobile Professional) Near the bottom of the screen, select Items.• (Windows Mobile Standard) Select Menu > Items.
4. Highlight the item to edit.
• (Windows Mobile Professional) Select Edit.• (Windows Mobile Standard) SelectMenu > Edit.
5. Edit the item details, then select Save.
Some fields are grayed out and may not be editable. If you need to change the product ID ordescription, delete the item and create a new item.
See also• Creating or Editing a Note for a Lead on page 47• Adding a New Item to a Lead on page 48
Adding a New Item to a LeadAdd a new item to a lead.
1. On the home page, select Leads.
2. Select a lead to view its fact sheet.
3. View the existing items for the lead.
• (Windows Mobile Professional) Near the bottom of the screen, select Items.• (Windows Mobile Standard) Select Menu > Items.
4. Select Menu > Add.
5. (Optional) Search for the product by performing an online search.
You must have network connectivity to perform an online lookup. If you attempt an onlinelookup without network connectivity, the application hangs until you are connected withthe network. To continue working offline, cancel the search.
48 Sybase Mobile Sales for SAP CRM
a) Enter a Description (including the required asterisk as a wildcard).b) Select Search By Description. The SAP server returns all products that match the
search criteria.c) Select a product.
6. Complete the item details, then select Save.
Once you move to a difference screen, the item is sent to the SAP system.
See also• Creating or Editing a Note for a Lead on page 47
• Editing an Item for a Lead on page 48
CHAPTER 9: Lead Management
Device User Guide 49

50 Sybase Mobile Sales for SAP CRM

CHAPTER 10 Opportunity Management
New opportunities appear instantly as they are assigned in the SAP CRM system.
With Mobile Sales Opportunity Management, you can:
• Stay current on opportunities and accelerate the sales cycle while away from your desk.• Execute on the information and update the opportunity or capture new opportunities as
they arise.• Search, modify, and view opportunities, and associate accounts, contacts, and potential
orders and sales with an opportunity.
See also• Chapter 6, Account Management on page 25
• Chapter 7, Contacts Management on page 33
• Chapter 8, Activity Management on page 39
• Chapter 9, Lead Management on page 45
Searching and Viewing OpportunitiesSearch to find an opportunity.
1. On the home screen, select Opportunities.
2. Find the opportunity.
To Do this
Search using a text string Enter a text string to narrow and display theresults.
View recent items • (Windows Mobile Professional) Select Fil-ter By > Recent Items.
• (Windows Mobile Standard) Select Menu> Show > Recent.
Sort the opportunities You can sort opportunities by Name, Date,Chance, or Status.• (Windows Mobile Professional) Select
Sort By.• (Windows Mobile Standard) Select Menu
> Sort By.
Device User Guide 51
See also• Updating Opportunity Details on page 52
• Creating an Opportunity on page 52
• Adding a New Line Item to an Opportunity on page 53
• Updating an Opportunity Line Item on page 54
Updating Opportunity DetailsUpdating opportunity details, such as description, status, start and end dates, and notes.
You cannot update opportunities with pending changes.
1. On the home screen, select Opportunities.
2. Select an opportunity to view opportunity details.
3. Select Edit.
4. Update the information.
5. (Windows Mobile Standard) Select Next to continue.
6. Select Save.
The opportunity has pending changes until the device data is synchronized with the SAPsystem. If the SAP system rejects the changes, you receive a warning message. You must fix orundo the changes.
See also• Searching and Viewing Opportunities on page 51
• Creating an Opportunity on page 52
• Adding a New Line Item to an Opportunity on page 53
• Updating an Opportunity Line Item on page 54
Creating an OpportunityCreate a new opportunity
1. On the home screen, select Opportunities.
2. Select Create Opportunity.
3. Select the Opportunity Type, then Next.
4. Enter a Description.
5. (Optional) Enter information in the other applicable fields, then select Next.
52 Sybase Mobile Sales for SAP CRM

6. (Windows Mobile Standard) Indicate the associated contacts and accounts, then selectNext.
7. (Optional) Select Menu > Add to add an item (product) to an opportunity.
You can also search for the product by performing an online search. You must havenetwork connectivity to perform an online lookup. If you attempt an online lookup withoutnetwork connectivity, the application hangs until you are connected with the network. Tocontinue working offline, cancel the search.
a) Enter a Description (including the required asterisk as a wildcard).b) Select Search By Description. The SAP server returns all products that match the
search criteria.c) Select a product.
8. Select Save.
See also• Searching and Viewing Opportunities on page 51
• Updating Opportunity Details on page 52
• Adding a New Line Item to an Opportunity on page 53
• Updating an Opportunity Line Item on page 54
Adding a New Line Item to an OpportunityAdd an item to an opportunity.
1. On the home screen, select Opportunities.
2. Select an opportunity to view its fact sheet.
3. View the existing items for the opportunity.
• (Windows Mobile Professional) Near the bottom of the screen, select Items.• (Windows Mobile Standard) Select Menu > Items.
4. Select Menu > Add.
5. Enter the Product ID and Quantity.
6. (Optional) Add a Description or indicate the Unit of Measure.
7. (Optional) Select Search on Description to perform an online lookup on the SAP system.
Note: Because you are performing an online lookup, be sure to indicate text with asterisksfor your search.
8. Select Save.
Once you move to a difference screen, the item is sent to the SAP system.
CHAPTER 10: Opportunity Management
Device User Guide 53

See also• Searching and Viewing Opportunities on page 51
• Updating Opportunity Details on page 52
• Creating an Opportunity on page 52
• Updating an Opportunity Line Item on page 54
Updating an Opportunity Line ItemEdit a line item associated with a lead.
1. On the home screen, select Opportunities.
2. Select the opportunity to view its fact sheet.
3. View the existing items for the opportunity.
• (Windows Mobile Professional) Near the bottom of the screen, select Items.• (Windows Mobile Standard) Select Menu > Items.
4. Highlight a line item.
• (Windows Mobile Professional) Select Edit.• (Windows Mobile Standard) Select Menu > Edit.
5. Change the appropriate information, then select Save.
Some fields are grayed out and may not be editable. If you need to change the product ID ordescription, delete the item and create a new item.
See also• Searching and Viewing Opportunities on page 51
• Updating Opportunity Details on page 52
• Creating an Opportunity on page 52
• Adding a New Line Item to an Opportunity on page 53
54 Sybase Mobile Sales for SAP CRM

CHAPTER 11 Analytics
Review charts and key reports, based on realtime information, to prioritize actions to achievesales objectives in the most efficient manner.
You must have network connectivity to view reports. Mobile Sales includes several reporttypes. The reports display the most current Mobile Sales data based on the default reportcriteria specified on the device for each report.
Report type Description
Pipeline Analysis Displays the opportunities in the pipeline.
Top Opportunities Displays the top opportunities in the pipelinebased on expected sales volume.
Top Risk Opportunities Displays the opportunities at risk in the pipeline.
Top Sales Order Displays the top sales orders.
Report Display FormatsYou can toggle between graph view or table view by selecting Chart or Table, respectively.
Edit Report CriteriaYou can change the report criteria, and save it as the default report or create a new report. If yousave a report as a new name, it appears in My Reports.
Select the report to view it, select Menu > Edit, change the desired report options, selectMenu > Save As, then enter a report name.
Delete Saved ReportsYou can delete any report saved in My Reports.
Highlight the report and select Menu > Delete.
Refresh User PositionThe SAP system maintains your position within the sales organization. If your positionchanges, you need to refresh your user position for the Mobile Sales application. For example,if you get promoted to Sales Manager, you can run Pipeline Analysis reports for you or yoursales representatives. To refresh the user position, select Analytics, then Menu > RefreshUser Position.
Device User Guide 55
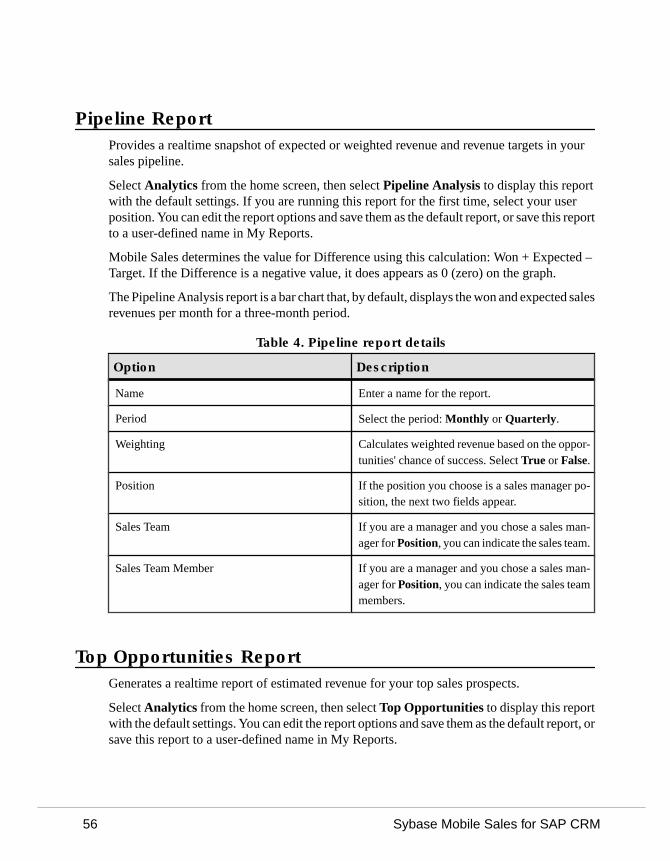
Pipeline ReportProvides a realtime snapshot of expected or weighted revenue and revenue targets in yoursales pipeline.
Select Analytics from the home screen, then select Pipeline Analysis to display this reportwith the default settings. If you are running this report for the first time, select your userposition. You can edit the report options and save them as the default report, or save this reportto a user-defined name in My Reports.
Mobile Sales determines the value for Difference using this calculation: Won + Expected –Target. If the Difference is a negative value, it does appears as 0 (zero) on the graph.
The Pipeline Analysis report is a bar chart that, by default, displays the won and expected salesrevenues per month for a three-month period.
Table 4. Pipeline report details
Option Description
Name Enter a name for the report.
Period Select the period: Monthly or Quarterly.
Weighting Calculates weighted revenue based on the oppor-tunities' chance of success. Select True or False.
Position If the position you choose is a sales manager po-sition, the next two fields appear.
Sales Team If you are a manager and you chose a sales man-ager for Position, you can indicate the sales team.
Sales Team Member If you are a manager and you chose a sales man-ager for Position, you can indicate the sales teammembers.
Top Opportunities ReportGenerates a realtime report of estimated revenue for your top sales prospects.
Select Analytics from the home screen, then select Top Opportunities to display this reportwith the default settings. You can edit the report options and save them as the default report, orsave this report to a user-defined name in My Reports.
56 Sybase Mobile Sales for SAP CRM

If the SAP system contains multiple line items for the same sales prospect, the account appearsonly once on the graph, and the graph totals all the expected revenue for all line itemsassociated with the account.
The Top Opportunities report is a column chart that, by default, displays top sales prospectsand their expected revenues by closing date.
Options appear in alphabetical order.
Table 5. Top Opportunity report details
Option Description
Closing Date Indicates the cut-off date for the opportunities toqualify for the report. Select a date on the calen-dar, or None.
Name Enter a name for the report.
# Of Opportunities Select number of opportunities to display.
Period Select the period: Previous, Current, Next, orNone.
Select None if specifying a closing date.
Sales Rep If you are a manager, you can indicate a salesrepresentative or all representatives.
Sort By Select Closing Date or Expected Revenue .
Sort Order Select Ascending or Descending.
Status Select the sales order status.
Time Frame Select the time frame: Monthly, Quarterly, orNone.
Select None if specifying a closing date.
Top Risk Opportunities ReportGenerates a realtime risk opportunity report.
Select Analytics from the home screen, then select Top Risk Opportunities to display thisreport with the default settings. You can edit the report options and save them as the defaultreport, or save this report to a user-defined name in My Reports.
If the SAP system contains multiple line items for the same sales prospect, the account appearsonly once on the graph, and the graph totals all the expected revenue for all line itemsassociated with the account.
CHAPTER 11: Analytics
Device User Guide 57

The Top Risk Opportunities report is a column chart that, by default, displays the salesprospects at risk by expected revenue.
Options appear in alphabetical order.
Table 6. Top Risk Opportunity report details
Option Description
Name Enter a name for the report.
# Of Opportunities Select number of opportunities to display.
Sales Rep If you are a manager, you can indicate a salesrepresentative or all representatives.
Sales Stage Select the sales stage.
Sort Order Select Closing Date, Revenue, or Sales Stage.
Time Frame Select the time frame: Last 7 Days, Last 30Days, or Last 90 Days.
Top Sales Order ReportGenerates a realtime report of your top sales orders.
Select Analytics from the home screen, then select Top Sales Order to display this reportwith the default settings. You can edit the report options and save them as the default report, orsave this report to a user-defined name in My Reports.
Table 7. Top Sales Order report details
Option Description
Name Enter a name for the report.
Status Select the sales order status.
Period Select the period: Previous, Current, Next, orNone.
Timeframe Select the timeframe: Monthly, Quarterly, orNone.
Posting Date Select a date on the calendar, or None.
Sales Rep If you are a manager, you can indicate a salesrepresentative or all representatives.
58 Sybase Mobile Sales for SAP CRM
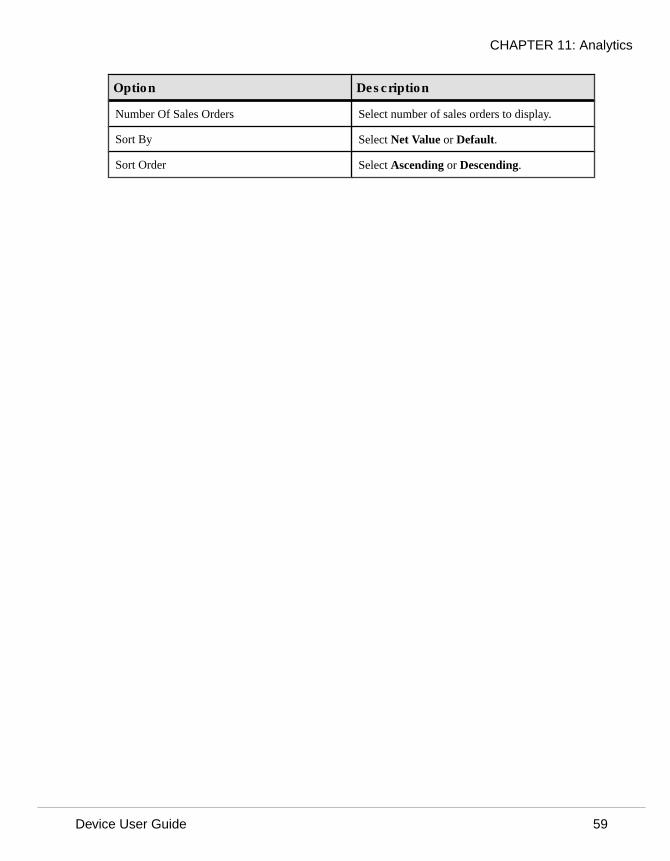
Option Description
Number Of Sales Orders Select number of sales orders to display.
Sort By Select Net Value or Default.
Sort Order Select Ascending or Descending.
CHAPTER 11: Analytics
Device User Guide 59

60 Sybase Mobile Sales for SAP CRM

CHAPTER 12 Sales Documents
Sales documents include sales orders, services orders, quotations, and contracts.
You can view all sales documents, or view sales documents associated with an account orcontact, using these methods:
Method Description
Sales Documents 1. Select Sales Documents.2. Select a sales document to view its details.
Accounts 1. Select Accounts.2. Select an account to view its fact sheet.3. Near the bottom of the screen, select Sales
Documents.4. Select the sales document to view its details.
Contacts 1. Select Contacts.2. Select a contact to view its fact sheet.3. Near the bottom of the screen, select Sales
Documents.4. Select the sales document to view its details.
Searching Sales DocumentsSearch to find and view a sales document.
1. Select Sales Documents.
2. Search for the sales document.
You can also perform an advanced search or create an online lookup.
To Do this
View recent sales document • (Windows Mobile Professional) Select Fil-ter By > Recent Items.
• (Windows Mobile Standard) Select Menu> Show > Recent.
Device User Guide 61

To Do this
Sort the sales documents You can sort sales documents by Name, Date,Type, or Status.• (Windows Mobile Professional) Select
Sort By.• (Windows Mobile Standard) Select Menu
> Sort By.
62 Sybase Mobile Sales for SAP CRM
CHAPTER 13 Device Data Integration WithMobile Sales
Mobile Sales enables you to integrate some Mobile Sales data with your personal data (PIMintegration).
You can:
• Save a CRM contact as a personal contact• Save a personal contact as a CRM contact• Log a calendar entry as a Mobile Sales activity• Log an e-mail as a Mobiles Sales activity• Log a phone call as a Mobile Sales activity• View new activities, leads, and opportunities in your Notifications messaging folder
When configuring the Mobile Sales application, your system administrator determines howpersonal contacts and calendar entries synchronize with the Mobile Sales contacts andactivities: automatic, manual, or none.
Data Description
Contacts • If automatic, native contacts automaticallybecome Mobile Sales contacts, and MobileSales contacts automatically become nativecontacts.
• If manual, you must specifically indicatewhich contacts to synchronize.
• If none, you cannot synchronize native con-tacts and Mobile Sales contacts.
CRM activities and calendar entries • If automatic, native calendar entries automat-ically become Mobile Sales activities, andMobile Sales activities (appointments, meet-ings) automatically become calendar entries.
• If manual, you must specifically indicatewhich CRM activities or native calendar en-tries to synchronize.
• If none, you cannot synchronize calendar en-tries and Mobile Sales activities.
Once a contact or activity is integrated, regardless of PIM integration method, Mobile Salesautomatically synchronizes the data if you make any changes. If you update the data and the
Device User Guide 63

SAP server rejects the changes because of errors, Mobile Sales does not perform thesynchronization until you fix the errors and the SAP system accepts the changes.
Adding a Personal Contact to Mobile SalesYou can manually add a personal contact to the Mobile Sales application, if the Mobile Salesapplication is configured to synchronize these items manually.
1. Open a personal contact to view contact details.
2. Select Menu > Add Contact to CRM.
The Mobile Sales application opens the contact in edit mode.
3. Associate this contact with an account, then select Next.
4. (Optional) Edit the contact's alternate contact information, then select Save.
See also• Adding a Calendar Entry as a Mobiles Sales Activity on page 64
Adding a Calendar Entry as a Mobiles Sales ActivityManually log a calendar entry as a Mobile Sales activity, if the Mobile Sales application isconfigured to synchronize these items manually.
1. Select a calendar entry in your personal calendar to open it.
2. Select Menu > Log as Activity.
The Mobiles Sales application opens the Edit Activity screen.
3. Add the Activity Partner and Contact Person.
4. Add or edit any other applicable activity details.
5. Select Save.
The activity is added to the activities list.
See also• Adding a Personal Contact to Mobile Sales on page 64
64 Sybase Mobile Sales for SAP CRM

CHAPTER 14 Uninstalling Mobile Sales
If needed, you can uninstall the Sybase Mobile Sales for SAP CRM application from yourdevice, which removes the application and all Mobile Sales data from the device.
Uninstall the previous version of the Mobile Sales application before installing a newerversion.
1. Exit the Mobile Sales application.
2. Select Start > Programs > Settings.
3. Select Remove Programs.
(Windows Mobile Professional) Remove Programs is in the System tab. Uninstall theprograms in the specified order.
4. Remove Sybase Mobile Sales.
5. Remove Sybase Messaging.
Follow the onscreen prompts to restart the device. Once your device restarts, you mighthave to navigate back to Remove Programs.
6. Select Done.
7. Verify that the uninstaller removed the Mobile Sales folder to make sure no installationartifacts remain.
a) Open File Explorer.b) In the Program Files folder, delete the Mobile Sales folder if it exists.
See also• Upgrading on page 5
Device User Guide 65
66 Sybase Mobile Sales for SAP CRM

CHAPTER 15 Troubleshooting
Determine the cause of problems and apply the recommended solution.
Messages or Field Names Appear in Different LanguageIssue: In some cases, SAP system messages and field names appear in the language defined forthe SAP system. If the SAP system is set up for English, some warning messages and fieldnames appear in English, for example, when creating or updating an account, contact, oractivity, or viewing and editing Analytics report options.
Workaround: None.
Online Lookup Returns No DataIssue: The system can only return a maximum of 1MB of data, so broad searches may returnonly a subset of the data or return no data. Your company determines the maximum allowabledata when configuring your SAP system.
Solution: To ensure you see the all results you want, limit the data set by indicating additionalsearch parameters.
Password Error During SynchronizatonIssue: If you changed your device password but did not have your company change it first onthe SAP server, you will get an error during synchronization.
Solution: Select Menu > Options > Change Password to change it back to previouspassword.
Last Edits Overwrite Pending ChangesIssue: If more than one person is editing the same record at the same time, and that informationhas not been sent to the SAP system, the information associated with the last save operationoverwrites any pending modifications.
Workaround: None.
Search on Item Description Hangs ApplicationIssue: When adding a new item to a lead, if you attempt to search on the description using anonline lookup, and do not have network connectivity, the Mobile Sales application hangs untilyou have a network connection.
Workaround: To continue working offline, cancel the search.
Device User Guide 67

Start and End Times for Advanced Search Must Be Exact MatchesIssue: When performing an advanced search, the dates you indicate for the Start Time and EndTime reflect the exact date when the activity or opportunity started and ended, meaning, thesearch will only find records for objects with that exact start date and end date. It does not act asa date range and return records between those two dates.
Workaround: None.
Rejected Record Must Be Fixed on DeviceIssue: If the SAP system rejects a record or the record contains an error on your device, anotherMobile Sales user or your system administrator cannot fix the error or update the object whileit is in an error state.
Solution: Fix the record or object on your device.
Receive Error When Starting Mobile Sales While Receiving DataIssue: If you try to start a new installation of Mobile Sales while you are receiving data, thesystem generates a SQLiteException error.
Solution: Contact your system administrator to remove the pending messages on UnwiredServer so you can resubscribe (log in).
Activities From SAP System Show Empty DatesIssue: When your company configured the SAP system, it indicated which date type can flowto the device. All other date types are blank on the device.
Workaround: None.
Country Code For Phone Number Does Not Flow to DeviceIssue: Although the country code for a phone number appears in the SAP system, it does notflow to the device.
Workaround: None.
Mobile Sales Objects Reflect SAP Server Time ZoneIssue: Any objects created in the SAP system or on your device are saved using the time zonein which the SAP server resides.
Workaround: None.
Maximum Allowed Login Attempts ExceededIssue: If you have tried to log in but have entered the wrong login information and receivedseveral Password Is Invalid errors, the application displays Maximum Login AttemptsExceeded!.
68 Sybase Mobile Sales for SAP CRM

Solution: Contact your system adminstrator for instructions on how to reset the maximumlogin attempts configuration setting.
No Report Data Appears (Analytics)Issue: When you try to view a report, you see an empty graph and the report does not display.
Workaround:
Issue Workaround
The system may not have enough appropriate da-ta to display the report
Try again later when more data is available.
The user position is not set properly for PipelineAnalysis report
Indicate the user position. Mobile Sales displaysthe report criteria screen.
You receive a warning that your device is offlinewhen trying to view a report
Make sure you device is online and you are con-nected to the SAP system.
No Sales Prospect in Top Opportunity report SAP system data does not contain a Sales Pros-pect. Be sure to define a Sales Prospect whencreating an opportunity.
AM and PM Toggle When Entering HourIssue: If you manually enter one digit for the hour, the AM and PM values toggle.
Workaround: Enter two digits for the hour, for example, "01" instead of just "1."
Device Data and SAP System Data Do Not Always MatchIssue: Data on your device and data in the SAP system (WebUI) do not always match. Yourorganization may decide to send a subset of the data to your device, and some objects mighthave different names in the two systems. Also, your organization might customize yourMobile Sales data on the SAP system.
Workaround: None.
Device Is Toggling Between Connected and DisconnectedIssue: Sybase Settings log shows that device is toggling between Connected andDisconnected.
Solution: None. No action necessary. Application response may be slow.
See also• Changing Your Password on page 15
• Data Status Indicators on page 11
CHAPTER 15: Troubleshooting
Device User Guide 69

70 Sybase Mobile Sales for SAP CRM

IndexA
accounts 25activities 26calling 28contacts 31e-mailing 29existing activity 41interaction history 27leads 27, 30map 23new 29new activity 40notes 31opportunities 27, 30relationships 26, 31searching 25update details 30viewing 26Web site 28
activities 39add to account 40, 41add to contact 40, 41edit 43log e-mails 42log phone calls 41searching 39viewing 39
advanced search 19analytics 55
C
calendar entrylog as activity 64
connection settings 5contacts 33
activities 35alternate contact information 34calling 36creating 37e-mailing 36existing activity 41interaction history 35leads 35
map 23new activity 40notes 38opportunities 35personal 64relationships 34saving to native contacts 38searching 33update details 37viewing 34
D
data status indicators 11delete online lookup 20Demo mode
running 7switching to Live 8
device data integration 63device storage requirements 1
F
fact sheetspersonalizing 15
G
getting started 11
H
home screen 11
I
installation prerequisites 2installing the application on your device 4
L
leads 45, 46add item 48
Index
Device User Guide 71

edit item 48notes 47searching 45update details 47viewing 45
Mmap
provider options 23view address 23
memory requirements 9
Nnotifications 16
clearing 16deleting 16viewing 16
Notifications messaging folder 3
Oonline lookup 20opportunities 51
edit item 54new 52new item 53searching 51update details 52viewing 51
Ppassword 15personalization 13pipeline analysis report 56
Rreports 55
pipeline analysis 56top opportunites 56top risk opportunity 57top sales order 58
S
sales documentssearching 61viewing 61
searching 20advanced 19online lookup 20types 19
settings 13, 14storage requirements 1subscribing to Mobile Sales 13supported devices 1supported languages 2Sybase Mobile Sales for SAP CRM
introduction 1password 15starting 7
Sybase Settings 5synchronization with SAP system 1, 12
T
top opportunities report 56top risk opportunity report 57top sales order report 58troubleshooting 67
U
uninstalling Mobile Sales 65unsubscribing to Mobile Sales 13upgrading 5
Index
72 Sybase Mobile Sales for SAP CRM