developing web applications
DESCRIPTION
Developing Web ApplicationsTRANSCRIPT

30/10/2015 Developing Web Applications
http://docs.oracle.com/cd/E40938_01/doc.74/e40142/dev_web_apps.htm#NBDAG1035 1/43
NetBeans Developing Applications with NetBeans IDERelease 7.4E40142-08 Home Book
ListContents Contact
Us
Previous Next
PDF · Mobi · ePub
11 Developing Web ApplicationsThis chapter describes how to build a Java EE based web application using the NetBeans IDE supportfor JSF 2.1 (Facelets), JSPs, and Servlets.
This chapter contains the following sections:
Section 11.1, "About Developing Web Applications"
Section 11.2, "Creating Web Application Projects"
Section 11.3, "Working with JSP Files"
Section 11.4, "Working with Tag Libraries"
Section 11.5, "Working with Applets"
Section 11.6, "Working with Servlets"
Section 11.7, "Using Filters"
Section 11.8, "Using Web Application Listeners"
Section 11.9, "Configuring a Web Application"
Section 11.10, "Deploying a Web Application"
Section 11.11, "Debugging a Web Application"
Section 11.12, "Profiling a Web Application"
11.1 About Developing Web Applications
A web application is an application written for the Internet, including those built with Java technologiessuch as JavaServer Pages and servlets, as well as those built with non-Java technologies such as CGIand Perl. Web Applications often include frameworks such as JavaServer Faces, Spring, Hibernate, andStruts.
You can create a web application by writing and editing Java source code in the Source Editor.
30/10/2015 Developing Web Applications
http://docs.oracle.com/cd/E40938_01/doc.74/e40142/dev_web_apps.htm#NBDAG1035 2/43
Configure the application yourself. Add the JavaServer Faces, Struts, or Spring Web framework toimprove the design of your application.
A web application roughly corresponds to the J2EE term web application module. This is a deployableunit that consists of one or more web components, other resources, and web application deploymentdescriptors, contained in a hierarchy of directories and files in a standard web application format.
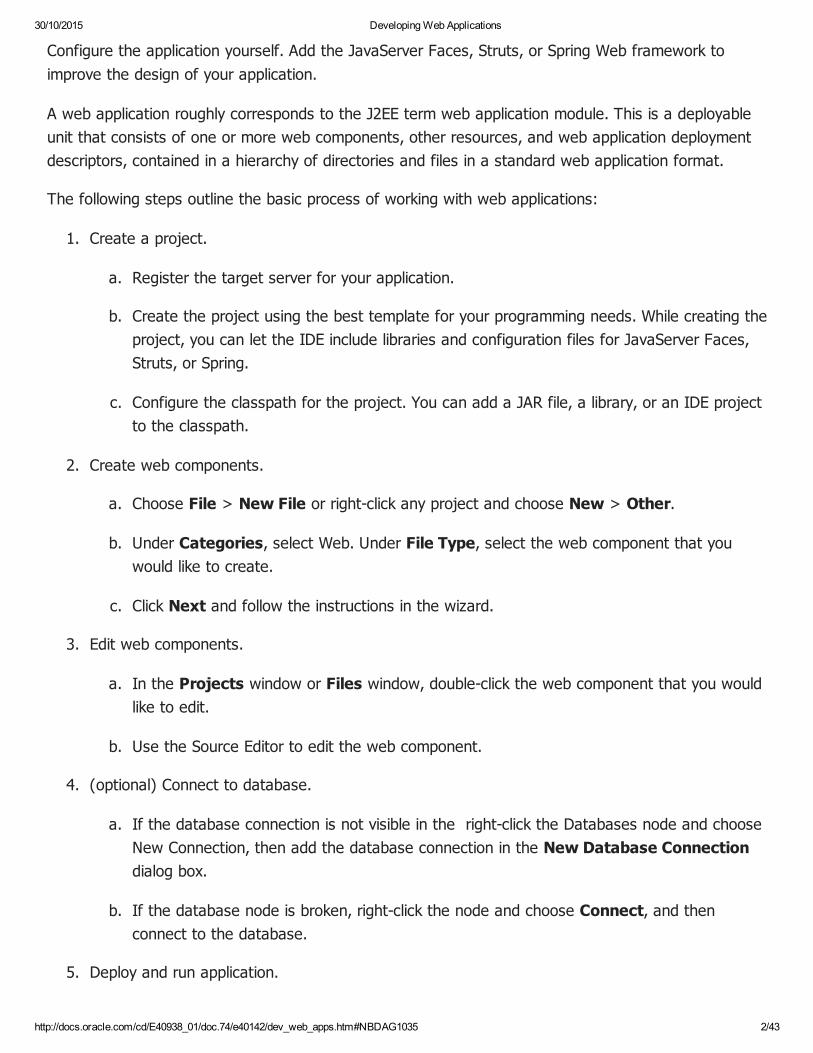
The following steps outline the basic process of working with web applications:
1. Create a project.
a. Register the target server for your application.
b. Create the project using the best template for your programming needs. While creating theproject, you can let the IDE include libraries and configuration files for JavaServer Faces,Struts, or Spring.
c. Configure the classpath for the project. You can add a JAR file, a library, or an IDE projectto the classpath.
2. Create web components.
a. Choose File > New File or right-click any project and choose New > Other.
b. Under Categories, select Web. Under File Type, select the web component that youwould like to create.
c. Click Next and follow the instructions in the wizard.
3. Edit web components.
a. In the Projects window or Files window, double-click the web component that you wouldlike to edit.
b. Use the Source Editor to edit the web component.
4. (optional) Connect to database.
a. If the database connection is not visible in the right-click the Databases node and chooseNew Connection, then add the database connection in the New Database Connectiondialog box.
b. If the database node is broken, right-click the node and choose Connect, and thenconnect to the database.
5. Deploy and run application.
30/10/2015 Developing Web Applications
http://docs.oracle.com/cd/E40938_01/doc.74/e40142/dev_web_apps.htm#NBDAG1035 3/43
Choose Run > Run Project or right-click the project and choose Run. The project is compiled,and new and changed files are copied from the project's build directory to the WAR's deploymentdirectory. The deployed application then opens in a browser.
6. Debug web application.
a. Set breakpoints or watches in your code.
b. Right-click the project node in the Projects window and choose Debug.
Alternatively, set the project as the main project and choose Debug > Debug MainProject.
You can also attach a running process to the debugger.
c. Step through the program execution.
d. Choose Debug > Finish Debugger Session when you are finished debugging.
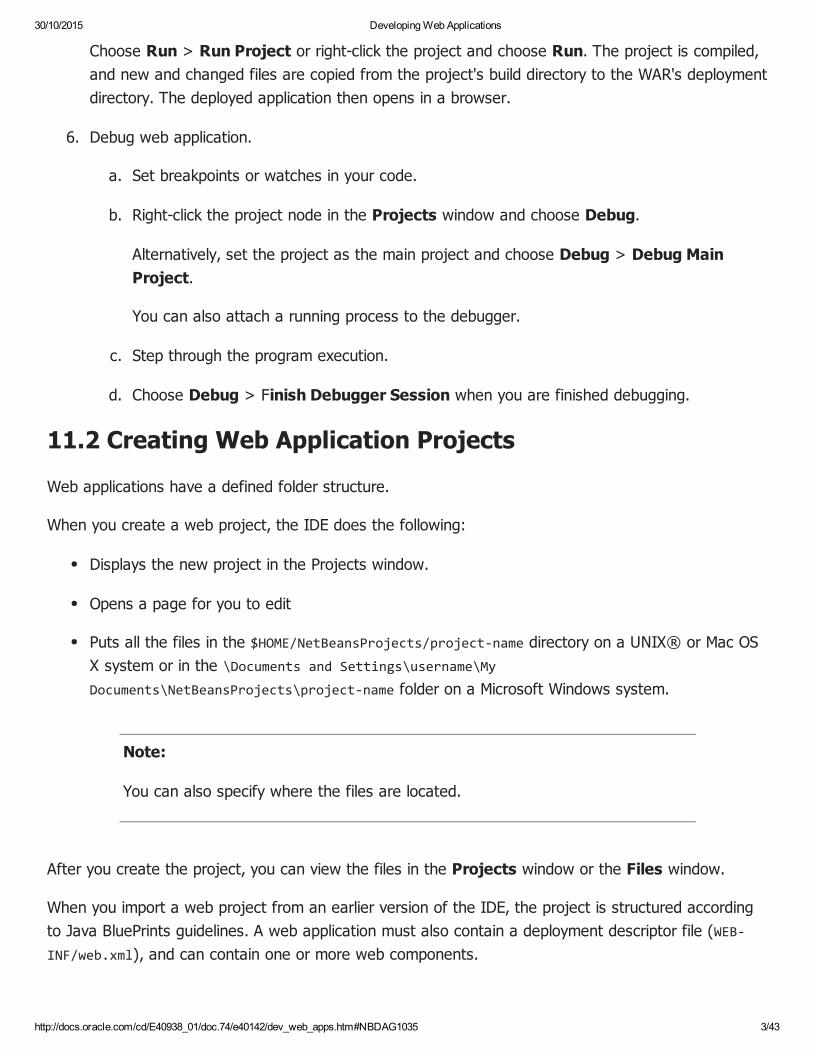
11.2 Creating Web Application Projects
Web applications have a defined folder structure.
When you create a web project, the IDE does the following:
Displays the new project in the Projects window.
Opens a page for you to edit
Puts all the files in the $HOME/NetBeansProjects/project-name directory on a UNIX® or Mac OSX system or in the \Documents and Settings\username\MyDocuments\NetBeansProjects\project-name folder on a Microsoft Windows system.
Note:
You can also specify where the files are located.
After you create the project, you can view the files in the Projects window or the Files window.
When you import a web project from an earlier version of the IDE, the project is structured accordingto Java BluePrints guidelines. A web application must also contain a deployment descriptor file (WEB-INF/web.xml), and can contain one or more web components.
30/10/2015 Developing Web Applications
http://docs.oracle.com/cd/E40938_01/doc.74/e40142/dev_web_apps.htm#NBDAG1035 4/43
Note:
You can add a framework to a web application project after creating it. To do so,choose Tools > Ant Libraries to access the Ant Library Manager.
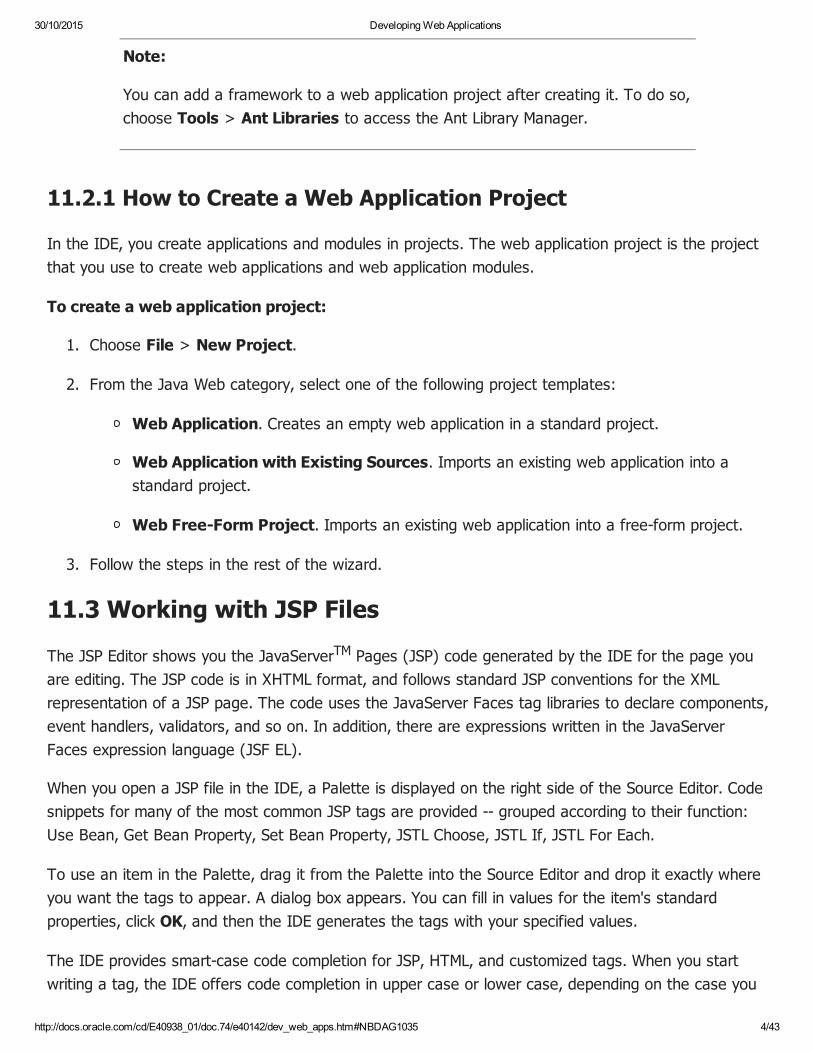
11.2.1 How to Create a Web Application Project
In the IDE, you create applications and modules in projects. The web application project is the projectthat you use to create web applications and web application modules.
To create a web application project:
1. Choose File > New Project.
2. From the Java Web category, select one of the following project templates:
Web Application. Creates an empty web application in a standard project.
Web Application with Existing Sources. Imports an existing web application into astandard project.
Web Free-Form Project. Imports an existing web application into a free-form project.
3. Follow the steps in the rest of the wizard.
11.3 Working with JSP Files
The JSP Editor shows you the JavaServerTM Pages (JSP) code generated by the IDE for the page youare editing. The JSP code is in XHTML format, and follows standard JSP conventions for the XMLrepresentation of a JSP page. The code uses the JavaServer Faces tag libraries to declare components,event handlers, validators, and so on. In addition, there are expressions written in the JavaServerFaces expression language (JSF EL).
When you open a JSP file in the IDE, a Palette is displayed on the right side of the Source Editor. Codesnippets for many of the most common JSP tags are provided -- grouped according to their function:Use Bean, Get Bean Property, Set Bean Property, JSTL Choose, JSTL If, JSTL For Each.
To use an item in the Palette, drag it from the Palette into the Source Editor and drop it exactly whereyou want the tags to appear. A dialog box appears. You can fill in values for the item's standardproperties, click OK, and then the IDE generates the tags with your specified values.
The IDE provides smart-case code completion for JSP, HTML, and customized tags. When you startwriting a tag, the IDE offers code completion in upper case or lower case, depending on the case you

30/10/2015 Developing Web Applications
http://docs.oracle.com/cd/E40938_01/doc.74/e40142/dev_web_apps.htm#NBDAG1035 5/43
are using.
Note:
To enable code completion for a JavaBean class, the JSP file must have a validjsp:useBean directive, the class must be in a package, and the class must beavailable from the src folder or from a library that is included in the compilationclasspath. To enable code completion for tags in tag libraries, the JSP file musthave a valid taglib directive for the library and the library must be included in thecompilation classpath.
Other examples of additional JSP support are the highlighting of JSP tags, JSP directives, and ELexpressions, code templates, code folding, the display of matching JSP tags, JSP delimiters (<>), andEL delimiters ({}), and code navigation features such as hyperlinking for JSP identifiers. For example,you can jump to the tag source file that defines a tag referenced in a JSP file if you simultaneouslyhold down the Ctrl key and move the mouse over the tag, as illustrated in Section 11.3.4, "How toAccess a Custom Tag from a JSP Page".
11.3.1 How to Create a JSP File
Creating JSP files is similar to creating Java files. The Source Editor provides support for JSP, includingcode completion for the following JSP elements:
JSP tags
JavaBeans that are defined with the <jsp:useBean> tag
Attributes that are defined in tag files
Java code in scriptlets
To create a JSP file:
1. From the Projects window or Files window, right-click the project's node and choose New >Other from the pop-up menu.
2. Under Categories, select Web. Under File Types, select JSP. Click Next.
3. Type the name of your JSP. Do not include a filename extension as this is added automaticallywhen the file is created.
4. Click Browse to select a folder to house your JSP file. By default, the JSP file is created in theweb subfolder.

30/10/2015 Developing Web Applications
http://docs.oracle.com/cd/E40938_01/doc.74/e40142/dev_web_apps.htm#NBDAG1035 6/43
5. Select the type of JSP file that you want to create:
JSP File (Standard Syntax). Standard JSP pages are written using the standard JSPsyntax. Standard JSP pages typically use the .jsp extension.
JSP Document (XML Syntax). JSP documents are written using the JSP documentsyntax, which is well formed XML. JSP documents typically have the .jspx extension. Twoexamples of the advantages that JSP documents have over standard JSP pages are:
You can edit, verify, and view them with XML capable tools, such as the IDE's SourceEditor.
You can transform them using XSLT tools, such as the IDE's XSL Transformationcommand.
6. (Optional) Click the Create as a JSP Segment checkbox. A segment is a file that contains afragment of JSP text for inclusion by standard JSP pages and JSP documents. JSP segmentstypically use the .jspf extension.
7. Click Finish. The IDE opens the JSP file for editing in the Source Editor.
11.3.2 How to Set Character Encoding
A character encoding maps a character set to units of a specific width and defines byte serializationand ordering rules. Many character sets have more than one encoding. For example, Java programscan represent Japanese character sets using the EUC-JP or Shift-JIS encodings, among others. Eachencoding has rules for representing and serializing a character set. Two of the more popular characterencodings are the following:
The ISO 8859 series. This series defines 13 character encodings that can represent texts indozens of languages. Each ISO 8859 character encoding can have up to 256 characters. ISO8859-1 (Latin-1) comprises the ASCII character set, characters with diacritics (accents,diaereses, cedillas, circumflexes, and so on), and additional symbols.
UTF-8 (Unicode Transformation Format, 8-bit form). A variable-width character encodingthat encodes 16-bit Unicode characters as one to four bytes. A byte in UTF-8 is equivalent to 7-bit ASCII if its high-order bit is zero; otherwise, the character comprises a variable number ofbytes. UTF-8 is compatible with the majority of existing web content and provides access to theUnicode character set. Current versions of browsers and E-mail clients support UTF-8. Inaddition, many new web standards specify UTF-8 as their character encoding. For example, UTF-8 is one of the two required encodings for XML documents (the other is UTF-16).
To produce an internationalized web application, you need to encode the following:
Request Character Encoding. The character encoding in which parameters in an incoming

30/10/2015 Developing Web Applications
http://docs.oracle.com/cd/E40938_01/doc.74/e40142/dev_web_apps.htm#NBDAG1035 7/43
request are interpreted. This encoding that converts parameters to string objects.
Page Character Encoding. The character encoding in which the JSP file is written. Unless thepage character encoding is set correctly, the JSP parser, web container, or web server that readsthe page cannot understand the characters before they do anything with them, such astranslating the JSP file into a servlet. Page character encoding is used for the rendering of JSPfiles only if the response character encoding has not been set separately.
Response Character Encoding. The character encoding of the textual response generated bya web component. This lets you control the encoding that the page uses when it is sent to thebrowser. The web page encoding must be set appropriately so that the characters are renderedcorrectly for a given locale.
All modern web browsers understand UTF-8, so that is a safe encoding to pick for the response. In theIDE, it is a good encoding at the page level too. This is why UTF-8 is the default page characterencoding and also the default response character encoding for JSP files created in the IDE.
The request encoding is the character encoding in which parameters in an incoming request areinterpreted. Many browsers do not send a request encoding qualifier with the Content-Type header. Insuch cases, a web container will use the default encoding--utf-8--to parse request data. For detailedinformation on request character encoding, see the references at the end of this topic.
Page character encoding is the encoding in which the JSP source file is written. The JSP 2.0specification distinguishes between two syntaxes when detecting the page character encoding:
For files in standard JSP syntax, encoding is detected by looking at two primary sources ofinformation: First in the deployment descriptor (the web.xml file) for a page-encoding element ina jsp-property-group whose URL pattern matches the file; then for a pageEncoding attribute inthe page itself. If neither is present, the charset of a JSP file's contentType attribute is used, orthe ISO 8859-1 character encoding is used as the ultimate fallback.
For files in JSP document syntax, the encoding is detected as described in the XML specification;this means that UTF-8 is the default and any other encoding must be declared in the XMLdeclaration at the beginning of the file.
To set the page character encoding for a file in standard JSP syntax:
1. Create a JSP file that uses standard JSP syntax. Right-click the JSP file and choose Properties.Note that the Encoding property is set to the encoding for the project. This is the JSP file's pageencoding. You cannot change the page encoding in the Properties sheet. The place where youset the page encoding depends on whether you want to set it for an individual JSP file or for agroup of JSP files together. The following step guides you through the setting of the pageencoding for JSP files.
2. Do one of the following to change the JSP file's page encoding:

30/10/2015 Developing Web Applications
http://docs.oracle.com/cd/E40938_01/doc.74/e40142/dev_web_apps.htm#NBDAG1035 8/43
Set the page character encoding for an individual JSP file. Double-click the JSP file sothat it opens in the Source Editor. The default pageEncoding attribute of a JSP file createdin the IDE is as follows:
<%@page pageEncoding="UTF-8"%>
You can change the page encoding in the JSP file and save it. Note that the IDE warns youif you try to save a character set that is not valid for JSP pages.
Alternatively, set the page encoding in the contentType attribute of the page directiveinstead. The default contentType attribute of a JSP file does not contain a charset value,because the pageEncoding attribute handles page encoding by default. However, you canadd a charset value as follows:
<%@page contentType="text/html;charset=UTF-8"%>
Set the page character encoding for groups of JSP files. Expand the Web Pagesnode, then the WEB-INF node, and then double-click the web.xml file. Click Pages at thetop of the editor and then click the JSP Property Groups header to open the JSP PropertyGroups section. Use the JSP Property Groups section to add, remove, and view a webapplication's JSP property groups. A JSP property group is a set of properties defined for agroup of JSP files within a web application. One of the properties you can set here is thepage encoding value for a group of JSP files.
Note:
Only if the other two are absent is the contentType attribute of a JSPfile's page directive used as the page encoding. If none of these areprovided, utf-8 is used as the page encoding. A translation-time errorresults if you define the page encoding with one value in the JSPproperty group and then give it a different value in an individual JSPfile's pageEncoding directive.
To set the page character encoding for a file in JSP document syntax:
1. Create a JSP file that uses XML syntax, see Section 11.3.1, "How to Create a JSP File." Right-click the JSP document and choose Properties. Note that the Encoding property is set to theencoding for the project. This is the JSP document's page encoding. You cannot change the pageencoding in the Properties sheet. For JSP documents, you can change the page characterencoding in one place only:
The encoding attribute of an XML declaration at the beginning of the file. The XML

30/10/2015 Developing Web Applications
http://docs.oracle.com/cd/E40938_01/doc.74/e40142/dev_web_apps.htm#NBDAG1035 9/43
declaration is also known as the XML prolog.
Note:
The page encoding for JSP documents may also be described in anindividual JSP document's page directive or in a JSP property group, as longas the values described there match the value derived from the XML prolog.It is a translation-time error to specify different encodings in the XML prologand in the declarations in a JSP document or JSP property group. If the XMLprolog does not specify an encoding, the UTF-8 encoding is derived instead.
2. Double-click the JSP file so that it opens in the Source Editor. The default XML declaration of aJSP document created in the IDE includes an encoding attribute as follows:
<?xml version="1.0" encoding="UTF-8"?>
You can change the encoding in the XML declaration and save the JSP document.
The response character encoding is the encoding of the textual response generated by a webcomponent. The response character encoding must be set appropriately so that the characters arerendered correctly for a given locale. An initial response character encoding for a JSP page is set fromthe same sources as for page character encoding:
The charset value of a contentType attribute in a page directive.
The pageEncoding attribute of a page directive.
The <page-encoding> tags of a web.xml file's JSP property group.
However, note that the charset value of a contentType attribute is the place where you arerecommended to set the response character encoding. The other two places are meant for the pagecharacter encoding; these are only used for the response character encoding when no specificresponse character encoding has been defined.
To set the response character encoding for a JSP file:
1. Double-click the JSP file so that it opens in the Source Editor. The default pageEncoding attributeof a JSP file created in the IDE is as follows:
<%@page pageEncoding="UTF-8"%>
You can change the page encoding in the JSP file and save it. Note that the IDE warns you ifyou try to save a character set that is not valid for JSP pages. The place where you set the

30/10/2015 Developing Web Applications
http://docs.oracle.com/cd/E40938_01/doc.74/e40142/dev_web_apps.htm#NBDAG1035 10/43
response character encoding depends on whether you want it to be the same as the pagecharacter encoding or not.
2. Do one of the following:
Set a distinct response character encoding. Use the contentType attribute of thepage directive. The default contentType attribute of a JSP file created in the IDE does notcontain a charset value, because the pageEncoding attribute handles page encoding bydefault. However, you can add a charset value as follows:
<%@page contentType="text/html;charset=UTF-8"%>
Use the page character encoding as the response character encoding. Do not adda charset value to the page directive's contentType attribute. In the absence of thecharset value, the encoding specified for the page by means of the page directive'spageEncoding attribute is also that of the response.
11.3.3 How to Edit a JSP File
Editing JSP files is similar to editing Java files. The Source Editor provides support for JSP tags.
To format selected code, right-click in the Source Editor and choose Format from the context menu. Ifno code is selected, the IDE acts as if the whole file has been selected. The IDE indents nested tagsonly if both the start and end parent tags are in the selected area. Note that this action does notformat scriptlets.
11.3.4 How to Access a Custom Tag from a JSP Page
The JavaServer Pages technology provides a set of standard action elements for performing actions oninformation. The <jsp:getProperty> element is an example of a commonly used action element. Youcan extend the set of action elements through custom tags that are defined in tag libraries, such asthe JSTL tag library.
This topic shows how to use a tag from a tag library JAR file, and then shows how to use a tag from atag library folder that contains tag files.
To access a custom tag from a tag library JAR file:
1. Ensure that the tag library's JAR file is on the web application's classpath, as described in Section5.2.3.1, "Managing the Classpath".
2. Before referencing one of its tags in a JSP file, add a taglib directive with a uri and prefixattribute to the JSP file: <%@taglib uri="http://java.sun.com/jsp/jstl/core" prefix="c"%>.
The uri attribute shows the location of the tag library and should be unique within the
30/10/2015 Developing Web Applications
http://docs.oracle.com/cd/E40938_01/doc.74/e40142/dev_web_apps.htm#NBDAG1035 11/43
web application. The uri can either be the URI specified by the TLD file, or the uri can bethe location of the TLD file in the WEB-INF folder, if the uri element is missing in TLD file.When you type the uri attribute, press Ctrl-Space after you type the first quotation mark.The IDE shows the list of URIs for available tag libraries.
The prefix attribute is used to identify tags from the library. The TLD file usuallyrecommends a prefix, but you can use any prefix you want.
3. At any point after the taglib directive, you can use the tag prefix to reference tags from the taglibrary. For example:
<c:if test="${param.sayHello}">
Hello ${param.name}!
</c:if>
To access a custom tag from a tag library folder:
1. Ensure that the tag library's JAR file is on the web application's classpath, as described in Section5.2.3.1, "Managing the Classpath".
2. Before referencing one of its tags in a JSP source file, add a taglib directive to the file:
<%@ taglib tagdir="/WEB-INF/tags/" prefix="a" %>
The tagdir attribute shows the location of the tag library within the web application.
The prefix attribute is used to identify tags from the library. The tag file usuallyrecommends a prefix, but you can use any prefix you want.
3. At any point after the taglib directive, you can use the tag prefix to reference tags from the taglibrary. For example:
<a:mytagfile>abc</a:mytagfile>
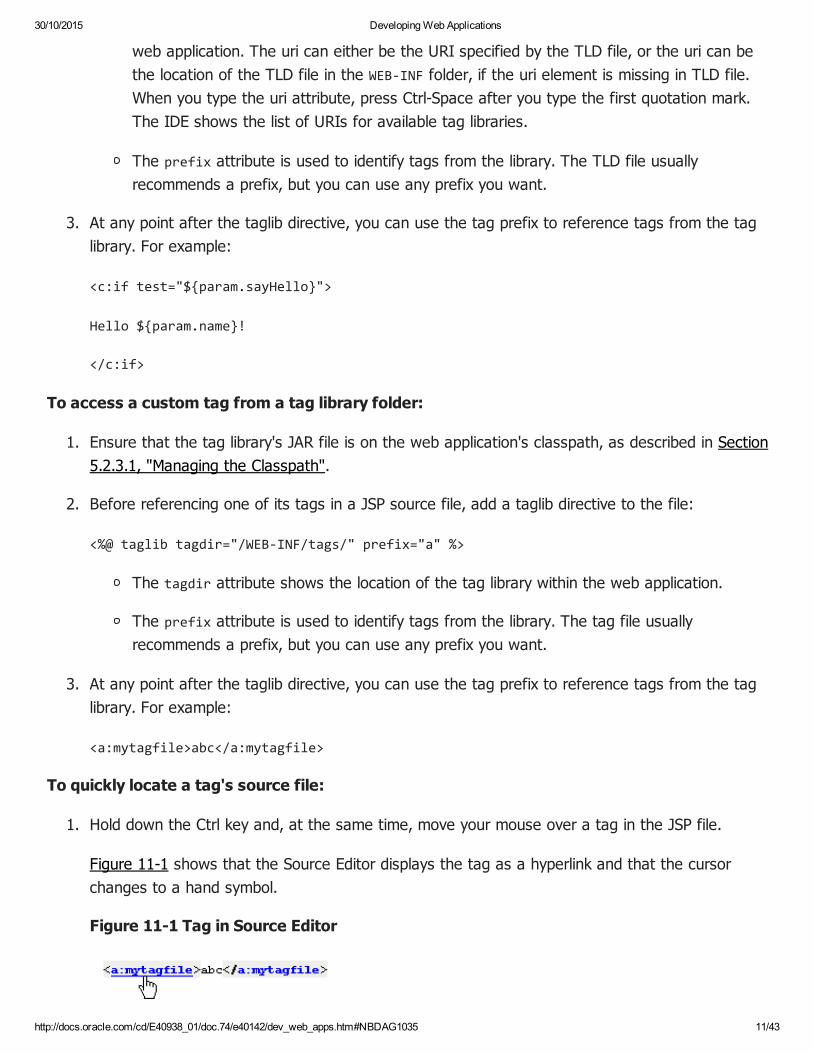
To quickly locate a tag's source file:
1. Hold down the Ctrl key and, at the same time, move your mouse over a tag in the JSP file.
Figure 11-1 shows that the Source Editor displays the tag as a hyperlink and that the cursorchanges to a hand symbol.
Figure 11-1 Tag in Source Editor

30/10/2015 Developing Web Applications
http://docs.oracle.com/cd/E40938_01/doc.74/e40142/dev_web_apps.htm#NBDAG1035 12/43
2. Click the hyperlink.
The tag file referenced by the tag opens in the Source Editor.
11.3.5 How to Access an Applet from a JSP Page
To access an applet from a JSP page:
1. Ensure that the applet is correctly packaged in the web application.
2. Define the applet in the JSP file by using the following applet tag:
<applet code="mypkg.MyApplet" archive="JavaAppletLibrary.jar"/>
mypkg.MyApplet is the full classname to your applet
JavaAppletLibrary.jar is the JAR file built from the Java class library project where yourapplet was created.
11.3.6 How to Compile a JSP File
When you compile a JSP file you can detect syntax problems before you execute the file on a server.Compilation also translates the JSP file into a servlet. Therefore, compilation discovers syntax errorsthat occur at translation time and at compile time. If a JSP file references a tag file, the referenced tagfile is compiled with the JSP file.
To compile a JSP file:
1. Do one of the following:
Compile a single file. In the Projects window, right-click the JSP file and choose CompileFile from the context menu.
Compile selected files. In the Projects window, use the Ctrl key and the Shift key toselect the files that you want to compile, right-click the selection and choose Compile Filefrom the context menu.
Compile all JSP files in a project. In the Projects window, right-click the project node,choose Properties, click Compiling, and select the Test compile all JSP files duringbuilds checkbox. Close the Project Properties dialog box, right-click the project node,and choose Build from the context menu.
Note:
By default, the IDE does not compile JSP files while building a project.

30/10/2015 Developing Web Applications
http://docs.oracle.com/cd/E40938_01/doc.74/e40142/dev_web_apps.htm#NBDAG1035 13/43
This is because JSP compilation can take a long time because JSP fileshave to be translated to servlets before they can be compiled.
2. In the Output window, click an error to jump to the source of the error in the Source Editor.
Troubleshooting
The following list shows some typical compilation messages and possible solutions:
Invalid expression. Might be caused by an unmatched curly brace ({). Look for EL syntaxhighlighting that extends past the EL expression. If the ending brace is missing, the Source Editorautomatically highlights the next beginning brace as an error. When you select a brace, theSource Editor highlights the matching brace.
Missing equal symbol. This error can be caused by a missing quote mark ("). Look for codethat has the same color as the text or text that has the same color as the code. Look for taghighlighting that extends past the tag's end delimiter.
Missing mandatory attribute. Might be caused by a misspelled attribute. Use the codecompletion feature to verify the correct spelling.
Unterminated tag. Can be caused by a missing percent sign (%) in the directive's closingdelimiter. Look for an end delimiter. that is a different color from the start delimiter.
Tag must be empty. Check for a missing forward slash (/) in the tag's closing delimiter.
Forgetting to delimit EL expressions with curly braces ({}) is a common error that cannot be caughtthrough compilation, because the text is valid syntax. To catch this type of error, look for expressionsthat are not highlighted with the color used for EL expressions.
If you see a the following compilation output, there might be an internal cache problem:
java.lang.NoClassDefFoundError: javax/servlet/jsp/tagext/SimpleTagSupport
You might need to reboot the IDE to be able to compile the JSP file.
11.3.7 How to View a JSP File's Servlet
When you execute a JSP file, the server translates the contents of the JSP file into a Java servlet andcompiles the servlet. You can view, but not edit, the translated servlet source in the Source Editor. Youcannot set breakpoints in the servlet source code. You can set breakpoints in the JSP file only.
To view the servlet generated from a JSP file:

30/10/2015 Developing Web Applications
http://docs.oracle.com/cd/E40938_01/doc.74/e40142/dev_web_apps.htm#NBDAG1035 14/43
1. Run the JSP file, see Section 11.3.9, "How to Run a JSP File".
2. In the Projects window, right-click the JSP file and choose View Servlet.
Note:
The View Servlet menu item is enabled only if the target server hassuccessfully executed the JSP file and the target server supports the viewingof translated servlets.
The servlet appears in the Source Editor. This servlet is based on the state of the JSP file when the filewas last executed. If you have changed the JSP file but have not executed it, the servlet does notreflect the changes. While this file is opened, if you execute the JSP file or if you change the targetserver in the Run section of the Project Properties dialog box, the file changes to reflect the latesttranslated servlet on the selected server.
11.3.8 How to Pass Request Parameters
You can pass request parameters in URL query string format to JSP pages and servlets from the IDE.Specifying input data in this fashion provides a useful aid in testing for expected JSP and servletoutput.
To specify parameters for a JSP page:
1. In the Projects window or Files window, right-click the JSP file and choose Properties.
2. In the Request Parameters dialog box, type the parameters in the URL query string format.
URL query string is a string appended to the URL for passing parameter values in a GET request.The query string must begin with a question mark (?). The parameters must be in name/valuepairs, with the pairs separated by ampersands (&). The names and values must be URL-encoded. For example, white space is encoded as +. The following URL shows an example of aquery string: http://www.myapp.com/sayhello?name=Fido+Filbert&type=Dog.
3. Click OK.
4. Click Close to exit the Properties window.
The IDE saves the parameters and automatically passes them to the JSP or servlet the next time youselect the file and choose Run File from the context menu.
Note:

30/10/2015 Developing Web Applications
http://docs.oracle.com/cd/E40938_01/doc.74/e40142/dev_web_apps.htm#NBDAG1035 15/43
The HTTP Monitor enables you to monitor data flow on the server.
11.3.9 How to Run a JSP File
When you run a JSP file, the IDE displays the file in the IDE's default web browser. If the JSP file thatyou run from the IDE has not been compiled, or if it has changed since it was last compiled, the IDEautomatically compiles it before executing it. If the server or the IDE's default web browser have notbeen started, the IDE automatically starts it.
To run a JSP file:
1. (Optional) Define request parameters to pass to the JSP file.
2. Select the JSP file in the Source Editor or Projects window.
3. Choose Run > Run File > Run "filename.jsp" from the main menu. If there are no errors, theserver displays the file in the IDE's default web browser.
Note:
If you are using a free-form project, this command is disabled by default. Youhave to write an Ant target for running the currently selected file in the IDE andhook it up to the Run Class command. For a full guide to configuring free-formprojects, see https://netbeans.org/kb/articles/freeform-config.html
Troubleshooting
If you get "File not found" errors when you execute a JSP file, see Section 22.2.2, "How to Change theDefault Web Browser" for a possible solution.
11.4 Working with Tag Libraries
Rather than writing action code directly in your JSP file, you can store common functions in a tag libraryand implement the functions using simple tags. This practice makes the JSP file more readable andisolates the JSP file from any underlying implementation changes.
Tag libraries can be in one of the following forms:
Java class tag handlers or JSP tag files (or both) bundled with a TLD (tag library descriptor) intoa JAR file.

30/10/2015 Developing Web Applications
http://docs.oracle.com/cd/E40938_01/doc.74/e40142/dev_web_apps.htm#NBDAG1035 16/43
A tag library folder containing tag files. The tag files can use standard JSP syntax or JSPdocument syntax.
A tag library folder containing tag handlers. The tag handlers must be written in the Javaprogramming language.
The IDE is bundled with the JSTL (JSP Standard Tag Library), which is a set of compatible tag librariesthat you can use in your JSP pages. The JSTL supports iteration, control-flow, text inclusion, andformatting features, as well as XML manipulation capabilities. The JSTL also supports an expressionlanguage to simplify page development, as well as extensibility mechanisms that allow you to integrateyour own custom tags with JSTL tags.
For a complete description of the JSTL, including documentation and tutorials, seehttp://jakarta.apache.org/taglibs/doc/standard-doc/GettingStarted.html.
Note:
When the JSTL tag library exists in the web application's WEB-INF/lib folder andthe JSP file has taglib directives with URIs for the parts of the library that you areusing, the Source Editor provides code completion for this library.
11.4.1 How to use Tag Libraries
You use the IDE to add the tag library to the web application's classpath. You use taglib directives in aJSP file to declare the tag libraries that the JSP file uses and to give each library a namespace uniquewithin the JSP file. The tags are used in the same manner as regular XML tags with namespaces. TheSource Editor provides code completion and Javadoc for tags and tag attributes of all types of taglibraries mentioned previously.
11.4.2 How to Create a Tag Library Descriptor
A tag library consists of:
A set of tag handlers that implement the tag library's feature set.
A Tag Library Descriptor (TLD) that describes the tags in the tag library and maps each tag to atag handler.
You can provide custom tags for JSP files using either tag handlers or JSP tag files. A tag library cancontain either type of custom tag, or it can contain both types. When you bundle a tag library in a JARfile, you must include a TLD (tag library descriptor) file. A JSP container uses the TLD file to associatea URI with a tag library and its tags.

30/10/2015 Developing Web Applications
http://docs.oracle.com/cd/E40938_01/doc.74/e40142/dev_web_apps.htm#NBDAG1035 17/43
The TLD file contains:
Documentation on the library as a whole and on its individual tags
Version information on the JSP container and on the tag library
Information about each of the actions (tags) defined in the tag library
You use the tag element to add a Java class tag handler to a TLD. You use the tag-file element to adda tag handler implemented in a tag file to the TLD.
The IDE creates a TLD file when you use the New File wizard to create a tag library. You can then usecode completion in the Source Editor to edit the elements of the TLD file. For example, you will need todo this for certain advanced features, including adding validators and event listeners. If you edit theTLD file directly, you can validate it as you would with a normal XML file.
The following steps show how to create a TLD in a web application. After you create the TLD, usecode completion in the Source Editor to define the tag library descriptor's properties.
To create a TLD in a web application:
1. In the Projects window or Files window, right-click the project node.
2. From the context menu, choose New > Other.
3. Under Categories, select Web. Under File Types, select Tag Library Descriptor. Click Next.
4. Type the name of the TLD file. Do not add the .tld extension, unless it is part of the name.
5. Type the folder where your TLD files are housed. By default, it is created in WEB-INF/tlds. If youcreate TLD files outside the WEB-INF subfolder, but still within the web folder, you must mapthem in your WEB-INF/web.xml file. You can use the Source Editor to modify the URI.
6. Type the prefix to be used within your JSP file. By default, the prefix is the same as the name ofyour TLD file. You can use the Source Editor to modify the prefix.
7. Click Finish.
The IDE creates a TLD file that conforms to the JSP 2.0 specification in J2EE 1.4 projects or to the JSP1.2 specification in J2EE 1.3 projects. The IDE supports both types of TLD files. That is, you can editthem using code completion in the Source Editor.
For more information about creating and using tag libraries, see the JavaServer Pages Specificationavailable at http://download.oracle.com/otndocs/jcp/jsp-2.1-fr-eval-spec-oth-JSpec/.
11.4.3 How to Edit a Tag Library Descriptor

30/10/2015 Developing Web Applications
http://docs.oracle.com/cd/E40938_01/doc.74/e40142/dev_web_apps.htm#NBDAG1035 18/43
You can use the Source Editor to edit a tag library descriptor (TLD) file.
1. In the Projects window or Files window, double-click the TLD file's node.
2. The TLD file opens in the Source Editor.
3. In the Source Editor, edit the tag library descriptor by using the following main elements:
<short-name>. Specifies a simple name that can be used by JSP page authoring tools tosuggest a namespace prefix for using the tag library in a JSP page. The default is the .tldfilename, without the .tld extension.
<display-name>. Specifies a short name intended for display by tools. It does not need tobe unique.
<tlib-version>. Specifies the version of the tag library being created. The default is 1.0.
<uri>. Specifies a public URI that uniquely identifies this version of the tag library. JSP filesthat use this tag library must use this value for the uri attribute in the taglib directive,unless there exists a jsp-config element in the web.xml file that maps a different URI tothe tag library.
<icon>. Specifies the name of a file containing a small (16 x 16) icon image for use bytools. The file name is a relative path within the tag library.
<description>. Specifies descriptive information about the tag library.
<version>. This is an attribute of the <taglib> element. It specifies the JSP version thatthe tag library requires. The default for J2SEE 1.3 is 1.2 and for J2SEE 1.4 is 2.0.
For general information about tag libraries, see JavaServer Pages Specification available athttp://download.oracle.com/otndocs/jcp/jsp-2.1-fr-eval-spec-oth-JSpec/.
11.4.4 How to Create a Tag File
You can use JSP syntax in tag files to create custom tags. Tag files can have the following extensions:
.tag - a tag file that is written using the standard JSP syntax
.tagx - a tag file that is written using JSP document syntax
.tagf - a tag segment
All tag files that are under WEB-INF/tags are available for use by the JSP files in that web application.Each folder under WEB-INF/tags represents a separate tag library. You use the tagdir attribute in ataglib directive to specify the location of the tag library folder. For example, <%@ taglib prefix="x"

30/10/2015 Developing Web Applications
http://docs.oracle.com/cd/E40938_01/doc.74/e40142/dev_web_apps.htm#NBDAG1035 19/43
tagdir="/WEB-INF/tags/xtremeLib" %>.
Tag files can also be referenced in a TLD file and bundled in a JAR file.
The IDE recognizes tag files and provides wizard support for creating new tag files.
Note:
A tag file is run when the JSP file in which it is defined is deployed. You can setbreakpoints in the tag file. Then, when the JSP file is debugged, the tag file isdebugged too.
For a full guide to creating and using tag files, see http://wiki.netbeans.org/FaqTaglibrary.
The following steps show how to create a tag file in a web application. After you create the tag file,use code completion in the Source Editor to specify the tag's attributes, body, and behavior.
To create a tag file:
1. In the Projects window or Files window, right-click the project node.
2. From the context menu, choose New > Other.
3. Under Categories, select Web. Under File Types, select Tag File. Click Next.
4. Type the name of the tag file.
5. Type the folder where your tag files are housed. By default, they are created in WEB-INF/tags.
6. Select the type of tag file that you want to create:
Tag File (Standard Syntax). Tag files written using the standard JSP syntax typicallyhave the .tag extension.
Tag File (XML Syntax). Tag files written using the XML document syntax typically havethe .tagx extension. Two examples of the advantages that XML document syntax has overstandard JSP syntax are:
You can edit, verify, and view files in XML document syntax with XML capable tools,such as the IDE's Source Editor.
You can transform files in XML document syntax using XSLT tools, such as the IDE'sXSL Transformation command.
7. (Optional) Click the Create as a Segment of a Tag File checkbox. A segment is a file that
30/10/2015 Developing Web Applications
http://docs.oracle.com/cd/E40938_01/doc.74/e40142/dev_web_apps.htm#NBDAG1035 20/43
contains a fragment of tag file text for inclusion by tag files. Tag segments typically use the.tagf extension.
8. (Optional) Click the Add Tag File to Tag Library Descriptor checkbox if you want the IDE tocreate entries in a TLD file for the tag file. If you click this checkbox, you must have a TLD fileavailable. If not, create one first.
If you selected the Add Tag File to Tag Library Descriptor checkbox, do the following:
a. Click Browse to select the tag library descriptor (TLD file) for your tag file. By default, theTLD files are in the WEB-INF/tlds folder.
b. Type the name of the tag. This is the name you use in the JSP file to refer to the tag file.
9. Click Finish.
The IDE creates a tag file that conforms to the JSP 2.0 specification.
Note:
A tag file is run when the JSP file in which it is defined is deployed. You can setbreakpoints in the tag file. Then, when the JSP file is debugged, the tag file isdebugged too.
For more information about creating and using tag libraries, see the JavaServer Pages Specificationavailable at http://download.oracle.com/otndocs/jcp/jsp-2.1-fr-eval-spec-oth-JSpec/.
11.4.5 How to Edit a Tag File
To edit a tag file:
1. In the Projects or Files window, locate your tag file.
2. Double-click the selected file to open it in the Source Editor.
3. Edit your tag file as you would any Java file, including the use of Source Editor features for tagfiles.
4. Choose File > Save to save your file. Unsaved changes are indicated by an asterisk in the file'stab in the Source Editor.
11.4.6 How to Create a Tag Handler
30/10/2015 Developing Web Applications
http://docs.oracle.com/cd/E40938_01/doc.74/e40142/dev_web_apps.htm#NBDAG1035 21/43
You can develop tag handlers for JSP custom actions using Java classes or tag files. This topicdiscusses how to use the IDE to create tag handlers using Java code. See Section 11.4.4, "How toCreate a Tag File" for information about tag files.
The IDE provides tools for creating a TLD file and for adding tag elements, tag attribute elements, andvariable elements to the TLD file. You can create Java code for a tag handler by using the New Filewizard and then you can edit the tag handler code in the Source Editor to modify the logic thatimplements the features of the tag.
Note:
Before you can create a tag handler, you have to create its tag library descriptor(a TLD file). See Section 11.4.2, "How to Create a Tag Library Descriptor" forinformation about TLD files.
To create a tag handler:
1. In the Projects window or Files window, right-click the project node.
2. From the context menu, choose New > Other.
3. Under Categories, select Web. Under File Types, select Tag Handler. Click Next.
4. Type the class name of the tag handler.
5. Type the package name of your tag handler.
6. Select BodyTagSupport if you want to write complex tags, such as nested tags or iteration tags.Otherwise, leave the default SimpleTagSupport selected.
7. Click Next.
8. Define the tag handler's TLD information, see Section 11.4.7, "How to Define TLD Informationfor a Tag Handler" for details.
For a full guide to creating and using tag handlers, see http://wiki.netbeans.org/FaqTaglibrary.
11.4.7 How to Define TLD Information for a Tag Handler
To define TLD information for a tag handler:
1. Click the Add Corresponding Tag to the Tag Library Descriptor checkbox if you want theIDE to create entries in a TLD file for the tag handler. If you click this checkbox, you must have

30/10/2015 Developing Web Applications
http://docs.oracle.com/cd/E40938_01/doc.74/e40142/dev_web_apps.htm#NBDAG1035 22/43
a TLD file available. If not, create one first.
2. If you clicked the Add Corresponding Tag to the Tag Library Descriptor checkbox, do thefollowing:
a. Click Browse to select the tag library descriptor (TLD file) for your tag handler. By default,the TLD files are in the WEB-INF/tlds folder.
b. Type the name of the tag. This is the name you use in the JSP file to refer to the taghandler.
c. Specify the allowable content of the tag handler:
empty. Tags that do not accept a body.
scriptless (default). Body content containing custom and standard tags and HTMLtext.
tagdependent. All other types of body content, such as SQL statements passed tothe query tag.
3. Click New to create attributes for the tag handler. Use the Add New Attribute dialog to createan attribute as follows:
Attribute Name. Specifies the name of the attribute.
Attribute Type. Specifies the type of the class being referred to. Choose a type from thedrop-down menu or type one yourself. The default is java.lang.String.
required attribute. If selected, specifies that the attribute must be given an argumentwhenever the tag is called. This option is set to False by default.
value evaluated at request time. If selected, specifies that the value of the attributecan be dynamically calculated at request time. This option is set to True by default.Mutually exclusive with the Value evaluated at JSP translation time attribute.
value evaluated at JSP translation time. If selected, specifies that the value of theattribute is static and determined at translation time. This option is set to False by default.Mutually exclusive with the Value evaluated request time attribute.
4. Click Finish.
11.5 Working with AppletsBefore you create an applet in the IDE, you must determine the type of project from which you wantto run the applet. You can create the applet in one of the following two places:

30/10/2015 Developing Web Applications
http://docs.oracle.com/cd/E40938_01/doc.74/e40142/dev_web_apps.htm#NBDAG1035 23/43
Within a Java Application project with Java WebStart enabled and with an applet descriptorspecified in the application's JNLP file.
Within a Java Class Library project that is a library for a Web Application project.
11.5.1 How to Create an Applet
To create an applet in a web application:
1. Choose File > New Project. Under Categories, select Java. Under Projects, select Java ClassLibrary. Complete the wizard.
2. Right-click the node of the new project in the Projects window and select New > Other. UnderCategories, select Swing GUI Forms. Under File Types, select JApplet Form. Click Next.
3. In the Class Name text field, type the name of your applet. In the Package text field, enterthe package to which the applet will belong.
4. Click Finish.
The IDE creates the applet in the specified package. The applet opens in the Source editor.
5. Design the applet with the GUI Builder or type code in the source view.
6. Right click the project node in the Projects window and choose Build from the context menu.
7. Run the applet, see Section 11.5.3, "How to Run an Applet".
Note:
When you create the applet, you can also choose from the JApplet or Applettemplates in the Java category. These templates do not work with the IDE's GUIBuilder.
11.5.2 How to Create an Applet that is Called from a JNLP File
To create and run an applet that is called from a JNLP file:
1. Choose File > New Project. Under Categories, select Java. Under Projects, select JavaApplication. Complete the wizard.
2. Right-click the node of the new project in the Projects window and select New > Other. UnderCategories, select Swing GUI Forms. Under File Types, select JApplet Form. Click Next.

30/10/2015 Developing Web Applications
http://docs.oracle.com/cd/E40938_01/doc.74/e40142/dev_web_apps.htm#NBDAG1035 24/43
3. In the Class Name text field, type the name of your applet. In the Package text field, enterthe package to which the applet will belong.
4. Click Finish.
The IDE creates the applet in the specified package. The applet opens in the Source editor.
5. Design the applet with the GUI Builder or type code in the source view.
6. Right-click the project's node, choose Properties, and select the Web Start panel.
7. Select the Enable Web Start checkbox.
8. Select the Applet Descriptor radio button and make sure that your applet is selected in theApplet Class combo box.
9. Close the Project Properties dialog box.
10. Right-click the project node in the Projects window and choose Build from the context menu.
11. Right-click the project node and choose Run Project.
11.5.3 How to Run an Applet
If you create an applet as part of a Java WebStart-enabled project (see Section 11.5.2, "How toCreate an Applet that is Called from a JNLP File"), you can run the applet by running the project.
If your applet is not part of a WebStart-enabled project, the applet is not run as part of the project.
To run an applet individually:
1. Right-click an applet class in the Projects window or Files window.
2. Select Run File from the context menu.
The myappletclass.html launcher file, with the applet embedded, is created in the build folderand launched in the Applet Viewer.
To run or debug an applet with the parameters, you need to edit the launcher, copy it from thebuild folder to the package where the applet class lives in the src folder. Make sure that themyappletclass.html launcher file has the same name as the applet class. Now edit themyappletclass.html launcher file as needed. When you build the project, the myappletclass.htmllauncher file is copied from the src folder to the build folder.
Note:

30/10/2015 Developing Web Applications
http://docs.oracle.com/cd/E40938_01/doc.74/e40142/dev_web_apps.htm#NBDAG1035 25/43
The myappletclass.html launcher file in your build folder is overwritten eachtime you run or debug the applet. Therefore, do not modify themyappletclass.html launcher file in your build folder.
3. To exclude the myappletclass.html launcher file from the JAR file, right-click the project, choosingProperties, clicking Packaging, and adding an expression to exclude them.
Note:
An HTML file is created by the IDE when you run or debug an applet. Whenyou copy it to your src folder for editing, it will automatically be included inthe JAR file when you build the project.
4. Package the applet in the web application.
5. Define the applet in a JSP file, see Section 11.3.5, "How to Access an Applet from a JSP Page."
6. Run the JSP file that contains the applet (see Section 11.3.9, "How to Run a JSP File") or deploythe web application that contains the JSP file (see Section 11.10.1, "How to Deploy a WebApplication").
Debugging an Applet
Applets run in the virtual machine of the IDE's default web browser. The IDE uses a different virtualmachine and therefore applets are not included in a web application's debug session. Therefore, debugthe applet launcher file as described in step 2 above.
11.5.4 How to Generate an Applet Policy File
By default, applets do not have access to resources on a client's computer, such as threads and diskoperations. An applet's permissions are defined in its applet.policy file. If you have an applet policyfile, you can specify its location in the IDE. Then, when you run the application, the IDE uses theapplet policy file that you specified. If you do not specify an applet policy file, the IDE generates onefor you when you run the applet. The applet policy file that the IDE generates for you grants allpermissions to the applet. You can use the Source Editor to modify the policy file, so that appropriatesecurity checks are done.
To specify the location of an existing applet policy file:
1. Right-click the project node and choose Properties.

30/10/2015 Developing Web Applications
http://docs.oracle.com/cd/E40938_01/doc.74/e40142/dev_web_apps.htm#NBDAG1035 26/43
2. In the left pane of the Project Properties dialog box, select Run.
3. In VM Options, specify the location of the applet policy file. For example, use the followingsetting to specify that the applet policy file is in the project's root folder: -Djava.security.policy=applet.policy
4. Click OK.
To use the IDE to generate an applet policy file:
1. Run the applet, see Section 11.5.3, "How to Run an Applet."
The IDE creates an applet policy file.
2. In the Files window, expand the project node and double-click the applet.policy file.
3. In the Source Editor, set permissions according to your needs.
4. Right-click the project node and choose Properties.
5. In the Project Properties dialog box, select Run.
6. In VM Options, note that the IDE has specified the location of the applet policy file. By default,the applet policy file is in the project's root folder: -Djava.security.policy=applet.policy
7. Click OK.
11.6 Working with ServletsServlets are server-side programs that give Java technology-enabled servers additional features.Servlets provide web developers with a simple, consistent mechanism for extending the features of aweb server and for gaining access to existing business systems. In other words, servlets are programswritten in the Java programming language that execute on the server. You can contrast servlets toJava programs written for the client browser, that is, applets.
Servlets are Java classes that can be loaded dynamically into a web server and executed by a webserver to extend its feature set. Servlets are useful for tasks that involve processing an HTTP request.Servlets are also helpful for tasks that do not generate an HTTP response at all or that generate arelatively simple HTTP response. Servlets use the javax.servlet API.
JSP technology was designed to simplify the process of creating servlets. In fact, the main function ofservlets is to generate HTML output in cases where dynamic portions can be encapsulated. Servletsare generated by JSP pages when compiled. In many applications, the response sent to the client is acombination of template data and dynamically-generated data. In this situation, it is often easier towork with JSP pages than to do everything with servlets.
30/10/2015 Developing Web Applications
http://docs.oracle.com/cd/E40938_01/doc.74/e40142/dev_web_apps.htm#NBDAG1035 27/43
For more information about servlet technology, see the Java Servlet Technology Overview available athttp://www.oracle.com/technetwork/java/javaee/servlet/index.html.
11.6.1 How to Create a Servlet Source File
When you create a servlet in the web application's src folder and compile it, the IDE includes it in theweb application's WAR file. When you create the servlet using the following steps, the IDE compiles theclass and its package structure to the build/web/WEB-INF/classes folder.
To create a servlet source file:
1. In the Projects or Files window, right-click the project's node and choose New > Other fromthe pop-up menu. The New File wizard appears.
2. Under Categories, choose Web. Under File Types, choose Servlet. Click Next.
3. Specify the fully qualified class name, the location and the servlet's package. Do not include afilename extension to the class name as this is added automatically when the file is created.
4. Click Next to specify the server deployment configuration for the servlet.
This page does not enable the Finish button until you enter a servlet name and URL mappingsthat are unique to the deployment descriptor. After you create the servlet, you can edit thisinformation in the deployment descriptor (web.xml).
5. Click Finish. The IDE opens the file for editing in the Source Editor.
11.6.2 How to Edit a Servlet Source File
The IDE provides support for editing Java source files, such as syntax highlighting, Java SE API codecompletion, automatic formatting, bracket matching, and macros, to name a few of the many features.In addition to the Java support, the IDE provides code completion for the Servlet API. Note thatalthough you can view the servlet that generated from a JSP file by right-clicking the JSP file andchoosing View Servlet from the pop-up menu, you cannot edit this servlet.
To edit a servlet source file:
1. Locate your servlet file in the Projects window or Files window.
2. Double-click the selected file to open it in the Source Editor.
3. Edit your file as you would any Java source file, including the use of code completion and editorabbreviations.
4. Choose File > Save to save your file. Unsaved changes are indicated by an asterisk in the file's
30/10/2015 Developing Web Applications
http://docs.oracle.com/cd/E40938_01/doc.74/e40142/dev_web_apps.htm#NBDAG1035 28/43
tab in the Source Editor.
Note:
If you create the servlet outside of the IDE or turn an existing class into aservlet, the IDE may not recognize the file as a servlet. If this is the case,manually register the servlet in the web.xml file.
11.6.3 How to View the Servlet Generated from a JSP File
When you execute a JSP file, the server translates the contents of the JSP file into a Java servlet andcompiles the servlet. You can view, but not edit, the translated servlet source in the Source Editor. Youcannot set breakpoints in the servlet source code. You can set breakpoints in the JSP file only.
To view the servlet generated from a JSP file:
1. Run the JSP file, see Section 11.3.9, "How to Run a JSP File."
2. In the Projects window, right-click the JSP file and choose View Servlet.
Note:
The View Servlet menu item is enabled only if the target server hassuccessfully executed the JSP file and the target server supports the viewingof translated servlets.
The servlet appears in the Source Editor. This servlet is based on the state of the JSP file when the filewas last executed. If you have changed the JSP file but have not executed it, the servlet does notreflect the changes. While this file is opened, if you execute the JSP file or if you change the targetserver in the Run section of the Project Properties dialog box, the file changes to reflect the latesttranslated servlet on the selected server.
11.6.4 How to Specify Parameters for a JSP Page
You can pass request parameters in URL query string format to JSP pages and servlets from the IDE.Specifying input data in this fashion provides a useful aid in testing for expected JSP and servletoutput.
To specify parameters for a JSP page:

30/10/2015 Developing Web Applications
http://docs.oracle.com/cd/E40938_01/doc.74/e40142/dev_web_apps.htm#NBDAG1035 29/43
1. In the Projects window or Files window, right-click the JSP file and choose Properties.
2. In the Request Parameters dialog, type the parameters in the URL query string format. SeeSection 11.3.8, "How to Pass Request Parameters" for details on URL query string.
3. Click OK.
4. Click Close to exit the Properties window.
The IDE saves the parameters and automatically passes them to the JSP or servlet the next time youselect the file and choose Run File from the context menu.
Note:
The HTTP Monitor enables you to monitor data flow on the server.
11.6.5 How to Run a Servlet
When you run a servlet, the IDE sends a URL to the server. The URL is comprised of the server's URL,the Execution URI value, and Request Parameters. The default URI value is specified in the deploymentdescriptor (the web.xml file).
Note:
Your servlet must have an entry defined in the deployment descriptor (theweb.xml file) in order to be able to run. The entry can be created automaticallyby the IDE when you create a servlet in the New File wizard. Otherwise, youhave to create it by hand in the web.xml file.
To run a servlet:
1. (Optional) Define request parameters to pass to the servlet, see Section 11.6.4, "How to SpecifyParameters for a JSP Page."
2. Select the servlet in the Source Editor or Projects window.
3. Choose Run > Run File > Run "filename.java" (Shift-F6) from the main menu. If the compiledservlet is newer, the server reloads the servlet.
Note:

30/10/2015 Developing Web Applications
http://docs.oracle.com/cd/E40938_01/doc.74/e40142/dev_web_apps.htm#NBDAG1035 30/43
If you are using a free-form project, this command is disabled by default.You have to write an Ant target for running the currently selected file in theIDE and hook it up to the Run Class command. For a full guide toconfiguring free-form projects, see:https://netbeans.org/kb/articles/freeform-config.html
Troubleshooting
If you get "file not found" errors when you execute a servlet, see Section 22.2.2, "How to Change theDefault Web Browser" for a possible solution.
11.7 Using Filters
A filter is a piece of re-usable code that modifies requests to and responses from a servlet. Filters canperform many functions, including (but not limited to):
Authentication, that is, blocking requests based on user identity
Logging and auditing, that is, tracking users of a web application
Localization, that is, tailoring the request and response to a particular locale
Data compression, that is, making downloads smaller
XSLT transformations of XML content, that is, targeting web application responses to more thanone type of client
The IDE provides a wizard to help you create both simple and more advanced filter elements.
Note:
Filters are run on each mapped request; therefore, you cannot run or debugthem individually.
Filters are declared using the filter element in the web application's deployment descriptor (web.xml)and are packaged in a WAR file along with the static content and servlets that make up a webapplication. A filter or collection of filters can be configured for invocation by defining the filter mappingelements in the deployment descriptor.
For more information about filters, see the Java Servlet Technology Overview page available athttp://www.oracle.com/technetwork/java/javaee/servlet/index.html.

30/10/2015 Developing Web Applications
http://docs.oracle.com/cd/E40938_01/doc.74/e40142/dev_web_apps.htm#NBDAG1035 31/43
11.7.1 How to Create a Filter
You create a filter by implementing the javax.servlet.Filter interface and providing a publicconstructor taking no arguments. The IDE provides a wizard to help you create two types of filters:
A basic filter class
A filter class that wraps the Request and Response objects prior to passing on the request.
To create a Filter:
1. Right-click the package where you want to put the filter and choose New > Other from thepop-up menu.
2. Under Categories, select Web. Under File Types, select Filter. Click Next.
3. Specify the fully qualified class name, the location and the servlet's package. Do not include afilename extension to the class name as this is added automatically when the file is created.
4. Select the Wrap Request and Response Objects checkbox if you want the filter to wrap therequest and response objects. For example, you can extend the capabilities of the request andresponse by allowing parameters to be set on the request before it is sent to the rest of thefilter chain. Or you can keep track of the cookies that are set on the response. Note that someservers do not handle wrappers very well for forward or include requests.
5. Click Finish to register the filter in the deployment descriptor. You can also register the filterafterwards, using the Servlet Filters section of the web.xml Visual Editor.
6. Click Next to define initialization parameters or click Finish to accept the default configuration.The IDE opens the filter source code in the Source Editor.
For more information about filters, see the Java Servlet Technology Documentation available at theJava Servlet Technology Overview page athttp://www.oracle.com/technetwork/java/javaee/servlet/index.html.
11.7.2 How to Register a Filter
You can add a filter to a web application deployment descriptor (web.xml) in two ways:
Using the New Filter wizard when you create the filter. On the Configure Filter Deployment page,select the Add information to deployment descriptor (web.xml) checkbox, type the filter's internalname, and add the filter's mappings. Optionally, you can add the filter's initialization parametersfrom the Filter Init Parameters page, which is the next step in the wizard.
Using the Servlet Filters section of the web.xml Visual Editor.
30/10/2015 Developing Web Applications
http://docs.oracle.com/cd/E40938_01/doc.74/e40142/dev_web_apps.htm#NBDAG1035 32/43
The filter element defines a filter in the deployment descriptor. Filter class instances are scoped to onefilter per deployment descriptor declaration per Java virtual machine.
For more information about filters, see the Java Servlet Specification available athttp://www.oracle.com/technetwork/java/index-jsp-135475.html.
11.8 Using Web Application Listeners
Listeners allow you more control over interactions with the ServletContext and HttpSession objectsand let you efficiently manage the resources used by a web application.
Application event listeners are classes that implement one or more of the servlet event listenerinterfaces. Application events let listener objects be notified when servlet contexts and sessions areinitialized and destroyed, as well as when attributes are added or removed from a context or session.
Use Servlet context listeners to manage resources or state held at a virtual machine level for the webapplication. The IDE helps you create two types of context event listeners:
ServletContextListener, which notifies you that the servlet context has just been created andis available to service its first request, or that the servlet context is about to be shut down.
ServletContextAttributesListener, which notifies you that attributes on the servlet contexthave been added, removed, or replaced.
Use HTTP session listeners to manage state or resources associated with a series of requests made toa web application from the same client or users. The IDE helps you create two types of session eventlisteners:
HttpSessionListener, which notifies you that an HttpSession has been created, invalidated, ortimed out.
HttpSessionAttributesListener, which notifies you that attributes have been added, removed,or replaced on an HttpSession.
Use Servlet request listeners to observe as requests are created and destroyed, and as attributes areadded and removed from a request. This is supported by J2EE 1.4 only. The IDE helps you create twotypes of request event listeners:
ServletRequestListener, which notifies you that the request is coming in or out of a webapplication's scope.
ServletRequestAttributesListener, which notifies you that request attributes have been added,removed, or replaced.
Listener classes are declared in the deployment descriptor (web.xml) using the listener element. They
30/10/2015 Developing Web Applications
http://docs.oracle.com/cd/E40938_01/doc.74/e40142/dev_web_apps.htm#NBDAG1035 33/43
are listed by class name in the order in which they are to be invoked.
The IDE provides a wizard to help you create listener classes.
Note:
Listeners are run on each mapped event, therefore you cannot run or debugthem individually.
For more information about listeners, see the Java Servlet Specification available athttp://www.oracle.com/technetwork/java/index-jsp-135475.html.
11.8.1 How to Create a Web Application Listener
The Java Servlet Specification supports application level events for controlling interactions with theServletContext and HttpSession objects and for managing the resources that a web application uses.
Application event listeners are classes that implement one or more of the servlet event listenerinterfaces. Application events notify listener objects when servlet contexts and sessions are initializedand destroyed, as well as when attributes are added or removed from a context or session.
The IDE provides a wizard to help you create listener classes. Use the Web Application Listener wizardto create listener classes that manage resources or state held at a virtual machine level for the webapplication.
You use the listener element to declare listeners in the deployment descriptor (web.xml). List thelistener elements in the order in which they are to be invoked.
To create a listener:
1. In the Projects or Files window, right-click the package node and choose New > Other fromthe pop-up menu.
2. Under Categories, select Web. Under File Types, select Web Application Listener.
3. Follow the instructions in the New Web Application Listener wizard and click Finish. The sourcecode appears in the Source Editor.
For more information about listeners, see the Java Servlet Specification available athttp://www.oracle.com/technetwork/java/index-jsp-135475.html.
11.8.2 How to Register a Web Application Listener

30/10/2015 Developing Web Applications
http://docs.oracle.com/cd/E40938_01/doc.74/e40142/dev_web_apps.htm#NBDAG1035 34/43
You can add a listener to a web application deployment descriptor (web.xml) in two ways:
Using the New Web Application Listener wizard when you create the listener (see Section 11.8.1,"How to Create a Web Application Listener"). On the Name and Location page, select the Addinformation to deployment descriptor (web.xml) checkbox.
Using the Web Application Listeners section of the web.xml Visual Editor.
The listener element defines a listener in the deployment descriptor. Listener class instances arescoped to one listener per deployment descriptor declaration per Java virtual machine.
For more information about listeners, see the Java Servlet Specification available athttp://www.oracle.com/technetwork/java/index-jsp-135475.html.
11.9 Configuring a Web Application
You configure your web applications at several different levels.
Project Contents and Classpath
Basic project settings like the web application's source roots and classpath are set in the application'sProject Properties dialog box. You open this dialog box by right-clicking the web application's projectnode and choosing Properties.
For standard projects, you can add source roots in the Sources page of the Project Properties dialogbox. You can quickly add to the compilation and test classpath by right-clicking the Libraries or TestLibraries node in the Projects window. To further configure the classpath, or to specify which itemsshould be included in deployment, use the Libraries page of the Project Properties dialog box.
For free-form projects, there are no Libraries or Test Libraries nodes. The classpath and source rootsare managed completely by your project's Ant script. In the Java Sources and Java Sources Classpathpages of the Project Properties dialog box, you just configure the project to match the settings thatalready exist in your Ant script. This tells the IDE which classes to offer for debugging, codecompletion, and so forth.
Deployment Settings
There are several key steps to configuring deployment settings:
Setting the target server. You can have several instances of your favorite server registered.You can set the target server instance for a web application by doing any of the following:
Specifying the server in the New Project wizard when creating the project.
Going to an web application's Project Properties dialog box and setting the target server inthe Run page.

30/10/2015 Developing Web Applications
http://docs.oracle.com/cd/E40938_01/doc.74/e40142/dev_web_apps.htm#NBDAG1035 35/43
Adding the web application to an enterprise application. The web application is thendeployed to the same server instance as the enterprise application.
Adding the web application to a J2EE application. You can add a web application to anenterprise project by doing any of the following:
Specifying the enterprise application in the New Project wizard when creating the project.
Right-clicking the J2EE Modules node for any enterprise application project and choosingAdd J2EE Module.
Configuring deployment descriptors. The IDE automatically updates your deploymentdescriptors as you code your web application. Whenever you insert a call to an enterprise bean,for example, the IDE automatically enters the necessary information in your deploymentdescriptors. You can manually configure your deployment descriptors by expanding the webapplication's Configuration Files node and double-clicking web.xml, sun-web.xml, or context.xml.
11.9.1 How to Edit Deployment Descriptors
Deployment descriptors are XML-based text files whose elements describe how to assemble anddeploy a module to a specific environment. The elements also contain behavioral information aboutcomponents not included directly in code.
For web applications, there are three types of deployment descriptors:
web.xml. The general web application deployment descriptor that configures deployment settingsfor components belonging to a web application, such as servlets and JSP files.
sun-web.xml. The server-specific deployment descriptor that configures deployment settings forthe Glassfish application server.
context.xml.The server-specific deployment descriptor that configures deployment settings forthe Tomcat Web Server.
To edit web.xml:
1. In the Projects window, expand the Configuration Files node for your web application project.
2. Double-click web.xml to open it in the web.xml Visual Editor.
The web.xml Visual Editor opens in a Source Editor tab. The editor contains an Overview sectionand a section for most of the elements in the web.xml file.
3. Edit the deployment descriptor as necessary.
4. (Optional) Click XML at the top of the web.xml Visual Editor to view and edit the deployment

30/10/2015 Developing Web Applications
http://docs.oracle.com/cd/E40938_01/doc.74/e40142/dev_web_apps.htm#NBDAG1035 36/43
descriptor's XML code.
5. Choose File > Save to save your changes.
To edit sun‐web.xml:
1. In the Projects window, expand the Configuration Files node for your web application project.
2. Double-click sun-web.xml to open it in the graphical editor. The graphical editor opens in aSource Editor tab. The editor contains a tree view of the module's contents on the left andproperty editors for each item on the right.
3. Edit the deployment descriptor as necessary.
4. Choose File > Save to save your changes.
Note:
If you enter any XML syntax errors the IDE automatically alerts you. To fullyensure your changes have not cause any errors, you should verify the webapplication.
To edit context.xml:
1. In the Projects window, expand the Configuration Files node for your web application project.
2. Double-click context.xml to open it in the graphical editor. The graphical editor opens in aSource Editor tab. The editor contains a tree view of the module's contents on the left andproperty editors for each item on the right.
3. Edit the deployment descriptor as necessary.
4. Choose File > Save to save your changes.
Note:
If you enter any XML syntax errors the IDE automatically alerts you. To fullyensure your changes have not cause any errors, you should verify the webapplication.
11.10 Deploying a Web Application

30/10/2015 Developing Web Applications
http://docs.oracle.com/cd/E40938_01/doc.74/e40142/dev_web_apps.htm#NBDAG1035 37/43
The IDE uses an Ant script to run your web applications. If you are using a standard project (for moreinformation on standard projects, see Section 5.2.1, "Standard Project Templates"), the IDE generatesthe build script based on the options you enter in the project's Project Properties dialog box. You canset the project's classpath, context path, and web server in the Project Properties dialog box. You canfurther customize program execution by editing the Ant script and Ant properties for the project.
If you are using a free-form project (for more information on free-form projects, see Section 5.2.2,"Free-Form Templates"), the IDE uses your existing Ant script to run your project. You can write atarget that executes the currently selected project in the IDE and map it to the Deploy command.
You can execute your web application from the IDE using one of the supported servers that implementa J2EE web container. The process for running a web application is slightly different depending onwhich server you use. For more information about specifying the server on which to run the webapplication, see Section 11.10.2, "How to Change the Target Server". Some servers do not supportweb applications in WAR format. In such cases, it might be necessary to extract the WAR file withinthe server before deploying. For details on whether the server you intend to use supports JSP files andWAR files, see the documentation accompanying your server.
To execute a web application, the web server requires a configuration file. When you create a webapplication from the IDE, the IDE creates the necessary server configuration for you.
All the resources that the web application uses must be in the server's classpath and their placementmust follow the WAR structure:
Public JSP files and static files, such as HTML files and images, must be in the document base(root folder) or one of its subfolders. JSP files that are under the WEB-INF folder can only beaccessed by another JSP or by a servlet.
Tag library descriptor (TLD) files must be in the WEB-INF folder or a subfolder, such as WEB-INF/tlds or WEB-INF/tags. If a tag library JAR file contains the TLD, you are not required to havea TLD under the WEB-INF folder. Note that tag library descriptors are not required for tag files.
The classes must be in a Source Packages subfolder.
JAR files must be in the WEB-INF/lib folder or in the web server's shared library folder. Forinformation about using shared libraries when deploying to other servers, see the documentationaccompanying that server. Note that Tomcat does not support .zip files in the WEB-INF/libfolder.
Tag files must be the WEB-INF/tags folder or one of its subfolders.
Troubleshooting
If you get "file not found" errors when you execute a web application, see Section 22.2.2, "How toChange the Default Web Browser" for possible solutions.

30/10/2015 Developing Web Applications
http://docs.oracle.com/cd/E40938_01/doc.74/e40142/dev_web_apps.htm#NBDAG1035 38/43
If the browser does not reflect changes in a JSP file or HTML file, this might be because of the waythe browser is caching pages. Check the browser's settings to ensure that the browser is reloading thepage every time you access it.
11.10.1 How to Deploy a Web Application
When you run a web application, the IDE automatically builds, deploys, and runs the web applicationusing the project's ant build script and target server.
To deploy a web application:
1. (Optional) Define parameters to pass to one or more JSP files, servlets, or both (see Section11.3.8, "How to Pass Request Parameters").
2. (Optional) Specify a different welcome file by right-clicking the project node in the Projectswindow, choosing Properties, clicking Run, and typing it in the Relative URL text box.
Note:
The welcome file specified in the Project Properties window overrides thewelcome file set in the web.xml file. If no welcome file is defined in theProject Properties window, the first existing welcome file defined in theweb.xml file's welcome-file-list is displayed. If the server does not find awelcome file, the server's default servlet displays the root of the webapplication. You can change the behavior of the default servlet in theweb.xml file.
3. (Optional) Specify a different target server or browser.
4. In the Projects window, right-click the project's node and choose Run. The project is compiled,and new and changed files are copied from the project's build directory to the WAR's deploymentdirectory. The deployed application then opens in a browser.
Note:
The Compile on Save feature is enabled by default for web projects. The IDErecompiles and deploys the project application when you save changes to projectfiles in the editor. The Compile on Save feature can be toggled from the Runcategory in the Project Properties window.

30/10/2015 Developing Web Applications
http://docs.oracle.com/cd/E40938_01/doc.74/e40142/dev_web_apps.htm#NBDAG1035 39/43
The IDE sends the web application's URL to the server. The URL is derived from the server's URL, theweb application's context path, and the relative URL or welcome file.
Troubleshooting
The Output window displays error information and the HTTP monitor displays requests, data states,and the servlet environment.
If you get HTTP 404 or Not Found error messages when you execute a web application, see Section22.2.2, "How to Change the Default Web Browser" for possible solutions. Also verify the following:
The URL is correct.
The servlet mapping in the web.xml file is correct.
The application's resources are in the appropriate location.
11.10.2 How to Change the Target Server
Each project has a target server. The target server is the server that is used when the project is run.You can set the target server to any server which has been registered in the IDE.
To change the target server:
1. Right-click the project node in the Projects window and choose Properties.
2. Select Run in the Project Properties dialog.
3. Select the new target server from the Server drop-down menu and click OK.
11.11 Debugging a Web ApplicationAt the end of the development cycle, you need to debug and test your web application. The IDE has anumber of features that help you to do so. The following are the most important ones:
Detecting syntax problems in JSP files during compilation, see Section 11.3.6, "How to Compile aJSP File."
Viewing the translated servlet after deployment, see Section 11.3.7, "How to View a JSP File'sServlet."
Unit testing, see Section 8.2, "Testing Java Application Projects with Unit Tests."
Using the debugger to debug web applications (see Section 11.11.1, "How to Debug a WebApplication"), JSP files (see Section 11.11.2, "How to Debug a JSP File"), and servlets (seeSection 11.11.3, "How to Debug a Servlet").
30/10/2015 Developing Web Applications
http://docs.oracle.com/cd/E40938_01/doc.74/e40142/dev_web_apps.htm#NBDAG1035 40/43
Using the profiler to profile web application performance (see Section 11.12.1, "How to Profile aStandalone Web Application") and check for memory leaks.
Monitoring by means of the HTTP Monitor. When you run web applications, JSP files, or servlets,the HTTP Monitor can gather data about HTTP requests that the servlet engine processes. Foreach HTTP request that the engine processes, the monitor records data about the incomingrequest, the data states maintained on the server, and the servlet context. You can view data,store data for future sessions, and replay and edit previous requests.
Writing a target to debug and test free-form web projects.
11.11.1 How to Debug a Web Application
You can use the debugger in the IDE to debug web applications.
To debug a web application:
1. Set breakpoints and watches in the web application's JSP files, servlets, and other source files.
2. If necessary, specify request parameters in the JSP files and servlets, see Section 11.3.8, "Howto Pass Request Parameters."
3. Right-click the project node in the Projects window and choose Debug from the context menu.
11.11.2 How to Debug a JSP File
You can use the debugger in the IDE to debug JSP files. Just as with Java programs, the IDE enablesyou to set new watches, evaluate a variable by holding the cursor over the variable, and setbreakpoints in JSP files, JSP documents, and JSP segments. A tag file is debugged when you debug theJSP file that references it.
To debug a JSP file:
1. Set breakpoints and watches in the JSP file and, optionally, its tag files.
2. If necessary, specify request parameters in the JSP file, see Section 11.3.8, "How to PassRequest Parameters."
3. Right-click the JSP file's node and choose Debug File. Optionally, choose Debug > Debugfile.jsp from the main menu.
11.11.3 How to Debug a Servlet
You can use the debugger in the IDE to debug servlets.
30/10/2015 Developing Web Applications
http://docs.oracle.com/cd/E40938_01/doc.74/e40142/dev_web_apps.htm#NBDAG1035 41/43
To debug a servlet:
1. Set breakpoints and watches in the servlet.
2. If necessary, specify request parameters in the servlet, see Section 11.3.8, "How to PassRequest Parameters".
3. Right-click the servlet's node and choose Debug File. Optionally, choose Debug > Debugfile.java from the main menu.
11.12 Profiling a Web Application
There are two ways to profile a web application project:
As a stand-alone web application project
As part of an enterprise application
If your web application is part of an enterprise application, you should always profile it by running theprofile command on the enterprise application project. Since the IDE does not know which enterpriseapplications a web application project belongs to, running the Profile command on a web applicationproject deploys it as a stand-alone application.
If you are deploying your web application or enterprise application to a local installation of the Glassfishapplication server, you can profile your project by right-clicking the project node in the Projectswindow and choosing Profile from the context menu or by setting the project as the main project (seeSection 5.4, "Setting the Main Project") and choosing Profile Main Project from the main menu.
If you are deploying your web application or enterprise application to a remote server, you need toattach the IDE to the remote server and profile the application in Attach mode. The Attach Wizard canhelp you configure the remote server to accept attachment.
11.12.1 How to Profile a Standalone Web Application
To profile a stand-alone web application:
1. In the Projects window, right-click the web application project and choose Profile.
2. Select a profiling task and click Run.
When you profile a stand-alone web application project, the IDE does the following:
Compiles the web application if necessary.
Stops the application server and starts it in profile mode.

30/10/2015 Developing Web Applications
http://docs.oracle.com/cd/E40938_01/doc.74/e40142/dev_web_apps.htm#NBDAG1035 42/43
Deploys the web application to the application server.
Starts a profiling session, attaches the profiler to the server, and opens the Profiler window inthe IDE. After the application is deployed to the server, you should invoke its code the same wayas you would for debugging or just evaluating application functionality. You can view the profilingdata once the code of the application is invoked.
11.12.2 How to Profile an Enterprise Application
To profile an enterprise application:
1. In the Projects window, right-click the enterprise application project and choose Profile.
2. Select a profiling task and click Run.
Note:
If you are analyzing application performance, you may want to choose the ProfileProjects & Subprojects Classes filter if you want to profile the classes in yourweb application and also any sub-projects, such as any EJB modules. If you donot choose this filter, the classes in the EJB module are not profiled.
You can limit the classes in the enterprise application that are profiled by doingthe following:
1. In the Analyze Performance pane, choose the Profile Projects &Subprojects Classes filter and then click Show Filter Value.
2. Click to Quickfilter in the dialog box.
3. In the Set Quick Filter dialog, select a filter type and edit the filter valuesto limit the classes that are profiled and click OK.
4. Make sure that Quick Filter is selected in the Filter drop-down list whenyou run the profiling session.
When you profile an enterprise application, the IDE does the following:
Compiles the EAR file if necessary.
Stops the application server and starts it in profile mode.
Deploys the enterprise application to the application server.
30/10/2015 Developing Web Applications
http://docs.oracle.com/cd/E40938_01/doc.74/e40142/dev_web_apps.htm#NBDAG1035 43/43
Starts a profiling session, attaches the profiler to the server, and opens the Profiler window inthe IDE. If the application has a designated web application and URL to run, the IDE opens theURL in the external browser.
Previous Next Copyright © 2013, Oracle and/or its affiliates. All rights reserved.Legal Notices Home Book
ListContents Contact
Us