developing, managing and maintaining web … · developing, managing and maintaining web...
TRANSCRIPT

Developing, Managing and Maintaining Web Applications with Content Management Systems: Drupal and Joomla as case study.
Samsideen A. Quadri
Bachelor‟s Thesis
Business Information Technology
2011

Abstract
Business Information Technology
Author or authors Samsideen Adedoyin Quadri
Group or year of entry 2009
Title of thesis Developing, Managing and Maintaining Web Applications with Content Management Systems: Drupal and Joomla as case study.
Number of pages and appendices 70 + 5
Supervisor or supervisors Eija Kalliala
The use of Content management systems by businesses, individuals, corporate and non-governmental organisations are recognized in the business and technology industries. Developers and companies are realising the advantages in the concept of free development environment for Web contents. Content Management systems have made content publishing on the internet fast and easy. Companies want to reach out to their customers, sell their products and expertise, maximize profits and increase efficiency. All these are great advantages provided by content management systems applications. Open source content management gives opportunities for develpoers to utilize and practise their knowledge. It also allow developers to contribute to the contribute to growing applications on the internet. This thesis focuses on researching and examining how to build different web applica-tions with desired functionalities using both Drupal and Joomla. It contains Web ap-plications introduction, interviews and questionnaires from Drupal and Joomla experts, Definitions and argument about content management systems and Open source con-tent management systems, Drupal and Joomla analysis and guides, Sample applications to support the research, and application testing which confirm that content manage-ment applications provides functionalities that are seen in applications developed with HTML editors. In conclusion, it can be inferred from the research and analysis of the result that Drup-al and Joomla Web applications which are content management systems are secure, reliable, flexible and cost effective.
Keywords Content Management Systems, Drupal, Joomla, Open Source, Web applications, Ubercart, VirtueMart
Table of contents
1 Introduction ........................................................................................................................ 1
1.1 Research methodology ............................................................................................... 3
1.2 Research method used ................................................................................................ 3
1.3 Organisations used ...................................................................................................... 3
1.4 Data collection ............................................................................................................. 3
1.5 Questionnaire ............................................................................................................... 4
1.5.1 Questionnaire result analysis .......................................................................... 4
1.6 Interview ....................................................................................................................... 5
1.6.1 Interview result analysis .................................................................................. 5
1.6.2 Activeark Oy .................................................................................................... 5
1.6.3 Braindigit IT Solutions.................................................................................... 6
2 CMS ....................................................................................................................................... 8
2.1 Introduction ................................................................................................................. 8
2.2 Definition ..................................................................................................................... 9
2.3 Classification of CMS ............................................................................................... 10
2.3.1 Open Source CMS ......................................................................................... 11
3 Drupal ................................................................................................................................. 14
3.1 Introduction ............................................................................................................... 14
3.2 Getting started with Drupal ..................................................................................... 15
3.3 Structure of Drupal ................................................................................................... 16
3.4 Drupal installation ..................................................................................................... 17
3.4.1 Web Installation of Drupal .......................................................................... 18
3.4.2 Command Line Installation of Drupal ....................................................... 22
3.5 Creating site contents in Drupal .............................................................................. 25
3.6 The site contents and configurations ..................................................................... 26
3.7 Improving site contents functionality ..................................................................... 27
3.7.1 Drupal Modules ............................................................................................. 27
3.7.2 Module installation ........................................................................................ 28
3.7.3 Creating and customizing modules ............................................................. 29
3.7.4 Drupal Themes .............................................................................................. 30
3.7.5 Theme installation ......................................................................................... 31

3.7.6 Creating and customizing themes ............................................................... 31
4 Joomla ................................................................................................................................. 32
4.1 Introduction ............................................................................................................... 32
4.2 Getting started with Joomla ..................................................................................... 33
4.3 Structure of Joomla ................................................................................................... 33
4.4 Joomla Installation .................................................................................................... 35
4.4.1 Web Installation of Joomla .......................................................................... 35
4.4.2 Command Line Installation of Joomla ....................................................... 37
4.5 Creating contents for Joomla powered site ........................................................... 38
4.6 Improving site functionality ..................................................................................... 40
1. Joomla Templates .......................................................................................... 41
2. Joomla Components ..................................................................................... 41
3. Joomla Modules ............................................................................................. 41
4. Joomla Plugins ............................................................................................... 42
5 Application Sample ......................................................................................................... 42
5.1 Drupal Web shop ...................................................................................................... 42
5.1.1 Ubercart installation ...................................................................................... 42
5.1.2 Application Scenario ..................................................................................... 43
5.2 Joomla Web shop ...................................................................................................... 46
5.2.1 VirtueMart installation .................................................................................. 46
5.2.2 Application Scenario ..................................................................................... 50
6 Testing the Applications ............................................................................................... 54
6.1 System and Usability Testing ................................................................................... 54
6.2 The Test form ............................................................................................................ 55
7 Conclusion ......................................................................................................................... 56
7.1 Recommendation ...................................................................................................... 57
Bibliography .......................................................................................................................... 59
Appendices ............................................................................................................................. 65
Appendix A: Drupal Questionnaires .................................................................................... 65
Appendix B: Joomla Questionnaires .................................................................................... 66
Appendix C: System and Usability Test Form and Results ............................................... 68

List of Figures
Figure 3.1: Drupal‟s Technology Requirements. ................................................................ 15
Figure 3.2: Drupal‟s Structure ............................................................................................... 16
Figure 3.3: Wamp server download pop up. ....................................................................... 19
Figure 3.4: Wamp server Download security warning ....................................................... 19
Figure 3.5: Wampserver cone icon menu ............................................................................ 21
Figure 3.6: Drupal installation error page. ........................................................................... 22
Figure 3.7: Create “Page” content type ................................................................................ 25
Figure 3.8: Front page of the application sample, showing the created content has been
saved and published. ............................................................................................................... 26
Figure 3.9: Drupal 6 Core optional modules ....................................................................... 28
Figure 4.1: Joomla‟s structural architecture ......................................................................... 33
Figure 4.2: Joomla Web Installation ..................................................................................... 36
Figure 4.3: Joomla Installation Database Configuration ................................................... 36
Figure 5.1: Create Product Page ............................................................................................ 44
Figure 5.2: JM Coffee Capsules Catalogue showing table display of products, price of
each products and ability to add each product to cart. ...................................................... 45
Figure 5.3: Ubercart Cart Display ......................................................................................... 46
Figure 5.4: Joomla Administrative Logon Page .................................................................. 47
Figure 5.5: Joomla Control Panel, click on Install/Uninstall to install extension .......... 48
Figure 5.6: Extension Installation Page ................................................................................ 48
Figure 5.7: Joomla VirtueMart Welcome Page ................................................................... 49
Figure 5.8: Add Product wizard screenshot ........................................................................ 50
Figure 5.9: Product Catalogue Display ................................................................................. 51
Figure 5.10: Joomla‟s Payment Method ............................................................................... 52
Figure 5.11: Joomla‟s VirtueMart Cart Display ................................................................... 53
Acronyms and Meaning
API Application Programming Interface
CMS Content Management System
CSS Cascading style sheets
CRM Customer Relationship Management
GNU “GNU,s Not Unix!”
GNU GPL GNU General Public License
HTML Hypertext Markup Language
IIS Internet Information Services
JS Javascript
OOD Object Oriented Design
OS Open Source
SQL Structured Query Language
OSCMS Open Source Content Management System
OSI Open Source Initiative
OSS Open Source Software
PHP PHP:Hypertext Preprocessor
URL Uniform Resource Locator
XML Extensible Markup Language
XML-RPC XML for Remote Procedure Call
1
1 Introduction
Since the emergent and widespread of web browsers, organisations and
individuals have been using web applications to enhance their businesses and day
to day activities. The cost, availability, centralisation, compatibility and up-to-
date advantages of using web applications contributed to their usage and
popularity.
In addition, the existence of internet has contributed to the increase in different
applications on the web.
Web application refers to an application installed on a server accessed through
the internet or intranet with the aid of a web browser (Wikipedia, January 2010).
The use of content management systems for web applications development such
as portal, webshop, web bookings, weather report e.t.c. has been on the increase
over the past five years because cost reduction, easy to update advantages that
CMS website has over traditional HTML websites. Many web content
management systems application are evolving every year such as phpNuke,
wordPress, phpBB, mambo and so on.
This thesis focuses on how new person and experts in web application
development could get started with Drupal and Joomla for building different
web applications. A sample demonstration of webshop application for both
Drupal and Joomla will be provided.
Furthermore, this thesis will also demonstrate and analyse how to add different
functionalities and features to a Drupal and Joomla web applications by utilising
the knowledge of PHP, MySQL, CSS, Javascript, Jquery, and possibly Ajax.

2
This thesis will last for about 4 months, which contains 400 working hours. This
thesis has 4 main parts, which are; CMS, OS, Drupal and Joomla, and a Sample
application part.
Chapter 2 of this thesis focuses on method through which sources and
information are gathered. The utilisation of the datas are also discused in the
second chapter.
Chapter 3 comprises content management systems, its meaning, types and the
reasons why it‟s necessary to use a CMS for processing contents. It also talks
about the emerging software technology in the computing world.
Chapter 4 and 5 discuss the main focus of this thesis, Drupal and Joomla. It
contains everything that is needed to start developing web applications with
Drupal and Joomla. Also, chapter 4 and 5 are useful for anyone who had
developed web applications with Drupal and Joomla before and just need to
modify it.
In chapter 6, there are explanations and screenshots of a sample webshop
developed with Drupal and Joomla.
Chapter 7 contains testing procedures and results for the webshop sample
application built using Drupal and Joomla.
The final chapter of this thesis is the conclusion, which contains summary of the
findings about Drupal and Joomla, experences about CMS softwares and
suggestions for further findings.
3
1.1 Research methodology
This basically describes the procedure used in this thesis. It explains the research
method, method of collecting data, analysis and result of collected data, and the se-
lected organisation used for this research. It also shed light on peoples‟ experience on
this thesis topic.
Research methodology is a process used for making observation, gathering evidence
and data, and obtaining information through a research work or study in ones area of
practise (Kumar, 2011).
1.2 Research method used
This thesis will be base on qualitative research that involves using action method as the
research method. This method involves interviews, observation, and documents and
literature analysis (Fisher, 2007, p.166). This method also includes a case study work.
1.3 Organisations used
This thesis work was chosen due to the widespread usage of content management sys-
tems and open source softwares both in big and small organisation. Another reason for
chosen this thesis topic was because application developers think CMS softwares
wouldn‟t contribute to ones knowledge in the area of web application, rather it is a
complete work of someone.
This research work was carried out in two different companies in different countries,
Finland and Canada, though both companies are into ICT developments.
Activeark Oy and Braindigit IT solutions are the two companies used for carrying out
the interviews.
1.4 Data collection
According to Verkevisser et al, data collection gives a research worker the system of collecting
information on a subject under study such as people, objects and phenomena and the particu-
lar settings which the events occur (Verkevisser et al. 2003, p.380).

4
There are different methods of data collection, but interview and questionnaire are
those used in this thesis.
1.5 Questionnaire
Questionnaire is a way of gathering data from people in a particular area with the aim
of getting scholarly opinions and ideas. Questionnaire is a convenient and easy
method of data collection. It reduces cost and energy, and it usually gives adequate
information for analysing the goal of the research work (HH CnM, 2010.)
The questionnaire used in this thesis is a structured one which involves predefined
questions. The questionnaires were distributed through the Drupal and Joomla com-
munity site. The Drupal and Joomla community sites have experts from different
countries and they contribute and experiences about Drupal and Joomla developments
and usage.
Response has been gotten from about 10-15 respondents. The result and questionnaire
will be presented in the appendix.
1.5.1 Questionnaire result analysis
This analysis covers both Drupal and Joomla CMS questionnaire.
Background
Individual respondents have used one or two content management systems such as
e107, Drupal, DotNetNuke (dnn), Joomla, and WordPress. Also, 99 percent of the
respondents are web developers.
CMS used and why current one
The respondents have experience with the following CMS software: e107, Drupal,
DotNetNuke (dnn), Joomla, and WordPress. According to the respondents, they
choose their current CMS software because of its flexibility, extensibility and because it
is open source.
How to add features and tools needed (languages)
You could add features and functionality to Drupal and Joomla via modules, themes,
components, and blocks. You need knowledge of JavaScript and its derivatives to op-
5
timise pageload and speed, PHP for module customisation and block, MySQL for the
improving data storage, XML etc.
Supports available
The average support availability given by the respondents for their chosen CMS soft-
ware is 8 out of 10.
1.6 Interview
Interview is an exchange of questions and answers between persons with common
goals or interest. The interview used in this thesis is called a structured interview,
which involves pre-prepared questionnaires and verbal presentation of the questions
(HH CnM, 2010.) The same questions were used for both the questionnaire and inter-
view methods. Out of the two organisations interviewed, one deals with Drupal and
the other with Joomla.
1.6.1 Interview result analysis
1.6.2 Activeark Oy
Respondent: Quang Pham
Company Background
Activeark is a full-service agency built for today's digital society. Activeark has 70 de-
sign-driven digital professionals located in three locations around the world; London,
Mumbai and it Headquarters in Helsinki. It has developed different applications for
Nokia Siemens, Marimekko, sipooranta, Koskinen, Finnmatkat, Hartwall, Jaffa e.t.c.
CMS used and why current one
We use CMS because CMS offers different functionalities to organize the whole
of your site. It gives you options and easy ways to organize the content than
making everything from the scratch. The main important thing is that CMS
makes everything works in normal and correct flow in an organized manner. We
make use of Drupal in our company and it has contributed to our efficiency
with good results. Mr. Quang also said they choose Drupal because of its exten-
6
sibility, flexibility and supports for other technologies like; Google map API,
Flash, and so on. (Quang, 2011)
How to add features and tools needed (languages)
You can add features to Drupal through its modules and themes, which also in-
volves making “hooks” (Quang, 2011)
According to Mr. Quang, PHP, SQL, and JAVASCRIPT & its derivatives could
be used for adding functionalities to Drupal.
Supports availability
There are many supports for Drupal in different sections and I can give Drupal support 80%.
1.6.3 Braindigit IT Solutions
Respondent: Narayan Koirala
Company Background
Brain digit has been established with a vision to provide affordable and unique ICT
services to all business, government and social communities round the world.
Braindigit has its development center in Kathmandu, Nepal; head office is in Ontario,
Canada and has equipped her offices with latest hardware and network facilities.
Braindigit uses latest software and tools to develop customized web application and
software application for her clients.
“It helps business communities to digitalize their business process, that‟s why we have
named ourselves as “Brain digit”. By this we mean think digital and then go digital.”
(Narayan, 2011)
CMS used and why current one
“At Braindigit, we currently use Joomla because it is powerful and highly extensible. I
have tested and used other CMS software like Drupal, dnn, and WordPress”. (Narayan,
2011)
How to add features and tools needed (languages)
7
If you have to add feature to core, build a plugins, if you are not satisfied with
the design then customize the template you have, or for design you can make
your own custom view, and for other make components or modules as per your
need. PHP, JavaScript (Jquery, mootools etc), XML, CSS (not really a program-
ming language). (Narayan, 2011)
Supports availability
“I will give Joomla 100% because it has an elaborate and organized wide range of sup-
ports through the Joomla community and other platforms”. (Narayan, 2011)
8
2 CMS
2.1 Introduction
Not everyone knows how to write HTML, PHP, JavaScript, Mysql codes, for putting
up and updating information on the web. Industries today, want to advertise their
businesses for improved communication, E-commerce and information without going
through any hassle or difficulty.
Importantly, organisations want to publish and update contents to the web without the
need to know about any software than the web browser. Also, individuals want to
share ideas, store reference list of URLs, snippets of technology configuration details,
web logs, list of upcoming events and appointments, and their thoughts without bor-
dering with any technical details (Simpson, 2005.)
The best solution to these needs of organisations and individuals is content manage-
ment systems. Delgado describes CMS as everything from portals, e-commerce to
blogs and wikis (Delgado, 2007).
“A Content Management System (CMS) can be defined as a database of information
and a way to change and display that information, without spending a lot of time deal-
ing with the technical details of presentation” (Simpson, 2005.)
A content management system provides anyone without the knowledge of HTML,
PHP, Javascript, and Mysql the ability to manage, update, upload and delete contents
from a website without the proficiency or advice of a web developer (Robertson, 2003).
In addition, according to Altarawneh & El Sheikh (2008), “Web based projects are; 79
percent of information technology projects are delayed with respect to time, 84 percent
fails to meet business requirement, and 63 percents exceeds budgets”.
With all these problems encountered in web based projects, the best solution to these
problems could be a CMS. As CMS does not need writing HTML codes from scratch
thereby reducing the time spend in web based project development. CMS also gives a

9
way of organizing web based development in a continuous flow manner; this will en-
sure web based projects development to meet its business purpose.
With a content management system, a web page developed by a web developer could
be updated by any member of an organisation or any individuals. This without doubt
ensure continuous flow of work and increase efficiency in a company. For instance, A
company employs a web developer that develops the company‟s website, after some
time the web developer was fired or got a new job and decided to join the new
company. Then the former company wants to update or remove some information on
their website, instead of hiring a new web developer, since the website was developed
with a content management system any member of the company with permision could
update the information on the website.
2.2 Definition
A content management system is software that enhances the initiation or foundation,
formation, manipulation, and elimination of information in the form of images, docu-
ments, scripts, and plain text (Mercer, 2010).
“The CMS increases overall operational efficiency through the automation of custo-
mized content processing via rules management interface and extensible workflow”
(Ericsson highlights watchpoint CMS, April 2010.)
“Content management system is a standardized and organized process of supply, crea-
tion, processing, management, presentation, processing, publication and reuse of con-
tent” (Rothfuss, 2001.)
Content management systems render organizations and individuals the skill to develop
and organize enterprise information for all its web needs such as Internet portals, e-
business applications, intranets and extranets (Durham, 2004. p 3).
Bradford Lee, 2006 describes CMS as a way of managing large numbers of web-based
information that are more than coding all of the information into each page in HTML
by hand (Bradford Lee, 2006. p 5).
10
A content management system (CMS) is a computer application used to create,
edit, manage, and publish content in a consistently organized fashion. CMSs are
frequently used for storing, controlling, versioning, and publishing industry-
specific documentation such as news articles, operators' manuals, technical ma-
nuals, sales guides, and marketing brochures. The content managed may include
computer files, image media, audio files, video files, electronic documents, and
Web content (The Open Source Collective, Inc., 2002.)
CMSs have been defined by different authors, individuals, organisations and so on.
These definitions represent the opinion of individuals or organisations, and have been
based on their own experiences using CMS.
A general definition of content management system is that, a CMS is a facility that is
used to handle the content of a website.
In conclusion, base on the preceding discussion it can be inferred that CMS provides
multiple functionalities with capability to manage the contents of a site. With such
functionalities, CMS provides avenue for easy and well organized contents arranged in
a proper flow rather than developing the site contents from the scratch.
2.3 Classification of CMS
In an attempt to classify CMS, it could be classified based on two different criteria
which are either Functionality or License. Classification based on functionality reveals
what the CMS is used for and which sector or platform it is being used.
Enterprise CMS, Web CMS, and Component CMS are the 3 categories of CMS based
on functionality. Classification of CMS based on functionality is not the main focus of
this thesis but a brief description will be provided.
Enterprise CMS abbreviated as ECM, ECM is used by organisations for managing, or-
ganizing and sharing their large contents. These contents could be images, text, files etc.
ECM system usually includes many template website in their package. E.g. IBM Lotus,
Alfresco, SharePoint, RedDot e.t.c.

11
Component CMS abbreviated as CCM, could be taught of as a CMS used for contents
constituent or part stored for later use.
Web CMS is a CMS that involves the use of Markup languages for publicising, creat-
ing, storing and sending contents onto the World Wide Web.
Web Content management systems could be categorise into 2 based on the license,
which are proprietary CMS and open source CMS. This category also forms the license
categorisation of CMS.
Proprietary CMS is a commercial CMS used by organisations and it usually comes with
price value. E.g. Microsoft DotNetNuke- also available as open source CMS.
Open Source CMS should be explained in details because the focus of this thesis is
base on OSCMS. Therefore, the next subtitle will be dedicated to OSCMS.
2.3.1 Open Source CMS
Open Source is not a new technology; it literarily means source code availability.
Though, the word open source encompasses many other rights. According to the
Open Source Initiative (OSI. 2011), before software would be considered an OS, it
must meet the following criteria:
- Free Redistribution
The license shall not restrict any party from selling or giving away the software as a
component of an aggregate software distribution containing programs from several
different sources. The license shall not require a royalty or other fee for such sale.
- Source Code
The program must include source code, and must allow distribution in source code as
well as compiled form. Where some form of a product is not distributed with source
code, there must be a well-publicized means of obtaining the source code for no more
than a reasonable reproduction cost preferably, downloading via the Internet without
charge. The source code must be the preferred form in which a programmer would
modify the program. Deliberately obfuscated source code is not allowed. Intermediate
forms such as the output of a preprocessor or translator are not allowed.
- Derived Works

12
The license must allow modifications and derived works, and must allow them to be
distributed under the same terms as the license of the original software.
- Integrity of The Author's Source Code
The license may restrict source-code from being distributed in modified form only if
the license allows the distribution of "patch files" with the source code for the pur-
pose of modifying the program at build time. The license must explicitly permit dis-
tribution of software built from modified source code. The license may require de-
rived works to carry a different name or version number from the original software.
- No Discrimination Against Persons or Groups
The license must not discriminate against any person or group of persons.
- No Discrimination Against Fields of Endeavor
The license must not restrict anyone from making use of the program in a specific field
of endeavor. For example, it may not restrict the program from being used in a busi-
ness, or from being used for genetic research.
- Distribution of License
The rights attached to the program must apply to all to whom the program is redistri-
buted without the need for execution of an additional license by those parties.
- License Must Not Be Specific to a Product
The rights attached to the program must not depend on the program's being part of a
particular software distribution. If the program is extracted from that distribution and
used or distributed within the terms of the program's license, all parties to whom the
program is redistributed should have the same rights as those that are granted in con-
junction with the original software distribution.
- License Must Not Restrict Other Software
The license must not place restrictions on other software that is distributed along with
the licensed software. For example, the license must not insist that all other programs
distributed on the same medium must be open-source software.
- License Must Be Technology-Neutral
No provision of the license may be predicated on any individual technology or style
of interface (OSI, 2011.)
Making source codes available means the public could contribute to a software com-
pletion thus making software open to community of developers who could share their
knowledge and could also customize the software to suit their needs. OS softwares
come with many different licenses, those that are used with Drupal and Joomla will be
discussed in later chapters.
13
OSCMS means a CMS that has the criteria of an open source. That is, OSCMS is a
CMS that has its source code available for use or alteration by users or other developer
community, as they like.
In addition, it is possible to play around OSCMS software source code and develop
any type of derived product that would suits your own purpose.

14
3 Drupal
3.1 Introduction
Drupal is one of the 10 most popular and highly rated OSCMS.(WebDevNews, 2008)
It became open source software in 2001, when the source code was released to the
public by Dries Buytaert, the original creator and project lead of Drupal. Drupal.org is
the official web site for Drupal. It offers consistent and thorough support about Dru-
pal, and it contains well structured, agile community of developers and users who con-
tribute towards further Drupal development and security on a daily basis.
Drupal is used to build different web applications ranging from community portal
sites, business community sites, news publishing, aficionado sites, corporate web sites,
international sites to e-commerce web sites.(Drupal, 2002) It is easy to use, and has so
many modules and libraries. Web applications developed with Drupal are reliable, ro-
bust, efficient, extensible and flexible.
Drupal being OS software, comes under the restrictive General Public Licence GPL.
This license gives the freedom to share and modify any part of Drupal source code. It
is not possible to make proprietary software from Drupal. That is, if you modify any
part of a Drupal source code and build software from it in order to make money, then
you must provide the source code of the software to anyone who requests for it and
distribute the software under the GPL license. (Mercer, 2010.)
Drupal is written in at least six different programming languages: PHP, SQL, HTML,
CSS, XML, and JAVASCRIPT. (Butcher, 2009) Drupal also uses the open source da-
tabases: MYSQL and PostgreSQL for storing contents and settings. It is multiplatform
software that runs on different platforms such as Windows, Mac OS X and Linux.
Presently, current version of Drupal is Drupal 7.xx which is characterized with a better
administrative interface over previous versions but lack some modules and supports.
Due to the fact that some features are missing or not yet presented in Drupal 7.xx, a
previous version Drupal 6.xx was selected for this thesis work.
15
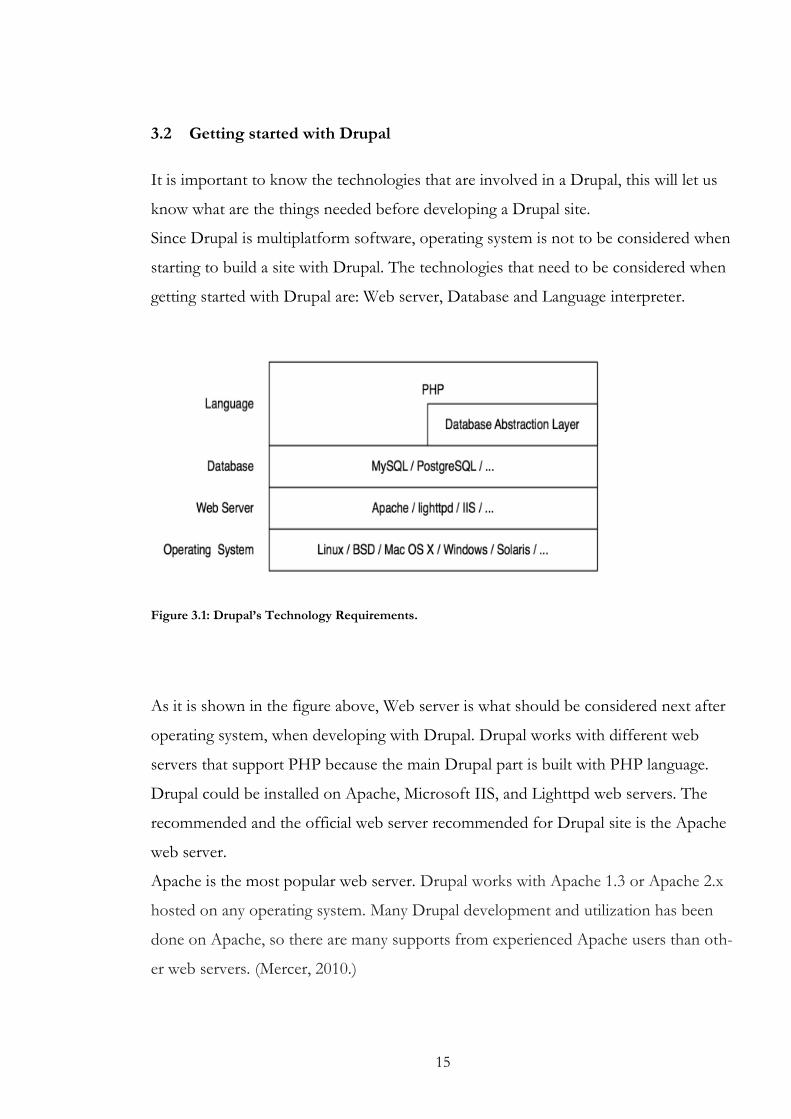
3.2 Getting started with Drupal
It is important to know the technologies that are involved in a Drupal, this will let us
know what are the things needed before developing a Drupal site.
Since Drupal is multiplatform software, operating system is not to be considered when
starting to build a site with Drupal. The technologies that need to be considered when
getting started with Drupal are: Web server, Database and Language interpreter.
As it is shown in the figure above, Web server is what should be considered next after
operating system, when developing with Drupal. Drupal works with different web
servers that support PHP because the main Drupal part is built with PHP language.
Drupal could be installed on Apache, Microsoft IIS, and Lighttpd web servers. The
recommended and the official web server recommended for Drupal site is the Apache
web server.
Apache is the most popular web server. Drupal works with Apache 1.3 or Apache 2.x
hosted on any operating system. Many Drupal development and utilization has been
done on Apache, so there are many supports from experienced Apache users than oth-
er web servers. (Mercer, 2010.)
Figure 3.1: Drupal’s Technology Requirements.
16
The next technology that is needed for getting started with Drupal is the database.
MySQL and PostgreSQL have been used with Drupal but MySQL is recommended
due to the availability of support from other users.
MySQL is a popular open source database engine that works with all platforms, though
each platform has its unique installation guide. Drupal 6 version works with MySQL
4.1 or higher. MySQL will be used to store all the site information.
The last technology is PHP interpreter. PHP is the language of Drupal; it has Object
Oriented Design (OOD) framework. It is used with many open source softwares on
the web. PHP 4.4.0 or higher is the version that can be used with Drupal 6.
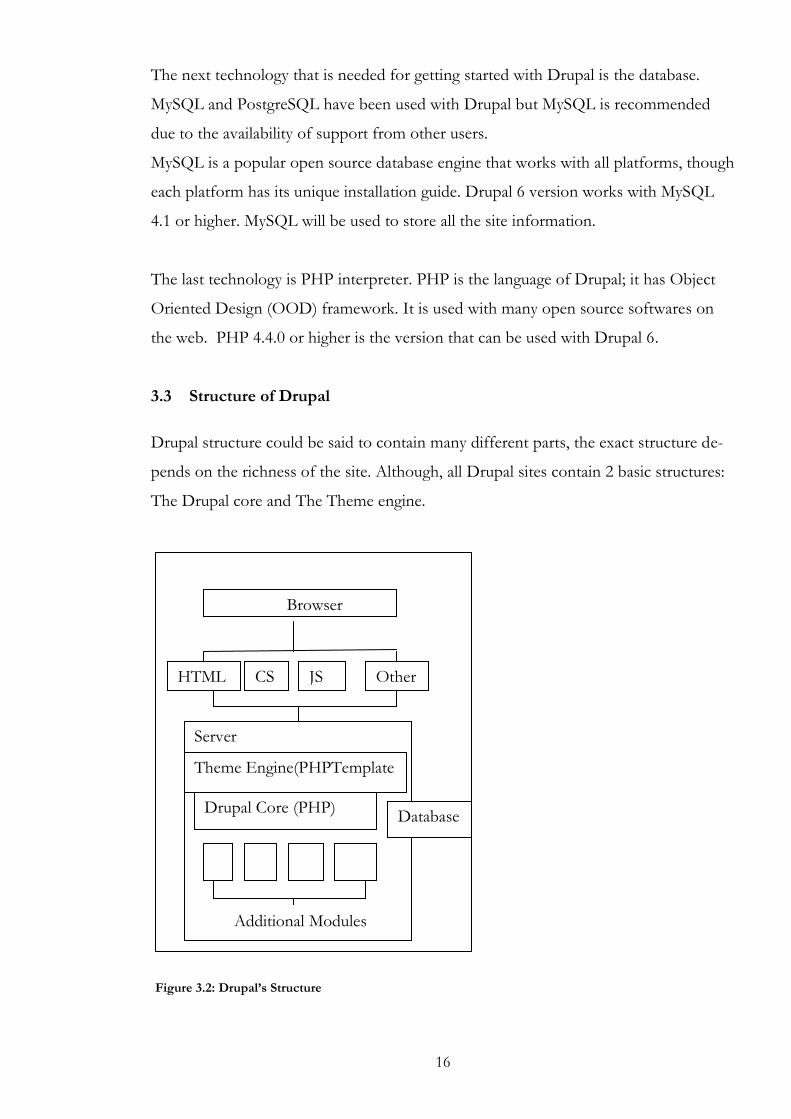
3.3 Structure of Drupal
Drupal structure could be said to contain many different parts, the exact structure de-
pends on the richness of the site. Although, all Drupal sites contain 2 basic structures:
The Drupal core and The Theme engine.
Browser
HTML CS
S
JS Other
Server
Theme Engine(PHPTemplate
Drupal Core (PHP) Database
Additional Modules
Figure 3.2: Drupal’s Structure

17
The Drupal core is the drupal folder that is downloaded from the drupal.org, and it is
the heart of Drupal. The Drupal core provides main functionality to be used by other
parts of Drupal system. It contains: codes that assist the Drupal system to respond
when it takes a request, libraries for running Drupal, and Core modules-modules that
provides basic functionalities for Drupal system. Drupal core takes data from
contributed modules, custom modules, core modules, and database and hand them
over to the theme engine.
The Theme engine is responsible for receiving the data from the Drupal core and
rendered them for display in the web browser. That is, Drupal uses PHPTemplate-a
theme engine, for formatting and to layout HTML, CSS, and XML for display in the
browser. There are many theme engines such as Smarty, XTemplate, PHPTemplate,
and PHPTal. Drupal makes use of PHPTemplate as its theme engine (VanDyk, 2008.)
The Contributed modules and themes are the modules and themes developed or put
up and maintained by the Drupal community. Any individuals with Drupal
development interest can be part of the Drupal community.
The Custom modules and themes are implemented or developed, and customized by
individual Drupal site developer. This is usually done when a drupal site developer
couldn‟t find a suitable module or theme for his/her site need.
The Hook is an act or process through which the Drupal core interact with the
contibuted modules, and custom modules. This is the most common way to enhance
the Drupal core functionalities (VanDyk, 2008 p. 5).
3.4 Drupal installation
As it has been said earlier, web server (Apache), MySQL, and PHP are needed for
building a Drupal site. Different operating sytems have different local web servers that
incorporate these 3 technologies. So, it is only required to download and install the
web server as it already contains Apache, MySQL, and PHP. Otherwise, one needs to
18
download and install the three technologies one by one and then connect them
together.
There are 2 different ways through which Drupal could be installed:
1- Web installation
2- Command line installation
Web installation is usually good for individuals who are not used to Drupal and don‟t
know how to use the UNIX/Linux commands.
Command line installation is mostly used by drupal developers and individuals with
UNIX/Linux commands knowledge. It is used on a UNIX computer.
3.4.1 Web Installation of Drupal
For installing Drupal through the web, I will be describing the process on both Win-
dows and UNIX machine (Mac and Linux). Web installation can either takes place on a
local host or on a production server. The processes of installing Drupal on local host
and on production server are similar but some web hosting organizations provide
"one-click" installations of Drupal via a third party application on their production
server. E.g. The Fantastico application used by Green Geeks Web hosting (Drupal
guide, 2011).
For installations on Windows, there are many web servers that have the 3 Drupal tech-
nologies (Server, MySQL, PHP) included in them; examples include XAMPP, and
WAMP. In this thesis, WAMP server will be employed.
WAMP (Windows Apache MySQL and PHP) server is a free and open source web
development environment that allows the creation of web application on Windows.
WAMP server could be downloaded from
http://www.wampserver.com/en/download.php, the server official web page. It con-
tains a database engine for managing and storing data.
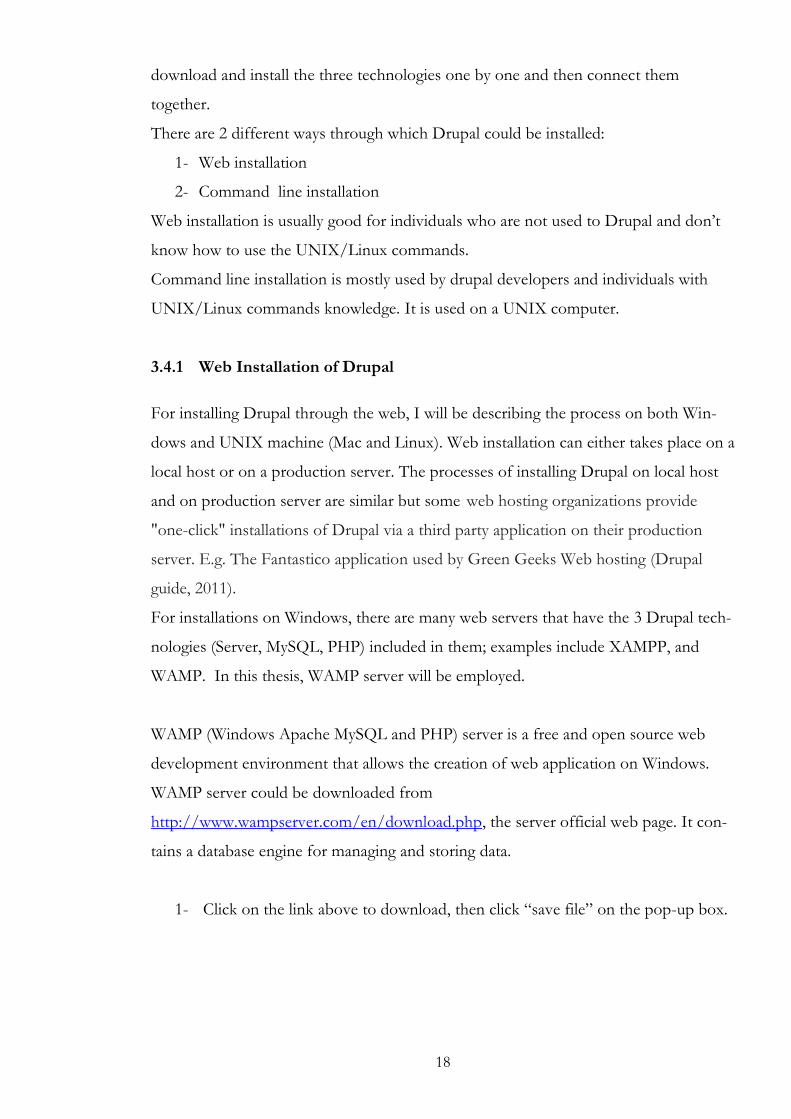
1- Click on the link above to download, then click “save file” on the pop-up box.
19
Figure 3.3: Wamp server download pop up.
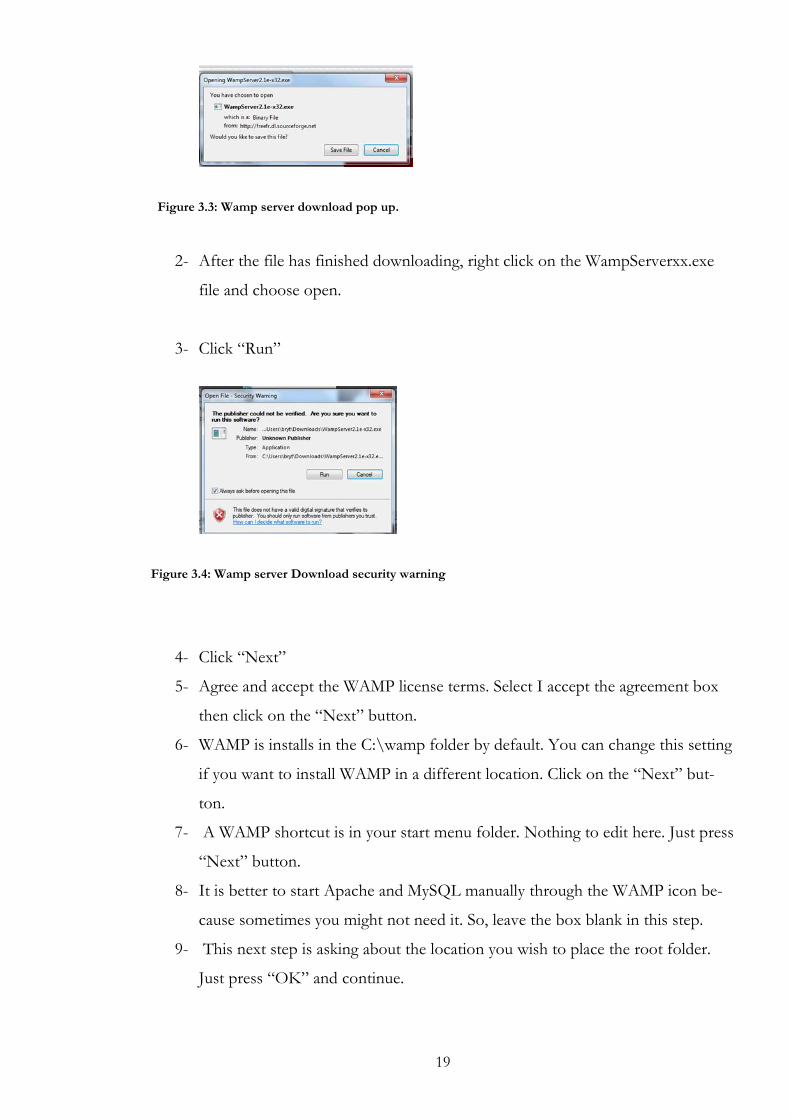
2- After the file has finished downloading, right click on the WampServerxx.exe
file and choose open.
3- Click “Run”
Figure 3.4: Wamp server Download security warning
4- Click “Next”
5- Agree and accept the WAMP license terms. Select I accept the agreement box
then click on the “Next” button.
6- WAMP is installs in the C:\wamp folder by default. You can change this setting
if you want to install WAMP in a different location. Click on the “Next” but-
ton.
7- A WAMP shortcut is in your start menu folder. Nothing to edit here. Just press
“Next” button.
8- It is better to start Apache and MySQL manually through the WAMP icon be-
cause sometimes you might not need it. So, leave the box blank in this step.
9- This next step is asking about the location you wish to place the root folder.
Just press “OK” and continue.

20
10- It is not advisable to configure SMTP and mail server on a localhost because it
requires great technical knowledge, so skip the next 2 prompts.
11- This step is just asking if you want FireFox to be the default web browser to use
with WAMP if you have it installed, instead of Internet Explorer. Click “Yes”
to set FireFox as your default web browser for WAMP, otherwise press „no‟ to
leave Internet Explorer as your WAMP default web browser.
12- Click “Yes” in this step because you are installing WAMP for the first time.
13- Successfully, WAMP has now been installing on your computer. If you don‟t
want to start WAMP now, uncheck the box and press the finish „button.
Double click the “Start WAMP” icon in the WAMP menu from the start menu on
your computer to start WAMP. WAMP has a tray icon located in the bottom right
corner of your screen. You can tell if there are any problems running any of the servers
by the color of the icon.
After the WAMP server has finished installing and started, a cone-like shape will ap-
pear in the taskbar notification area of your computer, with white colour. If half of the
cone shape is red, it means you‟ve not started the WAMP server, if after you‟ve started
the server the cone shaped icon shows half yellow colour, it means there are some ser-
vices conflicting with the WAMP server. Close any VoIP software on your computer
like Skype.
There are two ways to access the applications you have created on WAMP. The first
way is to use the WAMP tray icon menu and select “Localhost”. The default WAMP
web browser will start and open the default WAMP home page. The second way to
access your website is to start your web browser and type “Localhost” which will also
open WAMP home page.
After installing the web server, it‟s now time to install Drupal on the server. The fol-
lowing steps show how to install Drupal on both local host and production server:
Step by step installation of Drupal
Before starting the installation, it is necessary to create the installation database that
will be used to store data for the web application.
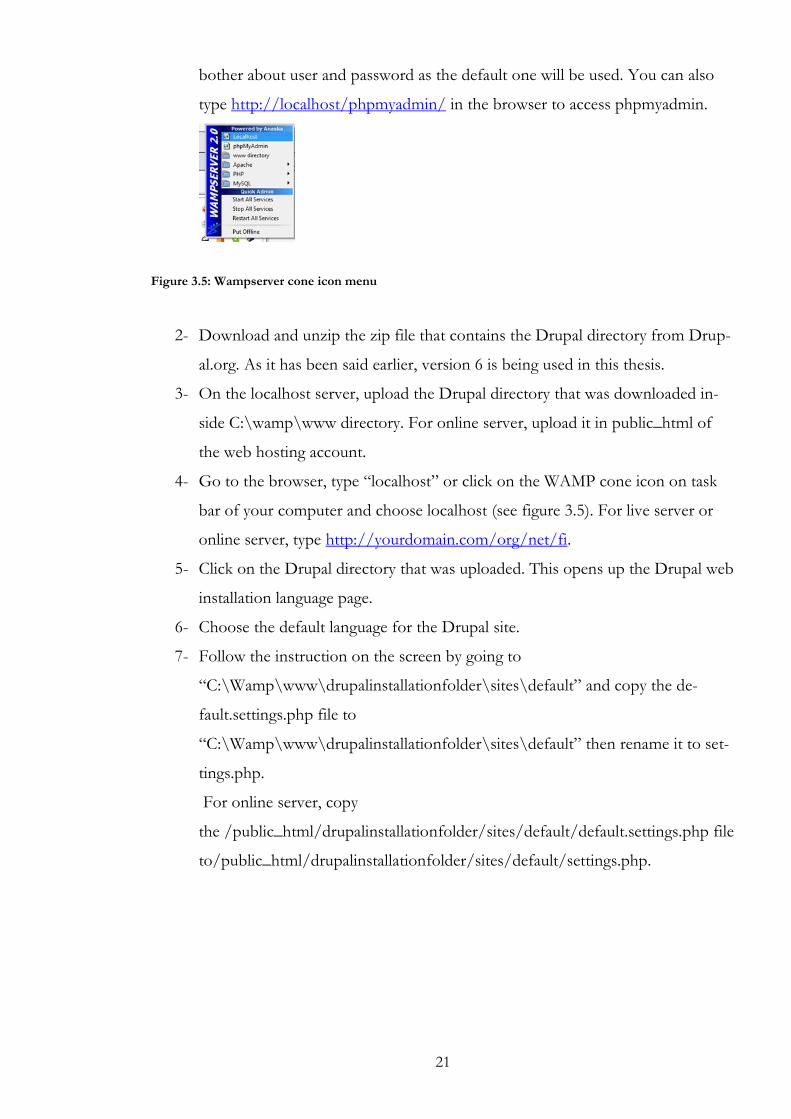
1- First click on the WAMP cone icon and select phpmyadmin or through CPanel
on a production server. Create a database for the Drupal installation; don‟t
21
bother about user and password as the default one will be used. You can also
type http://localhost/phpmyadmin/ in the browser to access phpmyadmin.
Figure 3.5: Wampserver cone icon menu
2- Download and unzip the zip file that contains the Drupal directory from Drup-
al.org. As it has been said earlier, version 6 is being used in this thesis.
3- On the localhost server, upload the Drupal directory that was downloaded in-
side C:\wamp\www directory. For online server, upload it in public_html of
the web hosting account.
4- Go to the browser, type “localhost” or click on the WAMP cone icon on task
bar of your computer and choose localhost (see figure 3.5). For live server or
online server, type http://yourdomain.com/org/net/fi.
5- Click on the Drupal directory that was uploaded. This opens up the Drupal web
installation language page.
6- Choose the default language for the Drupal site.
7- Follow the instruction on the screen by going to
“C:\Wamp\www\drupalinstallationfolder\sites\default” and copy the de-
fault.settings.php file to
“C:\Wamp\www\drupalinstallationfolder\sites\default” then rename it to set-
tings.php.
For online server, copy
the /public_html/drupalinstallationfolder/sites/default/default.settings.php file
to/public_html/drupalinstallationfolder/sites/default/settings.php.
22
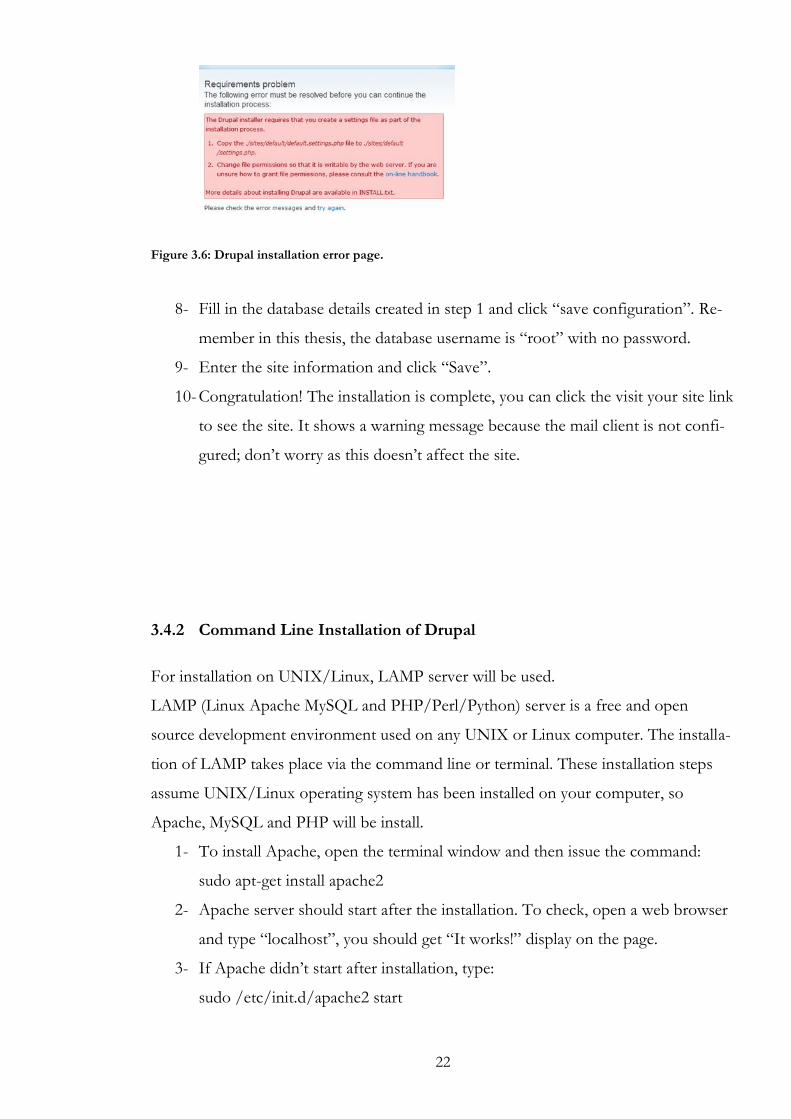
Figure 3.6: Drupal installation error page.
8- Fill in the database details created in step 1 and click “save configuration”. Re-
member in this thesis, the database username is “root” with no password.
9- Enter the site information and click “Save”.
10- Congratulation! The installation is complete, you can click the visit your site link
to see the site. It shows a warning message because the mail client is not confi-
gured; don‟t worry as this doesn‟t affect the site.
3.4.2 Command Line Installation of Drupal
For installation on UNIX/Linux, LAMP server will be used.
LAMP (Linux Apache MySQL and PHP/Perl/Python) server is a free and open
source development environment used on any UNIX or Linux computer. The installa-
tion of LAMP takes place via the command line or terminal. These installation steps
assume UNIX/Linux operating system has been installed on your computer, so
Apache, MySQL and PHP will be install.
1- To install Apache, open the terminal window and then issue the command:
sudo apt-get install apache2
2- Apache server should start after the installation. To check, open a web browser
and type “localhost”, you should get “It works!” display on the page.
3- If Apache didn‟t start after installation, type:
sudo /etc/init.d/apache2 start

23
command in the terminal to start Apache manually.
4- For PHP installation, type:
sudo apt-get install php5 libapache2-mod-php5
in the terminal. Then after installation,
5- Restart apache with the command:
sudo /etc/init.d/apache2 restart
6- For MySQL installation, only the server is needed, then configuration inside the
server.
Type: sudo apt-get install mysql-server
Now, issue the command: “mysql –u root –p” to log into mysql server.
Click “enter”
Issue the command “SET PASSWORD FOR „root‟@'localhost‟ = PASS-
WORD („YOURPASSWORD‟); “.
NB: YOURPASSWORD is the password you want to choose for the MySQL
administrative user.
Enter “quit” to exit the MySQL prompt. Then type: “sudo /etc/init.d/mysql
start” to start MySQL.
Step by step installation of Drupal via command line
There are four main steps to do for installing Drupal through command line. They are:
Downloading and extracting the Drupal file, creating the configuration file and grant-
ing permissions, creating the Drupal database, and running the installation scripts.
Breaking the steps down, consists;
1- Open the terminal and type
“wget http://drupal.org/files/projects/drupal-x.x.tar.gz
tar –zxvf Drupal-x.x.tar.gz” to download and extract the Drupal zip file.
2- Then move the file to the web server folder with the command
“mv Drupal-6.20 /var/www/”

24
3- Copy the default.settings.php file that is in the sites/default folder of the Drupal
directory and rename the default.settings.php file to settings.php with the com-
mand “cp sites/default/default.settings.php sites/default/settings.php”
4- Grant write privilege to the web server for the configuration file and
sites/default directory with the commands
“chmod a+w sites/default/settings.php” and “ chmod a+w sites/default”
5- Create the Drupal database and user with “mysqladmin –u root –p create dru-
pal” command.
NB “root” is the username while “drupal” is the database name.
6- Log into the MySQL server to set the database rights.
Enter “mysql –u root –p”
Then enter “GRANT SELECT, UPDATE, DELETE, INSERT, ALTER,
CREATE, DROP, INDEX, CREATE TEMPORARY TABLES, LOCK TA-
BLES ON drupal.* TO „root‟@‟localhost‟ IDENTIFIED BY „password‟” to
the prompt.
NB “localhost” is the server name for the mysql, you could replace it with your
web hosting server name if you are using online server. “Password” is the pass-
word for the username “root”.
7- If this query is successful, mysql respond with “Query OK, 0 rows affected”.
8- Run the installation script by opening your browser and type: “local-
host/drupal” for local server and “yourdomainname.com/drupal” for online
server.
9- Follow the installation wizard on the screen to complete the Drupal installation
via command line and start using the Drupal website.

25
3.5 Creating site contents in Drupal
There are different types of contents in Drupal called content types. Content types can
be created or deleted. Each content type depends on the idea of the content or what
the content really does. Content can be created and updated by anyone logged in as
the administrator or any users with create content privilege/role.
Create content in Drupal by following the steps below:
1- Click on the “Create content” link on the navigation menu or from the adminis-
trator menu (If the administrator menu module is installed).
2- Select the type of content to be created (Content type)
3- Fill the content form and Save. By creating content, a menu link to the content
could also be created. In the content display section of the form, select “pub-
lish”.
Figure 3.7: Create “Page” content type
4- “Page” content type usually appears in the site front page. Go to the front page
to see the content.
26
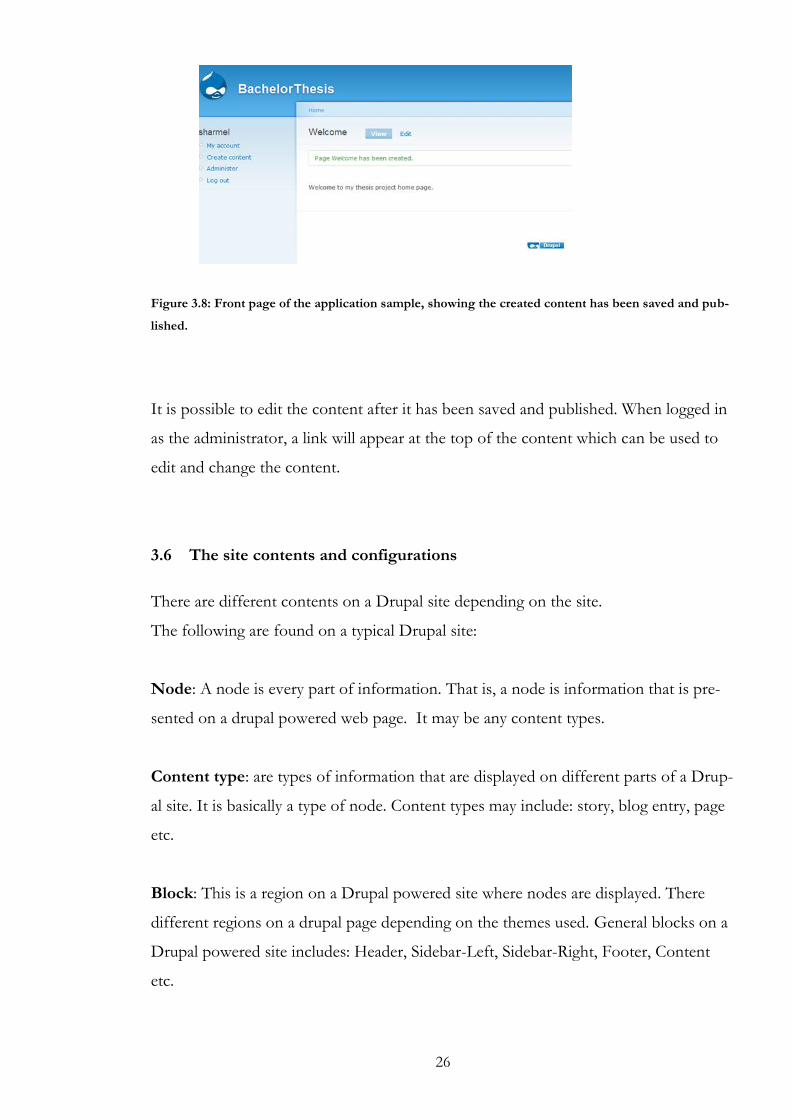
Figure 3.8: Front page of the application sample, showing the created content has been saved and pub-
lished.
It is possible to edit the content after it has been saved and published. When logged in
as the administrator, a link will appear at the top of the content which can be used to
edit and change the content.
3.6 The site contents and configurations
There are different contents on a Drupal site depending on the site.
The following are found on a typical Drupal site:
Node: A node is every part of information. That is, a node is information that is pre-
sented on a drupal powered web page. It may be any content types.
Content type: are types of information that are displayed on different parts of a Drup-
al site. It is basically a type of node. Content types may include: story, blog entry, page
etc.
Block: This is a region on a Drupal powered site where nodes are displayed. There
different regions on a drupal page depending on the themes used. General blocks on a
Drupal powered site includes: Header, Sidebar-Left, Sidebar-Right, Footer, Content
etc.

27
Menu: are links used to explore different part of a Drupal powered site. They include:
navigation menu, primary menu, secondary menu, Jquery dropdown menu etc.
Comment: is a piece of information that is attached to a node. It is not in many drupal
powered sites because it involves security risks if it isn‟t configuring properly.
In addition, after installing drupal, it is necessary to configure the site. Changing the
favicon, site name, configuring the search result, adding mission statement to the site
are all that could be configure before starting to use the website. These could be done
by navigating to Administer>site configuration>site information.
3.7 Improving site contents functionality
According to the Drupal structure (Figure 3.2), it shows that Drupal provides four dif-
ferent ways of improving the content of a site. These four ways are all based on the
Modules and the Themes. Functionalities are included in modules and themes.
“Drupal itself doesn‟t try to provide every possible feature that a web site might need.
Instead, it provides common and important features and then it provides a mechanism
for plugging in additional functionalities” (Butcher, 2009.)
It is possible to add functionalities to Drupal web site by enabling existing modules and
themes, installing modules developed by others, customising existing modules and
themes, and by developing new modules and themes yourself (VanDyk, 2008).
3.7.1 Drupal Modules
Drupal being a modular system contains many categories of modules. The modules
that are contained in the Drupal core are called Core modules. Core modules are fur-
ther divided into Core required and Core optional modules. The core required mod-
ules cannot be disabled, they are require by the Drupal core for it functionality. These
modules are: Filter, Node, User, System, and Block module.

28
The core optional modules can be enabled and disabled; they can also be customising
to add more functionality to a Drupal site. Some of these modules include: Aggregator,
Blog, Content translation, Open ID, Help, Locale, Menu e.t.c.
Figure 3.9: Drupal 6 Core optional modules
Contributed modules are later added to Drupal sites, they are not part of the drupal
core. Contributed modules allow the site developer to extend, create, and manage
Drupal‟s core functionality. These types of modules are developed and managed by the
Drupal community and are available for download from the Drupal module page:
http://drupal.org/project/modules.
3.7.2 Module installation
Installing a module is the same as when installing a theme but enabling a module and
theme are two different ways.
1- First, go to http://drupal.org/project/modules search and download the mod-
ule. Be sure of the version of the module that is compatible with the drupal in-
stallation.
29
2- Extract the downloaded zip file to a location on your computer. The directory
inside the zip file contains a folder with the module name and version.
3- Create a directory inside drupalinstallationfolder/sites/all/ and name it “mod-
ules”. So you have drupalinstallationfolder/sites/all/modules.
4- Copy the extracted module directory in step 2 to drupalinstallationfold-
er/sites/all/modules.
The module has been installed successfully. After installing the module, it is of no use
until it is enable.
Go to Administer >site building >modules, and check the “Enabled” box that is be-
side the module just installed. Then scroll down and click “save configuration”
After enabling the module, some modules require setting access control or permission
before they can be used. For setting who can access the module, go to Administer>
user management>permission. Locate the module and enable the role that should
access it.
3.7.3 Creating and customizing modules
Drupal being a modular CMS, has the advantage of creating new modules that suits
ones purpose. It also gives the opportunity for individuals to customize already existing
modules. Some popular Drupal module that suits many purposes includes:
Anyone with knowledge of PHP, MySQL, and JAVASCRIPT could develop and cus-
tomize Drupal module. These programming languages are specific to Drupal; other
CMS have their own programming languages.
Drupal has some specific development tools that would help a module developer to
create and customize any kind of modules. These development tools are also modules
themselves and could be downloaded from the Drupal modules site. These modules
includes: Developer and Coder modules.

30
Developer module (Devel module) it provides cache management, SQL debugging
tools, investigation tools, a module reinstaller, an API reference tool, and many more.
It also provides tools for building themes, and tools to generate testing data.
Coder module helps Drupal module developers to conform to the Drupal coding stan-
dard, and to locate and fix non standard codes.
Any integrated development environment (IDE) could be used for Drupal module
development. Information on how to configure IDE for Drupal development could be
found from http://drupal.org/node/147789.
3.7.4 Drupal Themes
Drupal provides a way to enhance the visual display of the site. Just like Drupal mod-
ules, there are different categories of themes in Drupal. The Core themes are themes
that come with default Drupal installation. That is, the themes of the Drupal core. In
Drupal, it is possible to enable more than one themes but only one theme can be the
default. The core themes that accomplished the Drupal core file are: Minnelli, Push
button, Garland, Marvin, and Chameleon. Garland is enabled and used as the default
in Drupal installation. Asides the core themes, there are also contributed and custom
themes. It is possible to customize an existing theme to suit your site needs and you
could make a custom theme- create a new theme yourself. You can explore many Dru-
pal themes in the themes official page, http://drupal.org/project/Themes.
Contributed themes are themes that are developed by the Drupal community and there
are different types of contributed themes, which are:
- End User themes e.g. Tapestry, Artists C01 and Acquia Marina.
- Colourable themes e.g. Bartik and Garland in Drupal core, Pixture Reloaded
and Twilight.
- Starter themes e.g. Zen, Fusion, Ninesixty, Genesis and Foundation.
- Admin themes e.g. Rubik, Root Candy, Activesite and Fruity.
- HTML5 themes e.g. HTML5 Base, Boron and Adaptive Theme.
- RTL Ready themes e.g. Colorfulness, Interactive Media and Garland. Tendu
and Zen which are starter themes are also RTL themes.
31
3.7.5 Theme installation
A theme can be installed the same way a module is being installed. So, follow the mod-
ule installation step above to install themes.
NB: Create themes directory instead of modules directory in sites/all/
As it is with modules, a theme is of no use when it is not enabling.
Themes can be enabled by going to Administer>Site buildings>Themes. After enabl-
ing the preferred theme, click on the “configure” link that is closed to the chosen
theme used as default and adjust or change the theme settings.
3.7.6 Creating and customizing themes
Theme creation and customization is similar to module creation and customization.
Although, understanding of Theme system and PHPTemplate are needed in order to
customize or create any theme. Basically anyone who could create a module will also
be able to create themes.

32
4 Joomla
4.1 Introduction
Joomla is an award winning CMS used for developing different applications on the
web (Rahmel, 2009). Joomla make way into the web development software in 2005
when the name Joomla was announced by Open Source Matters-a non-profit organisa-
tion. Joomla is an English spelling of a Swahili word jumla which means “As a whole”
or “altogether”. Joomla is said to have evolved as branch of Mambo CMS in 2005
(Kennard, 2007). The official web page for Joomla is www.joomla.org. It is very well
structured and provides adequate information and help about Joomla.
Joomla is used to build small and large web applications; it offers nice and extensible
web site functionalities. Joomla has been adopted internationally by web developers for
building corporate web sites, corporate intranets and extranets, news publishing, e-
commerce, and NGO web sites. Joomla ease of use provides features such as: built-in
user polling, automatic full text searching, and accessibility option for disabled, and
plug-ins for e-commerce. (Rahmel, 2009.)
Joomla Content Management System is licensed under an Open Source Software li-
cense, the General Public License (GNU). It‟s free of charge. What this mean is that,
you can build a CMS website for an organization with open source software to reduce
cost on software license. Since Joomla is free, you get access to its source code and you
can make any changes as you want. More so, you can make contribution to the Joomla
community and you could also get some help when you need it.
PHP, SQL, MySQL, HTML, and CSS are the programming languages behind Joomla.
It also includes JAVASCRIPT language for extension. It is cross- platform software
that runs on different platforms such as Windows, Mac OS X and Linux.
As at the time of writing this thesis, Joomla 1.6.x is the current Joomla version. Be-
cause this version might not have all extensions yet, this thesis will be using the Joomla
33
1.5.x version which is a successor to the first version of Joomla that was released in
2005. Joomla 1.5.x offers many improved features compared to the first version.
4.2 Getting started with Joomla
It is known that Joomla doesn‟t make choice of operating systems, because it will run
on all operating systems browsers that exist.
So just like Drupal, operating system is not a concern when starting up Joomla web
site. Web server is what should be considered next after when developing with Joomla.
Joomla also works with different web servers that support PHP because the main
Drupal part is built with PHP language.
Joomla could be installed on Apache, and Microsoft IIS web servers. The recommend-
ed and the official web server recommended for Drupal site is the Apache web server.
These technologies needed for getting started with Joomla has been explained in chap-
ter 4.2 of this thesis.
.
4.3 Structure of Joomla
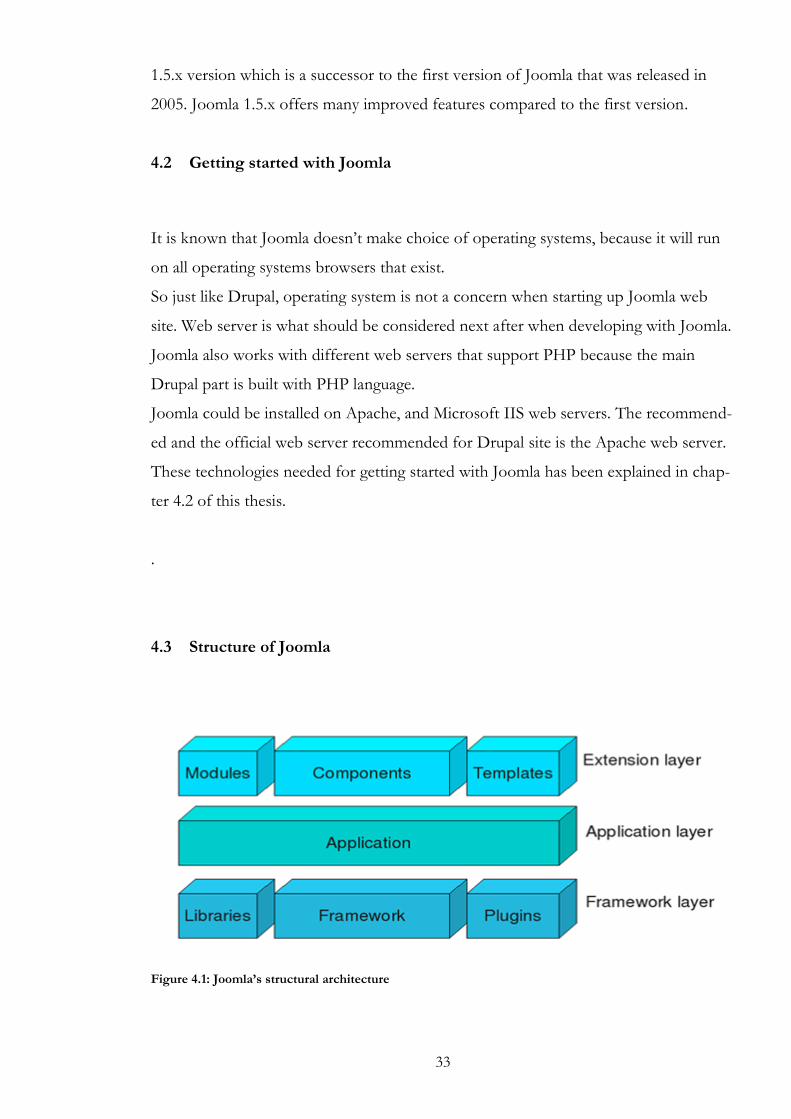
Figure 4.1: Joomla’s structural architecture

34
Joomla is built on 3 structures:-
1- Extension Layer
2- Application Layer
3- Framework Layer
These three layers work together to give the flexible and extensible Joomla CMS soft-
ware.
The Extension layer provides section through which Joomla could be improved
beyond its core. It offers extensible ability to the application and framework layers. It
consists of Modules, Components, and Templates.
Module is an extension that appears on different sections of a Joomla site. It shows
what the contents of a site are or what could be done on a Joomla powered web site.
Examples of modules includes: Poll module, Menu module, Latest News module e.t.c.
Components are fundamental extension in Joomla; it provides major new functionali-
ties that occur in Joomla. Examples of components are: forums, feeds e.t.c.
Template controls the general visibility or appearance of a Joomla web site. It is also
used to modify the position of a module on a site.
The Application layer are applications that extends Joomla framework, this include:
JInstallation, JAdministration, JSite, and XML-RPC.
JInstallation is in charge of Joomla installation on a web server. It is the folder that is
deleted after finishing the Joomla installation.
JAdministration is responsible for administrative login into Joomla back-end.
JSite controls the front-end of a Joomla website.
XML-RPC is a protocol that aid remote access to a Joomla administrative section. it
can be found in Joomla 1.5 and above.
Framework layer is made up of the Framework, Libraries, and Plugins.
“Framework is a major part in the Joomla structure. That‟s based on modern object-
oriented design models which make the Joomla core highly maintainable and easily
extensible” (Wikipedia, 2011.)
Libraries are groups of codes that render common functionalities to Joomla Frame-
work and Extensions.

35
“Plugins are Joomla extensions that modify: Joomla behavior, extend Joomla functio-
nality beyond the core components, and also add completely new functionality to
Joomla. It extends mainly the basic features of Joomla” (SLJ, 2011.)
4.4 Joomla Installation
It is now time to install Joomla, since the system and software requirements and some
basic knowledge of Joomla have been discussed. All the technology discussed above
must be available before starting the installation.
As it is with Drupal installation, also Joomla can be installing through 2 different ways:
Web installation, and Command line installation.
4.4.1 Web Installation of Joomla
Joomla works with any web server that supports PHP, but Wamp Server will be used
as the local web server in this thesis. I have gone through the installation of Wamp
server in chapter 5, so only Joomla installation will be discuss here.
The process of installing on local and production servers is the same except that you
need an FTP client for the transfer of file to the production server.
This installation procedure here is suitable for both local and hosted server.
1- First click on the WAMP cone icon and select phpmyadmin or through CPanel
on a production server. Create a database for the Joomla installation.
2- Go to joomla.org to download version 1.5 of the Joomla package. Then unzip
the package.
3- Move the folder content of the downloaded zip file to the www directory in the
WAMP server. In a live server, copy the downloaded folder to the public_html
of the web hosting account through an ftp client.
4- Open up the web browser, type “localhost”. For live server or online server,
type http://yourdomain.com/org/net/fi. This displays the web root folders,
click on the Joomla directory just uploaded.
5- This opens up Joomla web installation page. Choose the language for the instal-
lation.
6- The next step is the pre-installation check, Joomla check the system environ-
ment to see if the requirements has been met.
36
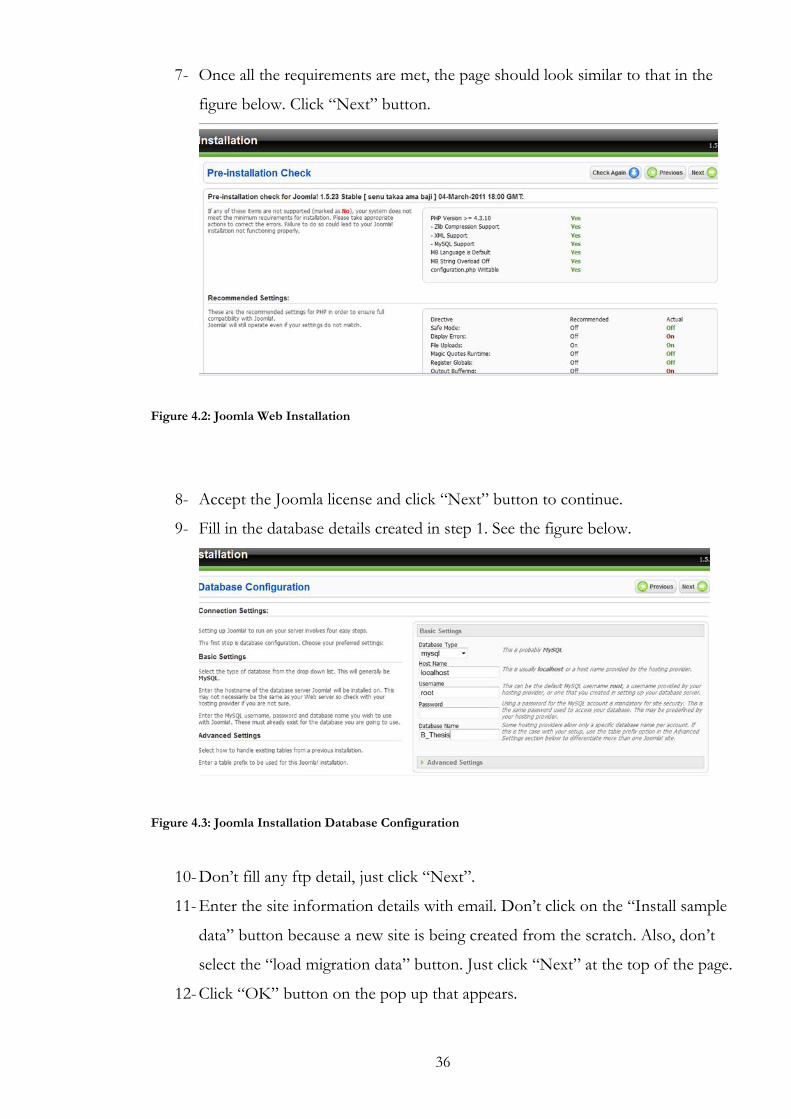
7- Once all the requirements are met, the page should look similar to that in the
figure below. Click “Next” button.
Figure 4.2: Joomla Web Installation
8- Accept the Joomla license and click “Next” button to continue.
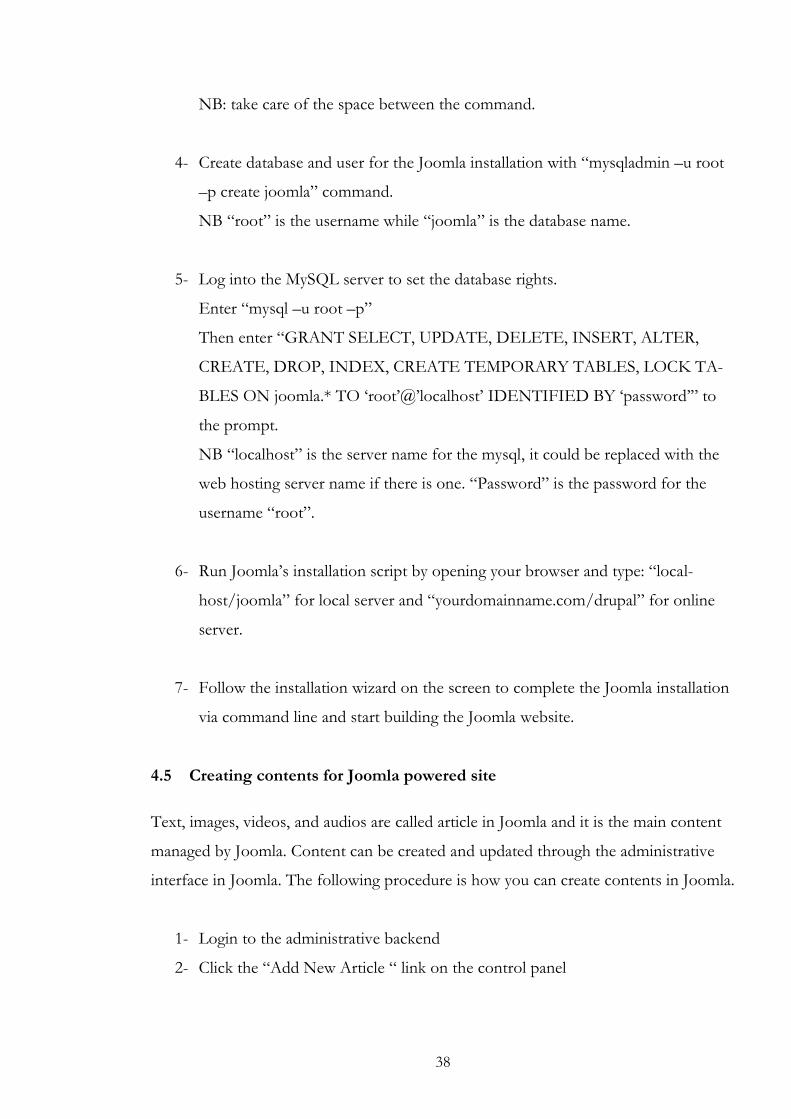
9- Fill in the database details created in step 1. See the figure below.
Figure 4.3: Joomla Installation Database Configuration
10- Don‟t fill any ftp detail, just click “Next”.
11- Enter the site information details with email. Don‟t click on the “Install sample
data” button because a new site is being created from the scratch. Also, don‟t
select the “load migration data” button. Just click “Next” at the top of the page.
12- Click “OK” button on the pop up that appears.

37
13- The next page that appears is the installation success information page. Before
continuing, the installation directory that is located in the Joomla folder must be
deleted.
14- After deleting the folder, go back to the web and click “site” at the top right
corner of the installation page to access the blank site.
15- For accessing the administrative page or backend of the site, type “local-
host/joomla/administrator in the browser URL.
NB: The username for the backend page is “admin” and password is the password that
was chosen in step 11 installation steps.
4.4.2 Command Line Installation of Joomla
LAMP server will be used for installing Joomla via the command line. The LAMP
server installation steps had been explained above in chapter 4.
1- Open the terminal to download, create a joomla folder and extract the Joomla
zip file into the folder. Type
“wget
http://joomlacode.org/gf/download/frsrelease/8232/30034/Joomla_1.5.6-
Stable-Full_Package.zip”
Then change current directory to the web root with
“cd /var/www” Make a directory in the current location by typing “mkdir –m
0755 joomla” command.
2- Move into the newly created directory in the web server folder with the com-
mand
“cd joomla” Then type “tar -xvjf /home/user/Joomla_1.5.11-Stable-Full_Package.tar.bz” to
extract the joomla zip file.
3- Set ownership and grant file and directory permission for the joomla directory
with the commands below:
“chown –R www-data:www-data var/www/joomla” ,
“find var/www/joomla –type f exec- chmod 0644 {} \;” and
“find var/www/joomla –type d exec- chmod 0755 {} \;”
38
NB: take care of the space between the command.
4- Create database and user for the Joomla installation with “mysqladmin –u root
–p create joomla” command.
NB “root” is the username while “joomla” is the database name.
5- Log into the MySQL server to set the database rights.
Enter “mysql –u root –p”
Then enter “GRANT SELECT, UPDATE, DELETE, INSERT, ALTER,
CREATE, DROP, INDEX, CREATE TEMPORARY TABLES, LOCK TA-
BLES ON joomla.* TO „root‟@‟localhost‟ IDENTIFIED BY „password‟” to
the prompt.
NB “localhost” is the server name for the mysql, it could be replaced with the
web hosting server name if there is one. “Password” is the password for the
username “root”.
6- Run Joomla‟s installation script by opening your browser and type: “local-
host/joomla” for local server and “yourdomainname.com/drupal” for online
server.
7- Follow the installation wizard on the screen to complete the Joomla installation
via command line and start building the Joomla website.
4.5 Creating contents for Joomla powered site
Text, images, videos, and audios are called article in Joomla and it is the main content
managed by Joomla. Content can be created and updated through the administrative
interface in Joomla. The following procedure is how you can create contents in Joomla.
1- Login to the administrative backend
2- Click the “Add New Article “ link on the control panel
39
3- A form that allows you to add content is pop out. Add a title to identify the ar-
ticle. It is what the user sees in the front page.
4- Choose the “yes” for publishing; else it will save it in the database without pub-
lishing to the front page.
5- Leave the alias field empty, and choose “yes” for the front page field.
6- Select “uncategorized” in the section and category fields.
7- Put the text you want inside the text editor body. You could also format the
text through the editor as you want.
8- Then click “save “.
The content has now been saved in the database. Go to the front page of the site by
typing “localhost/thesis2011” or “domainname/drupalfoldername” and refresh. The
content is now shown on the front page of the site.
Joomla has a function called “Read more” that appears at the bottom of an article, it is
used to break long article or content on a page. It is added the same way used in adding
content to the site.
Use the following steps to add “Read more” functionality to the site content;
1- Click the “Add New Article “ link on the control panel
2- A form that allows you to add content is pop out. Add a title to identify the ar-
ticle. It is what the user sees in the front page.
3- Choose the “yes” for publishing; else it will save it in the database without pub-
lishing to the front page.
4- Leave the alias field empty, and choose “yes” for the front page field.
5- Select “uncategorized” in the section and category fields.
6- Put the text you want inside the text editor body. You should put text of like 3
paragraphs.
7- place the cursor after the first paragraph to separate the texts,
8- At the bottom of the text editor, click “Read more”.
9- Then click “save “.
Go to the front page and refresh, the read more functionality has been added to the
content.
To edit or update already created articles, follow the steps below:
1- Login to the backend

40
2- Click “Article Manager” from the control panel menu. This will shows list of ar-
ticles on the site.
3- Click the title of the article to be changed or updated.
4- Then update the article and click save at the right corner of the page. The article
has now been updated.
4.6 Improving site functionality
Extensions are the main media through which features and functionalities could be
added to a Joomla site. They provide a way of improving Joomla powered web applica-
tions beyond the core.
Extensions in Joomla includes: Templates, Components, Modules, and Plugins.
Through these 4 extensions, the functionalities and features of a Joomla powered site
may be improved. They allow for example, adding slideshow, image gallery, blog
comment, online shopping and so on to a Joomla application. (Kramer,J 2010 p 231.)
There are 2 types of extensions in Joomla, which are; Core extensions and Third
party developer extensions (3PD).
Core extensions are joomla extensions that are contained in the downloaded zip file
from joomla.org. These extensions are maintained, developed, and updated by the
Joomla project team or community. These types of extensions come with Joomla by
default. They include extensions like: user component, content component, web links
component, and contacts component.
3PD extensions are those extensions developed, maintained and updated by people
that do not belong to the Joomla community. These types of extensions usually add
completely new functionalities to Joomla applications. Extensions like social network,
galleries, slideshow are 3PD extensions. Some of these extensions are free and some
are proprietary.
It is a best practise to use Core extensions before searching for 3PD extensions.

41
Furthermore, a whole lot of Joomla‟s extensions are available for download in the
Joomla extension directory (JED) located in extension.joomla.org web page (Chapman,
D 2009 p 55.)
1. Joomla Templates
In the administrative backend, go to Extensions-> Template Manager. There are three
templates that come with Joomla site by default. Template function like theme in Dru-
pal, it is responsible for the visual look of a Joomla powered applications.
It is possible to have different design for the administrative back end and another de-
sign for the site. This could be done through the two tabs in the Template Manager
page. Click the Edit button in the template manager screen and configure the template
parameters for the default template.
Templates, Components, Modules, and Plugins could be downloaded from the Joomla
Extension directory (JED) or other sites by searching through Google or other search
engines. For installing templates, components, modules and plugins, refer to the Vir-
tueMart installation steps in chapter 5.
NB: Templates usually comes in a zip file.
2. Joomla Components
Contacts, polls, banners and web links are components that come with Joomla pow-
ered site. These could be configured by logging into the back end, and go to Compo-
nents on the top menu.
3. Joomla Modules
Breadcrumbs, Latest News, Newsflash, Random Image, and Search are some of the
popular modules that exist in Joomla powered sites. They are text functionality that is
on a particular page. Modules could be embedded inside articles.
To configure modules, logging into the back end, and go to Extensions on the top
menu then click Module Manager from the dropdown list.

42
4. Joomla Plugins
Plugins work behind the scenes, providing indirect functionality. Login form features,
email address, editors and many more could be improved through plugins. It is better
not to edit plugins because it might affect the main functions in the site if not properly
done.
To configure plugins, logging into the back end, and go to Extensions on the top
menu then click Plugin Manager from the dropdown list.
5 Application Sample
5.1 Drupal Web shop
Ubercart is an online web shop component for selling products on a Drupal CMS
website. Like Drupal, Ubercart is OS and has a lot of modules that enhance its fea-
tures. It is completely compatible with the Drupal core system. Ubercart offers users
great features such as search engine friendly, powerful online shop features, security,
growing number of community members.
5.1.1 Ubercart installation
Installing Ubercart is similar to module installation. Just by downloading Ubercart
from this link http://www.ubercart.org/downloads, and enable it like any other mod-
ules. Check the version that is compatible with the Drupal version you have for your
site. Ubercart component contains many other modules like:
Attribute (uc_attribute)
Cart (uc_cart)
Cart Links (uc_cart_links)
Catalog (uc_catalog)
Conditional Actions (ca)
Credit Card (uc_credit)
Order (uc_order)
43
Payment (uc_payment)
Payment Method Pack (uc_payment_pack)
Product (uc_product)
Product Kit (uc_product_kit)
Reports (uc_reports)
Roles (uc_roles)
Store (uc_store)
Test Gateway (test_gateway)
These modules are already installed but they need to be enabled separately. See module
installation section for how to enable other Ubercart modules.
5.1.2 Application Scenario
With Ubercart, any online shop features are integrated through its Drupal administra-
tive panel. After enabling the downloaded Ubercart file, there are still some more
modules that are needed for complete Ubercart web shop features. Modules like
Fivestar, Google Analytics, uc_bank_transfer, uc_upsell, uc_checkout_review,
uc_coupon, uc_gift_certificate etc.
Adding Product
After downloading the Ubercart file, the file contains many other modules which are
considered as the Ubercart core modules. This product module has been enabled by
default. It allows adding and display of products in an Ubercart powered shop.
Adding product to a Drupal Ubercart shop is just like adding contents. In fact after
enabling Ubercart, Drupal automatically create a content type called “Product” which
makes it possible for adding a product content type.

44
Figure 5.1: Create Product Page
Catalogues
Ubercart like other online stores allow the possibility of putting similar products into
groups. Products with same or similar feature could be display together in a category
called catalogue. The catalogue module is an optional Ubercart core module, i.e. it can
be enabling and disable anytime. Creating a catalogue in Drupal Ubercart starts by
creating “Taxonomy”, then adds “Vocabulary” to the taxonomy, and lastly adds
“Terms” to the vocabulary. “Taxonomy” simply means classification, the “Terms” is
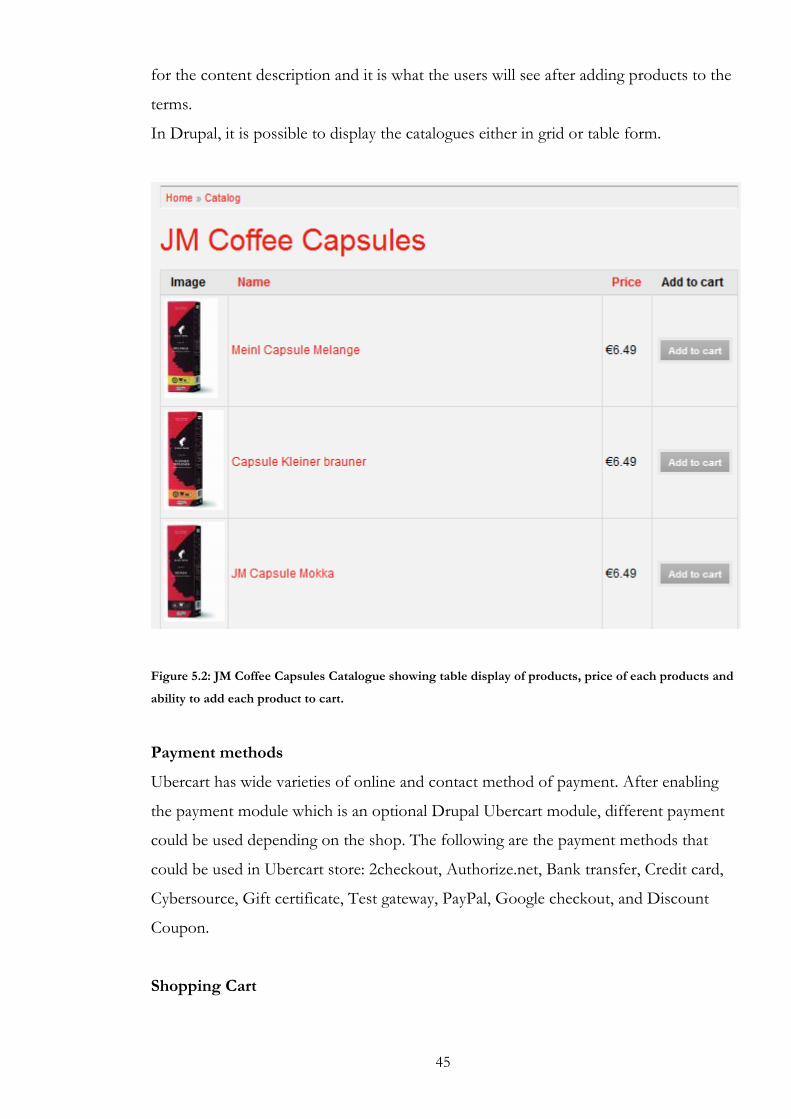
45
for the content description and it is what the users will see after adding products to the
terms.
In Drupal, it is possible to display the catalogues either in grid or table form.
Figure 5.2: JM Coffee Capsules Catalogue showing table display of products, price of each products and
ability to add each product to cart.
Payment methods
Ubercart has wide varieties of online and contact method of payment. After enabling
the payment module which is an optional Drupal Ubercart module, different payment
could be used depending on the shop. The following are the payment methods that
could be used in Ubercart store: 2checkout, Authorize.net, Bank transfer, Credit card,
Cybersource, Gift certificate, Test gateway, PayPal, Google checkout, and Discount
Coupon.
Shopping Cart
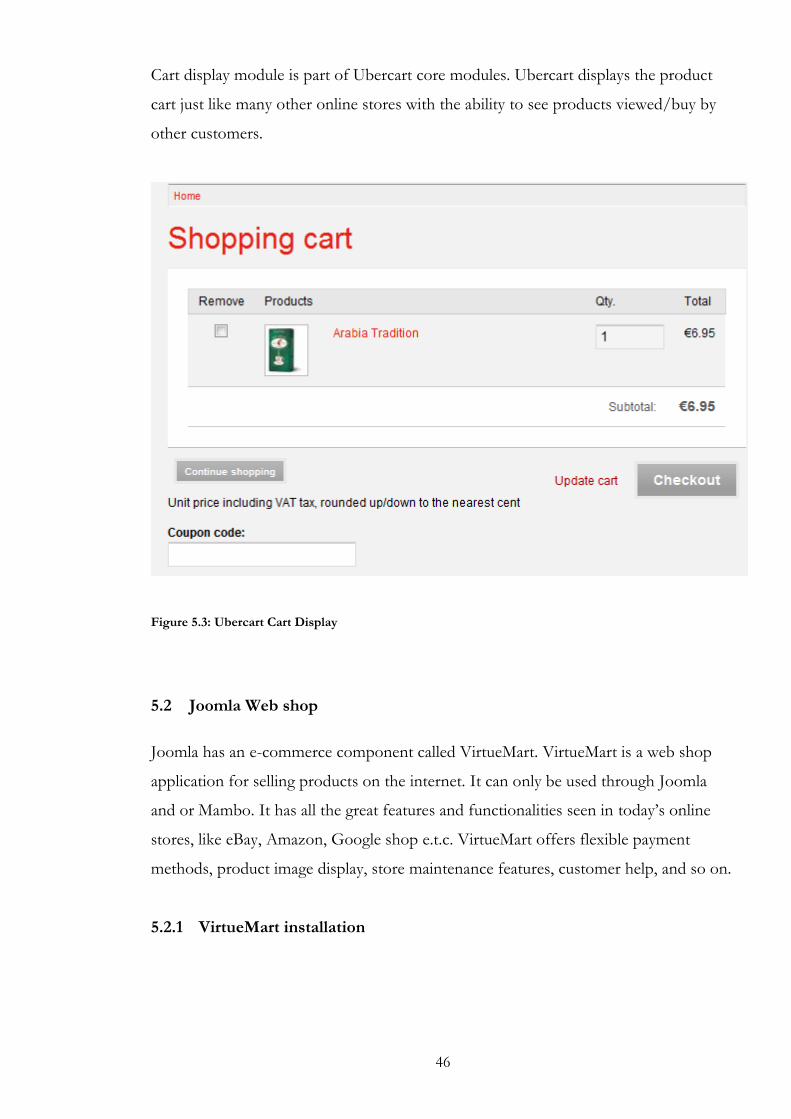
46
Cart display module is part of Ubercart core modules. Ubercart displays the product
cart just like many other online stores with the ability to see products viewed/buy by
other customers.
Figure 5.3: Ubercart Cart Display
5.2 Joomla Web shop
Joomla has an e-commerce component called VirtueMart. VirtueMart is a web shop
application for selling products on the internet. It can only be used through Joomla
and or Mambo. It has all the great features and functionalities seen in today‟s online
stores, like eBay, Amazon, Google shop e.t.c. VirtueMart offers flexible payment
methods, product image display, store maintenance features, customer help, and so on.
5.2.1 VirtueMart installation
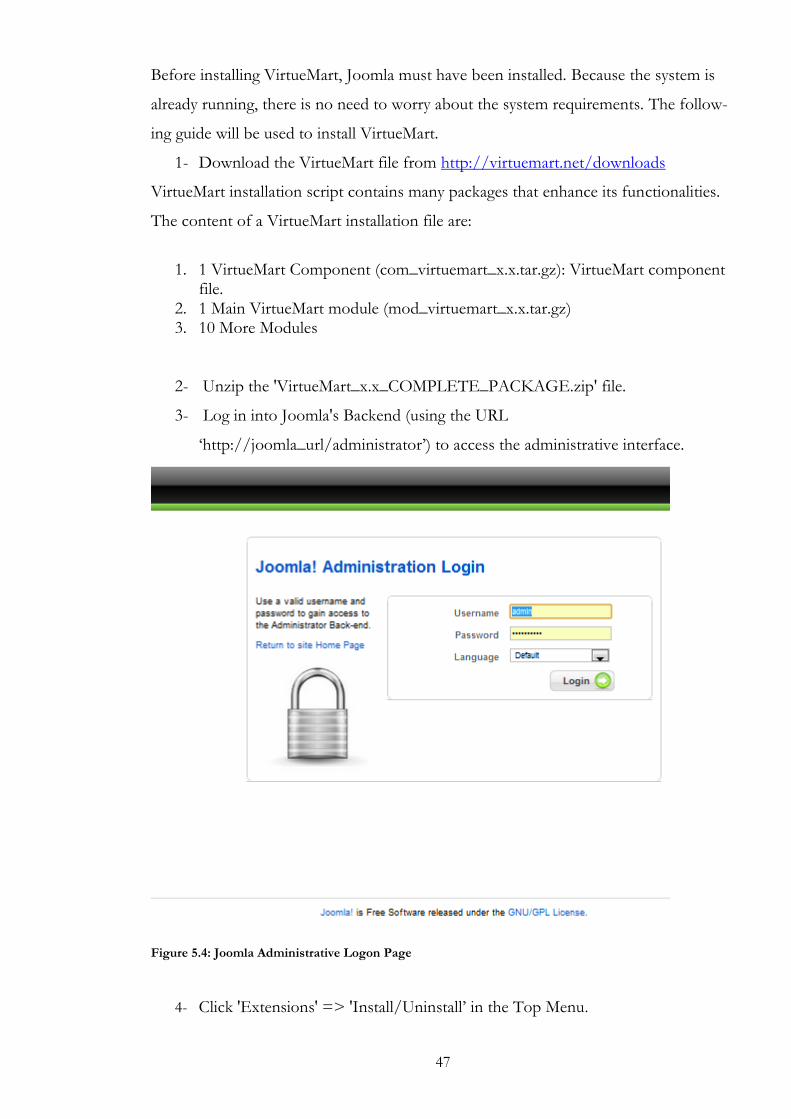
47
Before installing VirtueMart, Joomla must have been installed. Because the system is
already running, there is no need to worry about the system requirements. The follow-
ing guide will be used to install VirtueMart.
1- Download the VirtueMart file from http://virtuemart.net/downloads
VirtueMart installation script contains many packages that enhance its functionalities.
The content of a VirtueMart installation file are:
1. 1 VirtueMart Component (com_virtuemart_x.x.tar.gz): VirtueMart component
file. 2. 1 Main VirtueMart module (mod_virtuemart_x.x.tar.gz) 3. 10 More Modules
2- Unzip the 'VirtueMart_x.x_COMPLETE_PACKAGE.zip' file.
3- Log in into Joomla's Backend (using the URL
„http://joomla_url/administrator‟) to access the administrative interface.
Figure 5.4: Joomla Administrative Logon Page
4- Click 'Extensions' => 'Install/Uninstall‟ in the Top Menu.

48
Figure 5.5: Joomla Control Panel, click on Install/Uninstall to install extension
5- It shows this screen below
Figure 5.6: Extension Installation Page

49
In the 'Package Filet' part, click „Choose File‟ select the file 'com_virtuemart_x.x.tar.gz'.
This package file contains all files for the VirtueMart component, which was down-
loaded in Step 1.
Then click on 'Upload File & Install'.
6- VirtueMart Component has now been installed. It should display the Welcome
Message Screen with two options:
Figure 5.7: Joomla VirtueMart Welcome Page
You can choose either to install sample data Or 'go directly to the Shop >>' with-
out installing any sample data.
7- Follow step 4 &5 to install VirtueMart Main module.
Choose the file 'mod_virtuemart_x.x.tar.gz' from the zip file downloaded in step 1 and
click 'Upload File & Install'.
After finishing the installation, it is necessary to enable or publish some important
modules.
This can be done by clicking „Components‟ -> „Module Manager‟ in the Top Menu.
Then browse t the list of already installed modules and look for those with 'VirtueMart
Module'. You can select it and modify it settings and where you want it to be display
on your site.

50
5.2.2 Application Scenario
The VirtueMart control panel after installation offers the possibility of adding products
to the shop. Without downloading and installing the required modules, it is not possi-
ble to add online shop features like product display, catalogue, payment and shipping
methods etc to your VirtueMart web shop.
Adding Product
It is a common functionality in all online stores to be able to add product to their shop.
VirtueMart have this feature integrated to the main file which can be accessed through
the VirtueMart control panel after installing VirtueMart.
Figure 5.8: Add Product wizard screenshot
Product category and Product catalogue
VirtueMart allows the shop owner to group their products. This feature can be added
to Drupal by downloading and installing the mod_product_categories module.

51
Figure 5.9: Product Catalogue Display
Payment Methods
VirtueMart offers different kind of payment methods ranging from cash on delivery,
PayPal etc.

52
Figure 5.10: Joomla’s Payment Method
Cart Display
VirtueMart have a module called mod_virtuemart_cart. By downloading and installing
this module, it offers cart display with a link to the items currently in your shopping
cart.

53
Figure 5.11: Joomla’s VirtueMart Cart Display
VirtueMart also have the following modules that add to its functionalities after down-
loading and installing them. They are:
mod_virtuemart_manufacturers: This displays product manufacturers and a link to all
the products offered by that manufacturer.
mod_virtuemart_latestprod: Shows the newly added products in the store
mod_virtuemart_search: Allows site wide product search
mod_virtuemart_topten: Displays top best selling product in the store and provide a
link to the products.
54
6 Testing the Applications
6.1 System and Usability Testing
The purpose of this testing is to verify that the whole system exhibit the functionalities
and features found in all other web shop applications built with HTML editors. Such
as Amazon, EBay, Google web store etc.
1. Who is testing?
This testing will be conducted by the end users of the systems or independent test
group. These end users are usually not involved in the development and design process
of the system. The end users or individual test group could be anyone that is familiar
with web shop functionalities.
2. What is tested?
The functionalities of the system as a whole are tested. The following functionalities
and usability will be tested: View products, adding products to cart, checking out, view
products in the cart, view the catalogue, and ordering a product.
3. How the testing is performed?
Thinking aloud Method-
This method will be used to collect information on users‟ own reason for their beha-
vior i.e. the users will be able to verbalize their thoughts about the system.
4. What test type is used (white-box or black box)?
The black box approach (Equivalent portioning) will be employed for the System Test-
ing.
Black-box testing will test the functionality of the web shop application, as opposed to
its internal structures or workings.
5. When does the testing take place?
The system and usability testing will take place on the 13th of September, 2011. Two
people will test the applications and it will be done on WAMP server (localhost).
6. How is the test result handled?

55
All the test results will be well documented and reported.
6.2 The Test form
The test form could be found in appendix C.

56
7 Conclusion
The goal of this thesis work is to research and analyse how to develop different web
applications with desired functionalities using content management systems (Drupal
and Joomla).
After about 4 months of thorough research, thinking and analysis, I have been able to
achieve the goal. This has been demonstrated with a web shop sample application for
both Drupal and Joomla. From this research, I have been able to learn how and where
to add functionality in a Drupal and Joomla powered web application.
There are many CMS software, the open source collective incorporated contains list of
the CMS software currently available. They include Moodle, DotNetNuke, WordPress,
Drupal, BitWeaver, CitusCMS, and Joomla etc. Drupal and Joomla has been chosen
for this thesis work. However, this thesis is not about comparing Drupal and Joomla
but to analyse the potentials in both of them separately. I have researched and analyse
both CMS software from the fundamentals to advance thereby, making this research
work suitable for novice and professional CMS learners.
In This thesis, I have been able to demonstrate that without much technical knowl-
edge, it is possible to insert and update contents of a site developed with CMS software
which would therefore increase organisations efficiency and information outreach. In
addition, I have been able to show that there are lots of ways one could utilize ones
knowledge of programming languages in CMS web applications. PHP, JAVASCRIPT,
MySQL and CSS are those discussed in this research because they are ones used with
Drupal and Joomla.
The advent of open source software has given drastic improvement and widespread
adoption of CMS to small and medium sized companies. Although many enterprise
content management systems are being used by large companies but the use of its open
source software is still minimal. However, with more community involvement in the
improvement and development of the OSCMS software, ECMS benefits would be
achieved by OSCMS. Therefore, there will be widespread usage of CMS by corporate
organisations.

57
CMS convey considerable number of contents together in a location for easy retrieval
and convenient improvement from other locations. Although, CMS are essentially for
business purposes, yet, can be used for individual purposes. CMS can be used with
CRM to automate all paper works in an organisation. That is, it can be used to manage
all administrative work online, e.g. event registration, and membership renewal etc.
There are many web applications that can be developed with CMS. Web shop has been
used in this thesis and system and usability testing was carried out with the web shop
application. The testing ascertained that CMS applications exhibits the same function-
alities with web applications developed with HTML editors.
Nowadays, many web applications exist on the web. A great number of these web ap-
plications are made with CMS. This means that these applications are open to wide
range of developers that are willing to contribute to the usability, security and stability
of the CMS web applications.
Finally, Drupal and Joomla are reliable, flexible, stable, secure, modular, supportive,
extensible and less expensive. They can be used for all types of web sites and web ap-
plications by individual or organisation. They provide the ability of learning from the
basis and develop on it in later time. With ease of use functionality and growing com-
munity support for Drupal and Joomla, CMS have the ability to replace HTML editor
for web application development.
7.1 Recommendation
As this thesis work analyse Drupal and Joomla in detail, time could not permit in dept
explanation of how to develop modules, themes and extensions. Though, the basics
such as tools and examples needed for developing modules, themes and extensions had
been discussed explicitly in this thesis. Further research work could be done in the area
of modules and extensions development.

58
Also, I would like to recommend this thesis work for used by Haaga-Helia University
of Applied sciences (HHUAS) Information technology department. CMS could be
included in the Business Information Technology (BIT) course curriculum as many
companies will be adopting this software for their businesses in future because of its
advantages. Therefore, students of BIT program in HHUAS will not be lacking in this
area.
Although, PHP is not being taught in HHUAS BIT program but CMS software like
DotNetNuke and Umbraco that involves Microsoft ASP.Net knowledge could be
taught and student can utilize their ASP.Net knowledge. This will prevent students
dropping from BIT to other programs. Because I can remember many of my col-
leagues that we started the BIT together in 2009, many have dropped to other pro-
grams and some withdrew from HHUAS with the claim that the starting courses like
introduction to website design and introduction to programming are advance. There-
fore, with CMS students could learn the basis of web applications and improve on it
with other courses.

59
Bibliography
Adobe ColdFusion Help Resource center. 2011. Web Applications. URL:
http://livedocs.adobe.com/coldfusion/8/htmldocs/help.html?content=introducing_c
f_2.html. Quoted 24.06.2011
Adekunle, O. 2010. INVESTIGATION, INSTALLATION AND IMPLEMENTA-
TION OF A CONTENT MANAGEMENT SYSTEM. Theseus: electronic library of
the university of applied sciences.
Altarawneh, H. & El Sheikh, A. 2008, A Theoretical Agile Process Framework for
Web Applications Development in Small Software Firms. ACM Digital Library URL:
http://dl.acm.org/citation.cfm?id=1099512 Quoted 30.05.2011
Bradford Lee, E, 2006. Content Management Systems. Volume 24 Number 1, Emerald
Group Publishing Ltd: Bradford, , GBR.
URL:http://site.ebrary.com.proxy.tritonia.fi/lib/tritonia/docDetail.action?
adv.x=1&d=all&f00=all&f01=&f02=&hitsPerPage=500&p00=Content+Managemen
t+Systems&p01=&p02=&page=1&id=10120698 Quoted 03.08.11
Butcher, M. 2009. Drupal 6 JavaScript and Jquery. Packt publishing Ltd. Olton Bir-
mingham, UK.
Butcher, M. 2008. Learning Drupal 6 module development. Packt publishing Ltd. Ol-
ton Birmingham, UK.
Charlotte Regional. 2008. Drupal core modules. URL:
http://www.charlotteregionalstc.com/drupal_core_modules Quoted 10.07.11
Chapman. D. 2009. Joomla! 1.5x Customization : Make Your Site Adapt to Your
Needs. Packt Publishing. Olton Birmingham, GBR.

60
Dione, B. 2007. Managing technologies and automated library systems in developing
countries : open source vs commercial options
Delgado, B, Daniel. 2007. Inspiring teamwork & Communication with a content man-
agement system. ACM Digital Library URL:
http://dl.acm.org/citation.cfm?id=1294060 Quoted 30.05.2011
Drupal modules development. 2010. URL: http://drupal.org/developing/modules
Quoted 23.08.2011
Drupal themes site. 2010. URL: http://drupal.org/project/Themes Quoted 11.07.11
Drupal modules site. 2010. URL: http://drupal.org/project/modules Quoted 09.07.11
Drupal guide & documentation site. 2011. URL:
http://drupal.org/documentation/install Quoted 09.07.2011
Drupal founder's site. Buytaert, D.1999. http://buytaert.net/ Quoted 4.7.2011
Drupal, 2002. URL: http://drupal.org/ Quoted 31.07.2011
Ericsson highlights watchpoint CMS, 2010. Raheem, M. 2010. INVESTIGATION,
INSTALLATION AND IMPLEMENTATION OF AN OPEN SOURCE CON-
TENT MANAGEMENT SYSTEM. Theseus: electronic library of the University of
applied sciences.
Fisher, 2007. Daniel, A. & Godspower, O. 2011. Potential Benefits Organizations De-
rive From Using Enterprise Content Management Systems. Swedish University Essays.
URL:
http://www.essays.se/about/Potential+Benefits+Organizations+Derive+From+Usin
g+Enterprise+Content+Management+Systems/ Quoted 18.07.2011

61
George, P. 2010. Drupal E-commerce with Ubercart 2.x. Packt publishing Ltd. Olton
Birmingham, UK
HH CnM, Haaga-Helia Thesis document. Thesis contents template "contents and
methods" URL: https://extra.haaga-
helia.fi/english/studies/guidelines/thesis/Pages/default.aspx Quoted 27.05.2011
Durham, 2004. IBM Redbooks. 2004. Lotus Workplace Web Content Management.
Durham, NC, USA. URL:
http://site.ebrary.com/lib/tritonia/Doc?id=10112483&ppg=25
Jen, K, 2010. Joomla! Start to finish: How to Plan, Execute, and Maintain Your Web-
site. Edition, Publisher
Jeremy, B. 2006. content in context. ABI/INFORM global, URL:
http://search.proquest.com.proxy.tritonia.fi/docview/201001212/abstract?source=fe
dsrch&accountid=14797
Jojo, J. 2008. Web application development using open source and Ruby on Rails
Framework. Theseus: electronic library of the University of Applied Sciences.
Joomla layout. 2004. URL:
http://www.siteground.com/tutorials/joomla15/joomla_layout.htm Quoted
28.07.2011
Joomla History. 2011. URL: http://en.wikipedia.org/wiki/Joomla Quoted 12.07.2011
Joomla framework. 2010. URL: http://docs.joomla.org/Framework/1.5 Quoted
14.7.11
Joomla documentation site. 2011. URL:
http://docs.joomla.org/Installing_Joomla_on_Debian_Linux 15.7.11 19.50

62
JED, Joomla extension directory. 2010. URL: http://extensions.joomla.org Quoted
07.07.2011
Joomla Main web site, 2005. URL: http://www.joomla.org/ Quoted 09.08.2011
Kelly, M. 2009. why Joomla? URL: http://ezinearticles.com/?Why-
Joomla!&id=2781449 Quoted 27.05.2011.
Kumar, R. 2011. Research Methodology: A Step-by-Step Guide for Beginners. Third
Edition. SAGE Publication, LONDON.
URL: http://www.google.com/books?hl=en&lr=&id=i9NtQV-
ZsZMC&oi=fnd&pg=PP1&dq=research+methodology&ots=ra-
Wxd1344&sig=eWaO21tUNnKaeBF-57d8ueTl4Vc#v=onepage&q&f=false Quoted
17.07.2011
Kramer, J. 2010. Joomla! Start to Finish: How to Plan, Execute, and Maintain Your
Web Site. Wrox. Hoboken, NJ, USA.
Kennard, J. 2007. Mastering Joomla 1.5 extension and framework development. Packt
publishing Ltd. Olton Birmingham, UK.
Leblanc, J. 2008. Learning Joomla! 1.5 Extension Development. Packt publishing Ltd.
Olton Birmingham, UK..
Mercer, D, 2010. Drupal 7 Create and operate any type of website quickly and effi-
ciently. Second edition, Packt publishing Ltd. Olton Birmingham UK.
My php scripts. Lamp server definition and installation. 2011. URL:
http://myphpscriptz.com/2010/09/what-is-lamp-server-
and-how-to-install-it/ Quoted 10.7.2011 01:13

63
Narayan, K. 2011. Interviewer, Braindigit IT Solution. www.braindigit.com
OSCI. The Open Source Collective, Inc. 2002. “OpenSourceCMS”,
http://php.opensourcecms.com/scripts/show.php?catid=1&category=CMS%20/%20
Portals Quoted 2.07.2011
OSI, Open Source initiative. 2011. http://www.opensource.org/docs/osd Quoted
02.06.2011
Quang, P. 2011. Interviewer, Activeark Oy. www.activeark.fi
Rahmel, D. 2009. Beginning Joomla!. Second Edition. Apress. NY. USA.
Rothfuss, 2001. Ivanova, V. 2009. Content Management System Implementation Effi-
ciency and Value. Theseus: electronic library of the university of applied sciences.
Robertson, 2003. Chocha, Z. 2010. JOOMLA WEBSITE PROJECT FOR NORSAD
AGENCY. Theseus: electronic library of the university of applied sciences.
Samples of site made with Drupal. 2011. URL: http://drupal.org/cases Quoted
05.07.11
Shreves, R. 2008. Drupal 6 Themes. Packt publishing Ltd. Olton Birmingham, UK.
SLJ, Start Learning Joomla! 2011. Pdf. URL: http://www.startlearningjoomla.com/
Quoted 24.07.2011
Simpson, L. Doug, 2005. Content for one: developing a personal content management
system. ACM Digital Library URL: http://dl.acm.org/citation.cfm?id=1099512
Quoted 30.05.2011
Stanley, P. 2010. Advantages of Web Applications. URL:
http://www.pssuk.com/AdvantagesWebApplications.htm Quoted 24.06.2011

64
Suhreed, S. 2009. Joomla! E-Commerce with VirtueMart. Packt publishing Ltd. Olton
Birmingham, UK.
VanDyk, J, 2008. Pro Drupal Development. Second edition, Apress Media LLC. New
York City, USA.
Verkevisser et al. 2003. Daniel, A. & Godspower, O. 2011. Potential Benefits Organi-
zations Derive From Using Enterprise Content Management Systems. Swedish Uni-
versity Essays. URL:
http://www.essays.se/about/Potential+Benefits+Organizations+Derive+From+Usin
g+Enterprise+Content+Management+Systems/ Quoted 18.07.2011
Wamp server forum. 2007. URL:
http://www.wampserver.com/phorum/read.php?2,22282,22320 Quoted 11.07.11
Webmaster tips. 2007. Why drupal?. URL:
http://tips.webdesign10.com/drupal/about-drupal-311.html Quoted 12.07.2011.
Web Dev News. Scott, J. 2008, http://webdevnews.net/2008/09/the-top-10-open-
source-content-management-systems/ quoted 5.7.11
Wikipedia. 2011. Content Management system. URL:
http://en.wikipedia.org/wiki/Content_management_system Quoted 1.07.2011
Wikipedia. 2010. Web Application URL:
http://en.wikipedia.org/wiki/Web_application Quoted 09.06.2011

65
Appendices
Appendix A: Drupal Questionnaires
1- Name of individual or organisation
2- How many employees in your organisation
3- What is your organisation's business type?
4- In your opinion, what is the advantage of using content management systems?
5- What content management system do you currently use?
6- What other content management systems have you used or evaluated before choosing the current system?
7- Why do you choose the current content management system?
8- Why do you use Drupal as your content management system?
9- Is it possible to improve Drupal web applications features?
10- How can one add own features or functionalities (with programming know-ledge) to a Drupal web applications.
11- What is the best and common way to add own features/functionalities to a Drupal web application?
12- What programming language can I use to improve or change the features of Drupal web applications?
13- How can I use Jquery, JavaScript, PHP, MySQL, and AJAX to improve or change the features of my Drupal web applications?

66
14- How can you rate the support or resources available for Drupal?
Appendix B: Joomla Questionnaires
1- Name of individual or organisation
2- How many employees in your organisation
3- What is your organisation's business type?
4- In your opinion, what is the advantage of using content management systems?
5- What content management system do you currently use?
6- What other content management systems have you used or evaluated before choosing the current system?
7- Why do you choose the current content management system?
8- Why do you use Joomla as your content management system?
9- Is it possible to improve Joomla web applications features?
10- How can one add own features or functionalities (with programming know-ledge) to a Joomla web applications.
11- What is the best and common way to add own features/functionalities to a Joomla web application?
12- What programming language can I use to improve or change the features of
Joomla web applications?
13- How can I use Jquery, JavaScript, PHP, MySQL, and AJAX to improve or change the features of my Joomla web applications?
14- How can you rate the support or resources available for Joomla?

67

68
Appendix C: System and Usability Test Form and Results
Test
cases
Detailed In-
structions for
the Tester
Expected
result
Errors/Exceptions
Has to be
fixed?
Yes/No
View
Products
Click or select
“product”
from top
menu.
Displays list
of all prod-
ucts as drop
down
No
Add
products
to cart
Click on a
product, then
click “Add to
cart” button
on the right.
Scroll down
and click
“Add to cart”
button that is
under “Quan-
tity”
The selected
product has
been added
to your
shopping cart
No
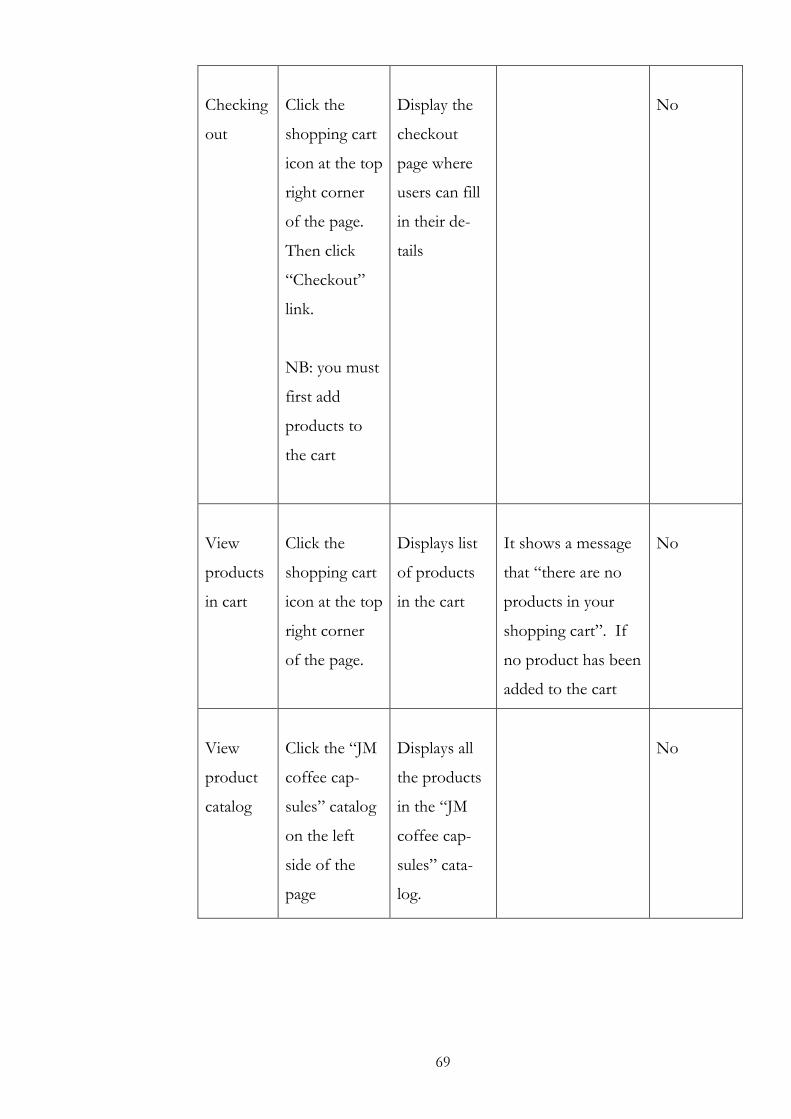
69
Checking
out
Click the
shopping cart
icon at the top
right corner
of the page.
Then click
“Checkout”
link.
NB: you must
first add
products to
the cart
Display the
checkout
page where
users can fill
in their de-
tails
No
View
products
in cart
Click the
shopping cart
icon at the top
right corner
of the page.
Displays list
of products
in the cart
It shows a message
that “there are no
products in your
shopping cart”. If
no product has been
added to the cart
No
View
product
catalog
Click the “JM
coffee cap-
sules” catalog
on the left
side of the
page
Displays all
the products
in the “JM
coffee cap-
sules” cata-
log.
No

70
Ordering
a product
Do add prod-
uct to cart and
checking out
steps above,
then fill in the
details in the
check out
page and click
“Submit or-
der”
It displays
order com-
pletion page
with Pay-
ment infor-
mation and
my order
number.
Also, it sends
order suc-
cessful mes-
sage to my
email.
Message was not
send because email
client has not been
configured on a lo-
calhost server.
No
1- Question: Are the items on the screen consistently aligned? E.g. Menus, text-boxes, site name etc. Answers: Yes/ No Comment:
2- Question: Do you feel the screen is clutter with unnecessary information? Answer: Yes/ No Comment:
3- Question: Is the screen well organized? Answer: Yes/ No Comment:
4- Question: Is it easy to find available action buttons on the screen?
Answer: Yes/ No Comment: but not all
5- Question: Is the navigation menus easy to use. Answers: Yes/ No
Comment: but could be improved more