developing great shot technique, part i
TRANSCRIPT

Developing Great Shot Technique
Developing Great Shot Technique, Part IBy Gary Anderson, DCM Emeritus
6
Athletes in a Junior World Cup Air Rifle Final. Rifle finals today have short time limits that make it necessary for athletes to use shot techniques that emphasize position stabilization before the shot so consistent good shots can be fired on first holds.
One of the biggest challenges in rifle marksmanship is mastering the complex, dynamic combination of functions involved in firing accurate shots. They include stabilizing the firing position, accurate aiming, breath control, trigger control, calling the shot and follow-through. A short name for all of this is “shot technique.”
This two-part OTM article examines the five phases of shot technique. Part I of this article analyses the first two phases, Position Preparation and Position Alignment. Part II, which will appear in the Spring 2018 OTM, considers the Shot Start, Shot Execution and Shot Follow-Up phases.
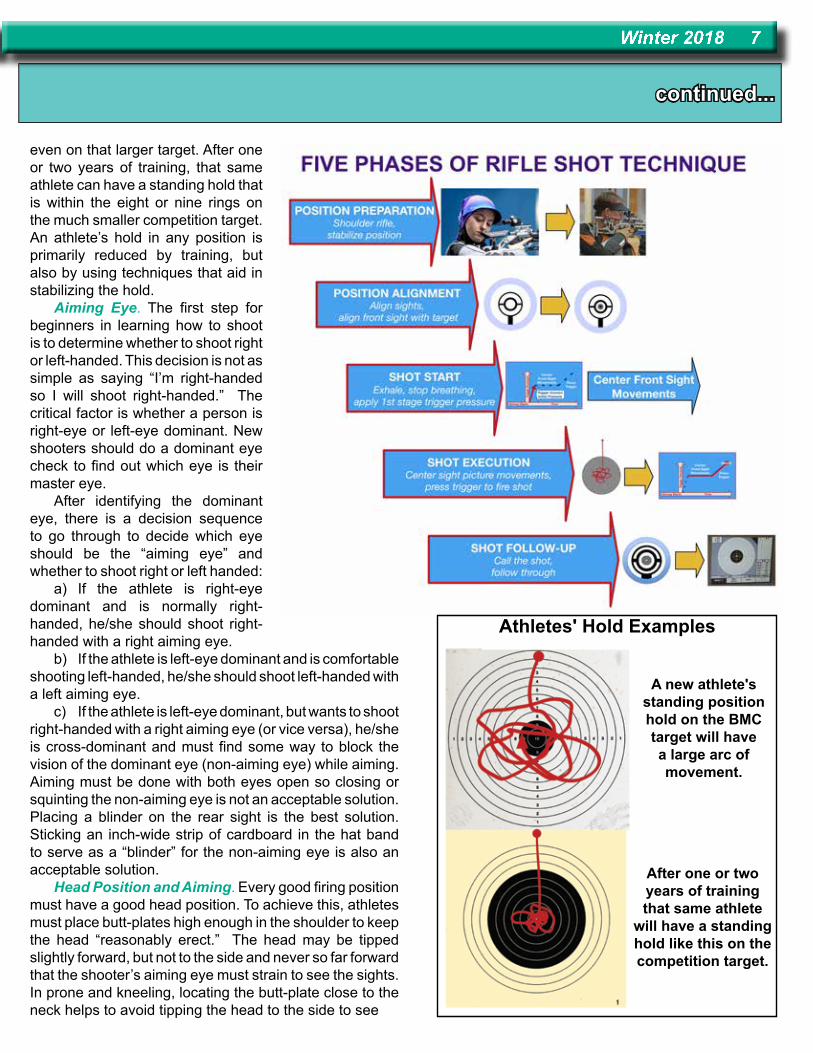
The first step in examining shot technique is to understand how the functions and phases of shot technique fit together. The chart, “Five Phases of Rifle Shot Technique,” shows how shot technique functions flow in a sequence of five performance phases.
I - POSITION PREPARATIONThe first phase of shot technique, Position
Preparation, is a lot more than just holding the rifle still in a firing position. Position Preparation is performing techniques that improve hold stability.
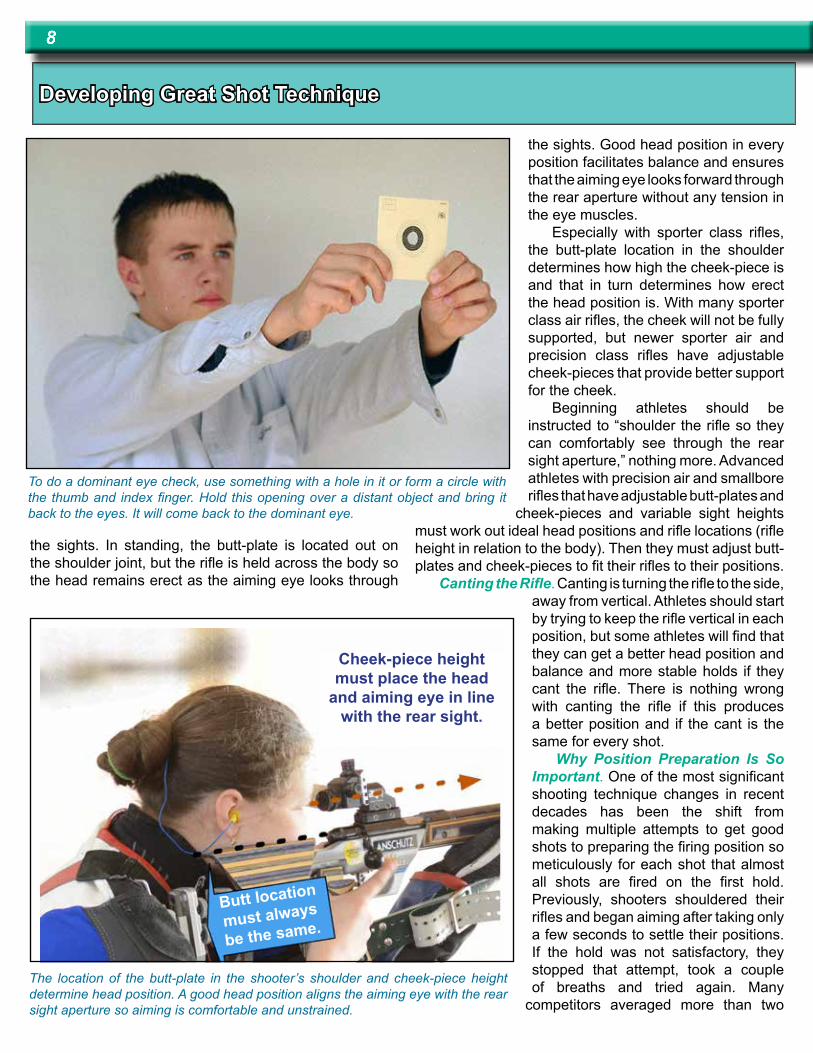
Hold. When an athlete shoulders the rifle to fire a shot, he/she is beginning a process where the accuracy of the shot is primarily determined by how stable the firing position is, whether it be kneeling, prone or standing. “Hold” is a term that describes how stable a firing position is. An athlete’s hold is the magnitude of his/her front sight movements in relation to the aiming bull. One way to understand hold is to visualize a laser beam representing the rifle’s point of impact and how that laser beam oscillates through an area of movement while the athlete is aiming at the target. A new athlete shooting standing on the BMC target will have relatively large hold that covers most of the scoring rings
continued...
Winter 2018 7
even on that larger target. After one or two years of training, that same athlete can have a standing hold that is within the eight or nine rings on the much smaller competition target. An athlete’s hold in any position is primarily reduced by training, but also by using techniques that aid in stabilizing the hold.
Aiming Eye. The first step for beginners in learning how to shoot is to determine whether to shoot right or left-handed. This decision is not as simple as saying “I’m right-handed so I will shoot right-handed.” The critical factor is whether a person is right-eye or left-eye dominant. New shooters should do a dominant eye check to find out which eye is their master eye.
After identifying the dominant eye, there is a decision sequence to go through to decide which eye should be the “aiming eye” and whether to shoot right or left handed:
a) If the athlete is right-eye dominant and is normally right-handed, he/she should shoot right-handed with a right aiming eye.
b) If the athlete is left-eye dominant and is comfortable shooting left-handed, he/she should shoot left-handed with a left aiming eye.
c) If the athlete is left-eye dominant, but wants to shoot right-handed with a right aiming eye (or vice versa), he/she is cross-dominant and must find some way to block the vision of the dominant eye (non-aiming eye) while aiming. Aiming must be done with both eyes open so closing or squinting the non-aiming eye is not an acceptable solution. Placing a blinder on the rear sight is the best solution. Sticking an inch-wide strip of cardboard in the hat band to serve as a “blinder” for the non-aiming eye is also an acceptable solution.
Head Position and Aiming. Every good firing position must have a good head position. To achieve this, athletes must place butt-plates high enough in the shoulder to keep the head “reasonably erect.” The head may be tipped slightly forward, but not to the side and never so far forward that the shooter’s aiming eye must strain to see the sights. In prone and kneeling, locating the butt-plate close to the neck helps to avoid tipping the head to the side to see
A new athlete's standing position hold on the BMC target will have a large arc of movement.
After one or two years of training that same athlete
will have a standing hold like this on the competition target.
Athletes' Hold Examples
Developing Great Shot Technique
8
the sights. In standing, the butt-plate is located out on the shoulder joint, but the rifle is held across the body so the head remains erect as the aiming eye looks through
the sights. Good head position in every position facilitates balance and ensures that the aiming eye looks forward through the rear aperture without any tension in the eye muscles.
Especially with sporter class rifles, the butt-plate location in the shoulder determines how high the cheek-piece is and that in turn determines how erect the head position is. With many sporter class air rifles, the cheek will not be fully supported, but newer sporter air and precision class rifles have adjustable cheek-pieces that provide better support for the cheek.
Beginning athletes should be instructed to “shoulder the rifle so they can comfortably see through the rear sight aperture,” nothing more. Advanced athletes with precision air and smallbore rifles that have adjustable butt-plates and
cheek-pieces and variable sight heights must work out ideal head positions and rifle locations (rifle height in relation to the body). Then they must adjust butt-plates and cheek-pieces to fit their rifles to their positions.
Canting the Rifle. Canting is turning the rifle to the side, away from vertical. Athletes should start by trying to keep the rifle vertical in each position, but some athletes will find that they can get a better head position and balance and more stable holds if they cant the rifle. There is nothing wrong with canting the rifle if this produces a better position and if the cant is the same for every shot.
Why Position Preparation Is So Important. One of the most significant shooting technique changes in recent decades has been the shift from making multiple attempts to get good shots to preparing the firing position so meticulously for each shot that almost all shots are fired on the first hold. Previously, shooters shouldered their rifles and began aiming after taking only a few seconds to settle their positions. If the hold was not satisfactory, they stopped that attempt, took a couple of breaths and tried again. Many
competitors averaged more than two
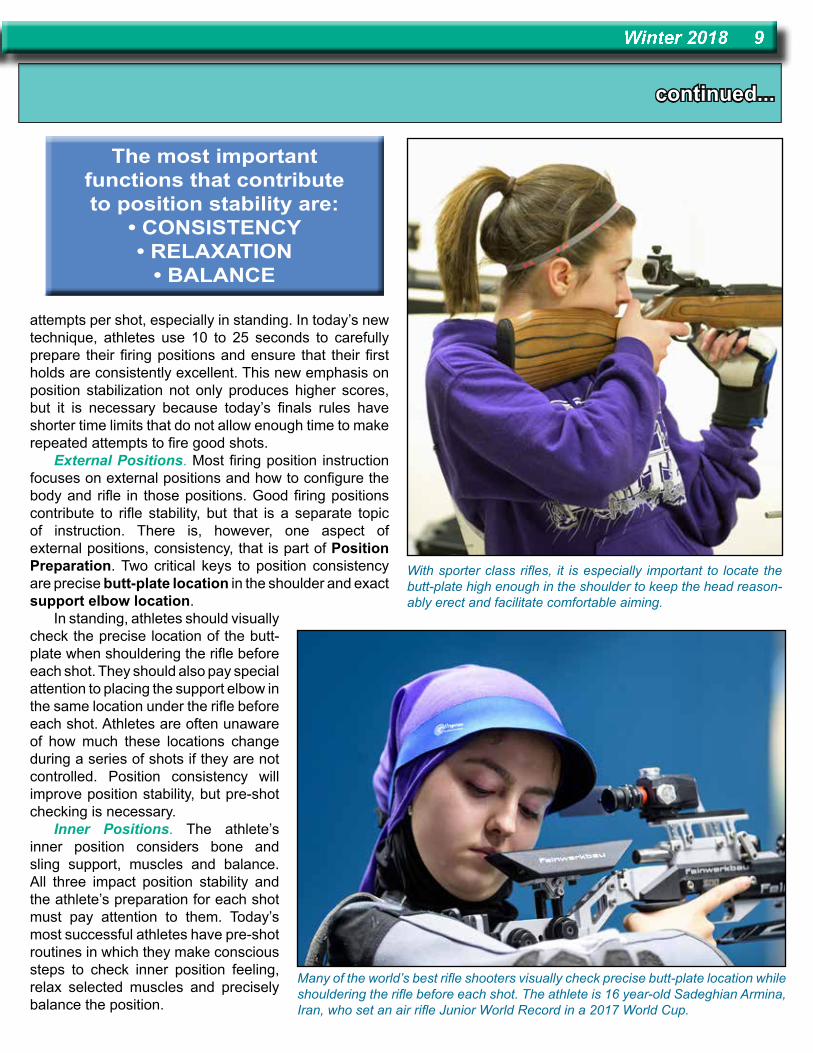
To do a dominant eye check, use something with a hole in it or form a circle with the thumb and index finger. Hold this opening over a distant object and bring it back to the eyes. It will come back to the dominant eye.
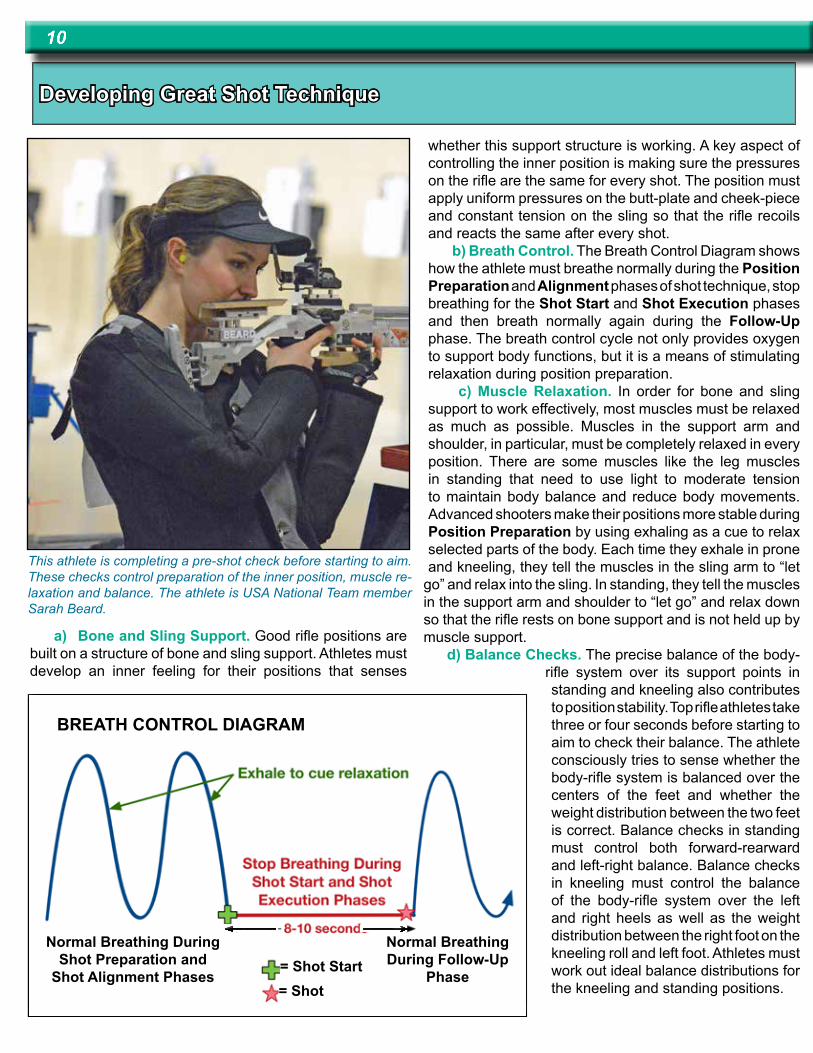
The location of the butt-plate in the shooter’s shoulder and cheek-piece height determine head position. A good head position aligns the aiming eye with the rear sight aperture so aiming is comfortable and unstrained.
Cheek-piece height must place the head
and aiming eye in line with the rear sight.
Butt location
must always
be the same.
continued...
Winter 2018 9
attempts per shot, especially in standing. In today’s new technique, athletes use 10 to 25 seconds to carefully prepare their firing positions and ensure that their first holds are consistently excellent. This new emphasis on position stabilization not only produces higher scores, but it is necessary because today’s finals rules have shorter time limits that do not allow enough time to make repeated attempts to fire good shots.
External Positions. Most firing position instruction focuses on external positions and how to configure the body and rifle in those positions. Good firing positions contribute to rifle stability, but that is a separate topic of instruction. There is, however, one aspect of external positions, consistency, that is part of Position Preparation. Two critical keys to position consistency are precise butt-plate location in the shoulder and exact support elbow location.
In standing, athletes should visually check the precise location of the butt-plate when shouldering the rifle before each shot. They should also pay special attention to placing the support elbow in the same location under the rifle before each shot. Athletes are often unaware of how much these locations change during a series of shots if they are not controlled. Position consistency will improve position stability, but pre-shot checking is necessary.
Inner Positions. The athlete’s inner position considers bone and sling support, muscles and balance. All three impact position stability and the athlete’s preparation for each shot must pay attention to them. Today’s most successful athletes have pre-shot routines in which they make conscious steps to check inner position feeling, relax selected muscles and precisely balance the position.
With sporter class rifles, it is especially important to locate the butt-plate high enough in the shoulder to keep the head reason-ably erect and facilitate comfortable aiming.
The most important functions that contribute to position stability are:
• CONSISTENCY• RELAXATION
• BALANCE
Many of the world’s best rifle shooters visually check precise butt-plate location while shouldering the rifle before each shot. The athlete is 16 year-old Sadeghian Armina, Iran, who set an air rifle Junior World Record in a 2017 World Cup.
Developing Great Shot Technique
10
a) Bone and Sling Support. Good rifle positions are built on a structure of bone and sling support. Athletes must develop an inner feeling for their positions that senses
whether this support structure is working. A key aspect of controlling the inner position is making sure the pressures on the rifle are the same for every shot. The position must apply uniform pressures on the butt-plate and cheek-piece and constant tension on the sling so that the rifle recoils and reacts the same after every shot.
b) Breath Control. The Breath Control Diagram shows how the athlete must breathe normally during the Position Preparation and Alignment phases of shot technique, stop breathing for the Shot Start and Shot Execution phases and then breath normally again during the Follow-Up phase. The breath control cycle not only provides oxygen to support body functions, but it is a means of stimulating relaxation during position preparation.
c) Muscle Relaxation. In order for bone and sling support to work effectively, most muscles must be relaxed as much as possible. Muscles in the support arm and shoulder, in particular, must be completely relaxed in every position. There are some muscles like the leg muscles in standing that need to use light to moderate tension to maintain body balance and reduce body movements. Advanced shooters make their positions more stable during Position Preparation by using exhaling as a cue to relax selected parts of the body. Each time they exhale in prone and kneeling, they tell the muscles in the sling arm to “let
go” and relax into the sling. In standing, they tell the muscles in the support arm and shoulder to “let go” and relax down so that the rifle rests on bone support and is not held up by muscle support.
d) Balance Checks. The precise balance of the body-rifle system over its support points in standing and kneeling also contributes to position stability. Top rifle athletes take three or four seconds before starting to aim to check their balance. The athlete consciously tries to sense whether the body-rifle system is balanced over the centers of the feet and whether the weight distribution between the two feet is correct. Balance checks in standing must control both forward-rearward and left-right balance. Balance checks in kneeling must control the balance of the body-rifle system over the left and right heels as well as the weight distribution between the right foot on the kneeling roll and left foot. Athletes must work out ideal balance distributions for the kneeling and standing positions.
Normal Breathing During Shot Preparation and
Shot Alignment Phases
Normal Breathing During Follow-Up
Phase= Shot Start
BREATH CONTROL DIAGRAM
= Shot
This athlete is completing a pre-shot check before starting to aim. These checks control preparation of the inner position, muscle re-laxation and balance. The athlete is USA National Team member Sarah Beard.
continued...
Winter 2018 11
II - POSITION ALIGNMENTThe second phase of shot technique, Position
Alignment, involves using the shooter’s vision, the rifle’s sights and aiming functions to precisely align the position and rifle with the target.
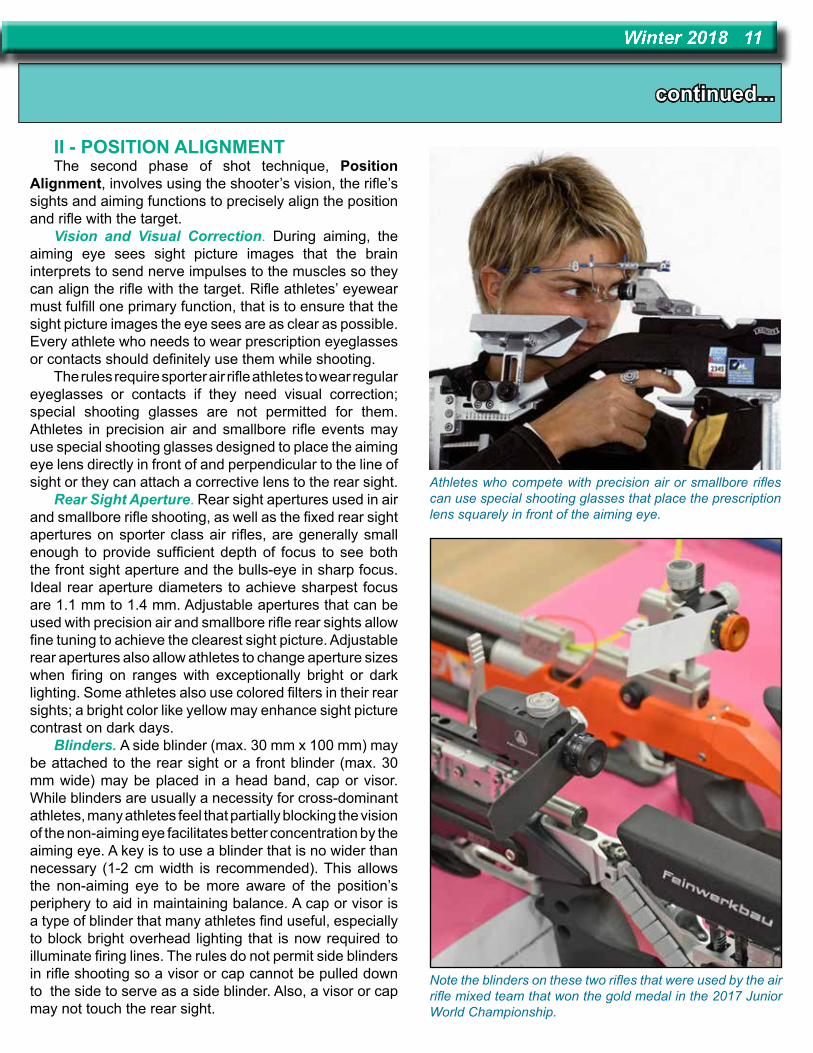
Vision and Visual Correction. During aiming, the aiming eye sees sight picture images that the brain interprets to send nerve impulses to the muscles so they can align the rifle with the target. Rifle athletes’ eyewear must fulfill one primary function, that is to ensure that the sight picture images the eye sees are as clear as possible. Every athlete who needs to wear prescription eyeglasses or contacts should definitely use them while shooting.
The rules require sporter air rifle athletes to wear regular eyeglasses or contacts if they need visual correction; special shooting glasses are not permitted for them. Athletes in precision air and smallbore rifle events may use special shooting glasses designed to place the aiming eye lens directly in front of and perpendicular to the line of sight or they can attach a corrective lens to the rear sight.
Rear Sight Aperture. Rear sight apertures used in air and smallbore rifle shooting, as well as the fixed rear sight apertures on sporter class air rifles, are generally small enough to provide sufficient depth of focus to see both the front sight aperture and the bulls-eye in sharp focus. Ideal rear aperture diameters to achieve sharpest focus are 1.1 mm to 1.4 mm. Adjustable apertures that can be used with precision air and smallbore rifle rear sights allow fine tuning to achieve the clearest sight picture. Adjustable rear apertures also allow athletes to change aperture sizes when firing on ranges with exceptionally bright or dark lighting. Some athletes also use colored filters in their rear sights; a bright color like yellow may enhance sight picture contrast on dark days.
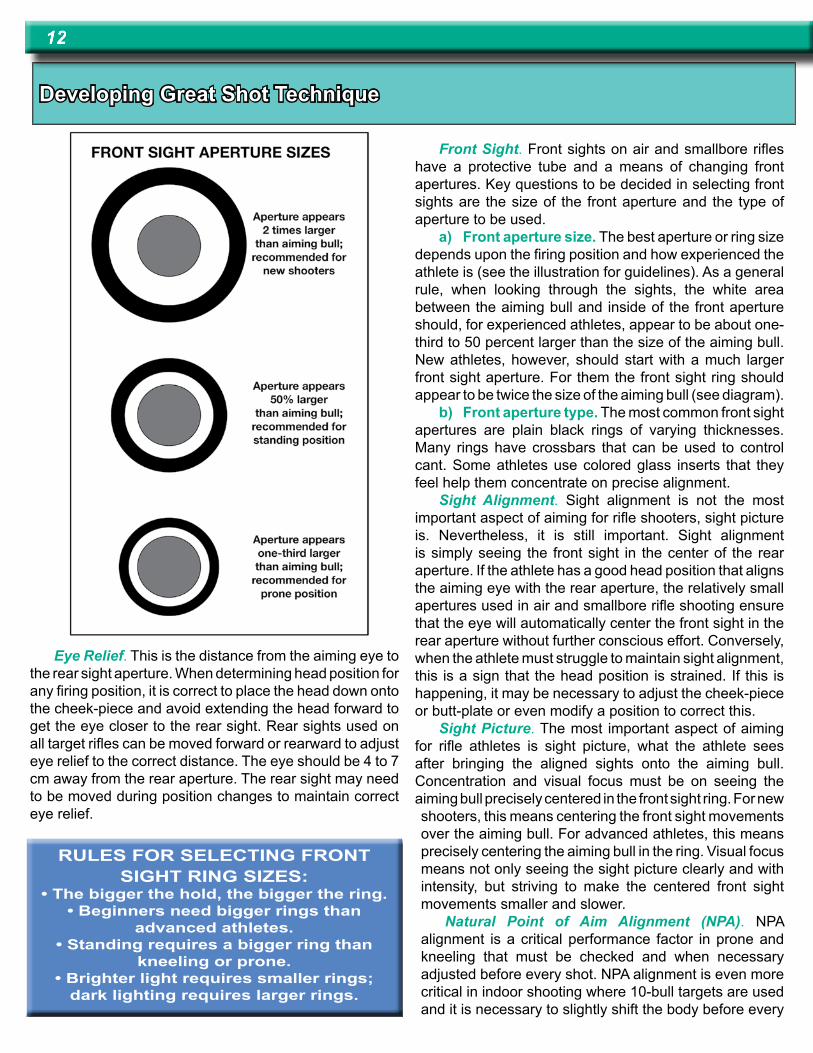
Blinders. A side blinder (max. 30 mm x 100 mm) may be attached to the rear sight or a front blinder (max. 30 mm wide) may be placed in a head band, cap or visor. While blinders are usually a necessity for cross-dominant athletes, many athletes feel that partially blocking the vision of the non-aiming eye facilitates better concentration by the aiming eye. A key is to use a blinder that is no wider than necessary (1-2 cm width is recommended). This allows the non-aiming eye to be more aware of the position’s periphery to aid in maintaining balance. A cap or visor is a type of blinder that many athletes find useful, especially to block bright overhead lighting that is now required to illuminate firing lines. The rules do not permit side blinders in rifle shooting so a visor or cap cannot be pulled down to the side to serve as a side blinder. Also, a visor or cap may not touch the rear sight.
Athletes who compete with precision air or smallbore rifles can use special shooting glasses that place the prescription lens squarely in front of the aiming eye.
Note the blinders on these two rifles that were used by the air rifle mixed team that won the gold medal in the 2017 Junior World Championship.
Developing Great Shot Technique
Eye Relief. This is the distance from the aiming eye to the rear sight aperture. When determining head position for any firing position, it is correct to place the head down onto the cheek-piece and avoid extending the head forward to get the eye closer to the rear sight. Rear sights used on all target rifles can be moved forward or rearward to adjust eye relief to the correct distance. The eye should be 4 to 7 cm away from the rear aperture. The rear sight may need to be moved during position changes to maintain correct eye relief.
Front Sight. Front sights on air and smallbore rifles have a protective tube and a means of changing front apertures. Key questions to be decided in selecting front sights are the size of the front aperture and the type of aperture to be used.
a) Front aperture size. The best aperture or ring size depends upon the firing position and how experienced the athlete is (see the illustration for guidelines). As a general rule, when looking through the sights, the white area between the aiming bull and inside of the front aperture should, for experienced athletes, appear to be about one-third to 50 percent larger than the size of the aiming bull. New athletes, however, should start with a much larger front sight aperture. For them the front sight ring should appear to be twice the size of the aiming bull (see diagram).
b) Front aperture type. The most common front sight apertures are plain black rings of varying thicknesses. Many rings have crossbars that can be used to control cant. Some athletes use colored glass inserts that they feel help them concentrate on precise alignment.
Sight Alignment. Sight alignment is not the most important aspect of aiming for rifle shooters, sight picture is. Nevertheless, it is still important. Sight alignment is simply seeing the front sight in the center of the rear aperture. If the athlete has a good head position that aligns the aiming eye with the rear aperture, the relatively small apertures used in air and smallbore rifle shooting ensure that the eye will automatically center the front sight in the rear aperture without further conscious effort. Conversely, when the athlete must struggle to maintain sight alignment, this is a sign that the head position is strained. If this is happening, it may be necessary to adjust the cheek-piece or butt-plate or even modify a position to correct this.
Sight Picture. The most important aspect of aiming for rifle athletes is sight picture, what the athlete sees after bringing the aligned sights onto the aiming bull. Concentration and visual focus must be on seeing the aiming bull precisely centered in the front sight ring. For new shooters, this means centering the front sight movements over the aiming bull. For advanced athletes, this means precisely centering the aiming bull in the ring. Visual focus means not only seeing the sight picture clearly and with intensity, but striving to make the centered front sight movements smaller and slower.
Natural Point of Aim Alignment (NPA). NPA alignment is a critical performance factor in prone and kneeling that must be checked and when necessary adjusted before every shot. NPA alignment is even more critical in indoor shooting where 10-bull targets are used and it is necessary to slightly shift the body before every
12
RULES FOR SELECTING FRONT SIGHT RING SIZES:
• The bigger the hold, the bigger the ring.• Beginners need bigger rings than
advanced athletes.• Standing requires a bigger ring than
kneeling or prone.• Brighter light requires smaller rings;
dark lighting requires larger rings.
continued...
shot to move from one bull to the next. In theory, every firing position has an alignment point where the position points most naturally when it is relaxed, unstrained and balanced. New shooters’ positions will not have NPAs until they have done enough firing in the new positions to feel comfortable in them. After a few hundred repetitions when their bodies learn to relax and utilize bone and sling support, those new positions will develop NPAs.
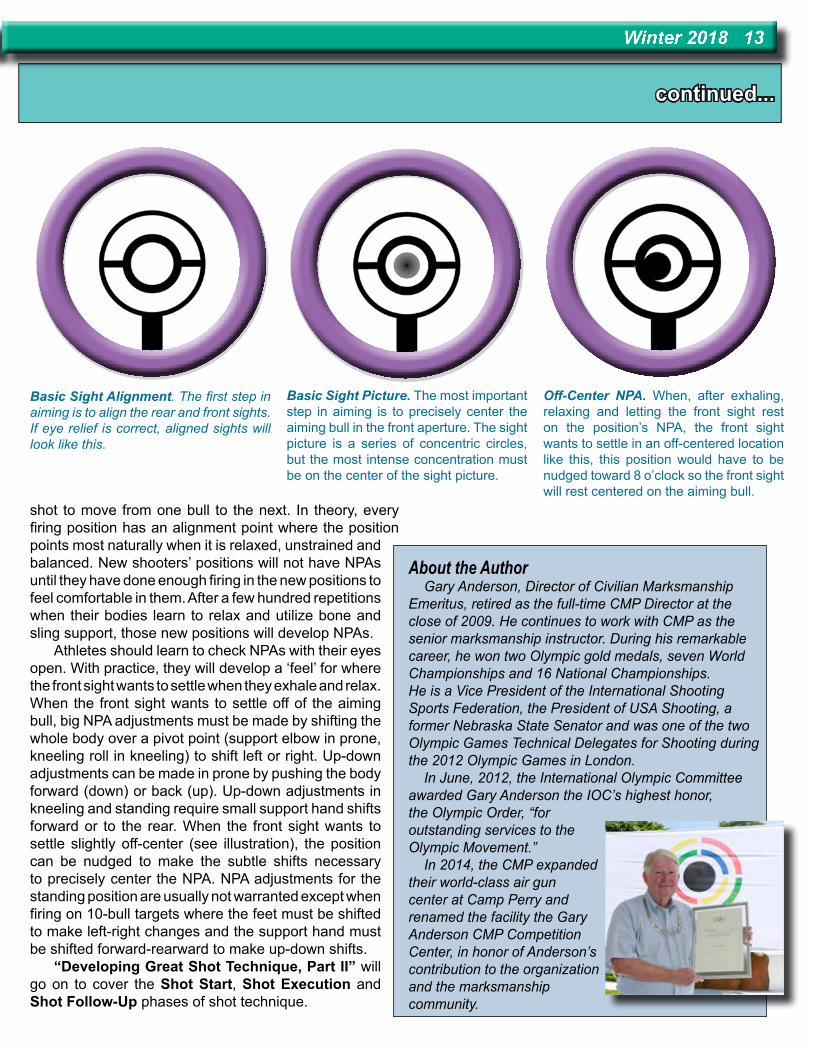
Athletes should learn to check NPAs with their eyes open. With practice, they will develop a ‘feel’ for where the front sight wants to settle when they exhale and relax. When the front sight wants to settle off of the aiming bull, big NPA adjustments must be made by shifting the whole body over a pivot point (support elbow in prone, kneeling roll in kneeling) to shift left or right. Up-down adjustments can be made in prone by pushing the body forward (down) or back (up). Up-down adjustments in kneeling and standing require small support hand shifts forward or to the rear. When the front sight wants to settle slightly off-center (see illustration), the position can be nudged to make the subtle shifts necessary to precisely center the NPA. NPA adjustments for the standing position are usually not warranted except when firing on 10-bull targets where the feet must be shifted to make left-right changes and the support hand must be shifted forward-rearward to make up-down shifts.
“Developing Great Shot Technique, Part II” will go on to cover the Shot Start, Shot Execution and Shot Follow-Up phases of shot technique.
About the Author Gary Anderson, Director of Civilian Marksmanship Emeritus, retired as the full-time CMP Director at the close of 2009. He continues to work with CMP as the senior marksmanship instructor. During his remarkable career, he won two Olympic gold medals, seven World Championships and 16 National Championships. He is a Vice President of the International Shooting Sports Federation, the President of USA Shooting, a former Nebraska State Senator and was one of the two Olympic Games Technical Delegates for Shooting during the 2012 Olympic Games in London. In June, 2012, the International Olympic Committee awarded Gary Anderson the IOC’s highest honor, the Olympic Order, “for outstanding services to the Olympic Movement.” In 2014, the CMP expanded their world-class air gun center at Camp Perry and renamed the facility the Gary Anderson CMP Competition Center, in honor of Anderson’s contribution to the organization and the marksmanship community.
Winter 2018 13
Basic Sight Alignment. The first step in aiming is to align the rear and front sights. If eye relief is correct, aligned sights will look like this.
Basic Sight Picture. The most important step in aiming is to precisely center the aiming bull in the front aperture. The sight picture is a series of concentric circles, but the most intense concentration must be on the center of the sight picture.
Off-Center NPA. When, after exhaling, relaxing and letting the front sight rest on the position’s NPA, the front sight wants to settle in an off-centered location like this, this position would have to be nudged toward 8 o’clock so the front sight will rest centered on the aiming bull.