developer guide sybase brand mobiliser 1 - sybooks...
TRANSCRIPT

Developer Guide
Sybase Brand Mobiliser 1.3

DOCUMENT ID: DC01690-01-0130-02LAST REVISED: June 2013Copyright © 2013 by Sybase, Inc. All rights reserved.This publication pertains to Sybase software and to any subsequent release until otherwise indicated in new editions ortechnical notes. Information in this document is subject to change without notice. The software described herein is furnishedunder a license agreement, and it may be used or copied only in accordance with the terms of that agreement.Upgrades are provided only at regularly scheduled software release dates. No part of this publication may be reproduced,transmitted, or translated in any form or by any means, electronic, mechanical, manual, optical, or otherwise, without the priorwritten permission of Sybase, Inc.Sybase trademarks can be viewed at the Sybase trademarks page at http://www.sybase.com/detail?id=1011207. Sybase andthe marks listed are trademarks of Sybase, Inc. ® indicates registration in the United States of America.SAP and other SAP products and services mentioned herein as well as their respective logos are trademarks or registeredtrademarks of SAP AG in Germany and in several other countries all over the world.Java and all Java-based marks are trademarks or registered trademarks of Oracle and/or its affiliates in the U.S. and othercountries.Unicode and the Unicode Logo are registered trademarks of Unicode, Inc.All other company and product names mentioned may be trademarks of the respective companies with which they areassociated.Use, duplication, or disclosure by the government is subject to the restrictions set forth in subparagraph (c)(1)(ii) of DFARS52.227-7013 for the DOD and as set forth in FAR 52.227-19(a)-(d) for civilian agencies.Sybase, Inc., One Sybase Drive, Dublin, CA 94568.
Contents
Developing Brand Mobiliser Applications ...........................1Advanced Interactive Messaging Server ........................1Application States ...........................................................2
Base States ...........................................................3Subscriber States ..................................................3USSD States ..........................................................4Custom States .......................................................4Input and Output Parameters .................................4State Machine ........................................................5
Application Composer .....................................................5State Transitions ....................................................6Controlling State Transitions with Regular
Expressions .......................................................7Testing Regular Expressions .................................8State Editor ............................................................9Adding States to Applications ..............................10Editing State Properties .......................................10Removing States .................................................11Removing State Transitions .................................11
Developing Interactive Applications ..............................11Adding Keywords to Applications .........................12Searching for a Keyword ......................................13Designing Application Task Flows .......................13Short Codes, Long Codes, and Keywords ...........14
Developing Event Applications .....................................15Events ..................................................................16Creating Events ...................................................17Creating One-Time Event Windows .....................17Creating Recurring Event Windows .....................18Assigning Events to Applications .........................19
Activation ......................................................................19
Developer Guide iii
Application Mode Transitions ...............................20Activating Applications .........................................21Activating Events .................................................21Deactivating Applications .....................................22Deactivating Events .............................................22
Testing Applications ......................................................22Testing Interactive Applications ............................23Testing Event Applications ...................................25
Importing Applications ..................................................26Importing Application XML Files ..........................26Creating Applications from Templates .................27
Exporting Applications ..................................................27Exporting a Single Application .............................28Exporting a Group of Applications .......................28
Sample Applications .....................................................28Cash-Out Interactive Application .........................28Mobiliser Counter Interactive Application ............30Utility Notification Event Application ....................31
Developing Custom Application States .............................33Application Life Cycle ...................................................33Developing and Deploying Custom States ...................35
Extending the SmappStatePlugin Class ..............35Extending the AbstractDynamicMenu Class ........39Implementing State Logic ....................................41Custom State Information ....................................43Custom State Variables .......................................45Setting Up Apache Maven ...................................53Custom State Bundles .........................................56
Custom State Samples .................................................78Sample GetMyWeather State ..............................78Sample Custom State ..........................................80Sample Custom-Menu State ................................82
State SDK Core Components .......................................84States Catalog ......................................................................87
Add Subscriber State ....................................................87
Contents
iv Sybase Brand Mobiliser

Application Call State ....................................................89Application Call Return State ........................................92Compare Typed Variables State ...................................94Compare Variables State ..............................................96Copy Variables State .................................................... 98Counter State ..............................................................100Get Subscriber State ..................................................101Goto Application State ................................................104Process Subscriber State ...........................................106Send SMS State .........................................................109Send USSD Input State ..............................................111Send USSD Menu State .............................................112
Sample USSD Menu Code ................................116Send USSD Text State ...............................................118Set Variable State .......................................................120Start Application State ................................................122Update Subscriber State ............................................124
Index ................................................................................127
Contents
Developer Guide v

Contents
vi Sybase Brand Mobiliser

Developing Brand Mobiliser Applications
In Sybase® Brand Mobiliser, states are basic building blocks that you can link sequentially tomodel application task flows. Applications are executed by the Brand Mobiliser ProcessingEngine at runtime.
Two application types, interactive and event, differ by both how they are invoked and how theyperform. Interactive applications provide rich, user-interactive mobile services, and aretypically invoked when mobile customers send a keyword to a preassigned short or long code.Event applications work non-interactively, such as batch processes that send campaignmessages, and are typically invoked by events, such as scheduled times or triggers.
You can create applications:
• From scratch• Using provided application templates• By importing application files from another computer
Brand Mobiliser provides tools that let you visually compose a mobile-messaging application,test it using a built-in simulator, and deploy it, ready to be used by mobile consumers.
Advanced Interactive Messaging ServerThe core of Sybase® Brand Mobiliser is the Advanced Interactive Messaging Server (AIMS),also known as the messaging server.
The server components include:
• Brand Mobiliser Processing Engine (processing engine) – manages application life cycles,and provides the runtime environment.
• Event engine – invokes applications based on scheduled events.• Session manager – tracks active sessions and terminates expired sessions.• Channel manager – manages incoming and outgoing communication channels.
Developing Brand Mobiliser Applications
Developer Guide 1

Application StatesIn Brand Mobiliser, states are basic building blocks that you can link sequentially to modelapplication-process flows.
Brand Mobiliser states are either:
• Standalone – implemented natively.• Service – proxy to a Web service or aggregated Web services that are exposed through the
service-oriented architecture (SOA) layer.
Brand Mobiliser provides:
• Base states – for composing task flows.• Subscriber states – for performing operations on subscriber storage.
Developing Brand Mobiliser Applications
2 Sybase Brand Mobiliser

You can meet customer requirements by developing custom states using the Brand MobiliserState SDK. You can add custom states dynamically using the plug-in mechanism that isenabled by the OSGi services registry.
Create Brand Mobiliser applications using the Application Composer Web tool. Applicationtypes include:
• Interactive – provide a user-interactive mobile service; typically invoked when mobileconsumers send a keyword to a preassigned short code.
• Event – designed for batch processing; invoked by events, such as scheduled times, systemtriggers, or external triggers.
Most states can be used in either application type. However, there are a few states that areavailable only to a specific application type. For example, you can use the Process Subscriberstate only in event applications, because it relies on the callback mechanism provided by theprocessing engine. You can use Application Call and Application Call Return states only forinteractive applications, because these states do not support the callback mechanism.Application Composer prevents you from adding invalid states to an application.
Base StatesBrand Mobiliser base states provide standalone functionality, without dependency on orinteraction with external services. You commonly use base states to construct process flows.
Base states perform functions such as calling applications, comparing and copying variables,incrementing counters, sending SMS messages, and setting session variable values.
See also• Application Call State on page 89• Application Call Return State on page 92• Compare Typed Variables State on page 94• Compare Variables State on page 96• Copy Variables State on page 98• Counter State on page 100• Goto Application State on page 104• Send SMS State on page 109• Set Variable State on page 120• Start Application State on page 122
Subscriber StatesApplications that contain subscriber states have access to subscriber storage, which storesattributes that are useful in push campaigns.
Subscriber storage is nondurable storage for staging, or in-transit storage, pending batchtransfer to the system of record. The database schema is designed to be generic, and is not fullyoptimized for large scale or more domain-specific purposes.
Developing Brand Mobiliser Applications
Developer Guide 3

See also• Add Subscriber State on page 87
• Get Subscriber State on page 101
• Process Subscriber State on page 106
• Update Subscriber State on page 124
USSD StatesBrand Mobiliser delivers Unstructured Supplementary Service Data (USSD) states via JavaMessaging Service (JMS) to external USSD channels.
Brand Mobiliser USSD states prompt subscribers for input, send text notifications and menu-based requests.
See also• Send USSD Input State on page 111
• Send USSD Menu State on page 112
• Send USSD Text State on page 118
Custom StatesYou can develop custom application states to extend the functionality of Brand Mobiliser, andto meet client-specific requirements.
Custom states are typically developed by:
• SAP® personnel to implement client-specific requirements.• Third parties for plug-in applications to meet client requirements.
To integrate new custom states, develop Java components using the provided APIs, andcustomize the product by installing custom-state bundles.
Input and Output ParametersApplication states can have input and output parameters. Input parameters allow states toreceive input from consumers, other states, and applications. Output parameters allow statesto save values in session variables that can be used by other states or applications.
Input parameters contain the information a state requires to perform its task. Input parameterscan be constant values, or values copied from a variable in the current user session.
Output parameters allow states to return values. All output parameters are available asvariables.
See also• Custom State Variables on page 45
• Defining Input Variables on page 47
Developing Brand Mobiliser Applications
4 Sybase Brand Mobiliser
• Defining Output Variables on page 49
• Accessing Input Variables on page 50
• List Variables on page 51
State MachineA state machine defines an application process flow at runtime. During development, you cancompose an application task flow visually using the Application Composer. When youactivate the application, the process flow is converted to a state machine.
States are elements of a state-machine system. An application usually has many states, and caninclude different types of states. Each state has a previous state and a following state, unless itis the initial state or the final state. There can be only one initial state, but, depending on userinteraction, there can be many final states.
An initial state is the first state in an application, and only handles state transitions to follow-upstates, based on transition rules. The initial-state, which is a base state, is Start Application.The initial state is created automatically when you create an application, and cannot bedeleted. By default, the name of the initial state is the same as the name of the application.
Application ComposerTo visually develop applications, use the Application Composer.
The Application Composer state layout view lets you visualize the processing steps of theapplication task flow. You can create states and draw transitions between them. TheApplication Composer enables application developers to:
• Visualize states in the application using an automatic layout• Drag and drop states to rearrange the layout• Highlight the context, dependencies, and transitions of states• Zoom in and out to see a complete or partial application layout• Set the grid line type
Developing Brand Mobiliser Applications
Developer Guide 5

The Layout Canvas shows the application flow, from left to right, on a grid line background.The flow consists of states (shown in boxes) and transitions that connect two states (depictedas lines with arrows). State boxes include the name of the state instance, the type, and awatermark pattern that define the state type. In complex applications, transition lines mayoverlap.
When you highlight a state, all of its transition lines and states they connect to are highlighted.To highlight a state, move the cursor over the state icon and left-click. The dependent statesand transition lines display in different colors:• The selected state displays a dark gray border; for example, the Validate FI Code Format
state in the screen above. When you select a state, the text at the bottom of the state iconchanges to Delete.
• States that transition to the highlighted state display a blue border and a blue transitionline.
• States to which the highlighted state transitions display an orange border and an orangetransition line.
• States that transition both to and from the highlighted state have borders that are half blueand half orange (dual mode); for example, the Invalid FI Code Format state in the screenabove.
State TransitionsSome state transitions are determined by matching regular expressions with text supplied byconsumers. Other states have specific transitions that define follow-up states, which statedevelopers define in the code.
The OK and Fail transitions do not use pattern matching; such transitions are based on states'code, and validation provided by, or events in, back-end systems. Some states do not requireOK or Fail transitions. If a state does require one of these transitions, and you do not specify afollow-up state, the application terminates.
Developing Brand Mobiliser Applications
6 Sybase Brand Mobiliser

For dynamic transitions, a state's code has the option to return an expression, which providesthe input to the pattern-matching mechanism. Dynamic transitions also provide a way totransition to success or failure outcomes, and may replace the OK and Fail transitions.Dynamic transitions can communicate information back to applications about certainvalidation problems.
This example includes an OK transition, a Fail transition, and a dynamic transition that usesthe expression MIN|MAX.
See also• Controlling State Transitions with Regular Expressions on page 7
Controlling State Transitions with Regular ExpressionsYou can control state transitions by defining regular expressions. When expressions matchuser-input strings, the state transitions to the follow-up state.
Some states expect user input to control the transition to follow-up states. Input can beprovided either by consumers in response to the Send SMS state, or as dynamic output fromeither a Brand Mobiliser state, or a third-party custom state. Dynamic values allow externalsystems to communicate specific context information back to the application.
A regular expression can contain any combination of characters. The Brand Mobiliserexpression tester enables you to test regular expressions during application development.Sample regular expressions are:
Regular Expression Matches
.* Any value in the Expression field.
(.*) Any value in the Expression field; assigns the expression to a sessionvariable.
Developing Brand Mobiliser Applications
Developer Guide 7

In more complex cases, you can break a regular expression into multiple regular-expressiongroups and assign them to separate session variables.
For a complete description of regular expressions, see: http://java.sun.com/j2se/1.5.0/docs/api/java/util/regex/Pattern.html.
In the state editor, Target identifies the state that follows the current state if its Expressionvalue matches the input. If the input matches more than one Expression value, a list of matchesis created. The first entry in the list is the first matching pattern, continuing with other states inthe order in which they appear in the state editor. For example, if the input is 0, the follow-upstate is Goto Application Main Menu, even though 0 also matches the second expression. Ifthe input is anything other than 0, it matches the second expression, and the value is assignedto the session variable AGENT_CODE, because the value of Expression is surrounded byparentheses. To move an expression up or down in the Follow-up States list, use the arrows onthe left side of the editor.
Testing Regular ExpressionsAs you develop applications in the Application Composer, you can test regular expressions todetermine whether they match alphanumeric strings.
1. In the Application Composer, select a state.
2. Click the ? icon to the right of the Assign To field for a follow-up state.
The expression tester opens and populates Expression and Assign To fields with follow-upstate values from the state editor.
3. Enter the value to test in the Text to Test field, and click Test.
The result is either:
• Match – value in Expression field matches the value in Text to Test field.
Developing Brand Mobiliser Applications
8 Sybase Brand Mobiliser

• No Match – expression value does not match Text to Test value.
State EditorIn the state editor, you can edit state properties, define follow-up states, test regularexpressions for follow-up transitions, and detach the current state from follow-up states.
The state editor window opens automatically when you select a state in the ApplicationComposer. Depending on the state type, the state editor displays various options, context-sensitive links, and entry fields.
State editor fields and controls are:
1. Entry Nodes – identify links to other states that transitions to this state. If you click an entrynode, a state editor opens for the corresponding state. If you hover over an entry node, yousee the state name with which it is associated.
2. State Type Watermark and Icon – icon associated with the state type. The watermarkallows you to quickly recognize state types in the editor and in the layout view.
3. Pop-up Drag Area – you can move the state editor anywhere within the ApplicationComposer by clicking the header and dragging.
4. Encryption – encrypts incoming and outgoing messages, which are saved in message logs.5. Editor Closer – closes the state editor. If you have pending changes that have not been
saved, you are prompted to either save or discard these changes.
Developing Brand Mobiliser Applications
Developer Guide 9

6. State Type Notes – to view or edit notes that describe a state's function, input and outputvariables, and follow-up state transitions, click the down arrow.
7. State Collapser – shrink or enlarge the state editor.8. Inputs Section – input variable names and values. Click the down arrow to close this
section.9. Variables Paging for Inputs Section – if a state contains more than five input variables, you
can page through the others by selecting the relevant page set. To display all inputvariables, click All.
10. Outputs Section – output variable names and values. Click the down arrow to close thissection.
11. Variables Paging for Outputs Section – if a state contains more than five output variables,you can page through the others by selecting the relevant page set. To display all outputvariables, click All.
12. Follow-up Section – configure, change, and test follow-up states. To collapse this section,click the down arrow.
13. Follow-up Paging – three follow-up states appear on each page. To see more follow-upstates, select the relevant page set.
14. Exit Nodes – identify links to other states that this state transitions to. If you select an exitnode, a state editor opens for the next state. If you hover over an exit node, you see the statename with which it is associated.
15. Follow-up Selector – select the follow-up state. All states, except the Goto Applicationstate, allow you to add a follow-up state.
16. State Actions – Add Follow-up State and Save.
Adding States to ApplicationsYou can add new states in the Application Composer. When you create a new application, aStart Application state is created automatically, as the initial application state.
1. In the Application Composer, select an existing state.
2. In the state editor, expand the list of follow-up states, and select a state.
3. Click Add Follow-up.The new state appears in the Application Composer. A transition line connects the currentstate to the new state.
A new state is automatically assigned the name New State Type State. Change the name,because state names must be unique.
Editing State PropertiesYou can edit state properties and state transitions in the Application Composer.
1. In the Application Composer, select the state you want to edit.
2. In the state editor, configure state properties.
These changes are immediately saved to the database:
Developing Brand Mobiliser Applications
10 Sybase Brand Mobiliser

• Adding a new follow-up state• Adding a transition to an existing state• Removing a transition from an existing state• Moving a transition up or down in the list of follow-up states
3. For other changes, click Save.
Removing StatesIn the Application Composer, you can remove states from an application. Removing a statepermanently deletes the state and transition lines that are connected to it from the application.
1. In the Application Composer, select the state to remove.
2. Click Delete.
If you remove a state that has follow-up states, these states may be orphaned.
Removing State TransitionsRemoving a state transition permanently deletes the transition, but does not remove anyfollow-up states to which it is connected.
1. In the Application Composer, select the state with the follow-up transition you want todelete.
2. In the state editor, to the right of the Target State field, click the asterisk-arrowhead icon:
NextTo reattach orphaned states, add a new transition using the follow-up selector.
Developing Interactive ApplicationsBrand Mobiliser interactive applications provide rich, user-interactive mobile services, andare typically invoked when mobile customers send a keyword to a preassigned short or longcode.
1. In the Dashboard screen, at the bottom of the My Applications module, select CreateInteractive Application.
2. On the Application Details tab, enter:
• Name – the main identifier for an application. SAP recommends that you do not useduplicate names within a workspace.
• Category – (optional) select the application category from the list. You can usecategories to group applications together for managing and reporting.
Developing Brand Mobiliser Applications
Developer Guide 11

• Active From – the date and time the application becomes active, based on the serverdate and time.
• Active To – the date and time the application ceases to be active, based on the serverdate and time.
• Timeout (secs) – an interactive application establishes conversations with mobilesubscribers. When a conversation starts, a unique session is established for theconversation. The session terminates (or times out) when there is no conversation formore than the number of seconds you enter here. The default value is 450 seconds (7minutes and 30 seconds).
• Session Limit Response – the message that is sent to mobile subscribers when theapplication cannot start or carry on a conversation for various reasons; the mostcommon reason being too many conversations are already taking place, exceeding thesystem capacity. In this case, the default message is sent to mobile subscribers. Forexample, the message may say “Service busy, try again in few minutes.”
3. Click Save.
4. (Optional) To save the application to the local file system, click Export.The application is exported to a Brand Mobiliser application XML file. You can transferthe XML file to other Brand Mobiliser workspaces or instances. You can also use the file toback up the application, or store it in the source control management system.
Note: The Export button is disabled until you save an application the first time.
5. Add a keyword to the application.
6. Design the application task flow.
7. Activate the application.
8. Test the application.
See also• Activating Applications on page 21
• Testing Interactive Applications on page 23
Adding Keywords to ApplicationsA keyword identifies an application within a workspace. Create at least one keyword for eachinteractive application.
1. Select the Keywords tab, and enter values for these fields.
• Add New Keyword – enter plain text or regular expressions. SAP recommends that akeyword be unique for each application in the same workspace.
• Active From – the date and time the keyword becomes active, based on the server dateand time.
• Active To – the date and time the keyword ceases to be active, based on the server dateand time.
Developing Brand Mobiliser Applications
12 Sybase Brand Mobiliser

2. To save the keyword, click the diskette icon.
After you save a keyword, another Add New Keyword field appears, allowing you to addanother keyword.
See also• Searching for a Keyword on page 13
• Short Codes, Long Codes, and Keywords on page 14
Searching for a KeywordKeywords should be unique within a Brand Mobiliser workspace. The keyword-search toolenables application developers to see if a keyword is assigned to any applications.
If you use a regular expression to define a keyword, the keyword search tool cannot detectduplicates.
1. In the Interactive Applications window, select the Keywords tab.
2. Enter the keyword for which to search, and click Search.
If any applications in the workspace already use the keyword, this information appears on thescreen:
• Used by – the application name.• Approved – indicates whether the application is active. False means that either the
application is inactive, or the application has never been activated, so the status is draft.
See also• Adding Keywords to Applications on page 12
• Short Codes, Long Codes, and Keywords on page 14
Designing Application Task FlowsThe key to effective application development is defining the task flows involved in modelingbusiness processes. In the Application Composer, you can graphically design an applicationtask flow.
The first time you open the Application Composer, you see the Start Application state. If youselect the state, the state editor opens, which allows you to add follow-up states.
You can rearrange a layout by dragging and dropping state icons. To get a better view of statetransitions, you may want to rearrange the layout, particularly when transition lines overlap.You can drag and drop state icons into fixed-grid positions on the canvas. The canvas does notallow free-form positions. Transition lines are automatically positioned, and you cannot movethem.
• To move a state, select it, and drag it to an alternate grid position.
Developing Brand Mobiliser Applications
Developer Guide 13

While moving, the state icon appears transparent, and the target grid positions arehighlighted when the mouse enters the grid area.
• To delete a state, select the state, and click Delete.
When you delete a state, all transitions to and from other states are deleted. However,corresponding states and all of their downstream flows are not deleted. States that are notconnected to other states become orphans, but they are still accessible from the follow-upstate list, and you can connect them to other states.
• To save a rearranged layout to the database, click Save Layout.• To revert the application layout to the last one saved in the database, click Revert
Layout.• To change the grid lines, expand the Gridlines list, and select All, Partial, or None.• To zoom in or out, expand the Zoom list, and select the magnification you want to see,
relative to the initial display.
If you zoom out from the default 100% view, you must reset the zoom level back to 100%before you can make any layout changes.
See also• Developing Event Applications on page 15
• Activating Applications on page 21
• Creating Events on page 17
• Assigning Events to Applications on page 19
• Activating Events on page 21
• Testing Event Applications on page 25
Short Codes, Long Codes, and KeywordsA short code or long code plus a keyword identifies an interactive application within a BrandMobiliser workspace.
Each Brand Mobiliser workspace has a unique short or long code. For incoming messages, theprocessing engine compares the destination MSISDN with the short or long code list to find amatching workspace. Once a matching workspace is identified, the processing enginecompares the message content with keywords assigned to applications in the workspace. Aworkspace can contain many applications, which should all have unique keywords. Atruntime, the processing engine stops when it finds the first matching keyword, and calls thecorresponding application.
A short code is a special telephone number, significantly shorter than a full telephone numberthat can be used to address SMS and MMS messages from some mobile phones or fixedphones, and is limited to national borders. A long code is a longer number and is availableinternationally.
Brand Mobiliser uses short codes and long codes differently from how they are used in themobile-operator world. Short codes are often associated with mobile services, such as Brand
Developing Brand Mobiliser Applications
14 Sybase Brand Mobiliser

Mobiliser interactive applications, and they are assigned by the mobile operator to the ownerof the service.
For example, company XYZ wants to provide a mobile service for paying street-parking finesin the financial district of San Francisco. XYZ applies for an assigned short code from amobile operator. Typically, the short code (9999) is advertised on billboards in the financialdistrict area: “To pay parking fines with your mobile phone, text “SFpay to 9999.” When amobile subscriber texts SFpay to 9999, the message first reaches the mobile operator. Theoperator, in turn, routes it to Brand Mobiliser. When Brand Mobiliser receives the message,the Brand Mobiliser Processing Engine maps the destination MSISDN (9999) to a workspace.Once the workspace is identified, the engine looks at the keyword SFpay and maps it to thecorresponding interactive application in that workspace. The first matching application ischosen.
A keyword can be a simple string like “coupon,” or a regular expression. Optionally, you canassociate a date range with a keyword, which controls the length of time a keyword remainsactive. A keyword's date range takes precedence over an application's date range: if anapplication's date range expires, but the keyword date range is still active, the applicationremains active until the keyword dates expire. When keyword dates are empty, the applicationdefines the date range.
Best practices:
• Verify that an interactive application acting as an entry point has at least one assignedkeyword.
• Use the keyword-search tool to verify that a keyword is assigned to only one application inthe workspace.
• If you define a regular expression as a keyword, verify that the regular expression does notoverlap with keywords that are already in use by other applications. The keyword-searchtool does not work for regular expressions.
See also• Adding Keywords to Applications on page 12
• Searching for a Keyword on page 13
Developing Event ApplicationsEvent applications work non-interactively, such as batch processes that send campaignmessages, and are typically invoked by events, such as scheduled times, system triggers, orexternal triggers. An event application can send outbound messages but has no user-interactive capability.
After you create and activate an event application, you can assign an event to it. You can assignan event to only one event application.
Developing Brand Mobiliser Applications
Developer Guide 15

1. On the Dashboard screen, at the bottom of the My Applications module, select CreateEvent Application.
2. On the Application Details tab, enter:
• Name – the main identifier for an application. SAP recommends that you do not useduplicate names within a workspace.
• Category – (optional) select the application category from the list. You can usecategories to group applications together for managing and reporting.
• Active From – the date and time the application becomes active, based on the serverdate and time.
• Active To – the date and time the application ceases to be active, based on the serverdate and time.
3. To save the application, expand Advanced Settings, and click Save.
4. Select the Application Composer tab, and define the application states and the task flow.
5. Activate the application.
6. Create an event and assign it to the application.
7. Activate the event.
8. Test the application.
9. (Optional) To export the application, expand Advanced Settings, and click Export.
Note: The Export button is disabled until you save an application the first time.
The application is exported to a Brand Mobiliser application XML file, and saved to thelocal file system. You can transfer the XML file to other Brand Mobiliser workspaces orinstances. You can also use the file to back up the application, or store the XML in thesource control management system.
See also• Designing Application Task Flows on page 13• Activating Applications on page 21• Creating Events on page 17• Assigning Events to Applications on page 19• Activating Events on page 21• Testing Event Applications on page 25
EventsA Brand Mobiliser event triggers an event application. Event applications are designed forbatch processing, and are triggered by events, such as scheduled times.
You assign an event to an event application, so that when the event occurs, the application isinvoked. For example, you can create a promotional event that is scheduled betweenNovember 1 and November 30. Within this event runtime, you can define event windows thatspecify when to invoke the event application. You can define event windows by setting start
Developing Brand Mobiliser Applications
16 Sybase Brand Mobiliser

and stop dates and times. You can also define recurring windows, for example, to occur daily,by setting start and stop times.
The event model is a container for storing configuration details and relationships, includingactive runtime, event windows (manual or recurring), the event application to trigger when anevent window is current, and all related interactive applications.
If you assign an event to an interactive application, no one can delete the application.
Creating EventsCreate an event to trigger an event application.
1. In the Dashboard screen, at the bottom of the My Events module, select Create NewEvent.
2. On the Event Details tab, enter:
• Name – the main identifier for an event. Duplicate names within a workspace areallowed, but not recommended.
• Category – (optional) select a category from the list. You can use categories to filterevents.
• Runtime From – the date and time the event becomes active, based on the server dateand time.
• Runtime To – the date and time the event ceases to be active, based on the server dateand time.
• Description – (optional) a description of the event's purpose.
3. Click Save.
Next
1. Set up event windows.2. Assign the event to an active event application.3. Activate the event.
See also• Developing Event Applications on page 15• Designing Application Task Flows on page 13• Activating Applications on page 21• Assigning Events to Applications on page 19• Activating Events on page 21• Testing Event Applications on page 25
Creating One-Time Event WindowsCreate a one-time event window to define when to start and stop time an event application. Atthe event-window start time, the event starts its corresponding event application; the event
Developing Brand Mobiliser Applications
Developer Guide 17

application stops either when it has finished processing its data, or at the event-window stoptime, whichever comes first.
1. On the Events screen, select the Event Windows tab.
2. Click Add New Window, and enter:
• Start date and time – time and date at which to start the event application.• Stop date and time – time and date at which to stop the event application.• Limit – maximum number of loopbacks to process. When used with a throttle, specify
as a multiple of throttle. For example, if throttle = 60 messages per minute, specify alimit of 60, 120, or 180.
• Throttle – maximum processing rate: number of messages per minute.• Resume – select to resume from the last processed item; leave unselected to restart
from the beginning of the list. This is useful for states that process lists, such as theProcess Subscriber state.
3. Save your settings.
4. (Optional) Create another event window, if necessary.
Creating Recurring Event WindowsCreate recurring event windows to start event applications at the same time every day, week, ormonth.
1. On the Events screen, select the Event Windows tab.
2. Click Add New Window.
3. Select Switch to Recurring Mode, and select:
• Recurring Start Date – the date at which to start the event application.• Recurring Interval – the frequency at which to start the application: Daily, Weekly, or
Monthly.
4. Click Add New Window, and enter:
• Start time – time at which to start the event application.• Stop time – time at which to stop the event application.• Limit – maximum number of loopbacks to process. When used with a throttle, specify
as a multiple of throttle. For example, if throttle = 60 messages per minute, specify alimit of 60, 120, or 180.
• Throttle – maximum processing rate: number of messages per minute.• Resume – select to resume from the last processed item; leave unselected to restart
from the beginning of the list.
5. Save your settings.
6. (Optional) Define additional recurring event windows, if required.
Developing Brand Mobiliser Applications
18 Sybase Brand Mobiliser

Assigning Events to ApplicationsAssign an event to an event application. The event invokes the event application.
PrerequisitesActivate the event application.
Task
1. In the main Brand UI window, select Events.
2. Select the event, then select either the Event Applications tab or the InteractiveApplications tab.
Note: You can assign an event to only one event application. If an assignment alreadyexists, you can remove it. If you assign an event to an interactive application, it prevents itfrom being inadvertently deleted. You can assign an event to an unlimited number ofinteractive applications.
3. Click Assign Applications.
4. To narrow the list of applications that appear, do one of the following, and click Search:
• Select Event Applications or Interactive Applications.• Enter the application name.• Expand the Advanced list, and select a category.
5. Select the application to assign to the event.
6. To save the assignment, select:
• Add to Event – remains on the current screen.• Add and Return to Event – returns to the Events screen, and displays the Event
Applications tab.
See also• Developing Event Applications on page 15• Designing Application Task Flows on page 13• Activating Applications on page 21• Creating Events on page 17• Activating Events on page 21• Testing Event Applications on page 25
ActivationBefore you can run Brand Mobiliser applications and events, you must activate them.
The processing engine executes applications and events when they are in active mode. If youedit the active version of an application or an event in the Brand UI, changes are saved to an
Developing Brand Mobiliser Applications
Developer Guide 19

in-review version. Changing an in-review version does not impact the active version, until youreactivate the application or event.
Initially, the mode of activated applications and events is on-deck, and changes to active whenthe active from-date and time are the same as the current-date and time. Artifacts in activemode are rolled back to on-deck mode, if the active from-date and time are moved into thefuture.
To run some newly created artifacts—default menus, applications, and events—you mustactivate them. If you make any changes to one of these artifacts, you must reactivate them.
Once artifacts are activated, changes are committed and cannot be rolled back. If applicationsor events contain mistakes, deactivate them. For information about default menus, see BrandMobiliser System Administration.
Application Mode TransitionsAfter you create an application, it transitions through a series of modes. A running applicationis in active mode.
Initial Mode Event/Condition New Mode
None Create an application Draft
Draft • Activate the application
• Start date is earlier than current date
Active
Draft • Activate the application
• Start date is later than current date
On-deck
On-deck Start date is earlier than current date Active
On-deck Modify the application On-deck
On-deck • Modify the application
• Start date is earlier than current date
Active in-review
Active Modify the application Active in-review
Active End date is earlier than current date Ended
Active In-Review End date is earlier than current date Ended
Developing Brand Mobiliser Applications
20 Sybase Brand Mobiliser

Activating ApplicationsYou must activate applications before you can test or run them. If you modify an activeapplication and save changes, you must reactivate the application before changes are appliedto the active version.
Applications that are currently running are in active mode. If you activate an application, butits active start time is in the future, the application mode is on-deck, and cannot be tested.
1. On the Brand UI navigation bar, select Assets.
2. On the Assets screen, select Activate Applications.
3. Click Load Applications for Activation.
Applications that are in-review appear.
4. Choose either:
• To activate a single application, select Actions > Activate.• To activate all in-review applications, select Activate All.
See also• Developing Event Applications on page 15• Designing Application Task Flows on page 13• Creating Events on page 17• Assigning Events to Applications on page 19• Activating Events on page 21• Testing Event Applications on page 25• Developing Interactive Applications on page 11• Testing Interactive Applications on page 23
Activating EventsActivate an event to trigger an event application.
PrerequisitesAssign the event to an active event application.
Task
1. In the Brand UI navigation bar, select Events.
2. For the event you want to activate, select Actions > Activate.
See also• Developing Event Applications on page 15• Designing Application Task Flows on page 13
Developing Brand Mobiliser Applications
Developer Guide 21

• Activating Applications on page 21
• Creating Events on page 17
• Assigning Events to Applications on page 19
• Testing Event Applications on page 25
Deactivating ApplicationsIf necessary, you can deactivate or delete an application.
• To deactivate the application until a specified future date, change the active from-date to afuture date, and reactivate.
• (Interactive applications only) To prevent an application from being invoked, remove thekeywords, and reactivate.
• To delete an application:
a) Export the application.b) Delete the application.
Deactivating EventsIf necessary, you can deactivate an event. If the event has a current event window, change thewindow start date to a future date, before deactivating the event.
1. In the Brand UI navigation bar, select Events.
2. Select the event you want to deactivate.
3. On the Event Details tab, change the active from-date to a future date.
4. (If necessary) Reset the event window start date and time.
5. Save your changes and reactivate the event.
The event remains inactive until the specified future date.
Testing ApplicationsTest Brand Mobiliser applications using the built-in application simulator.
To access the Simulation page, expand the Actions list on the right side of the navigation bar,and select Simulate Application. You can test interactive applications and event applications.Select the tab that corresponds to the application type you want to test.
You can also test applications using either a Short Message Peer-to-Peer (SMPP) test harnessor a Java Message Service (JMS) test harness; these methods are typically used by custom-state developers and advanced system administrators.
Developing Brand Mobiliser Applications
22 Sybase Brand Mobiliser

Testing Interactive ApplicationsTest an interactive application in the current workspace by simulating incoming and outgoingmessages.
PrerequisitesActivate the application.
Task
1. On the Interactive Application tab of the Simulation page, enter:
• Customer MSISDN – numeric value. Brand Mobiliser uses the MSISDN to eithercreate a new session or find the existing session. If the application being tested hasstates that interface with a back-end system, such as Money Mobiliser, enter anMSISDN that identifies a customer in that system.
• Workspace Short | Long Code – select from the list.• Message Encoding – accept the default, or select Unicode.• Message Text – a valid keyword for the application.
2. Click Send to Brand Mobiliser.
3. To see Brand Mobiliser responses, click Reload Message Log.
If the application calls an external Web service, responses may take longer than the page-refresh time.
See also• Developing Interactive Applications on page 11
• Activating Applications on page 21
Developing Brand Mobiliser Applications
Developer Guide 23

Sample Interactive Message LogAn interactive-application message log shows a sequence of consumer interactions withBrand Mobiliser.
For each message, the logs displays:
• Send Date – the date and time the message was sent.• ACK and ACK Date – whether an acknowledgment is requested from the short message
service center (SMSC) or the SMS gateway, and the date and time the acknowledgmentwas received.
• Direction – message direction, IN or OUT; IN messages come from customers; OUTmessages are Brand Mobiliser responses.
• Sender – sender's identification number. For IN messages, the number is the customer'sMSISDN; for OUT messages, it is the workspace short or long code.
• Application – name of the application that processed the message. A Brand Mobiliserapplication can call other applications, which are identified in the log.
• Receiver – receiver's identification number. For IN messages, the number is the workspaceshort or long code; for OUT messages, it is the customer's MSISDN.
Developing Brand Mobiliser Applications
24 Sybase Brand Mobiliser

Testing Event ApplicationsTo test event applications, invoke the triggering event. Event applications are linked to eventsthat occur at times defined by their event windows.
1. On the Simulation page, select the Event Application tab:
• Event Name – select from the list.• Resume From Last – accept the default value, false. If set to true, and if the previous test
did not exhaust the subscriber list, the application resumes from the last subscriber.• Throttle – enter the maximum processing rate: number of messages per minute.• Limit – enter the maximum number of loopbacks to process. When used with a throttle,
specify as a multiple of throttle. For example, if throttle = 60 messages per minute,specify a limit of 60, 120, or 180.
• Event Threads – specify the number of threads to use to run the simulation. Change thisvalue to test performance with different numbers of threads.
• End Date – specify to keep the application from overrunning.
2. Click Simulate Event.
3. To see messages, click Reload Message Log.
Depending on the number of subscribers, you may need to reload the log multiple times tosee all the messages.
See also• Developing Event Applications on page 15
• Designing Application Task Flows on page 13
• Activating Applications on page 21
• Creating Events on page 17
• Assigning Events to Applications on page 19
• Activating Events on page 21
Developing Brand Mobiliser Applications
Developer Guide 25

Sample Event Message LogThe Utility Notification event application generates messages that appear in the message log.
See also• Utility Notification Event Application on page 31
Importing ApplicationsYou can import application XML files that were previously exported from Brand Mobiliser,and you can create applications from Quick-Start template files that are installed with BrandMobiliser.
See also• Exporting Applications on page 27
Importing Application XML FilesImport a Brand Mobiliser application by uploading the XML file that contains the applicationconfiguration. XML configuration files are created when you export applications from BrandMobiliser.
If you import a single application that links to other applications, create the linked-toapplications before you import. If you import a single application that contains circularreferences, which are common in menu-based systems, you must manually relink applicationsbefore you can run them.
Developing Brand Mobiliser Applications
26 Sybase Brand Mobiliser

To import a group of dependent applications, first export them as a group, so all the dependentapplications are in one export file. When you import a group of applications from a singleexport file, all interdependent links and references are maintained.
1. In the Brand UI, select Assets, then select Create Asset.
2. Under Upload Applications From Existing Files, click Browse, and select the applicationfile.
3. Enter a name for the application.
• If the file contains a single application, the application name is replaced.• If the file contains more than one application, the new application name is prepended to
all applications. For example, if the file contains two applications, Test1 and Test2, andyou enter NewName as the new application name, the uploaded applications are named NewName-Test1 and NewName-Test2.
4. Click Upload.
5. To edit application details, select View Application Details.
Creating Applications from TemplatesBrand Mobiliser includes a set of application templates that you can upload and run.
1. In the Brand UI navigation bar, select Assets.
2. Select Create Asset.
3. Choose a template from the list, and click Create.The template is installed, and names of the template applications appear.
4. Select Application Details.
After you create an application, you can run it or modify its details.
See also• Developing Quick-Start Templates on page 75
Exporting ApplicationsYou can export applications to make backup copies, or to move applications to other BrandMobiliser installations. If you export an application, it is saved in an XML file.
See also• Importing Applications on page 26
Developing Brand Mobiliser Applications
Developer Guide 27

Exporting a Single ApplicationExporting a single application creates an XML file that contains the application configuration.
1. In the Brand UI, navigate to the Application Details tab for the application you want toexport.
2. Click Export.The application is exported to a file called appFlow.xml in the Downloads directory.
If the application you export contains references to other applications through either the GotoApplication state or the Application Call state, details of the called applications are included inappFlow.xml; however, interapplication links may not be reestablished when you importthe file. To maintain links and dependencies between applications, export them as a group.
Exporting a Group of ApplicationsExporting a group of applications maintains links and dependencies between applications.
1. In the Brand UI, navigate to the Assets page.
2. Select the check box to the left of each application you want to export.
3. Click Group Export Applications.A file called groupedFlow.xml, which contains all the exported applicationconfigurations is created in the Downloads directory.
Sample ApplicationsMobiliser Platform offers a customizable way to more efficiently manage financial services. Itallows customers to redeem vouchers on any phone, remit money domestically, pay billsautomatically, and manage their accounts remotely.
Cash-Out Interactive ApplicationUse SMS to interact with the Cash-Out application. Brand Mobiliser manages a unique usersession that maintains the context of the conversation between the user and the application.
The Cash-Out application comprises multiple interactive applications. The applications arelinked by either Goto Application states, in which control is passed to referenced applications,or Application Call states, in which case control moves temporarily to the referencedapplication, before returning to the application that called it.
A complete mobile service is created from multiple interactive applications that are validatedwith a customer's MSISDN. Although there is no Brand Mobiliser internal customer list,back-end systems—such as Money Mobiliser—can validate customers. The Cash-Outapplication assumes a valid customer session exists.
Developing Brand Mobiliser Applications
28 Sybase Brand Mobiliser

Once an application has validated a customer, it is typical to offer a series of SMS menus, fromwhich customers can select. By default, the Cash-Out application contains one menu optionthat is related to the mobile financial services that are offered to customers.
The Cash-Out application:
1. Requests the account from which to withdraw cash.2. Requests the code of the customer support agent with whom to perform the transaction.3. Requests the transaction amount.4. Validates and preauthorizes the transaction by verifying sufficient funds in the account,
amount limits, and the agent's SVA.5. Requests an account PIN, or transaction confirmation.6. Sends money to the agent.7. If a transaction fails, requests a solution to validation problems.
Cash-Out Application State EditorIn the Cash-Out application, the Get Wallet Menu state sends a menu to customers via SMS.
Developing Brand Mobiliser Applications
Developer Guide 29

Mobiliser Counter Interactive ApplicationThe Mobiliser Counter sample application increments a session variable, displays the value,then either increments the value again, or exits.
You can develop the Mobiliser Counter application in the Application Composer.
The session variable INDEX is used as the counter variable. This variable is dynamicallysubstituted into the text sent to mobile consumers.
If consumers respond with the keyword "again," the application loops back to the MobiliserCounter state. Any other input causes the application to exit.
Developing Brand Mobiliser Applications
30 Sybase Brand Mobiliser

Utility Notification Event ApplicationEvent applications are designed for task flow or batch processing, and are typically invoked byevents, such as scheduled times, system triggers, or external triggers.
For example, Brand Mobiliser applications can provide end-to-end solutions for utilitycompanies. A common use case includes:
• Self-registration – register telephone numbers using SMS; for customers who did notprovide their number when signing up with the company.
• Self-services – such as looking up usage history and status of move-in activation, reportingissues, and finding offices.
• Notifications – set up notifications for overdue payments, high usage, service-outagealerts, summer-savings awareness, and so on.
• Engagement – enables customers who receive notifications to reply. For example, ifcustomers respond to overdue-payment notifications, they automatically receive 1–2 daysextension; they can also authorize automatic payments.
In this example, the company's customer relationship management (CRM) system generates alist of subscribers who have opted to receive outage notifications. The list contains customertelephone numbers (MSISDNs) and cities for which an outage-notification service isprovided. This list is uploaded to Brand Mobiliser subscriber storage. When a service outageis planned for the city of Dublin, the Process Subscriber state retrieves subscribers from thelist. For each subscriber:
1. Get Subscriber Details retrieves subscriber attributes (city).2. Check City=Dublin filters out customers who are not in Dublin.3. Send SMS Outage Message sends a message to Dublin customers.
Developing Brand Mobiliser Applications
Developer Guide 31

Invoke the application, by assigning it to an active event, and creating an event window. Eventwindows can be one-time or recurring. This application has a one-time event window.
An alternative to manually uploading subscribers to the database is to use an event applicationto fetch subscribers from the system of record, and use batch processing to upload and storethem in the database.
See also• Sample Event Message Log on page 26
Developing Brand Mobiliser Applications
32 Sybase Brand Mobiliser

Developing Custom Application States
Custom state development using the State SDK is a Java development task you can performwith or without a development IDE, such as Eclipse or NetBeans. After you develop anddeploy custom states, you can use them to develop applications.
Before proceeding with custom state development, verify that:
• The development environment meets system requirements in the Brand Mobiliser ReleaseBulletin.
• Brand Mobiliser is installed on the development machine. Brand Mobiliser is required toaccess State SDK bundles for custom state development, and to deploy and test customstates through the development process.
Third-party software mechanisms that custom states can use include:
• Spring Framework – for application context and dependency injection.• Spring Dynamic Modules (Spring DM) – for abstracting OSGi mechanisms.• OSGi Services – for software-service publication and consumption.• OSGi Configuration Admin – for container-based configuration of services and
components.
Application Life CycleApplications run in the Brand Mobiliser Processing Engine (processing engine) runtimecontainer and are managed by the processing engine. Once deployed to the runtime container,applications can be invoked by either incoming messages or events. Events can be generatedby the system, a scheduled time, or a call from an external Web service.
Starting or Restarting an ApplicationFor a newly started application, a new session is created, and the Application Start state isexecuted. Sessions are based on a consumer's MSISDN, which is typically the mobiletelephone number from which the message is sent. The Application Start state is createdautomatically for new applications, and cannot be removed. This state performs initializationprior to executing the application. The Application Start state is typically followed by at leastone state. For example, if an interactive application is invoked by an incoming message, theApplication Start state processes the incoming message, and routes it to the appropriatefollow-up state, based on the message value. The Application Start state can also filtermessages, and save incoming message values in session attributes.
If you restart an application, the existing session is reactivated, and all session attributes areavailable to the application. The application continues from the last active state.
Developing Custom Application States
Developer Guide 33

Executing the Current Application StateThe processing engine executes the current application state, calling eitherprocessMessage or processState; these methods contain state-specific logic.
The processing engine calls:
• processMessage to reactivate a state, when an external event occurs for which thestate is waiting.
• processState when another state activates the current state through a follow-uptransition.
Processing an Incoming MessageIf a state is reactivated by a call to its processMessage method, the state processes theincoming message.
For example, State 1 —> Send SMS state —> State 3. When the flow reaches the Send SMSstate, a message is sent out and the flow waits for a response. When the response arrives, theprocessing engine calls the Send SMS state's processMessage method to reactivate thestate. The state processes the message, finds the follow-up transition that matches theincoming message, and returns the follow-up transition state. For example, if the follow-upstate is State 3, the processing engine sets the current state to State 3, and begins executingit.
Processing State LogicWhen a state is activated by a follow-up transition, the processing engine calls theprocessState method, which contains the core logic of the state. If the state needs to callan external Web service, you implement the call in the processState method.
States do not return objects from the processState method. Instead, they set flags usingthe helper object SmappStateProcessingAction, which is an input parameter to themethod. For example, if the state-logic processing is successful, the state callscontinueProcessing(followUpState), passing the name of the follow-up state asfollowUpState.
The processing engine sets the current state to the value of followUpState, and executes thecurrent state.
To determine the follow-up state, you can call either of two methods provided by the utilityclass StateUtils, which is included in the State SDK:
• determineFollowingSmappStateFromPattern• determineFollowingSmappStateFromTransitionTypeIn addition to calling continueProcessing, states can call:
Developing Custom Application States
34 Sybase Brand Mobiliser

• terminateProcessing – if a severe error occurs and the application must beterminated.
• waitForMessage – if the state sends a message and must wait for the response.
Terminating ConditionsThe processing engine continues through the application flow until it meets one of theseterminating conditions:
• No follow-up transition• Call to terminateProcessing• Call to waitForMessageThe first two conditions terminate the application. A call to waitForMessage pauses theapplication until a response is received, and the session hibernates. When the responsemessage arrives, the life cycle restarts.
For event applications, if the processing engine encounters no follow-up transition, it checksthe preconfigured terminating criteria to determine whether to stop, or keep the session aliveand generate a callback to repeat from the Application Start state.
Developing and Deploying Custom StatesDevelop and deploy custom states to extend the functionality of Brand Mobiliser, and to meetclient-specific requirements.
1. Develop a custom state by extending either:
• SmappStatePlugin class – for most states.
• AbstractDynamicMenu class – for menu states.
2. (Classes that extend SmappStatePlugin only) Implement the state logic.
3. Add custom state information.
4. Define custom state variables.
5. Set up Apache Maven.
6. Build and deploy a custom state bundle.
Extending the SmappStatePlugin ClassYou can simplify custom-state development by extending the SmappStatePlugin class.
If you develop a custom state by extending the SmappStatePlugin class, you must:
• Implement the state logic.• Provide the state information: ID, name, revision number, and usage notes.• Specify the input attributes.
Developing Custom Application States
Developer Guide 35

• Specify the output attributes.• Customize the state follow-up transitions, if they are different from the default transitions.
See also• Sample Custom State on page 80
• Sample GetMyWeather State on page 78
• Implementing State Logic on page 41
StatePlugin InterfaceYou can use the StatePlugin interface to develop Brand Mobiliser application states.
The SmappStatePlugin class is a base abstract class that implements theStatePlugin interface. Most custom states should extend SmappStatePlugin, whichprovides basic implementations that are common to most custom states, as well as helpermethods that are commonly used in state implementations.
Two important methods in the StatePlugin interface are processMessage andprocessState, which are integral parts of application life cycles. Some of the methods inthe StatePlugin interface customize the state editor, for example,supportsOkTransition and getStateNotes.
If a custom state extends the SmappStatePlugin class, implementing the class issimplified significantly. Instead of implementing both processMessage andprocessState methods, you can focus on adding business logic to theprocessStateLogic method. This is sufficient in most custom-state implementations.
Note: Do not extend the abstract class Plugin. Instead, extend SmappStatePlugin.
Developing Custom Application States
36 Sybase Brand Mobiliser

Developing Custom Application States
Developer Guide 37

PluginInterface InterfaceIf you develop a custom state by extending the SmappStatePlugin class, it implementsthe PluginInterface interface.
Plug-in components must have at least one class that implements the PluginInterface.Components that implement PluginInterface are automatically loaded into themessaging server and started. During start-up, the server calls the startup method of theimplementing class, which allows the class to perform any necessary setup.
PluginInterface methods are:
• getInstanceName():String• setInstanceName(String):void• getRevisedString():String• shutdown():void• startup(HashMap<String,String>):voidThe shutdown method is called when the server is shutting down, giving the implementationa chance to perform housecleaning, such as persisting cache data.
getInstanceName, setInstanceName, and getRevisedString areplaceholders only. The component must implement the appropriate functionality.
StatePlugin and ChannelPlugin implementations extend PluginInterface anddefine their specific interfaces. You can use StatePlugin APIs to develop custom states.The ChannelPlugin interface is reserved for SAP internal development only.
Developing Custom Application States
38 Sybase Brand Mobiliser

Extending the AbstractDynamicMenu ClassMany SMS and Unstructured Supplementary Service Data (USSD) applications rely onmenus to receive consumer responses. Menus reduce the potential for response errors,because they are numbered lists.
The AbstractDynamicMenu class simplifies the development of custom-menu states thatextend the class, because they inherit:
• A list of menu items• Menus and indexes that are generated automatically and recalculated on each page• Methods to send menus as SMS messages• These variables:
• Show Exit Menu – an input variable that specifies whether to allow recipients to exit themenu.
• Variable Name of the Selected Key – an output variable representing the menuselection, which is stored as a key-value pair object. Key is the unique key of the menuitem, which may be used later in the application.
• Variable Name of the Selected Value – an output variable that represents the value ofthe selected key.
Developing Custom Application States
Developer Guide 39

Custom states that extend the AbstractDynamicMenu class must implement thesemethods:
• constructMenuList() – gets the menu list.
• init() – initializes the state.
• getStateAttributeList() – gets the list of attributes.
• saveSessionVariables() – explicitly saves session variables.
Message recipients can select from lists, and reply using index numbers. If a menu has morethan four items, it includes a pagination option, which displays the next four items in the list.On the last page, selecting the pagination option returns to the first page. Selecting the exitoption abandons a list without a response; the application task flow determines the follow-uptransition. To force recipients to choose an item from the list, you can disable the exit option.
In a typical custom-state implementation that extends the SmappStatePlugin class, youimplement state logic in the processStateLogic method. However, when you extend theAbstractDynamicMenu class, both processStateLogic andprocessMessageLogic methods are implemented by the abstract class. These methodscontain the menu processing logic, and are declared as final, so they cannot be overridden.
See also• List Variables on page 51
• Sample Custom-Menu State on page 82
AbstractDynamicMenu Life CycleThe life cycle of the AbstractDynamicMenu class is based on the life cycle of theSmappStatePlugin class; however, there are slight differences in menu functionality.
If you extend the AbstractDynamicMenu class, it implements theprocessMessageLogic method and the processStateLogic method.
1. The processStateLogic method calls the init method.
2. processStateLogic calls both the constructMenuList andsaveSessionVariables methods.
3. The SmappStatePlugin::getStateAttributes method callsgetStateAttributeList, which aggregates the attributes returned by the methodwith attributes defined in the AbstractDynamicMenu class, such as the input exit-menu item and the output key-value pair.
4. An AbstractDynamicMenu state is initially activated as a follow-up transition from aprevious state, so the processing engine calls its processStateLogic method. Theinit and constructMenuList methods are called sequentially to initialize andconstruct the menu. Eventually, the menu is sent as an SMS message, and the processingengine waits for the response. The consumer selects a menu item.
Developing Custom Application States
40 Sybase Brand Mobiliser
5. If constructMenuList returns only a single item, the state immediately callssaveSessionVariables, and proceeds with the default dynamic follow-uptransition. You can customize the state's default behavior by overriding thecontinueWhenSingleEntry method.
6. When a response arrives, the processing engine calls the state'sprocessMessageLogic method, which calls constructMenuList to assemblethe menu and interpret the selected menu item. If the selection is a valid menu item,saveSessionVariables is called. The state prepares the selected-item details foroutput, and proceeds with the follow-up transition, as returned by thesaveSessionVariables method. If null is returned, the default OK follow-uptransition is used.
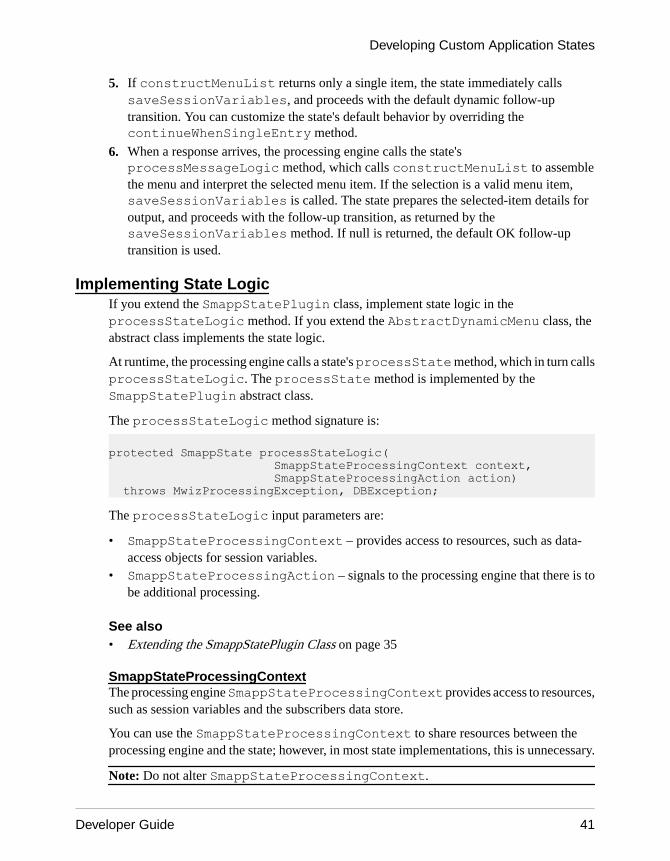
Implementing State LogicIf you extend the SmappStatePlugin class, implement state logic in theprocessStateLogic method. If you extend the AbstractDynamicMenu class, theabstract class implements the state logic.
At runtime, the processing engine calls a state's processState method, which in turn callsprocessStateLogic. The processState method is implemented by theSmappStatePlugin abstract class.
The processStateLogic method signature is:
protected SmappState processStateLogic( SmappStateProcessingContext context, SmappStateProcessingAction action) throws MwizProcessingException, DBException;
The processStateLogic input parameters are:
• SmappStateProcessingContext – provides access to resources, such as data-access objects for session variables.
• SmappStateProcessingAction – signals to the processing engine that there is tobe additional processing.
See also• Extending the SmappStatePlugin Class on page 35
SmappStateProcessingContextThe processing engine SmappStateProcessingContext provides access to resources,such as session variables and the subscribers data store.
You can use the SmappStateProcessingContext to share resources between theprocessing engine and the state; however, in most state implementations, this is unnecessary.
Note: Do not alter SmappStateProcessingContext.
Developing Custom Application States
Developer Guide 41

You can use these SmappStateProcessingContext methods:
• getStateDao – inserts, updates, or deletes session variables.
• getSubscriberDao – accesses the subscribers data store. Also used by some BrandMobiliser built-in states.
• isAckMessageRequested – queries whether an acknowledgment is requested.
• setAckMessageRequest – specifies whether an acknowledgment is requested.
• isCurrentStateEncrypted – queries whether state data is encrypted.
The following resources are available for read-only access, and include no API support. Donot access these resources directly, or make any changes. If you have special requirements,consult with SAP support services.
• client• session• clientMsisdn• currentState• customer• langDefault• matchingPattern• mr• msg• newSessionDo not use the following methods or resources; doing so may result in errors or unexpectedapplication behavior:
• getlangRequest• updateSession• cacheMgr• outgoingQueue
SmappStateProcessingActionThe SmappStateProcessingAction class controls state and application processing.Use it to signal the processing engine that further processing is intended.
The processing engine recognizes three signaling actions: continue, wait, and terminate,which you can send by calling:
• continueProcessing (SmappState) – continues execution to the specifiedfollow-up state. Causes an infinite loop if the follow-up state is the same as the callingstate. Termination must be handled within the state.
• waitForMessage() – pauses execution and waits for a response, then continuesexecution to the specified follow-up state.
Developing Custom Application States
42 Sybase Brand Mobiliser

• terminateProcessing () – terminates the application.
States that extend the SmappStatePlugin class, implementing logic inside theprocessStateLogic method need not explicitly call continueProcessing orterminateProcessing. The same functionality is accomplished by returning thefollow-up state from the processStateLogic method. For example, instead of callingcontinueProcessing, return the follow-up state using one of the helper methods:
• continueOk()• continueFail()• continueDyn()To terminate processing, states should call continueFail, and let the state-editorconfiguration determine what to do. If the state is not configured to forward continueFailcalls to a follow-up state, the application automatically terminates.
Note: If a state calls waitForMessage before it returns null from theprocessStateLogic method, the application does not terminate, because the state iswaiting for a response. For this reason, SAP recommends that you do not let states returnnull.
To enable states to send messages and wait for replies before they continue processing, callwaitForMessage.
To display a message control in the state editor, call supportsSendSmsMessage.
Custom State InformationState information includes an ID, a name, a revision number, and usage notes. The name andusage notes are metadata that the state editor shows in the Application Composer.
For a custom state, you can explain its purpose and functionality as state notes, which appearin the state editor.
@Overridepublic String getStateNotes() { StringBuilder sb = new StringBuilder(); sb.append("A sample state. When executed, it checks for "); sb.append("an entered Postal/ZIP Code, and returns the "); sb.append("weather report for that area.\n\n); sb.append("Use the following follow up states:\n "); sb.append("- OK: Weather report for the area was found\n "); sb.append("- FAIL: Unexpected error\n "); sb.append("- Dyn -1: Area code entered was not valid\n "); sb.append("- Dyn -2: No weather report for the area\n "); return sb.toString(); }
Developing Custom Application States
Developer Guide 43

The revision number is a prerequisite for any plug-in component, as specified in thePluginInterface class. It identifies a version, and sets the plug-in number.getRevisionString() can return any String value.
@Overridepublic String getRevisionString() { return "1.0.0";}
The state ID is a unique identifier for the state. Each state must have a unique ID stored in thedatabase for each installation in which the state is used. This unique value allows the state to beresolved to the same type across installations.private static long STATE_ID = 600000L;
@Overridepublic long getStateId() { return STATE_ID; }
For custom states, assign unique ID values between 600,000 and 999,999. Values between 0and 599,999 are reserved for Brand Mobiliser use.
Developing Custom Application States
44 Sybase Brand Mobiliser
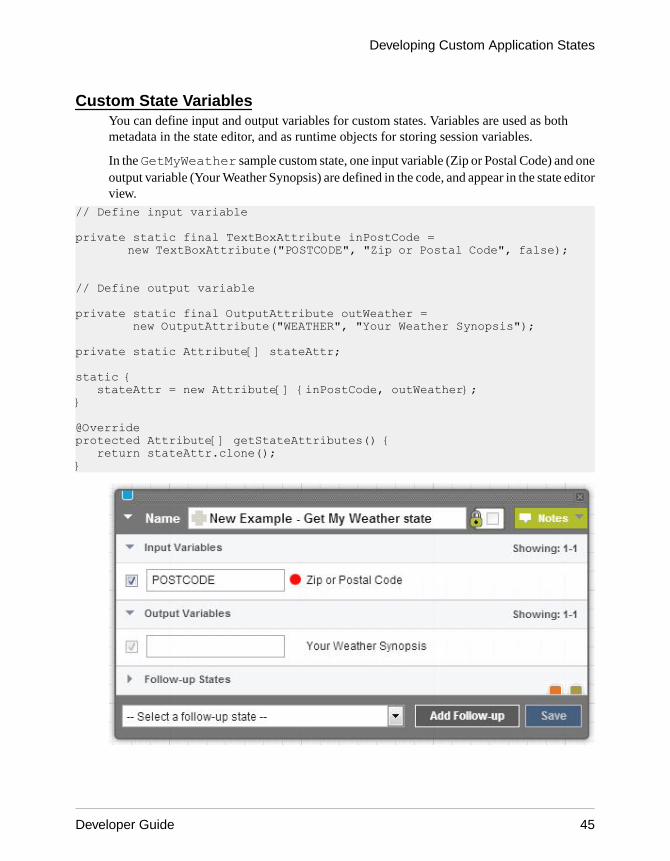
Custom State VariablesYou can define input and output variables for custom states. Variables are used as bothmetadata in the state editor, and as runtime objects for storing session variables.
In the GetMyWeather sample custom state, one input variable (Zip or Postal Code) and oneoutput variable (Your Weather Synopsis) are defined in the code, and appear in the state editorview.
// Define input variable private static final TextBoxAttribute inPostCode = new TextBoxAttribute("POSTCODE", "Zip or Postal Code", false); // Define output variable private static final OutputAttribute outWeather = new OutputAttribute("WEATHER", "Your Weather Synopsis");
private static Attribute[] stateAttr;
static { stateAttr = new Attribute[] {inPostCode, outWeather}; } @Override protected Attribute[] getStateAttributes() { return stateAttr.clone(); }
Developing Custom Application States
Developer Guide 45

getStateAttributes is an abstract helper method that the SmappStatePluginclass implements. It aggregates both input and output variables. The base class derives therequired getInputAttributes and getOutputAttributes methods fromgetStateAttributes, based on the attribute-type class. The state editor uses theattribute array that the getStateAttributes method returns to render input and outputvariables. The saveOutputAttributes method saves output attributes from theattribute array.
All variables (input and output) have input controls that appear on the state editor. Thepublic String getText() method returns the text from input controls.
See also• Input and Output Parameters on page 4• Defining Input Variables on page 47• Defining Output Variables on page 49• Accessing Input Variables on page 50• List Variables on page 51• Sample GetMyWeather State on page 78
Variables for TroubleshootingWhen you develop custom states, include error output variables that can help you troubleshootproblems in the production environment.
To facilitate debugging, include output variables in the state code for an error message, aunique error ID, and a service code. If the state calls an external Web service, for example, theWeb service can return a code in the service-code output variable.
// Define output variables
private static final OutputAttribute outErrMsg = new OutputAttribute("ERR_MSG", "Error Message"); private static final OutputAttribute outErrUUID = new OutputAttribute("ERR_UUID", "Error Unique ID"); private static final OutputAttribute outSvcCode = new OutputAttribute("SVC_CODE", "Service Code"); // some code omitted here… @Override protected SmappState processStateLogic(…) { // Logic implementation try { // Reset the error output variable outErrMsg.setHoldValue(""); outErrUUID.setHoldValue(""); saveOutputAttributes();
Developing Custom Application States
46 Sybase Brand Mobiliser

return continueOk(); } catch (Exception ex) { String uuid = UUID.randomUUID().toString(); log.error(ex.getMessage()+ " [UUID={}]", uuid); outErrMsg.setHoldValue(message); outErrUUID.setHoldValue(uuid); saveOutputAttributes(); return continueFail(); } }
UUID is a unique user ID that you can use to report errors. For example, if an error occurs, anSMS message can be sent to the consumer, who is identified by the UUID. Consumers can callcustomer support to report issues, using their UUID. UUIDs are logged so they can becorrelated with reported issues.
Defining Input VariablesStates use input variables to get input values, either from a session variable or as a constant.You can configure the behavior in the state editor. The InputAttribute class managesinput variables.
In addition to the basic properties, input variables have an isOptional property. If set to true,the input variable is optional; false indicates it is mandatory.
The input variable constructor is:InputAttribute (String id, String description, boolean isOptional)
Two types of input variables exist, text box input controls and selection input controls.
Text Box Input ControlsText boxes manage either a single constant value or a value that is accessed from a sessionvariable.
You can create the input variable in the example above using this constructor:TextBoxAttribute( " POSTCODE " , " Zip or Postal Code " , false);
By default, the variable ID is automatically assigned to the TextBoxAttribute control. Inthis case, the ID is POSTCODE. The description, Zip or Postal Code, appears to theright. The red dot indicates that the input variable is mandatory.
Note: If input is mandatory and a session variable name is specified, a runtime error is thrownif the session variable does not exist. The processing engine terminates the application, unless
Developing Custom Application States
Developer Guide 47

the state implementation handles RequiredParameterMissingException, witheither continueFail or continueDyn follow-up transitions.
The state of the check box tells the processing engine how to process an input variable:
• Selected – retrieve the value from the named session variable.• Not selected – use the constant value.
If you use a state twice in the same application, and if the state saves a value in a sessionvariable, change the session-variable name in the second instance, so it does not overwrite thevalue.
To find the session-variable name, hover the mouse over the description text; pop-up textincludes the variable description and the variable name.
Selection Input ControlsSelection input controls manage constant values that are selected from a list of options. Listsare populated in the state code.
Unique IDs are automatically assigned as the session-variable name; you cannot change them,and they do not appear in the state editor. To find the session-variable name, hover the mouseover the description text; pop-up text includes the variable description and the variable name.
To use a state twice in the same application, and save the value of the session variable, you cancall the Copy Variables state to copy the session variable to another variable.
The check box performs the same function as it does for text box controls. The red dotindicates that an input selection is mandatory.
See also• Input and Output Parameters on page 4
• Custom State Variables on page 45
• Defining Output Variables on page 49
• Accessing Input Variables on page 50
• List Variables on page 51
Developing Custom Application States
48 Sybase Brand Mobiliser

Defining Output VariablesStates return results as output variables, which are always session variables. Only states canset output variables, and only at runtime. Output-variable check boxes are always selected andcannot be modified.
To create an output variable, use the OutputAttribute constructor:
OutputAttribute("WEATHER", "Your Weather Synopsis")
By default, output session-variable names are not set, so text boxes are empty. You can setvalues by calling either of these two methods:
• setValue – creates a session variable (if none exists), and saves the value immediatelyin the database, or,
• setHoldValue – temporarily holds the value in the cache, until you explicitly call theSmappStatePlugin::saveOutputAttributes method.
The saveOutputAttributes method saves multiple session variables with a singledatabase connection. If the state has only a few output variables, call the setValue method.If there are many output variables, call setHoldValue; this may impact the efficiency ofthe state at runtime.
To set output variables, call one of the methods in the OutputAttribute class:
• public void setValue (String val)• public void setValue (Long val)• public void setValue (Integer val)• public void setValue (Boolean val)• public void setHoldValue (String val)• public void setHoldValue (Long val)• public void setHoldValue (Integer val)• public void setHoldValue (Boolean val)
See also• Input and Output Parameters on page 4• Custom State Variables on page 45• Defining Input Variables on page 47• Accessing Input Variables on page 50
Developing Custom Application States
Developer Guide 49

• List Variables on page 51
Accessing Input VariablesYou can access input variables that are in a custom state using either the getInputValuemethod or the getInputValueWithWarning method.
The signatures of the methods you can call to access input variables are:public InputValue getInputValue() throws DBException;public InputValue getInputValueWithWarning() throws DBException, RequiredParameterMissingException;
To retrieve optional input variables, call getInputValue. A null value is returned if eitheran input variable is not provided, or if the session variable that the input variable is assigned todoes not exist.InputValue iv = optionalVar.getInputValue(); if (iv != null) { retrieve the value}
To retrieve mandatory input variables, call getInputValueWithWarning. Theexception RequiredParameterMissingException is raised if either an inputvariable is not provided, or if the session variable that the input variable is assigned to does notexist. You can retrieve all mandatory input variables in the same try/catch block.
try { Long id = mandatoryIdVar.getInputValueWithWarning().getLong(); Integer count = mandatoryCountVar.getInputValueWithWarning().getInt();} catch (RequiredParameterMissingException rex) { log.error(rex.getMessage()); return continueFail();}
Note: The RequiredParameterMissingException::getMessage methodindicates the mandatory variable that is missing.
Both methods that access input variables return the InputValue class. InputValuemethods return values that you enter in the state editor when you configure an input attribute;return values can be either constants or session-variable names:
• InputValue.getString();• InputValue.getString(int size);• InputValue.getLong();• InputValue.getInt();• InputValue.getBoolean();• InputValue.getDouble();
Developing Custom Application States
50 Sybase Brand Mobiliser

• InputValue.getMsisdn();
See also• Input and Output Parameters on page 4• Custom State Variables on page 45• Defining Input Variables on page 47• Defining Output Variables on page 49• List Variables on page 51
List VariablesList variables do not appear in the state editor. You can use list variables to save lists of theBeanConverterInterface type to session variables.
As an example, the AbstractDynamicMenu class uses a list variable to persist an SMSmenu. The BeanConverterInterface specifies that a bean must provide stringserialization and deserialization logic. Each BeanConverterInterface item is saved asa session variable with a unique name.
package com.sybase365.mobiliser.brand.plugins.smapp.beans; public interface BeanConverterInterface<T> { T convert(String value); String convert(T object); }
Note: Strings returned by the convert(T object) method must be less than 1000characters.
The SessionVariableAttribute class has two methods: getList and setList.The getList method retrieves a list from the database. When setList is called, the list issaved to a session variable, which requires a database connection.
Note: Lists are saved outside of transactions. Therefore, if an exception occurs, the methodthrows a DBException, and a partial list may be saved. It is up to the state implementationthat uses this attribute to retry.
Most state implementations do not need list variables. They are needed only if a state cantransition into an internal waiting condition by calling waitForMessage. For example, listvariables are most commonly used when sending SMS messages. CallingwaitForMessage causes the application to hibernate until the response arrives. The listvariable is saved to a session variable, so it is available when the application is reactivated.
See also• Input and Output Parameters on page 4• Custom State Variables on page 45• Defining Input Variables on page 47• Defining Output Variables on page 49
Developing Custom Application States
Developer Guide 51

• Accessing Input Variables on page 50
• Extending the AbstractDynamicMenu Class on page 39
State Attributes Class HierarchyAll state variables that are derived from the Attribute class are identified by an ID and adescription, which are defined in the constructor Attribute(String ID, StringDescription). ID is a unique identifier of the attribute; for InputAttribute, IDdefaults to the session variable name. The value of the Description variable appears in theApplication Composer.
The diagram below illustrates the attribute class hierarchy.
These methods are reserved for use by the processing engine:
• public void setContext(SmappStateProcessingContext context)• protected SmappStateProcessingContext getContext()
Developing Custom Application States
52 Sybase Brand Mobiliser

SmappStateProcessingContext is the running context of the application, set by theprocessing engine using the setContext method.SmappStateProcessingContext provides access to the data source that stores sessionvariables.
Setting Up Apache MavenApache Maven is a software project management tool that is based on a project object model(POM). You can use Maven to manage a project's build, reporting, and documentation from acentral piece of information.
Install and configure Apache Maven, and deploy the State SDK bundles, so you can buildcustom-state bundles and deploy them to Brand Mobiliser.
Installing Apache MavenYou can download Apache Maven from the Apache Maven Project Web site. Apache Mavenversion 3.0.4 has been tested and certified with Brand Mobiliser.
1. Navigate to http://maven.apache.org/download.cgi, and download Apache Maven.
2. To verify that your Apache Maven installation is successful, on the command line, run:
mvn -version
The output looks similar to:Apache Maven 3.0.4 (r1232337; 2012-01-17 00:44:56-0800) Maven home: C:\ZPrograms\apache-maven-3.0.4 Java version: 1.6.0_35, vendor: Sun Microsystems Inc. Java home: C:\Program Files\Java\jdk1.6.0_35\jre Default locale: en_US, platform encoding: Cp1252 OS name: "windows 7", version: "6.1", arch: "amd64", family: "windows"
NextConfigure Apache Maven.
Configuring Apache MavenYou can customize where Maven looks for dependencies by editing the Maven configurationfile.
PrerequisitesInstall Apache Maven.
Task
By default, Maven looks for dependencies in its central repository; however, in some cases, itmay need additional repositories. For example, some companies have their own internalMaven repositories, and you, as a developer, must find these dependencies. The central Mavenrepository is open to the public, and its libraries are either open source or available for public
Developing Custom Application States
Developer Guide 53

use. Brand Mobiliser SDK libraries are not hosted in the central Maven repository, nor in anypublicly accessible Maven repository.
1. Navigate to your Apache Maven installation directory, and open the conf\setting.xml file.
2. Enter these lines:<settings>
<profiles> <profile> <id>brand_state_development</id> <repositories> <repository> <id>EclipseLink</id> <name>Eclipse Link</name> <url>http://download.eclipse.org/rt/eclipselink/maven.repo</url> </repository> </repositories> </profile> </profiles>
<activeProfiles> <activeProfile>brand_state_development</activeProfile> </activeProfiles> </settings>
3. To add a Maven dependency location, between the <repositories></repositories> elements, add a <repository></repository> element pair.
4. For the new repository, define:
• id – repository ID.
• name – name of the repository.
• url – Internet location of the repository.
Maven creates a default-user local cache repository in ${user.home}/.m2/repository, where user.home depends on the operating system. For example, on aWindows 7 machine, the user.home location is C:\Users\userName. During the buildprocess, this is the first location Maven searches for dependency libraries. Initially, the localrepository is empty. During the first build, Maven does not find libraries in the local repository,so it looks in the Maven central repository, which is, by default, http://search.maven.org/#browse. Maven downloads any dependency libraries to the local repository, then uses them inthe build. Subsequent builds are faster, because dependency libraries have been downloadedto the local repository.
NextDeploy State SDK bundles to Maven repositories.
Developing Custom Application States
54 Sybase Brand Mobiliser

Deploying State SDK Bundles to a Maven RepositoryYou can deploy State SDK bundles to the local Maven repository (also known as the .m2).Deploy bundles to local repositories on each development machine.
PrerequisitesInstall and configure Apache Maven.
Task
In Brand Mobiliser version 1.3, the State SDK consists of five bundles:
• mobiliser-brandplugin-api-1.3.1.jar• mobiliser-brandstate-sdk-1.3.1.jar• mobiliser-brandplugin-security-1.3.1.jar• mobiliser-brandplugin-core-1.3.1.jar• mobiliser-brandplugin-jpa-1.3.1.jarDeploy these bundles to the Maven repository so they are accessible as dependencies to state-development projects. Bundles are in the BRAND_HOME\bundle\applicationdirectory. To deploy the bundles, run a script for each bundle, or copy all five scripts to a singlescript file, and run it once.
Note: Scripts are for Windows only; to run on Linux, modify the -Dfile path.
1. Change to the BRAND_HOME directory.
2. Run:mvn install:install-file -Dfile=bundle\application\mobiliser-brand-plugin-api-1.3.1.jar-DgroupId=com.sybase365.mobiliser.brand.plugins -DartifactId=mobiliser-brand-plugin-api -Dversion=1.3.1 -Dpackaging=jar
mvn install:install-file -Dfile=bundle\application\mobiliser-brand-state-sdk-1.3.1.jar -DgroupId=com.sybase365.mobiliser.brand.plugins -DartifactId=mobiliser-brand-state-sdk -Dversion=1.3.1 -Dpackaging=jar
mvn install:install-file -Dfile=bundle\application\mobiliser-brand-security-1.3.1.jar -DgroupId=com.sybase365.mobiliser.brand.security -DartifactId=mobiliser-brand-security -Dversion=1.3.1 -Dpackaging=jar
mvn install:install-file -Dfile=bundle\application\mobiliser-brand-core-1.3.1.jar -DgroupId=com.sybase365.mobiliser.brand.core -DartifactId=mobiliser-brand-core -Dversion=1.3.1 -Dpackaging=jar
Developing Custom Application States
Developer Guide 55

mvn install:install-file -Dfile=bundle\application\mobiliser-brand-jpa-1.3.1.jar -DgroupId=com.sybase365.mobiliser.brand.database -DartifactId=mobiliser-brand-jpa -Dversion=1.3.1 -Dpackaging=jar
Custom State BundlesPackage custom states as OSGi bundles, which you can deploy to Brand Mobiliser.
An OSGi bundle is a JAR file with extra manifest headers that can be deployed in the OSGicontainer. A custom-state bundle can contain one or more custom states, and it must bepackaged as an OSGi bundle before you can deploy it to Brand Mobiliser.
Building Custom State BundlesAfter you develop custom states, and set up Apache Maven, build OSGi bundles that you candeploy to Brand Mobiliser.
1. Creating Maven Projects
The main artifacts of a Maven project are the project object model (POM) file, and foldersthat contain source-code files.
2. Customizing Maven POM Files
Customize a Maven project object model (POM) file to create and build custom-stateOSGi bundles to deploy to Brand Mobiliser.
3. Creating Maven Project Artifacts
After you create a Maven project, create project artifacts to use in a custom-state bundle.
4. Building Maven Projects
You can build Maven projects on the command line, or you can use Maven build and unittest projects in an IDE.
5. Declaring States as Spring Beans
Developing a custom-state bundle requires that you declare each state as a SpringFramework bean in the beans-context.xml file. A state is any Java class that either directlyor indirectly extends the SmappStatePlugin abstract class.
6. Configuring Bean Properties
The bean properties file, properties-context.xml, declares all properties that must beretrieved from the OSGi configuration administration service during runtime; propertiesare stored in the service so they can be configured dynamically at runtime.
7. Registering States as OSGi Services
To enable Brand Mobiliser to discover states at runtime, register them as OSGi services, bydeclaring them in the services-context.xml file.
Developing Custom Application States
56 Sybase Brand Mobiliser

Creating Maven ProjectsThe main artifacts of a Maven project are the project object model (POM) file, and folders thatcontain source-code files.
You can create a new Maven project on the command line, or in any IDE that supports Maven.To create a Maven project on the command line:
mvn archetype:create -DgroupId=com.sap.example -DartifactId=customState
where:• groupId – names the package.• artifactId – names the project and the project folder.
As the project is created, you see progress messages. For example:[INFO] Scanning for projects... Downloading: http://repo.maven.apache.org/maven2/org/apache/maven/plugins/maven-clean-plugin/2.4.1/maven-clean-plugin-2.4.1.pomDownloaded: http://repo.maven.apache.org/maven2/org/apache/maven/plugins/maven-clean-plugin/2.4.1/maven-clean-plugin-2.4.1.pom (5 KB at 6.8 KB/sec) [...] [INFO] [INFO]------------------------------------------------------------------------ [INFO] Building Maven Stub Project (No POM) 1 [INFO]------------------------------------------------------------------------ [INFO] [INFO] --- maven-archetype-plugin:2.2:create (default-cli) @ standalone-pom --- [...][INFO]------------------------------------------------------------------------ [INFO] BUILD SUCCESS [INFO]------------------------------------------------------------------------ [INFO] Total time: 41.155s [INFO] Finished at: Mon Oct 22 17:00:49 PDT 2012 [INFO] Final Memory: 8M/245M
See also• Creating Maven Project Artifacts on page 63
• Sample Maven POM File on page 60
• Maven Project Structure on page 58
• Customizing Maven POM Files on page 59
Developing Custom Application States
Developer Guide 57

Maven Project StructureWhen you create a Maven project, the directory structure that is created includes the projectobject model (POM) file.
In this sample project, the groupId is set to com.sap.example. This directory structure iscreated automatically for a new project:
Two Java files, App.java and AppTest.java, are created in the example folders, undermain and test, respectively. The POM file, which contains the initial project configuration,is created in the customState folder. You can use this POM file as a starting point forcustom-state development.
<project xmlns="http://maven.apache.org/POM/4.0.0" xmlns:xsi="http://www.w3.org/2001/XMLSchema-instance" xsi:schemaLocation="http://maven.apache.org/POM/4.0.0 http://maven.apache.org/xsd/maven-4.0.0.xsd"> <modelVersion>4.0.0</modelVersion> <groupId>com.sap.example</groupId> <artifactId>customState</artifactId> <version>1.0-SNAPSHOT</version> <packaging>jar</packaging> <name>customState</name> <url>http://maven.apache.org</url> <properties> <project.build.sourceEncoding>UTF-8</project.build.sourceEncoding>
Developing Custom Application States
58 Sybase Brand Mobiliser

</properties> <dependencies> <dependency> <groupId>junit</groupId> <artifactId>junit</artifactId> <version>3.8.1</version> <scope>test</scope> </dependency> </dependencies> </project>
You can open or import a newly created Maven project into your IDE. Eclipse and NetBeansboth support Maven. The image below shows the sample project structure in Eclipse.
Once you are familiar with the structure and the content of POM files, you can create themmanually. You can also create a new project in any IDE that supports Maven.
See also• Sample Maven POM File on page 60
• Creating Maven Projects on page 57
• Creating Maven Project Artifacts on page 63
Customizing Maven POM FilesCustomize a Maven project object model (POM) file to create and build custom-state OSGibundles to deploy to Brand Mobiliser.Edit the Maven pom.xml file for your project to define:
• groupId – package name.
Developing Custom Application States
Developer Guide 59

• artifactId – name of the project.
• version – version number of the project.
• packaging – bundle.
• name – name of the state.
For example:<groupId>com.sap.example</groupId><artifactId>customState</artifactId> <version>1.0-SNAPSHOT</version> <packaging>bundle</packaging> <name>Custom State</name>
See also• Creating Maven Projects on page 57• Creating Maven Project Artifacts on page 63
Sample Maven POM FileA Maven project object model (POM) file contains all the required information for Maven tocreate and build OSGi bundles that you can deploy to Brand Mobiliser.
This POM file (pom.xml) illustrates the basic configuration for a custom-state bundle. Thestate implementation does not need libraries other than those provided by the SDK. The SDKlibraries are shown as dependencies. The contents of the original POM are shown in bold:
<project xmlns="http://maven.apache.org/POM/4.0.0" xmlns:xsi="http://www.w3.org/2001/XMLSchema-instance" xsi:schemaLocation="http://maven.apache.org/POM/4.0.0 http://maven.apache.org/xsd/maven-4.0.0.xsd"> <modelVersion>4.0.0</modelVersion> <groupId>com.sap.example</groupId><artifactId>customState</artifactId> <version>1.0-SNAPSHOT</version> <packaging>bundle</packaging> <name>Custom State</name> <url>http://www.sap.com</url>
<properties> <project.build.sourceEncoding>UTF-8</project.build.sourceEncoding> <bundle.namespace>${project.groupId}</bundle.namespace> <bundle.symbolicName>${bundle.namespace}.${project.artifactId}</bundle.symbolicName> <brand.version>1.3.1</brand.version> </properties> <build> <defaultGoal>install</defaultGoal> <plugins> <plugin> <artifactId>maven-compiler-plugin</artifactId> <version>2.3.2</version>
Developing Custom Application States
60 Sybase Brand Mobiliser
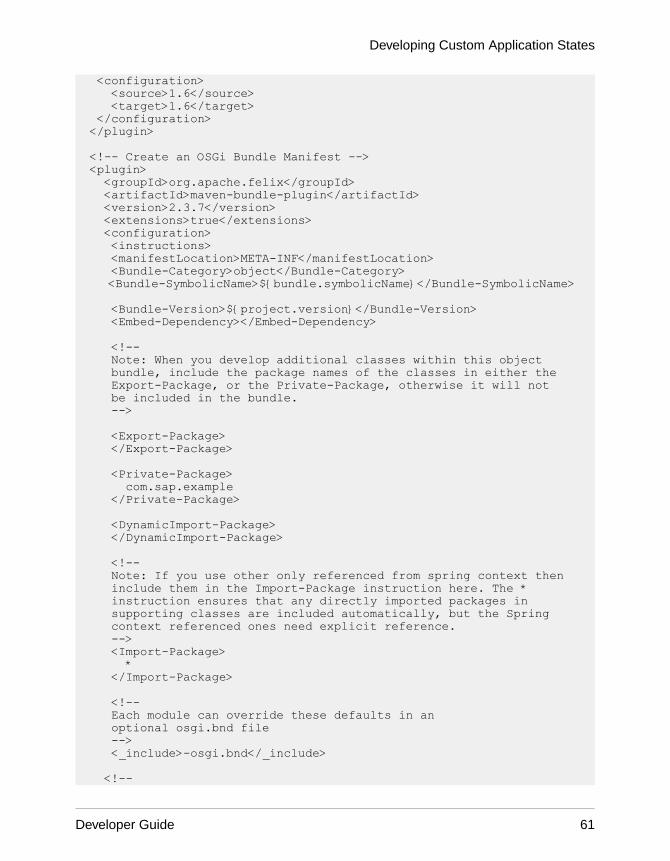
<configuration> <source>1.6</source> <target>1.6</target> </configuration> </plugin>
<!-- Create an OSGi Bundle Manifest --> <plugin> <groupId>org.apache.felix</groupId> <artifactId>maven-bundle-plugin</artifactId> <version>2.3.7</version> <extensions>true</extensions> <configuration> <instructions> <manifestLocation>META-INF</manifestLocation> <Bundle-Category>object</Bundle-Category> <Bundle-SymbolicName>${bundle.symbolicName}</Bundle-SymbolicName> <Bundle-Version>${project.version}</Bundle-Version> <Embed-Dependency></Embed-Dependency> <!-- Note: When you develop additional classes within this object bundle, include the package names of the classes in either the Export-Package, or the Private-Package, otherwise it will not be included in the bundle. --> <Export-Package> </Export-Package> <Private-Package> com.sap.example </Private-Package> <DynamicImport-Package> </DynamicImport-Package> <!-- Note: If you use other only referenced from spring context then include them in the Import-Package instruction here. The * instruction ensures that any directly imported packages in supporting classes are included automatically, but the Spring context referenced ones need explicit reference. --> <Import-Package> * </Import-Package> <!-- Each module can override these defaults in an optional osgi.bnd file --> <_include>-osgi.bnd</_include> <!--
Developing Custom Application States
Developer Guide 61

Enable viewing of the properties file content from telnet console --> <ARF-Bundle-Template>/META-INF/config</ARF-Bundle-Template> </instructions> <obrRepository>NONE</obrRepository> </configuration> </plugin> </plugins> </build> <dependencies> <dependency> <groupId>com.sybase365.mobiliser.brand.plugins</groupId> <artifactId>mobiliser-brand-plugin-api</artifactId> <version>${brand.version}</version> </dependency> <dependency> <groupId>com.sybase365.mobiliser.brand.plugins</groupId> <artifactId>mobiliser-brand-state-sdk</artifactId> <version>${brand.version}</version> </dependency> <dependency> <groupId>com.sybase365.mobiliser.brand.security</groupId> <artifactId>mobiliser-brand-security</artifactId> <version>1.3.1</version> </dependency> <dependency> <groupId>com.sybase365.mobiliser.brand.core</groupId> <artifactId>mobiliser-brand-core</artifactId> <version>${brand.version}</version> </dependency> <dependency> <groupId>com.sybase365.mobiliser.brand.database</groupId> <artifactId>mobiliser-brand-jpa</artifactId> <version>${brand.version}</version> </dependency>
<!-- Logging --> <dependency> <groupId>org.slf4j</groupId> <artifactId>slf4j-api</artifactId> <version>1.6.6</version> </dependency>
<!-- Optional for Unit Test --> <dependency> <groupId>junit</groupId> <artifactId>junit</artifactId> <version>3.8.1</version> <scope>test</scope> </dependency> </dependencies>
<!--
Developing Custom Application States
62 Sybase Brand Mobiliser

Required Javax Persistence dependencies not available from Maven central repository --> <profiles> <profile> <activation> <jdk>[1.5, 1.7)</jdk> </activation> <dependencies> <dependency> <groupId>org.eclipse.persistence</groupId> <artifactId>javax.persistence</artifactId> <version>2.0.4.v201112161009</version> <scope>provided</scope> </dependency> </dependencies> <repositories> <repository> <id>EclipseLink</id> <url>http://download.eclipse.org/rt/eclipselink/maven.repo</url> </repository> </repositories> </profile> </profiles> </project>
See also• Maven Project Structure on page 58
• Creating Maven Projects on page 57
• Creating Maven Project Artifacts on page 63
Creating Maven Project ArtifactsAfter you create a Maven project, create project artifacts to use in a custom-state bundle.
PrerequisitesCreate a Maven project.
Task
1. In the example subdirectory under main, delete the App.java file.
2. In the example subdirectory, under test, delete the AppTest.java file.
3. In the main directory, create a subdirectory called resources.
The resources directory stores configuration files that Brand Mobiliser needs when itloads state bundles.
4. In the resources directory, create these subdirectories:
• META-INF – contents are packaged in the state bundle.
Developing Custom Application States
Developer Guide 63

• META-INF/spring – stores a configuration file that the Spring Framework uses.
• META-INF/sample/conf – stores sample configuration property files; if youcopy these files to BRAND_HOME/conf/cfgload, Brand Mobiliser can loadthem dynamically.
Configuration files are specific to a bundle. They tell Brand Mobiliser what states andconfigurations to load, and how to link them together.
5. In the test directory, create these subdirectories:
• java• resources
See also• Creating Maven Projects on page 57• Sample Maven POM File on page 60• Maven Project Structure on page 58• Customizing Maven POM Files on page 59
Building Maven ProjectsYou can build Maven projects on the command line, or you can use Maven build and unit testprojects in an IDE.
For information about building projects using Maven in the Eclipse IDE, see http://maven.apache.org/eclipse-plugin.html.
On the command line, run:mvn clean install
As the project builds, you see progress messages:[INFO] Scanning for projects... Downloading: http://repo.maven.apache.org/maven2/org/apache/felix/maven-bundle-plugin/2.3.7/maven-bundle-plugin-2.3.7.pom Downloaded: http://repo.maven.apache.org/maven2/org/apache/felix/maven-bundle-plugin/ 2.3.7/maven-bundle-plugin-2.3.7.pom (4 KB at 15.0 KB/sec)[…] [INFO] Installing C:\ZMobiliser\customStateExample\customState\target\customState-1.0-SNAPSHOT.jarto C:\Users\I824993\.\m2\repository\com\sap\example\customState\1.0-SNAPSHOT\customState-1.0-SNAPSHOT.jar[INFO] Installing C:\ZMobiliser\customStateExample\customState\pom.xml to C:\Users\I824993\.m2\repository\com\sap\example\customState\1.0-SNAPSHOT\customState-1.0-SNAPSHOT.pom[INFO][INFO] --- maven-bundle-plugin:2.3.7:install (default-install) @ customState --- [INFO] Local OBR update disabled (enable with -DobrRepository)
Developing Custom Application States
64 Sybase Brand Mobiliser

[INFO] ------------------------------------------------------------------------ [INFO] BUILD SUCCESS [INFO] ------------------------------------------------------------------------ [INFO] Total time: 36.332s [INFO] Finished at: Mon Oct 29 10:48:50 PDT 2012 [INFO] Final Memory: 11M/242M [INFO] ------------------------------------------------------------------------
The bundle JAR file is saved in the /className/target directory; its name is derived fromthe Maven project artifactId and version. For this example, the filename iscustomState-1.0-SNAPSHOT.jar.
Declaring States as Spring BeansDeveloping a custom-state bundle requires that you declare each state as a Spring Frameworkbean in the beans-context.xml file. A state is any Java class that either directly orindirectly extends the SmappStatePlugin abstract class.
You can configure Spring beans by setting properties, or by creating other beans that supportstate operations.
1. Edit the beans-context.xml file to add a <bean> element for each state. Define:
• id – name of the state.• class – name of the Java class that implements the state.For example:
<bean id="SampleState" class="com.sap.example.SampleState"> <property name="country" value="${sample.country}"/> </bean>...
2. (Optional) Declare state properties, and assign either constant values or references to thevalues that are defined in the properties-context.xml file.
The value of the country property is a reference to the sample.country property defined inproperties-context.xml.
Configuring Bean PropertiesThe bean properties file, properties-context.xml, declares all properties that mustbe retrieved from the OSGi configuration administration service during runtime; propertiesare stored in the service so they can be configured dynamically at runtime.
You can reconfigure states at runtime, without reloading state bundles or restarting BrandMobiliser. However, state developers must implement dynamic reconfiguration, by definingstate properties in the code.
Edit the properties-context.xml file to configure bean properties:
Developing Custom Application States
Developer Guide 65
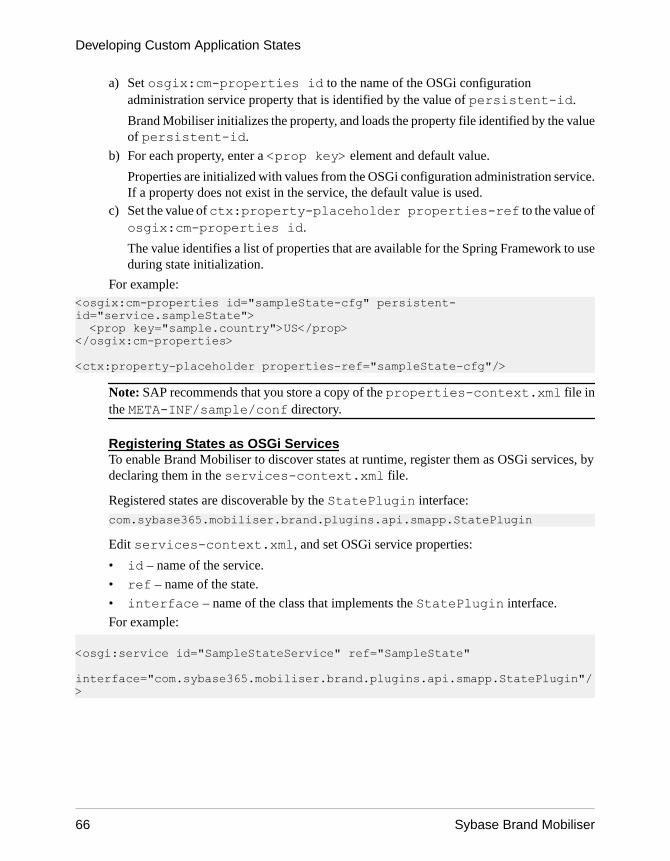
a) Set osgix:cm-properties id to the name of the OSGi configurationadministration service property that is identified by the value of persistent-id.
Brand Mobiliser initializes the property, and loads the property file identified by the valueof persistent-id.
b) For each property, enter a <prop key> element and default value.
Properties are initialized with values from the OSGi configuration administration service.If a property does not exist in the service, the default value is used.
c) Set the value of ctx:property-placeholder properties-ref to the value ofosgix:cm-properties id.
The value identifies a list of properties that are available for the Spring Framework to useduring state initialization.
For example:<osgix:cm-properties id="sampleState-cfg" persistent-id="service.sampleState"> <prop key="sample.country">US</prop></osgix:cm-properties> <ctx:property-placeholder properties-ref="sampleState-cfg"/>
Note: SAP recommends that you store a copy of the properties-context.xml file inthe META-INF/sample/conf directory.
Registering States as OSGi ServicesTo enable Brand Mobiliser to discover states at runtime, register them as OSGi services, bydeclaring them in the services-context.xml file.
Registered states are discoverable by the StatePlugin interface:
com.sybase365.mobiliser.brand.plugins.api.smapp.StatePlugin
Edit services-context.xml, and set OSGi service properties:
• id – name of the service.
• ref – name of the state.
• interface – name of the class that implements the StatePlugin interface.
For example:
<osgi:service id="SampleStateService" ref="SampleState" interface="com.sybase365.mobiliser.brand.plugins.api.smapp.StatePlugin"/>
Developing Custom Application States
66 Sybase Brand Mobiliser

Deploying State BundlesTo deploy custom-state bundles, make the files available to Brand Mobiliser at runtime, andconfigure the states to start automatically.
1. Copy the bundle .jar files to BRAND_HOME/bundle/application.
This directory contains all the bundles that are deployed to the Brand Mobiliser runtimeenvironment.
Note: Brand Mobiliser system bundles are installed in BRAND_HOME/bundle.
2. Edit the BRAND_HOME/conf/config.properties file to add the new custom-state file to the list of bundles that are started automatically.
felix.auto.start.15 = ${aims.app.dir}/customState-1.0-SNAPSHOT.jar
All state bundles are listed in the config.properties file. Brand Mobiliserreinitializes its bundle cache each time it starts.
3. Restart the Brand Mobiliser server.
To verify that no errors occurred, check these log files:• brand.log• felix.log• spring.log• persist.logIf there are errors, check the Spring configuration and the import/private/dynamic package specifications.
NextTo verify that bundles resolve and start, use either Telnet or the AIMS System Web console(both require access to localhost).
Verifying Deployment Using TelnetUse Telnet to verify that custom-state bundles resolve and start. The Telnet interface listensonly on the localhost port, which ensures runtime environment security.
1. On the command line, run:telnet localhost 5365
2. At the Telnet prompt, run:felix:lb
You see output similar to the following; the state of the bundle, in this casecustomState, is Active:
START LEVEL 20 ID|State | Level|Name 0|Active | 0|System Bundle (4.0.3) 1|Active | 14|activemq-core (5.5.1)
Developing Custom Application States
Developer Guide 67

2|Active | 14|activemq-pool (5.5.1) 3|Active | 14|activemq-ra (5.5.1) 4|Active | 14|activemq-spring (5.5.1) 5|Active | 14|ARF :: System :: arf-sys (0.3.4) 6|Active | 14|ARF :: System :: arf-util-commands (0.3.2) 7|Active | 14|ARF :: System :: cm-bridge (0.3.4) 8|Active | 14|Java Activation API (1.1.1) 9|Active | 14|Java Messaging System API (1.1.0) 10|Active | 14|CGLIB Code Generation Library (2.2.0) 11|Active | 14|AOP Alliance API (1.0.0) 12|Active | 14|Commons Pool (1.5.6) ... 108|Active | 1|ARF :: System :: cm-loader (0.3.4) 109|Resolved | 1|AIMS :: Object :: Brand Mobiliser Felix JRE System Package Support (1.3.1) 110|Installed | 10|AIMS :: Object :: Brand Mobiliser Quartz OSGi Support (1.3.1) 111|Active | 17|Restlet API (2.0.13.0) 112|Active | 17|Restlet Extension - Servlet (2.0.13.0) 113|Active | 17|Restlet Extension - Spring Framework (2.0.13.0) 114|Active | 17|Restlet Extension - JSON (2.0.13.0) 115|Active | 17|AIMS :: Service :: Brand Mobiliser Core REST Services (1.3.1) 116|Active | 16|AIMS :: Object :: Web Core (0.1.9) 117|Active | 16|AIMS :: Object :: Web API and Model (0.1.9) 118|Active | 16|AIMS :: Process :: Brand Mobiliser Webadmin UI (1.3.1) 119|Active | 15|customState (1.0.0.SNAPSHOT)
Verifying Deployment Using the AIMS Web ConsoleIn a development environment, you can use the AIMS System Web console to verify thatcustom-state bundles resolve and start. To ensure runtime environment security, the consolerestricts access, based on a list of allowable IP addresses. By default, only localhost isaccessible.
PrerequisitesEnable the AIMS System Web console.
Task
1. (Optional) To add IP addresses that the console can access:
a) Edit theorg.apache.felix.webconsole.internal.servlet.OsgiManager.properties file.
b) Add IP addresses to the allowed.ip.list, as a comma-separated list.
2. In a Web browser, connect to http://localhost:8080/system/console.
If you added other IP addresses, you can connect using one of them.
Developing Custom Application States
68 Sybase Brand Mobiliser
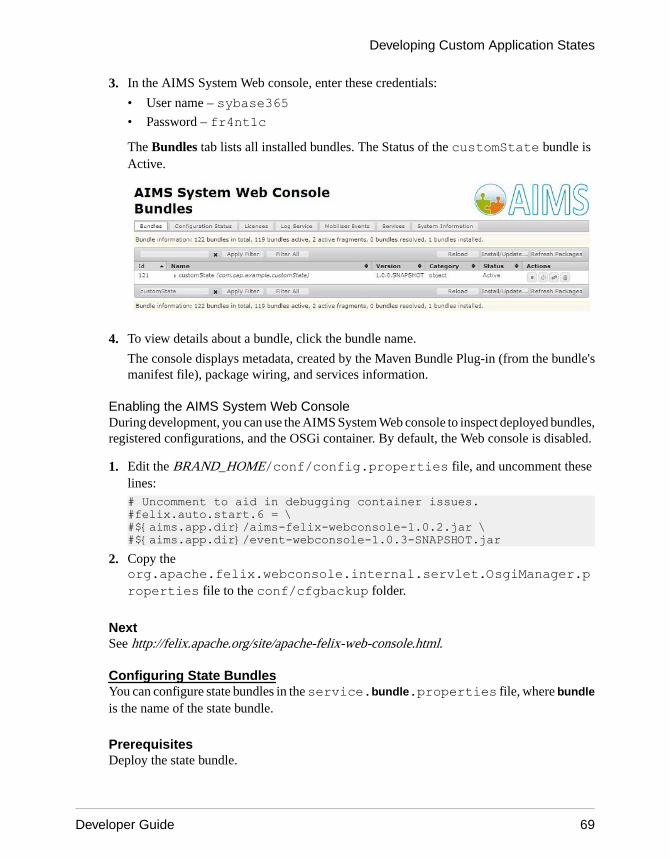
3. In the AIMS System Web console, enter these credentials:
• User name – sybase365• Password – fr4nt1cThe Bundles tab lists all installed bundles. The Status of the customState bundle isActive.
4. To view details about a bundle, click the bundle name.
The console displays metadata, created by the Maven Bundle Plug-in (from the bundle'smanifest file), package wiring, and services information.
Enabling the AIMS System Web ConsoleDuring development, you can use the AIMS System Web console to inspect deployed bundles,registered configurations, and the OSGi container. By default, the Web console is disabled.
1. Edit the BRAND_HOME/conf/config.properties file, and uncomment theselines:# Uncomment to aid in debugging container issues. #felix.auto.start.6 = \ #${aims.app.dir}/aims-felix-webconsole-1.0.2.jar \ #${aims.app.dir}/event-webconsole-1.0.3-SNAPSHOT.jar
2. Copy theorg.apache.felix.webconsole.internal.servlet.OsgiManager.properties file to the conf/cfgbackup folder.
NextSee http://felix.apache.org/site/apache-felix-web-console.html.
Configuring State BundlesYou can configure state bundles in the service.bundle.properties file, where bundleis the name of the state bundle.
PrerequisitesDeploy the state bundle.
Developing Custom Application States
Developer Guide 69

Task
1. Edit the service.bundle.properties file.
2. Copy the file to the BRAND_HOME/conf/cfgload directory.When the Brand Mobiliser server restarts, the files in the /conf/cfgload directory aremoved to /conf/cfgbackup, and all properties are reconfigured.
NextVerify the new configuration using either Telnet or the AIMS Web System console.
Verifying Bundle Configuration Using TelnetYou can use Telnet to verify that state bundle configuration changes are in effect.
1. On the command line, run:telnet localhost 5365
2. At the Telnet prompt, run:aims:cmlist
You see:Configuration list: org.apache.felix.webconsole.internal.servlet.OsgiManager file:bundle/application/aims-felix-webconsole-1.0.2.jar service.event.quartz file:bundle/application/event-scheduler-quartz-1.0.3.jar org.ops4j.pax.logging file:bin/pax-logging-service-1.6.9.jar service.webui.security file:bundle/application/web-core-0.1.9.jar service.sampleState file:bundle/application/customState-1.0-SNAPSHOT.jar service.brand_webapp file:bundle/application/mobiliser-brand-webadmin-ui-1.3.1.war service.mobiliserCustomer.states.plugin null service.mobiliserCustomer.client.plugin null service.dsprovider file:bundle/application/dbcp-osgi-service-1.3.1.jar service.coreprocessing file:bundle/application/mobiliser-brand-processing-1.3.1.jar org.ops4j.pax.web file:bundle/application/pax-web-jetty-bundle-1.1.4.jar service.event.core file:bundle/application/event-core-1.0.3.jar
In the output above, the service process ID (PID) for the customState-1.0-SNAPSHOT.jar is service.sampleState.
3. To see the customState-1.0-SNAPSHOT.jar configuration, run:
aims:cmget service.sampleState
You see:
Developing Custom Application States
70 Sybase Brand Mobiliser

Configuration for service (pid) "service.sampleState" (bundle location = file:bundle/application/customState-1.0-SNAPSHOT.jar) key value ------ ------ service.pid service.sampleState sample.country US arf.filename service.sampleState.properties
If you set the <ARF-Bundle-Template> property in the Maven POM file, you can view thesample properties file that is packaged in the state bundle. Sample property files generallycontain documentation for each property.
4. To find all state bundles that have sample property templates, run:aims:template
You see:Bundles with configuration templates: ID: 39 Bundle:com.sybase365.mobiliser.thirdparty.smppapi ID: 49 Bundle:com.sybase365.mobiliser.brand.processing.mobiliser-brand-processing ID: 51 Bundle:com.sybase365.mobiliser.brand.database.mobiliser-brand-jpa ID: 52 Bundle:com.sybase365.mobiliser.brand.database.mobiliser-brand-jpa-eclipselink ID: 56 Bundle:com.sybase365.mobiliser.framework.event-store-db-provider ID: 57 Bundle:com.sybase365.mobiliser.framework.event-store-jpa ID: 58 Bundle:com.sybase365.mobiliser.framework.event-store-eclipselink ID: 60 Bundle:com.sybase365.mobiliser.brand.osgi.dbcp-osgi-service ID: 117 Bundle:com.sybase365.mobiliser.brand.service.mobiliser-brand-rest-core ID: 118 Bundle:com.sybase365.aims.webui.web-core ID: 120 Bundle:com.sybase365.mobiliser.brand.webadmin.mobiliser-brand-webadmin-ui ID: 121 Bundle:com.sap.example.customState
5. To see more information about the com.sap.example.customState bundle, run:
aims:template 121
Verifying Bundle Configuration Using the AIMS Web ConsoleYou can use the AIMS System Web console to verify that state bundle configuration changesare in effect.
PrerequisitesEnable the AIMS System Web console.
Developing Custom Application States
Developer Guide 71

Task
1. In a Web browser, connect to http://localhost:8080/system/console.
2. In the AIMS System Web console, enter these credentials:
• User name – sybase365• Password – fr4nt1c
3. Select the Configuration Status tab, then select the Configuration tab.
You see all state-bundle configurations.
Custom State Bundle SamplesMany custom-state implementations are based on a service-oriented architecture, in which thecustom states consume existing Web services, either SOAP or Representational State Transfer(REST)ful types. States can either get results from one Web service, or they can aggregateresults from multiple Web service calls.
Consuming SOAP Web Service SampleA custom state can consume an external SOAP Web service.
The Web service provider in this sample is the United States Consumer Product SafetyCommission. The WSDL file (CPSCUpcSvc.wsdl) is embedded with the bundle.Alternately, you can retrieve the WSDL file in real time using the <wsdlUrls>configuration. The JAX-WS Maven plug-in reads the WSDL file and generates all therequired artifacts for Web service development, deployment, and invocation.
pom.xml<project xmlns="http://maven.apache.org/POM/4.0.0" xmlns:xsi="http://www.w3.org/2001/XMLSchema-instance" xsi:schemaLocation="http://maven.apache.org/POM/4.0.0 http://maven.apache.org/xsd/maven-4.0.0.xsd"> <build> […] <!-- Create an OSGi Bundle Manifest --> <plugins> <plugin> […] <configuration> […] <Private-Package> com.sap.example ,org.tempuri </Private-Package> […] </configuration> </plugin> </plugins> </build> <profiles>
Developing Custom Application States
72 Sybase Brand Mobiliser

<!-- Required Javax Persistence dependency --> <profile> <activation> <jdk>[1.5, 1.7)</jdk> </activation> <dependencies> <dependency> <groupId>org.eclipse.persistence</groupId> <artifactId>javax.persistence</artifactId> <version>2.0.4.v201112161009</version> <scope>provided</scope> </dependency> </dependencies> <repositories> <repository> <id>EclipseLink</id> <url>http://download.eclipse.org/rt/eclipselink/maven.repo</url> </repository> </repositories> </profile>
<!-- Required SOAP Web Service JAX-WS only on JDK 6 --> <profile> <id>jdk6</id> <activation> <jdk>1.6</jdk> </activation> <build> <plugins> <plugin> <groupId>org.jvnet.jax-ws-commons</groupId> <artifactId>jaxws-maven-plugin</artifactId> <version>2.1</version> <executions> <execution> <id>import-wsdld</id> <phase>generate-sources</phase> <goals> <goal>wsimport</goal> </goals> <configuration> <wsdlFiles> <wsdlFile>CPSCUpcSvc.wsdl</wsdlFile> </wsdlFiles> <extension>true</extension> <xdebug>true</xdebug> </configuration> </execution> </executions> </plugin> </plugins> </build> </profile>
Developing Custom Application States
Developer Guide 73

<!-- Required SOAP Web Service JAX-WS only on JDK 7 --> <profile> <id>jdk7</id> <activation> <jdk>1.7</jdk> </activation> <build> <plugins> <plugin> <groupId>org.jvnet.jax-ws-commons</groupId> <artifactId>jaxws-maven-plugin</artifactId> <version>2.2</version> <executions> <execution> <id>import-wsdld</id> <phase>generate-sources</phase> <goals> <goal>wsimport</goal> </goals> <configuration> <wsdlFiles> <wsdlFile>CPSCUpcSvc.wsdl</wsdlFile> </wsdlFiles> <extension>true</extension> <xdebug>true</xdebug> </configuration> </execution> </executions> </plugin> </plugins> </build> </profile> </profiles></project>
SampleSOAPState.javapackage com.sap.example; […] import org.tempuri.CPSCUpcSvc; import org.tempuri.GetRecallByWordResponse.GetRecallByWordResult;
public class SampleSOAPState extends SmappStatePlugin {
@Override protected SmappState processStateLogic(SmappStateProcessingContext context, SmappStateProcessingAction action) throws MwizProcessingException, DBException { CPSCUpcSvc recallService = null; String serviceUrl = "http://www.cpsc.gov/cgibin/CPSCUpcWS/CPSCUpcSvc.asmx?WSDL"; try { recallService = new CPSCUpcSvc(new URL(serviceUrl),
Developing Custom Application States
74 Sybase Brand Mobiliser

new QName("http://tempuri.org/", "CPSCUpcSvc")); } catch (MalformedURLException mfue) { […] } if (null == recallService) { return continueFail(); } String keyword = "booster"; GetRecallByWordResult recallServiceResult = recallService.getCPSCUpcSvcSoap12().getRecallByWord(keyword, "", ""); if (null == recallServiceResult) { return continueDyn(1); } return continueOk(); } }
Consuming RESTful ServicesCustom states that consume external RESTful Web services can use the Restlet API.
These Restlet bundles are included with Brand Mobiliser, so you need not copy them whenyou install bundles. For information about using the Restlet API, see www.restlet.org.
org.restlet-2.10.13.jar<groupId>org.restlet.jee</groupId> <artifactId>org.restlet</artifactId><version>2.0.13</version>
org.restlet.ext.servlet-2.0.13.jar<groupId>org.restlet.jee</groupId> <artifactId>org.restlet.ext.servlet</artifactId> <version>2.0.13</version>
org.restlet.ext.spring-2.0.13.jar<groupId>org.restlet.jee</groupId><artifactId>org.restlet.ext.spring</artifactId><version>2.0.13</version>
org.restlet.ext.json-2.0.13.jar<groupId>org.restlet.jee</groupId><artifactId>org.restlet.ext.json</artifactId> <version>2.0.13</version>
Developing Quick-Start TemplatesYou can develop custom states to enhance application capabilities, such as integration withexisting enterprise systems or cloud services. To demonstrate functionality, include sample
Developing Custom Application States
Developer Guide 75

applications in state bundles, which appear in the Brand UI as quick-start templates that youcan import into Brand Mobiliser.
Prerequisites
1. Develop custom states and deploy them to Brand Mobiliser.2. Develop one or more sample applications that use the custom states.3. Export applications to an XML file. An XML file can contain multiple applications.
Note: Each XML file creates one quick-start template. Each custom-state bundle can containmultiple quick-start templates.
Task
Quick-start templates provide commonly used applications that you can customize to meetspecific customer needs. You can also create a quick-start template that includes a group ofapplications to meet a specific functionality, for example, Mobile Wallet.
1. Copy application XML files to META-INF/sample/template.
2. For each XML file, create a dynamic template plug-in.
3. Redeploy the custom-states bundle to Brand Mobiliser.
The Quick-Start Templates component appears on the Brand Mobiliser Web UI Dashboard.
See also• Creating Applications from Templates on page 27
Creating Dynamic Template Plug-InsTo create a dynamic template that you can plug in to a custom-state bundle, configure the StateSDK SmappTemplateProvider class as a Spring bean.
This example configures the SmappTemplateProvider class for the GetDate.xmlfile, which contains an application that demonstrates how to use the custom state Get Date. Toconfigure the SmappTemplateProvider class, edit both the beans-context.xmland the services-context.xml files.
beans-context.xml<?xml version="1.0" encoding="UTF-8"?> <beans xmlns="http://www.springframework.org/schema/beans" xmlns:xsi="http://www.w3.org/2001/XMLSchema-instance" xsi:schemaLocation="http://www.springframework.org/schema/beans http://www.springframework.org/schema/beans/spring-beans-3.1.xsd">
<!-- ***********************************
Developing Custom Application States
76 Sybase Brand Mobiliser

Beans Configuration *********************************** --> <bean id="SampleState" class="com.sap.example.SampleState"> <property name="country" value="${sample.country}"/> </bean>
<!-- Template --> <bean id="SampleApplication" class= "com.sybase365.mobiliser.brand.template.SmappTemplateProvider"> <property name="name" value="Sample Get Date Application" /> <property name="description" value="Type: Training. A sample application to demonstrate the Get Date state." /> <property name="resource" value="classpath:META-INF/template/GetDate.xml" /> </bean> </beans>
services-context.xml<?xml version="1.0" encoding="UTF-8"?> <beans xmlns=http://www.springframework.org/schema/beans xmlns:xsi="http://www.w3.org/2001/XMLSchema-instance" xmlns:osgi="http://www.eclipse.org/gemini/blueprint/schema/blueprint" xsi:schemaLocation="http://www.springframework.org/schema/beans http://www.springframework.org/schema/beans/spring-beans-3.1.xsd http://www.eclipse.org/gemini/blueprint/schema/blueprint http://www.eclipse.org/gemini/blueprint/schema/blueprint/gemini-blueprint-1.0.xsd">
<!-- *********************************** Register state as OSGi Service *********************************** --> <osgi:service id="SampleStateService" ref="SampleState" interface= "com.sybase365.mobiliser.brand.plugins.api.smapp.StatePlugin"/> <!-- Template Service --> <osgi:service id="SampleApplicationService" ref="SampleApplication" interface= "com.sybase365.mobiliser.brand.plugins.api.smapp.SmappTemplate" context-class-loader="service-provider"/> </beans>
Developing Custom Application States
Developer Guide 77

Custom State SamplesCustom state samples illustrate how to implement a service state, a standalone state, and amenu state.
Sample GetMyWeather StateThe GetMyWeather sample illustrates a typical custom-state implementation. This type ofstate is called a service state, because its function is to call a specific Web service (in this case aweather service), and store the results for the application to use. This type of state is commonlyintegrated with enterprise systems.
public class GetMyWeather extends SmappStatePlugin { private static final Logger LOG = LoggerFactory.getLogger(GetMyWeather.class); // Define Input attributes private static final TextBoxAttribute inPostCode = new TextBoxAttribute("POSTCODE", "Zip or Postal Code", false); // Define Output attributes private static final OutputAttribute outWeather = new OutputAttribute("WEATHER", "Your Weather Synopsis"); private static Attribute[] stateAttr; static { stateAttr = new Attribute[] {inPostCode, outWeather}; } private static long STATE_ID = 600000L; @Override public long getStateId() { return STATE_ID; } @Override public String getStateName() { return "Example - Get My Weather"; } @Override public String getRevisionString() { return "1.0.0"; } @Override
Developing Custom Application States
78 Sybase Brand Mobiliser

public String getStateNotes() { StringBuilder sb = new StringBuilder(); sb.append("A sample state. When executed, it checks for a "); sb.append("Postal/ZIP Code, and returns the weather report for "); sb.append(" that area.\n\n Use the following follow up states:\n "); sb.append("- OK: Weather report for the area was found\n "); sb.append("- FAIL: Unexpected error\n "); sb.append("- Dyn -1: Area code entered was not valid\n "); sb.append("- Dyn -2: No weather report for the area\n "); return sb.toString(); } @Override public boolean supportsFailTransition() { return true; } @Override protected Attribute[] getStateAttributes() { return stateAttr.clone(); } @Override protected SmappState processStateLogic( SmappStateProcessingContext context, SmappStateProcessingAction action) throws MwizProcessingException, DBException {
WeatherResult result = null;
try { // Call the weather Web service // Details are Web service specific and therefore // are encapsulated in the callWeatherService method result = callWeatherService();
if (result == null) return continueFail();
if (result.status == -1) return continueDyn(-1);
if (result.status == -2) return continueDyn(-2);
// Output attribute outWeather.setValue(result.text); return continueOk(); } catch (DBException dbex) { // Database exception can occur while saving session attributes LOG.error("error"); return continueFail();
Developing Custom Application States
Developer Guide 79

} } }
See also• Sample Custom State on page 80• Extending the SmappStatePlugin Class on page 35• Custom State Variables on page 45
Sample Custom StateA simple custom state, named SampleState, formats the current date.
You can modify the date format in the properties-context.xml file. The formatteddate is stored in an output variable.
SampleState.javapackage com.sap.example; import java.text.Format; import java.text.SimpleDateFormat; import java.util.Date; import org.slf4j.Logger; import org.slf4j.LoggerFactory; import com.sybase365.mobiliser.brand.dao.DBException; import com.sybase365.mobiliser.brand.jpa.SmappState; import com.sybase365.mobiliser.brand.plugins.api.smapp.SmappStateProcessingAction; import com.sybase365.mobiliser.brand.plugins.api.smapp.SmappStateProcessingContext; import com.sybase365.mobiliser.brand.plugins.smapp.controls.Attribute; import com.sybase365.mobiliser.brand.plugins.smapp.controls.OutputAttribute; import com.sybase365.mobiliser.brand.plugins.smapp.state.SmappStatePlugin; import com.sybase365.mobiliser.brand.processing.exceptions.MwizProcessingException;
public class SampleState extends SmappStatePlugin { private static final Logger LOG = LoggerFactory.getLogger(SampleState.class); protected static final OutputAttribute outDate = new OutputAttribute("DATE", "Current Date"); private static Attribute[] stateAttr; private String country = ""; public void setCountry(String value) { LOG.debug("Country = " + value); this.country = value; }
Developing Custom Application States
80 Sybase Brand Mobiliser

static { stateAttr = new Attribute[] {outDate}; }
private static long STATE_ID = 600000L;
@Override public String getStateNotes() { return "A sample state. When executed, it returns the current \n" + " date in the format of the configured country.\n\n" + "Use the following follow up states:\n" + "- OK: date and time in the output variable.\n" + "- FAIL: If an error occurs during processing.\n"; }
@Override public boolean supportsFailTransition() { return true; }
@Override protected Attribute[] getStateAttributes() { return stateAttr.clone(); }
public String getRevisionString() { return "1.0.0"; }
public long getStateId() { return STATE_ID; }
public String getStateName() { return "Example - Get Date"; }
@Override protected SmappState processStateLogic( SmappStateProcessingContext context, SmappStateProcessingAction action) throws MwizProcessingException, DBException {
Format formatter = new SimpleDateFormat("MM dd yyyy"); if (!country.equalsIgnoreCase("US")) formatter = new SimpleDateFormat("dd MM yyyy");
outDate.setValue(formatter.format(new Date())); return continueOk(); } }
Developing Custom Application States
Developer Guide 81

See also• Sample GetMyWeather State on page 78• Extending the SmappStatePlugin Class on page 35
Sample Custom-Menu StateThe contents of SendSampleMenu.java and SampleBean.java illustrate how tocreate a custom-menu state.
SendSampleMenu.javaSome details from this sample have been omitted, because they are similar to those innonmenu custom-state implementations.
// Package name and imports have been omitted for clarity public class SendSampleMenu extends AbstractStateMenuImpl { // Other omissions include input and output variable declarations, // getRevisionString, getStateId, getStateName, and getStateNotes
@Override protected int getMaxMenuItems () { return 4; }
// Similar implementation as getStateAttributes
@Override protected Attribute[] getStateAttributeList() {
// Assume stateAttr has been defined return stateAttr.clone(); }
@Override protected SmappState init(SmappStateProcessingAction action) throws DBException { try { // Get the menu list from the source: database or service // Convert it to the SampleBean list // See SampleBean class below
List<SampleBean> sampleList = getSampleMenuList();
// Store the list in the session variable setMenuListToSession(sampleList); } catch (DBException dbex) { return continueFail(); } catch (Exception ex) { return continueFail(); } return null;
Developing Custom Application States
82 Sybase Brand Mobiliser

}
@Override protected List<KeyValuePair<String, String>> constructMenuList() throws DBException { List<KeyValuePair<String, String>> menuList = new ArrayList<KeyValuePair<String, String>>(); for (SampleBean sb : getMenuListFromSession(new SampleBean())) { keyValuePair = new KeyValuePair<String, String>(); keyValuePair.setKey(sb.getId()); keyValuePair.setValue(sb.getStatus()); menuList.add(keyValuePair); } return menuList; }
@Override protected SmappState saveSessionVariables(String key, String value) throws DBException { int selectedKey = Integer.parseInt(key);
}
SampleBean.java// Package name and imports have been omitted for clarity public class SampleBean implements BeanConverterInterface<SampleBean> {
protected String id; protected String status; public static SampleBean parse (String id, String status) { SampleBean sb = new SampleBean(); sb.id = id; sb.status = status; }
@Override public String convert(SampleBean sb) { StringBuilder sb = new StringBuilder(); sb.append(sb.getId()); sb.append("|"); sb.append(sb.getStatus()); return sb.toString(); }
@Override public SampleBean convert(String value) { String[] values = value.split("\\|"); Return SampleBean.parse(values[0], values[1]); }
public String getId() {
Developing Custom Application States
Developer Guide 83

return id; }
public String getStatus() { return status; } }
See also• Extending the AbstractDynamicMenu Class on page 39
State SDK Core ComponentsYou can use State SDK core components when developing custom states. Each component isan OSGi bundle. These components are deployed with Brand Mobiliser, so you need notredeploy them with custom-state components.
Plug-in APIsThe Plug-in APIs include APIs for states, state attributes, and data access objects.
Apache Maven:<groupId>com.sybase365.mobiliser.brand.plugins</groupId> <artifactId> mobiliser-brand-plugin-api</artifactId> <name>AIMS :: Object :: Brand Mobiliser Plugin - API</name>
File name: mobiliser-brand-plugin-api-1.3.1.jar
State SDKThe State SDK contains state implementation base classes, state input and output controls, andhelper classes.
Apache Maven:<groupId>com.sybase365.mobiliser.brand.plugins</groupId> <artifactId> mobiliser-brand-state-sdk</artifactId> <name>AIMS :: Object :: Brand Mobiliser Plugin - State SDK</name>
File name: mobiliser-brand-state-sdk-1.3.1.jar
SecurityThe Security APIs support encryption functionality that states use.
Apache Maven:<groupId>com com.sybase365.mobiliser.brand.security</groupId> <artifactId> mobiliser-brand-security</artifactId> <name>AIMS :: Object :: Brand Mobiliser Security</name>
File name: mobiliser-brand-security-1.3.1.jar
Developing Custom Application States
84 Sybase Brand Mobiliser

Core ObjectsApache Maven:
<groupId>com.sybase365.mobiliser.brand.core</groupId> <artifactId> mobiliser-brand-core</artifactId> <name>AIMS :: Object :: Brand Mobiliser Core Objects</name>
File name: mobiliser-brand-core-1.3.1.jar
Persistence APIs and ModelsApache Maven:
<groupId>com.sybase365.mobiliser.brand.database</groupId> <artifactId> mobiliser-brand-jpa</artifactId> <name>AIMS :: Object :: Brand Mobiliser Persistence</name>
File name: mobiliser-brand-jpa-1.3.1.jar
Developing Custom Application States
Developer Guide 85

Developing Custom Application States
86 Sybase Brand Mobiliser

States Catalog
You can use predefined Brand Mobiliser states to build interactive and event applications.
Each state definition includes:
• Input variables – constant values, or values copied from a variable in the current usersession.
• Output variables – allow states to return values.• Follow-up state OK – the condition that constitutes success.• Follow-up state OK – the condition that constitutes failure, and possible reasons for the
failure.• Follow-up state dynamic – dynamic conditions that transition to follow-up states.• State editor – example of the state configuration.• Notes – additional information about the state.• Usage – Application Composer screen shot that contains the state.
Add Subscriber StateAdds a subscriber and attributes to the selected subscriber list. You can retrieve a subscriber'sMSISDN from a session variable, and set as many as 20 attributes.
Input Variables
• Subscriber Set – select a subscriber set from a list.• Subscriber MSISDN – unique key for retrieving a subscriber's attributes.• Attribute 1, Attribute 2, ... Attribute 20 – subscriber attributes.
Output VariablesSUBSCRIBER_COUNT – total number of subscribers in the subscriber set, after adding thecurrent one.
Follow-up State – OKSubscriber was added successfully.
Follow-up State – FailError while adding the subscriber, possibly because:
• MSISDN already exists• Unrecoverable system error, such as a database-connection failure
States Catalog
Developer Guide 87

Follow-up State – DynamicNot applicable.
State EditorIn this example, the New Add Subscriber state adds a subscriber to the testList subscriberset.
UsageA common use for the Add Subscriber state is to store subscribers who opt to receive messagesor coupons. For example, in the More Info application, a message is sent to subscribers, andthe message contains a reply keyword for interested subscribers. When a subscriber replies
States Catalog
88 Sybase Brand Mobiliser

with the keyword, the application retrieves the subscriber's information from the list used inthe campaign (Get Subscriber Information state), adds the subscriber to the Opt-In list (AddSubscriber state), and sends a discount coupon to the subscriber.
See also• Get Subscriber State on page 101
• Process Subscriber State on page 106
• Update Subscriber State on page 124
Application Call StateCalls another application as a subroutine. The called application has access to sessionvariables, and returns control to the current (calling) application.
Input VariablesApplication – select an application in the list. All applications in the list are active in thecurrent workspace.
Output VariablesNone.
Follow-up State – OKNot applicable.
Follow-up State – FailNot applicable.
Follow-up State – DynamicUses the return value from the Application Call Return state to select which transition tofollow.
State EditorThe return value from the called application determines the follow-up state. In the examplebelow:
States Catalog
Developer Guide 89

• SUCCESS calls Get Agent Information.• FAILURE calls Invalid Agent Code Format.
NotesInteractive applications only.
UsageIn this example, customers enter a 6-digit code that identifies an agent, and the code isvalidated. Because this is a common task, you may want to write the validation procedure as aseparate application that returns a status code. Using multiple follow-up states, you can linkthe return value to the appropriate follow-up state.
States Catalog
90 Sybase Brand Mobiliser

States Catalog
Developer Guide 91

See also• Application Call Return State on page 92• Goto Application State on page 104
Application Call Return StateThe final state of applications that are called by other applications. This state returns a value tothe calling application.
Input VariablesReturn Value – value returned to the calling application.
Output VariablesNone.
Follow-up State – OKNot applicable.
Follow-up State – FailNot applicable.
States Catalog
92 Sybase Brand Mobiliser

Follow-up State – DynamicNot applicable.
State EditorThis state returns the constant value SUCCESS to the calling application.
NotesInteractive applications only.
UsageThis application attempts to validate an agent code, and returns three possible values to thecalling application.
See also• Application Call State on page 89
States Catalog
Developer Guide 93

Compare Typed Variables StateCompares two variables of the same type: text, integer, double, or date.
Input Variables
• Variable Type – type to compare: text, integer, double, or date.• Text Case Sensitive – whether text comparison is case-sensitive, yes or no; the default is
no.• Left Variable – name of the variable on left side of operator. If the corresponding check box
is selected, the application assumes Left Variable is the name of a session variable;otherwise, the application assumes Left Variable is a constant.
• Operator – comparison operator; variable type determines valid operators:
Variable Type Valid Operators
text =, !=, =REGEX
If =REGEX is selected, enter the regular expression as the Right
Variable.
integer, double, or date =, !=, <=. <, >=, >
• Right Variable – name of variable on right side of operator (or regular expression). If thecorresponding check box is selected, the application assumes Right Variable is the name ofa session variable, otherwise, a constant.
Note: If you enter the name of a session variable that does not exist, the state fails.
Output VariablesNone.
Follow-up State – OKLeft Variable equals Right Variable.
Follow-up State – Fail
• The values of Left Variable and Right Variable are not equal, or• Either Left Variable or Right Variable is the name of a session variable that does not exist.
Follow-up State – DynamicNot applicable.
States Catalog
94 Sybase Brand Mobiliser
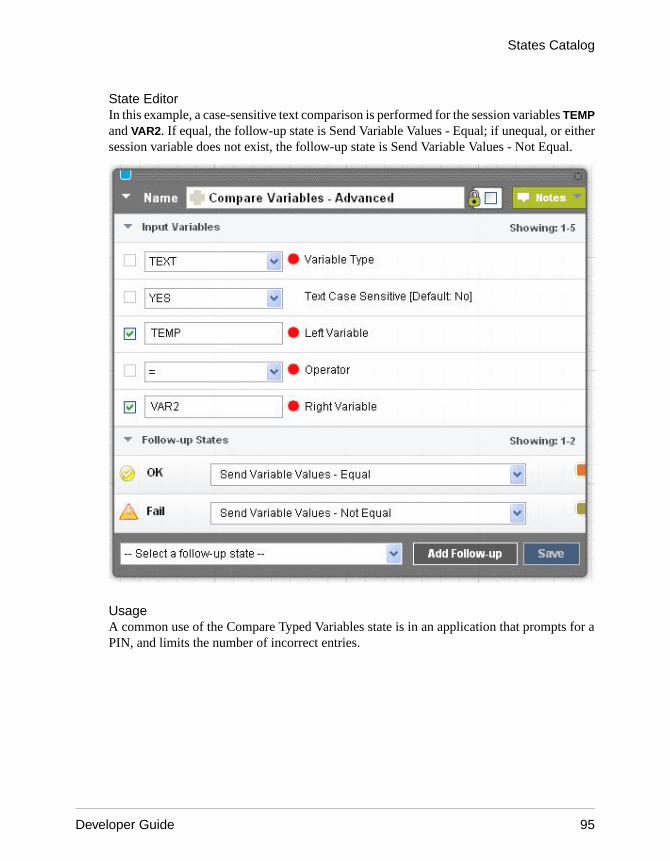
State EditorIn this example, a case-sensitive text comparison is performed for the session variables TEMPand VAR2. If equal, the follow-up state is Send Variable Values - Equal; if unequal, or eithersession variable does not exist, the follow-up state is Send Variable Values - Not Equal.
UsageA common use of the Compare Typed Variables state is in an application that prompts for aPIN, and limits the number of incorrect entries.
States Catalog
Developer Guide 95

See also• Compare Variables State on page 96
Compare Variables StateCompares the values of two variables, for string equality.
Input VariablesFor both input variables, if the corresponding check box is selected, the application assumesthe value is the name of a session variable; otherwise, the value is treated as a constant.
• Variable 1 – name of a session variable, or a constant value.• Variable 2 – name of a session variable, or a constant value.
Output VariablesNone.
Follow-up State – OKThe values of Variable 1 and Variable 2 are equal.
Follow-up State – Fail
• The values of Variable 1 and Variable 2 are not equal, or• Either Variable 1 or Variable 2 is the name of a session variable that does not exist.
Follow-up State – DynamicNot applicable.
State EditorIn this example, if the values of TEMP and VAR2 are equal, the application proceeds to theSend Variable Values - Equal state; if unequal, or either session variable does not exist,proceeds to the Send Variable Values - Not Equal state.
States Catalog
96 Sybase Brand Mobiliser

NotesThis state compares only for string equality. For comparing other types, use the CompareTyped Variables state.
UsageThe sample application below compares the session variable ACCOUNT to a constant value. Ifthe two values are unequal, the Validate Account Using Copy Variable state is called to copythe ACCOUNT session variable to a dummy session variable. If copying fails, the ACCOUNTsession variable does not exist.
States Catalog
Developer Guide 97

See also• Compare Typed Variables State on page 94
Copy Variables StateCopies a constant or the value of a source variable to a session variable.
Input VariablesSource – the source from which to copy. If source is the name of a session variable, select thecheck box. Otherwise, the application assumes the value of source is a constant.
Note: If you specify a session variable that does not exist, the state fails.
Output VariablesDestination – name of the destination session variable. If the session variable does not alreadyexist, it is created.
Follow-up State – OKSuccessfully copied the source to the destination variable.
States Catalog
98 Sybase Brand Mobiliser

Follow-up State – FailFailed to copy the source to the destination variable, usually because the source variable doesnot exist.
Follow-up State – DynamicNot applicable.
State EditorThis example copies the value of the session variable CUST_BALANCE into the sessionvariable PRE_REMIT_BALANCE.
NotesSession variables are also set in these circumstances:
• If you specify a value surrounded by parentheses in the Expression field for a follow-upstate, and specify the session variable name in the Assign To field.
• If a state returns values, they are copied to session variables, so they are accessible byfollow-up states.
UsageIn the sample application below, the customer balance is retrieved twice, before and aftercalling the transaction. The customer balance is stored in a session variable called Balance. To
States Catalog
Developer Guide 99

prevent overwriting the pretransaction balance with the posttransaction balance, theapplication copies the pre-transaction balance into another session variable before calling GetNew Balance. If Copy Customer Balance fails, Get Customer Balance is called again.
See also• Set Variable State on page 120
Counter StateCreates a variable that is incremented by one each time the state is called.
Input VariablesVariable Name – name of the session variable to increment. You must select the correspondingcheck box, or the state fails.
Output VariablesNone.
Follow-up State – OKNot applicable.
Follow-up State – FailFails if variable check box is not selected.
Follow-up State – DynamicDetermined by the integer N, the updated counter.
State EditorIn this example, the Counter state increments the INDEX session variable.
States Catalog
100 Sybase Brand Mobiliser

NotesThe Counter state increments session variables only.
UsageYou can use the Counter state as an index in a loop; commonly used to allow customers alimited number of retry attempts.
Get Subscriber StateGets subscriber information from a selected subscriber list. The subscriber's MSISDN isretrieved from the session variable MSISDN. Up to 20 subscriber attributes can be retrievedand assigned to session variables.
Input Variables
• Subscriber Set – select a subscriber set from a list.• Subscriber MSISDN – unique key for retrieving a subscriber's attributes.
Output VariablesAttribute 1, Attribute 2, ... Attribute 20 – up to 20 subscriber attributes can be assigned to thesesession variables.
Follow-up State – OKSubscriber attributes successfully retrieved.
States Catalog
Developer Guide 101

Follow-up State – FailError while retrieving attributes, possibly because:
• MSISDN does not exist.• Unrecoverable system error, such as database-connection failure.
Follow-up State – DynamicNot applicable.
State EditorThis Get Subscriber state retrieves the attributes for the subscriber identified by MSISDN,from the testList subscriber set, and saves attribute values in the output variables.
States Catalog
102 Sybase Brand Mobiliser

UsageThe Get Subscriber state is typically used with the Process Subscriber state.
States Catalog
Developer Guide 103

See also• Add Subscriber State on page 87
• Process Subscriber State on page 106
• Update Subscriber State on page 124
Goto Application StateThe final state of an application that transfers control to another application. Session variablesare available to the next application.
Input VariablesApplication – select an application from the list. All applications in the list are active in thecurrent workspace.
Output VariablesNone.
Follow-up State – OKNot applicable.
Follow-up State – FailNot applicable.
Follow-up State – DynamicNot applicable.
State EditorThis Goto Application state calls the Pay Parking application.
States Catalog
104 Sybase Brand Mobiliser

NotesThe called (Goto) application must be in the same workspace as the calling application.
In event applications, the Goto Application state cannot follow the Process Subscriber state,because the Goto Application state discontinues the loopback mechanism provided by theengine.
UsageIn this example, the Send SMS state sends a menu to customers, whose selections determinethe next (Goto) application.
States Catalog
Developer Guide 105

See also• Application Call State on page 89
Process Subscriber StateIn event applications, the Process Subscriber state typically retrieves a subscriber from asubscriber set, passes the subscriber information to the Send SMS state, then either returns toget the next subscriber, or ends the application.
Input VariablesSubscriber Set – select a subscriber set from the list.
Output VariablesNone.
Follow-up State – OKA subscriber is available to process.
Follow-up State – FailThe event-window processing terminates, because of database connection errors, or otherunexpected errors.
Follow-up State – Dynamic
• END – the end date for the event window has been reached.• FINISH – processing terminates because the event window ends.• COMPLETE – no unprocessed subscribers remain in the list.
Note: If the state does not handle END, FINISH, and COMPLETE dynamic transitions, thefollow-up state is the same as OK.
State EditorThis sample state processes subscribers in the testList subscriber set. When it successfullyretrieves a subscriber from the set, it calls Send Event Message.
States Catalog
106 Sybase Brand Mobiliser
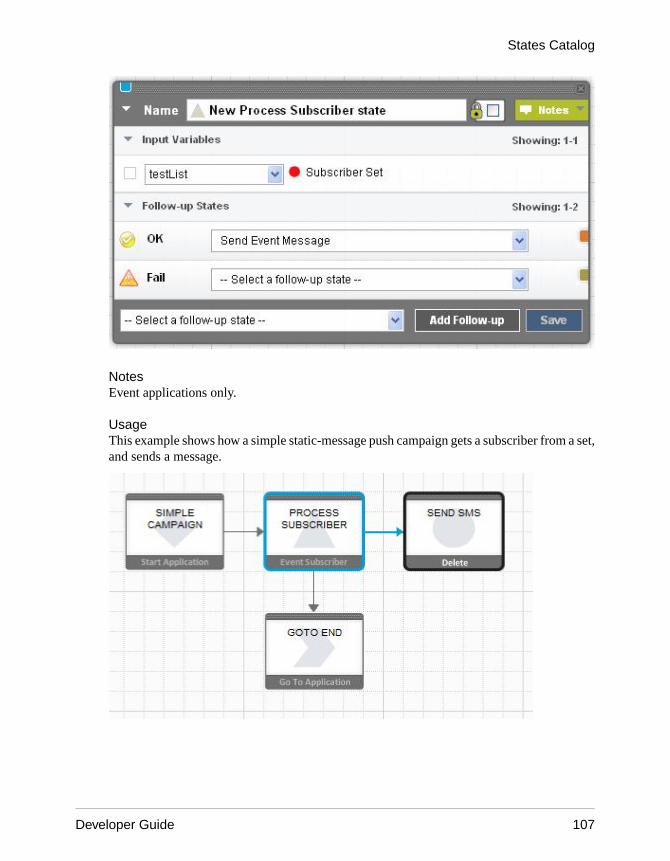
NotesEvent applications only.
UsageThis example shows how a simple static-message push campaign gets a subscriber from a set,and sends a message.
States Catalog
Developer Guide 107

See also• Add Subscriber State on page 87
• Get Subscriber State on page 101
• Update Subscriber State on page 124
States Catalog
108 Sybase Brand Mobiliser

Send SMS StateSends short message service (SMS) messages to mobile subscribers. If there is at least onefollow-up state, the application waits for a subscriber response; otherwise, the applicationterminates.
Input VariablesMessage – text to send via SMS. If the text is more than 160 characters, the text is divided andsent in multiple messages.
To embed the value of a session variable into the text, enter the name of the variable,surrounded by curly braces. For example, if you enter {INDEX}, it is replaced by the value ofthe session variable INDEX. If no such variable exists, {INDEX} is sent as a literal.
In event applications, the Request SMPP Acknowledgement flag appears in themessage, requesting acknowledgement from the short message peer-to-peer (SMPP) gateway.
Output VariablesNone.
Follow-up State – OKNot applicable.
Follow-up State – FailNot applicable.
Follow-up State – DynamicContinue the application when a response is received. To determine the follow-up state,compare the response to the values of Expression for follow-up states.
State EditorThis example specifies one follow-up state, the Mobiliser Change Credential state. The valueof Expression matches any response, and assigns the response to the NEW_CRED sessionvariable, which can be used later in the task flow.
States Catalog
Developer Guide 109

NotesIf session variables are embedded in a message, it may be impossible to determine the numberof characters in the message prior to runtime.
At runtime, the Send SMS state temporarily suspends the application flow and waits for aresponse. By default, the wait (also known as session timeout) lasts 7.5 minutes (450 seconds).Once a session times out, responses are ignored. Depending on the setup, subscribers mayreceive a guidance message or a menu. You can alter the length of the session timeout for eachapplication, on the Application Details screen.
UsageIn the scenario illustrated below, the Send SMS state sends a message asking for thesubscriber's PIN.
States Catalog
110 Sybase Brand Mobiliser

Send USSD Input StateSends a prompt for input to subscribers using Unstructured Supplementary Service Data(USSD).
Input VariablesAll input variables are optional.
• Input Validation String – value that can validate expected response values.• Input Validation Handler URL – URL to validate expected response values.• Mask the Response – select Yes or No to mask input on the telephone.
Output VariablesNone.
Follow-up State – OKNot applicable.
Follow-up State – FailIf an internal problem occurs formatting the state text.
Follow-up State – DynamicContinue the application when a response is received. To determine the follow-up state,compare the response to the values of Expression for follow-up states.
State EditorThis example specifies two follow-up states; if the input value is 0, the Send Response state iscalled; if the input value is anything else, the Send USSD Input state is called again.
States Catalog
Developer Guide 111

See also• Send USSD Menu State on page 112
• Send USSD Text State on page 118
Send USSD Menu StateSends a menu to subscribers via Unstructured Supplementary Service Data (USSD), andexpects menu-option responses. This is an abstract state type, which you can extend to developdynamic menus.
Input VariablesShow Exit Menu Item – enter:
• 1 for yes; this is the default.
• 0 for no.
Output Variables
• Variable for selected key – name of the session variable in which to store the selectedoption key.
States Catalog
112 Sybase Brand Mobiliser

• Variable for selected value – name of the session variable in which to store the selectedoption value.
Follow-up State – OKTypically used when the menu is created successfully, and the user sends a valid response.
Follow-up State – FailUsed only if there is an internal error processing the dynamic menu.
Follow-up State – DynamicTo process dynamic transitions, they must be implemented in the state’s code.
State EditorIn this example, if users send a valid response, another application is called to process theresponse. If an error occurs, control is passed to an application that terminates processing. Theselected option key is stored in the session variable VAR_KEY, and the selected option value isstored in the session variable VAR_VALUE.
States Catalog
Developer Guide 113

NotesThis state enables you to create a dynamic menu, and present the menu to subscribers as aseries of options with relevant responses. The menu items are:
States Catalog
114 Sybase Brand Mobiliser

• Header text – enter in the Message input field, as the message header.• Options – provided programmatically in instances of this state type, by a state developer.• Paging Options – this state type automatically adds Next and Previous options to a menu
list if there are more options than fit on a single page.• End Option – an option that you can add to end or exit the menu.
UsageTo implement a dynamic menu, create a subclass that extends this abstract class:
com.sybase365.mobiliser.brand.plugins.ussd.impl.AbstractDynamicUssdMenu
This abstract superclass creates and structures messages. Subclasses must override andimplement abstract methods to provide the required functionality.
/* The state attribute list is already set */ protected abstract Attribute[] getStateAttributeList();
/* * Initialize the dynamic list, possibly based on subscriber information */ protected abstract SmappState init(SmappStateProcessingAction action) throws MwizProcessingException, DBException, JAXBException, IOException, ServiceException, RequiredParameterMissingException;
/* * Return the list of options in a format [[key,text],...] */ protected abstract List<KeyValuePair<String, String>> getMenuList() throws NumberFormatException, DBException, RequiredParameterMissingException;
/* * Allow the branching of processes based on selected key. * If you want to use the configured dynamic follow-up * transitions, override this method and return continueDyn(key); * otherwise, override this method and return null to follow the * OK transition when the user selects an option. */ protected abstract SmappState saveSessionVariables(SmappStateProcessingContext context, String key, String value) throws MwizProcessingException, DBException, RequiredParameterMissingException;...
See also• Send USSD Input State on page 111
• Send USSD Text State on page 118
States Catalog
Developer Guide 115

Sample USSD Menu CodeThe code for a sample implementation of the Send USSD Menu state produces a menu withfour options: Option 1, Option 2, Option 3, and Option 4.
The SmappStateSendUssdMenu class implements the sample USSD menu. The fullyqualified class name is:
com.sybase365.mobiliser.brand.plugins.ussd.impl.SmappStateSendUssdMenu
SmappStateSendUssdMenu is a subclass of the AbstractDynamicUssdMenuabstract class.
package com.sybase365.mobiliser.brand.plugins.ussd.impl;
import com.sybase365.mobiliser.brand.dao.DBException; import com.sybase365.mobiliser.brand.jpa.SmappState; import com.sybase365.mobiliser.brand.plugins.api.smapp.SmappStateProcessingAction; import com.sybase365.mobiliser.brand.plugins.smapp.controls.Attribute; import com.sybase365.mobiliser.brand.plugins.useful.KeyValuePair; import java.util.ArrayList; import java.util.Arrays; import java.util.List; import org.slf4j.Logger; import org.slf4j.LoggerFactory;
/** * Loads all available languages and puts them into a menu * */ public class SmappStateSendUssdMenu extends AbstractDynamicUssdMenu { protected static final Logger LOG = LoggerFactory.getLogger(SmappStateSendUssdMenu.class); private static final String[] OPTIONS = { "Option 1", "Option 2", "Option 3", "Option 4" }; private List<String> listOfOptions = Arrays.asList(OPTIONS);
private static Attribute[] stateAttr;
static { stateAttr = new Attribute[]{}; }
@Override protected Attribute[] getStateAttributeList() { return stateAttr.clone(); }
States Catalog
116 Sybase Brand Mobiliser

@Override public long getStateId() { return 485002; }
@Override public String getStateName() { return "Send USSD Menu"; }
@Override public String getStateNotes() { return "This state generates a sample USSD Menu.\n" + "Use these follow-up states:\n" + "- OK: If user selected a menu item.\n" + "- FAIL: If an error occurs."; }
@Override public boolean supportsOkTransition() { return true; }
@Override public String getRevisionString() { return "$Revision:28128 $"; }
@Override protected SmappState init(SmappStateProcessingAction action) throws DBException { if (listOfOptions == null) { return continueFail(); }
return null; }
@Override protected int getMaxMenuItems() { return this.listOfOptions.size(); }
@Override protected List<KeyValuePair<String, String>> constructMenuList() throws DBException {
List<KeyValuePair<String, String>> list = new ArrayList<KeyValuePair<String, String>>();
int optionNumber = 1;
for (String option : listOfOptions) { KeyValuePair<String, String> keyVal = new KeyValuePair<String, String>();
States Catalog
Developer Guide 117
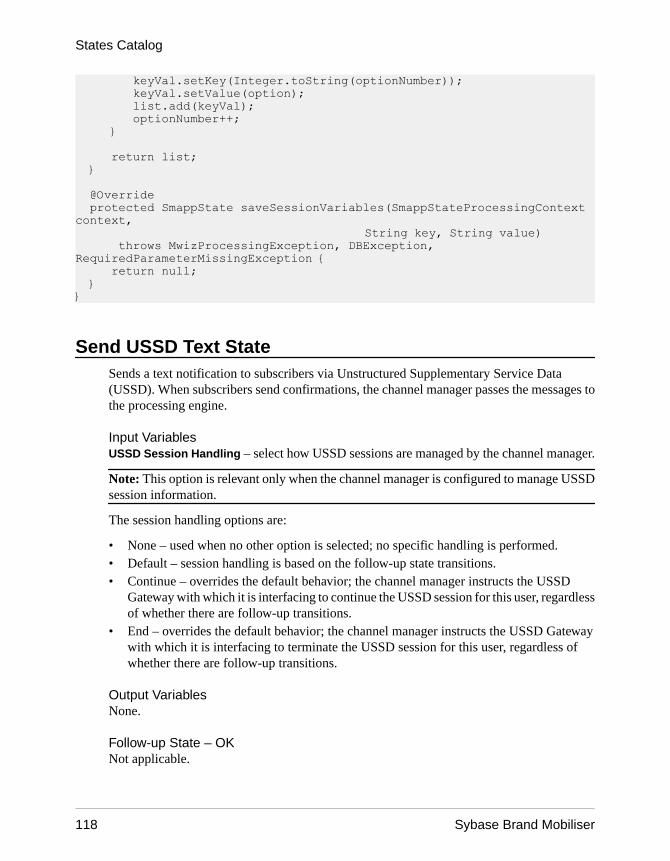
keyVal.setKey(Integer.toString(optionNumber)); keyVal.setValue(option); list.add(keyVal); optionNumber++; } return list; }
@Override protected SmappState saveSessionVariables(SmappStateProcessingContext context, String key, String value) throws MwizProcessingException, DBException, RequiredParameterMissingException { return null; } }
Send USSD Text StateSends a text notification to subscribers via Unstructured Supplementary Service Data(USSD). When subscribers send confirmations, the channel manager passes the messages tothe processing engine.
Input VariablesUSSD Session Handling – select how USSD sessions are managed by the channel manager.
Note: This option is relevant only when the channel manager is configured to manage USSDsession information.
The session handling options are:
• None – used when no other option is selected; no specific handling is performed.• Default – session handling is based on the follow-up state transitions.• Continue – overrides the default behavior; the channel manager instructs the USSD
Gateway with which it is interfacing to continue the USSD session for this user, regardlessof whether there are follow-up transitions.
• End – overrides the default behavior; the channel manager instructs the USSD Gatewaywith which it is interfacing to terminate the USSD session for this user, regardless ofwhether there are follow-up transitions.
Output VariablesNone.
Follow-up State – OKNot applicable.
States Catalog
118 Sybase Brand Mobiliser

Follow-up State – FailNot applicable.
Follow-up State – DynamicTo determine the follow-up state, compare responses to values of Expression for follow-upstates.
State EditorIn this example, you specify the text to send to subscribers in the Message field. Notes describethe state functionality and how to use it.
NotesTo tell the channel manager to end the USSD session, the state appends [$[End]$] to themessage text. The channel manager strips off this text before sending the message to the USSDGateway.
States Catalog
Developer Guide 119

See also• Send USSD Input State on page 111
• Send USSD Menu State on page 112
Set Variable StateSets a session variable with a specified string value. If you specify a numeric value, it is savedas a string.
Input Variables
• Variable – name of the session variable to set.• Value – value to save in the session variable. To set Variable with the value of another
session variable, specify the session variable name as {sessionVariable} wheresessionVariable contains the value to copy.
Output VariablesNone.
Follow-up State – OKThe name of the follow-up state after successful processing.
This process always succeeds and moves to the next state.
Note: This state performs no error checking. Even if the input variables are empty, it proceedsto the follow-up state. SAP recommends that you use the Copy Variables state to set sessionvariables, because it performs input validations, and uses the Fail follow-up state for errorhandling and debugging.
Follow-up State – FailNot applicable.
Follow-up State – DynamicNot applicable.
State EditorThis example sets the session variable CREDIT to 1000. The variable can be accessed by anystate in the application.
States Catalog
120 Sybase Brand Mobiliser

NotesSession variables are also set in these circumstances:
• If you specify a value surrounded by parentheses in the Expression field for a follow-upstate, and specify the session variable name in the Assign To field.
• If a state returns values, they are copied to session variables, so they are accessible byfollow-up states.
Note: Setting session variables overwrites any values that are already set for them. Forexample, if a state returns a value in the session variable X, and the follow-up state also setsvariable X, the return value is lost. To avoid this issue, use the Copy Variables state, instead ofSet Variable.
UsageThis example sets the session variable ALERT_MESSAGE with a message sent by the SendSMS state.
States Catalog
Developer Guide 121

See also• Copy Variables State on page 98
Start Application StateThe Start Application state is the initial state in applications. It is created automatically, andcannot be deleted.
Input VariablesNone.
Output VariablesNone.
Follow-up State – OKNot applicable.
Follow-up State – FailNot applicable.
Follow-up State – DynamicKeywords sent by subscribers initiate applications. An application can have multiplekeywords. Dynamic transitions enable custom flows, and are based on incoming keywords.
State EditorA Start Application state with a single follow-up state, Send SMS: Welcome and Menu.
States Catalog
122 Sybase Brand Mobiliser

NotesAt least one follow-up state is required.
UsageIn this example, the Start Application state processes multiple keywords using different taskflows.
States Catalog
Developer Guide 123

Update Subscriber StateUpdates subscriber attributes in the selected subscriber set. Gets the subscriber's MSISDNfrom a session variable, and updates as many as 20 attributes.
Input Variables
• Subscriber Set – select a subscriber set from a list.• Subscriber MSISDN – unique key for retrieving a subscriber's attributes.• Attribute 1, Attribute 2, ... Attribute 20 – subscriber attributes.
Output VariablesNone.
Follow-up State – OKSubscriber updated successfully.
Follow-up State – FailError while updating the subscriber, possibly because:
• MSISDN already exists.• Unrecoverable system error, such as database-connection failure.
Follow-up State – DynamicNot applicable.
State EditorIn this example, the Update Subscriber state updates attributes for subscribers in the testListsubscriber set.
States Catalog
124 Sybase Brand Mobiliser

NotesNone.
UsageOne possible use for the Update Subscriber state is a voting application, in which a voter isadded to the Voting Results list, and subsequently, the Update Subscriber state can insertinformation in other fields.
See also• Add Subscriber State on page 87
• Get Subscriber State on page 101
• Process Subscriber State on page 106
States Catalog
Developer Guide 125

States Catalog
126 Sybase Brand Mobiliser

IndexAAbstractDynamicMenu class 39
life cycle 40AbstractDynamicUssdMenu class 116AbstractStateMenuImpl class, extending 82accessing input variables 50activating
applications 21events 21
activation 19Add Subscriber state 87adding
states to applications 10advanced interactive messaging server 1AIMS 1AIMS System Web console
enabling 69Apache Maven
configuring 53creating a project 57customizing POM files 59installing 53project artifacts, creating 63project structure 58projects, building 64sample POM file 60setting up 53
Application Call Return state 92Application Call state 89Application Composer 5application states 2
adding 10base 3configuring in Application Composer 5custom, developing 33custom, developing and deploying 35developing with PluginInterface 38developing with StatePlugin interface 36dynamic menu 39editing 9editing properties 10extending SmappStatePlugin 35implementing state logic 41removing 11Send SMS 109
Send USSD Input 111Send USSD Menu 112Send USSD Text 118transitions, removing 11troubleshooting, variables for 46
applicationsactivating 21adding keywords to 12assigning events to 19Cash-Out interactive sample 28deactivating 22deleting 22designing task flows 13event, developing 15event, testing 25exporting 27, 28exporting a group 28importing 26importing XML files 26interactive, developing 11interactive, testing 23life cycle 33mode transitions 20samples 28testing 22uploading templates 27
applications, samplesUtility Notification event 31
assigning events to applications 19Attribute class hierarchy 52
Bbase states 2, 3
Application Call 89Application Call Return 92Compare Typed Variables 94Compare Variables 96Copy Variables 98Counter 100Goto Application 104Send SMS 109Set Variable 120Start Application 122
bean propertiesconfiguring 65
Index
Developer Guide 127

BeanConverterInterface 51beans-context.xml 65Brand Mobiliser
overview 1building
custom-state bundles 56Maven projects 64
bundlescustom states 56verify deployment using Telnet 67verify deployment using Web console 68verifying configuration using Web console 71
CCash-Out interactive application 28
state editor 29channel manager 1ChannelPlugin interface 38class hierarchy, Attribute 52classes
AbstractDynamicMenu 39, 51AbstractDynamicUssdMenu 116AbstractStateMenuImpl 82InputAttribute 47OutputAttribute 45, 49SampleSOAPState 72SampleState 80SendSampleMenu 82SessionVariableAttribute 51SmappStatePlugin 35, 36, 41, 80SmappStateProcessingAction 42SmappStateSendUssdMenu 116SmappTemplateProvider 76StateUtils 33TextBoxAttribute 45, 47
code samplesUSSD menu 116
Compare Typed Variables state 94Compare Variables state 96components
custom states 56State SDK 84
configuringApache Maven 53bean properties 65custom-state bundles 69Spring beans 65
constructMenuList method 39, 40consuming RESTful Web services 75
consuming SOAP Web services 72continueProcessing method 42continueWhenSingleEntry method 40controlling state transitions 7Copy Variables state 98Counter state 100creating
Apache Maven project 57applications from templates 27custom-state bundles 56event applications 15events 17interactive applications 11Maven project artifacts 63
creating applicationsApplication Composer 5
custom application states, developing 33custom state information 43custom states 4
developing and deploying 35dynamic menu 39GetMyWeather 78implementing logic 41variables 45
custom-menu state, sample 82custom-state bundles 56
adding quick-start templates to 75building 56configuring 69deploying 67verifying configuration using Telnet 70
customizingMaven POM files 59
Ddeactivating
applications 22events 22
defininginput variables 47output variables 49state variables 45
deployingcustom-state bundles 67State SDK bundles to Maven repository 55
developingapplications, overview 1custom application states 33custom states with PluginInterface 38
Index
128 Sybase Brand Mobiliser

custom states, troubleshooting variables 46event applications 15interactive applications 11states by extending SmappStatePlugin 35states with StatePlugin interface 36
developing and deploying custom states 35dynamic menu state 39dynamic template plug-ins
creating 76
E
editingstate properties 10states 9
enablingAIMS System Web console 69
event applicationsdeveloping 15sample message log 26testing 25Utility Notification sample 31
event engine 1event windows
one time 17recurring 18
events 16activating 21assigning to applications 19creating 17deactivating 22
exportingapplications 27group of applications 28single application 28
extending SmappStatePlugin class 35
G
Get Subscriber state 101getInputValue method 50getInputValueWithWarning method 50getList method 51GetMyWeather sample state 78getStateAttributeList method 39, 40getStateAttributes method 40getStateDao method 41getSubscriberDao method 41Goto Application state 104
Iimplementing state logic 41
SmappStateProcessingAction 42SmappStateProcessingContext 41
importingapplication XML files 26applications 26
init method 39input parameters 4input variables
accessing 50defining 47
InputAttribute class 47installing
Apache Maven 53interactive applications
Cash-Out sample 28developing 11initial state 122Mobiliser Counter sample 30sample message log 24testing 23
interfacesBeanConverterInterface 51ChannelPlugin interface 38PluginInterface 38StatePlugin 36StatePlugin interface 38
isAckMessageRequested method 41isCurrentStateEncrypted method 41
Kkeywords 14
adding to applications 12searching for 13
Llife cycle, application 33list variables 51long codes 14
MMaven
configuring 53
Index
Developer Guide 129
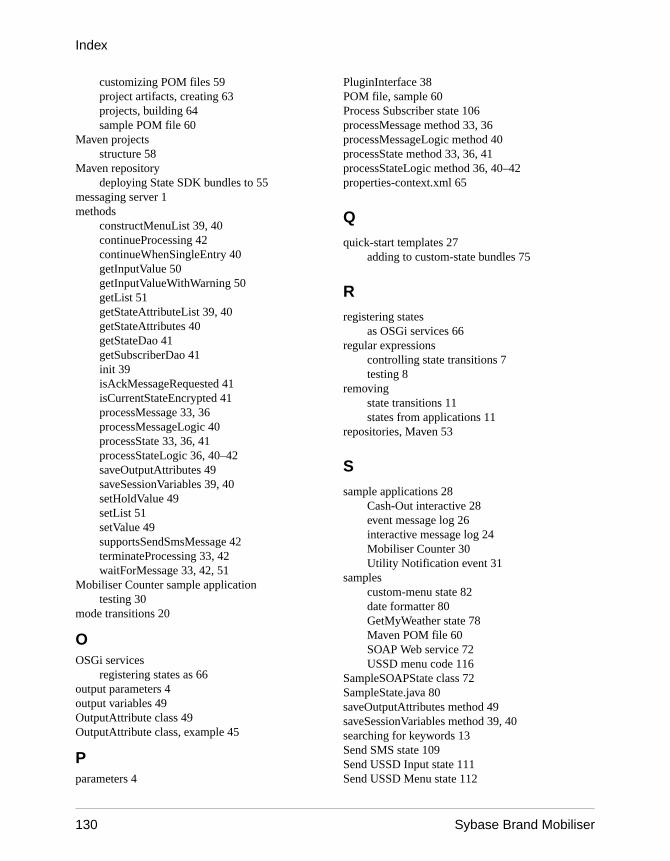
customizing POM files 59project artifacts, creating 63projects, building 64sample POM file 60
Maven projectsstructure 58
Maven repositorydeploying State SDK bundles to 55
messaging server 1methods
constructMenuList 39, 40continueProcessing 42continueWhenSingleEntry 40getInputValue 50getInputValueWithWarning 50getList 51getStateAttributeList 39, 40getStateAttributes 40getStateDao 41getSubscriberDao 41init 39isAckMessageRequested 41isCurrentStateEncrypted 41processMessage 33, 36processMessageLogic 40processState 33, 36, 41processStateLogic 36, 40–42saveOutputAttributes 49saveSessionVariables 39, 40setHoldValue 49setList 51setValue 49supportsSendSmsMessage 42terminateProcessing 33, 42waitForMessage 33, 42, 51
Mobiliser Counter sample applicationtesting 30
mode transitions 20
OOSGi services
registering states as 66output parameters 4output variables 49OutputAttribute class 49OutputAttribute class, example 45
Pparameters 4
PluginInterface 38POM file, sample 60Process Subscriber state 106processMessage method 33, 36processMessageLogic method 40processState method 33, 36, 41processStateLogic method 36, 40–42properties-context.xml 65
Q
quick-start templates 27adding to custom-state bundles 75
R
registering statesas OSGi services 66
regular expressionscontrolling state transitions 7testing 8
removingstate transitions 11states from applications 11
repositories, Maven 53
S
sample applications 28Cash-Out interactive 28event message log 26interactive message log 24Mobiliser Counter 30Utility Notification event 31
samplescustom-menu state 82date formatter 80GetMyWeather state 78Maven POM file 60SOAP Web service 72USSD menu code 116
SampleSOAPState class 72SampleState.java 80saveOutputAttributes method 49saveSessionVariables method 39, 40searching for keywords 13Send SMS state 109Send USSD Input state 111Send USSD Menu state 112
Index
130 Sybase Brand Mobiliser
Send USSD Text state 118SendSampleMenu class, sample 82service states 2services-context.xml 66session manager 1SessionVariableAttribute class 51Set Variable state 120setHoldValue method 49setList method 51settings.xml file 53setValue method 49short codes 14SmappStatePlugin abstract class 41SmappStatePlugin class 35
extending 78SmappStateProcessingAction 42SmappStateProcessingAction class 42SmappStateProcessingContext 41SmappStateSendUssdMenu class 116SmappTemplateProvider class
configuring as a Spring bean 76SOAP Web service sample 72Spring beans
configuring 65SmappTemplateProvider class 76
standalone statesbase states 2subscriber states 2
Start Application state 122state attributes
class heirarchy 52state bundle samples 72
RESTful Web service 75SOAP Web service 72
state editor 9state machine 5State SDK bundles
deploying to Maven repository 55State SDK core components 84state transitions 6
controlling with regular expressions 7state variables
defining 45StatePlugin interface 36, 38states
Add Subscriber 87adding to applications 10application 2Application Call 89
Application Call Return 92base 3Compare Typed Variables 94Compare Variables 96Copy Variables 98Counter 100custom 4defining 43Get Subscriber 101Goto Application 104Process Subscriber 106properties, editing 10removing from an application 11Send SMS 109Send USSD Input 111Send USSD Menu 112Send USSD Text 118service 2Set Variable 120standalone 2Start Application 122subscriber 3transitions, removing 11Update Subscriber 124USSD 2, 4
StateUtils class 33subscriber states 2, 3
Add Subscriber 87Get Subscriber 101Process Subscriber 106Update Subscriber 124
supportsSendSmsMessage method 42
T
task flowsapplications, designing 13
templates, quick start 27terminateProcessing method 33, 42testing
applications 22event applications 25interactive applications 23regular expressions 8
TextBoxAttribute class, sample 45, 47transitions
application modes 20
Index
Developer Guide 131

UUpdate Subscriber state 124uploading application templates 27USSD menu
sample code 116USSD states 2, 4
Send USSD Input 111Send USSD Menu 112Send USSD Text 118
Utility Notification event application 31
Vvariables
input, accessing 50input, defining 47
list 51output, defining 49
variables for troubleshooting 46verifying
bundle configuration using Telnet 70bundle configuration using Web console 71deployment using Telnet 67deployment using Web console 68
W
waitForMessage method 33, 42, 51windows, event
one time 17recurring 18
Index
132 Sybase Brand Mobiliser