developed by etr associates, as part of grant 0217221 from ...whyville.s3.amazonaws.com ›...
TRANSCRIPT

Flash Flowcharts(i.e., Skill Instruction Diagrams)
Developed by ETR Associates, as part of grant 0217221 from the National
Science Foundation

Contents________________________________________________________________These materials were developed using Flash MX v.6.0, and include
instruction for the following topics:
Text Drawing Tools Clip Art Convert to Symbol Adding Buttons Scenes “Stop” ActionScript on Frame “Goto” ActionScript on Button Add Sound to Button Download Sounds Frame-By-Frame Animation Motion Tweening Text Shape Tweening Morphing Text Add Music to Movie Input Text Fields Dynamic Text Fields Set Variable Screen shots for Input Dynamic Text fields

TEXT
TIP: If Properties Panelis not open, go to
Window > Properties
2) Double click name of Layer to give it a new nameRename Layer: “Text”
5) Using text cursor, highlight textand use the Properties Panel
to change the type, size or color
4) Click once on the Stagewhere you want your text
to go. Start typing
3) Click once on the Text Tool
1) Open a Flash fileType
New Text
Note:Cursor stylechanges to
crosshair + andletter A
Note:Text Box shows
up on stage.
Change& Move Text
6) Select Black Arrow tooland click on text to moveto new location on stage
Note:A blue line will appear
around text whenit is selected
Developed by ETR Associates, as part of grant 0217221 from the National Science Foundation

DRAWING TOOLS
5) To change color of shape:Using Black Arrow Tool, single click on
Fill (inside shape) or the Stroke (line around shape)
Tip: hold the Shift keydown while you draw,for straight lines, perfect squares or
circles
3) Click on a drawing tool from Tool Panel
8) Select Black Arrow toolto change shape
6) Use Paint Bucket (K)to change the Fill
1) Open Flash fileDrawShape
4) On the Stagedraw a shape
ChangeColor, Size,
Shape
7) Use Properties Panel tomake other changes
6) Use Ink Bottle (S)to change the Stroke
TIP: Change Stroke Style,Stroke Height orStroke Color inProperties Panel
TIP: Change Fill Colorin Properties Panel
Note: cursorhas small curve or angle
next to arrow when next toa shape. This indicates
that you can changethe shape.
Note: there are 2 parts to
every shape you draw: Fill & Stroke
9) Use Transform Toolto adjust size
Rotate, Resize & Skewimage by putting curser
near black squares.
2) Add New Layer:(Insert > Layer) or click on layer iconDouble click name to give it a new name
Developed by ETR Associates, as part of grant 0217221 from the National Science Foundation

CLIP ART
2) Add & Rename layer: Clip ArtPut name of clip art as layer name
if you know what it will be (e.g. “cat”).
3) Open Common LibraryWindow > Common Libraries > ClipArt
1) Start FlashClipArtfrom
CommonLibrary
4) Choose a Clip Art symbolClick and drag the clip art from Library to the stage
5) Double click on piece of cliparton stage or in Library to go “backstage”
6) Select clipart with black arrow tool
ModifyingClipartin yourLibrary
7) Modify > Break Apart as many timesas necessary to completely break apart
Note: Clipart will thenlook like it is drawn with
many dots or “pixels”
8) Make changes to the clipart(draw on it, change colors, etc.)
Note: Changes youmake will change the
image in the library and allinstances throughout
your Flash file9) Click on scene icon
to return to main stage
Note: Thisautomatically puts
a copy of symbol intoYOUR movie’s Library
Check that youare “backstage”
by looking for graphicname by scene icon
Developed by ETR Associates, as part of grant 0217221 from the National Science Foundation

CONVERT TO SYMBOLMaking a Drawing, Clipart or Buttoninto a Graphic, Button or Movie Clip
3) Insert > Convert to Symbol
1) Draw a shape,bring out a button,
or import cliparton it’s own layer
4) Name the Symbol
Draw orSelect aShape onStage
2) Use Black Arrow toolTo select ALL of the
shape, button or clipart.
Convert toA Symbol
5) Choose a Symbol Behavior:Movie Clip
orButton
orGraphic
Test
For a shapeselect both fill & strokewith black arrow, lasso
or transform tool
Note:Which behavior you
choose dependson how you wantit to work in your
Flash movie
Note:This symbol
is automatically placedin your
movie’s Library
6) Click OK
7) Window > Library to checkthat your symbol is there
Note:The blue lined box
around the symbol onthe stage tells you that
it is an instance ofthat symbol
Note:A dialog box comes upwith questions about
this new symbol
Developed by ETR Associates, as part of grant 0217221 from the National Science Foundation

ADDING BUTTONS
5) Add new layer for button textType new text on button
3) Open Common LibraryWindow > Common Libraries > Buttons
1) Start FlashUseButtonsCommonLibrary
4) Choose a button symbol. Click and drag the buttonfrom Library to the stage
6) To see button move Control > Test Movie
(Apple(Command)+Return)TestButton
2) Add a new Layer, Rename new layer: “Button”
7) Close inside “x” to return to stage
Note: The button willnot take you anywhere
because it’s notprogrammed yet
Note: Thisautomatically puts a copy
of this button symbol intoYOUR movie’s Library
Developed by ETR Associates, as part of grant 0217221 from the National Science Foundation

SCENES
1) Start FlashAdd & Name New
Scene
6) Control > Test SceneTestScene
2) Open Scene PanelWindow > Scene
4) Double click on text torename scene to “Welcome”
TIP: To switch betweenScenes, click on
Scene Icon on rightside of Timeline
3) Insert a new Scene
by clicking on + icon
5) Click and drag the scene youwant to come up first in your
Flash movie(“Welcome”)
TIP: You can alsodelete scenes in the
Scene Panel by clickingon the garbage can icon
Check that this is thescene you just added
Developed by ETR Associates, as part of grant 0217221 from the National Science Foundation

“STOP” ACTIONSCRIPT ON FRAME
3) Open Actions PanelWindow > Actions (F9)
1) Add a new layer.Rename new layer: “ActionScript”
6) Control > Test Movie(Apple(Command)+Return)
Add“stop”
toMovie 2) Select (single click)
Blank KeyFrame (empty circle)on the ActionScript layer of the timeline
Test tosee one scene
4) Put a Stop Action on the Frame
Action Panel: Actions > Movie Control> double click on the stop action
Note: thestop action on the
Frame stops anythingfrom moving past thatpoint on the timeline
7) Click inside “x” to return to stage
5) Close or minimizeAction Panel
Check that it says“Actions – Frame” at
the top of the Action Panelbefore selecting “stop”
Check that a small“a” above the
Blank KeyFrameappears in timeline
Developed by ETR Associates, as part of grant 0217221 from the National Science Foundation
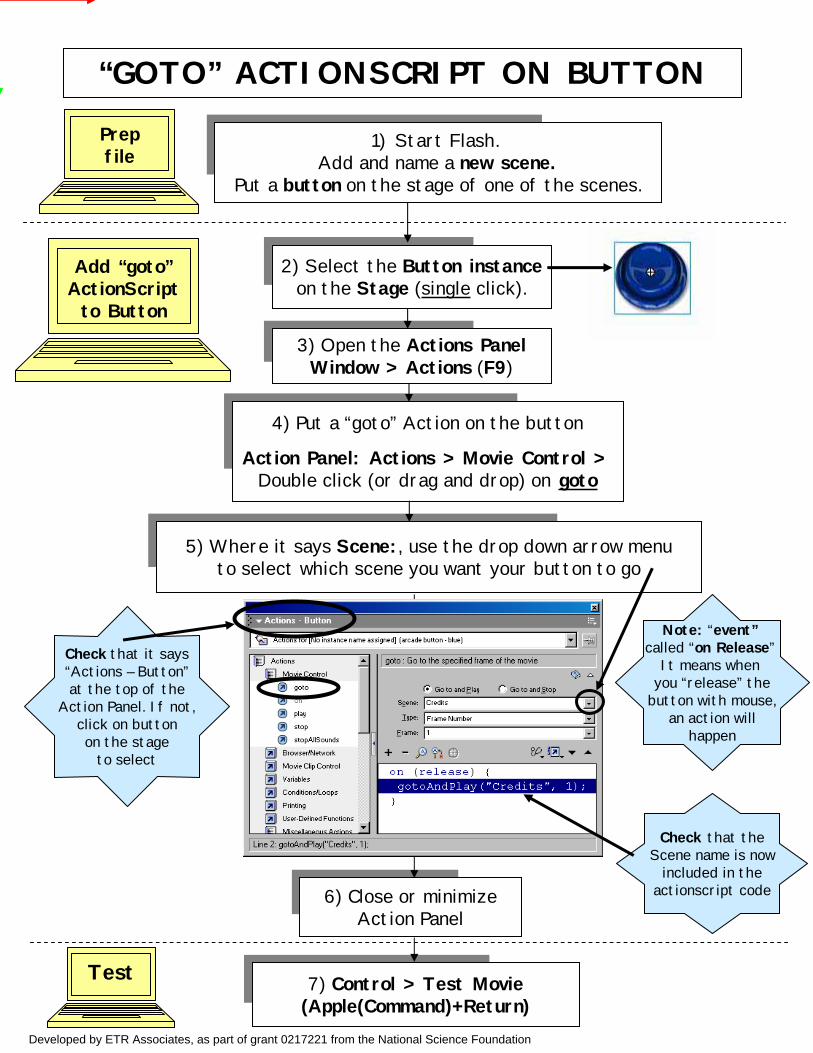
“GOTO” ACTIONSCRIPT ON BUTTON
6) Close or minimizeAction Panel
5) Where it says Scene:, use the drop down arrow menuto select which scene you want your button to go
2) Select the Button instanceon the Stage (single click).
3) Open the Actions PanelWindow > Actions (F9)
1) Start Flash. Add and name a new scene.
Put a button on the stage of one of the scenes.
7) Control > Test Movie(Apple(Command)+Return)
Add “goto” ActionScriptto Button
4) Put a “goto” Action on the button
Action Panel: Actions > Movie Control > Double click (or drag and drop) on goto
Test
Note: “event”called “on Release”
It means whenyou “release” the
button with mouse,an action will
happen
Check that it says“Actions – Button”at the top of the
Action Panel. If not,click on buttonon the stage
to select
Prepfile
Check that theScene name is now
included in theactionscript code
Developed by ETR Associates, as part of grant 0217221 from the National Science Foundation
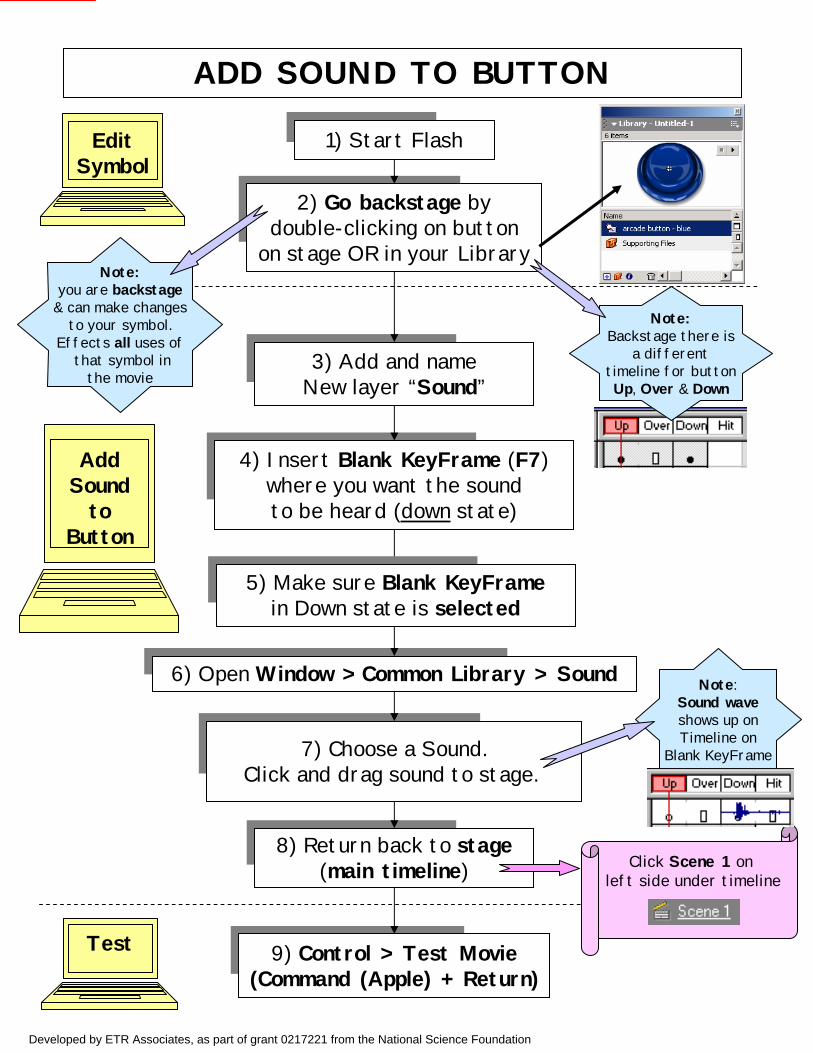
7) Choose a Sound.Click and drag sound to stage.
3) Add and nameNew layer “Sound”
2) Go backstage bydouble-clicking on button
on stage OR in your Library
8) Return back to stage(main timeline)
4) Insert Blank KeyFrame (F7)where you want the soundto be heard (down state)
ADD SOUND TO BUTTON
1) Start FlashEditSymbol
9) Control > Test Movie(Command (Apple) + Return)
6) Open Window > Common Library > Sound
Test
Note:Sound waveshows up onTimeline on
Blank KeyFrame
Note:you are backstage
& can make changesto your symbol.
Effects all uses ofthat symbol in
the movie
Click Scene 1 onleft side under timeline
AddSound
toButton
Note:Backstage there is
a differenttimeline for buttonUp, Over & Down
5) Make sure Blank KeyFramein Down state is selected
Developed by ETR Associates, as part of grant 0217221 from the National Science Foundation
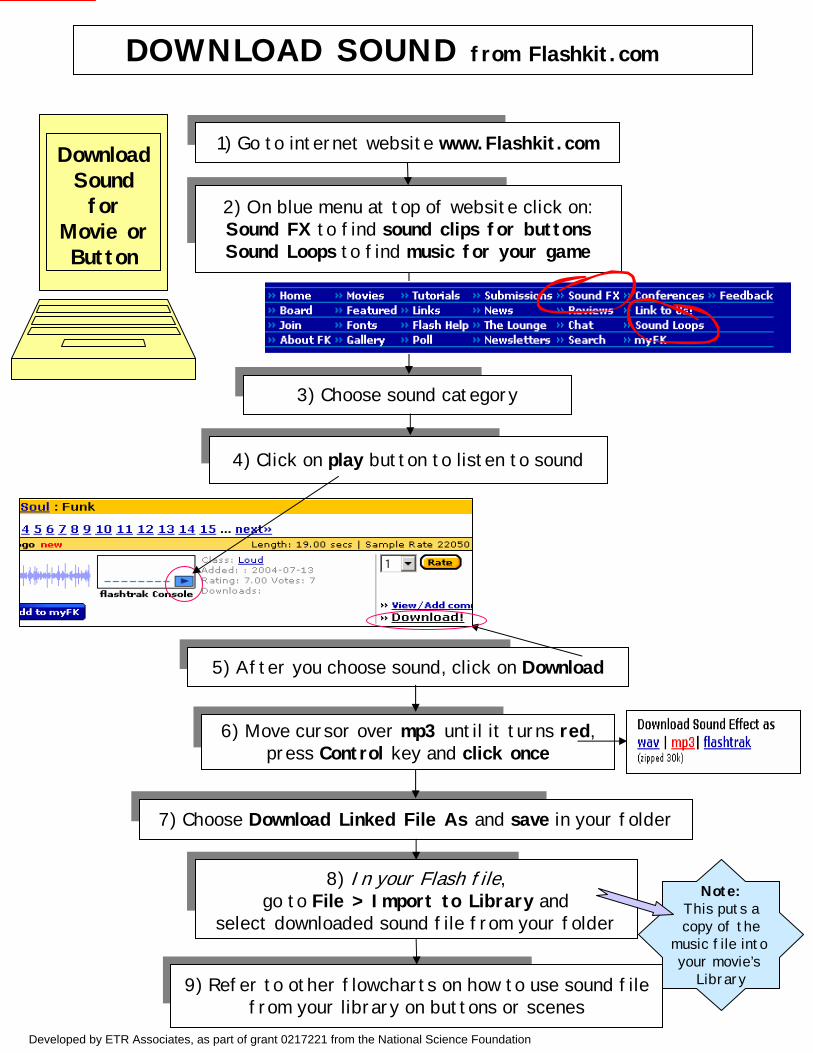
DOWNLOAD SOUND from Flashkit.com
Note:This puts acopy of the
music file intoyour movie’s
Library
2) On blue menu at top of website click on:Sound FX to find sound clips for buttonsSound Loops to find music for your game
3) Choose sound category
1) Go to internet website www.Flashkit.comDownloadSoundfor
Movie or Button
4) Click on play button to listen to sound
5) After you choose sound, click on Download
6) Move cursor over mp3 until it turns red,press Control key and click once
7) Choose Download Linked File As and save in your folder
8) In your Flash file,go to File > Import to Library and
select downloaded sound file from your folder
9) Refer to other flowcharts on how to use sound filefrom your library on buttons or scenes
Developed by ETR Associates, as part of grant 0217221 from the National Science Foundation

FRAME-BY-FRAME ANIMATION
6) Select Black Arrow Tool.Double click on your object
on the stage (to select all of it)
4) Insert > KeyFrame (F6)on timeline in the next frame
3) Draw object(notice how you are backstage in your symbol)
9) Control > PlayTo test your animation
Frame byFrame
Animation
5) Check that the new KeyFrameon the timeline is selected (single click)
Test
7) Click and hold mouse down on objectto move it to new location on stage
TIP:Repeat Steps 4-7to create a longeranimation scene
TIP: Put keyframeslater on timeline to affect
speed of animation.
10) Click on Scene iconto return back to stage
Your animation is now in your library!
1) From the menu,choose Insert > New Symbol
2) Name your animation and select Movie Clip behavior
8) Go back to Step 4 and repeatif you want to create a longer animation
TIP:Click on Onion Skinningto see frame before.
This allows you to know where to position your
object correctly.
Developed by ETR Associates, as part of grant 0217221 from the National Science Foundation

MOTION TWEENING TEXT
6) Select first keyframe
4) Select the frame whereyou want your text to stop animating
Insert > KeyFrame (F6)on that Frame
2) Name your tween andselect Movie Clip behavior.
7) Select Properties: TweenChoose: Motion
MotionTweenText
5) Using the Black Arrow tool,select text box and move to new location
Test
Select the1st KeyFrame
because we needto modify the timeline not
the text.
Make aMovie Clip Symbol
3) Type text(SEE ‘TEXT” FLOWCHART)
CHECKthat there is an arrow
& blue backgroundon that layer of the
Timeline.
1) From the menu,choose Insert > New Symbol
9) Control > Playto test your tweened text
10) Click on Scene iconto return back to stage
Your animation is now in your library!
Notice howyou are backstagein your movie clip
Developed by ETR Associates, as part of grant 0217221 from the National Science Foundation

SHAPE TWEENING(also called MORPHING)
1) From the menu,Choose Insert > New Symbol
6) Select first keyframewith the shape you want to morph
3) Draw a shape(see “DRAWING TOOLS” flowchart)
7) Select Properties: TweenChoose: Shape
MakeMovie ClipSymbol
4) Insert > KeyFrame (F6)on Frame where you want
the shape to stop changing shape/color
8) Control > Playto test your morphed shape
Tweenthe
Shape
Test
5) Click in the added Keyframe andmodify shape or deleteand draw a new shape
2) Name your animationand select Movie Clip behavior
9) Click Scene iconto return to the main stage.
Your animation is now in your library!
Notice thatyou are backstagein your movie clip
Automaticallycreates an arrow
& green backgroundon that layer
in the Timeline.
Draw & ChangeShape
Developed by ETR Associates, as part of grant 0217221 from the National Science Foundation

MORPHING TEXT(same as Shape Tweening “Text”)
7) Select first keyframewith the text you want to morph
6) Select each Keyframe with text andModify > Break Apart
2 times in a row.
2) Name your animation andselect Movie Clip behavior
8) Select Properties: TweenChoose: Shape
TypeText
4) Insert > KeyFrame (F6) on Frame whereyou want text to stop changing shape/color
9) Control > Play to test your morphed text
ShapeTweenText
Test
5) Click in Text Box on added KeyFrameand change the text
PrepareText to Tween
MakeMovie ClipSymbol
3) Type text
Automaticallycreates an arrow
& green backgroundon that layer
in the Timeline.
10) Click Scene icon to return to the main stage.Your animation is now in your library!
1) From the menu,choose Insert > New Symbol
Notice thatyou are backstagein your movie clip
Developed by ETR Associates, as part of grant 0217221 from the National Science Foundation

ADD MUSIC TO MOVIE
7) Select Blank Keyframeon “music” layer
CreateSymbol
for Music
9) Control > Test Movie(Command (Apple) + Return)
Test
AddMusic to Movie
TIP: To adjust sound tofade in or out,
Select KeyFramethen Properties Panel
select Effect.
1) From the menu,choose Insert > New Symbol
2) Name symbol(this is going to be your music)and select Movie Clip behavior
5) Return back to the main stage
6) Add & name new layer “music”
8) Open your Library and click & dragyour movie clip symbol to the stage
TIP: Loop music toRepeat more then once;Change Sync to Start
3) While you are backstage in the symbol,Open Window > Common Library > Music
ORWindow > Library
(where your downloaded music clip is)
4) Choose music clip andClick and drag sound to stage
Developed by ETR Associates, as part of grant 0217221 from the National Science Foundation

INPUT TEXT FIELDS
5) In Properties Panel,find the var field & type “input”
in lowercase letters.
6) Add & name New layer: “Directions”
1) On the scene where you wantthe player to type a name or word/s,
Add & name a New layer: “input box”
2) Select first KeyFrameon “input box” layer
3) Use Text Tool to draw a boxon the stage
9) Go to ‘DYNAMIC TEXT FIELDS’ FLOWCHARTfor the next step!
CreateInput Text
Field
4) In Properties Panel,change type of text to Input Text
NextStep
Make sureBorder & Selectableicons are selected.
This makes it so usercan see a box wherethey type their name
Note:This will be the
variable name forthis text field
Modify size of Text Box to hold
characters in person’sname (approximately
3 inches).
Directionsfor InputText Field 7) Use the Text Tool to
type Directions for the player.Example: “Type your name in the box below”
8) In Properties Panel,change type of text to Static Text
See backside offlowchart for howit looks in Flash
Developed by ETR Associates, as part of grant 0217221 from the National Science Foundation

DYNAMIC TEXT FIELDS
2) On the dynamic box layer,
Use the Text Tool to draw a box closeto the same size as input box you made
on previous scene
1) On the scene where you wantthe name or word/s the player typed to appear,
Add & name a New layer: “dynamic box”
3) In Properties Panel,change type of text to Dynamic Text
Start with a file that already has anInput Text Field on the scene where you want
player to type in name or word/s
Set upNewLayer
CreateDynamic
Text Field
NextStep
Note:This will be thevariable name
for thistext field.
4) In Properties Panelfind the var field & type “dynamic”
in lowercase letters
5) Go to ‘SET VARIABLE’ FLOWCHARTfor the last step to make your text fields work!
See backside offlowchart for howit looks in Flash
Developed by ETR Associates, as part of grant 0217221 from the National Science Foundation

SET VARIABLE(Program your button to move text)
3) Open Actions Panel (F9)
2) On scene with Input Text Field & button,Select button with black arrow tool
6) In Actions Panel for set Variable,find value parameter (box).
Type “input” (your “input box” var name)
1) Open Flash filewith input & dynamic text fields
9) Control > Test Movie(Command (apple)+Return)
Start by typing a word into Input Text Field!
AddActionScriptTo Button
4) Open Actions > Variables >Double click on set variable
Test
5) In Actions Panel for set Variable,find variable parameter (box).
Type “dynamic” (your “dynamic box” var name) Make sure totype the namesEXACTLY as youdid on the text
field for the var
Note:This tells
Flash to takewhatever is inthat box to
dynamic textfield
8) If you don’t have a “goto” actionon your button, ADD it.
(SEE ‘GOTO A.S. ON BUTTON’ FLOWCHART)
7) Check the value expression box only
See backside offlowchart for howit looks in Flash
Developed by ETR Associates, as part of grant 0217221 from the National Science Foundation

Customize your game! Check out this feature, called “input dynamic text”You input a name on Scene 1,and it dynamically appears in Scene 2.
Step 1. Make an “input text” box on Scene 1.
Hint: Use your text tool to draw your “input text” box, and follow the paw clues to set up the text box properties.
Developed by ETR Associates, as part of grant 0217221 from the National Science Foundation

Step 2. Program your button on Scene 1
This button already has “go to” action script on it. Pressing it takes you to Scene 2.Add more action script to your button.
Tell Flash to take the “input text” and move it so it pops-up in a new “dynamic text” box (You’ll make that next, on Scene 2).
Hint: Follow the paw clues to set up your button action panel to look like this:
Developed by ETR Associates, as part of grant 0217221 from the National Science Foundation
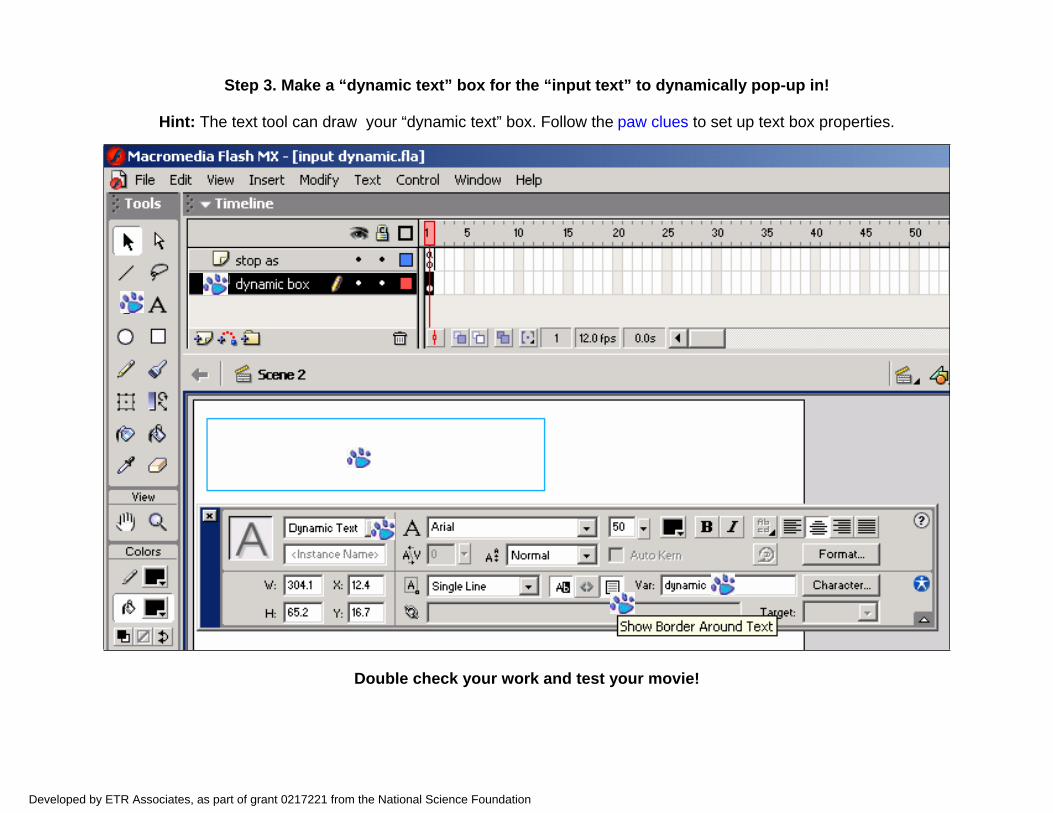
Step 3. Make a “dynamic text” box for the “input text” to dynamically pop-up in!
Hint: The text tool can draw your “dynamic text” box. Follow the paw clues to set up text box properties.
Double check your work and test your movie!
Developed by ETR Associates, as part of grant 0217221 from the National Science Foundation