detecting basics treasure view (go‑find 44/66 only)
TRANSCRIPT
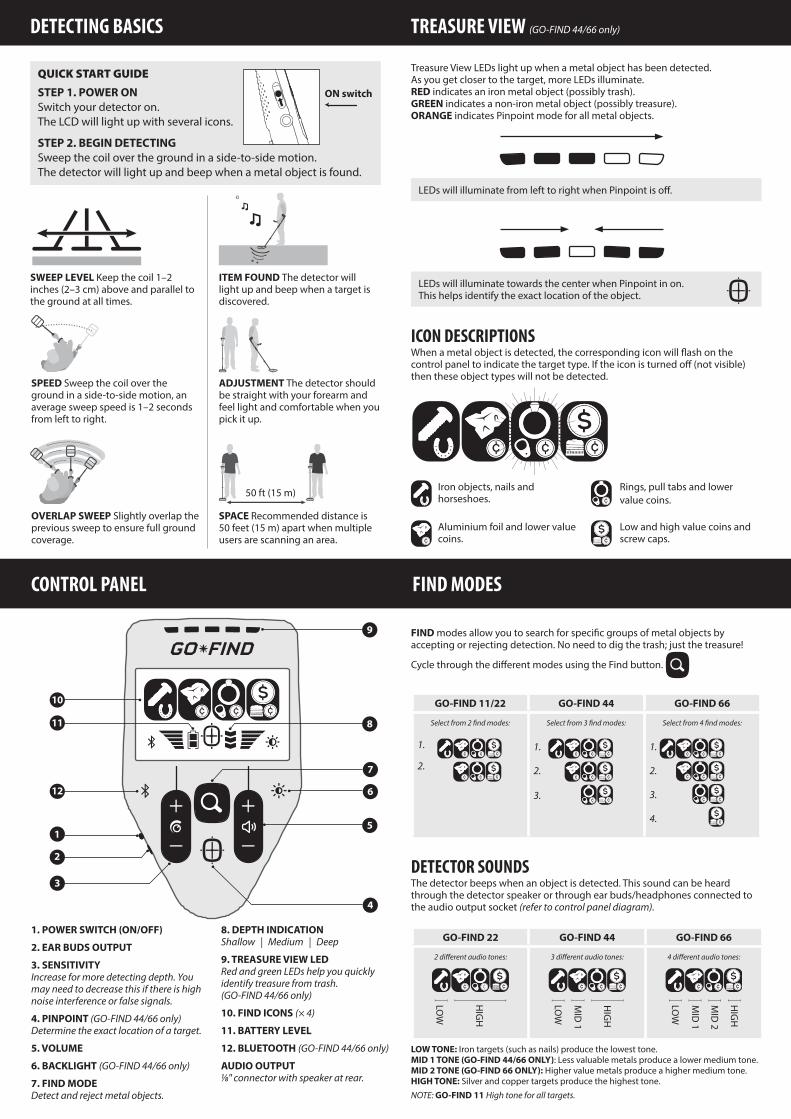
1. POWER SWITCH (ON/OFF)
2. EAR BUDS OUTPUT
3. SENSITIVITYIncrease for more detecting depth. You may need to decrease this if there is high noise interference or false signals.
4. PINPOINT (GO‑FIND 44/66 only)Determine the exact location of a target.
5. VOLUME
6. BACKLIGHT (GO‑FIND 44/66 only)
7. FIND MODEDetect and reject metal objects.
8. DEPTH INDICATIONShallow | Medium | Deep
9. TREASURE VIEW LED Red and green LEDs help you quickly identify treasure from trash.(GO‑FIND 44/66 only)
10. FIND ICONS (× 4)
11. BATTERY LEVEL
12. BLUETOOTH (GO‑FIND 44/66 only)
AUDIO OUTPUT1/8" connector with speaker at rear.
DETECTING BASICS TREASURE VIEW (GO‑FIND 44/66 only)
CONTROL PANEL
QUICK START GUIDE
STEP 1. POWER ONSwitch your detector on.The LCD will light up with several icons.
STEP 2. BEGIN DETECTINGSweep the coil over the ground in a side-to-side motion.The detector will light up and beep when a metal object is found.
FIND MODES
FIND modes allow you to search for specific groups of metal objects by accepting or rejecting detection. No need to dig the trash; just the treasure!
Cycle through the different modes using the Find button.
DETECTOR SOUNDSThe detector beeps when an object is detected. This sound can be heard through the detector speaker or through ear buds/headphones connected to the audio output socket (refer to control panel diagram).
SWEEP LEVEL Keep the coil 1–2 inches (2–3 cm) above and parallel to the ground at all times.
SPEED Sweep the coil over the ground in a side-to-side motion, an average sweep speed is 1–2 seconds from left to right.
ADJUSTMENT The detector should be straight with your forearm and feel light and comfortable when you pick it up.
SPACE Recommended distance is 50 feet (15 m) apart when multiple users are scanning an area.
OVERLAP SWEEP Slightly overlap the previous sweep to ensure full ground coverage.
Treasure View LEDs light up when a metal object has been detected. As you get closer to the target, more LEDs illuminate.RED indicates an iron metal object (possibly trash).GREEN indicates a non-iron metal object (possibly treasure).ORANGE indicates Pinpoint mode for all metal objects.
LEDs will illuminate from left to right when Pinpoint is off.
GO‑FIND 11/22 GO‑FIND 44 GO‑FIND 66
Select from 2 find modes:
1.
2.
Select from 3 find modes:
1.
2.
3.
Select from 4 find modes:
1.
2.
3.
4.
ICON DESCRIPTIONSWhen a metal object is detected, the corresponding icon will flash on the control panel to indicate the target type. If the icon is turned off (not visible) then these object types will not be detected.
ITEM FOUND The detector will light up and beep when a target is discovered.
LOW TONE: Iron targets (such as nails) produce the lowest tone.MID 1 TONE (GO‑FIND 44/66 ONLY): Less valuable metals produce a lower medium tone.MID 2 TONE (GO‑FIND 66 ONLY): Higher value metals produce a higher medium tone.HIGH TONE: Silver and copper targets produce the highest tone.
Iron objects, nails and horseshoes.
Aluminium foil and lower value coins.
Rings, pull tabs and lower value coins.
Low and high value coins and screw caps.
LEDs will illuminate towards the center when Pinpoint in on. This helps identify the exact location of the object.
12
1
2
3
4
5
6
7
8
9
10
11
50 ft (15 m)
GO‑FIND 22 GO‑FIND 44 GO‑FIND 66
2 different audio tones: 3 different audio tones: 4 different audio tones:
ON switch
NOTE: GO‑FIND 11 High tone for all targets.
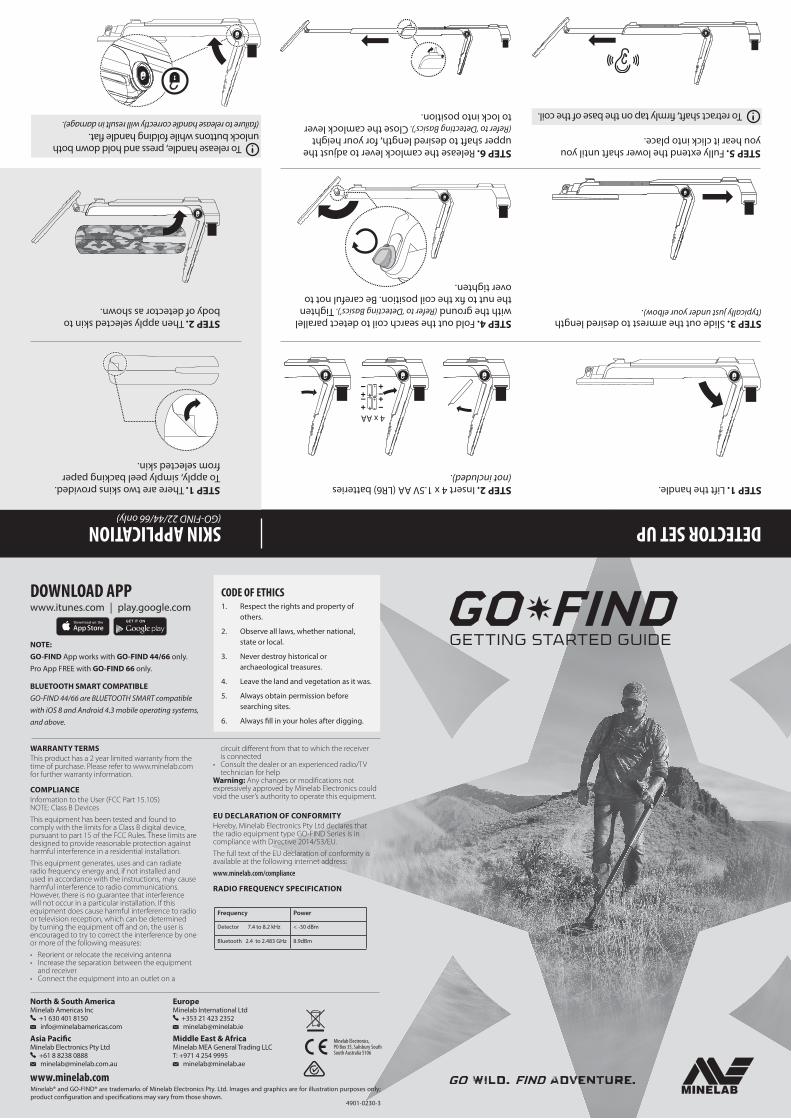
DETECTOR SET UPSKIN APPLICATION
North & South AmericaMinelab Americas Inc
+1 630 401 8150 [email protected]
Asia PacificMinelab Electronics Pty Ltd
+61 8 8238 0888 [email protected]
EuropeMinelab International Ltd
+353 21 423 2352 [email protected]
Middle East & AfricaMinelab MEA General Trading LLCT: +971 4 254 9995
WARRANTY TERMSThis product has a 2 year limited warranty from the time of purchase. Please refer to www.minelab.com for further warranty information.
COMPLIANCEInformation to the User (FCC Part 15.105) NOTE: Class B Devices
This equipment has been tested and found to comply with the limits for a Class B digital device, pursuant to part 15 of the FCC Rules. These limits are designed to provide reasonable protection against harmful interference in a residential installation.
This equipment generates, uses and can radiate radio frequency energy and, if not installed and used in accordance with the instructions, may cause harmful interference to radio communications. However, there is no guarantee that interference will not occur in a particular installation. If this equipment does cause harmful interference to radio or television reception, which can be determined by turning the equipment off and on, the user is encouraged to try to correct the interference by one or more of the following measures:
• Reorient or relocate the receiving antenna• Increase the separation between the equipment
and receiver• Connect the equipment into an outlet on a
circuit different from that to which the receiver is connected
• Consult the dealer or an experienced radio/TV technician for help
Warning: Any changes or modifications not expressively approved by Minelab Electronics could void the user’s authority to operate this equipment.
EU DECLARATION OF CONFORMITYHereby, Minelab Electronics Pty Ltd declares that the radio equipment type GO-FIND Series is in compliance with Directive 2014/53/EU.
The full text of the EU declaration of conformity is available at the following internet address:
www.minelab.com/compliance
RADIO FREQUENCY SPECIFICATION
CODE OF ETHICS1. Respect the rights and property of
others.
2. Observe all laws, whether national, state or local.
3. Never destroy historical or archaeological treasures.
4. Leave the land and vegetation as it was.
5. Always obtain permission before searching sites.
6. Always fill in your holes after digging.
DOWNLOAD APPwww.itunes.com | play.google.com
NOTE: GO‑FIND App works with GO‑FIND 44/66 only. Pro App FREE with GO‑FIND 66 only.
BLUETOOTH SMART COMPATIBLE GO‑FIND 44/66 are BLUETOOTH SMART compatible with iOS 8 and Android 4.3 mobile operating systems, and above.
4901-0230-3
STEP 1. Lift the handle.STEP 2. Insert 4 x 1.5V AA (LR6) batteries (not included).
STEP 1. There are two skins provided.To apply, simply peel backing paper from selected skin.
STEP 2. Then apply selected skin to body of detector as shown.
STEP 3. Slide out the armrest to desired length (typically just under your elbow).
STEP 4. Fold out the search coil to detect parallel with the ground (Refer to ‘Detecting Basics’). Tighten the nut to fix the coil position. Be careful not to over tighten.
STEP 5. Fully extend the lower shaft until you you hear it click into place.
STEP 6. Release the camlock lever to adjust the upper shaft to desired length, for your height (Refer to ‘Detecting Basics’). Close the camlock lever to lock into position. To retract shaft, firmly tap on the base of the coil.
www.minelab.com
4 x AA
GETTING STARTED GUIDE
To release handle, press and hold down both unlock buttons while folding handle flat. (failure to release handle correctly will result in damage).
Minelab® and GO-FIND® are trademarks of Minelab Electronics Pty. Ltd. Images and graphics are for illustration purposes only; product configuration and specifications may vary from those shown.
Frequency Power
Detector 7.4 to 8.2 kHz < -30 dBm
Bluetooth 2.4 to 2.483 GHz 8.9dBm
(GO‑FIND 22/44/66 only)