detailed steps connector housing-part design
TRANSCRIPT
8/12/2019 Detailed Steps Connector Housing-Part Design
http://slidepdf.com/reader/full/detailed-steps-connector-housing-part-design 1/14
Detailed Steps Connector Housing
Connector Housing (1): Creating the Main Pad and OtherFeatures
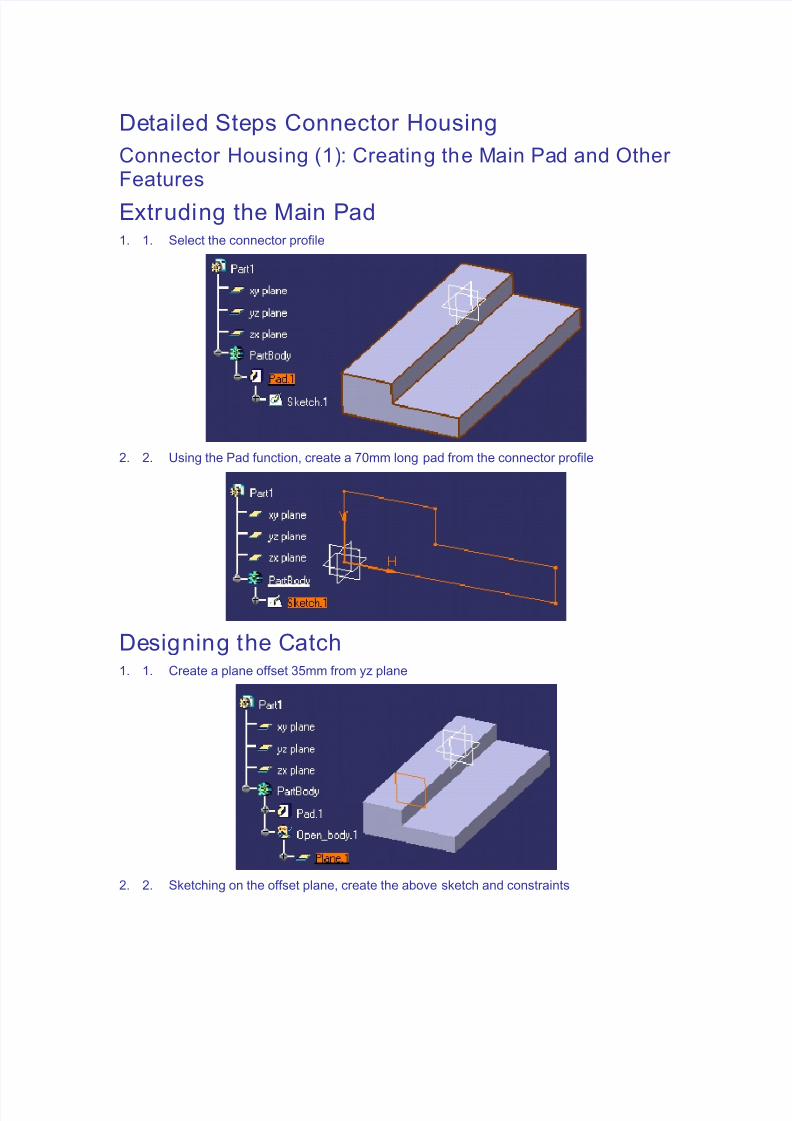
Extruding the Main Pad 1. 1. Select the connector profile
2. 2. Using the Pad function, create a 70mm long pad from the connector profile
Designing the Catch1. 1. Create a plane offset 35mm from yz plane
2. 2. Sketching on the offset plane, create the above sketch and constraints
8/12/2019 Detailed Steps Connector Housing-Part Design
http://slidepdf.com/reader/full/detailed-steps-connector-housing-part-design 2/14
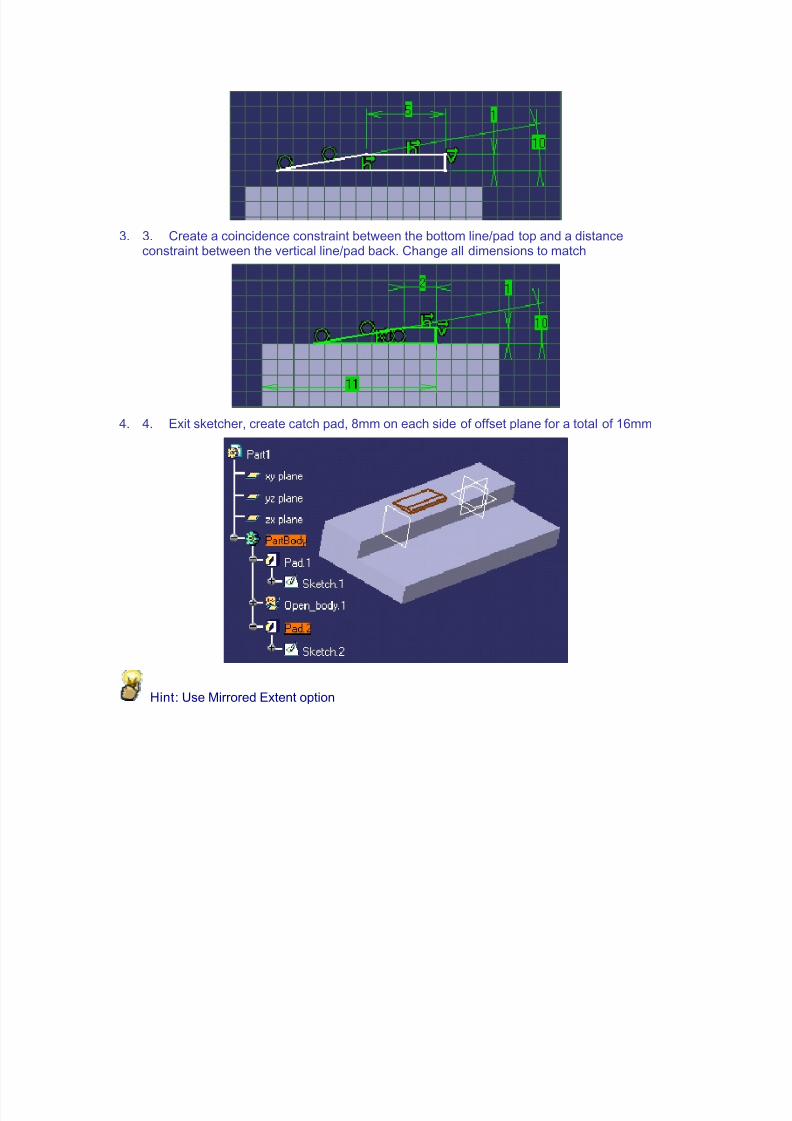
3. 3. Create a coincidence constraint between the bottom line/pad top and a distanceconstraint between the vertical line/pad back. Change all dimensions to match
4. 4. Exit sketcher, create catch pad, 8mm on each side of offset plane for a total of 16mm
Hint: Use Mirrored Extent option
8/12/2019 Detailed Steps Connector Housing-Part Design
http://slidepdf.com/reader/full/detailed-steps-connector-housing-part-design 3/14
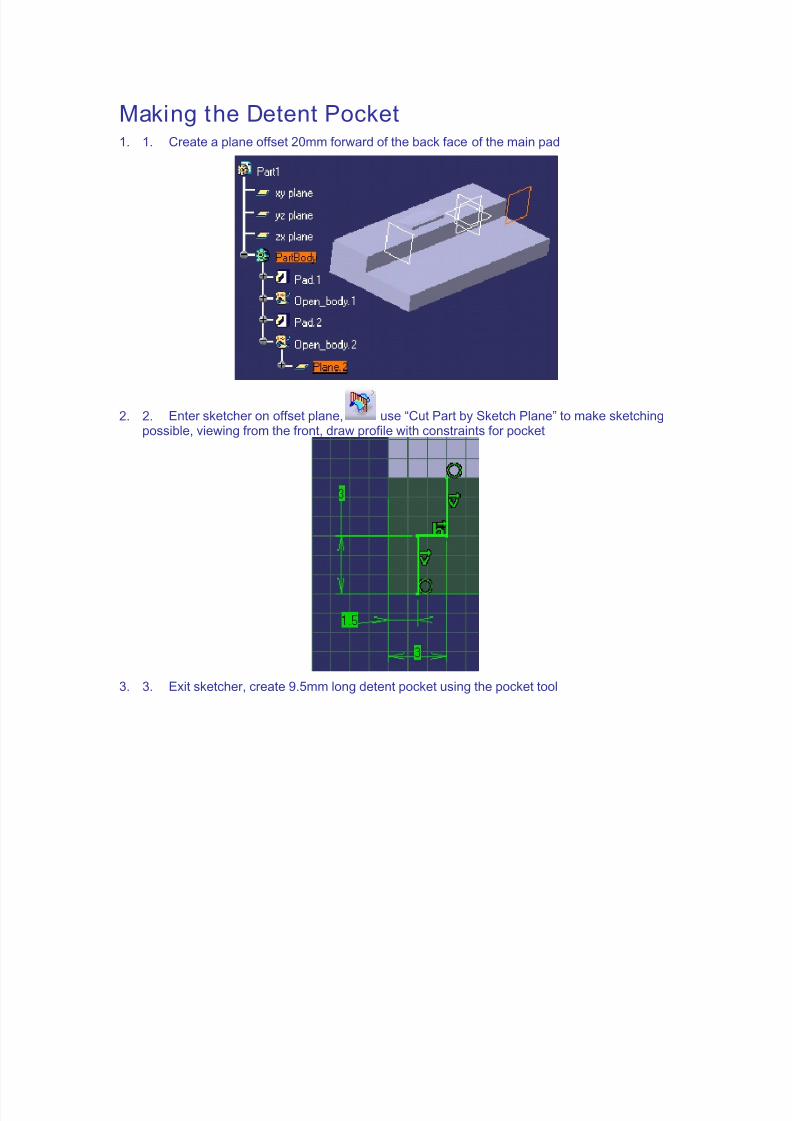
Making the Detent Pocket1. 1. Create a plane offset 20mm forward of the back face of the main pad
2. 2. Enter sketcher on offset plane, use “Cut Part by Sketch Plane” to make sketchingpossible, viewing from the front, draw profile with constraints for pocket
3. 3. Exit sketcher, create 9.5mm long detent pocket using the pocket tool

8/12/2019 Detailed Steps Connector Housing-Part Design
http://slidepdf.com/reader/full/detailed-steps-connector-housing-part-design 4/14
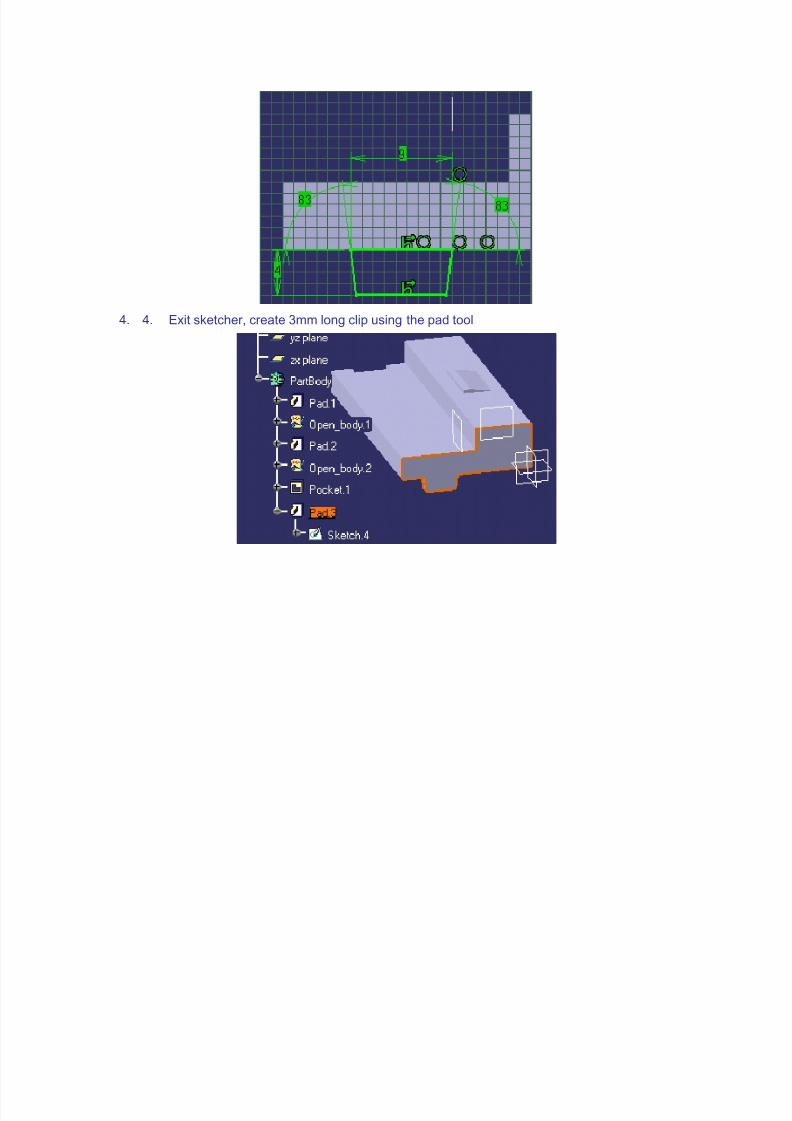
Designing the Clip
1. 1.
Select end of main pad and enter sketcher
2. 2. Sketch the clip in it’s rough position
3. 3. Create a coincidence constraint between the upper line/pad bottom and a coincidenceconstraint between the top right point/offset plane from detent. Create all other constraints
8/12/2019 Detailed Steps Connector Housing-Part Design
http://slidepdf.com/reader/full/detailed-steps-connector-housing-part-design 5/14
8/12/2019 Detailed Steps Connector Housing-Part Design
http://slidepdf.com/reader/full/detailed-steps-connector-housing-part-design 6/14
Detailed Steps Connector Housing
Connector Housing (2): Dressing-up the Connector
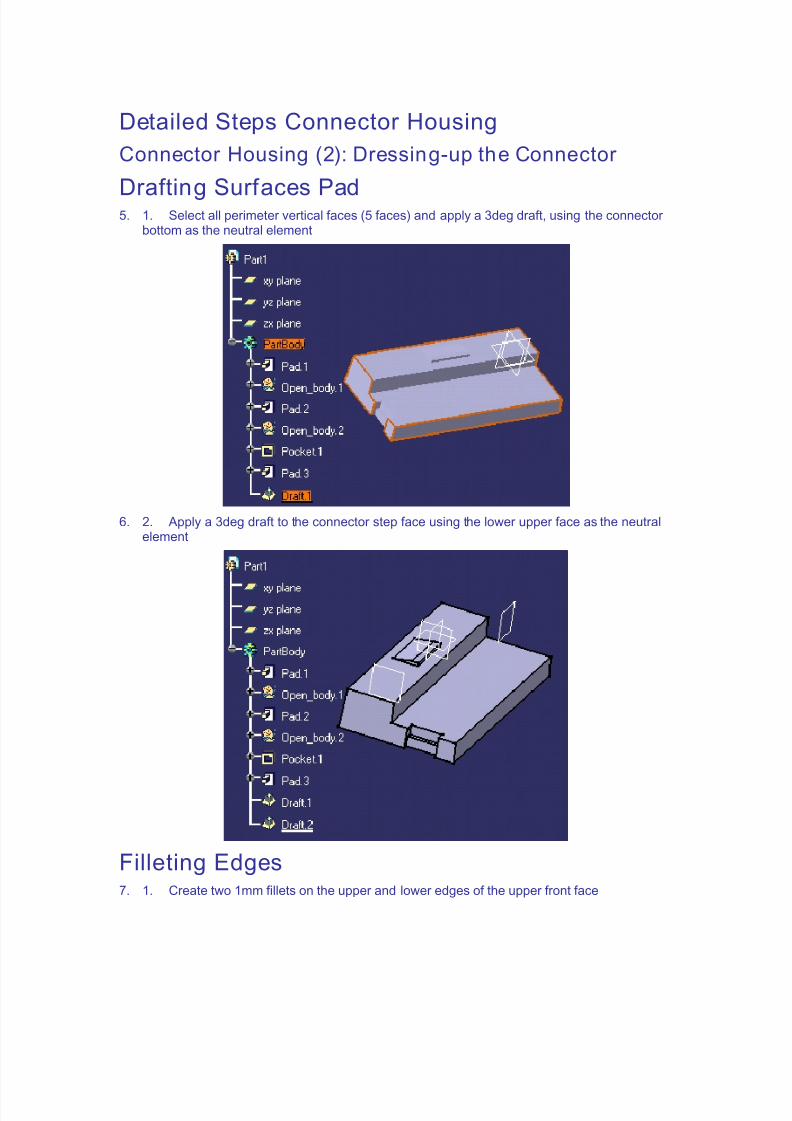
Drafting Surfaces Pad 5. 1. Select all perimeter vertical faces (5 faces) and apply a 3deg draft, using the connector
bottom as the neutral element
6. 2. Apply a 3deg draft to the connector step face using the lower upper face as the neutralelement
Filleting Edges 7. 1. Create two 1mm fillets on the upper and lower edges of the upper front face

8/12/2019 Detailed Steps Connector Housing-Part Design
http://slidepdf.com/reader/full/detailed-steps-connector-housing-part-design 7/14
8. 2. Variable fillet (linear) the four corner edges, each with a radius of 1mm at the top and2mm at the bottom
Shelling the PartPocket9. 1. Shell connector with 1mm wall thickness, removing the bottom face and the inside three
faces of the clip

8/12/2019 Detailed Steps Connector Housing-Part Design
http://slidepdf.com/reader/full/detailed-steps-connector-housing-part-design 8/14
Adding Fillets10. 1. Create 1mm fillet around top of part
11. 2. Hide unnecessary elements
Creating a Hole12. 1. Create a hole, 3.5mm diameter, located 15mm from right edge and 10mm from front
edge on the upper face

8/12/2019 Detailed Steps Connector Housing-Part Design
http://slidepdf.com/reader/full/detailed-steps-connector-housing-part-design 9/14
Creating a Pattern 13. 1. Use a rectangular pattern to create the second hole, using the first hole as the object
and spacing it 40mm from the first hole. Use the front edge for the direction of the pattern
Front Edge
Adding Standoffs and Reordering14. 1. On the underside of the part, sketch the above profile and constraints for the standoff

8/12/2019 Detailed Steps Connector Housing-Part Design
http://slidepdf.com/reader/full/detailed-steps-connector-housing-part-design 10/14
15. 2. Exit sketcher and create 4mm standoff using the pad tool
16. 3. Reorder the standoff before the hole in the specification tree so the hole goes through
17. 4. Use rectangular pattern to duplicate standoff and reorder it before the hole

8/12/2019 Detailed Steps Connector Housing-Part Design
http://slidepdf.com/reader/full/detailed-steps-connector-housing-part-design 11/14
Detailed Steps Connector Housing
Connector Housing (3): Modifying the Part
Editing Feature Parameters18. 1. Edit the first pad’s (Pad.1) width from 35mm to 40mm
19. 2. A wider connector is the result
Editing a Sketch20. 1. Edit Pad.4 sketch to include two tangent lines, perpendicular to each other with
constraints
8/12/2019 Detailed Steps Connector Housing-Part Design
http://slidepdf.com/reader/full/detailed-steps-connector-housing-part-design 12/14
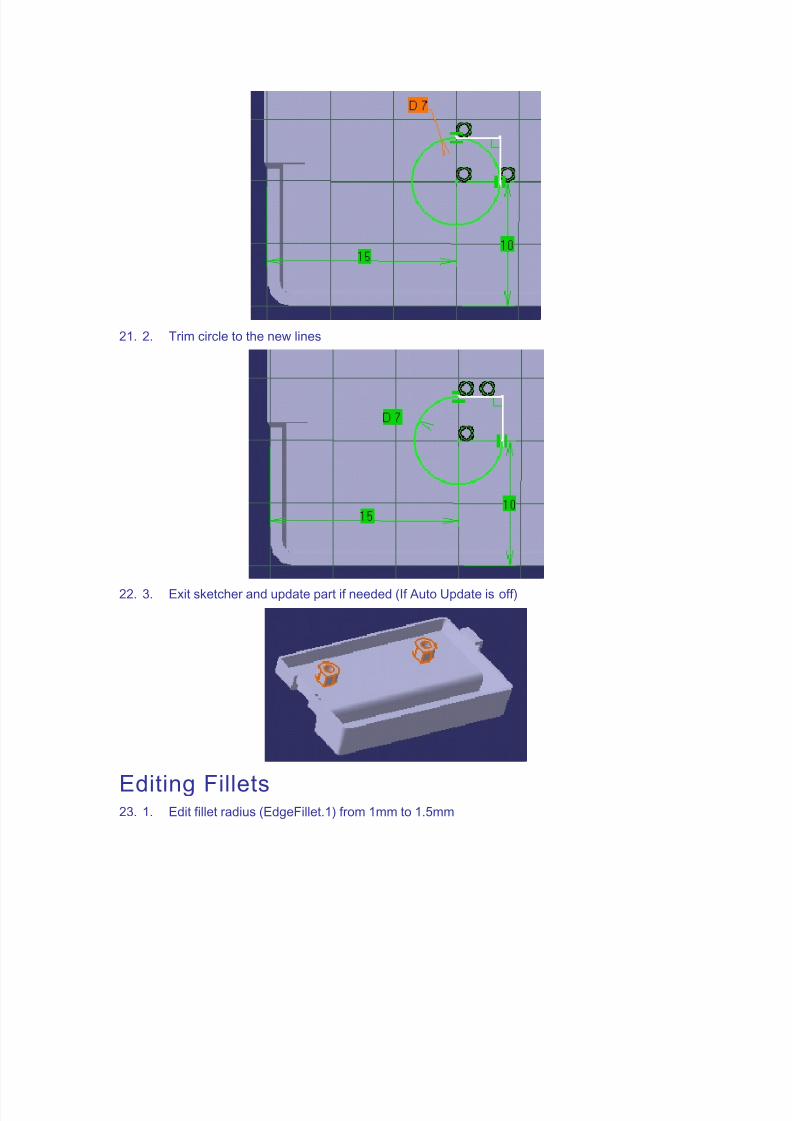
21. 2. Trim circle to the new lines
22. 3. Exit sketcher and update part if needed (If Auto Update is off)
Editing Fillets23. 1. Edit fillet radius (EdgeFillet.1) from 1mm to 1.5mm

8/12/2019 Detailed Steps Connector Housing-Part Design
http://slidepdf.com/reader/full/detailed-steps-connector-housing-part-design 13/14
A larger fillet radius is the result
Editing a Hole Type
24. 1. Edit Hole.1 to be a Counterbored Hole type with a diameter of 5mm and a depth of
1.5mm for the counterbore

8/12/2019 Detailed Steps Connector Housing-Part Design
http://slidepdf.com/reader/full/detailed-steps-connector-housing-part-design 14/14
Editing Feature Properties25. 1. Modify the properties of the catch (Pad.2) so that it is red