desktop phone system user guide - hello...
TRANSCRIPT
User Guide
DESKTOP PHONE SYSTEM
TS-user manual_Final_3rd.qxd 8/9/01 2:14 PM Page i

Copyright Information
Centrepoint Technologies’ Talkswitch, Copyright 2001. Al l Rights Reserved.
Reproduc t ion , adapta t ion or t rans la t ion wi thout pr ior wr i t t en permis s ion i sprohibi ted, except as al lowed under the copyright laws.
Information in this user guide is subject to change without not ice and does notrepresent any commitment on the part of Centrepoint Technologies Inc. . No part ofthis user guide may be reproduced or t ransmit ted in any form or by any means ,electronic or mechanical , including photocopying, recording, or information s torageand re tr ieval sys tems, or t ranslated to another language, for any purpose other thanthe l icensee’s personal use and, as speci f ical ly al lowed in the l icensing agreement,without the express wri t ten permiss ion of Centrepoint Technologies Inc. .
Third Edi t ion, Augus t 2001.
Par t number : CT-TS01-MNT-003
N O T FOR R E S A L E
Pr in ted in Canada
TS-user manual_Final_3rd.qxd 8/9/01 2:14 PM Page ii

Table of Contents
1.0 Installing TalkSwitch
1.1 What's included with TalkSwitch . . . . . . . . . . . . . . . . . . . . . . . . . . . . . . . .11.2 Front Panel Descriptions . . . . . . . . . . . . . . . . . . . . . . . . . . . . . . . . . . .2
1.3 Back Panel Descriptions . . . . . . . . . . . . . . . . . . . . . . . . . . . . . . . . . . .31.3.1 The TalkSwitch 24 . . . . . . . . . . . . . . . . . . . . . . . . . . . . . . . . .31.3.2 The TalkSwitch 48LS . . . . . . . . . . . . . . . . . . . . . . . . . . . . . . .4
1.4 Plugging into the Back Panel . . . . . . . . . . . . . . . . . . . . . . . . . . . . . . . . . .51.4.1 Attaching telephone lines to TalkSwitch line jacks . . . . . . . . . . .51.4.2 Attaching phones and other analog devices
to TalkSwitch extension jacks . . . . . . . . . . . . . . . . . . . . . .61.4.3 Connecting Devices to the Music and PA Jacks . . . . . . . . . . . . .71.4.4 Connecting TalkSwitch to a PC . . . . . . . . . . . . . . . . . . . . . . . .7
2.0 Configuring TalkSwitch
2.1 Installing the TalkSwitch Configuration Software . . . . . . . . . . . . . . . . . . . . .9
2.2 Control Centre . . . . . . . . . . . . . . . . . . . . . . . . . . . . . . . . . .102.3 Configuration . . . . . . . . . . . . . . . . . . . . . . . . . . . . . . . . . .11
2.3.1 System Information . . . . . . . . . . . . . . . . . . . . . . . . . . . . . . .142.3.1.1 Telephone Lines . . . . . . . . . . . . . . . . . . . . . . . .142.3.1.2 Line Hunt Groups . . . . . . . . . . . . . . . . . . . . . . .162.3.1.3 Fax Information . . . . . . . . . . . . . . . . . . . . . . . .172.3.1.4 Local Extensions . . . . . . . . . . . . . . . . . . . . . . . .182.3.1.5 Remote Extensions . . . . . . . . . . . . . . . . . . . . . .192.3.1.6 Extension Ring Groups . . . . . . . . . . . . . . . . . . .212.3.1.7 Voicemail . . . . . . . . . . . . . . . . . . . . . . . . . . . .232.3.1.8 Music-on-hold . . . . . . . . . . . . . . . . . . . . . . . . .25
2.3.2 Call Handling . . . . . . . . . . . . . . . . . . . . . . . . . . . . . . . . . .262.3.2.1 Modes . . . . . . . . . . . . . . . . . . . . . . . . . . . . . .262.3.2.2 Auto Attendant . . . . . . . . . . . . . . . . . . . . . . . . .272.3.2.3 Telephone Lines . . . . . . . . . . . . . . . . . . . . . . . .312.3.2.4 Local Extensions . . . . . . . . . . . . . . . . . . . . . . . .322.3.2.5 Remote Extensions . . . . . . . . . . . . . . . . . . . . . .352.3.2.6 Extension Ring Groups . . . . . . . . . . . . . . . . . . .37
2.3.3 Call Back / Call Bridge . . . . . . . . . . . . . . . . . . . . . . . . . . . .382.3.3.1 Auto Call Back . . . . . . . . . . . . . . . . . . . . . . . . .402.3.3.2 Prompted Call Back . . . . . . . . . . . . . . . . . . . . .422.3.3.3 Call Bridge . . . . . . . . . . . . . . . . . . . . . . . . . . .44
2.3.4 Options . . . . . . . . . . . . . . . . . . . . . . . . . . . . . . . . . .452.3.4.1 Administrator Password . . . . . . . . . . . . . . . . . . .452.3.4.2 Audio Controls . . . . . . . . . . . . . . . . . . . . . . . . .462.3.4.3 Manual Transfer . . . . . . . . . . . . . . . . . . . . . . . .472.3.4.4 Miscellaneous . . . . . . . . . . . . . . . . . . . . . . . . .482.3.4.5 Troubleshooting . . . . . . . . . . . . . . . . . . . . . . . .51
TS-user manual_Final_3rd.qxd 8/9/01 2:14 PM Page iii
3.0 Using Talkswitch
3.1 In the Office - Receiving Calls with the Auto Attendant . . . . . . . . . . . . . . .55
3.2 In the Office - Making and Receiving Calls . . . . . . . . . . . . . . . . . . . . . . .553.2.1 Making calls from a Local Extension . . . . . . . . . . . . . . . . . . .553.2.2 Receiving calls at a Local Extension . . . . . . . . . . . . . . . . . . . .563.2.3 Placing calls on Hold at a Local Extension . . . . . . . . . . . . . . .563.2.4 Transferring calls . . . . . . . . . . . . . . . . . . . . . . . . . . . . . . . .573.2.5 Call Park - Parking and retrieving callers . . . . . . . . . . . . . . . .583.2.6 Call Queue - Queuing and retrieving callers . . . . . . . . . . . . .583.2.7 Conference calling with TalkSwitch . . . . . . . . . . . . . . . . . . . .593.2.8 Using Phones connected in parallel to TalkSwitch . . . . . . . . . .603.2.9 External modem telephone line access . . . . . . . . . . . . . . . . . .61
3.3 Out of the Office - Receiving Calls through Call Forwarding . . . . . . . . . . .623.3.1 The three ways to forward calls . . . . . . . . . . . . . . . . . . . . . . .623.3.2 Screening options for forwarded calls . . . . . . . . . . . . . . . . . .63
3.4 Out of the Office - Making Calls with Call Back and Call Bridge . . . . . . . .643.4.1 Using Call Bridge . . . . . . . . . . . . . . . . . . . . . . . . . . . . . . . .643.4.2 Using Call Back . . . . . . . . . . . . . . . . . . . . . . . . . . . . . . . . .65
3.5 Using the Internal Voicemail System . . . . . . . . . . . . . . . . . . . . . . . . . . . .673.5.1 Activating Voice mailboxes . . . . . . . . . . . . . . . . . . . . . . . . . .673.5.2 Accessing a Voice mailbox . . . . . . . . . . . . . . . . . . . . . . . . . .67
3.6 Music-on-Hold . . . . . . . . . . . . . . . . . . . . . . . . . . . . . . . . . .68
3.7 Mode Switching Options . . . . . . . . . . . . . . . . . . . . . . . . . . . . . . . . . .69
3.8 Upgrading the TalkSwitch Firmware . . . . . . . . . . . . . . . . . . . . . . . . . . . .70
Appendices
Appendix A - Help & Troubleshooting . . . . . . . . . . . . . . . . . . . . . . . . . . . . . .75Appendix B - Using TalkSwitch with Telephone Company Calling Services . . . . .83
Appendix C - Quick Commands and DTMF Functions . . . . . . . . . . . . . . . . . .87
Appendix D - Safety Precautions and Regulatory Information . . . . . . . . . . . . . .91
Appendix E - TalkSwitch One Year Warranty . . . . . . . . . . . . . . . . . . . . . . . . . .95
Appendix F - Return Policy . . . . . . . . . . . . . . . . . . . . . . . . . . . . . . . . . .99Appendix G - TalkSwitch and Power Interruptions . . . . . . . . . . . . . . . . . . . . .101
Glossary . . . . . . . . . . . . . . . . . . . . . . . . . . . . . . . . . . . . . . . . . . . . . . . . . . . . . . .103
Index . . . . . . . . . . . . . . . . . . . . . . . . . . . . . . . . . . . . . . . . . . . . . . . . . . . . . . .111
TS-user manual_Final_3rd.qxd 8/9/01 2:14 PM Page iv

1.1 What's included with TalkSwitch
The TalkSwitch products come shipped wi th the fol lowing i tems.
1. The TalkSwitch Unit
2. AC Power Adap te r (Warning: never use any other Power Adapter other thanthe one provided with the TalkSwitch.)
3. 9 pin Serial Cable
4. 6' RJ-11 Telephone Cable - ( 2 )
5. Sof tware CD (This contains the conf igurat ion sof tware that you can use tosetup and configure TalkSwitch)
6. Use r Manua l
If any of these i tems are missing, please contact your reseller .
1
11.0 Installing TalkSwitch
InstallingTalkSwitch
TS-user manual_Final_3rd.qxd 8/9/01 2:14 PM Page 1

1.2 Front Panel Descriptions
TalkSwitch's f ront panel consis ts of a power button ("Power") and 5 LED l ight s that domore than let you know TalkSwitch is plugged in and turned on.
What do the LED l ights te l l you?
LED light: State Description
Line 1 On Sol id Line 1 is currently in use.Puls ing Slowly The Line 1 cal ler i s on hold.Fl ickering Line 1 i s r ingingPuls ing Rapidly Line 1 i s engaged by another device on the l ine
L ine 2 On Sol id Line 2 is currently in use.Puls ing Slowly The Line 2 cal ler i s on hold.Fl ickering Line 2 i s r inging.Puls ing Rapidly Line 2 i s engaged by another device on the l ine
Power / Data On Sol id TalkSwi tch i s powered on.Fl ickering The PC connected (via serial or USB port)to
TalkSwitch is ei ther sending or retr ievinginformation f rom TalkSwitch.
Pulsing Slowly Global Message Wait ing Indicator (optional)
L ine 3 On Sol id Line 3 is currently in use.Puls ing Slowly The Line 3 cal ler i s on hold.Fl ickering Line 3 i s r ingingPuls ing Rapidly Line 3 i s engaged by another device on the l ine
L ine 4 On Sol id Line 4 is currently in use.Puls ing Slowly The Line 4 cal ler i s on hold.Fl ickering Line 4 i s r inging.Puls ing Rapidly Line 4 i s engaged by another device on the l ine
2 TalkSwitch User Manual
TS-user manual_Final_3rd.qxd 8/9/01 2:14 PM Page 2
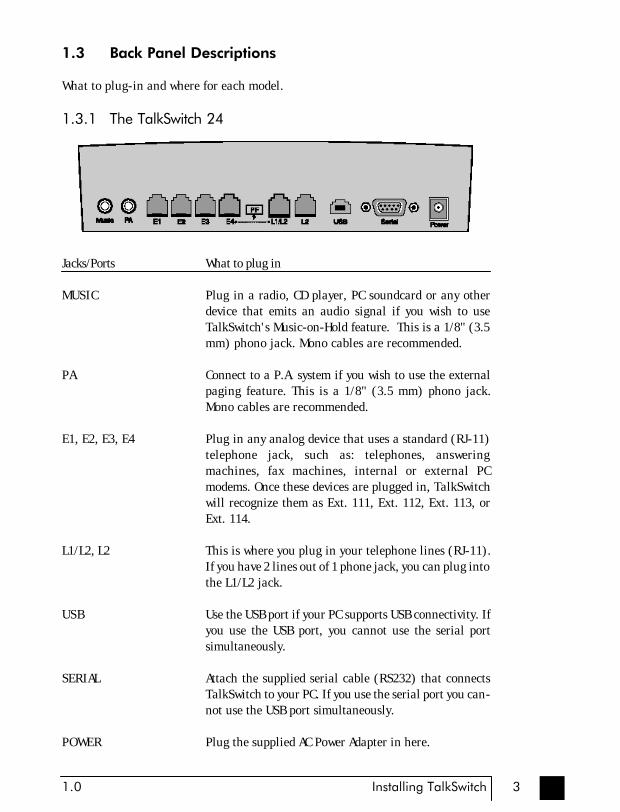
1.3 Back Panel Descriptions
What to p lug- in and where for each model .
1.3.1 The TalkSwitch 24
Jacks/Ports What to plug in
M U S I C Plug in a radio , CD player , PC soundcard or any otherdevice that emits an audio s ignal i f you wish to useTalkSwitch's Music-on-Hold feature. This is a 1/8" (3.5mm) phono jack . Mono cab le s a re r ecommended .
PA Connect to a P.A. system if you wish to use the externalpaging fea ture . This i s a 1/8" (3 .5 mm) phono jack .Mono cab le s a re r ecommended .
E1 , E2 , E3 , E4 Plug in any analog device that uses a s tandard (RJ-11)t e l e p h o n e j a c k , s u c h a s : t e l e p h o n e s , a n s w e r i n gm a c h i n e s , f a x m a c h i n e s , i n t e r n a l o r e x t e r n a l P Cmodems. Once these devices are plugged in, TalkSwitchwil l recognize them as Ext . 111, Ext . 112, Ext . 113, orExt. 114.
L1/L2, L2 This i s where you p lug in your te lephone l ines (RJ-11) .I f you have 2 l ines out o f 1 phone jack , you can plug intothe L1/L2 jack.
U S B Use the USB port i f your PC supports USB connect iv i ty . I fyou use the USB port , you cannot use the ser ial portsimultaneously.
SERIAL At tach the suppl ied ser ial cable (RS232) that connectsTalkSwitch to your PC. I f you use the ser ial port you can -not use the USB port s imultaneously .
P O W E R Plug the suppl ied AC Power Adapter in here .
31.0 Installing TalkSwitch
TS-user manual_Final_3rd.qxd 8/9/01 2:14 PM Page 3

By default, TalkSwitch is set to Serial connection. To activate USB connection, dial 91 from an extension then reset TalkSwitch. To return to Serial connection, dial90 and reset TalkSwitch.
The ‘PF’ box in between E4 and L1/L2 represents power failure support. In the eventof a power failure or loss of power to the TalkSwitch, Extension 4 will be able to receivecalls and make calls on Line 1.
1.3.2 The TalkSwitch 48LS
Jacks/Ports What to plug in
M U S I C Plug in a radio , CD player , PC soundcard or any otherdevice that emits an audio s ignal i f you wish to useTalkSwitch's Music-on-Hold feature. This is a 1/8" (3.5mm) phono jack . Mono cables are recommended .
PA Connect to a P.A. system if you wish to use the externalpaging fea ture . This i s a 1/8" (3 .5 mm) phono jack .Mono cab le s a re r ecommended .
L A N P O R T You can connect to an Ethernet hub using a Category 5cable wi th RJ-45 connectors . For future use .
E 1 - E 8 Plug in any analog device that uses a s tandard (RJ-11)t e l e p h o n e j a c k , s u c h a s : t e l e p h o n e s , a n s w e r i n gm a c h i n e s , f a x m a c h i n e s , i n t e r n a l o r e x t e r n a l P Cm o d e m s , e t c . O n c e t h e s e d e v i c e s a r e p l u g g e d i n ,TalkSwitch wi l l recognize them as Extensions 111 to1 1 8 .
L1/L2, L2 , L3/L4, L4 This i s where you p lug in your te lephone l ines (RJ-11) .I f you have 2 l ines out o f 1 phone jack , you can plug intothe 1/2 and 3/4 jacks .
4 TalkSwitch User Manual
TS-user manual_Final_3rd.qxd 8/9/01 2:14 PM Page 4
U S B Use the USB port i f your PC supports USB connect iv i ty . I fyou use the USB port , you cannot use the ser ial portsimultaneously.
SERIAL This is where you at tach the supplied serial cable(RS232) that connects TalkSwitch to your PC. I f you usethe ser ial port , you cannot use the USB port s imultane-ously.
M E M O R Y SLOT Memory expans ion s lo t . Used to expand internal memo-r y f o r v o i c e m a i l a n d A u t o A t t e n d a n t m e s s a g e s .TalkSwitch Memory cards can be purchased from yourresel ler or f rom Centrepoint Technologies .
P O W E R Plug the suppl ied AC Power Adapter in here .
By default, TalkSwitch is set to Serial connection. To activate USB connection, dial 91 from an extension then reset TalkSwitch. To return to Serial connection, dial90 and reset TalkSwitch.
The ‘PF’ box in between E4 and L1/L2 represents power failure support. In the eventof a power failure or loss of power to the TalkSwitch, Extension 4 will be able to receivecalls and make calls on Line 1.
1.4 Plugging into the Back Panel
1.4.1 Attaching telephone lines to TalkSwitch line jacks
You can connect your te lephone l ines f rom the wal l jack(s) to the TalkSwitch Linejacks with the phone cables provided. Take note of which telephone l ine is connectedto which Tel L ine number - this information wi l l be used in the conf igurat ionsection.
TalkSwitch works with many telephone company services such as 3-Way Calling andDistinctive Ring. For more information on phone company services, see Appendix B.
51.0 Installing TalkSwitch
TS-user manual_Final_3rd.qxd 8/9/01 2:14 PM Page 5

1.4.2 Attaching phones and other analog devices to TalkSwitchextension jacks
You can connect any analog device to TalkSwitch's extension jacks . Mult iple devicescan be connected to each extension jack by 'chaining' them together or us ing a l inesplit ter . In total , TalkSwitch is capable of managing a total of 20 electronic ringingdevices wi thout overpowering the te lephone l ines .
Use TalkSwitch's extension jacks to connect your:
• Analog Telephones (s ingle or mult i- l ined, corded or cordless)
• Fax Machine
• Answer ing Machine
• Internal or Ex ternal PC Modem
To At tach a S ingle Line Corded or Cordless Telephone and/or a Fax Mach ine:
Connect your s ingle l ine analog te lephone or fax machines to one of TalkSwitch'sextension jacks (E1 to E4 for the TalkSwitch 24 and E1 to E8 for the TalkSwitch48LS) just as you would i f you were plugging them into a s tandard te lephone walljack.
To At tach a Two-l ine Telephone:
Option # 1 (Use it as one TalkSwitch extension.)
Disregard the te lephone's Line 2 jack (plug-in). Connect the te lephone's Line 1plug-in to any one of TalkSwitch's extension jacks. You wil l s t i l l be able to accessboth te lephone l ines in the same manner as i f you were us ing a s ingle l inetelephone attached to TalkSwitch.
Option # 2 (Use it as two TalkSwitch extensions.)
You could use your two-l ine te lephone as two separate TalkSwitch extensions .Connect the te lephone's Line 1 and Line 2 plug-ins to two separate extensionjacks.
Most two-line phones have separate plug-ins for two incoming telephone lines (Line 1and Line 2). If your two-line telephone does not have separate plug-ins, you can usea "Line 1/Line 2" line splitter to separate the two lines.
To A t tach an Answer ing Machine:
Connect your answering machine to TalkSwitch's extension jacks just as youwould i f you were plugging i t into a s tandard te lephone wal l jack. You can alsoplug a te lephone into the answer ing machine , which al lows you to use theextension for both messaging and telephone cal ls .
6 TalkSwitch User Manual
TS-user manual_Final_3rd.qxd 8/9/01 2:14 PM Page 6

To A t tach an In ternal or Ex ternal Modem:
Simply plug the modem's te lephone cable into one of TalkSwitch's extensionjacks . Your modem is now a TalkSwitch extension and wi l l be able to access a l lLines and take advantage of TalkSwitch's call routing features.
I f you would l ike to use a te lephone on the same extens ion as your modem,simply plug the te lephone's cable into the modem's te lephone jack. (Mostmodems have a telephone jack, located beside the 'Line In' jack.)
You do not have to at tach a PC to TalkSwitch (via the Serial or USB ports) foryour modem to be funct ional .
1.4.3 Connecting Devices to the Music and PA Jacks
The Music jack is designed to support any audio source (CD player, radio, tape player,sound card etc .) for playing music or messages to cal lers while on hold. Simplyconnect the audio source via i t ’ s headphone output to the Music jack. The Music jackrequires a 1/8” (3.5mm) phono connector .
The PA jack can be connected to a P.A. System for external paging or to anampli f icat ion system to screen voicemail or to use as a l ine s imulator . The PA jackrequires a 1/8” (3.5mm) phono connector .
1.4.4 Connecting TalkSwitch to a PC
There are two ways to connect TalkSwitch direct ly to your PC for configurat ion -Ser ia l and USB.
Serial : Use the provided ser ial cable (RS232) to connect TalkSwitch to anopen COM por t on your PC.
USB : Use a USB cable to connect TalkSwitch to an avai lable USB por t onyour PC o r USB hub .
By default, TalkSwitch is set to Serial connection. To activate USB connection, dial to enter command mode, if you have an Administrator password enabled, enter thepassword. Dial 91 then to complete the command then reset TalkSwitch. To returnto Serial connection, enter command mode, dial 90 then reset TalkSwitch.
71.0 Installing TalkSwitch
TS-user manual_Final_3rd.qxd 8/9/01 2:14 PM Page 7

The fol lowing chapter descr ibes how to configure TalkSwitch with the configurat ionso f tware , and in some case s , the co r re spond ing touch tone commands fo rconfiguration using a telephone. I t also includes t ips on select ing the configurationoption(s) best suited to your needs.
2.1 Installing the TalkSwitch Configuration Software
Insert the TalkSwitch CD into your CD drive. The Install program wil l automaticallylaunch. Double-click the Setup.exe f i le and follow the instructions on the screen. I fthe sof tware does not launch automatical ly , you can use Windows Explorer to exploreyour CD-ROM drive and double-cl ick the Setup.exe f i le .
Configuration sof tware sys tem requirements :
PC running Windows 95/98/ME/2000
12 MB free hard disk space
An available Serial or USB port
800 x 600 minimum v ideo re so lu t ion
If you are having problems retr ieving the set t ings from TalkSwitch, please check theTroubleshooting sect ion of the manual and/or the FAQ sect ion of the TalkSwitchwebsi te : ht tp ://www.talkswitch.com/support
* USB not supported for Windows 2000. You will need to use the serial connection.
In some cases, Windows may find a device called “Creatix V90 modem” and install drivers for this device.TalkSwitch is powered by a modem chipset, but does not act as a modem, so the drivers do not need tofunction properly. Simply let the install proceed so that you are not bothered by Windows detecting newHardware everytime you reboot your PC.
92.0 Configuring TalkSwitch
2ConfiguringTalkSwitch
TS-user manual_Final_3rd.qxd 8/9/01 2:14 PM Page 9
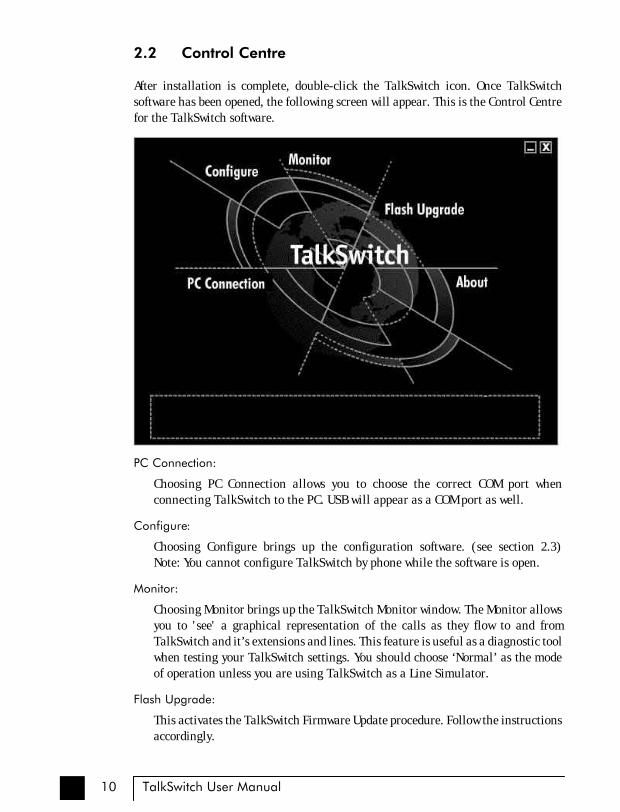
2.2 Control Centre
After installation is complete, double-click the TalkSwitch icon. Once TalkSwitchsoftware has been opened, the fol lowing screen wil l appear. This is the Control Centrefor the TalkSwitch software.
PC Connection:
Choos ing PC Connect ion a l lows you to choose the correc t COM por t whenconnect ing TalkSwi tch to the PC. USB wi l l appear as a COM por t as wel l .
Configure:
Choosing Configure brings up the configuration software. (see sect ion 2.3)Note : You cannot conf igure TalkSwitch by phone while the sof tware i s open.
Monitor:
Choosing Moni tor br ings up the TalkSwi tch Moni tor window. The Moni tor a l lowsyou to 'see' a graphical representat ion of the cal ls as they f low to and fromTalkSwitch and i t ’s extensions and l ines. This feature is useful as a diagnost ic toolwhen test ing your TalkSwitch set t ings. You should choose ‘Normal’ as the modeof operat ion unless you are using TalkSwitch as a Line Simulator .
Flash Upgrade:
This act ivates the TalkSwitch Firmware Update procedure. Fol low the instruct ionsaccordingly.
10 TalkSwitch User Manual
TS-user manual_Final_3rd.qxd 8/9/01 2:14 PM Page 10

About:
Displays useful information including the TalkSwitch sof tware, f i rmware andhardware vers ion numbers .
2.3 Configuration
From the Control Centre choose Configure. The fol lowing screen wil l appear :
The configuration screen consists of 4 parts :
1. Menu Items
2. Configuration Navigation
Controls what i s d isplayed in the conf igurat ion window
3. Configuration Window
Displays configuration tabs.
4. iGuide Window
D i s p l a y s h e l p f u l i n f o r m a t i o n a b o u t w h a t i s d i s p l a y e d i n t h e conf igurat ion window
112.0 Configuring TalkSwitch
1
2
3
4
TS-user manual_Final_3rd.qxd 8/9/01 2:14 PM Page 11
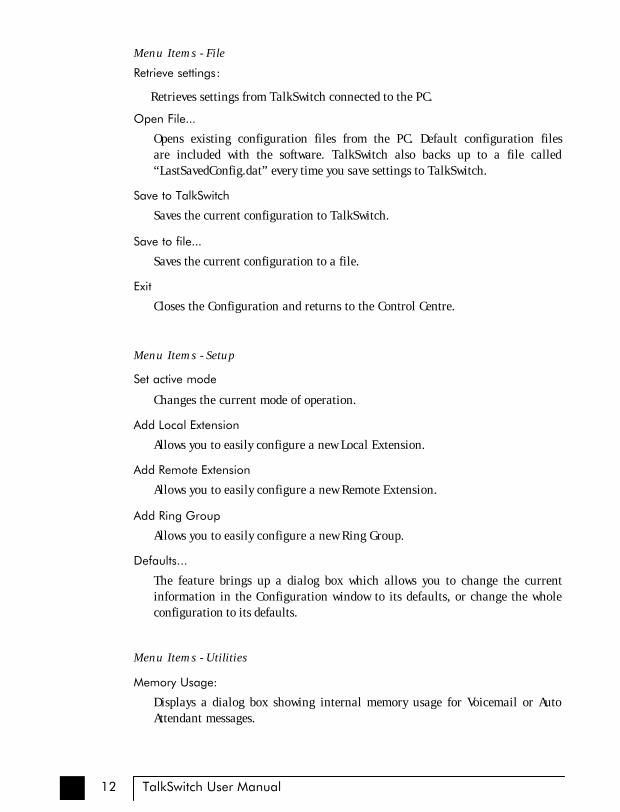
Menu Items - File
Retrieve settings:
Retr ieves se t t ings f rom TalkSwitch connected to the PC.
Open File...
Opens exis t ing configuration f i les f rom the PC. Default configuration f i les are included with the sof tware. TalkSwitch also backs up to a f i le cal led“LastSavedConfig.dat” every t ime you save set t ings to TalkSwitch.
Save to TalkSwitch
Saves the current configuration to TalkSwitch.
Save to file...
Saves the current configuration to a f i le .
Exit
Closes the Configuration and returns to the Control Centre.
Menu Items - Setup
Set active mode
Changes the current mode of operat ion.
Add Local Extension
Allows you to easi ly configure a new Local Extension.
Add Remote Extension
Al lows you to eas i ly conf igure a new Remote Extens ion.
Add Ring Group
Al lows you to eas i ly conf igure a new Ring Group.
Defaults...
The feature br ings up a dialog box which al lows you to change the currentinformation in the Conf igurat ion window to i t s defaul ts , or change the wholeconfiguration to i ts defaults .
Menu Items - Utilities
Memory Usage:
Displays a dialog box showing internal memory usage for Voicemail or AutoAttendant messages.
12 TalkSwitch User Manual
TS-user manual_Final_3rd.qxd 8/9/01 2:14 PM Page 12

Voicemail Manager:
Displays a dialog giving you options to check the s tatus of al l voicemail , delete amailbox password, and reset mailboxes ( this resets the mailbox back to factorydefault and clears al l messages and greet ings) .
Menu Items - Help
TalkSwitch Help:
Opens the TalkSwitch Help f i le . You can search through the contents for usefulin format ion . He lp i s a l so acces s ib le by pre s s ing the ‘F1 ’ key whi le theConfiguration is open.
Support on the Web:
Launches your browser and directs you to our support s i te .
About TalkSwitch:
Displays the TalkSwitch sof tware vers ion number, TalkSwitch f i rmware vers ionnumber and Copyr ight information.
Configuration Navigation
The Configurat ion Navigat ion organizes al l the configurat ion topics within folders .There are two types of Conf igurat ion Navigat ion: Basic and Advanced. When you f i rs topen the Conf igurat ion screen, the de faul t i s the Bas ic v iew. In the Bas icconfiguration, several features are hidden from view. I t doesn’t mean that you can’tuse them, i t s imply hides some of the more advanced features that you may not useinit ially . The following is a brief description of each configuration folder:
About TalkSwitch
This tab displays vers ion information about the TalkSwitch sof tware, f i rmwareand hardware . I t a lso displays memory usage wi th detai l s about voicemailmessages and Auto At tendants .
System Information
This folder al lows you to configure the system setup. This includes act ivat inglines, extensions and voicemail .
Call Handling
This fo lder al lows you to conf igure how you want incoming cal l s to be handled.I t al lows you to setup your Auto At tendants and individual cal l handling for eachl ine and dis t inct ive r ing number for both operat ing modes .
132.0 Configuring TalkSwitch
TS-user manual_Final_3rd.qxd 8/9/01 2:14 PM Page 13

Call Back / Call Bridge Settings
TalkSwitch’s Call Back and Call Bridge features are configured from this folder .Both of these features can reduce your company expenses by reducing longdistance costs.
Options
In this folder, advanced sett ings are configured including troubleshooting issuesand various operat ing opt ions . Recommended for exper ienced users only .
2.3.1 System Information
2.3.1.1 Telephone Lines
This sect ion tel ls TalkSwitch about the te lephone l ines plugged into i t s back panel .Simply select a l ine and fi l l in the information. For each line there is a status message(“Line detected at init ialization”) indicating i f TalkSwitch detected a l ine pluggedinto each of i ts l ine port . I f a l ine is plugged into a l ine port and is not detected, checkyour te lephone l ine, and then choose Fi le>Retrieve set t ings to update the screen.
In the “Phone numbers” sec t ion:
Enter the 'main' te lephone number for the appropriate l ine connected toTalkSwitch. Enable the Dis t inct ive Ring Numbers 1 and/or 2 i f you have thisservice on the current l ine and wish to have incoming cal ls handled 'di f ferent ly 'on the basis of the dis t inct ive r ing. I f you want Dist inct ive Ring numbers handled
14 TalkSwitch User Manual
TS-user manual_Final_3rd.qxd 8/9/01 2:14 PM Page 14

the same way as your 'Main' number , do not p lace a check mark in the box.
Next , enter the 'Dis t inct ive Ring' te lephone number for each of the Dis t inct iveRing numbers associated to this l ine . Dis t inct ive Ring 1 corresponds to anydouble r ing pattern. Dist inctive Ring 2 corresponds to any tr iple r ing pattern.
In the “Other te lephone company services” sec t ion:
Select any of the Telephone Company Services that you current ly have for eachline. The fol lowing is an explanation of each service and the impact of select ingeach option with respect to how TalkSwitch handles cal ls .
3-Way Calling/Conference/Centrex Transfer:If you select this option, TalkSwitch can work with this service to forward cal l s to Remote Extens ions or o ther external phone numberswhile us ing the same l ine (Same Line Connect) . You can also use thisservice as an opt ion for br idging cal ls to external numbers when cal l ing into TalkSwitch f rom the outs ide . See Appendix B for a def ini t ion of 3-Way Cal l ing/Conference and Centrex.
Call Waiting:Enable this opt ion i f you have Cal l Wai t ing serv ice on the current l ine .I t i s recommended that you remove this service from your l ine(s)since there is no way for TalkSwitch to handle a second call while i t i shandling the f i rs t cal l . You may want to consider adding theHunt/Rollover service to your l ines . (See Appendix B for def init ions)
Any other Flash activated service:Enable this opt ion i f you use any other serv ice that requires the useof a f lash or l ink key other than 3-Way Cal l ing/Conference , Transferor Cal l Wai t ing .
Caller ID:
Enable this opt ion i f the current l ine provides Caller ID information(service provided by your local te lephone company). TalkSwitch wil lpass on the Cal ler ID information to se lected extensions . A lso ,TalkSwitch can use the t ime information provided by Cal ler ID toupdate TalkSwitch’s internal clock. (see section 2.3.4.4).
Telephone Company Voicemail:Enable this opt ion i f you are subscr ibed to a Telephone CompanyVoicemail service. I f this service is enabled on a specif ic l ine, calls canbe routed to this voicemail service.
Hunt/Rollover: Enable this opt ion i f the current l ine is associated with a Line Hunt orLine Rollover service from the Telephone Company. You cannot usethe Auto Callback feature on that part icular l ine i f you have Hunt orRollover enabled. In general , any l ines that belong to a Hunt/Rollovergroup should be conf igured to handle cal l s the same way.
152.0 Configuring TalkSwitch
TS-user manual_Final_3rd.qxd 8/9/01 2:14 PM Page 15

In the “Calibration ” sect ion:
After you have configured the l ines , i t i s recommended that you cal ibrate thel ines . Complet ing this procedure optimizes your telephone l ine volume levels forthe Cal l Bridge and Cal l Forwarding (with Remote Extensions) features .
Note: Only lines that are detected can be calibrated.
2.3.1.2 Line Hunt Groups
There are a total of 9 Line Hunt Groups for control l ing outgoing cal l l ine select ions.These L ine Hunt Groups are used by the Local Extensions , Remote Extensions andwhen using the Cal l Br idge feature . Each Hunt Group can support several l inechoices and wil l a t tempt to grab an avai lable l ine in the order that they are l i s ted(Lines to hunt) for that Hunt group.
The default setup:
Hunt Group 9: selects any available l ine
Hunt Group 81 : selects Line 1
Hunt Group 82 : selects Line 2
Hunt Group 83 : selects Line 3 (for the TalkSwitch 48 LS only)
Hunt Group 84 : selects Line 4 (for the TalkSwitch 48 LS only)
16 TalkSwitch User Manual
TS-user manual_Final_3rd.qxd 8/9/01 2:14 PM Page 16

Firs t se lec t a Line Hunt Group then name the group(s) i f des ired.
Under Se t L ine Hunt Group, se lec t the l ines you wish to add to the Hunt Group f romthe lef t column 'Lines available' , then cl ick the '>>' button to move i t to the r ightcolumn 'Lines to hunt' . Repeat this process for the other Hunt Groups .
2.3.1.3 Fax Information
The information in this tab helps conf igure TalkSwitch to handle faxes .
I f you have a dedicated fax l ine or a Dis t inct ive Ring number for faxing associated toa l ine, please choose this ‘Fax number’ in the l is t . I f you don’t have a l ine dedicatedfor inbound faxing, se lect ‘none’ . I f you do not see your fax number in the l i s t , makesure you have act ivated the appropriate l ine or Dis t inct ive Ring number in theTelephone Lines sec t ion under Sys tem Information.
Next , se lect the extension number where you have your fax device connected. Forexample i f you have your fax machine connected to E8 on the rear of the TalkSwitch,then se lec t extension number 118.
By default , when both a dedicated l ine and fax extension have been selected, thesoftware automatically configures the incoming call handling propert ies for that l ineto ring only the fax extension you specif ied on this page.
172.0 Configuring TalkSwitch
TS-user manual_Final_3rd.qxd 8/9/01 2:14 PM Page 17

2.3.1.4 Local Extensions
Take note of where you want to connect your extensions . As you can see , there areei ther 4 or 8 physical extension jacks labeled 1 to 4 ( for the 24 models) or 1 to 8 ( forthe 48 models).
Se lec t any of the extensions that you wish to conf igure .
Local Extensions are by default act ivated with the associated Voice mailbox. Voicemailboxes for each Local Extension can be de-act ivated in the Voicemail sect ion inthe System Information folder.
I f des i red, name the extension in the 'Extension name' space . Whatever name isentered wi l l appear on the Cal ler ID o f another Local Extens ion dur ing an intercomcall .
Direct Line Access:
Direct l ine access al lows you to configure the extension to access a speci f ic HuntGroup automatical ly for outbound cal l s when the extension goes of f hook. Forexample , you may have a fax machine connected to this extens ion and don’ twant to reprogram the speed dial phone numbers . In this case you would se lec t'Direct l ine access ' and choose the appropriate Hunt Group. As soon as the faxgoes off hook, TalkSwitch wil l hunt the specif ied l ines for an available l ine. Thisfeature is also useful i f you want to avoid dialing any digits for accessing a l ine.
18 TalkSwitch User Manual
TS-user manual_Final_3rd.qxd 8/9/01 2:14 PM Page 18
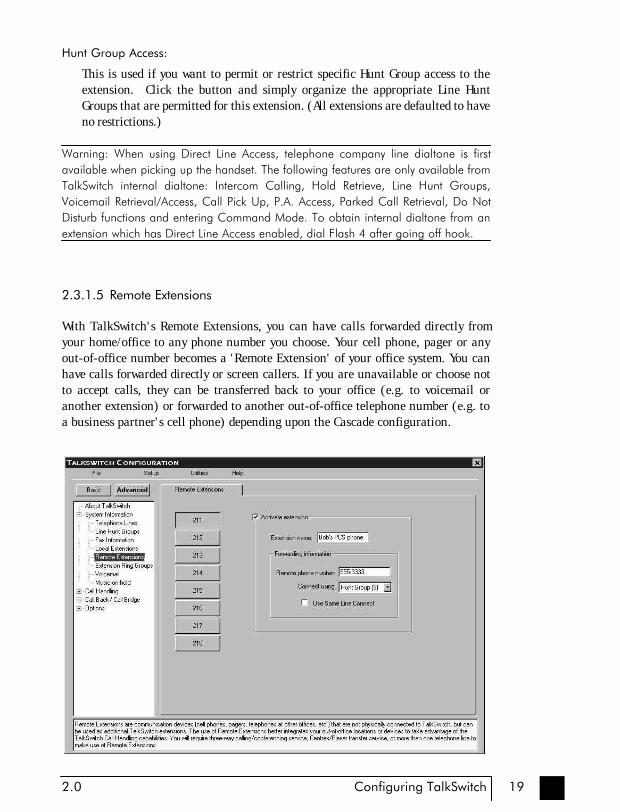
Hunt Group Access:
This is used i f you want to permit or restr ict speci f ic Hunt Group access to theextension. Cl ick the button and s imply organize the appropriate Line HuntGroups that are permitted for this extension. (All extensions are defaulted to haveno restrictions.)
Warning: When using Direct Line Access, telephone company line dialtone is firstavailable when picking up the handset. The following features are only available fromTalkSwitch internal dialtone: Intercom Calling, Hold Retrieve, Line Hunt Groups,Voicemail Retrieval/Access, Call Pick Up, P.A. Access, Parked Call Retrieval, Do NotDisturb functions and entering Command Mode. To obtain internal dialtone from anextension which has Direct Line Access enabled, dial Flash 4 after going off hook.
2.3.1.5 Remote Extensions
With TalkSwitch's Remote Extensions , you can have cal l s forwarded direc t ly f romyour home/of f ice to any phone number you choose . Your cel l phone, pager or anyout-of-of f ice number becomes a 'Remote Extension' of your of f ice sys tem. You canhave cal ls forwarded direct ly or screen cal lers . I f you are unavailable or choose notto accept calls , they can be transferred back to your off ice (e.g. to voicemail oranother extension) or forwarded to another out-of-of f ice te lephone number (e .g . toa business partner's ce l l phone) depending upon the Cascade conf igurat ion.
192.0 Configuring TalkSwitch
TS-user manual_Final_3rd.qxd 8/9/01 2:14 PM Page 19

TalkSwitch ass igns a Remote Extension number to each cal l forwarding te lephonenumber . Cal l s can then be forwarded by the Auto At tendant or t ransferred by someonein your of f ice s imply by dial ing the Remote Extension number . There are 8 RemoteExtensions available per TalkSwitch unit .
Choose a Remote Extension to conf igure . A f ter you have act ivated a RemoteExtension, you must f i r s t enter the phone number information. Once completed, theRemote Extension is act ive .
Remote phone number:
Enter the phone number of the Remote Extension (note : no speci f ic pre f ixes arerequired - put the number in jus t as though you were d ial ing i t f rom a regularphone). You may use the fol lowing in the space provided: digi ts 0 - 9 , space,comma, da sh , # a n d *. Once a number has been entered, the rest of the optionsin this section will become ‘ungreyed’.
Extension name:
I f des ired, name the extension in the 'Extension name' space.
Connect using:
Select the Line Hunt Group that TalkSwitch wil l use to connect to that RemoteExtension. For example i f you have an inexpensive long dis tance carr ier se tup forthe l ines in Hunt group 84, you may want to use this Hunt Group for your longdistance Remote Extensions.
Use Same Line Connect
Clicking this option al lows incoming calls , when forwarded to the RemoteExtension, to use the same l ine in which the originating cal l came in. Using thisfeature al lows only one l ine to be used when forwarding incoming cal ls to aRemote Extension. This feature can only be used when the l ine in which theoriginat ing cal l came in on has the 3-Way Cal l ing/Conference or Transfer(Centrex/Plexar) service. I f the l ine does not have any of these services, the callwi l l be forwarded using the Hunt Group chosen in the “Connect using:” sect ion.
When using Same Line Connect, callers will hear silence while they are on hold sincethe callers are on hold at the Telephone Company and not at TalkSwitch. If you wantcallers to hear music while they are on hold for calls forwarded to Remote Extensions,do not use Same Line Connect. It’s best to experiment with different settings in orderto decide what works best for your configuration.
20 TalkSwitch User Manual
TS-user manual_Final_3rd.qxd 8/9/01 2:14 PM Page 20
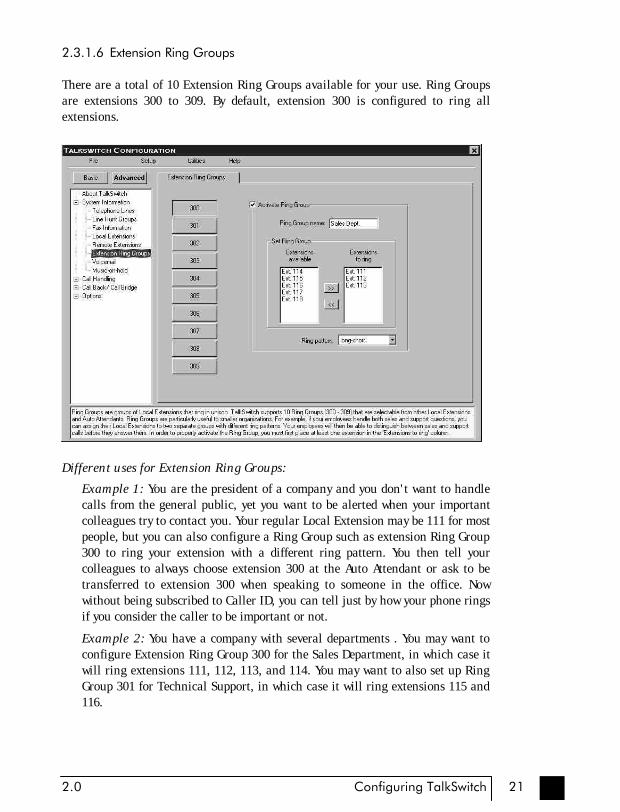
2.3.1.6 Extension Ring Groups
There are a total o f 10 Extension Ring Groups avai lable for your use . Ring Groupsare extensions 300 to 309. By default , extension 300 is configured to r ing al lextensions .
Dif f erent uses for Ex tens ion Ring Groups :
Example 1 : You are the pres ident o f a company and you don' t want to handlecalls f rom the general public , yet you want to be alerted when your importantcol leagues t ry to contact you. Your regular Local Extension may be 111 for mostpeople , but you can also conf igure a Ring Group such as extens ion Ring Group300 to ring your extension with a dif ferent ring pattern. You then tell yourcol leagues to always choose extension 300 at the Auto At tendant or ask to bet rans ferred to ex tens ion 300 when speaking to someone in the o f f ice . Nowwithout being subscribed to Caller ID, you can tel l just by how your phone r ingsi f you consider the caller to be important or not .
Example 2 : You have a company wi th several departments . You may want toconfigure Extension Ring Group 300 for the Sales Department , in which case i twi l l r ing extensions 111, 112, 113, and 114. You may want to a lso se t up RingGroup 301 for Technical Support , in which case i t wi l l r ing extensions 115 and116.
212.0 Configuring TalkSwitch
TS-user manual_Final_3rd.qxd 8/9/01 2:14 PM Page 21
Firs t se lect an Extension Ring Group (300-309) that you would l ike to configure andactivate it.
You wi l l not ice that a Ring Group must have extensions l i s ted in the ‘Extensions toring’ sect ion to al low access to the other information on the tab. I f desired, name theextension in the 'Ring Group name' space .
Ring pattern:
Choose how you want the phone(s) to r ing for the Ring Group.
In the “Se t Ring Group ” section:
To conf igure , se lec t each extension that you wish to add to that Ring Group f romthe le f t column 'Extensions avai lable ' , then c l ick '>>' to move i t to the r ightcolumn 'Extensions to r ing' . Repeat this process for each of the Extension RingGroups ac t ivated . I f you wish to remove an extens ion f rom a Ring Group,highl ight that extension in the r ight column then cl ick the '<<' but ton.
Extensions available:
This i s the l i s t o f avai lable extensions f rom which the Extension Ring Groupmay be buil t . Only active extensions wil l be available to add to the RingGroup .
Extensions to ring:
This i s the l i s t of extensions that wil l r ing when the Extension Ring Group isselected from the Auto Attendant or Local Extension. Al l extensions l is ted wil lr ing s imultaneously when this Ring Group i s d ialed f rom an extension or atthe Auto At tendant.
22 TalkSwitch User Manual
TS-user manual_Final_3rd.qxd 8/9/01 2:14 PM Page 22

2.3.1.7 Voicemail
This tab deals with the internal voicemail system included with TalkSwitch. I t al lowsyou to ac t ivate General , Local and Remote mai lboxes and v iew mai lbox s ta tus .
In the “General , Local and Remote mai lbox ac t ivat ion ” sect ions:
These sect ions al low you to act ivate General , Local or Remote mailboxes ase i ther a mai lbox or an announcement . By de faul t , a l l Local Extens ions areactivated with a mailbox. All activated general mailboxes wil l be accessiblefrom any extension’s Cal l Cascade sequence. For more detai l s on usingVoicemail, see section 3.5.
In the “Global Message Wait ing Indicator” sec t ion:
I f you enable this option, the Power/Data l ight wil l pulse s lowly to indicate youhave a new message in one o f the ac t ive mai lboxes . Once a l l new messages havebeen heard, the l ight wil l return to the default s tate.
232.0 Configuring TalkSwitch
TS-user manual_Final_3rd.qxd 8/9/01 2:14 PM Page 23

Record Mailbox Greeting:
Select ing this button brings up a dialogscreen which displays instructions forr e c o r d i n g m a i l b o x g r e e t i n g s o ra n n o u n c e m e n t s . S i m p l y f o l l o w t h einstructions. By default , all mailboxes wil l use the s tandard greet ing unti l yourecord a personal greeting.
View Mailbox Data:
Press ing this but ton br ings up a dialog screen which displays memory usage ofthe internal voice mailboxes including greet ing t ime, message t ime and numberof messages.
Reset Mailbox Password:
Select ing this button brings up a dialog screen which al lows you to reset thepassword for any mailbox. This may be useful i f someone has forgotten theirpassword or someone has le f t the company. I f you want to reset a voice mailboxcompletely , use the Voicemail manager located under the Uti l i t ies menu.
24 TalkSwitch User Manual
TS-user manual_Final_3rd.qxd 8/9/01 2:14 PM Page 24

2.3.1.8 Music-on-hold
I f you wish to have cal lers l i s ten to music or adver t i s ing while they are on hold , youwil l need to enable Music-on-hold in this tab.
Note: If you connect a music source to the Music jack and do not enable Music-on-hold, the caller will hear both music and a beep sound when on hold. Also when thecaller makes a selection at the Auto Attendant to go to an extension that has callscreening enabled, they will hear both ringing and music.
For more information on using Music-on-hold, please see sect ion 3.6.
252.0 Configuring TalkSwitch
TS-user manual_Final_3rd.qxd 8/9/01 2:14 PM Page 25

2.3.2 Call Handling
2.3.2.1 Modes
The use of Modes al lows you to run di f ferent cal l handling configurat ions at di f ferentt imes . For example , you may want cal l s handled one way during business hours andanother way for non-business hours . Modes can be swi tched e i ther manual ly orautomatical ly wi th the use o f Automatic Mode Swi tching.
Name the modes i f de s i r ed . The labe l s w i l l be d i sp layed e l s ewhere in theconf igurat ion sof tware whenever modes are used.
To use the Automat ic Mode Swi tching feature, you must f irst activate i t by cl icking'Use Automatic Mode Switching' . Next , se t the s tar t t imes for each mode. I f you wantTalkSwitch to change modes more than twice in one day, you can act ivate up to twoextra mode changes for that day .
If you do not want to use Automatic Mode Switching, you can still switch modesmanually in the software or through any telephone using touch tone commands.Enter command mode by dialing then your password if required. Next, dial anyof the following commands followed by to confirm.
31 Changes TalkSwitch to mode 132 Changes TalkSwitch to mode 230 TalkSwitch tells you what mode it currently is using
26 TalkSwitch User Manual
TS-user manual_Final_3rd.qxd 8/9/01 2:14 PM Page 26
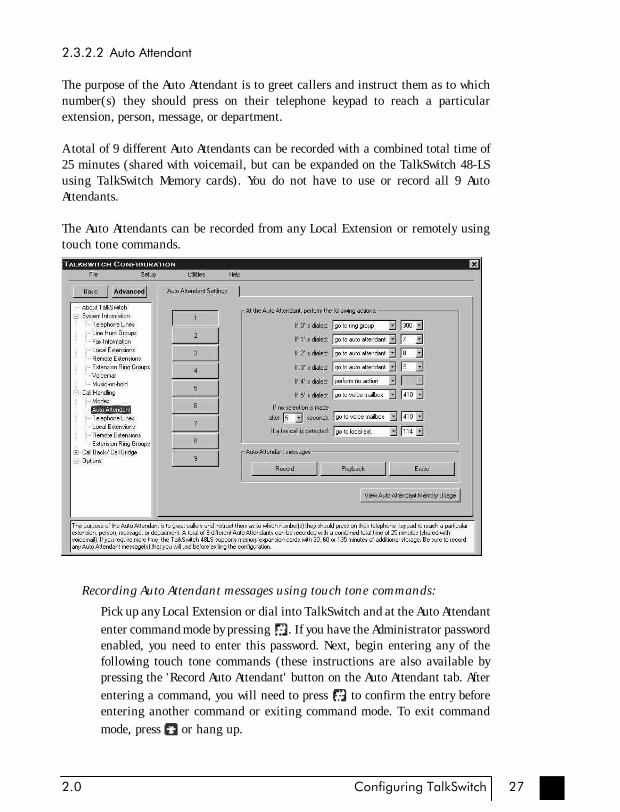
2.3.2.2 Auto Attendant
The purpose of the Auto At tendant i s to greet cal lers and instruct them as to whichnumber(s) they should press on their te lephone keypad to reach a part icularextension, person, message, or department .
A total of 9 di f ferent Auto At tendants can be recorded with a combined total t ime of25 minutes (shared wi th voicemail , but can be expanded on the TalkSwitch 48-LSus ing TalkSwi tch Memory cards). You do not have to use or record al l 9 AutoAt tendants .
The Auto A t tendants can be recorded f rom any Local Extens ion or remote ly us ingtouch tone commands .
Recording Auto A t t endant messages us ing touch tone commands :
Pick up any Local Extension or dial into TalkSwitch and at the Auto At tendant
enter command mode by pres s ing . I f you have the Administrator passwordenabled, you need to enter this password. Next , begin entering any of thefol lowing touch tone commands (these instruct ions are also avai lable bypressing the 'Record Auto At tendant' button on the Auto At tendant tab. Af ter
enter ing a command, you wi l l need to press to confirm the entry beforeenter ing another command or ex i t ing command mode . To ex i t command
mode, press or hang up.
272.0 Configuring TalkSwitch
TS-user manual_Final_3rd.qxd 8/9/01 2:14 PM Page 27
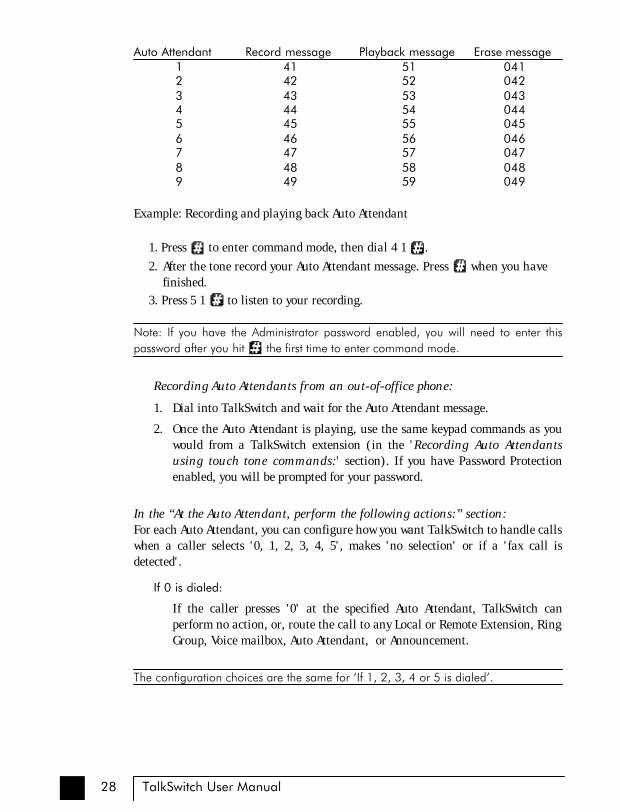
Auto Attendant Record message Playback message Erase message 1 41 51 041 2 42 52 042 3 43 53 043 4 44 54 044 5 45 55 045 6 46 56 046 7 47 57 047 8 48 58 048 9 49 59 049
Example : Recording and p lay ing back Auto A t tendant
1. Press to en te r command mode , then d ia l 4 1 .
2. Af ter the tone record your Auto At tendant message. Press w h e n y o u h a v e f inished.
3. Press 5 1 to l isten to your recording.
Note: If you have the Administrator password enabled, you will need to enter thispassword after you hit the first time to enter command mode.
Recording Auto A t tendants from an out-of -o f f ice phone:
1. Dial into TalkSwitch and wait for the Auto At tendant message.
2. Once the Auto A t tendant i s p lay ing, use the same keypad commands as youwould from a TalkSwitch extension (in the 'Recording Auto A t tendantsus ing touch tone commands : ' sect ion). I f you have Password Protect ionenabled, you wi l l be prompted for your password.
In the “At the Auto At tendant, perform the fol lowing act ions:” sec t ion:For each Auto At tendant , you can conf igure how you want TalkSwitch to handle cal l swhen a caller selects '0, 1, 2, 3, 4, 5' , makes 'no selection' or i f a ' fax call is detected' .
If 0 is dialed:
If the caller presses '0' at the specif ied Auto Attendant, TalkSwitch can perform no act ion, or , route the cal l to any Local or Remote Extension, RingGroup, Voice mailbox, Auto At tendant , or Announcement .
The configuration choices are the same for ‘If 1, 2, 3, 4 or 5 is dialed’.
28 TalkSwitch User Manual
TS-user manual_Final_3rd.qxd 8/9/01 2:14 PM Page 28

If no selection is made:
If no select ion is detected at the specif ied Auto Attendant, TalkSwitch canroute the cal l to any Local or Remote Extension, Ring Group, Voice mailbox, Auto At tendant , Announcement or s imply hang up. This feature i sincluded in case someone does not have a touch-tone phone or i t may be afax call . I t can also be used to forward calls immediately after the AutoAttendant answers the call . You wil l notice that you can specify the length oft ime af ter the Auto At tendant has f inished playing before i t performs the ‘noselection’ action.
If a fax call is detected:
If TalkSwitch detects a fax call (by CNG detection), i t has the abil i ty to routei t to a Local or Remote Extension or i f you do not want to use fax detect ion,you can have TalkSwitch perform no act ion when detect ing a fax cal l .
Fax calls are detected by what's called a CNG tone. If a fax machine sends this tonewhile trying to establish a connection to a fax machine connected to TalkSwitch,TalkSwitch will handle the call accordingly. Not all fax machines emit a CNG tone, andas a result TalkSwitch will not be able to detect the fax call and route it to the faxmachine. To guarantee the reception of every fax, we recommend the use of a‘Distinctive Ring Number’ added to one of your lines for fax calls. TalkSwitch can thenhandle every fax call consistently.
Auto A t tendant Messages :
Record
Select ing this button displays a dialog boxshowing the instructions on how to recordand playback an Auto At tendant using atelephone. No adjustments are required fort h e r e c o r d i n g v o l u m e a s T a l k S w i t c hautomatical ly adjusts the recording volumefor optimal recordings. I f you f ind that theplayback of your Auto At tendant messagesare too low, you can adjust the playbackvolume on the Audio Controls page locatedunder ‘Options’ .
292.0 Configuring TalkSwitch
TS-user manual_Final_3rd.qxd 8/9/01 2:14 PM Page 29
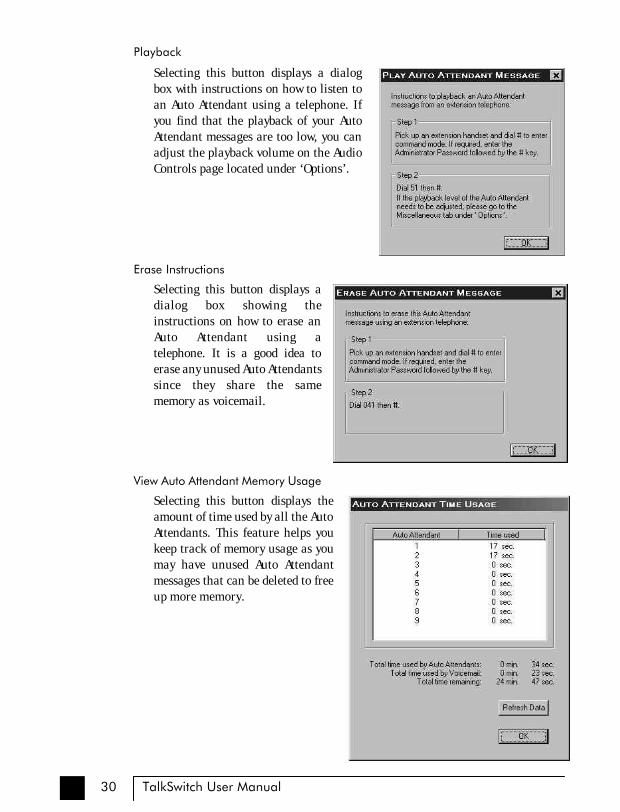
Playback
Select ing this button displays a dialogbox with instructions on how to l is ten toan Auto At tendant using a te lephone. I fyou f ind that the playback of your AutoAt tendant messages are too low, you canadjus t the p layback volume on the AudioControls page located under ‘Options’ .
Erase Instructions
Selecting this button displays ad i a l o g b o x s h o w i n g t h einstruct ions on how to erase anA u t o A t t e n d a n t u s i n g atelephone. It is a good idea toerase any unused Auto A t tendantss ince they share the samememory as voicemail .
View Auto Attendant Memory Usage
Selecting this button displays theamount of t ime used by al l the AutoAt tendants . This feature helps youkeep t rack of memory usage as youmay have unused Auto A t tendantmessages that can be deleted to freeup more memory .
30 TalkSwitch User Manual
TS-user manual_Final_3rd.qxd 8/9/01 2:14 PM Page 30

2.3.2.3 Telephone Lines
This sect ion deals wi th how TalkSwitch wil l handle incoming cal ls based on theincoming l ine and r ing cadence (dis t inct ive r ing numbers) .
F irs t se lect a l ine to configure then the appropriate mode you want TalkSwitch to usethese set t ings.
Play Auto Attendant:
I f you wish to have the Auto At tendant answer calls to give callers options, selectthe appropriate Auto At tendant and number of r ings before the Auto At tendantanswers . The cal ler wi l l a lways hear one more r ing than the number of r ings youselect s ince TalkSwitch uses the f irs t r ing to determine the r ing type and supportCaller ID information.
Ring extensions only (no Auto Attendant is played):
I f you don’t want the Auto At tendant to answer cal ls on this l ine, then select thisopt ion. By default al l the Local Extensions are set to r ing immediately during aninbound cal l . I f you select this opt ion, no Cal l Cascade act ions can be performed.I f you require a ‘ fal l through’ sequence, you can configure this l ine to have anAuto A t tendant answer a f ter X r ings then per form an act ion.
312.0 Configuring TalkSwitch
TS-user manual_Final_3rd.qxd 8/9/01 2:14 PM Page 31

The next sect ion controls how the extensions wil l r ing before the Auto At tendantanswers the cal l .
• If you have chosen the Auto At tendant to answer cal ls immediately , this sect ion does not require configurat ion and wil l be greyed out .
• If the Auto At tendant i s se t to answer af ter 1 or more r ings , then you can con -f igure when speci f ic extensions wil l r ing before the Auto At tendant answers .
• If no Auto At tendant is chosen to answer on the speci f ied l ine, then you canconfigure when speci f ic extensions wi l l r ing (up to 9 r ings) .
Extensions to ring on incoming call (before Auto Attendant answers):
Select the Local Extensions you would l ike to r ing before the Auto At tendantanswers. By default , al l activated Local Extensions wil l r ing. I f you require certainextensions to r ing in a sequence, i .e . one extension rings f irs t , then another onthe 2nd r ing, c l ick the “Adjust Sequence” button to configure.
Adjust Sequence:
This sect ion controls how the extensions wil l r ing before the Auto Attendantanswers the cal l .
• If you have chosen the Auto At tendant to answer cal ls immediately , this sect ion does not require configurat ion and wil l be greyed out .
• If the Auto At tendant i s se t to answer af ter 1 or more r ings , you can then con -f igure when speci f ic extensions wil l r ing before the Auto At tendant answers .
• If no Auto At tendant is chosen to answer on the speci f ied l ine, then you canconfigure when speci f ic extensions wil l r ing up to 9 r ings.
Note: The extensions that ring on incoming calls, do not follow their respective CallCascade settings. The Call Cascade options only occur after a call has passed throughan Auto Attendant.
2.3.2.4 Local Extensions
This sec t ion conf igures the incoming Cal l Cascade opt ions for the Local Extens ions .The Cal l Cascade rout ing opt ions are only engaged i f the extens ion i s chosen f romthe Auto At tendant or i f a cal l i s manually transferred to the extension. Once a callenters an extension’s Cal l Cascade sequence, the extension “owns” the cal l . I t wi l l notfol low any other extension’s opt ions even i f chosen in the Cascade sequence - whatyou see in an extension’s Cascade sequence i s exact ly what you wil l get . You can setup the Cal l Cascade sequences di f ferently for both scheduling modes ( the schedulingfor these modes are se t up on the Modes tab) .
32 TalkSwitch User Manual
TS-user manual_Final_3rd.qxd 8/9/01 2:14 PM Page 32

For Local Extensions, there are 4 di f ferent ' Call Cascade' s i tuations; Busy atextension, No answer at extension, Answer at extension(routing when a cal l i sre jec ted) and Do not Dis turb (when turned on at an extension). For each of theses i tuat ions , you can control how and where you want the incoming cal l to theextension handled with up to 3 'cascade' dest inat ions avai lable .
1. Busy at extension - rout ing opt ions when this extension is busy
Cascade opt ions include forwarding cal l s to a Local Extension, RemoteExtension, Extension Ring Group, buil t in Voicemail , Announcement, AutoAttendant , play busy tone (for example: used i f a fax machine is at the exten -s i o n ) , q u e u e c a l l e r , o r h a n g u p . F o r m o r e i n f o r m a t i o n o n t h e s e features , see chapter 3.0 - Using TalkSwitch.
2. No answer a t ex t . - rout ing opt ions when th i s ex tens ion does not answeraf ter a spec i f ied number of r ings .
Cascade opt ions include forwarding cal l s to a Local Extension, RemoteExtens ion, Extens ion Ring Group, bui l t in Voicemai l , Announcement , Auto At tendant or keep r inging.
3. Answer at ext. - routing opt ions when this extension 'rejects ' a screenedcall.
Selecting 'play caller’s name f irst ' wil l prompt callers , when they choose thisextension at the Auto At tendant , to record their name. When you answer thecall at the extension, i t wil l announce the cal ler (by playing their recording),
at which t ime you can choose to accept the cal l by press ing or reroute the
cal l to the Cascade opt ions on this tab by e i ther hanging up or press ing .
332.0 Configuring TalkSwitch
TS-user manual_Final_3rd.qxd 8/9/01 2:14 PM Page 33
Routing opt ions include forwarding cal ls to a Local Extension, RemoteExtension, Extension Ring Group, buil t in Voicemail , Announcement, AutoAt tendant or hang up. In the case where ‘hang up’ i s se lected, TalkSwitch wil lf irs t play the fol lowing prompt before hanging up: “I’m sorry, that extensionis unavailable at this t ime. Please try again later .”
4. Do not Dis turb - rout ing opt ions when th i s extension has engaged the 'Donot Dis turb' feature
The Do not Dis turb feature i s turned on (by dial ing 61) or off (by dialing
60) from the extension’s handset . Cascade opt ions include forwardingcal ls to a Local Extension, Remote Extension, Extension Ring Group, bui l t inVoicemai l , Announcement , Auto A t tendant or hang up. When Do not Dis turbis enabled, you wil l hear “Do not dis turb on” before the dial tone as areminder s ince no cal ls wi l l r ing through to your extension. You may s t i l l dialany digits during this prompt.
In the Cascade sequence, only choosing an extension (Local, Remote or Ring Group)will allow you to choose an option in the next line. Any other selection (Voicemail,Announcement, Auto Attendant, Queue, Busy signal, Keep ringing and Hang up) isconsidered an end-of-call option. Note as well that the last line in the Cascadesequence only allows the choice of an 'end-of-call' option. This is done so the chanceof a caller being “looped” within the system is removed.
Adding se lec t ions to a Cal l Cascade that are not yet conf igured:
I f while configuring the Cascade sequence you require a Local Extension, RemoteExtens ion, Ring Group, Voice mai lbox or Announcement that has not beenact ivated as ye t , ( i .e . not d isplayed in the extension number drop-down l i s t) youcan easi ly add the required select ion by choosing 'new'. I f chosen, a screen wil lappear (depending upon which type i s chosen). S imply f i l l in the requiredinformation to add the new option to the selectable l is t .
The information given in the 'Add new...' screens will be reflected within their respectivesections. For example, if you add a new Remote Extension (let’s say 211), when yougo to the Remote Extensions section you will see that extension 211 has the informationpreviously filled in the 'Add new Remote Extension' screen. You will also note that notall the information displayed in the extension tabs are available in the 'Add new...'screens. This is because only the information that effects the original extension’s CallCascade functionality is offered.
34 TalkSwitch User Manual
TS-user manual_Final_3rd.qxd 8/9/01 2:14 PM Page 34

2.3.2.5 Remote Extensions
This sec t ion al lows you to conf igure the incoming Cal l Cascade options for theRemote Extensions. The Call Cascade routing opt ions are only engaged i f theextension is chosen from the Auto At tendant or i f a call is manually transferred to theextension. Once a cal l enters an extension’s Call Cascade sequence, the extension“owns” the cal l . I t wil l not fol low any other extension’s opt ions even i f chosen in theCal l Cascade sequence - what you see in an extension’s Cal l Cascade sequence i sexact ly what you wil l get . You can set up the Call Cascade sequences for both modes( the schedul ing for these modes are se t up in the Modes tab) .
For Remote Extensions, there are 3 di f ferent 'Cal l Cascade' opt ions. For each of theseopt ions , you can control how and where you want the incoming cal l to the extens ionhandled with up to 3 'cascade' dest inat ions avai lable .
1. Busy at extension - routing opt ions when this extension is busy
Cascade opt ions include forwarding cal l s to a Local Extension, RemoteExtens ion, Extens ion Ring Group, bui l t in Voicemai l , Announcement , Auto At tendant , play busy tone or hang up.
2. No answer a t ex t . - rout ing opt ions when th i s ex tens ion does not answeraf ter a spec i f ied number of r ings .
Cascade opt ions include forwarding cal l s to a Local Extension, RemoteExtension, Extension Ring Group, bui l t in Voicemail , Announcement or AutoAt tendant , keep r inging or hang up.
352.0 Configuring TalkSwitch
TS-user manual_Final_3rd.qxd 8/9/01 2:14 PM Page 35

3. Answer a t ext . - routing opt ions when this extension 'rejects ' a cal l .
With Remote Extensions you have the choice between two di f ferent Cal l
Screening methods, 'play accept/reject prompt' and 'play caller’s name f irs t ' .Select ing 'play accept/reject prompt' wi l l prompt the Remote Extension whenanswered by s tat ing “This i s cal l forward”. Selecting 'play caller’s name first'
wil l prompt callers to record their name. When you answer the call at theextension, i t wi l l announce the cal ler (by playing their recording). Af ter hear-ing e i ther message, the Remote Extension can choose to accept the cal l by
pressing or reroute the cal l to the Call Cascade options on this tab byei ther hanging up or pressing . Routing options include forwarding callsto a Local Extension, Remote Extension, Extension Ring Group, bui l t in
Voicemail , Announcement , Auto At tendant or hang up.
I f you select ‘s tay connected’ you wil l notice that the Call Cascade options aregreyed out . TalkSwitch can only control forwarded cal ls when prompting isenabled. Also, i f you use one of the prompted methods for this RemoteExtension, have Music-on-hold enabled, and are not using 3-way cal l ing toforward calls to this Remote Extension, the Call Cascade wil l be seamless tothe cal ler as they wil l only hear music throughout the entire process of t rying to locate you.
If a call is forwarded to a Remote Extension from a Call Cascade sequence and haseither ‘play caller’s name first’ or ‘play accept/reject prompt’ enabled, the RemoteExtension will hear “This is Call Cascade...” instead of “This is Call Forward...”. This isdone so that you know when the call is rejected, it will send the caller to the next CallCascade option of the extension that forwarded the call and not follow the RemoteExtension’s ‘Answer at ext.’ Call Cascade options.
36 TalkSwitch User Manual
TS-user manual_Final_3rd.qxd 8/9/01 2:14 PM Page 36

2.3.2.6 Extension Ring Groups
The fo l lowing sec t ion conf igures the incoming cal l rout ing opt ions for Ring Groups .The Cal l Cascade rout ing opt ions are only engaged i f the Ring Group had beenchosen from the Auto At tendant or i f a cal l had been manually t ransferred to theRing Group. Once a cal l enters a Ring Group’s Cal l Cascade sequence, the RingGroup “owns” the cal l . I t wi l l not fol low any other extensions opt ions even i f chosenin the Cal l Cascade sequence - what you see in a Ring Group’s Cal l Cascade sequenceis exactly what you’ll get .
For Ring Groups, there are 3 di f ferent Cal l Cascade opt ions. For each of these opt ions,you can contro l how and where you want the incoming cal l handled wi th up to 3'cascade' dest inations available. You can set up the Call Cascade sequences for bothModes ( the schedul ing for these modes are se t up on the Modes tab) .
1. Busy at extension - routing opt ions when al l the extensions in the RingGroup are busy
Cascade opt ions include forwarding cal l s to a Local Extension, RemoteExtens ion, Extens ion Ring Group, bui l t in Voicemai l , Announcement , Auto At tendant , play busy tone, queue cal ler or hang up.
2. No answer a t ex t . - routing opt ions when al l the extensions in the RingGroup do not answer af ter a spec i f i ed number o f r ings .
Cascade opt ions include forwarding cal l s to a Local Extension, RemoteExtens ion, Extens ion Ring Group, bui l t in Voicemai l , Announcement , Auto At tendant, keep r inging or hang up.
372.0 Configuring TalkSwitch
TS-user manual_Final_3rd.qxd 8/9/01 2:14 PM Page 37

3. Answer at ext. - rout ing opt ions when any o f the ex tens ions in the RingGroup 'rejects ' a screened cal l .
Selecting 'play caller’s name f irst ' wil l prompt callers (when they choose thisRing Group at the Auto A t tendant) to record their name. When you answerthe cal l at a Ring Group extension, i t wi l l announce the cal ler (by playingtheir recording), a t which t ime you can choose to accept the cal l by press ing
or reroute the cal l to the Cascade opt ions on this tab by ei ther hanging up
or pressing . Routing options include forwarding cal ls to a Local exten -s i o n , R e m o t e E x t e n s i o n , E x t e n s i o n R i n g G r o u p , b u i l t i n V o i c e m a i l ,Announcement , Auto A t t endant or hang up .
2.3.3 Call Back / Call Bridge
Working together , Cal l Back and Cal l Br idge act as your personal long dis tanceoperator . Whether you are across town or around the world , you can place cal l s f romyour home/off ice telephone l ine(s) accessing your long dis tance savings plan. CallBridge al lows you to place cal ls f rom your of f ice te lephone l ines when you are not inthe of f ice . You can make a direct cal l to TalkSwitch, act ivate Call Bridge and enterthe te lephone number you want to d ial . TalkSwitch dials the number f rom yourhome/of f ice te lephone l ines and connects the two cal ls together ( the cal l you madeto TalkSwitch and the cal l TalkSwitch made from your home/off ice to the dialedparty).
Here i s how i t works :
Step 1: Call yourTalkSwitch telephonenumber to activateCall Back. Hang up.
Step 2: TalkSwitch calls youback within 10 seconds.You answer and acceptCall Back. Your AutoAttendant will play or ifyou have none recorded,the TalkSwitch messagewill play.
38 TalkSwitch User Manual
TS-user manual_Final_3rd.qxd 8/9/01 2:14 PM Page 38

Step 3 : You can now accessany TalkSwitch extension,voice mailbox or useCall Bridge to makecalls around the globejust as if you were sittingin your own office.
There are two ways to act ivate Cal l Back:
1. Auto Cal l Back - Auto Call Back is immediate and el iminates the ini t ial longdis tance cal l charge required to act ivate Cal l Back. When using Auto CallBack, al l the Cal l Back se t t ings must be pre-configured before Cal l Back isact ivated. To use Auto Call Back act ivat ion, s imply dial your home/of f ice te le-phone number , le t the cal l r ing twice and then hang up. Cal l Back i s ins tant-ly activated!
2. Prompted Cal l Back - Prompted Call Back of fers the convenience of enter ing or changing your Cal l Back te lephone number and message eachtime Call Back is act ivated. To use Prompted Call Back act ivat ion, s imply dialyour home/of f ice te lephone number . When the Auto At tendant answers yourcall , you dial ‘6’ to access the Call Back set t ings through a series of promptswhich a l low you to :
a ) Enter the te lephone number where you would l ike TalkSwitch tocal l you.
b ) Record an 'Announced' message i f required . Cal l Back wi l l beact ivated r ight af ter you ini t ia te Prompted Cal l Back and hang up.I t i s i m p o r t a n t t o r e m e m b e r t h a t a s m a l l i n i t i a l l o n g dis tance charge wi l l be incurred at your current locat ion whenact ivat ing Prompted Cal l Back.
By default, Prompted Call Back is not activated in the TalkSwitch configuration. You willneed to activate Prompted Call Back before you can use this feature.
392.0 Configuring TalkSwitch
TS-user manual_Final_3rd.qxd 8/9/01 2:14 PM Page 39
2.3.3.1 Auto Call Back
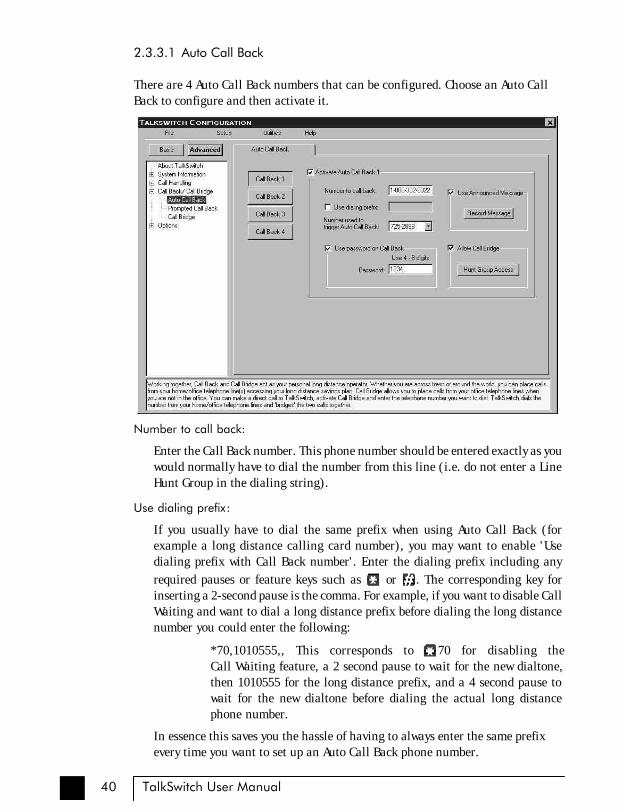
There are 4 Auto Cal l Back numbers that can be conf igured . Choose an Auto Cal lBack to configure and then act ivate i t .
Number to call back:
Enter the Cal l Back number . This phone number should be entered exact ly as youwould normally have to dial the number f rom this l ine ( i .e . do not enter a LineHunt Group in the dial ing s tr ing).
Use dialing prefix:
I f you usual ly have to d ial the same pre f ix when using Auto Cal l Back ( forexample a long d i s tance cal l ing card number) , you may want to enable 'Usedial ing pref ix with Call Back number' . Enter the dial ing pref ix including any
required pauses or feature keys such as or . The corresponding key forinser t ing a 2-second pause i s the comma. For example , i f you want to disable Cal lWait ing and want to dial a long dis tance pref ix before dial ing the long dis tancenumber you could enter the fol lowing:
*70 ,1010555 , , Th i s co r r e sponds t o 70 fo r d i sab l ing the Cal l Wait ing feature , a 2 second pause to wai t for the new dial tone,then 1010555 for the long dis tance pref ix , and a 4 second pause towait for the new dial tone before dial ing the actual long dis tancephone number.
In essence this saves you the hass le of having to always enter the same pref ixevery t ime you want to se t up an Auto Cal l Back phone number .
40 TalkSwitch User Manual
TS-user manual_Final_3rd.qxd 8/9/01 2:14 PM Page 40

Number used to trigger Auto Call Back:
Select the l ine/phone number when out of the of f ice that you wil l be dial ing totr igger this Auto Call Back. TalkSwitch wil l init iate the Call Back using the sameline you init ial ly cal led. You can make configure changes to this Auto Call Backby dial ing into this phone number only .
Use Password on Call Back:
This option is designed to give you security and to restr ict who can use thispart icular Call Back number. Simply f i l l in a 4 to 8 digi t password for the CallBack. When TalkSwitch cal ls you back, you wil l be prompted to input thepassword to accept Call Back to access Call Bridge or any TalkSwitch extension.
Use Announced Message:
This opt ion i s recommended i f the number TalkSwitch wil l be cal l ing backcorresponds to a hotel or a locat ion where somebody else wi l l be answering thecal l . The Announced Message opt ion al lows you to record a message that wi l l beplayed when the cal l i s ini t ial ly answered during a Cal l Back. For example, youmay want to say "Please t rans fer thi s ca l l to Bob in room 307" . When the hote lreceptionist gets the Call Back and hears this message, they wil l know to transferthe cal l to your room.
The Announced Message can be recorded us ing an extension handset or remotelywhen you access Cal l Back f rom the Auto A t tendant . The Record message but tongives the instructions to record the message. They are as fol lows:
Pick up a telephone handset connected to the TalkSwitch and use thefol lowing keypad commands to record the speci f ic Auto Cal l BackAnnounced Mes sage :
1) Press to enter command mode. I f required, enter the pas sword .
2) Next , enter the appropriate command as l i s ted below. Af ter each
command, p re s s to confirm the entry.
Auto Call Back Recording Playback
1 6 1 71
2 6 2 72
3 6 3 73
4 6 4 74
If you need to configure and/or record an Announced Message from a remote locationand do not have the Auto Attendant set to answer this Call Back line, you can call yourCall Back number and let it ring 15 times. A generic Auto Attendant will answer andyou will can configure Call Back by pressing 6.
412.0 Configuring TalkSwitch
TS-user manual_Final_3rd.qxd 8/9/01 2:14 PM Page 41

Allow Call Bridge :
To al low Cal l Br idge af ter a Cal l Back has been accepted, check the Al low Cal lBr idge box. You may al so res t r ic t the Hunt Group access us ing Cal l Br idge f romthis Call Back by choosing the Hunt Group Access button. By default , CallBridge is enabled when Call Back is act ivated. You wil l not be prompted foranother password when you choose a Hunt Group at the Auto A t tendant .
When entering a Call Back phone number using a telephone, you can enter specialcharacters using a special prefix. The default prefix is the key. To enter a in adialing string you will need to dial , for a 2 second pause dial 0, and for a , dial . When you have completed the entire dial string you need to dial .
2.3.3.2 Prompted Call Back
Number to call back:
This phone number should be entered exact ly as you would normal ly have to d ia lthe number f rom this l ine (do not enter a L ine Hunt Group in the dial ing s t r ing) .TalkSwitch wil l Call Back out on the same l ine the call originated.
When you access Prompted Call Back from out of the office, you may change thisnumber before initiating Prompted Call Back. This is the benefit of Prompted Call Back- you do not need to preset the number before you leave the office.
42 TalkSwitch User Manual
TS-user manual_Final_3rd.qxd 8/9/01 2:14 PM Page 42
Use dialing prefix with Call Back number:
I f you usual ly have to d ia l the same pre f ix when us ing Prompted Cal l Back ( forexample a long d i s tance cal l ing card number) , you may want to enable 'Usedial ing pref ix with Call Back number' . Enter the dial ing pref ix including anyrequired pauses or feature keys such as * or # . The corresponding key forinser t ing a 2-second pause i s the comma. For example , i f you want to disable Cal lWait ing and want to dial a long dis tance pref ix before dial ing the long dis tancenumber you could enter the fol lowing:
*70,1010555,, This corresponds to 70 for disabling the Call Waitingfeature, a 2 second pause to wait for the new dialtone, then 1010555 forthe long distance prefix, and a 4 second pause to wait for the new dialtone before dialing the actual long distance phone number.
In essence this saves you the hassle of having to always enter the same pref ixevery t ime you want to se t up a Prompted Cal l Back phone number .
Use password on Call Back:
This option is designed to give you securi ty and to restr ict who can use PromptedCall Back. Simply f i l l in a 4 to 8 digi t password and when TalkSwitch cal ls youback, you wil l be prompted to input the password to accept Call Back to accessCall Bridge or any TalkSwitch extension.
Use Announced message:
As with described in the Auto Call Back sect ion, this opt ion is recommended if thenumber TalkSwitch wil l be cal l ing back corresponds to a hotel or a locationwhere somebody e l se wi l l be answer ing the cal l . The Announced message opt ionallows you to record a message that wi l l be played when the cal l i s ini t ial lyanswered during a Cal l Back. For example , you may want to say "Please t ransferthis cal l to Bob in room 307". When the hotel receptionist gets the cal l and hearsthis message, they will know to transfer the call to Bob’s room.
The Announced Message can be recorded us ing an extension handset or remotelywhen you access Cal l Back f rom the Auto A t tendant . The Record message but tongives the instructions to record the message. They are as fol lows:
Pick up a telephone handset connected to the TalkSwitch and use thefol lowing keypad commands to record the Prompted Cal l BackAnnounced Mes sage :
1) Press to enter command mode. I f required, enter the password.
2) Next , enter the appropriate command as l i s ted below. Af ter eachcommand, press # to conf i rm the entry .
To record message: 65
To p layback message : 75
432.0 Configuring TalkSwitch
TS-user manual_Final_3rd.qxd 8/9/01 2:14 PM Page 43

Allow Call Bridge :
To al low Cal l Br idge af ter a Cal l Back has been accepted , check the Al low Cal lBr idge box. You may also res t r ic t the Hunt Group access us ing Cal l Br idge f romthis Call Back by choosing the Hunt Group Access button.
The call back number shown will always be the last number TalkSwitch dialed in thelast Prompted Call Back session.
When entering a Call Back phone number using a telephone, you can enter specialcharacters using a special prefix. The default prefix is the key. To enter a in adialing string you will need to dial , for a 2 second pause dial 0, and for a
, dial . When you have completed the entire dial string you need to dial .
2.3.3.3 Call Bridge
How to use Ca l l Br idge:
1. Cal l into TalkSwitch from any out-of-of f ice te lephone.
2. At the Auto At tendant message, dial the Hunt Group you know you have theaccount password for, (let ’s say i t ’s 9 - the default) you will then be promptedfor the account password.
3. You dial the password and then the key to access a TalkSwitch te lephonel ine.
4. At this point you can dial a number as though you were s i t t ing in the of f ice .
44 TalkSwitch User Manual
TS-user manual_Final_3rd.qxd 8/9/01 2:14 PM Page 44

There are four Cal l Br idge accounts ac t ivated by passwords . Each account can beconfigured to al low access to cer tain Hunt Group(s) when using Cal l Bridge. Toactivate an account, check the ‘Activate Call Bridge’ box and fi l l in a 4 to 8 digitpassword. Next , select ‘Hunt Group Access’ and assign the Hunt Groups you want tomake avai lable for this account .
Call Bridge account passwords are only valid when using Call Bridge by itself, not whenused in conjunction with Call Back.
2.3.4 Options
2.3.4.1 Administrator Password
This tab al lows you to se t up the Adminis trator password for TalkSwitch. TheAdminis trator password gives access to al l configurat ion opt ions. The password thati s en t e r ed he re w i l l b e u sed a t con f igura t ion s ta r t -up and th rough DTMFconfigurat ion.
Administrator password:
To act ivate the use of an administrator password, enter a 4 to 8 digi t password andthen confirm the password. Next , c l ick the ‘Veri fy Password’ button to have thesof tware val idate the password.
452.0 Configuring TalkSwitch
TS-user manual_Final_3rd.qxd 8/9/01 2:14 PM Page 45

I f there is a problem with the password, you wil l need to re-enter the passwordand then confirm i t . I f you do not want a password or want to delete the exist ingpassword, s imply clear the password f ield and click ‘Veri fy Password’. TalkSwitchwil l no longer require a password for configurat ion.
If the administrator forgets their password, the only option to gain access to theconfiguration settings is to contact Centrepoint Technologies.
2.3.4.2 Audio Controls
This sect ion deals wi th the adjustment of volume and sys tem gain controls . A l l thecontrols on this page update TalkSwitch in ‘real t ime’. This allows you to adjust levelsduring a conversation without having to f irs t save the configuration to TalkSwitch.
Message Vo lumes :
I f you need to increase or decrease the playback volume of the sys tem promptsand recordings , you can use both the Internal and External volume controls onthis page. Internal re fers to prompts and messages heard at the Local Extensions,and External re fers to prompts and messages heard f rom an outs ide l ine .
46 TalkSwitch User Manual
TS-user manual_Final_3rd.qxd 8/9/01 2:14 PM Page 46
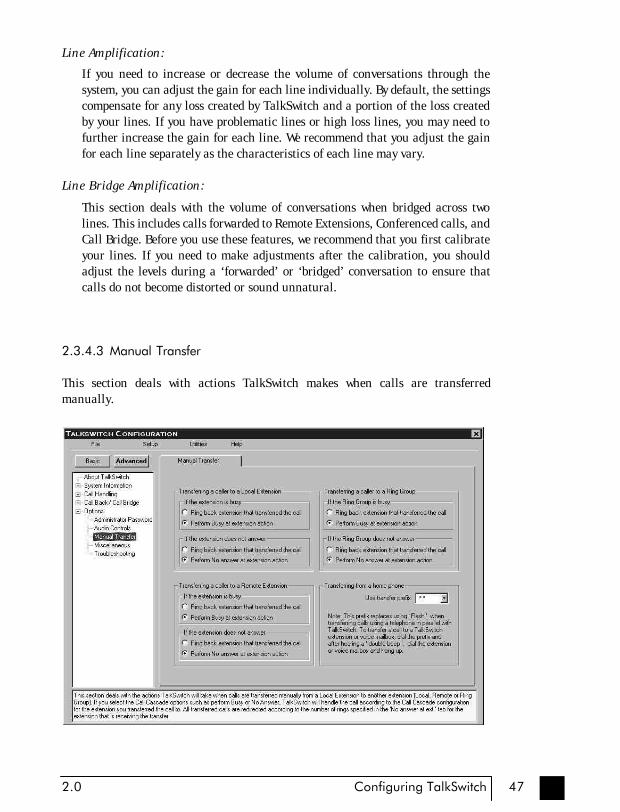
Line Ampli f icat ion:
I f you need to increase or decrease the volume of conversat ions through thesystem, you can adjust the gain for each l ine individually . By default , the set t ingscompensate for any loss created by TalkSwitch and a port ion of the loss createdby your l ines. I f you have problematic l ines or high loss l ines, you may need tofurther increase the gain for each l ine. We recommend that you adjust the gainfor each l ine separately as the characterist ics of each l ine may vary.
Line Bridge Ampli f icat ion:
This sect ion deals with the volume of conversat ions when bridged across twolines . This includes cal ls forwarded to Remote Extensions, Conferenced calls , andCall Bridge. Before you use these features , we recommend that you f irs t cal ibrateyour l ines. I f you need to make adjustments af ter the calibration, you shouldadjust the levels during a ‘ forwarded’ or ‘bridged’ conversation to ensure thatcal ls do not become dis torted or sound unnatural .
2.3.4.3 Manual Transfer
This sect ion deals with act ions TalkSwitch makes when cal ls are t ransferred manual ly .
472.0 Configuring TalkSwitch
TS-user manual_Final_3rd.qxd 8/9/01 2:14 PM Page 47

Transferr ing a cal ler to a Local Extens ion:
When performing this act ion, in the case of the extension not answering or beingbusy, you have the choice of TalkSwitch ei ther r inging back the extension whotransferred the cal l or per forming the “no answer” or “busy” act ion of theextension who the call was intended for.
You also have the choice to adjust this se t t ing for both the Remote Extensions andExtension Ring Groups. Any changes made in this sect ion affect the entire system.
Trans ferr ing f rom a Home phone :
You can transfer a cal l f rom a phone connected in paral le l to one of the incomingTalkSwitch l ines (Home phone) to a Local or Remote Extension, Extension RingGroup, an Announcement , or a Voice mai lbox. This sec t ion al lows you to choosewhich transfer pref ix you would l ike to use to perform the act ion. The transferpref ix ‘wakes up’ TalkSwitch and can be considered the equivalent of the Flash or
Link act ion at a Local Extension. By defaul t the pref ix i s .
Example: Let ’s say you receive a cal l on a phone in your home that is not anextension of TalkSwitch and you want to transfer the cal ler to Remote
Extension 215. You would then dial , wait for the ‘double beep’ then dial215 and hang up. TalkSwitch wil l now handle the cal l . For more detai ls , seesection 3.2.8.
2.3.4.4 MiscellaneousAll of the fol lowing opt ions af fect TalkSwitch as a sys tem. Adjust them according toyour needs .
Caller in queue reminder
When a cal ler i s in queue at an extension which is of f -hook, a reminder tone isplayed at the extension to le t them know they have a cal ler in their queue. Thisoption allows you to turn off this function.
Call Back ring return
You can adjust the number of r ings during a Call Back session before TalkSwitchdisengages the Cal l Back ( i .e . hangs up). Depending upon the s i tuat ion you maywant to give yoursel f more t ime to pick up and accept the Call Back by increasingthe number o f r ings .
48 TalkSwitch User Manual
TS-user manual_Final_3rd.qxd 8/9/01 2:14 PM Page 48
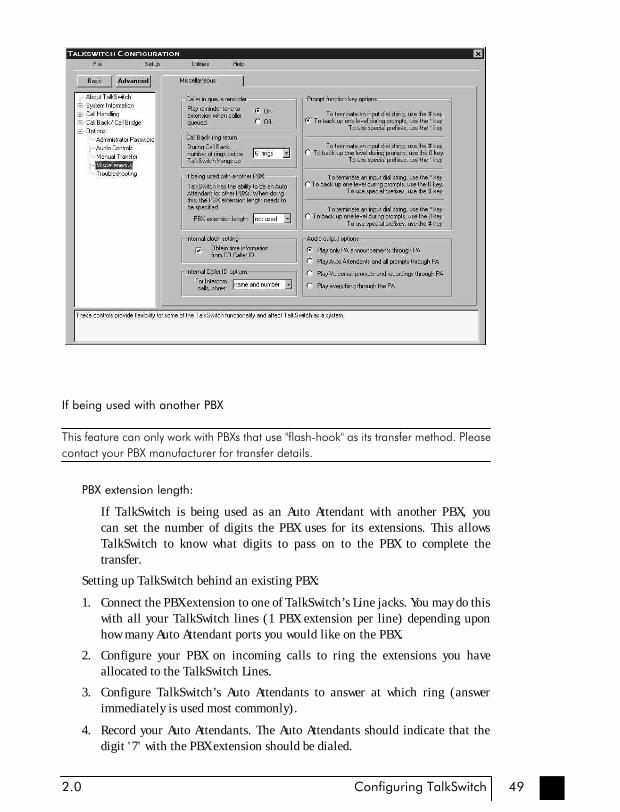
If being used with another PBX
This feature can only work with PBXs that use "flash-hook" as its transfer method. Pleasecontact your PBX manufacturer for transfer details.
PBX extension length:
I f TalkSwitch is being used as an Auto At tendant with another PBX , you can set the number of digi ts the PBX uses for i t s extensions. This al lowsTalkSwitch to know what digi t s to pass on to the PBX to complete the transfer.
Set t ing up TalkSwitch behind an exis t ing PBX:
1. Connect the PBX extension to one of TalkSwitch’s Line jacks . You may do thiswi th al l your TalkSwitch l ines (1 PBX extension per l ine) depending uponhow many Auto A t tendant por t s you would l ike on the PBX.
2. Conf igure your PBX on incoming cal l s to r ing the extensions you have allocated to the TalkSwitch Lines.
3. Configure TalkSwitch’s Auto At tendants to answer at which ring (answerimmedia te ly i s used mos t commonly) .
4. Record your Auto At tendants . The Auto At tendants should indicate that thedigi t '7 ' wi th the PBX extension should be dialed.
492.0 Configuring TalkSwitch
TS-user manual_Final_3rd.qxd 8/9/01 2:14 PM Page 49

Example : I f you have chosen the PBX extension length to be 3 digi ts (and le t ' ssay John Doe's extension is 111 on the PBX), the Auto At tendant should say "Tospeak wi th John Doe , press 7111…". Now when 7111 i s d ia led , TalkSwi tch putsthe cal ler on hold and transfers the cal ler to extension 111.
Internal clock setting:
TalkSwitch can obtain t ime information from Caller ID for i t ’ s internal c lock. I fyou have indicated that you do have Caller ID on any of the l ines , this opt iondefaults to the active posit ion. If i t is de-activated, TalkSwitch can obtain i t ’s t imeinformation from the t ime and date se t in the ‘Mode’ tab under Automatic ModeSwi t ch ing . Ta lkSwi t ch ’ s c lock in fo rmat ion i s u s ed f o r Au tomat i c ModeScheduling and for internal Cal ler ID information when intercom cal ls areplaced in the office.
Internal Caller ID options:
TalkSwitch has the abi l i ty to generate name and number Cal ler ID to eachextension during intercom calls . I f your Caller ID unit/ telephone does notsupport the name opt ion, you can choose to have TalkSwitch send the numberonly.
Prompt function key options:
Some phone cards and phone services use di f ferent keypad digi ts for some of theirfeatures. Four options are given to allow flexibil i ty with other systems. If required,choose an opt ion that bes t sui ts working wi th your phone card or phone service .You can use these pref ixes for enter ing phone numbers when cal l ing intoTalkSwitch and using Call Back and Call Bridge using 3-way call ing.
The fol lowing descr ibes how to input special pref ixes depending upon whichkey is used.
When us ing the key : When us ing the key :
= =
0 = 2 s e c o n d p a u s e 0 = 2 s e c o n d p a u s e
1 = Wai t for d ia l tone 1 = Wai t for d ia l tone
= =
Example : You want to change the Prompted Cal l Back phone number remote ly
and the special pref ix key is the key. After you dial into TalkSwitch and press‘6’ for Call Back, you go into the options for Prompted Call Back and select tochange the phone number . When prompted to enter the phone number , youenter:
70 018005551212
50 TalkSwitch User Manual
TS-user manual_Final_3rd.qxd 8/9/01 2:14 PM Page 50

This te l l s TalkSwitch that you want i t to dial :
70 (2 second pause) 1-800-555-1212
Audio output options:
The fol lowing controls can be used for var ious reasons including demonstrat ingTalkSwitch and screening callers using Voicemail . By default the system is set to
play only PA announcements through the PA output when 0 is dialed at aLocal Extension.
If you are a single person operation and would like to screen all voicemail messagesbeing left on TalkSwitch, you can connect a speaker to the PA output and select‘Play Voicemail prompts and recordings through PA’. When a caller goes tovoicemail, you will hear your greeting and the caller leaving a message. If you wish
to interrupt and speak to the caller, dial 9 from any Local Extens ion.
2.3.4.5 Troubleshooting
The fol lowing controls should not be changed unless you are famil iar wi th the e f fectthey wil l have on TalkSwitch’s operation. I f your system does not appear to befunctioning properly , please contact Centrepoint Technologies for ass is tance.
512.0 Configuring TalkSwitch
TS-user manual_Final_3rd.qxd 8/9/01 2:14 PM Page 51

Flash Lengths
Accepted Flash Length:
These opt ions control the al lowable Flash length from a Local Extension thatTalkSwitch wil l consider to be an intent ional Flash. The range can be adjust-ed to accept anything f rom 50ms to 1 second. The defaul t range for accept-ing a F lash s ignal a t a Local Extens ion i s be tween 200 ms and 800 ms. Bydefaul t , most phones emit a 300 ms Flash s ignal when the ‘Flash’ or ‘L ink’button is pressed.
Transmitted Flash Length:
This opt ion controls the transmit ted Flash length from TalkSwitch to theTelephone Company l ines . TalkSwitch emits a Flash when forwarding orbridging calls using the 3-Way Call ing/Conference or Centrex Transfer serv-ice , or when transferr ing cal ls through an exis t ing PBX sys tem. The value canbe adjusted f rom 50 ms to 900 ms. The defaul t se t t ing i s 400 ms. I f you not icethat you are having problems wi th any of the TalkSwitch features that use 3-way call ing, you may want to experiment with this value.
Double Flash time:
When two f lashes are detected, TalkSwitch needs to calculate the t ime between theflashes to establish i f they were intended to propagate a f lash at the CO or i f i t wasthe intention to place a cal ler on hold then quickly retr ieve them. The DoubleFlash t ime values s igni fy the maximum t ime between two f lashes that TalkSwitchwil l recognize as an intended f lash to the CO. When two f lashes are detected wi tha t ime gap larger than the value displayed, no f lash wil l be propagated at the CO.The value can be adjus ted f rom 200ms to 2000ms wi th the de faul t se t a t 1200ms.
3-Way Calling wait time:
This opt ion adjusts the t ime required between f lash hook and a dial s t r ing. Sometelephone company 3-Way Call ing/Conference services require di f ferent t imeallowances after the f lash signal to re-establish dial tone. The default t ime is 2seconds so that TalkSwitch can let the l ines set t le after going off hook beforesending the DTMF digi t s .
Direct line access and modems:
Some modems emit a f lash s ignal when going of f hook. I f this occurs in unison with direct l ine access , the modem can potential ly put the outs ide l ine“on-hold” when going of f-hook. By act ivat ing this opt ion, TalkSwitch capturesand ignores the f irs t f lash s ignal thus avoiding potential problems.
Non-detection of disconnect-clear:
This opt ion controls the length of t ime when TalkSwitch wil l "drop" a l ine whensilence is heard. This safeguard is very useful when a telephone l ine does not sendout the disconnect-clear signal that tel ls TalkSwitch the call is f inished.
52 TalkSwitch User Manual
TS-user manual_Final_3rd.qxd 8/9/01 2:14 PM Page 52

Auto Attendant Adjustments:
Since TalkSwitch al lows cal lers to dial 100, 200 and 300 series extensions andalso allows fall through options for the single digits 1, 2 and 3 at the AutoAt tendant , there needs to be a t ime l imit placed on how much longer af ter thefirst digit is pressed that TalkSwitch will wait for another digit before following thesingle digi t option configured for that part icular Auto At tendant. There are 3 waysto make use of this control . You should be careful not to i solate your cal lers f romhaving both choices as l is ted in (1).
1) With the current set t ing, cal lers can dial any Local Extension (1xx), RemoteExtension (2xx), or Ring Group (3xx) as long as the second digi t i s pressedwithin 1.5 seconds of pressing the first digit . Callers can also press just 1, 2, or 3for opt ions and when TalkSwitch detects no second digi t wi thin 1.5 seconds, i t wi l lfo l low the programmed opt ion for that Auto At tendant .
2) I f you don’t want to use the opt ions 1 , 2 , and 3 for any of the Auto At tendants ,you can se t the opt ion to ‘4 seconds’ . This pre t ty much guarantees that cal lerswi l l have more than enough t ime to dial a l l 3 digi t s o f any extension wi thoutaccidentally fal l ing through to one of the Auto At tendant options.
3) If you don’t want to give callers the abil i ty to dial any of the extensions andonly permit them to access s ingle digit options, set this value to ‘ immediately’ . Assoon as TalkSwitch detects the f irst digit , i t wil l follow the specif ied option for thatAuto At tendant .
Ring Patterns
This opt ion al lows you to check the r ing pat tern of your Telephone Companylines. When you activate this feature, you wil l need to call into any of the l inesconnected to TalkSwitch and let i t r ing at least 3 t imes before the Auto Attendantanswers the call . Af ter TalkSwitch captures 2 r ing patterns, the information wil lbe displayed in a dialog box. Please take note of this information and pass i talong to Centrepoint Technologies support i f you are having problems withTalkSwitch answering the l ines and playing the Auto At tendant .
532.0 Configuring TalkSwitch
TS-user manual_Final_3rd.qxd 8/9/01 2:14 PM Page 53
3.1 In the Office - Receiving Calls with or without the Auto Attendant
The Auto At tendant funct ions automatical ly . Once i t has been configured and i t smessages have been recorded, that's i t ! The Auto At tendant takes care of the rest . I twil l fol low whatever instruct ions (configuration) i t was given.
I f you choose not to use the Auto At tendant to answer cal ls , please note that the CallCascade opt ions for the Local Extensions wil l not be engaged. In order for any CallCascade sequence to work, the Auto At tendant must f i r s t answer the cal l .
I f you subscribe to Caller ID service , you may want to se t the Auto At tendant to answeraf ter at least 1 r ing to give TalkSwitch a chance to capture the Caller ID information.
3.2 In the Office - Making and Receiving Calls
3.2.1 Making calls from a Local Extension
Placing Intercom cal l s from one Local Extension to another Local Extension,Remote Extens ion or Extens ion Ring Group:
You can place intercom cal ls f rom one Local Extension to another LocalExtension, Remote Extension or Extension Ring Group by s imply picking up theextension's handset and dial ing the number of the extension wi th which youwish to intercom. An Intercom cal l can be identi f ied by a unique r ing cadence (2short r ings) except in the case of a Remote Extension Intercom cal l where thephone wil l r ing as usual or i f a Ring Group has selected a di f ferent r ing cadenceother than 'normal' .
553.0 Using TalkSwitch
3 UsingTalkSwitch
TS-user manual_Final_3rd.qxd 8/9/01 2:14 PM Page 55

Placing 'out-of-of f ice ' cal l s from a Local Extension:
To place a cal l to an out-of-of f ice te lephone number f rom a Local Extension youmust f i r s t access an avai lable l ine by choosing a Hunt Group (9, 81-88) at theinternal dial tone. Restr ic t ions to speci f ic Line Hunt Groups can be configured perextension. Your extension can also be configured to Direct ly Access a specif ic l ine(i .e . when a handset i s p icked up, you wi l l hear the Telephone Company dial tone(not TalkSwitch's) and can dial an outside telephone number as usual).
If you have Direct Line Access enabled for a Local Extension, you will need to dial‘Flash’ then ‘4’ before dialing any extensions.
3.2.2 Receiving calls at a Local Extension
To receive cal ls at a Local Extension, s imply pick up the extension's handset whenthe extension r ings . I f the cal l went through the Auto At tendant to the extension andi t has cal l screening enabled (conf igured on the Local extension and Ring Group
pages), you have the choice of accept ing the cal l by press ing or, re-routing the call
to i t ’s ‘Answer at ext. ’ Call Cascade options by pressing or hanging up .
Cal l P ick Up/Cal l Grab :
To intercept a call that is ringing at another Local Extension before the AutoAt tendant has engaged, pick up your handset and at the TalkSwi tch internal
dial tone, dial 9. This wil l route the call to your Local Extension. It isimportant to note, however, that you cannot "Grab" calls r inging at otherextensions once the Auto At tendant has answered the cal l . I f you are in the middleof a call and want to connect to another caller call ing in, press ‘ f lash’ to place the
f irs t cal ler on hold, then dial 9 to connect to the second cal ler . Once you arefinished the second call or you would like to return to the first caller, press ' f lash''7'.
3.2.3 Placing calls on Hold at a Local Extension
To Place calls on hold:
To place callers on hold, press ' f lash' . Follow the same procedure to take callersof f immediate hold . I f you have mult ip le cal lers on hold or in queue at yourextension, you can press 'flash' '7' to retrieve callers on a first in / first out basis.
If you use the ‘Hold’ button on your phone, you will not be able to access any of theTalkSwitch features while the caller is on hold. Also, if you have Music-on-holdenabled, the caller will not hear music while they are on hold.
56 TalkSwitch User Manual
TS-user manual_Final_3rd.qxd 8/9/01 2:14 PM Page 56

3.2.4 Transferring calls
From a Local Ex tens ion to another Local Ex tens ion, Remote Extens ion orExtens ion Ring Group:
To init iate an Unscreened Transfer - Put the caller on hold (by dialing ' f lash'),dial the appropriate extension number and hang up. The cal ler wi l l be taken of fhold when the receiving extension is answered. I f the transferred call is notanswered af ter the number of r ings speci f ied in the No Answer set t ing for thedestination extension or, i f the extension is busy, ei ther of the following willhappen:
Default: The transferred cal l wil l be handled according to the dest ination extension's No Answer or , Busy at extension sett ings.
Option: The cal l wi l l be transferred back to the transferr ingextension.
These options are chosen in the Manual Transfer tab in the Options folder.
To announce calls before transferring (Screened Transfer ) - Put the cal ler onhold and dial the appropriate extension number. I f the person at the receivingextension answers and wishes to take the cal l , s imply hang up or opt ionally , dial' f lash' ‘4’ to complete the transfer and get internal dialtone. The caller wil limmediately be taken of f hold and connected with the receiving extension. I f theperson at the receiving extension does not wish to take the cal l , you can press'flash' ‘5’ to return to the caller.
If you tend to handle many calls, you may want to complete or cancel a transfer withouthanging up. Flash '4' will complete the transfer and then provide internal dialtone whileflash '5' will cancel the transfer and connect you back to the caller.
From a Local Ex tens ion to any out s ide t e l ephone number :
To initiate an Unscreened Transfer - Put the cal ler on hold , se lec t a L ine HuntGroup (dial 80 for Same Line Connect) , then dial the outs ide te lephone numberand hang up. The cal ler wi l l be taken of f hold and connected to the outs ideperson as soon as you hang up.
To announce cal ls before transferr ing - Put the cal ler on hold, select a Line HuntGroup, then dial the outside te lephone number. I f the person at the receivingextension answers and wishes to take the cal l , s imply hang up or opt ionally , dial' f lash' 4 to complete the transfer and get internal dial tone. The cal ler wil limmediately be taken of f hold and connected with the receiving extension.
573.0 Using TalkSwitch
TS-user manual_Final_3rd.qxd 8/9/01 2:14 PM Page 57

I f the person at the receiving extension does not wish to take the cal l , you canpress 'flash' 5 to return to the caller.
If you have the 3-Way Calling/Conference or Centrex Transfer feature enabled on thecurrent line, you can select the Same Line Connect (80) to make use of these features.Everything proceeds as outlined above other than the fact that you are using the sameline to transfer the call.
3.2.5 Call Park - Parking and retrieving callers
Call Park is a useful feature for placing a cal ler on hold and then being able tore tr ieve them from any other Local Extension. TalkSwitch has 10 Park Orbi t s for a l lmodel s .
To place a caller in a Park Orbit , press Flash then and choose a Park Orb i t (500to 509). You wil l hear a confirmation af ter parking the cal ler , i t means the cal ler hasbeen parked successful ly . I f the Park Orbit i s already occupied, you wil l hear “I’m
sorry, that extension is unavailable at this t ime.” then dial tone. Once again pressand choose a new Park Orbi t . Once the cal ler i s parked, you can re tr ieve the cal ler a t
another Local Extension by pressing and the appropriate Park Orbi t .
I f you have the External Paging opt ion enabled on TalkSwitch, you may choose to
announce over the P.A. system (by pressing 0) that there is a cal l parked in aspeci f ic Park Orbit for a co-worker . (For example: "Bob, please pick up 501." - whichtel ls Bob that he can retr ieve the parked call from any extension by get t ing dial tone
and press ing 501. The cal ler wil l now be connected to Bob at that extension.)
3.2.6 Call Queue - Queuing and retrieving callers
Call Queue is a useful feature for placing mult iple cal lers on hold at your extension.I t i s s imilar to the te lephone company feature Call Wait ing. Cal l Queue is enabledin the Cal l Cascade sect ion for Local Extensions and Extension Ring Groups . Cal lerswil l get queued at your extension i f you set the f irs t level in the ‘Busy at extension’Call Cascade to ‘queue caller’ .
I f an extension is chosen at the Auto At tendant or the cal ler i s t ransferred f romanother extension and the extension i s current ly busy and has ‘queue cal ler ’ se t forthe ‘Busy at extension’ Call Cascade, the caller will hear one of the followingprompts :
I f the cal l came from the Auto A t tendant and the extens ion has a voice mai lbox :
58 TalkSwitch User Manual
TS-user manual_Final_3rd.qxd 8/9/01 2:14 PM Page 58

“The extension you have reached is currently busy. I f you wish to continueholding, p lease remain on the l ine . To leave a voicemail message, press 1 ,
and to re turn to the main menu, press ”
I f the cal l came from the Auto A t tendant and the extens ion has no voice mai lbox :
“The extension you have reached is currently busy. I f you wish to continue
holding, p lease remain on the l ine and to re turn to the main menu, press . ”
I f the cal l was transferred from another extension, there i s no Auto At tendanton th i s l ine and the ex tens ion has a voice mai lbox:
“The extension you have reached is currently busy. I f you wish to continueholding, p lease remain on the l ine . To leave a voicemail message, press 1 .”
I f the cal l was transferred from another extension, there i s no Auto At tendanton th i s l ine and the ex tens ion has no vo ice mai lbox :
“The extension you have reached is currently busy. I f you wish to continueholding, please remain on the l ine .”
While the caller is on hold at your extension you wil l hear a ‘Call Wait ing’ beep inyour ear every 45 seconds. I f you want to rotate through queued cal lers , dial Flashthen ‘7’ . The caller you are speaking to wil l be placed on hold, and the f irs t caller inthe queue wil l be retr ieved. I f you have mult iple cal lers queued up, pressing Flashthen ‘7’ will retrieve callers on a first in/first out basis.
Queuing ca l le r s f rom an Extens ion Ring Group
If you want to queue cal lers for a Ring Group, you can only queue cal lers to oneof the extensions in the Ring Group and not to the entire Ring Group. TalkSwitchdoes not have the resources to perform Automatic Cal l Dis tr ibution with RingGroups . This capabi l i ty may be introduced as a future f i rmware upgrade.
3.2.7 Conference calling with TalkSwitch
2 TalkSwitch Local Extensions and 1 outs ide cal ler :
You do not require access to the te lephone company's 3-WayCalling/Conference service to use TalkSwitch's conference call ing capabili t ies .
1. Establish a cal l with an outside party .
2. Place the outs ide cal ler on hold by press ing Flash and dial the number ofthe Local Extension you wish to conference wi th .
593.0 Using TalkSwitch
TS-user manual_Final_3rd.qxd 8/9/01 2:14 PM Page 59

3. When the extension is picked up, you can establish the 3-way call at anytime by pressing Flash then '6' .
2 outs ide cal lers and 1 Local Extens ion (L ine 1 and L ine 2) :
You can do this type of conference call using two di f ferent methods.
The f i rs t method i s s imilar to above, us ing only TalkSwitch for the conferencefunction.
1. Establish a cal l with an outside party .
2. Place the outs ide cal ler on hold and dial the number of the other outs ideparty you wish to conference with.
3. When the cal l i s answered, you can es tabl ish the 3-way cal l at anyt ime bypressing Flash '6'.
When us ing the te lephone company's 3-Way Cal l ing/Conference serv ice youcan conference by fol lowing the instruct ions below:
1. Establish a cal l with an outside party .
2. Place the outs ide cal ler on hold by press ing Flash twice and then dial thenumber of the other outs ide party you wish to conference with.
3. When the cal l i s answered, you can es tabl ish the 3-way cal l at anyt ime bypressing Flash twice.
3.2.8 Using Phones connected in parallel to TalkSwitch
Phones connected in parallel with TalkSwitch wil l always r ing at least once beforeTalkSwitch starts ringing its extensions or the Auto Attendant answers the call . Thisoccurs because TalkSwitch uses the f irs t r ing to identi fy the incoming cal l beforepass ing i t on to the extensions or the Auto At tendant (e .g . TalkSwitch determines i fthe cal l i s a Dis t inct ive Ring and detects any Cal ler ID information). A parallel phonecan 'barge in' on any telephone call on any of TalkSwitch's Lines (e.g. any calls toor f rom a TalkSwitch extension).
Making and rece iv ing cal l s on phones connected in paral le l wi th TalkSwitch:
Making Calls: Make cal ls on paral le l connected phones just as you would i fTalkSwitch were not sharing the te lephone l ine with them.
Answering Calls: I f a cal l i s answered on a paral le l connected phone before theAuto At tendant engages, s imply continue with the cal l as per usual , TalkSwitchwil l take no further act ion. I f a call i s answered on a parallel connected phoneafter the Auto At tendant engages, you can turn of f the recorded Auto At tendant
message by using the phone's touchtone keypad to dial ' 0' . You may thencontinue the cal l on the paral lel connected phone.
60 TalkSwitch User Manual
TS-user manual_Final_3rd.qxd 8/9/01 2:14 PM Page 60
Transferring cal ls on paralle l connected phones:
Calls answered on a paral le l connected phone can be t ransferred to anyTalkSwitch extension or voice mailbox. I f you want to transfer the caller , s imply
key in the 'Transfer Prefix ' , then after you hear 2 ‘beeps’ , enter theextens ion or voice mai lbox number then hang up. You cannot announce a cal lerto the transferred extension, but i f you do stay on the l ine, you will be in a‘conference cal l ’ s tate . You can hang up at any t ime.
I f you transfer a cal l f rom a paral le l connected phone and then hang up, theextension will r ing the number of t imes selected for that extension. If theextension is not answered within the speci f ied number of r ings, the call wil l behandled according to that extension’s Call Cascade act ions.
When a phone in paral le l wi th Talkswitch is of f-hook, you wil l not ice that thecorresponding l ine l ight wil l f l icker very rapidly to indicate the l ine is occupied.TalkSwitch wil l not barge in on a cal l when that l ine is in use.
You have the ability to change the Transfer Prefix to instead of . You mayneed to change the prefix if the default prefix conflicts with another device or service.To change the Transfer Prefix, open the configuration software and change the settingin the Manual Transfer tab under 'Options'.
3.2.9 External modem telephone line access
I f your external modem has been a t tached to TalkSwi tch as an extens ion, you canconfigure i t to access your te lephone l ines in one of two ways :
1. Direct Line Access: You can give the extension to which your modem isat tached 'Direct Access' to one of your telephone l ines (i .e . you don't have todial 9 , or any other Hunt Group to access an outs ide l ine). This can be a use-ful opt ion i f you don’ t want to change your d ial-up opt ions for the modem.
2. Hunt Group Restriction: I f you have dec ided to use a t e l ephone and modemon the same extension, 'Direct Access' may not be the best solution.TalkSwitch extensions with 'Direct Access' immediately connect to one ofyour l ines when you pick up the telephone's handset . Therefore, you areunable to select a speci f ic te lephone l ine or use the extension for 'Intercom'calls or to configure TalkSwitch.
To have your modem access a spec i f i c l ine or Hunt Group :
Change your modem's 'Dial Proper t ies ' to include the intended Hunt Group (81-88 or 9) fol lowed by the let ter 'w' , before the 'Dial up Networking' te lephonenumber (e.g. 9w555-5555). Including the let ter 'w' af ter your 'Dial out Access'number ins t ructs your modem to a) d ial the access number 81-88 or 9 , and b)wait unti l i t detects a dial tone, and then c) dial your 'Dial up Networking'number.
613.0 Using TalkSwitch
TS-user manual_Final_3rd.qxd 8/9/01 2:14 PM Page 61
I f your modem is having problems d ia l ing out , you may have to use a comma ‘ , ’which represents a 2 second pause, instead of the ‘w’ for ‘wait for dial tone’ .
To change your modem's d ia l proper t ie s in Windows 95/98 :
1. 'Double Cl ick' on the 'My Computer ' icon on your Windows screen. Then'double c l ick' on 'Control Panel ' , and f inal ly 'Modems' .
2. When the 'Modems Propert ies ' screen opens, c l ick on the 'Dial ing Propert ies 'button.
3. In the sect ion labeled 'To access an outside l ine, f irs t Dial' , enter the Dial outAccess number (81-88, or 9) that you have chosen to use . (Enter your Dialout Access number for both local and long dis tance numbers .) Then type inthe letter 'w' or ‘ , ’ directly after the Dial out Access number.
4. Cl ick the 'OK' button to save your changes and close the screen; then close the'Modems Proper t ies ' screen.
If you use 'Direct Line Access', you do not need to put the Hunt Group in the dialingstring.
3.3 Out of the Office - Receiving Calls through CallForwarding
3.3.1 The three ways to forward calls1. Automatic call forwarding - The Auto Attendant can automatically forward
o f f i c e c a l l s t o y o u r c a l l f o r w a r d i n g t e l e p h o n e n u m b e r ( s ) ( R e m o t eExtensions) . This i s done by using the Auto At tendant message to promptcal lers to se lect your Remote Extension number(s) . (e .g . "To speak to JohnDoe, press 211.")
2. Manual call forwarding - I f someone in your of f ice has answered a cal l at aLocal Extension, the call can be ' transferred' to one of the call forwarding(Remote Extens ion) numbers . S imply put the cal l on hold a t the LocalExtension, d ial the Remote Extension number (e .g . 211) to which you wantthe cal l forwarded and then hang-up. The cal l wi l l be handled according tothe Cal l Cascade opt ions o f that Remote Extens ion.
3. Conditional call forwarding - If the Auto Attendant answers a call and thecal ler se lects an extension or Ring Group number that i s already busy or i snot answered , the Auto A t tendant can forward the cal l to a Remote (out o fof f ice) extension number. Condit ional cal l forwarding is configured using theCall Cascade’s 'No answer' or 'Busy at extension' set t ings configurable foreach Local Extens ion, Remote Extens ion and Ring Group.
62 TalkSwitch User Manual
TS-user manual_Final_3rd.qxd 8/9/01 2:14 PM Page 62
3.3.2 Screening options for forwarded calls
The screening opt ions for Cal l Forwarding are configured using the Call Cascade’s'Answer at ext . ' options available in the 'Remote Extension' tab, see sect ion 2.3.2.5
Forwarding cal l s wi th screening:
When 'play accept/reject prompt' i s configured in the 'Answer at ext . ' Cal lCascade opt ion, TalkSwitch plays a pre-recorded prompt to the cal ler asking themto hold, and then dials your cal l forwarding te lephone number . When you answerthe forwarded call , TalkSwitch plays a pre-recorded prompt to you that identi f iesthe cal l as having been forwarded f rom your home/of f ice ("This i s Cal lForward"). You then have the choice of accepting the forwarded cal l by press ing
on your telephone keypad or , re-routing the cal l to i t ’ s cal l screening Call
Cascade options by pressing or hanging up.
When 'play caller’s name f irst ' is configured in the 'Answer at ext . ' Call Cascadeoption, TalkSwitch plays a pre-recorded prompt to the cal ler asking them torecord their name at the sound of the tone. TalkSwitch then asks the cal ler tohold and dials your cal l forwarding te lephone number. When you answer theforwarded call , TalkSwitch plays a pre-recorded prompt identi fying the call ashaving been forwarded from your home/of f ice ("This i s Cal l Forward, you havea call from.. .") and then plays the recording of the callers name. You have the
choice of accepting the forwarded call by pressing on your te lephone keypad
or, re-routing the call to i t ’s call screening Call Cascade options by pressing orhanging up .
If a forwarded call is not answered or the l ine is busy, TalkSwitch will perform thefol lowing based upon how the cal l was originally forwarded:
If the call was automatically forwarded: the call will follow the RemoteExtension’s 'No answer at ext . ' or 'Busy at extension' Call Cascade act ion.
If the call was manually forwarded: The call wil l fol low the Remote Extension’s'No answer at ext . ' or 'Busy at extension' Call Cascade act ion. This act ion can bechanged to r ing the ex tens ion back who per formed the t rans fe r in theOptions>Manual Transfer tab.
If the call was conditionally forwarded: The call wil l fol low the fol lowing CallCascade act ion in the 'No answer at ext . ' or 'Busy at extension' for the originalextension chosen.
633.0 Using TalkSwitch
TS-user manual_Final_3rd.qxd 8/9/01 2:14 PM Page 63

3.4 Out of the Office - Making Calls with Call Back andCall Bridge
Working together , Cal l Back and Cal l Br idge act as your personal long dis tanceoperator . Whether you are across town or around the world , these two features al lowyou to place cal ls f rom your home/off ice te lephone l ine(s).
3.4.1 Using Call Bridge
Call Br idge al lows you to place cal l s us ing your of f ice te lephone l ines when you arenot in the of f ice . You can make a direct cal l to TalkSwitch, access a telephone l ineconnected to TalkSwitch and enter the number you want to dial . This i s especial lyuseful when out of the of f ice wi th your cel l phone and need to dial a long dis tancenumber. To avoid the inflated long dis tance cel l rates al l you need to do is make thelocal cal l to TalkSwitch to access Call Bridge, then make the long dis tance call -accessing your of f ice savings plan.
How to use Cal l Br idge:
Dial into one of TalkSwitch's Lines (Main or Dis t inct ive Ring). When the AutoAt tendant answers , se lec t a Hunt Group (81-88 or 9) or Same Line Connect (80).You wil l then be asked to supply your Account password to receive dial tone. I f youare us ing Same L ine Connec t 80 , and the l ine you are on suppor t s the 3-WayCall ing/Conference service, you wil l be prompted to enter the phone number.
When you have comple ted your cal l or i f the te lephone number d ia led was busy ,you can do one of the following:
A) Make another call: Press . TalkSwitch wil l disconnect you from the calli n p r o g r e s s a n d y o u c a n d i a l a n o t h e r n u m b e r o r r e d i a l t h e s a m e number.
B) Activate the Auto Attendant: Press . TalkSwitch will end the Call Bridgesess ion and act ivate the Auto At tendant . Once the Auto At tendant messagebegins playing, you have the fol lowing options:
• Dia l (and enter a password i f applicable) to enterC o m m a n d M o d e .
• Dial '6' to change/enter Call Back set t ings .
• Dial one o f your ex tens ion numbers (Local , Remote or RingGroup). This opt ion al lows you to use Cal l Back to contactsomeone in your of f ice , check your voicemail , e tc .
64 TalkSwitch User Manual
TS-user manual_Final_3rd.qxd 8/9/01 2:14 PM Page 64

C) End the Call Bridge Session: Simply Hang up. This wi l l end your Cal lBridge sess ion and disconnect you from TalkSwitch. I f you want to guarantee that TalkSwitch disconnects at the end of a Call Bridge sess ion,
dial , then hang up.
If you changed the ‘Special Prefix’ to instead of , you will need to dial tomake another call, and dial to return to the Auto Attendant. To enter commandmode, you will still need to enter .
The Cal l Br idge te lephone number dialed can be any te lephone number : local , long distance, tol l free (800 and 888) or international. Simply enter the telephonenumber as you would i f you were s i t t ing in your of f ice . For long dis tance cal l s , do notforget to include the '1' , country code, and area code i f applicable .
3.4.2 Using Call Back
The Call Back feature al lows you to init iate TalkSwitch to call you at a specif iedtelephone number. This gives you access to any of the fol lowing:
• Call Bridge
• Local Extens ions , Remote Extens ions and Extens ion Ring Groups
• Voicemail
• Configurat ion set t ings
Using Call Back involves '3' easy s teps :
1. You cal l your TalkSwitch te lephone number to act ivate Cal l Back.
2. You answer and accept the Cal l Back. (TalkSwitch cal l s you back wi thin 30seconds.)
3. At the Auto At tendant you can: choose to per form Cal l Br idge, dial anyextension, access and retr ieve voicemail or configure TalkSwitch.
Act ivat ing Call Back:
There are two ways to act ivate Cal l Back, Prompted and Auto act ivat ion:
1. Using 'Prompted Call Back' Activation: From your out-of-off ice location, diala TalkSwitch telephone number ('Main' or 'Dist inct ive Ring'). Let the l iner ing unti l the Auto At tendant answers your cal l and then dial '6 ' on the te le-phone keypad. I f you have enabled password protect ion you wi l l be asked tosupply your password and TalkSwitch wil l then of fer a ser ies of prompts . Nowyou can ei ther enter 1 and hang up to ini t iate the Call Back or , i f you need toenter a new Prompted Cal l Back number , enter 2 to access the Prompted Cal lBack set t ings then fol low the prompts .
653.0 Using TalkSwitch
TS-user manual_Final_3rd.qxd 8/9/01 2:14 PM Page 65

For Prompted Call Back, TalkSwitch always dials the last Prompted Call Back numberentered. If you do not have the Auto Attendant set to answer a line, a genericTalkSwitch Auto Attendant will answer after 15 rings and you can then dial 6 to accessthe Call Back settings.
2. Using 'Auto Call Back' Activation: From your out-of-of f ice location, dial oneof the Call Back telephone numbers that has been pre-configured for AutoCall Back act ivat ion. Let the l ine r ing at least once, but no more than threet i m e s a n d t h e n h a n g - u p ( b e f o r e t h e c a l l i s a n s w e r e d ) . W i t h i n 3 0 seconds, TalkSwitch will dial your Auto Call Back number.
It is important to remember that all the Call Back settings must be pre-configuredbefore using Auto Call Back. Please be sure that the Auto Attendant for the line usingCall Back does not answer before 4 rings.
Accept ing the Cal l Back:
There are two ways to accept a Cal l Back f rom TalkSwi tch.
1. Cal l Back i s normally accepted by answering the cal l and press ing , thenif required, enter ing your password. This opt ion is used when you have adirect l ine to your Call Back telephone number.
2. The 'Use Announced message' opt ion al lows the Cal l Back f rom TalkSwitchto reach you even when you are s taying at a hote l or are in an of f ice wherecalls are intercepted by a receptionist or switchboard operator. When the CallBack i s answered , Ta lkSwi t ch w i l l beg in p lay ing your p re - r ecorded message (e .g. "Please forward this cal l to Jane Doe in room 312"). The message wi l l be p layed repeatedly for '2 ' minutes . When the cal l i s
forwarded to you, press , then enter your password on the te lephone keypad to accept the Call Back. (I f the Call Back is not accepted within theinit ial '2' minute period, TalkSwitch wil l disconnect the Call Back.) Af ter youaccept the cal l , you wi l l hear the Auto At tendant , and you can now make yourselect ion to check your voicemail , r ing an extension, use Call Bridge, or enterc o m m a n d m o d e .
66 TalkSwitch User Manual
TS-user manual_Final_3rd.qxd 8/9/01 2:14 PM Page 66

3.5 Using the Internal Voicemail System
3.5.1 Activating Voice mailboxes
A Voice mailbox is act ivated from the TalkSwitch configurat ion sof tware. There are 3series of Voice mailboxes that can be act ivated in the Voicemail sect ion of theconf igurat ion:
Local Extensions mailboxes:
These mailboxes are general ly associated to the Local Extensions. Bydefault , al l Local Extensions are act ivated with their respect ive mailbox
Remote Extension mailboxes:
The Remote mailboxes are associated wi th the Remote Extensions . I f youact ivate a Remote Extens ion and want a voice mai lbox assoc ia ted wi th thatextension, you can act ivate that mailbox in the Voicemail tab.
General mailboxes:
These mailboxes are act ivated in the Voicemail tab. They are not associatedto any part icular extension.
3.5.2 Accessing a Voice mailbox
When a new message is le f t at a Local Extension mailbox, TalkSwitch wil l playstutter dial tone to that extension when the handset is picked up. I t can also l ight upthe message wait ing l ight on a phone i f i t supports FSK Message Waiting Indicator.
To access a mailbox to re tr ieve messages or change mailbox opt ions , d ial <mailbox number> ei ther f rom a Local Extens ion or a t the Auto A t tendant i f d ia l ingf rom an out s ide loca t ion . Once you are in your mai lbox , through promptins truct ions , you may do the fo l lowing:
Listen to messages (press 1): (i f any are present) , wi th the abi l i ty to per formthe fol lowing act ions:
Whi le messages are be ing p layed:
Dial 1 : Rewind 5 seconds
Dial 11: Rewind to beginning of message
Dial 2 : Pause message (dial 2 again to cont inue playing message)
Dial 3 : Skip ahead 5 seconds
Dial 33: Skip to end of message
Dial 7 : Delete message
Dial 9 : Save message
673.0 Using TalkSwitch
TS-user manual_Final_3rd.qxd 8/9/01 2:14 PM Page 67

Af ter a message has been played:
Dial 1 : Rewinds to las t 5 seconds of message
Dial 11: Replays message
Dial 6 : Forward the message
Dial 7 : Delete message
Dial 9 : Save message
Change greeting options (press 2):
This sect ion al lows you to record a new personal voicemail greet ing. Thedefault greet ing is “The extension you have reached is unavailable at thist ime. Please leave a message after the tone”.
Change personal options (press 3):
This sect ion al lows you to change your current password and turn auto dateand t ime s tamp on or of f . I f you turn auto date and t ime s tamp on, this infor-mation wil l be played fol lowing each message.
3.6 Music-on-Hold
TalkSwitch can play music to cal lers when they are on hold , parked or queued. Themusic played to the cal lers wi l l be provided by whatever source you have connectedto the MUSIC jack.
I f you ENABLE Mus ic -on-Hold and have an audio device p lugged into theback of TalkSwitch:
1. When cal lers are put on hold at an extension, cal lers wi l l hear your musicinstead of TalkSwitch's default on hold beeping tone.
2. When the Auto At tendant answers a call and transfers the caller to an extension; the cal ler wil l hear a pre-recorded message saying "please hold",and then hear your music .
I f you ENABLE Mus ic -on-Hold and do not have an audio device p lugged intothe back of TalkSwitch:
1. When cal lers are put on hold at an extension, TalkSwitch wil l not play i t sdefault on hold beeping tone. The cal ler wil l hear s i lence.
2. When the Auto At tendant answers a call and transfers the caller to an extension, the cal ler wi l l hear a pre-recorded message saying "please hold"and then hear s i lence.
68 TalkSwitch User Manual
TS-user manual_Final_3rd.qxd 8/9/01 2:14 PM Page 68
I f you DO NOT ENABLE Mus ic -on-Hold and have an audio dev ice p lugged in tothe back of TalkSwitch:
1. When callers are put on hold at an extension, callers wil l hear TalkSwitch'sdefaul t on hold beeping tone and your music .
2. When the Auto At tendant answers a cal l and t ransfers the cal ler to an extension, the cal ler wi l l not hear any pre-recorded message. They wil l hear your extension r inging and your music .
What happens i f you DO NOT ENABLE Mus ic -on-Hold and do no t have anaudio device plugged into the back of TalkSwitch:
1. When cal lers are put on hold at an extension, they wi l l hear TalkSwitch'sdefaul t on hold beeping tone.
2. When the Auto At tendant answers a cal l and t ransfers the cal ler to anextension, cal lers wi l l hear your extension r inging.
Music-on-Hold and Cal l Forwarding:
I f you are using the telephone company's 3-Way Call ing/Conference service toact ivate TalkSwitch's Cal l Forwarding, cal lers wi l l not hear your 'music' whenbeing forwarded to a Remote Extension. When cal ls are forwarded, the cal ler i sput on hold by the te lephone company central of f ice swi tch rather than atTalkSwitch. Therefore, the caller hears si lence while being transferred.
3.7 Mode Switching Options
Manual Mode Swi t ch ing:
You can use Telephone Keypad Commands to have TalkSwi tch swi tch Modes .
First dial to enter command mode, then enter a password i f necessary . Next ,
d ia l any o f the fo l lowing Quick Commands fo l lowed by the sign:
Activate Mode 1: 3 1
Activate Mode 2: 3 2
Check Current Mode : 3 0
Automat ic Mode Swi tch ing using the T ime Scheduler:
Use the Configurat ion sof tware or Telephone Keypad Commands to act ivateTa lkSwi t ch ' s T ime Schedule r f ea ture . You can con f igure Ta lkSwi t ch toautomatical ly swi tch between Modes by configuring the t imes for Mode changesin the ‘Modes’ tab located under Call Handling in the configuration sof tware.
693.0 Using TalkSwitch
TS-user manual_Final_3rd.qxd 8/9/01 2:14 PM Page 69

3.8 Upgrading the TalkSwitch Firmware
We are cont inual ly looking for ways to enhance your communicat ions capabi l i t ies .When new features are added, we want TalkSwitch users to have immediate access tothe update.
The ease wi th which TalkSwitch's f i rmware program can be updated and theconvenience of having updates readi ly avai lable to users on our websi te , makes i tposs ible for us to provide quick and easy TalkSwitch enhancements !
TalkSwitch’s f i rmware program (or the programming code that operates yourTalkSwitch) is located on a 'Flash EPROM'. This means that the Code operat ing yourTalkSwi tch can be 'updated' wi thout removing the chip that contains the code .Because of this , you can easi ly update your TalkSwitch by disk or by vis i t ing ourwebs i te a t www. ta lkswi tch.com and downloading an update f rom the Suppor t area .
Step # 1
The f i rs t s tep is to select and download the proper update f i le f rom the CentrepointTechnologies website (www.talkswitch.com). I t is possible that you wil l also need todownload the corresponding configurat ion sof tware. In this case , the f i rmware andsoftware will be integrated in one fi le.
To ident i f y thea p p r o p r i a t e u p d a t ef i l e , you mus t f i r s td e t e r m i n e y o u rTalkSwi tch f i rmwarea n d sof tware vers ion .Y o u c a n f i n d y o u rTa lkSwi t ch ve r s ionnumbers by se lect ing' A b o u t ' f r o m t h emain sp lash sc reen oron the 'About ' tab inthe configuration.
Wri te down the sof tware and f i rmware vers ion numbers and then go to the Supportsect ion of our websi te at www.talkswitch.com. You wil l f ind instructions there to helpyou to se lect and download the appropriate upgrade.
70 TalkSwitch User Manual
TS-user manual_Final_3rd.qxd 8/9/01 2:14 PM Page 70

Step # 2
When you se lec t and c l ick on the appropr ia te vers ion for download, a screen wi l lappear asking you what you would l ike to name the f i le you are about to download,and in which folder/directory you would l ike to save i t . We suggest leaving the f i lename 'as i s ' ( instal l .exe) and saving i t on your Desktop. Once the download iscompleted, you can begin your upgrade by double cl icking on the ' instal l .exe' f i le oruse the 'Run' opt ion on your Windows 'Start ' menu. A ser ies of screens wil l guide youthrough the installation process .
Step # 3
The f inal s tep in the upgrade process i s to open the TalkSwitch sof tware and select'Flash Upgrade' f rom the main splash screen. A screen wil l appear warning you notto interrupt the update process once i t has begun. Cl ick on the "Yes" button toproceed. A second screen wil l then appear asking you to select the appropriate update(.bin) f i le . I f you see more than one .bin f i le , select the most recent f i le (the one withthe highes t number) .
Highlight the newest f i rmware f i le , then cl ick the "Open" button.
The f inal s tage of the update process wi l l take approximately 3 minutes , duringwhich time the LED lights on TalkSwitch’s front panel will f l icker.
When the update i s complete , the fol lowing screen wil l appear :
Cl ick the "OK" button and the TalkSwitch sof tware wil l then close. There is no needto restart Windows or TalkSwitch - your updated TalkSwitch Firmware is now readyto go!
In the event the f i rmware update was unsuccess ful , p lease t ry the update processagain and fol low the instruct ions. I f you continue to have problems please contactCentrepoint Technologies .
Firmware updates will not alter your system configuration. In the event of a majorsystem update, it may be necessary for the configuration file to be reset to defaultvalues. In this case you will need to reconfigure the entire system. In the case of a majorsystem update, Centrepoint Technologies will mention any issues involved with thefirmware update.
713.0 Using TalkSwitch
TS-user manual_Final_3rd.qxd 8/9/01 2:14 PM Page 71
Appendix A - Help & Troubleshooting
Appendix B - Using TalkSwitch with Telephone
Company Calling Services
Appendix C - Quick Commands and DTMF
Functions
Appendix D - Safety Precautions and Regulatory
Information
Appendix E - TalkSwitch One Year Warranty
Appendix F - Return Policy
Appendix G - TalkSwitch and Power Interruptions
73Appendices
Appendices
TS-user manual_Final_3rd.qxd 8/9/01 2:14 PM Page 73

75Appendices
Appendix A - Help & Troubleshooting
I f you are having problems with the configurat ion or operat ion of TalkSwitch, pleasecheck the Troubleshooting sect ion s tart ing on this page. I f you don’t f ind the solutionto your problem, next t ry checking the FAQ sect ion located under the Support area atour websi te : www.talkswitch.com.
If you cannot resolve your problem and require further ass is tance, you can do one ofthe fol lowing:
1. Contact your TalkSwitch reseller.
2. Contact our Cus tomer Suppor t depar tment by e -mai l :he lp@talkswi tch .com.
3. Ask for a 'Technical Support Special is t ' . I f you would l ike to speak with aTechnical Support Specialist , call Centrepoint Technologies at (613) 725-2980 weekdays be tween 9 :00 a .m. and 5 :00 p .m. EST.
Please have the fo l lowing information avai lable when you cal l :
a) Your e-mai l address and te lephone number .
b) The ser ia l number located on the bot tom of TalkSwi tch and your date o fpurchase .
c) The number of te lephone l ines that you have connected to TalkSwitch.
d) The te lephone company services that you are using wi th TalkSwitch.
e) Your PC's operat ing sys tem (e .g .Windows 95, 98, ME, 2000 etc .)
Troubleshooting
This sect ion of the manual i s des igned to help you quickly resolve problems thatcan be exper ienced by new TalkSwi tch users . The problems and their correspondingsolut ions are organized in the fo l lowing manner .
1 . Problems that can occur when instal l ing the Configurat ion sof tware.
2 . Problems that can occur during Configurat ion.
3. Problems that can occur while using TalkSwitch's features .
Before examining the 'Problems' , rev iew these common ins tal la t ion checks f i r s t !
TS-user manual_Final_3rd.qxd 8/9/01 2:14 PM Page 75

76 TalkSwitch User Manual
The f irs t things you should check
1. Check that your te lephone cables are connected to a wall jack at one endand TalkSwitch at the other. Ensure the devices you are using as TalkSwitchextensions (phones, faxes , e tc .) are plugged into the extension jacks locatedon the back panel of TalkSwitch. (Do not plug your extensions direct ly intoa wal l jack .)
2. Check the Serial cable or U S B connect ion between TalkSwi tch and your PC.
3. Ensure that TalkSwitch's power adapter is plugged into a working powerout le t and that TalkSwitch i s turned on. Please make sure that you areusing the power adapter that was provided with TalkSwitch. This i s a uniqueadapter and i t cannot be subst i tuted with any other adapter . I f your adapterappears to be defective, please contact Centrepoint Technologies to order theproper replacement adapter .
Problems that may occur dur ing Conf igurat ion
Problem: I am not able to “Retrieve settings” from my TalkSwitch.
• Make sure your TalkSwitch is turned on and plugged into a working poweroutlet . Then select "Retrieve set t ings", available under the File menu in theConfigurat ion Sof tware .
• Make sure the serial or USB cable connect ing TalkSwitch and your PC issecurely at tached to the serial ports . "Retrieve set t ings", available under theFi le menu in the Configurat ion Sof tware. Confirm that TalkSwitch is se t touse the proper port . For USB, dial # 9 1 # at a Local Extension then youshould hear the prompt “Accepted”. Next , reset TalkSwitch. For Serial , dial# 9 0 # a t a Local Extens ion then you should hear the prompt “Accepted”.Next, reset TalkSwitch.
• From the Control Centre , choose 'PC Connect ion' and then se lect COM Por t .Ensure that the Configuration Software is using the correct port to commu -nicate with TalkSwitch. Then select "Retrieve set t ings", available under theFi le menu in the Conf igurat ion Sof tware .
• Try ' reset t ing' TalkSwitch (turn the power of f and then back on). Thenselect "Retrieve set t ings", available under the File menu in theConfigurat ion Sof tware . This wi l l o f ten correct any 'miscommunicat ion'that may have occurred between TalkSwitch and your PC.
TS-user manual_Final_3rd.qxd 8/9/01 2:14 PM Page 76

77Appendices
Problem: I am unable to configure TalkSwitch using a touchtone phone and theKeypad Commands.
• TalkSwi tch cannot be conf igured us ing a phone connected in paral le l toTalkSwitch.
• If you are trying to configure TalkSwitch using an Out-of-Off ice phone, youmust f i r s t enter Command Mode. I f you have enabled password protect ion,you must also f irs t enter the correct password.
• If you are t ry ing to conf igure TalkSwitch using a Local Extension, makesure the extension has not been given 'Direct Access ' to your te lephonelines. I f so, you wil l have to dial f lash 4 to receive internal dialtone.
• If the TalkSwitch configuration sof tware is open, you cannot configureTalkSwitch using DTMF. I f the software is closed and you continue to get theprompt “I’m sorry, TalkSwitch is currently being configured.” Try reset t ingTalkSwitch. I t is possible that the software did not close properly and as aresult TalkSwitch st i l l thinks i t is in ‘configuration mode’.
Problems that may occur while us ing TalkSwitch's features
The Auto At tendant:
Problem: The Auto Attendant does not play when calls come in.
• Make sure you have recorded the Auto At tendant message .
• Check your Call Handling set t ings for the 'Auto At tendant answers' numberof r ings . I t may be that the number of r ings af ter which the Auto At tendantis set to answer calls is set too high.
Problem: The Auto Attendant message is broken up or very faint.
• Adjust the Auto At tendant Playback volume set t ing located in the AudioControls tab in the Options folder of the Configuration sof tware.
• The quali ty of the microphone in the telephone handset that you are usingto record your Auto At tendant also af fects the quali ty of your recording. Tryrecording the Auto At tendant using another extension/te lephone.
TS-user manual_Final_3rd.qxd 8/9/01 2:14 PM Page 77

78 TalkSwitch User Manual
Problem: The Auto Attendant answers calls before any of the extensions ring.
This i s a problem for those TalkSwitch users who wish to have their localextensions r ing before the Auto At tendant picks up incoming cal ls .
• Check the 'Extensions to r ing on incoming cal l before Auto At tendantanswers' set t ing in the Call Handling tab in the 'Inbound Calls' folder. I tmay be that the number of r ings af ter which the Auto At tendant i s se t toanswer calls is set too low. (More specifically, check to see if the AutoAttendant is set to answer calls before the extensions are set to begin ringingin the extensions to ring on incoming call section.)
Problem: The Auto Attendant is transferring calls to the wrong extension.
• Veri fy which extension jacks your devices (phones, faxes) are at tached to .
Problem: The Auto Attendant answers calls, but does not transfer them to the extensions.
• Make sure your extensions are plugged into the extension jacks on the backpanel of TalkSwitch (instead of your te lephone wall jacks).
Music-on-Hold:
Problem: Callers hear music and 'ringing' when the Auto Attendant transferstheir call to an extension.
• You have an audio device p lugged into TalkSwitch, but have not enabled(turned on) the Music-on-Hold feature found on the Auto At tendant tab inthe Inbound Calls folder .
Problem: Callers hear music and a beeping sound when put on hold at anextension.
• You have an audio device p lugged into TalkSwitch, but have not enabled(turned on) the Music-on-Hold feature found on the Auto At tendant tab inthe Inbound Calls folder .
Problem: Callers hear a 'Please Hold' message and then total silence when theAuto Attendant transfers their call to an extension.
• You have enabled ( turned on) the Music-on-Hold feature , but have notat tached an audio device to TalkSwitch.
Problem: Callers hear only silence when put on hold at an extension.
• You have enabled ( turned on) the Music-on-Hold feature , but have notat tached an audio device to TalkSwitch.
TS-user manual_Final_3rd.qxd 8/9/01 2:15 PM Page 78

79Appendices
Call Routing with Local Extensions and Home Phones (Transfer and Intercom):
Problem: Callers are disconnected when transferring calls from one extension toanother.
• It is possible that i f you are using the hookswitch to put callers on holdrather than a F lash but ton, you may be holding the hookswi tch down toolong, and as a resul t are actual ly hanging up on the cal ler .
Problem: Unable to place intercom calls from a Local Extension.
• You can not use a Local Extension that has been given 'Direct Access ' toyour telephone l ines for intercom call ing. To change this set t ing, go to theLocal Extension configurat ion tab and make the necessary adjustment bygiving access to a Line Hunt Group or dial Flash then ‘4’ to get internal dialtone.
Call Hold:
Problem: Unable to place calls on hold (Calls are disconnected).
• Extensions that have been given 'Direct Access to Telephone Lines' cannotuse TalkSwitch's 'Call Hold' feature. These extensions wil l also not haveaccess to any of the cal l handl ing features which require the use of Hold,such as transfer call Grab, etc.
Answering and Fax Machines:
Problem: The answering machine and/or fax machine picks up calls before theycan be answered by telephone extensions.
• Check your set t ings in the Telephone Lines tab in the 'Call Handling' sec-t ion in the Sof tware Conf igurat ion. The problem may be that your faxmachine/answering machine extension i s se t to answer cal l s a t the sametime as your telephone extensions. To f ix this problem, cl ick the “Adjustsequence” button and set the s l ider bars for your telephone extensions sothat they wi l l r ing a few t imes before your fax/answer ing machine beginsringing.
TS-user manual_Final_3rd.qxd 8/9/01 2:15 PM Page 79

80 TalkSwitch User Manual
Problem: Incoming faxes are not automatically detected and routed to the faxmachine.
On the Auto At tendant tab of the configurat ion sof tware , check to ensure thatyou have chosen the appropriate extension for the f ie ld labeled ' i f a fax cal l i sdetected'.
• Not al l fax machines emit a CNG tone that TalkSwitch can detect and route .Therefore, i t i s wise to consider incorporating an addit ional method of faxrouting. This may include the use of a dis t inct ive r ing number or giving thecaller the option to select the fax extension.
• On average , fax machines/modems wi l l ' t ime out ' or d i sconnect a f ter 20seconds i f they have not connected wi th another fax machine/modem. I fyou are using the 'User does not make a select ion' opt ion to route incomingfaxes, the fax cal l may ' t ime out' before i t reaches your fax extension. I fyour Auto At tendant i s lengthy, you may want to shorten i t or use anotherfax routing option.
• The level of the Auto At tendant is too loud and as a result i s overpoweringthe CNG tone e f fec t ing detect ion. You may want to lower the volume level o fthe Auto Attendants .
Other Poss ible Local Extension Problems:
Problem: I am unable to access TalkSwitch's Lines with a Local Extension.
• Check your 'Dial Out Access ' se t t ings on the Local page under 'Extensions'of the Sof tware Configurat ion. I f a Local Extension has not been given'Direct Access' to your telephone l ines, you must dial (81-88 or 9) to accessone of TalkSwitch's Lines.
Problem: My PC attached (Internal or External) Modem cannot dial out.
• If the extension to which your Modem is a t tached has not been given 'DirectAccess' to telephone l ines , you wil l have to include a Line Hunt Group pref ix(81-88 or 9) before the number you are dial ing. For more informationabout Dial Out Access and changing your Modem's d ial proper t ies , see sect ion 3.2.9, "External modem telephone l ine access" .
• You may have to change your Modem's proper t ies so that i t wai t s for a'dial tone' before i t begins dial ing your Dial Up Networking number . Formore information about changing your Modem's propert ies , see sect ion3.2 .9 , "External modem te lephone l ine access" .
TS-user manual_Final_3rd.qxd 8/9/01 2:15 PM Page 80
81Appendices
Problem: One of the Local Extensions (telephones) does not ring.
• Some te lephones require more 'vol tage' in order to r ing. These phones areusually the older 'Bel l ' phones that have mechanical r ingers . These phonesare s imply too much of a load for TalkSwitch and should not be used as anextension.
• Make sure the te lephone cord you are using between the phone andTalkSwitch is working properly. Also, check to make sure the ringer isturned on for your phone.
Problem: Extension(s) ring, but there is no caller.
• This can occur when a cal ler hangs up af ter the Auto At tendant has begunto play. In some areas, the Telephone Company's 'disconnect/clear' s ignal isweak. This i s the reason the Auto At tendant may not pick up the disconnects ignal r ight away when a cal ler hangs up. Because the Auto At tendant wil lreceive no response after playing i ts message, the call wil l fal l through toyour set t ings for the 'User does not make a select ion' option associated withthat Auto At tendant.
TS-user manual_Final_3rd.qxd 8/9/01 2:15 PM Page 81

83Appendices
Appendix B - Using TalkSwitch with Telephone Company Calling Services
Many of the cal l ing services of fered by your local te lephone company are compatiblewith and enhanced by TalkSwitch's capabi l i t ies .
Caller ID (Call Display) - Disp lays the te lephone number and name assoc ia ted wi than incoming ca l l .
TalkSwitch is capable of regenerat ing the Cal ler ID and pass ing the informationto i ts Local Extensions When incoming cal ls are transferred by the AutoAttendant, TalkSwitch regenerates the Caller ID and passes i t only to the selectedLocal Extension. I f a Local Extension is configured to ring at least twice beforethe Auto At tendant answers , TalkSwitch wil l pass the Caller ID information tothat extension. I f a call is transferred from one extension to another, the CallerID information will also be passed. TalkSwitch can also use the Caller ID’s t imestamp to set i t ’s internal clock.
Distinctive Ring - The abi l i ty to have more than one te lephone number that cal lerscan dial to reach the same telephone l ine. (Dist inct ive Ring is also referred to as :Ident-A-Ring, Ident-A-Call , Ring Master , Teen Service , Double Number, PersonalRinging, Ring Plus , Smart Ring Service , Special Ring or Customized Ringing.)
TalkSwitch can detect Dis t inct ive Ring telephone numbers and use them toroute incoming calls automatically . TalkSwitch gives you the abil i ty to use twoDis t inct ive Ring te lephone numbers on al l l ines . Dis t inct ive Ring numbers onTalkSwitch's Lines also have access to the Auto Attendant and all ofTalkSwitch's other call routing features.
TalkSwitch's Dis t inct ive Ring cal l rout ing features can be used a number ofways . Routing fax/modem cal ls , rout ing voice messaging, separat inghome/off ice cal ls , and making use of TalkSwitch's Auto Call Back feature. EachDist inct ive Ring number has a 'dis t inct ive' r ing cadence or r ing sequence,which al lows you to ident i fy the te lephone number that was dialed.
Voicemail (Call Answer) - A service which gives cal lers the opportunity to leave amessage when your phone l ine i s busy or unanswered .
TalkSwitch can work in conjunct ion wi th your te lephone company's VoicemailService.
Call Waiting - I f you are already on the phone, the Call Wait ing service wil l emit asof t beeping sound to le t you know you have another cal l wai t ing to be answered.
To talk to the other cal ler when you hear a Call Wait ing beep, press the Flashbutton twice. To return to the other caller, you will need to press the Flashbutton twice again.
TS-user manual_Final_3rd.qxd 8/9/01 2:15 PM Page 83

84 TalkSwitch User Manual
3-Way Calling/Conference - The 3-Way Cal l ing/Conference serv ice al lows you toadd a third party to a cal l already in progress .
The 3-Way Call ing/Conference service enhances TalkSwitch's capabil i t ieswhether you have 1 or more te lephone l ines . Us ing only one te lephone l ine with 3-Way Call ing/Conference service , gives you access to TalkSwitch's Cal lForwarding, Call Back and Call Bridge features.
Centrex/Plexar Transfer - The Centrex Transfer service is s imilar in function to the 3-Way Cal l ing/Conference serv ice . The pr imary d i f fe rence i s that two external part ies can s t i l l remain in conversat ion even af ter you hang up. TalkSwitch does notdisconnect af ter the transfer s ince we need to track the cal l progress .
Using only one te lephone l ine with Centrex Transfer service gives you access toTalkSwitch's Call Forwarding, Call Back and Call Bridge features .
Hunt or Rollover - When us ing two or more l ines , ca l l s coming in on a busy l ine canbe "rolled over" to an available l ine in a "hunt" pattern that you can set . There aretwo types of hunting - Sequential and Circular. Sequential hunting starts at thenumber d ialed and ends in the las t number in the ass igned Group. Circular hunt inghunts al l the l ines in the hunting Group, regardless of the s tart ing point . (It wil l onlyc i rc le once through the Hunt Group).
TalkSwitch has the same functionali ty available on al l l ines and therefore canwork in conjunction with the Hunt and Rollover services .
Call Hold and Flash
TalkSwitch uses 'Flash' to put cal ls on hold. A Flash s ignal i s produced by press ingthe 'Flash' or 'Link' button on your te lephone (Link is another name for Flash). I fyou do not have these but tons on your te lephone, you can produce a 'F lash' byquickly depress ing and releasing the te lephone's 'Hangup Hook' or 'Hook Switch' .
Single Flash - is pressing the 'Flash' or 'Link' button once. You can also depress andrelease the te lephone's 'Hangup Hook' or 'Hook Switch' once.
Double Flash - is pressing the 'Flash' or 'Link' button twice. You can also depress andrelease the te lephone's 'Hangup Hook' or 'Hook Swi tch' twice . When using yourtelephone's 'Hangup Hook' to ini t iate a 'Double Flash' , do not try to ini t iate thesecond Flash too quickly or you may lose or 'disconnect' your caller . Press and releasethe 'Hangup Hook' once, count to '2' , then ini t iate the second Flash.
TS-user manual_Final_3rd.qxd 8/9/01 2:15 PM Page 84

85Appendices
When would you use double f lash?
1. I f TalkSwitch is to connected to any other sys tem/service that uses 'Flash' toactivate i ts features (e.g. a Key Telephone System, PBX, or telephone linewi th the Centrex serv ice f rom your phone company) .
2. I f you are using any of your local te lephone company services that are activated with 'Flash' (e.g. Call Waiting, 3-Way Call ing/Conference, etc.) .
What does S ingle and Double F lash do?
TalkSwitch and the above-mentioned systems/services use 'Flash' to act ivatetheir call ing features . TalkSwitch therefore needs a way to tel l which (or whose)features you want to access when you press the 'Flash' button.
Using a 'Single Flash' : places the caller on hold. (The Flash is not passed to the CO l ine , solv ing problems associated wi th Flash causing a hang-up at some COs.)
Using a 'Double Flash': f irs t Flash places the caller on hold, and the secondFlash ( i f pressed wi thin 2 seconds) tel ls TalkSwitch to pass a Flash to the COline to act ivate the CO or PBX intended feature.
TS-user manual_Final_3rd.qxd 8/9/01 2:15 PM Page 85

87Appendices
Appendix C - Quick Commands and DTMF Functions
These DTMF Quick Commands can be dialed from a Local Extension or an outsidetelephone at the Auto Attendant. To enter Command mode, dial at a LocalExtension or at the Auto Attendant. If you are requested to enter a password, enterthe Administrator password. Next, enter any command followed by the sign.
Command Action
30 TalkSwitch tells you which mode it is currently using
3x Switch Modes (x = 1or 2)
4x Record Auto Attendant (x = 1 to 9)
04x Erase Auto Attendant messages (x = 1 to 9)
5x Playback Auto Attendant messages (x = 1 to 9)
61 Record Auto Call Back Announced Message 1
62 Record Auto Call Back Announced Message 2
63 Record Auto Call Back Announced Message 3
64 Record Auto Call Back Announced Message 4
65 Record Prompted Call Back Announced Message
06x Erase Call Back Announced Message (x = 1 to 5)
71 Playback Auto Call Back Announced Message 1
72 Playback Auto Call Back Announced Message 2
73 Playback Auto Call Back Announced Message 3
74 Playback Auto Call Back Announced Message 4
75 Playback Prompted Call Back Announced Message
90 Set to Serial connection mode (default)
91 Set to USB connection mode
2xx 8<phone number> Enter Remote ext. (2xx) phone number
2xx 980 0 Enter Remote ext. (2xx) Turn off “Same Line Connect”
2xx 980 1 Enter Remote ext. (2xx) Turn on “Same Line Connect”
2xx 9 <Hunt Group> Enter Remote ext. (2xx) “Connect using:” Hunt Group(Hunt Group = 9, 81-88)
1xx 61 Enable ‘Do not Disturb’ at the Local Extension
1xx 60 Disable ‘Do not Disturb’ at the Local Extension
TS-user manual_Final_3rd.qxd 8/9/01 2:15 PM Page 87

88 TalkSwitch User Manual
DTMF descr ip t ions d ia led f rom a Local Extens ion.
DTMF
111-114 (24 models)111-118 (48 models)
119
211-218
300-309
<flash> if connected to acaller
<flash> at internal dialtone
<flash> at external dialtone
111-118
211-218 410-419
111-118
211-218 410-419
<flash>4
0
Function performed
Intercoms a Local Extension
Reserved
Dials a Remote Extension (associatedwith an external phone number).
Dials an Extension Ring Group - 10 intotal for the entire system. Mapped tolocal extensions(s), with specific fallthrough options.
Puts caller on hold.
It retrieves the most recent caller put onhold.
Switches to internal dialtone. Usedmainly when an extension has DirectLine Access enabled.
Dials into a voice mailbox.
Internal voicemail retrieval/access.
Completes a transfer and returns to internal dialtone <or> disconnectsTalkSwitch from external dial tone andgives internal dial tone.
External P.A. Access
Notes
Direct dial from dialtone.
Direct dial from internal dialtone.
Direct dial from internal dialtone.
Direct dial from internal dialtone.
After putting a caller on hold, you receiveinternal dialtone.
To retrieve the caller on hold for the mosttime, dial 7 at internal dialtone
Dialed when connected to an outside line.
To transfer a caller to a mailbox, press'flash' to place a call on hold, then 111-118, 211-218, or 410-419 andhang up.
Direct dial 111-118, 211-218,
or 410-419 from internal dialtone to retrieve voicemail.
Action performed after putting a caller onHold then dialing an indented destination.<or> Action performed with Direct LineAccess enabled at a Line.
Direct dial 0 at dial tone to make anannouncement through the attached external P.A. system.
TS-user manual_Final_3rd.qxd 8/9/01 2:15 PM Page 88

89Appendices
DTMF
<flash>5
500-509
500-509
<flash>6
61
60
<flash>7
80
81-88, 9
8
9
Function performed
Disconnects current caller and reconnects immediately to the lastcaller put on hold.
Call Parking Spaces - 10 in total forthe entire system.
Parked Call Retrieval
Conference Call for 3 parties.
Enables 'Do Not Disturb' at the current extension
Disables 'Do Not Disturb' at the current extension.
Hold Retrieve - used for retrieving anycalls placed on hold at that extension.
Accesses Same Line Connect whentransferring an outside caller to another outside number.
Line Hunt Groups used to access aline.
Play music source through PA output
Call Pick up
Enters command mode
Notes
Action performed after putting a caller on Holdand dialing an intended destination.
Press 'flash' to place a call on hold, then assigna parking space 500-509.
Direct dial 500-509 from dial tone to pickup a parked call.
Press 'flash' to put the first caller on hold, dialanother extension or external number, thenpress 'flash' 6.
Direct Dial 61 at a local extension. User willhear confirmation. Reminder is played everytime the extension is picked up.
Direct Dial 60 at a local extension. User willhear confirmation.
Direct dial from dial tone or by pressing 'flash'then 7 to cycle through on a first in / first outbasis.
Put the caller on Hold, dial 80, and then dialthe outside number. Hang up to complete thetransfer. Can only be used when the line has 3-Way Calling/Conference or Transfer(Centrex/Plexar) service.
Direct dial from dial tone.
Direct dial from dial tone to toggle on or offmusic through the PA port. Useful for officebackground music.
Direct dial from dial tone to pick up a call ringing at another extension before the AutoAttendant answers the call.
Direct dial at a Local Extension
TS-user manual_Final_3rd.qxd 8/9/01 2:15 PM Page 89
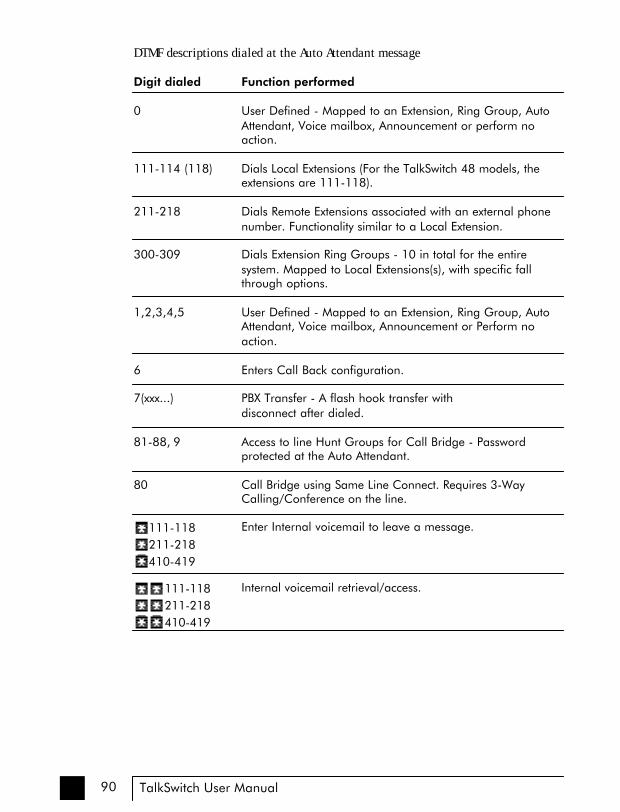
90 TalkSwitch User Manual
DTMF descr ipt ions dialed at the Auto At tendant message
Digit dialed
0
111-114 (118)
211-218
300-309
1,2,3,4,5
6
7(xxx...)
81-88, 9
80
111-118211-218 410-419
111-118211-218410-419
Function performed
User Defined - Mapped to an Extension, Ring Group, AutoAttendant, Voice mailbox, Announcement or perform noaction.
Dials Local Extensions (For the TalkSwitch 48 models, theextensions are 111-118).
Dials Remote Extensions associated with an external phonenumber. Functionality similar to a Local Extension.
Dials Extension Ring Groups - 10 in total for the entire system. Mapped to Local Extensions(s), with specific fallthrough options.
User Defined - Mapped to an Extension, Ring Group, AutoAttendant, Voice mailbox, Announcement or Perform noaction.
Enters Call Back configuration.
PBX Transfer - A flash hook transfer with disconnect after dialed.
Access to line Hunt Groups for Call Bridge - Password protected at the Auto Attendant.
Call Bridge using Same Line Connect. Requires 3-WayCalling/Conference on the line.
Enter Internal voicemail to leave a message.
Internal voicemail retrieval/access.
TS-user manual_Final_3rd.qxd 8/9/01 2:15 PM Page 90

91Appendices
Appendix D - Safety Precautions and Regulatory Information
Safety Precautions
Before using TalkSwitch, please review and ensure the fol lowing safety instructionsare adhered to :
1. Read, Fol low and Retain Instruct ions - Al l safety and operat ing instruct ionsshould be read before operat ing the equipment , fol lowed and retained forfuture reference.
2. Heed Warnings - A l l warnings on the equipment and in the operat inginstructions should be adhered to.
3. Mois ture - Do not p lace TalkSwitch in a high humidi ty environment .
4. Heat - Never place TalkSwitch near heat sources such as radiators , f loor registers or direct sunlight.
5. Power Supply - The equipment should only be connec ted to an approvedpower supply of the type descr ibed in the operat ing instruct ions or markedon the equipment . Use only the power adapter suppl ied wi th TalkSwitch.
6. Damage requir ing service - Do not at tempt to service the TalkSwitch yoursel f . Unplug TalkSwitch and refer servicing to a l icensed technicianwhen:
• The p lug or power cord has been damaged.
• TalkSwi tch has been exposed to mois ture .
• TalkSwitch does not appear to be operat ing properly or exhibi ts amarked change in per fo rmance .
TS-user manual_Final_3rd.qxd 8/9/01 2:15 PM Page 91
92 TalkSwitch User Manual
Important Notices
FCC and IC Warnings
This equipment complies wi th Part 15 and 68 of the Federal Communicat ionsCommission (FCC) rules in the United States . I t a lso complies wi th regulat ionsRSS210 and CS-03 of Industry Canada and Science Canada. Operat ion i ssubject to the fol lowing two condit ions: (1) this device may not causeinterference, and (2) this device must accept any interference, includinginterference that may cause undesired operation of the device.
FCC Part 15:
NOTE: This equipment has been tes ted and found to comply wi th the l imits fora "CLASS B" Digi tal Device pursuant to Part 15 of the FCC rules . These l imitsare designed to provide a reasonable protect ion against harmful interference ina res idential instal lat ion. This equipment generates , uses and can radiate radiofrequency energy, and i f not instal led and used in accordance with theseinstruct ions , may cause harmful inter ference to radio communicat ions .However, there is no guarantee that interference will not occur in a particularinstal lat ion. I f this equipment does cause harmful interference to radio orte lev i s ion recept ion, which can be determined by turning the equipment o f f andon, the user i s encouraged to t ry to correct the inter ference by one or more ofthe fo l lowing measures :
• Reorient or relocate the receiving antenna.
• Increase the separat ion between the equipment and receiver .
• Connect the equipment to an outle t on a c ircui t di f ferent to that which thereceiver is connected.
• Consul t the dealer or an exper ienced Radio/TV technician for help .
This CLASS B Digital apparatus meets all requirements of the Canadianinterference-causing equipment regulations.
Changes or modifications not expressly approved by Centrepoint Technologiescould void the user's authority to operate the equipment.
TS-user manual_Final_3rd.qxd 8/9/01 2:15 PM Page 92

93Appendices
FCC Part 68:
Notice : The Industry Canada label identi f ies cert i f ied equipment. This cert i f icat ionm e a n s t h a t t h e e q u i p m e n t m e e t s t e l e c o m m u n i c a t i o n s n e t w o r k p r o t e c t i v e ,operat ional and safety requirements as prescribed in the appropriate TerminalEquipment Technical Requirements document(s) . The Depar tment does notguarantee that the equipment wi l l operate to the user 's sat i s fact ion.
Before install ing this equipment, users should ensure that i t is permissible to beconnec ted to the fac i l i t i e s o f the loca l Te l ecommunica t ions Company . Theequipment must a l so be ins tal led us ing an acceptable method of connect ion. Thecus tomer should be aware that compl iance wi th the above condi t ions may notprevent degradat ion of serv ice in some s i tuat ions .
Repairs to cer t i f ied equipment should be coordinated by a representat ive des ignatedby the suppl ier . Any repairs or al terat ions made by the user to this equipment , orequipment mal funct ions , may g ive the te lecommunicat ions company cause toreques t the user to d isconnect the equipment .
Users should ensure, for their own protect ion, that the electr ical ground connect ionsof the power uti l i ty , telephone l ines and internal metall ic water pipe system, i fpresent , are connected together . This precaution may be part icularly important inrural areas.
Caution: Users should not attempt to make such connections themselves, butshould contact the appropriate electric inspection authority, or electrician, asappropriate.
A label i s located on the underside of the base unit containing both the FCCregis t ra t ion number and Ringer Equivalency Number (REN) or the IC regis t ra t ionnumber and Load Number. You must , upon request , provide this information to yourlocal te lephone company.
The REN is used to determine the quanti ty o f devices that may be connected to thetelephone l ine. Excess ive RENs on the te lephone l ine may resul t in the devices notr inging in response to an incoming cal l . In most , but not a l l areas , the sum of RENsshould not exceed f ive (5 .0) . To be cer tain of the number of devices that may beconnected to a l ine, as determined by the total RENs, contact the local TelephoneCompany .
This equipment is compatible with inductively coupled hearing aids.
TS-user manual_Final_3rd.qxd 8/9/01 2:15 PM Page 93

94 TalkSwitch User Manual
Service
Should you exper ience t rouble wi th this te lephone equipment , Model CT-TS01,TalkSwitch, for repair or warranty information, please contact your reseller. SeeAppendix E , “TalkSwi tch One Year L imited Warranty” , for more informat ion.
I f the equipment i s causing harm to the te lephone network, the Telephone Companymay request that you disconnect the equipment unti l the problem is corrected.
This equipment cannot be used on publ ic coin te lephone services provide by thetelephone company. Connection to party l ine service is subject to s tate tari f fs .
The FCC requires that you connect your cordless te lephone to the nat ion-widete lephone network through a modular te lephone jack (USOC, RF11C, RJ11W, orR J14) .
Your te lephone company may di scont inue your serv ice i f your equipment causesharm to the te lephone network. They wi l l not i fy you in advance of d isconnect ion, i fpossible . During noti f icat ion, you wil l be informed of your r ight to f i le a complaintto the FCC.
O c c a s i o n a l l y , y o u r t e l e p h o n e c o m p a n y m a y m a k e c h a n g e s i n i t s f a c i l i t i e s ,equipment , operat ion, or procedures that could af fect the operat ion of yourequipment . I f so , you wi l l be given advance not ice of the change to give you anopportunity to maintain uninterrupted service .
Fax Branding
The Telephone Consumer Protect ion Act o f 1991 makes i t unlawful for any person touse a computer or any other e lectronic device , including Fax machines and Faxmodems, to send any message unless such message c lear ly contains a margin at thetop or bot tom of each transmit ted page or on the f i rs t page of the t ransmiss ion, thedate and t ime i t is sent and an identi f ication of the business or other enti ty , or otherindiv idual sending the message and the te lephone number o f the sending machineor such business , other ent i ty , or individual . (The te lephone number provided maynot be a 900 number or any o ther number for which charges exceed local or long-dis tance transmission charges .)
TS-user manual_Final_3rd.qxd 8/9/01 2:15 PM Page 94

95Appendices
Appendix E - TalkSwitch One Year Warranty
The Original end-user purchaser acknowledges that he or she has read the limitedOne-Year Warranty and Warranty Disclaimers and understands the same and agreesto be bound by its terms and conditions.
Cent repo in t Technolog ie s war ran t s to the o r ig ina l end-use r purchase r tha tTalkSwitch meets applicable speci f icat ions (as set forth in the product descript ions inthe technical manuals) and to be f ree f rom defec ts in mater ials and workmanshipfor a period of one year f rom the date of purchase (proof of purchase required). I fCentrepoint Technologies receives notice of such defects , Centrepoint Technologieswill , at i ts discretion, ei ther repair or replace products that prove to be defective.
The above warranty shal l not apply to defects resul t ing f rom improper or inadequatemaintenance, instal lat ion, end-user supplied sof tware or interfacing, modif icat ionsor a t tempted modi f icat ions , misuse , damage f rom corros ive environments , mois ture ,shipping, high vol tage surges f rom external power sources such as power l ine ,telephone l ine or connected equipment, or operat ion outside of the speci f icat ions forthe product . This warranty is not val id when the product i s sold by the original 'end-user' purchaser or to any product with an altered or defaced serial number.
Incidental and consequential damages caused by malfunct ion, defect , or otherwiseand with respect to breach of any expressed or implied warranty are not theresponsibil i ty of Centrepoint Technologies and to the extent permitted by law, arehereby excluded both for property and to the extent not unconscionable , for personalinjury or damage.
In no event wil l Centrepoint Technologies be l iable to the user for damages,including any los t prof i t s , los t savings or other incidental or consequential damagesaris ing out of or inabil i ty to use such product , even i f Centrepoint Technologies or anauthorized Centrepoint Technologies dealer has been advised of the possibi l i ty ofsuch damages, or for any claim for any other party. In any event, the l iabil i ty ofCentrepoint Technologies shal l not exceed the purchase pr ice of the product .
There i s no assumption of l iabi l i ty as a consequence of any of the fol lowing events :
1. Shipment to or f rom Centrepoint Technologies or the cus tomer ; and
2. Forces beyond the control of Centrepoint Technologies including, but notl imited to, an act of God, war, insurrection, civi l disturbances, natural disasters , labour disputes or government regulat ions.
The original 'end-user' purchaser's sole and exclusively remedy hereunder shal l bel imited to repair or replacement speci f ied herein.
TS-user manual_Final_3rd.qxd 8/9/01 2:15 PM Page 95

96 TalkSwitch User Manual
DOC ComplianceDOC ComplianceThis digi tal apparatus does not exceed the Class B l imits for radio noise emiss ions fordigi tal apparatus as set out in the Radio Interference Regulat ions of the CanadianDepar tment o f Communica t ions .
The FCC Statement i s located in Appendix D, “Safe ty Precaut ions and RegulatoryInformat ion” .
Warranty Service
To be el igible to obtain warranty service you must retain proof of purchase andcontact your resel ler for warranty details . I f you fail to provide proof of purchase, yourresel ler and Centrepoint Technologies wil l not be able to provide you with any kindof warranty service.
To obtain warranty service, products must be sent to your resel ler or a service faci l i tydes ignated by Centrepoint Technologies . The or iginal end-user purchaser shal l payal l shipping charges , dut ies and taxes for products sent to Centrepoint Technologiesfor warranty service. Centrepoint Technologies shall pay for return of the product tothe end-user purchaser.
TS-user manual_Final_3rd.qxd 8/9/01 2:15 PM Page 96

97Appendices
To obtain Warranty service:To obtain Warranty service:
1. Contact your resel ler and obtain a Warranty Return Authorizat ion (WRA)number i f required. I f you purchased the product direct ly f rom CentrepointTechnologies , you can obtain this number by contact ing the TechnicalSupport depar tment a t Centrepoint Technologies (613) 725-2980. Pleasehave your model and ser ial number avai lable when you cal l .
2. Include a copy of your proof o f purchase and a wri t ten explanat ion of theproblem; this wi l l enable us to expedi te your repair .
3. Attach the shipping label to the exterior of the package.
4. On the shipping label , be sure to include the WRA number obtained f romCentrepoint Technologies or your reseller.
5. Ship the product (prepaid) to your resel ler . In the case of the product beingpurchased from Centrepoint Technologies, send the unit in i t ’s original orbetter protect ive packaging to:
Centrepoint Technologies1545 Carl ing Ave. Sui te 510Ottawa, Ontar ioK1Z 8P9Canada
I f the product i s be ing shipped f rom outs ide o f Canada, the fo l lowing s ta tement mustbe inc luded on the package . 'Canadian Goods Being Returned to Canada'.
Failure to include the information indicated above will result in the package beingrefused.
TS-user manual_Final_3rd.qxd 8/9/01 2:15 PM Page 97

99Appendices
Appendix F - Return Policy
Products purchased from a reseller:Products purchased from a reseller:Check with your reseller on the specif ic details regarding their return policy.
Products purchased directly from Centrepoint Technologies:Products purchased directly from Centrepoint Technologies:Contact Centrepoint Technologies for detai ls regarding the return policy. Forinformation regarding product servicing, please refer to the TalkSwitch One YearLimited Warranty. Centrepoint Technologies wil l not accept product returns outsideof its return policy.
To Return products which were purchased directly from Centrepoint Technologies:To Return products which were purchased directly from Centrepoint Technologies:
1. Obtain a Return Merchandise Author izat ion (RMA) number . You canobtain this number by contact ing the Technical Support department atCentrepoint Technologies (613) 725-2980. Please have your model andserial number available when you call .
2. Include a copy of your proof o f purchase and a wri t ten explanat ion of thereason for the return; this wil l al low us to expedite your refund.
3. At tach the shipping label to the exterior of the package.
4. On the shipping label , be sure to include the RMA number obtained f romCentrepoint Technologies.
5. Ship the product (prepaid and in i t ’ s or iginal packaging) to :
Centrepoint Technologies1545 Carl ing Ave. Sui te 510Ottawa, Ontar ioK1Z 8P9Canada
I f the product i s be ing shipped f rom outs ide o f Canada, the fo l lowing s ta tement mustbe inc luded on the package . 'Canadian Goods Being Returned to Canada'.
Failure to include the information indicated above will result in the package beingrefused.
Important: The Centrepoint Technologies Return Policy applies only for productspurchased directly from Centrepoint Technologies. The Return Policy for productspurchased from an authorized Centrepoint Technologies dealer is determined by thedealer (the retail outlet where the product was purchased). Please contact your retailerfor information regarding their return policy; do not return the product directly toCentrepoint Technologies.
TS-user manual_Final_3rd.qxd 8/9/01 2:15 PM Page 99

101Appendices
Appendix G - TalkSwitch and Power Interruptions
TalkSwitch settings and configurations:TalkSwitch settings and configurations:
In the event of a power failure, your TalkSwitch sett ings and configurations will notbe los t .
TalkSwitch’s feature se t t ings (configurat ion) are s tored in an EEPROM. An EEPROMis a form of non-volat i le memory. Non-volat i le memory means that your featureset t ings (conf igurat ions) remain in TalkSwitch's memory despi te interrupt ions inTalkSwitch's power supply.
Calling Features:Calling Features:
In the event of a power fai lure, no TalkSwitch features or capabil i t ies wil l be availableother than:
• Local Extension 114 can make or receive calls on Line 1
In the event of a power return, al l TalkSwitch features and capabil i t ies wil l be re-established.
Mode Scheduling and Power Interruptions: Mode Scheduling and Power Interruptions:
When the power supply to TalkSwitch has been interrupted, TalkSwitch's internalclock wil l continue to run for approximately 12 hours. I f you have enabledTalkSwitch's Automatic Mode Scheduling feature, i t wi l l not funct ion properly unti lTalkSwitch's internal clock is reset via a Caller ID call or with the TalkSwitchconfigurat ion sof tware in the Mode tab under Cal l Handling. When power i s res toredto TalkSwitch, TalkSwitch wil l check the t ime and determine the mode i t should bein according to the configuration and set i tsel f to that mode.
To check the current mode of operat ion, d ia l at a Local Extension to enter
command mode then enter a password i f required . Next , d ia l 30 then . TalkSwitchwi l l repor t the current mode .
TS-user manual_Final_3rd.qxd 8/9/01 2:15 PM Page 101

103Glossary
* (Star/Asterisk Sign)The character on the bottom left of yourtouchtone telephone keypad.
# (Pound Sign)The character on the bottom right ofyour touchtone telephone keypad. It isalso commonly called the number sign.
3-Way Calling/ConferenceA service provided by telephone companies which allows you to connectparties on three different telephone linestogether for one conversation.
3-Way Conference CallConnecting three parties together for onetelephone conversation. TalkSwitch offersits own 3-Way Conference feature andalso allows you to use the 3-WayConference (Calling) service provided bylocal telephone companies.
AnalogAll sound actually begins in the form ofsine waves and must be in this form to beheard by the human ear. Analog devices(phones, answering machines, etc.)transmit and receive sound in the formof 'sine waves'. The telephone lines inyour home are also designed to carryanalog signals (sine waves). TalkSwitchis an analog device and will work withany other analog device or telephone system.
Auto Attendant MessageTalkSwitch's electronic attendant. A self-recorded message that greets anddirects callers to select an extensionnumber based on information providedin the message.
BPSBits Per Second. A measure of how fast amodem can transmit and receive data.
Call BackA TalkSwitch feature which, once activated, instructs TalkSwitch to call youback at a preset Out-of-Office telephonenumber. You can then accessTalkSwitch's Call Bridge feature.TalkSwitch offers two ways to activateCall Back - Prompted and Auto
Call BridgeA TalkSwitch feature which 'bridges'together calls from two different remotelocations. Call Bridge allows you to placelong distance calls from your office telephone lines even when you are out of the office.
Call ForwardA TalkSwitch feature which forwards callsto one of 10 or more Remote Extensions.
Caller IDA service provided by telephone companies which transmits informationabout incoming calls (callers name andtelephone number). The Caller ID information is transmitted between thefirst and second ring.
Call WaitingA service provided by telephone companies which allows you to accept asecond incoming call on a telephone linethat is already in use. Call Waiting Allowsyou to 'toggle' from one caller to theother.
Glossary
TS-user manual_Final_3rd.qxd 8/9/01 2:15 PM Page 103

104 TalkSwitch User Manual
Central OfficeYour local telephone company or publicexchange network.
Centrex/PlexarCentral Office Exchange Service. A type ofPBX service offered by the telephonecompany on a 'pay per service' basis. Allcall switching occurs at a local telephonestation instead of a company's premises.
CNGA 'chirping' tone emitted by fax modemsand most fax machines to initiate contact with another faxmachine/modem.
COCentral Office.
COM PortCommunications Port . Internal virtualpathways used to transmit data to andfrom a PC's exterior Serial Port and software running on the PC. The majori-ty of PCs have four Com Ports : COM1,COM2, COM3, and COM4. Most sof twareprograms gain access to the Com Portsvia system interrupts (IRQs) and onlytwo IRQs are reserved for the four ports.If you have two devices using Com Portsthat share an IRQ, you cannot use thedevices simultaneously. Typically, COM1and COM3 use IRQ4, while COM2 andCOM4 use IRQ3.
Communications SoftwareSoftware that makes it possible to sendand receive data over telephone lines viamodems.
Compression (Data)Storing information in a format thatrequires less space than usual.Compression saves transmission time,capacity and storage space.
Computer Telephony IntegrationRefers to systems that enable a computerto act as a call center, accepting incoming calls and routing them to theappropriate device or person. Today's CTIsystems, like TalkSwitch, are quitesophisticated and can handle all sorts of incoming and outgoing communications, including phone calls, faxes, and Internet messages.
Conference CallConnecting three or more parties together for one conversation.
ConfigurationThe way a system is setup. For TalkSwitchthe configuration is the collection of values or options you have chosen foreach of TalkSwitch's features. Together,the settings for each of these features(The configuration) determine whatTalkSwitch will do. TalkSwitch can beconfigured using the Configuration software or Telephone KeypadCommands .
ConnectorThe part of a cable that plugs into a portor interface to connect one device toanother. Most connectors are either maleor female.
CTIComputer Telephony Integration.
DialtoneA tone used by the telephone company toindicate to the user that the line is 'free'and available for making calls .
Dial Up NetworkingA component in Windows 95/98 thatenables you to connect your computer toa network v ia a modem.
TS-user manual_Final_3rd.qxd 8/9/01 2:15 PM Page 104

105Glossary
DigitAny whole number from 0 to 9 . Thenumbers on your telephone keypad canalso be referred to as digits.
DigitalDigital devices (phones, answeringmachines, etc.) convert analog sinewaves into digital signals (a combinationof zeroes and ones) for storage and/ortransmission over digital lines.The digitalsignal is then converted back to analogsine waves, that can be heard by humanears.
DigitizeTo translate into a digital form. Forexample, optical scanners digitize imagesby translating them into bit maps. It isalso possible to digitize sound, video, andany type of movement. In all these cases,digitization is performed by sampling atdiscrete intervals. To digitize sound, forexample, a device measures a soundwave's amplitude many t imes per second.These numeric values can then berecorded digitally.
Distinctive RingThe abili ty to have more than one telephone number that callers can dial toreach the same telephone line. EachDistinctive Ring number has a distinctivering cadence or ring sequence.TalkSwitch recognizes Distinctive Ring 1as 2 short rings. Distinctive Ring 2 isidentified as 3 short rings. (DistinctiveRing is also referred to as: Ident-A-Ring,Ident-A-Call, Ring Master,Teen Service,Double Number, Personal Ringing, RingPlus, Smart Ring Service, Special Ring orCustomized Ringing.)
DriverA program that controls a device. Everydevice, whether it is a printer, disk drive,or keyboard, must have a driver program.A driver acts like a translator between thedevice and programs that use the device.
DSPDigital Signal Processing. Refers tomanipulating analog information, suchas sound or video that has been converted into a digital form.
DTMFDual Tone Multi-Frequency. The systemused by touchtone telephones. DTMFassigns a specific frequency, or tone, toeach key so that it can easily be identifiedby a microprocessor.
EEPROMTalkSwitch's feature settings (conf igurat ion) are s tored in EEPROMwhich is a form of non-volati le memory.This means that the feature settings(configurations) remain in TalkSwitch'smemory despite interruptions inTalkSwitch's power supply.
Extended AT CommandsAn extension of the standard ATCommand Set that is specific toTalkSwitch. The extended command is indicated by an ' ! ' (e.g. AT!|TS).
Extension (Local)A Local Extension is any telephone oranalog device (answering machine, fax,etc.) that is plugged into one of the'Extensions' jacks located on the backpanel of your TalkSwitch.
Extension (Remote)A call forwarding number that can beany telephone number, in any location.
FCCFederal Communicat ions Commission.The FCC is the United States federal regulatory agency responsible for the regulation of interstate and internationalcommunications by radio, television,wire, satellite and cable.
TS-user manual_Final_3rd.qxd 8/9/01 2:15 PM Page 105

106 TalkSwitch User Manual
FirmwareFirmware is a combination of softwareand hardware. More precisely, it is software (programs or data) that hasbeen written onto hardware (micro-chips). Micro-chips (ROMs,PROMs and EPROMs) that have data orprograms recorded on them are calledfirmware.
Flash buttonA button on your telephone. Pressing theFlash button has the same effect as press-ing the Link button or depressing andreleasing the 'hang up' (switch) hook ona telephone. All of these actions will senda signal to TalkSwitch to put calls on oroff hold.
Flash EPROMTalkSwitch's f irmware program (the programming code that operatesTalkSwitch) is located on a 'FlashEPROM' chip. This means that the codeoperating TalkSwitch can be erased andreprogrammed (upgraded) withoutreplacing the chip that contains the code.
Home phoneA Home phone is any telephone using thesame telephone line as one ofTalkSwitch's Lines, but is not pluggeddirectly into the back of TalkSwitch as anextension.
IconA small picture that represents a program, action or feature in theConfiguration Software. When you clickon an icon, that program, action or feature is activated.
Auto Call BackAllows you to activate Call Back by dialing one of TalkSwitch's telephonenumbers, letting the call ring at leastonce and then hanging up.
IntercomA dedicated voice service within a specified user environment. TalkSwitchoffers intercom capabilities between itsLocal Extensions.
InterfaceSomething that connects two separateentities. A user interface is the part of aprogram that connects the computer witha human operator (user).
InternetA global network connecting millions of computers. Unlike online service networks (.com, .ca, .net, etc.) which arecentrally controlled, the Internet isdecentralized by design. Each Internetcomputer, called a host, is independent.
IRQInterrupt Request Line. Hardware l inesfound in PCs over which devices can sendinterrupt signals to the microprocessor.IRQs allow multiple devices attached toyour PC to share the micro processorsresources in an orderly fashion. Whenyou add a new device to a PC, you sometimes need to set which IRQ number the device wil l use.
ISDNIntegrated Services Digital Network. Thesame lines are used for many dif ferenttypes of services, such as telephone, data,electronic mail and facsimile. ISDN specifications let large quantities of data(wide-bandwidth) f low from one locationto another using the public telephonenetwork. Under ISDN, a phone call cantransfer 64 kilobits of digital data per second.
Keypad CommandsCombinations of digits that are used toconfigure TalkSwitch from a touchtonetelephone.
TS-user manual_Final_3rd.qxd 8/9/01 2:15 PM Page 106

107Glossary
Keypad (Telephone)The push buttons on a telephone.
Key Telephone SystemWith Key Telephone Systems, access totelephone lines and calling features iscontrolled internally within each tele-phone unit. Users can gain direct accessto telephone lines, etc. by pressing a key(or button) on their telephone.
LEDLight Emitting Diode. An electronicdevice that lights up when electricity ispassed through it. LEDs are used in dis-plays on electronic devices such as com-puters. TalkSwitch has five LEDs on itsfront panel. They show which telephoneis in use, whether data is being trans-ferred to or received from an attached PC,and which Mode sett ing is in use.
Link buttonOn most telephones, pressing the Linkbutton has the same effect as pressing theFlash button or depressing and releasingthe 'hang up' (switch) hook. However, onsome telephones, the function of the Linkbutton is internal to the telephone andpressing it will have no effect onTalkSwitch.
ModemAcronym for MODulator-DEModulator. Amodem is a device or program that converts digital information stored on aComputer into analog signals for transmission over telephone lines and, inreverse, converts analog signals into digital.
Modem (External)A separate self-contained unit whichattaches to your PC via a Serial Port orUSB port.
Modem (Internal)Modems that come as an expansionboard that can be inserted into a vacantexpansion slot on a PC. These are alsocal led onboard modems.
Modem (voice/fax/data)A modem which supports a switch tochange between voice and data modes.In data mode, the modem acts l ike a regular modem. In voice mode, themodem acts l ike a regular telephone.Modems that support a voice/data switchhave a built-in loudspeaker and microphone for voice communication.
ModesA TalkSwitch feature which allows you tostore two distinct incoming call handlingconfigurations (Mode 1 and Mode 2).
Monitor (TalkSwitch Monitor)A feature included with the SoftwareConfiguration package. The Monitor provides a graphical representation oftelephone traffic as it flows through theTalkSwitch system.
Msec - MillisecondOne thousandth of a second or one thousand microseconds.
NetworkA Group of two or more computer systems linked together.
PBXPrivate Branch Exchange. A PBX is a private telephone network used within anEnterprise. Access to telephone lines andservices are controlled by the PBX. A PBXallows many users (extensions) to sharea smaller number of telephone l ines andhave access to additional call handlingbenefits (call hold, intercom calling,etc.). TalkSwitch is a 'mini' or 'micro'PBX.
TS-user manual_Final_3rd.qxd 8/9/01 2:15 PM Page 107

108 TalkSwitch User Manual
Phone LoadSee Ringing Equivalency.
PromptRecorded instructions delivered by voiceprocessing units. TalkSwitch providesprompts for you when using such features as Call Back, Call Bridge andSelective Call Forward. Prompts are alsoprovided when configuring TalkSwitchusing a telephone Keypad and for callersbeing put 'on hold'.
Registered JacksTelephone and data plugs registered withthe FCC.
Ringing Equivalency(Ringer Equivalency Number [REN]) Anumber, determined in accordance withthe US Code of Federal Regulations,which represents the ringer loading effecton a l ine. A ringer equivalency numberof 1 represents the loading effect of a traditional telephone set ringing circuit.
RJ-11Registered Jacks 11 is the most commonmodular jack in the world. It is usuallyused to connect 'single line' telephonicdevices such as telephones, fax machinesand modems. It supports 2 conductors.
RJ-14Registered Jacks 14 is a technical termfor a telephone jack that looks similar tothe standard RJ-11. However, the RJ-14 isusually used to connect 'two line' tele-phonic devices. It supports 4 conductors.
RJ-45Registered Jacks 45 is a technical termfor a telephone jack that supports 8 conductors and is used generally forNetworking applications.
Prompted Call BackAllows you to activate Call Back by dialing one of TalkSwitch's telephonenumbers, let t ing the Auto Attendantanswer and then entering the Call Backsettings.
RoutingDetermining the path that a message orcall is to take over circuits. TalkSwitchoffers 'routing' of incoming calls usingDSP technology.
Serial CommunicationA type of electronic communication that,unlike parallel communication, requiresthat data bits be sent one after the other.Modems rely on serial communication tosend data over telephone lines.
Shortcut KeyA special key combination that causes aspeci f ic command to be executed.Typically, shortcut keys combine the Ctrl or Alt keys with some other keys. InWindows environments, for example, Ctrl +C is used as the shortcut key tocopy. On PCs, the function keys are alsooften used as shortcut keys.
S/secSamples per second.
Serial Port
Serial Ports are physical 'plug-ins'. They allow two devices to exchangeinformation or data. A Serial Cable isused to connect the two Serial Ports together.
SOHOAcronym for Small Off ice/Home Office.It 's a burgeoning market comprised ofsolo professionals, part-time work-at-homes, te lecommuters and small businesses.
TS-user manual_Final_3rd.qxd 8/9/01 2:15 PM Page 108

109Glossary
TAPIAbbreviation of Telephony ApplicationProgramming Interface, TAPI, intro-duced in 1993 as the result of joint development by Microsoft and Intel, is astandard for applications connecting aPC running Windows to telephone services. TAPI defines standards for simple call control and for manipulatingcall content.
TelephonyThe science of translating sound intoelectrical signals, transmitting them, andthen converting them back to sound; thatis, the science of telephones. The term isused frequently to refer to computerhardware and software that performsfunctions traditionally performed by telephone equipment.
Tel Lines 1, 2, 3, or 4A jack or plug-in on the back panel ofTalkSwitch which can accept a RJ-11plug from either a telephone line or PBXsystem. A single line telephone cable canbe plugged into this jack and willbecome a usable TalkSwitch Line.
Telephone KeypadThe collection of push buttons on atouchtone telephone.
Telephone Wall JackA wall outlet for a standard telephonejack.
Terminal AdapterA device that allows analog devices to beused on ISDN (digital) l ines. TerminalAdapters are somewhat similar tomodems.
Touchtone telephoneA push-button telephone which emits distinctive (DTMF) tones as different but-tons on the keypad are pressed.
Two Line TelephoneA telephone which allows you to makeand receive calls on two separate telephone lines.
TX/RXAn acronym for transmit and receive.
USBShort for Universal Serial Bus, the USBconnection supports more bandwidththan a serial or parallel connection.
Virtual ExtensionA telephone or other communicationsdevice not physically connected toTalkSwitch as an extension, but whichprovides the same functionality. In general, the term 'virtual' distinguishessomething that is merely conceptualfrom something that has physical reality.TalkSwitch's Remote Extensions are virtual extensions.
Voicemail (Call Answer)A service provided by TalkSwitch or telephone companies which gives callersthe opportunity to leave a message whenyour extension or telephone line is busyor unanswered.
TS-user manual_Final_3rd.qxd 8/9/01 2:15 PM Page 109

# (Pound S ign) , 1 0 1
* (Star/Asterisk Sign), 101
3-Way Cal l ing, 15
3-Way Cal l ing wai t t ime, 53
3-Way Cal l ing/Conference , 84, 1 03
3-Way Conference Cal l , 103
6' RJ-11 Telephone Cable , 1
9 p in Ser ia l Cable , 1
About (Menu i t em) , 11
About TalkSwitch, 13
AC Power Adapter , 1
Accepting the Call Back, 66
Access ing a Voice mailbox, 67
Activate the Auto Attendant, 64
Act ivat ing Cal l Back, 65
Add Local Extens ion, 12
Add Remote Ex tens ion , 12
Add Ring Group , 12
Adjust Sequence, 3 2
Adminis t rator Password, 45
Al low Cal l Br idge, 42, 4 4
Analog, 1 03
Announced Message , 41, 43
Answer at ext . , 33 , 36 , 38
At tach an Answer ing Machine , 6
A t tach a Modem, 7
At taching phones, 6
Attaching telephone l ines, 5
Audio output opt ions , 51
Auto At tendant , 27
Auto At tendant Message, 29, 1 03
Auto Call Back, 39 , 40, 66
Automatic cal l forwarding, 62
Automatic mode swi tching, 26 , 69
Back Panel , 3
Busy at extension, 33, 35, 37
Calibration, 16 , 52
Call Back, 38, 10 3
Call Back / Call Bridge, 14, 38
Call Back number, 4 0, 4 2
Call Back ring return, 4 8
Call Bridge, 44 , 1 0 1
Call Cascade, 33 , 34 , 35
Call Forward, 36 , 62, 10 3
Call Handling, 1 3, 2 6
Cal l Hold and Flash, 84
Call Park, 5 8
Cal l Pick Up/Cal l Grab, 5 6
Call Queue, 58
Call Waiting, 15, 83 , 103
Caller ID (Call Display), 15, 55, 83, 103
Caller in queue reminder, 47
Central Office, 104
Centrex Transfer, 15, 58
Centrex/Plexar, 84, 103
Centrex/Plexar Transfer, 84
CNG, 104
C O 104
C O M , 7 6, 104
COM Por t , 76 , 10 4
Communicat ions Sof tware , 1 04
Compress ion (Data) , 1 04
Computer Telephony Integrat ion, 10 4
Conditional call forwarding, 6 2
Conference, 1 5
Conference Cal l , 10 4
111Index
Index
TS-user manual_Final_3rd.qxd 8/9/01 2:15 PM Page 111
Conference call ing, 59
Configuration, 10, 11, 104
Configurat ion sof tware, 9
Connect us ing , 2 0
Connect ing devices to the music and PAjacks, 7
Connect ing TalkSwitch to a PC, 7
Connector , 10 4
Copyr ight Informat ion, i i
Customer support , 7 5
Dial ing pref ix 40, 43
Dial tone, 1 04
Direct Line Access , 18 , 61
Direc t l ine access and modems, 5 3
Dis t inct ive Ring 8 3, 10 5
Dis t inc t ive Ring numbers , 14
Do not Di s turb , 34
Double f lash, 85
Double F lash t ime, 52
DTMF, 10 5
DTMF funct ions , 8 7
Erase instruct ions, 30
Extension Ring Groups , 21, 37
Extensions to r ing on incoming cal l(before Auto At tendant answers) , 32
External modem, 61
Fax call is detected, 29
Fax in format ion, 17
Fax machine , 6
FCC, 92 , 10 5
Firmware, 70, 106
Flash act ivated service, 15
Flash but ton, 106
F la sh EPROM, 106
Flash lengths , 52
Flash upgrade , 10
Front panel , 2
General mailbox act ivat ion, 23
General mai lboxes , 6 7
greet ing opt ions, 68
Home phone , 10 6
How to use Cal l Bridge, 4 4, 6 4
Hunt Group access , 19
Hunt Group restr ict ion, 61
Hunt or Rol lover , 15, 84
iGuide, 1 1
Initiate Call Back, 40
Intercom, 106
Internal clock set t ing, 4 8
Internal voicemail , 6 7
LAN port, 4
LED lights, 2
Line Hunt Groups, 16
Link button, 107
Local extensions, 18, 32
Local extensions mailboxes , 67
Local mailbox act ivat ion, 23
Making and receiving cal ls , 53
Manual ca l l forwarding, 62
Manual mode swi tch ing , 69
Manual transfer , 46
Memory Usage , 12
Memory s lo t , 5
Menu I tems, 11
File, 1 2
Help, 13
Setup, 12
Utilities, 12
Miscel laneous, 4 7
Mode swi tching, 2 6, 69 , 107
Modes , 26, 69, 1 07
Monitor, 10 , 10 7
112 TalkSwitch User Manual
TS-user manual_Final_3rd.qxd 8/9/01 2:15 PM Page 112

Music , 3, 4
Music-on-hold , 2 5, 6 8
No answer a t ext . , 33, 35, 37
No se lec t ion i s made, 29
Non-detection of disconnect-clear, 53
Open f i le , 12
Opt ions , 14, 45
PA, 3, 4
Parallel phone, 60
Park Orbi t , 58
Part number , i i
Password on Cal l Back, 41, 43
P B X , 48 , 10 7
PBX, extension length, 48
PC Connec t ion , 10
Personal opt ions , 68
Placing cal ls on Hold, 56
Placing Intercom cal ls , 55
Play Auto At tendant , 31
Power, 3, 5
Power / Data, 2
Power Interruptions, 101
Prompt , 10 8
Prompt funct ion key opt ions , 49
Prompt message vo lume, 49
Prompted Cal l Back, 39, 42, 63
Q u i c k C o m m a n d s , 87
Record instruct ions , 30
Record mai lbox gree t ing, 24
Recording Auto At tendant messages , 27
Regulatory information, 91
Remote extens ion mai lboxes , 67
Remote Extensions , 1 9, 3 5
Remote mai lbox act ivat ion, 23
Rese t mai lbox password , 24
Retrieve settings, 1 2
Return Pol icy , 99
Ring extensions only (no Auto At tendantis played, 31
Ring pat tern, 22
RJ-11, 108
Rout ing opt ions , 33
Safety precautions, 91
Save to file, 12
Save to TalkSwitch, 12
Screened transfer, 57
Screening options, 63
Serial, 3, 5, 7 , 76
Service, 94
Set act ive mode, 12
Set Ring Group, 2 2
Software version, 70
Sys tem information, 13, 14
Sys tem requirements , 9
TalkSwitch 24, 3
TalkSwitch 48LS, 4
TalkSwi tch CD, 9
TalkSwitch help, 13
TalkSwi tch memory cards , 27
Technical support , 75
Telephone Company cal l ing services , 83
Telephone Company voicemail , 1 5, 83
Telephone Lines, 14, 31
Time Scheduler , 6 9
Touchtone phone, 77
Transferring calls, 57
Trans fe r r ing f rom a Home (para l l e l )phone, 47
Troubleshooting, 52
Two--l ine analog te lephone, 6
Unscreened transfer , 5 7
Upgrading the TalkSwitch f i rmware, 70
113Index
TS-user manual_Final_3rd.qxd 8/9/01 2:15 PM Page 113
U S B , 3, 5, 7, 7 6
Use Same L ine Connec t , 20
View Auto A t tendant memory usage , 30
View Mailbox data, 2 4
Virtual extension, 1 09
Voice mailboxes, 23, 67
Voicemail , 23, 67, 83
Voicemail manager, 1 3
Warranty, 9 5
Warranty service, 96
114 TalkSwitch User Manual
TS-user manual_Final_3rd.qxd 8/9/01 2:15 PM Page 114