desk reference 8-6-08
TRANSCRIPT
1
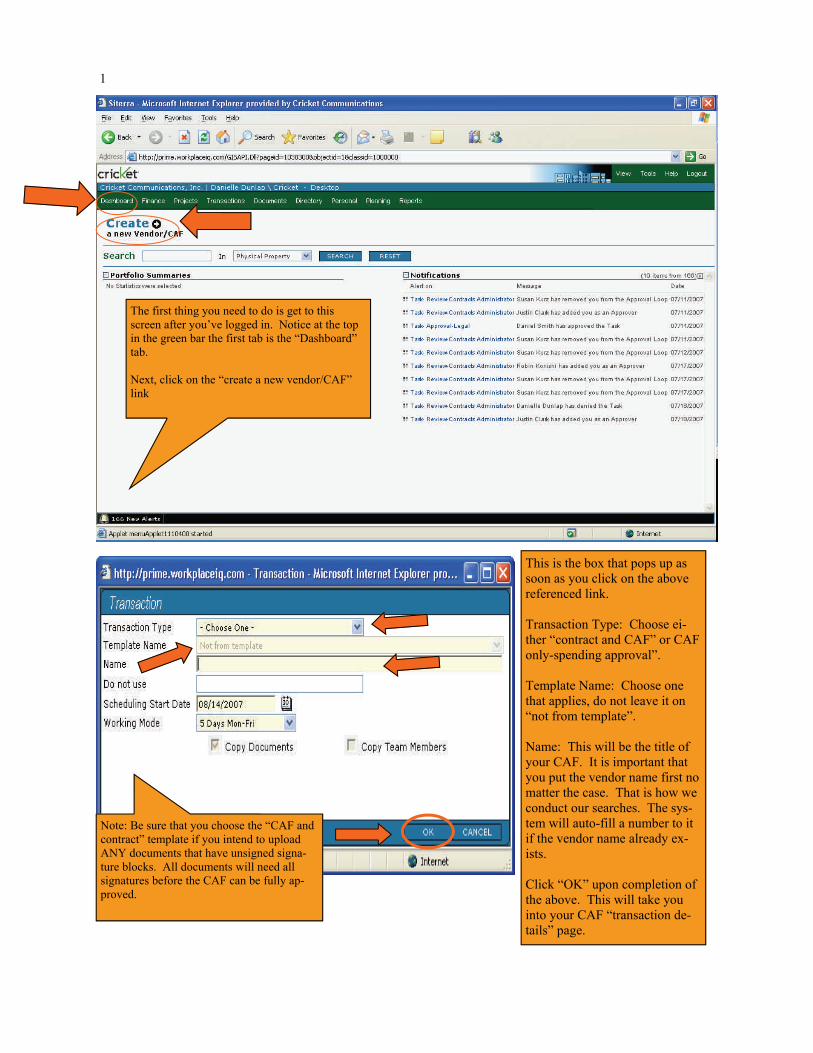
The first thing you need to do is get to this screen after you’ve logged in. Notice at the top in the green bar the first tab is the “Dashboard” tab. Next, click on the “create a new vendor/CAF” link
This is the box that pops up as soon as you click on the above referenced link. Transaction Type: Choose ei-ther “contract and CAF” or CAF only-spending approval”. Template Name: Choose one that applies, do not leave it on “not from template”. Name: This will be the title of your CAF. It is important that you put the vendor name first no matter the case. That is how we conduct our searches. The sys-tem will auto-fill a number to it if the vendor name already ex-ists. Click “OK” upon completion of the above. This will take you into your CAF “transaction de-tails” page.
Note: Be sure that you choose the “CAF and contract” template if you intend to upload ANY documents that have unsigned signa-ture blocks. All documents will need all signatures before the CAF can be fully ap-proved.
2
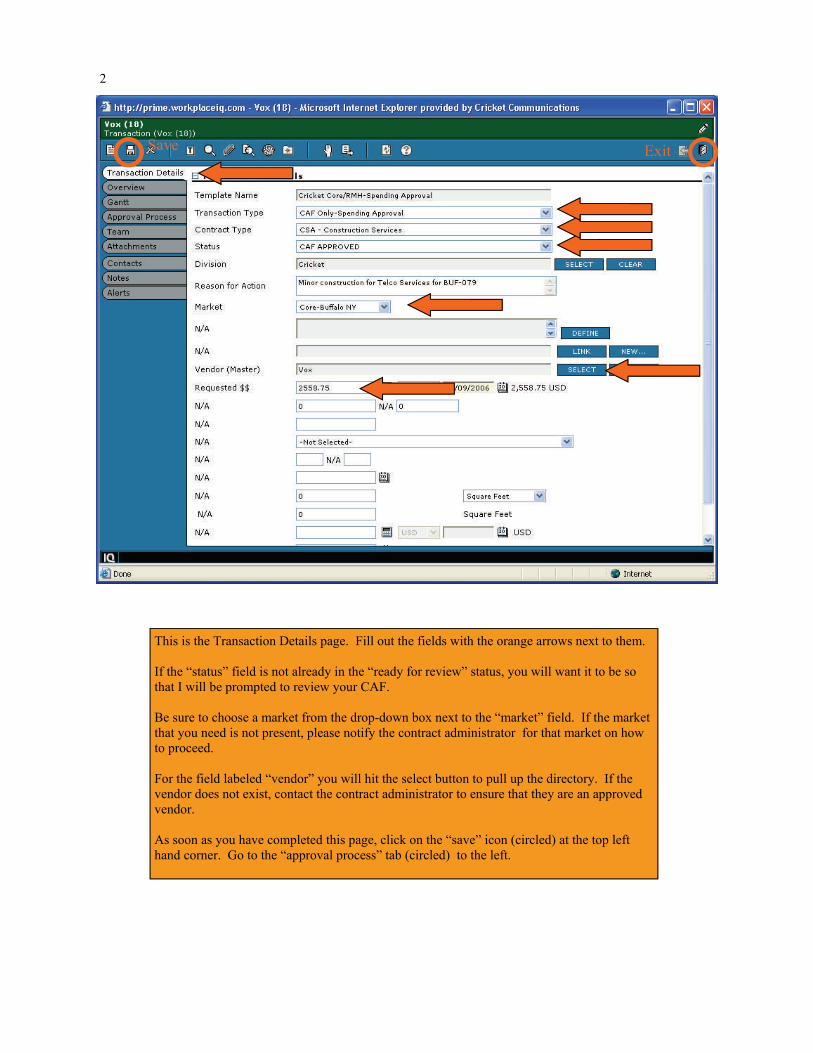
This is the Transaction Details page. Fill out the fields with the orange arrows next to them. If the “status” field is not already in the “ready for review” status, you will want it to be so that I will be prompted to review your CAF. Be sure to choose a market from the drop-down box next to the “market” field. If the market that you need is not present, please notify the contract administrator for that market on how to proceed. For the field labeled “vendor” you will hit the select button to pull up the directory. If the vendor does not exist, contact the contract administrator to ensure that they are an approved vendor. As soon as you have completed this page, click on the “save” icon (circled) at the top left hand corner. Go to the “approval process” tab (circled) to the left.
Save Exit
3
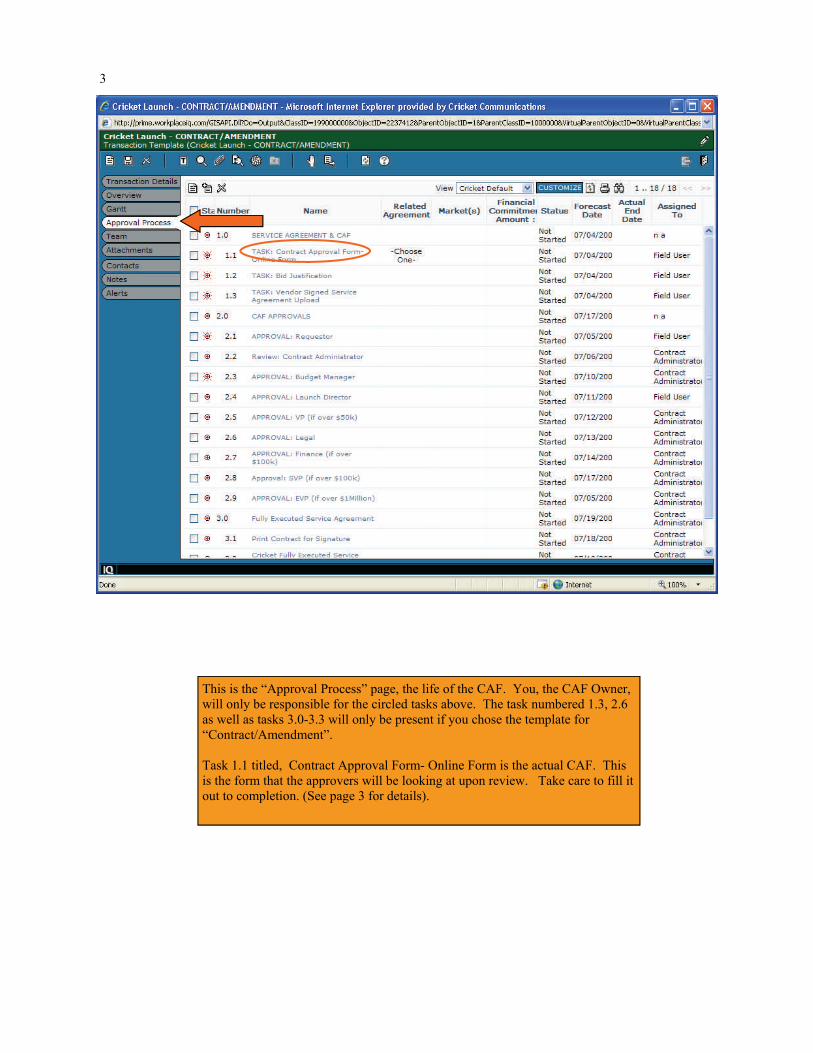
This is the “Approval Process” page, the life of the CAF. You, the CAF Owner, will only be responsible for the circled tasks above. The task numbered 1.3, 2.6 as well as tasks 3.0-3.3 will only be present if you chose the template for “Contract/Amendment”. Task 1.1 titled, Contract Approval Form- Online Form is the actual CAF. This is the form that the approvers will be looking at upon review. Take care to fill it out to completion. (See page 3 for details).

4
Save
Exit
You must have atleast 2 alternate bids and bid uploads on your CAF. They will be listed in the section titled Alternate Vendors/Bids. Take care to include the amounts next to each bid. If there are special circum-stances for not having alternate bids, please describe this in the section labeled “reason for recommendation”.
The budget approvers will not look at a CAF unless you have listed all the site #’s in the section labeled “related site numbers”. You may have one CAF for multiple site numbers as long as they fall under the same market/service umbrella. Also be sure to choose a “spending type” in the Budget Compliance section.

5
Change to show the num-ber of bids you intend to upload and then hit the save button before exiting.
6
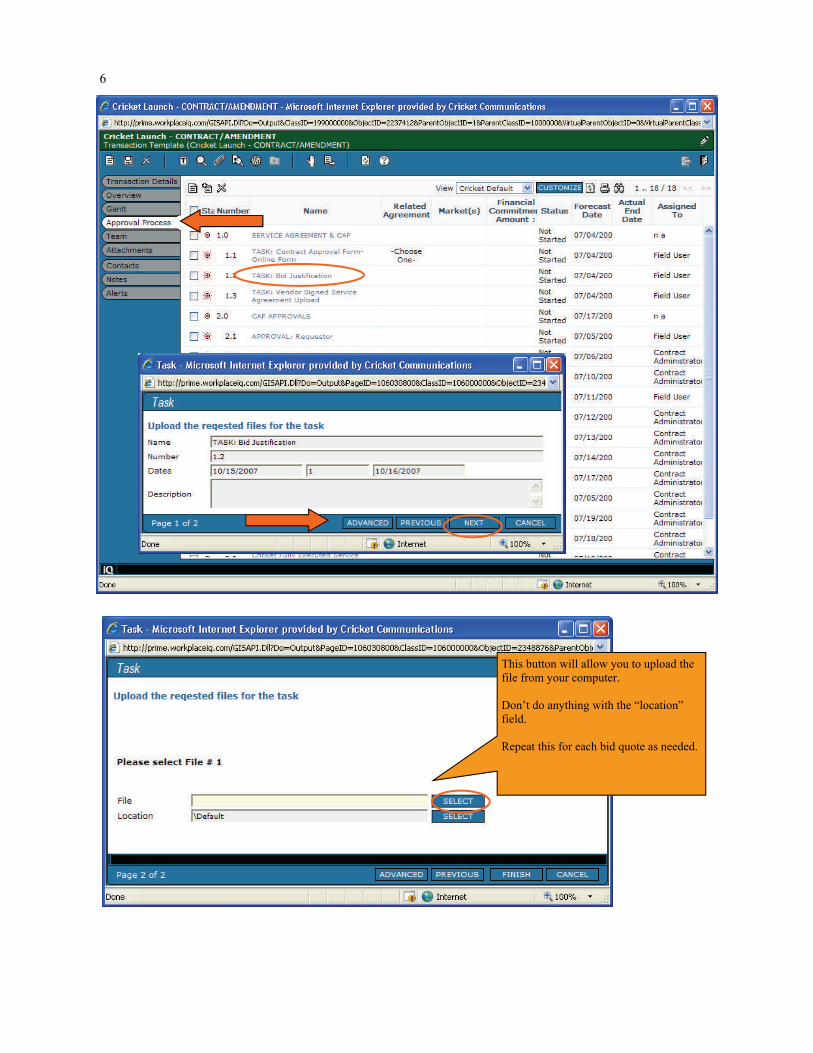
This button will allow you to upload the file from your computer. Don’t do anything with the “location” field. Repeat this for each bid quote as needed.

7
Task 1.3 will be the task used to upload documents that are not signed by all parties or documents that need to be approved by legal. It is done the same way that you would upload bid quotes.
8
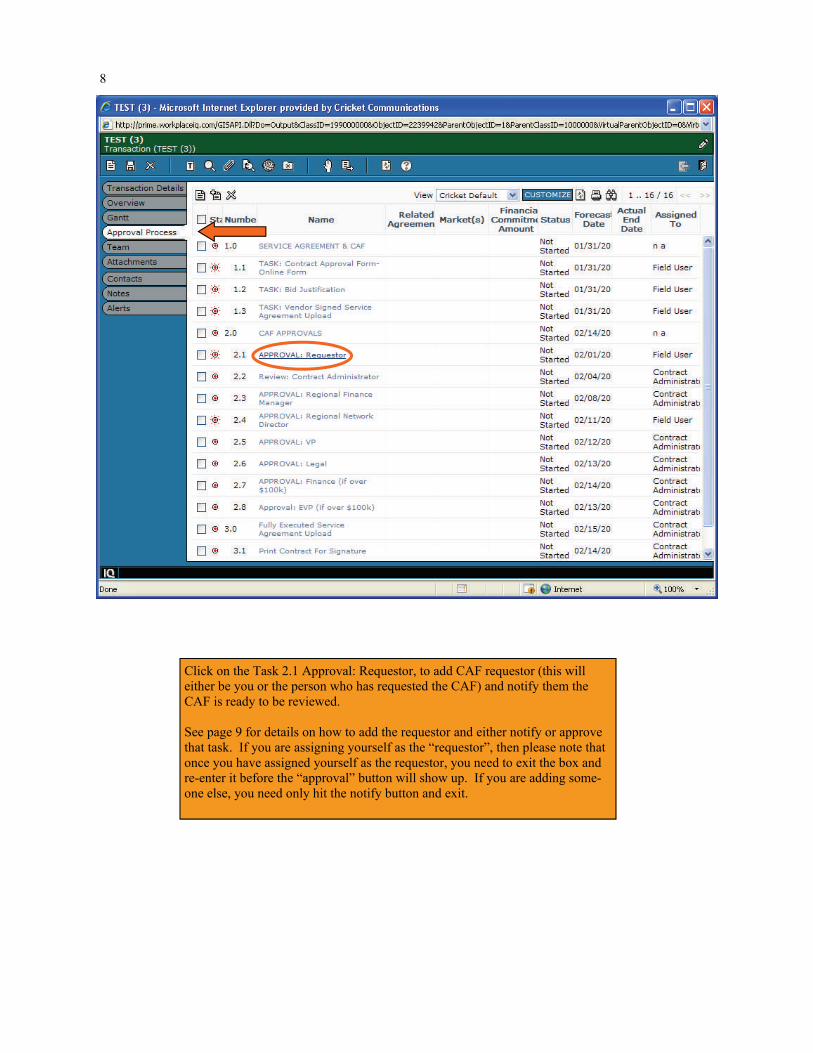
Click on the Task 2.1 Approval: Requestor, to add CAF requestor (this will either be you or the person who has requested the CAF) and notify them the CAF is ready to be reviewed. See page 9 for details on how to add the requestor and either notify or approve that task. If you are assigning yourself as the “requestor”, then please note that once you have assigned yourself as the requestor, you need to exit the box and re-enter it before the “approval” button will show up. If you are adding some-one else, you need only hit the notify button and exit.

9
1
2 3
4
10
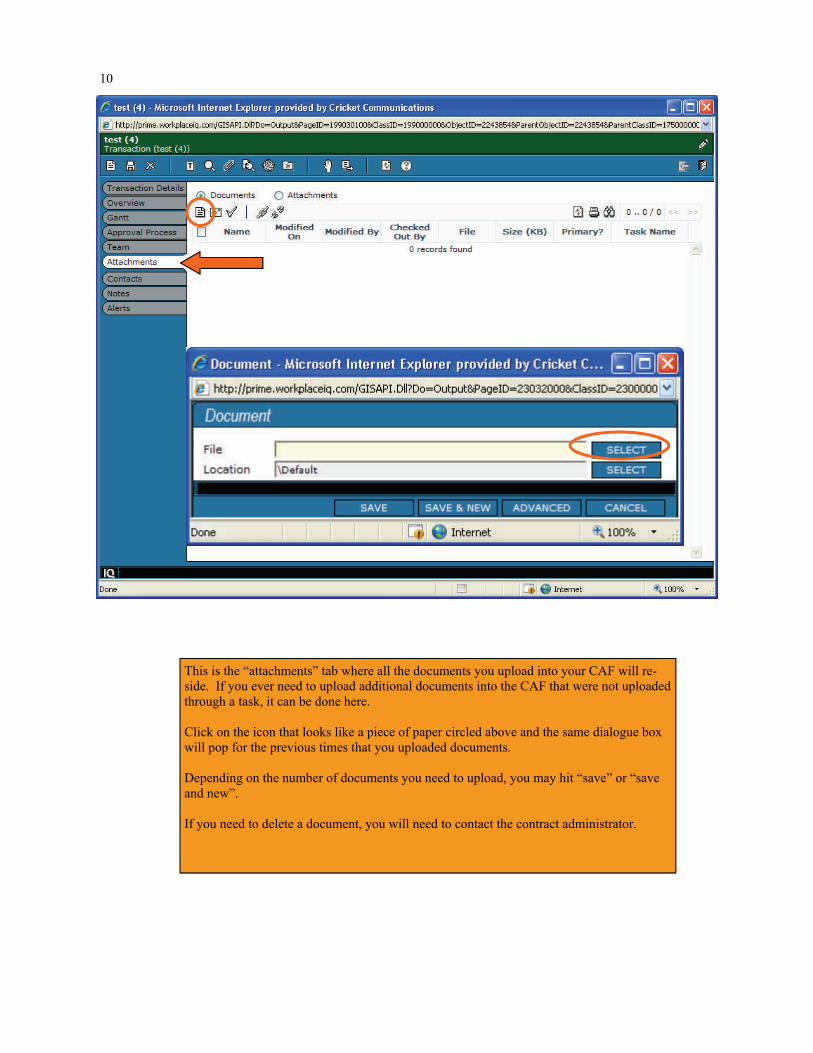
This is the “attachments” tab where all the documents you upload into your CAF will re-side. If you ever need to upload additional documents into the CAF that were not uploaded through a task, it can be done here. Click on the icon that looks like a piece of paper circled above and the same dialogue box will pop for the previous times that you uploaded documents. Depending on the number of documents you need to upload, you may hit “save” or “save and new”. If you need to delete a document, you will need to contact the contract administrator.
11
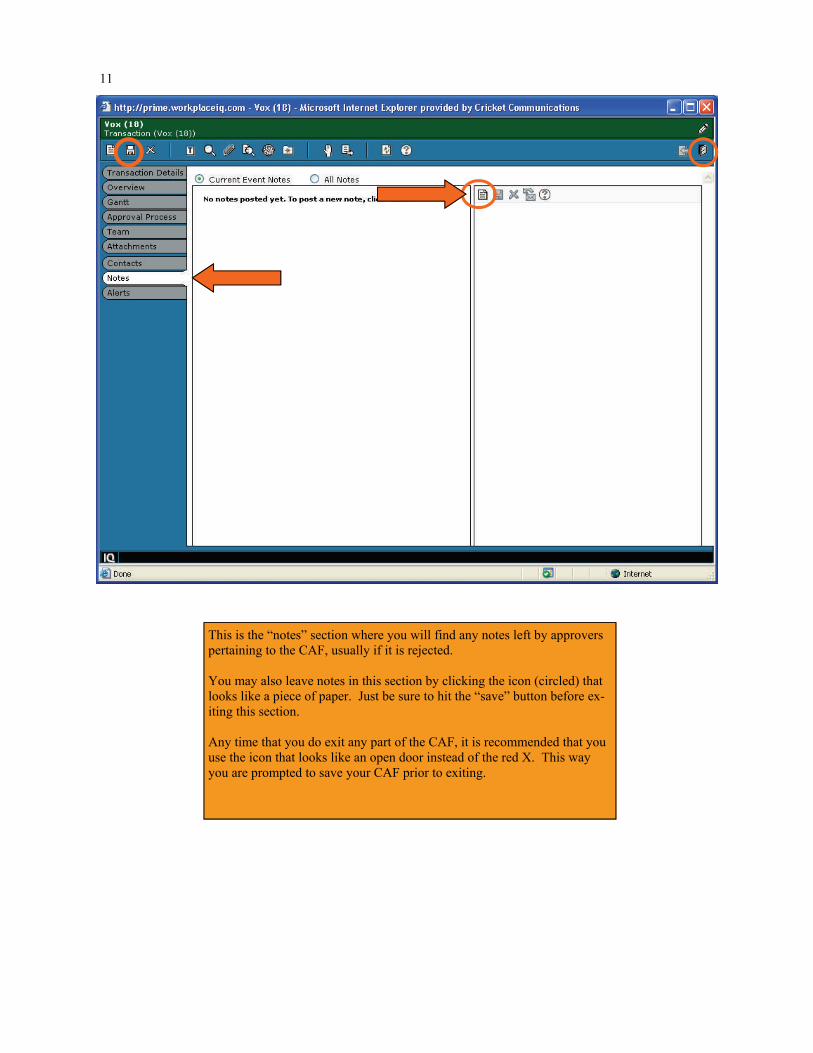
This is the “notes” section where you will find any notes left by approvers pertaining to the CAF, usually if it is rejected. You may also leave notes in this section by clicking the icon (circled) that looks like a piece of paper. Just be sure to hit the “save” button before ex-iting this section. Any time that you do exit any part of the CAF, it is recommended that you use the icon that looks like an open door instead of the red X. This way you are prompted to save your CAF prior to exiting.