design a vintage baseball card in photoshophartington.esu1.org/~mhochstein/graphic design/design a...
TRANSCRIPT

Design a Vintage Baseball Card in Photoshop
Preview

Step 1: Set Up the Photoshop Document
Create a new Photoshop document (File > New) at 600x750px.
Use the Gradient Tool (G) to make a subtle gradient on the Background layer.

Step 2: Creating the Card’s Background
Using the Rectangle Tool (U), create a rectangle (360x504px) that will represent the baseball
card. Fill it with white.

Create another rectangle (which will be the inner area where the content will be) with the
Rectangle Tool (U). The inner rectangle is 15px smaller on each side compared to the bigger,
white rectangle. Fill the inner rectangle with a light blue color (#1ba2f7).

Make sure to reset your Foreground and Background colors to black and white by pressing D on
keyboard. Create a new layer. Then go to Filter > Render > Clouds.

Cmd-click/Ctrl-click on the inner blue rectangle’s vector mask thumbnail to create a selection,
make sure the clouds layer is the active layer, then go to Layer > Layer Mask > Reveal Selection.
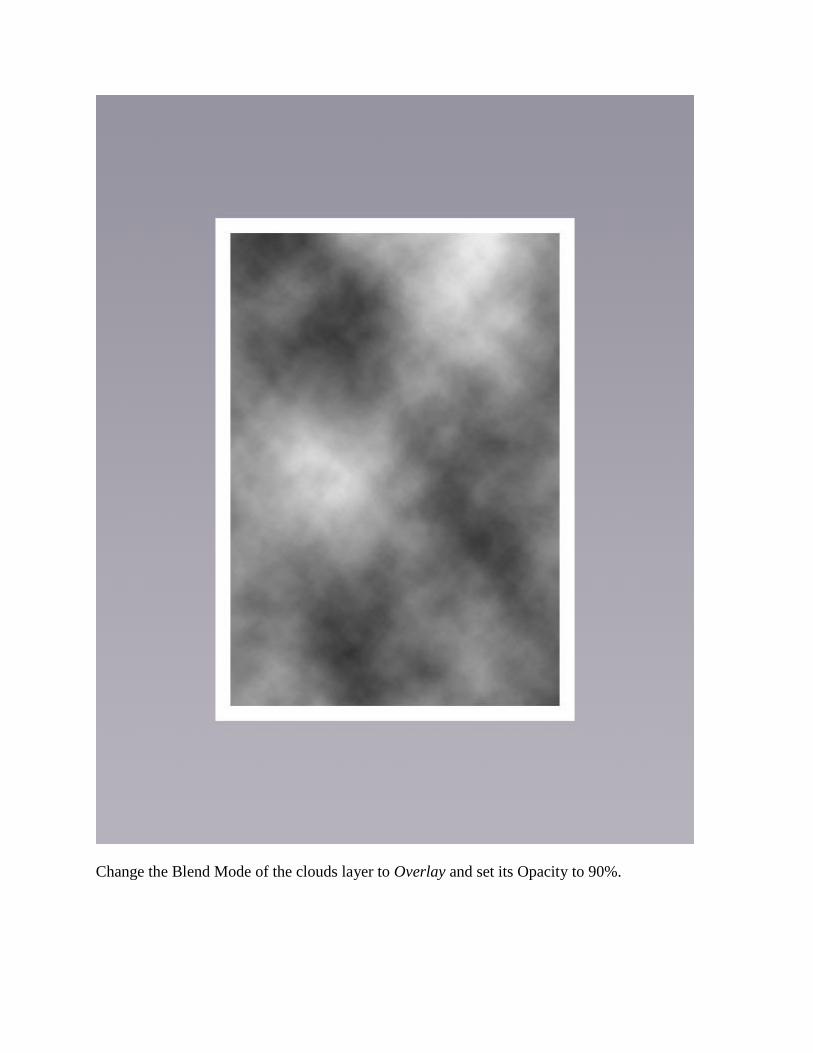
Change the Blend Mode of the clouds layer to Overlay and set its Opacity to 90%.

Import the New York Yankees Stadium image (listed in tutorial resources) in our design. We
aren’t going for historical accuracy here, obviously. Use the image below as a reference on how
to position the image.
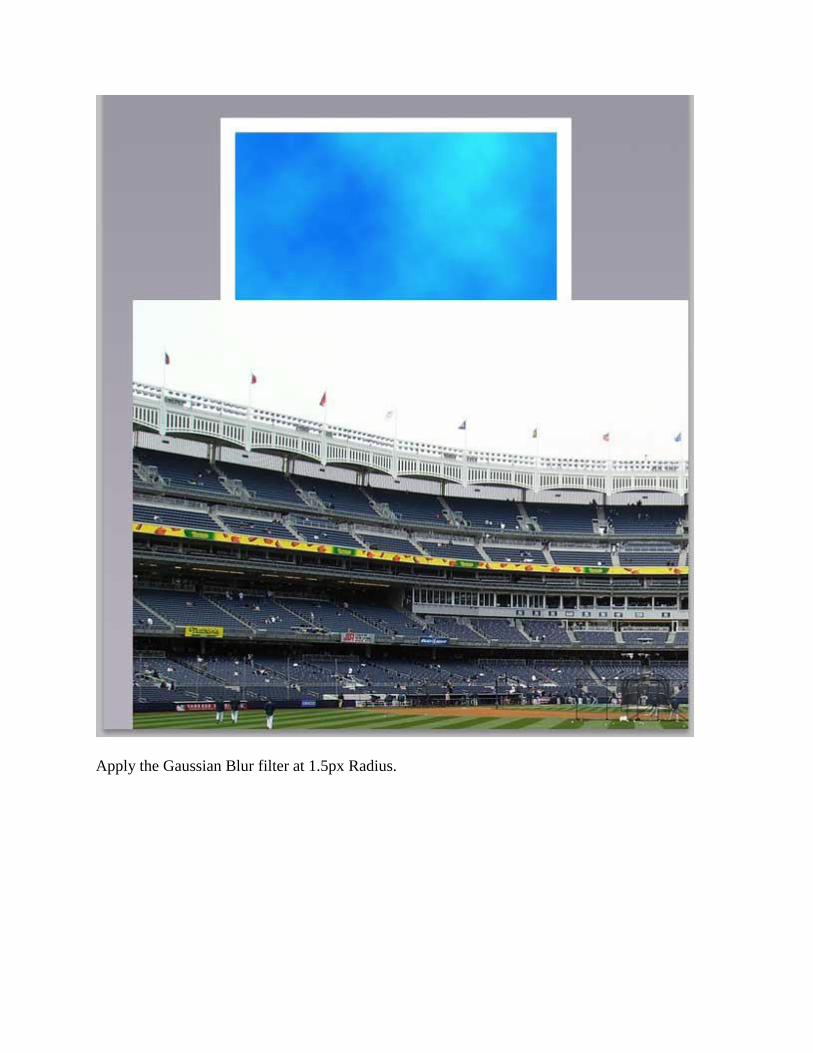
Apply the Gaussian Blur filter at 1.5px Radius.

Afterwards, set the Blend Mode to Multiply.

Duplicate the stadium layer twice. Select the duplicated layer that is just above the stadium layer
and go to Filter > Stylize > Find Edges.
Move on to the second duplicated layer and apply Filter > Stylize > Glowing Edges. Use these
settings:

Edge Width: 2
Edge Brightness: 8
Smoothness: 10


While the "stadium glowing edges" layer is still the active layer, choose Image > Adjust >
Desaturate (Cmd/Ctrl + Shift + U). Invert the colors of the layer by pressing Cmd/Ctrl + I and
then set the Opacity to 60%.

Select all stadium layers and group them (Cmd/Ctrl + G). Cmd/Ctrl + click on the blue rectangle
(inner area) to create the selection. Make sure you’re on the stadium group, then go to Layer >
Layer Mask > Reveal Selection. Lower the layer group’s Opacity to 90%.

Step 3: Isolating the Baseball Player
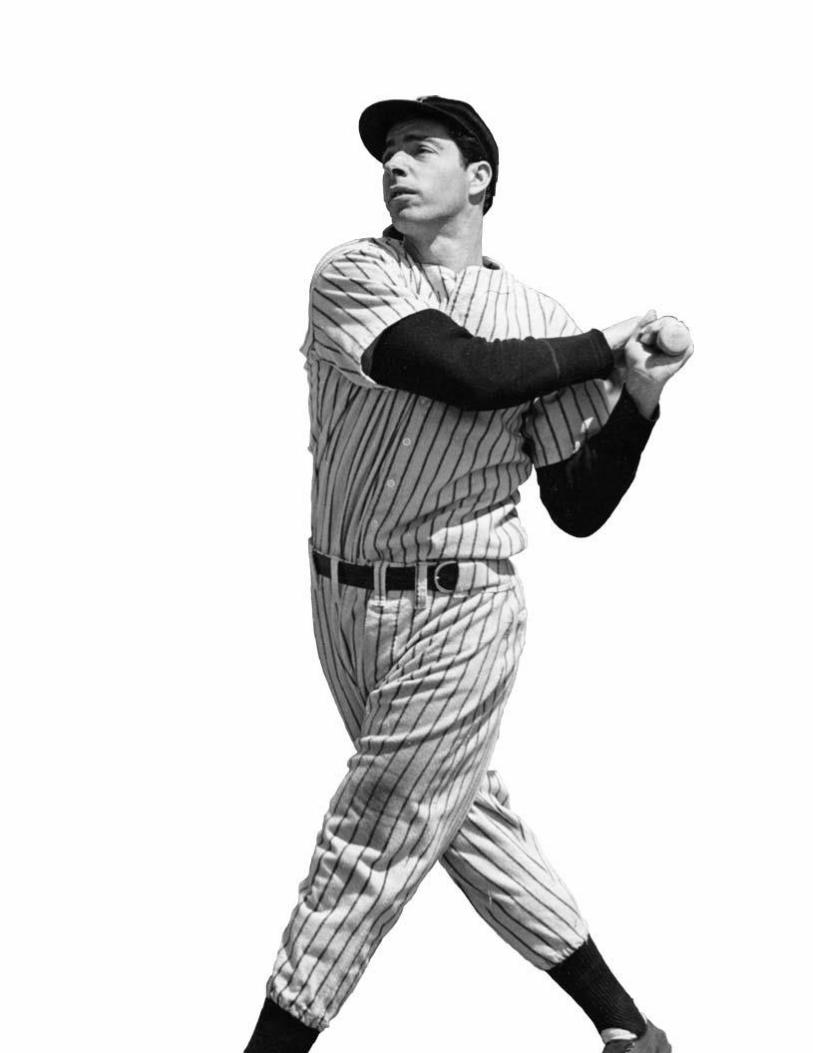
Download and open the Joe DiMaggio photo in Photoshop. Choose the Pen Tool (P) from the
Tools Panel, pick Paths mode in the Options Bar, and then carefully draw around the player.

In the Paths Panel (Window > Paths), Control-click/right-click on the path you drew with the
Pen Tool and then choose Make Selection from the menu that appears.
Copy and paste Mr. DiMaggio in a new Photoshop document so that we can process him further
before we placing him into our design.

Step 4: Coloring the Baseball Player
Let’s colorize Joe DiMaggio’s black and white photo.
Create selection around Joe DiMaggio (Cmd-click/Ctrl-click on the layer’s thumbnail).


Go to Layer > New Fill Layer > Solid Color and fill this layer with the color we are going to use
for the skin (#e2b97b).


Change the Blend Mode of the layer to Color. Click on the vector mask thumbnail in the Layers
Panel (the one on the right that’s primarily black) so that we’ll be painting on it.
With the Brush Tool (B) (Hardness set to 100%, Foreground color set to black), start painting on
the vector mask to remove the color from areas other than the face and hands.
If you make a mistake, simply select the Eraser Tool (E) and paint back the area that you
accidentally masked out.
Following the previous process, let’s create another solid color fill layer (Layer > New Fill Layer
> Solid Color), but this time we are going to fill this layer with navy blue color (#00005a).
Using the Brush Tool (B) on the vector mask, remove the navy blue color from the subject’s
face, hands, baseball bat and shoes so that the color only shows up in his uniform. Quite simple
and easy.
Let’s look at the image right now; you should have something like this:
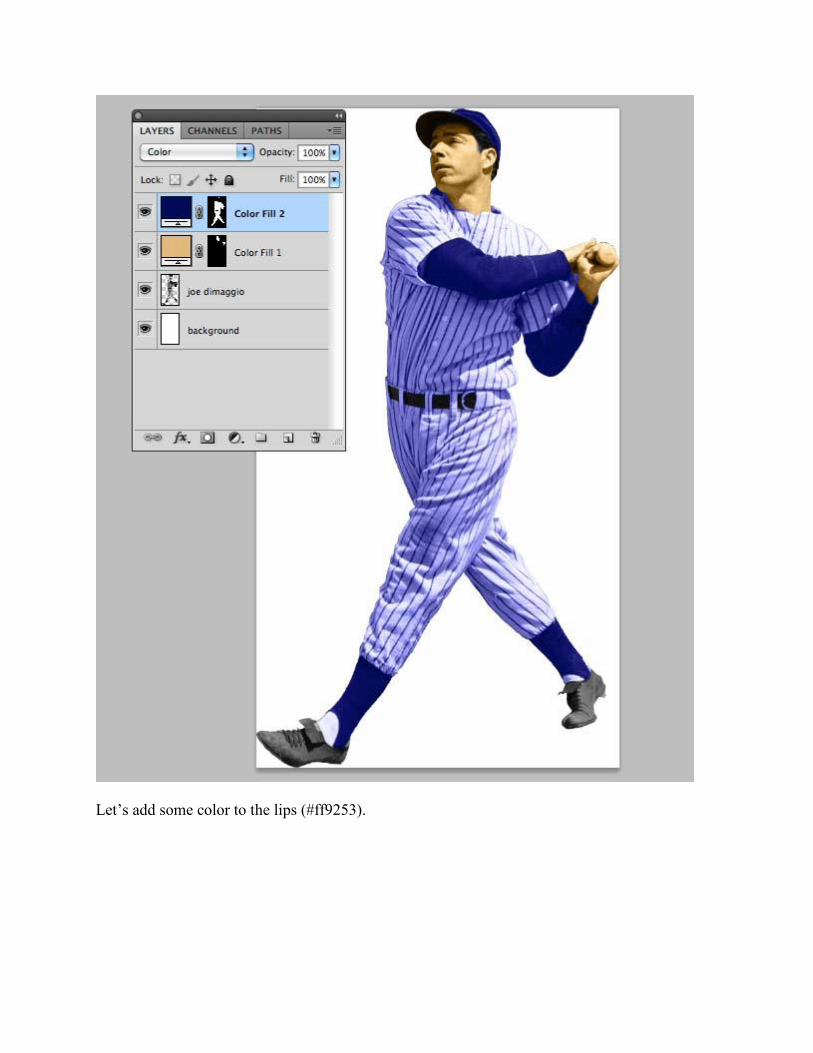
Let’s add some color to the lips (#ff9253).

To finish coloring, we will create one more solid color fill layer with black as the color, which
will help us give more intense colors on the shoes, socks and sleeves. Again, go to Layer > New
Fill Layer > Solid Color, fill it with black (#000000). This time, set Blend Mode to Soft Light.
Use the Brush Tool (B) on the vector mask to remove the color from all areas other than his
shoes, socks and sleeves.
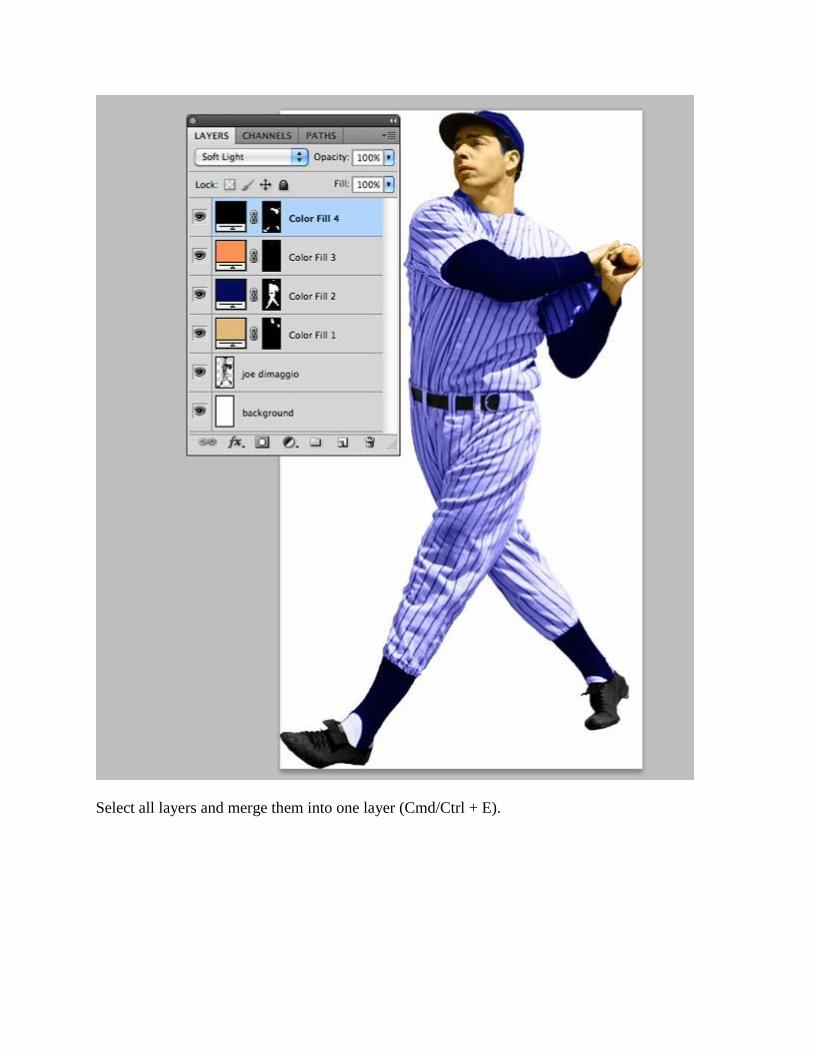
Select all layers and merge them into one layer (Cmd/Ctrl + E).
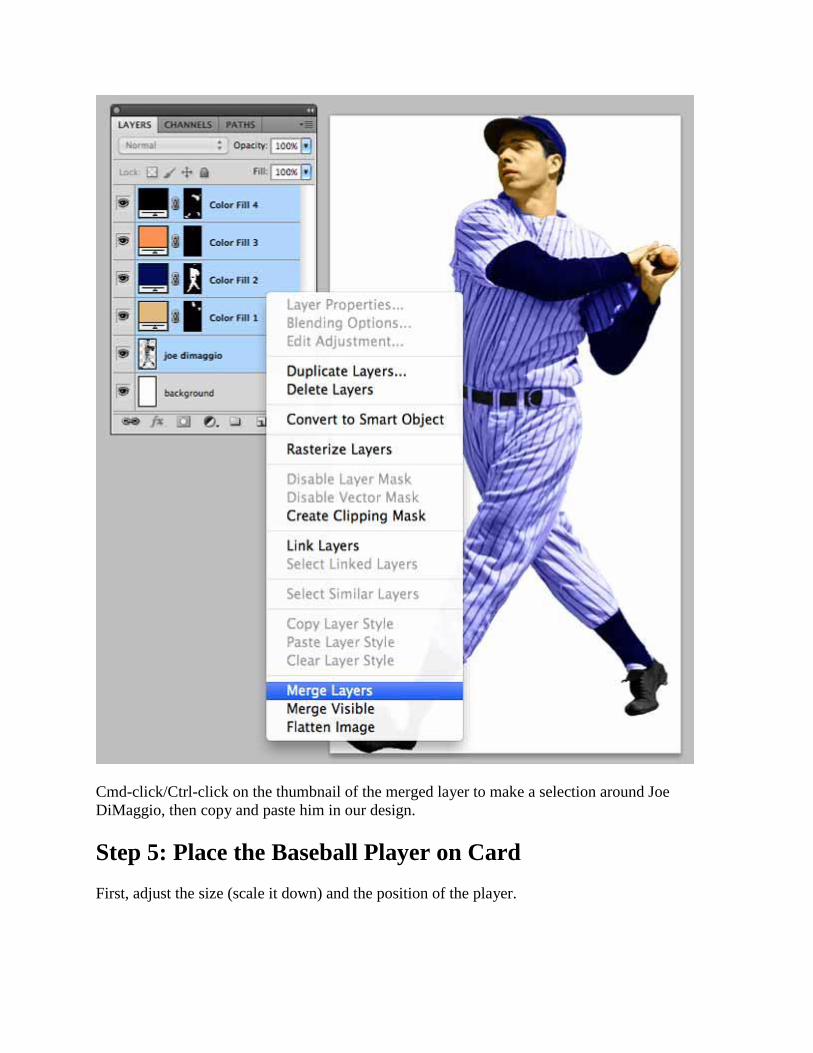
Cmd-click/Ctrl-click on the thumbnail of the merged layer to make a selection around Joe
DiMaggio, then copy and paste him in our design.
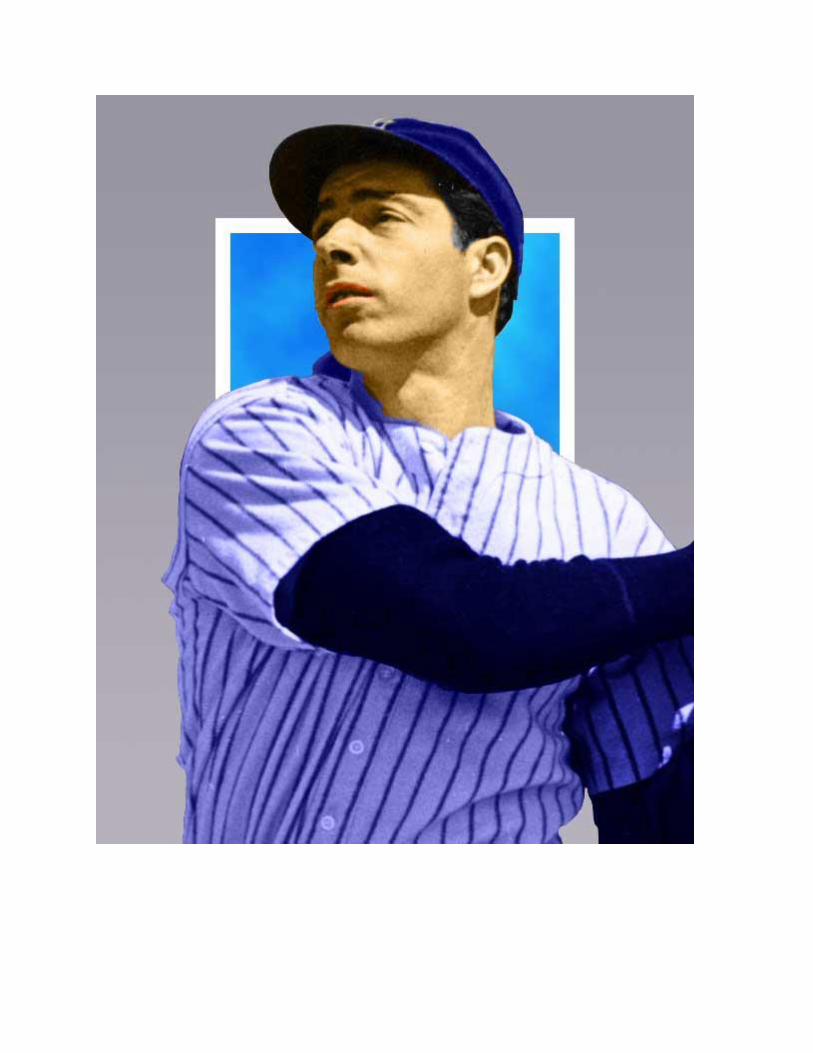
Step 5: Place the Baseball Player on Card
First, adjust the size (scale it down) and the position of the player.
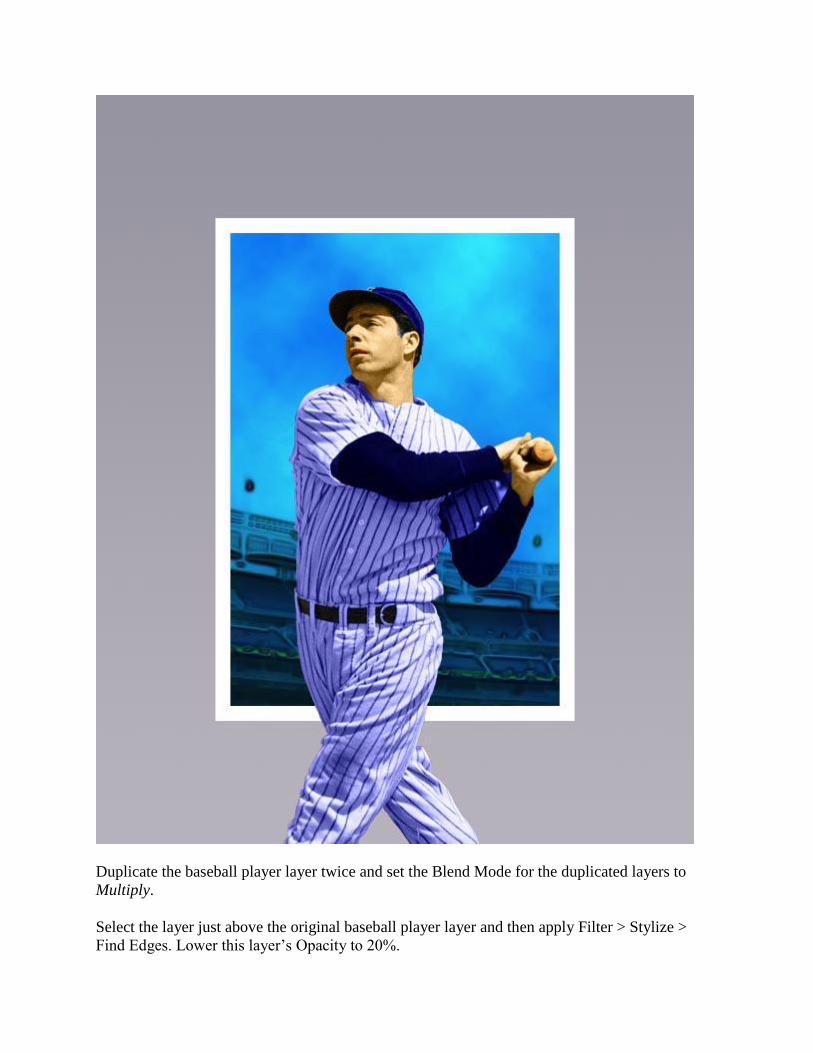
Duplicate the baseball player layer twice and set the Blend Mode for the duplicated layers to
Multiply.
Select the layer just above the original baseball player layer and then apply Filter > Stylize >
Find Edges. Lower this layer’s Opacity to 20%.

Next, click on the other duplicated layer (which should be on top of the first duplicated layer).
Go to Filter > Stylize > Glowing Edges and use the following settings:
Edge Width: 1
Edge Brightness: 7
Smoothness: 1

Desaturate this layer by going to Image > Adjustments > Desaturate (Shift + Cmd/Ctrl + U).
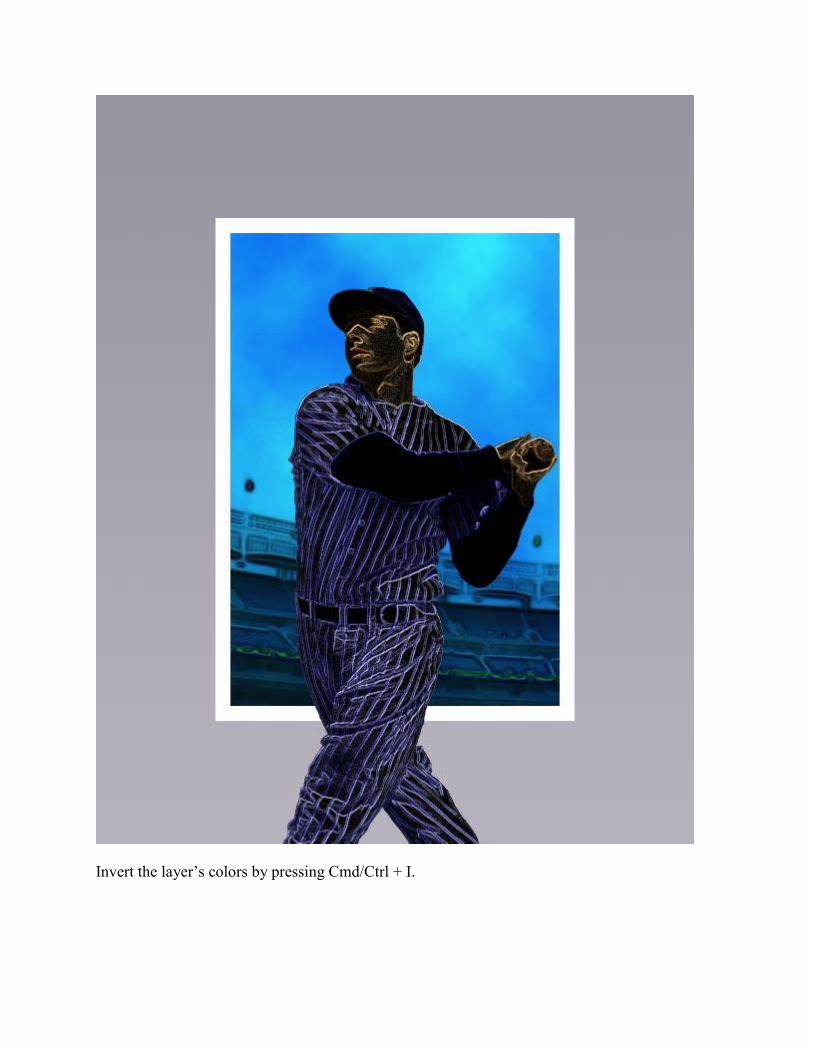
Invert the layer’s colors by pressing Cmd/Ctrl + I.

Set the layer’s Opacity to 60%.

By doing this, we have achieved an illustrated look of the baseball player without having to
laboriously paint it manually.
Place all baseball player layers into a layer group (Layer > Group Layers), then make a selection
around the inner area of the card (Cmd-click/Ctrl-click on the blue rectangle vector mask). Then
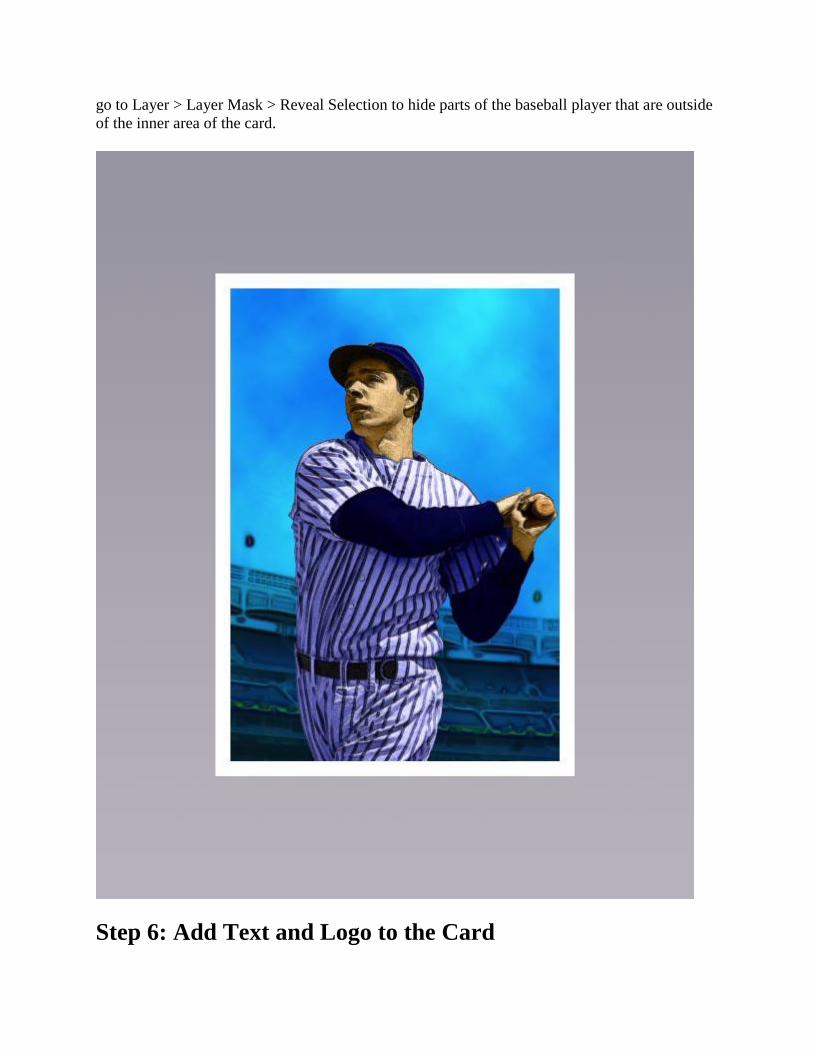
go to Layer > Layer Mask > Reveal Selection to hide parts of the baseball player that are outside
of the inner area of the card.
Step 6: Add Text and Logo to the Card
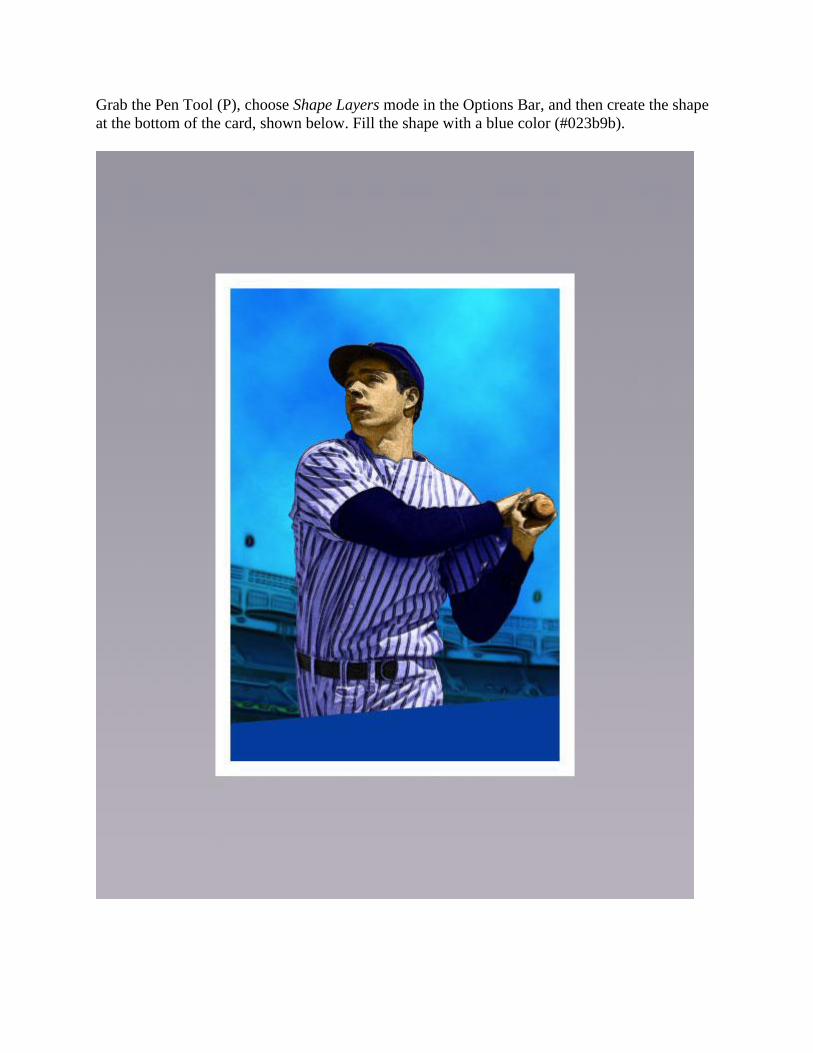
Grab the Pen Tool (P), choose Shape Layers mode in the Options Bar, and then create the shape
at the bottom of the card, shown below. Fill the shape with a blue color (#023b9b).

Download and install the free League Gothic font (if you don’t have it installed yet). Using the
Horizontal Type Tool (T), add some text on the card. Use the following image as a reference for
the font settings.
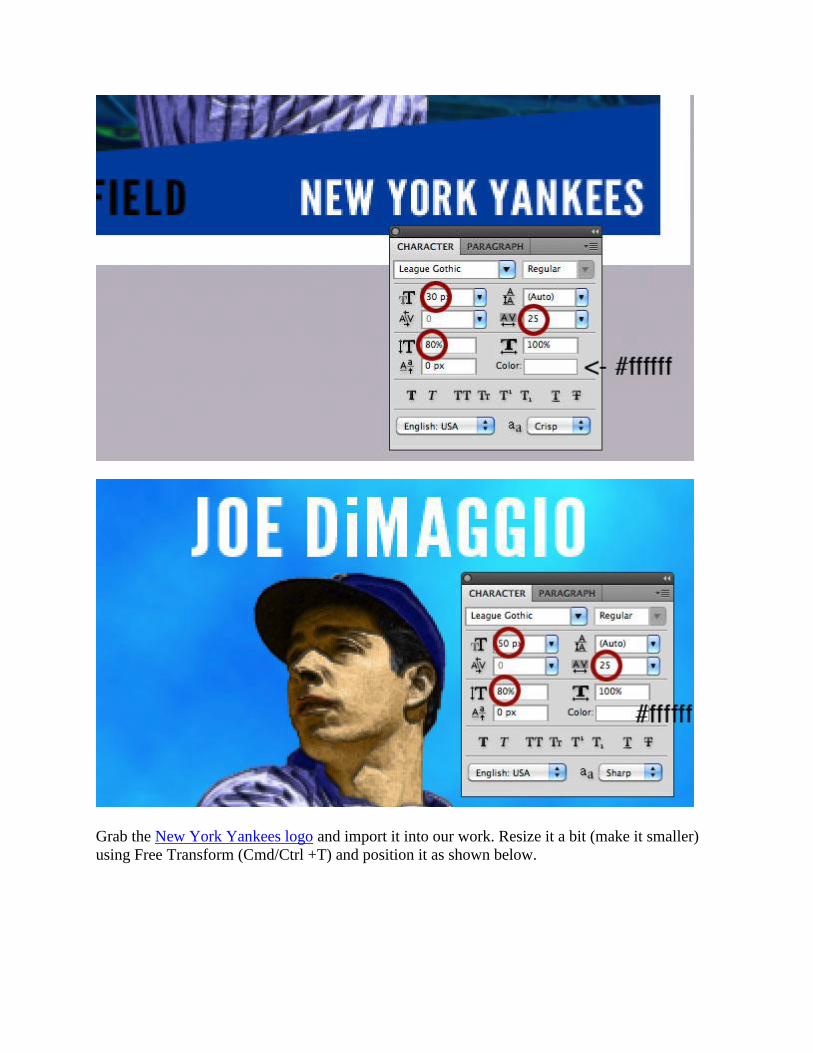
Grab the New York Yankees logo and import it into our work. Resize it a bit (make it smaller)
using Free Transform (Cmd/Ctrl +T) and position it as shown below.

Step 7: Adjusting the Card Colors
We are going to adjust the color of the card now by adding a Hue/Saturation adjustment layer.
This will change the card’s colors so that it has a faded, vintage look.

Go to Layer > New Adjustment Layer > Hue/Saturation. Change the Saturation to -50.


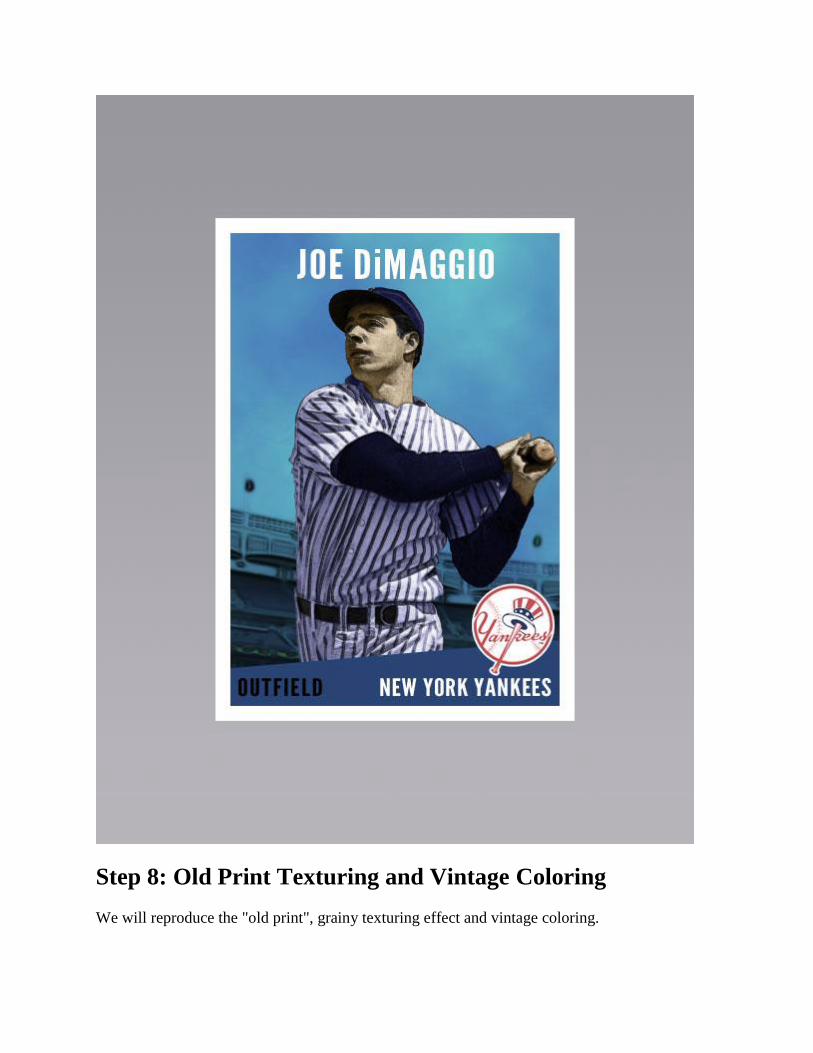
Step 8: Old Print Texturing and Vintage Coloring
We will reproduce the "old print", grainy texturing effect and vintage coloring.

Create a new layer (Cmd/Ctrl + Shift + N) on top of all the layers. Set the Foreground color to
orange (#fc7500) and fill the new layer with this color (Alt + Backspace). Use Filter > Noise >
Add Noise with the Amount at 10% and Distribution set to Gaussian (also make sure that the
Monochromatic option is checked).
Change the Blend Mode to Multiply and Opacity to 40%.
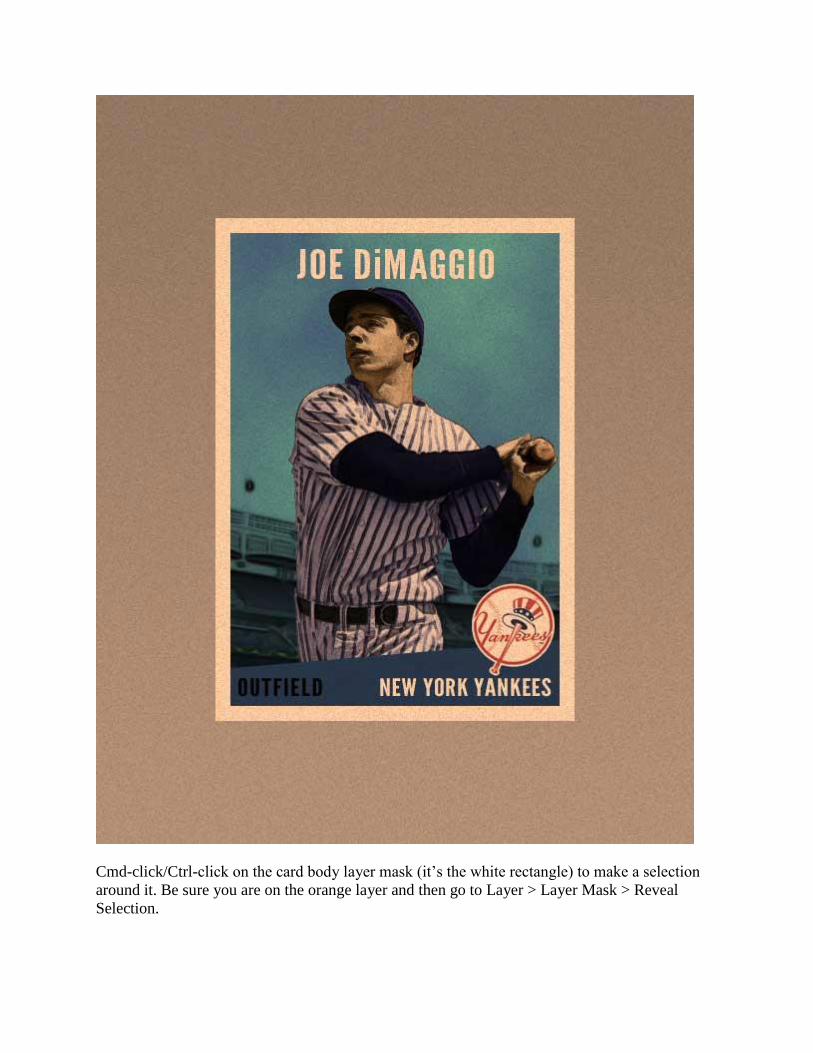
Cmd-click/Ctrl-click on the card body layer mask (it’s the white rectangle) to make a selection
around it. Be sure you are on the orange layer and then go to Layer > Layer Mask > Reveal
Selection.

Download this Film Texture and open it in Photoshop. Place it into our main document.

Change the Blend Mode of the film texture layer to Soft Light and set the Opacity of the layer to
30%. This will give our work an aged, worn look.

Apply a layer mask on the film layer just like we did for the orange noise layer.

Finally add a Drop Shadow layer effect to the card body layer to give it a nice touch.

That’s it, we’re done!
Tutorial Summary
In this tutorial, we did a lot. We utilized photos, textures, blending modes, filters and adjustment
layers to achieve the final design. You discovered different design techniques such as coloring a
black and white photo, creating an "old print", grainy texturing effect using the Noise filter,
reproducing an illustrated effect using Stylize filters, how to use adjustment layers to control the
scene’s colors, and more.
I encourage you to try different photos, textures, shapes and fonts to create your own unique
vintage baseball card. Make sure to show off your work by linking to your version in the
comments and adding it to our Flickr group so we can see what you can come up with. Thanks
for reading!

Download Source Files
retro_baseball_card (ZIP, 8.23 MB)
