des1005d i1 qig - d-link · (enrutadores, puentes, etc.) mediante un cable recto o cruzado utp/stp...
TRANSCRIPT

Introduction This Quick Installation Guide gives step-by-step instructions for setting up the D-Link DES-1005D 10/100M Fast Ethernet Switch. The model you have purchased may appear slightly different from those shown in the illustrations. For more detailed information about the switch, its components, making network connections and technical specifications, please refer to the User’s Guide included you’re your switch.
UnpackingUnpackingUnpackingUnpacking
Please make sure the following items are present and undamaged.
Physical Installation Physical Installation Physical Installation Physical Installation
Attaching the Rubber Feet For desktop installation, please take time now to attach the included rubber feet to the base of the switch

Mounting Switch on Wall The DES-1005D can be mounted on a wall.
Two mounting slots are provided on the bottom side of the hub for this purpose. Make sure that the front panel is exposed to allow you to view the LEDs while the unit is on.
PC to DESPC to DESPC to DESPC to DES----1005D1005D1005D1005D
A PC can be connected to the Switch via a two-pair Category 3,4, or5 UTP/STP straight-through cable. For 100Mbps operation Category 5 must be used. The PC (equipped with a RJ-45 10Mb Ethernet or 100Mb Fast Ethernet NIC) should be connected to any of the 5 ports (1 - 5) for the DES-1005D.

The LED indicators for PC connection are dependent on the LAN card capabilities. If the LED indicators do not light after making a proper connection, check the PC LAN card, the cable, the Switch conditions and connections.
HubHubHubHub to DES to DES to DES to DES----1005D1005D1005D1005D
A hub (10 or 100BASE-TX) can be connected to the Switch via a two-pair Category 3, 4, or 5 UTP/STP straight cable. For 100Mbps operation a Category 5 cable must be used. The connection is accomplished from any port of the hub to any port of the Switch.
DESDESDESDES----1005D to switch1005D to switch1005D to switch1005D to switch
The Switch can be connected to another switch or other devices (routers, bridges, etc.) via a two-pair Category 3, 4, 5 UTP/STP straight or crossover cable. A Cate-gory 5 cable must be used for 100Mbps operation. The connection can be done from any (MDI-X) port of the Switch (Switch A) to any of the 10Mbps, 100Mbps (MDI-X) port of the other switch (switch B) or other devices.
Additional Information If you are encountering problems setting up your network, please refer to the User’s Guide that came with the switch. It contains many more rules, charts, explanations and examples to help you get your network up and running.
Additional help is available online at http://www.dlink.com in the United States, at http://www.dlink.co.uk in the United Kingdom, or through our offices listed at the back of the User’s Guide.

Einführung Diese Kurzanleitung für die Installation enthält Hinweise zur Inbetriebnahme des 10/100 MBit/s Fast Ethernet Switch DES-1005D von D-Link. Das von Ihnen erwor-bene Modell kann im äußeren Erscheinungsbild von den in den Illustrationen abgebildeten Modellen abweichen. Weitere Informationen zum Switch, seinen Komponenten, zur Herstellung von Netzwerkverbindungen und zu technischen Daten finden Sie im Benutzerhandbuch.
AuspackenAuspackenAuspackenAuspacken
Vergewissern Sie sich, dass die folgenden Gegenstände vorhanden und unbe-schädigt sind:
Gerät aufstellenGerät aufstellenGerät aufstellenGerät aufstellen
Gummifüße anbringen Falls Sie das Gerät auf einer ebenen Fläche aufstellen, sollten Sie die Gummifüße am Gerät befestigen.

Wandmontage Der DES-1005D ist auch zur Wandmontage geeignet. Dazu befinden sich an der Unterseite des Geräts zwei Montageschlitze. Achten Sie darauf, dass die Vorder-seite des Geräts sichtbar bleibt, damit die LED-Anzeigen abgelesen werden können.
PC an DESPC an DESPC an DESPC an DES----1005D1005D1005D1005D
Ein PC kann über ein zweipaariges, ungekreuztes UTP/STP-Kabel der Kategorien 3, 4 oder 5 mit dem Switch verbunden werden. Für einen Betrieb mit 100 MBit/s muss ein Kabel der Kategorie 5 verwendet werden. Der PC (ausgestattet mit einer RJ-45 10 MBit/s Ethernet- bzw. 100 MBit/s Fast-Ethernet-Netzwerkkarte) sollte mit einem der 5 Anschlüsse (1 - 5) verbunden werden (DES-1005D ).

Der Status der LED-Anzeigen für die PC-Verbindung hängt von den technischen Merkmalen der Netzwerkkarte des PCs ab Falls die LED-Anzeigen nach Herstel-lung einer korrekten Verbindung nicht leuchten, müssen Netzwerkkarte, Kabel und Switch überprüft werden.
Hub an DESHub an DESHub an DESHub an DES----1005D1005D1005D1005D
Ein Hub (10 oder 100 Base-TX) kann über ein zweipaariges, ungekreuztes UTP/STP-Kabel der Kategorien 3, 4 oder 5 mit dem Switch verbunden werden. Für einen Betrieb mit 100 MBit/s muss ein Kabel der Kategorie 5 verwendet werden. Die Verbindung kann zwischen einem beliebigen Anschluss des Hub und einem beliebigen Anschluss des Switch hergestellt werden.
DESDESDESDES----1005D an Switch1005D an Switch1005D an Switch1005D an Switch
Der Switch kann mit weiteren Switches oder anderen Geräten (Router, Bridges etc.) über zweipaarige, ungekreuzte oder gekreuzte UTP/STP-Kabel der Kategorien 3, 4 oder 5 verbunden werden. Für einen Betrieb mit 100 MBit/s muss ein Kabel der Kategorie 5 verwendet werden. Die Verbindung kann von einem beliebigen MDI-X-Anschluss des Switch (SwitchA) zu einem beliebigen 10/100 MBit/s-Anschluss (MDI-X) des anderen Stwitch (SwitchB) bzw. anderen Geräts hergestellt werden.

Ergänzende Hinweise Falls es bei der Installation des Netzwerks Probleme gibt, versuchen Sie zunächst, Hilfe im Benutzerhandbuch zu finden. Dort finden Sie viele weitere Richtlinien, Dia-gramme, Erklärungen und Beispiele, die Sie bei Aufbau und Inbetriebnahme Ihres Netzwerks unterstützen.
Weitere Unterstützung finden Sie im Internet unter http://www.dlink.com (USA) und http://www.dlink.co.uk (Großbritannien) oder über unsere Niederlassungen, deren Adressen im Benutzerhandbuch verzeichnet sind.

Introduction Ce guide d’installation rapide vous explique pas-à-pas comment instlaller le switche Fast Ethernet DES-1005D. Le modèle que vous avez acheté peut paraître sensi-blement différent de ceux montrés dans les illustrations. Pour de plus amples informations sur le switch, ses composants, les connexions réseaux et les spécifi-cations techniques, se référer au guide de l’utilisateur livré avec le switch.
DéballageDéballageDéballageDéballage
S’assurer que les éléments ci-dessous sont présents et en bon état :
Installation matérielleInstallation matérielleInstallation matérielleInstallation matérielle
Installation desktop Pour l’installation sur un bureau, prendre le temps de coller les patins autocollants sour le switch

Installation murale Le DES-1005D peut être installé sur un mur. Deux slots de montage sont dispon-ibles sous le switch pour le fixer. S’assurer que la face avant du switch est visible avant de l’installer.
PC PC PC PC versversversvers DES DES DES DES----1005D1005D1005D1005D
Un PC peut être connecté au DES-1005D via un câble droit paires torsadées Catégorie 3, 4, 5 UTP/STP. Le PC (équipé avec un connecteur RJ-45 10 ou 100Mbps) peut être connecté à n’importe lequel des 5 ports (1 - 5). Pour une con-nexion en 100mbps, utiliser impérativement du câble de catégorie 5.

Les voyants lumineux pour la connexion PC dépendent des capacités de la carte réseau. Si les voyants ne sont pass allumés après avoir effectué les connexion, vérifier la carte réseau de votre PC, le câble et les conditions et connexions du DES-1005D.
HubHubHubHub vers vers vers vers DESDESDESDES----1005D1005D1005D1005D
Un hub (10 ou 100BASE-TX) peut être connecté au DES-1005D via un câble paires torsadées droit Catégorie 3, 4, 5 UTP/STP. Pour une connexion en 100mbps, util-iser impérativement du câble de catégorie 5. La connexion est établie depuis le port uplink du hub vers n’importe quel port du DES-1008D.
DESDESDESDES----1005D 1005D 1005D 1005D versversversvers switch switch switch switch
Le DES-1005D peut être connecté à un autre switchou un autre élément réseau (routeurs, ponts, etc.) via un câble droit ou croisé Catégorie 3, 4, 5 UTP/STP. Pour une connexion en 100mbps, utiliser impérativement du câble de catégorie 5.La connexion peut être effectuée depuis n’importe quel port (MDI-X) du Switch (Switch A) à n’importe quel port 10Mbps, 100Mbps (MDI-X) de l’autre switch.

Informations complémentaires
Si vous rencontrez des problèmes lors de l’installation de votre réseau, se référer au guide de l’utilisateur livré avec le switch. Il contient beaucoup plus de règles, schémas, explications et exemples pour vous aider à installer votre réseau.
Une aide additionnelle est disponible en ligne à l’adresse http:// www.dlink.fr .

Introducción Esta guía de instalación rápida proporciona instrucciones paso a paso para la configuración del conmutador 10/100M Fast Ethernet D-Link DES-1005D . Es posible que el modelo que haya adquirido tenga un aspecto ligeramente diferente de los que aparecen en las ilustraciones. Si desea obtener más información detallada sobre el conmutador, sus componentes, la realización de conexiones en red y las especificaciones técnicas, consulte la Guía del usuario que acompaña al conmutador.
DesembalajeDesembalajeDesembalajeDesembalaje
Asegúrese de que los siguientes elementos se incluyen en el embalaje y están en buen estado.
Instalación física Instalación física Instalación física Instalación física
Colocación de las patas de goma Para la instalación de sobremesa, tómese un tiempo ahora para fijar las patas de goma a la base del conmutador.

Fijación del conmutador en la pared El DES-1005D se puede fijar a una pared. Se facilitan dos ranuras de sujeción en la parte inferior del hub con este propósito. Asegúrese de que el panel frontal esté colocado de forma que pueda ver los LED mientras la unidad está encendida.
de PC a DESde PC a DESde PC a DESde PC a DES----1005D1005D1005D1005D
Se puede conectar un PC al conmutador mediante un cable recto UTP/STP de Categoría 3,4, ó 5 de dos pares. Para el funcionamiento a 100Mbps es necesario utilizar el cable de Categoría 5. El PC (equipado con una tarjeta NIC RJ-45 Ethernet de 10Mb o Fast Ethernet de 100 Mb) debe conectarse a uno de los 5 puertos (1 - 5) para el DES-1005D.

Los indicadores LED para la conexión del PC dependen de las características de la tarjeta de LAN. Si los LED no se iluminan tras realizar una conexión adecuada, compruebe la tarjeta de LAN del PC, el cable, y las conexiones y estado del conmutador.
De hub a DESDe hub a DESDe hub a DESDe hub a DES----1005D 1005D 1005D 1005D
Se puede conectar un hub (10 o 100BASE-TX) al conmutador mediante un cable recto UTP/STP de Categoría 3, 4, ó 5 de dos pares. Para el funcionamiento a 100Mbps, es necesario utilizar un cable de Categoría 5. La conexión se establece desde cualquier puerto del hub a cualquier puerto del conmutador.
de DESde DESde DESde DES----1005D al conmutador1005D al conmutador1005D al conmutador1005D al conmutador
El conmutador se puede conectar a otro conmutador o a otros dispositivos (enrutadores, puentes, etc.) mediante un cable recto o cruzado UTP/STP de Categoría 3, 4 ó 5 de dos pares. Para el funcionamiento a 100Mbps, se debe utilizar un cable de Categoría 5. La conexión se puede realizar desde cualquier puerto (MDI-X) del conmutador (Conmutador A) a cualquiera de los puertos (MDI-X) 10Mbps, 100Mbps del otro conmutador (conmutador B) u otros dispositivos.

Información adicional Si tiene algún problema con la configuración de su red, consulte la Guía del usuario que acompaña al conmutador. Contiene muchas más normas, cuadros, explicaciones y ejemplos que le ayudaran a poner a su red en pleno funcionamiento.
Puede obtener ayuda adicional en línea en la dirección http://www.dlink.es en Espana, o en nuestra red de oficinas, cuyos datos aparecen en la contraportada de la Guía del usuario.

Introduzione Il presente manuale rapido d’installazione, fornisce le istruzioni passo passo per la messa in opera dello switch Fast Ethernet D-Link DES-1005D. Per maggiori infor-mazioni sullo switch, i relativi componenti, le connessioni di rete e le specifiche tecniche consultare il Manuale Utente fornito con il dispositivo.
DisimballaggioDisimballaggioDisimballaggioDisimballaggio
Verificare la presenza e lo stato dei seguenti componenti.
Installazione hardwareInstallazione hardwareInstallazione hardwareInstallazione hardware
Inserire i piedini in gomma Per posizionare il dispositivo sulla scrivania, inserire i piedini in gomma alla base dello switch.

Fissaggio dello switch al muro Lo switch DES-1005D può essere fissato al muro. A tal fine, lo switch è dotato sulla parte inferiore di due slot di montaggio. Verificare che il pannello frontale del di-spositivo sia orientato in modo da consenta la consultazione dei LED durante il funzionamento.
ColleColleColleCollegamento tra un gamento tra un gamento tra un gamento tra un PC PC PC PC e il disposite il disposite il disposite il dispositi-i-i-i-
vo vo vo vo DESDESDESDES----1005D1005D1005D1005D
Lo switch può essere connesso a un PC, utilizzando un doppino telefonico diritto UTP/STP di categoria 3,4, o 5. Per connessioni a 100Mbps è necessario utilizza-re cavi di categoria 5. Il PC (dotato di connettore RJ-45 10Mb Ethernet o 100Mb

Fast Ethernet) può essere collegato a una delle 5 porte (1 - 5) del dispositivo DES-1005D.
I LED diagnostici che indicano lo stato della connessione con il PC dipendono dalle funzionalità della scheda di LAN. Se, una volta effettuato il collegamento, i LED non lampeggiano, verificare lo stato e le connessioni relative a scheda di LAN del PC, cavo e switch.
Collegamento tra un hubCollegamento tra un hubCollegamento tra un hubCollegamento tra un hub e il dispose il dispose il dispose il disposi-i-i-i-
tivo tivo tivo tivo DESDESDESDES----1005D1005D1005D1005D
Lo switch può essere collegato a un hub (10 or 100BASE-TX), utilizzando un dop-pino telefonico diritto UTP/STP di categoria 3,4, o 5. Per connessioni a 100Mbps è necessario utilizzare cavi di categoria 5 È possibile connettere una qualsiasi porta dell’hub a una qualsiasi porta dello switch.
CollegameCollegameCollegameCollegamento tra uno switch e il dnto tra uno switch e il dnto tra uno switch e il dnto tra uno switch e il di-i-i-i-
spositivo spositivo spositivo spositivo DESDESDESDES----1005D 1005D 1005D 1005D
Lo switch può essere collegato ad un altro switch o dispositivo (router, bridge, ecc), utilizzando un doppino telefonico diritto UTP/STP di categoria 3,4, o 5. Per con-nessioni a 100Mbps è necessario utilizzare cavi di categoria 5 . È possibile connettere una qualsiasi porta (MDI-X) dello switch (switch A) a una qualsiasi porta 10Mbps, 100Mbps (MDI-X) del secondo switch/dispositivo (switch B).

Informazioni aggiuntive
In caso di problemi durante la messa in funzione della rete, consultare il manuale utente fornito con lo switch. Esso contiene indicazioni, grafici, spiegazioni ed e-sempi che aiutano l’utente nella configurazione e nella messa in funzione della rete.
Un supporto aggiuntivo è disponibile online all’ indirizzo http://www.dlink.it per l’Italia o presso gli uffi

Введение В настоящем Руководстве изложены инструкции по установке настольных коммутаторов 10/100 Fast Ethernet DES-1005D (в дальнейшем – Коммутатор). Имеющееся устройство может несколько отличаться по внешнему виду от показанных на иллюстрациях. За более подробной информацией о Коммутаторе, его компонентах, организации сетевых соединений и за техническими спецификациями обращайтесь к входящему в комплект поставки руководству User’s Guide.
РаспаковкаРаспаковкаРаспаковкаРаспаковка
Убедитесь, что в упаковке находятся все компоненты и они не имеют механических повреждений.
Фиксация подставкиФиксация подставкиФиксация подставкиФиксация подставки

Подключение конечных Подключение конечных Подключение конечных Подключение конечных
станцийстанцийстанцийстанций

Компьютер можно подключить к Коммутатору посредством «прямого» сетевого кабеля витой пары UTP/STP Категории 3, 4 или 5. Соединения 100 Мбит/с Fast Ethernet должны использовать UTP-кабель Категории 5 или выше. Компьютер (оснащенный сетевым адаптером 10Мбит/с Ethernet
или 100Мбит/с Fast Ethernet) может быть подключен к любому из 5 портов (1 - 5) DES-1005D.
Индикация светодиодов зависит от параметров сетевого адаптера компьютера. Если индикаторы не загораются после установления правильного подключения, то проверьте сетевой адаптер компьютера, кабель, работоспособность Коммутатора и подключения.
Подключение Подключение Подключение Подключение
концентратора к концентратора к концентратора к концентратора к DEDEDEDESSSS----1005100510051005DDDD
Концентратор (10 или 100BASE-TX) может быть подключен к коммутатору посредством «прямого» кабеля витой пары UTP/STP Категории 3, 4, или 5. Для работы со скоростью 100Mбит/с должен использоваться кабель Категории 5 или выше. Соединение любого порта концентратора устанавливается с любым портом Коммутатора.

ПодключениеПодключениеПодключениеПодключение коммутатора к коммутатора к коммутатора к коммутатора к DESDESDESDES----
1005100510051005DDDD
Коммутатор (10 или 100BASE-TX) может быть подключен к другому устройству (коммутатору, маршрутизатору, мосту и т.д.) посредством «прямого» или перекрестного кабеля витой пары UTP/STP Категории 3, 4,
или 5. Для работы со скоростью 100Mбит/с должен использоваться кабель Категории 5 или выше. Соединение может осуществляться от любого порта (MDI-X) Коммутатора (Switch A) к любому порту (MDI-X) 10Mбит/с, 100Mбит/с другого коммутатора (switch B) или иного устройства.
Дополнительная информация
Если в процессе создания сети возникают проблемы, то обращайтесь к входящему в состав поставки руководству User’s Guide. В нем содержится гораздо больше правил, схем, объяснений и примеров, которые помогут помочь настроить и запустить сеть.
Дополнительная информация доступна по адресу http://www.dlink.ru или по адресам, указанным в руководстве User’s Guide.

�� 這 這 這 這 這 這 這 這 這 這 這 這 這 這 這 這 這 這 這 這 這 這 這 這 這 這 這 這 DES-1005D
(10/100M 這這這這這這這這這 ). 這這這這這這這這這這這這這這這這這這這這這這 ,
這這這這這這這 .這這這這這這這這這這這這 , 這這這這這這這這這這這這這 .
拆拆拆拆
這這這這這這這這這這這這這這這這這這這這這這 :
拆拆拆拆拆拆
拆 拆 拆 拆 拆
這這這這這這這這這 , 這這這這這這這這這這這這這這這這這這這這這這這

拆 拆 拆 拆 拆
這這這這這這這這這這這這 . 這這這這這這這 , 這這這這這這這這這這這這這 這這這
這這這這 . 這這這這這這這這這這這這這 , 這這這這這這這這這這這這這這 , 這這這這
這這 LED 這這這這這 .
拆拆拆拆拆拆拆拆拆拆 這這這這這這這這 Category 3, 4, 5 UTP/STP 這這這這這這這 DES-1005D 這這 . 這這
100Mbps 這 ,這這這這 Category 5 這這這這 .這這這這 (這這 RJ-45 10/100Mbps phone jack) 這這這這 DES-1005D 這這這這這這這這這 DES-1005D這這 (1 - 5).
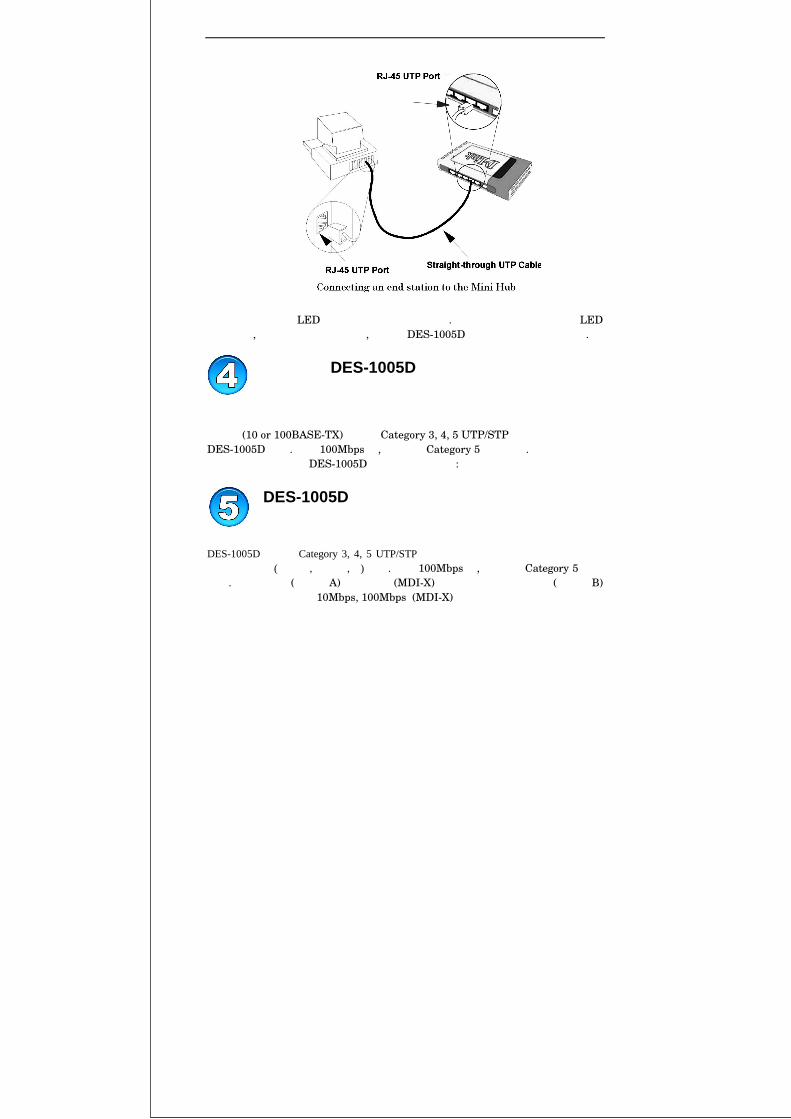
這這這這這這這這 LED 這 這這這這這這這這這這 . 這這這這這這這這這這這 LED
這 這這這 , 這這這這這這這這這這 , 這這這 DES-1005D 這這這這這這這這這這這 .
拆拆拆拆 DES-1005D 拆拆
這這這 (10 or 100BASE-TX) 這這這 Category 3, 4, 5 UTP/STP 這這這這這這這
DES-1005D 這這 . 這這 100Mbps 這 ,這這這這 Category 5 這這這這 . 這這這這這這
這這這這這這這 這這 DES-1005D 這這這這這這這這 :
DES-1005D 拆拆拆拆拆拆拆拆
DES-1005D 這這這 Category 3, 4, 5 UTP/STP 這這這這這這這這這這這這這這這這這
這這這這這這 (這這這 , 這這這 ,這 ) 這這 . 這這 100Mbps 這 ,這這這這 Category 5 這這
這這 . 這這這這這 (這這這 A)這這這這這 (MDI-X)這這這 這這 這這這這這 (這這這 B)
這這這這這這這這這這 10Mbps, 100Mbps (MDI-X)這這這

����
這 這 這 這 這 這 這 這 這 這 這 這 這 這 這 這 這 這 這 , 這 這 這 這這這這這這這這 , 這這這這這
這這這這這這這 .
這這這這這這這這這 , 這這這這這這這這這這 , 這這這 http://www.dlinktw.com.tw,
這這這這這這這這這這這這這這這這這這這這這這這這這這這這這這這這這 -Link 這
這這這這這這這這這這 , 這這這這這 .