deployment automation integration guide
TRANSCRIPT

Deployment AutomationIntegration Guide
Copyright © 2011-2020 Micro Focus or one of its affiliates. All rights reserved.
The only warranties for products and services of Micro Focus and its affiliates and licensors (“Micro Focus”) areset forth in the express warranty statements accompanying such products and services. Nothing herein shouldbe construed as constituting an additional warranty. Micro Focus shall not be liable for technical or editorialerrors or omissions contained herein. The information contained herein is subject to change without notice.
Contains Confidential Information. Except as specifically indicated otherwise, a valid license is required forpossession, use or copying. Consistent with FAR 12.211 and 12.212, Commercial Computer Software, ComputerSoftware Documentation, and Technical Data for Commercial Items are licensed to the U.S. Government undervendor's standard commercial license.
Part number: 6.3.1
Publication date: 2020-02-27
2 Deployment Automation

Table of ContentsChapter 1: Welcome to Deployment Automation ......................................................7
About This Documentation .................................................................................7
Chapter 2: Integrating with Deployment Automation ................................................9
Chapter 3: Integrating with SBM ........................................................................ 11
Configuring the REST Grid Widgets .................................................................. 11
Methods Supporting Composer Mode ............................................................... 12
Single Sign-On (SSO) Configuration .................................................................. 17
Configuring Common Tomcat for SSO ............................................................ 17
Creating an SSO Authentication Realm ............................................................ 19
Sign On Using SSO ....................................................................................... 19
Single Sign Out............................................................................................. 19
Chapter 4: Integrating with Dimensions CM ......................................................... 21
Dimensions CM Integration Example .................................................................. 21
Dimensions CM Integration Runtime Communication .......................................... 22
Dimensions CM Plugin Installation ..................................................................... 22
Configuring Dimensions CM Processes in Deployment Automation ........................ 23
Importing the Dimensions CM Sample Environment .......................................... 23
Importing the Sample Dimensions CM Application ............................................. 24
Configuring the Dimensions CM Application ...................................................... 24
Configuring Dimensions CM Component Processes ............................................. 26
Chapter 5: Integrating with ChangeMan ZMF......................................................... 27
ChangeMan ZMF Integration Example ............................................................... 27
ChangeMan ZMF Integration Runtime Communication .......................................... 28
Configuring ALM Connector on the Mainframe ................................................... 28
Configuring a ChangeMan ZMF Proxy User ID ................................................... 29
Configuring TSO User IDs and Permissions ...................................................... 29
Configuration in ChangeMan ZMF ..................................................................... 29
Adding Required Startup Parameters ............................................................... 30
Example ChangeMan ZMF Startup Parameters................................................... 30
Integration Guide 3

Configuring Change Packages in ChangeMan ZMF ............................................. 31
Installing the ALM Connector Services ............................................................... 31
Configuring the Integration Files........................................................................ 32
Loading the ChangeMan ZMF Plugin .................................................................. 33
Configuring ChangeMan ZMF Processes in Deployment Automation ........................ 33
Chapter 6: Integrating with Nolio ........................................................................ 35
Nolio Integration Example .............................................................................. 35
Nolio Integration Runtime Communication ......................................................... 36
Nolio Plugin Installation.................................................................................... 36
Configuring Nolio Processes in Deployment Automation ....................................... 37
Importing the Sample Nolio Environment ......................................................... 37
Importing the Sample Nolio Application............................................................ 37
Configuring the Nolio Application ..................................................................... 38
Configuring Nolio Component Processes ......................................................... 39
Chapter 7: Integrating with Micro Focus ALM Octane ............................................. 41
ALM Octane Pre-Configuration Steps .................................................................. 41
Chapter 8: Creating Custom Plugins..................................................................... 43
Plugin Creation Overview ................................................................................. 43
The plugin.xml File .......................................................................................... 44
The Header: <header> Element ..................................................................... 47
The Plugin Steps: <step-type> Element ......................................................... 47
Step Properties: <properties> Element ............................................................ 48
Step Commands: <command> Element ......................................................... 50
Step Post-Processing: <post-processing> Element............................................. 51
The upgrade.xml file ....................................................................................... 52
The info.xml File ............................................................................................. 53
Chapter 9: Integrating with Source Configuration Tools .......................................... 55
Chapter 10: Creating Custom Source Configuration Types....................................... 57
Getting Started with Custom Source Configuration Types .................................... 57
The CommonIntegrator Lifecycle ..................................................................... 59
4 Deployment Automation

An Implementation of the CommonIntegrator Interface ....................................... 59
Using the Annotations for Defining UI Properties ................................................ 60
Methods to Use During Version Import ............................................................... 60
getNextVersionInfo Method ........................................................................... 61
downloadVersionContent Method..................................................................... 63
Using ComponentInfo to Process Version Information .......................................... 63
Using the CommonIntegrator getAlerts Method to Validate Field Values .................. 64
Logging Messages to the Console ..................................................................... 64
Compiling and Loading Custom Source Configuration Types ................................. 65
Using Custom Source Configuration Types ......................................................... 66
Chapter 11: Importing and Configuring External Source Configuration Types ............ 67
Importing External Source Configuration Types ................................................... 67
Sonatype Nexus Properties .............................................................................. 67
Integration Guide 5

6 Deployment Automation

Chapter 1: Welcome to DeploymentAutomation
Deployment Automation enables you to automate the deployment of application changes.Benefits include continuous delivery and DevOps automation, reduction of developmentcosts, and increased deployment frequency without increased risk.
About This DocumentationThis documentation gives information on integrating with Deployment Automation and isintended for those who will configure the integrations. This information is also included inthe online Help in HTML format.
Integration Guide 7

Chapter 1: Welcome to Deployment Automation
8 Deployment Automation

Chapter 2: Integrating with DeploymentAutomation
The integrations provided by Deployment Automation enable you to execute deploymentrelated tasks through many Micro Focus and third-party products. Most integrations withDeployment Automation are implemented through the rich set of plugins provided withthe product. Plugins are used in Deployment Automation process steps. For details on theplugins, see Deployment Automation Plugins Guide.
For information on additional integration mechanisms, configuring integrations, andwriting plugins to create integrations of your own, see the following topics.
Chapter 3: Integrating with SBM [page 11]
Chapter 9: Integrating with Source Configuration Tools [page 55]
Chapter 4: Integrating with Dimensions CM [page 21]
Chapter 5: Integrating with ChangeMan ZMF [page 27]
Chapter 6: Integrating with Nolio [page 35]
Chapter 8: Creating Custom Plugins [page 43]
Integration Guide 9

Chapter 2: Integrating with Deployment Automation
10 Deployment Automation

Chapter 3: Integrating with SBM
Communication between SBM and Deployment Automation enables release deploymentautomation from SBM solutions. Integration mechanisms that enable this communicationare as follows:
• REST Grid Widgets
You can select Deployment Automation RESTful service data and populate SBM RESTGrid widgets directly from SBM Composer using Deployment Automation ComposerMode. This communication enables the creation and linking of DeploymentAutomation applications and environments and the access of DeploymentAutomation processes for automation deployment tasks.
• User Auto-registration
When that user accesses functionality in Deployment Automation through SBM, theSBM Single Sign-On (SSO) token sends the sign on information, and DeploymentAutomation extracts the credentials from the SSO token. Those credentials are usedto register the user in Deployment Automation. See the SBM documentation formore details on SSO.
• ALF Events
ALF Events are another mechanism that can be used to integrate SBM withDeployment Automation.
For information on ALF Events that can be emitted from Deployment Automation, seethe Deployment Automation User's Guide.
For more information on integrating with SBM Solutions, see the following topics:
• Configuring the REST Grid Widgets [page 11]
• Methods Supporting Composer Mode [page 12]
• Single Sign-On (SSO) Configuration [page 17]
Configuring the REST Grid WidgetsIn SBM Composer, in a Visual Design layout REST Grid widget, you can get data directlyfrom Deployment Automation REST services.
To configure the REST grid widget in SBM Composer:
1. In the REST grid widget, in the Configure URL dialog, provide the REST servicemethod URL and add the composerMode=true request parameter.
For example:
http://srademo:8080/da/rest/deploy/component/all?composerMode=true
2. If the given Deployment Automation GET REST service method supports ComposerMode, a sample JSON with returned property names will appear in the Result tab.These do not include real data, but are the JSON structure.
Integration Guide 11

3. In the Result tab, pick the corresponding property names to construct your RESTgrid widget columns.
4. When you have finished picking the property names to construct your columns,change the REST service method URL composerMode parameter to false.
For example:
http://srademo:8080/da/rest/deploy/component/all?composerMode=false
5. Turn on SSO authentication.
6. Deploy the process app.
7. Verify the information in the SBM process app's user workspace.
The REST service methods that support Composer Mode are given in the following topic.
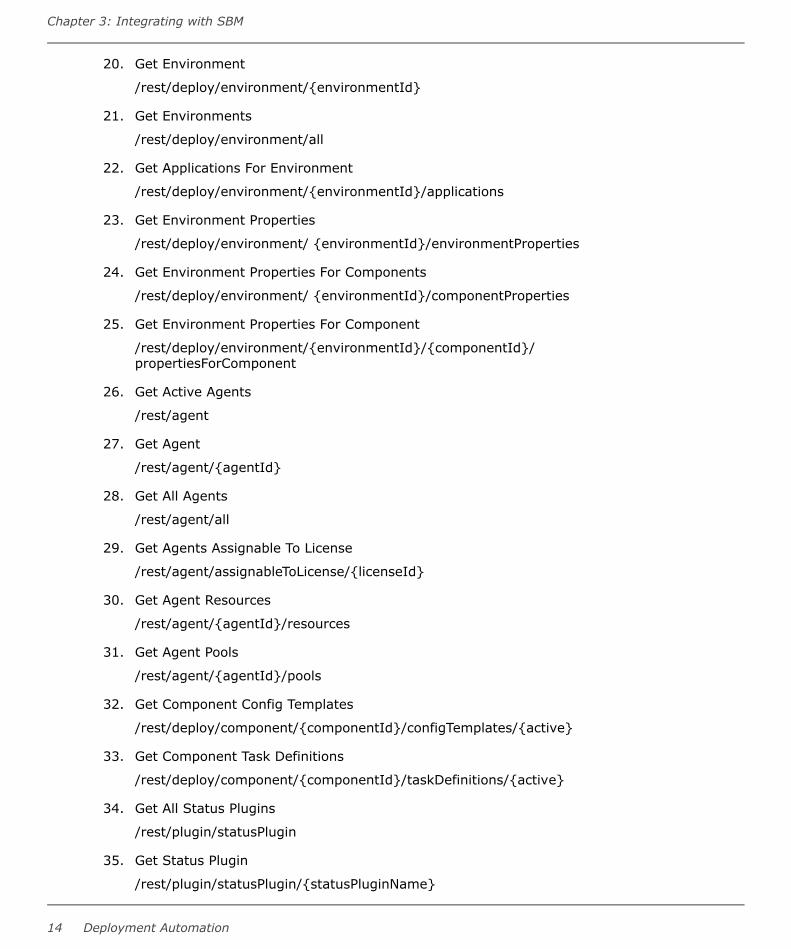
Methods Supporting Composer ModeOnly some GET methods from the da/rest/application.wadl file are supported by RESTGrid widgets in SBM Composer.
1. Get Application
/rest/deploy/application/{applicationId}
2. Get Applications
/rest/deploy/application
/rest/deploy/application/all
3. Get Application Components
/rest/deploy/application/{applicationId}/components
4. Get Application Environments
/rest/deploy/application/{applicationId}/environments/{inactive}
/rest/deploy/application/environments/forComponent/{componentParam}
/rest/deploy/application/{applicationId}/fullEnvironments
5. Get Application Process
/rest/deploy/applicationProcess/{applicationProcessId}/{version}
6. Get Application Processes
/rest/deploy/applicationProcess
/rest/deploy/application/{applicationId}/processes/{inactive}
/rest/deploy/application/processes/forComponent/{componentParam}
/rest/deploy/application/{applicationId}/executableProcesses
/rest/deploy/application/{applicationId}/fullProcesses
7. Get Application Process Unfilled Properties
Chapter 3: Integrating with SBM
12 Deployment Automation

/rest/deploy/applicationProcess/{applicationProcessId}/unfilledProps/{onlyRequired}
8. Get Application Properties
/rest/deploy/application/{applicationId}/applicationProperties
9. Get Component
/rest/deploy/component/{componentId}
10. Get Components
/rest/deploy/component
/rest/deploy/component/all
/rest/deploy/component/allFull
11. Get Component Versions
/rest/deploy/component/{componentId}/versions/{inactive}
12. Get Component Properties
/rest/deploy/component/{componentId}/componentProperties
13. Get Component Version Properties
/rest/deploy/component/{versionId}/componentVersionProperties
14. Get Component Process
/rest/deploy/componentProcess/{componentProcessId}/{version}
15. Get Component Processes
/rest/deploy/component/{componentId}/processes/{inactive}
/rest/deploy/component/{componentId}/fullProcesses/{inactive}
/rest/deploy/component/{componentId}/processesWithVersion
/rest/deploy/component/{componentId}/executableProcesses
16. Get Standalone Process
/rest/process/{processId}/{version}
17. Get Standalone Processes
/rest/process/{inactive}
18. Get Resource
/rest/resource/resource/{resourceId}
19. Get Resources
/rest/resource/resource
/rest/resource/resource/tree
/rest/resource/resource/treeWithInactive
/rest/resource/resource/{resourceId}/resources
Integration Guide 13
20. Get Environment
/rest/deploy/environment/{environmentId}
21. Get Environments
/rest/deploy/environment/all
22. Get Applications For Environment
/rest/deploy/environment/{environmentId}/applications
23. Get Environment Properties
/rest/deploy/environment/ {environmentId}/environmentProperties
24. Get Environment Properties For Components
/rest/deploy/environment/ {environmentId}/componentProperties
25. Get Environment Properties For Component
/rest/deploy/environment/{environmentId}/{componentId}/propertiesForComponent
26. Get Active Agents
/rest/agent
27. Get Agent
/rest/agent/{agentId}
28. Get All Agents
/rest/agent/all
29. Get Agents Assignable To License
/rest/agent/assignableToLicense/{licenseId}
30. Get Agent Resources
/rest/agent/{agentId}/resources
31. Get Agent Pools
/rest/agent/{agentId}/pools
32. Get Component Config Templates
/rest/deploy/component/{componentId}/configTemplates/{active}
33. Get Component Task Definitions
/rest/deploy/component/{componentId}/taskDefinitions/{active}
34. Get All Status Plugins
/rest/plugin/statusPlugin
35. Get Status Plugin
/rest/plugin/statusPlugin/{statusPluginName}
Chapter 3: Integrating with SBM
14 Deployment Automation

36. Get Status Plugin Version Statuses
/rest/plugin/statusPlugin/{statusPluginName}/versionStatuses
37. Get Status Plugin Inventory Statuses
/rest/plugin/statusPlugin/{statusPluginName}/inventoryStatuses
38. Get Application Component Process Tree
/rest/deploy/application/{applicationId}/componentProcessTree
39. Get Application Unused Components
/rest/deploy/application/{applicationId}/unusedComponents
40. Get Application Task Definitions
/rest/deploy/application/{applicationId}/taskDefinitions/{active}
41. Get Snapshots
/rest/deploy/application/{applicationId}/snapshots/{inactive}
42. Get Component Process Prop Defs
/rest/deploy/componentProcess/{componentProcessId}/{version}/propDefs
43. Get Component Process Activity Tree
/rest/deploy/componentProcess/{componentProcessId}/activityTree
44. Get Component Process Change Log
/rest/deploy/componentProcess/{componentProcessId}/changelog
45. Get Application Task Definition
/rest/task/applicationTaskDefinition/{id}
46. Get Deployment Request
/rest/deploy/deploymentRequest/{deploymentRequestId}
47. Get Deployment Requests
/rest/deploy/deploymentRequest/table
48. Get Deployment Request Application Process Requests
/rest/deploy/ deploymentRequest /{deploymentRequestId}/applicationProcessRequests
49. Get Deployment Request Non Compliancy By Resource
/rest/deploy/deploymentRequest/{deploymentRequestId}/noncompliancyByResource
50. Get Config Template
/rest/deploy/configTemplate/{componentId}/{name}/{version}
/rest/deploy/configTemplate/byRequest/{requestId}/{name}
Integration Guide 15

51. Get Application Process Request
/rest/deploy/applicationProcessRequest/{applicationProcessRequestId}
52. Get Application Process Requests
/rest/deploy/applicationProcessRequest/table
53. Get Application Process Request Properties
/rest/deploy/applicationProcessRequest/{applicationProcessRequestId}/properties
54. Get Application Process Request Environment Properties
/rest/deploy/applicationProcessRequest/{applicationProcessRequestId}/environmentProperties
55. Get Application Process Request Versions
/rest/deploy/applicationProcessRequest/{applicationProcessRequestId}/versions
56. Get Active Global Environments
- /rest/deploy/globalEnvironment
57. Get All Global Environments
- /rest/deploy/globalEnvironment/all
58. Get Active Applications For Global Environment
- /rest/deploy/globalEnvironment/{globalEnvironmentId}/applications
59. Get All Applications For Global Environment
- /rest/deploy/globalEnvironment/{globalEnvironmentId}/applications/all
60. Get Inactive Global Environments
- /rest/deploy/globalEnvironment/inactive
61. Get Global Environment
- /rest/deploy/globalEnvironment/{globalEnvironmentId}
62. Get Global Environment Properties
- /rest/deploy/globalEnvironment/{globalEnvironmentId}/globalEnvironmentProperties
63. Get Global Environment Resource Mappings
- /rest/deploy/globalEnvironment/{globalEnvironmentId}/resources
64. Get Global Environment Not Mapped Resources
- /rest/deploy/globalEnvironment/{globalEnvironmentId}/resourcesNotMapped
65. Get Global Environment Not Mapped Resource Groups
- /rest/deploy/globalEnvironment/{globalEnvironmentId}/resourceGroupsNotMapped
Chapter 3: Integrating with SBM
16 Deployment Automation

Single Sign-On (SSO) ConfigurationSSO enables Deployment Automation to integrate more easily with other Micro Focusproducts. Login information is passed automatically through SSO so that there is no needto prompt for login credentials as information flows between products.
For details on figuring SSO, see the following topics:
• Configuring Common Tomcat for SSO [page 17]
• Creating an SSO Authentication Realm [page 19]
• Sign On Using SSO [page 19]
• Single Sign Out [page 19]
Configuring Common Tomcat for SSOTo use a typical Deployment Automation installation with SBM, you must updateconfiguration files to enable Common Tomcat to find and use the correct SBM SSOinstallation.
Before you can use SSO with Deployment Automation, you must have SBM installed andSSO must be enabled. You must have the Deployment Automation server installed on thesame machine as the Common Tomcat.
1. On the Deployment Automation server, stop the Common Tomcat service.
2. Navigate to the Common Tomcat conf directory. For example:
C:\Program Files\Micro Focus\common\tomcat\8.5\alfssogatekeeper\conf
3. In gatekeeper-core-config.xml, change the following parameters as necessary toreplace the host and port values. Replace the placeholder variables shown here andin the default file as $HTTP_OR_HTTPS, $HOSTNAME and $PORT, with either HTTP orHTTPS, and the host name and port for your SBM SSO server. The default HTTP portnumber for the SBM SSO server is 8085, and the default HTTPS port number for theSBM SSO server is 8243.
<parameter name="SecurityTokenService"Type="xsd:anyURI">$HTTP_OR_HTTPS://$HOSTNAME:$PORT/idp/services/Trust<parameter>
<parameter name="SecurityTokenServiceExternal"Type="xsd:anyURI">$HTTP_OR_HTTPS://$HOSTNAME:$PORT/idp/services/Trust</parameter>
<parameter name="FederationServerURL"Type="xsd:anyURI">$HTTP_OR_HTTPS://$HOSTNAME:$PORT/idp/login</parameter>
For example:
Integration Guide 17

<parameter name="SecurityTokenService" Type="xsd:anyURI">HTTPS://myserver:8243/idp/services/Trust<parameter>
<parameter name="SecurityTokenServiceExternal" Type="xsd:anyURI">HTTPS://myserver:8243/idp/services/Trust</parameter>
<parameter name="FederationServerURL" Type="xsd:anyURI">HTTPS://myserver:8243/idp/login</parameter>
CAUTION:
For the gatekeeper core configuration, you use the SBM SSO HTTP orHTTPS port number. Be careful not to confuse this with the port numbersfor Deployment Automation, which are by default 8080 and 8443 for HTTPand HTTPS respectively.
4. Navigate to your Deployment Automation server profile directory. For example:
C:\Users\username\.microfocus\da\conf\serveror
/opt/MicroFocus/da/username/.microfocus/da/conf/server
5. Modify the da_config.xml to set the ssoEnabled property to true as follows:
<ssoConfig><ssoEnabled>true</ssoEnabled>
</ssoConfig>
6. On the Deployment Automation server, start the Common Tomcat service.
7. Verify the configuration by invoking the Deployment Automation user interfacethrough your implementation's URL, such as http://sdaserver:8080/da. If whenattempting to sign on, you receive the following error, you will need to update yourSSO STS certificates.
ALF SSO Gatekeeper error has occurred: Error obtaining security token.DetailValidation of WS-Federation token failed with code 40:Token issuer notallowed.See Knowledgebase item S140637 for more information.
Note: If you have enabled SSO, to login into DA you must add thehostname to the list of SSO protected hosts. Launch SBM Configurator andopen the Authentication tab. On the SSO Protected Hosts tab add the DAhostname.
Chapter 3: Integrating with SBM
18 Deployment Automation

Reconfiguring for SSO After UpgradesIf you have configured Single Sign-On (SSO) with one version of Common Tomcat andhave upgraded Deployment Automation to a version that uses a different version, youmust configure Common Tomcat for SSO again, including setting the parameters in thegatekeeper-core-config.xml file. Otherwise, the SSO login will fail.
You must set these parameters by copying over the corresponding strings from earlierversion of the gatekeeper-core-config.xml file. Copying and replacing the entire filefrom the earlier Common Tomcat installation does not work.
Creating an SSO Authentication RealmYou may need to create the Single Sign-On authentication realm in DeploymentAutomation. This is typically created for you automatically, although may need to becreated for upgrades.
To configure to use SSO:
1. Log in to Deployment Automation as an administrative user.
2. Navigate to Administration > Security > Authentication (Users).
3. In the left pane click '+' (Create Authentication Realm).
4. In the Type field, select Single Sign-On.
5. In the Authorization Realm field, select Internal Security.
6. In the User Header Name field, enter ALFSSOAuthNToken.
7. Click Save.
Deployment Automation allows sign on and sign out through SSO.
Sign On Using SSOTry signing on to the Deployment Automation user interface URL:http://<host>:<port>/da/, where port is the Common Tomcat HTTP port.
Instead of the default Deployment Automation login page, the SBM Single Sign-On pageshould appear.
Enter your user name and password to access Deployment Automation.
Single Sign OutWhen you use Single Sign-On (SSO), Single Sign Out will work correctly as long as youhave the Deployment Automation server and the SSO server both configured to use thesame host.
Integration Guide 19

Chapter 3: Integrating with SBM
20 Deployment Automation
Chapter 4: Integrating with DimensionsCM
You can integrate Deployment Automation with Dimensions CM through the providedDimensions CM plugin.
The Dimensions CM plugin can be used to retrieve a list of baselines for selection fromDimensions CM that are suitable for deployment, and then deploy the target baselineusing the Dimensions CM deployment functionality. The Dimensions CM plugin thatenables Deployment Automation and Dimensions CM to communicate uses theDimensions CM web services and passes predefined credentials and selection information,such as the Dimensions CM product and stream.
Note: Dimensions CM also includes an option to use Deployment Automation fordeployment. For information, see the Dimensions CM documentation.
The following topics describe the runtime communication and configuration of theDimensions CM plugin for use with Deployment Automation.
• Dimensions CM Integration Example [page 21]
• Dimensions CM Integration Runtime Communication [page 22]
• Dimensions CM Plugin Installation [page 22]
• Configuring Dimensions CM Processes in Deployment Automation [page 23]
Documentation References
For more information on using plugins, including details on the plugin steps, see theDeployment Automation Plugins Guide.
Dimensions CM Integration ExampleAll of the information needed for Deployment Automation to communicate withDimensions CM is embedded in the Deployment Automation application and componentprocesses, which use the Dimensions CM plugin.
The flow of communication between Deployment Automation and Dimensions CM is shownin the following figure.
Integration Guide 21

Dimensions CM Integration RuntimeCommunication
The communication between Deployment Automation and Dimensions CM proceeds asfollows:
1. Deployment Automation processes are configured for the Dimensions CM processesto be executed.
2. When the Deployment Automation processes are run, they invoke the DimensionsCM processes. The Deployment Automation processes must contain all connectiondetails for the target Dimensions CM server, product, stream, or other entities.
3. Deployment Automation requests information from Dimensions CM through SOAPservice calls.
4. The activity on the Dimensions CM server is initiated and Deployment Automationpolls the Dimensions CM server for the current job status.
5. Once the job status in Dimensions CM completes, either successfully or with afailure, the Deployment Automation process step that initiated the transactioncompletes.
Dimensions CM Plugin InstallationThe Dimensions CM plugin must be extracted before it can be loaded into DeploymentAutomation. Extract the plugin as follows:
1. Download the plugin installation file from the Deployment Automation downloadlocation on the Support website. For example, Dimensions_bundle_vvv.zip, wherevvv is the version.
2. Extract the files from the plugin bundle. It contains the plugin zip file and filesneeded to configure the plugin. The plugin zip file is named DimensionsCM_vvv.zip,where vvv is the version.
Chapter 4: Integrating with Dimensions CM
22 Deployment Automation

3. In Deployment Automation, navigate to Administration > Automation > Plugins.
4. Click the Load Plugin button.
5. Click Choose File and select the plugin zip file.
6. Click Load.
7. Configure the processes for the plugin that are required for the integration.
Configuring Dimensions CM Processes inDeployment Automation
The following topics describe how to configure the processes and properties for optimaluse of the Dimensions CM plugin for use with Deployment Automation.
• Importing the Dimensions CM Sample Environment [page 23]
• Importing the Sample Dimensions CM Application [page 24]
• Configuring the Dimensions CM Application [page 24]
• Configuring Dimensions CM Component Processes [page 26]
Importing the Dimensions CM Sample EnvironmentFor the quickest and most reliable implementation, you should import the sampleenvironment and application and modify the properties to suit your needs. Before you canimport the sample application processes, you must first import the environment that isassociated with the application.
One sample environment, UAT, is provided to use with all of the sample applications. Ifyou have already imported the environment to use with one of the other sampleapplications, you should not import it again.
To import the sample UAT environment:
1. Navigate to the directory location where you downloaded the plugin bundle.
2. Extract the following JSON file if it is not already extracted:
Sample UAT.json
3. If you want to change the name of the environment that will be imported, open theenvironment JSON file and change the name and description to whatever you wantto call your environment.
4. To import the environment:
a. In Deployment Automation, navigate to Management > Environments.
b. Click Import.
c. Click Choose File and browse to the path of the Sample UAT.json file.
d. Click Import.
Integration Guide 23
The environment should now be listed in your environments page, as UAT if you did notchange the name, or under the name you specified when you changed it.
Importing the Sample Dimensions CM ApplicationThere are several Deployment Automation processes necessary to create the operationsneeded for this plugin integration. To make it easier for you to configure your processes,an exported sample application is included in the plugin bundle.
The sample application includes all of the application and component information neededto get you started. You can import the exported file and modify the details to match yourimplementation. Otherwise, you must configure all of your processes and propertiesmanually as described in the subsequent topics:
To import the sample application:
1. Navigate to the directory location where you downloaded the plugin bundle.
2. Extract the following JSON file if it is not already extracted:
<product> Sample Application.json
3. If you changed the name and description of the sample environment that youimported, open the application JSON file and change the corresponding environmentname and description to the ones you used in your environment JSON file.
4. To import the application processes:
a. In Deployment Automation, navigate to Management > Applications.
b. Click Import.
c. Click Choose File and browse to the path of the JSON file.
d. Click Import.
The application should now appear in the application list.
Configuring the Dimensions CM ApplicationAn application process is used to run the component processes you need. Most of theproperties that are needed for the component processes should be set at the applicationlevel, because many properties are used by more than one component process.
Tip: For the quickest implementation, import the sample environment andapplication and modify the properties to suit your needs.
To configure the application:
1. Create an application that will contain your properties and component processes orselect an existing one. For example, DimCM Application.
2. If you imported the sample application, edit the application and change theapplication name and description to match your implementation's values.
Chapter 4: Integrating with Dimensions CM
24 Deployment Automation

3. Add properties to your application that are common to all component processes, ormodify the existing imported values to match your system information. For example,the connection information property values are as follows:
• DIMCM_DBCONNECTION: value <your DB connection name>
• DIMCM_DBNAME value <your DB name>
• DIMCM_SERVER value <your server name>
• DIMCM_SERVICE_USER value <your service user name>
• DIMCM_SERVICE_PASSWORD value <your service user password>
4. Add the following processes to your application if they have not already beenimported.
• Deploy Baseline
• Get Baselines
• Get Deployment Areas
• Get Products
• Get Projects
• Get Projects and Streams
• Get Stages
• Get Streams
• Promote Baseline
5. Add the properties to the application processes that the component processes willinherit, or change them in the imported application. Following are exampleproperties for Deploy Baseline.
• name DIMCM_PRODUCT, label Product, value {applicationProcess:GetProducts;displaycols:product}
• name DIMCM_PROJECT_NAME, label Project Name, value{applicationProcess:Get Projects AndStreams;properties:{[name:DIMCM_PRODUCT,value:DIMCM_PRODUCT]};displaycols:project_stream}
• name DIMCM_BASELINE_NAME, label Baseline Name, value{applicationProcess:GetBaselines;properties:{[name:DIMCM_PRODUCT,value:DIMCM_PRODUCT]};displaycols:baseline}
• name DIMCM_STAGE_NAME, label Stage Name, valueRM${applicationProcess:Get Stages;displaycols:stage}
• name DIMCM_DEPLOYMENT_AREAS, label Deployment Areas, value{applicationProcess:Get Deployment
Integration Guide 25

Areas;properties:{[name:DIMCM_PRODUCT,value:DIMCM_PRODUCT],[name:DIMCM_PROJECT_FILTER,value:DIMCM_PROJECT_NAME],[name:DIMCM_STAGE_NAME,value:DIMCM_STAGE_NAME]};displaycols:deployment_area}
• name DIMCM_REASONS, label Reasons, value none
Configuring Dimensions CM Component ProcessesComponent processes are used to combine the Dimensions CM plugin steps into theprocesses needed to execute the set of Dimensions CM operations you need.
Note: The Dimensions CM plugin must be loaded and available before youdesign a component process.
Tip: For the quickest implementation, import the sample environment andapplication and modify the properties to suit your needs.
To configure the Dimensions CM component processes:
1. Create a component that will contain your component processes or select an existingone. For example, DimCM Components.
2. Add the following processes to your component if they have not already beenimported.
• Action Baseline
• Demote Baseline
• Deploy Baseline
• Get Baselines
• Get Deployment Areas
• Get Products
• Get Projects and Streams
• Get Stages
• Promote Baseline
3. Specify values or variables for each component process step property that will not beset by application properties.
4. Ensure that any properties that will be passed from the application processes are setto Set a value here so that those property values will be replaced with theapplication properties passed to them.
Chapter 4: Integrating with Dimensions CM
26 Deployment Automation

Chapter 5: Integrating with ChangeManZMF
You can integrate Deployment Automation with ChangeMan ZMF through the providedChangeMan ZMF plugin.
The integration between Deployment Automation and ChangeMan ZMF is implementedthrough the ChangeMan ZMF plugin and the ALM Connector.
Documentation References
• For information on using the Deployment Automation ChangeMan ZMF plugin,including details on the plugin steps, see the Deployment Automation Plugins Guide.
• For details on configuring processes using the plugin, see the DeploymentAutomation User's Guide.
Important: The ALM Connector Configuration Guide primarily covers theintegration between Release Control and ALM Connector. The configurationdetails for integration with Deployment Automation are slightly different. Usethe Deployment Automation integration documentation rather than the ALMConnector documentation for configuring the integration with DeploymentAutomation.
The following topics describe the runtime communication and configuration of theChangeMan ZMF plugin and give details on configuring the ALM Connector for use withDeployment Automation.
• ChangeMan ZMF Integration Example [page 27]
• ChangeMan ZMF Integration Runtime Communication [page 28]
• Configuring ALM Connector on the Mainframe [page 28]
• Configuration in ChangeMan ZMF [page 29]
• Installing the ALM Connector Services [page 31]
• Configuring the Integration Files [page 32]
• Loading the ChangeMan ZMF Plugin [page 33]
• Configuring ChangeMan ZMF Processes in Deployment Automation [page 33]
ChangeMan ZMF Integration ExampleYou must configure ChangeMan ZMF communication on the z/OS mainframe and on theDeployment Automation server before you use the ChangeMan ZMF plugin. The rest of theinformation needed for Deployment Automation to communicate with ChangeMan ZMF isembedded in the Deployment Automation application and component processes, whichuse the ChangeMan ZMF plugin.
Integration Guide 27

The flow of communication between Deployment Automation, and ChangeMan ZMF isshown in the following figure.
ChangeMan ZMF Integration RuntimeCommunication
The communication between Deployment Automation and ChangeMan ZMF proceeds asfollows:
1. Deployment Automation processes are configured for the ChangeMan ZMF processesto be executed.
2. When the Deployment Automation processes are run, they invoke the ChangeManZMF processes. The processes use a proxy ID to logon on behalf of a designatedusername, typically the Deployment Automation user name, to initiate the requestedoperations in ChangeMan ZMF.
3. When the ChangeMan ZMF operations complete, an event is sent from the SERNETNTFYURL and the Deployment Automation listener detects it. When the operationsare complete, Deployment Automation retrieves ChangeMan ZMF informationthrough the listener and puts it in the Deployment Automation execution log.
4. The Deployment Automation process is updated with the completion status and thecomponent process step is flagged as successful or failed.
Configuring ALM Connector on the MainframeThe mainframe portion of the ALM Connector should be configured by your ChangeManZMF administrator or by someone familiar with the IBM mainframe and ChangeMan ZMF.This part of the configuration is required for the integration between ChangeMan ZMF andDeployment Automation to work.
Chapter 5: Integrating with ChangeMan ZMF
28 Deployment Automation

See the following topics for details on configuring ALM Connector support on the z/OSmainframe specifically for the Deployment Automation integration.
• Configuring a ChangeMan ZMF Proxy User ID [page 29]
• Configuring TSO User IDs and Permissions [page 29]
Configuring a ChangeMan ZMF Proxy User IDA proxy user ID, or trusted user ID, is required for each ChangeMan ZMF host server, orLPAR. You specify these in the zmf.properties configuration file when you configureChangeMan ZMF communication on the integrating server.
The purpose of the proxy user ID is to allow users to automatically access ChangeManZMF through the integration without logging on. The proxy ChangeMan ZMF user IDconnects to the host server on behalf of the user.
Consider an example where a user wants to freeze a release unit. The orchestrationinvoked for the Freeze function requires access to the ChangeMan ZMF host server. Theuser's TSO user ID is on his SBM contact record and is associated with the proxy user ID;however, there is no password stored in the user's contact record. The proxy user ID(which does have a password) logs on to the ChangeMan ZMF host server on behalf of theuser. The proxy user ID impersonates the user, but does not have access to otherresources (such as performing ChangeMan ZMF functions). The authority levels of theuser are in effect for the transaction.
The proxy user ID can be any SAF-defined user ID. No specific attributes are required. Itis not necessary that this user ID be allowed to access TSO. This user ID must be givenREAD (or higher) access to the "trusted resource". The trusted resource is a SAF resource,by default SERENA.SERNET.AUTHUSR in the FACILITY class. The resource and class areuser-modifiable by changing the names in the SERLCSEC module, which is delivered assource code with ChangeMan ZMF. This module is used for customizing a variety ofsecurity-related functions.
Note: It is not necessary to alter SERLCSEC to support the integration, as it isalready coded for the preceding resource name and class. Be sure to use theversion of SERLCSEC that is appropriate to your specific version of ChangeManZMF, including any customizations that you have applied.
Important: The trusted resource is not related to the RACF user ID TRUSTEDattribute.
Configuring TSO User IDs and PermissionsTSO IDs used to access ChangeMan ZMF from Deployment Automation must havepermission to access every resource required by ChangeMan ZMF functions thatDeployment Automation uses.
For information on specifying connection details for ChangeMan ZMF, refer to theDeployment Automation Plugins Guide, in the step details in the "ChangeMan ZMF Plugin"section.
Configuration in ChangeMan ZMFConfiguration is required in ChangeMan ZMF for ALM Connector to work.
Integration Guide 29

See the following topics for details.
• Adding Required Startup Parameters [page 30]
• Example ChangeMan ZMF Startup Parameters [page 30]
• Configuring Change Packages in ChangeMan ZMF [page 31]
Adding Required Startup ParametersThe ChangeMan ZMF server must be updated with startup parameters that will enableaccess to ALM Connector services.
These parameters are keyword options used with the SERNET started task. There aredifferent ways of passing the parameters to SERNET. For details on setting SERNETparameters, refer to the ChangeMan ZMF documentation.
Add the parameters as follows:
• Add the CMN=(,XXXX)parameter to the ChangeMan ZMF startup, where XXXX is theSERNET TCP/IP port used to process SERNET requests.
• Add the SERNET NTFYURL parameter. This parameter is required for notifying yourintegration when an ALF event is emitted from ChangeMan ZMF, which indicates thatChangeMan ZMF has completed a requested task.
It must be specified as follows:
NTFYURL='<connectorHostname>:<port>/da/services/ZMFALFEventRouter'where connectorHostname is the server name where your ALM Connector servicesare installed and port is the port number for that server.
Important: This parameter is case-sensitive; the non-variable text mustbe entered exactly as shown. Be sure to include the quotes around thevariable string.
• ChangeMan ZMF must be restarted for these changes to take effect. After therestart, verify that the CMN port has been started in the SERPRINT listing data set.
Example ChangeMan ZMF Startup ParametersExample ChangeMan ZMF startup parameters follow.
************************************************************************ MY SERNET MODULE* SUBSYSTEM ID 'A' (ALL SITE)* Please only activate (1)EventRouter at a time..Comment out the* ones not in use. SERNET can only handle EventRouter.03/19/09 - JN***********************************************************************STAX=YES /* DO NOT DISCONNECT ISPF APPLICATIONESTAE=NO /* ESTAE RECOVERYCMN=(,5314) /* CHANGE MAN TCP/IP PORT NUMBERSUBSYS=I /* CHANGE MAN SUBSYS IDSDNOTIFY=H8 /* WATCH-DOG TIMEREX003=N /* SERJES exit for securityAUTOMESSENGER=NOTIFY /* ZDD, RLC notify
Chapter 5: Integrating with ChangeMan ZMF
30 Deployment Automation

*TRACE=(SER,1,3)*TRACE=(CMN,1,3)TCPIP=TCPIPXML=YESXCH=6124,XCHMSG=6177 /* ZDD, RLCNTFYURL='ConnectorHostName:8080/da/services/ZMFALFEventRouter'
CAUTION! If your site is a DP site, you must specify the same hostname and port in theNTFYURL parameter specified for the DP site and the P site. If not, the P site will continueto wake up looking for work and will fill up the JESMSGLG (JES message log).
Documentation References
• Refer to documentation on passing parameters to SERNET in "Passing Parameters toSERNET" in the ChangeMan ZMF Installation Guide .
Configuring Change Packages in ChangeMan ZMFChange packages and their related ChangeMan ZMF entities are accessed through theintegration. The following should be configured in ChangeMan ZMF as part of your ongoingadministration and use of ChangeMan ZMF:
• Applications
• Sites
• Change Packages
• Approver lists
• Promotion levels
For details, refer to the ChangeMan ZMF documentation.
Installing the ALM Connector ServicesThe ALM Connector services must be installed into the Deployment Automation applicationserver before the Deployment Automation ChangeMan ZMF plugin can be used to accessChangeMan ZMF.
Important: The ALM Connector services are supported only in a Tomcatapplication server.
Install the services as follows:
1. Download the ALM Connector bundle zip file from the Support website. For example,ZMF_bundle_vvv.zip, where vvv is the version of ALM Connector.
2. Extract the files from the zip file.
3. Stop the Common Tomcat application server under which Deployment Automation isrunning. For example, Micro Focus Common Tomcat.
4. Copy the ALM Connector war files to the application server location where theDeployment Automation da.war file is deployed. The default location is as follows:
C:\Program Files\Micro Focus\common\tomcat\8.5\webapps
Integration Guide 31

The ALM Connector war files are as follows:
almzmf.waralmzmfalf.waralmzmfws.waralmsernet.war
5. Start Common Tomcat.
Configuring the Integration FilesAdditional files must be configured in the application server before the integration toChangeMan ZMF can be used.
Configure the additional files as follows:
1. Download the Deployment Automation ChangeMan ZMF plugin bundle from theDeployment Automation downloads on the Support website. For example,ChangeMan_ZMF_Bundle_vvv.zip, where vvv is the version of DeploymentAutomation.
2. Extract the plugin zip file, such as ZMF_6.1.4_v_bbb.zip, from the bundle, where vis the version of the plugin and bbb is the build number.
3. Copy the zmf-core-CURRENT.jar from the plugin zip file to the DeploymentAutomation application server as follows:
a. In the plugin bundle, navigate to the lib directory. For example:
C:\Users\bjoson\Downloads\ZMF_6.1.4_v_bbb.zip\lib
b. Copy the zmf-core-CURRENT.jar file to the Deployment Automation applicationserver WEB-INF\lib directory. The default path is:
C:\Program Files\Micro Focus\common\tomcat\8.5\webapps\da\WEB-INF\lib
4. In the Deployment Automation application server WEB-INF directory, such as
C:\Program Files\Micro Focus\common\tomcat\8.5\webapps\da\WEB-INF,edit the web.xml file and add the following lines before the </web-app> tag.
<servlet><servlet-name>ZMFALFEventRouter</servlet-name><servlet-class>com.serena.servlet.ZMFALFEventRouter</servlet-class><init-param>
<param-name>redirectURL</param-name><param-value>/</param-value>
</init-param><load-on-startup>1</load-on-startup>
</servlet><servlet-mapping>
<servlet-name>ZMFALFEventRouter</servlet-name>
Chapter 5: Integrating with ChangeMan ZMF
32 Deployment Automation
<url-pattern>/servlet/ZMFALFEventRouter</url-pattern></servlet-mapping>
<servlet-mapping><servlet-name>ZMFALFEventRouter</servlet-name><url-pattern>/services/*</url-pattern>
</servlet-mapping>
5. Restart Common Tomcat.
Loading the ChangeMan ZMF PluginThe current version of the ChangeMan ZMF plugin must be loaded into DeploymentAutomation.
Note: If you have just restarted the application server, wait for it to start beforestarting this procedure.
Load the plugin as follows:
1. In Deployment Automation, navigate to Administration > Automation > Plugins.
2. Click the Load Plugin button.
3. Click Choose File and select the ChangeMan ZMF plugin zip file, such asZMF_6.1.4_v_bbb.zip, that you extracted from the plugin bundle earlier.
4. Click Load.
Configuring ChangeMan ZMF Processes inDeployment Automation
After you have configured the integration and loaded the plugin, you should proceed withconfiguring the ChangeMan ZMF processes in Deployment Automation.
For information on configuring processes, see the Deployment Automation User's Guide.
For details on the plugin steps, see the Deployment Automation Plugins Guide orDeployment Automation Plugin Index.
Integration Guide 33

Chapter 5: Integrating with ChangeMan ZMF
34 Deployment Automation

Chapter 6: Integrating with Nolio
You can integrate Deployment Automation with CA Nolio through the provided Nolioplugin.
The Nolio plugin can be used to retrieve a list of Nolio processes for selection from Noliothat are suitable for execution, and then run the Nolio process on the target environmentusing the Nolio runProcess2 functionality. The Nolio plugin that enables DeploymentAutomation and Nolio to communicate uses the Nolio web services and will pass a numberof predefined credentials and selection information for the Nolio application, environment,servers, and so on.
The following topics describe the runtime communication and configuration of the Nolioplugin for use with Deployment Automation.
• Nolio Integration Example [page 35]
• Nolio Integration Runtime Communication [page 36]
• Nolio Plugin Installation [page 36]
• Configuring Nolio Processes in Deployment Automation [page 37]
Documentation References
For more information on using plugins, including details on the plugin steps, see theDeployment Automation Plugins Guide.
Nolio Integration ExampleAll of the information needed for Deployment Automation to communicate with Nolio isembedded in the Deployment Automation application and component processes, whichuse the Nolio plugin.
The flow of communication between Deployment Automation and Nolio is shown in thefollowing figure.
Integration Guide 35

Nolio Integration Runtime CommunicationThe communication between Deployment Automation and Nolio proceeds as follows:
1. Deployment Automation processes are configured for the Nolio processes to beexecuted.
2. Deployment Automation requests information from Nolio through SOAP service calls.
3. Deployment Automation polls for the status of the Nolio processes.
4. Once the process in Nolio completes, either successfully or with a failure, theDeployment Automation process step that initiated the transaction completes.
Nolio Plugin InstallationThe Nolio plugin must be extracted before it can be loaded into Deployment Automation.Extract the plugin as follows:
1. Download the plugin installation file from the Deployment Automation downloadlocation on the Support website. For example, Nolio_bundle_vvv.zip, where vvv isthe version.
2. Extract the files from the plugin bundle. It contains the plugin zip file and filesneeded to configure the plugin. The plugin zip file is named Nolio_vvv.zip, wherevvv is the version.
3. After the application server is started, in Deployment Automation, navigate toAdministration > Automation > Plugins.
4. Click the Load Plugin button.
5. Click Choose File and select the plugin zip file.
6. Click Load.
7. Configure the processes for the plugin that are required for the integration.
Chapter 6: Integrating with Nolio
36 Deployment Automation

Configuring Nolio Processes in DeploymentAutomation
The following topics describe how to configure the processes and properties for optimaluse of the Nolio plugin for use with Deployment Automation.
• Importing the Sample Nolio Environment [page 37]
• Importing the Sample Nolio Application [page 37]
• Configuring the Nolio Application [page 38]
• Configuring Nolio Component Processes [page 39]
Importing the Sample Nolio EnvironmentFor the quickest and most reliable implementation, you should import the sampleenvironment and application and modify the properties to suit your needs. Before you canimport the sample application processes, you must first import the environment that isassociated with the application.
One sample environment, UAT, is provided to use with all of the sample applications. Ifyou have already imported the environment to use with one of the other sampleapplications, you should not import it again.
To import the sample UAT environment:
1. Navigate to the directory location where you downloaded the plugin bundle.
2. Extract the following JSON file if it is not already extracted:
Sample UAT.json
3. If you want to change the name of the environment that will be imported, open theenvironment JSON file and change the name and description to whatever you wantto call your environment.
4. To import the environment:
a. In Deployment Automation, navigate to Management > Environments.
b. Click Import.
c. Click Choose File and browse to the path of the Sample UAT.json file.
d. Click Import.
The environment should now be listed in your environments page, as UAT if you did notchange the name, or under the name you specified when you changed it.
Importing the Sample Nolio ApplicationThere are several Deployment Automation processes necessary to create the operationsneeded for this plugin integration. To make it easier for you to configure your processes,an exported sample application is included in the plugin bundle.
Integration Guide 37

The sample application includes all of the application and component information neededto get you started. You can import the exported file and modify the details to match yourimplementation. Otherwise, you must configure all of your processes and propertiesmanually as described in the subsequent topics:
To import the sample application:
1. Navigate to the directory location where you downloaded the plugin bundle.
2. Extract the following JSON file if it is not already extracted:
<product> Sample Application.json
3. If you changed the name and description of the sample environment that youimported, open the application JSON file and change the corresponding environmentname and description to the ones you used in your environment JSON file.
4. To import the application processes:
a. In Deployment Automation, navigate to Management > Applications.
b. Click Import.
c. Click Choose File and browse to the path of the JSON file.
d. Click Import.
The application should now appear in the application list.
Configuring the Nolio ApplicationAn application process is used to run the component processes you need. Most of theproperties that are needed for the component processes should be set at the applicationlevel, because many properties are used by more than one component process.
Tip: For the quickest implementation, import the sample environment andapplication and modify the properties to suit your needs.
To configure the application:
1. Create an application that will contain your properties and component processes orselect an existing one. For example, Nolio Application.
2. If you imported the sample application, edit the application and change theapplication name and description to match your implementation's values.
3. Add properties to your application that are common to all component processes, ormodify the existing imported values to match your system information. For example,the connection information property values are as follows:
• NOLIO_SERVER_URL: value <your server URL>
• NOLIO_SERVICE_USER: value <your admin username>
• NOLIO_SERVICE_PASSWORD: value <your admin password>
4. Add the following processes to your application if they have not already beenimported.
Chapter 6: Integrating with Nolio
38 Deployment Automation

• Get Applications
• Get Environments
• Get Processes
• Get Process Tags
• Get Server Types
• Run Process
5. Add the properties to the application processes that the component processes willinherit, or change them in the imported application. Most properties use variables,such as the following for Run Process:
• Application: value ${p:NOLIO_APPLICATION}
• Environment: value ${p:NOLIO_ENVIRONMENT}
• Process: value ${p:NOLIO_PROCESS}
• Process Tag: value ${p:NOLIO_PROCESS_TAG}
• Servers: value ${p:NOLIO_SERVERS}
• Parameters: value ${p:NOLIO_PARAMETERS}
Configuring Nolio Component ProcessesConfigure your Nolio component processes. Component processes are used to combinethe plugin steps into the processes needed to execute the set of operations you need. Youcan either configure existing processes imported from JSON files or configure all of themmanually.
Note: The Nolio plugin must be loaded and available before you design acomponent process.
Tip: For the quickest implementation, import the sample environment andapplication and modify the properties to suit your needs.
To configure the Nolio component processes:
1. Create a component that will contain your component processes or select an existingone. For example, Nolio Components.
2. Add the following processes to your component if they have not already beenimported.
• Get Agents
• Get Applications
• Get Environments
• Get Processes
Integration Guide 39

• Get Process Tags
• Get Server Types
• Run Process
3. Specify values or variables for each component process step property that will not beset by the parent application properties.
4. Ensure that any properties that will be passed from the application processes are setto Set a value here so that those property values will be replaced with theapplication properties passed to them.
Chapter 6: Integrating with Nolio
40 Deployment Automation

Chapter 7: Integrating with Micro FocusALM Octane
You can integrate Deployment Automation with Micro Focus ALM Octane through theprovided plugin.
ALM Octane is a web-based application lifecycle management platform that enables teamsto collaborate easily, manage the product delivery pipeline, and visualize the impact ofchanges. The following topics describe the configuration of the ALM plugin for use withDeployment Automation.
• ALM Octane Pre-Configuration Steps [page 41]
Documentation References
For more information on using plugins, including details on the plugin steps, see theDeployment Automation Plugins Guide.
ALM Octane Pre-Configuration StepsTo prepare ALM Octane for integration with Deployment Automation:
1. Run Microsoft Internet Explorer as a user with administrator privileges.
2. Login into ALM Octane.
3. Go to Tools and install ALM Connectivity.
4. Go to Tools | ALM Client Registration | Register ALM.
5. Run a DOS prompt as an administrator and use regsvr32 to register OTAClient.dll.
Integration Guide 41

Chapter 7: Integrating with Micro Focus ALM Octane
42 Deployment Automation

Chapter 8: Creating Custom Plugins
You can create your own plugins if there is not already one that meets your needs. Seethe following for details.
• Plugin Creation Overview [page 43]
• The plugin.xml File [page 44]
• The upgrade.xml file [page 52]
• The info.xml File [page 53]
Plugin Creation OverviewA plugin consists of a ZIP file that contains a set of required and optional files in the rootdirectory and supporting files located as needed. To make the plugin available for generaluse, this ZIP file must be loaded into Deployment Automation. The plugin files aredescribed in the following section.
See also:
• A short tutorial to create a "HelloWorld" plugin, available from the Communitywebsite.
File Description
plugin.xml This file describes the steps provided by the new plugin. This file alsocontains informational elements such as description, name, and thelocation of the plugin in the Process Editor plugin list hierarchy. It is themain plugin file to create. (Required)
upgrade.xml This file is used by Deployment Automation to upgrade plugins betweenversions. Plugins are versioned, like all Serena Deployment Automationentities, and this file is used to describe how to upgrade previousversions of the plugin to the latest.
(Required)
info.xml This file is used to detail the high-level plugin information such as whocreated the plugin and its current version. Although optional, it isimportant to use the info.xml file.
Other Any supporting script files required by the plugin.
The plugin.xml file steps describe the functionality that can be used in the releaseprocess. Each step is defined by the use of the <step-type> element and contains thefollowing supporting information:
Integration Guide 43

Element Description
<properties> A container for <property> child elements, and can contain anynumber of <property> elements. Property values can be supplied atdesign-time or run-time.
In addition to the properties defined locally in a step, a step can alsoaccess properties defined in other steps or even other plugins. This canbe done by using the namespaces of the other steps or plugins toreference the property that is needed. For example, <step-name>.<property-name>
<command> This element is used to detail the command that the plugin step isinvoking. This command can be a shell script, an operating systemcommand, or a program. It has a set of additional XML attributes thatdescribe how the command is to be invoked.
<post-processing>
This element describes the logic that is to be invoked once thecommand has finished running and some kind of error-handling orpost-command processing is desired.
Plugin steps are performed by an agent that has been configured to run on a targetenvironment, so you must ensure that any step commands configured in the plugin areable to run on those agents. This may require additional software to be installed orlicenses to be added as needed. If the appropriate software cannot be invoked correctly,an error message will be shown.
Once a plugin is created, load it into Deployment Automation to make it available tousers.
To load a plugin:
1. Create a ZIP archive that contains the XML files (plugin.xml, upgrade.xml, andinfo.xml) along with any additional scripts required by the plugin.
2. Navigate to Administration > Automation > Plugins.
3. Click the Load Plugin button.
4. Click Choose File and select the ZIP file.
5. Click Load.
The plugin.xml FileThe functionality that a plugin provides is defined in the plugin.xml file. The structure ofthis file consists of the following:
• elements used by all plugins: the document type declaration, and the <plugin> rootelement that identifies the XML schema type, PluginXMLSchema_v1.xsd
• a header element that provides the identity, version, and description of the plugin
Chapter 8: Creating Custom Plugins
44 Deployment Automation

• the step definitions; each step is delimited by a <step-type> element that definesthe functionality and properties available to that step
Example
The following shows an example of a typical plugin.xml file:
<?xml version="1.0" encoding="UTF-8"?><plugin xmlns="PluginXMLSchema_v1"
xmlns:xsi="http://www.w3.org/2001/XMLSchema-instance"><header>
<identifier id="plugin_id" version="version_number" name="Plugin Name"/><description/><tag>Plugin_type/Plugin_subtype/Plugin_name</tag>
</header><step-type name="Step_Name">
<description/><properties>
<property name="property_name" required="true"><property-ui type="textBox" label="Driver Jar"
description="The full path to the jdbc driver jar to use."default-value="${p:resource/sqlJdbc/jdbcJar}"/>
</property></properties><post-processing>
<![CDATA[if (properties.get("exitCode") != 0) {
properties.put("Status", "Failure");}else {
properties.put("Status", "Success");}
]]></post-processing><command program="${path_to_tool">
<arg value="parameters_passed_to_tool"/><arg path="${p:jdbcJar}"/><arg file="command_to_run"/><arg file="${PLUGIN_INPUT_PROPS}"/><arg file="${PLUGIN_OUTPUT_PROPS}"/>
</command></step-type>
</plugin>
The following sections describe the elements of the plugin.xml file and their appropriateattributes.
• The Header: <header> Element [page 47]
• The Plugin Steps: <step-type> Element [page 47]
• Step Properties: <properties> Element [page 48]
• Step Commands: <command> Element [page 50]
Integration Guide 45

• Step Post-Processing: <post-processing> Element [page 51]
Chapter 8: Creating Custom Plugins
46 Deployment Automation

The Header: <header> Element<header> ElementThe mandatory header element identifies the plugin and contains the following childelements:
<header>ChildElements
Description
<identifier> This element's three attributes identify the plugin:
• version
API version (the version number used for upgrading plugins isdefined in the info.xml file).
• id
Identifies the plugin.
• name
The plugin name that appears on the Automation Plugins pane inDeployment Automation.
All values must be enclosed within single or double quotes.
<description> Describes the plugin. It appears on the Automation Plugins pane inDeployment Automation.
<tag> Defines where the plugin will appear on the process editor'shierarchy of available plugins. The location is defined by a stringseparated by slashes. For example, the Tomcat definition is:Application Server/Java/Tomcat. The Tomcat steps will be listedbeneath the Tomcat item, which in turn is nested within the othertwo.
The following is a sample header definition:
<header><identifier version="3" id="com.&company;.air.plugin.Tomcat"name="Tomcat"/><description>The Tomcat plugin is used during deployments to execute Tomcat run-bookautomations and deploy or undeploy Tomcat applications.
</description><tag>Application Server/Java/Tomcat</tag>
</header>
The Plugin Steps: <step-type> Element
Integration Guide 47

Plugin steps are defined with the step-type element; each step-type represents a singlestep in the Deployment Automation process editor. A step-type element has a nameattribute and several child elements: description, properties, command, and post-processing.
The mandatory name attribute identifies the step. The description and name specified inthe element will appear in the Process Editor.
<step-type name="Start"><description>Start Apache HTTP server</description>
Step Properties: <properties> ElementThe properties element is a container for properties, which are defined with theproperty tag. Each step has a single properties element; a properties element cancontain any number of property child elements.
A property tag has a mandatory name attribute, optional required attribute, and childelements, property-ui and value, which are defined in the following table.
Chapter 8: Creating Custom Plugins
48 Deployment Automation

<property> Element Table
<property>ChildElements
Description
<property-ui>
Defines how the property is presented to users in the Deployment Automation ProcessEditor. This element has several attributes:
• labelIdentifies the name of the property shown in the Process Editor Properties.
• descriptionHelp shown for the property in Properties.
• default-valueThe default value of the property. This is displayed in Properties and is used bythe step if left unchanged.
• typeIdentifies the type of widget displayed to users. Possible values are:
▪ textBoxEnables users to enter an arbitrary amount of text, limited to 4064 characters.
▪ textAreaBoxEnables users to enter an arbitrary amount of text in a multi-line text box. Thelength of the text is limited to 4064 characters.
▪ secureBoxUsed for passwords. Similar to textBox except values are redacted.
▪ checkBoxDisplays a check box. If selected, a value of true will be used; otherwise theproperty is not set.
▪ selectBoxRequires a list of one or more values that will be displayed in a drop-down listbox. Configuring a value is described below.
<value> Used to specify values for a selectBox. Each value has a mandatory label attributewhich is displayed to users, and a value used by the property when selected. Valuesare displayed in the order they are defined.
Here is a sample <property> definition:
Integration Guide 49

<property name="onerror" required="true"><property-ui type="selectBox"
default-value="abort"description="Action to perform when statement fails: continue, stop, abort."label="Error Handling"/>
<value label="Abort">abort</value><value label="Continue">continue</value><value label="Stop">stop</value>
</property>
Step Commands: <command> ElementSteps are executed by invoking the command line command specified by the <command>element. The <command> element's program attribute defines the location of the tool thatwill perform the command. It bears repeating that the tool must be located on the hostand the agent invoking the tool must have access to it. In the following example, thelocation of the tool that will perform the command, the scripting tool groovy is beinginvoked, but any command can be run as long as it is in the path and available.
<command program='${GROOVY_HOME}/bin/groovy'>
The actual command and any parameters it requires are passed to the tool by the<command> element's <arg> child element. Any number of <arg> elements can be used.The <arg> element has several attributes:
<arg> Element Attributes Table
Attribute Description
<value> Specifies a parameter passed to the tool. Format is tool-specific; must beenclosed by single-quotes.
<path> Path to files or classes required by the tool. Must be enclosed by single-quotes.
<file> Specifies the path to any files required by the tool. Format is tool-specific;must be enclosed by single-quotes.
Because <arg> elements are processed in the order they are defined, ensured the orderconforms to that expected by the tool.
<command program='${GROOVY_HOME}/bin/groovy'><arg value='-cp' /><arg path='classes:${sdkJar}:lib/commons-codec.jar:
lib/activation-1.1.1.jar:lib/commons-logging.jar:lib/httpclient-cache.jar:lib/httpclient.jar:lib/httpcore.jar:lib/httpmime.jar:lib/javamail-1.4.1.jar' />
Chapter 8: Creating Custom Plugins
50 Deployment Automation

<arg file='registerInstancesWithLB.groovy' /><arg file='${PLUGIN_INPUT_PROPS}' /><arg file='${PLUGIN_OUTPUT_PROPS}' />
</command>
The <arg file='${PLUGIN_INPUT_PROPS}' />specifies the location of the tool-supplied properties file.
The <arg file='${PLUGIN_OUTPUT_PROPS}' />specifies the location of the file that will contain the step-generated properties.
Note: New lines are not supported by the <arg> element and are shown in thisexample only for presentation.
Step Post-Processing: <post-processing> ElementWhen a plugin step's <command> element finishes processing, the step's mandatory<post-processing> element is executed. The <post-processing> element optionallysets the step's output properties and error handling. The <post-processing> element cancontain any valid JavaScript script (unlike the <command> element, <post-processing>scripts must be written in JavaScript). You can also provide your own scripts whendefining the step in the Deployment Automation editor. Although not required, it is bestpractice for the scripts to be wrapped in a CDATA element.
You have access to a java.util.Properties variable called properties. The propertiesvariable has several special properties: exitCode contains the process exit code, andStatus contains the step's status. A Status value of Success means the step completedsuccessfully.
Another available variable, scanner, can scan the step's output log on the agent and takeactions depending on the results. The scanner variable may use the following publicmethods:
• register(String regex, function call) registers a function to be called whenthe regular expression is matched.
• addLOI(Integer lineNumber) adds a line to the lines of interest list, which arehighlighted in the Log Viewer; implicitly called whenever scanner matches a line.
• getLinesOfInterest() returns a java.util.List of lines of interest. This can alsobe used to remove lines.
• scan() scans the log. Use after all regular expressions are registered.
The post-processing script can examine the step's output log and take actions based onthe result. In the following code fragment, scanner.register() registers a string with aregular expression engine, then takes an action if the string is found. Once all strings areregistered, it calls scanner.scan() on the step's output log line by line.

if (properties.get("exitCode") != 0) {properties.put("Status", "Failure");
}else {
scanner.register("(?i)ERROR at line", function(lineNumber, line) {var errors = properties.get("Error");if (errors == null) {
errors = new java.util.ArrayList();}errors.add(line);properties.put("Error", errors);properties.put("Status", "Failure");
});...scanner.scan();var errors = properties.get("Error");if (errors == null) {
errors = new java.util.ArrayList();}properties.put("Error", errors.toString());
}]]
You can also use post-processing scripts to set output properties that can then be used inother steps in the same process. This enables you to design complex workflows.Reference prior step output properties this way:
${p:stepName/propName}
The upgrade.xml fileTo upgrade a plugin, you must create an upgrade XML file. This can be done asfollows:
1. Increment the number of the version attribute of the <identifier> element inplugin.xml.
2. Create a <migrate> element in upgrade.xml with a to-version attribute containingthe new number.
3. Place the property and step-type elements that match the updated plugin.xml filewithin this element, as shown in the following example.
<?xml version="1.0" encoding="UTF-8"?><plugin-upgrade
xmlns="UpgradeXMLSchema_v1"xmlns:xsi="http://www.w3.org/2001/XMLSchema-instance">
<migrate to-version="3"><migrate-command name="Run SQLPlus script">
<migrate-properties>
Chapter 8: Creating Custom Plugins
52 Deployment Automation

<migrate-property name="sqlFiles" old="sqlFile"/></migrate-properties>
</migrate-command></migrate><migrate to-version="4">
<migrate-command name="Run SQLPlus script" /></migrate><migrate to-version="5">
<migrate-command name="Run SQLPlus script" /></migrate>
</plugin-upgrade>
Of course, you can also make a script-only upgrade, that is, an upgrade that containschanges to the step's associated scripts and files but does not change plugin.xml. Thismechanism can be useful for plugin development and for minor bug-fixes/updates.
Any upgrade that does not change the step definitions or properties does not need toprovide an upgrade.xml. You can simply load the new version of the plugin using theAutomation Plugins pane in Deployment Automation.
The info.xml FileUse the optional info.xml file to describe the plugin and provide release notes to users.The file's <release-version> element can be used for version releases.
Integration Guide 53

Chapter 8: Creating Custom Plugins
54 Deployment Automation

Chapter 9: Integrating with SourceConfiguration Tools
Deployment Automation provides built-in source configuration types that enable you toload artifacts from external tools into Deployment Automation as component versions.Loading artifacts into Deployment Automation enables you to track your artifacts ascomponent versions as they are deployed into application environments.
For details on selections for the Source Config Type fields while creating or editingcomponents, see "Creating Components" in the Deployment Automation User's Guide.
The source configuration tools that you can select are shown in the following table.
SourceConfig Type
Description
AnthillPro Select this to load artifacts that are stored in AnthillPro intoDeployment Automation as component versions.
Artifactory -Folder based
Select this to load artifacts that are stored in file folders managed byArtifactory into Deployment Automation as component versions.
Artifactory -Maven /NuGet
Select this to load artifacts that are stored in Maven or NuGetrepositories that are managed by Artifactory into DeploymentAutomation as component versions.
ClearCaseUCM Select this to load artifacts that are stored in ClearCase UCM intoDeployment Automation as component versions.
Dimensions Select this to load artifacts that are stored in Dimensions CM intoDeployment Automation as component versions.
File System(Basic)
Select this to load artifacts into Deployment Automation fromdirectories in your file system. This imports all files in thesubdirectories and creates a component version either on adesignated name or based on a version name pattern. Automaticimport is not supported with this option.
File System(Versioned)
Select this to load artifacts into Deployment Automation fromdirectories in your file system, creating a component version for eachsubdirectory in the base path.
Git Select this to load artifacts that are stored in Git into DeploymentAutomation as component versions.
Integration Guide 55

SourceConfig Type
Description
Jenkins Select this to load artifacts that are stored in Jenkins into DeploymentAutomation as component versions. This does not display additionalfields, but rather indicates that the Jenkins plugin for DeploymentAutomation is configured and activated.
Luntbuild Select this to load artifacts that are stored in Luntbuild intoDeployment Automation as component versions.
Maven Select this to load artifacts that are stored in Maven into DeploymentAutomation as component versions.
Nexus Select this to load artifacts that are stored in Nexus into DeploymentAutomation as component versions.
PVCS Select this to load artifacts that are stored in PVCS into DeploymentAutomation as component versions.
Perforce Select this to load artifacts that are stored in a Perforce versioningengine into Deployment Automation as component versions.
StarTeam Select this to load artifacts that are stored in Borland StarTeam intoDeployment Automation as component versions.
Subversion Select this to load artifacts that are stored in Subversion intoDeployment Automation as component versions.
TFS Select this to load artifacts that are stored in Microsoft TeamFoundation Server (TFS) into Deployment Automation as componentversions. Use this if using XAML build automation.
TFS vNext Select this to load artifacts that are stored in Microsoft TeamFoundation Server (TFS) 2015 and above into DeploymentAutomation as component versions. If you are using XAML buildautomation, use the TFS source configuration type.
TFS_SCM Select this to load artifacts that are stored in TFS_SCM intoDeployment Automation as component versions.
TeamCity Select this to load artifacts that are stored in JetBrains TeamCity intoDeployment Automation as component versions.
TeamForge Select this to load artifacts that are stored in CollabNet TeamForgeinto Deployment Automation as component versions.
Chapter 9: Integrating with Source Configuration Tools
56 Deployment Automation

Chapter 10: Creating Custom SourceConfiguration Types
You can create your own external source configuration type if there is not already one thatmeets your needs.
See Chapter 9: Integrating with Source Configuration Tools [page 55] for information onsource configuration types that come built into Deployment Automation.
See the following for details on creating your own source configuration types.
Note: The implementation of custom source configuration types is done usingJava. To implement these you must be proficient in Java programming.
• Getting Started with Custom Source Configuration Types [page 57]
• The CommonIntegrator Lifecycle [page 59]
• An Implementation of the CommonIntegrator Interface [page 59]
• Using the Annotations for Defining UI Properties [page 60]
• Methods to Use During Version Import [page 60]
• Using ComponentInfo to Process Version Information [page 63]
• Using the CommonIntegrator getAlerts Method to Validate Field Values [page 64]
• Logging Messages to the Console [page 64]
• Compiling and Loading Custom Source Configuration Types [page 65]
• Using Custom Source Configuration Types [page 66]
Getting Started with Custom Source ConfigurationTypes
You can use the provided Java files to create your own external source configurationtypes.
Some advantages of the external source configuration type architecture include thefollowing:
• It is easy for Java programmers to implement.
• The source configuration types can be loaded into Deployment Automation withoutrestarting the server and can be used immediately in Deployment Automationcomponents.
Get started creating a custom source configuration type as follows:
Integration Guide 57

1. Download the example project from Knowledgebase item S142533. This includes thesct-commons support files and the example .java file.
2. Build the example project and load the resulting source configuration type jar into atest Deployment Automation system to become familiar with the way it works.
3. Use the Javadoc to supplement this documentation and the example.
4. Create a project for your new source configuration type using any Java/J2EE IDE,such as Eclipse or IntelliJ IDEA. You can use the example project as a model for yournew project.
5. Ensure that sct-commons-1.1.0.jar is in the IDE’s current class path.
6. Implement the CommonIntegrator interface from sct-commons-1.1.0.jar. Packagethe implementation of CommonIntegrator in a jar file that you name according toyour naming standard. This includes the source configuration type definitions, whichare defined using annotations, and is the file that you will load into DeploymentAutomation when you are ready to use the source configuration type. See AnImplementation of the CommonIntegrator Interface [page 59].
7. Define the source configuration type that you want to include in this jar file. Forcomponents to work successfully, all the runtime dependencies of the jar must bepackaged together.
Note: Although it is technically possible and more efficient to includemultiple source configuration types per file, it is recommended to includeonly one source configuration type per file. This enables easiermaintenance going forward. If you put multiple types per file, you cannotdo things like upgrade or delete without impacting all of them.
8. Load your new source configuration type into a test Deployment Automation system.Configure a component to use it and test the functionality you implemented.
9. Load your new source configuration type into your production DeploymentAutomation system to make it available to your Deployment Automation users.
10. Ensure that those administrators who should have privileges to manage customsource configuration types are given the server role to do so.
Details are included in the subsequent sections of the documentation.
Minimum requirements:
• JDK 1.8 or later
• Deployment Automation 6.2 or later
Note:
You can use custom source configuration types developed using theDeployment Automation 6.1.5 CommonIntegrator interface withDeployment Automation 6.2, but you should not use source configurationtypes developed with the latest CommonIntegrator interface withDeployment Automation 6.1.5.
Chapter 10: Creating Custom Source Configuration Types
58 Deployment Automation
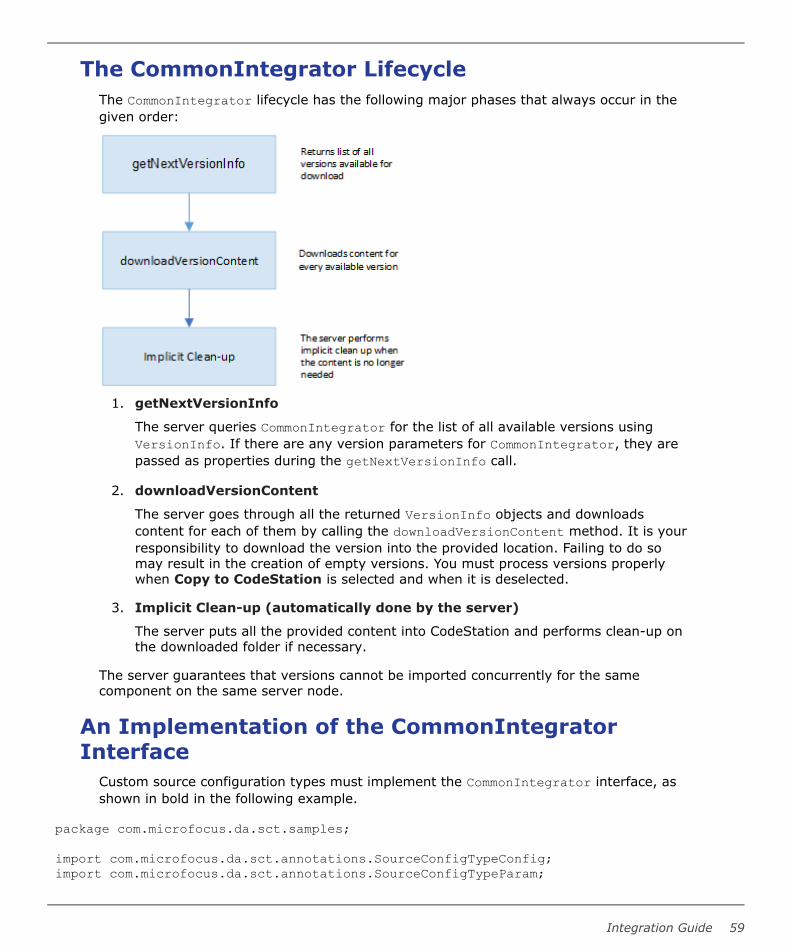
The CommonIntegrator LifecycleThe CommonIntegrator lifecycle has the following major phases that always occur in thegiven order:
1. getNextVersionInfo
The server queries CommonIntegrator for the list of all available versions usingVersionInfo. If there are any version parameters for CommonIntegrator, they arepassed as properties during the getNextVersionInfo call.
2. downloadVersionContent
The server goes through all the returned VersionInfo objects and downloadscontent for each of them by calling the downloadVersionContent method. It is yourresponsibility to download the version into the provided location. Failing to do somay result in the creation of empty versions. You must process versions properlywhen Copy to CodeStation is selected and when it is deselected.
3. Implicit Clean-up (automatically done by the server)
The server puts all the provided content into CodeStation and performs clean-up onthe downloaded folder if necessary.
The server guarantees that versions cannot be imported concurrently for the samecomponent on the same server node.
An Implementation of the CommonIntegratorInterface
Custom source configuration types must implement the CommonIntegrator interface, asshown in bold in the following example.
package com.microfocus.da.sct.samples;
import com.microfocus.da.sct.annotations.SourceConfigTypeConfig;import com.microfocus.da.sct.annotations.SourceConfigTypeParam;
Integration Guide 59

import com.microfocus.da.sct.dtos.VersionInfo;import com.microfocus.da.sct.interfaces.CommonIntegrator;import com.microfocus.da.sct.interfaces.ComponentInfo;import org.apache.commons.io.FileUtils;import org.apache.commons.lang.StringUtils;
import java.io.File;import java.util.*;
/*** Custom File System Versioned SCT**/
@SourceConfigTypeConfig(name="Sample File System (Versioned)", versionNumber = "1.0", description = "Sample Source Config type for connecting File System (Versioned) repositories")public class FileSystemVersioned implements CommonIntegrator {
<more example code here ...>
}
Using the Annotations for Defining UI PropertiesYou can use annotations to define the source configuration type properties that appear inthe Deployment Automation user interface during component configuration.
For details on the annotations, see the Javadoc.
In the following sample code you can see the annotation SourceConfigTypeParam definesa property called Base Path, as shown in bold:
.
.
.
public class FileSystemVersioned implements CommonIntegrator {
@SourceConfigTypeParam(displayName = "Base Path",description = "Base path for artifact storage", required = true) private String basePath;
<more example code here ...>
}
After the example is compiled and loaded into Deployment Automation, the property BasePath is shown in a component when the example source configuration type is selected.
Methods to Use During Version ImportYou must use specific methods and parameters in the commonIntegrator interface tocontrol the behavior of a custom source configuration type.
Chapter 10: Creating Custom Source Configuration Types
60 Deployment Automation

The methods that define how the custom source configuration type behaves when manualor automatic import of a Deployment Automation component is triggered are as follows:
• getNextVersionInfo()
• downloadVersionContent()
To create component versions in Deployment Automation, you must implement thebehavior accurately using:
@VersionParamsTo define validation of component settings and show corresponding and locale-dependentmessages in the UI, use:
getAlerts()See the Javadoc and the example for more details.
For more information on these methods, see the following topics.
• getNextVersionInfo Method [page 61]
• downloadVersionContent Method [page 63]
getNextVersionInfo MethodThe getNextVersionInfo method gets information about the next version to be imported.
getNextVersionInfo takes the Properties object as a parameter.
If you want specific properties to be used when creating the VersionInfo object,compose VersionParams so that those properties are passed to this method. The valuesof these parameters are supplied when importing versions.
For example:
@VersionParams(versionParams ={@VersionParam(displayName = "Specific version/tag", name = "revision",description = "Name of specific version or tag"), @VersionParam(displayName ="Name to create the version with", name = "name", description = "Name foridentifying the version")
})
The above returns
Collection<VersionInfo>This is the collection of VersionInfo objects that can be created using values from theVersionParams annotation.
public Collection<VersionInfo>getNextVersionInfo(Properties properties) throws Exception
Integration Guide 61

{
// This is the name of the first VersionParam objectString versionName = properties.getProperty("revision");VersionInfo info = new VersionInfo(versionName);
// Set some additional properties to existing Properties Object// so that we can use it in// downloadVersionContentproperties.put("myCustomProperty", “myValue”);info.setVersionProps(properties); // SET PROPERTIESreturn Arrays.asList(info);
}
public voiddownloadVersionContent(VersionInfo versionInfo, File processingDirectoryLocation)
throws Exception{
// Extract properties from VersionInfo objectProperties prop = versionInfo.getVersionProps();String myProp = prop.getProperty("myCustomProperty");Client someClient = new Client();Client.downloadContent(processingDirectoryLocation, myProp);
}
If you find that there is no version to create based on the getNextVersionInfo()call anddo not need to call downloadVersionContent(), you should return a null or emptyCollections object. When the Deployment Automation server receives an empty or nullobject instead of a collection of VersionInfo objects, it skips callingdownloadVersionContent().
public Collection<VersionInfo>getNextVersionInfo(Properties properties) throws Exception{
// This is the name of the first VersionParam objectString versionName = properties.getProperty("revision");
// No need to go further, we are not creating the version.if(versionName == null || versionName. length() == 0)return null;
VersionInfo info = new VersionInfo(versionName);
// Set some additional properties to existing Properties Object// so that we can use it in// downloadVersionContentproperties.put("myCustomProperty", “myValue”);info.setVersionProps(properties); // SET PROPERTIESreturn Arrays.asList(info);
}
Chapter 10: Creating Custom Source Configuration Types
62 Deployment Automation

downloadVersionContent MethodThe downloadVersionContent method downloads the artifact content after the versioninformation has been obtained by a getNextVersionInfo method call.
downloadVersionContent takes VersionInfo and File objects as parameters.
This method extracts the information from VersionInfo and starts working on generatingartifacts. Since the clean-up operation is handled implicitly, you must useprocessingDirectoryLocation for all of the processing so that the contents of thatlocation are cleaned and deleted after the download version processing is done. If you usea location other than processingDirectoryLocation, the server does not guarantee thecreation of a version. processingDirectoryLocation is provided as part of theintegration in the server side code. As an implementer, you must put all of your artifactsin this location.
public void downloadVersionContent(VersionInfo versionInfo,File processingDirectoryLocation) throws Exception {SomeClient client = new SomeClient();
// The below code will process and download the artifacts// under processingDirectoryLocation File Object.
client.processAndDownloadArtifacts(processingDirectoryLocation);}
Using ComponentInfo to Process VersionInformation
The ComponentInfo interface enables you to process version information.
With ComponentInfo you can:
• Determine whether to create a new version
• Create a new version based on version properties you set before
• Get file information for a particular version
After the ComponentInfo interface is initialized in the class definitions, you can use it forcreating or identifying artifacts as follows.
Existing Versions
getVersionByName()
// For get version by nameVersionInfo versionInfo = componentInfo.getVersionByName(versionName);// your logic here
getAllVersions()
// For all the existing versionsList<VersionInfo> existingVersions =
(componentInfo == null) ? null : componentInfo.getAllVersions();
Integration Guide 63

if(existingVersions != null && existingVersions.size() > 0) {for(VersionInfo info : existingVersions) {
// your logic here}
}
Latest Versions
// For latest versionsVersionInfo singleLatestVersion =
(componentInfo == null) ? null : componentInfo.getLatestVersion();// your logic goes here.
See the Javadoc and the example for more details.
Using the CommonIntegrator getAlerts Method toValidate Field Values
After someone has configured a component using your custom source configuration typeand saved the component, you can use the CommonIntegrator method getAlerts()tovalidate the provided values.
If the values are invalid, you can return a collection of alert messages to the UI. Thedefault implementation of this method returns nothing. This method can be treated as away to prevent integration failures by pre-checking all the required values.
An example implementation is as follows:
Private File location = null;
public Collection<String> getAlerts(Locale locale) throws Exception {if(location == null)
return Arrays.asList("The Base Directory cannot be empty");
File toCheck = new File(location);if(toCheck.exists())
return null;
return Arrays.asList("The Base Directory does not exist");}
See the Javadoc and the example for more details.
Logging Messages to the ConsoleFor debugging and informational purposes you can log the messages to the systemconsole.
To define and use logging:
1. Define and initialize the org.apache.log4j. Logger class as follows:
Chapter 10: Creating Custom Source Configuration Types
64 Deployment Automation

Logger log = Logger.getLogger(YourClass.class);
2. Include messages as follows:
Informational Messages
log.info(" Your informational message goes here ");Debugging Messages
Debugging Mode must be enabled.
log.debug(" Your debug message goes here ");For error messages
log.error(" Your error message goes here ", exceptionVariable);
Compiling and Loading Custom SourceConfiguration Types
After you have created a Java class that implements CommonIntegrator withdownloadVersionContent and getNextVersionInfo methods, you are ready to compileand generate the custom source configuration type jar file.
Compiling and Generating the Jar FileUsing a build tool such as one included in your Java IDE, compile the code and generatethe jar file.
Loading into Deployment AutomationAfter you have compiled and generated the jar file, you are ready to load the sourceconfiguration type into Deployment Automation and try it out.
You must have the Manage Custom Source Config Types server role to load customsource configuration types. See "Server Roles and System Security" in the DeploymentAutomation User's Guide.
To load a custom source configuration type:
1. In the Deployment Automation UI, navigate to Administration > Automation.
2. Select the Source Config Types tab.
3. Click the Load Source Config Type button.
4. Click Choose File and select the jar file you generated.
5. Click Load.
Integration Guide 65

After they are successfully loaded, custom source configuration types appear in theSource Config Type list and you can click the name link to view more information.
Note:
After a source configuration type jar file is loaded into the system, it is copied tothe profile directory. The default location is <profile_location>/var/plugins/source/custom. By default for Windows this is:
C:\Users\username\.microfocus\da\var\plugins\source\custom
Using Custom Source Configuration TypesYou can select the custom source configuration types in the Source Config Type drop-down when you are creating or configuring a component.
Following are some things to expect when using an external source configuration type,whether or not it is custom.
• If you attempt to delete a source configuration type that is packaged in a jar withmultiple custom source configuration types, you'll receive a warning message thatthis will delete all of the custom source configuration types that packaged with thisone. If you choose to delete, the source configuration type jar is physically deletedfrom the profile location.
• If a new version of a custom source configuration type is loaded that has additionalrequired fields, you are notified about the missing required fields when you view oredit a component that is configured with that source configuration type.
• If a component is configured with a custom source configuration type that is missing,the component page has an alert message that says to reconfigure the component.This can happen if:
▪ Someone deletes the source configuration type
▪ The Deployment Automation server starts without loading the custom sourceconfiguration type, due to an error loading the jar file or jar files missing from theprofile location
• Importing versions works the same as for built-in source configuration types. See"Importing Component Versions" in the Deployment Automation User's Guide.
Tip: You must select Copy to CodeStation if you want the versions to beimported into the Deployment Automation version file system. This is thepreferred setting, as it enables you to track the inventory of your versionsin environments.
See "Creating Components" in the Deployment Automation User's Guide.
Chapter 10: Creating Custom Source Configuration Types
66 Deployment Automation

Chapter 11: Importing and ConfiguringExternal Source Configuration Types
You can import external source configuration types.
• Importing External Source Configuration Types [page 67]
• Sonatype Nexus Properties [page 67]
Importing External Source Configuration TypesYou can import external source configuration types into Deployment Automation.
1. Download the required source configuration type .jar file.
2. Go to Administration | Automation.
3. Select the Source Config Types tab.
4. Click Load Source Config Type.
5. Select the source configuration type .jar file and click Load.
Sonatype Nexus PropertiesThe Sonatype Nexus source configuration type has the following fields and options:
Property Name Description
Server URL (Mandatory) Enter the base URL and port for the Nexus server, for example:http://localhost:8081
User Name Enter name of a Nexus user.
Password Enter the password for the Nexus user.
Repository (Mandatory) Enter the name of the Nexus repository.
Nexus Component Specify the name of the component Nexus to be imported. Use this propertywhen you have multiple Nexus components in the same repository, such asNPM repositories.
Component Group Specify the group ID of the component to which the assets belong. In Mavenrepositories uses Java package name rules, for example: org.apache.maven
Integration Guide 67

Property Name Description
Import folders asversions
Folders with subfiles will be imported as separate versions. Applies torepository types that do not have specific versions, for example, 'raw'.
Import all newversions • Selected: all missing versions will be imported during the next import.
• Cleared: only the latest version will be imported.
Include files Specify file patterns to upload. The wildcard ** includes every directory and *includes every file. For example, the pattern dist/**/* retrieves the entire filetree under the dist directory.
Exclude files Specify file patterns to exclude from uploads.
Preserve ExecutePermissions
File execution permissions are saved with imported files.
Import VersionsAutomatically
The source will be polled periodically for new versions.
Quiet Period The time period (in minutes) in which no polling is done. The quiet periodstarts after the last polling period that detected changes.
Default: not enabled
Polling Period Enter the polling interval (in seconds).
Default: system settings value
Copy to CodeStation Artifacts will be copied from the source into the server's CodeStationrepository. Artifacts can be retrieved during deployments.
Use LatestComponentProperties forVersion Download
When component version artifacts are downloaded, the properties set for theassociated component at the time of the download are used instead of theproperties set when the version was created.
Note: the component version properties are always the same as when theversion was created.
Default Version Type (Mandatory) Select the default version import type:
• Full
• Incremental
Inherit CleanupSettings
This environment will inherit the version clean up configuration from thesettings of each component or the system.
Chapter 11: Importing and Configuring External Source Configuration Types
68 Deployment Automation