deploy oracle linux cloud native environment on oracle ... · oracle linux cloud native environment...
TRANSCRIPT

Deploy application
containers on Oracle
Private Cloud
Appliance/ Private
Cloud at Customer Oracle Linux Cloud Native Environment helps deploy a multi-node
Kubernetes cluster on Oracle Private Cloud Appliance and Oracle
Private Cloud at Customer
WHITE PAPER / JULY 30, 2019
2 WHITE PAPER / Deploy Application Containers on Oracle Private Cloud Appliance/Private Cloud at Customer
PURPOSE STATEMENT
This document provides an approach for deployment of Oracle Linux Cloud Native Environment
on Oracle Private Cloud Appliance and Oracle Private Cloud at Customer. The end result is
deployment of Oracle Container Runtime for Docker in multiple virtual machines with Oracle
Container Services for use with Kubernetes managing the containers.
DISCLAIMER
This document in any form, software or printed matter, contains proprietary information that is
the exclusive property of Oracle. Your access to and use of this confidential material is subject
to the terms and conditions of your Oracle software license and service agreement, which has
been executed and with which you agree to comply. This document and information contained
herein may not be disclosed, copied, reproduced or distributed to anyone outside Oracle without
prior written consent of Oracle. This document is not part of your license agreement nor can it
be incorporated into any contractual agreement with Oracle or its subsidiaries or affiliates.
This document is for informational purposes only and is intended solely to assist you in planning
for the implementation and upgrade of the product features described. It is not a commitment to
deliver any material, code, or functionality, and should not be relied upon in making purchasing
decisions. The development, release, and timing of any features or functionality described in this
document remains at the sole discretion of Oracle.
Due to the nature of the product architecture, it may not be possible to safely include all features
described in this document without risking significant destabilization of the code.

3 WHITE PAPER / Deploy Application Containers on Oracle Private Cloud Appliance/Private Cloud at Customer
TABLE OF CONTENTS
Purpose Statement ...................................................................................... 2
Introduction .................................................................................................. 4
Resource requirements ............................................................................... 5
Steps common to each node in cluster ........................................................ 5
Steps for Private Cloud Appliance using Oracle VM GUI ............................................................ 6
Steps for Private Cloud at Customer using EM IaaS portal ......................................................... 6
Setting up kubernetes master node ........................................................... 14
Adding a worker node to the kuberneets cluster ........................................ 16
Conclusion ................................................................................................. 17
Further Reading / References ....................................................................................................17

4 WHITE PAPER / Deploy Application Containers on Oracle Private Cloud Appliance/Private Cloud at Customer
INTRODUCTION
Oracle Private Cloud Appliance (PCA) is an Oracle Engineered System
designed for rapid deployment of private cloud. Compute resources,
network hardware, storage providers, operating systems and applications
are engineered to work together but managed and operated as a single
unit.
Oracle Private Cloud at Customer enables Oracle and non-Oracle
applications to run in customers’ data centers, with infrastructure managed
by Oracle’s cloud experts. Oracle Private Cloud at Customer comes pre-
configured according to best-practices that have been proven at hundreds
of mission critical Oracle Private Cloud Appliance sites around the world.
Oracle Private Cloud Appliance and Oracle Private Cloud at Customer fully
support Oracle Linux Cloud Native Environment to easily automate
deployment, scaling and management of application containers. Oracle
Private Cloud Appliance includes premier support for Oracle Linux, which
comes with support for OL CNE - Oracle Container Runtime for Docker and
Oracle Container Services for Use with Kubernetes.
Components in Oracle Linux Cloud Native Environment are made available
via Oracle Linux yum server or Oracle Container Registry.
Oracle Container Runtime for Docker allows you to create and distribute
applications across Oracle Linux systems and other operating systems that
support Docker. Oracle Container Runtime for Docker consists of the
Docker Engine, which packages and runs the applications, and integrates
with the Docker Hub, Docker Store and Oracle Container Registry to share
the applications in a Software-as-a-Service (SaaS) cloud. Oracle Container
Registry is the trusted source of Oracle software packaged as Docker
Container images.
Kubernetes is used to manage containers running on a containerization
platform deployed on several systems. On Oracle Linux, Kubernetes is
currently only supported when used in conjunction with the Docker
containerization platform. Therefore, each system in the deployment must
have the Docker engine installed and ready to run. Support of Oracle
Container Services for use with Kubernetes is limited to usage with the

5 WHITE PAPER / Deploy Application Containers on Oracle Private Cloud Appliance/Private Cloud at Customer
latest Oracle Container Runtime for Docker version available in the
ol7_addons repository on the Oracle Linux yum server and in the
ol7_x86_64_addons channel on ULN.
Oracle Enterprise Manager 13c is the recommended management
framework for managing Oracle Infrastructure Software and Oracle
Engineered Systems. Oracle Enterprise Manager is a complete, integrated
and business-driven enterprise cloud management solution.
This paper will discuss the following approach to deploy a multi-node
Kubernetes cluster on Oracle Private Cloud Appliance and Oracle Private
Cloud at Customer:
Use Oracle Linux Virtual Appliances to deploy Oracle Linux VMs and
then using yum to install docker-engine on each VM.
Use kubeadm-setup.sh script to deploy Kubernetes master and
worker nodes by downloading images from Oracle Container
Registry.
RESOURCE REQUIREMENTS
On Oracle Private Cloud Appliance, we will deploy Oracle Linux 7 VMs to function as Master and
Worker nodes in the Kubernetes cluster. In this paper, we deploy a 2 node cluster – one master
node and one worker node.
Each node in the Kubernetes cluster requires at least 2 GB of RAM and 2 or more CPUs to
facilitate the use of kubeadm and any further applications that are provisioned using
kubectl.
A storage volume with at least 5 GB free space must be mounted at /var/lib/kubelet on
each node.
For the underlying Docker engine an additional volume with at least 5 GB free space must be
mounted on each node at /var/lib/docker.
Ensure each node has a unique UUID.
[root@kube-master ~]# dmidecode -s system-uuid
0004fb00-0006-0000-a6c3-6e4d06e5fa16
[root@kube-worker ~]# dmidecode -s system-uuid
0004fb00-0006-0000-658a-18bd874e86d1
STEPS COMMON TO EACH NODE IN CLUSTER
1. Install Docker Engine on all nodes

6 WHITE PAPER / Deploy Application Containers on Oracle Private Cloud Appliance/Private Cloud at Customer
For installations on Oracle Private Cloud Appliance, Oracle VM Manager GUI can be
used to create VMs.
Follow the instructions (with following notes) in this blog for step by step instructions on how to
install Docker Engine on an Oracle Linux 7 Virtual Machine on Oracle Private Cloud Appliance.
Note: As stated in the requirements, we need 5 GB free space mounted at /var/lib/docker
and at /var/lib/kubelet.
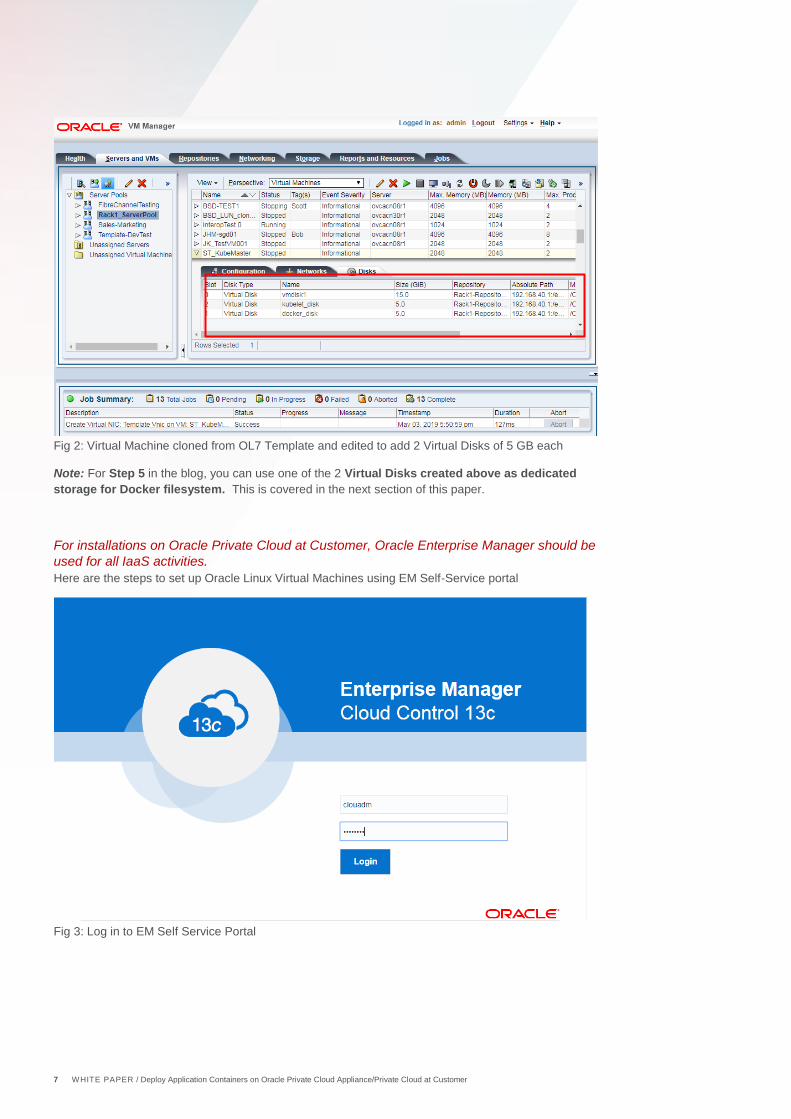
For this reason, in Step 2 of the above referenced blog, also add 2 Virtual disks of 5GB each
while editing the VM after cloning from the Virtual Appliance.
Add virtual disks to the VM
While editing the VM, go to ‘Disks’ tab and Choose ‘Virtual Disk’ from the Disk Type drop down.
Fig 1: Editing VM to attach Virtual Disks
7 WHITE PAPER / Deploy Application Containers on Oracle Private Cloud Appliance/Private Cloud at Customer
Fig 2: Virtual Machine cloned from OL7 Template and edited to add 2 Virtual Disks of 5 GB each
Note: For Step 5 in the blog, you can use one of the 2 Virtual Disks created above as dedicated
storage for Docker filesystem. This is covered in the next section of this paper.
For installations on Oracle Private Cloud at Customer, Oracle Enterprise Manager should be
used for all IaaS activities.
Here are the steps to set up Oracle Linux Virtual Machines using EM Self-Service portal
Fig 3: Log in to EM Self Service Portal

8 WHITE PAPER / Deploy Application Containers on Oracle Private Cloud Appliance/Private Cloud at Customer
Fig 4: Choose Deploy -> Assembly to initiate creation of VM from OL assembly
Fig 5: Assembly Deployment: Instance details – select source image, VM name
`

9 WHITE PAPER / Deploy Application Containers on Oracle Private Cloud Appliance/Private Cloud at Customer
Fig 6: Attach the NIC to a network on public VLAN in order to access Internet
Fig 7: Add 2 storage disks each of 5 GB for setting up Docker and kubelet filesystems
10 WHITE PAPER / Deploy Application Containers on Oracle Private Cloud Appliance/Private Cloud at Customer
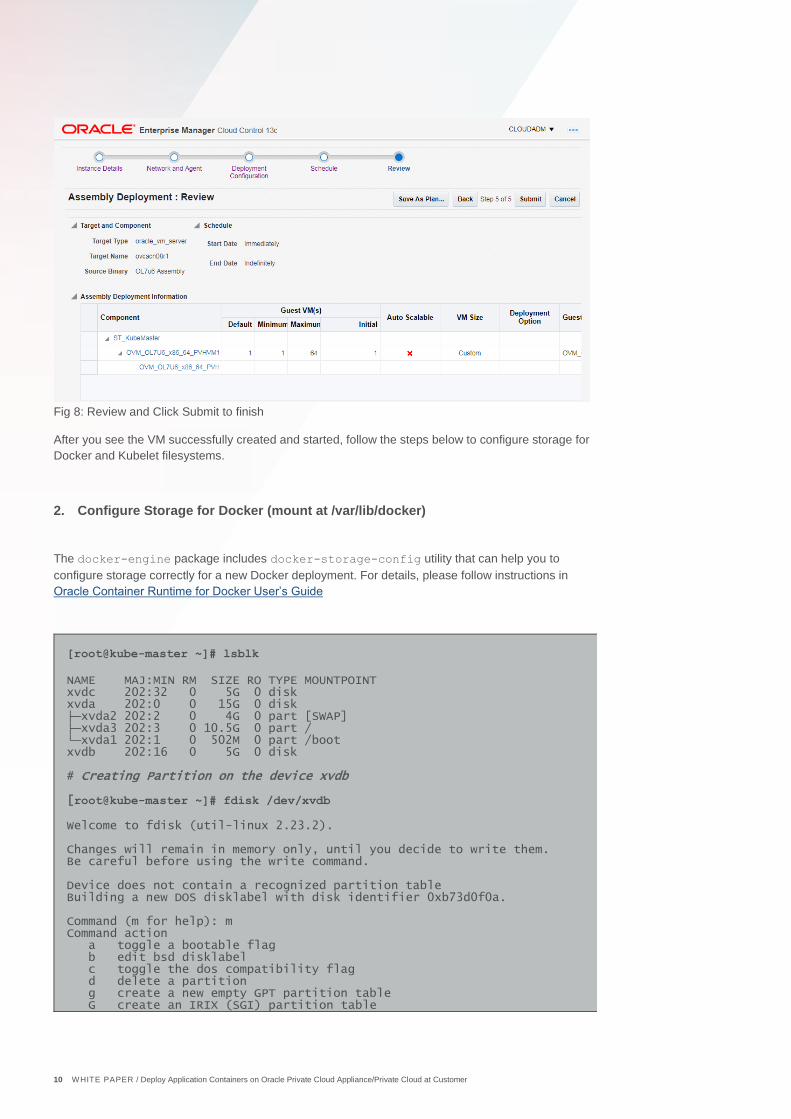
Fig 8: Review and Click Submit to finish
After you see the VM successfully created and started, follow the steps below to configure storage for
Docker and Kubelet filesystems.
2. Configure Storage for Docker (mount at /var/lib/docker)
The docker-engine package includes docker-storage-config utility that can help you to
configure storage correctly for a new Docker deployment. For details, please follow instructions in
Oracle Container Runtime for Docker User’s Guide
[root@kube-master ~]# lsblk
NAME MAJ:MIN RM SIZE RO TYPE MOUNTPOINT xvdc 202:32 0 5G 0 disk xvda 202:0 0 15G 0 disk ├─xvda2 202:2 0 4G 0 part [SWAP] ├─xvda3 202:3 0 10.5G 0 part / └─xvda1 202:1 0 502M 0 part /boot xvdb 202:16 0 5G 0 disk # Creating Partition on the device xvdb [root@kube-master ~]# fdisk /dev/xvdb Welcome to fdisk (util-linux 2.23.2). Changes will remain in memory only, until you decide to write them. Be careful before using the write command. Device does not contain a recognized partition table Building a new DOS disklabel with disk identifier 0xb73d0f0a. Command (m for help): m Command action a toggle a bootable flag b edit bsd disklabel c toggle the dos compatibility flag d delete a partition g create a new empty GPT partition table G create an IRIX (SGI) partition table

11 WHITE PAPER / Deploy Application Containers on Oracle Private Cloud Appliance/Private Cloud at Customer
l list known partition types m print this menu n add a new partition o create a new empty DOS partition table p print the partition table q quit without saving changes s create a new empty Sun disklabel t change a partition's system id u change display/entry units v verify the partition table w write table to disk and exit x extra functionality (experts only) Command (m for help): p Disk /dev/xvdb: 5368 MB, 5368709120 bytes, 10485760 sectors Units = sectors of 1 * 512 = 512 bytes Sector size (logical/physical): 512 bytes / 512 bytes I/O size (minimum/optimal): 512 bytes / 512 bytes Disk label type: dos Disk identifier: 0xce316206 Device Boot Start End Blocks Id System Command (m for help): n Partition type: p primary (0 primary, 0 extended, 4 free) e extended Select (default p): p Partition number (1-4, default 1): First sector (2048-10485759, default 2048): Using default value 2048 Last sector, +sectors or +size{K,M,G} (2048-10485759, default 10485759): Using default value 10485759 Partition 1 of type Linux and of size 5 GiB is set Command (m for help): w The partition table has been altered! Calling ioctl() to re-read partition table. Syncing disks. #List Block Devices [root@kube-master ~]# lsblk NAME MAJ:MIN RM SIZE RO TYPE MOUNTPOINT xvdc 202:32 0 5G 0 disk xvda 202:0 0 15G 0 disk ├─xvda2 202:2 0 4G 0 part [SWAP] ├─xvda3 202:3 0 10.5G 0 part / └─xvda1 202:1 0 502M 0 part /boot xvdb 202:16 0 5G 0 disk └─xvdb1 202:17 0 5G 0 part
Fig 9: Create a new block device on virtual disk to configure Docker storage
To automatically set up your Docker storage, before installation, run docker-storage-config as
root:
[root@kube-master ~]# docker-storage-config -s btrfs -d
/dev/xvdb1
Creating 'btrfs' file system on: /dev/xvdb1
Substitute /dev/xvdb1 with the path to the block device that you attached as dedicated storage.
This can be verified by looking for the new entry in file /etc/fstab as shown in Figure below.

12 WHITE PAPER / Deploy Application Containers on Oracle Private Cloud Appliance/Private Cloud at Customer
Fig 10: /etc/fstab file showing new entry added by docker-storage-config
Finally start the docker service as shown in Step 6 and login to Oracle Container Registry as
shown in Step 7 of the blog.
3. Configure Storage for Kubelet (mount at /var/lib/kubelet)
As per requirements, at least 5 GB of storage volume needs to be mounted at /var/lib/kubelet. We will
use the Virtual Disk created in above step for this purpose
[root@kube-master ~]# lsblk
NAME MAJ:MIN RM SIZE RO TYPE MOUNTPOINT xvdc 202:32 0 5G 0 disk xvda 202:0 0 15G 0 disk ├─xvda2 202:2 0 4G 0 part [SWAP] ├─xvda3 202:3 0 10.5G 0 part / └─xvda1 202:1 0 502M 0 part /boot xvdb 202:16 0 5G 0 disk └─xvdb1 202:17 0 5G 0 part /var/lib/docker # Creating Partition on the device xvdc [root@kube-master ~]# fdisk /dev/xvdc Welcome to fdisk (util-linux 2.23.2). Changes will remain in memory only, until you decide to write them. Be careful before using the write command. Device does not contain a recognized partition table Building a new DOS disklabel with disk identifier 0xb73d0f0a. Command (m for help): n Partition type: p primary (0 primary, 0 extended, 4 free) e extended Select (default p): p Partition number (1-4, default 1): First sector (2048-10485759, default 2048): Using default value 2048 Last sector, +sectors or +size{K,M,G} (2048-10485759, default 10485759): Using default value 10485759 Partition 1 of type Linux and of size 5 GiB is set Command (m for help): w The partition table has been altered! Calling ioctl() to re-read partition table. Syncing disks. # List Block Devices [root@kube-master ~]# lsblk NAME MAJ:MIN RM SIZE RO TYPE MOUNTPOINT xvdc 202:32 0 5G 0 disk └─xvdc1 202:33 0 5G 0 part xvda 202:0 0 15G 0 disk ├─xvda2 202:2 0 4G 0 part [SWAP] ├─xvda3 202:3 0 10.5G 0 part /

13 WHITE PAPER / Deploy Application Containers on Oracle Private Cloud Appliance/Private Cloud at Customer
└─xvda1 202:1 0 502M 0 part /boot xvdb 202:16 0 5G 0 disk └─xvdb1 202:17 0 5G 0 part /var/lib/docker
Create a btrfs file system on partition /dev/xvdc1: [root@kube-master ~]# mkfs.btrfs /dev/xvdc1 btrfs-progs v4.15.1 See http://btrfs.wiki.kernel.org for more information. Detected a SSD, turning off metadata duplication. Mkfs with -m dup if you want to force metadata duplication. Label: (null) UUID: d031a66b-341a-40e8-8c1b-a730034fb55f Node size: 16384 Sector size: 4096 Filesystem size: 5.00GiB Block group profiles: Data: single 8.00MiB Metadata: single 8.00MiB System: single 4.00MiB SSD detected: yes Incompat features: extref Number of devices: 1 Devices: ID SIZE PATH 1 5.00GiB /dev/xvdc1 [root@kube-master ~]# blkid /dev/xvdc1 /dev/xvdc1: UUID="d031a66b-341a-40e8-8c1b-a730034fb55f" UUID_SUB="e7045279-5e1a-4dd9-b7b5-4235904f36e5" TYPE="btrfs"
Create an entry in your /etc/fstab to ensure that the file system is mounted at boot. Open /etc/fstab in an editor and add a line similar to the following:
UUID=d031a66b-341a-40e8-8c1b-a730034fb55f /var/lib/kubelet btrfs defaults 0 0
Fig 11: /etc/fastab file showing mount for file system on /var/lib/kubelet
Mount the filesystem [root@kube-master ~]# mkdir /var/lib/kubelet [root@kube-master ~]# mount /var/lib/kubelet/
4. Network Time Service Setup
As a clustering environment, Kubernetes requires that system time is synchronized across each node within the cluster. Typically, this can be achieved by installing and configuring an NTP daemon on each node. You can do this in the following way:

14 WHITE PAPER / Deploy Application Containers on Oracle Private Cloud Appliance/Private Cloud at Customer
[root@kube-master ~]# yum install ntp
Ensure that NTP is enabled to restart at boot and is started before proceeding with Kubernetes installation.
[root@kube-master ~]# systemctl start ntpd [root@kube-master ~]# systemctl enable ntpd Created symlink from /etc/systemd/system/multi-user.target.wants/ntpd.service to /usr/lib/systemd/system/ntpd.service.
5. Firewall and IP settings
Kubernetes uses iptables to handle many networking and port forwarding rules. Therefore, you must
ensure that you do not have any rules set that may interfere with the functioning of Kubernetes.
The kubeadm-setup.sh script requires an iptables rule to accept forwarding traffic. If this rule is not
set, the script exits and notifies you that you may need to add this iptables rule. See Firewall and
iptables requirements in User Guide for details.
A standard Docker installation may create a firewall rule that prevents forwarding, therefore you may
need to run:
[root@kube-master ~]# iptables –P FORWARD ACCEPT
The kubeadm-setup.sh script checks iptables rules and, where there is a match, instructions
are provided on how to modify your iptables configuration to meet any requirements. In
summary, run the following on each node to set up port forwarding
#/sbin/iptables -A KUBE-FIREWALL -p tcp -m tcp --dport 6443 -m conntrack --
ctstate NEW -j ACCEPT
# /sbin/iptables -A KUBE-FIREWALL -p tcp -m tcp --dport 10250 -m conntrack --
ctstate NEW -j ACCEPT
# /sbin/iptables -A KUBE-FIREWALL -p udp -m udp --dport 8472 -m conntrack --
ctstate NEW -j ACCEPT
SETTING UP KUBERNETES MASTER NODE
After completing the above common steps for each node in the Kubernetes cluster, this section goes
through the steps to be executed on the Virtual Machine that will function as the Kubernetes Master.
The master node is responsible for cluster management and for providing the API that is used to
configure and manage resources within the Kubernetes cluster. Kubernetes master node components
can be run within Kubernetes itself, as a set of containers within a dedicated pod.
The Kubernetes images that are deployed by the kubeadm-setup.sh script are hosted on the Oracle
Container Registry.
1. Satisfy Oracle Container Registry requirements

15 WHITE PAPER / Deploy Application Containers on Oracle Private Cloud Appliance/Private Cloud at Customer
Thus, before you begin the setup, make sure you satisfy the Oracle Container Registry
Requirements - log into Oracle Container Registry in the Web UI (https://container-
registry.oracle.com), navigate to Container Service to accept the license and use docker login to
authenticate against the Oracle Container Registry (Step 7 of the blog).
2. Install kubeadm package and its dependencies using yum
[root@kube-master ~]# yum install kubeadm kubelet kubectl
3. Run the kubeadm-setup.sh up script to set up Master Node
[root@kube-master ~]# kubeadm-setup.sh up
Checking kubelet and kubectl RPM ...
Starting to initialize master node ...
Checking if env is ready ...
Checking whether docker can pull busybox image ...
[WARNING] docker might not be able to pull image from https://registry-1.docker.io/v2
Checking access to container-registry.oracle.com/kubernetes ...
Trying to pull repository container-registry.oracle.com/kubernetes/kube-proxy ...
v1.12.7: Pulling from container-registry.oracle.com/kubernetes/kube-proxy
Digest: sha256:aaf1d93c2fbaa1e09b40f50446d9ac99e93c1a11d4eff5ab2b5720284c5097c9
Status: Image is up to date for container-registry.oracle.com/kubernetes/kube-
proxy:v1.12.7
Checking whether docker can run container ...
Checking iptables default rule ...
Checking br_netfilter module ...
Checking sysctl variables ...
Check successful, ready to run 'up' command ...
Waiting for kubeadm to setup master cluster...
Please wait ...
| - 80% completed
Waiting for the control plane to become ready ...
................
100% completed
clusterrole.rbac.authorization.k8s.io/flannel created
clusterrolebinding.rbac.authorization.k8s.io/flannel created
serviceaccount/flannel created
configmap/kube-flannel-cfg created
daemonset.extensions/kube-flannel-ds created
Installing kubernetes-dashboard ...
secret/kubernetes-dashboard-certs created
serviceaccount/kubernetes-dashboard created
role.rbac.authorization.k8s.io/kubernetes-dashboard-minimal created
rolebinding.rbac.authorization.k8s.io/kubernetes-dashboard-minimal created
deployment.apps/kubernetes-dashboard created
service/kubernetes-dashboard created
Enabling kubectl-proxy.service ...
Starting kubectl-proxy.service ...
[===> PLEASE DO THE FOLLOWING STEPS BELOW: <===]
Your Kubernetes master has initialized successfully!
To start using your cluster, you need to run the following as a regular user:
mkdir -p $HOME/.kube
sudo cp -i /etc/kubernetes/admin.conf $HOME/.kube/config
sudo chown $(id -u):$(id -g) $HOME/.kube/config
You can now join any number of machines by running the following on each node
as root:

16 WHITE PAPER / Deploy Application Containers on Oracle Private Cloud Appliance/Private Cloud at Customer
kubeadm-setup.sh join 10.147.37.226:6443 --token v5mxj8.bmwayav7vszo2351 --
discovery-token-ca-cert-hash
sha256:7c5f8f64f65b6ab4a2ff727730ee4f2b9c62e8bdd6b737744b9b062bae7d8c4a
Run the post–completion commands to start using your cluster. We can then attach worker nodes to
the cluster as described in the following section.
ADDING A WORKER NODE TO THE KUBERNEETS CLUSTER
Worker nodes within the Kubernetes cluster are used to run containerized applications and handle
networking to ensure that traffic between applications across the cluster and from outside of the
cluster can be properly facilitated. The worker nodes perform any actions triggered via the Kubernetes
API, which runs on the master node.
Repeat all the steps that are common for all nodes in a Kubernetes cluster on the worker node. Here
are the steps to add a worker node to the cluster:
1. Install kubeadm package and its dependencies using yum
[root@kube-worker ~]# yum install kubeadm kubelet kubectl
2. Join the Worker Node to cluster
[root@kube-worker ~]# kubeadm-setup.sh join 10.147.37.226:6443 --token v5mxj8.bmwayav7vszo2351 --discovery-token-ca-cert-hash sha256:7c5f8f64f65b6ab4a2ff727730ee4f2b9c62e8bdd6b737744b9b062bae7d8c4a Checking kubelet and kubectl RPM ...
Starting to initialize worker node ...
Checking if env is ready ...
Checking whether docker can pull busybox image ...
[WARNING] docker might not be able to pull image from https://registry-1.docker.io/v2
Checking access to container-registry.oracle.com/kubernetes ...
Trying to pull repository container-registry.oracle.com/kubernetes/kube-proxy ...
v1.12.7: Pulling from container-registry.oracle.com/kubernetes/kube-proxy
Digest: sha256:aaf1d93c2fbaa1e09b40f50446d9ac99e93c1a11d4eff5ab2b5720284c5097c9
Status: Image is up to date for container-registry.oracle.com/kubernetes/kube-
proxy:v1.12.7
Checking whether docker can run container ...
Checking iptables default rule ...
Checking br_netfilter module ...
Checking sysctl variables ...
Enabling kubelet ...
Created symlink from /etc/systemd/system/multi-user.target.wants/kubelet.service to
/etc/systemd/system/kubelet.service.
Check successful, ready to run 'join' command ...
[validation] WARNING: kubeadm doesn't fully support multiple API Servers yet
[preflight] running pre-flight checks
[discovery] Trying to connect to API Server "10.147.37.226:6443"
[discovery] Trying to connect to API Server "10.147.37.226:6443"
[discovery] Created cluster-info discovery client, requesting info from
"https://10.147.37.226:6443"
[discovery] Created cluster-info discovery client, requesting info from
"https://10.147.37.226:6443"
[discovery] Requesting info from "https://10.147.37.226:6443" again to validate TLS
against the pinned public key
[discovery] Requesting info from "https://10.147.37.226:6443" again to validate TLS
against the pinned public key
[discovery] Cluster info signature and contents are valid and TLS certificate validates
against pinned roots, will use API Server "10.147.37.226:6443"

17 WHITE PAPER / Deploy Application Containers on Oracle Private Cloud Appliance/Private Cloud at Customer
[discovery] Successfully established connection with API Server "10.147.37.226:6443"
[discovery] Cluster info signature and contents are valid and TLS certificate validates
against pinned roots, will use API Server "10.147.37.226:6443"
[discovery] Successfully established connection with API Server "10.147.37.226:6443"
[kubelet] Downloading configuration for the kubelet from the "kubelet-config-1.12"
ConfigMap in the kube-system namespace
[kubelet] Writing kubelet configuration to file "/var/lib/kubelet/config.yaml"
[kubelet] Writing kubelet environment file with flags to file "/var/lib/kubelet/kubeadm-
flags.env"
[preflight] Activating the kubelet service
[tlsbootstrap] Waiting for the kubelet to perform the TLS Bootstrap...
[patchnode] Uploading the CRI Socket information "/var/run/dockershim.sock" to the Node
API object "kube-worker" as an annotation
This node has joined the cluster:
* Certificate signing request was sent to apiserver and a response was received.
* The Kubelet was informed of the new secure connection details.
Run 'kubectl get nodes' on the master to see this node join the cluster.
The kubeadm-setup.sh script checks whether the host meets all the requirements before it sets up a
worker node. If a requirement is not met, an error message is displayed together with the
recommended fix. You should fix the errors before running the script again.
After the kubeadm-setup.sh join command finishes, check that the worker node has joined the
cluster by running the flowing command on master node.
[root@kube-master ~]# kubectl get nodes NAME STATUS ROLES AGE VERSION kube-master Ready master 30m v1.12.7+1.1.2.el7 kube-worker Ready <none> 84s v1.12.7+1.1.2.el7
CONCLUSION
Oracle Container Services for use with Kubernetes is fully tested on Oracle Linux 7 and includes
additional tools developed at Oracle to ease configuration and deployment of a Kubernetes cluster.
This paper describes the process to quickly set up a Kubernetes cluster on your Oracle Private Cloud
Appliance in minutes.
To start using the Kubernetes cluster to deploy applications in pods, follow details in the Oracle
Container Services for use with Kubernetes User Guide
Further Reading / References
The following links are to Documentation Libraries that will provide useful background and technical
reading: -
Oracle Private Cloud Appliance
https://www.oracle.com/technetwork/server-storage/private-cloud-appliance/documentation/index.html
Oracle Container Runtime for Docker
https://docs.oracle.com/cd/E52668_01/E87205/html/index.html
Oracle Container Services for Use with Kubernetes
https://docs.oracle.com/cd/E52668_01/E88884/html/index.html

ORACLE CORPORATION
Worldwide Headquarters
500 Oracle Parkway, Redwood Shores, CA 94065 USA
Worldwide Inquiries
TELE + 1.650.506.7000 + 1.800.ORACLE1
FAX + 1.650.506.7200
oracle.com
CONNECT WITH US
Call +1.800.ORACLE1 or visit oracle.com. Outside North America, find your local office at oracle.com/contact.
blogs.oracle.com/oracle-systems facebook.com/oracle twitter.com/oracle
Copyright © 2019, Oracle and/or its affiliates. All rights reserved. This document is provided for information purposes only, and the contents
hereof are subject to change without notice. This document is not warranted to be error-free, nor subject to any other warranties or conditions,
whether expressed orally or implied in law, including implied warranties and conditions of merchantability or fitness for a particular purpose. We
specifically disclaim any liability with respect to this document, and no contractual obligations are formed either directly or indirectly by this
document. This document may not be reproduced or transmitted in any form or by any means, electronic or mechanical, for any purpose, without
our prior written permission
Oracle and Java are registered trademarks of Oracle and/or its affiliates. Other names may be trademarks of their respective owners.
Intel and Intel Xeon are trademarks or registered trademarks of Intel Corporation. All SPARC trademarks are used under license and are
trademarks or registered trademarks of SPARC International, Inc. AMD, Opteron, the AMD logo, and the AMD Opteron logo are trademarks or
registered trademarks of Advanced Micro Devices. UNIX is a registered trademark of The Open Group. 0719
White Paper Deploy application containers on Oracle Private Cloud Appliance/ Private Cloud at Customer
July 2019
Authors: Sonit Tayal