dell open source guideopensource.dell.com/releases/venue_7_3740_merrifield/developer... · dell...
TRANSCRIPT

Dell Open Source GuideFor Venue7 3740 and Venue8 3840
Version: 1.008/6/2014
Copyright © 2014 - 2015 By Dell Inc.

Dell Open Source Guide
Dell Tablet Flash Notes
Welcome to the Dell Open Source Guide. Here you'll find the guide that describes on how to
download, build and flash the appropriate kernel for Dell Venue7 3740/Venue8 3840 tablet
device.
* For Wi-Fi/LTE device on A195
Prerequisite System Setup
1) Operating Systems
Windows 7
Windows 8.1 desktop mode
2) A micro-SD card of 1GB or higher.
3) All anti-virus software should be disabled when to flash SW into device.
4) Download and install Dell driver and the flashing tool:
IntelAndroidDrvSetup1.5.0.exe
P708T_Driver_V1.0.0.msi
iSocUSB-Driver-Setup-1.0.4.zip
xFSTK_downloader_1.5.1.zip
* You MUST do “Flash A195 image to the tablet” part firstly if your tablet's build number
is not “YTP802A119500” or “YTP802A519500”. (Build number is here: Settings ->About
tablet ->Build number)
* WARNING: The data on the tablet device will be LOST when to flash A195 image, please
make sure you have already backed up data of device firstly.
A. Flash A195 image to the tablet
1) Download and extract tar package, for A195 Wi-Fi, is A195/Unbrick/YTP802A119500-2014-07-16-22.tgz; for A195-LTE, is A195/Unbrick/YTD802A519500-2014-07-16-16.tgz.
2) Open Flash Tool “xFSTK-Downloader”, and set configuration for each s dection.
Page 2 of 13
Dell Open Source Guide
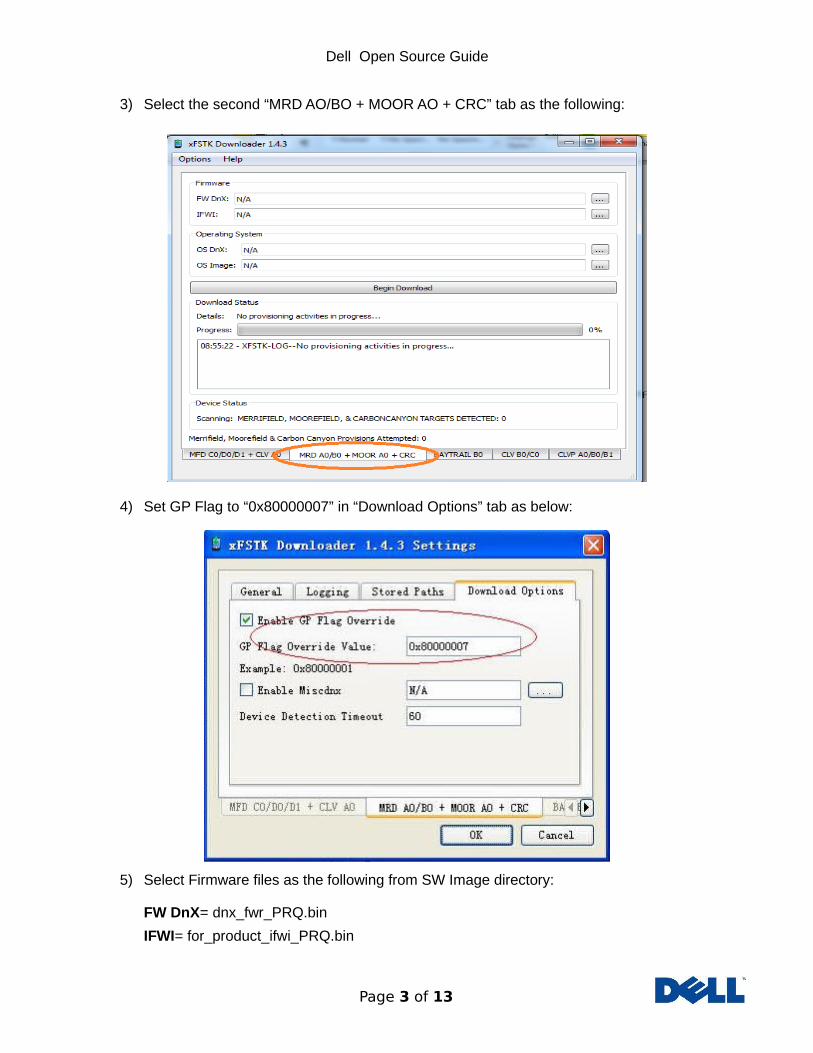
3) Select the second “MRD AO/BO + MOOR AO + CRC” tab as the following:
4) Set GP Flag to “0x80000007” in “Download Options” tab as below:
5) Select Firmware files as the following from SW Image directory:
FW DnX= dnx_fwr_PRQ.bin
IFWI= for_product_ifwi_PRQ.bin
Page 3 of 13
Dell Open Source Guide
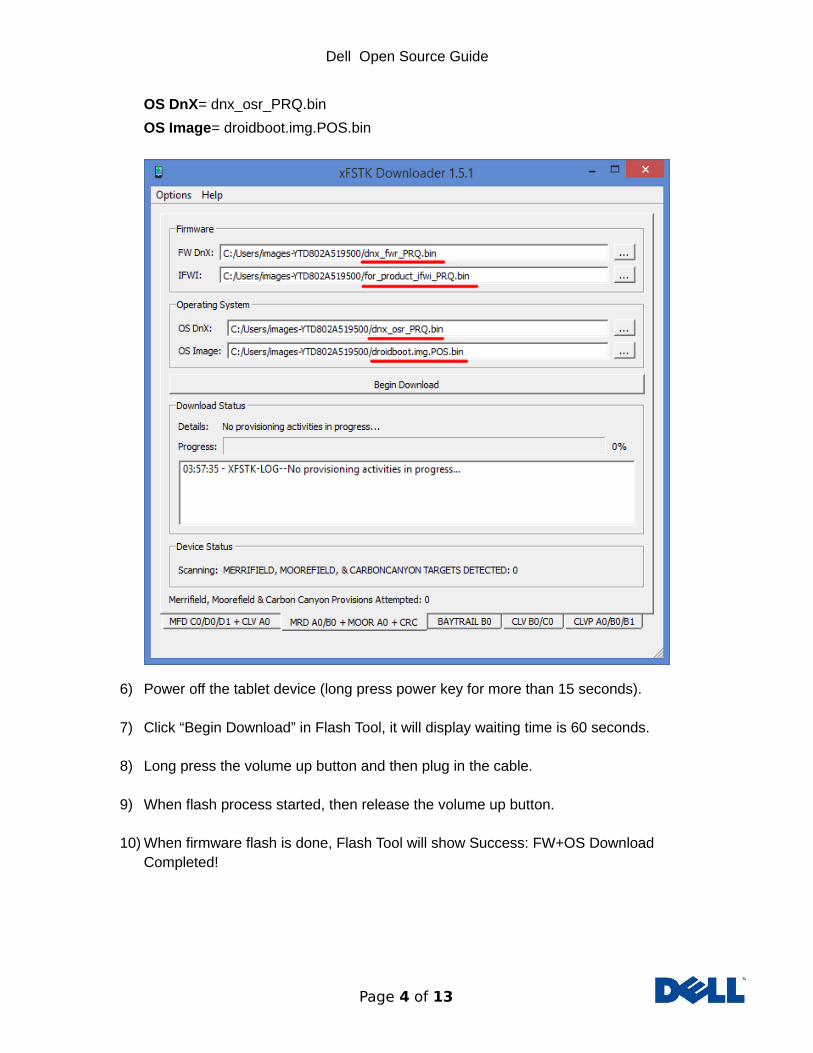
OS DnX= dnx_osr_PRQ.bin
OS Image= droidboot.img.POS.bin
6) Power off the tablet device (long press power key for more than 15 seconds).
7) Click “Begin Download” in Flash Tool, it will display waiting time is 60 seconds.
8) Long press the volume up button and then plug in the cable.
9) When flash process started, then release the volume up button.
10) When firmware flash is done, Flash Tool will show Success: FW+OS Download Completed!
Page 4 of 13

Dell Open Source Guide
11) After flashing firmware, the tablet device will switch to fastboot mode automatically as
the following:
12) Double click file “P802_flash_device_wifi_only.bat” or “P802_flash_device_lte.bat” in SW
image folder. The following CMD window will show up, and begin to flash OS system
image.
Page 5 of 13

Dell Open Source Guide
13) After flash is complete, “press any key to continue” will shown in the cmd window.
Please click any key, and the device will reboot automatically.
* You can either do part B (B. Rooting and bootloader unlocking process using
OTA package) or do part C (C. Build the kernel image from the kernel sources and
flash kernel image) to root your tablet.
B. Rooting and bootloader unlocking process using OTA
package
* You will no longer receive OTA notification once you have flashed the OTA package with unsigned kernel.
1. Enable fastboot mode
1) Open “xFSTK Downloader 1.5.1”.
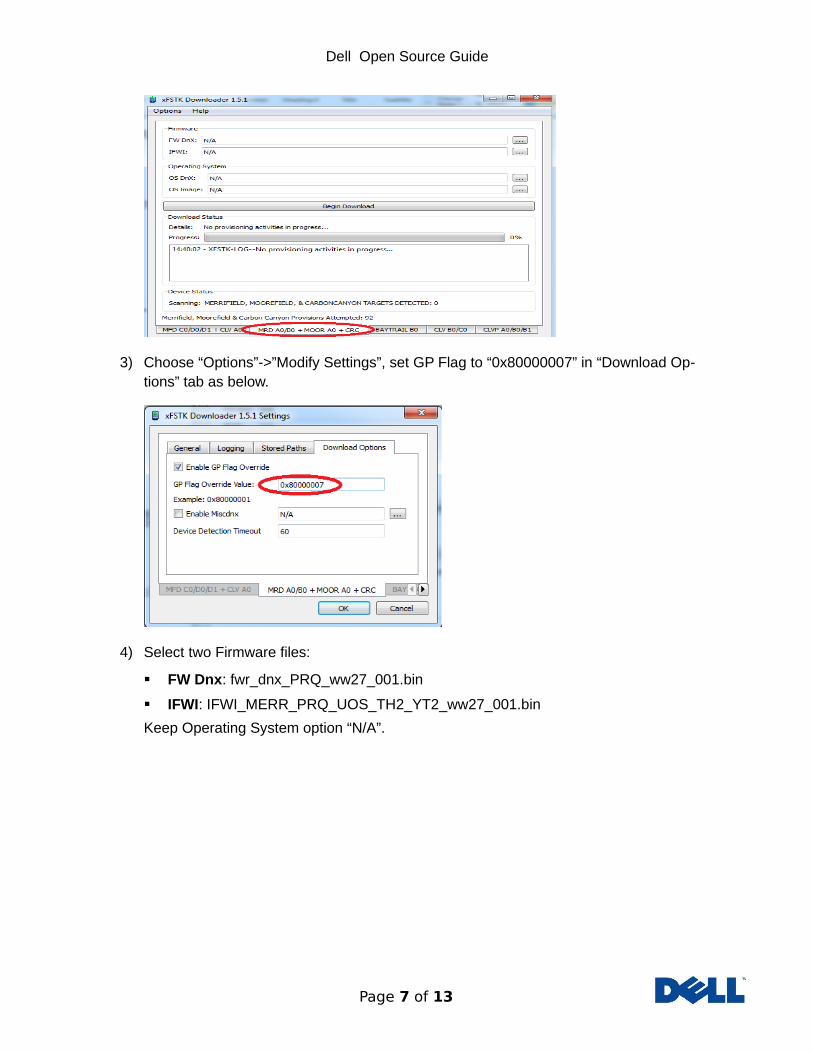
2) Select the second “MRD AO/BO + MOOR AO + CRC” tab as the following:
Page 6 of 13
Dell Open Source Guide
3) Choose “Options”->”Modify Settings”, set GP Flag to “0x80000007” in “Download Op-tions” tab as below.
4) Select two Firmware files:
FW Dnx: fwr_dnx_PRQ_ww27_001.bin
IFWI: IFWI_MERR_PRQ_UOS_TH2_YT2_ww27_001.bin
Keep Operating System option “N/A”.
Page 7 of 13

Dell Open Source Guide
5) Turn off the tablet(Venue 7 3740/Venue 8 3840).
6) Click “Begin Download” button.
7) Press the volume up button and then plug in the USB cable.
8) If it’s your first time to connect the tablet to PC, it’ll need some time to recognize the driver. After driver installation automatically, go to steps 5 again.
9) The flashing tool pops up the dialog as below, press “OK”.
10) When firmware flash is done, Flash Tool will show Success: FW+OS Download Completed!
Page 8 of 13

Dell Open Source Guide
11) Reboot the tablet and press power + volume down button to enter fastboot mode, and fastboot mode is enabled successfully as the following:
2. Rooting and bootloader unlocking process using OTA package
1) Download the file, For A195-WifiOnly, download the file “A195/OTA/YTP802A119600-f-2014-07-16-22_OSS.zip”; for A195-LTE, download the file “A195/OTA/YTD802A519600-f-2014-07-16-16_OSS.zip”.
2) Copy “YTP802A119600-f-2014-07-16-22_OSS.zip” or “YTD802A519600-f-2014-07-16-16_OSS.zip” to a micro-sd card and insert that card into the micro-sd card slot of dell venue tablet.
3) Power off the tablet.
4) Enter fastboot mode on the tablet (power + volume down button).
5) Select recovery (3rd item from list), and use volume down button to navigate to it and select it by pressing power button.
6) You will see android lying down with an ! Sign.
Page 9 of 13
Dell Open Source Guide
7) Now hold down the power button and briefly press the volume up button at the same time to get to the recovery menu.
8) Select “apply update from external storage” – second item from top (use vol down to navigate to it) and then press power button to select it.
9) Then select the file you stored on the sdcard (use vol down button to navigate to it) and press power button.
10) You will see a few messages on the screen (like cannot load volume /misc and then some update messages).
11) After a few minutes a menu appears on screen and then select reboot system now (1st item on menu) by pressing power button.
12) Now you are done and the bootloader is unlocked and you have root access.
C. Build the kernel image from the kernel sources and
flash kernel image
1. Build the kernel image from the kernel sources
1) Download kernel source package “A195/dell_venue_kernel.tgz”.
2) Download Android AOSP 4.4 source codes from android.com. The detailed download instruction is available at https://source.android.com/source/downloading.html.
\> pwd
/localdisk3/dell_venue
\> mkdir aosp
\> cd aosp
\> repo init -u https://android.googlesource.com/platform/manifest -b android-4.4_r1.2
\> repo sync .
3) Download gcc for linux-x86.
\> git clone https://android.googlesource.com/platform/prebuilts/gcc/linux-x86/x86/x86_64-linux-android-4.7
4) Copy “x86_64-linux-android-4.7/*” directory to “prebuilts/gcc/linux-x86/x86/x86_64-linux-android-4.7/”.
Page 10 of 13

Dell Open Source Guide
5) Extract the kernel source package “dell_venue_kernel.tgz” to the Android source root directory, i.e. aosp directory in this example.
\> pwd
/localdisk3/dell_venue/aosp
\> tar –xzf dell_venue_kernel.tgz
6) Once done, you should be able to see the “linux” directory inside aosp directory.
7) Copy “prebuilts” directory into “linux” directory. Run the kernel build script.
\> cd linux
\> ./kernel_build.sh
8) Check out if the kernel image “boot.img” was created.
\> cd out/target/product/
\> pwd
/localdisk3/dell_venue/aosp/linux/out/target/product
\> ls -al boot.img
-rw-r----- 1 xxx yyy 8540672 Mar 19 14:56 boot.img.
2. Flash boot.img and droidboot.img
1) make the device enable fastboot mode.
2) Download adb.exe, fastboot.exe, AdbWinApi.dll, AdbWinUsbApi.dll from “FlashTool/fastboot”.
3) Configure environment variable as the following. If this variable has been set before, please add this new environment path before old path.
Page 11 of 13

Dell Open Source Guide
4) In a cmd window, type “fastboot devices” and you should see the screen.
5) Download droidboot.img and A195/boot.img (or you can use boot.img you build), put it in the directory which contains your built boot.img.
6) Go to the directory contains “boot.img” and run these commands.
\> fastboot flash boot boot.img
\> fastboot flash fastboot droidboot.img
\> fastboot reboot
7) After the device is rebooted, confirm if the image is properly flashed. Go to Settings->About tablet and make sure if the information in Kernel version is right.
Page 12 of 13
Dell Open Source Guide
D. Unbricking Process
If you encounter some issues when doing the OTA or flash new firmware and boot image,
please reference section “Flash A195 image to the tablet” to unbrick the tablet.
Page 13 of 13