dell eql ps series storage arrays | mtu guide
DESCRIPTION
Dell™ EqualLogic® PS Series arrays optimize resources by automating capacity, performance, and network load balancing. Additionally, PS Series arrays offer all-inclusive array management software and firmware updates. Dell EqualLogic FS Series appliances, combined with PS Series arrays, offer a high performance, high availability, scalable NAS solution.This guide describes how to install and use the Dell EqualLogic Manual Transfer Utility (MTU) to replicate volumes between two PS Series groups.TRANSCRIPT

Dell EqualLogic PS Series Storage Arrays
Manual Transfer Utility
Installation and User's Guide
Version 1.2.3

©Copyright 2009-2012 Dell Inc. All rights reserved.
Dell™ and EqualLogic® are trademarks of Dell Inc.
All trademarks and registered trademarks mentioned herein are the property of their respective owners.
Information in this document is subject to change without notice.
Reproduction of these materials in any manner whatsoever without written permission is strictly forbidden.
Published: August 2012
Part Number: 110-6132-EN-R2

Table of Contents
Preface v1 Introduction 1
How MTU Works 2Scenarios for Using Manual Transfer 3Features of MTU 3Available User Interfaces 4Using MTU With Failback Replication 4
2 Planning for Manual Replication 5Transfer Media 5
Transfer Media Prerequisites 6Sizing Transfer Files 6Writing Transfer Files Directly to Removable Media 6Writing a Transfer File to a Temporary Directory 7
Verifying Data Transfer 7Transfer File Compression 8MTU Encryption 8Constraints When Using MTU 8
Windows XP Restrictions 8IPv6 Support 9Storage Space Requirements 9Suspension of Scheduled Replications 9
Using an Image Backup Instead of MTU 93 Installing the Manual Transfer Utility 11
Installation Requirements 11General Requirements 11Administrator Requirements 11Storage Group Requirements 12System Requirements 12
Obtaining the MTU Installation Kit 13Installing MTU on Your Computer 14
Installing on Microsoft Windows 14Installing on Linux 15
4 Using the GUI to Transfer Data 17Overview of Data Transfer Using the MTU GUI 17MTU GUI Overview 19Creating Transfer Files Using the MTU GUI 20
Prerequisites for Creating Transfer Files Using the GUI 20Procedure for Creating Transfer Files Using the GUI 21
Copying Transfer Files to Physical Media 23Loading the Transfer Files Using the MTU GUI 23
Procedure for Loading Transfer Files 23Completing the Manual Transfer Replication Using the MTU GUI 24
Prerequisites for Completing Manual Transfer Replication 24Procedure for Completing Manual Transfer Replication 25
Stopping and Deleting Tasks 25Stopping a Running Task 25Deleting a Task 26
5 Using the CLI to Transfer Data 27Prerequisites for Transferring Files Using the CLI 27Discovering Targets 28
iii

Creating a Single Transfer File Using the CLI 29Set Up the Connection and Launch MTU 29Create the Transfer File 30
Creating Multiple Transfer Files for Large Data Transfers 32Prerequisites for Creating Multiple Transfer Files 32Procedure for Creating Multiple Transfer Files 33
Loading Transfer Files Using the CLI 34Prerequisites for Loading Transfer Files 34Identifying and Connecting to the Replica Placeholder 35Loading the Transfer Files 36Use the Group Manager CLI to Complete the Manual Replication 38
A Planning Worksheet 39B Monitoring Manual Transfer Status Using GUI 41
Displaying Copy Status 42Displaying Load Status 43Displaying Details for a Specific Transfer Operation 44Updating Status for Completed Operations 46Index 47
iv
Manual Transfer Utility - Installation and User's Guide Table of Contents
Preface
Dell™ EqualLogic® PS Series arrays optimize resources by automating capacity, performance, and network load balancing. Additionally, PS Series arrays offer all-inclusive array management software and firmware updates. Dell EqualLogic FS Series appliances, combined with PS Series arrays, offer a high performance, high availability, scalable NAS solution.This guide describes how to install and use the Dell EqualLogic Manual Transfer Utility (MTU) to replicate volumes between two PS Series groups.
AudienceThe information in this guide is intended for experienced administrators who are responsible for managing a PS Series group. To use the information in this manual, you must have an understanding of the following topics:
• PS Series group administration• Operating environment administration for :
– Windows (or Windows Server) systems– Linux systems
• Basic network and SAN administration
Related DocumentationFor detailed information about FS Series appliances, PS Series arrays, groups, volumes, array software, and host software, log in to the Documentation page at the customer support site.
Dell Online ServicesYou can learn about Dell products and services using this procedure:
1. Visit http://www.dell.com or the URL specified in any Dell product information.
2. Use the locale menu or click on the link that specifies your country or region.
Dell EqualLogic Storage SolutionsTo learn more about Dell EqualLogic products and new releases being planned, visit the Dell EqualLogic TechCenter site. Here you can also see articles, demos, online discussions, and more details about the benefits of our product family.
Technical Support and Customer Service Dell support service is available to answer your questions about PS Series SAN arrays and FS Series appliances.
Contacting Dell
v
Manual Transfer Utility - Installation and User's Guide Preface

If you are a customer in the United States or Canada in need of technical support, call 1-800-945-3355. If you are outside of the United States or Canada, visit Dell EqualLogic Product Support.If you have an Express Service Code, have it ready. The code helps the Dell automated support telephone system direct your call more efficiently.
vi
Manual Transfer Utility - Installation and User's Guide Table of Contents

1 Introduction
Replication is a standard feature of Dell™ EqualLogic® PS Series groups that enables you to configure a disaster-tolerant SAN environment. Replication provides the ability to recover data after a disaster.When replication is configured, a PS Series group automatically copies volume data to a different group to maintain redundant copies of volume data. Remote copies of data volumes are known as replicas. For a detailed overview of replication, see the Dell EqualLogic Group Manager Administrator’s Manual.By default, replication occurs over the network link between the primary and secondary groups. The network link must have sufficient bandwidth and speed to handle the traffic and complete the replication in a timely manner. The secondary group can be geographically remote, to reduce the risk of data loss in the event of a localized disaster. If your network cannot sufficiently transfer a large amount of data, you can use the Dell EqualLogic Manual Transfer Utility (MTU) for a replication operation. Manual transfer replication requires manual tasks and typically uses removable media to copy data to the secondary group.The following topics are covered:
• How MTU Works on page 2
• Scenarios for Using Manual Transfer on page 3
• Features of MTU on page 3
• Available User Interfaces on page 4
• Using MTU With Failback Replication on page 4
1

Manual Transfer Utility - Installation and User's Guide 1 Introduction
How MTU Works
Figure 1 illustrates the sequence of typical Manual Transfer Utility (MTU) use.
Figure 1: Replication Using Physical Media
Table 1: Callout DescriptionsCallout Description
1Use MTU to copy volume data from the primary group, encapsulated in one or more transfer files, directly onto removable media (such as a portable disk drive, tape, or DVD-ROM), or a computer such as a laptop.
2 Transport the media or laptop to the location of the secondary group.
3 On the secondary group, use MTU to load the data onto the group into replicas.
2

Scenarios for Using Manual Transfer
Manual transfer replication should only be used when necessary. A properly constructed and sized network should be able to handle network replication. Possible scenarios for using MTU for replication include the following:
• An initial replication of a volume copies the entire contents of the volume to the secondary group. If in-use volume space is large and the network is slow, the initial replication operation can take a long time. Therefore, using manual transfer replication can be helpful.
• Major changes to the volume —You can use manual replication to replicate an unusually large amount of data (for example, you wrote a lot of data to a database) or if you performed a maintenance operation on the volume (such as a defragment operation) that results in a large data transfer.
• As part of failback— Prior to failing back to the primary group, you must replicate the recovery volume to the primary group. If you have a lot of data to transfer, or if the failback snapshot does not exist on the primary group, you may want to use manual replication. See Using MTU With Failback Replication on page 4.
Features of MTU
MTU offers the following features:
• Expediting large data transfers between groups.
• User interfaces for both Windows and Linux platforms. See Available User Interfaces on page 4.
• File compression - You can compress the volume data. However, there are some restrictions for file com-pression. See Transfer File Compression on page 8.
• Data encryption - You can encrypt the data and prevent unauthorized access with a password.
• Verify data transfer - MTU enables you to verify data when you replicate volumes between two PS Series groups.
3
Manual Transfer Utility - Installation and User's Guide 1 Introduction

Manual Transfer Utility - Installation and User's Guide 1 Introduction
Available User Interfaces
MTU has a Graphical User Interface (GUI) and a Command Line Interface (CLI). These interfaces run on either Windows or Linux systems.
• The MTU GUI is the recommended method of doing manual transfer replication. The MTU GUI is integrated into the EqualLogic Group Manager GUI, and is launched from the Group Manager GUI. See Using the GUI to Transfer Data on page 17 for more information about launching and using the MTU GUI.
• The MTU interactive CLI is an alternative to the MTU GUI. In general, the MTU CLI is used only for special situations that require it. You can also use the MTU CLI for scripting. See Using the CLI to Transfer Data on page 27 for more information.
You can use either interface on either replication partner. For example, you can use the MTU GUI to do the data copy on the primary group, and then use the CLI to load the data on the secondary group, or vice versa. You can also use the GUI or the CLI on both partners.Refer to Installing the Manual Transfer Utility on page 11 for information about the operating environments that support MTU.
Using MTU With Failback Replication
The Manual Transfer Utility can be used for all replications, including during failback. You can use MTU when replicating from a recovery group to the primary group prior to failing back to the primary group.Detailed descriptions on how to fail over user data volumes are included in the Dell EqualLogic Group Manager Administrator's Manual. Using the Group Manager, you can fail over the volume to the secondary group and make the volume data available to initiators. If the original volume on the primary group becomes available, use the Replicate to Partner operation to replicate the recovery volume to the primary group. You can choose the MTU option to replicate the recovery volume to the primary group.When you use manual transfer replication, the Group Manager’s Group Monitoring – Replication window shows an in-progress status until the transfer completes. When the manual transfer replication completes, the Replicate to Partner operation resumes automatically. To return to the original volume replication configuration, use the Group Manager Failback to Primary option.
4

2 Planning for Manual Replication
Before you begin using MTU to create the transfer files, consider the following:
• Type of transfer media and capacity. See Transfer Media on page 5.
• Control of the number and size of transfer files. See Sizing Transfer Files on page 6.
• Use of file encryption. See MTU Encryption on page 8.
• Use of removable media. See Writing Transfer Files Directly to Removable Media on page 6.
• Use of a temporary directory. See Writing a Transfer File to a Temporary Directory on page 7.
• Constraints when using MTU. See Constraints When Using MTU on page 8.
• Whether you can use an image backup. See Using an Image Backup Instead of MTU on page 9.
Transfer Media
Use the following transfer media to transport the volume data from the primary group to the secondary group:
• Removable media, such as high-capacity tape, portable disk drive, DVD-ROM, or Blu-ray disk. Using removable media is the most common method.
Requirement: The media must have enough capacity to store the transfer files. Note that you can break a file into smaller segments, storing each on different media.
Optional: If you are not writing directly to the media, you need enough temporary space on the computer to store the transfer files.
• A portable computer, such as a laptop, that has access to both groups.
Requirement: You need enough available space on the computer to store the transfer files.
5
Manual Transfer Utility - Installation and User's Guide 2 Planning for Manual Replication
Transfer Media Prerequisites
Table 2 describes the prerequisites for using transfer media.
Table 2: Transfer Media PrerequisitesPrerequisite Item Description
Media type Type of transfer media, such as portable disks, high-capacity tape, DVD-ROM, or Blu-ray disk.
Media capacity File size and total capacity limits of the media. See Sizing Transfer Files on page 6.
Temporary space requirement
If you must create the transfer files in temporary space, and then use a separate application to copy the data onto the media, you need space on the computer. See Writing a Transfer File to a Temporary Directory on page 7.
Planning Worksheet on page 39 provides a worksheet that you can use to determine the maximum requirements for removable media.
Sizing Transfer Files
MTU provides settings that enable you to control the number and size of transfer files. If writing directly onto removable media, by default, the utility limits the transfer file size to 98% of the secondary drive capacity.If you limit the size of the individual transfer files, you can specify the number of files the utility creates in a single operation (1 to 100). The utility creates the number of files specified.If the operation is interrupted (either by you or due to a network problem), when the utility resumes the operation, it creates the number of files specified, even if a previous attempt failed to create all the files in that operation.
Writing Transfer Files Directly to Removable Media
If your computer has the capability of writing directly to removable media, you can specify a file size limit based on the media capacity. Use the default value for the number of files to create (1 file). By default, the utility uses 98% of the media capacity, to leave room for operational overhead. When the media is full, if more transfer files are needed, MTU displays the following message:Need more files
MTU then pauses until you remove the full media and mount blank media at the same location (drive letter or mount point). Repeat this operation until you have created all the transfer files for the volume.
6

Note: If your primary and secondary groups are geographically close, you can use a device such as an external hard drive. If that external drive does not have sufficient capacity to hold all the replicated data in a single file, you can refill and off-load the drive as many times as is necessary to complete the transfer. MTU pauses the transfer and prompts: need more files until the transfer is complete.
Writing a Transfer File to a Temporary Directory
If you use a separate application to write to removable media (such as tape, CD-ROM, DVD, or Blu-ray), you can specify a file size limit based on the media capacity or its file system requirements. Specify the number of files based on the file size limit and the amount of temporary space available on the hard drive. If you choose instead to use the computer itself as the transport media, use the computer's file system limits as your guide.When using large-capacity media with no file size limits (such as tape), specify a file size based on the tape capacity. Create the maximum number of files that fit in the temporary directory on the computer. MTU pauses after creating the number of files you specified. This allows you to write the files onto the media. You can then delete the files in the temporary location, making it available for you to create the next batch of transfer files.
Specifying Copy OptionsYour temporary directory might provide sufficient space for all the transfer files but you might not know how many files you need to create. In this instance:
• Specify a file size based on the media capacity.
• Specify the maximum value for the number of files to create (100).MTU creates only as many files as needed. If more than 100 files are needed, it displays the following message:Need more files
MTU then pauses until you resume the operation to create the next set of files.
Note: Plan carefully when creating transfer files in the same temporary space for several volumes at the same time. Calculate the size and number of transfer files for each volume, and the number of volumes for which you are creating transfer files. Make sure that the temporary space is large enough to contain all the files.
Verifying Data Transfer
MTU enables you to verify data when you replicate volumes between two PS Series groups. When you select this option, MTU verifies that the files are readable on the device to which they are transferred, and that they contain the correct data. To use this option, select the Verify transfer file option when you configure the replication operation. The replication operation is described in Procedure for Creating Transfer Files Using the GUI on page 21.
7
Manual Transfer Utility - Installation and User's Guide 2 Planning for Manual Replication
Manual Transfer Utility - Installation and User's Guide 2 Planning for Manual Replication
MTU provides a check box for the option in Copy Operation panel. The Verify transfer file check box only appears when starting MTU (setting up the operation).A column appears in the MTU main panel during the replication operation.When the Verify transfer file option is enabled, the Phase column displays a status of either Copy, Verify, or Load, to indicate which operation has occurred.
• If it is copy operation, the value of Phase column is either Copy or Verify.
• If it is load operation, the value of Phase is Load.
Transfer File Compression
You can compress volume data. However, do not use compression if any of the following is true:
• You are writing the transfer file to a medium that has its own compression algorithm (such as a tape).
• The data does not benefit from further compression (such as video or audio files).
• The media has enough space for the transfer file without compression.
• The speed of the copy operation is more important than data compression.
MTU Encryption
Encryption is optional. If you use it, you can supply a password to prevent unauthorized access to the encrypted files. If you supply a password, the administrator for the secondary group must enter that same password to decrypt the files.
Constraints When Using MTU
There are some usage constraints that apply to this release of MTU. See the following topics for details:
• Windows XP Restrictions on page 8
• Storage Space Requirements on page 9
• Suspension of Scheduled Replications on page 9
Windows XP Restrictions
When using Windows XP, the following constraints apply:
• Windows XP does not support connecting to both a volume and its snapshot at the same time.
8

If you are running MTU on a Windows XP computer that is connected to the primary volume, or if you are running the CLI on a Windows XP computer, you must disconnect from the primary volume before you can start the manual replication. When you are done creating the transfer files, you can reconnect to the volume.
To avoid this restriction, run MTU or run the CLI under an operating system other than Windows XP. This enables MTU to connect to the temporary snapshot on the primary group.
• Windows XP does not support a volume greater than 2 TB.
To avoid this restriction, when transferring volumes larger than 2 TB, use an alternate operating system as a client.
IPv6 Support
The Manual Transfer Utility (MTU) includes support for IPv6 through the MTU CLI.The MTU GUI does not support IPv6.
Storage Space Requirements
MTU, by default, uses up to 98% of the available space on the system device or directory that you specify for each replicated volume. If you are performing manual transfer replication on several volumes simultaneously and writing the data files to the same location, you must divide the available space among all the volumes you are transferring. Otherwise, one volume's data might use 98% of the space and the other manual transfer replications may fail due to lack of space.
Suspension of Scheduled Replications
Any time you create a new replica (except by using a schedule), you can use manual transfer replication. Scheduled replications do not start until a pending or in-process manual transfer replication is complete.
Using an Image Backup Instead of MTU
Dell recommends using MTU as the method for manual replication. However, if you cannot use MTU to create transfer files, you must use a method that creates an image copy of the volume, such as raw data backup. You cannot use a file-based backup method. You can also use third-party backup software that creates a mirror image of an iSCSI volume from your primary PS Series group. For Linux, you can use a utility such as dd. After you create an image copy of the primary volume , follow the instructions for using the CLI version of the Manual Transfer Utility to create a replica set on the secondary group. Using the CLI ensures that you create the correct access controls and that you update the replication status when the transfer is complete.
9
Manual Transfer Utility - Installation and User's Guide 2 Planning for Manual Replication

Manual Transfer Utility - Installation and User's Guide 2 Planning for Manual Replication
10

3 Installing the Manual Transfer Utility
The Manual Transfer Utility (MTU) must be installed on computers at both replication partner locations - the primary group and the secondary group. You can install the Windows or the Linux version of MTU at either location, depending on the local operating environment.
Note: You must uninstall earlier versions of MTU prior to installing the latest version.
This chapter covers the following installation topics:
• Installation Requirements on page 11
• Obtaining the MTU Installation Kit on page 13
• Installing MTU on Your Computer on page 14
Installation Requirements
Before you install or use the Manual Transfer Utility, you must address the requirements listed in this section.
General Requirements
• MTU must be installed on computers with network access to the primary group and the secondary group.
• You can install MTU in any location on your computer’s local boot device. However, Dell recommends that you install MTU at the default location.
• The system on which MTU is installed must be able to establish an iSCSI connection to the group.
• Do not install MTU on an iSCSI volume in your PS Series group.
• Uninstall previous versions of MTU before installing a new version.
Administrator Requirements
• You must have Administrator privileges on Windows systems.
• You must be logged-in as root on Linux systems. Use the sudo utility to get root-level privileges.
11

Manual Transfer Utility - Installation and User's Guide 3 Installing the Manual Transfer Utility
• You cannot install or run the Manual Transfer Utility if you are not logged in as the administrator and do not have authorization to manipulate the iSCSI initiator. If a non-authorized user attempts this operation, an error message similar to the following is displayed:
Data transfer operation could not start due to the following error Internal error in transfer program (reptool), contact product support.
Storage Group Requirements
• Replication configuration
You must set up replications between groups, as described in the Dell EqualLogic Group Manager Admin-istrator's Manual.
• SNMP configuration
If you are using the MTU command line interface (CLI), you must configure SNMP with a public community name, as described in the Dell EqualLogic Group Manager Administrator's Manual. MTU uses SNMP to communicate with the group, which requires a community string. If you are using the MTU graphical user interface (GUI), the community name is created automatically by the GUI.
• Group Administration account
You need the name and password for a group/pool administration account on both the primary group and on the secondary group.
System Requirements
• Windows OS requirements
The following Windows operating environments are supported:– Windows 7– Windows XP Pro SP2 or later versions– Windows Vista– Windows Server 2003 SP2, 2003 R2 SP2, 2008, and 2008 Core or later versions
Both 32-bit and 64-bit versions are supported where applicable.
• Linux OS requirements
The following Linux operating environments are supported:– Red Hat Enterprise Linux (RHEL) V5.3-5 to V5.5, and earlier versions of 6.0– SUSE Linux Enterprise Server (SLES) V10sp2, V10sp3 and V11– Ubuntu
Note: These versions of Linux include an acceptable iSCSI initiator.
12
• Software requirements
On a Linux system, the following software must also be installed:– Python 2.3 (or later) –You can download Python from the following website: www.python.org– pySNMP V2 (MTU does not support PySNMP V4) – You can download PySNMP from: pysnmp.sourc-
eforge.net– pyCrypto –This software is required only if you intend to perform encryption. To encrypt the volume
data, both computers (at the primary and secondary group locations) must also have pyCrypto installed. You can download pyCrypto from: www.amk.ca/python/code/crypto
– pyASN1 –Depending on your configuration, you may also need to download and install ASN.1 for Python. You can download it from: sourceforge.net/projects/pyasn1/
Your Linux distribution may already include one or more of these software kits. To see if a kit is installed, and its version number, using the yum command. For example:
# yum search [kitname]| grep installed
# yum info [kitname]
• iSCSI initiator requirements
You must have an iSCSI initiator installed on any system running MTU.– Windows: The Microsoft iSCSI Initiator is included with most versions of Windows. For Windows XP
or Windows 2003, you must download the Microsoft iSCSI Initiator from: www.microsoft.com/downloadsYou can also install a Windows iSCSI initiator from the Host Integration Tools for Windows kit. See the Host Integration Tools User Guide.
– Linux: An iSCSI initiator is included with Red Hat Enterprise Linux, SUSE Linux Enterprise Server, and Ubuntu. For other versions of Linux, check to see if your system includes an iSCSI initiator using the following command:# yum info iscsi-initiator-tools If your version of Linux does not include an iSCSI Initiator, you can obtain one from the Open-iSCSI website: www.open-iscsi.orgFor information about installing and configuring an iSCSI Initiator on Linux, refer to the following documents:
• RedHat Linux v5.x Software iSCSI Initiator Configuration and Tuning Guide
• iSCSI Initiator Configuration and Multipathing Guide
• EqualLogic Storage (iSCSI) on Fedora 13
Obtaining the MTU Installation Kit
Download the installation kit from the support site. This requires a Dell EqualLogic Customer User account, which you can set up at the following URL: www.equallogic.com/support
13
Manual Transfer Utility - Installation and User's Guide 3 Installing the Manual Transfer Utility

Manual Transfer Utility - Installation and User's Guide 3 Installing the Manual Transfer Utility
After you have set up the support account, obtain the kit as follows:
1. Log in to your account and click the Customer Service Home tab.
2. Click Downloads in the navigation bar and select PS Series Firmware. Click on the link to the firmware that you are using, for example, 5.2.0.
3. On the bottom of the page, click Manual Transfer Utility.
4. Under Manual Transfer Utility, choose the Windows version (setup.exe) or the Linux version (reptool.py).
5. Click Accept to accept the terms and conditions of the download.
6. Save the executable installation image to your local computer.
Installing MTU on Your Computer
Use the appropriate method for your operating environment:
• Installing on Microsoft Windows on page 14
• Installing on Linux on page 15
Note: Although the MTU GUI is integrated into the Group Manager GUI, you must install the MTU utility separately. If you attempt to launch MTU and the installation is not found, or if you installed it at a custom location, the following message appears:The Equallogic Manual Transfer Utility could not be found in the default installation directory(C:Program Files\Equallogic\reptool). Check the Manual transfer Utility installation. If it is already installed, enter the correct path to the utility below:
Installing on Microsoft Windows
To install the Manual Transfer Utility on a computer running Windows:
1. Copy the installation file to an installation location, such as C:\tmp.
2. Double-click setup.exe to start the installation.
By default, the installer creates the following directory where MTU is located:C:\Program Files(x86)\Equallogic\reptool\
Note: There are several prerequisites that must be met by any system where you intend to install and run MTU. Refer to Installation Requirements on page 11 for details.
14

Installing on Linux
To install the Manual Transfer Utility on a computer running Linux:
1. Install reptool.py in /usr/bin or /usr/local/bin, depending on your system setup.
2. Make sure your PATH variable contains the path to the file.
3. Examine the file permissions and, if necessary, make the file executable.
4. Type the file name at the command prompt and press the Enter key to start the installation.
Note: There are several prerequisites that must be met by any system where you intend to install and run MTU. Refer to Installation Requirements on page 11 for details.
15
Manual Transfer Utility - Installation and User's Guide 3 Installing the Manual Transfer Utility

Manual Transfer Utility - Installation and User's Guide 3 Installing the Manual Transfer Utility
16

4 Using the GUI to Transfer Data
The Manual Transfer Utility (MTU) GUI is the recommended method of performing manual transfer replication. To use the Manual Transfer Utility GUI:
• You must have Administrator privileges on a Windows system.
• You must be logged-in as root on a Linux system.
• You must be able to establish an iSCSI connection from the system running MTU to the group.Refer to Installation Requirements on page 11 for more information about the requirements related to using the MTU.The following topics are discussed in this section:
• Overview of Data Transfer Using the MTU GUI on page 17
• MTU GUI Overview on page 19
• Creating Transfer Files Using the MTU GUI on page 20
• Copying Transfer Files to Physical Media on page 23
• Loading the Transfer Files Using the MTU GUI on page 23
• Completing the Manual Transfer Replication Using the MTU GUI on page 24
Overview of Data Transfer Using the MTU GUI
The overall process for using the MTU GUI to transfer data is as follows: Step 1 - Create a ReplicaOn a computer with MTU installed and access to the primary and secondary groups, use the Group Manager GUI to create a replica. Select the manual transfer option. This action creates the following:
• A temporary snapshot on the primary group. (The snapshot is deleted automatically when the manual transfer completes.)
• A replica set and replica placeholder on the secondary group.
• Action items in the Outstanding Alarms panel for both groups. These action items persist until the manual replication is complete and committed.
17
Manual Transfer Utility - Installation and User's Guide 4 Using the GUI to Transfer Data
Full instructions for configuring replication are described in the Dell EqualLogic Group Manager Administration manual.Start the Manual Transfer Utility GUI and create the transfer files on the computer.
Note: If you need to use a separate application to write to removable media, perform the following:
• Copy the transfer files from the computer to removable media.
• If you divided the volume data among several transfer files, copy all the files for the volume onto the external media.
Step 2 - Transport the ReplicaPhysically transport the replica media to a computer with access to the secondary group.
Step 3 - Transfer the ReplicaMake the replica file data on the external media accessible to the computer that has MTU installed and has access to the primary group and secondary group.Start the Manual Transfer Utility GUI and start the load process on the computer with the secondary group.Commit the manual transfer replication operation. Optionally, delete the transfer files.
18

MTU GUI Overview
This section provides an overview of the MTU GUI. Instructions about using it for specific operations are discussed in later sections.Figure 2 shows the layout of the MTU GUI.
Figure 2: Manual Transfer Utility GUI
The top panel, Manual Replications in Current Group, shows the manual transfer replication operations for the group to which the computer is connected, including:• The direction of data transfer (inbound or outbound)• Volume name• Replication status• Replica timestamp• Amount of data being transferred• Status of the data transferThe bottom panel, Data Transfers on Local Machine, shows the data transfer operations between this computer and any group. Click the checkbox to see all data transfer operations on all groups with connectivity to this computer. The Actions column in the bottom panel displays icons that enable you to:• View details of a transfer
19
Manual Transfer Utility - Installation and User's Guide 4 Using the GUI to Transfer Data
Manual Transfer Utility - Installation and User's Guide 4 Using the GUI to Transfer Data
• Stop a transfer• Resume a transfer• Delete a stopped or completed transfer (displays only after transfer is stopped)
Creating Transfer Files Using the MTU GUI
The first step in manual transfer replication is to create transfer files.The following topics are covered:
• Prerequisites for Creating Transfer Files Using the GUI on page 20
• Procedure for Creating Transfer Files Using the GUI on page 21
Prerequisites for Creating Transfer Files Using the GUI
The configuration prerequisites discussed in Installation Requirements on page 11 apply when you use the MTU GUI to create transfer files. Before you begin, be sure to perform the following additional prerequisites:
• Replication partners for the volume must already be configured.
• If you are using Windows XP, you must disconnect the computer from the primary volume. (You can reconnect the volume after the transfer files are created.)
describes the data required for performing a manual transfer.
20

Table 3: Data Required for a Manual Transfer (GUI Method)Data Item Description and Sample User DataName of the replicated volume
Use the Group manager GUI to obtain the name of the volume that you want to replicate
Location for the transfer files
The path to a folder where MTU creates and stores the transfer files, such asC:/tmp/xfer_files
If you write the transfer files to a directory on a computer that uses enhanced security (for example, the Internet Explorer Enhanced Security Configuration), make sure the directory has the appropriate permissions. You cannot modify directory permissions when using MTU.
(Optional) Full path to the MTU executable
E:/utilities/reptool.exe
If you installed MTU in a custom location, specifying the full path is a one time operation that you perform during the first invocation of MTU.
Copy options - compression
When planning the manual transfer, if you use MTU compression.
Check the compression option during the procedure. This is the default.
Copy options - encryption
When planning the manual transfer, if you use MTU encryption, you must supply a password.
Check the encryption option during the procedure.
Copy options - File sizeWhen planning the manual transfer, if you specify a file size, you must state the size in Megabytes or Gigabytes.
Copy options - Create multiple transfer segments
When planning the manual transfer, decide on how many transfer files you want MTU to use for the operation. See Specifying Copy Options on page 7
Procedure for Creating Transfer Files Using the GUI
To create transfer files, do the following on the computer with MTU installed:
1. Connect to the Group Manager GUI, and log in to a group administrator account.
2. If volumes are not configured, click Volumes, then volume name, and then Configure replication (located under the Replication heading in the Activities panel). If volumes are already configured, select the create replica link (also located under the Replication heading in the Activities panel).
3. The Create Replica dialog box pops up. Select the checkbox Perform Manual Replication. Click Yes.
4. Wait for an alarm to appear in the Alarms panel. When it does, click the icon to expand the Alarm section.
5. Click on Manual Transfer Utility in the Actions tab.
The Manual Transfer Utility GUI starts.
21
Manual Transfer Utility - Installation and User's Guide 4 Using the GUI to Transfer Data

Manual Transfer Utility - Installation and User's Guide 4 Using the GUI to Transfer Data
Notes:
• An alternative method for starting MTU is to select Manual Transfer Utility from the Tools panel of the Group Manager GUI.
• (For custom installations only) Enter the full path to the MTU executable if prompted and click OK to launch MTU.
6. Locate the primary volume in the Manual Replications in Current Group window.
7. Click the Start data copy link in the Actions column. The Copy Data to Transfer File screen is displayed.
8. Click Next and specify the path to the location for the transfer files.
You must specify one of the following:
– a drive letter if you are writing the file directly to removable media
– the full path to a directory (folder) where the transfer file is created
If you have already performed a manual transfer operation, the data in this screen defaults to the directory or drive letter you last used.
9. Select the Copy operation options that you want for the data transfer file, then click Next.
10. Review the information in the summary window and click Finish.
11. The Manual Transfer Start confirmation box appears. Verify that the transfer status is in progress and click OK.
12. MTU displays the need more files if more transfer files are required. Follow the two-step wizard to resume the data transfer. MTU automatically creates a transfer file name, using the following syntax: primary_name.volume_name.secondary_name.n.eqd
If MTU creates multiple transfer files for the same volume, n specifies the order in which each was created, starting from 0. For a single transfer file, n is 0.
13. Verify the status of the manual transfer as follows:
– Use the Group Manager GUI to display the Replication tab for the primary volume. A Remote Replica entry appears for the primary volume and its status is Manual in progress.
– An action in the Alarms Panel persists until you complete the transfer operation.
14. Once all necessary transfer files have been created for the volume, commit the copy status (which updates only the primary group). Click Commit copy status.
15. The Commit Complete popup screen appears. Click Yes to complete the data transfer. At this point, the primary volume entry under the Manual Replications in Current Group is removed because MTU updated the status.
16. You are now ready to copy the files to removable media.
22

Copying Transfer Files to Physical Media
When the transfer file creation process is complete, you can copy the transfer files to physical media if that will be your mode of transfer file transportation.To do this, you might have to use another application, such as a DVD writer. When the copy operation is completed, you can transport the physical media to the remote location.
Note: You can monitor the status of the copy operation in the Manual Transfer Utility GUI window. See Monitoring Manual Transfer Status Using GUI on page 41 for more information.You are now ready to load the transfer files into the replica set on the secondary group, as described in the next section.
Loading the Transfer Files Using the MTU GUI
Use the Manual Transfer Utility GUI on the computer with access to the secondary group to load the data from the transfer files into the replica placeholder.The following topic is covered:
• Procedure for Loading Transfer Files on page 23You'll need the data shown in the following table to perform the load procedure.
Table 4: Data Required for a Manual Transfer (GUI Method)Data Item Description and Sample User DataPartner name The group name of the replication partner.
Volume nameThe volume name, which you use to identify the replica placeholder on the secondary group.
Path to the mediaD:/filename.ext
The path to the location where you mount or load the transfer file media.
Encryption password The encryption password, if you decided to use MTU encryption.
Procedure for Loading Transfer Files
On the computer where MTU is installed:
1. Connect to the second Group Manager GUI and log in to a group administrator account. An outstanding alarm for the current manual transfer is registered in the Alarms panel.
23
Manual Transfer Utility - Installation and User's Guide 4 Using the GUI to Transfer Data
Manual Transfer Utility - Installation and User's Guide 4 Using the GUI to Transfer Data
2. In the Actions tab, click on Manual Transfer Utility.
The MTU main window is displayed.
3. Identify the source volume in the top panel, and click Start data load.
The Load Data from Transfer File dialog appears.
4. Enter or browse for the path to where the transfer file is located.
(Optional) Click Encryption password and enter the correct password if the transfer files are encrypted.
5. Click Next. MTU creates and displays temporary access control records for all the listed interfaces.
6. Review the transfer file summary and click Finish.
7. The Manual Transfer Start confirmation box appears. Click OK.
8. Verify the data load status of Done from the data Transfer on Local Machine panel, and the Data transfer status in the Manual Replications in Current Group panel shows as Complete.
9. To complete the manual transfer replication on single volume, click Commit complete status from the Manual Replication in the Current Group panel, and click Yes to commit the update.
Completing the Manual Transfer Replication Using the MTU GUI
The final step in the procedure is to commit the transfer on the primary group. You can also delete the operation from the Manual Transfer Utility GUI, and delete the associated transfer files from the computer.The following topics are covered:
• Prerequisites for Completing Manual Transfer Replication on page 24
• Procedure for Completing Manual Transfer Replication on page 25
Prerequisites for Completing Manual Transfer Replication
Before committing:
• Make sure that all data is loaded on the secondary group and the transfer status is completed.
• Use the monitoring feature described in Monitoring Manual Transfer Status Using GUI on page 41 to make sure that any MTU CLI operations are complete before you use the procedure described here. The MTU GUI does not display the status of manual transfer operations performed using the CLI.
24
Procedure for Completing Manual Transfer Replication
Use the following procedure to complete MTU operations:
1. Log in to the Group manager GUI on the secondary group.
2. Launch the MTU GUI from the left panel. Click Tools then Manual transfer utility.
3. Click Commit status of complete data transfers for any volume that has completed data transfer. If you prefer to commit the status for a specific volume, click Commit complete status under the Actions of the volume.
4. Click Yes when the confirmation box appears.
5. Verify the completion of the load operation as follows:
• On the secondary Group Manager GUI, select the partner’s Inbound Replicas under the Replication, shows the replication status of the replica set as ready, and the replica is listed with a status of complete.
• On the primary Group Manager GUI, select the partner’s Outbound Replicas under the Replication, shows the Replication status of the volume replication status as ready, and the replica is listed with a status of completed.
6. You can delete the transfer task by clicking the red “X” in the Actions column under Data Transfers on Local Machine. The confirmation dialog appears.
(Optional) Click the checkbox next to Also delete related transfer files with volume data if you want to delete the transfer files.
7. Click Yes to confirm the deletion.
8. Close the MTU GUI.
Stopping and Deleting Tasks
The Group Manager GUI enables you to stop and delete tasks. A running task must be stopped before it can be deleted.
Stopping a Running Task
To stop a running task, use the Stop icon in the Group Manager GUI. Note that a stopped task is only stopped, not deleted. When you stop a running task, you can subsequently restart or delete the stopped task by using the Group Manager icons that are displayed after the task is stopped.
25
Manual Transfer Utility - Installation and User's Guide 4 Using the GUI to Transfer Data
Manual Transfer Utility - Installation and User's Guide 4 Using the GUI to Transfer Data
Deleting a Task
To delete a task, use the Delete icon in the Group Manager GUI. Note that the Delete icon is not available while the task is running. Before you can delete a task, the task must be in a stopped state. You cannot delete a running task. If a task you intend to delete is still running, stop it as described above.
26

5 Using the CLI to Transfer Data
If you cannot use the Manual Transfer Utility GUI, use the interactive command line interface (CLI) utility. This interface is also referred to as reptool.CLI supports file name completion. Enter the first few characters of a directory or file name and press Tab. The prompt shows a list of matching names. You can then select the name of the file to load.
Note: The MTU GUI does not display the status of manual transfer operations that you start when using the CLI.
The CLI creates only one transfer file at a time. Unless all the data fits into one file, you must run the CLI several times to create all the transfer files needed for a volume. After creating the first transfer file, see Creating Multiple Transfer Files for Large Data Transfers on page 32.
Note: In the CLI output, the input and output values are usually not the same as the volume size. Transfer files are smaller than the volume size, because unwritten (unused) blocks of the volume are not copied. Even if every block of the volume contains data, if you use compression, the transfer files add up to less than the volume size.
The following topics are covered:
• Prerequisites for Transferring Files Using the CLI on page 27
• Discovering Targets on page 28
• Creating a Single Transfer File Using the CLI on page 29
• Creating Multiple Transfer Files for Large Data Transfers on page 32
• Loading Transfer Files Using the CLI on page 34
Prerequisites for Transferring Files Using the CLI
The configuration prerequisites discussed in Installation Requirements on page 11 apply when you use the MTU CLI to create transfer files.When transferring files using the CLI, the data shown in Table 5 is required.
27

Manual Transfer Utility - Installation and User's Guide 5 Using the CLI to Transfer Data
Table 5: Data Required for a Manual Transfer (CLI Method)Data Item Description and Sample User Data
Transfer file name primary_group.volume_name.secondary_group.n.eqd
Device name (Linux only)
The device name corresponding to the connected snapshot. Specify the device name of the whole disk (not the device name of a partition). For example, a Linux device name is: /dev/sde.
File size limit (Optional)
You can divide the volume data into several files that span multiple media by specifying a file size limit in Megabytes.
Encryption password To use MTU encryption, you must supply a password.
Compression (default setting)
In the CLI, compression is enabled by default. Disable compression if the transfer file media has its own compression algorithm, or if copy speed is more important than data compression.
Yes/No
IP Address Primary group IP address (or the management IP address for the group, if configured). ___.___.___.___
Note: The variable n is a sequence number, starting from 0 (zero), for multiple transfer files for the volume. (Naming the files in this format allows both GUI and CLI interfaces to correctly process the transfer files for the data load operation.)
Discovering Targets
When you create a transfer file on the primary group, or load a transfer file on the secondary group, you need to log in to the targets that represent:
• The temporary snapshot (when copying data from the primary group)
• The replica placeholder (when loading data on the secondary group)Use an iSCSI initiator to discover group targets. This will make the target visible to the computer on which you are running MTU. Then, locate the target with a name that includes the volume name and the correct timestamp and log in to the target.
28
Creating a Single Transfer File Using the CLI
Use the procedure described in this section to create a single transfer file.The following topics are covered:
• Set Up the Connection and Launch MTU on page 29
• Create the Transfer File on page 30
Note: Before running the following procedure, create an access control record for the volume and apply it to the temporary snapshot that lets the initiator connect. See the Dell EqualLogic Group Manager Administrator's Manual for information about creating an access control record.
Set Up the Connection and Launch MTU
On a computer with MTU installed:
1. Connect to the Group Administration GUI or CLI and log in to the group administration account.
2. Create a replica of the volume, specifying the manual transfer option. Note: You must enable volume replication before doing this.
For example, using the Group Manager CLI, use this command:
beta> volume select volume-name replication create-replica manual partner-name
3. On the computer with the Manual Transfer Utility installed, use an iSCSI initiator to log in to the temporary snapshot on the primary group. See Discovering Targets on page 28.
4. Start the Manual Transfer Utility CLI using one of the following ways:
• Windows operating system- Open a command prompt and run the reptool executable, specifying the full path to the utility (C:\Program Files\EqualLogic\reptool\reptool.exe). On some Windows systems, the path may be: (C:\Program Files(x86)\EqualLogic\reptool\reptool.exe)- From the Windows Start menu, click All Programs > EqualLogic > Manual Transfer Utility
• Linux operating system- In a terminal window, specify the full path to the reptool.py executable, such as /usr/bin/reptool.py.
29
Manual Transfer Utility - Installation and User's Guide 5 Using the CLI to Transfer Data

Manual Transfer Utility - Installation and User's Guide 5 Using the CLI to Transfer Data
Create the Transfer File
1. Select operation: 1: copy data from a replica snapshot to a transfer file.
2. Enter the number of the appropriate replica snapshot from the list (Windows) or specify the device name (Linux).
3. Enter a name for the transfer file, specifying the full path or drive letter if you are writing directly to removable media. For example: C:\temp\group1.emailvol.group2.0.eqd.
The file name is automatically appended with the extension .eqd.
• (Optional) Specify a limit on the size of the transfer file.
• (Optional) Create an encryption password.
• (Optional) Choose n to the prompt Do you want to compress transfer file, if you do not want to use compression.
4. If prompted, enter an IP address. Enter the group IP address or the management network, if configured.
The copy operation starts. When it completes, the CLI displays a message indicating whether or not more files are needed.
Note: If you need to create more files, see Creating Multiple Transfer Files for Large Data Transfers on page 32.
5. Exit MTU.
6. (Optional) Copy the transfer file from the computer to external media (unless you created the transfer file directly on external media, such as an external hard drive).
7. When the copy operation is completed, transport the physical media to the remote location (of the secondary group). Then load the transfer file into the replica set on the secondary group, as described in Loading Transfer Files Using the CLI on page 34.
Example of Creating a Transfer FileThe following example shows a complete operation that created a single transfer file for the volume contents.C:\Program Files\EqualLogic\reptool>reptool
Welcome to the command line version of the Manual Transfer Utility.Manual Transfer Utility Version 1.2.1.144343 Copyright (C) 2006-2011 by Dell, Inc. Only use the command line version of the Manual Transfer Utility ifyou attempted to use the Manual Transfer Utility GUI and received anerror message. See the Group Administration manual for informationabout manual transfer replication.
30

Enter the number associated with the operation you want to perform. 0. Exit reptool.1. Copy data from a replica snapshot to a transfer file.2. Load a transfer file into a replication placeholder.3. Collect diagnostic information for your support provider.
Operation: 1
Enter the number associated with the replica snapshot. 1. vol1-2011-02-29-11:30:03.2 Replica snapshot: 1
Enter a name for the transfer file. You must specify the full pathname. It is recommended that you use the following file name format: primary_group.volume_name.secondary_group.n.eqd The variable n is a sequence number used if you will be creatingmultiple transfer files for the volume.
Transfer file name: e:\group1.vol1.beta.0.eqd
Optionally, enter the transfer file size limit in MB. The value inbrackets shows the available space on the transfer file device. Transfer file size limit in MB [221076]: Enter the encryption password for the transfer file.Press the ENTER or RETURN key if you do not want encryption. Password: Do you want to compress the transfer file (y/n) [y]: Do you want to verify the transfer file after copying (y/n) [y]: 10244 MB of 10244 MB in, 21 MB of 35 MB out, 19.7 MB/s The copy operation is complete. No additional transfer files are needed. Press the ENTER key to exit.
31
Manual Transfer Utility - Installation and User's Guide 5 Using the CLI to Transfer Data

Manual Transfer Utility - Installation and User's Guide 5 Using the CLI to Transfer Data
Creating Multiple Transfer Files for Large Data Transfers
If the volume data cannot fit into a single transfer file, you must create additional files. Repeat the following procedure until all the files have been created.The following topics are covered:
• Prerequisites for Creating Multiple Transfer Files on page 32
• Procedure for Creating Multiple Transfer Files on page 33
Prerequisites for Creating Multiple Transfer Files
The data specified in Table 6 is required to create multiple transfer files
Table 6: Data Required for Creating Multiple Transfer FilesData Item Description and Sample User Data
Transfer file name
The CLI commands support command-line editing. Enter the first few characters of the previous transfer file name and press Tab. The prompt displays a list of matching file names. You can modify the file name, for example, to increment its sequence number. Dell recommends using the same naming convention for all transfer files for a volume.
File write locationFor each consecutive transfer file, specify a different drive or path name or mount empty media on the same drive letter that you previously specified.
Encryption Supply a password if you intend to encrypt the transfer files.
Compression (default)
You can disable compression if you are writing the transfer file to a medium that has its own compression algorithm (such as a tape), or if the speed of the copy operation is more important than data compression.
yes/no
32

Procedure for Creating Multiple Transfer Files
Use the following procedure to create multiple transfer files.If an iSCSI initiator is not already connected to the temporary snapshot, connect it. For details, see the Dell EqualLogic Group Manager Administrator's Manual. On the same computer on which you created the first transfer file, do the following:
1. Start the Manual Transfer Utility CLI by running the reptool executable.
2. Enter y at the prompt that informs you that an earlier operation is incomplete and needs more files:
The copy operation for [file-name] is incomplete.
You must create additional transfer files.
Do you want to continue the copy operation (y/n) [y]:
3. Enter a file name, and optionally a file write location for the next transfer file.
4. Specify a limit on the size of the transfer file, if applicable. (The number in brackets in the prompt shows the amount of free space.)
• (Optional) Enter an encryption password.
• (Optional) Choose n to the prompt Do you want to compress transfer file, if you do not want to use compression.
The MTU will perform the file creation operation. The following message is displayed if more transfer files are needed:
The copy operation is not complete. You can exit the Manual Transfer
Utility and either restart to create additional transfer files now or
restart at a later time.
5. Repeat the above process until all transfer files are created. The MTU CLI will continue to prompt you until all required transfer files are created.
6. After finishing the transfer file creation process, copy all of the transfer files for the volume onto the external media.
7. Send the media to the location of the secondary group.
8. You (or the administrator of the secondary group) can now load the transfer files into the replica set on the secondary group, as described in Loading Transfer Files Using the CLI on page 34.
33
Manual Transfer Utility - Installation and User's Guide 5 Using the CLI to Transfer Data

Manual Transfer Utility - Installation and User's Guide 5 Using the CLI to Transfer Data
Loading Transfer Files Using the CLI
When you have created transfer files and physically transferred them to the location of the secondary group, you can load the data from the transfer files into the replica placeholder on the secondary group.The following topics are covered:
• Prerequisites for Loading Transfer Files on page 34
• Identifying and Connecting to the Replica Placeholder on page 35
• Loading the Transfer Files on page 36
• Use the Group Manager CLI to Complete the Manual Replication on page 38
Prerequisites for Loading Transfer Files
Before you can load the transfer files, you must make the transfer files on the external media accessible to the computer running MTU with access to the secondary group. For example, insert the CD–ROM or copy the files from tape to a directory.You will need the data specified in Table 7.
Table 7: Data Required for Loading Transfer FilesData Item Description and Sample User DataPartner name The name of the replication partner (the primary group).
Initiator nameThe name assigned to the initiator, which you can determine by viewing the iSCSI initiator properties page. For example:
iqn.1991-05.com.microsoft:admin-pc.company.com
Volume name Helps you identify the replica placeholder on the secondary group.
Linux path nameThe device name corresponding to the connected replica placeholder, such as: /dev/sde.
34

Identifying and Connecting to the Replica Placeholder
On the computer with MTU installed and access to the secondary group, do the following:
1. Connect to the Group Manager CLI on the secondary group, and log into the group administration account.
2. Identify the name of the replica placeholder by using the following command:
beta> partner select partner_name inbound-replicaset show
In the output from this command, look for the string in-progress in the column titled Status.
The following is an example of how to identify a replica placeholder:
beta> partner select group1 inbound-replicaset show
Name ReservedSpace FreeSpace Replicas Status
--------------- ------------- ------------ -------- ----------
vol2.1 2.61GB 1.3GB 1 ready
vol1.1 8.03GB 4.01GB 2 in-progress
3. Create an access control record that allows the computer to connect to the replica placeholder using the following command:
partner select partner_name inbound-replicaset select volume_name access create initiator init_name
For example:
beta> partner select group1 inbound-replicaset select vol1.1 access create initiator iqn.1991-05.com.microsoft:admin-pc.company.com
Created access entry with ID 3.
Make a note of the access control record number that is created, so you can delete it when the transfer is complete.
4. Connect the computer to the iSCSI target associated with the replica placeholder identified in Step 3. See Discovering Targets on page 28.
35
Manual Transfer Utility - Installation and User's Guide 5 Using the CLI to Transfer Data

Manual Transfer Utility - Installation and User's Guide 5 Using the CLI to Transfer Data
Loading the Transfer Files
1. Start the Manual Transfer Utility CLI by running the reptool executable.
2. After starting the MTU CLI, select the Load operation from the menu:
2. Load a transfer file into a replication placeholder
3. Identify the replica placeholder, as follows:
• On Windows operating systems, enter the number displayed for the replica placeholder.
• On Linux operating systems, specify the device name corresponding to the connected replica placeholder (for example: /dev/sde).
4. Enter the name of the transfer file to load, including the path or drive letter.
5. If used, enter the password for the transfer file.
6. When the operation completes, a message appears notifying you if more transfer files are expected by MTU to complete the transfer.
The load operation is not complete. Exit the Manual transfer Utility and restart to load
additional files.
– If you created multiple transfer files, as described in Creating Multiple Transfer Files for Large Data
Transfers on page 32, you must repeat the loading operation until all transfer files are loaded. – Exit the MTU and restart it to continue loading additional transfer files for the same replica set. The
MTU will continue to prompt you for additional transfer files until all files are loaded. – Repeat the above process until the MTU displays the following message:
The load operation is complete.
Press the Enter key to exit.
7. Using the secondary group CLI, disconnect the iSCSI initiator from the replica placeholder.
You can now use the Group Manager CLI to complete the transfer and initiate replication over the network.
36
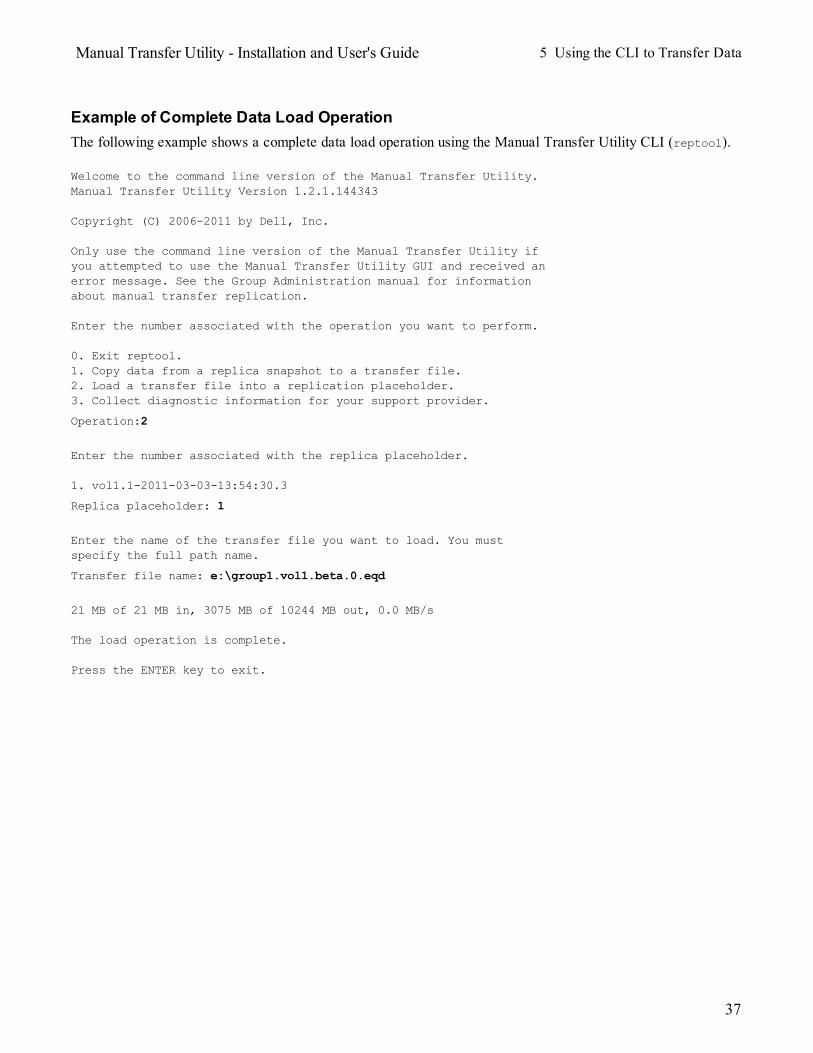
Example of Complete Data Load OperationThe following example shows a complete data load operation using the Manual Transfer Utility CLI (reptool). Welcome to the command line version of the Manual Transfer Utility.Manual Transfer Utility Version 1.2.1.144343 Copyright (C) 2006-2011 by Dell, Inc. Only use the command line version of the Manual Transfer Utility ifyou attempted to use the Manual Transfer Utility GUI and received anerror message. See the Group Administration manual for informationabout manual transfer replication. Enter the number associated with the operation you want to perform. 0. Exit reptool.1. Copy data from a replica snapshot to a transfer file.2. Load a transfer file into a replication placeholder.3. Collect diagnostic information for your support provider.
Operation:2
Enter the number associated with the replica placeholder. 1. vol1.1-2011-03-03-13:54:30.3
Replica placeholder: 1
Enter the name of the transfer file you want to load. You mustspecify the full path name.
Transfer file name: e:\group1.vol1.beta.0.eqd
21 MB of 21 MB in, 3075 MB of 10244 MB out, 0.0 MB/s The load operation is complete. Press the ENTER key to exit.
37
Manual Transfer Utility - Installation and User's Guide 5 Using the CLI to Transfer Data

Manual Transfer Utility - Installation and User's Guide 5 Using the CLI to Transfer Data
Use the Group Manager CLI to Complete the Manual Replication
Caution: When deleting access control records, do not delete record number 1. It is required for network replication betweenthe groups. (This record has a user name that matches the primary group name, and an authentication method of chap-local.)
Use the following procedure to complete the transfer.
1. Enter the following command to view the access control records:
partner select partner_name inbound-replicaset select replicaset_name access show
2. Enter the following command to delete the access control record for the replica set:
partner select partner_name inbound-replicaset select replicaset_name access delete number
For example:
beta> partner select group1 inbound-replicaset select vol1.1 access del 2
Do you really want to delete? (y/n)[n]: y
Access entry deletion succeeded.
3. On the secondary group, enter the following command to update the replication status:
partner select partner_name inbound-replicaset select replica_set_name manual-xfer done
For example:
beta> partner select group1 inbound-replicaset select vol1.1 manual-xfer done
When you update the replication status, the manual transfer is complete.
On both groups, the replication status changes to ready (for the replica set) and complete (for the first replica). It might take several minutes (or longer) to update the status on the primary group.
38

A Planning Worksheet
This appendix provides a planning worksheet to help you prepare for using the MTU. The worksheet (shown in Table 8) contains sample data that enables you to estimate the maximum required media and file size limits.Knowing the number of media required, and the typical copy time, enables you to estimate the time required to create the transfer files. When you enable compression, fewer blank media are required, and the procedure might take significantly less time.
Table 8: Manual Replication Planning Worksheet Planning Item Sample Data User Data Notes
A Volume in-use capacity 220GB Use the in-use size of the primary volume.
B Media Type Dual-layer DVD
C File Size Limit 2.0GB If the media has a file size limit.
D Media Capacity 8.5 GB E Usable Capacity 8.33 GB =D x.98%F Actual Capacity 8 GB =Int(E/C)*CG Media Required 28 =Int (A/F)+1H Number of Files 110 =Int (A/C)
I Write method or Application
Windows internal DVD burning.
J Encryption password sqldatarep$1 Do not write down the password.
39

Manual Transfer Utility - Installation and User's Guide A Planning Worksheet
40
B Monitoring Manual Transfer Status Using GUI
For each volume using manual transfer replication, you can monitor the status of the copy operation status and the load operation. The status indicates if more files must be created for a copy operation and if more files must be loaded for a load operation.
Note: You cannot use the GUI to monitor the status of any operations that you initiated by using the CLI.
When the commit operation is complete, update the status. If you have many volumes using manual transfer replication that finish at different times, you can update the load status individually as you complete them.Alternately, you can update the status for all volumes whose manual transfer replications are complete:
• On the primary group, updating the copy status for a specific volume removes the alarm for that volume from the Actions panel. The alarm on the secondary group remains active until you have finished loading the transfer files into the replica set and committed that operation.
• On the secondary group, updating the load status for a specific volume removes the alarm for that volume from the Actions panel on both groups, if applicable, and changes the replication status to complete on both groups.
• On the secondary group, updating the status for all complete data transfers removes the alarms from the Actions panel on both groups, and changes the replication status to complete, for all volumes whose manual transfer operations are complete.
Note: Future replications for a volume (including those run by a schedule) cannot start until the entire manual transfer replication is complete.
The following topics are covered:
• Displaying Copy Status on page 42
• Displaying Load Status on page 43
• Displaying Details for a Specific Transfer Operation on page 44
• Updating Status for Completed Operations on page 46
41
Manual Transfer Utility - Installation and User's Guide B Monitoring Manual Transfer Status Using GUI
Displaying Copy Status
Start the Manual Transfer Utility, if it is not already running.
• In the top panel, the copy status (on the primary group) is shown in the Data transfer status column for the appropriate volume.
• In the bottom panel, the Status column shows that the Copy data to file operation is done.
42

Displaying Load Status
Start the Manual Transfer Utility, if it is not already running.
• In the top panel, the load status (on the secondary group) is shown in the Data transfer status column for the appropriate volume.
• In the bottom panel, the Status column shows that the Load data from file operation is done.
43
Manual Transfer Utility - Installation and User's Guide B Monitoring Manual Transfer Status Using GUI

Manual Transfer Utility - Installation and User's Guide B Monitoring Manual Transfer Status Using GUI
Displaying Details for a Specific Transfer Operation
Select the operation in the bottom panel and click the Show details icon ( ) in the Actions column. The Data transfer details window opens.Table 9 describes the Data transfer status column.
Table 9: Data Transfer Status Status Description
Not started Transfer has not started.
Running
Transfer is in progress. In the bottom panel, the Progress column shows the current percentage of completion.For a load operation, if all the transfer files are available to the computer, they are loaded automatically.
Need more files
Additional transfer files must be created (on the primary group) or loaded (on the secondary group).To create more transfer files, load blank media onto the same drive letter you specified previously or make temporary space available in the same directory you specified previously and then click Resume ( ) in the Actions column.
To load more transfer files, make them available to the computer or mount the media onto the same drive letter you specified previously and then click Resume ( ) in the Actions column.
Interrupted
Manual transfer replication was stopped by the user.
To continue creating or loading transfer files, click Resume ( ).
If you interrupt and then resume a copy operation, the utility creates the next file in the sequence. The interrupted transfer file might be smaller than the others, but is still valid. All the transfer files are used during the data load operation on the secondary group.If you interrupt and then resume a load operation, the operation continues loading data from the same transfer file that was in progress.
Transfer is complete
All necessary transfer files have been created for the volume, or loaded into the replica set.To commit the copy status (which updates only the secondary group), click Commit copy status.To commit the load status (which updates the replication status on both partners), click Commit comlete status.If necessary, copy the files to external media. You might have to use another application, such as a CD-ROM writer. Send the media to the location of the replication partner. You can then load the transfer files into the replica set on the secondary group.
Error An error occurred. For details about the error, click Show Details ( ).
44

45
Manual Transfer Utility - Installation and User's Guide B Monitoring Manual Transfer Status Using GUI
Manual Transfer Utility - Installation and User's Guide B Monitoring Manual Transfer Status Using GUI
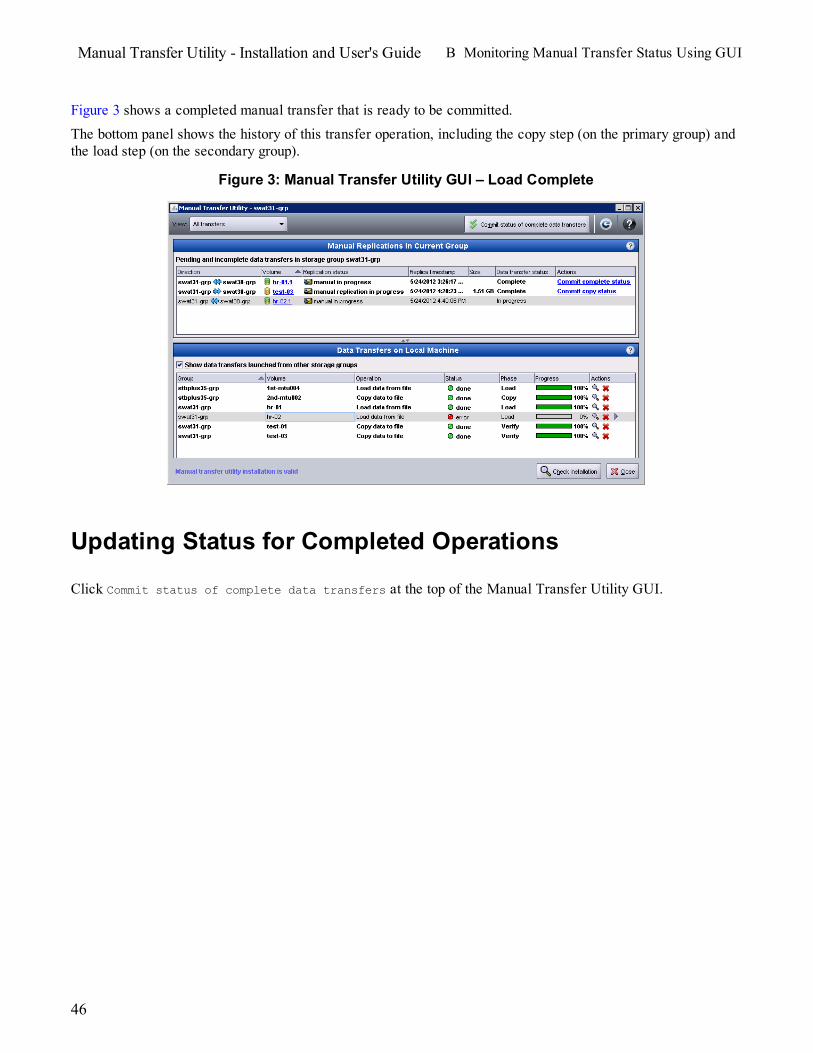
Figure 3 shows a completed manual transfer that is ready to be committed. The bottom panel shows the history of this transfer operation, including the copy step (on the primary group) and the load step (on the secondary group).
Figure 3: Manual Transfer Utility GUI – Load Complete
Updating Status for Completed Operations
Click Commit status of complete data transfers at the top of the Manual Transfer Utility GUI.
46

Index
A
access controlcreating 35manual replication requirements 24, 29
B
backupimage 9
C
CD-ROM 7CLI 4
creating multiple transfer files 33creating single transfer file 29loading transfer file 34
command line 4compression 8constraints
MTU 8scheduled replications 9storage space 9XP 9
copy statusdisplaying 42
creatingaccess control 35
crypto 13customer service 14
D
dd command 9demote
converting volume to replica set 4disaster tolerant 1displaying
copy status 42load status 43transfer status 44
DVD 7
E
encryptionpassword 8
error messageauthorization problem 12
error state 44example
creating access control 35single transfer file creation 30
F
failbackdemoting a recovery volume 4promoting a failback replica set 4
failback replica setpromoting to volume 4
Failback to Primary operationstarting 4
file size limit 7
G
graphical interface 4Group Manager GUI 14GUI 4
Group Manager 14main window 19MTU 14
I
image backup 9installation
Windows 12installing MTU 11interfaces
MTU 4introduction to MTU 1iSCSI initiator
connect to replica placeholder 35connect to replica snapshot 29
K
kitobtaining 13
47

Manual Transfer Utility - Installation and User's Guide Index: Linux – temporary directory
L
Linuxcrypto 13dd 9PySNMP 13Python 13
load statusdisplaying 43
M
main window 19manual transfer
complete status 44displaying copy status 42displaying detail status 44displaying load status 43interrupted status 44planning 5run status 44updating status 46
Manual Transfer Utilitychecking transfer status 41confirming completion 38transfer file size 27
manual updates 3media
CD-ROM 7DVD 7removable 6tape 7
mount point 6MTU 39
CLI 4compression 8constraints on using 8GUI 4GUI procedure overview 17installing 11interfaces 4introduction 1main window 19planning 5software 13using the CLI (reptool) 27using the GUI 17
O
obtaining the kit 13
overviewMTU 1MTU GUI procedure 17
P
planningmanual transfer 5transfers 39
planning worksheet 39promote
converting replica set to volume 4PySNMP 13Python 13
R
raw data backup 9recovery volumes
demoting to replica set 4removable media 6replica 1replication
schedules 9reptool
creating single transfer file 29
S
scheduled replications 9security
encryption 8single transfer file 29
creation example 30software kit 13status
complete 44error 44interrupted 44need more files 44running 44updating 46
supportURL 14
T
tape 7temporary directory 7
48

Manual Transfer Utility - Installation and User's Guide Index: transfer file – worksheet
transfer filecompression 8creating single with the CLI 29encryption 8
transfer statusdisplaying details 44
U
updating volumes 3URL
support 14
V
Vista 12volume replication 1
W
Windowsinstalling MTU 12
Windows Server 2003 12Windows Server 2008 12Windows Vista 12Windows XP 12worksheet
transfer planning 39
49
