dell emc poweredge raid controller cli reference...
TRANSCRIPT

Dell EMC PowerEdge RAID Controller CLI Reference Guide

Notes, cautions, and warnings
NOTE: A NOTE indicates important information that helps you make better use of your product.
CAUTION: A CAUTION indicates either potential damage to hardware or loss of data and tells you how to avoid the problem.
WARNING: A WARNING indicates a potential for property damage, personal injury, or death.
© 2014 – 2018 Dell Inc. or its subsidiaries. All rights reserved. Dell, EMC, and other trademarks are trademarks of Dell Inc. or its subsidiaries. Other trademarks may be trademarks of their respective owners.
2018 - 11
Rev. A02

Contents
1 Overview........................................................................................................................................................6Documentation matrix....................................................................................................................................................... 6
2 Accessing the command prompt.................................................................................................................... 7Using CLI commands from Windows command prompts.............................................................................................7Using CLI commands in Linux...........................................................................................................................................7Using CLI commands in VMware..................................................................................................................................... 7
3 Working with the PERC Command Line Interface tool................................................................................... 8System commands.............................................................................................................................................................8
System show commands............................................................................................................................................ 9Controller commands.........................................................................................................................................................9
Show and set controller properties commands...................................................................................................... 10Controller show commands.......................................................................................................................................14Controller background tasks operation commands................................................................................................ 15Controller security commands.................................................................................................................................. 19Flashing controller firmware command................................................................................................................... 20Controller cache command.......................................................................................................................................20Controller profile commands..................................................................................................................................... 21HBA controller commands.........................................................................................................................................21
Drive commands.............................................................................................................................................................. 24Drive show commands..............................................................................................................................................25Missing drives commands.........................................................................................................................................26Drive initialization commands....................................................................................................................................27Set drive state commands........................................................................................................................................28Locate drives commands.......................................................................................................................................... 29Prepare to remove drives commands......................................................................................................................29Drive security commands......................................................................................................................................... 30Drive erase commands...............................................................................................................................................31Rebuild drives commands......................................................................................................................................... 32Drive copyback commands.......................................................................................................................................33Hot spare drive commands.......................................................................................................................................34
Virtual drives commands.................................................................................................................................................35Add virtual drives commands................................................................................................................................... 36Delete virtual drives commands............................................................................................................................... 39Delete Non-RAID disks..............................................................................................................................................39Virtual drive show commands.................................................................................................................................. 40Preserved cache commands.................................................................................................................................... 40Change virtual drive properties commands.............................................................................................................41Virtual drive initialization commands........................................................................................................................44Virtual drive erase commands.................................................................................................................................. 45Virtual drive migration commands........................................................................................................................... 46
Contents 3

Virtual drive consistency check commands............................................................................................................47Background initialization commands........................................................................................................................49Virtual drive expansion commands.......................................................................................................................... 50
Foreign configurations commands.................................................................................................................................50BIOS-related commands..................................................................................................................................................51
perccli /cx set bios=[state=<on|off>] [Mode=<SOE|PE|IE|SME>] [abs=<on|off>]......................................... 51perccli /cx show bios.................................................................................................................................................52OPROM BIOS commands........................................................................................................................................ 52
Drive group commands................................................................................................................................................... 53Drive group show.......................................................................................................................................................53
Dimmer switch commands............................................................................................................................................. 54Change virtual drive power settings commands....................................................................................................54
BBU commands............................................................................................................................................................... 55perccli /cx/bbu set <options>..................................................................................................................................55perccli /cx/bbu show................................................................................................................................................ 56perccli /cx/bbu show all............................................................................................................................................56perccli /cx/bbu show learn.......................................................................................................................................56perccli /cx/bbu show properties..............................................................................................................................56perccli /cx/bbu show status.................................................................................................................................... 56perccli /cx/bbu start learn........................................................................................................................................56
Enclosure commands.......................................................................................................................................................57perccli /cx/ex show................................................................................................................................................... 57perccli /cx/ex show all...............................................................................................................................................57perccli /cx /ex show phyerrorcounters................................................................................................................... 57perccli /cx/ex show status [extended]....................................................................................................................57
PHY commands................................................................................................................................................................57perccli /cx/px|pall set linkspeed=0(auto)|1.5|3|6|12............................................................................................. 58perccli /cx/px|pall show............................................................................................................................................58perccli /cx/px|pall show all....................................................................................................................................... 58
Logging commands..........................................................................................................................................................58perccli /cx delete events...........................................................................................................................................58perccli /cx show eventloginfo.................................................................................................................................. 58
PERC CLI command examples...................................................................................................................................... 59Getting a complete list of CLI commands.............................................................................................................. 59Checking controller availability................................................................................................................................. 59Viewing controllers.....................................................................................................................................................59Viewing free space information................................................................................................................................60Viewing disk1 information..........................................................................................................................................60Viewing controller, virtual disk, and drivers information.........................................................................................61Checking for preserved cache ................................................................................................................................ 62Deleting preserved cache ........................................................................................................................................ 63Viewing expansion information ................................................................................................................................63Viewing the foreign configuration............................................................................................................................64Importing the foreign configuration.........................................................................................................................64Viewing BBU information..........................................................................................................................................65
4 Contents

Viewing physical drive details for the specified slot in the controller.................................................................. 67Viewing the boot drive for the controller................................................................................................................68Setting virtual drive as boot drive............................................................................................................................69Locating a drive..........................................................................................................................................................69Stopping a locate operation...................................................................................................................................... 70
4 Getting help..................................................................................................................................................71Contacting Dell EMC........................................................................................................................................................71Locating your system Service Tag.................................................................................................................................. 71
Contents 5

Overview
You can set up, configure, and manage your Dell PowerEdge RAID Controller (PERC) by using the Command Line Interface (CLI).
NOTE: Some features may not be supported on every generation of PERC, or may require a firmware update to enable a feature. See your PERC’s User’s Guide for information on the specific features supported by that controller.
Documentation matrixThe documentation matrix provides information on documents that you can refer to for setting up and managing your system.
Table 1. Documentation matrix
To... See the...
Install your system into a rack Rack documentation included with your rack solution.
Set up your system and know the system technical specifications Getting Started With Your System that shipped with your system or see Dell.com/poweredgemanuals.
Install the operating system Operating system documentation at Dell.com/operatingsystemmanuals.
Get an overview of the Dell Systems Management offerings Dell OpenManage Systems Management Overview Guide at Dell.com/openmanagesoftware.
Configure and log in to iDRAC, set up managed and management system, know the iDRAC features, and troubleshoot by using iDRAC
Integrated Dell Remote Access Controller User's Guide at Dell.com/idracmanuals.
Know about the RACADM subcommands and supported RACADM interfaces
RACADM Command Line Reference Guide for iDRAC at Dell.com/idracmanuals.
Launch, enable, and disable Dell Lifecycle Controller, know the features, use and troubleshoot Dell Lifecycle Controller
Dell Lifecycle Controller User’s Guide at Dell.com/idracmanuals.
Use Dell Lifecycle Controller Remote Services Dell Lifecycle Controller Remote Services Quick Start Guide at Dell.com/idracmanuals.
Set up, use, and troubleshoot OpenManage Server Administrator Dell OpenManage Server Administrator User’s Guide at Dell.com/openmanagemanuals > OpenManage Server Administrator.
Install, use, and troubleshoot OpenManage Essentials Dell OpenManage Essentials User’s Guide at Dell.com/openmanagemanuals > OpenManage Essentials.
Know the features of the storage controller cards, deploy the cards, and manage the storage subsystem
Storage controller documentation at Dell.com/storagecontrollermanuals.
Check the event and error messages generated by the system firmware and agents that monitor system components
Dell Event and Error Messages Reference Guide at Dell.com/openmanagesoftware.
1
6 Overview

Accessing the command promptAccess the CLI in Microsoft Windows, Linux, or VMware operating systems.
Topics:
• Using CLI commands from Windows command prompts
• Using CLI commands in Linux
• Using CLI commands in VMware
Using CLI commands from Windows command promptsEnsure that you copy the perccli.exe and perccli64.exe files to C:\Windows\System32.To access the command prompt in systems using the Microsoft Windows operating system, perform the following procedure:
1 Click Start > Run.
The Run window is displayed.
2 In the Open field, type cmd, and then click OK.
The Administrator: Command Prompt window is displayed, where you can execute the PERC CLI commands.
Using CLI commands in LinuxPerform the following procedures to access the command prompt in systems using the Linux operating system:
1 To install the percli RPM, run rpm -ivh <percli-x.xx-x.noarch.rpm>, or to upgrade the percli RPM, run rpm -Uvh <percli-x.xx-x.noarch.rpm>.
2 Change directory to /opt/MegaRAID/perccli.
3 As a root user, run ./perccli.
Using CLI commands in VMwarePerform the following procedures to access the command prompt in systems using the VMware system:
1 View the list of installed VIB package using the following command: esxcli software vib list.
2 Install the VIB package using the command: esxcli software vib install -v /vmfs/volume/datastore1/vmware-esx-perccli.vib where /vmfs/volume/datastore1 is the path detail of the VIB.
3 You can remove the installed VIB by using the command: esxcli software vib remove -n=vmware-esx-perccli.vib --force.
4 Run perccli by browsing to the following location: cd /opt/lsi/perccli.
2
Accessing the command prompt 7

Working with the PERC Command Line Interface tool
This chapter describes the commands supported by the PERC Command Line Tool.
NOTE: The PERC Command Line Interface (CLI) Tool is not case sensitive.
CAUTION: The order in which you specify the command options should be the same as in the User Guide; otherwise, the command will fail.
NOTE: The PERC CLI Tool does not support the Snapshot feature.
Topics:
• System commands
• Controller commands
• Drive commands
• Virtual drives commands
• Foreign configurations commands
• BIOS-related commands
• Drive group commands
• Dimmer switch commands
• BBU commands
• Enclosure commands
• PHY commands
• Logging commands
• PERC CLI command examples
System commandsIn the following sections, syntax is read as follows:
Table 2. System commands reference table
Variable Description
all Displays information on all controllers present on the host.
cx Specifies the controller where x is the controller index.
ex The enclosure ID.
.<file extension> Specifies the file required for a particular command.
sx The drive slot ID of the controller.
3
8 Working with the PERC Command Line Interface tool

System show commandsThe PERC Command Line Tool supports the following system show commands:
perccli showperccli show allperccli show ctrlcount perccli show help perccli -vThe detailed description for each command follows.
perccli show
This command shows a summary of controller and controller-associated information for the system. The summary includes the number of controllers, the host name, the operating system information, and the overview of existing configuration.
perccli show all
This command shows the list of controllers and controller-associated information, information about the drives that need attention, and advanced software options.
perccli show ctrlcount
This command shows the number of controllers detected in the server.
perccli show help
This command shows help for all commands at the server level.
perccli -v
This command shows the version of the PERC Command Line Tool.
Controller commandsController commands provide information and perform actions related to the specified controller, such as the /c0 controller. The PERC
Command Line Tool supports the controller commands described in this section.
Working with the PERC Command Line Interface tool 9

Show and set controller properties commands
Table 3. Controller commands quick reference table
Commands Value range Description
show <properties> See Table 4. Properties for show and set commands. Shows specific controller properties.
set <properties> See Table 4. Properties for show and set commands. Sets controller properties.
show all: Shows all properties of the virtual drive.
freespace: Shows the freespace in the controller. See Controller show commands.
Shows physical drive information.
This section provides command information to show and set controller properties.
NOTE: You cannot set multiple properties with a single command.
The generalized syntax for show controller properties command is as follows:
perccli /cx show <property>
This command shows the current value of the specified property on the specified controller.
General example output:
Status Code = 0 Status = Success Description = None Controller: 0Property_name = Property_valueYou can show the following properties using the perccli /cx show <property1>|<property2> command.
NOTE: /cx specifies the controller where x is the controller index.
perccli /cx show abortcconerror perccli /cx show activityforlocate perccli /cx show backplane perccli /cx show badblocks perccli /cx show batterywarning perccli /cx show bgirateperccli /cx show bootwithpinnedcache perccli /cx show cachebypassperccli /cx show cacheflushint perccli /cx show ccrate perccli /cx show coercionperccli /cx show consistencycheck|cc perccli /cx show copybackperccli /cx show dimmerswitch|dsperccli /cx show jbodperccli /cx show loadbalancemode perccli /cx show maintainpdfailhistory perccli /cx show migraterateperccli /cx show ncqperccli /cx show patrolread|pr perccli /cx show perfmode
10 Working with the PERC Command Line Interface tool

perccli /cx show personality perccli /cx show piperccli /cx show prcorrectunconfiguredareas perccli /cx show prrateperccli /cx show rebuildrate perccli /cx show restorehotspare perccli /cx show smartpollinterval perccli /cx show timeperccli /cx show usefdeonlyencrypt perccli /cx(x|all) show piperccli /cx set <property>=<value>
General example output:
Status Code = 0 Status = Success Description = NoneController 0, new Property_name = Property_valueThe following commands are examples of the properties that can be set using the perccli /cx set<property>=<value> command:
perccli /cx set abortcconerror=<on|off>perccli /cx set activityforlocate=<on|off>perccli /cx set backplane=<value>perccli /cx set batterywarning=<on|off>perccli /cx set bgirate=<value>perccli /cx set bootwithpinnedcache=<on|off> perccli /cx set cachebypass=<on|off>perccli /cx set cacheflushinterval=<value>perccli /cx set ccrate=<value>perccli /cx set coercion=<value>perccli /cx set consistencycheck|cc=[off|seq|conc][delay=value] [starttime=yyyy/mm/dd hh] [excludevd=x-y,z]perccli /cx set copyback=<on|off> type=<smartssd|smarthdd|all> perccli /cx set eghs [state=<on|off>] [eug=on|off>] [smarter=<on|off>] perccli /cx set dimmerswitch|ds=<on|off type=1|2|3|4> perccli /cx set foreignautoimport=<on|off>perccli /cx set jbod=<on|off>perccli /cx set loadbalancemode=<value> perccli /cx set maintainpdfailhistory=<on|off>perccli /cx set migraterate=<value>perccli /cx set ncq=<on|off>perccli /cx set patrolread|pr {=on mode=<auto|manual>}|{off} perccli /cx set perfmode=<value>perccli /cx set personality=<RAID|HBA|eHBA>perccli /cx set pi=<on|off>perccli /cx set prcorrectunconfiguredareas=<on|off>perccli /cx set prrate=<value>perccli /cx set rebuildrate=<value> perccli /cx set restorehotspare=<on|off> perccli /cx set smartpollinterval=<value> perccli /cx set stoponerror=<on|off> perccli /cx set usefdeonlyencrypt=<on|off>perccli /cx set time=yyyymmdd hh:mm:ss|systemtimeThe following table lists and describes the properties for the show and set commands.
Table 4. Properties for show and set commands
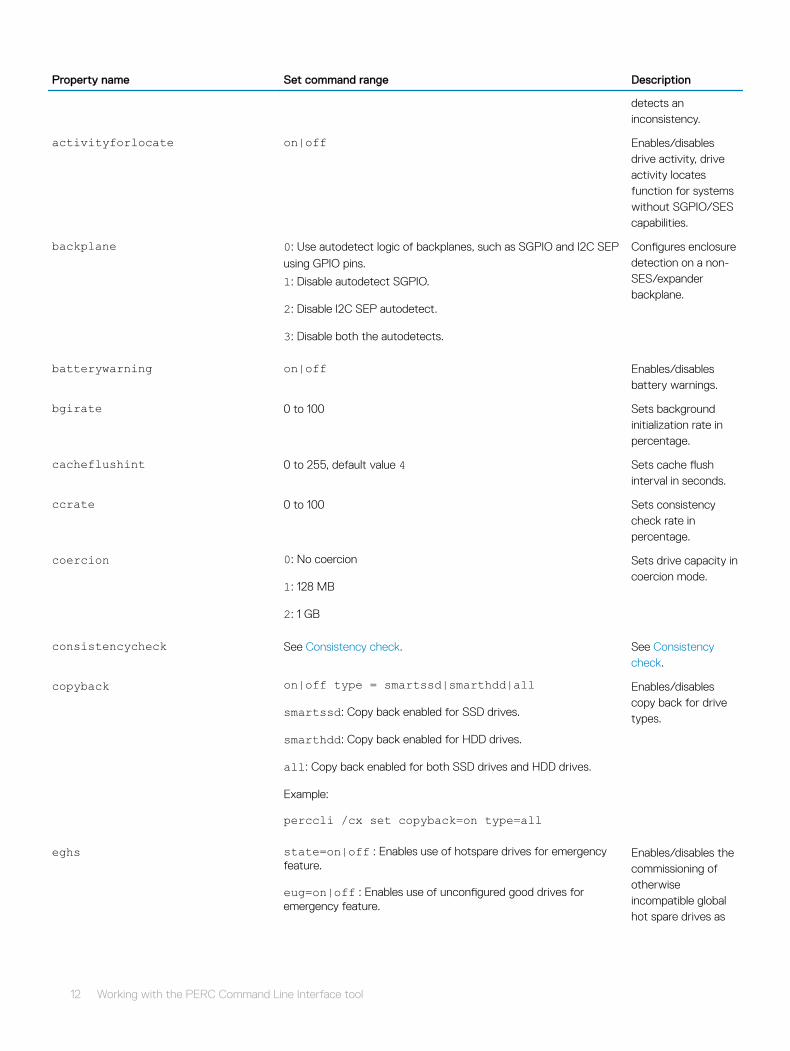
Property name Set command range Description
abortcconerror on|off Aborts consistency check when it
Working with the PERC Command Line Interface tool 11
Property name Set command range Description
detects an inconsistency.
activityforlocate on|off Enables/disables drive activity, drive activity locates function for systems without SGPIO/SES capabilities.
backplane 0: Use autodetect logic of backplanes, such as SGPIO and I2C SEP
using GPIO pins.
1: Disable autodetect SGPIO.
2: Disable I2C SEP autodetect.
3: Disable both the autodetects.
Configures enclosure detection on a non-SES/expander backplane.
batterywarning on|off Enables/disables battery warnings.
bgirate 0 to 100 Sets background initialization rate in percentage.
cacheflushint 0 to 255, default value 4 Sets cache flush interval in seconds.
ccrate 0 to 100 Sets consistency check rate in percentage.
coercion 0: No coercion
1: 128 MB
2: 1 GB
Sets drive capacity in coercion mode.
consistencycheck See Consistency check. See Consistency check.
copyback on|off type = smartssd|smarthdd|all
smartssd: Copy back enabled for SSD drives.
smarthdd: Copy back enabled for HDD drives.
all: Copy back enabled for both SSD drives and HDD drives.
Example:
perccli /cx set copyback=on type=all
Enables/disables copy back for drive types.
eghs state=on|off : Enables use of hotspare drives for emergency feature.
eug=on|off : Enables use of unconfigured good drives for emergency feature.
Enables/disables the commissioning of otherwise incompatible global hot spare drives as
12 Working with the PERC Command Line Interface tool

Property name Set command range Description
smarter=on|off : Enables use of emergency spares for copy back during SMART errors.
Emergency Hot Spare (EHSP) drives.
exposeencldevice on|off Enables/disables device drivers to expose enclosure devices; for example, expanders, SEPs.
dimmerswitch|ds See Dimmer switch commands. See Dimmer switch commands.
foreignautoimport on|off Imports foreign configuration automatically, at boot.
jbod on|off Enables/disables JBOD mode; by default, drives become system drives.
NOTE: Not supported by all controllers.
loadbalancemode on|off Enables/disables automatic load balancing between SAS phys or ports in a wide port configuration.
maintainpdfailhistory on|off Maintains the physical drive fail history.
migraterate 0 to 100 Sets data migration rate in percentage.
patrolread|pr See Patrol Read. See Patrol Read.
perfmode 0: Tuned to provide best IOPS, currently applicable to non-FastPath
1: Tuned to provide least latency, currently applicable to non-FastPath
Performance tuning setting for the controller.
personality RAID | HBA | eHBA Sets the personality of the controller to either RAID, HBA or eHBA mode.
pi on|off Enables/disables data protection on the controller.
prcorrectunconfiguredareas on|off Correct media errors during PR by writing
Working with the PERC Command Line Interface tool 13

Property name Set command range Description
0s to unconfigured areas of the disk.
prrate 0 to 100 Sets patrol read rate of the virtual drives in percentage.
rebuildrate 0 to 100 Sets rebuild rate of the drive in percentage.
reconrate 0 to 100 Sets reconstruction rate for a drive in percentage.
restorehotspare on|off Becomes a hot spare on insertion of a failed drive.
smartpollinterval 0 to 65535 Set time for polling of SMART errors in seconds.
spinupdrivecount 0 to 255 Sets number of drives that are spun up at a time.
spinupdelay 0 to 255 Sets spin-up delay between a group of drives or a set of drives, in seconds.
stoponerror on|off Stops the MegaRAID BIOS during POST, if any errors are encountered.
time Valid time in yymmdd hh:mm:ss format or systemtime Sets the controller time to your input value or the system time (local time in 24-hour format).
usefdeonlyencrypt on|off Enables/disables FDE drive-based encryption.
Controller show commandsThe PERC Command Line Tool supports the following show commands:
perccli /cx showperccli /cx show allperccli /cx show freespaceperccli /cx show personality
14 Working with the PERC Command Line Interface tool

The detailed description for each command follows.
perccli /cx show personality
This command shows the personality set on the controller. eHBA mode lists the personality as eHBA.
Input example:
perccli /c1 show personality
perccli /cx show [jbod]
This command shows the summary of the controller information. The summary includes basic controller information, foreign configurations, drive groups, virtual drives, physical drives, enclosures, and BBU information. If you use the JBOD option, the command shows all Non-RAID disk(s) displayed in JBOD list. If the physical disk is Non-RAID, its type is set as JBOD and its state as Online.
Input example:
perccli /c1 show
perccli /cx show all
This command shows all controller information, which includes basic controller information, bus information, controller status, advanced software options, controller policies, controller defaults, controller capabilities, scheduled tasks, miscellaneous properties, foreign configurations, drive groups, virtual drives, physical drives, enclosures, and BBU information.
Input example:
perccli /c0 show allNOTE: The PCI information displayed as a part of perccli /cx show and perccli /cx show all commands is not
applicable for the FreeBSD operating system. Hence, the PCI information fields are displayed as N/A.
perccli /cx show freespace
This command shows the usable free space on all disk groups in the controller.
Input example:
perccli /c0 show freespace
Controller background tasks operation commands
Rebuild Rate
perccli /cx set rebuildrate=<value> perccli /cx show rebuildrateThe detailed description for each command follows.
Working with the PERC Command Line Interface tool 15

perccli /cx set rebuildrate=<value>
This command sets the rebuild task rate of the specified controller. The input value is in percentage.
Input example:
perccli /c0 set rebuildrate=30NOTE: A high rebuild rate slows down I/O processing.
perccli /cx show rebuildrate
This command shows the current rebuild task rate of the specified controller in percentage.
Input example:
perccli /c0 show rebuildrate
Patrol Read
The PERC Command Line Tool supports the following patrol read commands:
perccli /cx resume patrolreadperccli /cx set patrolread ={{on mode=<auto|manual>}|{off}}perccli /cx set patrolread [starttime=<yyyy/mm/dd hh>] [maxconcurrentpd=<value>] [includessds=<on|off>] [uncfgareas=<on|off>]perccli /cx set patrolread delay=<value> perccli /cx show patrolreadperccli /cx start patrolread perccli /cx stop patrolread perccli /cx suspend patrolread
NOTE: A patrol read operation is scheduled for all the physical drives of the controller.
The detailed description for each command follows.
perccli /cx resume patrolread
This command resumes a suspended patrol read operation.
Input example:
perccli /c0 resume patrolread
perccli /cx set patrolread {=on mode=<auto|manual>}|{off}
This command turns the patrol read scheduling on and sets the mode of the patrol read to automatic or manual.
Input example:
perccli /co set patrolread=on mode=manual
16 Working with the PERC Command Line Interface tool
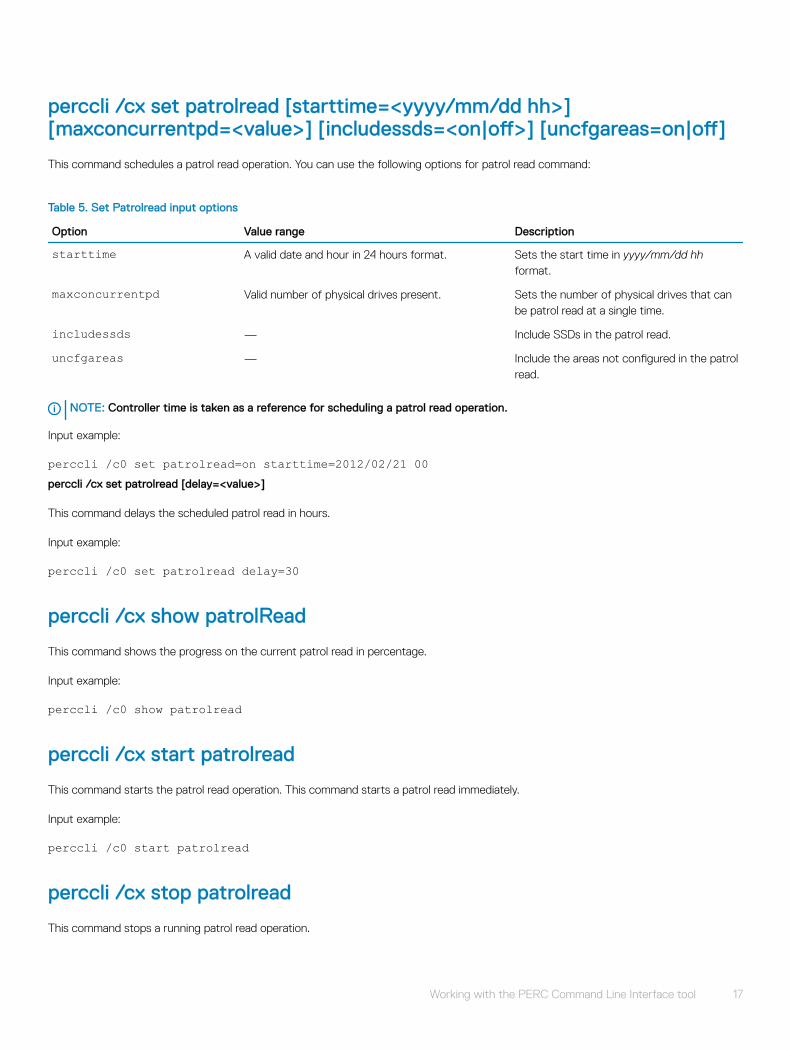
perccli /cx set patrolread [starttime=<yyyy/mm/dd hh>] [maxconcurrentpd=<value>] [includessds=<on|off>] [uncfgareas=on|off]
This command schedules a patrol read operation. You can use the following options for patrol read command:
Table 5. Set Patrolread input options
Option Value range Description
starttime A valid date and hour in 24 hours format. Sets the start time in yyyy/mm/dd hh format.
maxconcurrentpd Valid number of physical drives present. Sets the number of physical drives that can be patrol read at a single time.
includessds — Include SSDs in the patrol read.
uncfgareas — Include the areas not configured in the patrol read.
NOTE: Controller time is taken as a reference for scheduling a patrol read operation.
Input example:
perccli /c0 set patrolread=on starttime=2012/02/21 00perccli /cx set patrolread [delay=<value>]
This command delays the scheduled patrol read in hours.
Input example:
perccli /c0 set patrolread delay=30
perccli /cx show patrolRead
This command shows the progress on the current patrol read in percentage.
Input example:
perccli /c0 show patrolread
perccli /cx start patrolread
This command starts the patrol read operation. This command starts a patrol read immediately.
Input example:
perccli /c0 start patrolread
perccli /cx stop patrolread
This command stops a running patrol read operation.
Working with the PERC Command Line Interface tool 17

Input example:
perccli /c0 stop patrolreadNOTE: You cannot resume a stopped patrol read.
perccli /cx suspend patrolread
This command pauses a running patrol read operation.
Input example:
perccli /c0 suspend patrolreadNOTE: You can run this command only when a patrol read operation is running on the controller.
Consistency check
The PERC Command Line Tool supports the following commands to schedule, perform, and view the status of a consistency check (CC) operation:
perccli /cx set consistencycheck|cc=[off|seq|conc][delay=value] starttime=yyyy/mm/dd hh [excludevd=x-y,z]perccli /cx show cc perccli /cx show ccrateThe detailed description for each command follows.
perccli /cx set consistencycheck|cc=[off|seq|conc][delay=value] starttime=yyyy/mm/dd hh [excludevd=x-y,z]
This command schedules a consistency check (CC) operation. You can use the following options with the consistency check command:
Table 6. Set CC input options
Option Value range Description
cc seq: Sequential mode.
conc: Concurrent mode.
off: Turns off the consistency check.
Sets CC to either sequential mode, or concurrent mode, or turns off the CC.
NOTE: The concurrent mode slows I/O processing.
delay -1 and any integer value. Delay a scheduled consistency check. The value is in hours. A value of 0 makes the CC runs continuously with no delay (in a loop).
NOTE: Only scheduled consistency checks can be delayed.
starttime A valid date and hour in 24-hours format. Start time of a consistency check is yyyy/mm/dd hh format.
excludevd The range should be less than the number of virtual drives.
Excludes virtual drives from the consistency checks. To exclude particular virtual drives, you can provide list of virtual drive names (Vx,Vy … format) or the range of virtual drives that you want to exclude from a consistency check (Vx-Vy format). If this option is
18 Working with the PERC Command Line Interface tool

Option Value range Description
not specified in the command, no virtual drives are excluded.
Input example:
perccli /c0 set CC=on starttime=2012/02/21 00 excludevd v0-v3
perccli /cx show cc
This command shows the consistency check schedule properties for a controller.
Input example:
perccli /c0 show cc
perccli /cx show ccrate
This command checks the status of a consistency check operation. The CC rate appears in percentage.
Input example:
perccli /c0 show ccrateNOTE: A high CC rate slows I/O processing.
Controller security commandsThe PERC Command Line Tool supports the following controller security commands:
perccli /cx compare securitykey=ssssss perccli /cx delete securitykeyperccli /cx set securitykey keyid=kkkkperccli /cx set securitykey=sssss keyid=sssss] perccli /cx set securitykey=sssssoldsecuritykey=ssss [keyid=sssss]The detailed description for each command follows.
perccli /cx compare securitykey=ssssss
This command compares and verifies the security key of the controller.
perccli /cx delete securitykey
This command deletes the security key of the controller.
Input example:
perccli /c0 delete securitykey
Working with the PERC Command Line Interface tool 19

perccli /cx set securitykey keyId=kkkk
This command sets the key ID for the controller. The key ID is unique for every controller.
perccli /cx set securitykey=sssss [keyid=sssss]
This command sets the security key for the controller. You can use the following options with the set security key command:
Table 7. Set security key input options
Option Value range Description
Securitykey Should have a combination of numbers, upper case letters, lower case letters and special characters.Minimum of 8 characters and maximum of 32 characters.
• Security key is used to lock the drive.
keyid — Unique ID set for different controllers to help you specify a passphrase to a specific controller.
Input example:
perccli /c0 set securitykey=Lsi@12345 keyid=1perccli /cx set securitykey=sssss oldsecuritykey=ssss [passphrase=sssss][keyid=sssss]
This command changes the security key for the controller.
Input example:
perccli /c0 set securitykey=Lsi@12345 oldsecuritykey=pass123 keyid=1
Flashing controller firmware commandThe following command flashes the controller firmware:
perccli /cx download file=filepath [noverchk]
This command flashes the firmware to the specified adapter from the given file location (filepath is the absolute file path). You can use the following options when you flash the firmware:
Table 8. Flashing controller firmware input options
Option Value range Description
noverchk — The application flashes the controller firmware without checking the version of the firmware image.
Controller cache commandThe following command flushes the controller cache:
20 Working with the PERC Command Line Interface tool

perccli /cx flush|flushcache
This command flushes the controller cache.
Input example:
perccli /c0 flushcache
Controller profile commandsThe PERC command line tool supports the following profile-related commands:
perccli /cx show profileperccli /cx set profile profileid=<profileid>The detailed description for each command follows.
perccli /cx show profile
This command shows current profile and profile properties.
Input example:
perccli /c1 show profile
perccli /cx set profile profileid=<profileid>
This command sets profile ID. The output contains control ID, status, and description attributes.
Input example:
perccli /c1 set profile profileid=<profileid>NOTE: You must reboot the system for profile changes to take effect.
NOTE: Profile changes fail if:
• The new profile supports fewer drives than the number of drives supported in the current topology.
• Background operations (rebuild, copy back, full initialization, background initialization, patrol read, cc) are active.
• Background operations start after profile change but before you reboot the system.
HBA controller commandsNOTE: The UEFI version of PERCCli is not supported on Dell HBA330 or 12Gbps HBA controllers. Support will be added in a future PERCCli release.
The PERC Command Line Tool supports the following HBA-related commands:
perccli /call showperccli /cx download bios file=mptsas.romperccli /cx download file=image.fw
Working with the PERC Command Line Interface tool 21

perccli /cx/ex/sx start locateperccli /cx/ex/sx stop locateperccli /cx/pall showperccli /cx showperccli /cx show allperccli /cx show freespaceperccli /cx show sasaddperccli h|?|helpperccli /restartperccli v
perccli /call show
This command shows information on all the controllers present on the host.
Input example:
perccli /call show
perccli /cx download bios file=<.rom>
Use this command to update the BIOS component on all supported controllers.
Input example:
perccli /c1 download bios file=mptsas.romNOTE: .rom specifies the file extension on which you are updating the BIOS component.
perccli /cx download file=<filepath>
Use this command to flash the firmware with the .rom file to a specified adapter from the provided file location (file path is the absolute file path).
Input example:
perccli /cx download file=image.fw
perccli /cx/ex/sx start locate
Use this command to turn on the drive LED flash to locate physical drives.
Input example:
perccli /c1/e10/s12 start locate
perccli /cx/ex/sx stop locate
Use this command to turn off the drive LED flash to locate physical drives.
Input example:
perccli /c1/e10/s12 stop locate
22 Working with the PERC Command Line Interface tool

perccli /cx/pall show
This command shows the basic PHY layer information on a specified adapter.
Input example:
perccli /c1/pall show
perccli /cx show
This command shows the summary of the controller information. The summary includes basic controller information, foreign configurations, drive groups, virtual drives, physical drives, enclosures, and BBU information.
Input example:
perccli /c1 show
perccli /cx show all <logfile>
This command shows all of the controller information, including basic controller information, bus information, controller status, advanced software options, controller policies, controller defaults, controller capabilities, scheduled tasks, miscellaneous properties, foreign configurations, drive groups, virtual drives, physical drives, enclosures, and BBU information.
If you use the logfile option in the command syntax, the logs are written to the specified file. If you do not specify the file name, then the logs are written to the percas.log file. If you do not use the logfile option in the command syntax, the entire log output is printed to the console.
Ensure that the filename does not contain a blank space.
Input example:
perccli /c0 show all logfile=log.txt
perccli /cx show freespace
This command shows the usable free space in the controller.
Input example:
perccli /c0 show freespace
perccli /cx show sasadd
This command displays the SAS address of the specified controller.
Input example:
perccli /c1 show sasadd
Working with the PERC Command Line Interface tool 23

perccli —h|?|help
This command displays the perccli help.
Input example:
perccli —h
perccli /restart
Using this command, you can reset a specific controller or reset all controllers connected to the host. This command resets the chip hardware and reinitializes all the chip information. This command also performs the following operations:
• Moves the new firmware image from the backup location to the current location of the firmware.
• Migrates the NVDATA changes.
• Brings up and runs the new firmware.
Input example:
perccli /c1 restart
perccli —v
This command displays the version of the command line tool.
Input example:
perccli —v
Drive commandsThis section describes the drive commands, which provide information and perform actions related to physical drives. The following table describes frequently used virtual drive commands:
Table 9. Physical drives commands quick reference table
Commands Value range Description
set missing: Sets the drive status as missing.
good: Sets the drive status to unconfigured good.
offline: Sets the drive status to offline.
online: Sets the drive status to online.
Sets physical drive properties.
show all: shows all properties of the physical drive. See Drive show
commands.
Shows virtual drive information.
24 Working with the PERC Command Line Interface tool

Drive show commandsThe PERC Command Line Tool supports the following drive show commands:
perccli /cx[/ex]/sx show perccli /cx[/eall]/sall showperccli /cx[/ex]/sx|sall show allperccli /cx[/ex]/sall show jbodperccli /cx[/ex]/sx show jbod
NOTE: If enclosures are used to connect physical drives to the controller, specify the enclosure ID in the command. If no enclosures are used, you must specify the controller ID and slot ID.
The detailed description for each command follows.
perccli /cx[/ex]/sx show
This command shows the summary of the physical drive for a specified slot in the controller.
Input example:
perccli /c0/e0/s4,5 show
perccli /cx[/eall]/sall show
This command shows the summary information for all the enclosures and physical drives connected to the controller.
Input example:
perccli /c0/eall/sall show
perccli /cx[/ex]/sx|sall show all
This command shows all information of a physical drive for the specified slot in the controller. If you use the all option, the command
shows information for all slots on the controller. x stands for a number, a list of numbers, a range of numbers, or all numbers.
Input examples:
perccli /c0/e3/s0-3 show all perccli /c0/e35/sall show all
NOTE: The perccli /cx/sx show all command shows tape drives information.
perccli /cx[/eall]/sall show jbod
This command shows the summary information for all the enclosures and physical drives connected to the controller. If you use the JBOD option, the command shows all Non-RAID disk(s) displayed in JBOD list. If physical disk is Non-RAID, type is set as JBOD and state as
Online. ID displays the target ID Non-RAID disks.
Input example:
perccli /c0/eall/sall show jbod
Working with the PERC Command Line Interface tool 25

perccli /cx[/ex]/sx show jbod
This command shows the summary of the physical drive for a specified slot in the controller.
Input example:
perccli /c0/e0/s4,5 show jbod
Missing drives commandsThe PERC Command Line Tool supports the following commands to mark and replace missing physical drives:
perccli /cx[/ex]/sx set offline perccli /cx[/ex]/sx set missing perccli /cx /dall show perccli /cx[/ex]/sx insert dg=a array=b row=c perccli /cx[/ex]/sx start rebuildThe detailed description for each command follows.
perccli /cx[/ex]/sx set offline
This command marks the drive in an array as offline.
NOTE: To set a drive that is part of an array as missing, first set it as offline. After the drive is set to offline, you can set the drive to missing.
Input example:
perccli /c1/e56/s3 set offline
perccli /cx[/ex]/sx set missing
This command marks a drive as missing.
Input example:
perccli /c0/s4 set missing
perccli /cx /dall show
This command shows the topology information of the drive group.
Input example:
perccli /c0/dall show
26 Working with the PERC Command Line Interface tool

perccli /cx[/ex]/sx insert dg=a array=b row=c
This command replaces the configured drive that is identified as missing. User must manually start the rebuild.
Input example:
perccli /c0/e32/s4 insert dg=2 array=2 row=1
perccli /cx[/ex]/sx start rebuild
This command starts a rebuild operation for a drive.
Input example:
perccli /c0/e32/s4 start rebuild
Drive initialization commandsWhen you initialize drives, all the data from the drives is cleared. The PERC Command Line Tool supports the following commands to initialize drives:
perccli /cx[/ex]/sx show initialization perccli /cx[/ex]/sx start initialization perccli /cx[/ex]/sx stop initializationThe detailed description for each command follows.
perccli /cx[/ex]/sx show initialization
This command shows the current progress of the initialization progress in percentage.
Input example:
perccli /c0/e31/s4 show initialization
perccli /cx[/ex]/sx start initialization
This command starts the initialization process on a drive.
Input example:
perccli /c0/e31/s4 start initialization
perccli /cx[/ex]/sx stop initialization
This command stops an initialization process running on the specified drive. A stopped initialization process cannot be resumed.
Input example:
perccli /c0/e56/s1 stop initialization
Working with the PERC Command Line Interface tool 27

Set drive state commandsThe PERC Command Line Tool supports the following commands to set the status of physical drives:
perccli /cx[/ex]/sx set jbodperccli /cx[/ex]/sx set good [force] perccli /cx[/ex]/sx set offline perccli /cx[/ex]/sx set onlineperccli /cx[/ex]/sall set jbodperccli /cx[/ex]/sx-y set jbodThe detailed description for each command follows.
perccli /cx[/ex]/sx set jbod
This command converts unconfigured good drive to Non-RAID disks.
Input example:
perccli /c1/e56/s3 set jbod
perccli /cx[/ex]/sx set good [force]
This drive changes the drive state to unconfigured good. If the drive has the operating system in it, use the force option.
Input example:
perccli /c1/e56/s3 set good
perccli /cx[/ex]/sx set offline
This command changes the drive state to offline.
Input example:
perccli /c1/e56/s3 set offline
perccli /cx[/ex]/sx set online
This command changes the drive state to online.
Input example:
perccli /c1/e56/s3 set online
perccli /cx[/ex]/sall set jbod
This command converts all unconfigured good drives to Non-RAID disks.
Input example:
28 Working with the PERC Command Line Interface tool

perccli /c1/e56/sall set jbod
perccli /cx[/ex]/sx-y set jbod
This command converts all the selected unconfigured good drives to Non-RAID disks.
Input example:
perccli /c1/e56/s1-6 set jbod
Locate drives commandsThe PERC Command Line Tool supports the following commands to locate a drive and activate the physical disk activity LED:
perccli /cx[/ex]/sx start locate perccli /cx[/ex]/sx stop locateThe detailed description for each command follows.
perccli /cx[/ex]/sx start locate
This command locates a drive and activates the drive’s LED.
Input example:
perccli /c0/e56/s1 start locate
perccli /cx[/ex]/sx stop locate
This command stops a locate operation and deactivates the drive’s LED.
Input example:
perccli /c0/e56/s1 stop locate
Prepare to remove drives commandsThe PERC CLI supports the following commands to prepare the physical drive for removal:
perccli /cx[/ex]/sx spindown perccli /cx[/ex]/sx spinupThe detailed description for each command follows.
perccli /cx[/ex]/sx spindown
This command spins down an unconfigured drive and prepares it for removal. The drive state is unaffiliated and it is marked offline.
Input example:
perccli /cx/e34/s4 spindown
Working with the PERC Command Line Interface tool 29

perccli /cx[/ex]/sx spinup
This command spins up a spun-down drive and the drive state is unconfigured good.
Input example:
perccli /cx/e34/s4 spinup
Drive security commandsThe PERC Command Line supports the following drive security command:
perccli /cx[/ex]/sx show securitykey keyid
This command shows the security key and key ID of the controller.
Input example:
perccli /c0/s4 show securityKey keyid
perccli /cx[/ex]/sx set security=on
This command sets the security key on JBOD or Non-RAID disks.
Input example:
perccli /c0/e2/s4 set security=on
perccli /cx[/ex]/sx show jbod
This command shows the summary of the non-RAID disks/JBOD drive for specified slot in the controller.
Input example:
perccli /c0/e2/s4 show jbod
perccli /cx[/ex]/sx show jbod all
This command shows all information of a non-RAID disks/JBOD drive for the specified slot in the controller. The all option in the
command shows information for all slots on the controller. x stands for a number, a list of numbers, a range of numbers, or all numbers.
Input example:
perccli /c0/e2/s4 show jbod all
30 Working with the PERC Command Line Interface tool

Drive erase commands
Table 10. Conventions
Options Description
/cx Specifies a controller where x is the controller index.
/ex Specifies an enclosure where x is the enclosure device ID.
/sx Specifies a physical drive where x is the slot number.
The PERC Command Line supports the following drive erase commands:
perccli /cx[/ex]/sx secureerase [force]perccli /cx[/ex]/sx stop eraseperccli /cx[/ex]/sx show eraseperccli /cx[/ex]/sx start erase[simple| normal| thorough| standard| threepass | crypto][patternA=<val>][patternB=<val>]The detailed description for each command follows.
perccli /cx[/ex]/sx secureerase [force]
This command erases the drive's security configuration and securely erases data on a drive. You can use the force option as a confirmation to erase the data on the drive and the security information.
Input example:
perccli /c0/e25/s1 secureeraseNOTE: This command deletes data on the drive and the security configuration and this data is no longer accessible. This command is used for SED drives only.
perccli /cx[/ex]/sx stop erase
Stops secure erase on non-SED drives.
perccli /cx[/ex]/sx show erase
Displays the status as percentage of secure erase completed.
perccli /cx[/ex]/sx start erase [simple| normal| thorough| standard| threepass | crypto] [patternA=<val>][patternB=<val>]
This command securely erases non-SED drives. The drive is written with erase patterns to ensure that the data is securely erased. You can use the following options with the start erase command:
Working with the PERC Command Line Interface tool 31

Table 11. Drive erase command options
Options Value range Description
cx[/ex]/sx — • /cx - specifies a controller where X is the controller index
• /ex - specifies an enclosure where X is the enclosure device ID
• /sx - specifies a physical drive where X is the slot number
erase simple: Single pass, single pattern write
normal: Three pass, three pattern write
thorough: Nine pass, repeats the normal write three times.
standard: Applicable only for DFFs
threepass: Three pass, pass1 random pattern write, pass 2, 3 write zero, verify
crypto: Applicable only for ISE capable drives
Secure erase type
patternA 8-bit value Erase pattern A to overwrite the data.
patternB 8-bit value Erase pattern B to overwrite the data.
Input example:
perccli /c0/e25/s1 start erase thorough patternA=10010011 patternB=11110000
Rebuild drives commandsThe following commands rebuild drives in the PERC Command Line Tool:
perccli /cx[/ex]/sx pause rebuild perccli /cx[/ex]/sx resume rebuild perccli /cx[/ex]/sx show rebuild perccli /cx[/ex]/sx start rebuild perccli /cx[/ex]/sx stop rebuild
NOTE: If enclosures are used to connect physical drives to the controller, specify the enclosure ID in the command.
The detailed description for each command follows.
perccli /cx[/ex]/sx pause rebuild
This command pauses an ongoing rebuild process. You can run this command only for a drive that is currently rebuilt.
Input example:
perccli /c0/s4 pause rebuild
32 Working with the PERC Command Line Interface tool
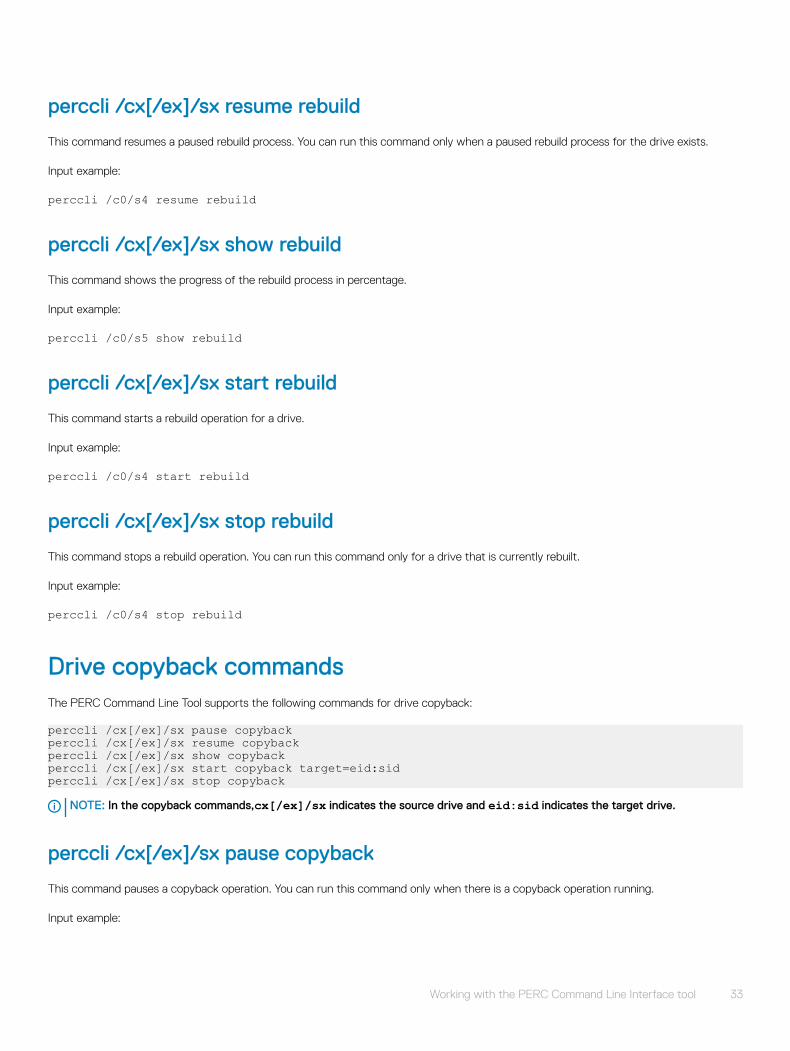
perccli /cx[/ex]/sx resume rebuild
This command resumes a paused rebuild process. You can run this command only when a paused rebuild process for the drive exists.
Input example:
perccli /c0/s4 resume rebuild
perccli /cx[/ex]/sx show rebuild
This command shows the progress of the rebuild process in percentage.
Input example:
perccli /c0/s5 show rebuild
perccli /cx[/ex]/sx start rebuild
This command starts a rebuild operation for a drive.
Input example:
perccli /c0/s4 start rebuild
perccli /cx[/ex]/sx stop rebuild
This command stops a rebuild operation. You can run this command only for a drive that is currently rebuilt.
Input example:
perccli /c0/s4 stop rebuild
Drive copyback commandsThe PERC Command Line Tool supports the following commands for drive copyback:
perccli /cx[/ex]/sx pause copyback perccli /cx[/ex]/sx resume copyback perccli /cx[/ex]/sx show copybackperccli /cx[/ex]/sx start copyback target=eid:sidperccli /cx[/ex]/sx stop copyback
NOTE: In the copyback commands,cx[/ex]/sx indicates the source drive and eid:sid indicates the target drive.
perccli /cx[/ex]/sx pause copyback
This command pauses a copyback operation. You can run this command only when there is a copyback operation running.
Input example:
Working with the PERC Command Line Interface tool 33
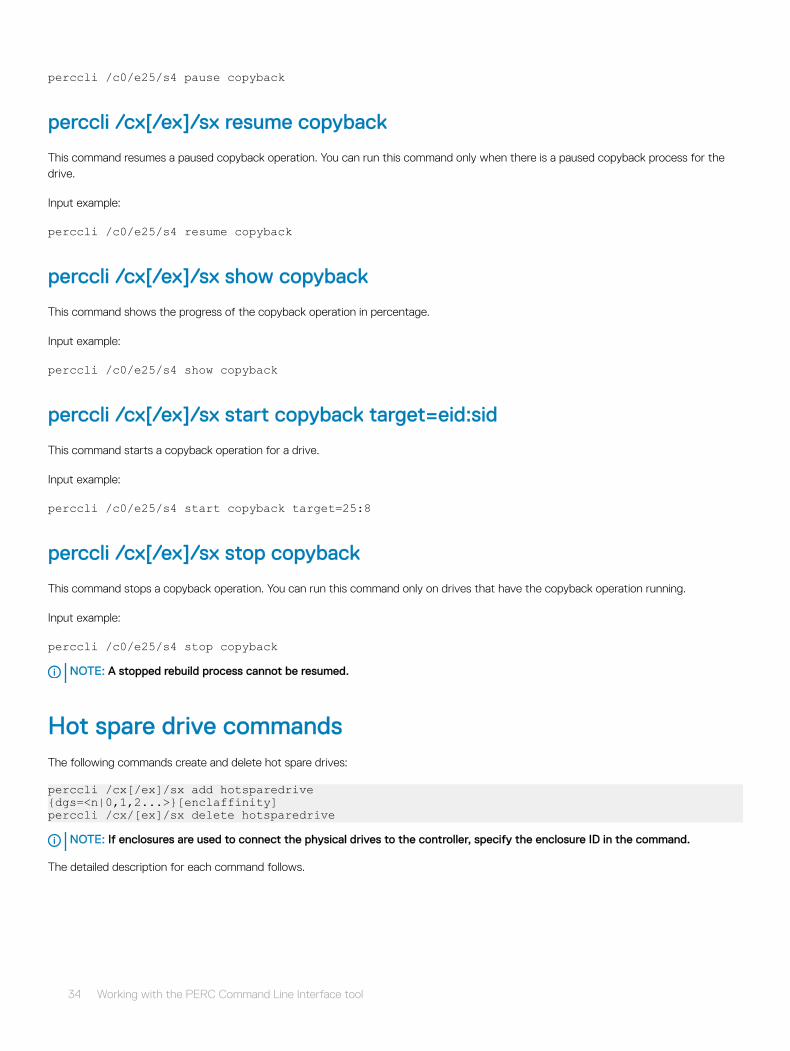
perccli /c0/e25/s4 pause copyback
perccli /cx[/ex]/sx resume copyback
This command resumes a paused copyback operation. You can run this command only when there is a paused copyback process for the drive.
Input example:
perccli /c0/e25/s4 resume copyback
perccli /cx[/ex]/sx show copyback
This command shows the progress of the copyback operation in percentage.
Input example:
perccli /c0/e25/s4 show copyback
perccli /cx[/ex]/sx start copyback target=eid:sid
This command starts a copyback operation for a drive.
Input example:
perccli /c0/e25/s4 start copyback target=25:8
perccli /cx[/ex]/sx stop copyback
This command stops a copyback operation. You can run this command only on drives that have the copyback operation running.
Input example:
perccli /c0/e25/s4 stop copybackNOTE: A stopped rebuild process cannot be resumed.
Hot spare drive commandsThe following commands create and delete hot spare drives:
perccli /cx[/ex]/sx add hotsparedrive{dgs=<n|0,1,2...>}[enclaffinity]perccli /cx/[ex]/sx delete hotsparedrive
NOTE: If enclosures are used to connect the physical drives to the controller, specify the enclosure ID in the command.
The detailed description for each command follows.
34 Working with the PERC Command Line Interface tool

perccli /cx[/ex]/sx add hotsparedrive [{dgs=<n|0,1,2...>}] [enclaffinity]
This command creates a hot spare drive. You can use the following options to create a hot spare drive:
Table 12. Add hotsparedrive input options
Option Value range Description
dgs Valid drive group number Specifies the drive group to which the hot spare drive is dedicated.
enclaffinity Valid enclosure number Specifies the enclosure with which the hot spare is associated. If this option is specified, affinity is set; if it is not specified, there is no affinity.
NOTE: Affinity cannot be removed after it is set for a hot spare drive.
Input example:
perccli /c0/e3/s4,5 add hotsparedriveThis command sets the drives /c0/e3/s4,5 as Global Hot spare.
Input example:
perccli /c0/e3/s6,8 add hotsparedrive dgs=0,1This command sets /c0/e3/s6,8 as Dedicated Hot spare for disk groups 0,1.
perccli /cx/[ex]/sx delete hotsparedrive
This command deletes a hot spare drive.
Input example:
perccli /c0/e3/s4,5 delete hotsparedrive
Virtual drives commandsThe PERC Command Line Tool supports the following virtual drive commands. The following table describes frequently used virtual drive commands.
Table 13. Virtual drives commands quick reference table
Commands Value range Description
add See Table 15. Add RAID 0 configuration input options. Creates virtual drives.
delete force: Deletes the virtual drive where operating system is present. Deletes a virtual drive.
set See Table 15. Add RAID 0 configuration input options, and Change virtual drive properties commands.
Sets virtual drive properties.
show all: Shows all properties of the virtual drive. Shows virtual drive information.
Working with the PERC Command Line Interface tool 35

Add virtual drives commandsThe PERC Command Line Tool supports the following commands to add virtual drives:
perccli /cx add vd r[0|1|5|6|10|50|60][Size=<VD1_Sz>,<VD2_Sz>,..|all] [name=<VDNAME1>,..] drives=e:s|e:s-x|e:s-x,y,e:s-x,y,z [PDperArray=x][SED][pdcache=on|off|default][pi][DimmerSwitch(ds)=default|automatic(auto)| none|maximum(max)|MaximumWithoutCaching(maxnocache)][wt|wb|fwb][nora|ra][direct|cached] [CachedBadBBU|NoCachedBadBBU][Strip=<64|128|256|512|1024>] [AfterVd=X] [EmulationType=0|1|2] [Spares = [e:]s|[e:]s-x|[e:]s-x,y] [force][ExclusiveAccess][Cbsize=0|1|2 Cbmode=0|1|2|3|4|5|6|7] perccli /cx add vd each r0 [name=<VDNAME1>,..] [drives=e:s|e:s-x|e:s-x,y][SED] [pdcache=on|off|default][pi] [DimmerSwitch(ds)=default| automatic(auto)|none|maximum(max)|MaximumWithoutCaching(maxnocache)][wt|wb|fwb] [nora|ra][direct|cached] [CachedBadBBU|NoCachedBadBBU][Strip=<64|128|256|512|1024>] [EmulationType=0|1|2] [ExclusiveAccess][Cbsize=0|1|2 Cbmode=0|1|2|3|4|7]This command creates a RAID configuration. You can use the following options to create the RAID volume:
NOTE: * indicates default values.
The detailed description for each command follows.
perccli /cx add vd type=raid[0|1|5|6|10|50|60][Size=<VD1_Sz>,<VD2_Sz>,..|*all][name=<VDNAME1>,..] drives=e:s|e:s-x|e:s-x,y;e:s-x,y,z [PDperArray=x][SED][pdcache=on|off|*default][pi] [DimmerSwitch(ds)=default|automatic(auto)|*none|maximum(max)|MaximumWithoutCaching(maxnocache)] [wt|*wb] [nora|*ra] [*direct|cached] [CachedBadBBU|*NoCachedBadBBU] [Strip=<8|16|32|64|128|256|1024>][AfterVd=X] [Spares = [e:]s|[e:]s-x|[e:]s-x,y] [force]
Table 14. Add RAID configuration input options
Option Value range Description
type RAID [0|1|5|6|10|50|60]. Sets the RAID type of the configuration.
size Maximum size based on the physical drives and RAID level.
Sets the size of each virtual drive. The default value is for the capacity of all referenced disks.
name 15 characters of length. Specifies the drive name for each virtual drive.
drives Valid enclosure number and valid slot numbers for the enclosure.
In e:s|e:s-x|e:s-x,y:
• e specifies the enclosure ID.
• s represents the slot in the enclosure.
• e:s-x is the range convention used to represent slots s to x in the enclosure e.
pdperarray 0 to 15. Specifies the number of physical drives per array. The default value is automatically chosen.
sed — Creates security-enabled drives.
pdcache on|off|default. Enables or disables PD cache.
pi — Enables protection information.
36 Working with the PERC Command Line Interface tool

Option Value range Description
dimmerswitch default: Logical device uses controller default
power-saving policy.
automatic (auto): Logical device power savings are managed by firmware.
none: No power-saving policy.
maximum (max): Logical device uses maximum power savings.
MaximumWithoutCaching (maxnocache): Logical device does not cache write to maximize power savings.
Specifies the power-saving policy. Sets to default automatically.
wt|wb wt: Write through.
wb: Write back.
Enables write through. Write back is the default.
nora|ra ra: Read ahead.
nora: No read ahead.
Disables read ahead. Enabled is the default.
cachedbadbbu|nocachedbadbbu
cachedbadbbu: Enable bad BBU caching.
nocachedbadbbu: Disable bad BBU caching.
Enables caching when BBU is not functioning. Disabled is the default.
strip 8, 16, 32, 64, 128, 256, 512, 1024. Sets the strip size for the RAID configuration.
aftervd Valid virtual drive number. Creates the VD in the adjacent free slot next to the specified VD.
spares Number of spare physical drives present. Specifies the physical drives that are to be assigned to a disk group for spares.
force — Forces a security-capable physical drive to be added to a drive group without security.
perccli /cx add vd each r0 [name=<VDNAME1>,..][drives=e:s|e:s-x|e:s-x,y] [SED][pdcache=on|off|default][pi][DimmerSwitch(ds)=default| automatic(auto)|none|maximum(max)|MaximumWithoutCaching(maxnocache)][wt|wb] [nora|ra][direct|cached] [CachedBadBBU|NoCachedBadBBU] [Strip=<64|128|256|512|1024>][EmulationType=0|1|2] [ExclusiveAccess] [Cbsize=0|1|2 Cbmode=0|1|2|3|4|7]This command creates a RAID 0 configuration for each disk specified in the drives option. You can use the following options to create
the RAID volume:
Table 15. Add RAID 0 configuration input options
Option Value range Description
type RAID [0|1|5|6|10|50|60]. Sets the RAID type of the configuration.
size Maximum size based on the physical drives and RAID level.
Sets the size of each virtual drive. The default value is for the capacity of all referenced disks.
name 15 characters of length. Specifies the drive name for each virtual drive.
drives Valid enclosure number and valid slot numbers for the enclosure.
In e:s|e:s-x|e:s-x,y:
• e specifies the enclosure target.
• s represents the disk slot number.
• e:s-x is the range of disk slot numbers.
Working with the PERC Command Line Interface tool 37

Option Value range Description
• e:s-x,y is the range of disk slot numbers plus the disk with a slot number out of the specified range.If you replace s-x with 0-9, it will provide 10 RAID 0 virtual disks with each using one disk.
pdperarray 0 to 15. Specifies the number of physical drives per array. The default value is automatically chosen.
sed — Creates security-enabled drives.
pdcache on|off|default. Enables or disables PD cache.
pi — Enables protection information.
dimmerswitch default: Logical device uses controller default
power-saving policy.
automatic (auto): Logical device power savings are managed by firmware.
none: No power-saving policy.
maximum (max): Logical device uses maximum power savings.
MaximumWithoutCaching (maxnocache): Logical device does not cache write to maximize power savings.
Specifies the power-saving policy. Sets to default automatically.
wt|wb wt: Write through.
wb: Write back.
Enables write through. Write back is the default.
nora|ra ra: Read ahead.
nora: No read ahead.
Disables read ahead. Enabled is the default.
cachedbadbbu|nocachedbadbbu
cachedbadbbu: Enable bad BBU caching.
nocachedbadbbu: Disable bad BBU caching.
Enables caching when BBU is not functioning. Disabled is the default.
strip 8, 16, 32, 64, 128, 256, 512, 1024. Sets the strip size for the RAID configuration.
aftervd Valid virtual drive number. Creates the VD in the adjacent free slot next to the specified VD.
spares Number of spare physical drives present. Specifies the physical drives that are to be assigned to a disk group for spares.
force — Forces a security-capable physical drive to be added to a drive group without security.
Input example:
perccli /c0 add vd type=raid10 size=2gb,3gb,4gb names=tmp1,tmp2,tmp3 drives=252:2-3,5,7 pdperarray=2
38 Working with the PERC Command Line Interface tool

Delete virtual drives commandsThe PERC Command Line Tool supports the following virtual drive delete commands:
perccli /cx/vx|vall delperccli /cx/vx|vall del force
NOTE: If the virtual drive has user data, you must use the force option to delete the virtual drive.
A virtual drive with a valid master boot record (MBR) and a partition table is considered to contain user data.
If you delete a virtual drive with a valid MBR without erasing the data and then create a new virtual drive using the same set of physical drives and the same RAID level as the deleted virtual drive, the old unerased MBR still exists at block0 of the new virtual drive, which makes it a virtual drive with valid user data. Therefore, you must provide the force option to delete this newly created virtual drive.
The detailed description for each command follows.
perccli /cx/vx|vall del
This command deletes a particular virtual drive or, when the vall option is used, all the virtual drives on the controller are deleted.
Input example:
perccli /c0/v2 delNOTE: This command deletes virtual drives. Data located on these drives will no longer be accessible.
NOTE: This command deletes virtual drives. Data located on these drives will no longer be accessible.
perccli /cx/vx|vall del force
This command deletes a virtual drive only after the cache flush is completed. With the force option, the command deletes a virtual drive without waiting for the cache flush to complete.
Input example:
perccli /c0/v2 del forceNOTE: This command deletes the virtual drive where the operating system is present. Data located on these drives and the operating system of the drive will no longer be accessible
Delete Non-RAID disksThe PERC Command Line Tool supports the following Non-RAID disks delete commands:
perccli /cx[/ex]/sx del jbod [force]perccli /cx[/ex]/sall del jbod [force]perccli /cx[/ex]/sx-y del jbod [force]When in eHBA mode, this command deletes a particular Non-RAID disk (listed as JBOD drive) or when the sall option is used, all the
non-RAID disks on the controller are deleted. The x stands for a number, list of numbers, range of numbers, or all numbers. The force option should be used only if the user needs to delete a Non-RAID drive with any partition.
Working with the PERC Command Line Interface tool 39
Virtual drive show commandsThe PERC Command Line Tool supports the following virtual drive show commands:
perccli /cx/vx show perccli /cx/vx show allThe detailed description for each command follows.
perccli /cx/vx show
This command shows the summary of the virtual drive information.
Input example:
perccli /c0/v0 show
perccli /cx/vx show all
This command shows all virtual drive information, which includes virtual drive information, physical drives used for the virtual drives, and virtual drive properties.
Input example:
perccli /c0/v0 show all
Preserved cache commandsIf a virtual drive becomes offline or is deleted because of missing physical disks, the controller preserves the dirty cache from the virtual disk. The PERC Command Line Tool supports the following commands for preserved cache:
perccli /cx/vx delete preservedCache [force] perccli /cx show preservedCacheThe detailed description for each command follows.
perccli /cx/vx delete preservedcache
This command deletes the preserved cache for a particular virtual drive on the controller in missing state. Use the force option to delete
the preserved cache of a virtual drive in offline state.
Input example:
perccli /c0/v1 delete preservedcache
perccli /cx show preservedCache
This command shows the virtual drive that has preserved cache and whether the virtual drive is offline or missing.
40 Working with the PERC Command Line Interface tool

Input example:
perccli /c0 show preservedCache
Change virtual drive properties commandsNOTE: In the following, /cx specifies the controller, where x is the controller index, while /vx specifies the virtual drive, where x
is the virtual drive ID.
The PERC Command Line Tool supports the following commands to change virtual drive properties:
perccli /cx/vx set accesspolicy=RW|RO|Blocked|RmvBlkd perccli /cx/vx set bootdrive=<on|off>perccli /cx/vx set cbsize=0|1|2 cbmode=0|1|2|3|4|7perccli /cx/vx set ds=Default|Auto|None|Max|MaxNoCacheperccli /cx/vx set iopolicy=Cached|Directperccli /cx/vx set name=<NameString>perccli /cx/vx set pdcache=On|Off|Defaultperccli /cx/vx set pi=Offperccli /cx/vx set rdcache=RA|NoRAperccli /cx/vx set wrcache=WT|WB|FWBThe detailed description for each command follows.
perccli /cx/vx set accesspolicy=<RW|RO|Blocked|RmvBlkd>
This command sets the access policy on a virtual drive to read write, read only, or blocked or rmvblkd (remove blocked).
Input example:
perccli /c0/v0 set accesspolicy=rwOptions:
RW - Access is Read Write
RO - Access is Read Only
Blocked - Access is Blocked
RmvBlkd - Remove Blocked Access
perccli /cx/vx set bootdrive=<on|off>
Sets or unsets a virtual drive as the boot drive.
NOTE: Set bootdrive is applicable only in legacy BIOS mode.
Input example:
perccli /c0/v0 set bootdrive=on
perccli /cx/vx set cbsize=0|1|2 cbmode=<0|1|2|3|4|7>
This command sets the cache bypass size and cache bypass mode on a virtual drive.
Working with the PERC Command Line Interface tool 41

Input example:
perccli /c0/v0 set cbsize=0 cbmode=0|1|2|3|4|7Options:
cbsize:
0 — 64k cache bypass
1 — 128k cache bypass
2 — 256k cache bypass
cbmode:
0 — 64k cache bypass
1 — Enable standard mode cache bypass
3 — Enable custom mode bypass
24 — Enable custom mode cache bypass
37 — Disable cache bypass
perccli /cx/vx set ds=<Default|Auto|None|Max|MaxNoCache>
This command changes the power-saving properties on a virtual drive.
Input example:
perccli /c0/v0 set ds=DefaultOptions:
Default — Controller default power saving options are applied
Auto — Power savings is managed by firmware
None — Power savings is disabled
Maximum — Maximum power savings options are applied
MaxNoCache — Maximum power savings with no caching of writes are applied
perccli /cx/vx set iopolicy=<cached|direct>
This command sets the I/O policy on a virtual drive to cached I/O or direct I/O.
Input example:
perccli /c0/v0 set iopolicy=cachedOptions:
Cached — I/Os are cached
42 Working with the PERC Command Line Interface tool

Direct — I/Os are not cached
perccli /cx/vx set name=<NameString>
This command names a virtual drive. The name is restricted to 15 characters.
Options:
NameString — VD name
perccli /cx/vx set pdcache=<on|off|default>
This command sets the current disk cache policy on a virtual drive to on, off, or default setting.
Input example:
perccli /c0/v0 set pdcache=onOptions:
On — Enables pd caching
Off — Disables pd caching
Default —pd caching is set to default
perccli /cx/vx set pi=Off
This command disables the data protection of a virtual drive.
Input example:
perccli /cx/vx set pi=OffOptions:
Off — Disables data protection
perccli /cx/vx set rdcache=<ra|nora>
This command sets the read cache policy on a virtual drive to read ahead or no read ahead.
Input example:
perccli /c0/v0 set rdcache=noraOptions:
RA= Read ahead
NORA = No read ahead
Working with the PERC Command Line Interface tool 43
perccli /cx/vx set wrcache=<WT|WB|FWB>
This command sets the write cache policy on a virtual drive to write back, write through, or always write back.
Input example:
perccli /c0/v0 set wrcache=wtOptions:
WT — Write through
WB — Write back
FWB — Force write back even in case of bad BBU
Virtual drive initialization commandsThe PERC Command Line Tool supports the following commands to initialize virtual drives:
perccli /cx/vx show initperccli /cx/vx start init [full][Force] perccli /cx/vx stop init
NOTE: If the virtual drive has user data, you must use the force option to initialize the virtual drive. A virtual drive with a valid
MBR and partition table is considered to contain user data.
The detailed description for each command follows.
perccli /cx/vx show init
This command shows the initialization progress of a virtual drive in percentage.
Input example:
perccli /c0/v2 show init
perccli /cx/vx start init [full]
This command starts the initialization of a virtual drive. The default initialization type is fast initialization. If the full option is specified, full
initialization of the virtual drive starts.
Input example:
perccli /cx/vx start init [full]
perccli /cx/vx stop init
This command stops the initialization of a virtual drive. A stopped initialization cannot be resumed.
Input example:
perccli /c0/v0 stop init
44 Working with the PERC Command Line Interface tool

Virtual drive erase commandsThe PERC Command Line Tool supports the following command to erase virtual drives:
perccli /cx/vx erase [force]
This command erases the data on the virtual drive. You can use the force option as a confirmation to erase the data on the drive and the
security information.
Input example:
perccli /cx/vx show eraseperccli /cx/vx stop eraseperccli /cx/vx start erase [simple| normal| thorough | standard| threepass | crypto] [patternA=<val>] [patternB=<val>]
NOTE: If the virtual drive has user data, you must use the force option to erase the virtual drive. A virtual drive with a valid
MBR and partition table is considered to contain user data.
perccli /cx/vx show erase
This command shows the progress of drive's security configuration and erases data in percentage.
Input example:
perccli /c0/v1 show erase
perccli /cx/vx stop erase
This command stops the erase operation.
Input example:
perccli /c0/v1 stop erase
perccli /cx/vx start erase [simple| normal| thorough | standard| threepass | crypto] [patternA=<val>] [patternB=<val>]
This command securely erases non-SED drives. The drive is written with erase patterns to ensure that the data is securely erased. You can use the following options with the start erase command:
Table 16. Drive erase command options
Options Value range Description
cx[/ex]/sx — • /cx - specifies a controller where X is the controller index
• /ex - specifies an enclosure where X is the enclosure device ID
Working with the PERC Command Line Interface tool 45

Options Value range Description
• /sx - specifies a physical drive where X is the slot number
erase simple: Single pass, single pattern write.
normal: Three pass, three pattern write
thorough: Nine pass, repeats the normal write three times.
threepass: Three pass, pass1 random pattern write, pass 2, 3 write zero, verify
crypto: Applicable only for ISE capable drives
Secure erase type
patternA 8-bit value Erase pattern A to overwrite the data.
patternB 8-bit value Erase pattern B to overwrite the data.
Virtual drive migration commandsNOTE: The virtual drive migration commands are not supported in Embedded MegaRAID.
The PERC Command Line Tool supports the following commands for virtual drive migration (reconstruction):
perccli /cx/vx show migrateperccli /cx/vx start migrate <type=raidlevel>[option=<add|remove> disk=<e1/s1,e2/s2 ...> ]The detailed description for each command follows.
perccli /cx/vx show migrate
This command shows the progress of the virtual drive migrate operation in percentage.
Input example:
perccli /c0/v0 show migrate
perccli /cx/vx start migrate <type=raidlevel> [option=<add | remove> disk=<e1:s1,e2:s2 ...> ]
This command starts the reconstruction on a virtual drive to the specified RAID level by adding or removing disks from the existing virtual drive. You can use the following options with the start migrate command:
46 Working with the PERC Command Line Interface tool

Table 17. Virtual drive migration command options
Options Value range Description
type = RAID level RAID [0|1|5|6] The RAID level to which the virtual drive must be migrated.
[option=<add | remove> disk=<e1:s1,e2:s2, …>]
add: Adds disks to the virtual drive and starts reconstruction.
remove: Removes disks from the virtual drive and starts reconstruction.
disk: The enclosure number and the slot number of the disks to be added to the virtual drive.
Adds or removes disks from the virtual drive.
Virtual drive migration can be done between the following RAID levels:
Table 18. Virtual drive migration table
Initial RAID level Migrated RAID level
RAID 0 RAID 1
RAID 0 RAID 5
RAID 0 RAID 6
RAID 1 RAID 0
RAID 1 RAID 5
RAID 1 RAID 6
RAID 5 RAID 0
RAID 5 RAID 6
RAID 6 RAID 0
RAID 6 RAID 5
Input example:
perccli /c0/v3 start migrate type=r5 option=add disk=e5:s2,e5:s3
Virtual drive consistency check commandsThe PERC Command Line Tool supports the following commands for virtual drive consistency checks:
perccli /cx/vx pause ccperccli /cx/vx resume ccperccli /cx/vx show ccperccli /cx/vx start cc [force]perccli /cx/vx stop cc
The detailed description for each command follows.
Working with the PERC Command Line Interface tool 47

perccli /cx/vx pause cc
This command pauses an ongoing consistency check process. You can resume the consistency check at a later time. You can run this command only on a virtual drive that has a consistency check operation running.
Input example:
perccli /c0/v4 pause cc
perccli /cx/vx resume cc
This command resumes a suspended consistency check operation. You can run this command on a virtual drive that has a paused consistency check operation.
Input example:
perccli /c0/v4 resume cc
perccli /cx/vx show cc
This command shows the progress of the consistency check operation in percentage.
Input example:
perccli /c0/v5 show cc
perccli /cx/vx start cc force
This command starts a consistency check operation for a virtual drive. Typically, a consistency check operation is run on an initialized virtual drive. Use the force option to run a consistency check on an uninitialized drive.
Input example:
perccli /c0/v4 start cc
perccli /cx/vx stop cc
This command stops a consistency check operation. You can run this command only for a virtual drive that has a consistency check operation running.
Input example:
perccli /c0/v4 stop ccNOTE: You cannot resume a stopped consistency check process.
48 Working with the PERC Command Line Interface tool

Background initialization commandsThe PERC Command Line Tool supports the following commands for background initialization:
perccli /cx/vx resume bgiperccli /cx/vx set autobgi=<on|off> perccli /cx/vx show autobgiperccli /cx/vx show bgi perccli /cx/vx stop bgiperccli /cx/vx pause bgiThe detailed description for each command follows.
perccli /cx/vx resume bgi
This command resumes a suspended background initialization operation.
Input example:
perccli /c0/v0 resume bgi
perccli /cx/vx set autobgi=<on|off>
This command sets the auto background initialization setting for a virtual drive to on or off.
Input example:
perccli /c0/v0 set autobgi=on
perccli /cx/vx show autobgi
This command shows the background initialization setting for a virtual drive.
Input example:
perccli /c0/v0 show autobgi
perccli /cx/vx show bgi
This command shows the background initialization progress on the specified virtual drive in percentage.
Input example:
perccli /c0/v0 show bgi
perccli /cx/vx stop bgi
This command stops a background initialization operation. You can run this command only for a virtual drive that is currently initialized.
Input example:
Working with the PERC Command Line Interface tool 49
perccli /c0/v4 stop bgi
perccli /cx/vx pause bgi
This command suspends a background initialization operation. You can run this command only for a virtual drive that is currently initialized.
Input example:
perccli /c0/v4 pause bgi
Virtual drive expansion commandsThe PERC Command Line Tool supports the following commands for virtual drive expansion:
perccli /cx/vx expand size=<value> [expandarray]perccli /cx/vx|vall show expansionThe detailed description for each command follows.
perccli /cx/vx expand size=<value> [expandarray]
This command expands the virtual drive within the existing array or if you replace the drives with drives larger than the size of the existing array. The value of the expand size is in GB. If the expandarray option is specified, the existing array is expanded. If this option is not
specified, the virtual drive is expanded.
perccli /cx/vx show expansion
This command shows the expansion information on the virtual drive with and without array expansion.
Input example:
perccli /c0/v0 show expansion
Foreign configurations commandsThe PERC Command Line Tool supports the following commands to view, import, and delete foreign configurations:
perccli /cx/fx|fall del|delete [ securitykey=sssssssssss ]perccli /cx/fx|fall import [preview][ securitykey=sssssssssss ] perccli /cx/fx|fall show [all] [ securitykey=sssssssssss ]
NOTE: Provide the security key when importing a locked foreign configuration created in a different machine that is encrypted with a security key.
The detailed description for each command follows.
perccli /cx/fx|fall del| delete [ securitykey=sssssssssss ]
This command deletes the foreign configuration of a controller. Input the security key if the controller is secured.
Input example:
perccli /c0/fall deleteperccli /cx/fx|fall import [preview] [ securitykey=sssssssssss ]
50 Working with the PERC Command Line Interface tool

This command imports the foreign configurations of a controller. The preview option shows a summary of the foreign configuration
before importing it.
Input example:
perccli /c0/fall importperccli /cx/fx|fall show [all][ securitykey=sssssssssss ]
This command shows the summary of the entire foreign configuration for a particular controller. The all option shows all the information
of the entire foreign configuration.
NOTE: The EID:Slot column is populated for the foreign PDs that are locked.
Input example:
perccli /c0/fall show preview foreign perccli /c0/fall import preview perccli /c0/fall show all
BIOS-related commandsThe PERC Command Line Tool supports the following BIOS commands:
perccli /cx set bios [state=<on|off>] [Mode=<SOE|PE|IE|SME>] [abs=<on|off>]perccli /cx show biosThe detailed description for each command follows.
perccli /cx set bios=[state=<on|off>] [Mode=<SOE|PE|IE|SME>] [abs=<on|off>]This commands sets the BIOS controller property to on or orr. The Mode sets the BIOS boot mode.
Only the following combinations are supported:
• perccli /cx set bios state=<on|off>
• perccli /cx set bios Mode-<SOE|PE|IE|SME>
• perccli /cx set bios abs=<on|off>
• perccli /cx set bios DeviceExposure=<value>
Options
SOE — Stop on errors
PE — Pause on errors
IE — Ignore errors
SME — Safe mode on errors
abs — Enables|Disables the auto boot select
DeviceExposure — Number of devices to be exposed: value range is 0–255
value 0 and 1: Expose all
Working with the PERC Command Line Interface tool 51

value 2 — 255: Actual number of devices to be exposed
Input example:
perccli /c0 set bios=on
perccli /cx show biosThis command displays the value of the controller BIOS.
Input example:
perccli /c0 show bios
OPROM BIOS commandsThe PERC Command Line Tool supports the following OPROM BIOS commands:
perccli /cx/ex/sx set bootdrive=on|off perccli /cx/vx set bootdrive=on|off perccli /cx show bootdriveThe detailed description for each command follows.
perccli /cx/ex/sx set bootdrive=on|off
This command sets the specified physical drive as the boot drive. During the next reboot, the BIOS looks for a boot sector in the specified physical drive. The eHBA mode supports setting a Non-RAID disk as a boot drive.
Input example:
perccli /c0/e32/s4 set bootdrive=on
perccli /cx/vx set bootdrive=on|off
This command sets the specified virtual drive as the boot drive. During the next reboot, the BIOS looks for a boot sector in the specified virtual drive.
Input example:
perccli /c0/v0 set bootdrive=on
perccli/cx/vx show bootdrive
This command shows the boot drive for the controller. The boot drive can be a physical drive or a virtual drive. The existing configured boot drives will be displayed.
Input example:
perccli /c0/v0 show bootdrive
52 Working with the PERC Command Line Interface tool

Drive group commandsThis section describes the drive group commands.
Drive group showThe PERC Command Line Tool supports the following drive group commands:
perccli /cx/dx show perccli /cx/dx show allperccli /cx/dall show mirrorperccli /cx/dall split mirrorperccli /cx/dall add mirror src=<val> [force]perccli /cx/dx set security=on
NOTE: In the following, /cx specifies the controller where x is the controller index, while the value /dx specifies the disk group
where x is the disk group index.
perccli /cx/dx show
This command shows the topology information of the drive group.
Input example:
perccli /c0/dall show
perccli /cx/dall show mirror
This command displays information about the mirror associated with drive group.
Input example:
perccli /c0/dall show mirror
perccli /cx/dall split mirror
This command splits apart the mirror virtual drives.
Input example:
perccli /c0/dall split mirror
perccli /cx/dall add mirror src=<val> [force]
This command joins the virtual drive with its mirror.
Input example:
perccli /c0/dall add mirror src=<2>Options for <val>:
Working with the PERC Command Line Interface tool 53

• 0 — Data will be copied from existing virtual drive to drives.
• 1 — Data will be copied from drives to virtual drive.
• 2 — Broken mirror is imported as a new virtual drive.
perccli /cx/dx set security=on
This command enables security on the specified drive group.
Input example:
perccli /c0/d0 set security=on
perccli /cx/dx show all
This command shows physical and virtual drive information for the disk group.
Input example:
perccli /c0/dall show all
Dimmer switch commands
Change virtual drive power settings commandsThe PERC Command Line Tool supports the following command to change the Dimmer Switch setting. The Dimmer Switch is the power-saving policy for the virtual drive.
perccli /cx/vx set ds=<default | auto | none | max | maxnocache>
This command changes the power-saving properties on a virtual drive. See dimmerswitch in the following table for values.
Input example:
perccli /cx/vx set ds=defaultYou can use the following combinations for the dimmer switch commands:
perccli /cx set ds=off type=1|2|3|4perccli /cx set ds=on type=1|2 [properties]perccli /cx set ds=on type=3|4 defaultldtype=<value> [properties] perccli /cx set ds=on [properties]The following table describes the power-saving options.
Table 19. Dimmer switch input options
Option Value range Description
dimmerswitch or ds on|off Turns the dimmer switch option on.
type 1: Unconfigured
2: Hot spare
Specifies the type of drives that the dimmer switch feature is applicable. By default, it is
54 Working with the PERC Command Line Interface tool

Option Value range Description
3: Virtual drive
4: All
activated for unconfigured drives, hot spare drives and virtual drives.
defaultldtype auto: Logical device power savings are managed
by the firmware.
none: No power saving policy.
max: Logical device uses maximum power savings.
maxnocache: Logical device does not cache write to maximise power savings.
Specifies the default logical drive type that is created by the dimmer switch option; set to none automatically.
properties disableldps: Interval in hours or time in.
hh:mmformatspinupdrivecount: Valid enclosure number (0 to 255).
SpinUpEncDelay: Valid time in seconds.
Sets the interval or time in which the power-saving policy for the logical drive is turned off. Specifies the number of drives in the enclosure that are spun up. Specifies the delay of spin-up groups within an enclosure in seconds.
perccli/cx show DimmerSwitch(ds)
This command shows the current dimmer switch setting for the controller.
Input example:
perccli/c0 show ds
BBU commandsThe PERC Command Line Tool supports the following battery backup unit (BBU) commands:
perccli /cx/bbu set [learnDelayInterval=<val>|bbuMode=<val>|learnStartTime=[DDDHH|off]|autolearnmode=<val>|powermode=sleep|writeaccess=sealed]perccli /cx/bbu show perccli /cx/bbu show allperccli /cx/bbu show learnperccli /cx/bbu show propertiesperccli /cx/bbu show statusperccli /cx/bbu start learnIn the following, /cx specifies a controller where x is the controller index, and /bbu signifies a battery backup unit.
The detailed description for each command follows:
perccli /cx/bbu set <options>This command sets bbu properties on the controller bbu.
Options:
• learnDelayInterval=<val>: number of hours to delay a learn cycle, not greater than 7 days
• bbuMode=<val>: val range 0–255
• autolearnmode=<val>: 0 — Enabled, 1 — Disabled, 2 — WarnViaEvent
Working with the PERC Command Line Interface tool 55

• learnStartTime=[DD HH|off>: DDD — day of week {SUN, MON, . . . SAT} HH — 0–23 hours, off: Sets learn start to OFF
• powermode=sleep
• writeaccess=sealed
perccli /cx/bbu showThis command shows the summary information for the BBU of a controller.
Input example:
perccli /c0/bbu show
perccli /cx/bbu show allThis command shows all the information of a BBU.
Input example:
perccli /c0/bbu show all
perccli /cx/bbu show learn
perccli /cx/bbu show propertiesThis command shows the BBU Learn properties for a controller.
Input example:
perccli /c0/bbu show properties
perccli /cx/bbu show statusThis command shows summary information for the BBU of a controller.
Input example:
perccli /c0/bbu show status
perccli /cx/bbu start learnThis command starts the BBU learning cycle.
Input example:
perccli /c0/bbu start learn
56 Working with the PERC Command Line Interface tool

Enclosure commandsThe PERC Command Line Tool supports the following enclosure commands:
perccli /cx/ex showperccli /cx/ex show allperccli /cx/ex show phyerrorcountersperccli /cx/ex show statusThe detailed description for each command follows.
perccli /cx/ex showInput example:
perccli /c1/e1 show
perccli /cx/ex show allThis command shows the status of each model in the enclosure.
Input example:
perccli /c0/e0 show all
perccli /cx /ex show phyerrorcountersInput example:
perccli /c0 /e0 show phyerrorcounters
perccli /cx/ex show status [extended]This command shows the enclosure status and the status of all the enclosure elements.
Input example:
perccli /c0/e0 show status
PHY commandsThe PERC Command Line Tool supports the following PHY commands:
perccli /cx/px|pall set linkspeed=0(auto)|1.5|3|6|12 perccli /cx/px|pall showperccli /cx/px|pall show allThe detailed description for each command follows.
Working with the PERC Command Line Interface tool 57

perccli /cx/px|pall set linkspeed=0(auto)|1.5|3|6|12This command sets the PHY link speed. You can set the speed to 1.5 Gb/s, 3 Gb/s, 6 Gb/s, or 12 Gb/s. The linkspeed is set to auto when
you specify linkspeed = 0.
Input example:
perccli /c0/p0 set linkspeed=1.5
perccli /cx/px|pall showThis command shows the basic PHY layer information.
Input example:
perccli /c1/p0 show
perccli /cx/px|pall show allThis command shows all the PHY layer information.
Input example:
perccli /c1/p0 show all
Logging commandsThe PERC Command Line Tool supports the following commands to generate and maintain log files:
perccli /cx delete events perccli /cx show events file=<absolute path> perccli /cx show eventloginfoThe detailed description for each command follows.
perccli /cx delete eventsThis command deletes all records in the event log.
Input example:
perccli /c0 delete events
perccli /cx show eventloginfoThis command shows the history of log files generated.
Input example:
58 Working with the PERC Command Line Interface tool

perccli /c0 show eventloginfo type=config
PERC CLI command examplesYou can use the Dell PowerEdge RAID Controller (PERC) Command Line Interface (CLI) to manage RAID controllers, configure PERC cards, and perform a variety of controller and enclosure specific operations.
Getting a complete list of CLI commandsTo view a full list of available CLI commands, use one of the following CLI commands:
perccli64.exe —help > [filename]perccli64.exe —? > [filename]
Checking controller availability
Syntax
perccli show
Description
Displays information about the adapter and the operating system.
Result
Status Code = 0Status = SuccessDescription = none
Number of Controllers = 1Host name = WIN-RFV0S1VAILBOperating System = Windows Server 2012
System Overview :===============-------------------------------------------------------------------------Ctl Model Ports PDs DGs DNOpt VDs VNOpt BBU sPR DS EHS ASOs------------------------------------------------------------------------- 0 Adapter 8 9 2 0 2 0 Fld On 3 N 0-------------------------------------------------------------------------
Viewing controllers
Syntax
perccli show ctrlcount
Working with the PERC Command Line Interface tool 59

Description
Displays the number of controllers detected in the server.
Result
Status Code = 0Status = SuccessDescription = None
Controller Count = 1
Viewing free space information
Syntax
perccli /c0 show freespace
Description
Displays the free space details of the controller.
Result
Status Code = 0Status = SuccessDescription = None
FREE SPACE DETAILS :==================Total Slot Count = 0ID-Index|DG-Drive Group|AftrVD-Identify Freespace After VD
Viewing disk1 information
Syntax
perccli /c0/d1 show
Description
Displays information about disk1.
60 Working with the PERC Command Line Interface tool
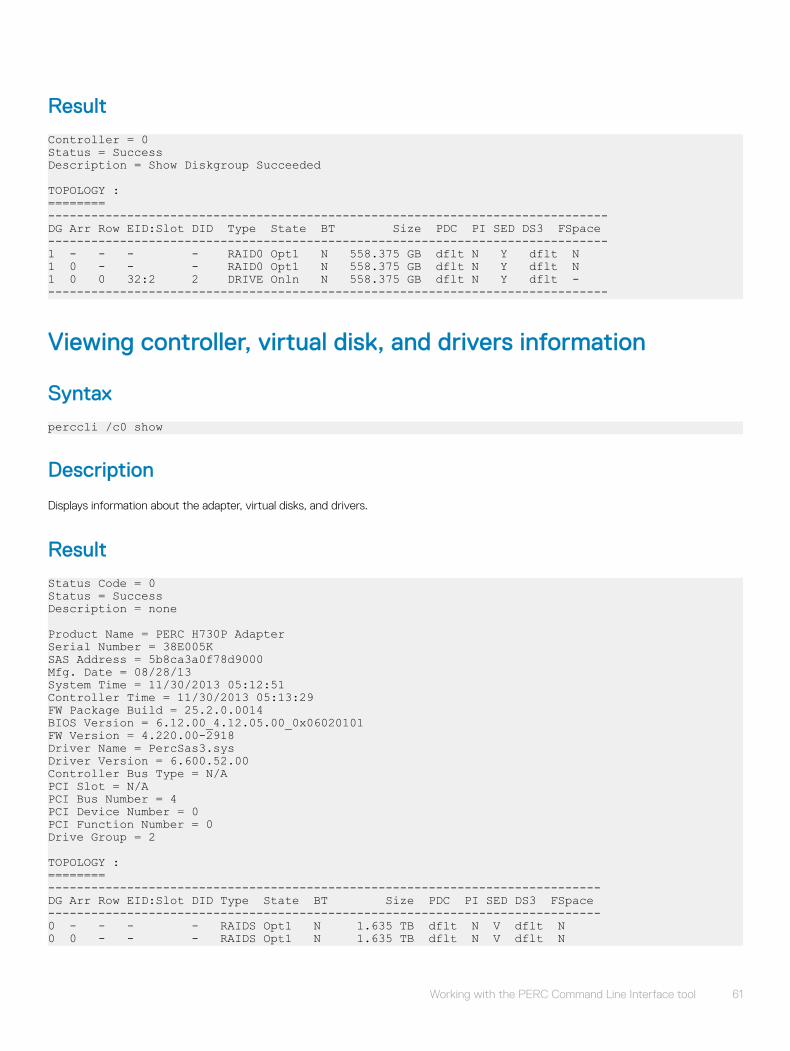
Result
Controller = 0Status = SuccessDescription = Show Diskgroup Succeeded
TOPOLOGY :========------------------------------------------------------------------------------DG Arr Row EID:Slot DID Type State BT Size PDC PI SED DS3 FSpace------------------------------------------------------------------------------1 - - - - RAID0 Opt1 N 558.375 GB dflt N Y dflt N1 0 - - - RAID0 Opt1 N 558.375 GB dflt N Y dflt N1 0 0 32:2 2 DRIVE Onln N 558.375 GB dflt N Y dflt -------------------------------------------------------------------------------
Viewing controller, virtual disk, and drivers information
Syntax
perccli /c0 show
Description
Displays information about the adapter, virtual disks, and drivers.
Result
Status Code = 0Status = SuccessDescription = none
Product Name = PERC H730P AdapterSerial Number = 38E005KSAS Address = 5b8ca3a0f78d9000Mfg. Date = 08/28/13System Time = 11/30/2013 05:12:51Controller Time = 11/30/2013 05:13:29FW Package Build = 25.2.0.0014BIOS Version = 6.12.00_4.12.05.00_0x06020101FW Version = 4.220.00-2918Driver Name = PercSas3.sysDriver Version = 6.600.52.00Controller Bus Type = N/APCI Slot = N/APCI Bus Number = 4PCI Device Number = 0PCI Function Number = 0Drive Group = 2
TOPOLOGY :========-----------------------------------------------------------------------------DG Arr Row EID:Slot DID Type State BT Size PDC PI SED DS3 FSpace-----------------------------------------------------------------------------0 - - - - RAIDS Opt1 N 1.635 TB dflt N V dflt N0 0 - - - RAIDS Opt1 N 1.635 TB dflt N V dflt N
Working with the PERC Command Line Interface tool 61

0 0 0 32:0 0 DRIVE Onln N 558.375 GB dflt N V dflt -0 0 1 32:1 1 DRIVE Onln N 558.375 GB dflt N V dflt -0 0 2 32:3 3 DRIVE Onln N 558.375 GB dflt N V dflt -0 0 3 32:4 4 DRIVE Onln N 558.375 GB dflt N V dflt -1 - - - - RAID0 Opt1 N 558.375 GB dflt N V dflt N1 0 - - - RAID0 Opt1 N 558.375 GB dflt N V dflt N1 0 0 32:2 2 DRIVE Onln N 558.375 GB dflt N V dflt ------------------------------------------------------------------------------
Virtual Drives = 2
VD LIST :=======------------------------------------------------------------------DG/VD Type State Access Consist Cache sCC Size Name------------------------------------------------------------------0/0 RAID5 Opt1 RW Yes RWTD - 1.635 TB1/1 RAID0 Opt1 RW Yes RWTD - 558.375 GB Test------------------------------------------------------------------
Physical Drives = 9
PD LIST :=======-------------------------------------------------------------------------EID:Slt DID State DG Size Intf Med SED PI SeSz Model Sp-------------------------------------------------------------------------32:0 0 Onln 0 558.375 GB SAS HDD Y Y 4 KB ST600MP0084 U32:1 1 Onln 0 558.375 GB SAS HDD Y Y 4 KB ST600MP0084 U32:2 2 Onln 1 558.375 GB SAS HDD Y N 512B ST600MP0054 U32:3 3 Onln 0 558.375 GB SAS HDD Y Y 4 KB ST600MP0084 U32:4 4 Onln 0 558.375 GB SAS HDD Y Y 4 KB ST600MP0084 U32:5 5 UGood - 558.375 GB SAS HDD N N 512B ST600MP0034 U32:6 6 UGood - 558.375 GB SAS HDD Y N 512B ST600MP0054 U32:7 7 UGood - 558.375 GB SAS HDD N N 512B ST600MP0034 U32:18 18 UGood - 558.375 GB SAS HDD Y N 512B ST600MP0054 U-------------------------------------------------------------------------
Cachevault_info :===============-------------------------------------Model State Temp Mode MfgDate-------------------------------------BBU Failed 76C - 2011/07/18-------------------------------------
Checking for preserved cache
Syntax
perccli /c0 show preservedcache
Description
Displays available preserved cache.
Result
Controller = 0Status = Success
62 Working with the PERC Command Line Interface tool

Description = None
------------VD State------------0 Missing------------
Deleting preserved cache
Syntax
perccli /c0/v1 delete preservedcache
Description
Deletes the available preserved cache.
Result
Controller = 0Status = SuccessDescription = Virtual Drive preserved Cache Data Cleared
Viewing expansion information
Syntax
perccli /c0/v0 show expansion
Description
Displays virtual drive’s expansion information with and without array expansion.
Result
Controller = 0Status = SuccessDescription = None
EXPANSION INFORMATION :=====================------------------------------------------------VD Size OCE NoArrExp WithArrExp Status------------------------------------------------0 1.635 TB N - - -------------------------------------------------OCE - Online Capacity Expansion | WithArrExp - With Array ExpansionNoArrExp - Without Array Expansion
Working with the PERC Command Line Interface tool 63

Viewing the foreign configuration
Syntax
perccli /c0/fall show
Description
Displays the foreign configuration of the selected controller.
Result
Controller = 0Status = SuccessDescription = Operation on foreign configuration Succeeded
FOREIGN CONFIGURATION :=====================---------------------------------------DG EID:Slot Type State Size NoVDs --------------------------------------- 0 - RAID0 Frgn 372.0 GB 1 ---------------------------------------
NoVDs - Number of VDs in disk group|DG - DiskgroupTotal foreign drive groups = 1
Importing the foreign configuration
Syntax
perccli /c0/fall import
Description
Imports the foreign configurations of the selected controller.
Result
Controller = 0Status = SuccessDescription = Successfully imported foreign configuration
64 Working with the PERC Command Line Interface tool

Viewing BBU information
Syntax
perccli /c0/bbu show all
Description
Displays information related to the Battery Backup Unit (BBU) of a controller.
Result
Controller = 0Status = SuccessDescription = None
BBU_Info :========----------------------Property Value----------------------Type BBUVoltage 3 mVCurrent 0 mATemperature 32 CBattery State Optimal----------------------
BBU_Firmware_Status :===================-------------------------------------------------Property Value -------------------------------------------------Charging Status None Voltage OK Temperature OK Learn Cycle Requested No Learn Cycle Active No Learn Cycle Status OK Learn Cycle Timeout No I2C Errors Detected No Battery Pack Missing No Replacement required No Remaining Capacity Low No Periodic Learn Required No Transparent Learn No No space to cache offload No Pack is about to fail & should be replaced No Cache Offload premium feature required No Module microcode update required No -------------------------------------------------
GasGaugeStatus :==============-------------------------------------Property Value -------------------------------------Fully Discharged Yes Fully Charged Yes
Working with the PERC Command Line Interface tool 65

Discharging No Initialized No Remaining Time Alarm No Remaining Capacity Alarm Yes Terminate Discharge Alarm No Over Temperature No Charging Terminated No Over Charged No Relative State of Charge 100% Charger System State Complete Remaining Capacity 407 Full Charge Capacity 407 Is SOH Good Yes Battery backup charge time 0 hour(s) -------------------------------------
BBU_Capacity_Info :=================------------------------------------------------------Property Value ------------------------------------------------------Relative State of Charge 100% Absolute State of charge 0% Remaining Capacity 407 mAh Full Charge Capacity 407 mAh Run time to empty Battery is not being charged Average time to empty 33 min Average Time to full Battery is not being charged Cycle Count 3 Max Error 0% Remaining Capacity Alarm 0 mAh Remaining Time Alarm 0 minutes(s) ------------------------------------------------------
BBU_Design_Info :===============-----------------------------------Property Value -----------------------------------Date of Manufacture 18/07/2011 Design Capacity 90 mAh Design Voltage 0 mV Specification Info 0 Serial Number 0 Pack Stat Configuration 0 Manufacturer's Name Device Name Device Chemistry Battery FRU N/A Transparent Learn 1 App Data 0 Module Version 0.3 -----------------------------------
BBU_Properties :==============--------------------------------------------------------------Property Value --------------------------------------------------------------Auto Learn Period 90d (7776000 seconds) Next Learn time 2014/02/19 12:44:32 (446129072 seconds) Learn Delay Interval 0 hour(s) Auto-Learn Mode Transparent --------------------------------------------------------------
66 Working with the PERC Command Line Interface tool

Viewing physical drive details for the specified slot in the controller
Syntax
perccli /c0/e32/s4 show all
Description
Displays information about the physical drive, including device attribute, settings, and port information for a particular slot in the controller.
Result
Controller = 0Status = SuccessDescription = Show Drive Information Succeeded.
Drive /c0/e32/s4:================-------------------------------------------------------------------------------EID:Slt DID State DG Size Intf Med SED PI SeSz Model Sp-------------------------------------------------------------------------------32:4 4 Onln 0 558.375 GB SAS HDD Y Y 4 KB ST600MP0084 U-------------------------------------------------------------------------------EID-Enclosure Device ID|Slt-Slot No.|DID-Device ID|DG-Drive GroupDHS-Dedicated Hot Spare|UGood-Unconfigured Good|GHS-Global HotspareUBad-Unconfigured Bad|Onln-Online|Offln-Offline|Intf-InterfaceMed-Media Type|SED-Self Encryption Drive|PI-Protection InfoSeSz-Sector Size|Sp-Spun|U-Up|D-Down|T-Transition|F-ForiegnUGUnsp-Unsupported
Drive /c0/e32/s4 - Detailed Information :=======================================Drive /c0/e32/s4 State :======================Shield Counter = 0Media Error Count = 0Other Error Count = 0Drive Temperature = 43c <109.40F>Predictive Failure Count = 0S.M.A.R.T alert flagged by drive = No
Drive /c0/e32/s4 Device attribute : =================================SN = S2G01H5TWWN = 5000C5006B1A4FB8Firmware Revision = VB44Raw size = 558.911 GB [0x8bba5f6 Sectors]Coerced size = 558.375 GB [0x8b98000 Sectors]Non Coerced size = 558.411 GB [0x8b9a5f6 Sectors]Device Speed = 6.0Gb/sLink Speed = 6.0Gb/sLogical Sector Size = 4 KBPhysical Sector Size = 4 KB
Drive /c0/e32/s4 Policies/Settings :==================================Drive position = DriveGroup:0, Span:0, Row:3
Working with the PERC Command Line Interface tool 67

Enclosure Position = 0Connected Port Number = 0<path0>Sequence Number = 2Commissioned Spare = NoEmergency Spare = NoLast Predictive Failure Event Sequence Number = 0Successful diagnostics completion on = N/ASED Capable = YesSED Enabled = YesSecured = YesLocked = NoNeeds EKM Attention = NoPI Eligible = YesDrive is formatted for PI = YesPI type = 2Number of bytes of user data in LBA = 4 KBCertified = YesWide Port Capable = No
Port Information :================--------------------------------------------Port Status Linkspeed SAS address-------------------------------------------- 0 Active 6.0Gb/s 0x5000c5006b1a4fba 1 Active 6.0Gb/s 0x0--------------------------------------------
Inquiry Data =00 00 06 12 8b 01 30 02 53 45 41 47 41 54 45 2053 54 36 30 30 4d 50 30 30 38 34 20 20 20 20 2056 42 34 34 53 32 47 30 31 48 35 54 00 00 00 0000 00 00 00 00 00 00 00 00 00 00 00 00 00 00 0000 00 00 00 00 00 00 00 00 00 00 00 00 00 00 0000 00 00 00 00 00 00 00 00 00 00 00 00 00 00 0000 43 6f 70 79 72 69 67 68 74 20 28 63 29 20 3230 31 33 20 53 65 61 67 61 74 65 20 41 6c 6c 20
Viewing the boot drive for the controller
Syntax
perccli /c0 show bootdrive
Description
Displays the boot drive for the controller. The boot drive can be a physical drive or a virtual drive.
Result
Controller = 0Status = SuccessDescription = None
Controller Properties :=====================-----------------Ctrl_Prop Value-----------------
68 Working with the PERC Command Line Interface tool
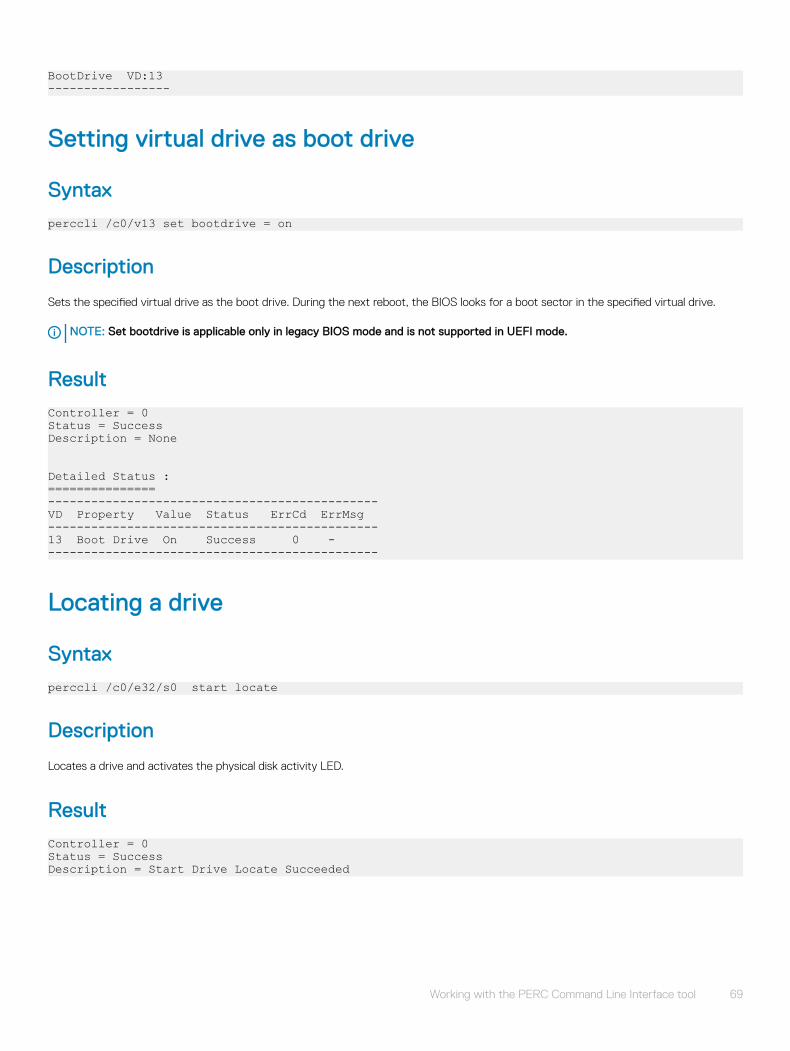
BootDrive VD:13-----------------
Setting virtual drive as boot drive
Syntax
perccli /c0/v13 set bootdrive = on
Description
Sets the specified virtual drive as the boot drive. During the next reboot, the BIOS looks for a boot sector in the specified virtual drive.
NOTE: Set bootdrive is applicable only in legacy BIOS mode and is not supported in UEFI mode.
Result
Controller = 0Status = SuccessDescription = None
Detailed Status :===============----------------------------------------------VD Property Value Status ErrCd ErrMsg----------------------------------------------13 Boot Drive On Success 0 - ----------------------------------------------
Locating a drive
Syntax
perccli /c0/e32/s0 start locate
Description
Locates a drive and activates the physical disk activity LED.
Result
Controller = 0Status = SuccessDescription = Start Drive Locate Succeeded
Working with the PERC Command Line Interface tool 69

Stopping a locate operation
Syntax
perccli /c0/e32/s0 stop locate
Description
Stops a drive locate operation and deactivates the physical disk activity LED.
Result
Controller = 0Status = SuccessDescription = Stop Drive Locate Succeeded
70 Working with the PERC Command Line Interface tool

Getting helpYou can get help with your Dell product by contacting Dell, or send feedback on product documentation.
Contacting Dell EMCDell EMC provides several online and telephone based support and service options. If you do not have an active internet connection, you can find contact information about your purchase invoice, packing slip, bill, or Dell EMC product catalog. Availability varies by country and product, and some services may not be available in your area. To contact Dell EMC for sales, technical assistance, or customer service issues:
1 Go to Dell.com/support/home.
2 Select your country from the drop-down menu on the lower right corner of the page.
3 For customized support:
a Enter your system Service Tag in the Enter your Service Tag field.b Click Submit.
The support page that lists the various support categories is displayed.
4 For general support:
a Select your product category.b Select your product segment.c Select your product.
The support page that lists the various support categories is displayed.
5 For contact details of Dell EMC Global Technical Support:
a Click Global Technical Support.b The Contact Technical Support page is displayed with details to call, chat, or e-mail the Dell EMC Global Technical Support
team.
Locating your system Service TagYour system is identified by a unique Express Service Code and Service Tag number. The Express Service Code and Service Tag are found on the front of a physical DR Series system by pulling out the information tag. The service tag can also be found on the Support page in the GUI. This information is used to route support calls to the appropriate personnel for resolution.
4
Getting help 71