dear guitar player! - mayones.com · - 4-electric guitar user’s manualwinding the strings on...
TRANSCRIPT


- 2 - Electric Guitar User’s Manual
DEAR GUITAR PLAYER!Thank you for purchasing an electric guitar of our production. We are convinced that you
have made a good choice and that your new instrument will help you in developing yourmusical talent.
We would like to help you in achieving this goal and this is why we would like you tofamiliarise yourself with a number of maintenance rules.
Maintenance and operation.
1. Use only good quality strings, preferably from a single set. Acoustic and classical guitarstrings are NOT suitable for an electric guitar.
2. The way you wind the strings around the tuning keys is crucial for the instrument to stayin tune. Remember to read the chapter explaining this procedure.
3. In order to work correctly, a bridge (especially a tremolo bridge) has to be correctlybalanced and adjusted. It is the bridge that determines if the instrument is tuned well.It also determines the overall comfort of playing.
4. Setting up the proper neck relief and the action of the strings is very important to achievegood comfort of playing. These procedures need to be performed each time the gaugesof the strings are changed.
5. In order for a string to hold its pitch well, its intonation has to be adjusted.
A separate chapter is devoted to this procedure.
6. It is recommended to change the strings after 30 hours of operation. After this periodmost strings tend to lose their bright sound and stop holding their pitch.
7. It is advised to clean the instrument, particularly the strings, after each period of playingit. Suitable products are available in good music shops.
8. When transporting the instrument, a gig bag or a hardshell case should be used in orderto prevent damage caused by mechanical shock or temperature change.
9. A guitar is a delicate instrument. The finish is vulnerable to scratches, fractures and evenchipping. Take good care of your instrument and use it according to the goal it was built for.
10. Protect your instrument from low and high temperature, and also from humidity.
11. Do not expose the instrument to direct sunlight for long periods of time. Do not leaveyour instrument close to heating devices, nor in a car on a hot day.
12. Avoid sudden changes of temperature or humidity. In winter, after bringing a chilledinstrument into a heated room, leave it for a few hours in its case, until it has returned toroom temperature.
13. Clean the strings and lacquer surfaces with a dry, delicate cotton cloth. For thorough cleaning,use specialized products only (Guitar Polish and String Cleaner). Instruments with naturalfinish should be conserved with special products based on natural wax and oils.
14. Make sure that all parts of the instrument are cleaned regularly. Use bearing lube toregularly clean the tremolo arm´s socket, and remember to lubricate the spot, where thetremolo´s knife-edge meets the stud bolts.
Disregard of the above rules may result in loss of warranty.
www.mayones.com
EN

- 3 -Electric Guitar User’s Manual
www.mayones.com
Main parts of the guitar
1. headstock2. logo3. tuning mechanics4. tuning key post5. truss rod adjustment screw (plate)6. nut (locking nut)7. strings8. frets9. fingerboard10. neck joint11. neck joint screws12. pickup mounting ring13. pickup selector switch14. volume knob15. tone control knob (piezo blender)16. output jack17. front strap button18. neck pickup (humbucker)19. pickup height adjustment screws20. bridge pickup (humbucker)21. bridge height adjustment screws22. bridge saddles23. string ferrules24. rear strap button25. electronic compartment plate26. string ferrules (back of the guitar)27. battery compartment
Neck
Body
Head
stoc
k
EN

- 4- Electric Guitar User’s Manual
Winding the strings on tuning keys
Depending on the construction of the bridge, insert the ball into the slot of the bridge, pullthe string through the hole in the tremolo block, pull the string through the hole in the body,or cut off the ball and install the string in the locking saddle (Floyd Rose). Next, pull the stringthrough the hole in the tuning key’s post. Next, stretch the string and bend it (90o) 3-5cmbehind the tuning key. Position the bent part of the string at the edge of the hole in the tuningkey’s post and point the end down (6 tuners in line; when the tuners use 3+3 system - pointthe end of the string towards the centre of the headstock. Next, paying attention that thestring clings tightly to the edge of the slot, put the loose end of the string under the part of thestring between the tuning key and the nut (locking nut). Next, pull it strongly up and back(fig. 1). Wind the string over the tuning key in the way that the string winds around andpushes the created loop to the surface of the tuning key (fig. 2). The above procedure shouldbe performed only on unwound strings (E1, H2 and G3).
In case of wound strings (D4, A5 and E6) we do not make a loop before winding them overthe tuning key. The first turn of the string around the key should go above the bent part ofthe string. Further turns should go under the bent part (fig. 3). The windings should clingto each other, but the string should not cross itself (fig. 4).
After having tuned the instrument, it is advised to cut the loose ends of the string moreor less 0,5cm behind the keys. The ends should be bent towards the front of the headstock(fig. 5).
If an instrument is equipped with locking tuning pegs, the stringwinding procedure is the same for all strings. We do not wind thestring around the tuning peg. After installing a string in the bridge,we pull it through the hole in the tuning key’s post and, while holdingthe string behind it, we stretch it firmly (fig. 6). We lock the stretchedstring by tightening the bolt inside the key using the correct screw.Next, we tune the string to the desired pitch. It should only takeseveral turns of the key.
In many tuning keys, it is possible to adjust the strength neededto turn a key by using a special screw (fig. 7).
Remember: even if the instrument is equipped with a locking nut,you still need to correctly install the strings on the tuning pegs.
fig. 1 fig. 2 fig. 3 fig. 4 fig. 5
1. pull the string throughand stretch it firmly
2. tighten the screwlocking the string
3. tune the string
fig. 6
fig. 7
www.mayones.com
EN

- 5 -Electric Guitar User’s Manual
Adjusting the bridge
Fixed bridges
Tune-O-Matic type bridges
The height of each single saddle is usually set by adjustingtwo screws at the sides of the saddle (fig. 8). The saddlesshould be positioned in a slight curve - the difference betweenthe inner and outer saddles should be close to 1mm. This iscaused by the necessity of the saddles to follow the radiusof the fingerboard. In some older bridge types (Tele) twostrings use one saddle. In this case the action is set fortwo strings at the same time.
The height of the string over the 12th fret depends onpersonal preferences of the musician. A standard string actionis: 2.0 mm for the E1 string and 2.5 mm for the E6 string.
In Tune-O-Matic style bridges the action adjustment isglobal, which means that we adjust the height of all the stringsat the same time. We perform this by adjusting two screws onwhich the bridge is placed. By turning the screws clockwise welower the bridge. By turning them counter-clockwise we raiseit. Sometimes the bridge is placed on two large spinners andthis is what we use to adjust the height of the bridge (fig. 10).The proper curve of the strings over the frets is given by thecurve of the base of the bridge, different height of placementof the saddles or different heights of the saddles themselves.
Tremolo bridges
In traditional vintage-type tremolos (attached to the bodywith 6 screws) the height of the strings over the frets is determinedin the same way as in fixed bridges (fig. 11), that is by changingthe height of each saddle separately. In newer constructions,in which the whole structure is placed on two stud bolts (alsoFloyd Rose bridges), adjustment is accomplished by operatingthe stud bolts and changing the action of all strings at the sametime. A proper curve of the strings over the fingerboard (radius)is achieved by a change of thickness of the base of the bridge,different saddle heights, or with each saddle adjusted separately,like in fixed bridges (fig. 12).
fig. 8
fig. 9
fig. 10
fig. 11
fig. 12
www.mayones.com
EN
- 6 - Electric Guitar User’s Manual
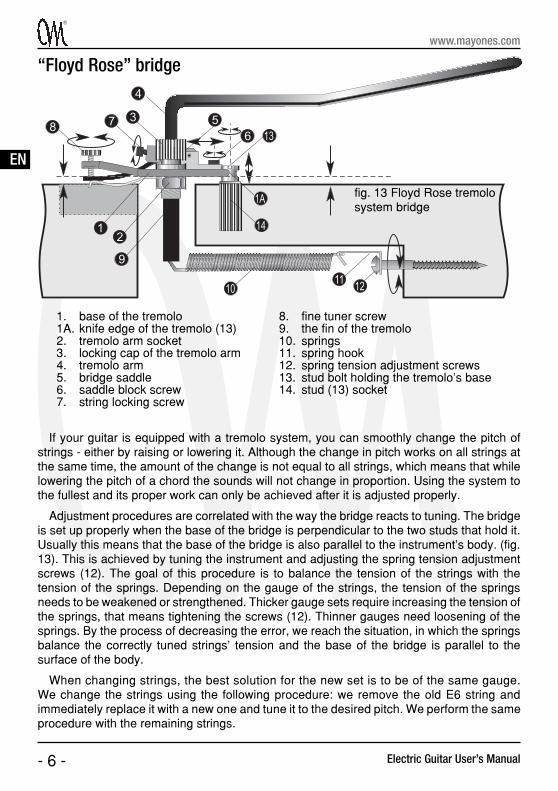
“Floyd Rose” bridge
1. base of the tremolo1A. knife edge of the tremolo (13)2. tremolo arm socket3. locking cap of the tremolo arm4. tremolo arm5. bridge saddle6. saddle block screw7. string locking screw
fig. 13 Floyd Rose tremolosystem bridge
8. fine tuner screw9. the fin of the tremolo10. springs11. spring hook12. spring tension adjustment screws13. stud bolt holding the tremolo’s base14. stud (13) socket
If your guitar is equipped with a tremolo system, you can smoothly change the pitch ofstrings - either by raising or lowering it. Although the change in pitch works on all strings atthe same time, the amount of the change is not equal to all strings, which means that whilelowering the pitch of a chord the sounds will not change in proportion. Using the system tothe fullest and its proper work can only be achieved after it is adjusted properly.
Adjustment procedures are correlated with the way the bridge reacts to tuning. The bridgeis set up properly when the base of the bridge is perpendicular to the two studs that hold it.Usually this means that the base of the bridge is also parallel to the instrument’s body. (fig.13). This is achieved by tuning the instrument and adjusting the spring tension adjustmentscrews (12). The goal of this procedure is to balance the tension of the strings with thetension of the springs. Depending on the gauge of the strings, the tension of the springsneeds to be weakened or strengthened. Thicker gauge sets require increasing the tension ofthe springs, that means tightening the screws (12). Thinner gauges need loosening of thesprings. By the process of decreasing the error, we reach the situation, in which the springsbalance the correctly tuned strings’ tension and the base of the bridge is parallel to thesurface of the body.
When changing strings, the best solution for the new set is to be of the same gauge.We change the strings using the following procedure: we remove the old E6 string andimmediately replace it with a new one and tune it to the desired pitch. We perform the sameprocedure with the remaining strings.
www.mayones.com
EN
- 7 -Electric Guitar User’s Manual
Neck reliefSetting up a proper neck relief is achieved by loosening or tightening the truss rod which
is placed in the axis of the neck. The truss rod adjustment screw is placed either in anopening next to the nut (nut locks) or at the heel of the neck. We check the neck relief byfretting the string on the first and last fret simultaneously. With the relief set up correctly, theheight of the string above the 8th fret should measure about 0,5 mm.
If the string is higher (concave neck), one should tighten the adjustment screw.If the string is lower(convex neck), one should loosen the adjustment screw (fig. 15).
It is important to remember to carefully insert the Allen key’s tip into the truss rod’s adjustmentscrew to prevent its damage and adjustment difficulties. Extensive force should not be usedand the Allen key’s movement should be gradual, not larger than 1/8 of a full turn. The trussrod’s screw should never be left loose in order to prevent from buzzing. Some instrumentsmay be equipped with double action truss rods. This enables the neck to be adjusted bothways, even when the neck is convex after the strings are installed. The relief needs to bechecked each time the strings are changed.
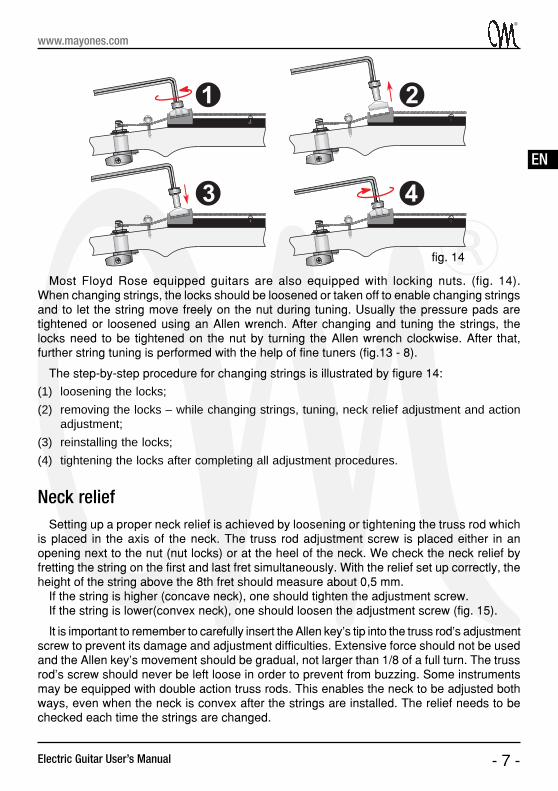
Most Floyd Rose equipped guitars are also equipped with locking nuts. (fig. 14).When changing strings, the locks should be loosened or taken off to enable changing stringsand to let the string move freely on the nut during tuning. Usually the pressure pads aretightened or loosened using an Allen wrench. After changing and tuning the strings, thelocks need to be tightened on the nut by turning the Allen wrench clockwise. After that,further string tuning is performed with the help of fine tuners (fig.13 - 8).
The step-by-step procedure for changing strings is illustrated by figure 14:
(1) loosening the locks;
(2) removing the locks – while changing strings, tuning, neck relief adjustment and actionadjustment;
(3) reinstalling the locks;
(4) tightening the locks after completing all adjustment procedures.
fig. 14
www.mayones.com
EN

- 8 - Electric Guitar User’s Manual
Adjusting the intonation is crucial to eliminating the error in the string pitch on certain frets.It consists of tuning the string exactly to the desired pitch and then fine tuning its bridgesaddle to make the pitch at the 12th fret exactly an octave higher. If after tuning a string thepitch on the 12th fret is too low, the saddle of the bridge should be moved toward the frontedge of the bridge (the scale should be shortened). If after tuning a string the pitch on the12th fret is too high, the saddle of the bridge should be moved toward the rear edge ofthe bridge (the scale should be lengthened).
This action is usually repeated a few times in order to achieve precise intonation. Retunethe string after each repositioning of its saddle. When the intonation is set up properly, thesaddles are usually positioned in a diagonal line. If they do not, or if the range of regulationappears too small, the problem is either the strings being too worn out or of bad quality.
Because of different types of bridges and saddles, the saddle adjustment is achieved bydifferent means. they are schematically presented in fig. 17.
Adjusting intonation
Stabilising the tuningAfter each string has been changed and after tuning it to the
desired pitch, hold it with your fingers above the 12th fret and pull it1cm away from the fretboard for around 10 seconds (fig. 16). Retunethe string and repeat this procedure until the last stretching will notcause a change in the pitch. After stabilising the tuning, adjust theintonation.
Attention: an electronic chromatic tuner will greatly facilitate all theprocedures connected with tuning the instrument.
fig. 16
fig. 15
www.mayones.com
Underbow
Backbow
first fretlast fret
8 fret
tighten
loosen
EN

- 9 -Electric Guitar User’s Manual
fig. 17
The height of the strings over the pickups
The distance between the pickups and the strings is animportant factor of the instrument’s sound. This distancedepends on the type of pickups and the type of strings used.It is checked by fretting the string on the last fret andmeasuring the distance between the surface of the pickupand the surface of the string. For the bridge pickup thestandard heights are: 2.0 mm for the E1 string and 2.5 mmfor the E6 string and for the neck pickup: 2.5 mm for the E1string and 3.0 mm for the E6 string. We usually regulate theheight of the pickups by adjusting the screws that attachthem to the body of the instrument. Turning the screwsclockwise will decrease the height and turning them counter-clockwise will increase the height. If a pickup is equippedwith adjustable pole pieces, it is possible to adjust thedifferences in volume between strings by determiningthe height of each pole piece. fig. 18
www.mayones.com
EN

- 10 - Electric Guitar User’s Manual
Some guitars are equipped with Graph Tech saddles with built in piezo pickups. The pickupsignal is led to the instrument’s output jack after it has been amplified by a preamp poweredby a single 9V battery. The preamp is located in the guitar’s control cavity and attached to thepiezo/magnetic signal mixing knob (Blender). The preamp enables adjusting the piezo pickup’soutput level to the output level of magnetic pickups (for the Blender’s centre setting), as wellas determining the amount of EQ for the piezo pickup. It is achieved by adjusting two smallPR-type controls located on the piezo system’s plate. Adjustments should be performedcarefully, using a small screwdriver or a similar tool (fig. 19).
The Piezo System
fig. 22
www.mayones.com
fig. 19 fig. 20
fig. 21
When shipped from the factory, the piezo volume is set up to match the magnetic pickup’svolume. It may require adjustment after changing strings or after changing the height of themagnetic pickups under the strings.Piezo pickups tend to carry much more high frequenciescompared to magnetic pickups. In some instances, this may lead to signal distortion. In orderto rectify the problem, it is advised to either (fig. 20), decrease the piezo system’s outputvolume (fig. 21), decrease the amplifier’s input gain or adjust its EQ. Signal distortion may bealso caused by an empty battery. In this case, the battery should be replaced immediately,with attention to correct polarisation. The piezo system’s battery is located in a specialcompartment placed at the back of the body, next to the control cavity. The guitar’s outputjack also functions as a power switch. To prolong battery life, remove the plug from theoutput jack when not using your instrument.
Given the fragility of the saddles’ construction andthe fact that they are linked to the electronics withthin wires, it is recommended to use special cautionwhile replacing strings and intonation and actionadjustments. Use of superfluous force may causedamage to the piezo system.
Depending on pickup and electronics’ configuration,there are a few different ways of controlling both piezoand magnetic signals. One of them is described below.
The piezo system is activated by the push-pullmaster volume knob. The next knob acts as a piezoand magnetic signals’ mixer (Blender) (fig. 22).
EN

- 11 -Electric Guitar User’s Manual
In order to preserve the aesthetic look and good technical shape,the instrument should be regularly cleaned and maintained. Aninstrument should be thoroughly cleaned after each playing session- especially the neck, strings and body. Attention should be givento wiping all sweat residue, which is the main cause of string andmetal parts’ corrosion. It also decreases the gloss of the finish.The best tool for wiping the sweat residue is a soft, dry cloth. As anoption, some types of specifically formulated polish can be used,respectably for finished, not finished and metal parts. Theseproducts should be handled with caution and their usefulnessshould be first checked on a small, less visible piece of surface.Products based on acids, alkalis, benzene, gasoline, alcohols,solvents and strong detergents, should not be used. We advisethorough cleaning and maintenance during each string change.
Natural (wax and oil) finishes require different kinds of attention. Delicate cloths can beused for cleaning, but maintaining the the finish is achieved by using a specifically formulatedpolish based on natural oils. When using them, be sure to act according to the instructionson their containers.
Rosewood, ebony and other types of exotic wood occasionally require impregnating.The need for such an operation may be indicated by the wood looking more pale and mat.In order to facilitate impregnating, it is recommended to remove the strings and to wipe thefretboard with a soft brush. Next, after soaking a cloth with Lemon Oil (Fretboard Conditioner)rub it in the fretboard. This procedure should be repeated a few times with hour-long intervals.In the end, wipe the residue off with a dry cloth.
Cleaning
Battery replacementIf a guitar is equipped with active electronics, a preamp, a piezo
system, or LED fret markers, they are usually powered by one ortwo 9V batteries. The battery compartment (or compartments)are located on the back of the instrument´s body (fig. 23).Opening them does not require tools, however caution isadvised in order not to break the delicate l id. Thecompartment´s construction prevents putting the battery in thewrong way. The compartment is locked by gently pushing the lid back,which produces a distinct click.
www.mayones.com
fig. 23
Other optionsDue to the restricted volume of this User’s Manual, an array of other options and technical
solutions was not mentioned here. Among these are: Hipshot D-tuners, different bridgeconstructions, LED fret markers, or sophisticated electronics packages. If you encounterproblems with your instrument, visit our technical support page at www.mayones.com,or contact us via email.
EN

Gitary Mayones s.c.ul. Narwicka 10
80-557 Gdañsk, Poland
tel. +48 58 343 07 83 fax +48 58 343 04 [email protected] www.mayones.com
© Gitary Mayones 2010
You will find more information on guitar operation and maintenance and solving basic problems on our websitewww.mayones.com.
Mayones Guitars and Basses care constantly about the quality of their instruments and release their newer andupgraded versions, as well as search for the best possible building materials.
All parts of the instruments are RoHS compliant.The company reserves the right to make changes without prior notice.
Mayones and the Mayones logo are registered trade-marks of Gitary Mayones s.c.