dealer online (dol iii) introduction
TRANSCRIPT

DEALER ONLINE (DOL III)
Introduction
APCO Dealer Online is a dealer facing website developed by APCO to allow dealers to retrieve statements, research contracts, find the status of pending claims and quote and enter new business. Dealer Online Phase Three, DOL III, is the latest version of Dealer Online, one which allows dealers to quote and enter any APCO/EasyCare product that they sell.
DOL User Levels There are three user levels within the dealership; Administrative, Service, and Business Office. Administrative The Administrative security level allows a user access to ALL areas of the website. This includes all statements, rates and claims information. Administrative users also have access to dealer profile set up and user administration. User administration allows the user to reset passwords, create new users and modify individual user security.
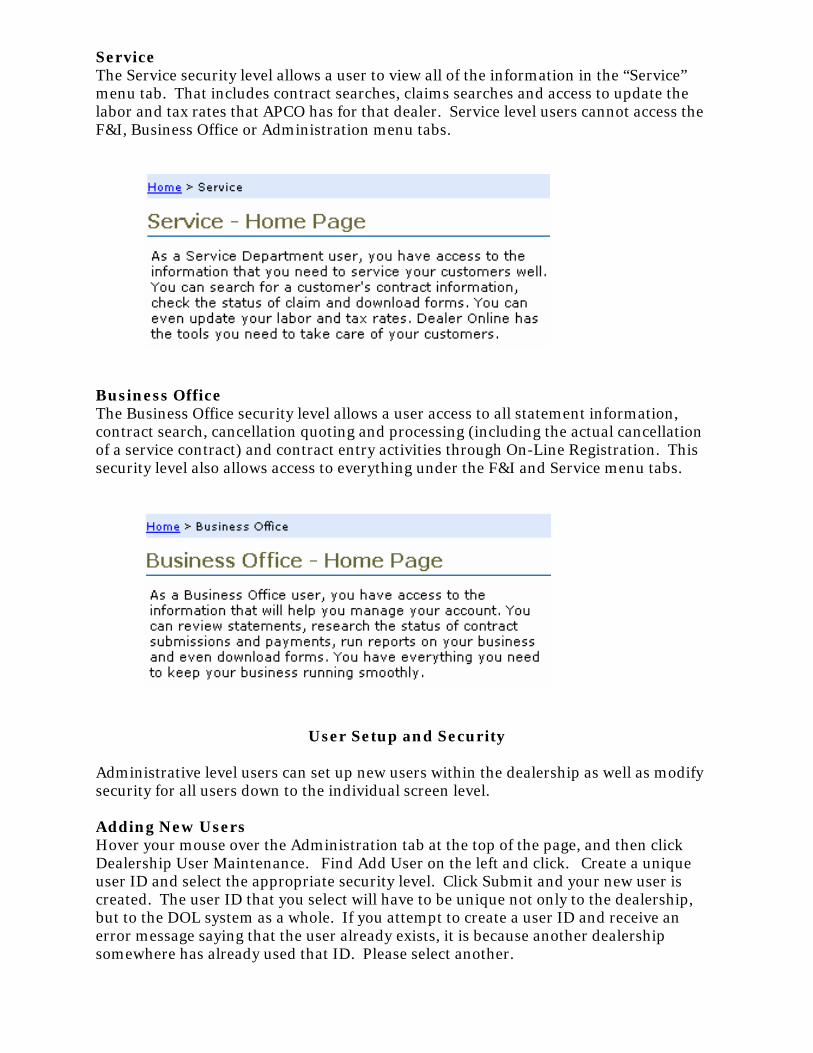
Service The Service security level allows a user to view all of the information in the “Service” menu tab. That includes contract searches, claims searches and access to update the labor and tax rates that APCO has for that dealer. Service level users cannot access the F&I, Business Office or Administration menu tabs.
Business Office The Business Office security level allows a user access to all statement information, contract search, cancellation quoting and processing (including the actual cancellation of a service contract) and contract entry activities through On-Line Registration. This security level also allows access to everything under the F&I and Service menu tabs.
User Setup and Security
Administrative level users can set up new users within the dealership as well as modify security for all users down to the individual screen level. Adding New Users Hover your mouse over the Administration tab at the top of the page, and then click Dealership User Maintenance. Find Add User on the left and click. Create a unique user ID and select the appropriate security level. Click Submit and your new user is created. The user ID that you select will have to be unique not only to the dealership, but to the DOL system as a whole. If you attempt to create a user ID and receive an error message saying that the user already exists, it is because another dealership somewhere has already used that ID. Please select another.
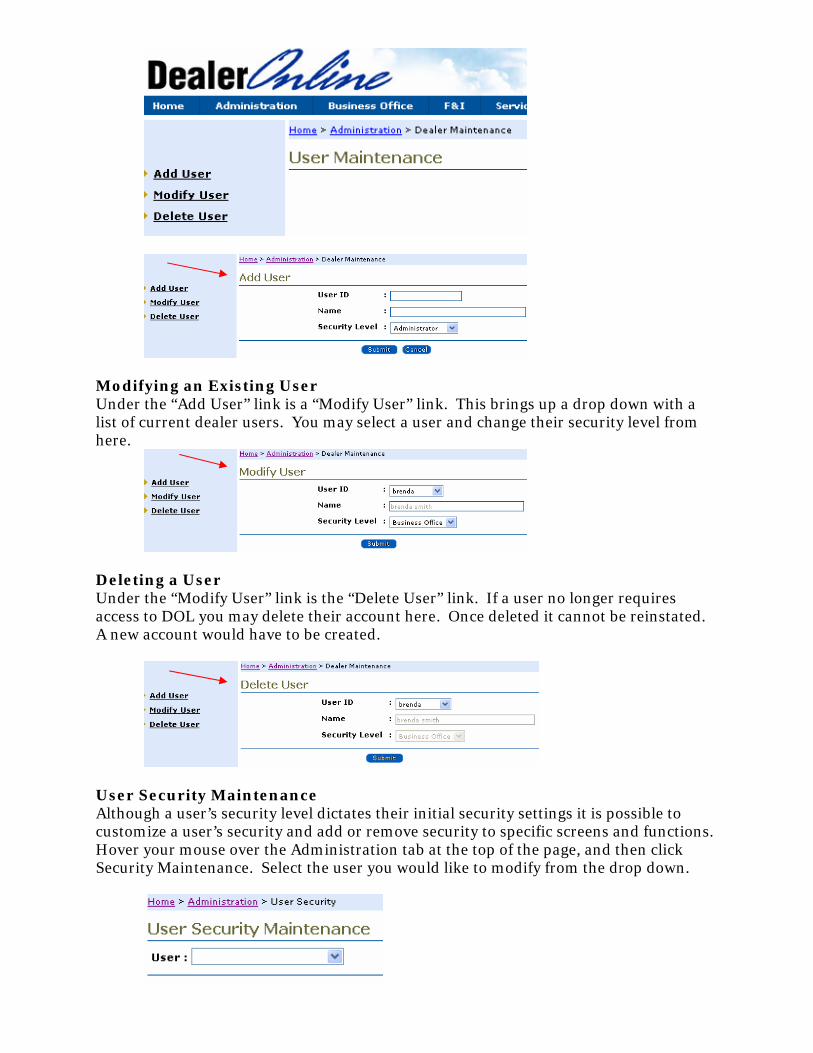
Modifying an Existing User Under the “Add User” link is a “Modify User” link. This brings up a drop down with a list of current dealer users. You may select a user and change their security level from here.
Deleting a User Under the “Modify User” link is the “Delete User” link. If a user no longer requires access to DOL you may delete their account here. Once deleted it cannot be reinstated. A new account would have to be created.
User Security Maintenance Although a user’s security level dictates their initial security settings it is possible to customize a user’s security and add or remove security to specific screens and functions. Hover your mouse over the Administration tab at the top of the page, and then click Security Maintenance. Select the user you would like to modify from the drop down.
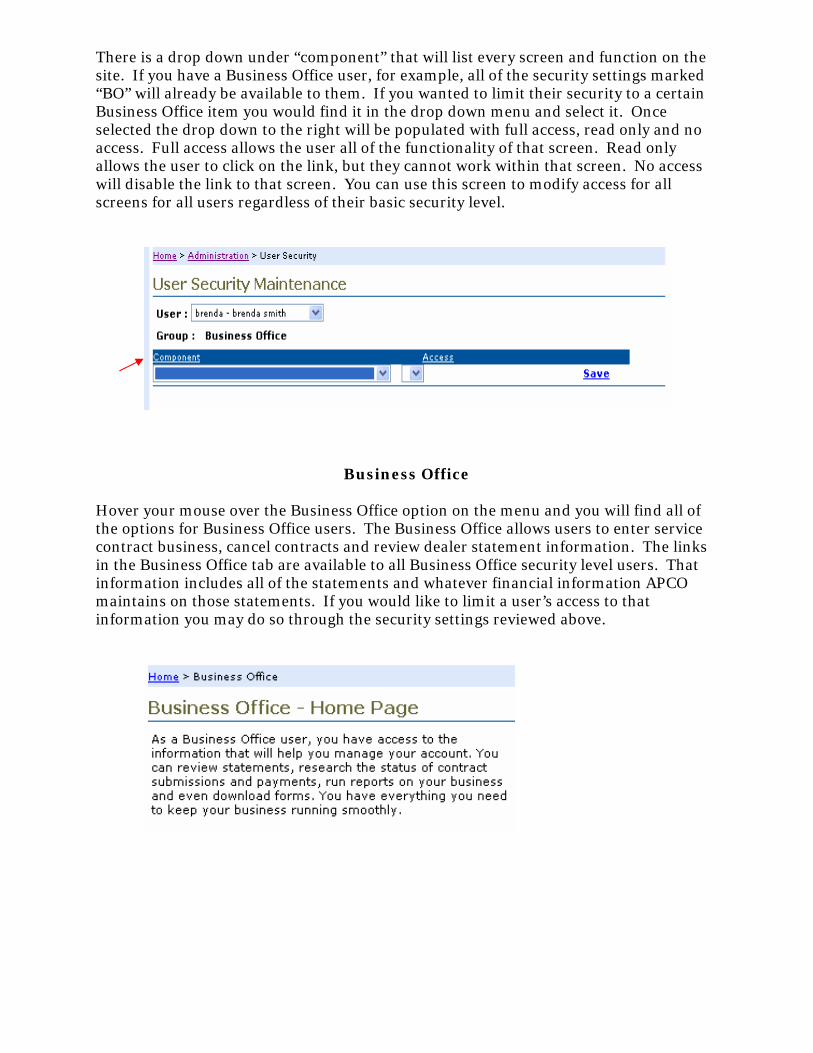
There is a drop down under “component” that will list every screen and function on the site. If you have a Business Office user, for example, all of the security settings marked “BO” will already be available to them. If you wanted to limit their security to a certain Business Office item you would find it in the drop down menu and select it. Once selected the drop down to the right will be populated with full access, read only and no access. Full access allows the user all of the functionality of that screen. Read only allows the user to click on the link, but they cannot work within that screen. No access will disable the link to that screen. You can use this screen to modify access for all screens for all users regardless of their basic security level.
Business Office Hover your mouse over the Business Office option on the menu and you will find all of the options for Business Office users. The Business Office allows users to enter service contract business, cancel contracts and review dealer statement information. The links in the Business Office tab are available to all Business Office security level users. That information includes all of the statements and whatever financial information APCO maintains on those statements. If you would like to limit a user’s access to that information you may do so through the security settings reviewed above.

On-Line Registration On-line registration allows the dealership to enter their APCO/EasyCare business online and remit via ACH. By using DOL the dealership can avoid mailing paper contracts to our office and mailing checks to our lockbox. Dealerships must sign DOL access agreements and submit ACH information and agreements, including a voided check for account verification, before they can use the on-line registration feature.
On-line registration begins with the Application Registration link. Clicking that link will take you to the Application Registration page where you will begin entering information from an already sold service contract, GAP application or any other product APCO administers. Begin by entering the sale date of the service contract. Once the sale date is entered the system will populate the Program drop down with all of the products that are/were available as of that sale date. Your sale date cannot go back farther than 60 days. Contracts more than 60 days old will have to be submitted to the lockbox. After selecting your program follow the prompts to enter the application prefix, application number and the form number. A diagram at the top of the Application Registration page will show you which numbers are needed. Select “continue” to move to the next step in application entry.
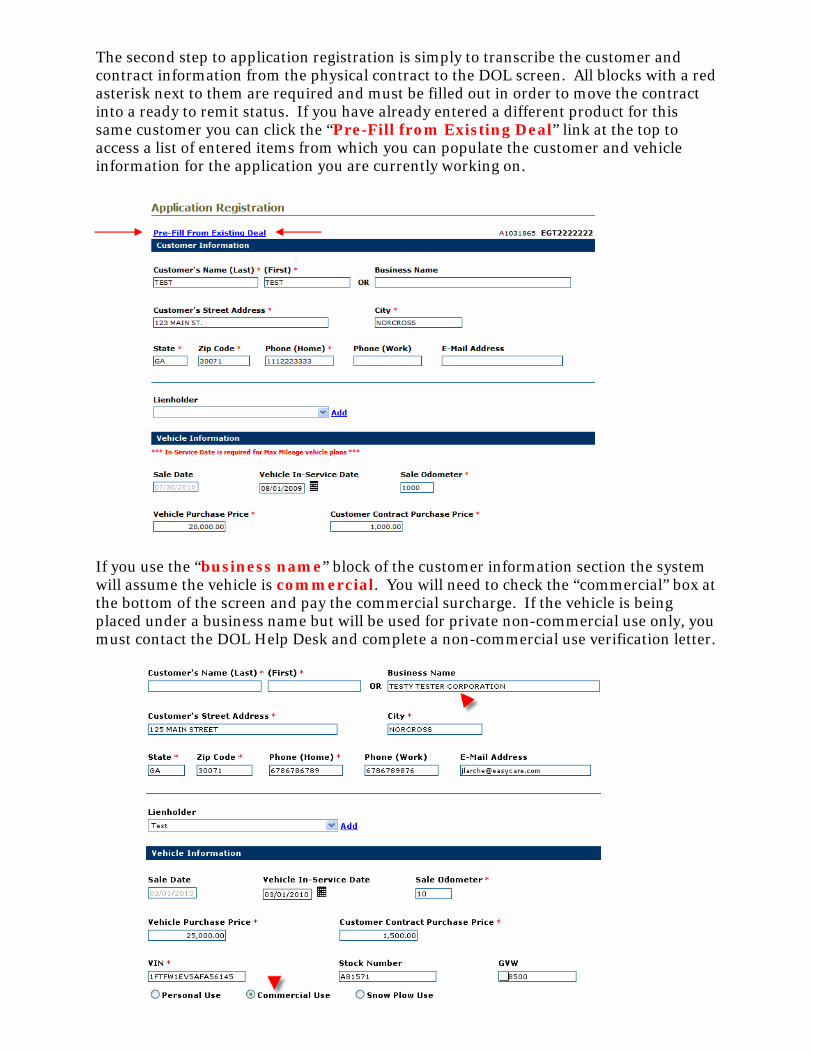
The second step to application registration is simply to transcribe the customer and contract information from the physical contract to the DOL screen. All blocks with a red asterisk next to them are required and must be filled out in order to move the contract into a ready to remit status. If you have already entered a different product for this same customer you can click the “Pre-Fill from Existing Deal” link at the top to access a list of entered items from which you can populate the customer and vehicle information for the application you are currently working on.
If you use the “business name” block of the customer information section the system will assume the vehicle is commercial. You will need to check the “commercial” box at the bottom of the screen and pay the commercial surcharge. If the vehicle is being placed under a business name but will be used for private non-commercial use only, you must contact the DOL Help Desk and complete a non-commercial use verification letter.
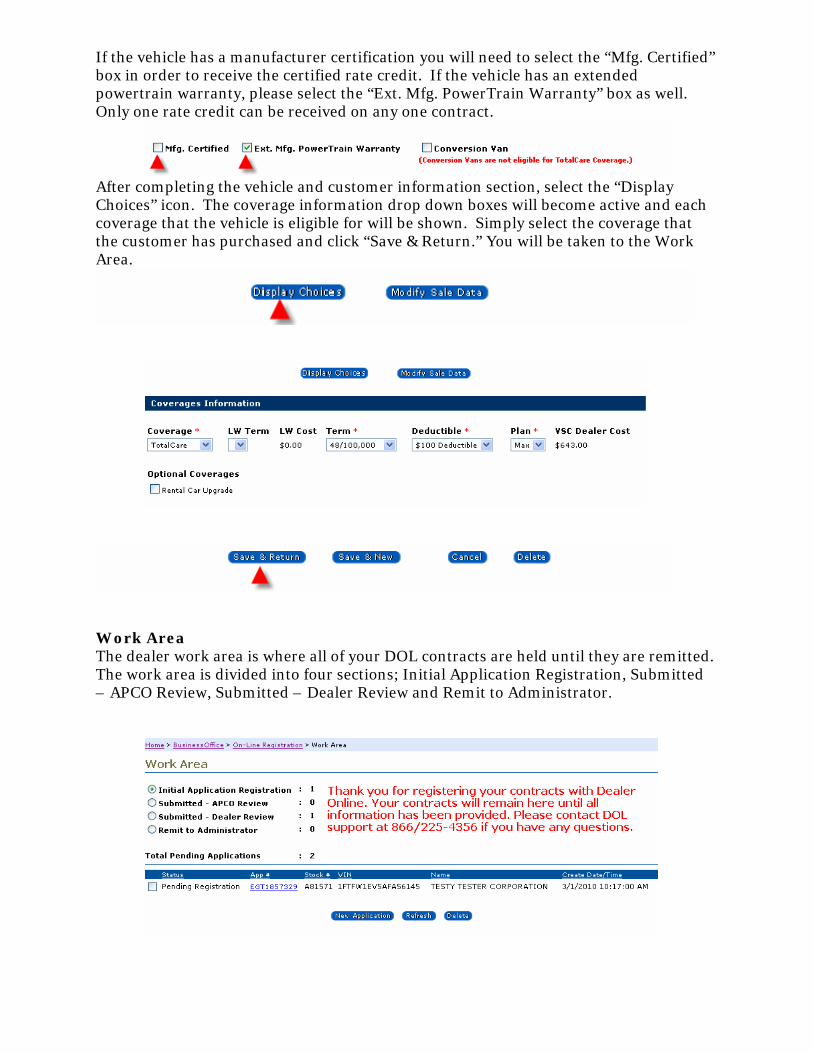
If the vehicle has a manufacturer certification you will need to select the “Mfg. Certified” box in order to receive the certified rate credit. If the vehicle has an extended powertrain warranty, please select the “Ext. Mfg. PowerTrain Warranty” box as well. Only one rate credit can be received on any one contract.
After completing the vehicle and customer information section, select the “Display Choices” icon. The coverage information drop down boxes will become active and each coverage that the vehicle is eligible for will be shown. Simply select the coverage that the customer has purchased and click “Save & Return.” You will be taken to the Work Area.
Work Area The dealer work area is where all of your DOL contracts are held until they are remitted. The work area is divided into four sections; Initial Application Registration, Submitted – APCO Review, Submitted – Dealer Review and Remit to Administrator.

Initial Application Registration The initial application registration section is where all contracts are held while the dealer is still in the process of entering them. Until all customer and vehicle information is entered and valid terms selected the contracts will remain here.
Submitted – APCO Review Contracts with errors that must be reviewed by APCO will be placed here. Once here they will be queued up to be reviewed by APCO. You will notice a warning message at the top of the page. This is the error that APCO is attempting to resolve. Depending on the error, the contract may be returned to you for further information.
Submitted – Dealer Review Contracts with errors that must be reviewed by the dealership are here. The error will be listed at the top, or there might be a message from APCO at the top. Either one will indicate what the dealership will need to do to move the contract along to the ready to remit section. If you have a contract in the Dealer Review section and you are unsure what to do with it, please call the DOL help desk.

Remit to Administrator All contracts that have cleared underwriting and are error free are placed in the Remit to Administrator (often referred to as “ready to remit”) section. These contracts are ready for the dealership to remit electronically to APCO. Once the contracts are remitted they are active and there is nothing more that the dealer will need to send to APCO.
In order to remit electronically the dealership will need to have an approved ACH account set up with APCO. This will allow the dealership to remit their business without needing to send a check to the APCO lockbox. To remit the business, make sure that the contracts you wish to remit have a green check mark next to them. Once confirmed, you can click the “Remit to Admin” button. A dialog box will pop up asking you if you are certain you would like to remit the contracts. Once you confirm, the contracts will be submitted and the process will be complete. Before actually remitting the business it is recommended that you select the “Review Remittance” link above or below the contract list. A box will come up that lists all of the contracts that you are about to remit along with the dealer cost information. We recommend that you print this page and keep it for your records. This makes a convenient reference if there are any questions about the business you intended to remit. Current Month Remits The Current Month Remits link allows you to review all of the contract remittances you have made during the current business month. Once the business month closes all of those contracts will move to your statement.

Cancellation Processing Dealer Online allows you to quote and process contract cancellations as well. From the business office tab, click “Cancellation Processing.” The cancellation quoting screen will appear as a pop-up. Note: if your computer has pop-up blockers enabled, you may need to disable them in order to access contract cancellation.
Cancellation quoting is a simple process that follows three steps. Step one is to locate the contract that you would like to cancel. Step two is to provide the cancellation date, mileage and reason. Step three provides a cancellation quote and an opportunity to cancel the service contract. If you choose not to cancel, your quote will be held in a queue for 24 hours. If you decide to cancel after the quote has left the queue you may requote and proceed with the cancellation. Once a cancellation has been processed online there is no need to mail further paperwork or verification to APCO. The cancellation will appear on your next dealer statement. Cancellation Payment History The Cancellation Payment History link from the Business Office tab allows the dealer to review cancellations to see when they were paid and how much. Simply use any of the search criteria presented on the screen to find the contract(s) that you wish to review.

Statements From the Business Office tab you may also access all of your dealer statements. You may review your Current or Past statements, or you may review a list of statements that can be downloaded in PDF or ASCII format.
Current Statement The Current Statement link allows you to review your most recent statement on screen. The statement is dynamic and allows you to click through on most sections and review the items that make up that section of your statement. For example, if you click the “Contracts Cancelled” link you will be taken to a list of cancelled contracts for that statement. If you click the “Remittance Totals” link you will be taken to a drop down list that allows you to select any of your remittances for that statement period and review the component contracts. You are encouraged to click through and experiment with your statement to find the information that is most useful to you.

Past Statements The Past Statements link will provide you with the same information as the Current Statements link, but first allows you to search for and select any of your past statements. Once you find the statement that you would like to review you can click through it the same way you can click through the Current Statement.
Downloadable Statements The Downloadable Statements link allows you to pull a printable version of your statement in PDF format, or to download an ASCII version of your statement that you can put into an Excel sheet and manipulate in whatever manner satisfies your dealer’s accounting processes.
There is a link titled “How to download the ASCII file into Excel or Access.” Please use this link as a tutorial if you have any questions about downloading your ASCII statement.
F&I The F&I section of DOL allows Finance personnel to quote EasyCare products with the customer in the office. Personnel can easily compare prices on different terms and deductibles without having to open a rate book.
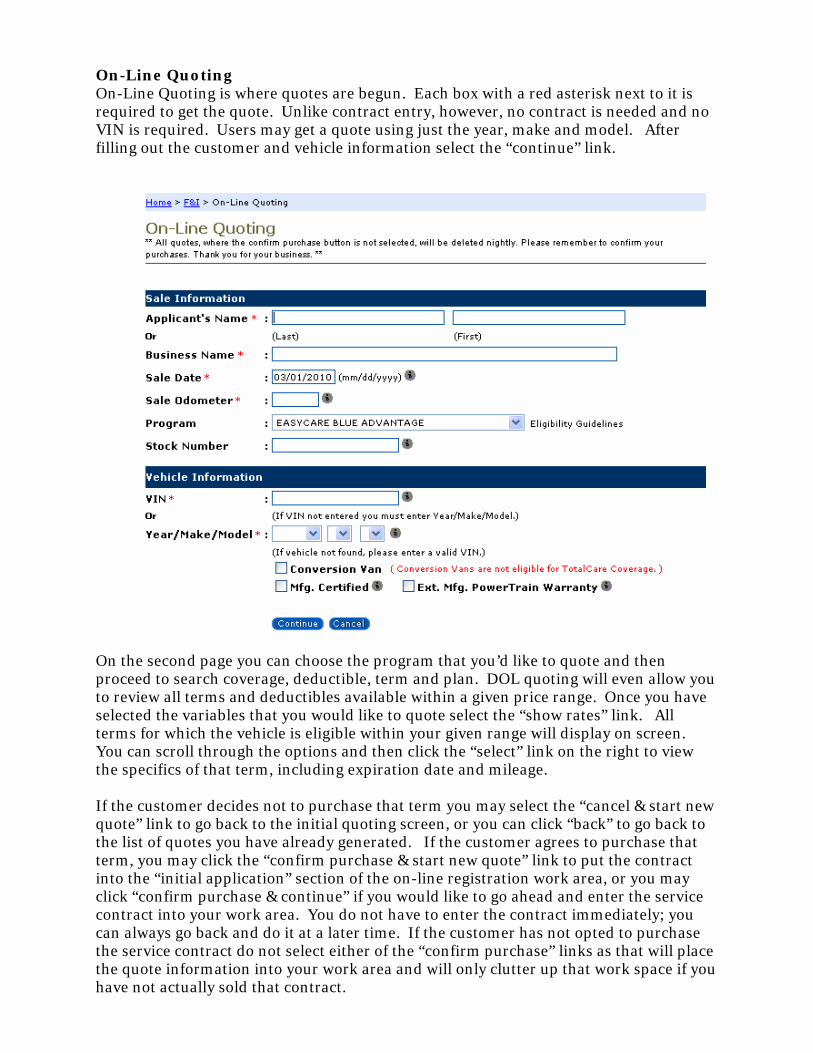
On-Line Quoting On-Line Quoting is where quotes are begun. Each box with a red asterisk next to it is required to get the quote. Unlike contract entry, however, no contract is needed and no VIN is required. Users may get a quote using just the year, make and model. After filling out the customer and vehicle information select the “continue” link.
On the second page you can choose the program that you’d like to quote and then proceed to search coverage, deductible, term and plan. DOL quoting will even allow you to review all terms and deductibles available within a given price range. Once you have selected the variables that you would like to quote select the “show rates” link. All terms for which the vehicle is eligible within your given range will display on screen. You can scroll through the options and then click the “select” link on the right to view the specifics of that term, including expiration date and mileage. If the customer decides not to purchase that term you may select the “cancel & start new quote” link to go back to the initial quoting screen, or you can click “back” to go back to the list of quotes you have already generated. If the customer agrees to purchase that term, you may click the “confirm purchase & start new quote” link to put the contract into the “initial application” section of the on-line registration work area, or you may click “confirm purchase & continue” if you would like to go ahead and enter the service contract into your work area. You do not have to enter the contract immediately; you can always go back and do it at a later time. If the customer has not opted to purchase the service contract do not select either of the “confirm purchase” links as that will place the quote information into your work area and will only clutter up that work space if you have not actually sold that contract.

All quotes are kept for a period of 24 hours. Any time during the next 24 hours you can select “Review Old Quotes” from the F&I menu and return to the quote. After 24 hours, though, the quote will be discarded and you will need to requote if the customer agrees to purchase at a later time.
Service The Service menu of DOL is designed to allow service writers to find customers with service contracts and identify their coverage and deductible without having to call APCO. It also allows service directors to track claims and identify what has been paid, how much and when. Users with Service level security can only access the Service menu and cannot see Business Office or F&I menu items. Contract Search When a customer comes in and identifies themselves as an EasyCare contract holder the service writer can easily log into DOL and come to this tab to find the customer and obtain their contract information. Customers who purchased their service contract through your dealership or who purchased their contract elsewhere but have had a claim through your dealership will show up on your contract search. If the customer has never been to your dealership before they will not show up on your contract search. Records are maintained that way for the privacy of our contract holders.
Once the contract is located you can print a sample copy for the customer, mail a contract and ID card to the customer or even change the customer’s address using the links at the bottom of the screen.
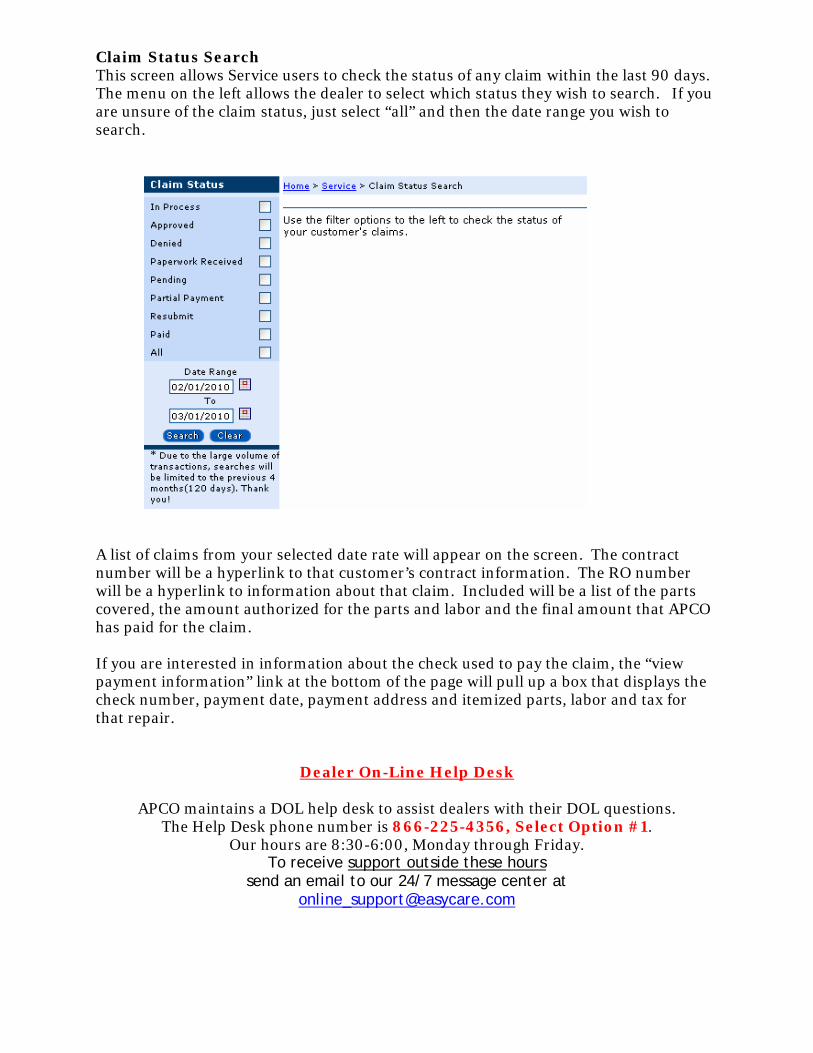
Claim Status Search This screen allows Service users to check the status of any claim within the last 90 days. The menu on the left allows the dealer to select which status they wish to search. If you are unsure of the claim status, just select “all” and then the date range you wish to search.
A list of claims from your selected date rate will appear on the screen. The contract number will be a hyperlink to that customer’s contract information. The RO number will be a hyperlink to information about that claim. Included will be a list of the parts covered, the amount authorized for the parts and labor and the final amount that APCO has paid for the claim. If you are interested in information about the check used to pay the claim, the “view payment information” link at the bottom of the page will pull up a box that displays the check number, payment date, payment address and itemized parts, labor and tax for that repair.
Dealer On-Line Help Desk
APCO maintains a DOL help desk to assist dealers with their DOL questions. The Help Desk phone number is 866-225-4356, Select Option #1.
Our hours are 8:30-6:00, Monday through Friday. To receive support outside these hours
send an email to our 24/7 message center at [email protected]