deadline submission guide - connect -...
TRANSCRIPT
Deadline Submission Guide
Before Submitting•Projects should be finished before submitting, do not use the farm to test render full scenes.
•Set your project and check the Project Window in Maya, all the time every time.
•Create test frames and playblasts on your local machine to check aesthetics and animation timing before beginning a render.
•Make sure projects are pulling any and all external files (pictures, video, sound, etc) from the project directory.
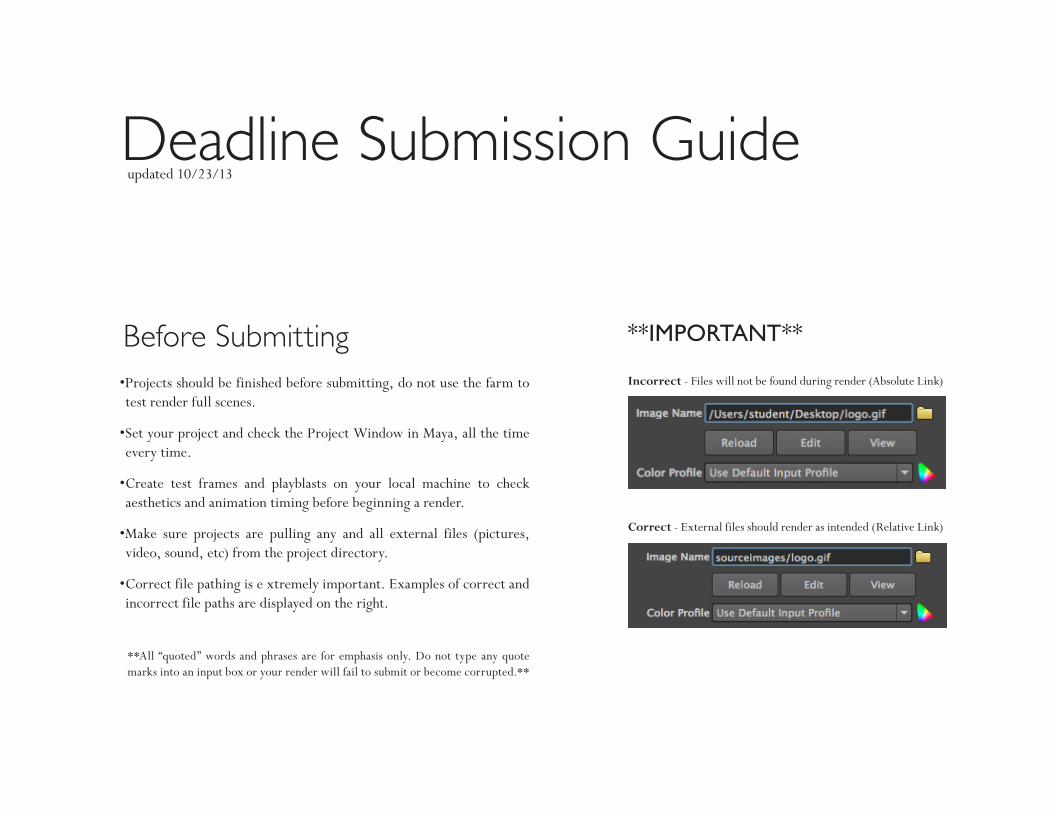
•Correct file pathing is e xtremely important. Examples of correct and incorrect file paths are displayed on the right.
**All “quoted” words and phrases are for emphasis only. Do not type any quote marks into an input box or your render will fail to submit or become corrupted.**
Incorrect - Files will not be found during render (Absolute Link)
Correct - External files should render as intended (Relative Link)
**IMPORTANT**
updated 10/23/13
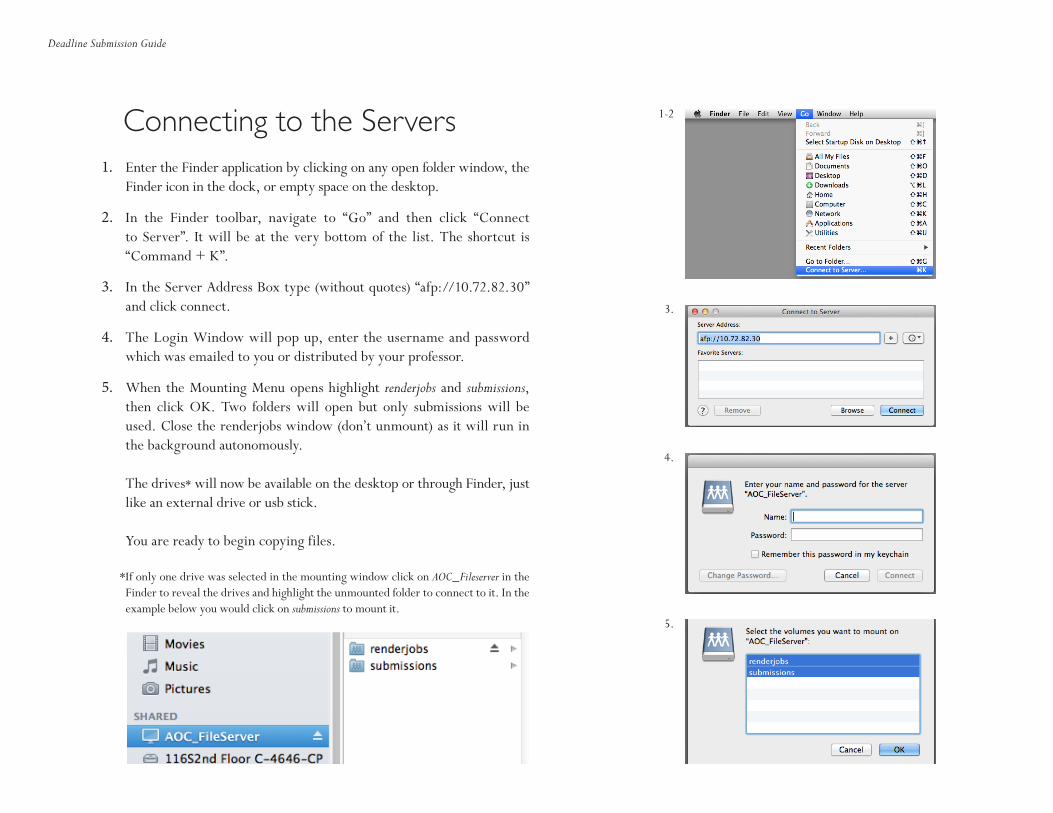
Connecting to the Servers1. Enter the Finder application by clicking on any open folder window, the
Finder icon in the dock, or empty space on the desktop.
2. In the Finder toolbar, navigate to “Go” and then click “Connect to Server”. It will be at the very bottom of the list. The shortcut is “Command + K”.
3. In the Server Address Box type (without quotes) “afp://10.72.82.30” and click connect.
4. The Login Window will pop up, enter the username and password which was emailed to you or distributed by your professor.
5. When the Mounting Menu opens highlight renderjobs and submissions, then click OK. Two folders will open but only submissions will be used. Close the renderjobs window (don’t unmount) as it will run in the background autonomously.
The drives* will now be available on the desktop or through Finder, just like an external drive or usb stick.
You are ready to begin copying files.
*If only one drive was selected in the mounting window click on AOC_Fileserver in the Finder to reveal the drives and highlight the unmounted folder to connect to it. In the example below you would click on submissions to mount it.
3.
4.
5.
Deadline Submission Guide
1-2
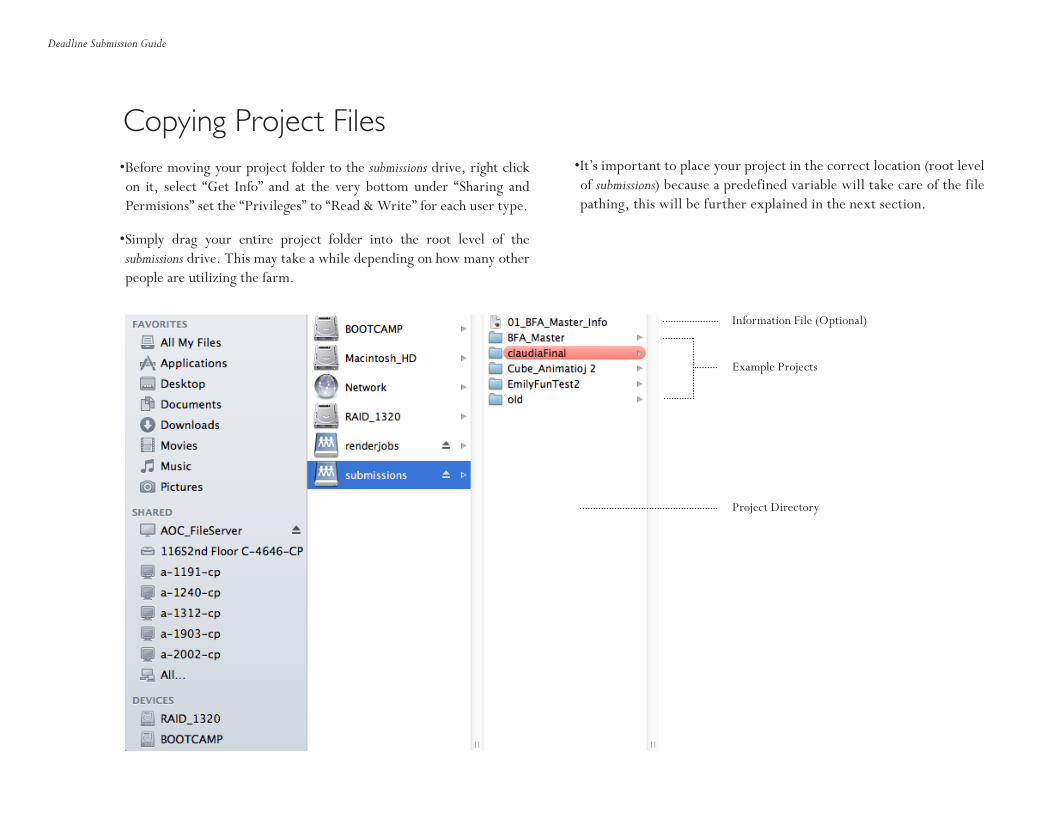
Copying Project Files•Before moving your project folder to the submissions drive, right click on it, select “Get Info” and at the very bottom under “Sharing and Permisions” set the “Privileges” to “Read & Write” for each user type.
•Simply drag your entire project folder into the root level of the submissions drive. This may take a while depending on how many other people are utilizing the farm.
Project Directory
Example Projects
Information File (Optional)
Deadline Submission Guide
•It’s important to place your project in the correct location (root level of submissions) because a predefined variable will take care of the file pathing, this will be further explained in the next section.

Setting Submissions Parameters1. Open Maya 2014 on your local machine (Do not double click a scene
file to open Maya), when it opens make sure to set the project to your folder on the submissions drive.
2. Open the scene you would like to submit. File > Open Scene.
3. Double check that all files are correctly pulling from the project directory (relative) and not a full path (absolute). If any files are hard linked the nodes will attempt to find them in places that probably don’t exist and will throw back an error or more likely render without those files present. (See example marked Important in Pre-Submission section.)
4. Navigate to the far right hand side of the Maya shelf. The last tab should say “Thinkbox”, click on it and it will have a single icon available.
5. Click the button/icon in the Maya shelf called: “Submit to Deadline”.
*If it gives you the error “Cannot find procedure” then you are not connected to the renderjobs drive. Review section 1 for help troubleshooting connection issues.
*You may have to restart Maya after connecting to the repository (renderjobs drive).
6. Under “Job Description” enter your email address in case something happens to your job or the farm in general.
7. Within the “Job Scheduling” section move the Priority slider all the way to the right until it reads 100. Make sure to check this every time.
*Failure to change this setting will most likely result in an extremely delayed render. Your job will be categorized as less important than anyone else who sets their job to 100 regardless if they submitted before or after your job.
8. In the “Render Options” section there are quite a few changes to make and things to be aware of.
4.
5.
6.
7.
Deadline Submission Guide
*Also remember, at this point any changes made to the local project will not be reflected in what has been copied to the submissions drive. If changes are made be sure to re-upload any altered files to the farm before continuing/submitting for render.
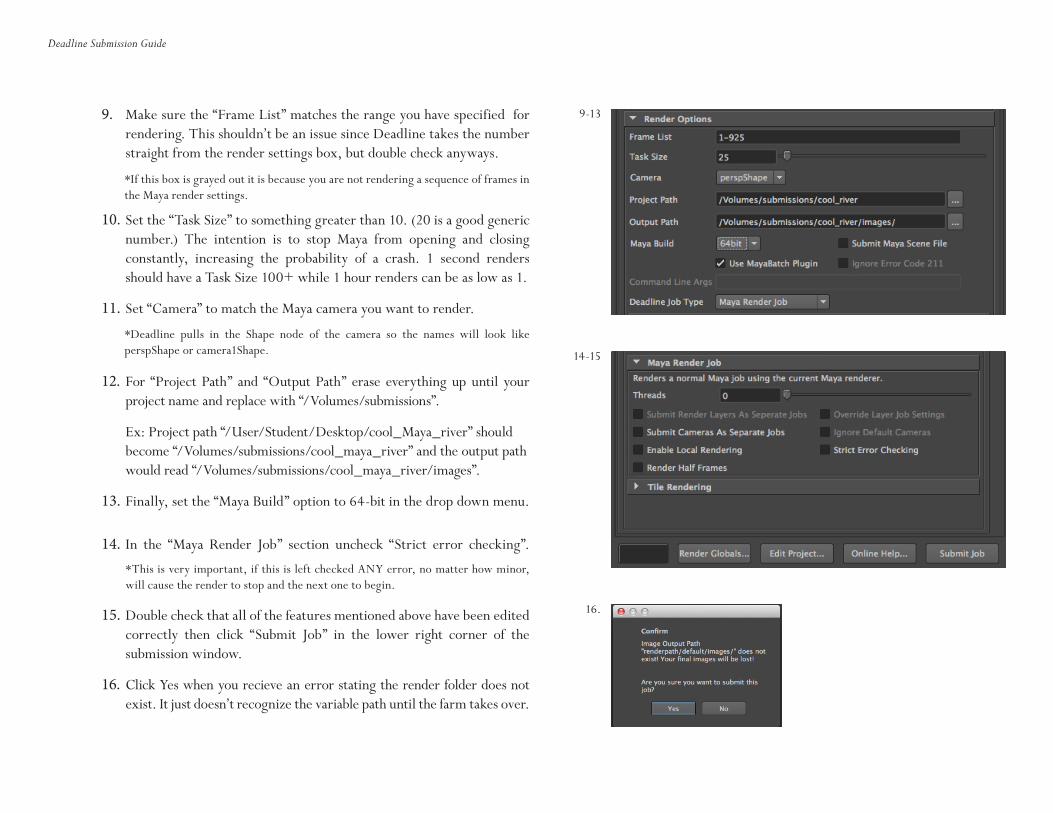
9. Make sure the “Frame List” matches the range you have specified for rendering. This shouldn’t be an issue since Deadline takes the number straight from the render settings box, but double check anyways.
10. Set the “Task Size” to something greater than 10. (20 is a good generic number.) The intention is to stop Maya from opening and closing constantly, increasing the probability of a crash. 1 second renders should have a Task Size 100+ while 1 hour renders can be as low as 1.
11. Set “Camera” to match the Maya camera you want to render.
12. For “Project Path” and “Output Path” erase everything up until your project name and replace with “/Volumes/submissions”.
Ex: Project path “/User/Student/Desktop/cool_Maya_river” should become “/Volumes/submissions/cool_maya_river” and the output path would read “/Volumes/submissions/cool_maya_river/images”.
13. Finally, set the “Maya Build” option to 64-bit in the drop down menu.
14. In the “Maya Render Job” section uncheck “Strict error checking”.
*This is very important, if this is left checked ANY error, no matter how minor, will cause the render to stop and the next one to begin.
15. Double check that all of the features mentioned above have been edited correctly then click “Submit Job” in the lower right corner of the submission window.
16. Click Yes when you recieve an error stating the render folder does not exist. It just doesn’t recognize the variable path until the farm takes over.
*Deadline pulls in the Shape node of the camera so the names will look like perspShape or camera1Shape.
9-13
14-15
16.
Deadline Submission Guide
*If this box is grayed out it is because you are not rendering a sequence of frames in the Maya render settings.

17. The progress bar in the lower left (opposite side of Submit Job button)will begin to fill. Be patient, it will take anywhere from 30 seconds to 2 minutes to create the job. (It usually sticks at 33%)
18. Once finished, the results window will pop open. Make sure it says “Result=Success” near the bottom in the last set of lines.
19. The scene has now been submitted and will begin when queued jobs ahead of yours are finished.
Picking Up Completed RendersOnce the render is complete you will be able to connect to the submissions drive and copy the finished frames out of the images folder within your project (not your entire directory). Simply drag them onto an external harddrive.
Remember to delete projects after they are picked up to save space on the submissions drive.
*Copying files over the network can be slow if there are a lot of users accessing it. Give yourself upwards of 2-3 hours for downloading large amounts of data.
*Refer to section 1 for help connecting to the server.
Deadline Submission Guide
Test Frame SubmissionAs opposed to normal test frames rendered on your local machine, these test frames are not meant to be used for visual/aesthetic checks. These frames are used to make sure all your external assets are being found and rendered by the nodes.
Examples of things to check for in the test frame: File textures (including but not limited to color, bump, alpha, paint effects), Realflow meshes, hair and fur, cached particles, unbaked dynamics.
The test frame process is almost identical to the previous submission settings with two minor but important changes. Follow all the Submission Parameter steps and substitute the changes below.
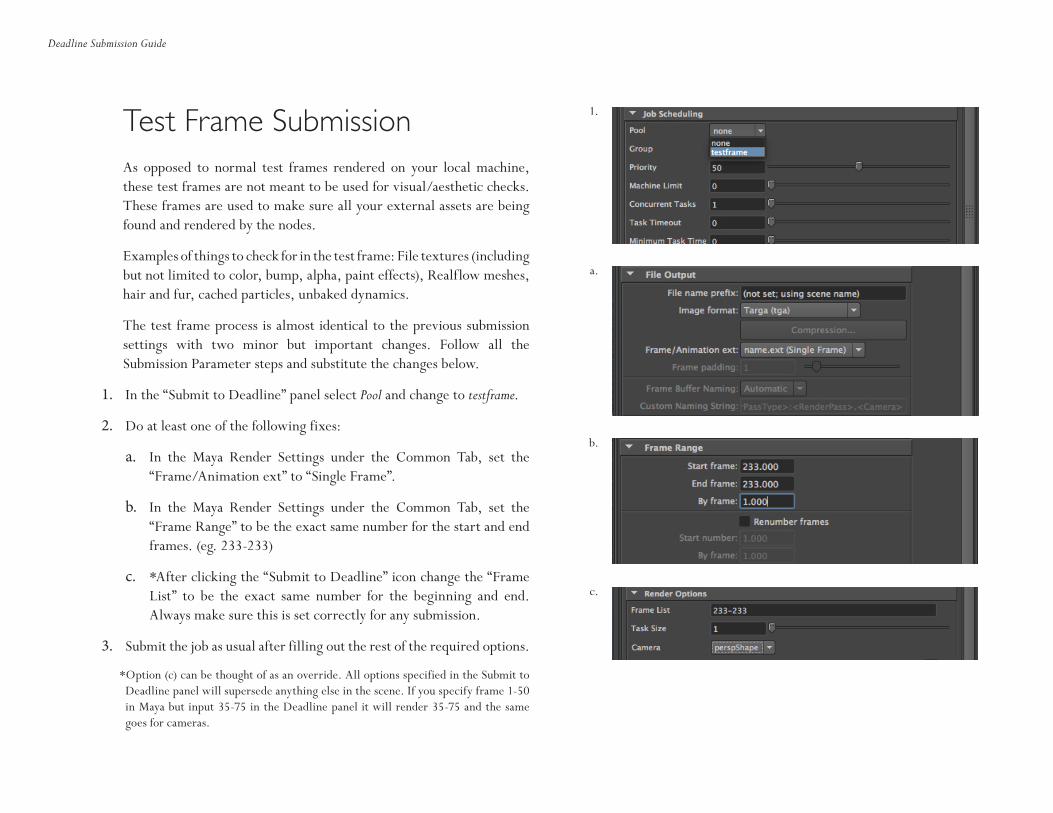
1. In the “Submit to Deadline” panel select Pool and change to testframe.
2. Do at least one of the following fixes:
a. In the Maya Render Settings under the Common Tab, set the “Frame/Animation ext” to “Single Frame”.
b. In the Maya Render Settings under the Common Tab, set the “Frame Range” to be the exact same number for the start and end frames. (eg. 233-233)
c. *After clicking the “Submit to Deadline” icon change the “Frame List” to be the exact same number for the beginning and end. Always make sure this is set correctly for any submission.
3. Submit the job as usual after filling out the rest of the required options.
*Option (c) can be thought of as an override. All options specified in the Submit to Deadline panel will supersede anything else in the scene. If you specify frame 1-50 in Maya but input 35-75 in the Deadline panel it will render 35-75 and the same goes for cameras.
Deadline Submission Guide
1.
a.
b.
c.
Common PitfallsPaint Effects
The paint effects brush library is in a different location on each operating system. Tha t means without accounting for the path differences any paint effects textures will not be found. Thankfully it’s a simple process to workaround this issue, all you need to do is copy the paint effects picture from the library to your sourceimages folder. It will work the same way any other texture does once it is linked.
The paint effects library can be found in Applications/Autodesk/maya2014/. Once there, right click on the maya.app and choose “Show package contents”, this will reveal the files Maya uses to run. Go into the “Contents” folder and the paint effects brushes will be in the “brushImages” folder (Some of the more advanced effects might also use the “brushes” and “brushShapes” folder). Copy the ones your scene is using and paste them into your sourceimages, don’t forget to relink them within the Maya scene.
Baking/Caching Simulations
Rigid/Soft Body DynamicsFor dynamic simulations, things like soft bodies and hard bodies using wind/gravity/etc, you will need to convert the animation into keys so that it can be carried to any computer. If you do not bake the simulation every computer will attempt to calculate the simulation and yield different results rendering your animation useless. In the case of the render farm it will start 7 of the 8 computers after the necessary initial frame, meaning the simulation will be completely ignored and no animation will take place.
To bake a simulation select the dynamic objects in your scene (either all at once or one by one, the method that works best will depend on the complexity of your scene and objects) and then go to Edit > Keys > Bake Simulation.
You are encouraged to read the following link which gives a simple rundown of what all the settings in the Bake Simulation option box mean.
http://download.autodesk.com/global/docs/maya2014/en_us/files/Soft_and_
Rigid_Bodies_Convert_rigid_body_animation_to_keys.htm
Dynamics - Cloth, Fluids, Particles, and HairThe same issues from the previous dynamics section apply here. In this case you will need to cache the dynamic simulation instead of baking keys.
To cache a simulation select the object(s) in your scene or outliner and make sure your menu bar is set to “Dynamics” or “nDynamics”, the distinction matters. If you’ve created a set of nWhatevers you’ll need to use the “nCache” under the nDynamics menu. If it’s regular particles you’ll need to use the cache option under “Solvers” in the regular Dynamics menu.
I would suggest setting the File Distribution option to “One file per frame” in the nCache option box. And again, it would be best to take 5-10 minutes to read the links below as everyone’s project will be different and some settings may need to be changed to accommodate that.
nCachehttp://download.autodesk.com/global/docs/maya2014/en_us/files/Caching_nCloth_Create_or_import_nCloth_caches.htm
Solver Cachehttp://download.autodesk.com/global/docs/maya2014/en_us/files/Solvers__Create_Particle_Disk_Cache_.htm
TerminologyAbsolute LinkA type of file path that specifies the full location of a file on a computer. A computer will attempt to find the file in the exact location specified regardless if it exists or not. The farm runs on a Windows operating system, OSX file paths will not exist, use relative links.
AOC_FileServerA combination of computers that holds the Deadline Repository files and the submissions server.
Job Monitor (Deadline)The Deadline Job Monitor allows you to automatically monitor the progress of a few specific jobs without having to refresh the Monitor.
Launcher (Deadline)The main use is to provide a means of remote communication between the Slave/Pulse and the Monitor/Configuration applications. For our purposes it will be used simply as an alternate method of starting up the Monitor or Job Monitor.
Monitor (Deadline)The Deadline Monitor application offers detailed information and control options for each job and slave in the Deadline Repository. It provides users a means of monitoring and controlling their jobs, and it gives administrators options for configuration.
PriorityThe numerical importance of a render job. Jobs with lower priority will always be pushed underneath jobs with a higher priority, regardless of the submission time-line.
RenderjobsA server that contains a set of files which keeps the nodes synchronized and rendering the correct batch of frames.
Slave/NodeA computer stripped to only its essential parts (motherboard, CPU, GPU, etc) and housed in a large case with other similar machines. These do all the heavy lifting when rendering files. There are 8 nodes, each one has 16 CPUs at 2.4GHz with 16 virtual CPUs.
Relative LinkA type of link Maya will interpret as a part of its base project folder structure. “sourceimages/test.tif ” looks in the sourceimages folder, “data/car.obj” looks in the data folder, and “clockpictures/minute_hand.jpg” looks in the clockpictures folder, granted if it’s real and resides in your project folder.
Strict Error CheckingIf disabled, Deadline will only fail on messages that it knows are fatal. Enable this option to have Deadline fail Maya jobs when Maya prints out any “error” or “warning” messages.
SubmissionsA server that is used to copy projects and pick up finished renders.
Task SizeThe Task Size is an important feature of the submission script. The number specified will determine how many frames each node renders in succession. Setting the number too high may reduce the effectiveness of the farm and setting the number too low raises the chance of each node stalling or crashing.
Deadline Submission Guide