day of defeat cover - ia600704.us.archive.org
TRANSCRIPT

U.S. $19.99 Can. $29.95 U.K. £12.99
DA
Y O
F D
EFEA
T™
PRIMA’S O
FFICIAL STRATEG
Y GU
IDE
EX
PLO
SIV
E
MU
LTIP
LA
YER
STR
ATEG
Y
Games/ActionPlatform: PC
The Prima Games logo is a registered trademark ofRandom House, Inc., registered in the United States andother countries. Primagames.com is a registered trademarkof Random House, Inc., registered in the United States.
primagames.com®
primagames.com®
This game has received thefollowing rating from the ESRBDebra Lockridge
David Cassady
© 2003 Valve L.L.C. All rights reserved. Day of Defeat, the Day of Defeat logo, Valve,and the Valve logo are trademarks or registered trademarks of Valve, L.L.C.
Detailed maps of all 15 game areas
Comprehensive missionstrategies
Stats on every class of soldier
Hints for getting the most out of your arsenal
Advanced tips for effectiveteam-based gameplay
Weapons and equipmentstats for both Allied and Axis fighters
Essential multiplayer strategies for total domination

PRIMA’S OFFICIAL STRATEGY GUIDE
DEBRA LOCKRIDGEDAVID CASSADY
PRIMA GAMESA DIVISION OF RANDOM HOUSE, INC.
3000 LAVA RIDGE COURT
ROSEVILLE, CA 95661
(800) 733-3000WWW.PRIMAGAMES.COM
™

Prima’s Official Strategy Guide
The Prima Games logo is a registered trademark ofRandom House, Inc., registered in the United States andother countries. Primagames.com is a registered trademarkof Random House, Inc., registered in the United States.
© 2004 by Prima Games. All rights reserved. No part of thisbook may be reproduced or transmitted in any form or byany means, electronic or mechanical, including photo-copying, recording, or by any information storage orretrieval system without written permission from PrimaGames. Prima Games is a division of Random House, Inc.
Product Manager: Sara WilsonProject Editor: Michelle Trujillo
© 2004-2003 Valve L.L.C. All rights reserved. Day of Defeat, the Day of Defeat logo, Valve, and the Valve logo are trademarks or registered trademarks ofValve, L.L.C.
All products and characters mentioned in this book are trademarks of theirrespective companies.
Please be advised that the ESRB rating icons, "EC", "K-A", “E”, "T", "M", "AO"and “RP” are copyrighted works and certification marks owned by theEntertainment Software Association and the Entertainment Software RatingBoard and may only be used with their permission and authority. Under nocircumstances may the rating icons be self-applied or used in connection withany product that has not been rated by the ESRB. For information regardingwhether a product has been rated by the ESRB, please call the ESRB at 1-800-771-3772 or visit www.esrb.org. For information regarding licensing issues,please call the ESA at (212) 223-8936. Please note that ESRB ratings only applyto the content of the game itself and does NOT apply to the content of thisbook.
IMPORTANT:Prima Games has made every effort to determine that the informationcontained in this book is accurate. However, the publisher makes no warranty,either expressed or implied, as to the accuracy, effectiveness, or completeness ofthe material in this book; nor does the publisher assume liability for damages,either incidental or consequential, that may result from using the informationin this book. The publisher cannot provide information regarding game play,hints and strategies, or problems with hardware or software. Questions shouldbe directed to the support numbers provided by the game and device manufac-turers in their documentation. Some game tricks require precise timing andmay require repeated attempts before the desired result is achieved.
ISBN: 0-7615-4350-3Library of Congress Catalog Card Number: 2003105572
™

TABLE OF CONTENTSChapter I—Introduction . . . . . . . . . . . . . . . . . . . . . . . . 4
Chapter II—Game Basics . . . . . . . . . . . . . . . . . . . . . . . 5
Chapter III—Classes . . . . . . . . . . . . . . . . . . . . . . . . . . 18
Allies (American) . . . . . . . . . . . . . . . . . . . . . . . . . . 19
Allies (British) . . . . . . . . . . . . . . . . . . . . . . . . . . . . . 27
German . . . . . . . . . . . . . . . . . . . . . . . . . . . . . . . . . . 31
Chapter IV—The Armory . . . . . . . . . . . . . . . . . . . . . . 38
Allied Weaponry . . . . . . . . . . . . . . . . . . . . . . . . . . . 46
British Weaponry . . . . . . . . . . . . . . . . . . . . . . . . . . 51
Axis Weaponry . . . . . . . . . . . . . . . . . . . . . . . . . . . . 54
Chapter V: Missions
Anzio . . . . . . . . . . . . . . . . . . . . . . . . . . . . . . . . . . . . 59
Avalanche . . . . . . . . . . . . . . . . . . . . . . . . . . . . . . . . 71
Caen . . . . . . . . . . . . . . . . . . . . . . . . . . . . . . . . . . . . . 79
Charlie . . . . . . . . . . . . . . . . . . . . . . . . . . . . . . . . . . . 90
Chemille . . . . . . . . . . . . . . . . . . . . . . . . . . . . . . . . . 101
Donner . . . . . . . . . . . . . . . . . . . . . . . . . . . . . . . . . . 109
Flash . . . . . . . . . . . . . . . . . . . . . . . . . . . . . . . . . . . . 118
Forest . . . . . . . . . . . . . . . . . . . . . . . . . . . . . . . . . . . 127
Glider . . . . . . . . . . . . . . . . . . . . . . . . . . . . . . . . . . . 135
Jagd . . . . . . . . . . . . . . . . . . . . . . . . . . . . . . . . . . . . 145
Kalt . . . . . . . . . . . . . . . . . . . . . . . . . . . . . . . . . . . . . 157
Kraftstoff . . . . . . . . . . . . . . . . . . . . . . . . . . . . . . . . 162
Merderet . . . . . . . . . . . . . . . . . . . . . . . . . . . . . . . . 170
Vicenza . . . . . . . . . . . . . . . . . . . . . . . . . . . . . . . . . . 180
Zalec . . . . . . . . . . . . . . . . . . . . . . . . . . . . . . . . . . . . 188
Chapter VI: Interviews . . . . . . . . . . . . . . . . . . . . . . . 200

™
4
Prima’s Official Strategy Guide
CHAPTER I:INTRODUCTIONA sharp ping rings in your ears as a high-caliber bullet zings past your ear. Mortarshells rain down on the beach, instantly crystallizing grains of sand and pelting youwith a storm of jagged glass. Soldiers, your friends and allies, drop to the ground
around you as the chatter of an enemy machine gun cuts through the air. Thesandbags around you provide minimal protection, but you sit perfectly still, heartpounding, knowing that moving in any direction could place you in a sniper’s
crosshairs. Mustering all of your courage and remembering your training, you pressforward against overwhelming odds. Victory is just one valiant act away, and this willbe your enemies’ Day of Defeat.
Day of Defeat is a multiplayer first-person shooter set during World War II and pitsthe Axis versus the Allies. The 15 missions are based on actual WWIIevents and locations. In each mission, both sides of the conflictmust complete a series of objectives before the other team does.This guide will help you battle past the waves of enemies as youmake your way to each objective.
Before diving into the fray, check out Game Basics beginningon page 5 for the lowdown on pulling your own weight incombat. Even if you’re familiar with first-person shooters,reading this chapter gives an immediate edge and allows youto maneuver like a pro from the very beginning.
The Soldier Classes and Weapons chapters provide a lookat the various classes and weapons available. The class ofsoldier you choose dictates your role in combat, makingthis an important selection. Get to know each of theroles, even those you choose not to take, so you canbetter know how to coordinate and attack.
When you think you’re ready, jump intoMissions, where we cover the missions indetail, with tried-and-true strategies that havebeen tested by the pros. We not only providevisual support on the best ways to battle through each mission, butyou’ll also find tips that give you advantages over other playersonline. Whether you choose to play as an Allied or Axis soldier, we’vegot you covered.
Heroes and legends are born in combat. Your squad is counting onyou, the enemy is advancing, and the fate of millions rests in yourhands. Gear up and move out. The Day of Defeat has arrived.
™

5
CHAPTER II: DAY OF DEFEAT BASICSCONTROLS REFERENCEMOVEMENT COMMANDS
Move Forward X or wMove Back Y or sTurn Left MTurn Right NMove Left (strafe) aMove Right (strafe) dJump QDuck DProne zSprint USwim Up ?Swim Down /Look Up }Look Down {Look Straight Ahead |Strafe Modifier ;Keyboard Look Modifier P
WEAPON COMMANDSPrimary Attack Mouse 1 or KSecondary Attack Mouse 2
Reload rWeapon Category 1 1Weapon Category 2 2Weapon Category 3 3Weapon Category 4 4Weapon Category 5 5Weapon Category 6 6Weapon Category 7 7Weapon Category 8 8Weapon Category 9 9Weapon Category 0 0Previous Weapon Mouse Wheel Up or [Next Weapon Mouse Wheel Down or ]Last Weapon q
Chapter II: Game Basics

™
6
Prima’s Official Strategy Guide
COMMUNICATIONUse Voice Communication f
Activate In-game GUI x
Chat Message y
Team Message u
GENERAL COMMANDSChange Class ,
Change Team .
Voice Menu 1 c
Voice Menu 2 v
Voice Menu 3 b
Drop Primary Weapon g
Drop Extra Ammo h
Use Item/Pick Up Grenades e
Open Map m
Minimap Zoom l
MISCELLANEOUSFlashlight n
Spray Logo t
Display Multiplayer Scores T
Take Screen Shot %
Quit Game A
* All controls can be edited to match personal preferences.
™

7
DAY OF DEFEAT 101Becoming a top-rank soldier takes a lot of practice and patience. As you learn thevarious maps and key locations for your team and your opponents, you’ll improve.Don’t be surprised if the first time you step into the game you’re overwhelmed,especially if playing with seasoned veterans. More experienced players move about themap in well-organized attack patterns and may unintentionally leave you behind. Itwon’t take long for you to learn in the thick of combat, and in no time you’ll feel rightat home, anticipating the actions of your enemies and allies. This chapter is designedto give you some pointers that veteran players will already know, so you can entercombat slightly ahead of the curve.
SOLDIER SELECTIONThe most important choice youmake in Day of Defeat is which classto play. This largely determinesyour role in combat, althoughnearly everyone plays each classdifferently. Look at Chapters 3 and4 for more information on eachclass and the weapons they use.Knowing the capabilities of eachclass helps you learn what to do incombat, and helps identifyweaknesses in your team.
GROUP TACTICSDay of Defeat relies heavily on large groups of players working together to achieve acommon goal. Thus the more organized a team is and the better they communicate,the more likely they are to dominate the battlefield. That doesn’t mean that a groupof complete strangers can’t be effective, but it does require that they quickly meld intoa team and listen closely to each other.
Soldiers working together in the field can provide support for each other. Bringingammunition to MG positions, providing cover fire during an advance, and creatingdistractions to draw the enemy away from certain areas ensure that enough peoplereach a target so the objective can be completed. It also ensures that not everyone onthe team is attempting to do the same thing, making the offense too weak or leavingcritical areas unattended.
Chapter II: Game Basics

8
Prima’s Official Strategy Guide
The easiest way to coordinate a group is by using voice communication. A cheapmicrophone costs around $5. Attach it to your computer to talk back and forthwith your team. If you can’t afford a microphone,or you don’t like the idea, you can also use in-game communication. Type messages to yourteam or use the preset voice commands and handsignals. Or use the in-game map to notify your
team of what’s happening on the battlefield. Itdoesn’t matter how you communicate—so long as
you do. In most games where one side iscompletely dominating another it’s due to good
communication and teamwork versus nocommunication and poor teamwork.
USING THE MAP
Press m to view a map that shows a basic layout of the mission area and thelocations of the main objectives, as well as the locations of your allies at any givenmoment. If you press D while the map is in full-screen mode, you can edit it. Addicons to pinpoint areas of enemy resistance, or even the location of critical items. Anytime something is added to the map everyone on your team sees a quick flash on theright side of the screen. This lets them know the map has been updated with newinformation. It’s an excellent way to coordinate an attack when not everyone on yourteam has a microphone and sound. Use it wisely and it will help your team dominatethe opposition.
™
™

9
OBJECTIVESEvery mission has an objective. Insome, each team must capture allof the flags, or both teams try todestroy certain enemy targets, orone team defends multiple targetswhile the other team attempts todestroy them within a time limit.Mission objectives are alwaysclearly stated before you join agame. Read them so you knowwhat’s going on before joining thegame. The objective locations are
clearly marked on the in-game map for both sides of the conflict. You can see yourenemies’ objectives and they can see yours.
CAPTURING FLAGSIn missions where you mustcapture flags, you actually see aflag in the area designated on themap. To capture a flag, stand at itsbase and wait for the icon at thetop of the screen to fill with yourteam’s logo (Axis or Allies). Thelength of time required to capturethe flag, often referred to as“capping the flag,” varies greatly.Some are instantaneous whileothers require several seconds.
Once a capture begins, it isn’t necessary to remain exactly at the flag’s base. You canseek cover within a few steps’ radius around the base. If you leave the area, thecapture is broken and you must try again.
Some flags require that two soldiers from the same team wait at the flag togetherto capture it. This requires a great deal of planning and coordination to ensure thattwo soldiers arrive at the same point at the same time. Not all objectives that must becaptured are flags. Some are enemy resources or installations. However, they requirethe same steps and generally, if you look closely enough, you’ll see a flag on themsomewhere.
Chapter II: Game Basics
10
Prima’s Official Strategy Guide
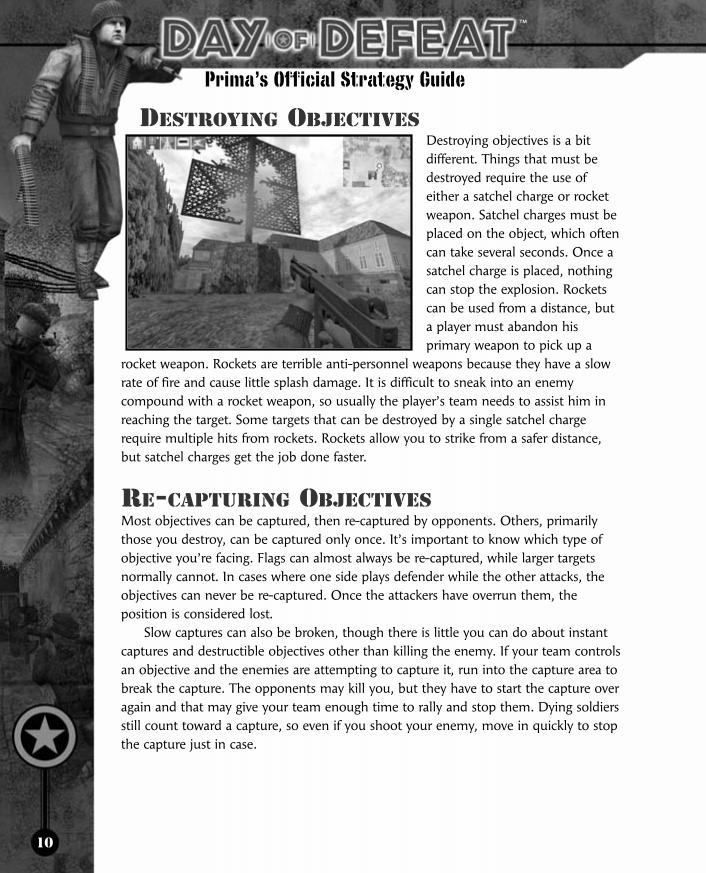
DESTROYING OBJECTIVESDestroying objectives is a bitdifferent. Things that must bedestroyed require the use ofeither a satchel charge or rocketweapon. Satchel charges must beplaced on the object, which oftencan take several seconds. Once asatchel charge is placed, nothingcan stop the explosion. Rocketscan be used from a distance, buta player must abandon hisprimary weapon to pick up a
rocket weapon. Rockets are terrible anti-personnel weapons because they have a slowrate of fire and cause little splash damage. It is difficult to sneak into an enemycompound with a rocket weapon, so usually the player’s team needs to assist him inreaching the target. Some targets that can be destroyed by a single satchel chargerequire multiple hits from rockets. Rockets allow you to strike from a safer distance,but satchel charges get the job done faster.
RE-CAPTURING OBJECTIVESMost objectives can be captured, then re-captured by opponents. Others, primarilythose you destroy, can be captured only once. It’s important to know which type ofobjective you’re facing. Flags can almost always be re-captured, while larger targetsnormally cannot. In cases where one side plays defender while the other attacks, theobjectives can never be re-captured. Once the attackers have overrun them, theposition is considered lost.
Slow captures can also be broken, though there is little you can do about instantcaptures and destructible objectives other than killing the enemy. If your team controlsan objective and the enemies are attempting to capture it, run into the capture area tobreak the capture. The opponents may kill you, but they have to start the capture overagain and that may give your team enough time to rally and stop them. Dying soldiersstill count toward a capture, so even if you shoot your enemy, move in quickly to stopthe capture just in case.
™
™
11
ALTERNATE PATHSIn Day of Defeat there is more than one way to get just about anywhere in each mission.Don’t use the same tired path each time you run onto the battlefield. Experiment andlook for a variety of ways to reach targets. Load up each map on your own and exploreit at your leisure. Players who know a map well are more effective than those whodon’t; they know where to go and what dangers lurk around each corner.
If the enemy has one area choked off, there’s almost always a way to get around itand come up on your enemy from behind. Extremely well-organized teams make thisdifficult, but even large teams can rarely cover every angle of approach. If you’re beingcut down by an entrenched enemy, don’t keep running into the same area hopingyou’ll get your shot off first. Look for an alternate path around the enemy and surprisehim from a different angle. A smart player shifts positions after every kill to keep hislocation a secret, so be ready for the unexpected.
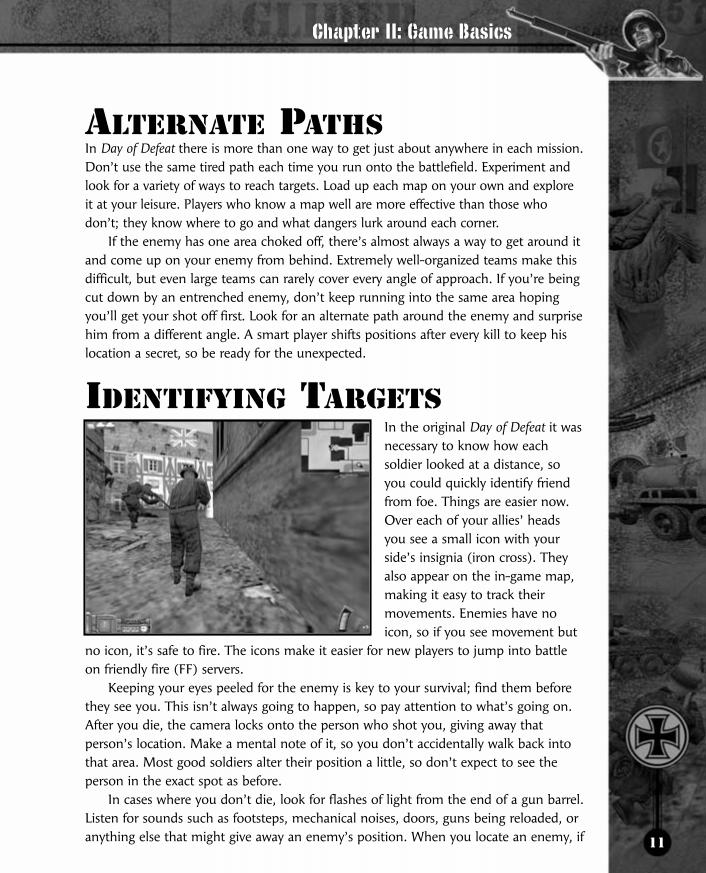
IDENTIFYING TARGETSIn the original Day of Defeat it wasnecessary to know how eachsoldier looked at a distance, soyou could quickly identify friendfrom foe. Things are easier now.Over each of your allies’ headsyou see a small icon with yourside’s insignia (iron cross). Theyalso appear on the in-game map,making it easy to track theirmovements. Enemies have noicon, so if you see movement but
no icon, it’s safe to fire. The icons make it easier for new players to jump into battleon friendly fire (FF) servers.
Keeping your eyes peeled for the enemy is key to your survival; find them beforethey see you. This isn’t always going to happen, so pay attention to what’s going on.After you die, the camera locks onto the person who shot you, giving away thatperson’s location. Make a mental note of it, so you don’t accidentally walk back intothat area. Most good soldiers alter their position a little, so don’t expect to see theperson in the exact spot as before.
In cases where you don’t die, look for flashes of light from the end of a gun barrel.Listen for sounds such as footsteps, mechanical noises, doors, guns being reloaded, oranything else that might give away an enemy’s position. When you locate an enemy, if
Chapter II: Game Basics

12
Prima’s Official Strategy Guide
he’s deeply entrenched, let your team know about him. They can assist in elimi-nating the threat, and the knowledge may help prevent unnecessary deaths.
ON THE MOVEGetting around the mission area isn’t as straightforward as it seems. Lots of shortcutsrequire finesse, and some objects may not be obvious on your first outing.The environment can be altered. Satchel charges and rockets can blow holes in
walls, destroy bunkers, eliminate sniper locations, and alter larger landmarks. Exploreevery path fully and don’t overlook anything. Even the smallest crack in a wall maybe a valuable hiding spot or the entrance to a grander area.
CLIMBINGLadders let you climb up anddown steep surfaces, but ropesand trellises can also be used.Ladders are nearly flush with thesides of most buildings and easilyoverlooked. At the top of someobjects, the climbable area endswithout an obvious destination.Look to the sides. Sometimes it’snecessary to crouch on the ladderand drop to the side whilepushing forward to reach an open
window or ledge. Be careful: Long falls hurt and can kill.
DUCK JUMPINGDuck jumping involves jumping then immediately ducking while still airborne. It canbe done while moving, or while standing still and pressing toward an object. Thisallows you to leap over walls and onto surfaces that would otherwise be too tall. It’sbest related to hurdling or high jumping. You’re leaping into the air, then quicklypulling your legs up, so you can land on a high surface or pass over a tall object.Master the duck jump and you can take indirect routes over walls and into small holesthat would otherwise be unreachable.
™
™

13
BUNNY HOPPINGBunny hopping involves the playerhopping continuously, making itharder for enemies to target him.In Day of Defeat bunny hoppinghas been all but eliminated. Eachtime a player jumps it saps a bit ofthe player’s stamina. Once thestamina bar is depleted, the playercan’t jump until he rests.
Sometimes a bunny hop cansave your life—especially whenfaced with an enemy sporting
superior firepower or a faster rate of fire. Don’t just stand there andget shot. Move back and forth, duck in and out, bounce around as
much as you can and you may survive long enough to get off asecond shot.
STALKING PREYStay crouched or prone and you can move silently, which isnecessary for sneaking up on enemies. Sound is the first thing
to betray a soldier’s position andsometimes the only warning a
soldier has of his impending doom. Keepquiet and get to know all of the sounds around the
area. Doors creak, footsteps pound on the pavement, soldiersgrunt as they jump, clips pop as weapons are reloaded, and there’salways the chatter of machine guns. Eventually, you’ll be able totell an enemy from an ally by the sound of his weapon.
Use the in-game map often. Keep track of your allies’locations. While you’re listening to the environment it’s possible
to tell if the soldier walking on the other side of a door is friend orfoe by looking for an icon on the map in that area. If not, go inwith guns blazing.
Chapter II: Game Basics
14
Prima’s Official Strategy Guide
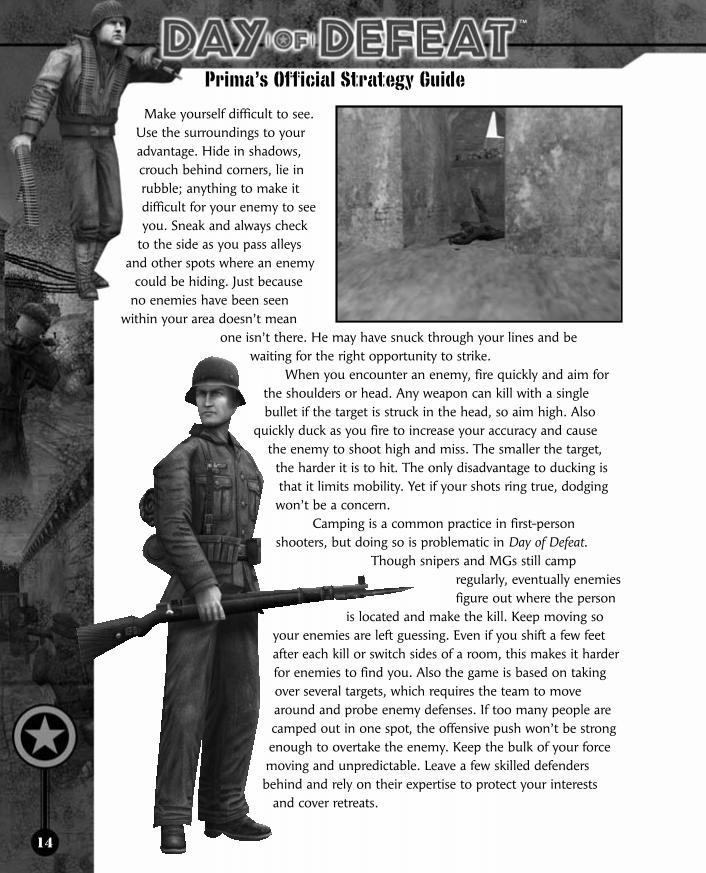
Make yourself difficult to see.Use the surroundings to youradvantage. Hide in shadows,crouch behind corners, lie inrubble; anything to make itdifficult for your enemy to seeyou. Sneak and always check
to the side as you pass alleysand other spots where an enemy
could be hiding. Just becauseno enemies have been seen
within your area doesn’t meanone isn’t there. He may have snuck through your lines and be
waiting for the right opportunity to strike.When you encounter an enemy, fire quickly and aim for
the shoulders or head. Any weapon can kill with a singlebullet if the target is struck in the head, so aim high. Also
quickly duck as you fire to increase your accuracy and cause the enemy to shoot high and miss. The smaller the target,
the harder it is to hit. The only disadvantage to ducking isthat it limits mobility. Yet if your shots ring true, dodgingwon’t be a concern.
Camping is a common practice in first-personshooters, but doing so is problematic in Day of Defeat.
Though snipers and MGs still campregularly, eventually enemiesfigure out where the person
is located and make the kill. Keep moving soyour enemies are left guessing. Even if you shift a few feetafter each kill or switch sides of a room, this makes it harderfor enemies to find you. Also the game is based on takingover several targets, which requires the team to movearound and probe enemy defenses. If too many people arecamped out in one spot, the offensive push won’t be strongenough to overtake the enemy. Keep the bulk of your forcemoving and unpredictable. Leave a few skilled defendersbehind and rely on their expertise to protect your interests
and cover retreats.
™
™

15
WEAPON USAGEAccuracy is the number one concern with most weapons. Sniper scopes sway, MGsand SMGs kick and are hard to control, and rifles need to be pinpoint accurate inmost fights. It’s possible to increase your accuracy with just a couple of simple actions.
MACHINE GUNS AND SUBMACHINE GUNSMachine guns (MGs) andsubmachine guns (SMGs) have alot of kick, which forces the barrelupward when firing continuouslyfor several seconds. If you don’tfight the kick, the gun fires intothe air rather than at the desiredtarget. Kick is difficult to battlewhile moving. Pull back on yourmouse while firing and thetargeting reticle should stay in thesame general area, though youraccuracy will be low. When shooting with an SMG or MG while moving, aim low onthe target’s body, so the natural kick sprays the target’s torso with bullets. If you aimtoo high at first, the shots fly over the target’s head. Accuracy is improved if theplayer stops before or while shooting, but these weapons with a high rate of fireremain inaccurate.
To improve the accuracy of either weapon, duck or go prone to reduce kick andbetter balance the gun. MGs can also be deployed on bipods while the player is in theprone position, which makes them easy to control and deadly accurate, but pins theuser down and makes him an easier target.
Located throughout everymission are MG nests. The mostobvious MG nests are sandbagbarricades on which the MG canbe rested. Many other objects canalso be used as MG nests. Theseobjects are usually windowsills,overturned tables, short walls, lowledges, boxes, and anything elsethat’s approximately waist high ona soldier.
Chapter II: Game Basics
16
Prima’s Official Strategy Guide
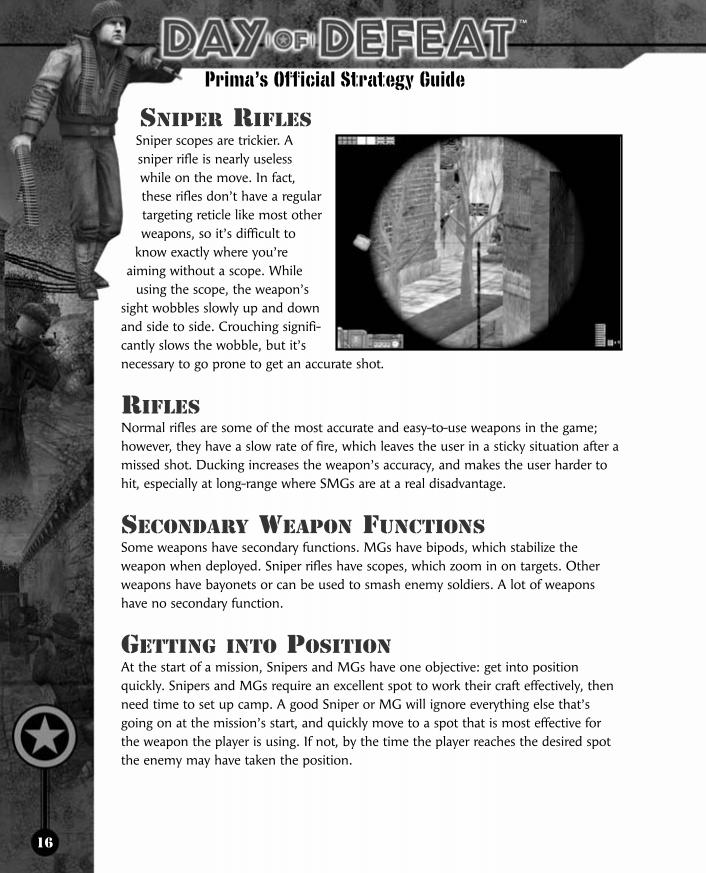
SNIPER RIFLESSniper scopes are trickier. Asniper rifle is nearly uselesswhile on the move. In fact,these rifles don’t have a regulartargeting reticle like most otherweapons, so it’s difficult to
know exactly where you’reaiming without a scope. While
using the scope, the weapon’ssight wobbles slowly up and downand side to side. Crouching signifi-cantly slows the wobble, but it’snecessary to go prone to get an accurate shot.
RIFLESNormal rifles are some of the most accurate and easy-to-use weapons in the game;however, they have a slow rate of fire, which leaves the user in a sticky situation after amissed shot. Ducking increases the weapon’s accuracy, and makes the user harder tohit, especially at long-range where SMGs are at a real disadvantage.
SECONDARY WEAPON FUNCTIONSSome weapons have secondary functions. MGs have bipods, which stabilize theweapon when deployed. Sniper rifles have scopes, which zoom in on targets. Otherweapons have bayonets or can be used to smash enemy soldiers. A lot of weaponshave no secondary function.
GETTING INTO POSITIONAt the start of a mission, Snipers and MGs have one objective: get into positionquickly. Snipers and MGs require an excellent spot to work their craft effectively, thenneed time to set up camp. A good Sniper or MG will ignore everything else that’sgoing on at the mission’s start, and quickly move to a spot that is most effective forthe weapon the player is using. If not, by the time the player reaches the desired spotthe enemy may have taken the position.
™
™
17
GRENADESGrenades are fun to use, but they can be deadly. A grenade blows up five seconds afterit’s released. This gives the opposition a few moments to move away from the blast,which limits a grenade’s usefulness. When a grenade is tossed, a small icon appears onthe map showing its trajectory and where it lands. Quick enemies can pick up enemygrenades and hurl them back. Nonetheless grenades are good weapons for flushingout enemies and taking out large groups.
PICKING UP WEAPONSAll dropped weapons can be picked up; so switch your empty weapon for one with atleast partial ammunition. To pick up guns, a player must first drop his primaryweapon, then walk over the weapon to be picked up. Satchel charges and othermission objectives are picked up automatically when walked over unless the player isalready carrying a mission item.
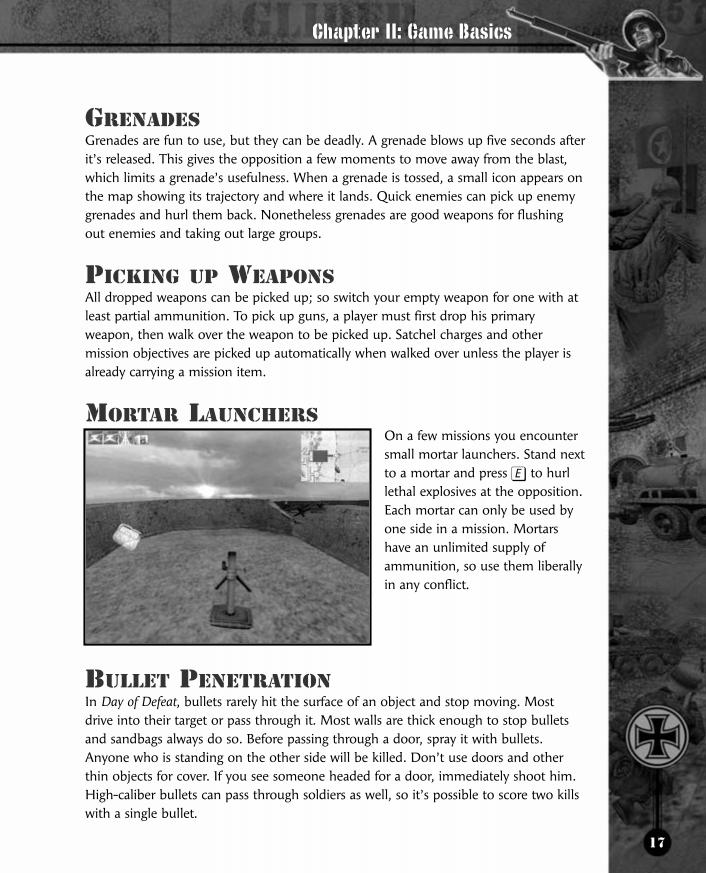
MORTAR LAUNCHERSOn a few missions you encountersmall mortar launchers. Stand nextto a mortar and press e to hurllethal explosives at the opposition.Each mortar can only be used byone side in a mission. Mortarshave an unlimited supply ofammunition, so use them liberallyin any conflict.
BULLET PENETRATIONIn Day of Defeat, bullets rarely hit the surface of an object and stop moving. Mostdrive into their target or pass through it. Most walls are thick enough to stop bulletsand sandbags always do so. Before passing through a door, spray it with bullets.Anyone who is standing on the other side will be killed. Don’t use doors and otherthin objects for cover. If you see someone headed for a door, immediately shoot him.High-caliber bullets can pass through soldiers as well, so it’s possible to score two killswith a single bullet.
Chapter II: Game Basics

™
18
Prima’s Official Strategy Guide
CHAPTER III: CLASSESThe most important decision you’ll make while playing Day of Defeat is your class.Each side of the conflict, Axis and Allies, has multiple classes from which to choosebefore each mission. The class you choose determines your role in the comingconflict. Why? Each class has a particular weapon load, which tends to have a
specific purpose. For instance, those equipped with riflesand submachine guns (SMGs) are normally theaggressors. They’re mobile, canreload quickly, and can shootquickly when necessary.Soldiers carrying sniper riflesand machine guns (MGs)tend to be defenders. They’reineffective while on the moveand fare much better when theycan find a spot to sit and cover aconcentrated area. Often these soldiers are the lastline of defense. Consider what role suits youbest before choosing. You can also switchclasses during a battle if you find the classyou’ve chosen isn’t needed, or if perhaps youfind a weakness in your squad’s composition.
By dropping your
weapon and picking
up another, you
essentially change your class in the
middle of combat. Familiarize
yourself with the ins and outs of
every class, so you’ll know what to
do in every situation, no matter
what weapon you’re carrying.
™
Tip

19
ALLIES (AMERICAN)
RIFLEMAN
The Rifleman, a.k.a. “light infantry,” is agood, all-around class and is deadly atboth long and short range. The Garandrequires a skilled hand, so the class isn’trecommended for new players. Riflemenare primarily effective at medium to longrange, because the Garand has a low rateof fire and relatively small clips. The highpowered Garand rifle delivers one-hit killsto the head, so it can also be effective atclose-range, assuming the player is quickto fire and very accurate. A Rifleman can
act much like a Sniper but has the advantage of added mobility, but lacking a Sniper’sscope. Riflemen make excellent scouts and can easily probe enemy defenses.
Chapter III: Classes
Primary Weapon
M1 Garand Rifle
Primary Ammo Loadout 11 clips (8 rounds each)
Secondary Weapon
Colt 1911 Pistol,Field Combat Knife
Grenades
Fragmentation Grenade x2

20
Prima’s Official Strategy Guide
STAFF SERGEANT
The Staff Sergeant is a class designed forassaults, as well as close-in engagements.The M1 Carbine is a happy mediumbetween a rifle and an SMG. While notas powerful as a Garand, it has less recoil,a faster rate of fire, and is more accurate,making it more useful in close-rangecombat yet maintaining a lethal bite atlong range. Staff Sergeants are especiallyeffective in tunnel environments wherelong hallways are often combined with
twisting corridors. They rapidly adjust to changing environments, making them veryeffective front-line troops.
™
™
Primary Weapon
M1 Carbine
Primary Ammo Loadout 11 clips (15 rounds each)
Secondary Weapons
Colt 1911 Pistol, Field Combat Knife
Grenades
Fragmentation Grenade x1

The Master Sergeant is a class designedfor short-range, inner-city fighting. This isone of the best classes for new players asthere is some leniency in accuracy.Equipped with a Thompson SMG, thesefighters are lethal at close range. They canresort to “spray and pray” tactics,covering a wide area with a hail ofbullets. The Master Sergeant is at anextreme disadvantage against snipers butfares well when cutting through buildings
and tunnels. In medium- to long-range battles, the Master Sergeant can lay downsuppressive cover, clearing the way for other troops.
21
Chapter III: Classes
MASTER SERGEANTPrimary Weapon
M1A1 Thompson Submachine Gun
Primary Ammo Loadout 7 clips (30 rounds each)
Secondary Weapons
Colt Pistol, Field Combat Knife
Grenades
Fragmentation Grenade x1

™
22
Prima’s Official Strategy Guide
™
Sergeants are very similar in ability toMaster Sergeants. Both classes are moreadept at close-range fighting than at long-range battles. The Sergeant’s Greasegun isslightly better than the Thompson inmost areas, but the Greasegun’s rate offire is slower. Despite the Thompson’sslightly lower stats, it’s still the AmericanSMG of choice for most players due tothe higher rate of fire. Either class,Sergeant or Master Sergeant, is an
excellent choice for players who consider themselves tunnel crawlers. For new players,the Sergeant is ideal, though we recommend upgrading to the Master Sergeant assoon as possible.
SERGEANTPrimary Weapon
M3A1 “Greasegun”
Primary Ammo Loadout 7 clips (30 rounds each)
Secondary Weapons
Colt 1911 Pistol, Field Combat Knife
Grenades
Fragmentation Grenade x1

23
Chapter III: Classes
Snipers play a unique role in combat.They’re mobile defenders who canquickly move from location to locationand set up camp. They hide in theshadows and in the highest towerslooking for targets. Good Snipers arelethal, as they require only a single bulletto eliminate an enemy. Yet the role of aSniper isn’t for everyone. Being a goodSniper means sitting in one location forlong periods of time, looking and
listening for nearby enemies. It requires quick reflexes combined with a very steadyhand. Location and movement are key elements to becoming a first-class Sniper. Youmust be able to immediately identify valuable Sniping locations and know how to getinto position quickly at the beginning of any mission. A skilled and disciplined Sniperis a huge asset to any team.
SNIPERPrimary Weapon
1903A4 Springfield Sniper Rifle
Primary Ammo Loadout 11 clips (5 rounds each)
Secondary Weapons
Colt 1911 Pistol, Field Combat Knife
Grenades
None

™
24
Prima’s Official Strategy Guide
™
The Support Infantry is a hybrid of theRifleman and Sergeant classes. His BARpacks enough firepower and accuracy tobe deadly at almost any range, althoughhis clip capacity may limit him onassaults. Support Infantry are mainlyuseful in holding positions or harassingenemy soldiers at choke points, butskilled players can handle the BARalmost as if it were an SMG rather thanan MG. The BAR sports a bipod, which
can be deployed on MG nests and while prone to provide superb stability andaccuracy. However, it limits the player’s movement, making him an easier target forskilled soldiers.
SUPPORT INFANTRYPrimary Weapon
Browning Automatic Rifle (BAR)]
Primary Ammo Loadout 12 clips (20 rounds each)
Secondary Weapons
Colt 1911 Pistol, Field Combat Knife
Grenades
Fragmentation Grenade x1
25
Chapter III: Classes
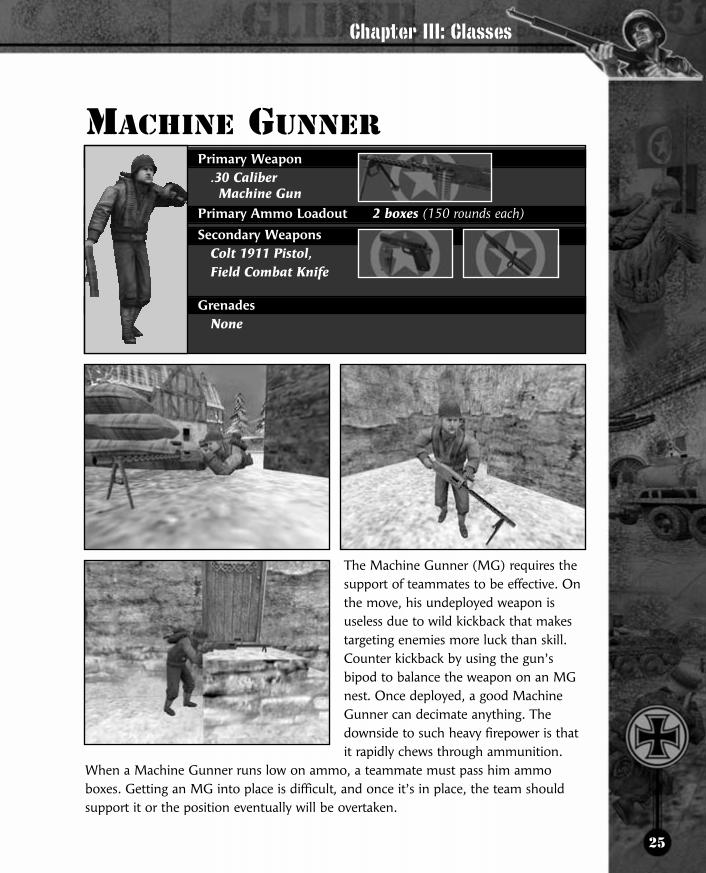
The Machine Gunner (MG) requires thesupport of teammates to be effective. Onthe move, his undeployed weapon isuseless due to wild kickback that makestargeting enemies more luck than skill.Counter kickback by using the gun’sbipod to balance the weapon on an MGnest. Once deployed, a good MachineGunner can decimate anything. Thedownside to such heavy firepower is thatit rapidly chews through ammunition.
When a Machine Gunner runs low on ammo, a teammate must pass him ammoboxes. Getting an MG into place is difficult, and once it’s in place, the team shouldsupport it or the position eventually will be overtaken.
MACHINE GUNNERPrimary Weapon
.30 Caliber Machine Gun
Primary Ammo Loadout 2 boxes (150 rounds each)
Secondary Weapons
Colt 1911 Pistol, Field Combat Knife
Grenades
None

™
26
Prima’s Official Strategy Guide
™
Airborne troops appear only on “Para” maps. Paratrooperscan select from any normal Allied weapons, as well as
Paratrooper-specific weapons, such as the Greasegun andfolding stock Carbine. As with other classes, Paratroopers
often carry a number of grenades depending upon theirprimary weapon.
ALLIED PARATROOPS

27
Chapter III: Classes
The Rifleman carries the No 4 MK1Enfield, one of the most accurate riflesduring World War II. Riflemen combinemobility with power and accuracy.They’re great on the move and can act asSnipers when necessary. Though moreadapt at medium- to long-range fighting,the Rifleman can be deadly in close-rangebattles, but quick aim is key. In theconfines of buildings and tunnels,Riflemen are at an extreme disadvantage
when faced with a soldier packing an SMG, due to the Enfield’s slow rate of fire.
ALLIED (BRITISH)
RIFLEMANPrimary Weapon
No 4 Mk1 Lee Enfield
Primary Ammo Loadout 11 clips (10 rounds each)
Secondary Weapons
Webley Revolver, Fairbairn Sykes
Combat KnifeGrenades
Mills Bomb x2

™
28
Prima’s Official Strategy Guide
™
Sergeant Majors are strong on the assault.The light recoil of the Sten is key to theSergeant Major’s mobility on thebattlefield. This excellent close-in weaponwas the choice for many commandosthroughout World War II. It’s ideal forsoldiers who use the back roads andalleys rather than the main paths.Though severely limited in long-rangecombat, the Sergeant Major can lay downa spread of cover fire to protect his allies
as they advance. The Sergeant Major is the best choice for new players, and deadlywhen guided by the hands of a skilled vet.
SERGEANT MAJORPrimary Weapon
Sten MKII
Primary Ammo Loadout 7 clips (30 rounds each)
Secondary Weapons
Webley Pistol, Fairbairn Sykes
Combat KnifeGrenades
Mills Bomb x1

29
Chapter III: Classes
Carrying one of the finest sniper weaponsof the war, this class can stifle nearly anyattack. Marksmen are nearly identical tothe American Sniper. Good positioningand movement are the keys to this class’ssurvival. Identifying valuable snipinglocations and getting into position quicklyat every mission’s beginning is key. Engagethe enemy and move to another location.Your muzzle flash gives you away if youstay in one spot too long.
MARKSMANPrimary Weapon
Enfield No 4(T) Sniper Rifle
Primary Ammo Loadout 11 clips (10 rounds each)
Secondary Weapons
Webley Revolver, Fairbairn Sykes
Combat KnifeGrenades
None
™
30
Prima’s Official Strategy Guide
™
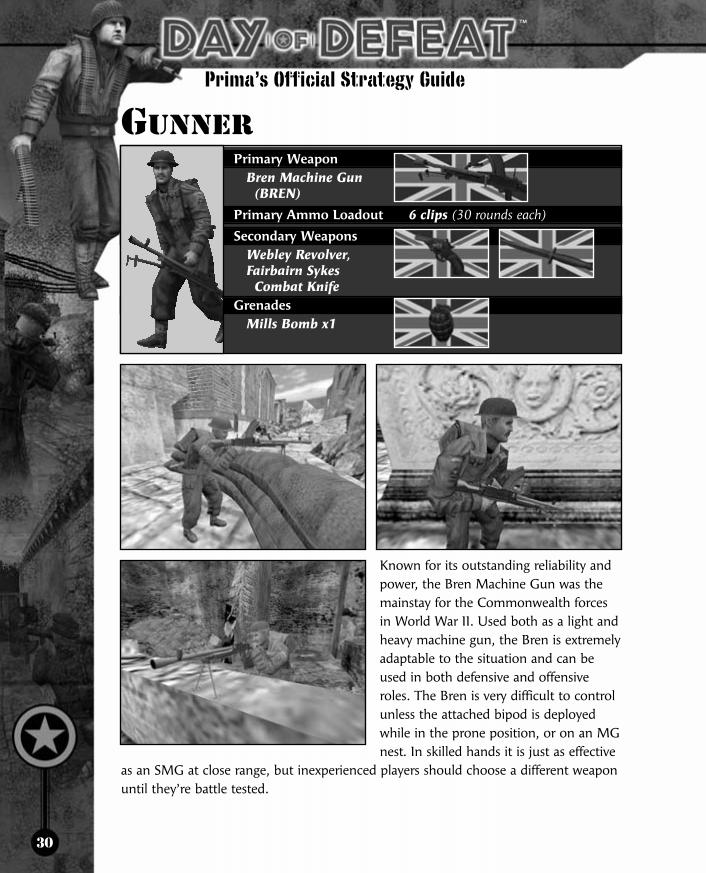
Known for its outstanding reliability andpower, the Bren Machine Gun was themainstay for the Commonwealth forcesin World War II. Used both as a light andheavy machine gun, the Bren is extremelyadaptable to the situation and can beused in both defensive and offensiveroles. The Bren is very difficult to controlunless the attached bipod is deployedwhile in the prone position, or on an MGnest. In skilled hands it is just as effective
as an SMG at close range, but inexperienced players should choose a different weaponuntil they’re battle tested.
GUNNERPrimary Weapon
Bren Machine Gun (BREN)
Primary Ammo Loadout 6 clips (30 rounds each)
Secondary Weapons
Webley Revolver, Fairbairn Sykes
Combat KnifeGrenades
Mills Bomb x1

31
Chapter III: Classes
The Grenadier is the Axis answer to theAllied Rifleman. Sporting a very accurate,powerful rifle with attached bayonet, healso has two grenades with which tocause havoc. Though excelling atmedium- to long-range combat, theGrenadier can also be deadly at close-range battles if guided by a sure andexperienced hand. The K98 has a slowrate of fire, which presents problemswhen faced with an SMG at close range.
If you choose the Grenadier, take the main routes and pick your enemies off from adistance. The Grenadier is a difficult class to master and therefore isn’t suggested forfirst-time players.
GERMAN GRENADIER
Primary Weapon
Karbiner 98k Rifle (with Bayonet)
Primary Ammo Loadout 13 clips (5 rounds each)
Secondary Weapons
Luger ’08 Pistol,
Field Spade
Grenades
Stielhandgranate 24 x2

™
32
Prima’s Official Strategy Guide
The Stosstrüppe class carries Germany’sreply to the US M1 Garand and SovietSVT40 rifles. Though not as powerful asthe K98, it has a faster rate of fire andstill causes substantial damage. Good forboth long- and short-range fighting, theK43 allows a great deal of versatility inbattle. Stosstrüppes make great front-linefighters in every mission.
STOSSTRÜPPEPrimary Weapon
Karbiner 43 Semi-Automatic Rifle
Primary Ammo Loadout 8 clips (10 rounds each)
Secondary Weapons
Luger ’08 Pistol, Field Spade
Grenades
Stielhandgranate 24 x2

33
Chapter III: Classes
Like the Allied Sergeant, the Unteroffizieris designed for assaults, as well as close-in engagements. This class is very similarto the Sturmtrüppe class, although theMP40 trades damage for reduced recoil.The Unteroffizier is the best Axis classfor first-time players, though you shouldupgrade to the Sturmtrüppe as soon asyou can properly control your weapon inthe heat of battle. Unteroffiziers arefront-line fighters who excel in tighthallways and tunnels.
UNTEROFFIZIERPrimary Weapon
Machinenepistole 40 (MP40)
Primary Ammo Loadout 7 clips (31 rounds each)
Secondary Weapons
Luger ’08 Pistol, Field Spade
Grenades
Stielhandgranate 24 x1

™
34
Prima’s Official Strategy Guide
The Sturmtrüppe class carries the first trueassault rifle in history. This class can effec-tively perform almost any role. TheSTG44’s medium-sized round providesknock-down power while keeping recoil toa minimum. The STG44 is best fired inshort two- to three-shot bursts. This is thebest Axis class for players who like to fightin buildings and tunnels. However, theSturmtrüppe should avoid wide-open areaswhere rifles have a definite advantage.
STURMTRÜPPEPrimary Weapon
STG44 Assault Rifle
Primary Ammo Loadout 7 clips (30 rounds each)
Secondary Weapons
Luger ’08 Pistol, Field Spade
Grenades
Stielhandgranate 24 x1

35
Chapter III: Classes
Scharfschütze have a distinct role incombat. They quickly move fromlocation to location and set up campdefending Axis locations. They lurk in theshadows seeking targets. TheScharfschütze can kill with a single bullet,but this role isn’t for everyone. Being agood Scharfschütze means sitting in onelocation for long periods of time, lookingand listening for nearby enemies. Itrequires quick reflexes combined with a
very steady hand. Location and movement are key elements to survival. AScharfschütze must be able to immediately identify valuable sniping locations and getinto position quickly at the beginning of a mission. A skilled and disciplinedScharfschütze is a huge asset to any team.
SCHARFSCHÜTZEPrimary Weapon
K98 High Turret Sniper
Primary Ammo Loadout 13 clips (5 rounds each)
Secondary Weapons
Luger ’08 Pistol, Field Spade
Grenades
None

™
36
Prima’s Official Strategy Guide
The Machine Gunner was the backboneof German military doctrine, and in turn,the MG Schütze is very important to anysquad. Like its allied counterpart, the MGSchütze requires support on the moveand extra ammunition once it’s deployed.Although the MG42 provides more rawfirepower, the MG34 trades clip capacityand rate of fire for accuracy and lighterrecoil. MGs are critical to any force. Theycan hold a position against large groups
of enemies, so long as ammunition is regularly brought to the MG. Though theseguns are difficult to control, they can be deployed on MG nests or in the proneposition, making them very accurate.
MG SCHÜTZEPrimary Weapon
MG42 Machine Gun or
MG34 Machine GunPrimary Ammo Loadout
2 boxes (250 rounds each) or 5 cans (75 rounds each)
Secondary Weapons
Luger ’08 Pistol, Field Spade
Grenades
None

37
Chapter III: Classes
AXIS PARATROOPS(FALLSCHIRMJAGER)
Fallschirmjager troopsappear on only a few maps.
Paratroopers can select from anynormal Axis weapon, as well asParatrooper-specific weapons(the FG42). As with normal
classes, they often carry anumber of grenadesdepending upon the primary
weapon that they choose. The FG42 issomewhere between a rifle and an SMG. It
can be equipped with a bipod or a scope, butit is not as powerful as a true rifle or as fast as anormal SMG. Be careful when choosing thescoped version, as it’s easy to confuse with asniper rifle.

™
38
Prima’s Official Strategy Guide
CHAPTER IV:THE ARMORYCHOOSING A SIDEARMWeapons chosen at the beginning of a mission determine the roles of all involved.Some weapons are best used while on the move, while others are effective only whileyou’re stationary. Many are used to storm the enemy base, but some are used toguard key locations. Just because you pick a certain weapon doesn’t mean you have touse it like every other player, but it’s important to know the basics of using each styleof firearm. This way, you’ll be versatile in combat and a greater asset to your team.
WEAPON TYPESBefore each mission, there are four types of weapons to choose from. These includerifles, submachine guns (SMGs), machine guns (MGs), and sniper rifles. Most classesalso come equipped with a pistol, a melee weapon, and grenades. Plus there are alsorocket weapons and explosive packs, known as satchel charges, which can occasionallybe found on the field.
RIFLES
Rifles are designed for range, accuracy, and power, making them ideal medium- tolong-range weapons. However, they sacrifice ammunition capacity and rate of fire.Most rifles can down an enemy soldier with a single shot, though some are lesspowerful. Players with quick reflexes and accurate hands will find rifles fitting nearlyevery situation.
™

39
Rifles are at their greatest disadvantage when
faced with SMGs at close range. In most cases
you only have time for one shot. Should you
miss, dance around, duck behind cover, or jump. Do anything
except stand still to have time for a second shot.
SUBMACHINE GUNS (SMGS)
Submachine guns trade accuracy and damage for a high rate of fire and largerammunition supplies. They’re designed for close-range fighting in buildings andtunnels. It’s also possible to use them for cover fire while one’s allies advance on atarget. SMGs are recommended for new players. They still require quick reflexes in afight, but accuracy is secondary; just point and shoot.
SMGs often have a large amount of kickback, so
they can be difficult to control under sustained
fire conditions. The gun pushes upward to the
point where it’s shooting directly overhead unless the user
counters the kick. Pull back on your mouse as you fire to keep
your sights on a target. Try shooting at an enemy’s feet or
midsection. The natural pull of an SMG sprays the target from
head to toe.
Chapter IV: The Armory
Tip
Tip

40
Prima’s Official Strategy Guide
MACHINE GUNS (MG)
Machine guns are powerful automatic weapons with large ammunition supplies andpowerful bites, but have terrible kickback and low accuracy. They’re mainly used asdefensive weapons. Most MGs are equipped with a bipod, which can be deployedwhile the user is prone. The bipod stabilizes the weapon, greatly increasing the user’saccuracy, but makes the person immobile and a sitting duck for snipers. Still, MGs areeffective weapons if properly placed in the field.
MGs can be deployed just about anywhere, but certain spots are designedespecially for them. Sandbag MG nests are located on every battlefield. They allow theuser to stand, giving a better view of the battlefield, while still supporting the MG.Other objects such as windowsills, walls, rubble, vehicles, tables, and other surfacescan also be used as MG nests. The machine gunner icon appears on screen when younear an object that indicates the MG can be deployed there.
Machine guns are wildly inaccurate even
when deployed. Still, the rate of fire is so
high that short bursts should eliminate most
enemies even at long range. And using short bursts helps
conserve valuable ammunition. A machine gunner’s allies can
drop off boxes of ammunition so the gunner never has to leave
a prime location.
™
™
Tip

41
SNIPER RIFLES
Sniper rifles are regular rifles with a scope attached.They’re powerful and accurate, but have very slow ratesof fire and are difficult to use at close-range because theylack normal crosshairs. To use a sniper rifle’s scope,press the secondary fire key and you see a close-upview of a small area in the distance. Zoom levelscannot be adjusted, so what you see is what youget. While you’re standing, the weapon’s sightshifts considerably, making it difficult to beprecise. By ducking or going prone you canreduce the movement in the sight, making it easierto score a quick kill.
The sniper rifle’s greatest
weakness is that the user
sees only a tiny and distant
portion of the battlefield, which makes it
easier for enemies to sneak up. Keep your
ears open for any telltale footsteps or other
sounds while searching for a target.
Chapter IV: The Armory
Tip

42
Prima’s Official Strategy Guide
PISTOLS
Every class comes equipped with a pistol. These last-resort weapons pack littlefirepower and have a limited supply of ammunition. However they can kill with asingle shot to the head just like any other weapon. Pistols are mainly used whenyou’ve abandoned your main weapon for a rocket weapon, or you’ve run out ofammunition.
MELEE WEAPONS
Melee weapons are knives or spades. They can be used only at extreme close range,and are great for silently eliminating an enemy or conserving ammunition. Meleeweapons deliver one-hit kills.
™
™

43
ROCKET WEAPONS
Each side of the war has a rocket weapon, which can be used for demolition purposes.Rockets create powerful, concentrated explosion able to rip through stone, wood, and
sandbags. They’re mainly used for completing objectives thatrequire the destruction of a target, opening passages through walls,
and destroying bunkers and sniperlocations. Shoulder these weaponsby pressing the secondary fire key
before shooting. Once the weapon isshouldered the player slows to a crawl,making it nearly impossible to dodge enemyfire, so be careful.
Rockets are terrible anti-
personnel weapons. On
missions that involve
destroying an object, someone or a small
party should always accompany the person
bearing the rocket weapon. Otherwise getting to
the target may be difficult, though sometimes
well-planned distractions can be just as effective
as having a partner.
Chapter IV: The Armory
Tip

44
Prima’s Official Strategy Guide
GRENADES
Grenades are small hand-held bombs that are thrown at targets. A grenade explodesfive seconds after being tossed and kills anything within the vicinity. They’re great forrooting out MGs and Snipers as well as entrenched soldiers. It’s possible to bouncegrenades off of walls and other objects. This makes it easier to throw them aroundcorners without exposing yourself to enemy fire. Grenades can be picked up (press e)by enemy soldiers and tossed back, so some caution is necessary. Grenades cannot beused for demolition purposes.
™
™
A soldier can
sacrifice himself
to save others if
the friendly fire option is turned
off. When you pick up a thrown
grenade, it becomes the
property of the collector.
Because you can’t harm your
allies, only the person holding
the grenade is killed by the
blast. This is a noble tactic to
consider in the heat of battle.
Advanced players
can prime their
grenades by
tossing them on the ground,
quickly picking them back up,
and then throwing them. Do
this quickly, or the player will
blow himself up. Also, the
player will be vulnerable while
performing the action unless
he’s behind cover—but the
enemy won’t have time to toss
the grenade back at the player.
Tip Tip

45
SATCHEL CHARGES
Sometimes you find white backpacks onthe ground. These packs containpowerful demolition charges, whichcan be placed on cracked walls andmission objectives to destroy them. Toplace a satchel charge, stand near a targetuntil the bomb is in place. You then havefive seconds to move before the bombexplodes. Satchel charges have about thesame destructive power as a grenade,but can’t be used as a weapon.
Chapter IV: The Armory

46
Prima’s Official Strategy Guide
ALLIED WEAPONRY.30 CALIBER MACHINE GUN (.30 CAL)
OPERATION: Belt-fed, automaticCALIBER: .30-06 RifleCAPACITY: 150-round beltWEIGHT: 32.5 lbs
Initially developed only as a tank-fitted weapon,the M1919A4 .30 Caliber LightMachine Gun eventually filled arole that was missing in a typical
US infantry squad—a mobile machine gun. The machine guns in useat the time were developed before World War I and could only servea defensive, static role because of their weight. The M1919A4 waslight enough that it could move with the squad and be setup withtripod or bipod at a moment’s notice. It was light enough toeven be dropped with paratroops, whose minimal load usuallylacked firepower.
The .30 cal has a reasonable rate of
fire and a large supply of ammo—
making sustained suppressive fire
very useful with this weapon.
Machineguns are nearly
useless when not
deployed. Go prone
and hit the secondary fire button to deploy your bipod.
(Or, find a machine gun (MG) nest to deploy the bipod
while standing.)
™
™
Tip
Tip

47
BROWNING AUTOMATIC RIFLE (BAR)OPERATION: AutomaticCALIBER: .30-06 RifleCAPACITY: 20-round box magazineWEIGHT: 18.5 lbs
The Browning Automatic Rifle first saw use in WorldWar I. At the time, its twenty-round magazine andautomatic fire capability bridged the gap between therifle and machine gun. It was so popular that almost
every other Allied country requested it throughout the war. It maintained this role throughthe Second World War, its only drawbacks being the lack of a quick-change barrel, and itslimited magazine capacity. Despite these shortcomings, it was constantly requested innumbers that could not be produced, especially during the Pacific campaign.
The BAR’s heavy recoil and low magazine capacity
will make long-range automatic fire useless. Fire in
2-3 shot bursts for the best effectiveness. Its
primary usage is in support—bipod down, firing at medium to long
range. You can also deploy the BAR’s bipod for maximum accuracy.
M1 CARBINEOPERATION: SemiautomaticCALIBER: .30 CarbineCAPACITY: 15-round box magazineWEIGHT: 5 lbs
The M1 Carbine, or “.30 Cal. Carbine” wasmanufactured in greater numbers than any otherAmerican military firearm during the war. Thebasic premise of the weapon was to arm rear-
echelon troops (normally only armed with pistols, if anything) who could not bebothered to carry heavier rifles and machineguns. This was especially importantconsidering World War II was so much more mobile than World War I—troops behindthe front line could be assaulted by the enemy without any notice.
The .30 Carbine round is not the same round
used in other .30 caliber weapons—it is shorter,
and much weaker. Most enemies will require
several hits to be eliminated.
Chapter IV: The Armory
Tip
Tip
48
Prima’s Official Strategy Guide
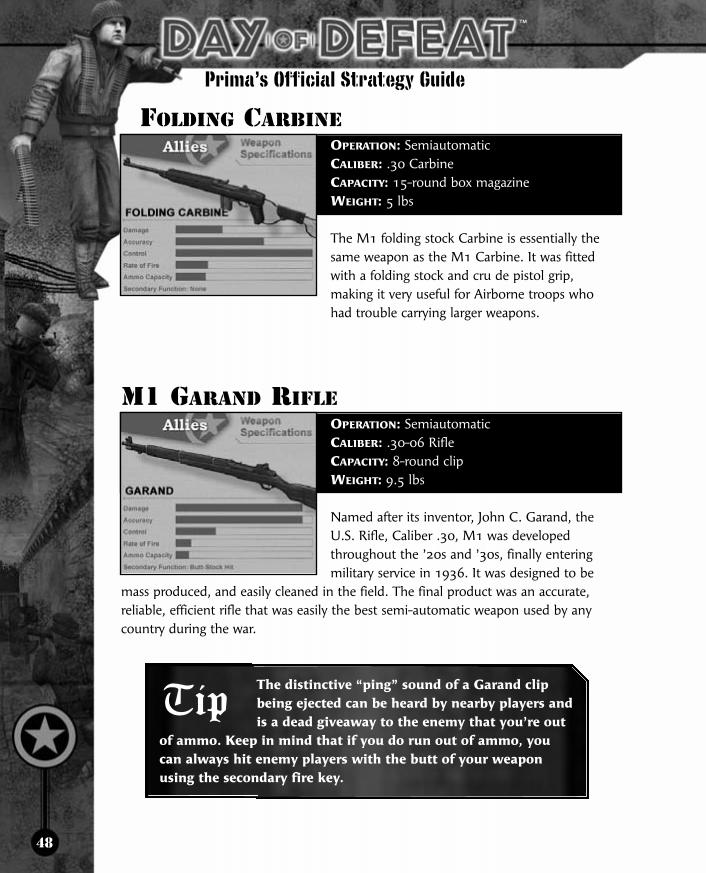
FOLDING CARBINEOPERATION: SemiautomaticCALIBER: .30 CarbineCAPACITY: 15-round box magazineWEIGHT: 5 lbs
The M1 folding stock Carbine is essentially thesame weapon as the M1 Carbine. It was fitted with a folding stock and cru de pistol grip, making it very useful for Airborne troops who had trouble carrying larger weapons.
M1 GARAND RIFLEOPERATION: SemiautomaticCALIBER: .30-06 RifleCAPACITY: 8-round clipWEIGHT: 9.5 lbs
Named after its inventor, John C. Garand, theU.S. Rifle, Caliber .30, M1 was developedthroughout the ’20s and ’30s, finally enteringmilitary service in 1936. It was designed to be
mass produced, and easily cleaned in the field. The final product was an accurate,reliable, efficient rifle that was easily the best semi-automatic weapon used by anycountry during the war.
The distinctive “ping” sound of a Garand clip
being ejected can be heard by nearby players and
is a dead giveaway to the enemy that you’re out
of ammo. Keep in mind that if you do run out of ammo, you
can always hit enemy players with the butt of your weapon
using the secondary fire key.
™
™
Tip

49
GREASEGUNOPERATION: AutomaticCALIBER: .45 ACPCAPACITY: 30-round box magazineWEIGHT: 9.9 lbs
Considering the manufacturing problems of theThompson, the Ordnance Department began tolook for a cheaper replacement as early as 1941.Numerous trials were held, including tests of the
British Sten submachine gun. The overall winner of these tests wasdubbed the M3A1 Submachine gun, or “Greasegun.” The weaponwas made entirely of stamped metal, making it incredibly cheap and
easy to mass-produce. The Greasegun was supplied to troops thatcould not get a Thompson, and was especially popularwith tank crewman, since its small size allowed it to fit
inside crew compartments.
The M3A1 Greasegun
is nearly identical to
the Thompson, the
main difference being the
Greasegun’s slower rate of fire.
Although it doesn’t spray as much lead
as the Thompson does, its slower rate of
fire allows a player to conserve
ammunition. The Greasegun is very useful
in the prone firing position—its accuracy
will allow an easy headshot.
Chapter IV: The Armory
Tip

50
Prima’s Official Strategy Guide
1903A4 SPRINGFIELD SNIPER RIFLEOPERATION: Bolt-actionCALIBER: .30-06 RifleCAPACITY: 5-round stripper clipWEIGHT: 9.38 lbs
U.S. military forces had no official sniper rifle at thebeginning of the war. To meet the demand, theOrdnance Department ordered that the M1903A3rifle be converted for the job. The resulting weapon,
designated M1903A4, was the only mass-produced sniper rifle of the war. Although it wasnot a true, dedicated sniper rifle, it served its purpose and performed reasonably well.
Crouching and lying on the ground will help
eliminate the sway encountered while using
the scope. Standing and firing is very difficult
with this weapon.
M1A1 THOMPSON SUBMACHINE GUNOPERATION: AutomaticCALIBER: .45 ACPCAPACITY: 30-round box magazineWEIGHT: 11 lbs
The Thompson submachine gun, or “Tommygun”as it was called by the troops, wasn’t initiallyaccepted into the US Army. The development ofthe Carbine and Garand superceded research of
any submachine gun, so it wasn’t until after Pearl Harbor that the Army saw a use inthe weapon. In fact, early versions of the Thompson were used by British troops beforeAmericans used them. The weapon wasn’t as easy or cheap to manufacture, however,and was eventually replaced by other weapons late in the war.
The Tommygun can be devastating at short
range—aim low and fire in long bursts—the recoil
will drag your fire upwards across your target.
™
™
Tip
Tip

51
BRITISH WEAPONRYBREN MACHINE GUN (BREN)
OPERATION: AutomaticCALIBER: .303 RifleCAPACITY: 30-round box magazineWEIGHT: 23 lbs
Originally a Czechoslovakiandesign, the Bren features a top-loaded 30-round clip,bipod, and easily
changeable barrel. It was one of the world’s first lightmachine guns and was arguably the best LMG of thewar. Five versions of the Bren were designed,including a post-war model that used the standard7.62 NATO round. Like the American BAR, it canbe used in either a support or assault role.
The Bren can be used in the
assault role on the move,
although its heavy recoil will
make it harder to use than a submachine gun.
Its primary usage is in support—bipod down,
firing at medium to long range.
MG Usage: Go prone and hit the
secondary fire button to deploy
your bipod. (Or, find an MG nest to
deploy the bipod while standing.)
Chapter IV: The Armory
Tip
Tip

52
Prima’s Official Strategy Guide
ENFIELD NO 4(T) SNIPER RIFLEOPERATION: Bolt-actionCALIBER: .303 RifleCAPACITY: 5-round stripper clips (two)WEIGHT: 11 lbs
This weapon is a basic Enfield fitted with the Number 32 Telescopic Sight. It was officially designated the Mark I (T)—only Enfields that were deemed the most accurate were fit for conversion to the sniper variant.
Crouching and lying on the ground will help
eliminate the sway encountered while using the
scope. Standing and firing is very difficult with
this weapon.
NO 4 MK1 LEE ENFIELDOPERATION: Bolt-actionCALIBER: .303 RifleCAPACITY: 5-round stripper clips (two)WEIGHT: 8.8 lbs
The Enfield rifle was the standard issue rifle to allCommonwealth troops throughout the war.Unique to the weapon was the ability to load twofull stripper clips—bringing the capacity up to 10
rounds instead of five. The Enfield was usually issued with a spike bayonet, but wascommonly removed and discarded due to its poor design.
Use this weapon at long ranges (and from
cover) if possible. The amount of time it takes
to load a new round makes this weapon
difficult to use in close quarters.
™
™
Tip
Tip
53
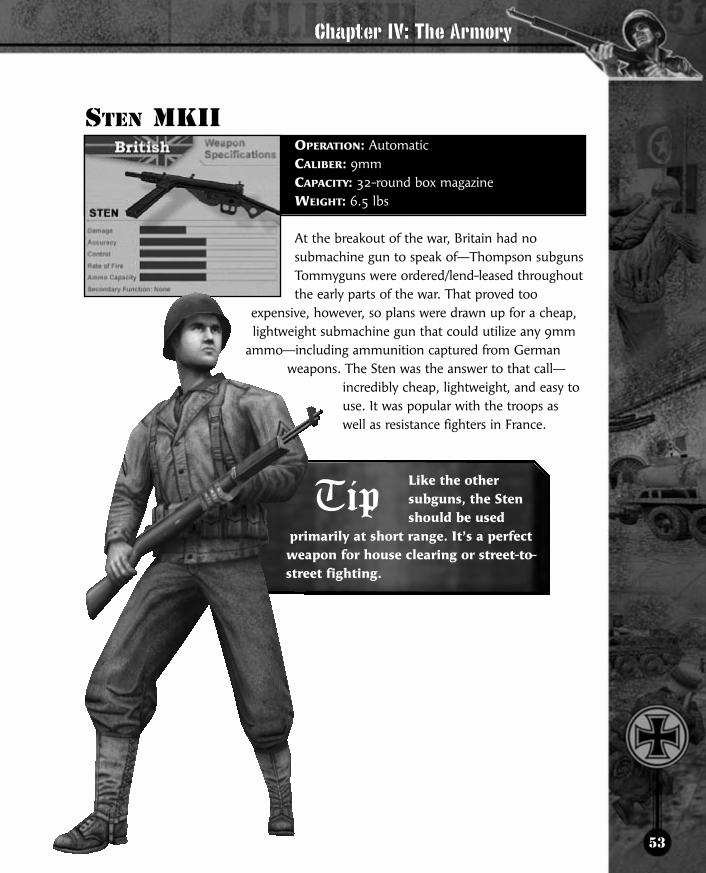
STEN MKIIOPERATION: AutomaticCALIBER: 9mmCAPACITY: 32-round box magazineWEIGHT: 6.5 lbs
At the breakout of the war, Britain had nosubmachine gun to speak of—Thompson subgunsTommyguns were ordered/lend-leased throughoutthe early parts of the war. That proved too
expensive, however, so plans were drawn up for a cheap,lightweight submachine gun that could utilize any 9mm
ammo—including ammunition captured from Germanweapons. The Sten was the answer to that call—
incredibly cheap, lightweight, and easy touse. It was popular with the troops aswell as resistance fighters in France.
Like the other
subguns, the Sten
should be used
primarily at short range. It’s a perfect
weapon for house clearing or street-to-
street fighting.
Chapter IV: The Armory
Tip

54
Prima’s Official Strategy Guide
AXIS WEAPONRYFG42
OPERATION: AutomaticCALIBER: 8mm MauserCAPACITY: 20-round box magazineWEIGHT: 9.9 lbs
The FG42 was designed specifically for paratroops.Its light weight and small size was perfect forairborne operations—yet, at the same time, its 20rounds of 8mm Mauser would provide the firepower
of a light machinegun in each rifle. The desired outcome wasn’t exactly reached, however,as the weapon’s light weight and short length was ill-suited for a full size rifle cartridge. Therecoil was enormous, making sustained automatic fire impossible. The complexity of thedesign slowed production to a crawl—only 7,000 of these weapons were ever made.
The FG42 is fairly useless at long range unless
your bipod is deployed. Otherwise, the weapon
is great for close-in work.
FG42 SNIPEROPERATION: AutomaticCALIBER: 8mm MauserCAPACITY: 20-round box magazineWEIGHT: 9.9 lbs
This weapon is identical to the previous FG42except that it sports a scope rather than a bipod.
The FG42’s scope does not grant a huge bonus in
accuracy like other sniper rifles—however, it
does allow you to see the target area much more
clearly and is thus suited more to the player who prefers to
move rather than remain stationary.
™
™
Tip
Tip

KARBINER 43 SEMI-AUTOMATIC RIFLEOPERATION: SemiautomaticCALIBER: 8mm MauserCAPACITY: 10-round box magazineWEIGHT: 8.6 lbs
Throughout 1941–1942, the German Army’sstandard issue rifle, the K98k, simply could notcompete with Soviet semi-auto rifles in sheervolume of fire. To answer that discrepancy,
Germany engineered a semi-auto rifle of its own. Although it was never produced inthe numbers suitable to equip all frontline troops, the K43 (Also known as the G43)proved to be an effective weapon, especially in the sniper role.
The K43 is very similar to the Garand in
performance—great for medium/long ranges, not
quite as effective close in.
KARBINER 98K RIFLE (WITH BAYONET)OPERATION: Bolt-actionCALIBER: 8mm MauserCAPACITY: 5-round stripper clipWEIGHT: 8.5 lbs
The Karbiner series of rifles were issued to mostGerman infantrymen throughout World War Iand II. It proved reliable through both wars:delivering heavy rounds at long ranges, with great
accuracy. An attachable bayonet was also included as standard issue.
In addition to the K98’s great accuracy at long
ranges, the bayonet can be a very effective
weapon in close quarters—hit the secondary fire
key to use it.
55
Chapter IV: The Armory
Tip
Tip

56
Prima’s Official Strategy Guide
K98 HIGH TURRET SNIPEROPERATION: Bolt-actionCALIBER: 8mm MauserCAPACITY: 5-round stripper clipWEIGHT: 11 lbs
The standard German infantryman’s weapon waseasily adapted as a sniper rifle with a simple HighTurret scope attachment. This versatility was oneof the reason’s the K98’s service life was so long.
Crouching and lying on the ground will help
eliminate the sway encountered while using the
scope. Standing and firing is very difficult with
this weapon.
MACHINENEPISTOLE 40 (MP40)OPERATION: AutomaticCALIBER: 9mm ParabellumCAPACITY: 31-round box magazineWEIGHT: 8.7 lbs
A new type of weapon was required for a newtype of war—blitzkrieg. Although the K98 was afantastic bolt-action rifle, it could not produce thevolume of fire required in every situation. The
submachine gun filled a role between rifle and machine gun, and the MP40 was oneof the first true submachine guns.
Like the Tommygun, the MP40 is one of the few
guns that can be used effectively on the run—
although accuracy is poor while moving, the
MP40’s volume of fire will usually keep it effective.
™
™
Tip
Tip
57
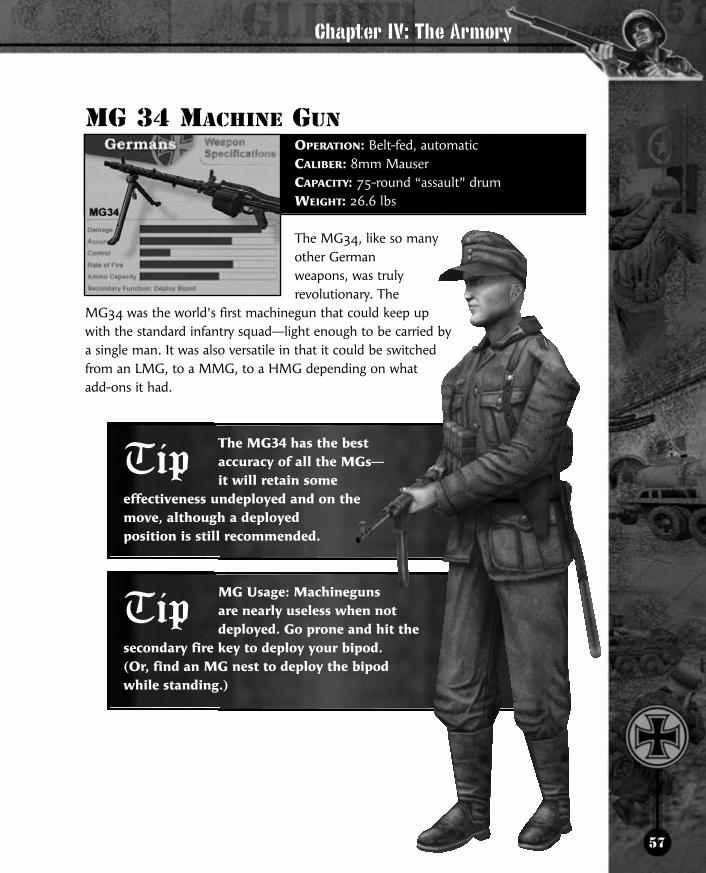
MG 34 MACHINE GUNOPERATION: Belt-fed, automaticCALIBER: 8mm MauserCAPACITY: 75-round “assault” drumWEIGHT: 26.6 lbs
The MG34, like so manyother Germanweapons, was trulyrevolutionary. The
MG34 was the world’s first machinegun that could keep upwith the standard infantry squad—light enough to be carried bya single man. It was also versatile in that it could be switchedfrom an LMG, to a MMG, to a HMG depending on whatadd-ons it had.
The MG34 has the best
accuracy of all the MGs—
it will retain some
effectiveness undeployed and on the
move, although a deployed
position is still recommended.
MG Usage: Machineguns
are nearly useless when not
deployed. Go prone and hit the
secondary fire key to deploy your bipod.
(Or, find an MG nest to deploy the bipod
while standing.)
Chapter IV: The Armory
Tip
Tip

58
Prima’s Official Strategy Guide
MG42 MACHINE GUNOPERATION: Belt-fed, automaticCALIBER: 8mm MauserCAPACITY: 250 round beltWEIGHT: 25.3 lb
Although the MG34 was revolutionary, it did haveproblems, including extreme sensitivity to dust and dirt.The answer to those problems was the MG42—aweapon that became known for its extreme reliability
and combat effectiveness. Its rate of fire was so fast that Allied troops learned to fear the soundthat it made—somewhat like that of canvas ripping since the bullet reports were so close together.
The MG42 has the highest rate of fire of any weapon in the
game—overheat its barrel if you don’t control your fire.
MG Usage: Machineguns are nearly useless when not deployed.
Go prone and hit the secondary fire key to deploy your bipod.
(Or, find an MG nest to deploy the bipod while standing.)
STG 44 ASSAULT RIFLE (MP44)OPERATION: AutomaticCALIBER: 8mm KurzCAPACITY: 30-round “banana clip”WEIGHT: 11.5 lbs
The MP44 assault rifle was easily one of the biggestachievements in history for the modern infantryman.The first ever of its kind, in that it used a shortened riflecartridge—more powerful than standard pistol ammo,
but not so powerful as to become uncontrollable in sustained fire. The MP44, if production hadcontinued, would have replaced every rifle and submachine gun in the German Army.
The MP44 is a good weapon all-around. Its accuracy is
slightly better than the SMG’s, so it can be used at both
long and short range.
™
™
Tip
Tip
Tip

59
MISSIONSANZIO (JANUARY 1944/ITALY)
MISSIONThe Allies have prepared asimple, fast beach assault tocapture the city of Anzio. Little did they know that the Germans were alreadythere, waiting.
Chapter V: Missions—Anzio
Legend1. Allied Spawn Zone
2. Axis Spawn Zone
3. Laundry Flag
4. Bridge Flag
5. Plaza Flag
6. Street Flag
7. Hill Flag

60
Prima’s Official Strategy Guide
™
™
ALLIED CLASSESAND WEAPONS1. Rifleman—Garand2. Staff Sergeant—M1 Carbine3. Master Sergeant—Tommygun4. Sergeant—Greasegun5. Sniper—Springfield6. Support Infantry—BAR7. Machine Gunner—.30 Cal
AXIS CLASSESAND WEAPONS1. Grenadier—K982. Stosstrüppe—K433. Unteroffizier—MP404. Sturmtrüppe—STG445. Scharfschütze—K98 Sniper6. MG34-Schütze—MG347. MG42-Schütze—MG42
ALLIED OBJECTIVE• Capture the 5 flag points.
ALLIED INTELLIGENCE
1. Laundry Flag
2. Plaza Flag
3. Bridge Flag
4. Street Flag
5. Hill Flag
6. Allied Spawn ZoneLegend

61
As the mission begins, both sides should attempt to capture two flags right away.Those are the Plaza Flag (2) and the Bridge Flag (3). Both can be reached quickly, butrequire two teammates to capture. Once these areas are taken by a side, it’s difficultfor the opposing force to take them away, due to the surroundings.
There are five capture locations. The first is the Laundry (1), which lies very close to the edge of the Allied spawn zone. A single soldier can capture the flag, so it’susually the first flag taken by the Allies. Defending it usually isn’t necessary becauseit’s so far back in Allied territory that it can be recaptured whenever Alliedreinforcements are unleashed. The only time it becomes a problem is when an Axissniper enters the tower down the street from the flag, or when an Axis MG sets upcamp in the water trough.
Chapter V: Missions—Anzio

62
Prima’s Official Strategy Guide
If a guard is needed, someone can jump into the water trough next to the flag and usean MG in partial coverage. This gives the gunner a good view of the streets leading tothe flag from Axis territory, but leaves him open to soldiers brave enough to cross theAllied frontline. A window above the flag, which is reached from the shop in the Plaza(2), provides a bird’s-eye view of the flag and works well for anyone packing a rifle.
Next is the plaza. This flag requires two soldiers to capture it. As the mission starts, theAllies should be able to reach this flag before the Axis troops. Watch the corners acrossthe flag for incoming enemies, and toss a grenade down the alley. Also inspect thewindows above the alley and be aware of anyone sneaking around from the Street Flagto come in from behind. The table in the shop near the flag is a perfect MG nest,giving you a good view of the two primary alleys where Axis troops emerge.
™
™

63
Once the initial wave has passed, have a sniper climb the ladder near the flag and holdthe position in the tower overlooking the Plaza. This is perhaps the most criticalsniping spot in the mission. It provides an excellent view of the road leading to boththe Street (4) and the Hill (5) flags, plus a good shot of the road coming from theBridge (3). Keep this spot out of enemy hands, because it provides the Axis with anincredible view of two Allied entrances from the spawn zone.
The Bridge is the second most important location. Leaving the spawn zone from theright, Allies can cut through the tunnel in the right wall of the first building to reach abroken building that overlooks the area around the bridge. The ledge acts as an MGnest and snipers can go prone in the broken section before the drop into the water.Keep your eyes on the dark crack across the way, as enemy snipers love this locationand are difficult to see.
Chapter V: Missions—Anzio

64
Prima’s Official Strategy Guide
Allies can pass through the broken building and into the water. There they can enter a passage on the other side that places them near the two small houses, but leavesthem open to fire. It’s also possible to pass under the bridge and up the other side,though this is more advantageous to Axis troops, because it leaves Allies with theirbacks exposed.
The Street is the spot on the map that changes hands the most. It’s accessible frommultiple directions and easy to dash through. If you approach it at the start from theright beach exit, be sure to chuck a grenade through the hole in the wall before goinginside. This should clear out any advancing enemies. Otherwise, consider this area alow priority.
™
™

65
Lastly, there is the Hill (5), which sits right next tothe Axis spawn zone. Reaching it isn’t easy,because Axis soldiers are constantly passing overit. It’s best to approach the area from the Plaza,passing through the buildings so you have some cover.You can take the riskier routes through the Streetexits and up the road near the Bridge, but theseare high-traffic areas. One of the best strategies isto hide in the buildings near the Axis spawn zoneand wait for a wave of reinforcements to run pastbefore dashing out and grabbing the flag.
Chapter V: Missions—Anzio

66
Prima’s Official Strategy Guide
AXIS OBJECTIVE• Capture the 5 flag points.
AXIS INTELLIGENCE
™
™
1. Hill Flag
2. Bridge Flag
3. Street Flag
4. Plaza Flag
5. Laundry Flag
6. Axis Spawn ZoneLegend
67
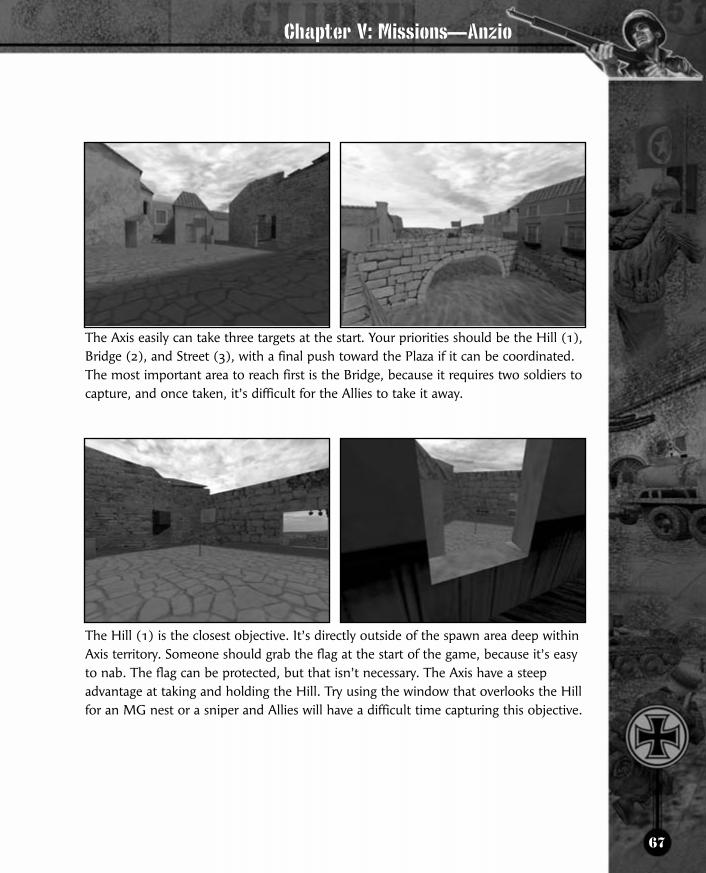
The Axis easily can take three targets at the start. Your priorities should be the Hill (1),Bridge (2), and Street (3), with a final push toward the Plaza if it can be coordinated.The most important area to reach first is the Bridge, because it requires two soldiers tocapture, and once taken, it’s difficult for the Allies to take it away.
The Hill (1) is the closest objective. It’s directly outside of the spawn area deep withinAxis territory. Someone should grab the flag at the start of the game, because it’s easyto nab. The flag can be protected, but that isn’t necessary. The Axis have a steepadvantage at taking and holding the Hill. Try using the window that overlooks the Hillfor an MG nest or a sniper and Allies will have a difficult time capturing this objective.
Chapter V: Missions—Anzio

68
Prima’s Official Strategy Guide
The Bridge (2) is the strongest Axis objective. On the Axis side is a cracked buildingthat makes a great sniper point. The large crack in the side is wide enough to lookthrough, but dark enough that it’s nearly impossible for Allied soldiers to spot an Axissoldier inside. The other two buildings on the side also offer strong MG nest points.
Axis soldiers can leap over the stone wall into the water and climb up the slope on theother side just below the Allied sniper point above the bridge. This small slope is agood spot to lie in wait for an Allied push to capture the area. One also could go pastthe bridge and use the tunnel below the sniper point to gain entrance to a room justoutside the Allied spawn zone. Camping here with an MG or SMG can allow you toeliminate and delay several Allied troops. But don’t stick around as they’ll be madwhen they recover.
When attempting to capture the bridge, both
soldiers must be on the bridge itself. Go prone
while waiting. Ducking leaves your head
exposed to enemy snipers on both sides.
™
™
Tip
69
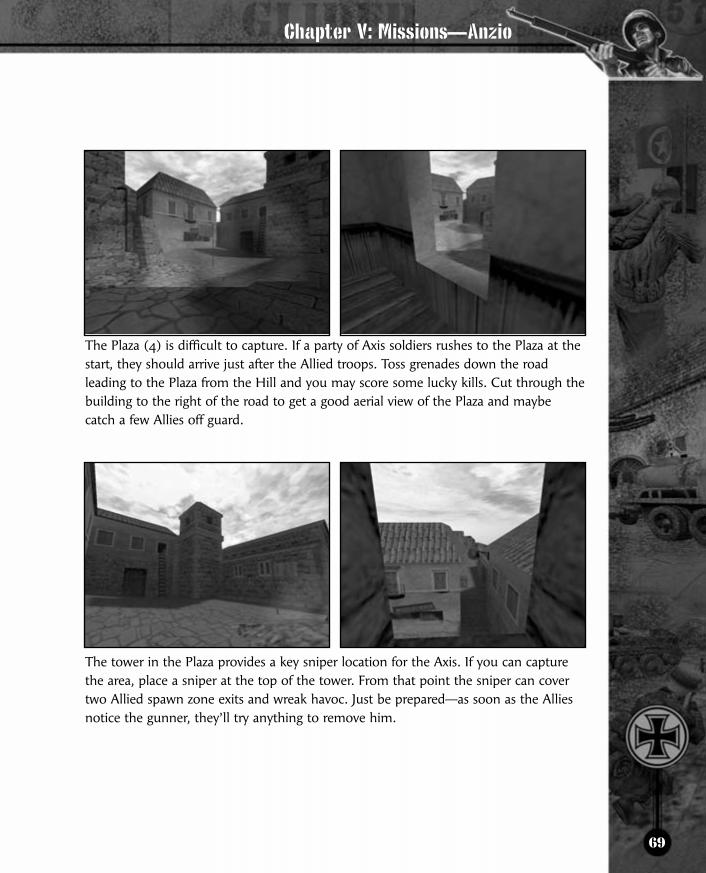
The Plaza (4) is difficult to capture. If a party of Axis soldiers rushes to the Plaza at thestart, they should arrive just after the Allied troops. Toss grenades down the roadleading to the Plaza from the Hill and you may score some lucky kills. Cut through thebuilding to the right of the road to get a good aerial view of the Plaza and maybecatch a few Allies off guard.
The tower in the Plaza provides a key sniper location for the Axis. If you can capturethe area, place a sniper at the top of the tower. From that point the sniper can covertwo Allied spawn zone exits and wreak havoc. Just be prepared—as soon as the Alliesnotice the gunner, they’ll try anything to remove him.
Chapter V: Missions—Anzio

70
Prima’s Official Strategy Guide
The Street (3) is basically common ground. The Axis usually captures this area first,but holding onto it throughout the game is nearly impossible. Try placing an MG onthe Axis end if your team really feels the need to control it, but the gunner could servebetter elsewhere.
The Laundry (5) is the last spot and the most difficult to capture. It’s deep withinAllied territory and right next to the spawn zone, so Allied soldiers pass through itregularly. The best bet is to hide in the water trough with an MG and gun Allies asthey appear, or to take a sneaky approach. Pass through the open restaurant in thePlaza and find the window that overlooks the Laundry. Sit in the window quietly untilthe other objectives are under Axis control, and then quickly leap down and takecontrol of the final objective for the win.
™
™

71
AVALANCHE (SEPTEMBER 1943/ITALY)
MISSIONA couple of days after establishing
a beachhead at Salerno, the
American advance toward the hills
was stopped by a vicious German
counterattack on September 13.
Intense streetfighting ensued, with
some towns changing hands several
times a day.
Chapter V: Missions—Avalanche
Legend1. Allied Street Flag
2. Allied Gun Position Flag
3. Market Flag
4. Axis Gun Position Flag
5. Axis Street Flag
6. Allied Spawn Zone
7. Axis Spawn Zone

72
Prima’s Official Strategy Guide
™
™
ALLIED CLASSESAND WEAPONS1. Rifleman—Garand2. Staff Sergeant—M1 Carbine3. Master Sergeant—Tommygun4. Sergeant—Greasegun5. Sniper—Springfield6. Support Infantry—BAR7. Machine Gunner—.30 Cal
AXIS CLASSESAND WEAPONS1. Grenadier—K982. Stosstrüppe—K433. Unteroffizier—MP404. Scharfschütze—K98 Sniper5. MG34-Schütze—MG346. MG42-Schütze—MG42
ALLIED OBJECTIVE• Capture the 5 flag points.
ALLIED INTELLIGENCE
1. Allied Street Flag
2. Allied Gun
Position Flag
3. Market Flag
4. Axis Gun
Position Flag
5. Axis Street Flag
6. Church
7. “W” crack
8. Destroyed Building
9. Allied Spawn Zone
Legend

73
As you leave the spawn zone and head into the street toward the Allied Street Flag (1),check the window above the flag for enemy snipers. At the start of the game theywon’t have had time to reach it, but from then on this is always a concern. A goodsniper can pick off Allied soldiers as they drop to the street below. The flag itselfrequires two soldiers to capture and is mainly under threat of attack from the sniperwindow. Watch for falling Axis.
As you approach the Market (3) from the Allied Street Flag be sure to toss a grenadeinto the Market area to clear the way. The Allies are at a real disadvantage whenentering this area due to their low position and the narrow chokepoint next to thechurch. Upon reaching the top, either dash into the church (6) on the left, or thedestroyed building (8) on the right. If you’re feeling lucky, sprint into the Market anduse the rubble as cover from enemy fire, but without cover fire from the rest of theteam you’re a sitting duck. It’s best to wait until an organized assault can be plannedand multiple soldiers can charge the Market.
Chapter V: Missions—Avalanche
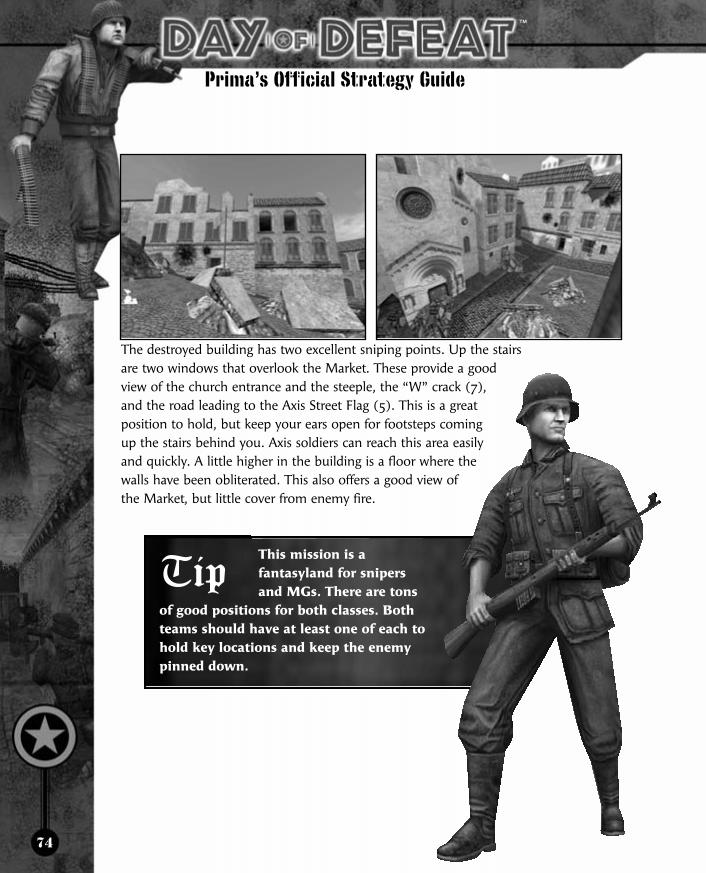
74
Prima’s Official Strategy Guide
The destroyed building has two excellent sniping points. Up the stairsare two windows that overlook the Market. These provide a goodview of the church entrance and the steeple, the “W” crack (7),and the road leading to the Axis Street Flag (5). This is a greatposition to hold, but keep your ears open for footsteps comingup the stairs behind you. Axis soldiers can reach this area easilyand quickly. A little higher in the building is a floor where thewalls have been obliterated. This also offers a good view ofthe Market, but little cover from enemy fire.
This mission is a
fantasyland for snipers
and MGs. There are tons
of good positions for both classes. Both
teams should have at least one of each to
hold key locations and keep the enemy
pinned down.
™
™
Tip
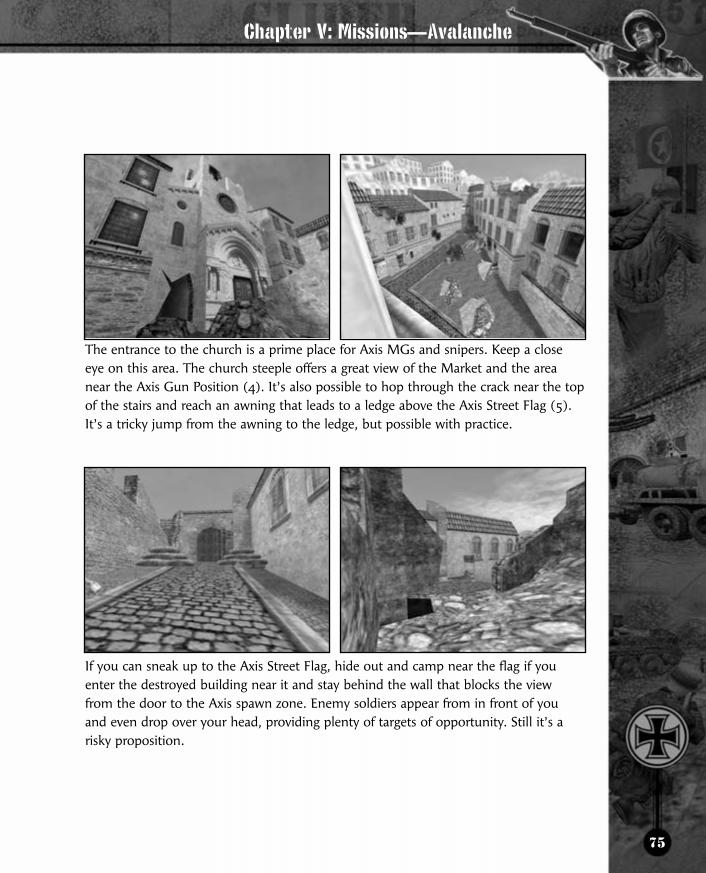
75
The entrance to the church is a prime place for Axis MGs and snipers. Keep a closeeye on this area. The church steeple offers a great view of the Market and the areanear the Axis Gun Position (4). It’s also possible to hop through the crack near the topof the stairs and reach an awning that leads to a ledge above the Axis Street Flag (5).It’s a tricky jump from the awning to the ledge, but possible with practice.
If you can sneak up to the Axis Street Flag, hide out and camp near the flag if youenter the destroyed building near it and stay behind the wall that blocks the view from the door to the Axis spawn zone. Enemy soldiers appear from in front of you and even drop over your head, providing plenty of targets of opportunity. Still it’s arisky proposition.
Chapter V: Missions—Avalanche

76
Prima’s Official Strategy Guide
AXIS OBJECTIVE• Capture the 5 flag points.
AXIS INTELLIGENCE
™
™
Legend 1. Axis Street Flag
2. Axis Gun Position
3. Market Flag
4. Allied Gun Position
5. Allied Street Flag
6. Church
7. “W” crack
8. Destroyed Building
9. Axis Spawn Zone

77
The Axis have a definite advantage in this mission. They’re fighting downhill, whichautomatically gives them a better perspective on the action. They also have easy accessto many great sniping locations and two street entrances into the Market. If the Axiscan choke the Allied attack in the Market and keep them busy in the tight corridorswithin the buildings, they should have little trouble in achieving a victory.
As the Axis soldiers leave the spawn zone they can quickly move into the Market (3)and take the first flag while positioning themselves for the initial push. Three keylocations are the easy to reach the “W” crack (7), with its good view of the Allied GunPosition (4) and the destroyed building (8); the entrance to the church (6), whichprovides an incredible view of the hill leading to the Allied Street Flag (5), a primepassage for spawning Allied soldiers; and the ledge over the Axis Gun Position (2),which also offers a good view of the destroyed building and the Allied Gun Position.
Chapter V: Missions—Avalanche

78
Prima’s Official Strategy Guide
The Axis also has the advantage on the street. The rubbleprovides excellent cover for Axis soldiers as they press onwardto the Allied portion of the map. As long as someone is
covering the approach, the Axis can reach the Allied GunPosition with very little difficulty. To reach the Allied Street
Flag, it’s best to cut through the destroyed building to thewindow that overlooks the flag. Wait for Alliedreinforcements to run past, and then quickly hop downand capture the objective.
™
™

79
CAEN (JULY 1944/FRANCE)
MISSIONThe battle of Caen wasplanned even before D-Day,and was not over until midJuly. What took place in thestreet was some of the fiercestcombat of the Western Front.
Chapter V: Missions—Caen
Legend1. Allied Street Flag
2. Allied Bunker Flag
3. Allied Plaza Flag
4. Axis Plaza Flag
5. Axis Bunker Flag
6. Axis Street Flag
7. Allied Spawn Zone
8. Axis Spawn Zone
9. Destroyable Sniper Points
10. Electric Alley
11. Fire Alley

80
Prima’s Official Strategy Guide
™
™
ALLIED CLASSESAND WEAPONS1. Rifleman—Enfield2. Sergeant Major—Sten3. Marksman—Enfield Sniper4. Gunner—Bren
AXIS CLASSESAND WEAPONS1. Grenadier—K982. Stosstrüppe—K433. Unteroffizier—MP404. Sturmtrüppe—STG445. Scharfschütze—K98 Sniper6. MG34-Schütze—MG347. MG42-Schütze—MG42
BRITISH OBJECTIVE• Capture the 5 flag points.
BRITISH INTELLIGENCE
1. Allied Street Flag
2. Allied Bunker Flag
3. Allied Plaza Flag
4. Axis Plaza Flag
5. Axis Bunker Flag
6. Axis Street Flag
7. Allied Spawn Zone
8. Axis Spawn Zone
9. Destroyable
Sniper Points
10. Electric Alley
11. Fire Alley
Legend

81
This is an even map with neither side having a true advantage. The main road throughtown is the easiest way to travel between locations, but the back alleys are where mostof the action takes place as soldiers scurry from one building to another. The only timeanyone should be sitting in the middle of the street is while trying to capture a flag.Otherwise, anyone walking or crawling in the open is likely feed for a sniper or MG.
The Allied spawn area contains satchel charges and rocket weapons. Take a satchelcharge with you the first couple of times out. Use the charges to destroy cracks inwalls and open paths into buildings and alleys scattered around the map. Rockets arenearly as effective, but if you take a rocket weapon, you must abandon your primaryweapon. Rockets can destroy certain key sniping locations (9), so they may be helpfulfor eliminating MG nests and snipers.
Chapter V: Missions—Caen
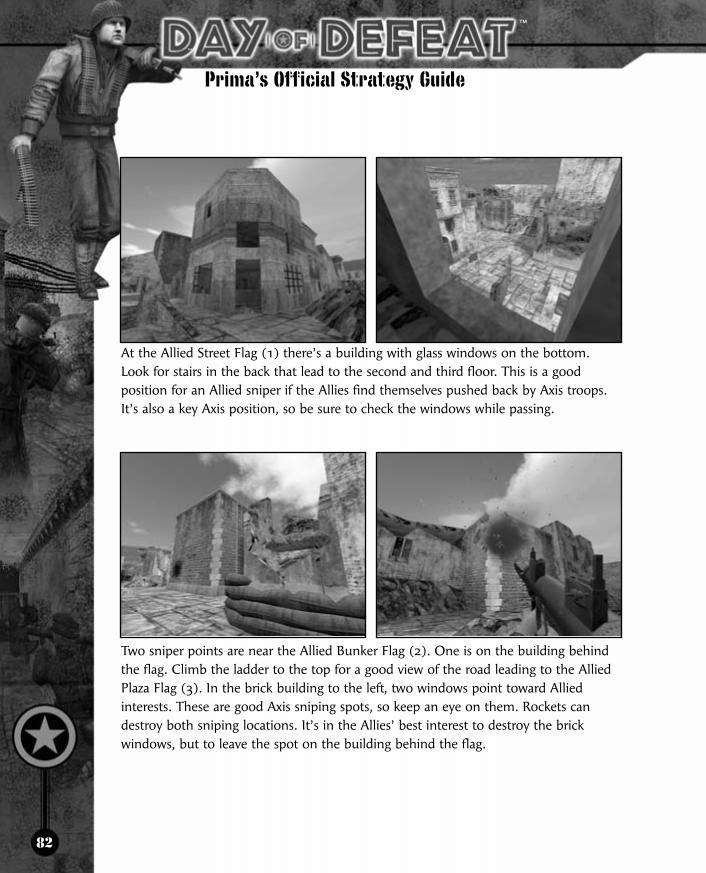
82
Prima’s Official Strategy Guide
At the Allied Street Flag (1) there’s a building with glass windows on the bottom.Look for stairs in the back that lead to the second and third floor. This is a goodposition for an Allied sniper if the Allies find themselves pushed back by Axis troops.It’s also a key Axis position, so be sure to check the windows while passing.
Two sniper points are near the Allied Bunker Flag (2). One is on the building behindthe flag. Climb the ladder to the top for a good view of the road leading to the AlliedPlaza Flag (3). In the brick building to the left, two windows point toward Alliedinterests. These are good Axis sniping spots, so keep an eye on them. Rockets candestroy both sniping locations. It’s in the Allies’ best interest to destroy the brickwindows, but to leave the spot on the building behind the flag.
™
™

83
Below the brick windows there are two cracks in the wall. Axis soldiers can destroyonly the crack nearest to the flag, but the Allies can destroy the second crack. Use thisopening to reach the electric alley, which leads to the Axis Plaza Flag (4).
A second alley runs behind the building to the northeast. This leads to the Allied PlazaFlag (3), but there’s another cracked wall at the side of the building. Destroy the crackto gain access to sniping points above the Allied Plaza Flag. This is another sniperlocation that can be destroyed by a rocket.
Chapter V: Missions—Caen

84
Prima’s Official Strategy Guide
From the Allied Plaza Flag we enter Axis territory. The buildings offer good snipingpoints for both sides of the conflict. They can be entered via the back alleys, or fromthe front. This area is always well covered by one side, so getting through the centerstreet can be difficult. The boarded up building on the street’s south side is moreadvantageous to Allied interests than the city hall on the opposite side. The southbuilding provides an excellent view of the street between the Axis Plaza Flag (4) andthe Axis Bunker Flag (5). It also allows someone to cover the alley exit behind the AxisPlaza Flag, which is a commonly used path by the Axis.
North of the Allied Plaza Flag is an alley that leads to the Axis Bunker Flag. You need asatchel charge to get through, but this is a great shortcut past Axis snipers. Just bewary of the crack over the alley. Axis snipers sometimes wait here for an Allied advanceand the small size of the crack and darkness behind it makes it virtually impossible tosee a soldier hiding in that location. On the second floor of the cracked building theAllies can set up an MG or sniper with an excellent view of the last two Axis flaglocations. It also allows for skilled Allied soldiers to harass Axis troops as they run intobattle; however, a rocket can destroy the window with broken bars.
™
™
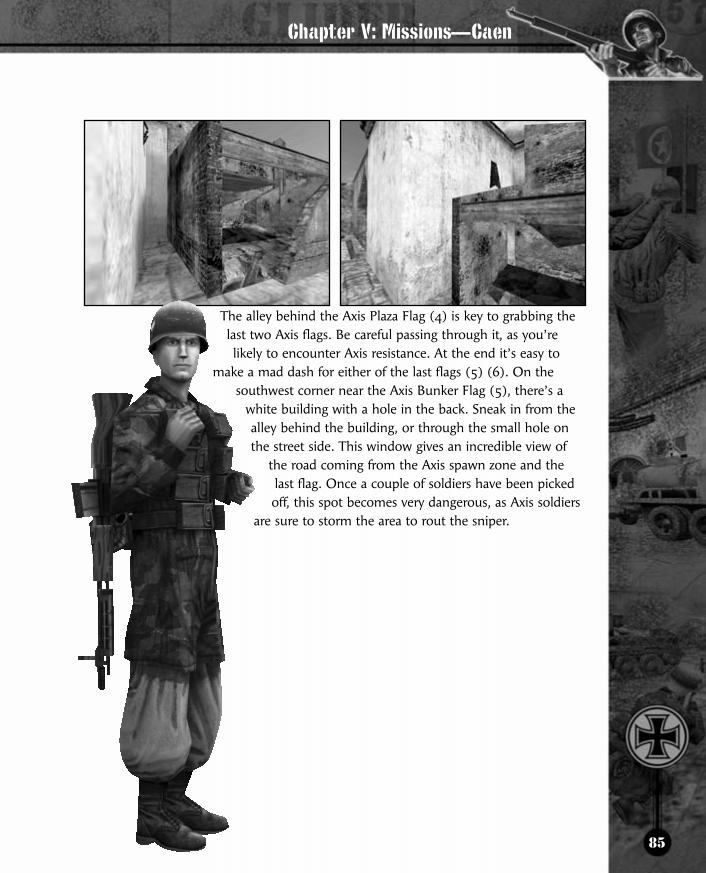
85
The alley behind the Axis Plaza Flag (4) is key to grabbing thelast two Axis flags. Be careful passing through it, as you’relikely to encounter Axis resistance. At the end it’s easy to
make a mad dash for either of the last flags (5) (6). On thesouthwest corner near the Axis Bunker Flag (5), there’s a
white building with a hole in the back. Sneak in from thealley behind the building, or through the small hole onthe street side. This window gives an incredible view of
the road coming from the Axis spawn zone and thelast flag. Once a couple of soldiers have been pickedoff, this spot becomes very dangerous, as Axis soldiers
are sure to storm the area to rout the sniper.
Chapter V: Missions—Caen

86
Prima’s Official Strategy Guide
AXIS OBJECTIVE• Capture the 5 flag points.
AXIS INTELLIGENCE
™
™
1. Axis Street Flag
2. Axis Bunker Flag
3. Axis Plaza Flag
4. Allied Plaza Flag
5. Allied Bunker Flag
6. Allied Street Flag
7. Allied Spawn Zone
8. Allied Spawn Zone
9. Destroyable Sniper Points
10. Fire Alley
11. Electric Alley
Legend

87
Axis troops see little of consequence until reaching the second flag (2). Beware ofAllied snipers sitting in the hole in the white building on the street’s south side. If younotice a sniper in this position, tell your teammates and help remove him, or he’llcause major problems for your side. Axis soldiers can also enter the building and takeadvantage of a couple of great sniper spots that overlook the plaza area. The windowabove the Axis Plaza Flag (3) can be destroyed, but the cracked door cannot.
An alley running behind the white building, leading to the Axis Plaza Flag. This isdecent way to sneak up on the opposition, but Allied snipers are almost alwayswatching the exit. Move fast or get shot. If an Axis soldier uses a satchel charge orrocket to destroy the wall of the building southeast of the Axis Bunker Flag, the teamcan gain access to the fire alley (10) and a better shortcut that leads to the Allied PlazaFlag (4). The second floor also provides two excellent sniper spots. The ledge on thestreet side allows coverage of the electric alley (11) exit and the Axis Plaza Flag. Asmall crack in the wall above the fire alley is a great spot for an MG. It’s dark andcramped, which makes the gunner nearly invisible. Even if the Allies know about theMG they’ll have a difficult time removing it.
Chapter V: Missions—Caen

88
Prima’s Official Strategy Guide
From the Axis Plaza Flag you can reach the electric alley. This provides an effectiveshortcut to the Allied Bunker Flag (5), but you need a satchel charge to exit thebuilding unless the Allies have already opened it. The brick building at the end alsoprovides a sniper point with a good view of the last two Allied flags. Experienced Allieswill be looking for an Axis soldier in this area and the sniper windows are destroyable,so don’t expect to hold this position long.
In the plaza area, the Axis can set up snipers and MGs in the city hall building on thenorth side of the street. It provides a decent view of the street south of the Allied PlazaFlag and the alley behind it, but Allied troops can still sneak through the electric alleywithout being seen.
™
™
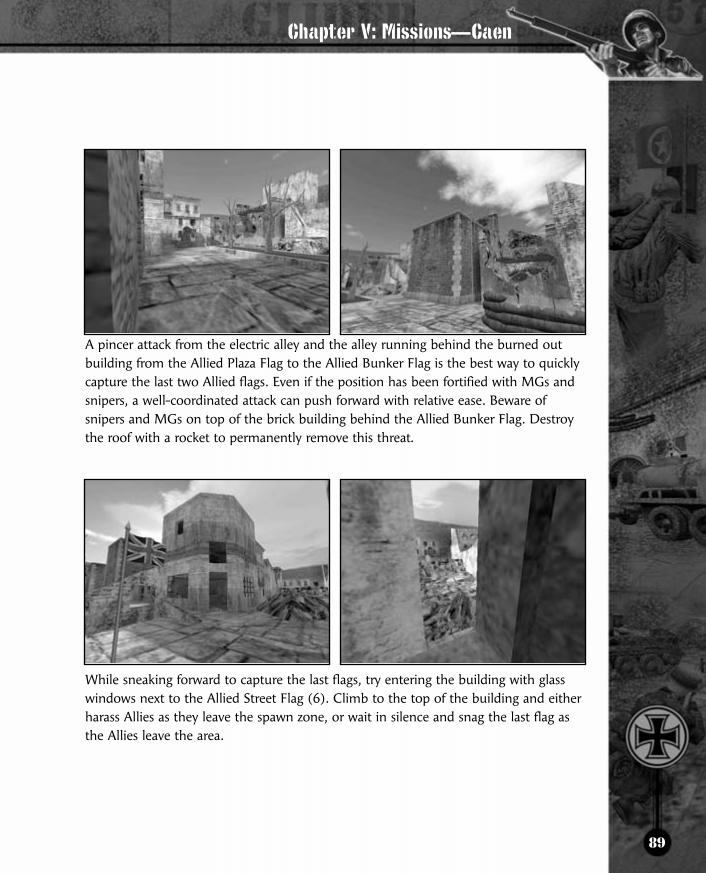
89
A pincer attack from the electric alley and the alley running behind the burned outbuilding from the Allied Plaza Flag to the Allied Bunker Flag is the best way to quicklycapture the last two Allied flags. Even if the position has been fortified with MGs andsnipers, a well-coordinated attack can push forward with relative ease. Beware ofsnipers and MGs on top of the brick building behind the Allied Bunker Flag. Destroythe roof with a rocket to permanently remove this threat.
While sneaking forward to capture the last flags, try entering the building with glasswindows next to the Allied Street Flag (6). Climb to the top of the building and eitherharass Allies as they leave the spawn zone, or wait in silence and snag the last flag asthe Allies leave the area.
Chapter V: Missions—Caen
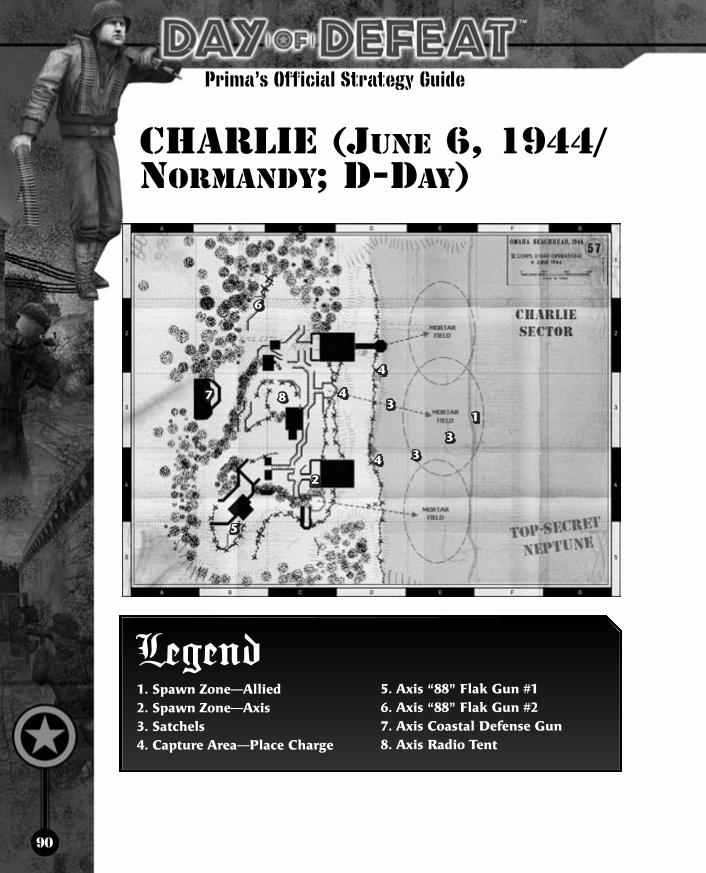
90
Prima’s Official Strategy Guide
™
™
CHARLIE (JUNE 6, 1944/NORMANDY; D-DAY)
Legend1. Spawn Zone—Allied
2. Spawn Zone—Axis
3. Satchels
4. Capture Area—Place Charge
5. Axis “88” Flak Gun #1
6. Axis “88” Flak Gun #2
7. Axis Coastal Defense Gun
8. Axis Radio Tent
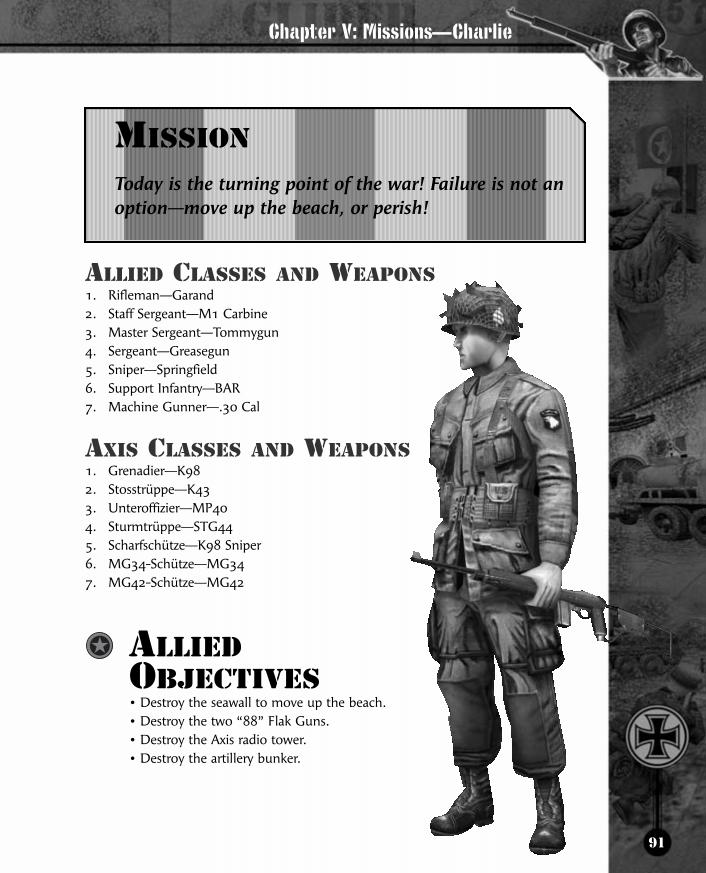
91
Chapter V: Missions—Charlie
ALLIED CLASSES AND WEAPONS1. Rifleman—Garand2. Staff Sergeant—M1 Carbine3. Master Sergeant—Tommygun4. Sergeant—Greasegun5. Sniper—Springfield6. Support Infantry—BAR7. Machine Gunner—.30 Cal
AXIS CLASSES AND WEAPONS1. Grenadier—K982. Stosstrüppe—K433. Unteroffizier—MP404. Sturmtrüppe—STG445. Scharfschütze—K98 Sniper6. MG34-Schütze—MG347. MG42-Schütze—MG42
ALLIEDOBJECTIVES• Destroy the seawall to move up the beach.• Destroy the two “88” Flak Guns.• Destroy the Axis radio tower.• Destroy the artillery bunker.
MISSION
Today is the turning point of the war! Failure is not anoption—move up the beach, or perish!
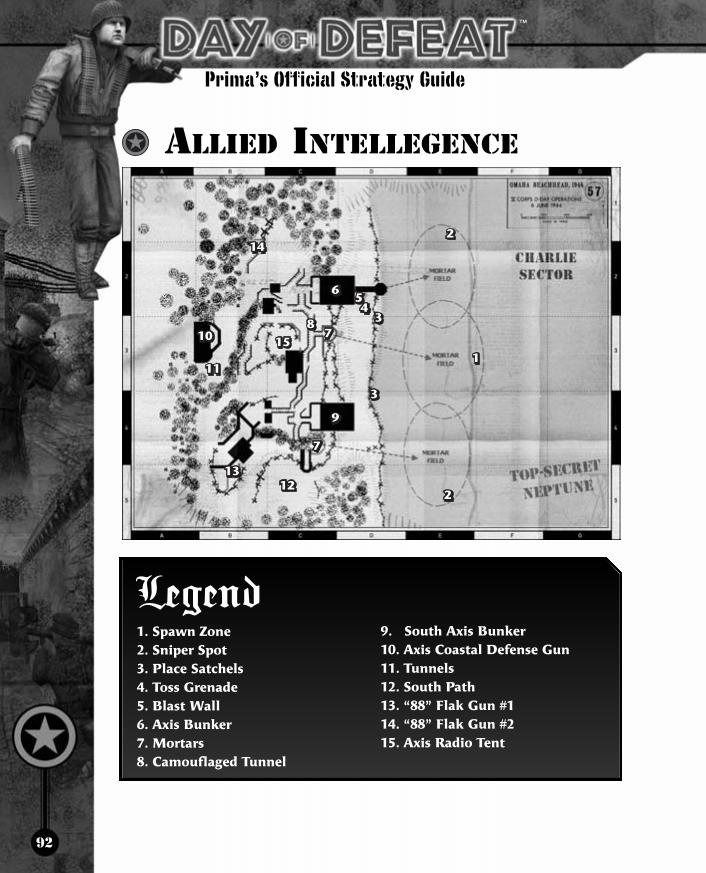
92
Prima’s Official Strategy Guide
ALLIED INTELLEGENCE
™
™
Legend1. Spawn Zone
2. Sniper Spot
3. Place Satchels
4. Toss Grenade
5. Blast Wall
6. Axis Bunker
7. Mortars
8. Camouflaged Tunnel
9. South Axis Bunker
10. Axis Coastal Defense Gun
11. Tunnels
12. South Path
13. “88” Flak Gun #1
14. “88” Flak Gun #2
15. Axis Radio Tent
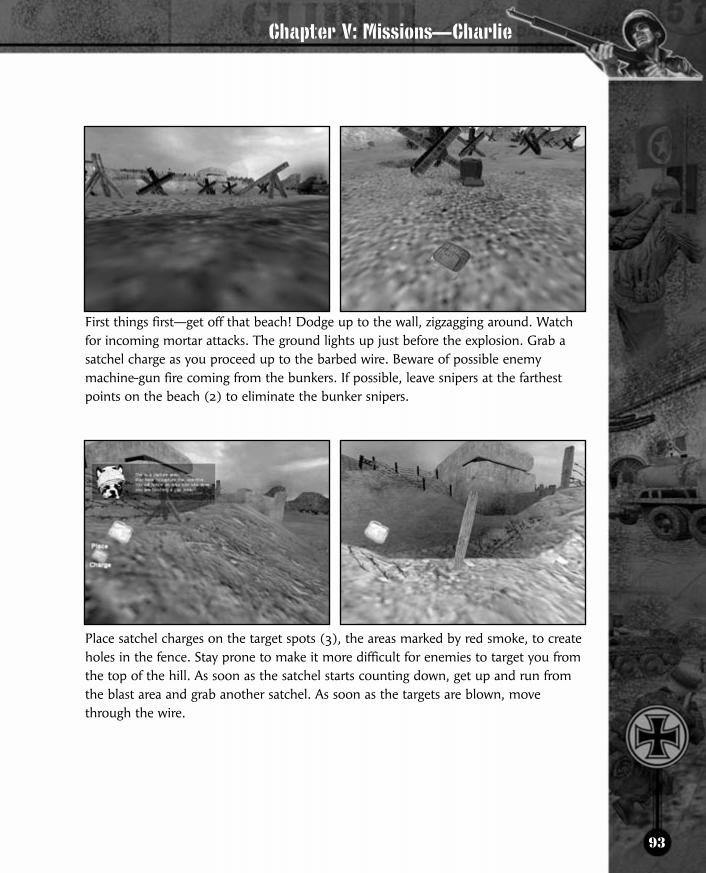
93
First things first—get off that beach! Dodge up to the wall, zigzagging around. Watchfor incoming mortar attacks. The ground lights up just before the explosion. Grab asatchel charge as you proceed up to the barbed wire. Beware of possible enemymachine-gun fire coming from the bunkers. If possible, leave snipers at the farthestpoints on the beach (2) to eliminate the bunker snipers.
Place satchel charges on the target spots (3), the areas marked by red smoke, to createholes in the fence. Stay prone to make it more difficult for enemies to target you fromthe top of the hill. As soon as the satchel starts counting down, get up and run fromthe blast area and grab another satchel. As soon as the targets are blown, movethrough the wire.
Chapter V: Missions—Charlie

94
Prima’s Official Strategy Guide
From one of the barbed wire target areas (4), lob a grenade over the short wall to pickoff any snipers lying in wait for Allied forces near the blast wall (5). Watch out for Axisforces laying down suppression fire from the bunker (6).
After breaching the blast wall (5), cut through and destroy the mortar gun (7) thenmove up through the bunker, eliminating Axis forces as you go. Go through thetunnel system from the bunker (6) to reach other targets and the south bunker (9).
™
™
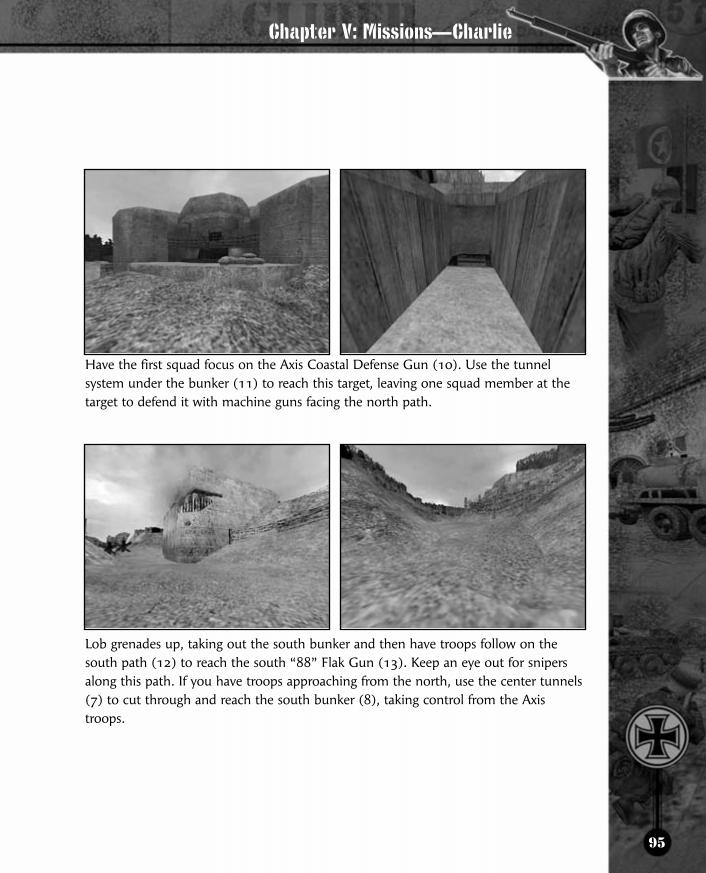
95
Have the first squad focus on the Axis Coastal Defense Gun (10). Use the tunnelsystem under the bunker (11) to reach this target, leaving one squad member at thetarget to defend it with machine guns facing the north path.
Lob grenades up, taking out the south bunker and then have troops follow on thesouth path (12) to reach the south “88” Flak Gun (13). Keep an eye out for snipersalong this path. If you have troops approaching from the north, use the center tunnels(7) to cut through and reach the south bunker (8), taking control from the Axistroops.
Chapter V: Missions—Charlie

96
Prima’s Official Strategy Guide
After taking the south “88” Flak Gun (13), follow thesouthern path (12) around to the center, taking the radio
tent (15). As always, toss grenades into the area to flush outany opposing troops before moving in to place the charge.
™
™

97
AXIS OBJECTIVES• Defend the beach.• Once the beach defenses are breached, fall back and defend.
AXIS INTELLIGENCE
Chapter V: Missions—Charlie
Legend1. Spawn Zone
2. Machine Gunner Spot
3. South Path
4. Blast Wall Sniper Spot
5. Gun Nests
6. Corner Sniper Spot
7. Bunker Elevator
8. Camouflaged Tunnel
9. South Bunker
10. “88” Flak Gun #2

98
Prima’s Official Strategy Guide
Keep a machine gunner at this spot (2) to take out Allied troops advancing along thesouth path (3) and to cover troops advancing from the beach.
On the north side of the field, keep a soldier prone near the blast wall (4), but watchout for grenades being lobbed over the wall. This person can eliminate any Allies thatcome through the barbed wire and keep them from breaching the blast wall.
™
™

99
Use the gun nests (5) as MG spots. These areas provide a clear view of the Alliedspawn zone. The only disadvantage is that the sandbags don’t provide as much coveras the two large bunkers overlooking the beach.
Keep troops tucked back around corners, such as the one marked on the map (6), topick off Allied troops as they advance up the paths. There are lots of good spots to liein wait for enemies. Try to stay to the sides of doors, so enemies can’t see you untilthey step into the open.
Chapter V: Missions—Charlie

100
Prima’s Official Strategy Guide
Listen for Allied troops climbingthe ladders inside of the bunker(7). Open fire even before thetroops reach the upper level.Soldiers can’t shoot back whileclimbing.
Keep troops tucked into the side pockets of the main camouflaged tunnels (8) to shutdown troop movements as they attempt to advance to the south bunker (9) and the“88” Flak Gun #2 (10).
™
™
101
CHEMILLE (MARCH 1944/WESTERN FRONT)
MISSIONChemille has become awasteland of vicious urbancombat—pick your waythrough the destroyed ruins to capture the city.
Chapter V: Missions—Chemille
Legend1. Spawn Zone—Allied
2. Spawn Zone—Axis
3. Destroyed House
4. Destroyed Factory
5. Underpass
6. Church
7. Bazooka
8. Panzerschreck

102
Prima’s Official Strategy Guide
™
™
ALLIED CLASSESAND WEAPONS1. Rifleman—Garand2. Staff Sergeant—M1 Carbine3. Master Sergeant—Tommygun4. Sergeant—Greasegun5. Sniper—Springfield6. Support Infantry—BAR7. Machine Gunner—.30 Cal
AXIS CLASSESAND WEAPONS1. Grenadier—K982. Stosstrüppe—K433. Unteroffizier—MP404. Sturmtrüppe—STG445. Scharfschütze—K98 Sniper6. MG34-Schütze—MG347. MG42-Schütze—MG42
ALLIED OBJECTIVE• Capture the 4 flag points.
ALLIED INTELLIGENCE
1. Spawn Zone
2. Underpass
3. Bazooka Door
4. Destroyed Factory
5. Bunker
6. Stairs
7. Locked Door
8. Sniper Spot
9. Church
10. Destroyed House
11. Sniper Spot
12. Bazooka
Legend
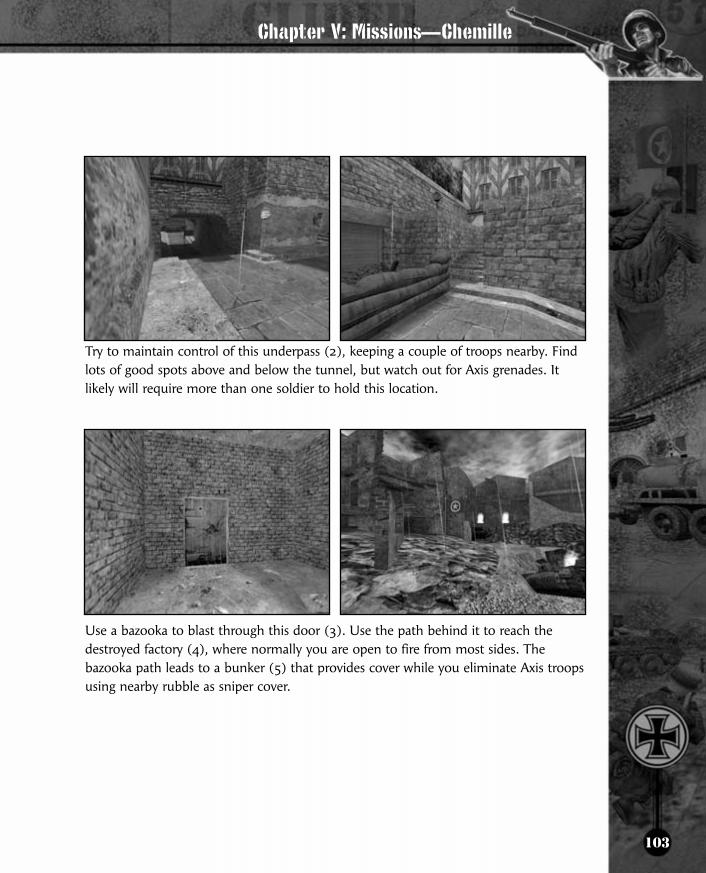
103
Try to maintain control of this underpass (2), keeping a couple of troops nearby. Findlots of good spots above and below the tunnel, but watch out for Axis grenades. Itlikely will require more than one soldier to hold this location.
Use a bazooka to blast through this door (3). Use the path behind it to reach thedestroyed factory (4), where normally you are open to fire from most sides. Thebazooka path leads to a bunker (5) that provides cover while you eliminate Axis troopsusing nearby rubble as sniper cover.
Chapter V: Missions—Chemille
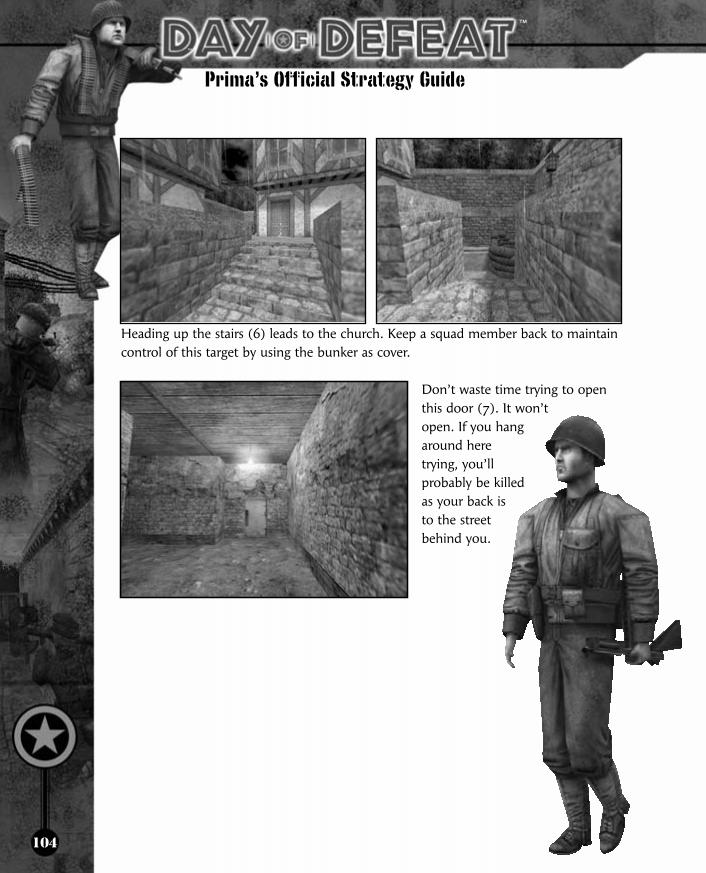
104
Prima’s Official Strategy Guide
Heading up the stairs (6) leads to the church. Keep a squad member back to maintaincontrol of this target by using the bunker as cover.
Don’t waste time trying to openthis door (7). It won’topen. If you hangaround heretrying, you’llprobably be killedas your back isto the streetbehind you.
™
™

105
Place a machine gun at this window (8) to cover the church target (9). The windowprovides an excellent point of view and decent cover.
Another good sniper spot for covering the destroyed house (10) is from this window(11). From this vantage point, you should be able to cover the street from troopsmoving from most directions in the nearby streets.
Chapter V: Missions—Chemille
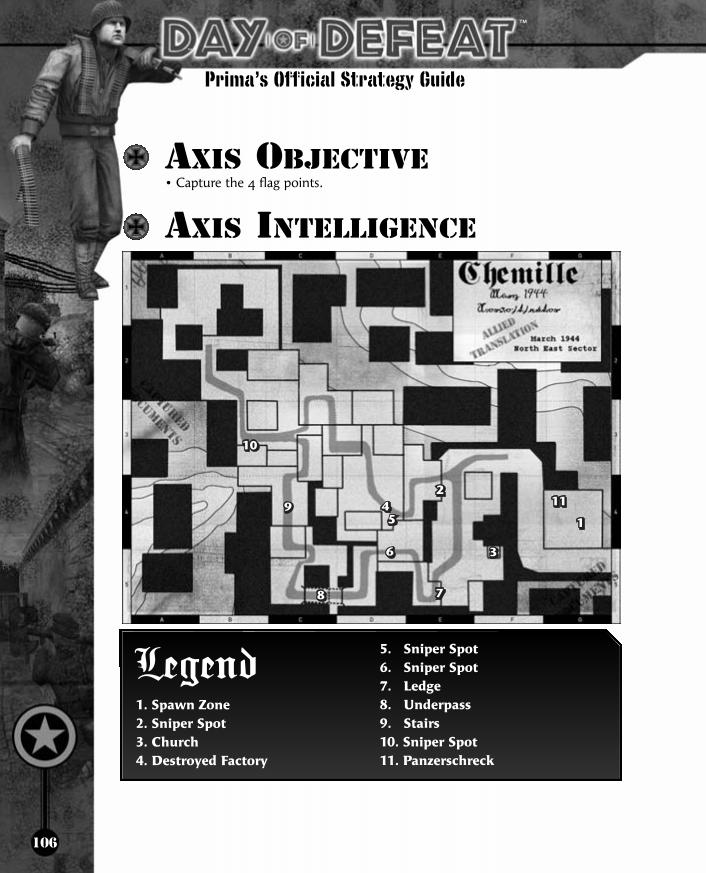
106
Prima’s Official Strategy Guide
AXIS OBJECTIVE• Capture the 4 flag points.
AXIS INTELLIGENCE
™
™
1. Spawn Zone
2. Sniper Spot
3. Church
4. Destroyed Factory
5. Sniper Spot
6. Sniper Spot
7. Ledge
8. Underpass
9. Stairs
10. Sniper Spot
11. Panzerschreck
Legend

107
Place a sniper or MG at this window (2) to cover the church (3). In addition, fromthis vantage point, you can cover the street from troops advancing from the east and south.
Cover the destroyed factory (4) from this window (5). Again, in addition to coveringthe target, your MG can also watch both sides of the building and keep troops fromadvancing from both sides of the street.
Beware of artillery shells raining down on the
city. Listen carefully and you’ll hear the
incoming shells. Move fast to get out of the
way if one is heading in your direction.
Chapter V: Missions—Chemille
Tip

108
Prima’s Official Strategy Guide
Set a sniper at this spot above the puddle (6) to cover troops crossing below. Keep inmind, once you’re discovered, you’ll be a fairly easy target for the Allied troops. Keepmoving from side to side and top to bottom. Don’t plan on setting up camp in anyone spot for too long.
Toss a grenade on top of this ledge(7) to clear out any Allied snipers orMGs lying in wait.
From the underpass (8), take the stairs on the left (9) up and follow them to thewindows to cover the destroyed house target (10). Jump from the windows to takethe target once the path is cleared.
™
™

109
DONNER (JUNE 1944/NORMANDY)
MISSIONThe Allies struggle through the hedgerow county towardthe key town of Sainte Lo—the intersection for roads to key cities such as Caen and Carentan.
Chapter V: Missions—Donner
Legend1. Allied HQ Flag
2. Allied Street Flag
3. Tank Flag
4. Axis Street Flag
5. Axis HQ Flag
6. Allied Spawn Zone
7. Axis Spawn Zone
8. Bunker
9. Sniper Tower

110
Prima’s Official Strategy Guide
™
™
ALLIED CLASSESAND WEAPONS1. Rifleman—Garand2. Staff Sergeant—M1 Carbine3. Master Sergeant—Tommygun4. Sergeant—Greasegun5. Sniper—Springfield6. Support Infantry—BAR7. Machine Gunner—.30 Cal
AXIS CLASSESAND WEAPONS1. Grenadier—K982. Stosstrüppe—K433. Unteroffizier—MP404. Sturmtrüppe—STG445. Scharfschütze—K98 Sniper6. MG34-Schütze—MG347. MG42-Schütze—MG42
ALLIED OBJECTIVE• Capture the 5 flag points.
ALLIED INTELLIGENCE
1. Allied HQ Flag
2. Allied Street Flag
3. Tank Flag
4. Axis Street Flag
5. Axis HQ Flag
6. Allied Spawn Zone
7. Axis Spawn Zone
8. Bunker
9. Sniper Tower
Legend

111
The very first thing the Allies should do is move someone into the sniper tower (9)west of the Tank Flag (3). Waste no time. Moves quickly to get someone in the towerwell before the Axis reach the area. Once this position is taken, Allied soldiers shouldbring clips to the sniper so the position is never abandoned. Keep communicationopen, so the sniper can notify the team when he’s running low.
The next critical spot to capture is the bunker (8) south of the Tank Flag. This is acommonly traveled area. A single MG can stay inside the bunker and hold thisposition well, forcing the Axis to use the street and attempt to bypass the sniper in thetower. Again the MG must be supplied with ammunition, but if the team can holdthese two positions it will be very difficult for the Axis to advance.
Chapter V: Missions—Donner

112
Prima’s Official Strategy Guide
Donner is a straightforward map. There are lots of good sniper and MG locations andmost fighting happens in the streets and alleys between buildings. South of the AlliedHQ Flag (1) there’s a building with two windows overlooking the street. Use this spotto cover the flag and stop the Axis should they manage to push the team back.Leaving someone here at the beginning of combat is a waste. There are also a coupledecent spots inside the white building to the northwest that allow a view of thesecond flag (2), but provide minimal coverage. Beware of Axis soldiers hiding in theblown-out building as you enter the area. There are back alleys on both sides of themap, so the main streets shouldn’t be too busy most of the time. Try to cut the Axisoff before the second flag, or they’ll be very hard to predict once they get deep withinAllied territory.
After the Allied Street Flag (2) the team can advance past the bunker (8) on its waydeeper into Axis territory, or follow the street toward the Tank Flag (3). Use thebuildings south of the tank for both MGs and snipers to keep the Axis honest, but beready for heavy resistance. Capturing the Tank Flag requires two soldiers. Try comingat it from the sides rather than down the main road unless there are one or twosnipers in the tower to provide cover fire.
™
™

113
Capturing the last two flags is easier if you cut through the building on the north andsouth sides of the street. To reach the Axis Street Flag (4) either cut through thebuilding near the tank, or bypass the bunker. A building to the south of the flagprovides some cover for a sniper, but its well lit, so enemy soldiers are likely to spotthe sniper easily.
At the same time, other Allied soldiers can pass through the buildings and back alleysto the north to come out right next to the Axis HQ Flag (5). If the two teams cancoordinate well they can capture both flags simultaneously, which is usually good for aquick victory. The main street is normally well protected by Axis troops, so the alleysand buildings are your best bet. Be sure to check each corner and watch windows forenemies, as they’re sure to be using the same paths on their way to the tank.
Chapter V: Missions—Donner

114
Prima’s Official Strategy Guide
AXIS OBJECTIVE• Capture the 5 flag points.
AXIS INTELLIGENCE
™
™
1. Axis HQ Flag
2. Axis Street Flag
3. Tank Flag
4. Allied Street Flag
5. Allied HQ Flag
6. Axis Spawn Zone
7. Allied Spawn Zone
8. Bunker
9. Sniper Tower
Legend

115
As the battle begins, make a mad dash southwest toward the bunker (8). The Allieslikely will attempt to place an MG in the bunker, and they have a shorter dash to thisarea. If you move quickly you can reach the area before the MG has a chance to getready. Eliminate him and claim the bunker with an MG of your own. This keychokepoint helps prevent Allied soldiers from reaching the Axis Street Flag (2). It’s alsowise to have one sniper set up camp in the house directly east of the Tank Flag (3). Heshould be watching the sniper tower (9) for Allied activity, keeping them fromsneaking around the building to the north and deep into Axis territory.
This mission offers tons of sniper locations and
MG nests. Use windows that face toward
enemy territory to catch them as they enter
your area. The windows on your team’s side that face enemy
territory are dark. Those that face into enemy territory on their
side of the map are well lit (the same goes for both sides), so
it’s easier for MGs and snipers to hide on their own sides.
Chapter V: Missions—Donner
Tip

116
Prima’s Official Strategy Guide
The house directly north of the Axis HQ Flag (1) is a good spot for an Axis MG toprotect the last of the Axis flags. Also place someone in the building to the southeastwith a large hole in the wall. This provides coverage of both the Axis HQ Flag and theAxis Street Flag (2). Though it isn’t absolutely necessary to have people in eitherlocation, it makes it very difficult for the Allies to sneak into the area.
Look for another key sniper location in the building southwest of the Axis Street Flag.The dark windows provide a clear view of the street toward the tank. From thisposition an Axis sniper can prevent Allied troops from sneaking into the back alleys onthe north side of the map.
™
™

117
Reaching the Tank Flag (3) is difficult if the Allies position a sniper in the tower to thewest (9). If you sneak a sniper or someone with a rifle along the north wall and intothe building just east of the tower, he can get a good view of the tower windows fromthe second floor. Someone may need to sacrifice himself to draw the sniper near thewindows, but it’s an act worthy of a commendation. Try leaping out of the windowsand rushing into the building if the sniper can’t be seen. Chances of making it are lowif the Allies are playing smart, but drastic measures are often required.
Reach the last two Allied flags (4) (5) through the passages between buildings andback alleys. The main roads probably will be well guarded. Check every window thatpoints east or north for waiting enemies. If the Axis really wants to create some havoc,an MG or sniper can climb into the broken building north of the Allied HQ Flag andgo prone on the table. This is a great spot to pick off a few Allied soldiers as they rushinto battle. It’s also a good place to hide if waiting for the rest of the team to capturethe tank and flags on the Axis side of the map before you grab the final two.
Chapter V: Missions—Donner
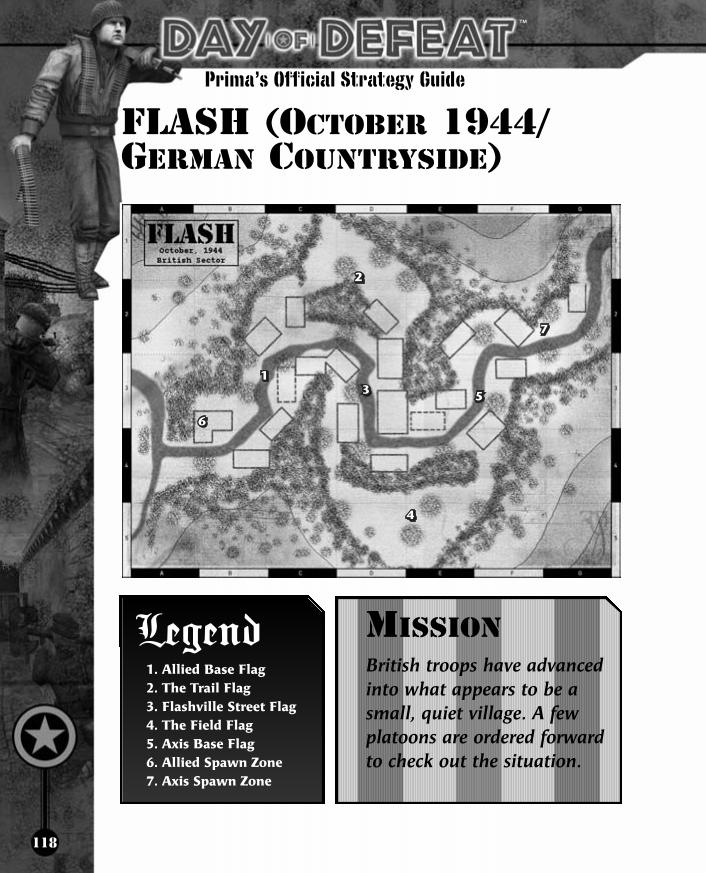
118
Prima’s Official Strategy Guide
™
™
FLASH (OCTOBER 1944/GERMAN COUNTRYSIDE)
MISSIONBritish troops have advancedinto what appears to be asmall, quiet village. A fewplatoons are ordered forwardto check out the situation.
Legend1. Allied Base Flag
2. The Trail Flag
3. Flashville Street Flag
4. The Field Flag
5. Axis Base Flag
6. Allied Spawn Zone
7. Axis Spawn Zone

119
Chapter V: Missions—Flash
BRITISH CLASSESAND WEAPONS1. Rifleman—Enfield2. Sergeant Major—Sten3. Marksman—Enfield Sniper4. Gunner—Bren
AXIS CLASSESAND WEAPONS1. Grenadier—K982. Stosstrüppe—K433. Unteroffizier—MP404. Sturmtrüppe—STG445. Scharfschütze—K98 Sniper6. MG34-Schütze—MG347. MG42-Schütze—MG42
BRITISH OBJECTIVE• Capture the 5 flag points.
BRITISH INTELLIGENCE
1. Allied Base Flag
2. Trail Flag
3. Flashville Street Flag
4. Field Flag
5. Axis Base Flag
6. Allied Spawn Zone
7. Axis Spawn ZoneLegend
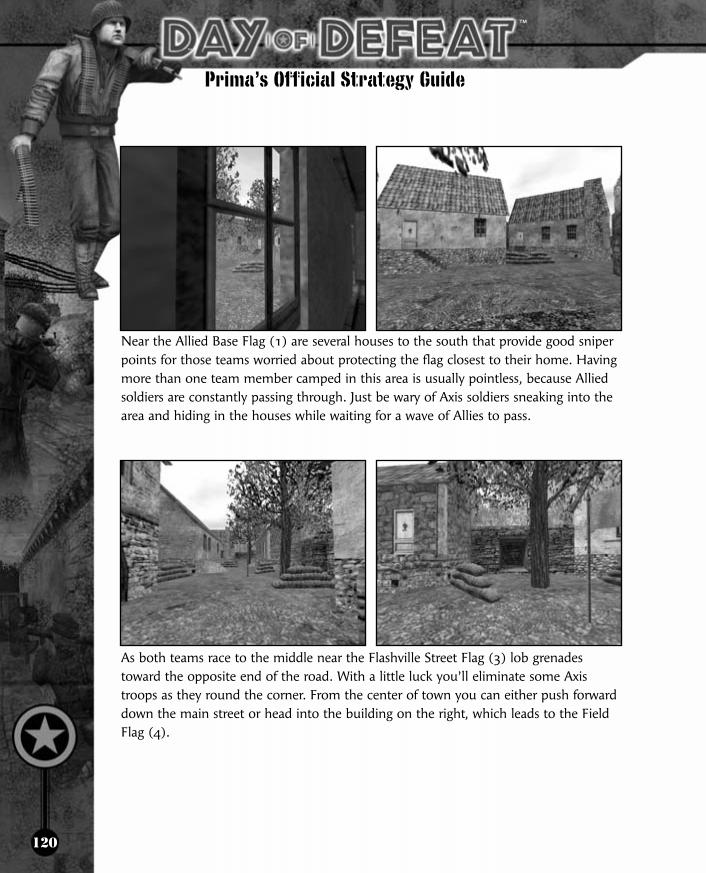
120
Prima’s Official Strategy Guide
Near the Allied Base Flag (1) are several houses to the south that provide good sniperpoints for those teams worried about protecting the flag closest to their home. Havingmore than one team member camped in this area is usually pointless, because Alliedsoldiers are constantly passing through. Just be wary of Axis soldiers sneaking into thearea and hiding in the houses while waiting for a wave of Allies to pass.
As both teams race to the middle near the Flashville Street Flag (3) lob grenadestoward the opposite end of the road. With a little luck you’ll eliminate some Axistroops as they round the corner. From the center of town you can either push forwarddown the main street or head into the building on the right, which leads to the FieldFlag (4).
™
™

121
Northwest of the Flashville Street Flag there’s a window in a white building lookingsoutheast across the street and into Axis territory. This is a good location for a sniper,as it allows the soldier to cover the street and the entrance to the Trail Flag (2). Ifanother soldier takes position in the two-story building directly across the street, hecan cover the exit from the Field Flag (4) with an MG. Two soldiers in these positionscan make it very difficult for the Axis to advance.
Near the Trail Flag (2) there’s a small bend in the path with a slight slope. A snipercan lie on the slope behind the bend in the turn and protect the flag from Axissoldiers coming from the south. If he’s placed properly, it’s very difficult to remove asniper from this position without sacrificing a few soldiers, or coming at him from theopposite direction. Snipers should beware of Axis soldiers entering the house in thedistance. They can sneak to the back window and easily lob a grenade to the corner ifthey’re aware of the sniper’s presence.
Chapter V: Missions—Flash

122
Prima’s Official Strategy Guide
Trying to capture the Field Flag (4) is difficult when coming from the west. Axissoldiers can hide behind the foliage and surprise Allies as they turn the corners. Usegrenades to flush the soldiers out of their hiding spots and make for a fair fight.However once the Axis soldiers have been cleared out, the Allies can use the samedirty tactic. An Allied MG may want to use the haystack near the entrance to the Fieldto jump into the back window of a house that overlooks the street toward the AxisBase (5). A single MG in this position can pin down Axis forces and force them topass through the Field rather than the main street.
As the Allies leaves the Field, they’re within a short distance of the Axis Base. Hidearound the corner before the main street to catch the Axis off guard as they head intothe area. Wait for a wave of Axis soldiers to pass and then have several Allied soldiersmake a mad dash at the flag. If the Axis is playing smart, an MG will guard the pathfrom the Field to the flag, so lob a few grenades toward the house across the streetbefore making your move.
™
™

123
AXIS OBJECTIVE• Capture the 5 flag points.
AXIS INTELLIGENCE
Chapter V: Missions—Flash
1. Axis Base Flag
2. The Field Flag
3. Flashville Street Flag
4. The Trail Flag
5. Allied Base Flag
6. Axis Spawn Zone
7. Allied Spawn ZoneLegend

124
Prima’s Official Strategy Guide
To protect the Axis Base Flag (1), place an MG in the window northwest of the flag. A soldier in this position can cut down enemies approaching from the Field (2) ordown the main street. For double coverage, place an MG in the window southwest of the flag and overlooking the entrance to the Field. Someone in this spot can holdthe location for an indefinite time, assuming nobody sneaks up on him from the main street.
As the Axis approaches the Flashville Street Flag (3) at the beginning of the game,someone should climb into the broken window on the right side of the street. Thisgives access to two windows overlooking the flag and an entrance to the Field. It’s nota great view of the area, but even someone with an SMG can hold the position fairlywell. Also be sure to lob grenades down the street toward Allied territory. The twosides arrive at this area at nearly the same time, so you may score an easy kill or two.
™
™

125
Protecting the Field Flag (2) isn’t too difficult. Use the foliage to your advantage andlie in wait for the Allies to stumble in from the east. As they turn corners, they’re easyprey. Just keep your eyes open for grenades and listen for footsteps.
The entrance to the Trail (4) from the Flashville Street Flag is a two story building onthe west side of the road. The building is also a great sniper/MG spot. Stick someoneon the top floor facing into Allied territory and he can keep Allies from marching upthe street from the Allied Base (5).
Chapter V: Missions—Flash
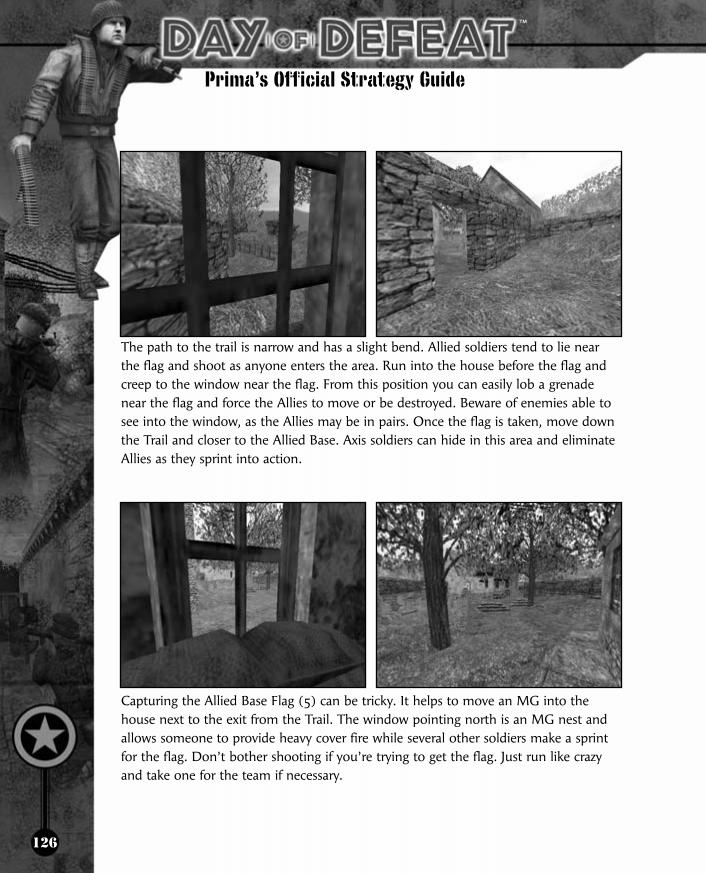
126
Prima’s Official Strategy Guide
The path to the trail is narrow and has a slight bend. Allied soldiers tend to lie nearthe flag and shoot as anyone enters the area. Run into the house before the flag andcreep to the window near the flag. From this position you can easily lob a grenadenear the flag and force the Allies to move or be destroyed. Beware of enemies able tosee into the window, as the Allies may be in pairs. Once the flag is taken, move downthe Trail and closer to the Allied Base. Axis soldiers can hide in this area and eliminateAllies as they sprint into action.
Capturing the Allied Base Flag (5) can be tricky. It helps to move an MG into thehouse next to the exit from the Trail. The window pointing north is an MG nest andallows someone to provide heavy cover fire while several other soldiers make a sprintfor the flag. Don’t bother shooting if you’re trying to get the flag. Just run like crazyand take one for the team if necessary.
™
™

127
FOREST (APRIL 1944/WESTERN FRONT)
MISSIONTwo opposing forces have dug in within the cover of aFrench forest. Walk carefullyand capture the trenches!
Chapter V: Missions—Forest
Legend1. Allied Hill Flag
2. Allied Valley Flag
3. Axis Valley Flag
4. Axis Hill Flag
5. Allied Spawn Zone
6. Axis Spawn Zone
7. Bunkers
8. Sniper Towers
9. Rocket Weapons
10. Allied Mortar
11. Axis Mortar
12. Blocked Passage
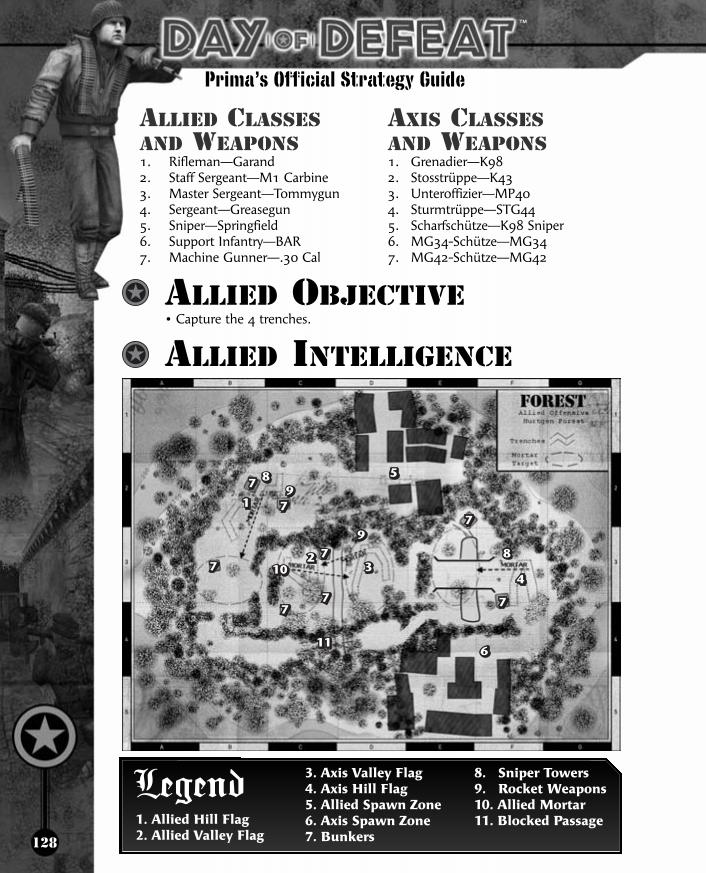
128
Prima’s Official Strategy Guide
™
™
ALLIED CLASSESAND WEAPONS1. Rifleman—Garand2. Staff Sergeant—M1 Carbine3. Master Sergeant—Tommygun4. Sergeant—Greasegun5. Sniper—Springfield6. Support Infantry—BAR7. Machine Gunner—.30 Cal
AXIS CLASSESAND WEAPONS1. Grenadier—K982. Stosstrüppe—K433. Unteroffizier—MP404. Sturmtrüppe—STG445. Scharfschütze—K98 Sniper6. MG34-Schütze—MG347. MG42-Schütze—MG42
ALLIED OBJECTIVE• Capture the 4 trenches.
ALLIED INTELLIGENCE
1. Allied Hill Flag
2. Allied Valley Flag
3. Axis Valley Flag
4. Axis Hill Flag
5. Allied Spawn Zone
6. Axis Spawn Zone
7. Bunkers
8. Sniper Towers
9. Rocket Weapons
10. Allied Mortar
11. Blocked Passage
Legend
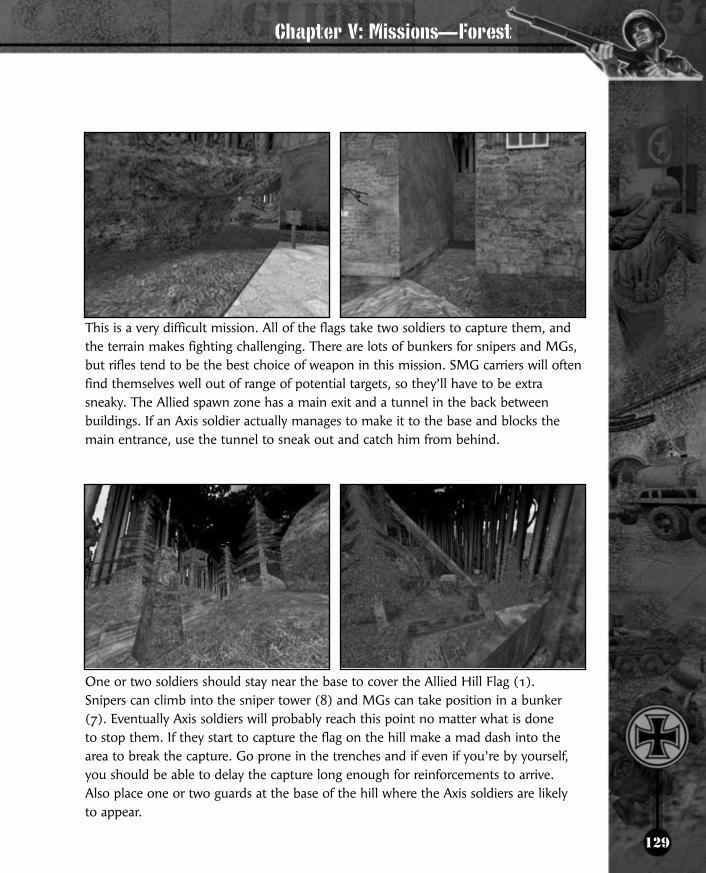
129
This is a very difficult mission. All of the flags take two soldiers to capture them, andthe terrain makes fighting challenging. There are lots of bunkers for snipers and MGs,but rifles tend to be the best choice of weapon in this mission. SMG carriers will oftenfind themselves well out of range of potential targets, so they’ll have to be extrasneaky. The Allied spawn zone has a main exit and a tunnel in the back betweenbuildings. If an Axis soldier actually manages to make it to the base and blocks themain entrance, use the tunnel to sneak out and catch him from behind.
One or two soldiers should stay near the base to cover the Allied Hill Flag (1). Snipers can climb into the sniper tower (8) and MGs can take position in a bunker(7). Eventually Axis soldiers will probably reach this point no matter what is done to stop them. If they start to capture the flag on the hill make a mad dash into thearea to break the capture. Go prone in the trenches and if even if you’re by yourself,you should be able to delay the capture long enough for reinforcements to arrive. Also place one or two guards at the base of the hill where the Axis soldiers are likely to appear.
Chapter V: Missions—Forest

130
Prima’s Official Strategy Guide
The area in the valley is very tricky as fighting tends to be heavy. Someone shouldquickly reach the Allied mortar (10) and begin firing shells into the Axis area, beingsure to stay prone so Axis snipers can’t pick him off. The rest of the squad shouldmove in from the west along the north line of trees, as a smaller squad approachesfrom the blocked passage (11) to the south. The secondary squad needs to carry arocket weapon to open the passage if it hasn’t already been cleared. Quickly moveforward and into the trenches. Use grenades to clear out Axis soldiers along with thecontinuous mortar fire. Hopefully with two forces advancing from separate sides, theAllies can confuse the Axis troops just long enough to capture the area.
Advance up the hill through the main path and through the lane past the blockedpassage. Be ready for heavy resistance, as Axis troops likely are guarding the passagesinto their territory. One or two soldiers should also use the tunnel near the Axis ValleyFlag (3) to pass below the Axis resistance and into the center of their territory. Thispassage may also be protected, so have grenades ready.
™
™

131
Be cautious of the bunker to the north high up on a hill. This is the best sniper/MGspot in the mission, and it’s usually under Axis control. Those attacking from thewater below the bunker can run up the hill without being seen from the bunker itself,but they’ll be exposed to the rest of the area. Push forward and use rockets to destroythe Axis bunkers and sniper tower (8). Reach the trench and go prone while waitingfor the capture to take. Someone should keep an eye on the top of the hill to guard itfrom any Axis soldier leaping into the capture area and breaking the capture. With alot of well-planned and coordinated maneuvers the team can capture both points, butit won’t be easy.
Once you’ve captured the valley, set up snipers
and MGs at the top of the side of the valley and
the blocked passage. Also guard any tunnels
into the region. Thus it’s sometimes possible to keep the enemy
pushed back and maintain control of the area while giving the
rest of the team time to capture the final objective.
Chapter V: Missions—Forest
Tip

132
Prima’s Official Strategy Guide
AXIS OBJECTIVE• Capture the 4 trenches.
AXIS INTELLIGENCE
™
™
1. Axis Hill Flag
2. Axis Valley Flag
3. Allied Valley Flag
4. Allied Hill Flag
5. Axis Spawn Zone
6. Allied Spawn Zone
7. Bunkers
8. Sniper Towers
9. Rocket Weapons
10. Axis Mortar
11. Blocked Passage
Legend

133
At the start, two or three Axis troops should immediately hop in the tunnel inside theAxis spawn zone and cut through to the waterfall on the hill. If they make a mad dashfor the valley, they may actually be able to capture the Allied Valley Flag (3) before theAllies can reach the area. Holding it may prove problematic, but it at least frustratesthe Allied troops and gives the Axis the initial advantage.
Meanwhile a few soldiers should begin protecting the Axis Hill Flag (1) by takingpositions in the bunker on the hill to the north and in the sniper tower. These twopositions make it very difficult for the Allies to enter the area. Also stick someone onthe Axis mortar (10) and begin shelling the bridge the help prevent Allied incursions.
Chapter V: Missions—Forest
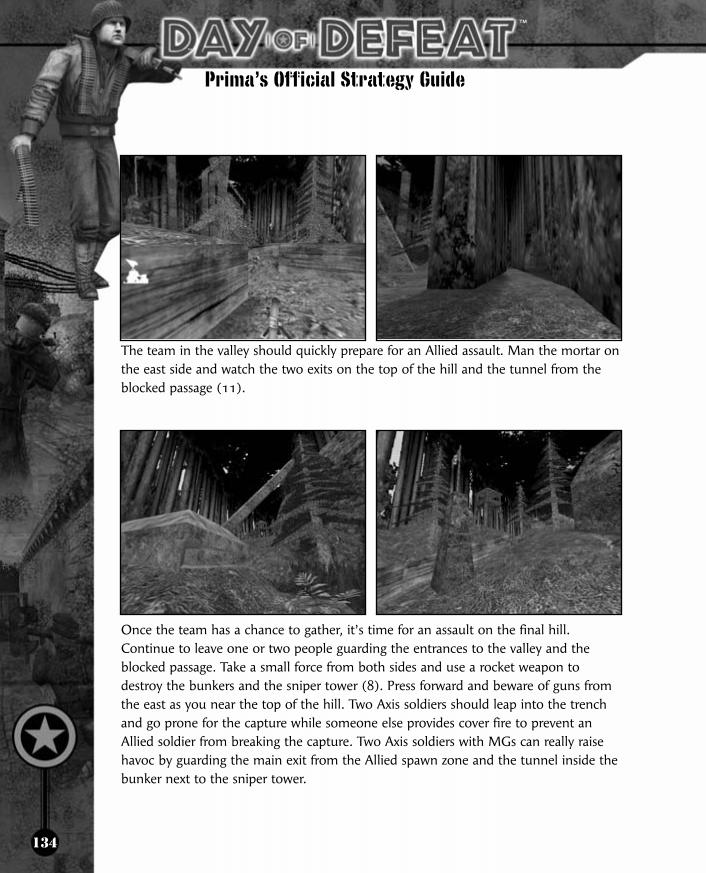
134
Prima’s Official Strategy Guide
The team in the valley should quickly prepare for an Allied assault. Man the mortar onthe east side and watch the two exits on the top of the hill and the tunnel from theblocked passage (11).
Once the team has a chance to gather, it’s time for an assault on the final hill.Continue to leave one or two people guarding the entrances to the valley and theblocked passage. Take a small force from both sides and use a rocket weapon todestroy the bunkers and the sniper tower (8). Press forward and beware of guns fromthe east as you near the top of the hill. Two Axis soldiers should leap into the trenchand go prone for the capture while someone else provides cover fire to prevent anAllied soldier from breaking the capture. Two Axis soldiers with MGs can really raisehavoc by guarding the main exit from the Allied spawn zone and the tunnel inside thebunker next to the sniper tower.
™
™

135
GLIDER (JUNE 1944/NORMANDY)
MISSION
Allied paratroopers havedropped behind the D-Daybeaches to disrupt enemycommunications andreinforcements to the front.
Chapter V: Missions—Glider
Legend1. “88” Flak Cannon
2. “Freya” Radar
3. Radio Room
4. German Forward
Supply House
5. German Bunker
6. Allied Spawn
7. Footbridge
8. Castle Wall
9. Sewer Wall
10. Allied Mortar
11. Stairwell Well
12. Satchel Charges
13. Rocket Weapons
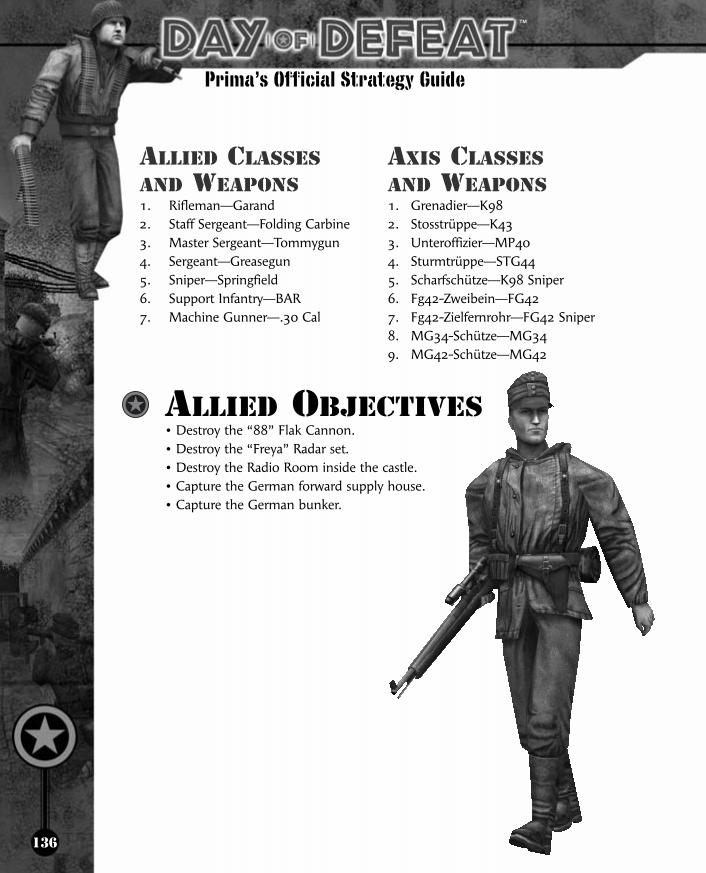
136
Prima’s Official Strategy Guide
™
™
ALLIED CLASSESAND WEAPONS1. Rifleman—Garand2. Staff Sergeant—Folding Carbine3. Master Sergeant—Tommygun4. Sergeant—Greasegun5. Sniper—Springfield6. Support Infantry—BAR7. Machine Gunner—.30 Cal
AXIS CLASSESAND WEAPONS1. Grenadier—K982. Stosstrüppe—K433. Unteroffizier—MP404. Sturmtrüppe—STG445. Scharfschütze—K98 Sniper6. Fg42-Zweibein—FG427. Fg42-Zielfernrohr—FG42 Sniper8. MG34-Schütze—MG349. MG42-Schütze—MG42
ALLIED OBJECTIVES• Destroy the “88” Flak Cannon.• Destroy the “Freya” Radar set.• Destroy the Radio Room inside the castle.• Capture the German forward supply house.• Capture the German bunker.

137
ALLIED INTELLIGENCE
Chapter V: Missions—Glider
1. “88” Flak Cannon
2. “Freya” Radar
3. Radio Room
4. German Forward
Supply House
5. German Bunker
6. Allied Spawn
7. Castle Wall
8. Sewer Wall
9. Stairwell Wall
10. Satchel Charges
11. Rocket Weapons
Legend

138
Prima’s Official Strategy Guide
The Allies have to move fast to win this mission. The Axis has a definite advantage,since the targets that must be destroyed are in a fairly concentrated area and easy toguard. Team cooperation will be essential. At the start the Allies should split into twoteams. One heads for the “Freya” Radar (2) and other nearby targets, while the othertakes the German Forward Supply House (4) and attempts to reach the Radio Room(3). All Allied soldiers need to take satchel charges with them, so they can destroytargets of opportunity. Bazookas are helpful, but not necessary. Find them outside theAllied spawn zone.
The German Forward Supply House is an easy target. It’s straight out from the Alliedspawn zone and can be captured almost immediately. Some Axis soldiers may havespawned in the Supply House, so be ready for possible resistance while approachingthe building. Windows on the second floor overlook the Allied spawn zone. Snipersmay have taken position in this area, but it’s unlikely. The Supply House isn’timperative for the Axis to protect.
™
™

139
From there the Supply House team should head through the tunnels toward the sewerwall (9). German soldiers likely are guarding the hall, so throw some grenades deepinto the hallway. At the same time, split some soldiers off to the north and around thebend to attack the castle wall, found at the top of a ladder in the courtyard outside thetunnel. Both spots can be destroyed with an explosive.
Once inside, head to the Radio Room from different angles. The trick on reaching theroom is to throw off the defenders. The room can be reached from two differentdirections. To destroy it, use a satchel charge or blast the red wall with a rocket. Theexplosion destroys the room, so get out fast or shoot from the doorway if you hope to survive.
Chapter V: Missions—Glider
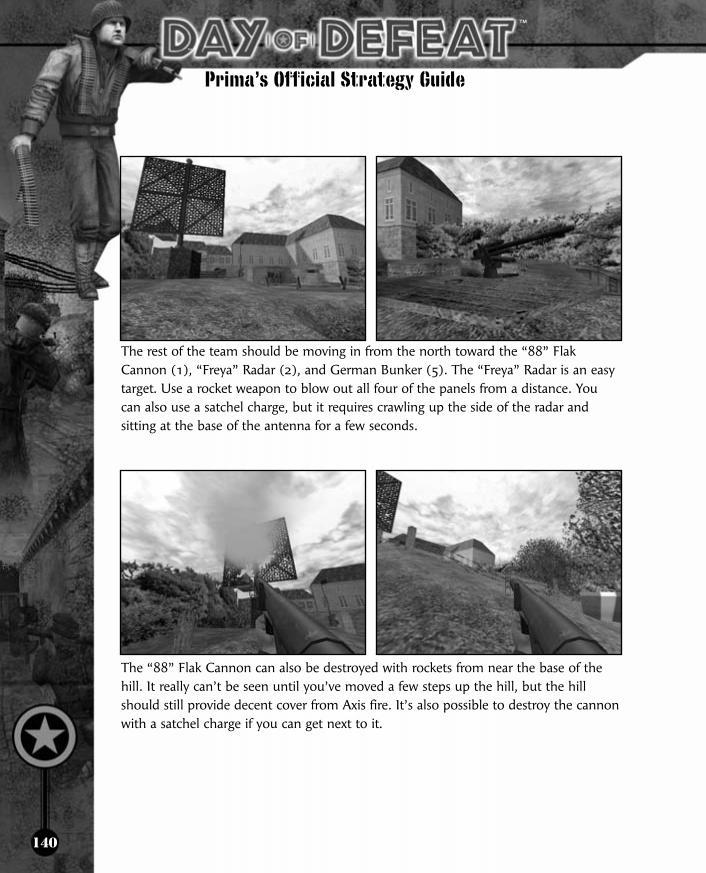
140
Prima’s Official Strategy Guide
The rest of the team should be moving in from the north toward the “88” FlakCannon (1), “Freya” Radar (2), and German Bunker (5). The “Freya” Radar is an easytarget. Use a rocket weapon to blow out all four of the panels from a distance. Youcan also use a satchel charge, but it requires crawling up the side of the radar andsitting at the base of the antenna for a few seconds.
The “88” Flak Cannon can also be destroyed with rockets from near the base of thehill. It really can’t be seen until you’ve moved a few steps up the hill, but the hillshould still provide decent cover from Axis fire. It’s also possible to destroy the cannonwith a satchel charge if you can get next to it.
™
™

141
Last is the German Bunker (5). This requires a direct assault from the hill, or frombehind if someone manages to infiltrate the castle. Blast the front wall of the bunker,directly on top of the boards leaning on the wall, to open the front. Then head inside and wait to capture it. This is a long capture, so you have to hold the positionfor awhile.
As either team completes its objectives, it
should head out to assist with any remaining
objectives. The Radio Room team can infiltrate
the bunker from the inside. If the team
assaulting the hill finishes first, they can pass through the
bunker to the Radio Room. Remember your main goal is to
force the Axis to defend several fronts at once rather than being
able to concentrate all of their firepower in one place.
Chapter V: Missions—Glider
Tip

142
Prima’s Official Strategy Guide
AXIS OBJECTIVE• Clear the area of Allied paratroopers.
AXIS INTELLIGENCE
™
™
1. “88” Flak Cannon
2. “Freya” Radar
3. Radio Room
4. German Forward
Supply House
5. German Bunker
6. Allied Spawn
7. Footbridge
8. Castle Wall
9. Sewer Wall
10. Stairwell Wall
11. Rocket Weapons
Legend

143
The Axis must act fast at the beginning of the mission to prevent the Allied soldiersfrom quickly completing some of their objectives. First, someone should grab a rocketweapon and run to the footbridge (7). Shoot a rocket into the center to destroy thebridge. This limits the Allies to three routes into the castle rather than four. Meanwhilethe rest of the party should set up intercept parties at the castle wall (8), sewer wall(9), and around the hill by the “88” Flak Cannon (1) and “Freya” Radar (2).
The castle wall is a great sniper spot made even
better once the footbridge is destroyed. By standing
on the rail someone can shoot directly down onto
Allies as they enter the courtyard below.
A few rogue Axis soldiers can press forward and attempt to stop the Allies before theyreach the castle. A sniper on the ledge above the footbridge is also an asset. Pick offthe Allies while they’re in the open, or as they walk down the tight tunnels leading tothe castle.
Chapter V: Missions—Glider
Tip
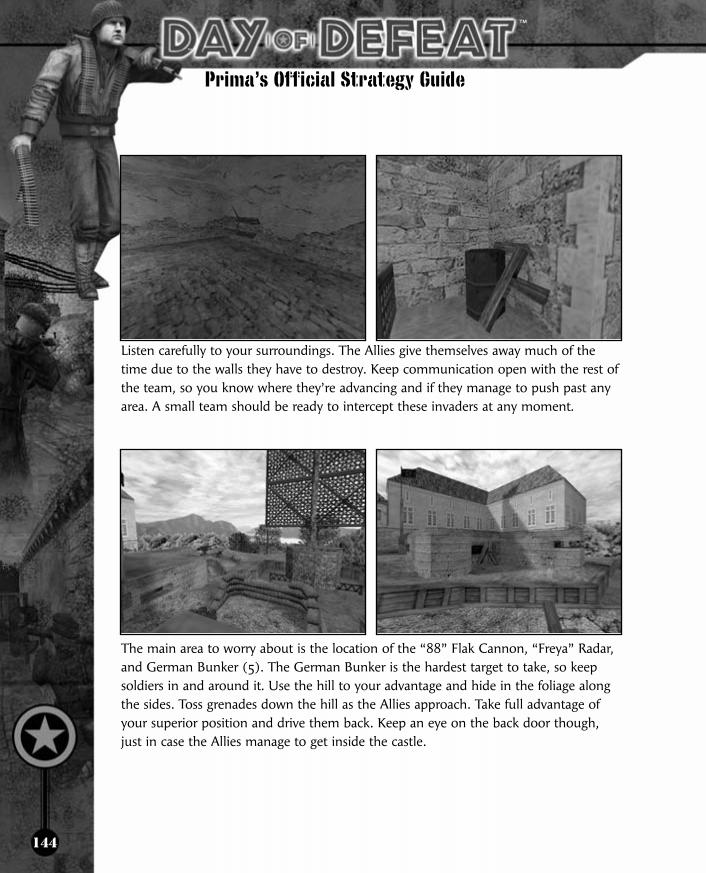
144
Prima’s Official Strategy Guide
Listen carefully to your surroundings. The Allies give themselves away much of thetime due to the walls they have to destroy. Keep communication open with the rest ofthe team, so you know where they’re advancing and if they manage to push past anyarea. A small team should be ready to intercept these invaders at any moment.
The main area to worry about is the location of the “88” Flak Cannon, “Freya” Radar,and German Bunker (5). The German Bunker is the hardest target to take, so keepsoldiers in and around it. Use the hill to your advantage and hide in the foliage alongthe sides. Toss grenades down the hill as the Allies approach. Take full advantage ofyour superior position and drive them back. Keep an eye on the back door though,just in case the Allies manage to get inside the castle.
™
™

145
JAGD (JUNE 1944/NEAR CAEN)
MISSIONThe British Army is advancingtoward Caen, but it’s being heldup in the town of Viller-bocageby a German panzer division. To make matters worse, a Horsaglider carrying plans for theattack on Caen has crashed inenemy territory.
Chapter V: Missions—Jagd
Legend1. Spawn Zone—British
2. Spawn Zone—Axis
3. Allied Tank
4. Allied Tank
5. Crash Site—
Secret Plans
6. Command Center
7. Piat
8. Panzerschreck

146
Prima’s Official Strategy Guide
™
™
BRITISH CLASSESAND WEAPONS1. Rifleman—Enfield2. Sergeant Major—Sten3. Marksman—Enfield Sniper4. Gunner—Bren
AXIS CLASSESAND WEAPONS1. Grenadier—K982. Stosstrüppe—K433. Unteroffizier—MP404. Sturmtrüppe—STG445. Scharfschütze—K98 Sniper6. FG42-Zweibein—FG427. FG42-Zielfernrohr—FG42 Sniper8. MG34-Schütze—MG349. MG42-Schütze—MG42
BRITISH OBJECTIVES• Recover and return the plans from the downed glider.• Defend the Cromwell tanks.

147
BRITISH INTELLIGENCE
Chapter V: Missions—Jagd
1. Spawn Zone
2. Sniper Spot
3. Secret Plans
4. Path through
Town
5. Sniper Spot
6. Sniper Spot
7. Possible Axis
Sniper Spots
8. Sniper Spot
9. Axis Sniper Spot
10. Church Tower
11. Sniper Spot
12. Sniper Spot
13. Sniper Spot
14. Rubble Wall
15. Piat
Legend

148
Prima’s Official Strategy Guide
There’s no need to take damage by jumping through the window at the spawn zone(1). Instead, go through the Command Center and down the stairs. It takes a secondor two more, but you take no damage.
Keep an MG or sniper at this spot (2) to stop Axis troops from advancing on thetanks. Even if equipped with rocket weapons, the Axis must come to this point whenapproaching from the west.
™
™

149
The objective is to reach the secret plans (3), so have half your troops follow the path through town (4). Be wary of the tunnel’s entrance. Though the British reach the tunnel first at the start, the Axis may take the tunnel during the mission. Alwayshave multiple soldiers ready to storm the tunnel together, so you can overwhelm any resistance.
You should be engaging the enemy for the first time as you near this point in the road(5). Either side of the road makes a good sniper spot. The hill gives your team theadvantage, as the enemies have a difficult time spotting prone soldiers at the top.Smart enemies will bank grenades off of the building on the street’s south side. Keepyour eyes open and be ready to move if necessary.
Chapter V: Missions—Jagd

150
Prima’s Official Strategy Guide
Plant an MG or sniper at this spot (6) to pick off Axis troops as they exit the spawnsite. The tunnel ahead is another good spot for an Axis MG. Toss a grenade insidebefore walking in front of the door. If you can’t flush the enemy out, use a differentpath, or have someone else attempt to eliminate the enemy when approaching fromthe opposite side.
Be on the lookout for Axis troops on either side of the road as you near the crash site.Axis troops could be lying in wait on either side (7). Experienced players will bedifficult to spot, but there are very few places to hide.
If you pick up the secret plans and then get
killed, the plans remain wherever you died.
Be sure to communicate with your other
squad members where you died so they can retrieve the secret
plans. If an Axis soldier runs over the plans, the plans reappear
at the crash site.
™
™
Note

151
Plant an MG or sniper at this window (8) to push back advancing Axis troops movingin from the west side of the town.
As you round the corner, continue down the street with caution. Axis snipers aretypically installed at this location (9). Pick off the sniper before advancing farther east.
Use a Piat to blast the top off the church tower (10). Blasting this apart kills any Axissoldier that may be lying in wait and prevents anyone else from using the tower again.
Chapter V: Missions—Jagd

152
Prima’s Official Strategy Guide
With an MG or sniper embedded at this location (13), you can effectively detect anyAxis troops coming from the east in three different directions. Blasting the short wallof rubble down in the street below prevents the Axis troops from using it as cover asthey move through this street.
Destroy this rubble wall (14) to reduce the amount of coverage available for Axissnipers. If you can’t seem to eliminate the snipers in this area, try approaching fromthe road to the north. Snipers looking down the street are blind to your approach.
™
™
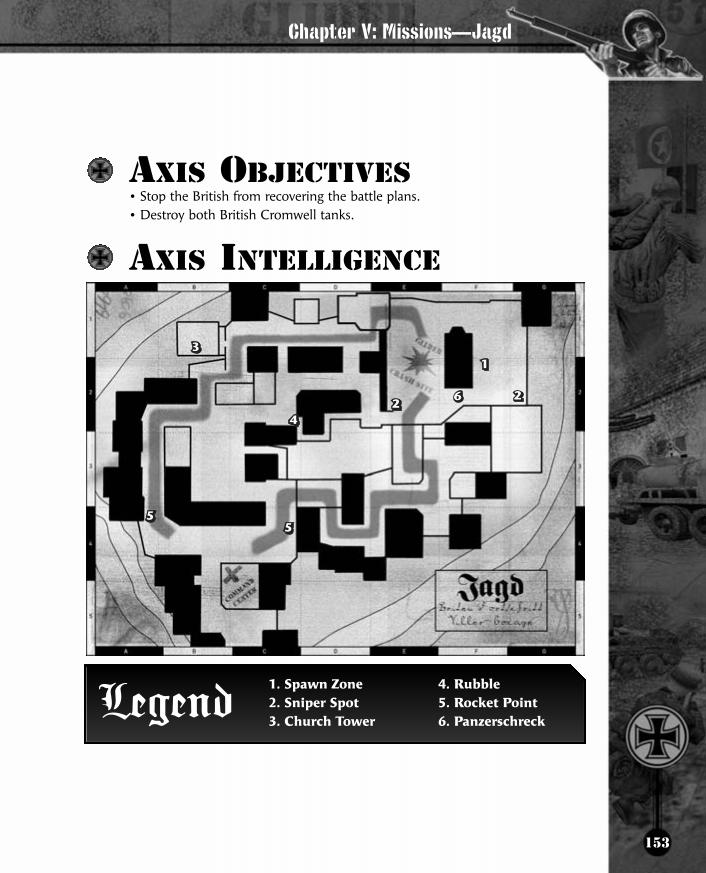
153
AXIS OBJECTIVES• Stop the British from recovering the battle plans.• Destroy both British Cromwell tanks.
AXIS INTELLIGENCE
Chapter V: Missions—Jagd
1. Spawn Zone
2. Sniper Spot
3. Church Tower
4. Rubble
5. Rocket Point
6. PanzerschreckLegend
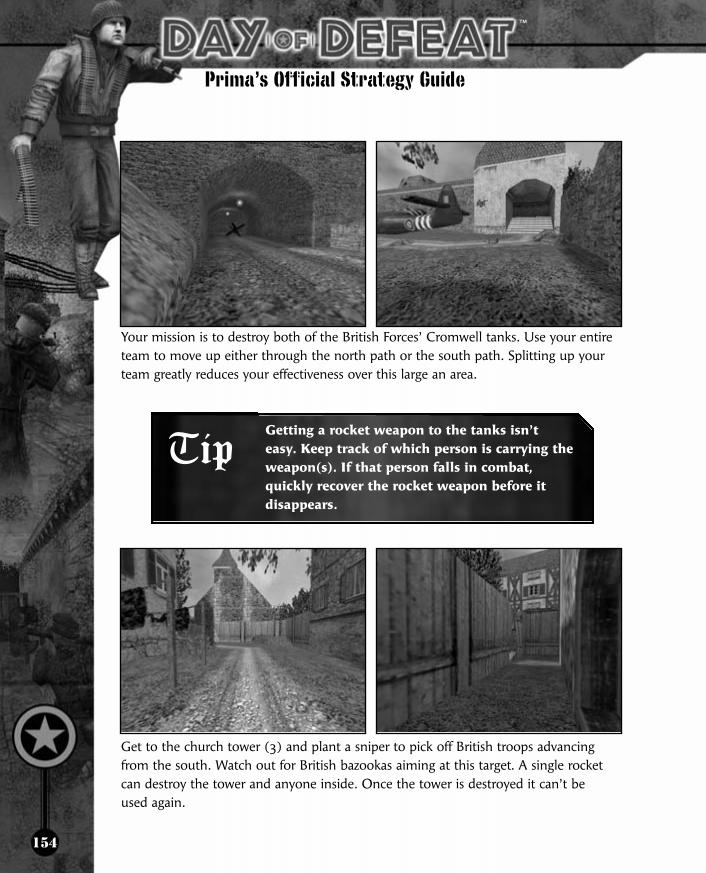
154
Prima’s Official Strategy Guide
Your mission is to destroy both of the British Forces’ Cromwell tanks. Use your entireteam to move up either through the north path or the south path. Splitting up yourteam greatly reduces your effectiveness over this large an area.
Getting a rocket weapon to the tanks isn’t
easy. Keep track of which person is carrying the
weapon(s). If that person falls in combat,
quickly recover the rocket weapon before it
disappears.
Get to the church tower (3) and plant a sniper to pick off British troops advancingfrom the south. Watch out for British bazookas aiming at this target. A single rocketcan destroy the tower and anyone inside. Once the tower is destroyed it can’t be used again.
™
™
Tip

155
Use the rubble (4) in the streets as effective cover. Snipers can go prone and peek overthe rubble fairly easily, but beware of enemies approaching from the north. Whileusing a scope, a sniper cannot detect soldiers approaching from this side.
While you’re attempting to destroy the tanks,
the British will be trying their best to capture
the secret plans near the wrecked plane. A
couple of defenders using MGs can hold this
area fairly easily, because Axis soldiers flood the area whenever
reinforcements arrive. Should a British soldier capture the
plans, he drops them when shot. Be sure to run over the plans
to return them to their original position.
Chapter V: Missions—Jagd
Tip
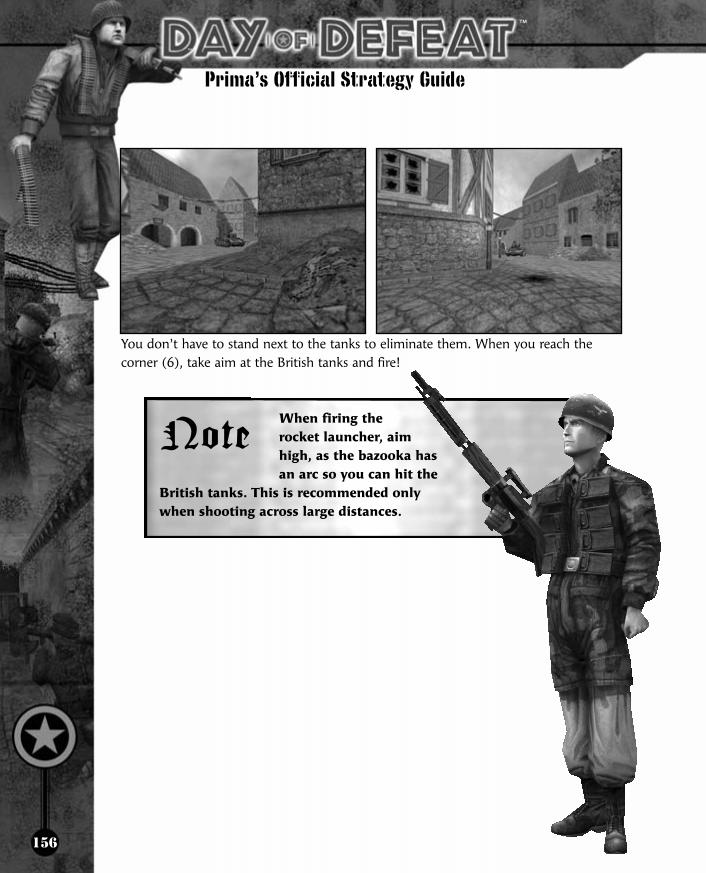
156
Prima’s Official Strategy Guide
You don’t have to stand next to the tanks to eliminate them. When you reach thecorner (6), take aim at the British tanks and fire!
When firing the
rocket launcher, aim
high, as the bazooka has
an arc so you can hit the
British tanks. This is recommended only
when shooting across large distances.
™
™
Note

157
KALT (DECEMBER 1944/WESTERN FRONT)
MISSIONThe half-frozen town of Kalt became the setting forsome of the most brutalfighting of the war—firefights raging in the streets, houses, and sewers.
Chapter V: Missions—Kalt
Legend1. Spawn Zone—Allied
2. Spawn Zone—Axis
3. Allied Capture Point
4. Allied Street
5. The Bridge
6. Axis Street
7. Axis Bunker
8. Sewer System
9. Sniper Spot
10. Bazooka
11. Panzerschreck

158
Prima’s Official Strategy Guide
™
™
ALLIED CLASSESAND WEAPONS1. Rifleman—Garand2. Staff Sergeant—M1 Carbine3. Master Sergeant—Tommygun4. Sergeant—Greasegun5. Sniper—Springfield6. Support Infantry—BAR7. Machine Gunner—.30 Cal
AXIS CLASSESAND WEAPONS1. Grenadier—K982. Stosstrüppe—K433. Unteroffizier—MP404. Sturmtrüppe—STG445. Scharfschütze—K98 Sniper6. MG34-Schütze—MG347. MG42-Schütze—MG42
ALLIED OBJECTIVE• Capture the 5 flag points.
AXIS OBJECTIVE• Capture the 5 flag points.
ALLIED AND AXISINTELLIGENCE
Kalt is a straightforward map
that has identical strategy
regardless of whether you are
playing as Allied or Axis.
Note

159
Approaching from either the Allied (1) or Axis (2) spawn zones, keep a squad memberat the first flags to defend against enemy capture. The beginning flags for both sidestake several seconds to capture, so you should have time to eliminate the enemy ifyou see the icon changing.
Each of the capture points along the street, (3, 4, 5, 6, 7) can be covered by snipers orMGs on either side of the target. Keep this in mind whether advancing on a target ordefending one.
All of the sandbags along the street can be
blown up. Use this to your advantage to
eliminate enemy cover.
Chapter V: Missions—Kalt
Note

160
Prima’s Official Strategy Guide
Use the sewer system (8) to travel underground to reach enemy territory. This passageis narrow with no cover should you come eye-to-eye against the enemy. However, it isanother way across town, giving you alternatives in reaching your objectives.
Look for paths through the building south of the bridge and between the buildingsnear the first and second flags on both sides of the map. These back paths offer asneaky way to pass from one end of the map to another. Also keep your eyes ondoors. If you see one open, assume a soldier is on the other side. Consider blastingdoors before opening them. It gives away your presence, but clears anyone campingon the other side.
™
™
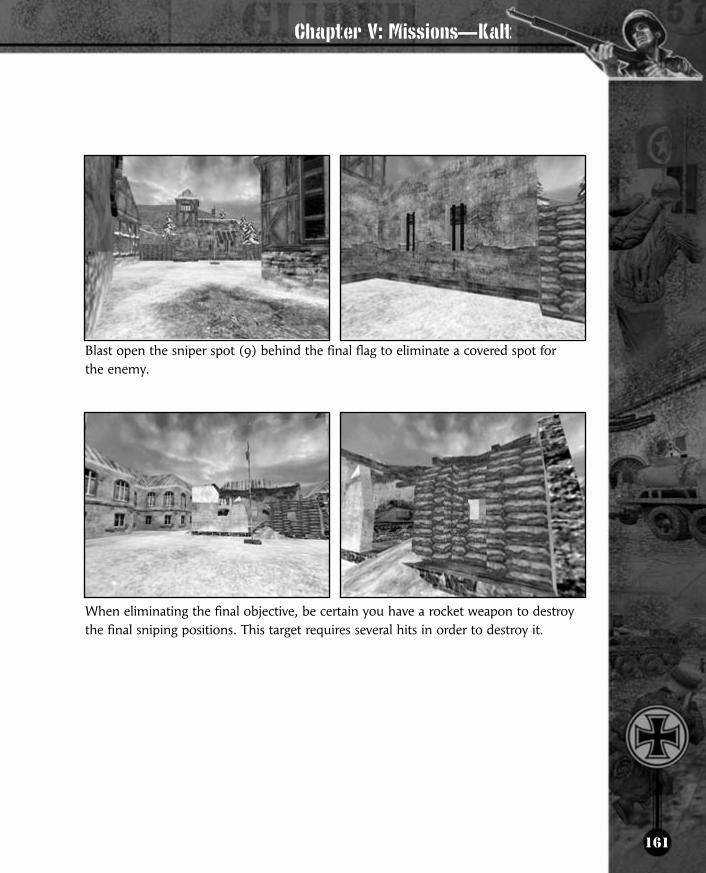
161
Blast open the sniper spot (9) behind the final flag to eliminate a covered spot for the enemy.
When eliminating the final objective, be certain you have a rocket weapon to destroythe final sniping positions. This target requires several hits in order to destroy it.
Chapter V: Missions—Kalt
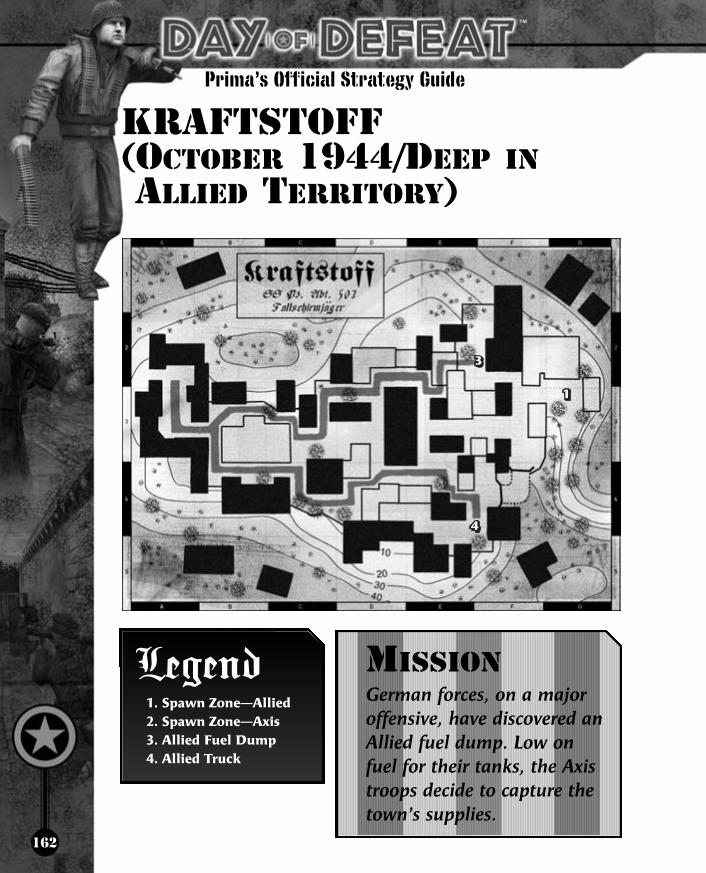
162
Prima’s Official Strategy Guide
™
™
KRAFTSTOFF (OCTOBER 1944/DEEP INALLIED TERRITORY)
MISSIONGerman forces, on a majoroffensive, have discovered anAllied fuel dump. Low on fuel for their tanks, the Axistroops decide to capture thetown’s supplies.
Legend1. Spawn Zone—Allied
2. Spawn Zone—Axis
3. Allied Fuel Dump
4. Allied Truck

163
Chapter V: Missions—Kraftstoff
ALLIED CLASSESAND WEAPONS1. Rifleman—Garand2. Staff Sergeant—Folding Carbine3. Master Sergeant—Tommygun4. Sergeant—Greasegun5. Sniper—Springfield6. Support Infantry—BAR7. Machine Gunner—.30 Cal
AXIS CLASSESAND WEAPONS1. Grenadier—K982. Stosstrüppe—K433. Unteroffizier—MP404. Sturmtrüppe—STG445. Scharfschütze—K98 Sniper6. FG42-Zweibein—FG427. FG42-Zielfernrohr—FG42 Sniper8. MG34-Schütze—MG349. MG42-Schütze—MG42
ALLIED OBJECTIVES• Defend the Fuel Truck.• Defend the Fuel Dump.
ALLIED INTELLIGENCE
1. Spawn Zone
2. Sniper Spot
3. Sniper Spot
4. Sniper Spot
5. Sniper Spot
6. Sniper SpotLegend
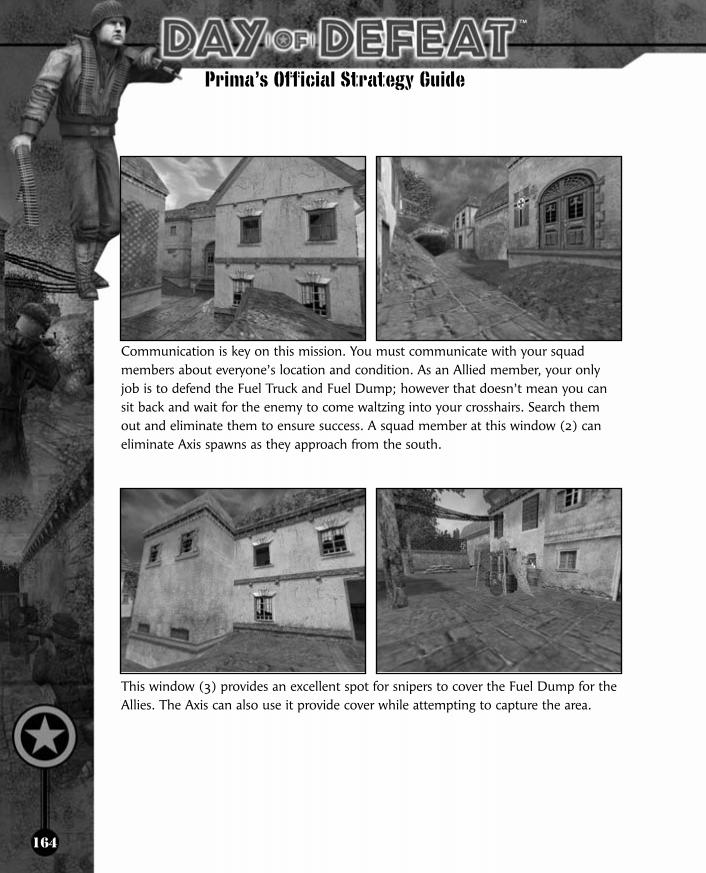
164
Prima’s Official Strategy Guide
Communication is key on this mission. You must communicate with your squadmembers about everyone’s location and condition. As an Allied member, your onlyjob is to defend the Fuel Truck and Fuel Dump; however that doesn’t mean you cansit back and wait for the enemy to come waltzing into your crosshairs. Search themout and eliminate them to ensure success. A squad member at this window (2) caneliminate Axis spawns as they approach from the south.
This window (3) provides an excellent spot for snipers to cover the Fuel Dump for theAllies. The Axis can also use it provide cover while attempting to capture the area.
™
™

165
These sniper spots (4) can be used to cover the streets for either side. Watch out forsnipers as you near these corners.
Toss a grenade from the corner, to the west end of the street (5), clearing out anypossible snipers in this area.
Plant an MG or sniper at this window (6) to cover the Allied truck. Listen for enemiesclimbing the ladder behind you and be prepared to eliminate them.
Chapter V: Missions—Kraftstoff

166
Prima’s Official Strategy Guide
AXIS OBJECTIVES• Capture the Fuel Truck.• Capture the Fuel Dump.
AXIS INTELLIGENCE
™
™
1. Spawn Zone
2. Allied Truck
3. Sniper Spot
4. Ladder
5. Sniper Spot
6. Sniper Spot—AlliedLegend

167
From your spawn zone, move to the Allied Truck (2) as quickly as you can. This is thetougher target for the Axis troops to capture.
Once captured, neither the truck or barrels can be recaptured by the Allies, so there’sno need to leave team members to cover those positions. Both teams shouldconcentrate their offense or defense on the remaining objective. The barrels should bethe secondary Axis target. They are much easier to capture than the truck, so theentire team should rush to the truck at the start.
Chapter V: Missions—Kraftstoff
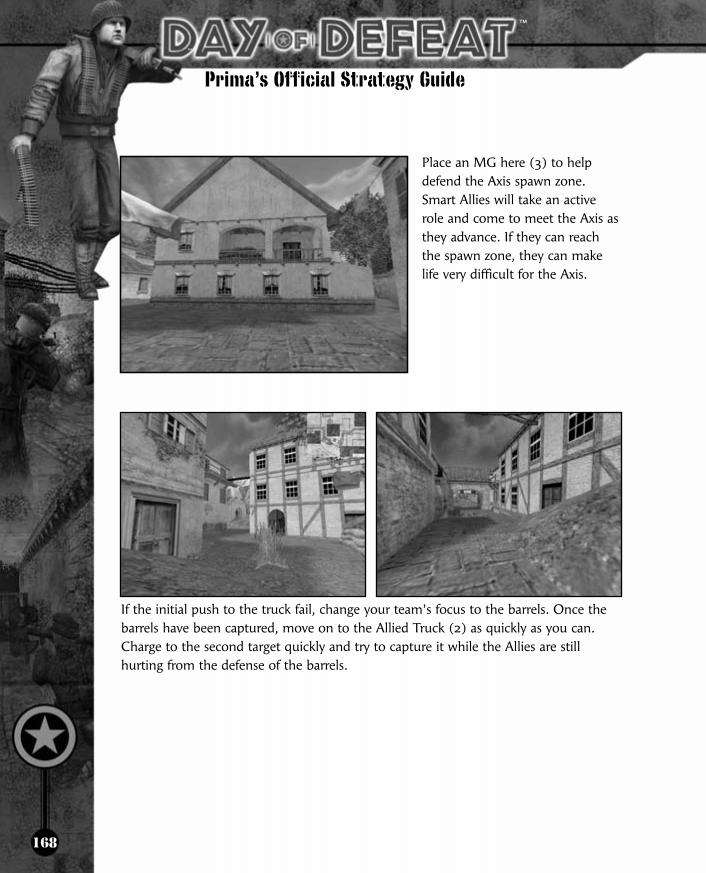
168
Prima’s Official Strategy Guide
Place an MG here (3) to helpdefend the Axis spawn zone.Smart Allies will take an activerole and come to meet the Axis asthey advance. If they can reachthe spawn zone, they can makelife very difficult for the Axis.
If the initial push to the truck fail, change your team’s focus to the barrels. Once thebarrels have been captured, move on to the Allied Truck (2) as quickly as you can.Charge to the second target quickly and try to capture it while the Allies are stillhurting from the defense of the barrels.
™
™
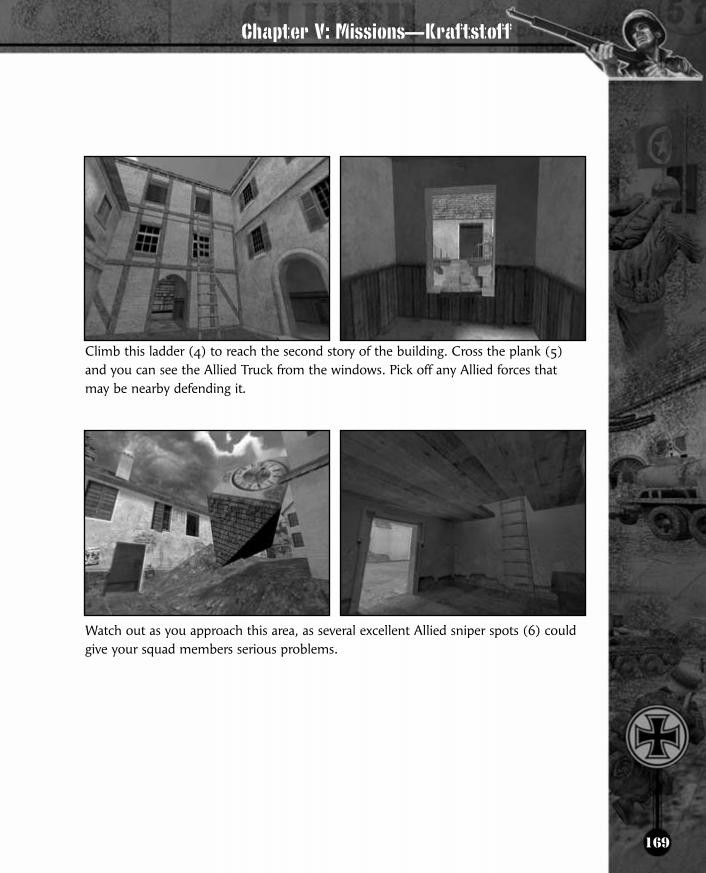
169
Climb this ladder (4) to reach the second story of the building. Cross the plank (5)and you can see the Allied Truck from the windows. Pick off any Allied forces thatmay be nearby defending it.
Watch out as you approach this area, as several excellent Allied sniper spots (6) couldgive your squad members serious problems.
Chapter V: Missions—Kraftstoff

170
Prima’s Official Strategy Guide
™
™
MERDERET (JUNE 13, 1944/ COTENTIN PENINSULA)
MISSIONGerman troops are attempting to regain a foothold against the invading Allied forces—to do so, they must capture a key bridge.
Legend1. Spawn Zone—Allied
2. Spawn Zone—Axis
3. Church Square
4. Stronghold
5. Bridge
6. Axis Street
7. The Field
8. Bazookas

171
Chapter V: Missions—Merderet
ALLIED CLASSESAND WEAPONS1. Rifleman—Garand2. Staff Sergeant—M1 Carbine3. Master Sergeant—Tommygun4. Sergeant—Greasegun5. Sniper—Springfield6. Support Infantry—BAR7. Machine Gunner—.30 Cal
AXIS CLASSESAND WEAPONS1. Grenadier—K982. Stosstrüppe—K433. Unteroffizier—MP404. Sturmtrüppe—STG445. Scharfschütze—K98 Sniper6. MG34-Schütze—MG347. MG42-Schütze—MG42
ALLIED OBJECTIVE• Capture the 5 flag points.
ALLIED INTELLIGENCE
1. Spawn Zone
2. Sniper Spot
3. Sniper Spot
4. Sniper Spot
5. Sniper Spot
6. Sniper Spot
7. Sniper Spot
8. Rope
9. Ladder
10. Sniper Spot
11. Sniper Spot
12. Sniper Spot—Axis
Legend

172
Prima’s Official Strategy Guide
Capturing the bridge is an important part of
this mission. Choose from several sniper
spots around the bridge to help defend it.
Use these spots and move your snipers to other locations
should they be detected.
Keep a sniper or MG in this window and lay down suppressive fire, keeping the enemyback across the bridge.
Axis troops will take up sniper positions in the windows across the bridge (3). Watchout for these spots as you near the bridge.
™
™
Note

173
If you find yourself really getting pushed back by the Axis troops, climb all the way to the top of this building (4) and go prone on the roof outside the window. From this vantage point, you can easily see the church capture point. Defend it fromAxis attacks.
Plant an MG or sniper here (5) to defend the first and second flags. This provides anincredible view of both areas and offers decent protection from enemy fire.
Chapter V: Missions—Merderet

174
Prima’s Official Strategy Guide
Another sniper placed at this location (6) can watch for Axis troops exiting the northedge of the water.
Placing an MG or sniper here (7) covers the bridge and the sniper window across the water.
™
™

175
Have troops lay down suppressive fire against the snipers across the water (7) andclimb up the rope (8). Climb into the window on the right (3). Have several troopstake over this building, securing it for Allied troops.
Swim under the bridge and climb up the ladder (9). Don’t exit the ladder until youhear Axis troops run by. Then climb up and shoot them in the back. Watch out forthe possible sniper in the window at the end of the street (10). From this vantage, asniper can easily down Allied troops approaching from the other side of the bridge orup out of the water.
Use bazookas to blow up sniper spots around
the bridge.
Chapter V: Missions—Merderet
Note

176
Prima’s Official Strategy Guide
Plant a sniper or MG at this window (11) to clear the area of enemy troops near thefinal capture point, the field.
Watch out for an Axis sniper at this location (12), which allows the enemy toeliminate Allied team members as they’re leaving the spawn zone.
™
™

177
AXIS OBJECTIVE• Capture the 5 flag points.
AXIS INTELLIGENCE
Chapter V: Missions—Merderet
1. Spawn Zone
2. Sniper Spot
3. Building Entrance
4. Sniper Spot
5. Sniper Spot
6. Rubble
7. Sniper Spot
8. Sniper Spot
Legend

178
Prima’s Official Strategy Guide
From the spawn zone, follow the path to the west to the small mound (2). Use thisraised area as a sniper spot to provide cover for troops defending the field.
Enter this building (3), following through to a sniper spot (4). From this vantagepoint, you easily can see any Allied troops approaching from their spawn zone in the east.
™
™
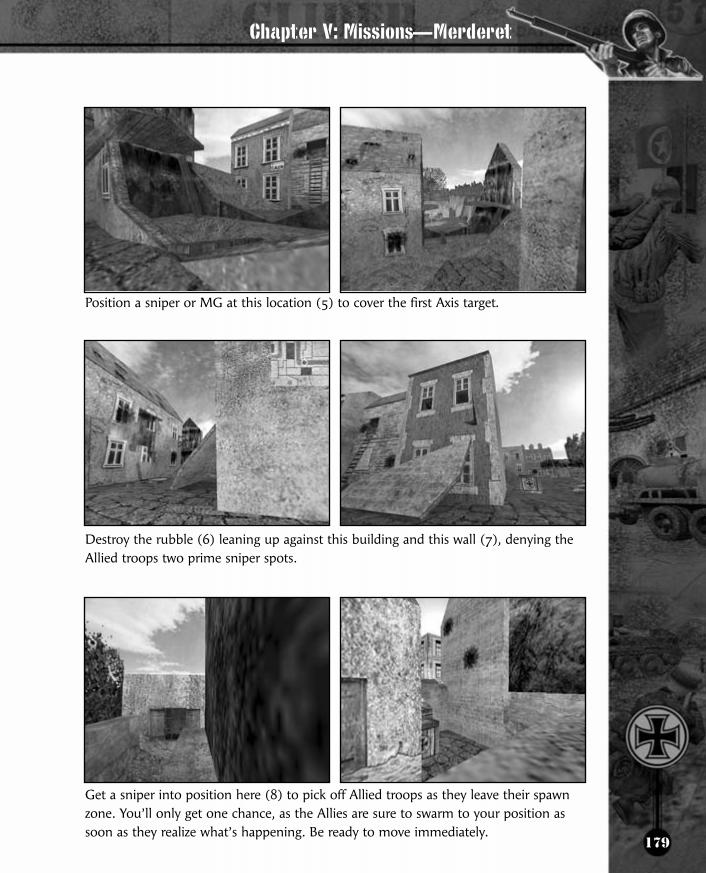
179
Position a sniper or MG at this location (5) to cover the first Axis target.
Destroy the rubble (6) leaning up against this building and this wall (7), denying theAllied troops two prime sniper spots.
Get a sniper into position here (8) to pick off Allied troops as they leave their spawnzone. You’ll only get one chance, as the Allies are sure to swarm to your position assoon as they realize what’s happening. Be ready to move immediately.
Chapter V: Missions—Merderet

180
Prima’s Official Strategy Guide
™
™
VICENZA (APRIL 1945/ITALY)
Legend1. Spawn Zone—
Allied
2. Bazookas, Satchels
3. Sniper Spot
4. Sniper Spot
5. Sniper Spot
6. Sniper Spot
7. Sniper Spot
8. Sniper Spot
9. Sniper Spot
10. Sniper Spot
11. Blast Wall
12. Sniper Spot
13. Sniper Spot
14. Sniper Spot
15. Central Building
16. Blast Wall
17. Building
18. Spawn Zone—Axis
19. Axis Machine Gun
20. Building
21. Doors Leading to
Axis Tank
22. Blast Door
23. Lattice
24. North Path
25. Building
26. Gap
27. Sniper Spot
28. Allied Jeep
29. Allied Jeep
30. King Tiger Tank
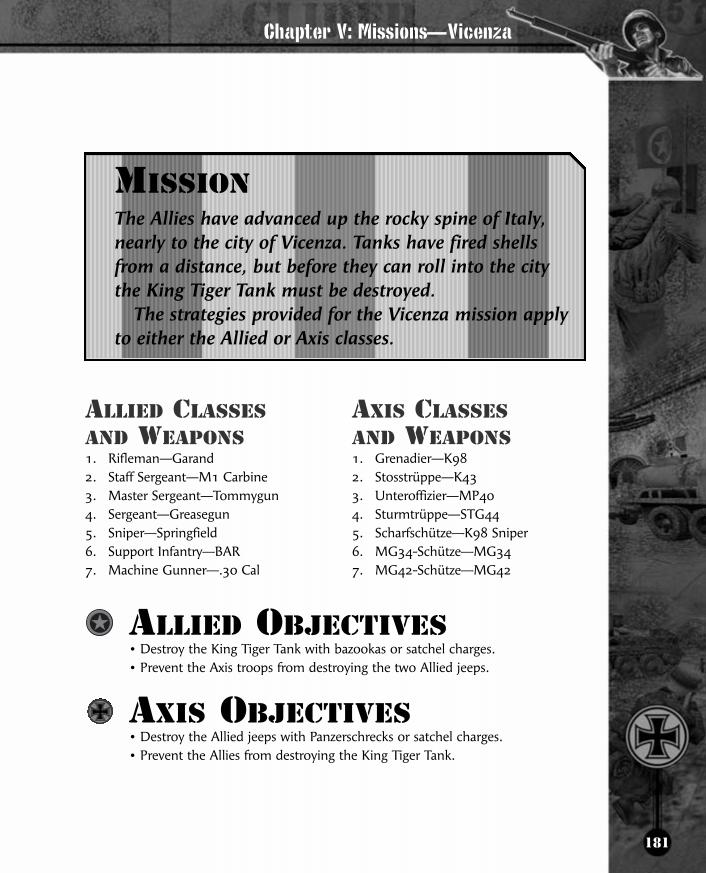
181
Chapter V: Missions—Vicenza
ALLIED CLASSESAND WEAPONS1. Rifleman—Garand2. Staff Sergeant—M1 Carbine3. Master Sergeant—Tommygun4. Sergeant—Greasegun5. Sniper—Springfield6. Support Infantry—BAR7. Machine Gunner—.30 Cal
AXIS CLASSESAND WEAPONS1. Grenadier—K982. Stosstrüppe—K433. Unteroffizier—MP404. Sturmtrüppe—STG445. Scharfschütze—K98 Sniper6. MG34-Schütze—MG347. MG42-Schütze—MG42
ALLIED OBJECTIVES• Destroy the King Tiger Tank with bazookas or satchel charges.• Prevent the Axis troops from destroying the two Allied jeeps.
AXIS OBJECTIVES• Destroy the Allied jeeps with Panzerschrecks or satchel charges.• Prevent the Allies from destroying the King Tiger Tank.
MISSIONThe Allies have advanced up the rocky spine of Italy,nearly to the city of Vicenza. Tanks have fired shells from a distance, but before they can roll into the city the King Tiger Tank must be destroyed.
The strategies provided for the Vicenza mission applyto either the Allied or Axis classes.
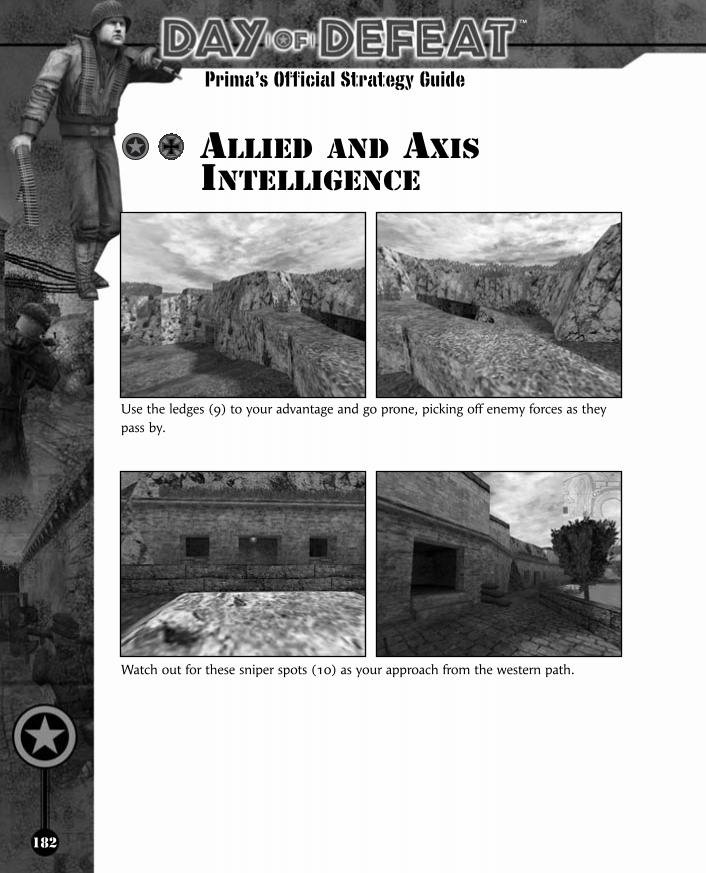
182
Prima’s Official Strategy Guide
ALLIED AND AXISINTELLIGENCE
Use the ledges (9) to your advantage and go prone, picking off enemy forces as theypass by.
Watch out for these sniper spots (10) as your approach from the western path.
™
™

183
Place a satchel here (11) to blow out the wall and gain access to the three primesniper spots below (10). Watch out for enemy troops as they pass.
Watch out for Axis snipers in these windows (12). The Axis spawn zone lies just to theeast, and it won’t take long for troops to reach this location.
Be careful when trying to reach the sniper spot within this building (13). It’s very darkinside, so enemy troops will be difficult to see until it’s too late.
Chapter V: Missions—Vicenza

184
Prima’s Official Strategy Guide
This sniper spot (14) is good for either side, but mainly useful for Allies wishing topick off Axis spawns. Just watch out for Axis troops firing off shots from the windowsalmost directly across from you (12).
Use this spot (15) as a shoot-and-run area, running up and taking out any enemytroops that may be occupying sniper spots below (10).
You start facing opposition around the middle building (15). Try to secure the sniperspots (10) in the area first.
™
™

185
Place a satchel charge, blasting open this wall (16) to gain easy access to the Axis side.Watch out for Axis troops approaching from the spawn zone in the east.
Go upstairs in this building (17), maneuvering through the building to reach thesniper points in the windows (12).
Use caution while approaching this machine gun (19) as an Allied soldier. It lies justbeyond the Axis spawn zone and can wipe out any nearby Allied troops.
Chapter V: Missions—Vicenza
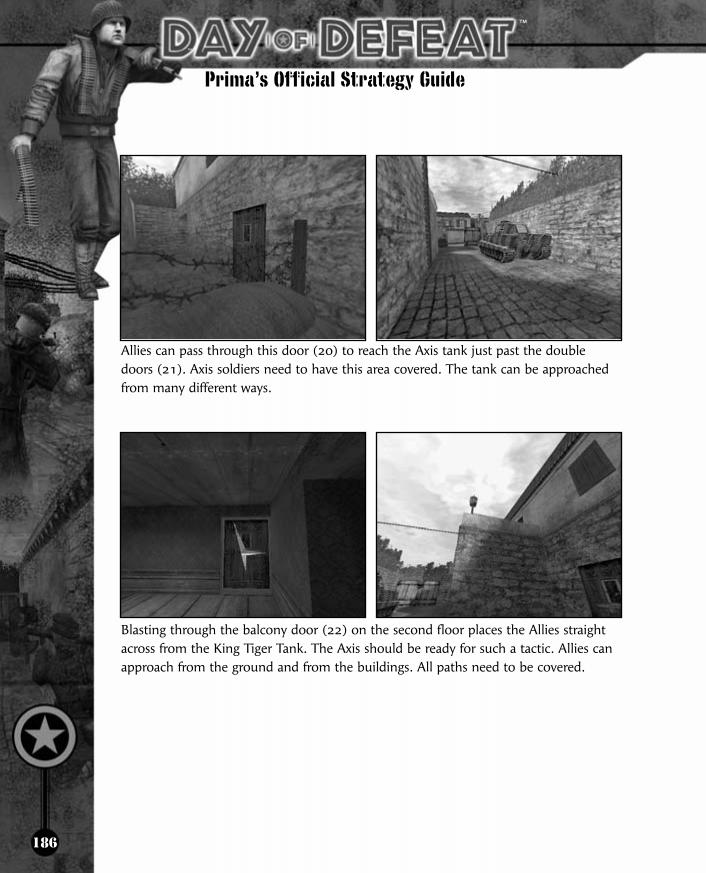
186
Prima’s Official Strategy Guide
Allies can pass through this door (20) to reach the Axis tank just past the doubledoors (21). Axis soldiers need to have this area covered. The tank can be approachedfrom many different ways.
Blasting through the balcony door (22) on the second floor places the Allies straightacross from the King Tiger Tank. The Axis should be ready for such a tactic. Allies canapproach from the ground and from the buildings. All paths need to be covered.
™
™

187
Allies can climb up the lattice (23) and hop through the open window to reach thebalcony. This may help you avoid running headlong into Axis troops coming fromtheir spawn site (18). Axis troops may want to have someone watch the window toprevent someone from sneaking past.
Allies should follow the north path (24) to the south. Take the stairs up to the second floor balcony (25). Hop across the gap (26) to the next building to reachanother sniper spot (27). From here you can pick off any Axis troops that head westfrom the spawn zone, but more importantly, you have a nice bead on the King TigerTank (30). Two bazooka blasts will destroy the target. The Axis should be especiallywary of the sniper spot. Keep an eye on this area and consider camping on the balconyif necessary.
Chapter V: Missions—Vicenza
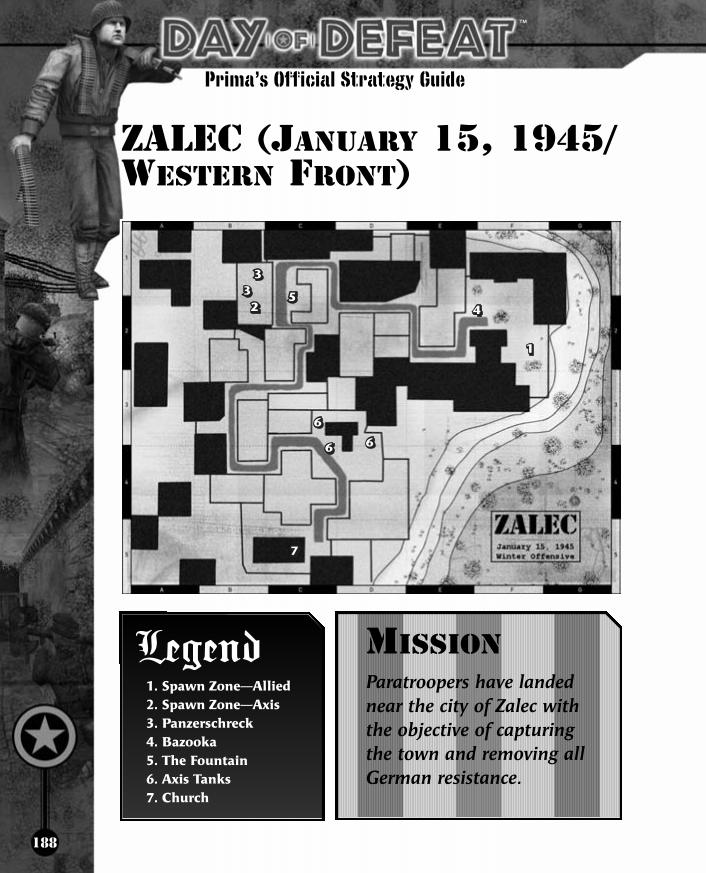
188
Prima’s Official Strategy Guide
™
™
ZALEC (JANUARY 15, 1945/WESTERN FRONT)
MISSIONParatroopers have landed near the city of Zalec with the objective of capturing the town and removing allGerman resistance.
Legend1. Spawn Zone—Allied
2. Spawn Zone—Axis
3. Panzerschreck
4. Bazooka
5. The Fountain
6. Axis Tanks
7. Church

189
Chapter V: Missions—Zalec
ALLIED CLASSESAND WEAPONS1. Rifleman—Garand2. Staff Sergeant—Folding Carbine3. Master Sergeant—Tommygun4. Sergeant—Greasegun5. Sniper—Springfield6. Support Infantry—BAR7. Machine Gunner—.30 Cal
AXIS CLASSESAND WEAPONS1. Grenadier—K982. Stosstrüppe—K433. Unteroffizier—MP404. Sturmtrüppe—STG445. Scharfschütze—K98 Sniper6. MG34-Schütze—MG347. MG42-Schütze—MG42
ALLIED OBJECTIVES• Capture the fountain near the clock tower.• Destroy the three Axis panzers.• Capture the Zalec church.

190
Prima’s Official Strategy Guide
ALLIED INTELLIGENCE
™
™
1. Spawn Zone
2. Main Path
3. Enemy Engagement
4. Door
5. Building Exit
6. Sniper Spot
7. Sniper Spot
8. Door
9. Arch
10. Possible Enemy
Encounters
11. Sniper Spot
12. New Axis
Spawn Zone
13. Bazooka
14. Building
15. Blast Wall
16. Sniper Spot
17. Air Strike Beacon
18. Sniper Spot
19. South Path
20. Building
21. North Windows
22. Building Exit
Legend

191
Follow the main path (2) to easily reach the first target. At this point (3), you shouldstart to engage the enemy. Be on the lookout for advancing Axis troops.
Go through this door (4) to reach the exit in the building to the west (5). Watch outfor Axis snipers shooting from across the expanse (6).
Chapter V: Missions—Zalec

192
Prima’s Official Strategy Guide
Head up the stairs to the top of this building (7). Use the second floor windows topick off Axis troops as they leave the spawn zone.
Go through this door (8) and wind through the building. Hide out in the church toavoid nearby Axis troops as they pass.
Wind out through the arch (9) to gain control of the fountain target.
™
™

193
Watch out for Axis troops in this building (10) if you take the northern path around to theAxis side.
Use the snow bank (11) as a sniper spot. Looking down the street to the west, youeasily can pick off any advancing Axis troops heading east through the north path.
After the fountain target has been destroyed, the Axis spawn zone is blocked off. Thisbuilding (12) serves as the new Axis spawn zone.
Chapter V: Missions—Zalec

194
Prima’s Official Strategy Guide
Go through the blown-out portion of the building (14). Blast through the wall (15)with a satchel. Go up the stairs to the window (16), giving you a prime sniper spot tothe tank on the right.
Touch the beacon (17) to call in an air strike and open up a new path. Loop aroundthe building to gain access to another sniper spot (18) and easily target the northtank. Then drop from the sniper spot and head east to reach the third tank target.
™
™

195
Follow the south path (19) to reach the church target. Go through the door (20) andeither cross through and exit to the back of the church, or head upstairs to reach thenorth windows (21) to target all three tanks.
Exit through this door (22) to gain easy access to the church.
Chapter V: Missions—Zalec

196
Prima’s Official Strategy Guide
AXIS OBJECTIVES• Defend the fountain.• If the fountain is captured, fall back to the panzers.• If the tanks are destroyed, fall back to the church.
AXIS INTELLIGENCE
™
™
1. Spawn Zone
2. Sniper Spot
3. Sniper Spot
4. Sniper Spot
5. New Spawn Zone
for Allied Troops
6. New Spawn Zone
for Axis Troops
7. Sniper Spot
8. Panzerschreck
9. Sniper Spot
10. Sandbags
11. Sniper Spot
12. Sniper Spot
13. MG or Sniper Spot
Legend
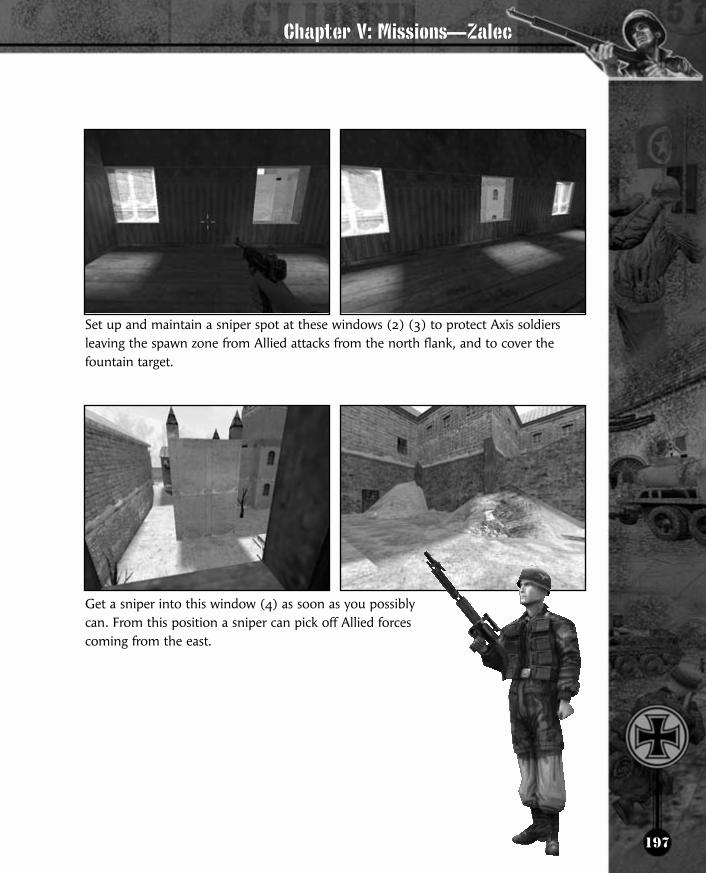
197
Set up and maintain a sniper spot at these windows (2) (3) to protect Axis soldiersleaving the spawn zone from Allied attacks from the north flank, and to cover thefountain target.
Get a sniper into this window (4) as soon as you possibly can. From this position a sniper can pick off Allied forces coming from the east.
Chapter V: Missions—Zalec

198
Prima’s Official Strategy Guide
Keep a sniper or MG in this window (7) to cover Axis tanks. It provides a good view ofthe area and a fair amount of cover from enemy fire.
Watch out for Allied snipers at this window (9). Place an Axis troop member at thesandbags (10) to cover the window.
Place an MG in this window (11) to cover the tanks. Listen for Allied troops in thebuilding, as they may be able to sneak up on you from behind.
™
™

199
Set up an MG or sniper at this window (12) just outside the new Allied spawn zoneand pick off enemy troops as they exit the building.
Place another MG or sniper here (13) to drop Allied troops if the hotel has beendestroyed and the Allied spawn zone relocated.
Only Allied troops can activate the beacon,
calling in an air strike.
Chapter V: Missions—Zalec
Note

™
200
Prima’s Official Strategy Guide
CHAPTER VI: INTERVIEWSINSIDE DAY OF DEFEAT:INTERVIEWS WITH THE TEAM
Q&A WITH MATT BOONE,PROGRAMMER AND DESIGNERPlease tell us a bit about yourself.
I’m Matt “Mugsy” Boone and I’m one halfof the programming team for Day ofDefeat. Along with the rest of the DoD coreteam, I also do the game design.
What is your background in the
gaming industry?
It all started with Day of Defeat actually! Wewere working in our spare time to make amod for Half-life, and after many years ofhard work and late nights, we were given thechance to work with Valve to finish the gameas a retail product. Along the way I picked upa Bachelor’s degree in Computer Science.
Have you worked on any other games?
Yes, I worked for Barking Dog Studios inVancouver, BC on a game called GlobalOperations.
What other first-person shooters do
you play?
Right now I’m playing a lot of DoD obviously,and Counter-Strike playtests when I can. Alsoa bit of UT2K3 deathmatch and bombing run.
What are your favorite computer games
besides Day of Defeat? Why?
I’m really into RTS games. I was a slave toWarcraft 3 for several months there and I’mplaying Age of Mythology, Hitman 2 andFreelancer right now.
Is there any designer/developer in the
industry (past or present) that you
admire or that may have inspired you?
I think I was most inspired by the peoplewho have come from the community andmade it into the industry. The Team Fortressteam definitely showed us that it could bedone, as well as what Minh Le did. As far asdevelopers, I always looked up to Valve.Their support for their products and thecommunities around them are unmatched,and their games are that much better for it.
What inspired the creation of the
original Day of Defeat mod and the
retail game?
The inspiration for the mod was just our willto make a game that we wanted to play. Ithink we saw a lot of first-person shootergames out there that had cool elements, sowe pulled those things together, added ourown ideas to it, and out came Day ofDefeat. The retail version was a surpriseactually—we never had high hopes ofmaking it to retail. Valve contacted us oneday and asked what we thought and wejumped at the chance.
How were settings and events chosen
for the missions and who created them?
The people who created the maps did a lotof that design, as well as the team sittingdown and discussing what type of gameplaywould fit in each map. Sometimes we’dcome up with a new gameplay element andwould approach a mapper to build a maparound that scenario. There were a lot ofways that it happened.
™

201
Are there any particular missions that
are your favorite?
I like Avalanche a lot, it’s very frantic, and alsoI can sneak around the back and pick peopleoff when they aren’t looking. The beach map,Charlie, is also a lot of fun. I enjoy the timedmissions, when the clock is running down andyou have to break through and complete anobjective—that’s when it got really tensearound the office, people would be shoutinginto the halls, “I need help over here!” and“They’re capping the truck! Go left! Go left!”.It’s really fun when everyone is into it like that.
Will any more missions be available for
this particular title?
We’ve always supported Day of Defeat andupdated content whenever we could, andthe community is always making new maps.I’m sure you’ll see something like that nottoo long after the release.
What were the major challenges in
taking Day of Defeat from a mod to a
full-blown game?
Being a retail game requires a significant stepup in the overall polish of the game. Wespent a lot of time fixing small bugs andmaking sure everything was solid. Also wehad an opportunity to give a more unifiedfeel to all the maps—a lot of elements arenow shared between maps so players willinstantly be comfortable playing a map theyhaven’t seen before.
What game name do you play under?
What class(es) do you prefer?
Most of the time I go by Mugsy. Boring Iknow. During testing I had a few others—Matt, Bubb Rubb and Lil Sis, Meowgsly. I’vebeen playing the rifleman class quite a lot,its just so satisfying to get those rifle buttkills. On Charlie I like playing as a sniper, toget the Allies up the beach.
Has the success of Day of Defeatsurprised you? Did anyone ever
anticipate so many people wanting to
play this game?
Yeah it is a surprise when I think about it. Itreally only hits me when I talk to peoplewho play it, or I’m telling someone what Ido and they say “Oh yeah, I play DoD andso do my buddies!” That’s a great feeling.It’s also a surprise that it’s gone on so long.It’s a great affirmation that people will play agame because its fun, even with gamescoming out that show off more advancedgraphics.
If there were one thing you can share
with your audience with regard to this
game or gaming in general, what would
it be?
I guess it would be that I hope they enjoythe new version! This is the biggest releaseso far for us, and its always fun jumping inservers on release day and playing withpeople, seeing what they think. So watch forme on the servers!
Please tell us a bit about yourself.
I’m Tim Holt, Lead Level Designer.
What is your background in the gaming
industry?
I’ve been an “amateur” mapper for sometime, but this has been my first professionalgame development project.
Have you worked on any other games?
Not professionally. I played around a bitwith making Counter-Strike maps a fewyears back.
What other first-person shooters do
you play?
I really like playing Team Fortress Classicactually. Fast and furious, but plenty of roomfor the thinking player.
Chapter VI: Interviews
Q&A WITH TIM HOLT, LEADLEVEL DESIGNER

Prima’s Official Strategy Guide
How were settings and events
chosen for the missions and who
created them?
It’s pretty much up to each individualmap maker to decide. We do, however,keep in mind that certain things need tobe in a WWII game. What would aWWII game be with out a D-Day beachinvasion map for example? But often
mappers start with one simple theme.“Cold snowy town”, “Forest”, “Destroyed
factory complex at night”, etc.
Are there any particular missions that
are your favorite?
I think I like our new beach map Charlie thebest. It’s quite intense, especially if you’re onthe beach with the invading Allies.
Will any more missions be available for
this particular title?
I hope so. We’re always talking aboutvarious ideas for maps. And our community is always creating new and interesting maps,some of which have the potential to go official.
We understand not all of the missions
that were available for the mod are
included in the retail version. Why was
this decided?
This was a tough decision! We basically feltit would be better to concentrate on a coreset of levels. We really wanted them to workand feel similar. If a player saw somethingwork one way in one level, we wanted it towork the same way in the other levels.Although not a secondary issue, we also diddrop some maps we felt just didn’t quitework as far as gameplay goes. A map has tolook good, but it has to play well above all.
What game name do you play under?
What class(es) do you prefer?
I usually play as “Waldo”, although Isometimes lurk as “MG Midget”. I usuallylike to play Axis with the K98 or an MGclass. As Allies I’m pretty partial to theCarbine or the sniper rifle.
Has the success of Day of Defeatsurprised you? Did anyone ever
anticipate so many people wanting to
play this game?
Yes and no. We have always known it was good, and I think we’ve also known the team and the game clearly had “the right stuff”.
Please tell us a bit about yourself.
I’m an artist on the Day of Defeat team. Ido modeling work, some texturing, andsome animation.
What is your background in gaming
industry?
Day of Defeat is my first project in thegaming industry. I also worked briefly on theAmerica’s Army project as an artist.
What other first-person shooters do
you play?
I’ve played a little of everything, but myfavorites are Counter-Strike, the RainbowSix series, and Operation Flashpoint. I’ve
played a ton of mods on the Half-life engine as well.
What are your favorite computer games
besides Day of Defeat? Why?
Since I work on a first person shooter, andI’ve played most FPS games to death, I liketo play games of other genres in my sparetime. I’d have to say my favorite is Baldur’sGate II—I’m a big fan of the AD&Duniverse, and Baldur’s Gate was a perfectimplementation of that world on the PC.
Is there any designer/developer in the
industry (past or present) that you
admire or that may have inspired you?
™
™
202
Q&A WITH JAKOB JUNGELS,ARTIST
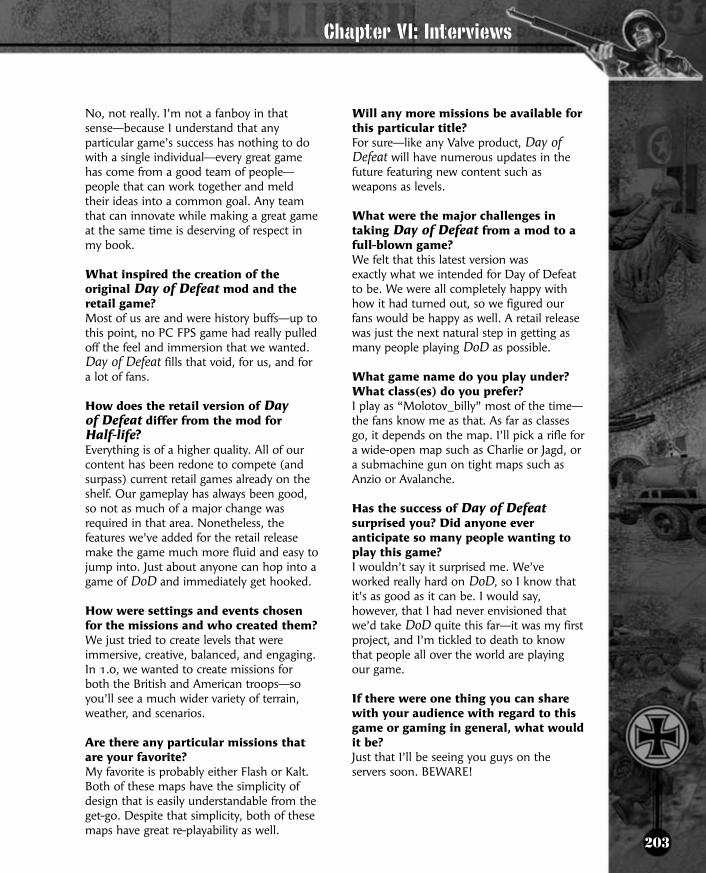
203
No, not really. I’m not a fanboy in thatsense—because I understand that anyparticular game’s success has nothing to dowith a single individual—every great gamehas come from a good team of people—people that can work together and meldtheir ideas into a common goal. Any teamthat can innovate while making a great gameat the same time is deserving of respect inmy book.
What inspired the creation of the
original Day of Defeat mod and the
retail game?
Most of us are and were history buffs—up tothis point, no PC FPS game had really pulledoff the feel and immersion that we wanted.Day of Defeat fills that void, for us, and fora lot of fans.
How does the retail version of Day of Defeat differ from the mod for
Half-life?Everything is of a higher quality. All of ourcontent has been redone to compete (andsurpass) current retail games already on theshelf. Our gameplay has always been good,so not as much of a major change wasrequired in that area. Nonetheless, thefeatures we’ve added for the retail releasemake the game much more fluid and easy tojump into. Just about anyone can hop into agame of DoD and immediately get hooked.
How were settings and events chosen
for the missions and who created them?
We just tried to create levels that wereimmersive, creative, balanced, and engaging. In 1.0, we wanted to create missions forboth the British and American troops—soyou’ll see a much wider variety of terrain,weather, and scenarios.
Are there any particular missions that
are your favorite?
My favorite is probably either Flash or Kalt.Both of these maps have the simplicity ofdesign that is easily understandable from theget-go. Despite that simplicity, both of thesemaps have great re-playability as well.
Will any more missions be available for
this particular title?
For sure—like any Valve product, Day ofDefeat will have numerous updates in thefuture featuring new content such asweapons as levels.
What were the major challenges in
taking Day of Defeat from a mod to a
full-blown game?
We felt that this latest version was exactly what we intended for Day of Defeatto be. We were all completely happy withhow it had turned out, so we figured ourfans would be happy as well. A retail releasewas just the next natural step in getting asmany people playing DoD as possible.
What game name do you play under?
What class(es) do you prefer?
I play as “Molotov_billy” most of the time—the fans know me as that. As far as classesgo, it depends on the map. I’ll pick a rifle fora wide-open map such as Charlie or Jagd, ora submachine gun on tight maps such asAnzio or Avalanche.
Has the success of Day of Defeatsurprised you? Did anyone ever
anticipate so many people wanting to
play this game?
I wouldn’t say it surprised me. We’veworked really hard on DoD, so I know thatit’s as good as it can be. I would say,however, that I had never envisioned thatwe’d take DoD quite this far—it was my firstproject, and I’m tickled to death to knowthat people all over the world are playingour game.
If there were one thing you can share
with your audience with regard to this
game or gaming in general, what would
it be?
Just that I’ll be seeing you guys on theservers soon. BEWARE!
Chapter VI: Interviews

204
Prima’s Official Strategy Guide
Please tell us a little about yourself.
John Morello II, Player Animator forDay of Defeat.
What is your background in gaming
industry?
Outside of DoD, my only interaction withgames was from an end user perspective.But that wasn’t enough, so with some luckand the help of my brother Nick, I gottogether with the rest of the DoDdevelopers, and the rest is history.
Have you worked on any other games?
I’ve created some art content for Counter-Strike but that is all.
What other first-person shooters do
you play?
When I have time, which isn’t often, I’ll play Battlefield 1942 or any in the long line of Rainbow 6 derivatives with the otherDoD fellas.
What are your favorite computer games
besides Day of Defeat? Why?
I really enjoyed the Baldur’s Gate andIcewind Dale series. The sheer amount ofart in those games is truly amazing. Plus Ican plug away at the story at my leisure.
Is there any designer/developer in the
industry (past or present) that you
admire or that may have inspired you?
I would have to say Id hands down. The dayI laid my eyes on Quake, I decided that Iwanted to work on video games.
What inspired the creation of the
original Day of Defeat mod and the
retail game?
I believe that we were a group of individualswho were not only very interested in history,but weren’t completely satisfied with thegames available to us. So instead of gripingabout it, we banded together and made the
game we wanted to play. Thankfully, othersfeel the same way we do.
How does the retail version of Day of Defeat differ from the mod for
Half-life?
The retail version includes the new VGUI2.0 which provides a much more user-friendly interface as well as the addition ofthe menu soundtrack.
How were settings and events chosen
for the missions and who
created them?
Since day one, the maps for DoD have beenborn out of the very dedicated DoDCommunity. Just as we the dev team did,these mappers and texture artists had avision of what they wanted to play andwhen they came up with solid work, weembraced it and included it into whicheverversion we were working on.
Are there any particular missions that
are your favorite?
While I really do love them all, I think Jagdcurrently fills that special place in my heart.It really embodies what we wanted andhoped to accomplish with 1.0.
Will any more missions be available for
this particular title?
We will always continue to support DoD.Make sure and check www.dayofdefeat.comfor the most up-to-date news and updates.
What were the major challenges in
taking Day of Defeat from a mod to a
full-blown game?
I think the largest challenge is living up tothe ideals that our community has for aretail release. The average DoD player is avery informed individual and cares verymuch for DoD, I think that’s what really setsthe DoD Community apart from others.They have always been very supportive.
™
™
Q&A WITH JOHN MORELLOII, PLAYER ANIMATOR

205
However to go from the realm of a mod to afull retail package implies a certain level ofquality. I think we have met those expec-tations and I’m really excited to see whatpeople think when it comes out.
What game name do you play under?
What class(es) do you prefer?
Well that depends, 99% of the time, I playunder the alias I have been using for almost8 years now, “PickItUp”. I usually attach the [DoD] tag on as well. Howeversometimes I just want to goof off so I’ll playunder the name of my favorite Internetcomic character.
Has the success of Day of Defeatsurprised you? Did anyone ever
anticipate so many people wanting to
play this game?
It’s a tough question. Honestly, it still hasn’treally sunk in. Maybe it’s because we stay so focused on the development that thesuccess factor doesn’t really sink in. I think
the times that make us both smile and strikeus as odd are when we run into randompeople who say they play, or know someonewho plays DoD. When the person preparingyour taxes knows just as much about whatyou have created as you do, the world seemsreally small.
If there were one thing you can share
with your audience with regard to
this game or gaming in general, what
would it be?
I just hope everyone supports the playersthat are new to the game. I think DoD has apretty steep learning curve at the beginningthat we all have to overcome. So it reallydisheartens me when I see players gettingupset with someone who is new to thegame. It’s just as easy to spend that timehelping that person become better and inthe end you are rewarded with a betterteammate, and thus a more enjoyableexperience. And lastly, thank you everyonefor playing and supporting DoD.
Please tell us a little bit about yourself.
My name is Brandon Russell and I am aprogrammer for DoD.
What is your background in the gaming
industry?
Simple work on mods in the beginning,other than that, just DoD…oh and plenty ofgame playtime as any gamer does.
Have you worked on any other games?
Nope, this is my first.
What other first-person shooters do
you play?
Well, my favorite is Operation Flashpoint. Ialso can be found playing Halo and GhostRecon from time to time.
What are your favorite computer games
besides Day of Defeat? Why?
Well, basically one stands out to me at themoment. Operation Flashpoint, justbecause of the sheer universe this gameleaves you open to. Vehicles (done the bestway I’ve seen so far in a FPS), wide-openterrain, and customization (level making,etc.) all in the same package.
Is there any designer/developer
in the industry (past or present)
that you admire or that may have
inspired you?
Well this is a given, but honestly Valve.Never have I been wrapped up in a FPSsingle player game with such story andatmosphere. Also I would have to say Id,which started it all for me with Doom reallygetting me hooked and into the mod world.
Chapter VI: Interviews
Q&A WITH BRANDONRUSSELL, PROGRAMMER

206
Prima’s Official Strategy Guide
How does the retail version of Day of Defeat differ from the mod for
Half-life?
Detail, detail, and detail…it’s basicallybeen totally revamped from HUD tomovements. Eye candy is another, detailssuch as muzzle flashes, particle systemsfor weather effects, explosion shrapnel,smoke, etc. Everything in the game has
been either replaced, or touched up.
Are there any particular missions that
are your favorite?
Can’t say that I really have a favorite at themoment that stands out.
Will any more missions be available for
this particular title?
Hope so.
What were the major challenges in
taking Day of Defeat from a mod to a
full-blown game?
Details, bugs, glitches, simple things that wenever got around to fixing, and so on otherthan the main things we knew we wouldwant to change for retail.
What game name do you play under?
What class(es) do you prefer?
My nick is always “Axis” and my favoritesare American BAR gunner, German MP44,and British Sten.
Has the success of Day of Defeatsurprised you? Did anyone ever
anticipate so many people wanting to
play this game?
Everyday I have to pinch myself, seriously. Ialways saw this game getting played, even in those alpha days before publicrelease of beta 1. Did I ever think it would go this far? I have to say no…no one everexpects this much fortune, or at least I didn’t.
If there were one thing you can share
with your audience with regard to this
game or gaming in general, what would
it be?
Probably, never give up on your idea ordream. If modding is your thing, look at us,or the CS team. They are average people,just like you, who had an idea and stuckwith it. If you give it your all, and surroundyourself with a great team just as eager asyou, great things are bound to happen foryou. Also, it’s a good excuse to stay up late,run up your phone bill talking to yourteammates, and eating lots and lots of chipsand ice cream and watching great warmovies!!
™
™
Please tell us a little about yourself.
My name is Travis Smith and I live inbeautiful Vancouver, Canada. I am currentlyon the Day of Defeat team as a 2D artist ofvarious types (skins, HUD).
What is your background in gaming
industry?
I started off making my own cars for GrandTheft Auto, and then I moved onto the HL(Half-life) mod community. Before I joinedthe Day of Defeat team, I had worked on
the HL mods War in Europe andGoldeneye HL.
Have you worked on any other games?
Day of Defeat is the first game I haveworked on. Previously I had worked onvarious mods in the HL community.
What other first-person shooters do
you play?
Up until my discovery of Goldeneye 64, Idid not play many first-person shooters. I
Q&A WITH TRAVIS SMITH,2D ARTIST

207
then found Half-life (and its mods), whichis basically the only FPS I have played on aregular basis for years. I enjoyed playingMetroid Prime for Gamecube, but Iwouldn’t consider it a FPS.
What are your favorite computer games
besides Day of Defeat? Why?
Starcraft: Horribly addicting. Half-life: Greatall around game with great replay value because of its mods. Civilization III:Horribly addicting, though I have not playedit in awhile. Mafia: I felt this game was thefull package, great story, great graphics andgreat gameplay without resorting tosimplifying to the point of making itunrealistic.
Is there any designer/developer in the
industry (past or present) that you
admire or that may have inspired you?
Nintendo, Valve, Sega, and Silicon Knights.
What inspired the creation of the
original Day of Defeat mod and the
retail game?
A mutual interest in history by theteammates and various popular movies (The
Thin Red Line, Saving Private Ryan) of thetime inspired part of the creation of Day ofDefeat. Fan support was a fuel that kept meworking on Day of Defeat for along time.
What were the major challenges in
taking Day of Defeat from a mod to a
full-blown game?
It is hard to say just one thing, because somuch has been changed. I would sayeverything has been improved; overalleverything is just more polished.
What game name do you play under?
And what class(es) do you prefer?
“Agent~0” (Half-life and mods), “Tb0ne”(Starcraft), “SerSmith”. I usually play on“Random Class” when I play Day of Defeat.
If there were one thing you can share
with your audience with regard to this
game or gaming in general, what would
it be?
Release dates are hard to keep, partlybecause sometimes the smallest things takethe longest time to complete.
Please tell us a bit about yourself.
Kelly Thornton, sound engineer.
What is your background in gaming
industry?
Day of Defeat is my first work experience inthe gaming industry. Most of us started withDoD as a hobby.
What other first-person shooters do
you play?
I play a bit of co-op with other DoD teammembers, Ghost Recon, OpFlash, but stillmostly play DoD.
What are your favorite computer games
besides Day of Defeat? Why?
The aforementioned, Ghost Recon andOpflash. I love teaming up with fellas Iknow to complete a mission. For me it reallyenhances the immersion when I play withpeople I know, and more importantly cancommunicate with, and fight towards asingle goal. I also get this satisfaction withDoD and its voice communication feature.
Is there any designer/developer in the
industry (past or present) that you
admire or that may have inspired you?
Honestly? It’s Minh Le who designed anddeveloped Counter-Strike. He’s worked inour DoD team office from time to time onother Valve projects, so we’ve all gotten toknow each other quite well. He is blessed
Chapter VI: Interviews
Q&A WITH KELLY THORNTON,SOUND ENGINEER
208
Prima’s Official Strategy Guide
with so many talents it’s inconceivable.This isn’t what’s great about him though,it’s his unbelievable modesty. The guy hasmade the most-played online video gamein the world, yet remains a down toearth, great guy. He’s one of the nicestpeople you’ll ever meet, always giving.
What inspired the creation of the
original Day of Defeat mod and the
retail game?
A desire to make the best, most fun, mostrealistic WWII FPS game out there. Thiscoincided with the onslaught of the new eraWWII realism movies like Saving PrivateRyan and The Thin Red Line.
How does the retail version of Day ofDefeat differ from the game the mod
for Half-life?
Right now the only difference is the VGUI.The mod release will have the standard Half-life VGUI. A new VGUI similar to that used inValve’s “Steam” is in the retail package. Thisallows easier navigation and the ability to Alt-Tab out of game easier along with editingcontrols. Along with this new VGUI comes aDoD title track that will play while you areoutside of the game searching for servers orconfiguring your settings. The mod versiondoes not have this. However, the mod versionwill have these two extra features upon releaseof the next Half-life patch.
How were settings and events chosen
for the missions and who created them?
The mappers took them from actual events,or were inspired by actual events. Places likeCaen, Anzio, and Merderet are real placeswhere actual battles happened. The mapswith these names (as well as the rest of ourmaps) were all created to give an accuratepicture of the period.
Are there any particular missions that
are your favorite?
I really like our new beach map, Charlie. It’sby far the best beach map I’ve played in anyFPS, even single player. We spent a couplemonths on that map alone trying to make itfun, yet convey the feeling of a completestruggle in getting off the beach.
Will any more missions be available for
this particular title?
Many more will be included. DoD 1.0 has thegreatest variety of missions yet to date. With abazooka, piat, or German panzerschreck you areordered to take out radio towers, tanks, blowup obstacles and take down walls to open uproutes. With satchel charges you must blow upradio rooms, 88mm Flak guns and take outobstacles and barbed wire protecting importantobjectives. Jagd requires you to return a case ofBritish battle maps from a downed glider whileat the same time protecting your tanks from aGerman anti-tank attack.
What game name do you play under?
Or would you prefer not to reveal that?
And what class(es) do you prefer?
Generally I play under “Kell” or [DoD]Kell”.It depends on what mood I’m in as to whatclass I play. If I’m tired I usually pick a sniperor MG and play the guard game. I’ll protecta flank or a route for my teammates and letthem press the attack. If I feel a little moreoffensive, you’ll always see me with anMP44 or MP40 on the German side.
Has the success of Day of Defeatsurprised you? Did anyone ever
anticipate so many people wanting to
play this game?
We thought the idea was good. It was just amatter of whether we could translate it intoan FPS in the right way. Often times there isa good idea, but it’s a whole other storyactually making that idea into a playable fungame. Did we ever think it would go thisfar? Does anyone ever say yes when they areasked that?
If there were one thing you can share with
your audience with regard to this game or
gaming in general, what would it be?
I know it sounds chummy, but basically athanks to those who play DoD and a thanksto the rest of the team. It’s a two-way street.Without us there would be no DoD…without them there would be no DoD.Complete and total reliance on each other.Players and developers both deserve a pat onthe back.
™
™