database performance testing, data masking, and ... - oracle · database performance testing, data...
TRANSCRIPT
An Oracle Hands-on Lab Workbook February, 2013
Database Performance Testing, Data Masking, and Data Subsetting Workshop

Page 1 of 92
ORACLE ENTERPRISE MANAGER Cloud Control 12c Database Testing & Test Data Management
The objective of this lab to provide exercises designed to showcase the new Real Application Testing and Test Data Management capabilities in Oracle Enterprise Manager Cloud Control 12c.
Database Performance Testing (70 minutes) A. SQL Performance Analyzer Optimizer (SPA) Statistics Refresh
Validation (20 minutes)
A1. Overview of Gathering Statistics Option A2. SPA Optimizer Statistics Refresh Validation
B. Real Application Testing and Data Masking (50 minutes)
B1. Generate Application Data Model
B2. Define Data Masking Definition B3. Replay Masked Workload
Test Data Management (50 minutes) C. Data Masking (30 minutes)
C1. Generate Application Data Model
C2. Create Data Masking Definition
D. Data Subsetting (20 minutes)
D. Define and Execute Subset Based on Application Data Model
Page 2 of 92
ORACLE ENTERPRISE MANAGER Cloud Control 12c Database Testing & Test Data Management
Getting Started
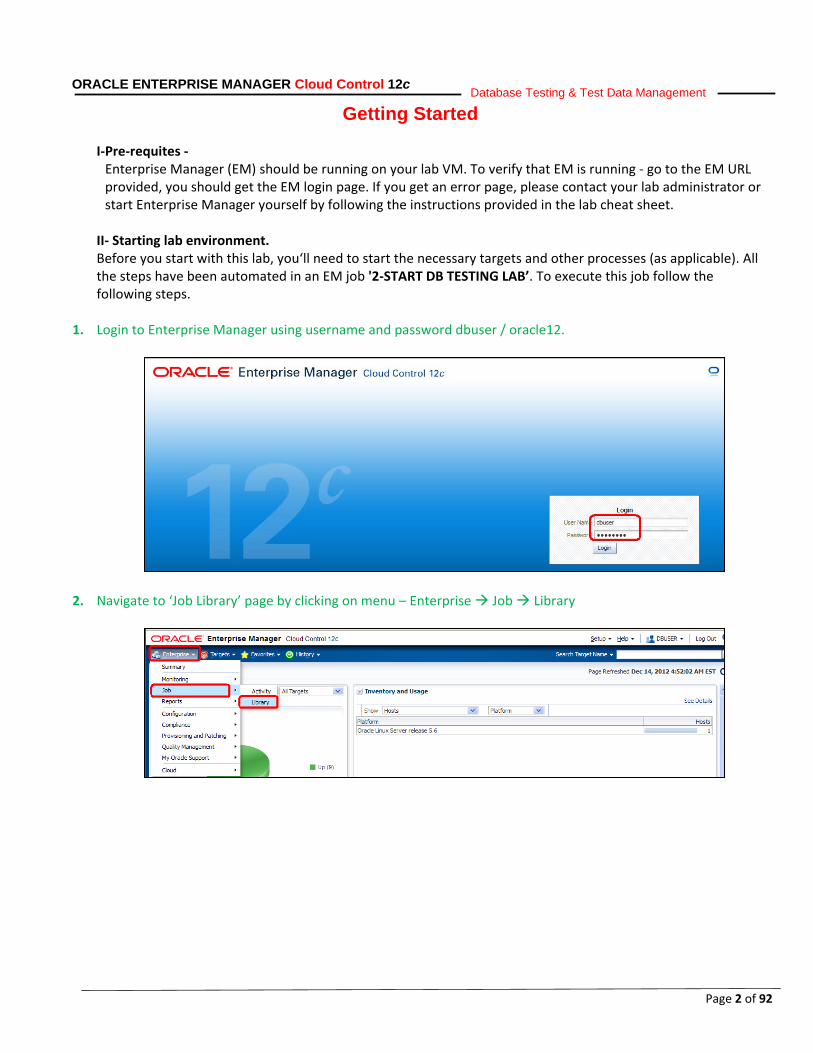
I-Pre-requites - Enterprise Manager (EM) should be running on your lab VM. To verify that EM is running - go to the EM URL provided, you should get the EM login page. If you get an error page, please contact your lab administrator or start Enterprise Manager yourself by following the instructions provided in the lab cheat sheet.
II- Starting lab environment. Before you start with this lab, you‘ll need to start the necessary targets and other processes (as applicable). All the steps have been automated in an EM job '2-START DB TESTING LAB’. To execute this job follow the following steps.
1. Login to Enterprise Manager using username and password dbuser / oracle12.
2. Navigate to ‘Job Library’ page by clicking on menu – Enterprise Job Library
Page 3 of 92
ORACLE ENTERPRISE MANAGER Cloud Control 12c Database Testing & Test Data Management
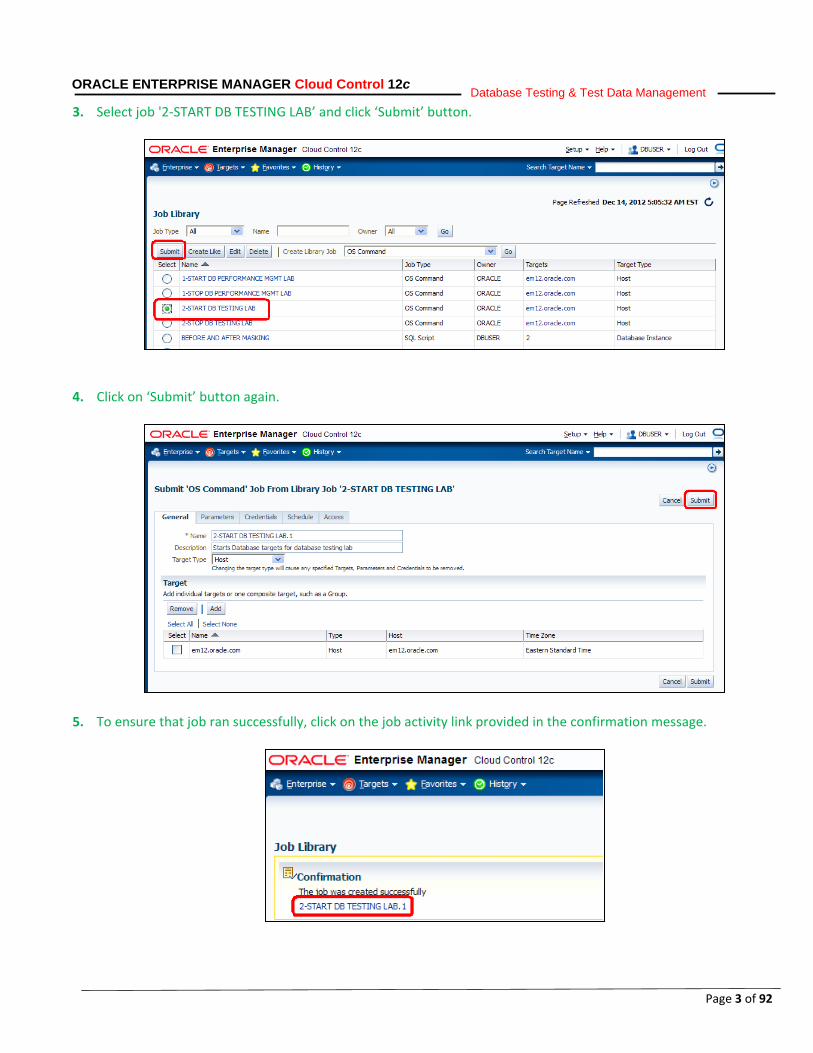
3. Select job '2-START DB TESTING LAB’ and click ‘Submit’ button.
4. Click on ‘Submit’ button again.
5. To ensure that job ran successfully, click on the job activity link provided in the confirmation message.
Page 4 of 92
ORACLE ENTERPRISE MANAGER Cloud Control 12c Database Testing & Test Data Management
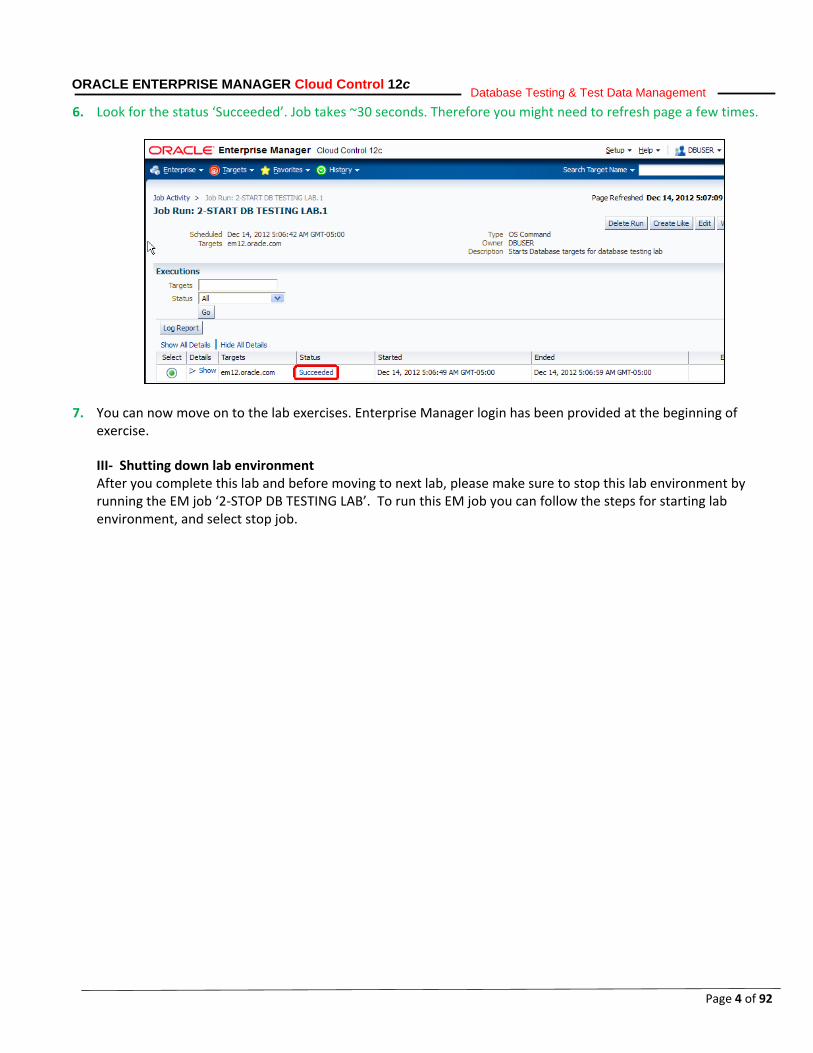
6. Look for the status ‘Succeeded’. Job takes ~30 seconds. Therefore you might need to refresh page a few times.
7. You can now move on to the lab exercises. Enterprise Manager login has been provided at the beginning of exercise.
III- Shutting down lab environment After you complete this lab and before moving to next lab, please make sure to stop this lab environment by running the EM job ‘2-STOP DB TESTING LAB’. To run this EM job you can follow the steps for starting lab environment, and select stop job.

Page 5 of 92
ORACLE ENTERPRISE MANAGER Cloud Control 12c Database Testing & Test Data Management
A1. Overview of Gathering Statistics Option
Estimated Time to Complete Use Case: 5 minutes Business Problem/Use Case
This Use Case is intended to familiarize the user with how to use SQL performance analyzer and to manage changes in a confident manner. Users will also get familiar with how to manage Optimizer statistics though Enterprise Manager 12c
1.1 Login using username and password dbuser / oracle12
1.2 Navigate to Databases: From the menu, Targets -> Databases
Page 6 of 92
ORACLE ENTERPRISE MANAGER Cloud Control 12c Database Testing & Test Data Management
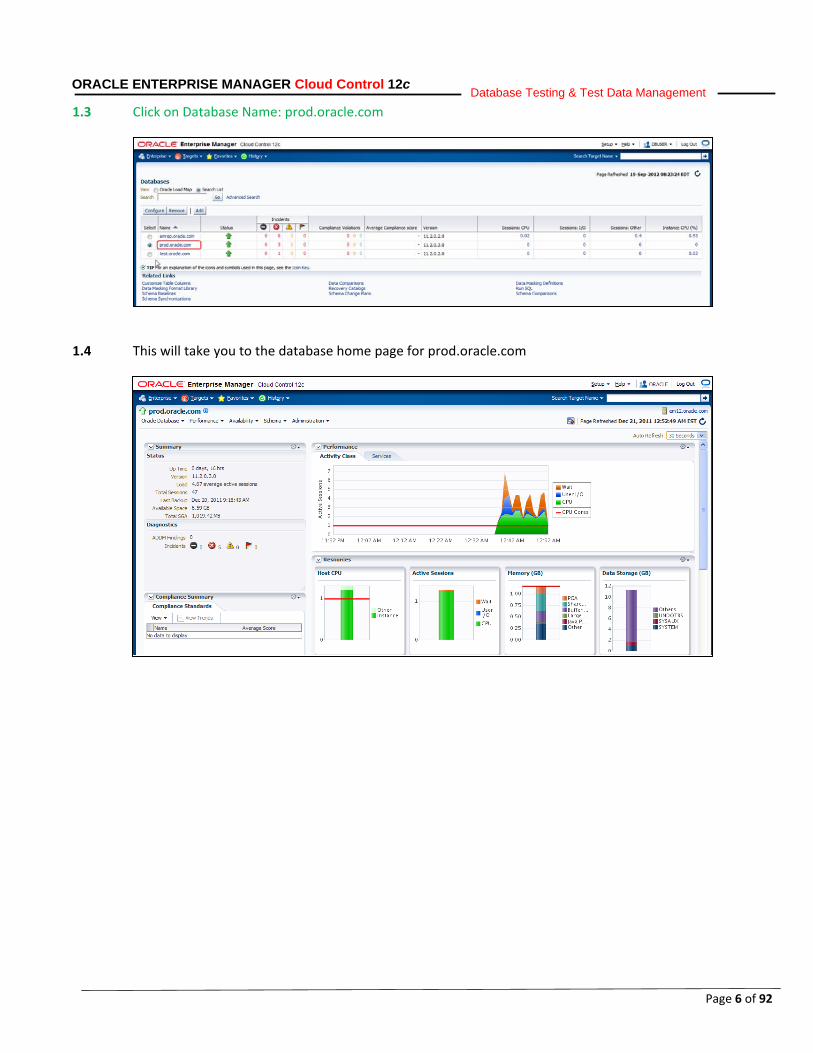
1.3 Click on Database Name: prod.oracle.com
1.4 This will take you to the database home page for prod.oracle.com
Page 7 of 92
ORACLE ENTERPRISE MANAGER Cloud Control 12c Database Testing & Test Data Management
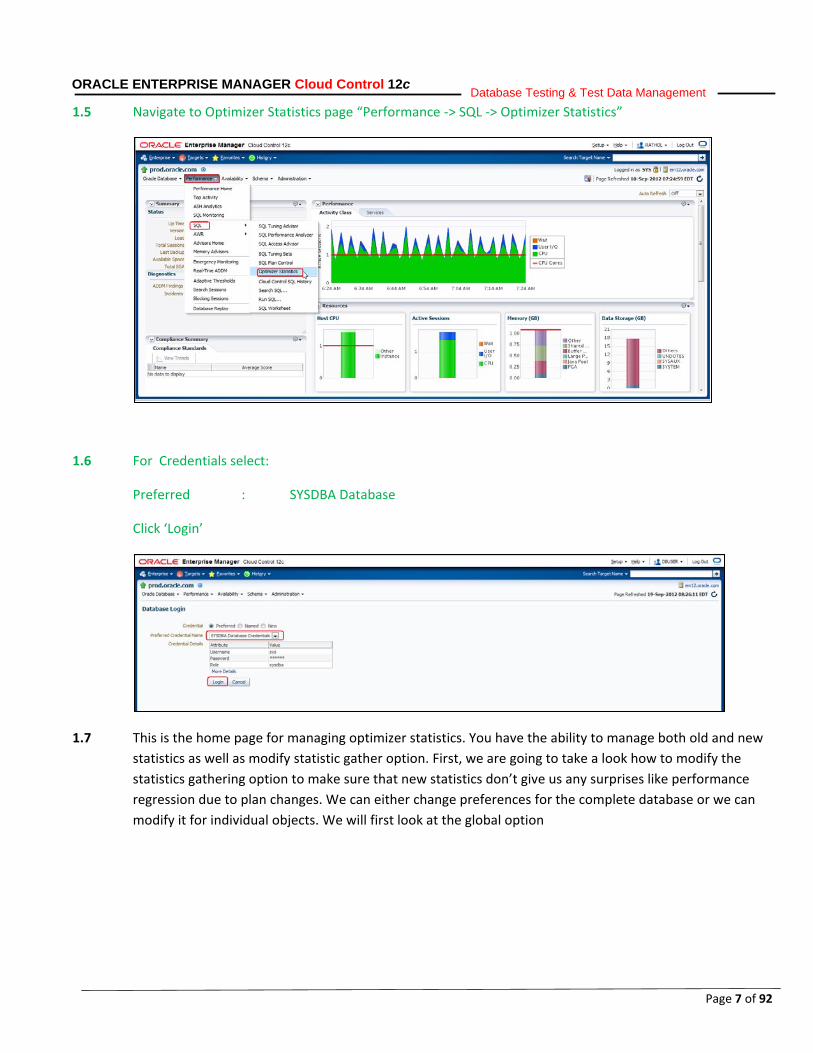
1.5 Navigate to Optimizer Statistics page “Performance -> SQL -> Optimizer Statistics”
1.6 For Credentials select:
Preferred : SYSDBA Database
Click ‘Login’
1.7 This is the home page for managing optimizer statistics. You have the ability to manage both old and new statistics as well as modify statistic gather option. First, we are going to take a look how to modify the statistics gathering option to make sure that new statistics don’t give us any surprises like performance regression due to plan changes. We can either change preferences for the complete database or we can modify it for individual objects. We will first look at the global option
Page 8 of 92
ORACLE ENTERPRISE MANAGER Cloud Control 12c Database Testing & Test Data Management
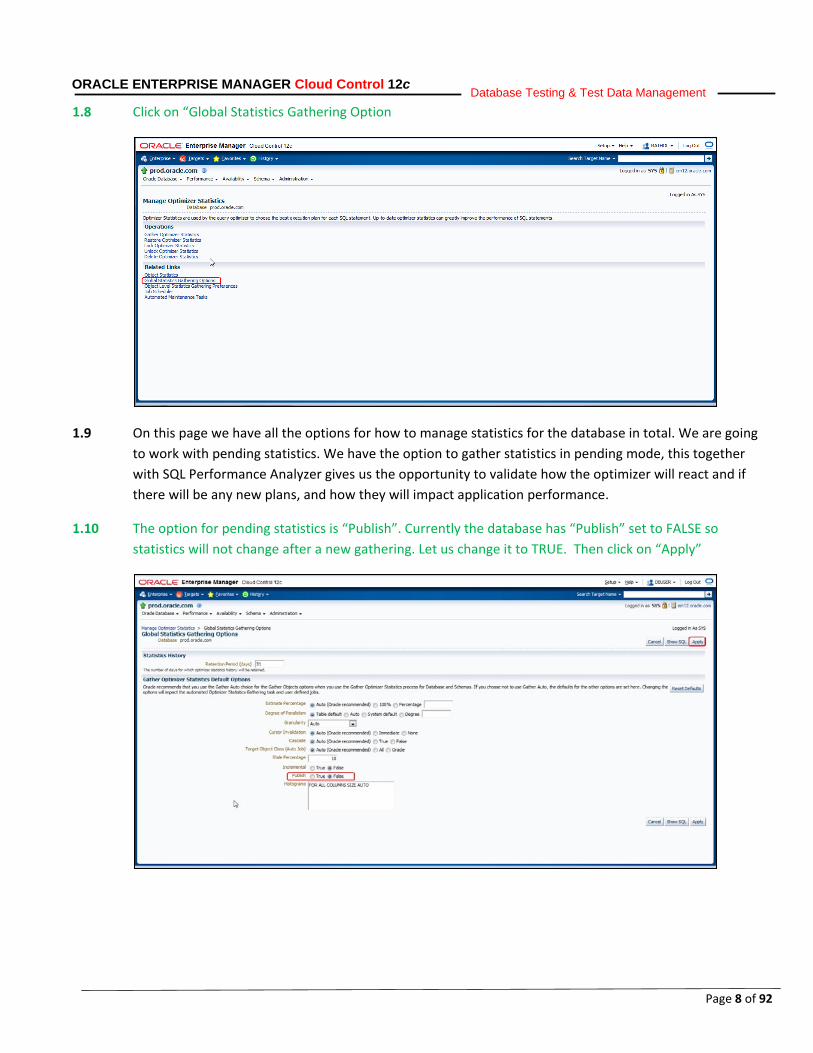
1.8 Click on “Global Statistics Gathering Option
1.9 On this page we have all the options for how to manage statistics for the database in total. We are going to work with pending statistics. We have the option to gather statistics in pending mode, this together with SQL Performance Analyzer gives us the opportunity to validate how the optimizer will react and if there will be any new plans, and how they will impact application performance.
1.10 The option for pending statistics is “Publish”. Currently the database has “Publish” set to FALSE so statistics will not change after a new gathering. Let us change it to TRUE. Then click on “Apply”
Page 9 of 92
ORACLE ENTERPRISE MANAGER Cloud Control 12c Database Testing & Test Data Management
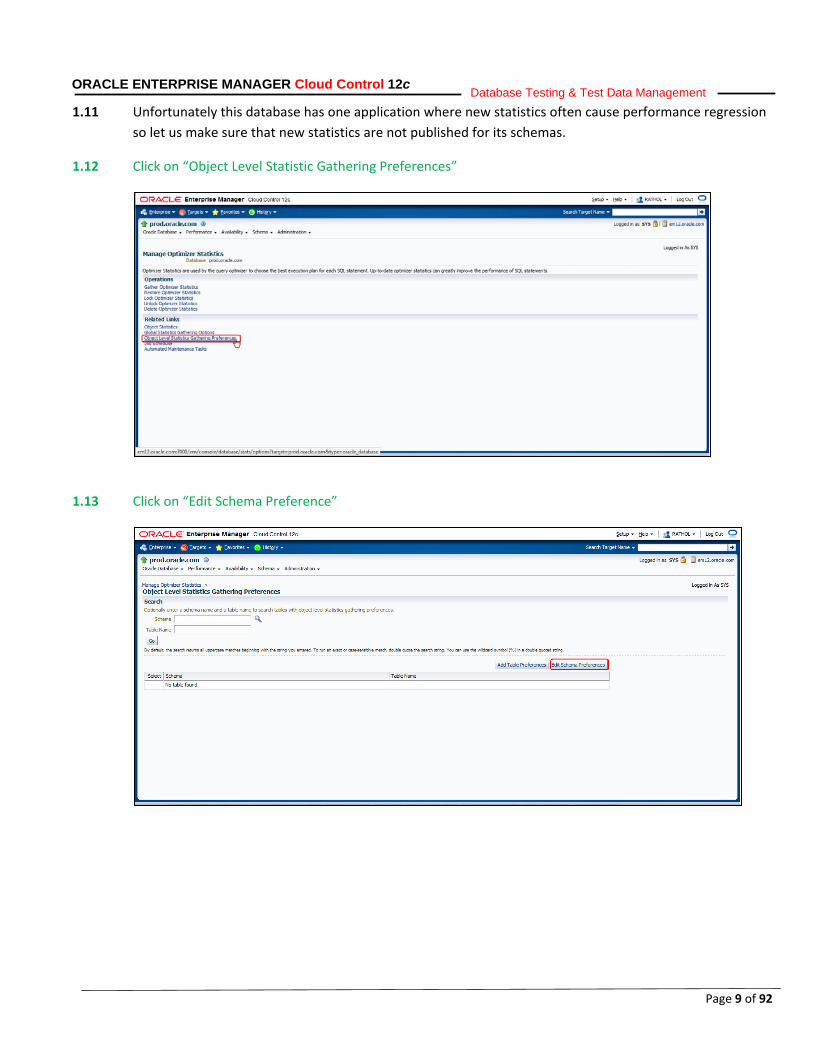
1.11 Unfortunately this database has one application where new statistics often cause performance regression so let us make sure that new statistics are not published for its schemas.
1.12 Click on “Object Level Statistic Gathering Preferences”
1.13 Click on “Edit Schema Preference”
Page 10 of 92
ORACLE ENTERPRISE MANAGER Cloud Control 12c Database Testing & Test Data Management
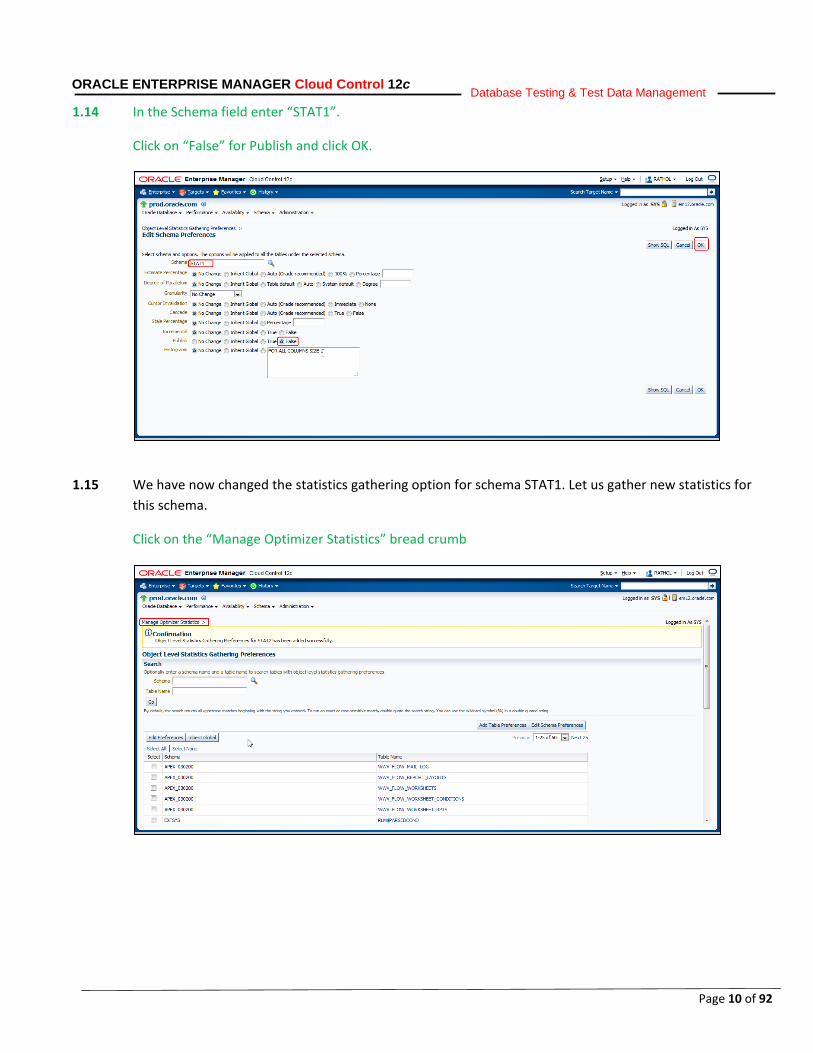
1.14 In the Schema field enter “STAT1”.
Click on “False” for Publish and click OK.
1.15 We have now changed the statistics gathering option for schema STAT1. Let us gather new statistics for
this schema.
Click on the “Manage Optimizer Statistics” bread crumb
Page 11 of 92
ORACLE ENTERPRISE MANAGER Cloud Control 12c Database Testing & Test Data Management
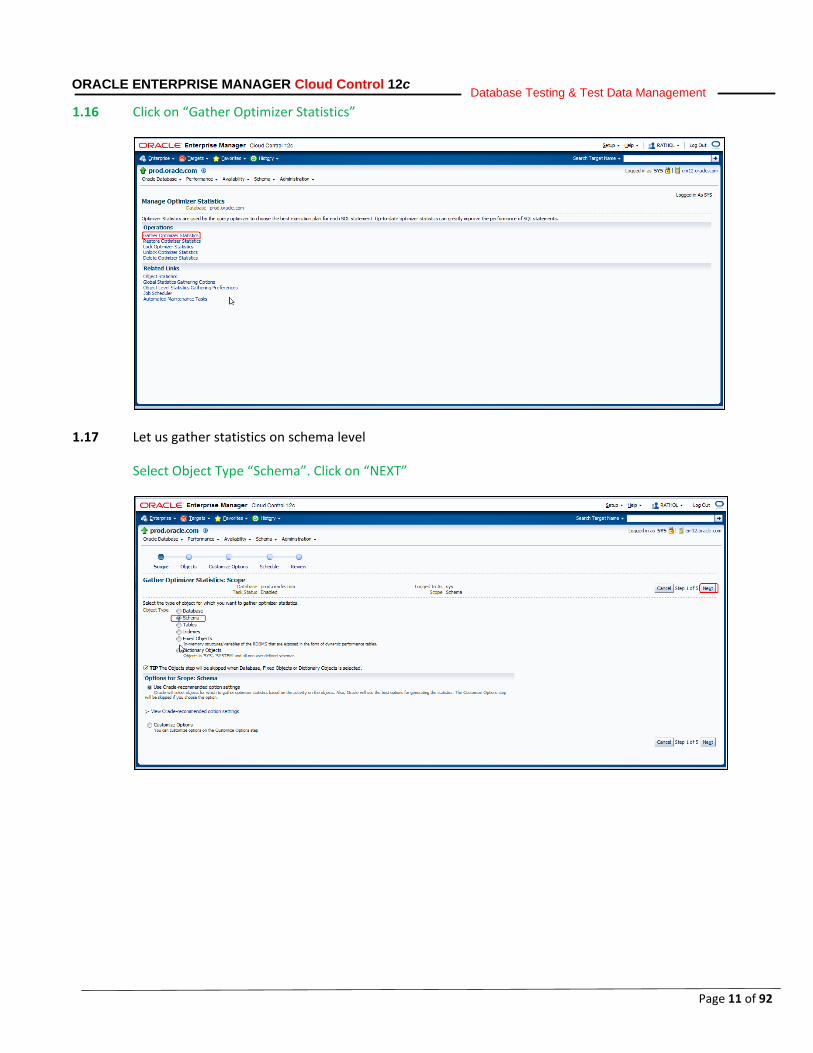
1.16 Click on “Gather Optimizer Statistics”
1.17 Let us gather statistics on schema level
Select Object Type “Schema”. Click on “NEXT”
Page 12 of 92
ORACLE ENTERPRISE MANAGER Cloud Control 12c Database Testing & Test Data Management
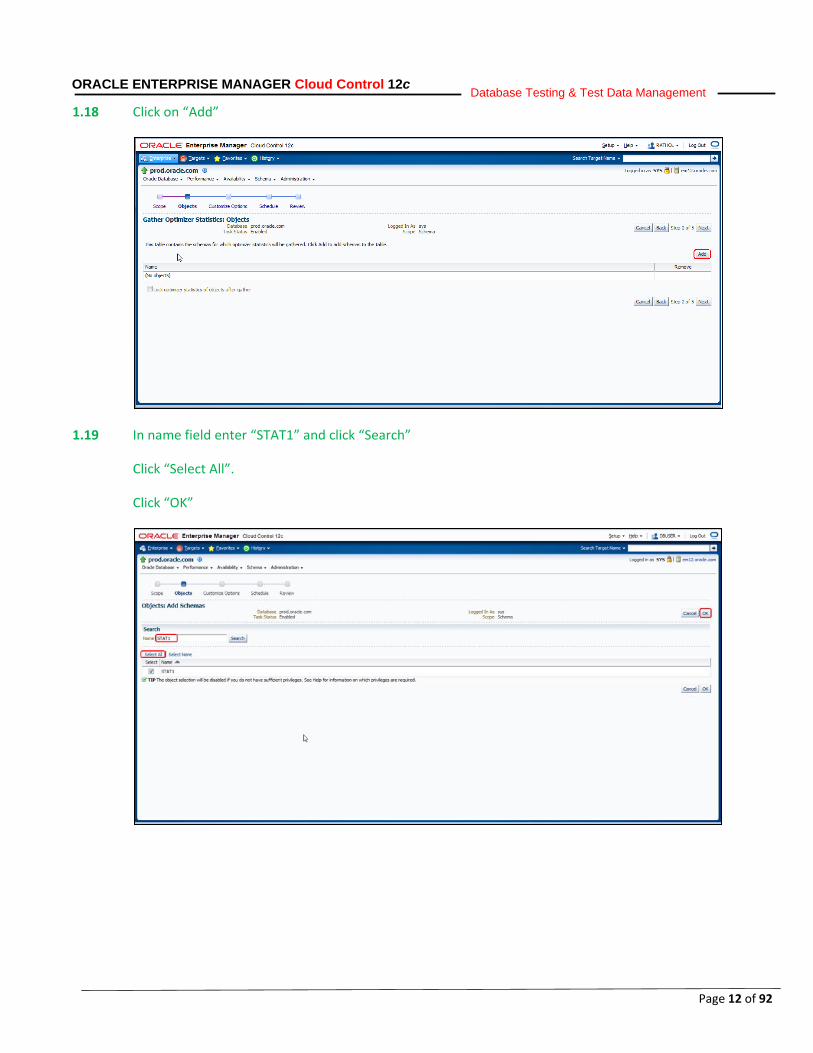
1.18 Click on “Add”
1.19 In name field enter “STAT1” and click “Search”
Click “Select All”.
Click “OK”

Page 13 of 92
ORACLE ENTERPRISE MANAGER Cloud Control 12c Database Testing & Test Data Management
1.20 Click “Next”
1.21 Click “Next”
1.22 Click “Submit”
Page 14 of 92
ORACLE ENTERPRISE MANAGER Cloud Control 12c Database Testing & Test Data Management
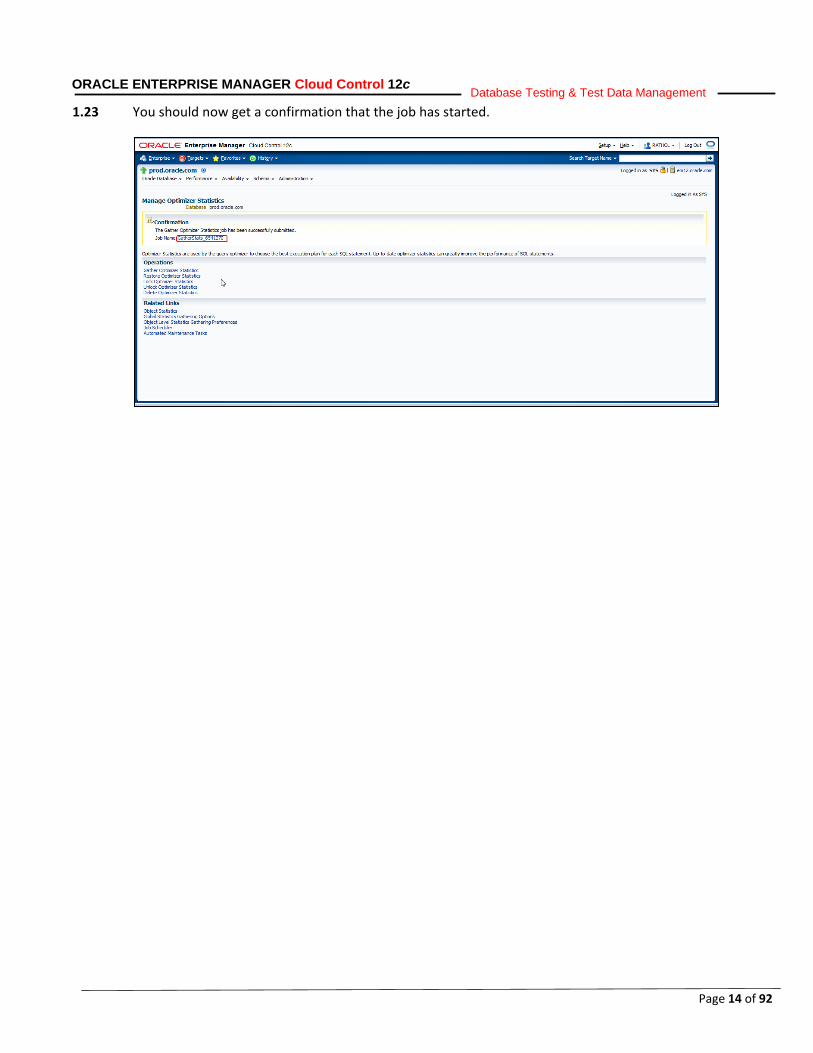
1.23 You should now get a confirmation that the job has started.
Page 15 of 92
ORACLE ENTERPRISE MANAGER Cloud Control 12c Database Testing & Test Data Management
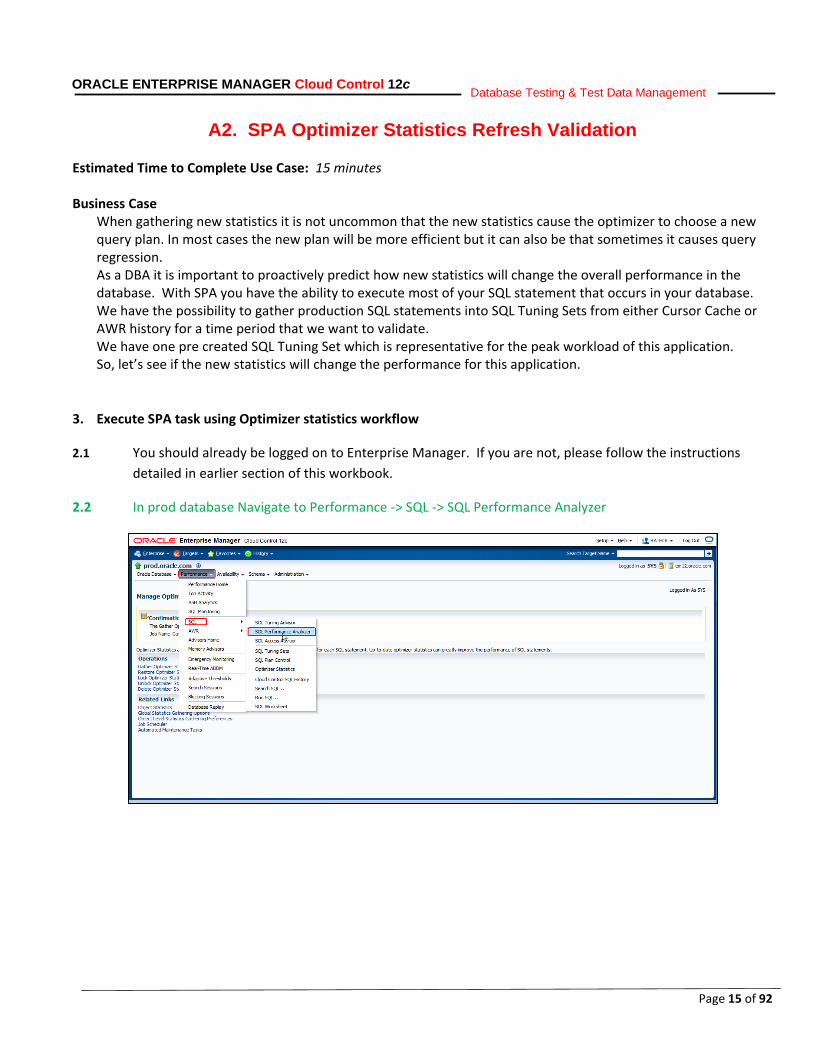
A2. SPA Optimizer Statistics Refresh Validation
Estimated Time to Complete Use Case: 15 minutes Business Case
When gathering new statistics it is not uncommon that the new statistics cause the optimizer to choose a new query plan. In most cases the new plan will be more efficient but it can also be that sometimes it causes query regression. As a DBA it is important to proactively predict how new statistics will change the overall performance in the database. With SPA you have the ability to execute most of your SQL statement that occurs in your database. We have the possibility to gather production SQL statements into SQL Tuning Sets from either Cursor Cache or AWR history for a time period that we want to validate. We have one pre created SQL Tuning Set which is representative for the peak workload of this application. So, let’s see if the new statistics will change the performance for this application.
3. Execute SPA task using Optimizer statistics workflow
2.1 You should already be logged on to Enterprise Manager. If you are not, please follow the instructions detailed in earlier section of this workbook.
2.2 In prod database Navigate to Performance -> SQL -> SQL Performance Analyzer
Page 16 of 92
ORACLE ENTERPRISE MANAGER Cloud Control 12c Database Testing & Test Data Management
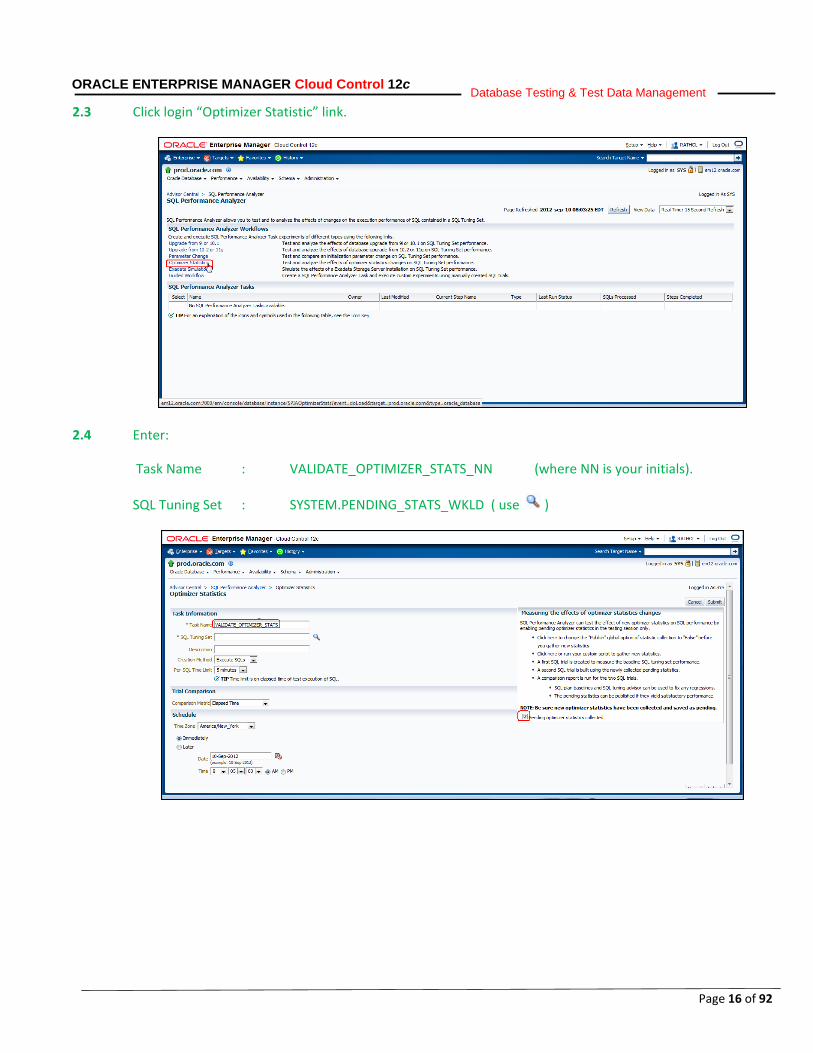
2.3 Click login “Optimizer Statistic” link.
2.4 Enter:
Task Name : VALIDATE_OPTIMIZER_STATS_NN (where NN is your initials).
SQL Tuning Set : SYSTEM.PENDING_STATS_WKLD ( use )
Page 17 of 92
ORACLE ENTERPRISE MANAGER Cloud Control 12c Database Testing & Test Data Management
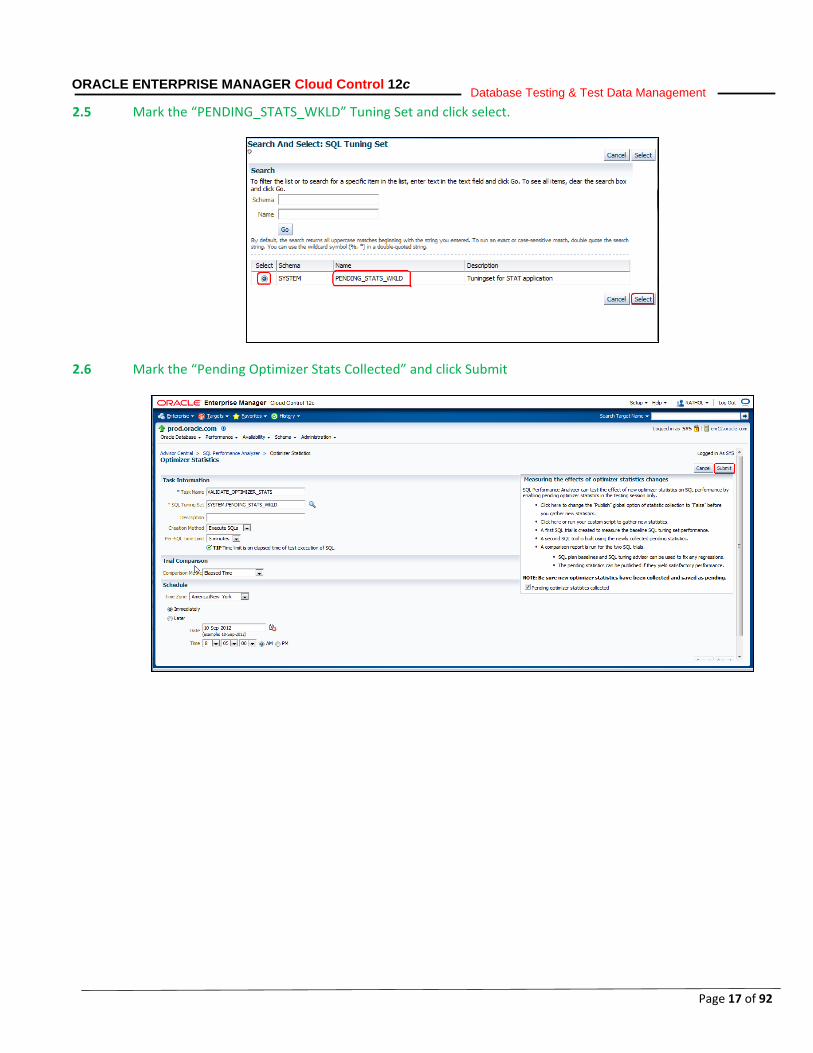
2.5 Mark the “PENDING_STATS_WKLD” Tuning Set and click select.
2.6 Mark the “Pending Optimizer Stats Collected” and click Submit
Page 18 of 92
ORACLE ENTERPRISE MANAGER Cloud Control 12c Database Testing & Test Data Management
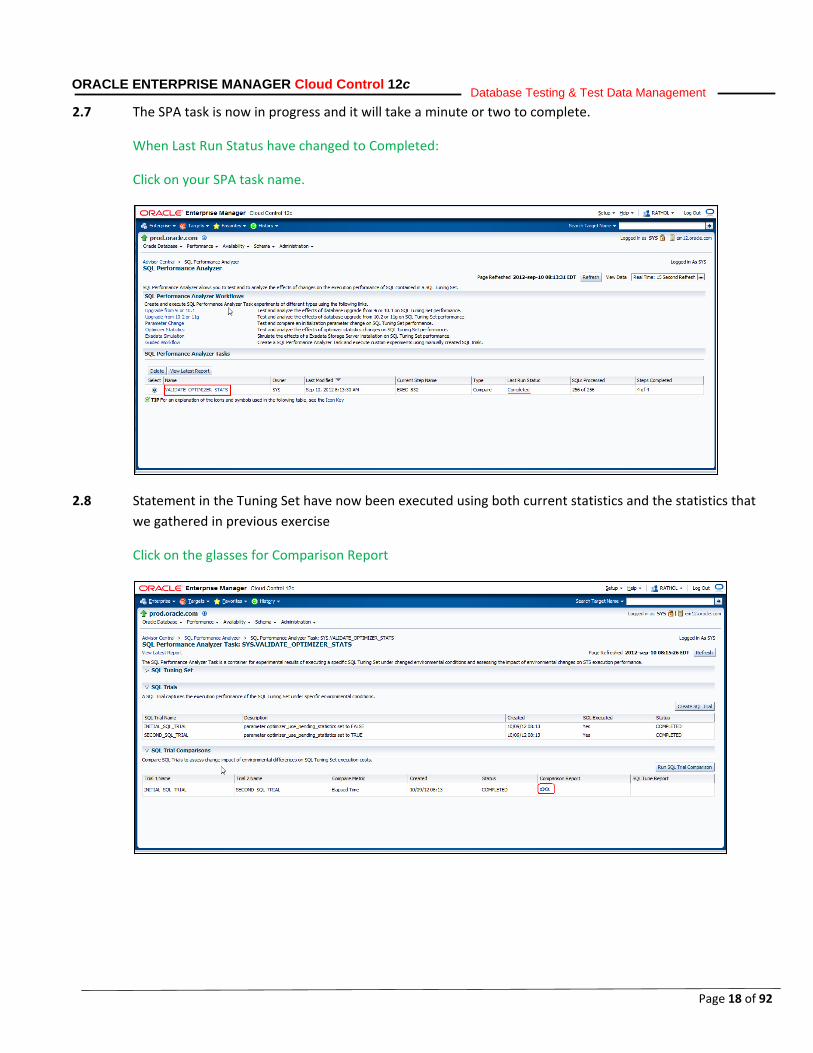
2.7 The SPA task is now in progress and it will take a minute or two to complete.
When Last Run Status have changed to Completed:
Click on your SPA task name.
2.8 Statement in the Tuning Set have now been executed using both current statistics and the statistics that we gathered in previous exercise
Click on the glasses for Comparison Report
Page 19 of 92
ORACLE ENTERPRISE MANAGER Cloud Control 12c Database Testing & Test Data Management
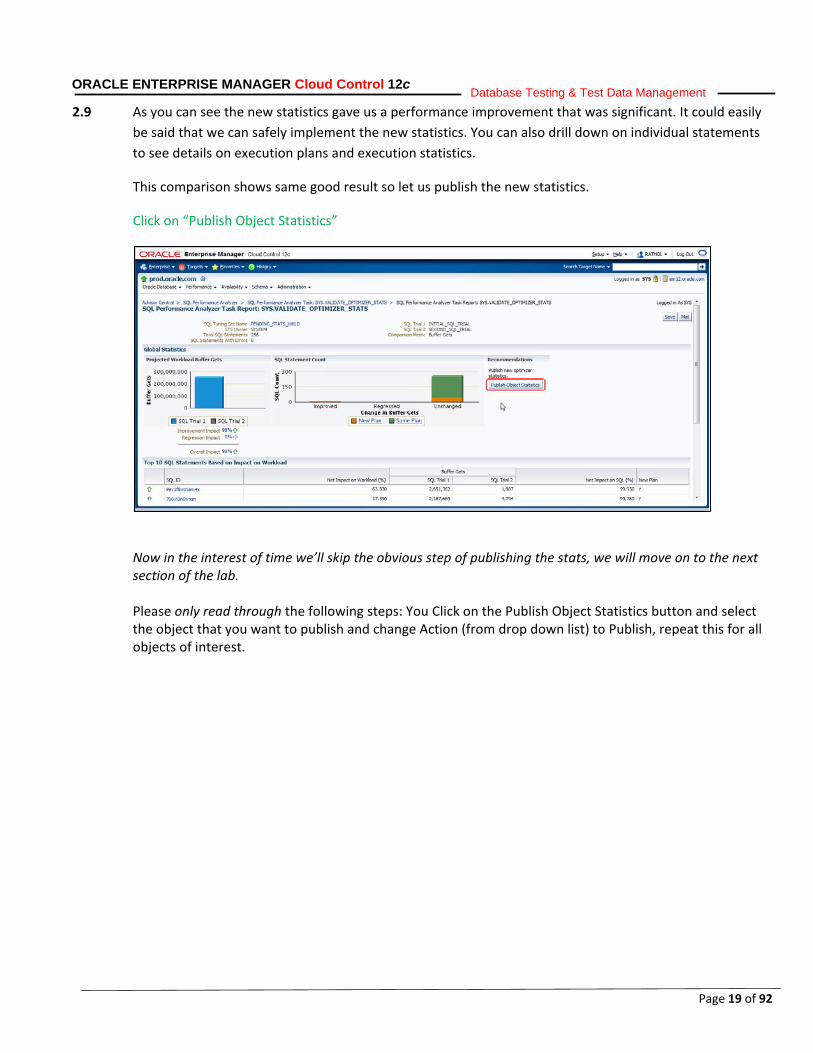
2.9 As you can see the new statistics gave us a performance improvement that was significant. It could easily be said that we can safely implement the new statistics. You can also drill down on individual statements to see details on execution plans and execution statistics.
This comparison shows same good result so let us publish the new statistics.
Click on “Publish Object Statistics”
Now in the interest of time we’ll skip the obvious step of publishing the stats, we will move on to the next section of the lab. Please only read through the following steps: You Click on the Publish Object Statistics button and select the object that you want to publish and change Action (from drop down list) to Publish, repeat this for all objects of interest.
Page 20 of 92
ORACLE ENTERPRISE MANAGER Cloud Control 12c Database Testing & Test Data Management
B. Secure testing with Real Application Testing Lab Overview
Objective:
The objective of this document is to provide high-level guidelines on new features associated with test data management in Oracle Enterprise Manager Cloud Control 12c. To perform real-world testing of Oracle databases, by capturing production workloads and replaying them on test systems enables you to perform real-world testing quickly and accurately. This allows enterprises to assess the impact of any planned system change before deploying it in production reliably. Additionally, enterprises run the risk of breaching sensitive information when copying production data into non-production environments for the purposes of application development, testing or data analysis. Oracle Real Application Testing and Oracle Data Masking Pack provides end to end secure automation for provisioning test databases from production in compliance with regulations and to enable businesses to significantly reduce the risk of database application instability due to systems changes
Page 21 of 92
ORACLE ENTERPRISE MANAGER Cloud Control 12c Database Testing & Test Data Management
B1. Generate Application Data Model for the Applications Deployed on the
Target Databases Estimated Time to Complete Use Case: 10 minutes
Business Case
When a new application has been provided to the application users, it can be a daunting task to construct the application relationships that make up the application. Fortunately, the process of creating the application data model has been greatly simplified for application schema where the application relationships are enforced through database constraint. In this use case, you will construct the application relationships for the TPC-H workload schema. This application data model will be the basis for performing the rest of the test data management operations.
1. Generating the ADM
1.1 You should already be logged on to Enterprise Manager. If you are not, please follow the instructions detailed in earlier sections of this workbook.
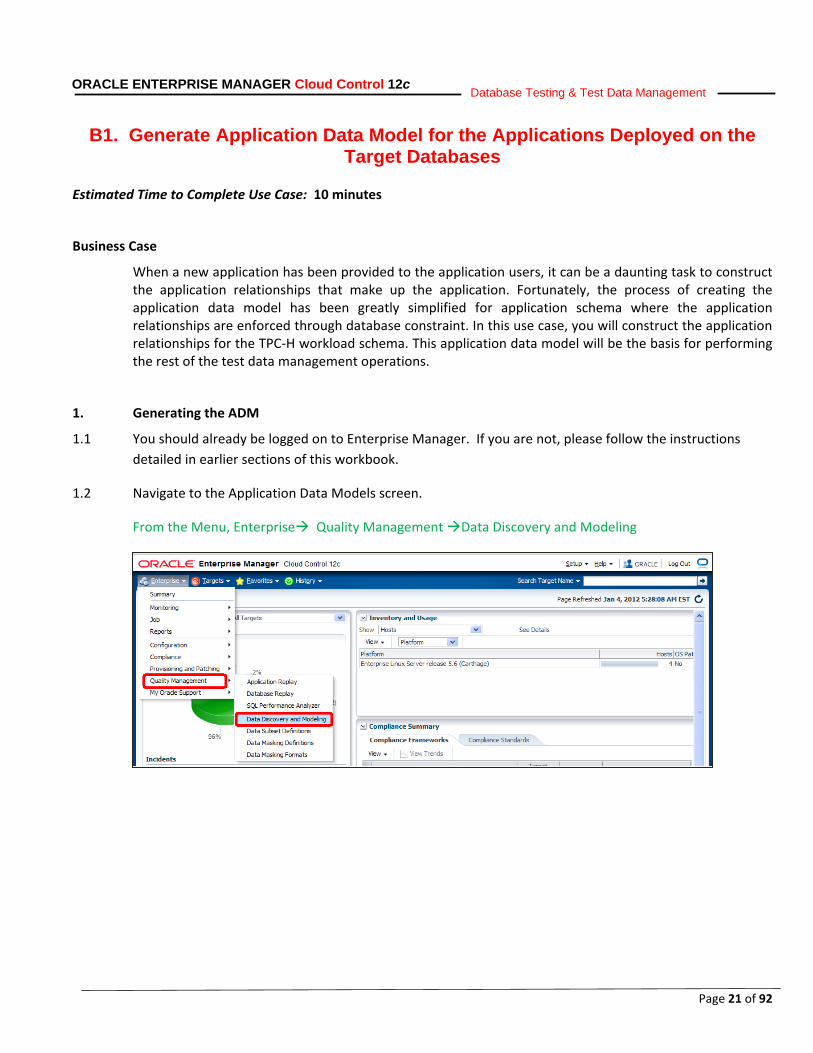
1.2 Navigate to the Application Data Models screen.
From the Menu, Enterprise Quality Management Data Discovery and Modeling
Page 22 of 92
ORACLE ENTERPRISE MANAGER Cloud Control 12c Database Testing & Test Data Management
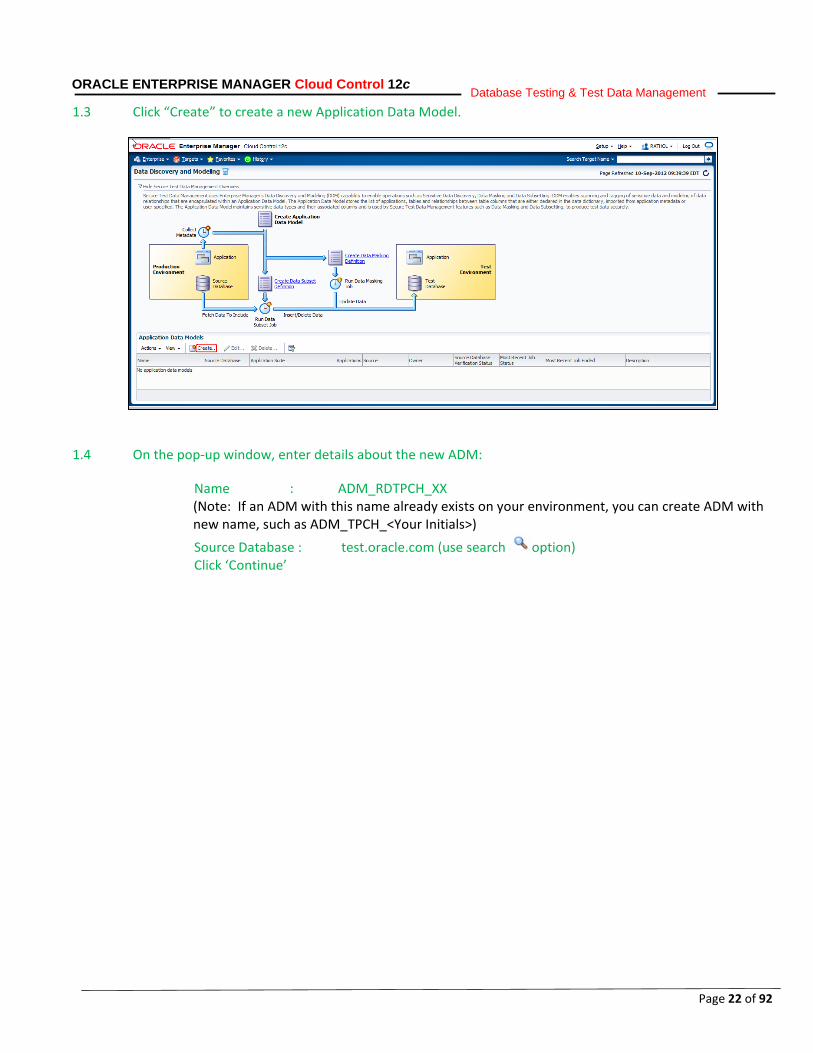
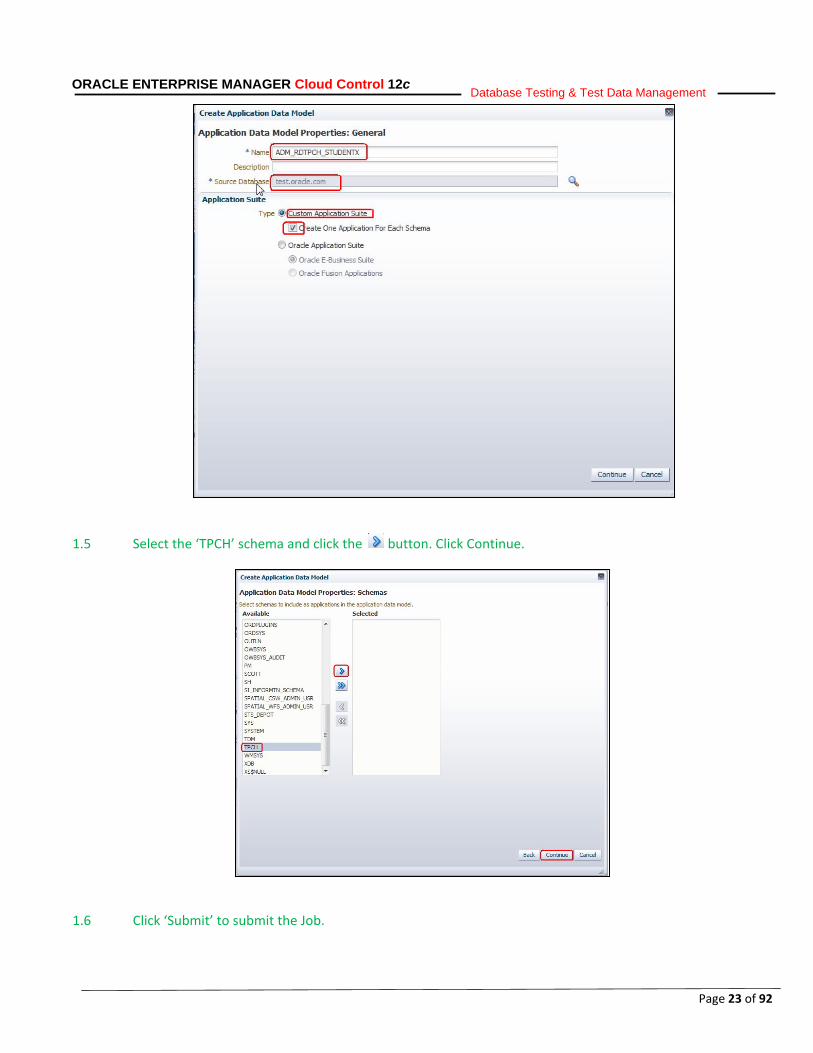
1.3 Click “Create” to create a new Application Data Model.
1.4 On the pop-up window, enter details about the new ADM:
Name : ADM_RDTPCH_XX (Note: If an ADM with this name already exists on your environment, you can create ADM with new name, such as ADM_TPCH_<Your Initials>) Source Database : test.oracle.com (use search option) Click ‘Continue’
Page 23 of 92
ORACLE ENTERPRISE MANAGER Cloud Control 12c Database Testing & Test Data Management
1.5 Select the ‘TPCH’ schema and click the button. Click Continue.
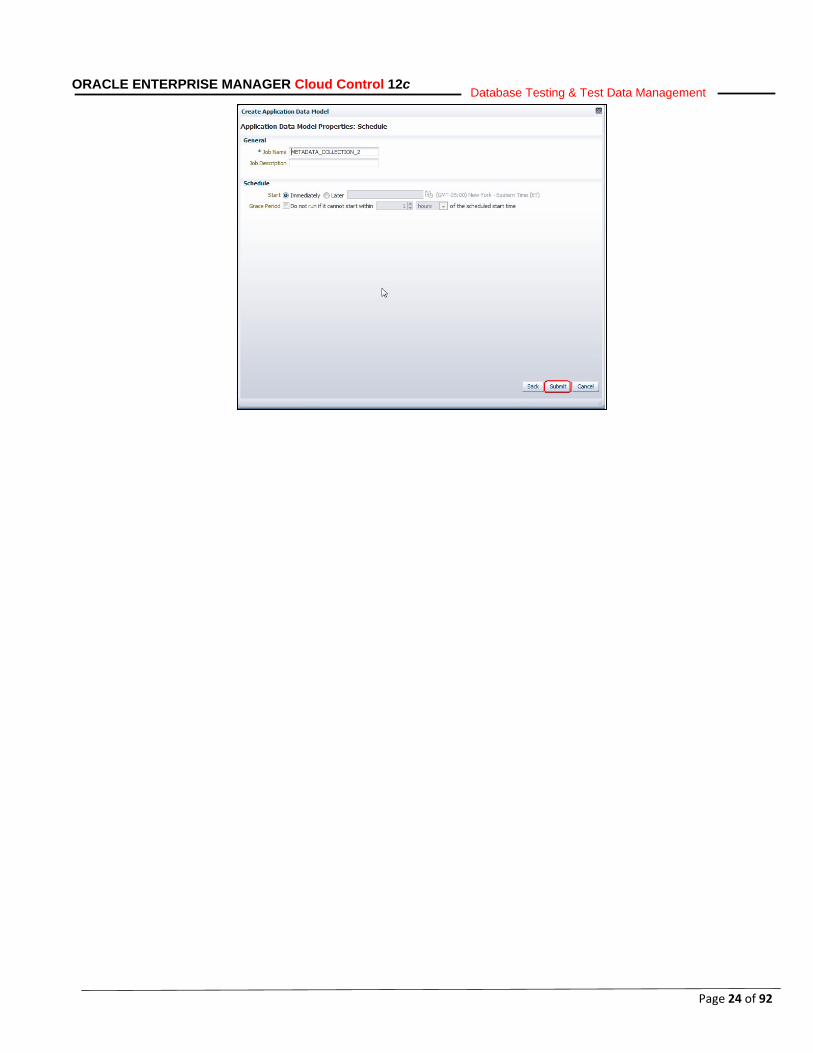
1.6 Click ‘Submit’ to submit the Job.
Page 24 of 92
ORACLE ENTERPRISE MANAGER Cloud Control 12c Database Testing & Test Data Management
Page 25 of 92
ORACLE ENTERPRISE MANAGER Cloud Control 12c Database Testing & Test Data Management
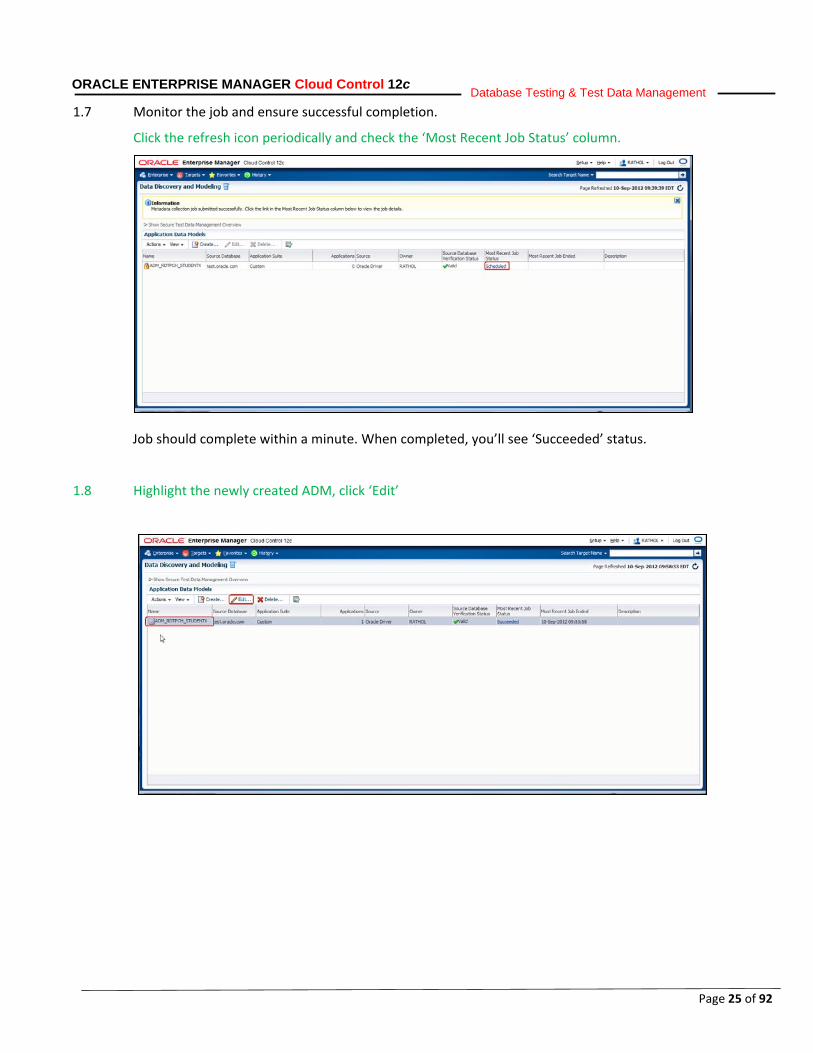
1.7 Monitor the job and ensure successful completion.
Click the refresh icon periodically and check the ‘Most Recent Job Status’ column.
Job should complete within a minute. When completed, you’ll see ‘Succeeded’ status.
1.8 Highlight the newly created ADM, click ‘Edit’
Page 26 of 92
ORACLE ENTERPRISE MANAGER Cloud Control 12c Database Testing & Test Data Management
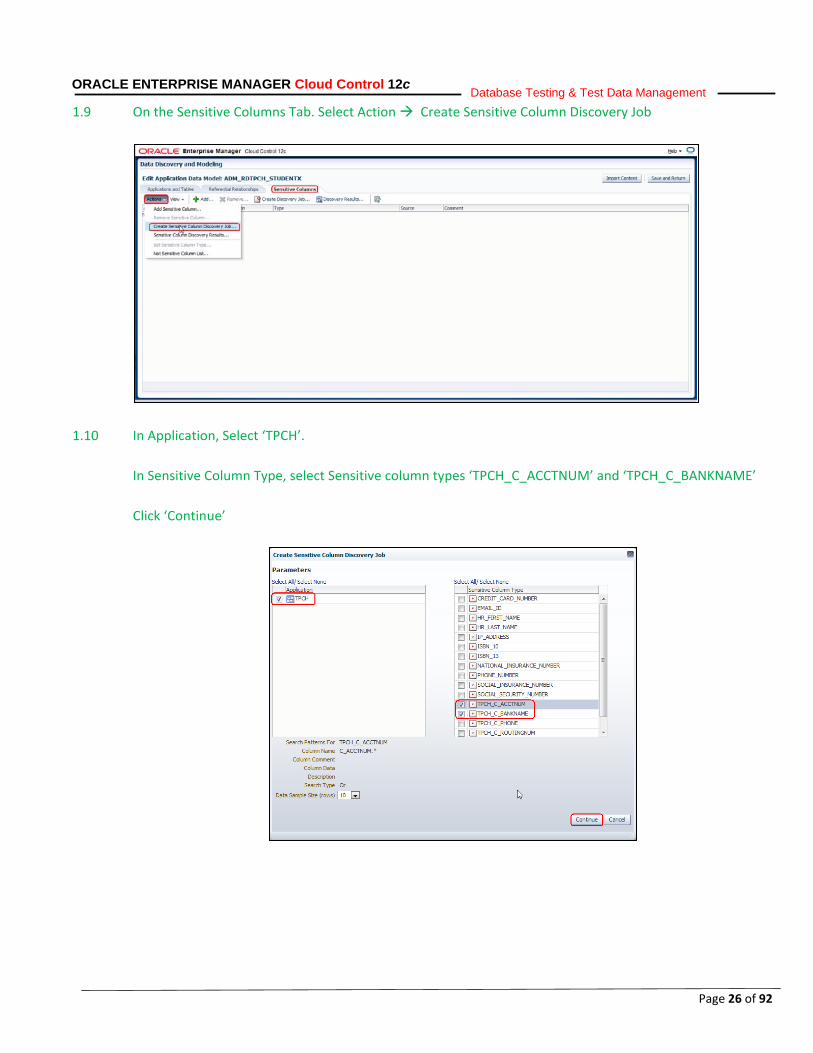
1.9 On the Sensitive Columns Tab. Select Action Create Sensitive Column Discovery Job
1.10 In Application, Select ‘TPCH’.
In Sensitive Column Type, select Sensitive column types ‘TPCH_C_ACCTNUM’ and ‘TPCH_C_BANKNAME’
Click ‘Continue’
Page 27 of 92
ORACLE ENTERPRISE MANAGER Cloud Control 12c Database Testing & Test Data Management
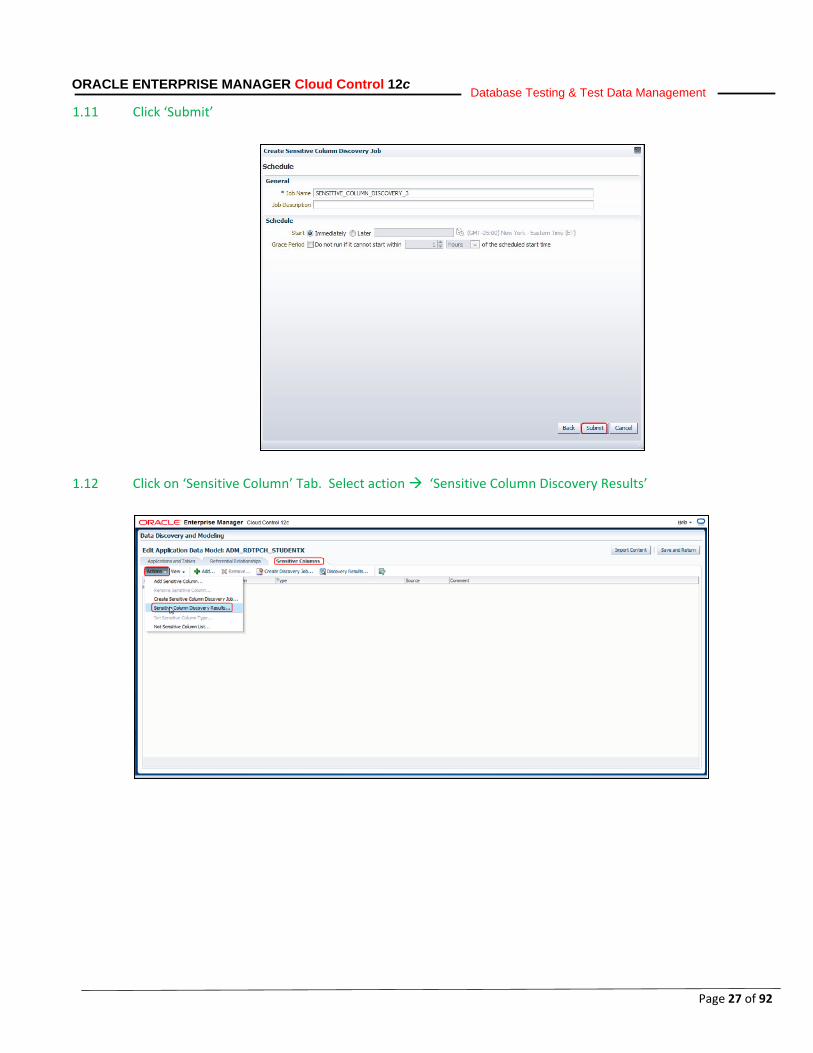
1.11 Click ‘Submit’
1.12 Click on ‘Sensitive Column’ Tab. Select action ‘Sensitive Column Discovery Results’
Page 28 of 92
ORACLE ENTERPRISE MANAGER Cloud Control 12c Database Testing & Test Data Management
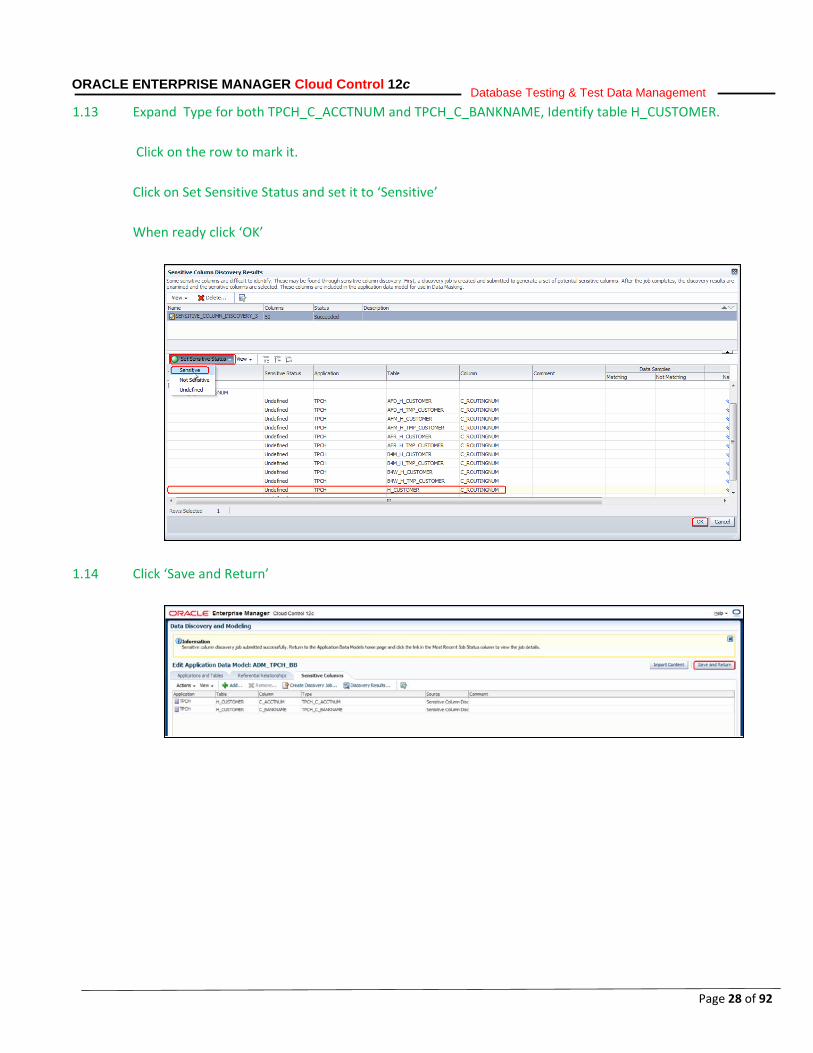
1.13 Expand Type for both TPCH_C_ACCTNUM and TPCH_C_BANKNAME, Identify table H_CUSTOMER.
Click on the row to mark it.
Click on Set Sensitive Status and set it to ‘Sensitive’
When ready click ‘OK’
1.14 Click ‘Save and Return’
Page 29 of 92
ORACLE ENTERPRISE MANAGER Cloud Control 12c Database Testing & Test Data Management
B2. Define and Execute Masking on Application Data Model
Estimated Time to Complete Use Case: 20 minutes
Business Case
Having discovered the application relationships, the application administrator now needs to create a masked of this database so that the enterprise provide realistic-production data available to application developers or testing groups for accurate application testing while reduce their storage costs by not having to provision an entire production environment for each developer or project.
4. Execute Masking
4.1 You should already be logged on to Enterprise Manager. If you are not, please follow the instructions detailed in earlier section of this workbook.
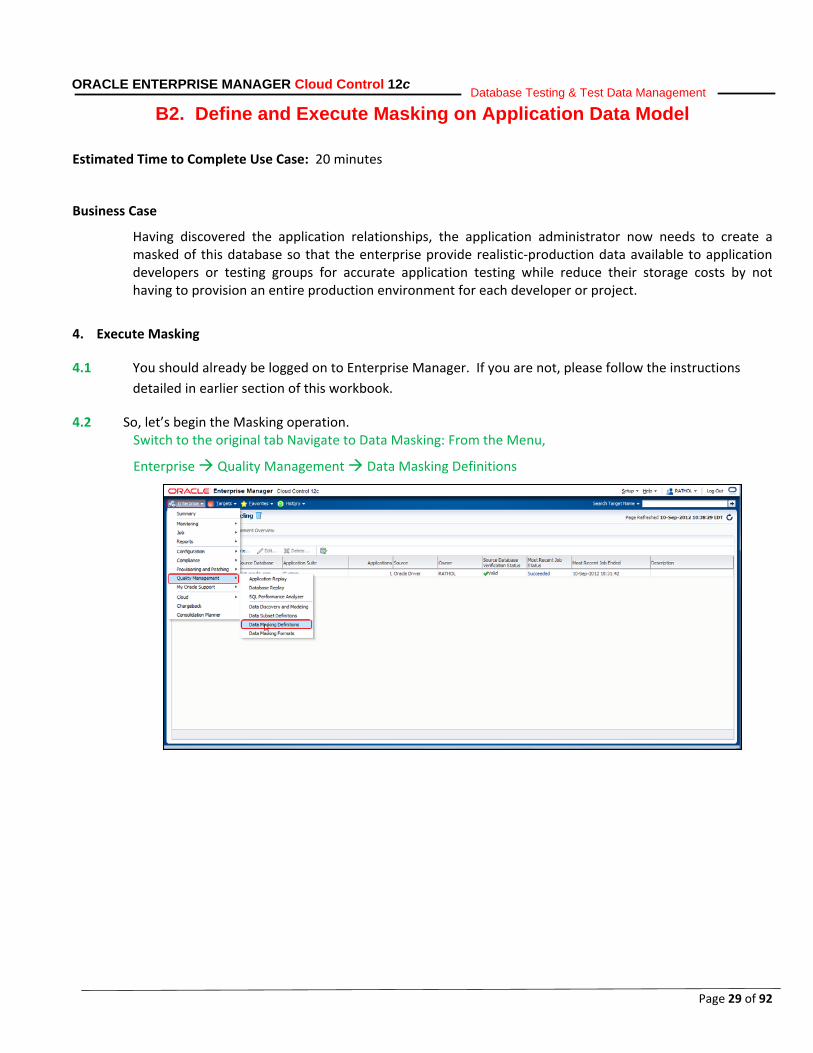
4.2 So, let’s begin the Masking operation. Switch to the original tab Navigate to Data Masking: From the Menu,
Enterprise Quality Management Data Masking Definitions

Page 30 of 92
ORACLE ENTERPRISE MANAGER Cloud Control 12c Database Testing & Test Data Management
4.4 Create a masking definition for ‘TPCH’ schema. Click ‘Create’
4.5 Complete the dialog box:
Name : TPCH-MASK_STUDENTX
(Note: If a Masking Definition with above name already exists in your environment. You can create masking definition with new name, such as TPCH-MASK_<Your Initials>)
Application Data Model : ADM_RDTPCH_STUDENTX (use search option)
Note: If you created an ADM with a different name in Generate Application Data Model lab, you may use it here. You can also use “TPCH”.
Reference Database : test.oracle.com (use search option)
Select ‘Ensure Workload Masking Compability’
Add column you would like to mask by, click ‘Add’

Page 31 of 92
ORACLE ENTERPRISE MANAGER Cloud Control 12c Database Testing & Test Data Management
Page 32 of 92
ORACLE ENTERPRISE MANAGER Cloud Control 12c Database Testing & Test Data Management
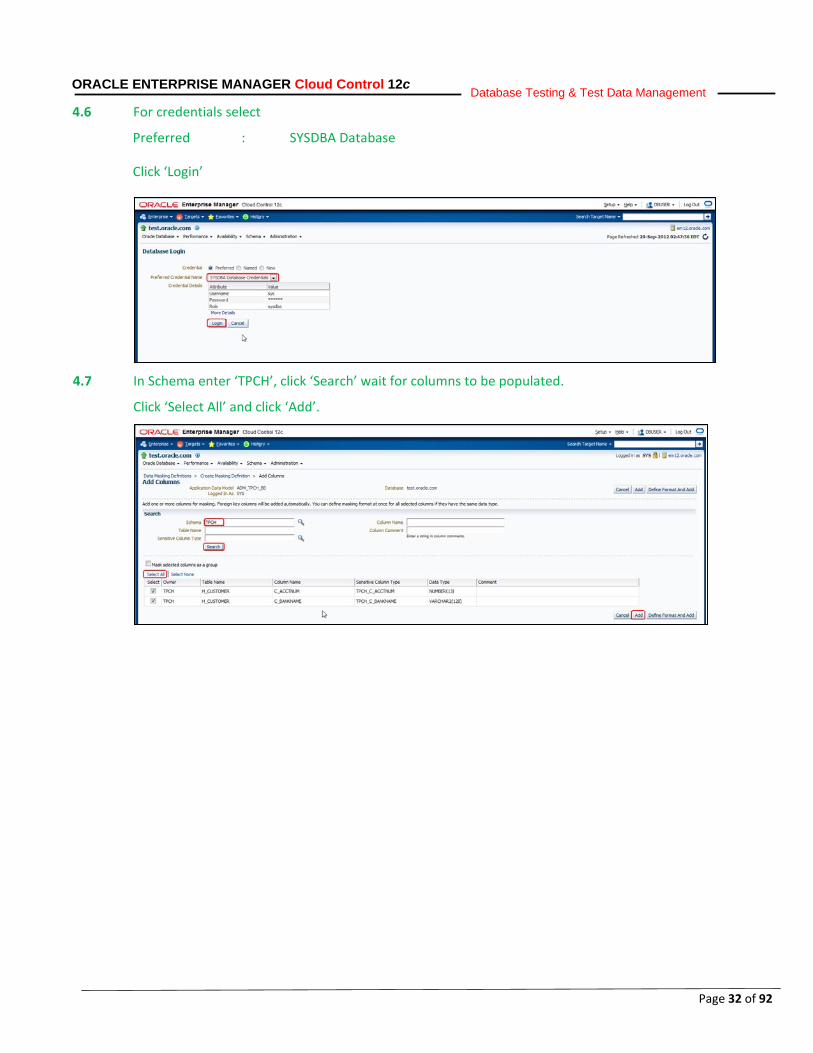
4.6 For credentials select
Preferred : SYSDBA Database
Click ‘Login’
4.7 In Schema enter ‘TPCH’, click ‘Search’ wait for columns to be populated.
Click ‘Select All’ and click ‘Add’.
Page 33 of 92
ORACLE ENTERPRISE MANAGER Cloud Control 12c Database Testing & Test Data Management
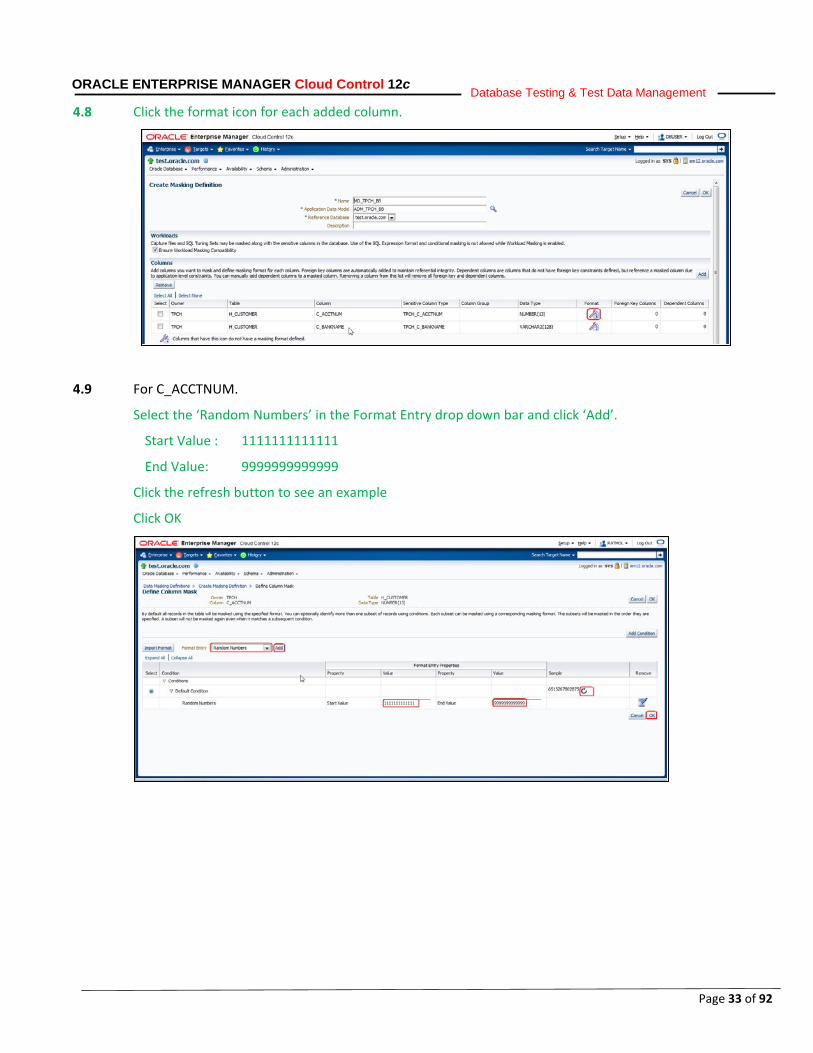
4.8 Click the format icon for each added column.
4.9 For C_ACCTNUM.
Select the ‘Random Numbers’ in the Format Entry drop down bar and click ‘Add’.
Start Value : 1111111111111
End Value: 9999999999999
Click the refresh button to see an example
Click OK
Page 34 of 92
ORACLE ENTERPRISE MANAGER Cloud Control 12c Database Testing & Test Data Management
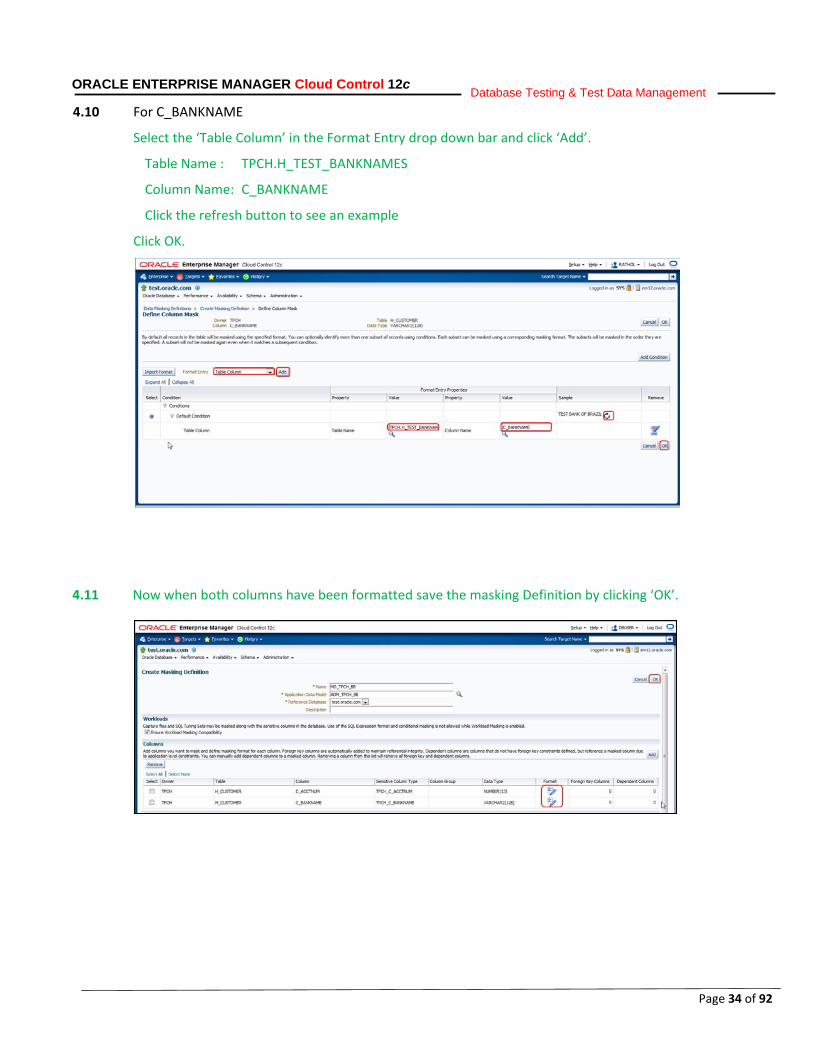
4.10 For C_BANKNAME
Select the ‘Table Column’ in the Format Entry drop down bar and click ‘Add’.
Table Name : TPCH.H_TEST_BANKNAMES
Column Name: C_BANKNAME
Click the refresh button to see an example
Click OK.
4.11 Now when both columns have been formatted save the masking Definition by clicking ‘OK’.
Page 35 of 92
ORACLE ENTERPRISE MANAGER Cloud Control 12c Database Testing & Test Data Management
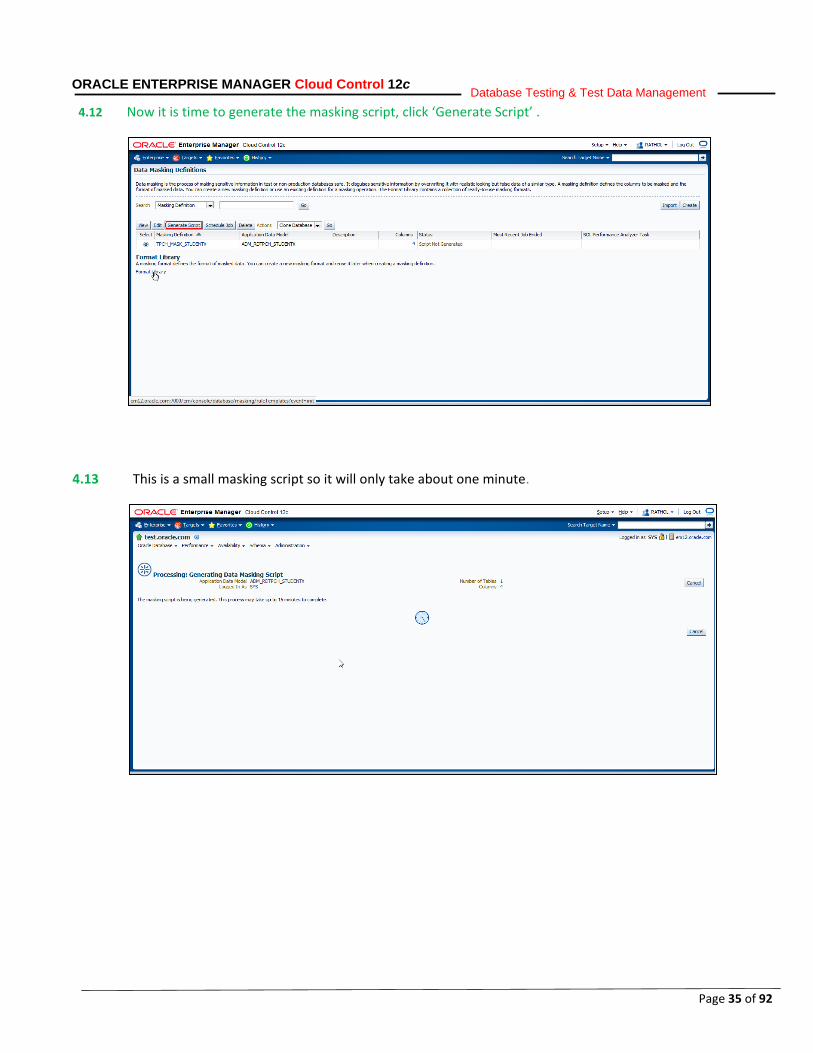
4.12 Now it is time to generate the masking script, click ‘Generate Script’ .
4.13 This is a small masking script so it will only take about one minute.
Page 36 of 92
ORACLE ENTERPRISE MANAGER Cloud Control 12c Database Testing & Test Data Management
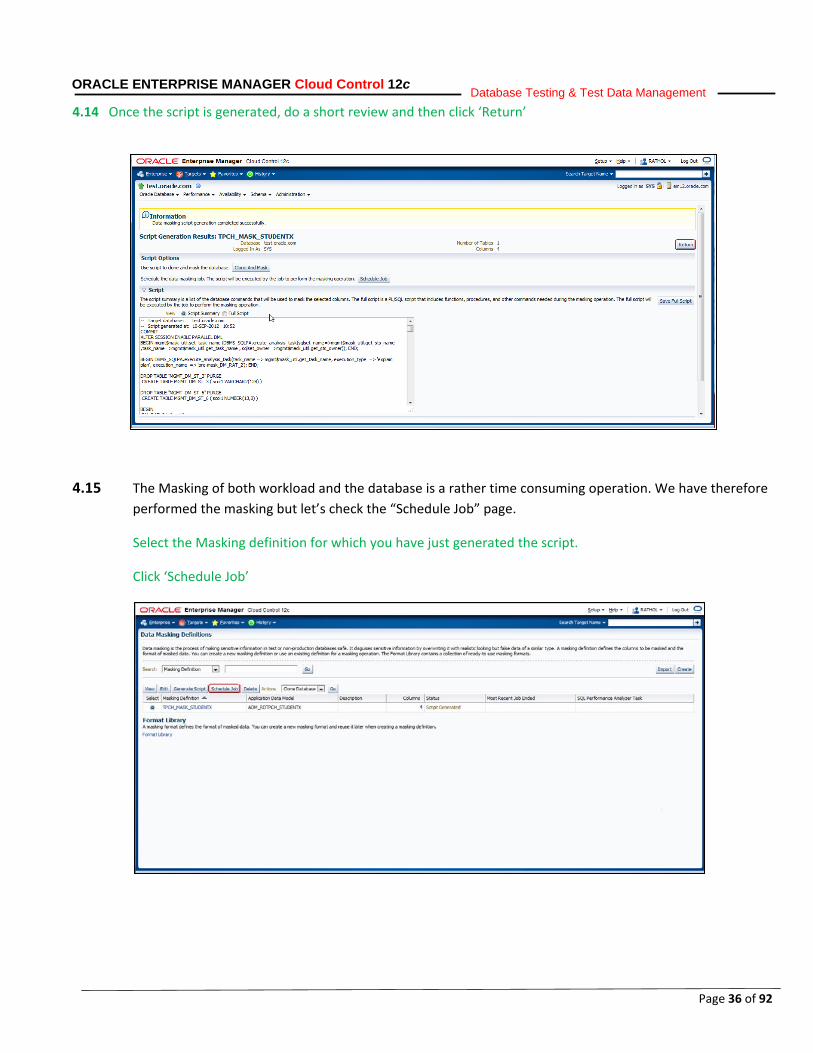
4.14 Once the script is generated, do a short review and then click ‘Return’
4.15 The Masking of both workload and the database is a rather time consuming operation. We have therefore performed the masking but let’s check the “Schedule Job” page.
Select the Masking definition for which you have just generated the script.
Click ‘Schedule Job’

Page 37 of 92
ORACLE ENTERPRISE MANAGER Cloud Control 12c Database Testing & Test Data Management
4.16 Credential Select
Preferred : SYSDBA Database
Click ‘Login’
4.17 In the dialog, enter following values.
Section Encrypt Seed Section If masking definition Encrypt or Decrypt have been chosen, an encryption seed is needed this will be supplied with: ‘Seed’ and ‘Confirm seed’ = This is the value that is used for the format Encrypt and Decrypt
Section Workload Check ‘Mask SQL Tuning Sets’ and ‘Capture Files’ Select the Workload directory that corresponds to this database backup in this case ‘CAPTURE’ Section Detect SQL Plan Changes Due to Masking Check ‘Run SQL Performance….’ Enter Task name ‘DM_PLAN’ Now click ‘Cancel’
Page 38 of 92
ORACLE ENTERPRISE MANAGER Cloud Control 12c Database Testing & Test Data Management
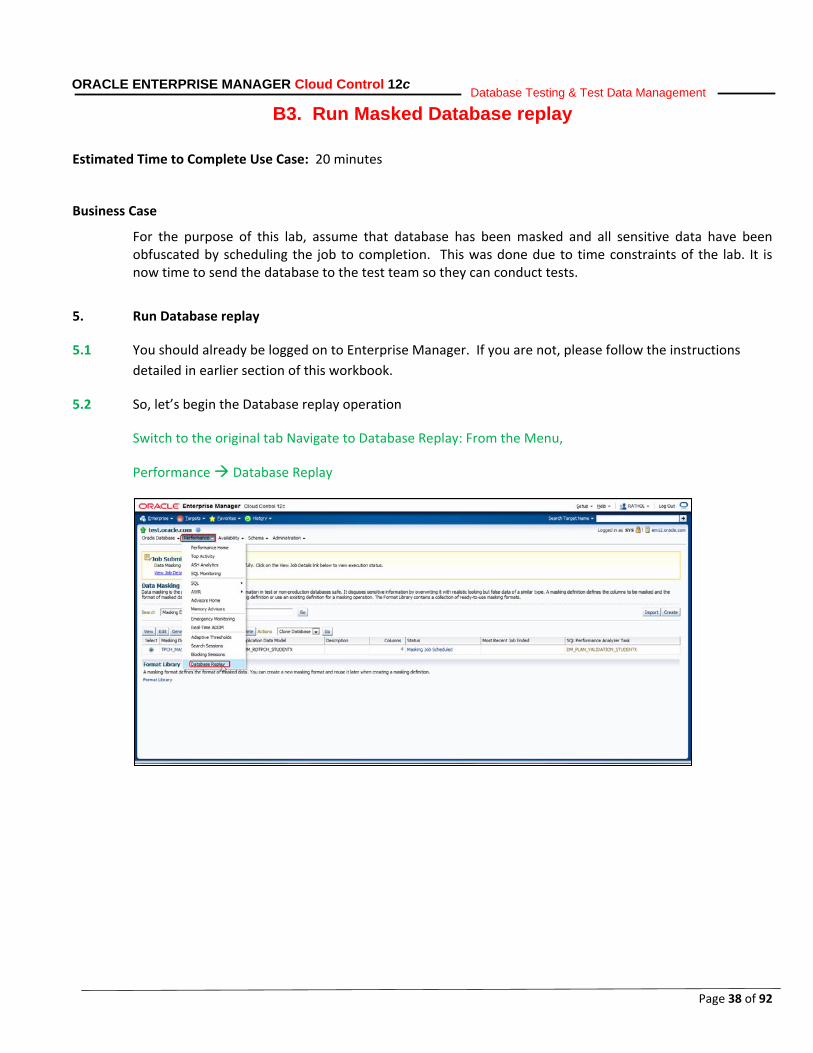
B3. Run Masked Database replay
Estimated Time to Complete Use Case: 20 minutes
Business Case
For the purpose of this lab, assume that database has been masked and all sensitive data have been obfuscated by scheduling the job to completion. This was done due to time constraints of the lab. It is now time to send the database to the test team so they can conduct tests.
5. Run Database replay
5.1 You should already be logged on to Enterprise Manager. If you are not, please follow the instructions detailed in earlier section of this workbook.
5.2 So, let’s begin the Database replay operation
Switch to the original tab Navigate to Database Replay: From the Menu,
Performance Database Replay
Page 39 of 92
ORACLE ENTERPRISE MANAGER Cloud Control 12c Database Testing & Test Data Management
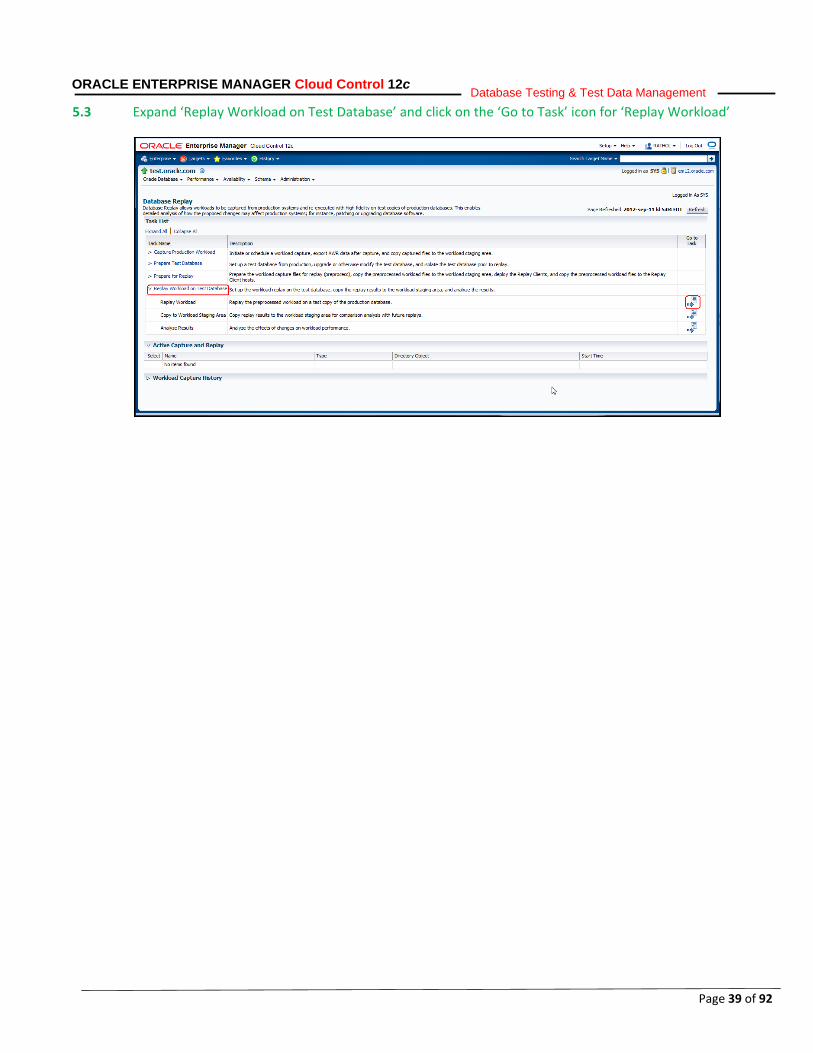
5.3 Expand ‘Replay Workload on Test Database’ and click on the ‘Go to Task’ icon for ‘Replay Workload’
Page 40 of 92
ORACLE ENTERPRISE MANAGER Cloud Control 12c Database Testing & Test Data Management
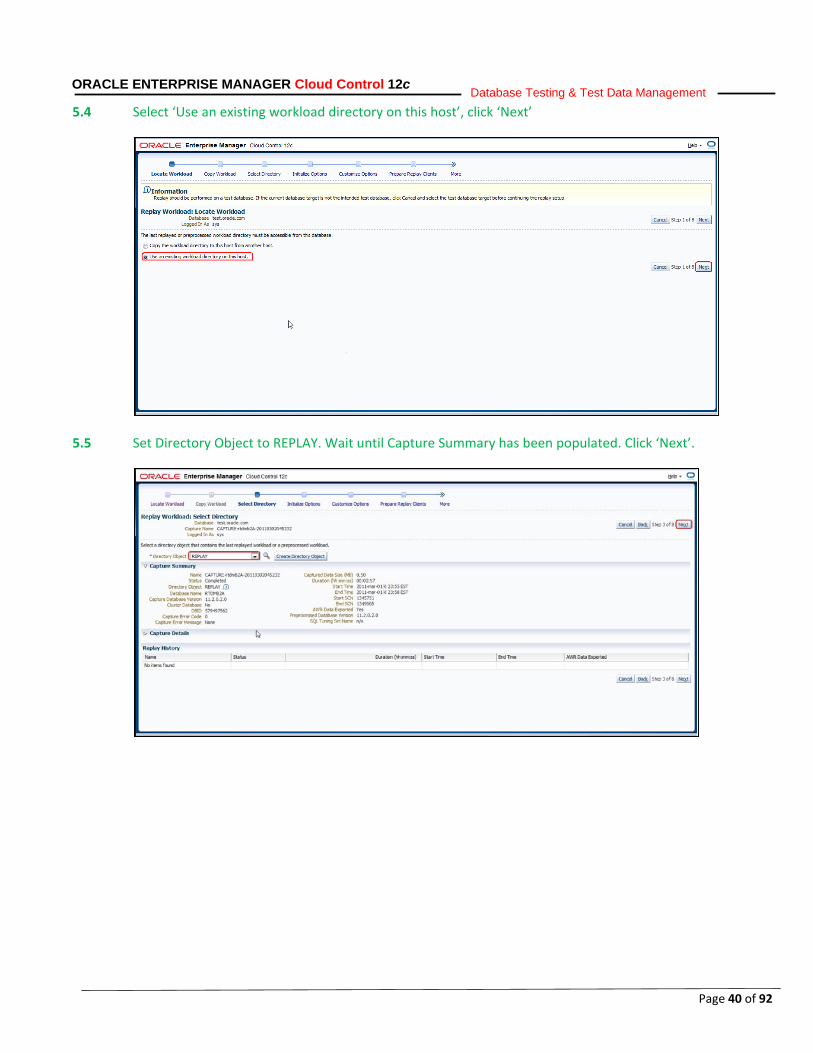
5.4 Select ‘Use an existing workload directory on this host’, click ‘Next’
5.5 Set Directory Object to REPLAY. Wait until Capture Summary has been populated. Click ‘Next’.
Page 41 of 92
ORACLE ENTERPRISE MANAGER Cloud Control 12c Database Testing & Test Data Management
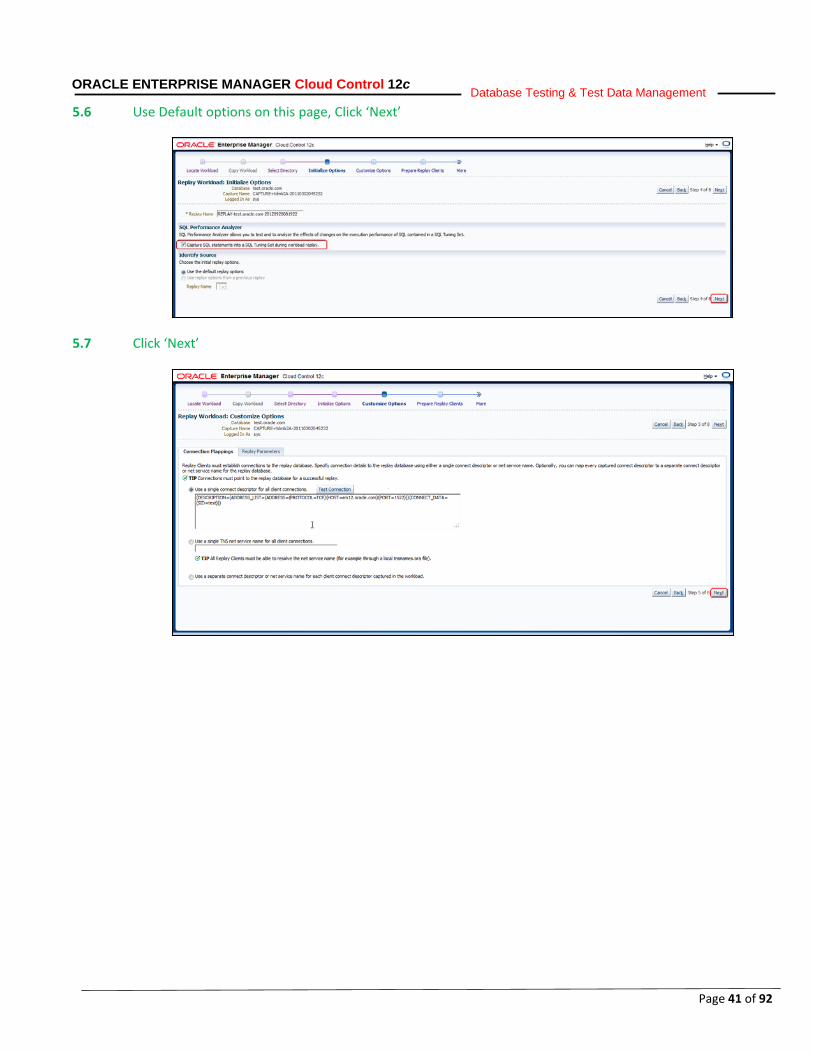
5.6 Use Default options on this page, Click ‘Next’
5.7 Click ‘Next’
Page 42 of 92
ORACLE ENTERPRISE MANAGER Cloud Control 12c Database Testing & Test Data Management
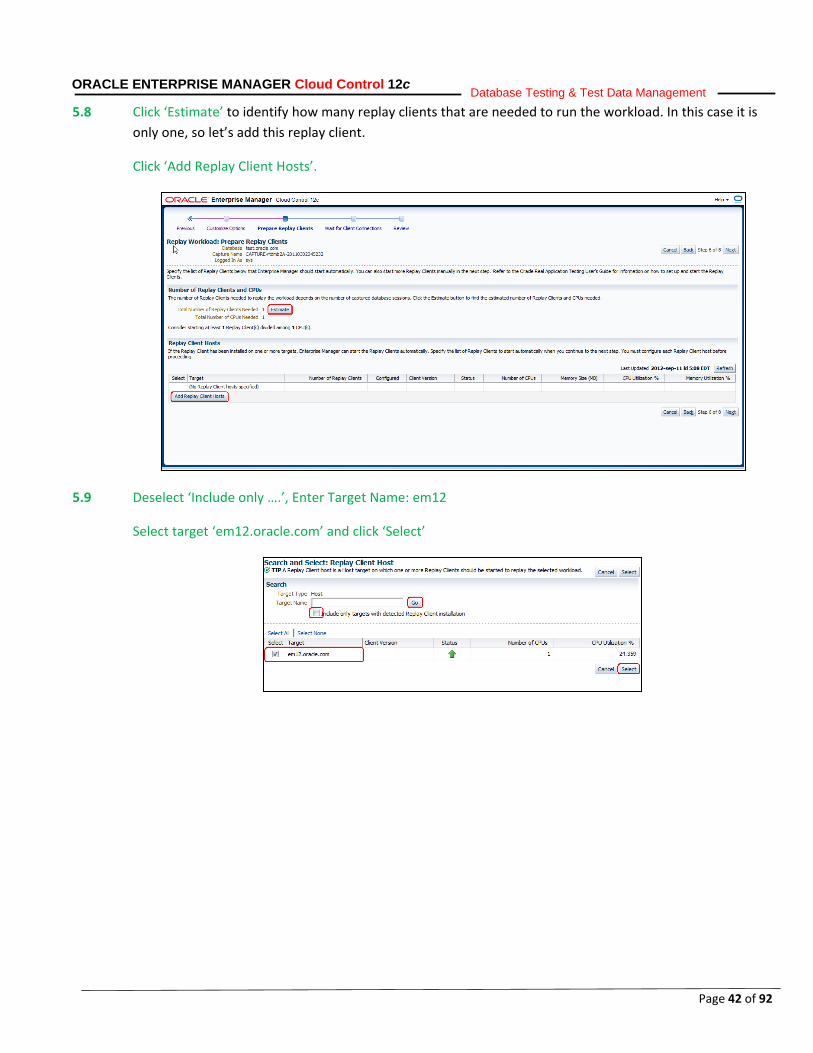
5.8 Click ‘Estimate’ to identify how many replay clients that are needed to run the workload. In this case it is only one, so let’s add this replay client.
Click ‘Add Replay Client Hosts’.
5.9 Deselect ‘Include only ….’, Enter Target Name: em12
Select target ‘em12.oracle.com’ and click ‘Select’
Page 43 of 92
ORACLE ENTERPRISE MANAGER Cloud Control 12c Database Testing & Test Data Management
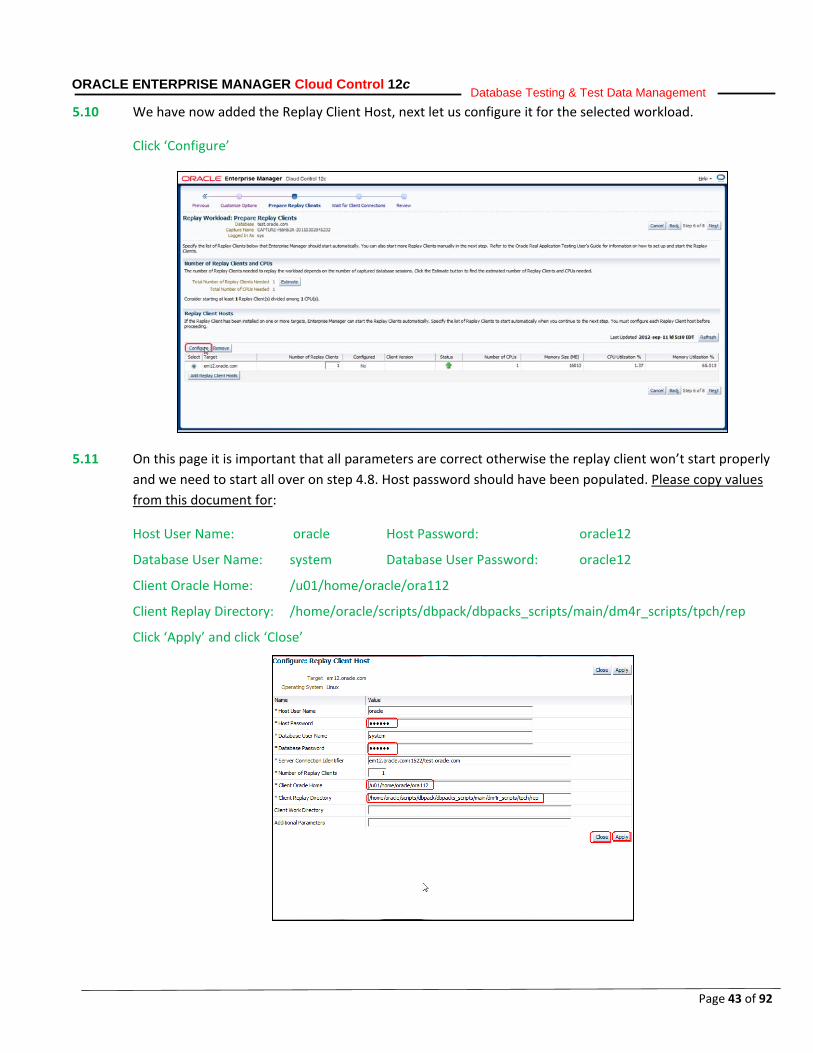
5.10 We have now added the Replay Client Host, next let us configure it for the selected workload.
Click ‘Configure’
5.11 On this page it is important that all parameters are correct otherwise the replay client won’t start properly and we need to start all over on step 4.8. Host password should have been populated. Please copy values from this document for:
Host User Name: oracle Host Password: oracle12
Database User Name: system Database User Password: oracle12
Client Oracle Home: /u01/home/oracle/ora112
Client Replay Directory: /home/oracle/scripts/dbpack/dbpacks_scripts/main/dm4r_scripts/tpch/rep
Click ‘Apply’ and click ‘Close’
Page 44 of 92
ORACLE ENTERPRISE MANAGER Cloud Control 12c Database Testing & Test Data Management
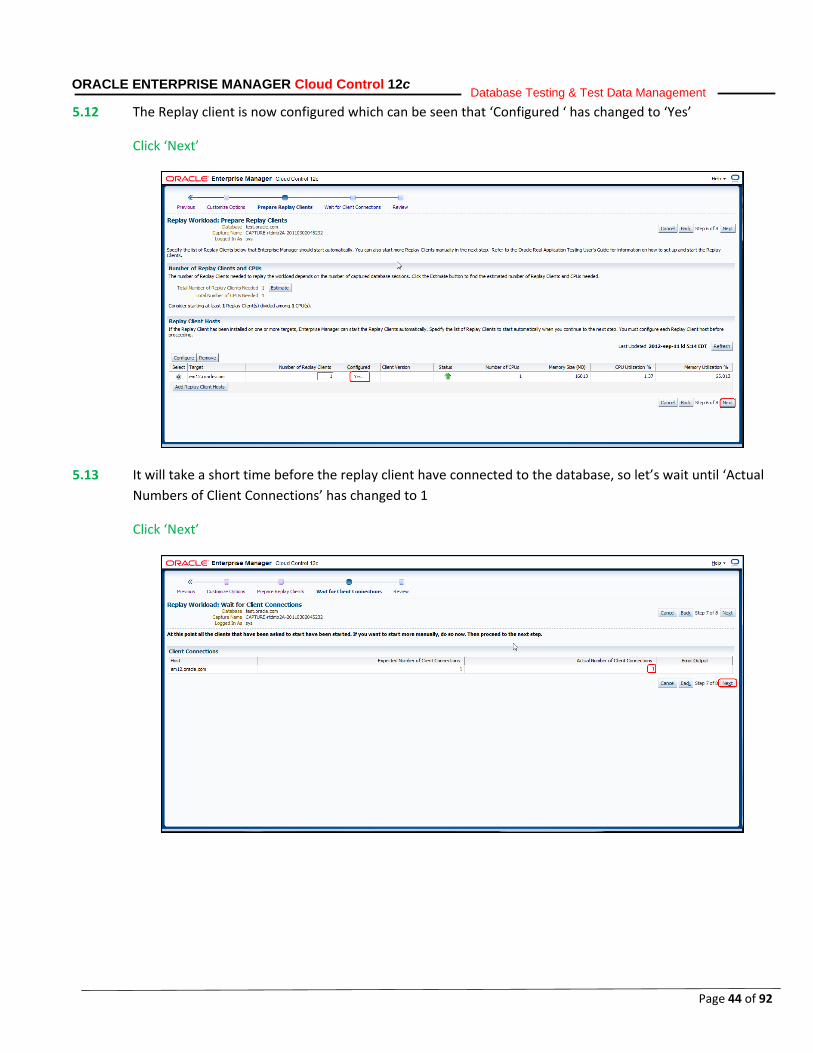
5.12 The Replay client is now configured which can be seen that ‘Configured ‘ has changed to ‘Yes’
Click ‘Next’
5.13 It will take a short time before the replay client have connected to the database, so let’s wait until ‘Actual Numbers of Client Connections’ has changed to 1
Click ‘Next’
Page 45 of 92
ORACLE ENTERPRISE MANAGER Cloud Control 12c Database Testing & Test Data Management
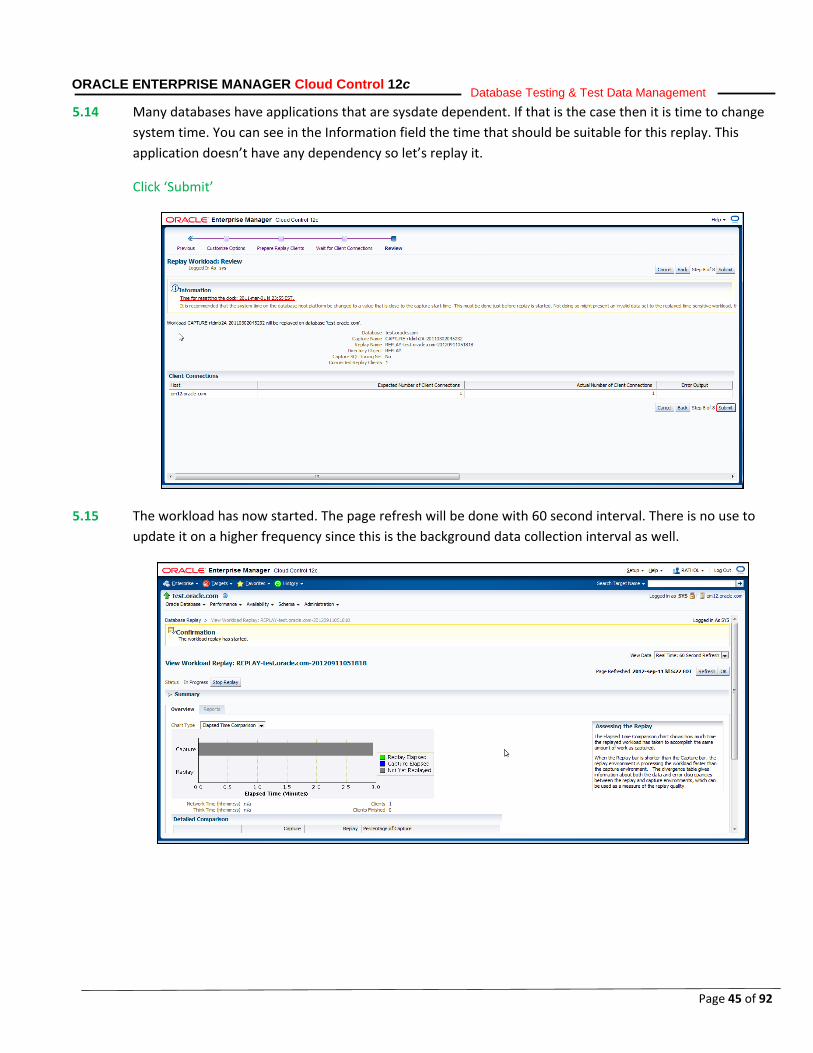
5.14 Many databases have applications that are sysdate dependent. If that is the case then it is time to change system time. You can see in the Information field the time that should be suitable for this replay. This application doesn’t have any dependency so let’s replay it.
Click ‘Submit’
5.15 The workload has now started. The page refresh will be done with 60 second interval. There is no use to update it on a higher frequency since this is the background data collection interval as well.
Page 46 of 92
ORACLE ENTERPRISE MANAGER Cloud Control 12c Database Testing & Test Data Management
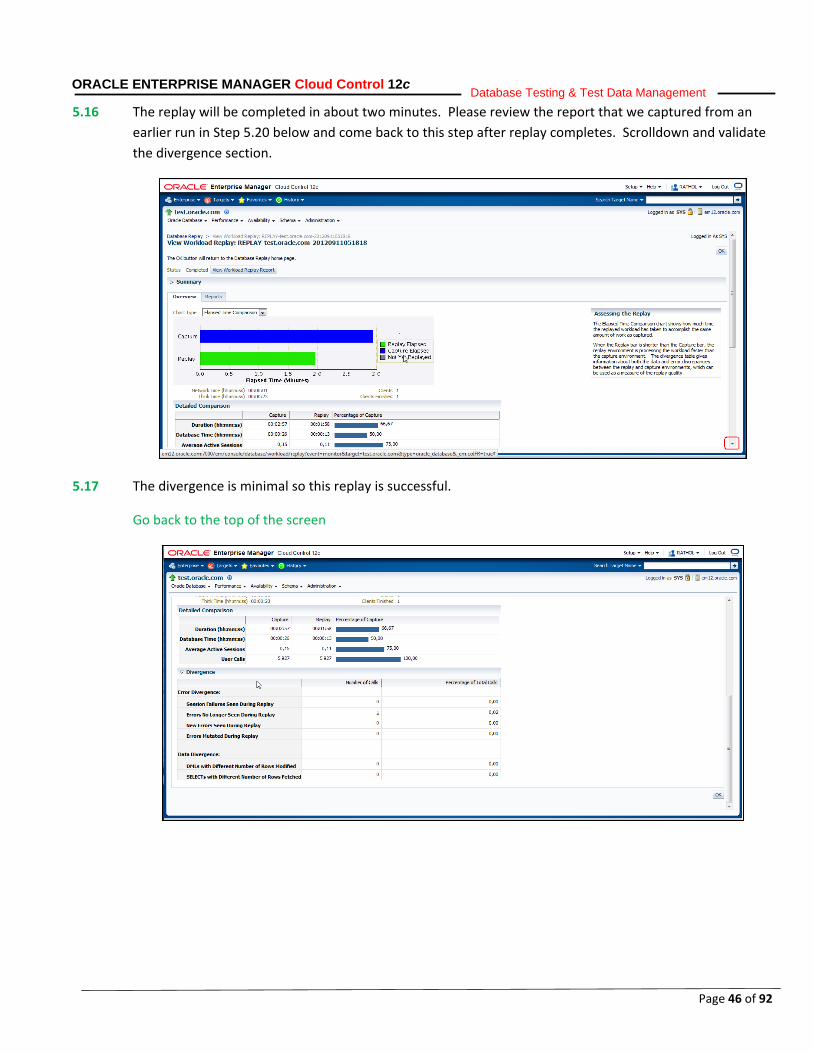
5.16 The replay will be completed in about two minutes. Please review the report that we captured from an earlier run in Step 5.20 below and come back to this step after replay completes. Scrolldown and validate the divergence section.
5.17 The divergence is minimal so this replay is successful.
Go back to the top of the screen
Page 47 of 92
ORACLE ENTERPRISE MANAGER Cloud Control 12c Database Testing & Test Data Management
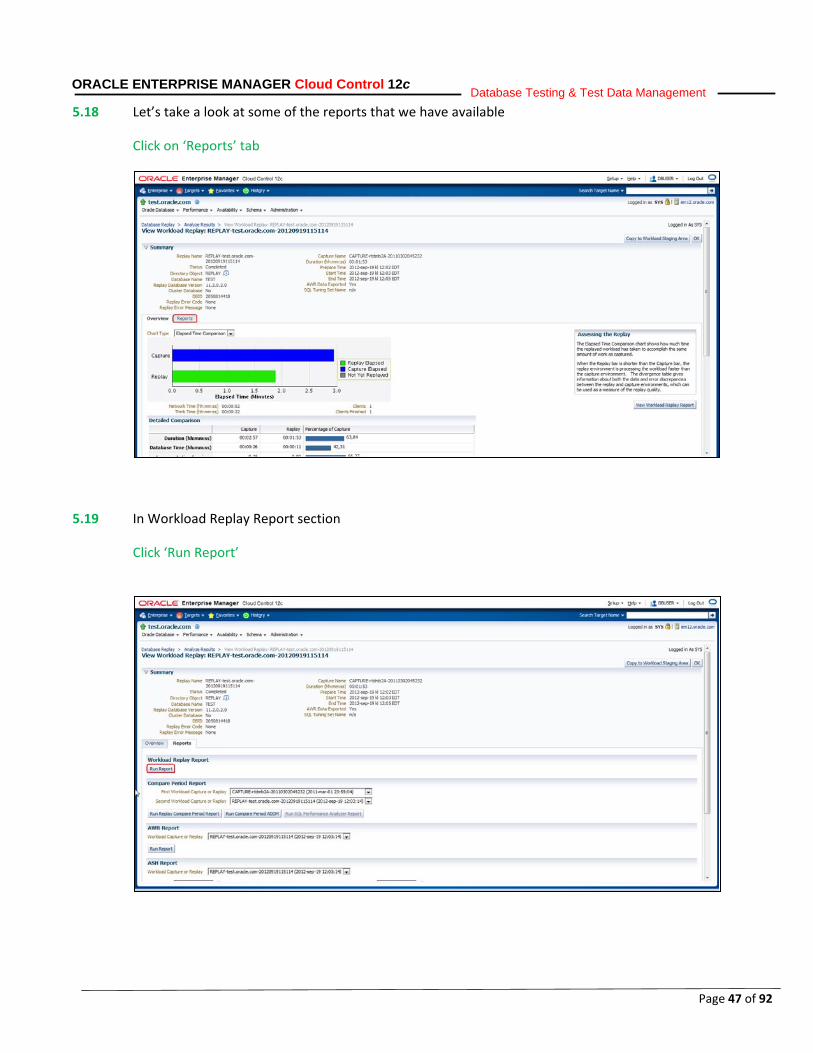
5.18 Let’s take a look at some of the reports that we have available
Click on ‘Reports’ tab
5.19 In Workload Replay Report section
Click ‘Run Report’
Page 48 of 92
ORACLE ENTERPRISE MANAGER Cloud Control 12c Database Testing & Test Data Management
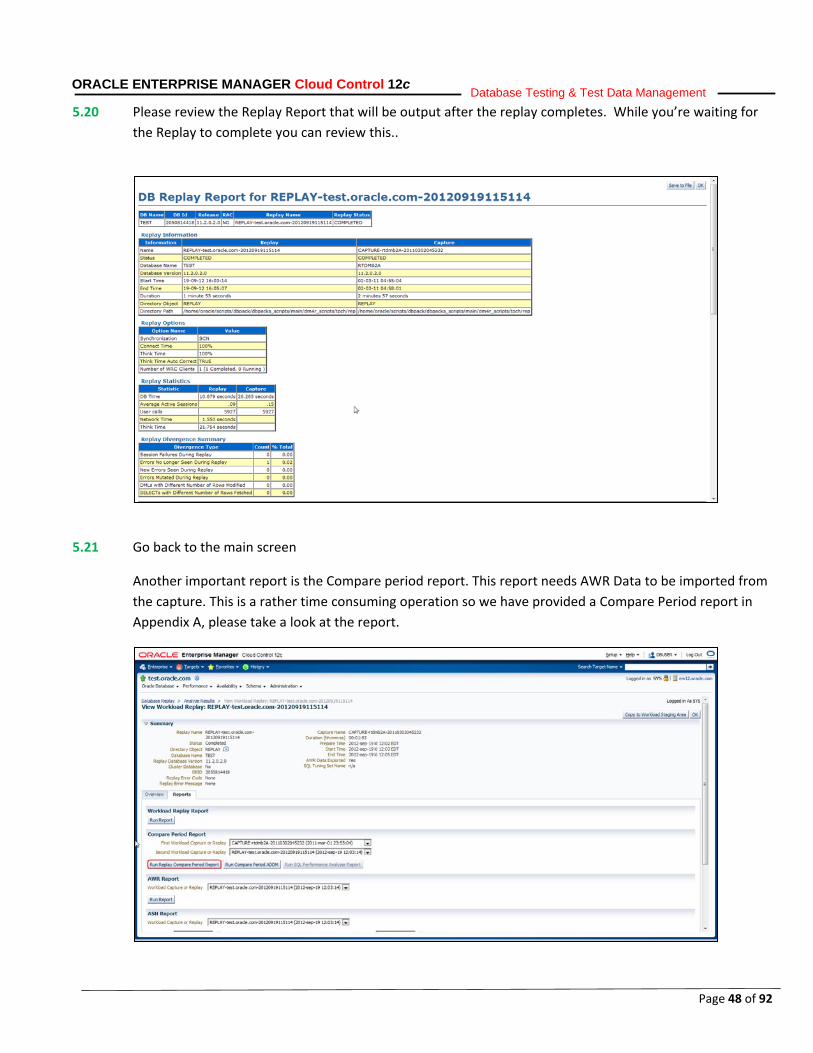
5.20 Please review the Replay Report that will be output after the replay completes. While you’re waiting for the Replay to complete you can review this..
5.21 Go back to the main screen
Another important report is the Compare period report. This report needs AWR Data to be imported from the capture. This is a rather time consuming operation so we have provided a Compare Period report in Appendix A, please take a look at the report.
Page 49 of 92
ORACLE ENTERPRISE MANAGER Cloud Control 12c Database Testing & Test Data Management
This concludes the Secure Testing section.
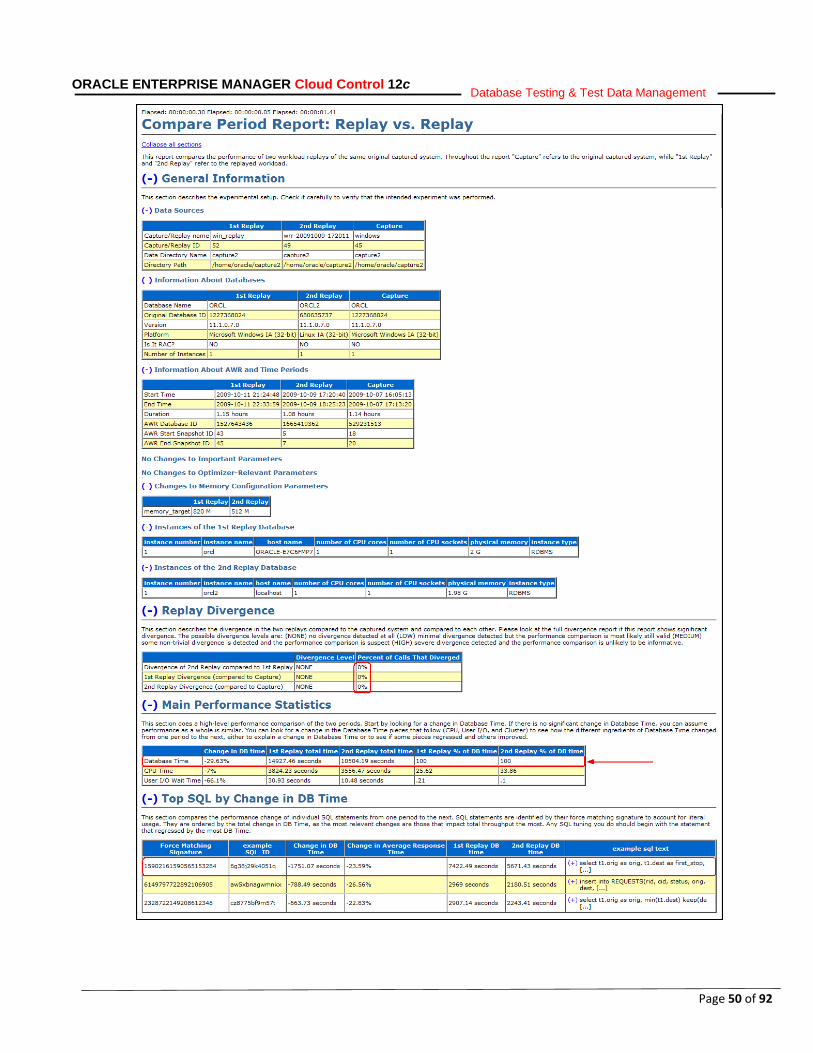
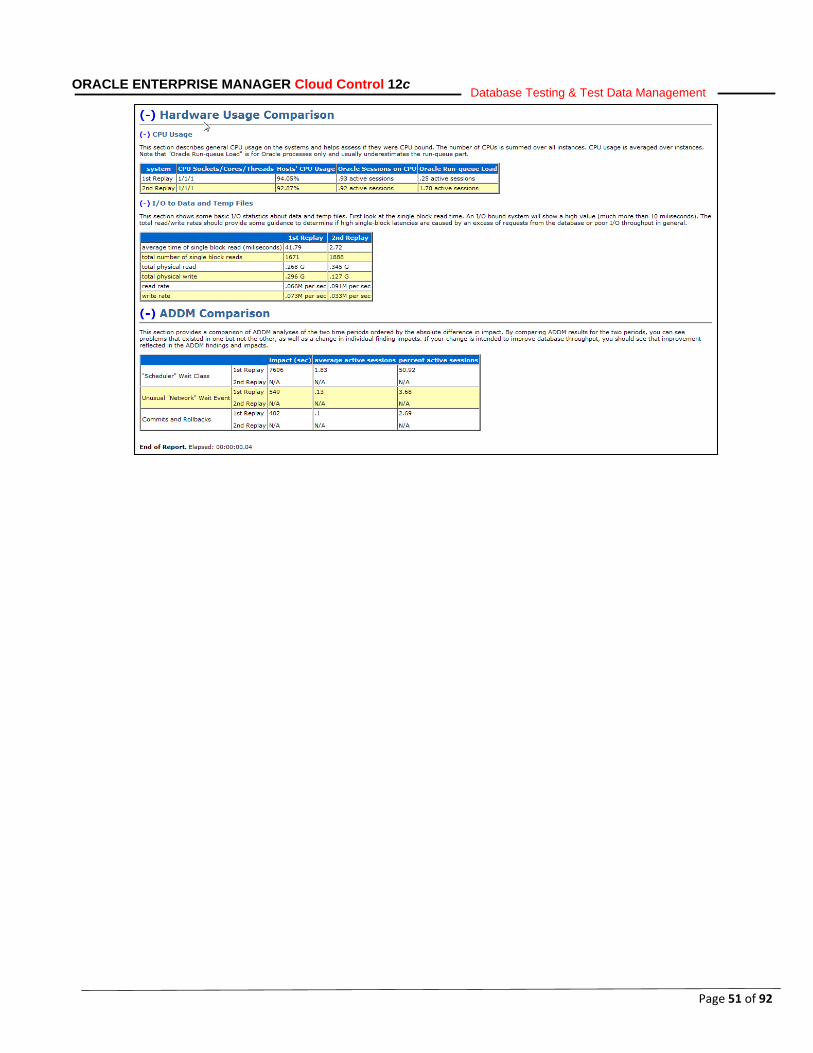
Appendix 1. Compare Period Report
This report gives you the possibility to compare the overall replay performance with either the capture or another replay.
In this example we have compared two replays on different platforms.
When comparing statistics from capture vs. Replay or Replay vs. Replay.
First thing to look at is the divergence, if the divergence is small or similar then we can continue with the analyze.
We can see that divergence during this replay is 0%. This is exceptional good and not very common, less than 5% should be considered as a good replay.
This is a platform comparison so next step is to validate the performance. This is done by comparing Database Time (Database time is the total time spent inside the database for all calls to the database. This includes CPU time, Wait time and I/O time)
This report shows that the Linux configuration performed better, it was almost 30% faster and that this performance improvement is mostly I/O related since I/O wait time have been reduced by 66%.
Page 50 of 92
ORACLE ENTERPRISE MANAGER Cloud Control 12c Database Testing & Test Data Management
Page 51 of 92
ORACLE ENTERPRISE MANAGER Cloud Control 12c Database Testing & Test Data Management
Page 52 of 92
ORACLE ENTERPRISE MANAGER Cloud Control 12c Database Testing & Test Data Management
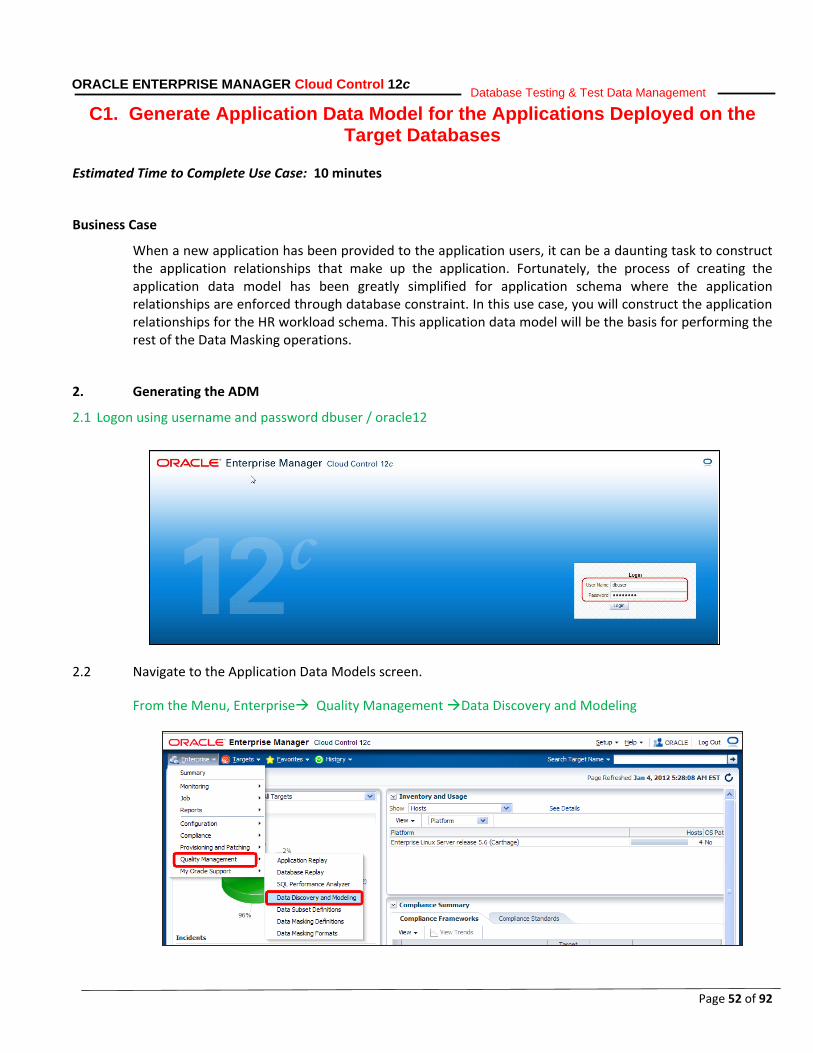
C1. Generate Application Data Model for the Applications Deployed on the Target Databases
Estimated Time to Complete Use Case: 10 minutes
Business Case
When a new application has been provided to the application users, it can be a daunting task to construct the application relationships that make up the application. Fortunately, the process of creating the application data model has been greatly simplified for application schema where the application relationships are enforced through database constraint. In this use case, you will construct the application relationships for the HR workload schema. This application data model will be the basis for performing the rest of the Data Masking operations.
2. Generating the ADM
2.1 Logon using username and password dbuser / oracle12
2.2 Navigate to the Application Data Models screen.
From the Menu, Enterprise Quality Management Data Discovery and Modeling

Page 53 of 92
ORACLE ENTERPRISE MANAGER Cloud Control 12c Database Testing & Test Data Management
Page 54 of 92
ORACLE ENTERPRISE MANAGER Cloud Control 12c Database Testing & Test Data Management
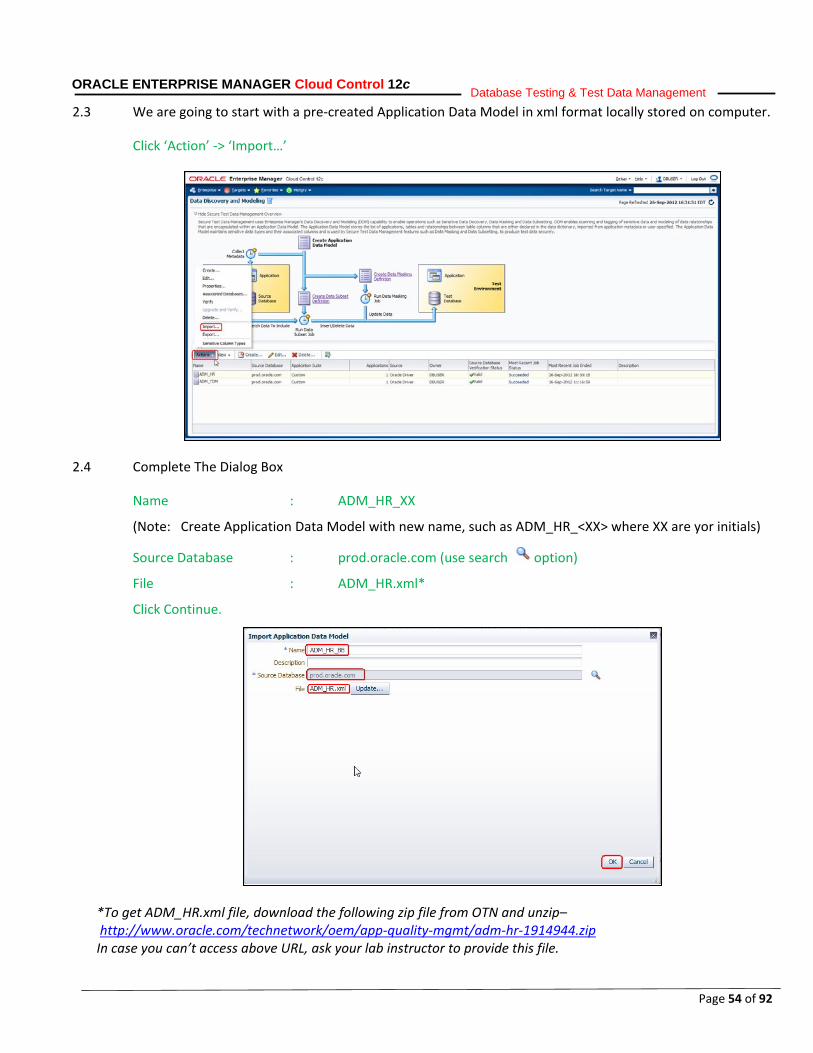
2.3 We are going to start with a pre-created Application Data Model in xml format locally stored on computer.
Click ‘Action’ -> ‘Import…’
2.4 Complete The Dialog Box
Name : ADM_HR_XX
(Note: Create Application Data Model with new name, such as ADM_HR_<XX> where XX are yor initials)
Source Database : prod.oracle.com (use search option)
File : ADM_HR.xml*
Click Continue.
*To get ADM_HR.xml file, download the following zip file from OTN and unzip– http://www.oracle.com/technetwork/oem/app-quality-mgmt/adm-hr-1914944.zip In case you can’t access above URL, ask your lab instructor to provide this file.
Page 55 of 92
ORACLE ENTERPRISE MANAGER Cloud Control 12c Database Testing & Test Data Management
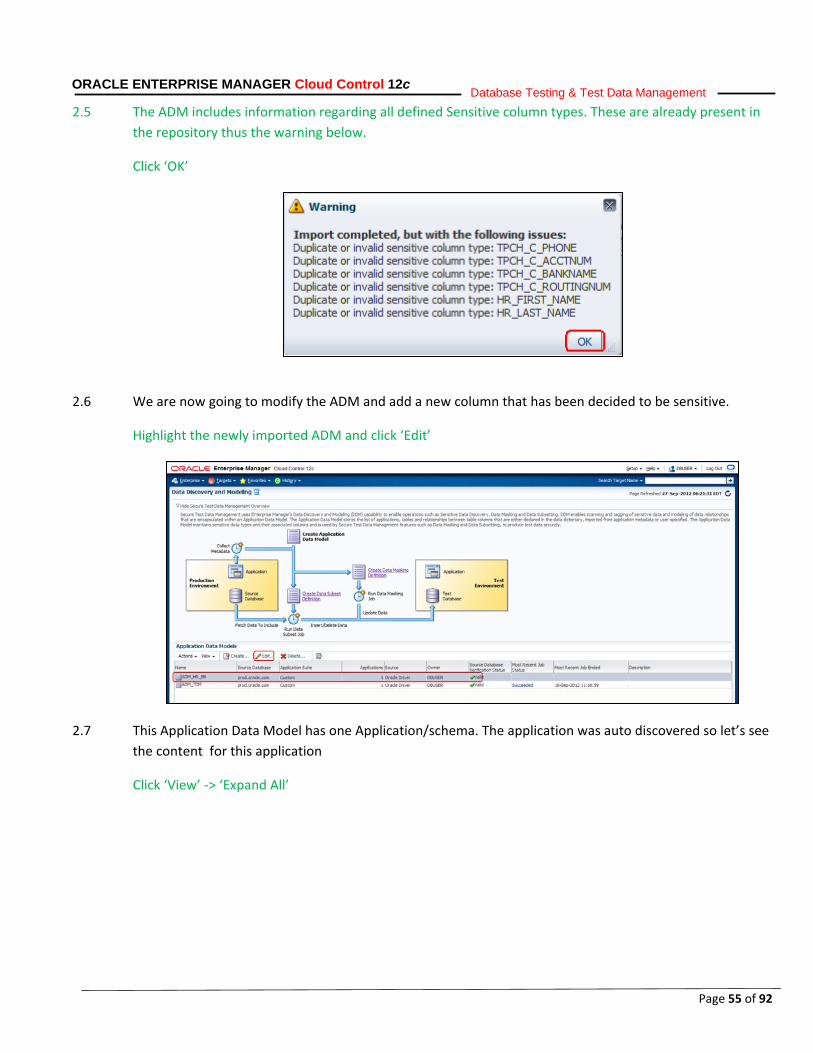
2.5 The ADM includes information regarding all defined Sensitive column types. These are already present in the repository thus the warning below.
Click ‘OK’
2.6 We are now going to modify the ADM and add a new column that has been decided to be sensitive.
Highlight the newly imported ADM and click ‘Edit’
2.7 This Application Data Model has one Application/schema. The application was auto discovered so let’s see the content for this application
Click ‘View’ -> ‘Expand All’
Page 56 of 92
ORACLE ENTERPRISE MANAGER Cloud Control 12c Database Testing & Test Data Management
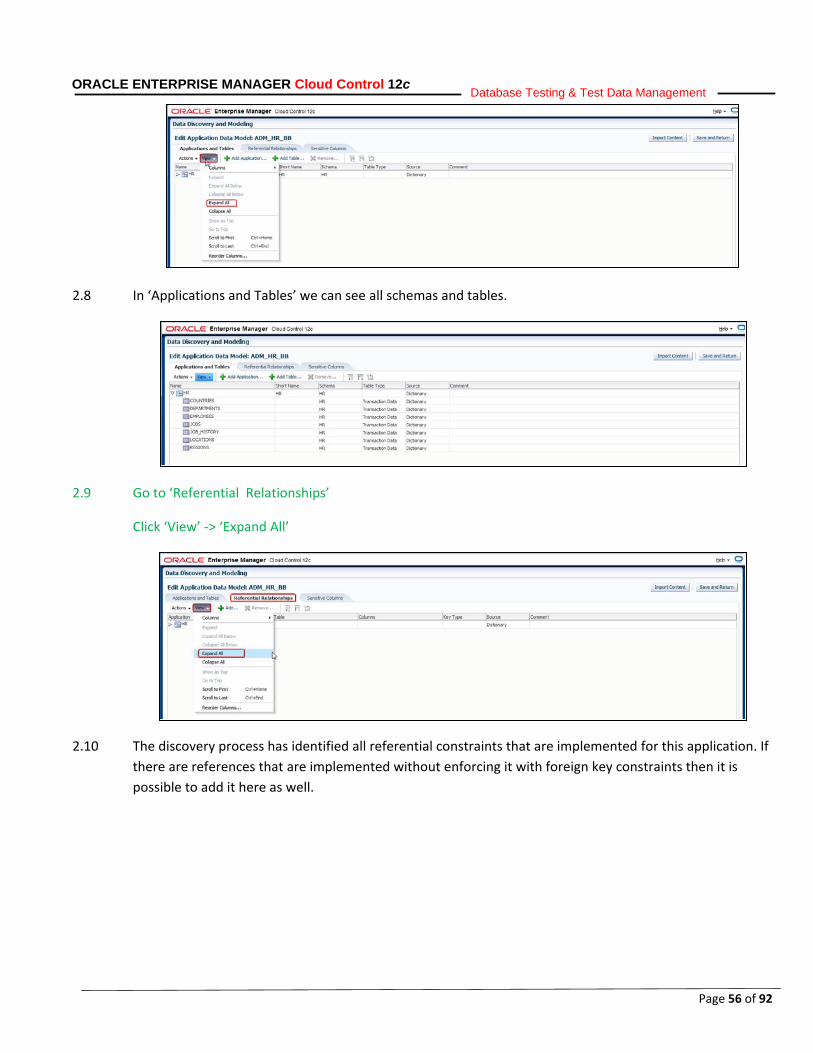
2.8 In ‘Applications and Tables’ we can see all schemas and tables.
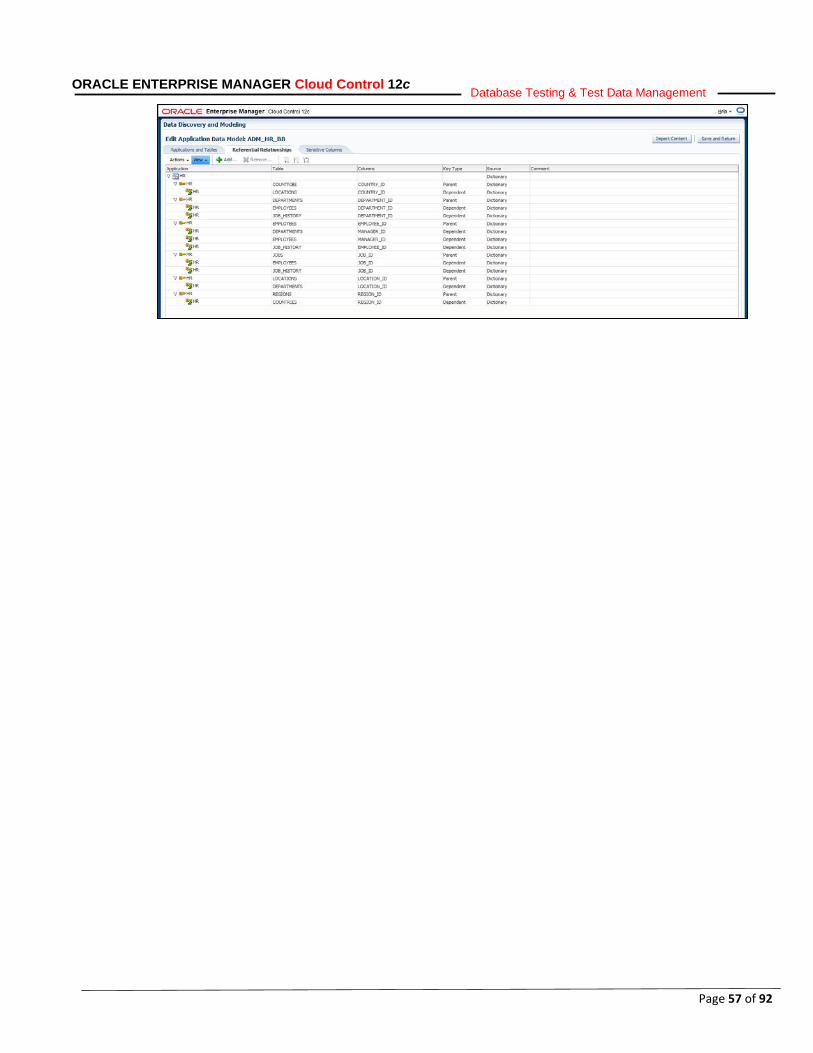
2.9 Go to ‘Referential Relationships’
Click ‘View’ -> ‘Expand All’
2.10 The discovery process has identified all referential constraints that are implemented for this application. If there are references that are implemented without enforcing it with foreign key constraints then it is possible to add it here as well.
Page 57 of 92
ORACLE ENTERPRISE MANAGER Cloud Control 12c Database Testing & Test Data Management
Page 58 of 92
ORACLE ENTERPRISE MANAGER Cloud Control 12c Database Testing & Test Data Management
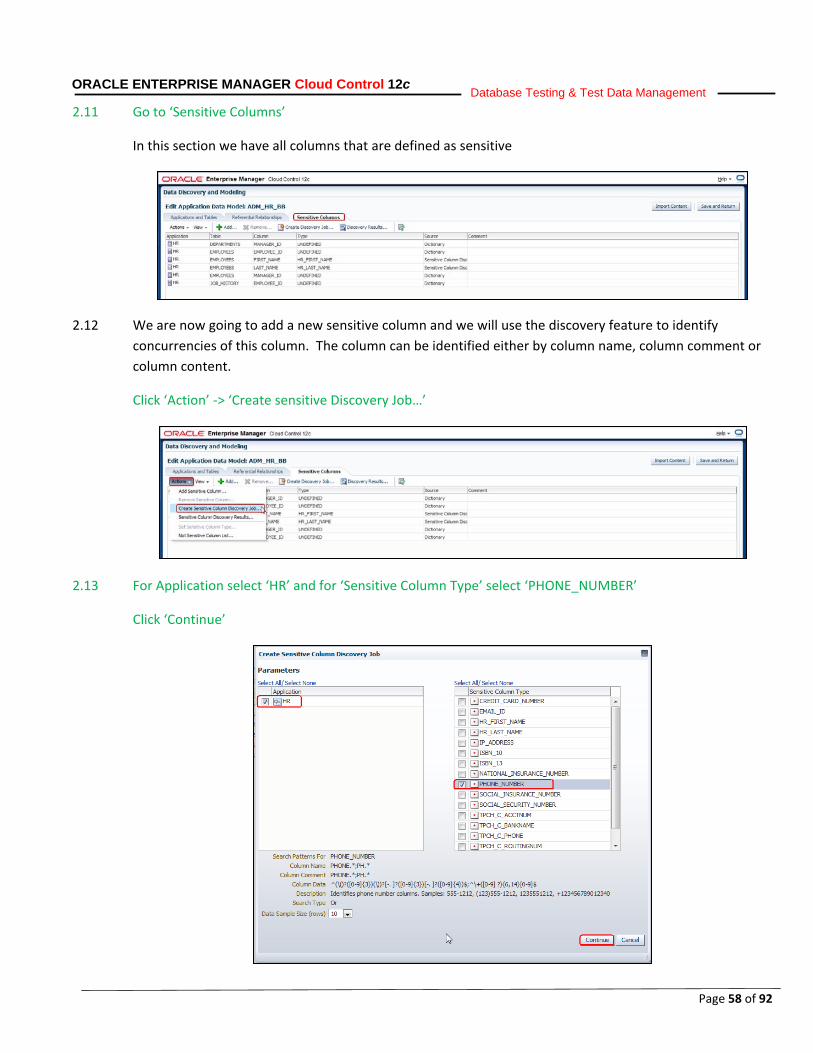
2.11 Go to ‘Sensitive Columns’
In this section we have all columns that are defined as sensitive
2.12 We are now going to add a new sensitive column and we will use the discovery feature to identify concurrencies of this column. The column can be identified either by column name, column comment or column content.
Click ‘Action’ -> ‘Create sensitive Discovery Job…’
2.13 For Application select ‘HR’ and for ‘Sensitive Column Type’ select ‘PHONE_NUMBER’
Click ‘Continue’
Page 59 of 92
ORACLE ENTERPRISE MANAGER Cloud Control 12c Database Testing & Test Data Management
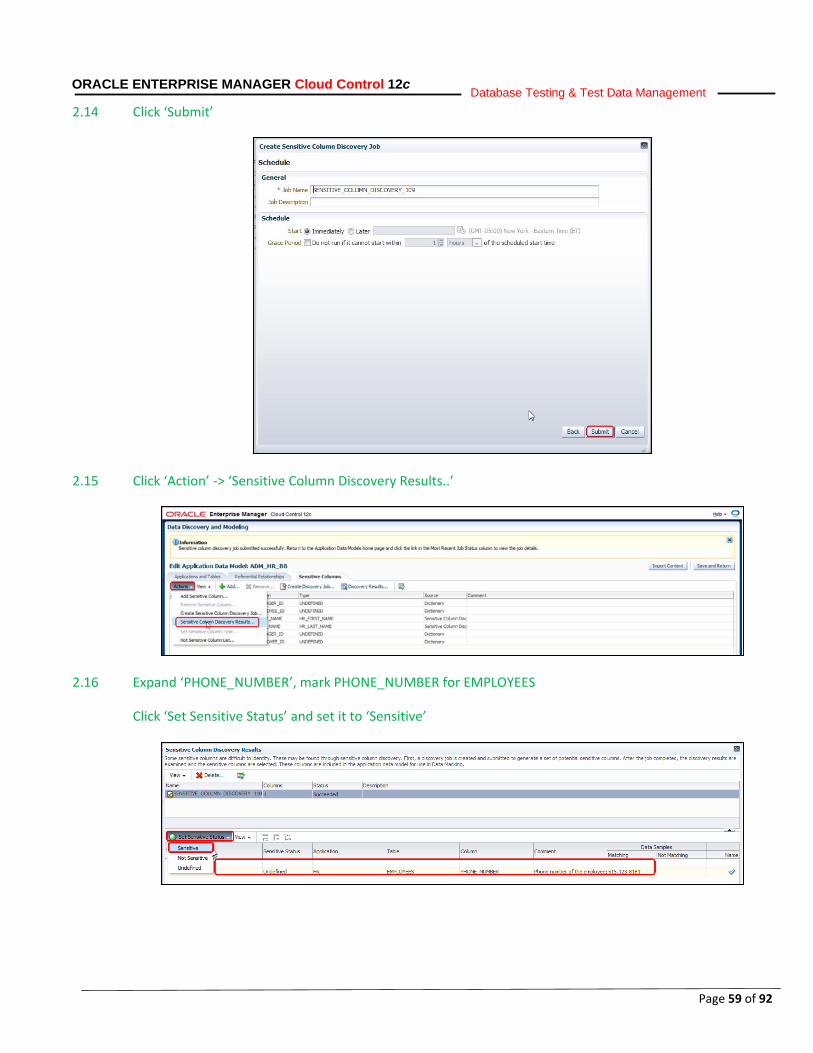
2.14 Click ‘Submit’
2.15 Click ‘Action’ -> ‘Sensitive Column Discovery Results..’
2.16 Expand ‘PHONE_NUMBER’, mark PHONE_NUMBER for EMPLOYEES
Click ‘Set Sensitive Status’ and set it to ‘Sensitive’
Page 60 of 92
ORACLE ENTERPRISE MANAGER Cloud Control 12c Database Testing & Test Data Management
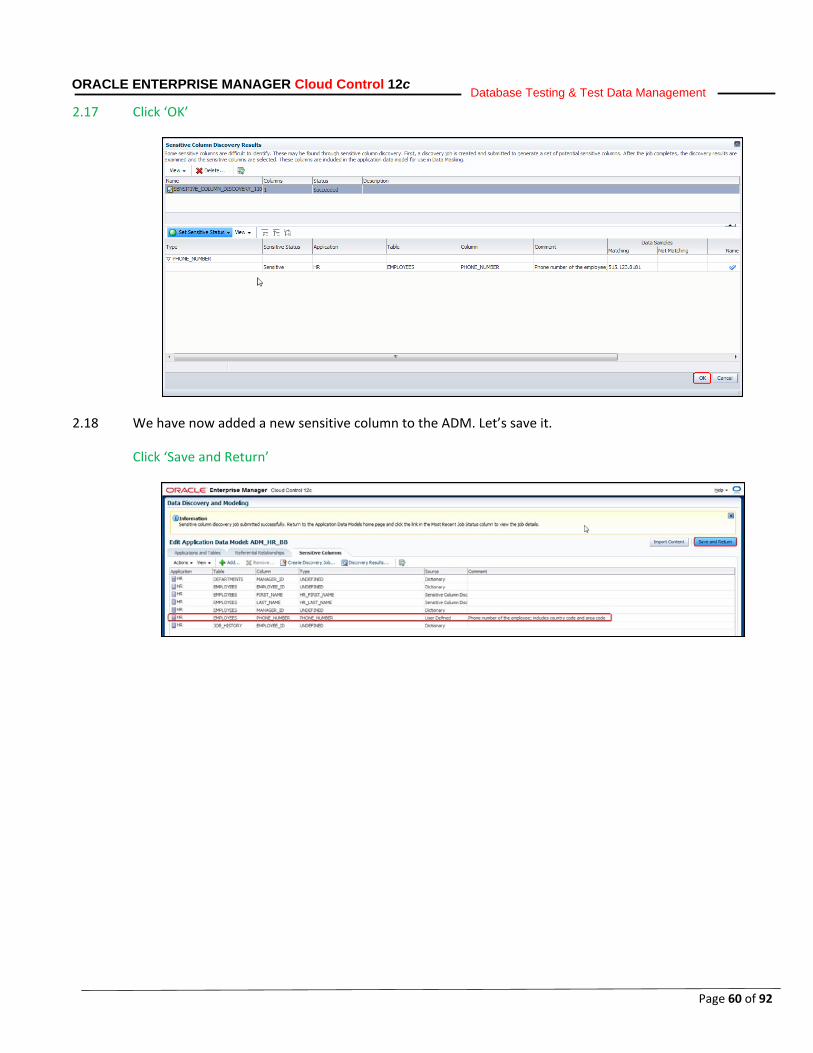
2.17 Click ‘OK’
2.18 We have now added a new sensitive column to the ADM. Let’s save it.
Click ‘Save and Return’
Page 61 of 92
ORACLE ENTERPRISE MANAGER Cloud Control 12c Database Testing & Test Data Management
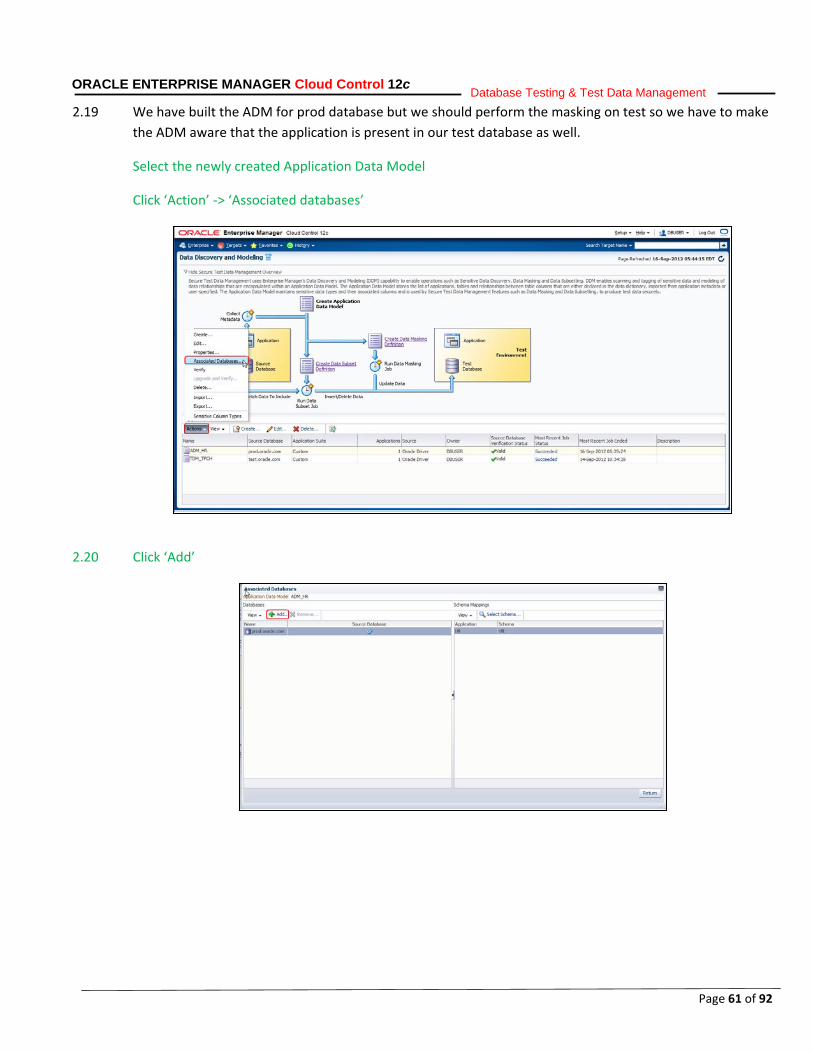
2.19 We have built the ADM for prod database but we should perform the masking on test so we have to make the ADM aware that the application is present in our test database as well.
Select the newly created Application Data Model
Click ‘Action’ -> ‘Associated databases’
2.20 Click ‘Add’
Page 62 of 92
ORACLE ENTERPRISE MANAGER Cloud Control 12c Database Testing & Test Data Management
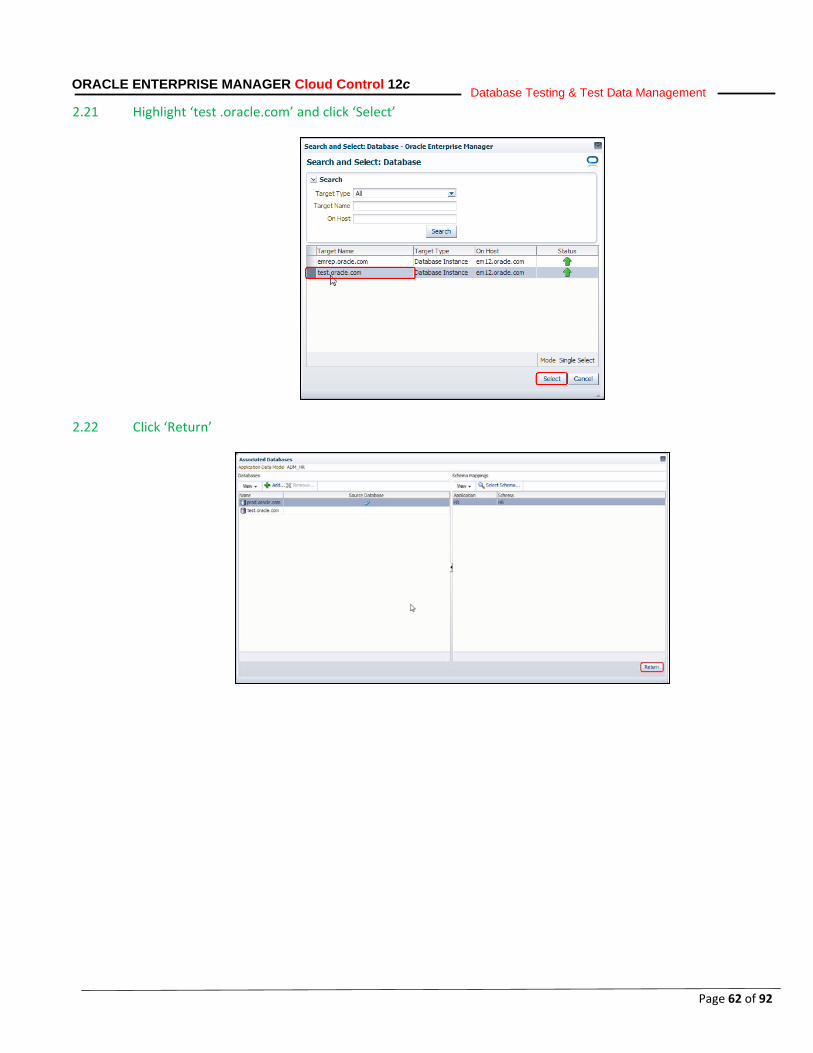
2.21 Highlight ‘test .oracle.com’ and click ‘Select’
2.22 Click ‘Return’
Page 63 of 92
ORACLE ENTERPRISE MANAGER Cloud Control 12c Database Testing & Test Data Management
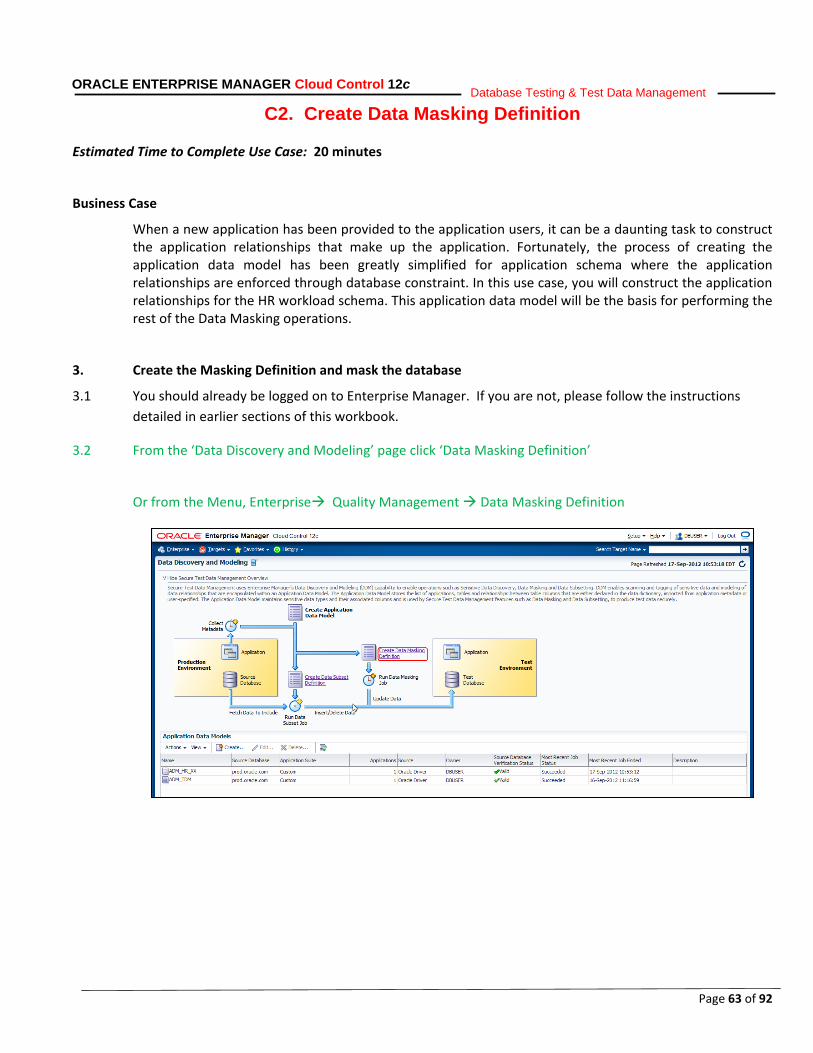
C2. Create Data Masking Definition Estimated Time to Complete Use Case: 20 minutes
Business Case
When a new application has been provided to the application users, it can be a daunting task to construct the application relationships that make up the application. Fortunately, the process of creating the application data model has been greatly simplified for application schema where the application relationships are enforced through database constraint. In this use case, you will construct the application relationships for the HR workload schema. This application data model will be the basis for performing the rest of the Data Masking operations.
3. Create the Masking Definition and mask the database
3.1 You should already be logged on to Enterprise Manager. If you are not, please follow the instructions detailed in earlier sections of this workbook.
3.2 From the ‘Data Discovery and Modeling’ page click ‘Data Masking Definition’
Or from the Menu, Enterprise Quality Management Data Masking Definition
Page 64 of 92
ORACLE ENTERPRISE MANAGER Cloud Control 12c Database Testing & Test Data Management
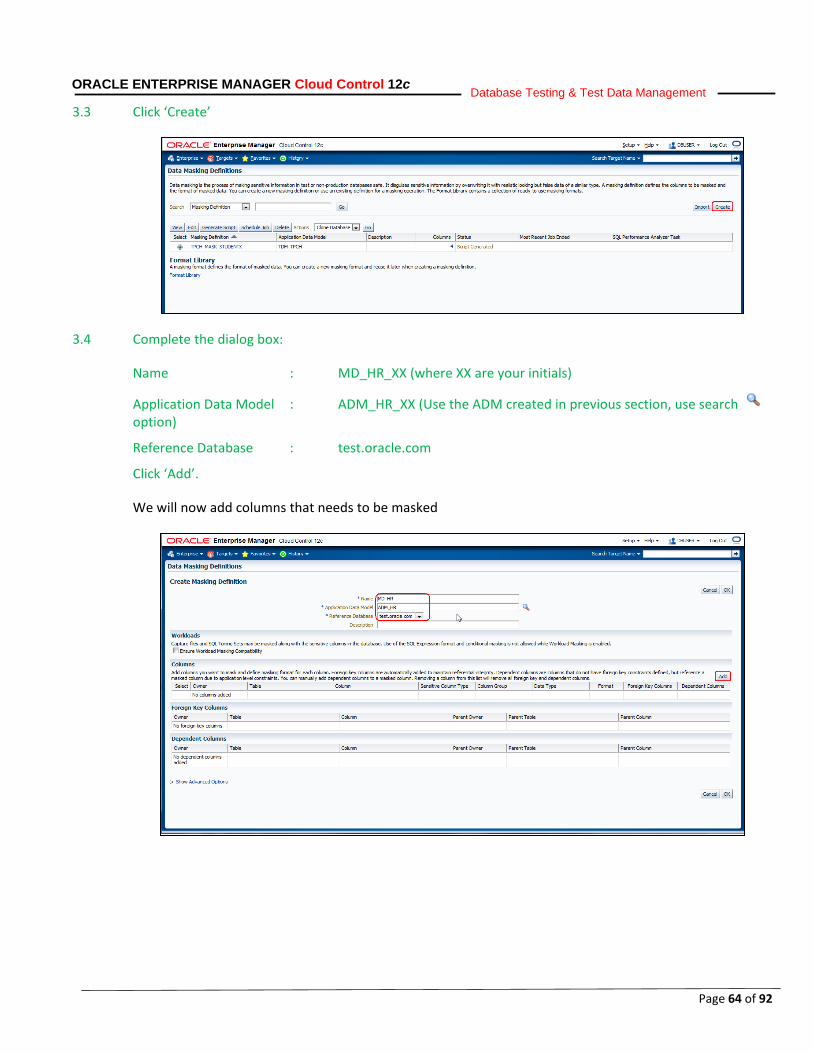
3.3 Click ‘Create’
3.4 Complete the dialog box:
Name : MD_HR_XX (where XX are your initials)
Application Data Model : ADM_HR_XX (Use the ADM created in previous section, use search option)
Reference Database : test.oracle.com
Click ‘Add’.
We will now add columns that needs to be masked
Page 65 of 92
ORACLE ENTERPRISE MANAGER Cloud Control 12c Database Testing & Test Data Management
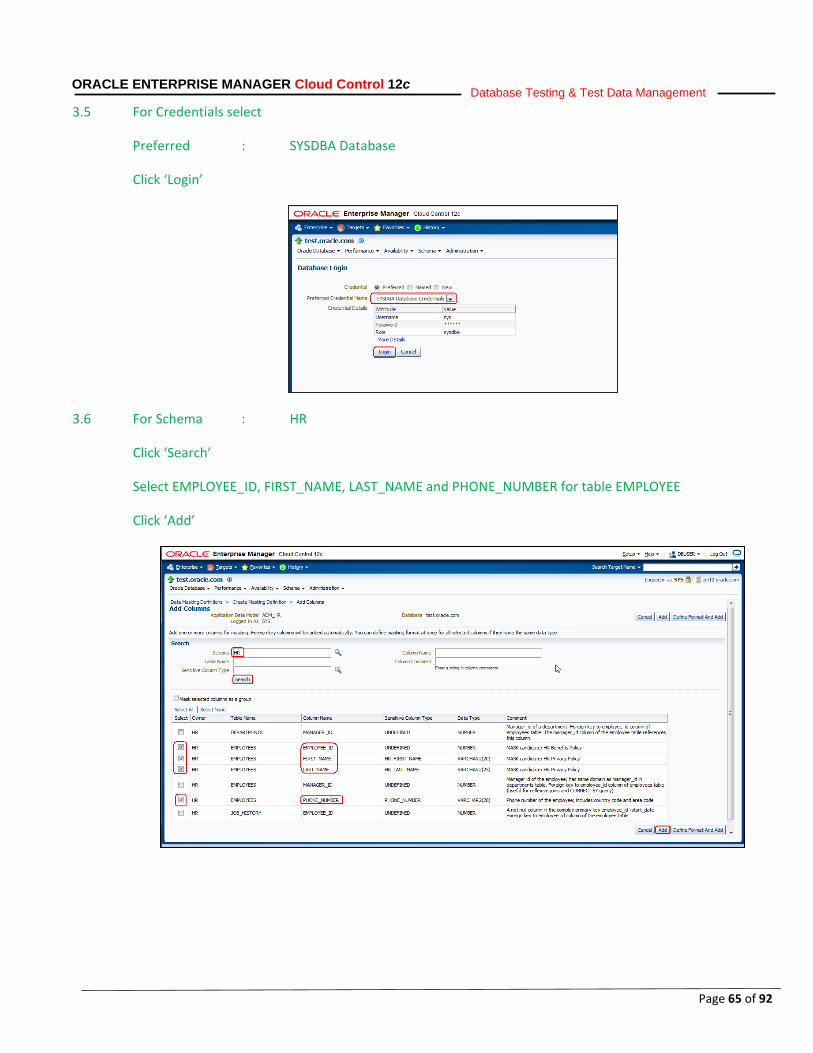
3.5 For Credentials select
Preferred : SYSDBA Database
Click ‘Login’
3.6 For Schema : HR
Click ‘Search’
Select EMPLOYEE_ID, FIRST_NAME, LAST_NAME and PHONE_NUMBER for table EMPLOYEE
Click ‘Add’
Page 66 of 92
ORACLE ENTERPRISE MANAGER Cloud Control 12c Database Testing & Test Data Management
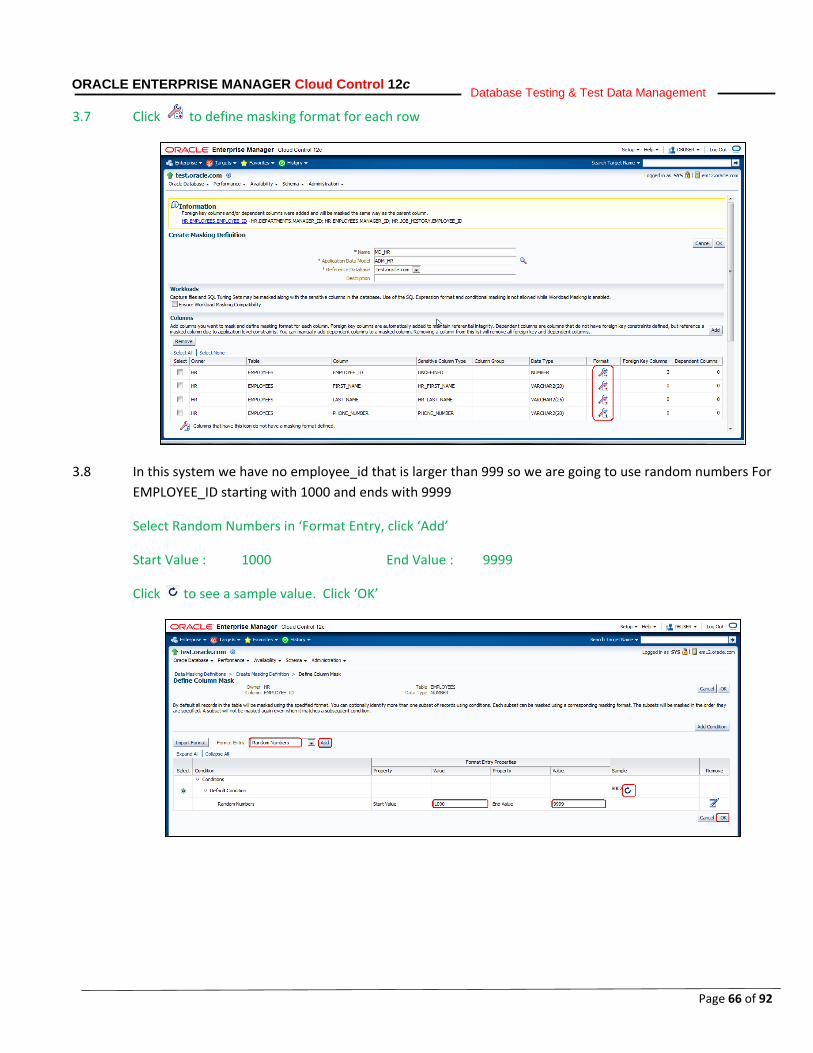
3.7 Click to define masking format for each row
3.8 In this system we have no employee_id that is larger than 999 so we are going to use random numbers For EMPLOYEE_ID starting with 1000 and ends with 9999
Select Random Numbers in ‘Format Entry, click ‘Add’
Start Value : 1000 End Value : 9999
Click to see a sample value. Click ‘OK’
Page 67 of 92
ORACLE ENTERPRISE MANAGER Cloud Control 12c Database Testing & Test Data Management
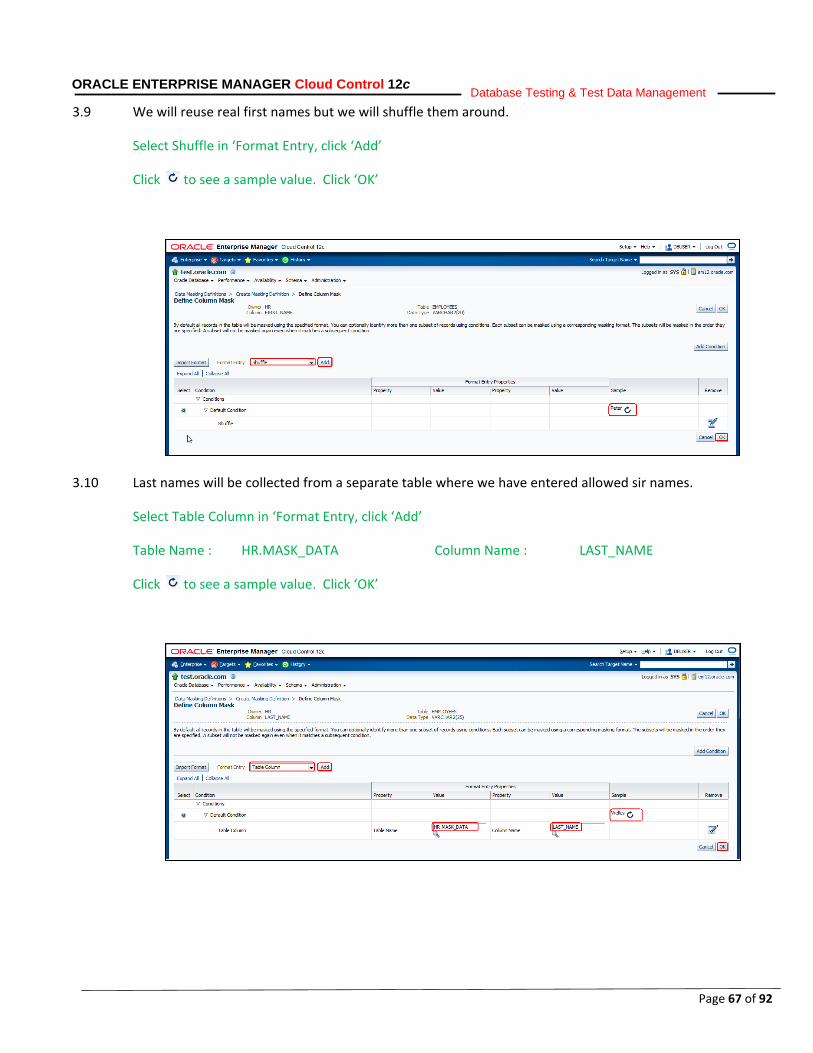
3.9 We will reuse real first names but we will shuffle them around.
Select Shuffle in ‘Format Entry, click ‘Add’
Click to see a sample value. Click ‘OK’
3.10 Last names will be collected from a separate table where we have entered allowed sir names.
Select Table Column in ‘Format Entry, click ‘Add’
Table Name : HR.MASK_DATA Column Name : LAST_NAME
Click to see a sample value. Click ‘OK’
Page 68 of 92
ORACLE ENTERPRISE MANAGER Cloud Control 12c Database Testing & Test Data Management
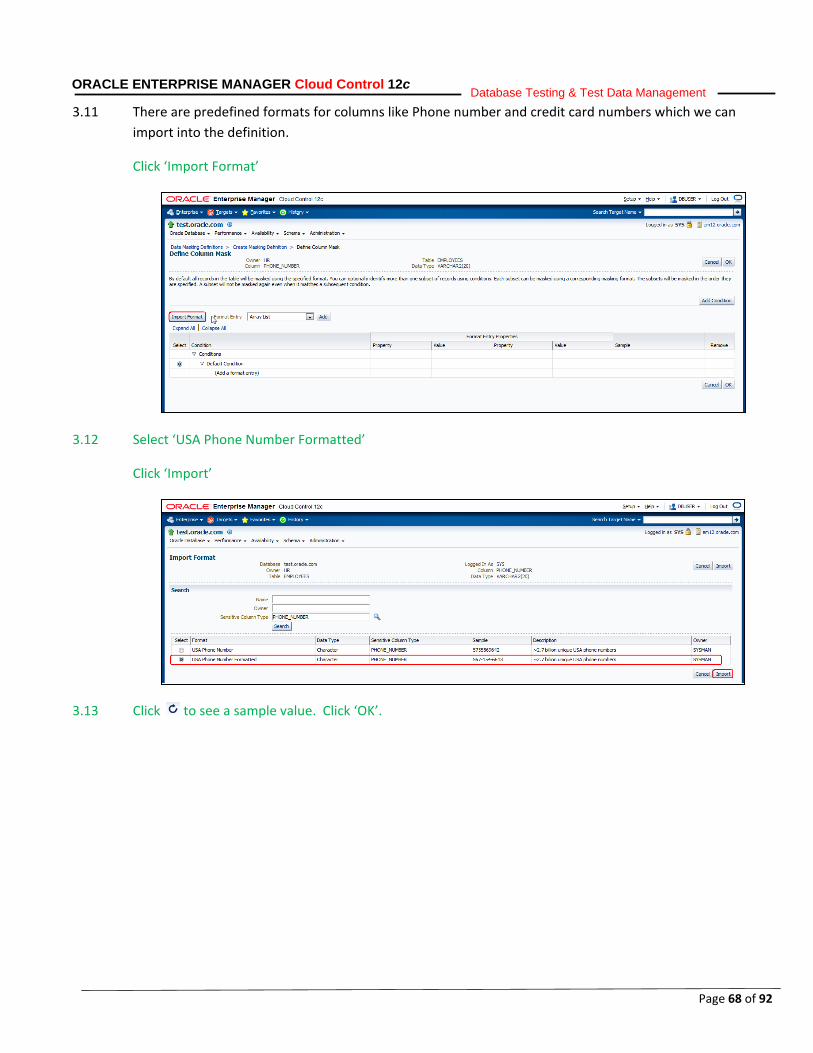
3.11 There are predefined formats for columns like Phone number and credit card numbers which we can import into the definition.
Click ‘Import Format’
3.12 Select ‘USA Phone Number Formatted’
Click ‘Import’
3.13 Click to see a sample value. Click ‘OK’.
Page 69 of 92
ORACLE ENTERPRISE MANAGER Cloud Control 12c Database Testing & Test Data Management
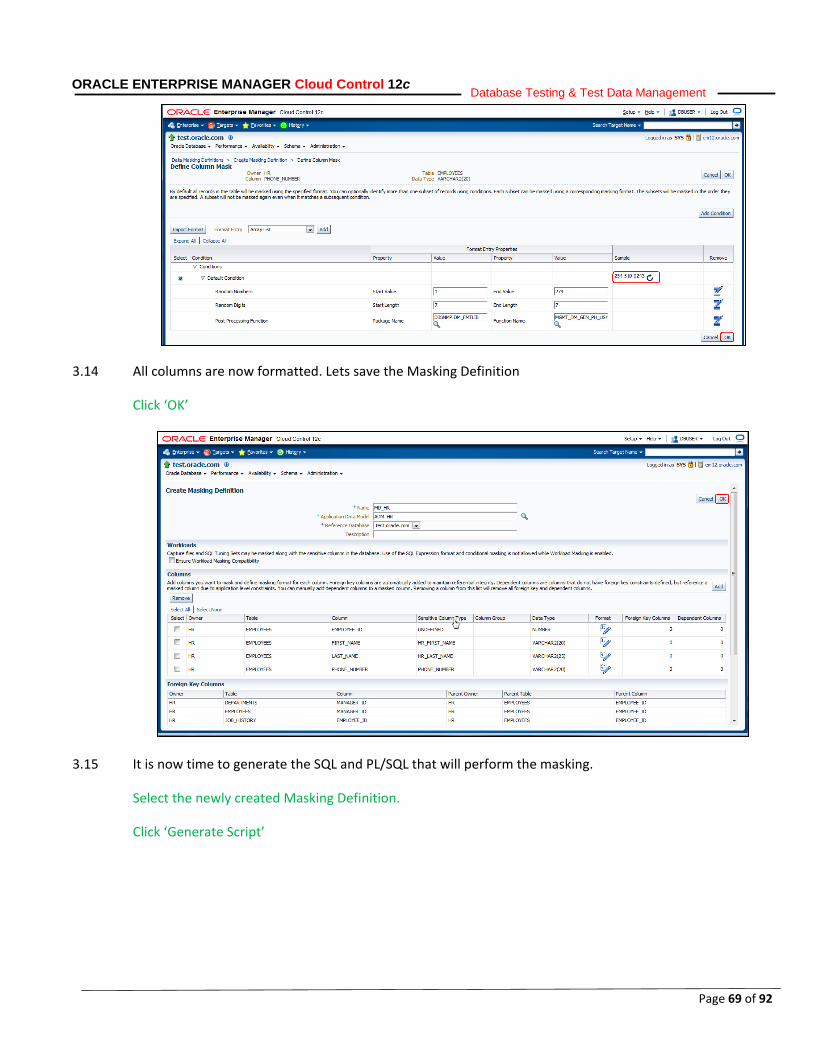
3.14 All columns are now formatted. Lets save the Masking Definition
Click ‘OK’
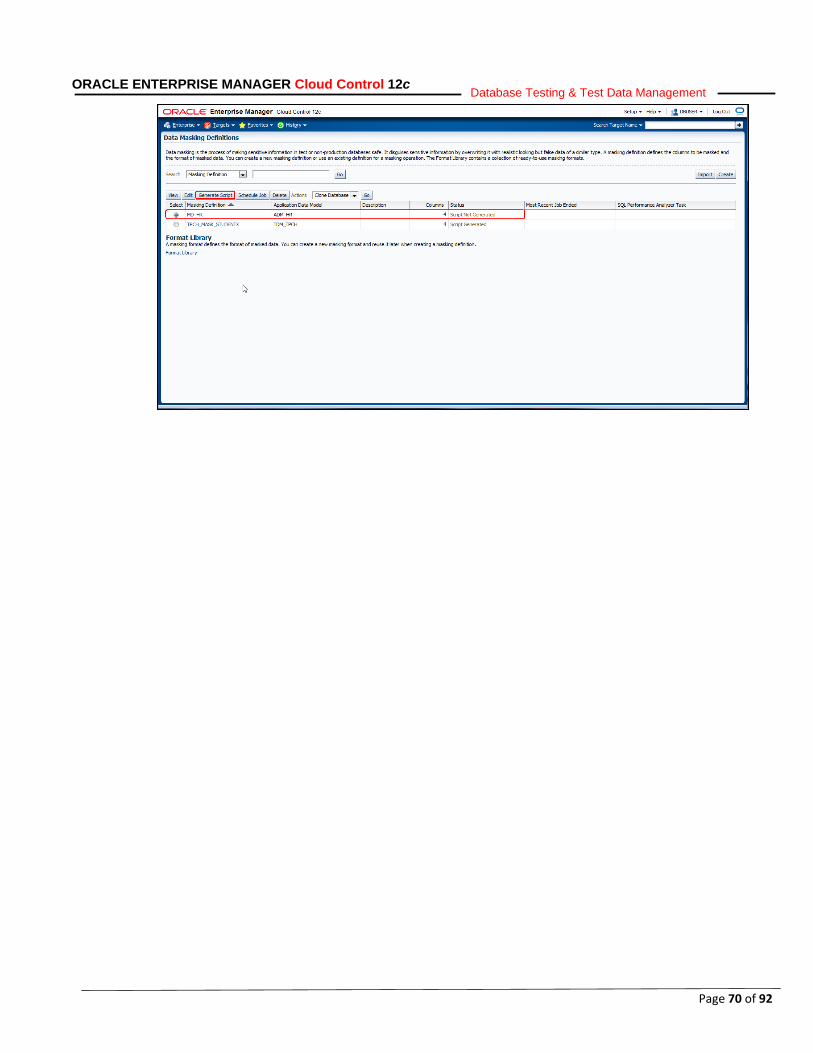
3.15 It is now time to generate the SQL and PL/SQL that will perform the masking.
Select the newly created Masking Definition.
Click ‘Generate Script’
Page 70 of 92
ORACLE ENTERPRISE MANAGER Cloud Control 12c Database Testing & Test Data Management
Page 71 of 92
ORACLE ENTERPRISE MANAGER Cloud Control 12c Database Testing & Test Data Management
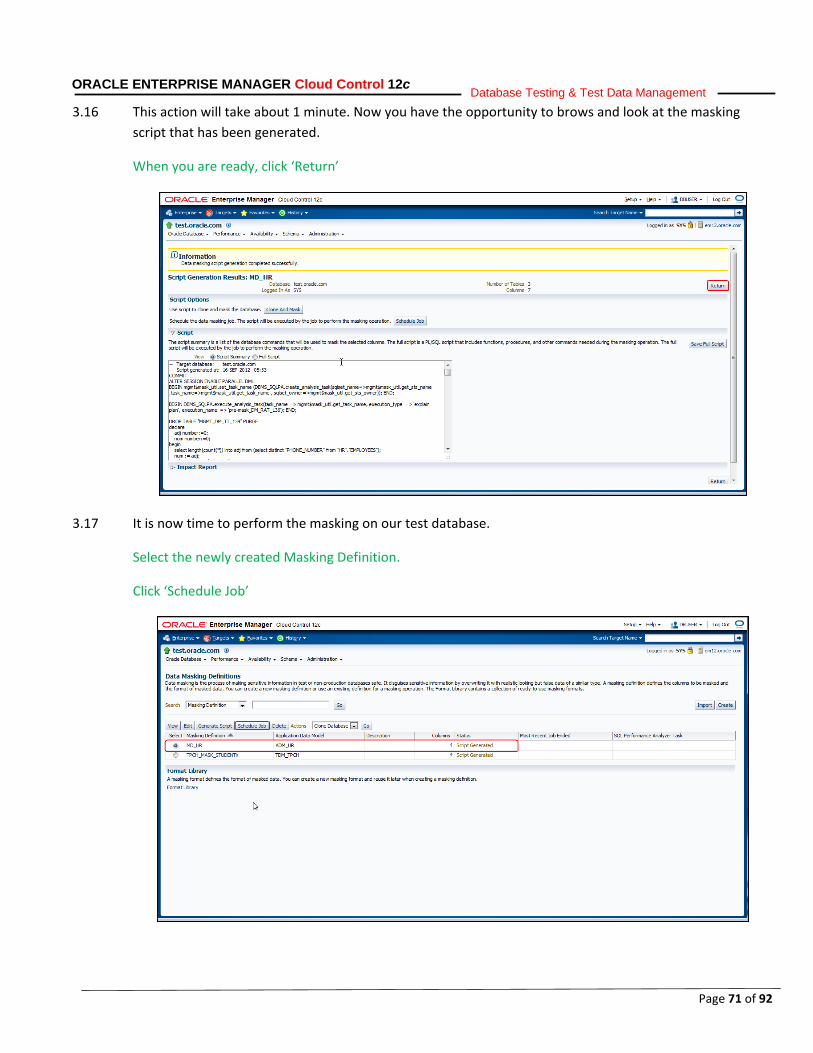
3.16 This action will take about 1 minute. Now you have the opportunity to brows and look at the masking script that has been generated.
When you are ready, click ‘Return’
3.17 It is now time to perform the masking on our test database.
Select the newly created Masking Definition.
Click ‘Schedule Job’
Page 72 of 92
ORACLE ENTERPRISE MANAGER Cloud Control 12c Database Testing & Test Data Management
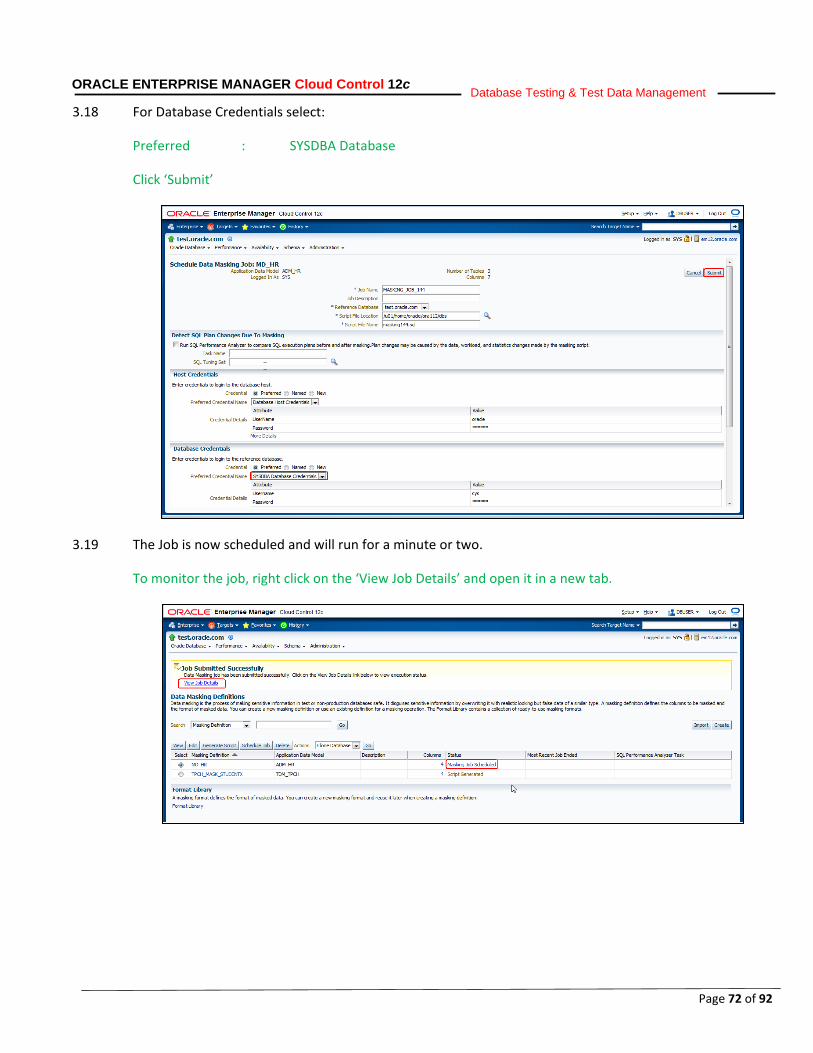
3.18 For Database Credentials select:
Preferred : SYSDBA Database
Click ‘Submit’
3.19 The Job is now scheduled and will run for a minute or two.
To monitor the job, right click on the ‘View Job Details’ and open it in a new tab.
Page 73 of 92
ORACLE ENTERPRISE MANAGER Cloud Control 12c Database Testing & Test Data Management
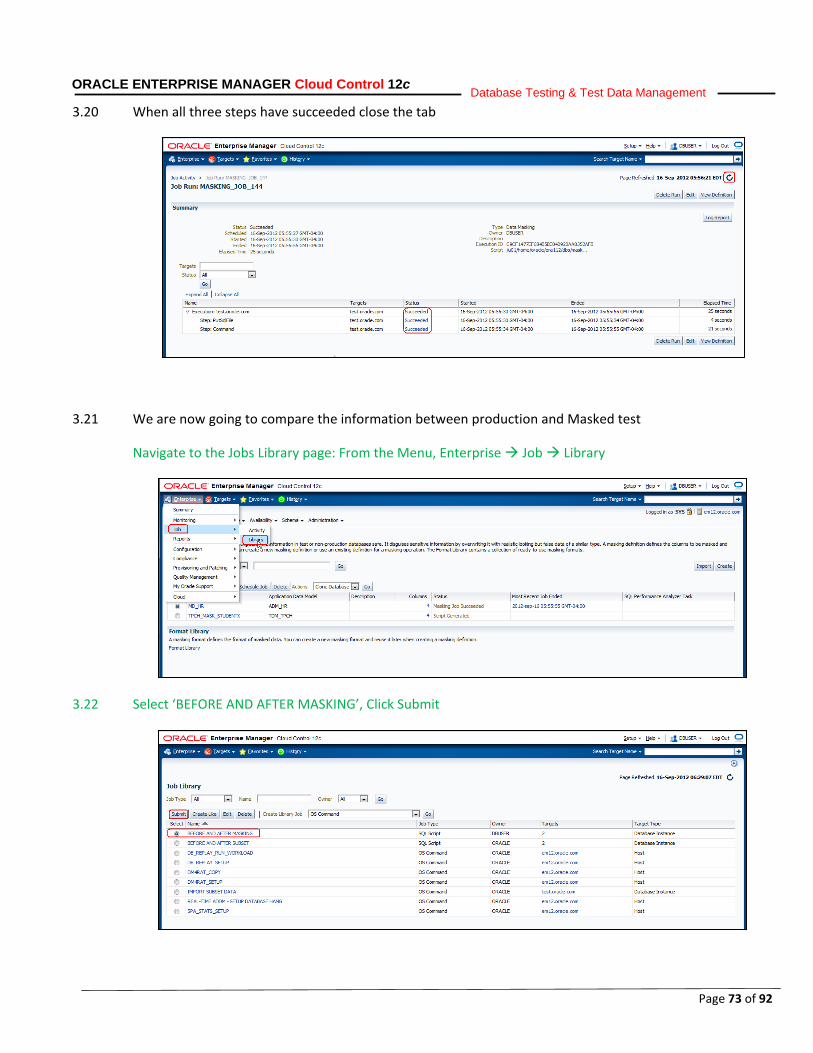
3.20 When all three steps have succeeded close the tab
3.21 We are now going to compare the information between production and Masked test
Navigate to the Jobs Library page: From the Menu, Enterprise Job Library
3.22 Select ‘BEFORE AND AFTER MASKING’, Click Submit
Page 74 of 92
ORACLE ENTERPRISE MANAGER Cloud Control 12c Database Testing & Test Data Management
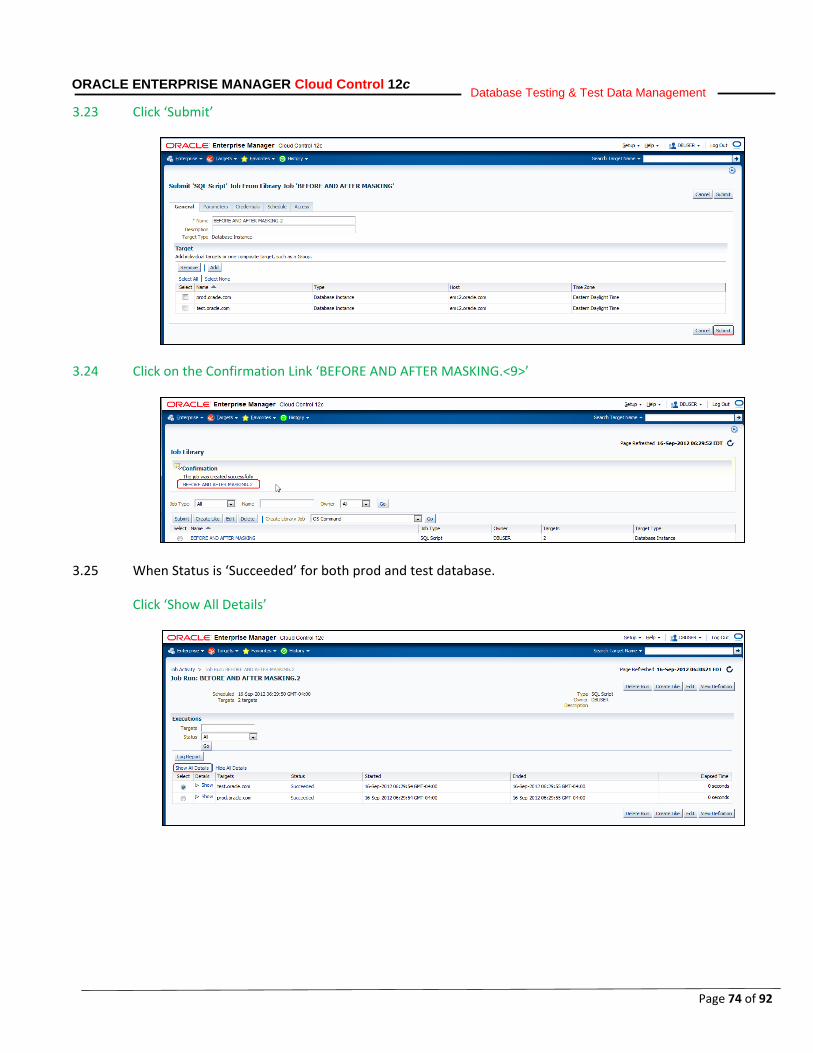
3.23 Click ‘Submit’
3.24 Click on the Confirmation Link ‘BEFORE AND AFTER MASKING.<9>’
3.25 When Status is ‘Succeeded’ for both prod and test database.
Click ‘Show All Details’
Page 75 of 92
ORACLE ENTERPRISE MANAGER Cloud Control 12c Database Testing & Test Data Management
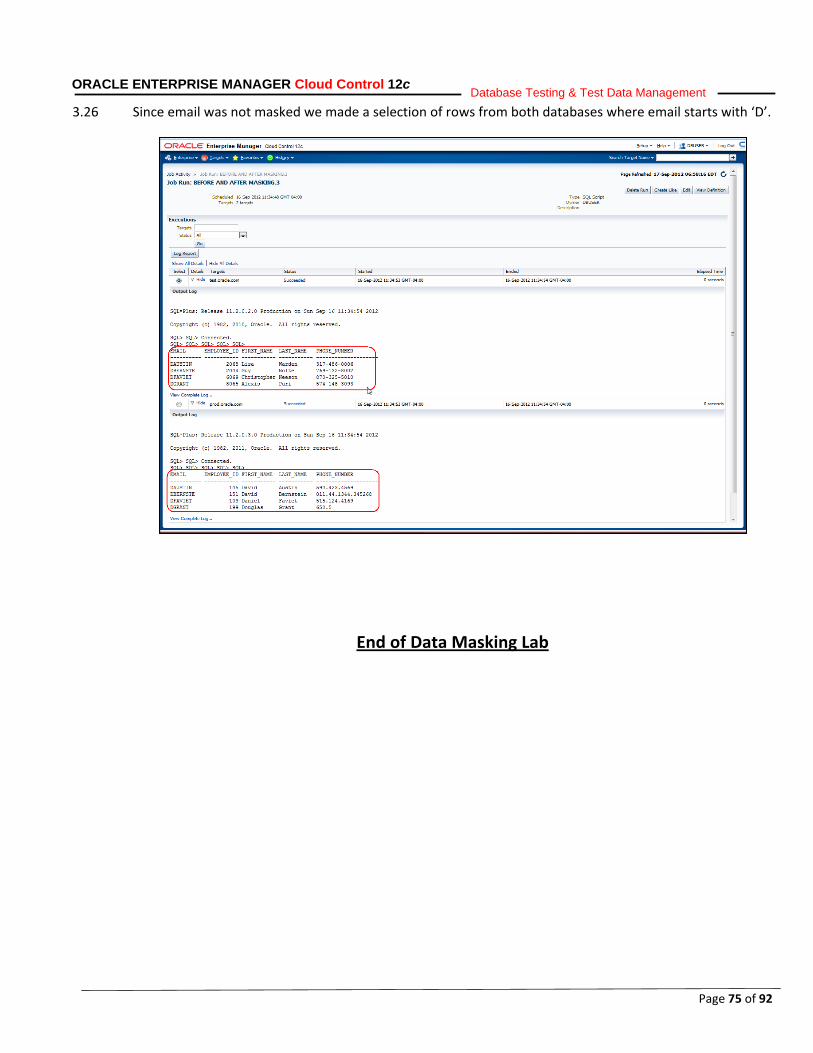
3.26 Since email was not masked we made a selection of rows from both databases where email starts with ‘D’.
End of Data Masking Lab
Page 76 of 92
ORACLE ENTERPRISE MANAGER Cloud Control 12c Database Testing & Test Data Management
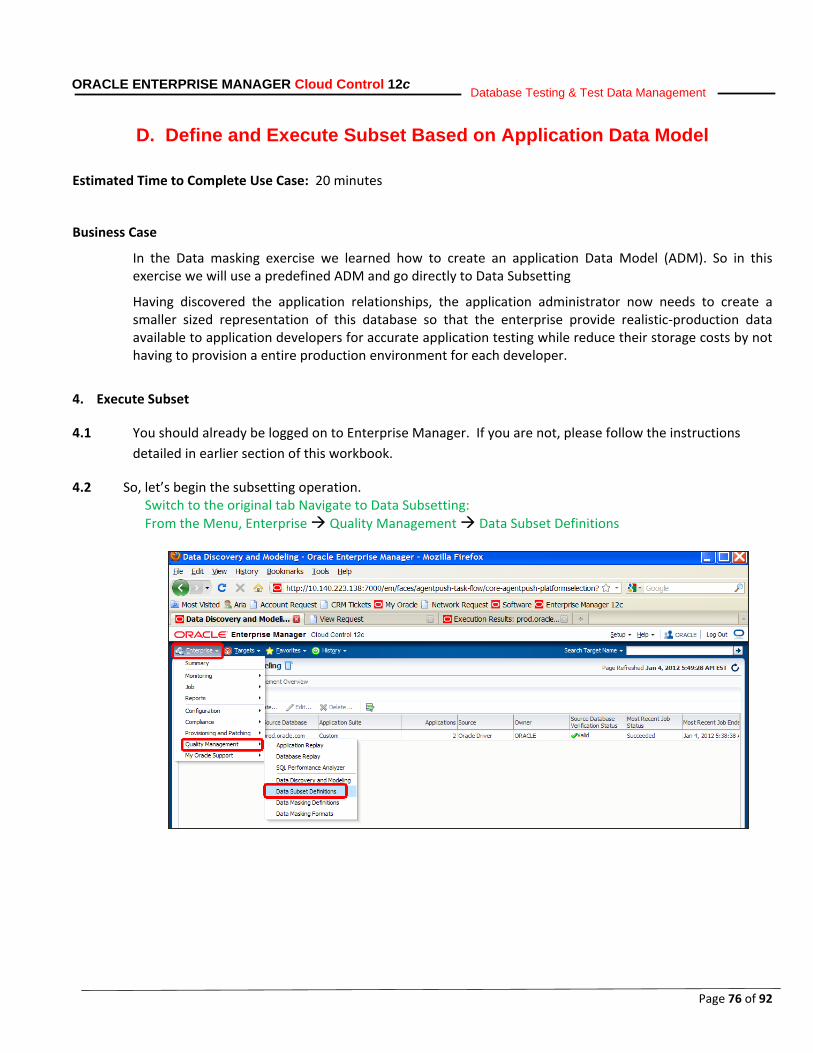
D. Define and Execute Subset Based on Application Data Model
Estimated Time to Complete Use Case: 20 minutes
Business Case
In the Data masking exercise we learned how to create an application Data Model (ADM). So in this exercise we will use a predefined ADM and go directly to Data Subsetting
Having discovered the application relationships, the application administrator now needs to create a smaller sized representation of this database so that the enterprise provide realistic-production data available to application developers for accurate application testing while reduce their storage costs by not having to provision a entire production environment for each developer.
4. Execute Subset
4.1 You should already be logged on to Enterprise Manager. If you are not, please follow the instructions detailed in earlier section of this workbook.
4.2 So, let’s begin the subsetting operation. Switch to the original tab Navigate to Data Subsetting: From the Menu, Enterprise Quality Management Data Subset Definitions
Page 77 of 92
ORACLE ENTERPRISE MANAGER Cloud Control 12c Database Testing & Test Data Management
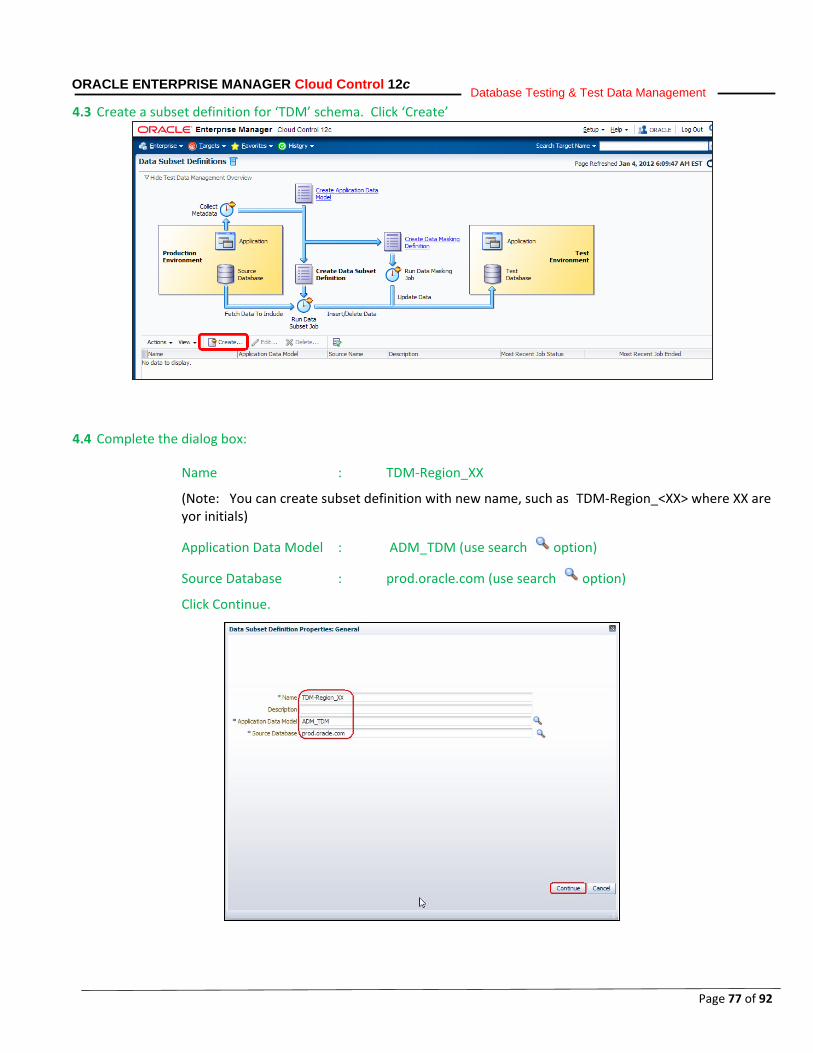
4.3 Create a subset definition for ‘TDM’ schema. Click ‘Create’
4.4 Complete the dialog box:
Name : TDM-Region_XX
(Note: You can create subset definition with new name, such as TDM-Region_<XX> where XX are yor initials)
Application Data Model : ADM_TDM (use search option)
Source Database : prod.oracle.com (use search option)
Click Continue.
Page 78 of 92
ORACLE ENTERPRISE MANAGER Cloud Control 12c Database Testing & Test Data Management
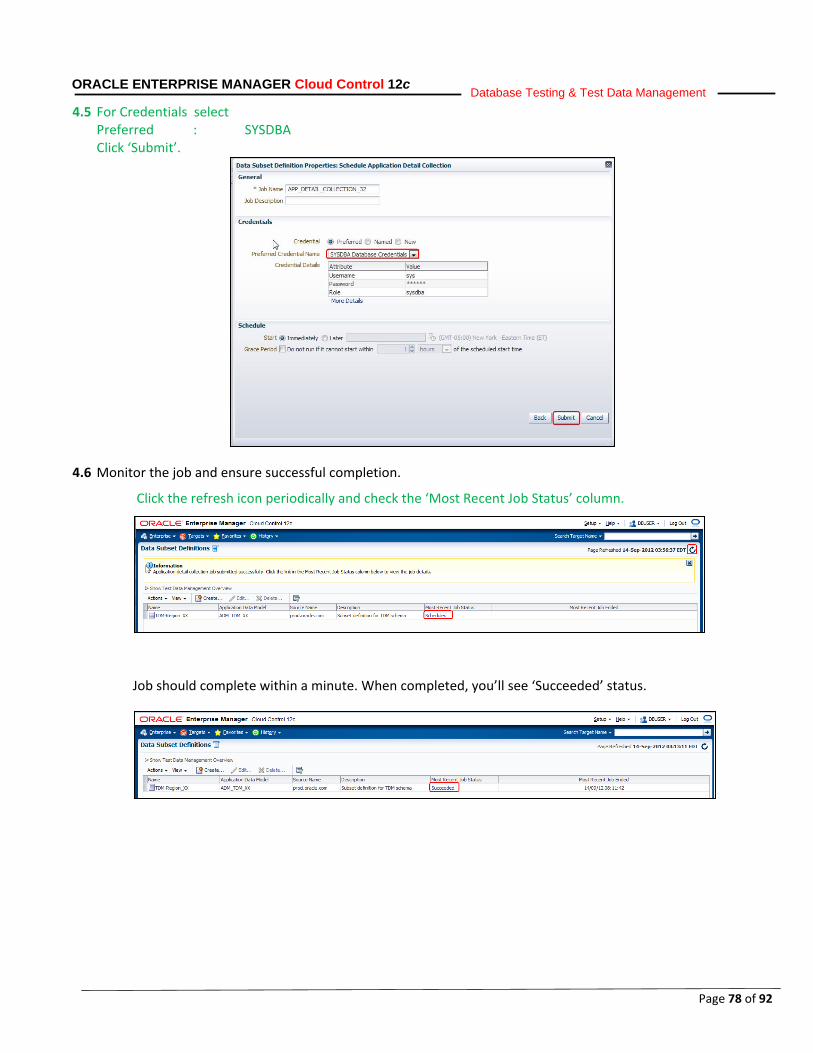
4.5 For Credentials select Preferred : SYSDBA Click ‘Submit’.
4.6 Monitor the job and ensure successful completion.
Click the refresh icon periodically and check the ‘Most Recent Job Status’ column.
Job should complete within a minute. When completed, you’ll see ‘Succeeded’ status.
Page 79 of 92
ORACLE ENTERPRISE MANAGER Cloud Control 12c Database Testing & Test Data Management
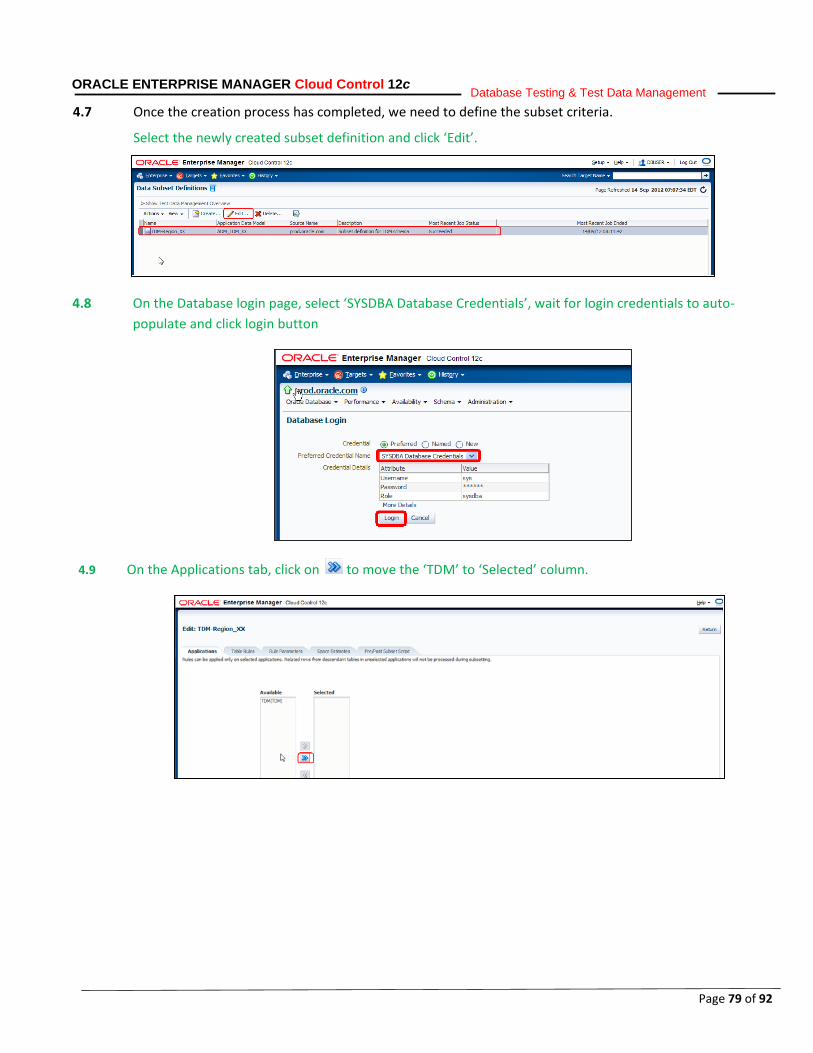
4.7 Once the creation process has completed, we need to define the subset criteria.
Select the newly created subset definition and click ‘Edit’.
4.8 On the Database login page, select ‘SYSDBA Database Credentials’, wait for login credentials to auto-populate and click login button
4.9 On the Applications tab, click on to move the ‘TDM’ to ‘Selected’ column.
Page 80 of 92
ORACLE ENTERPRISE MANAGER Cloud Control 12c Database Testing & Test Data Management
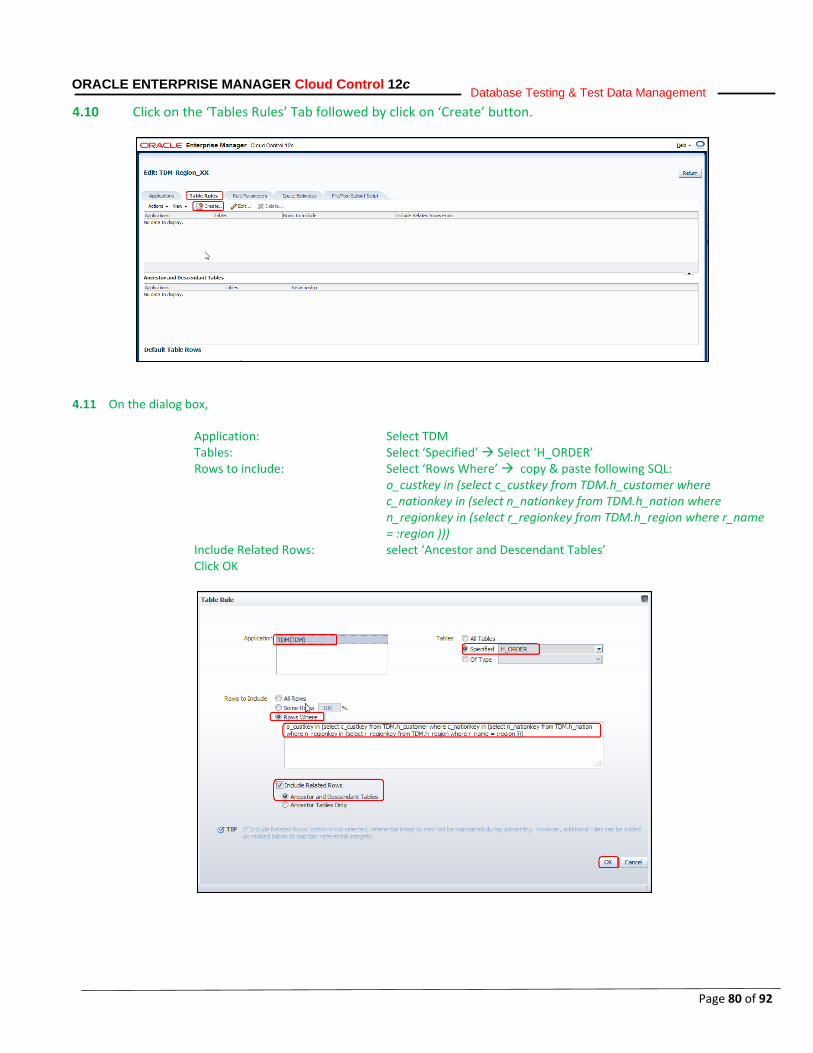
4.10 Click on the ‘Tables Rules’ Tab followed by click on ‘Create’ button.
4.11 On the dialog box,
Application: Select TDM Tables: Select ‘Specified’ Select ‘H_ORDER’ Rows to include: Select ‘Rows Where’ copy & paste following SQL:
o_custkey in (select c_custkey from TDM.h_customer where c_nationkey in (select n_nationkey from TDM.h_nation where n_regionkey in (select r_regionkey from TDM.h_region where r_name = :region )))
Include Related Rows: select ‘Ancestor and Descendant Tables’ Click OK
Page 81 of 92
ORACLE ENTERPRISE MANAGER Cloud Control 12c Database Testing & Test Data Management
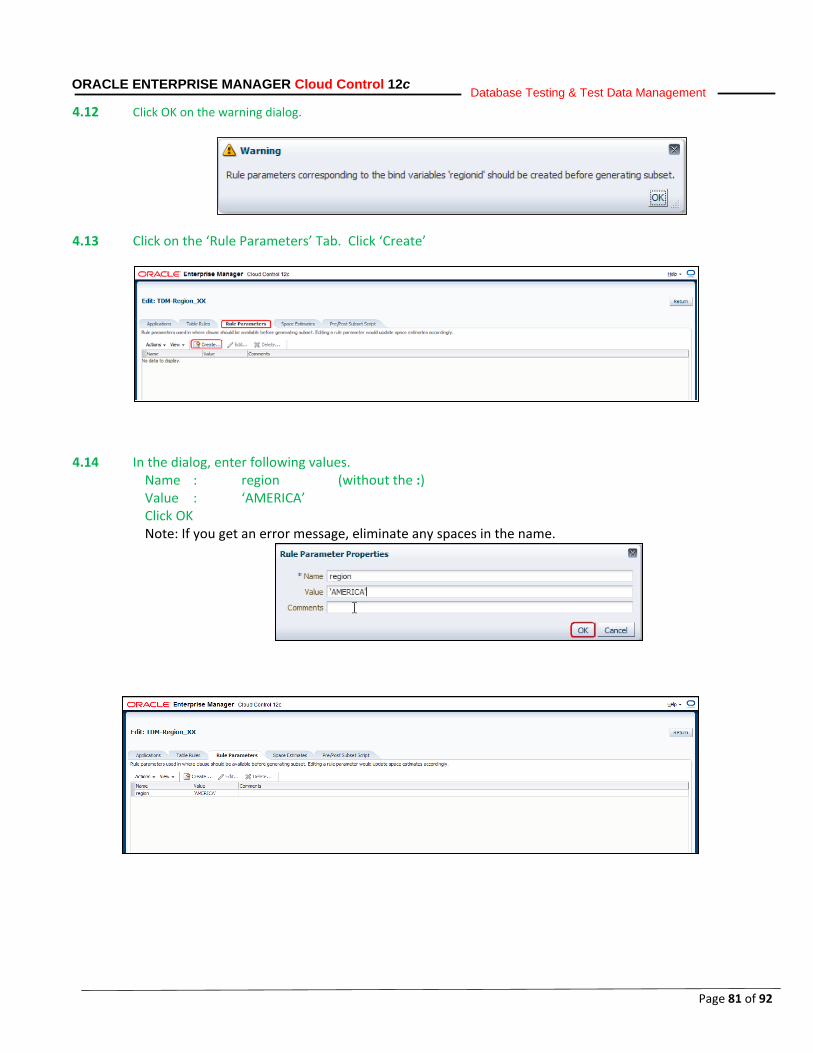
4.12 Click OK on the warning dialog.
4.13 Click on the ‘Rule Parameters’ Tab. Click ‘Create’
4.14 In the dialog, enter following values. Name : region (without the :) Value : ‘AMERICA’ Click OK Note: If you get an error message, eliminate any spaces in the name.
Page 82 of 92
ORACLE ENTERPRISE MANAGER Cloud Control 12c Database Testing & Test Data Management
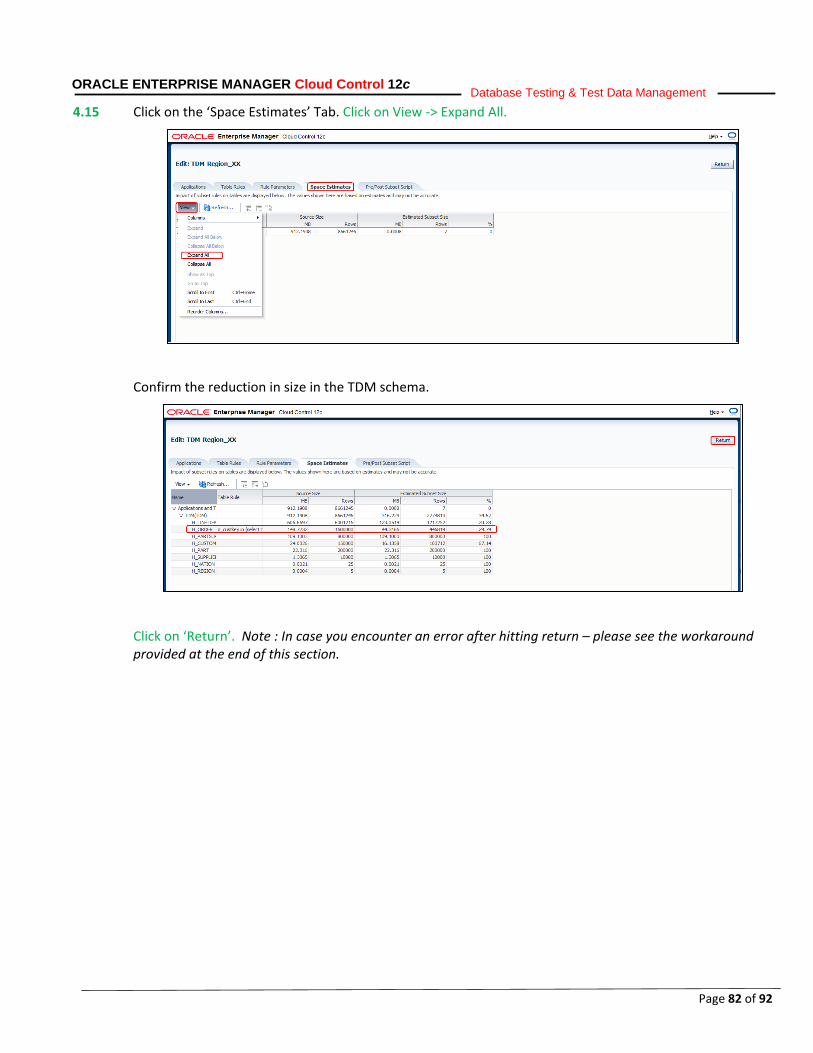
4.15 Click on the ‘Space Estimates’ Tab. Click on View -> Expand All.
Confirm the reduction in size in the TDM schema.
Click on ‘Return’. Note : In case you encounter an error after hitting return – please see the workaround provided at the end of this section.
Page 83 of 92
ORACLE ENTERPRISE MANAGER Cloud Control 12c Database Testing & Test Data Management
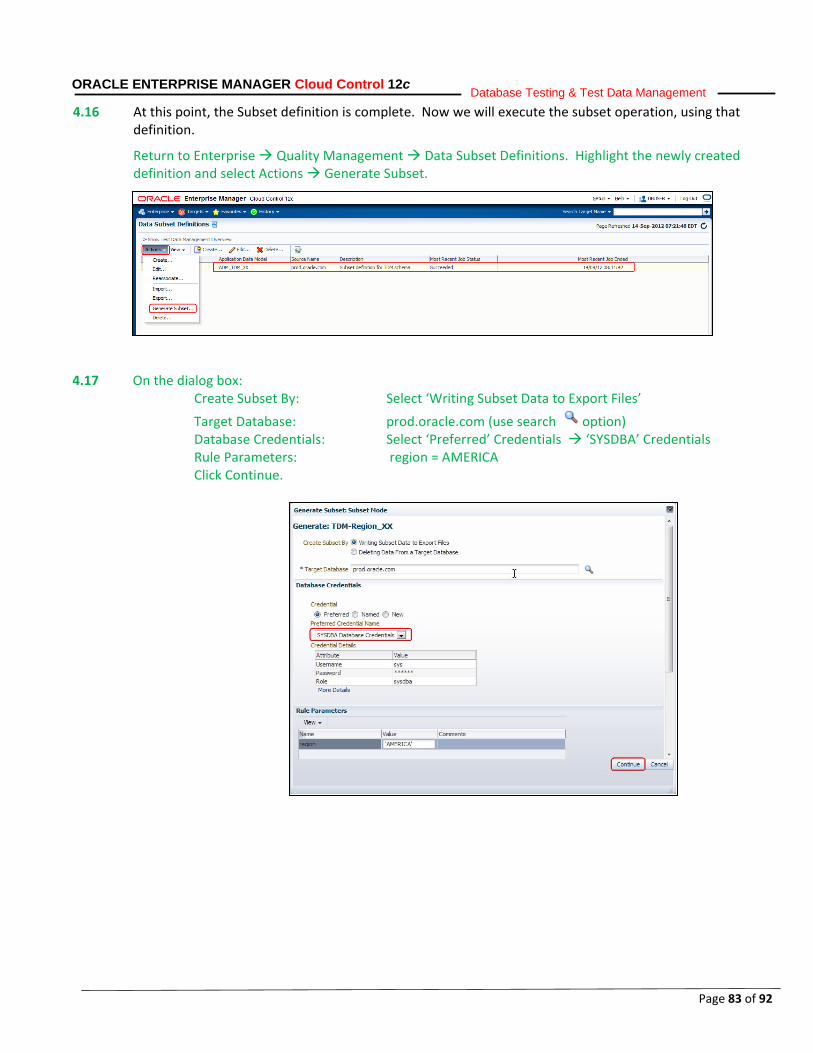
4.16 At this point, the Subset definition is complete. Now we will execute the subset operation, using that definition.
Return to Enterprise Quality Management Data Subset Definitions. Highlight the newly created definition and select Actions Generate Subset.
4.17 On the dialog box:
Create Subset By: Select ‘Writing Subset Data to Export Files’
Target Database: prod.oracle.com (use search option) Database Credentials: Select ‘Preferred’ Credentials ‘SYSDBA’ Credentials Rule Parameters: region = AMERICA Click Continue.
Page 84 of 92
ORACLE ENTERPRISE MANAGER Cloud Control 12c Database Testing & Test Data Management
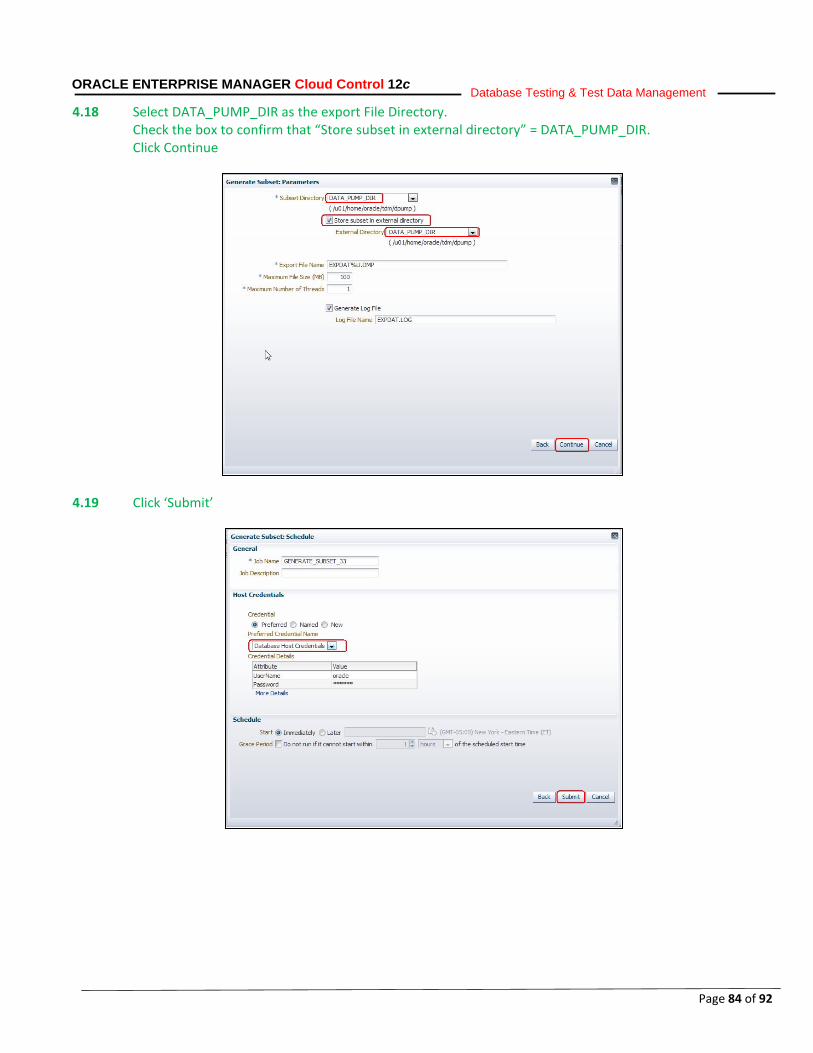
4.18 Select DATA_PUMP_DIR as the export File Directory. Check the box to confirm that “Store subset in external directory” = DATA_PUMP_DIR. Click Continue
4.19 Click ‘Submit’
Page 85 of 92
ORACLE ENTERPRISE MANAGER Cloud Control 12c Database Testing & Test Data Management
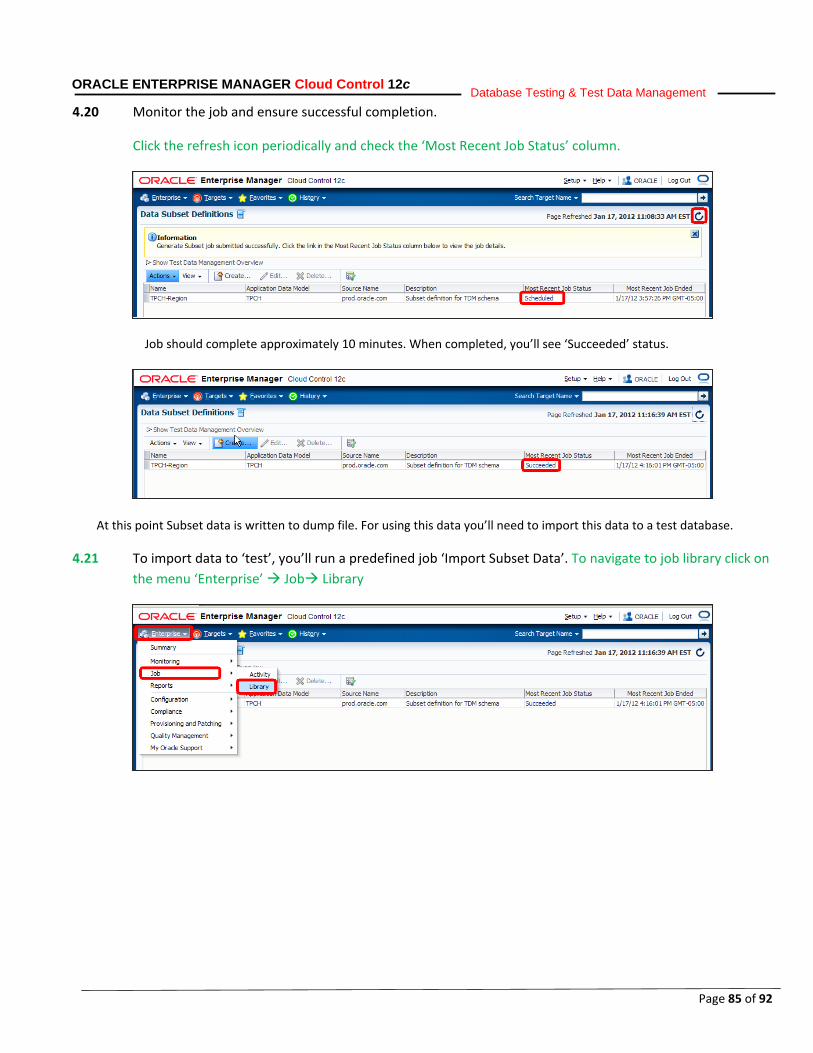
4.20 Monitor the job and ensure successful completion.
Click the refresh icon periodically and check the ‘Most Recent Job Status’ column.
Job should complete approximately 10 minutes. When completed, you’ll see ‘Succeeded’ status.
At this point Subset data is written to dump file. For using this data you’ll need to import this data to a test database.
4.21 To import data to ‘test’, you’ll run a predefined job ‘Import Subset Data’. To navigate to job library click on the menu ‘Enterprise’ Job Library

Page 86 of 92
ORACLE ENTERPRISE MANAGER Cloud Control 12c Database Testing & Test Data Management
4.22 Select the “Import Subset Data job” and click ‘Submit’ button.
4.23 Click on ‘Submit’ button again.
4.24 Check the ‘Import Subset Data job’ status, by clicking the job name link.
Page 87 of 92
ORACLE ENTERPRISE MANAGER Cloud Control 12c Database Testing & Test Data Management
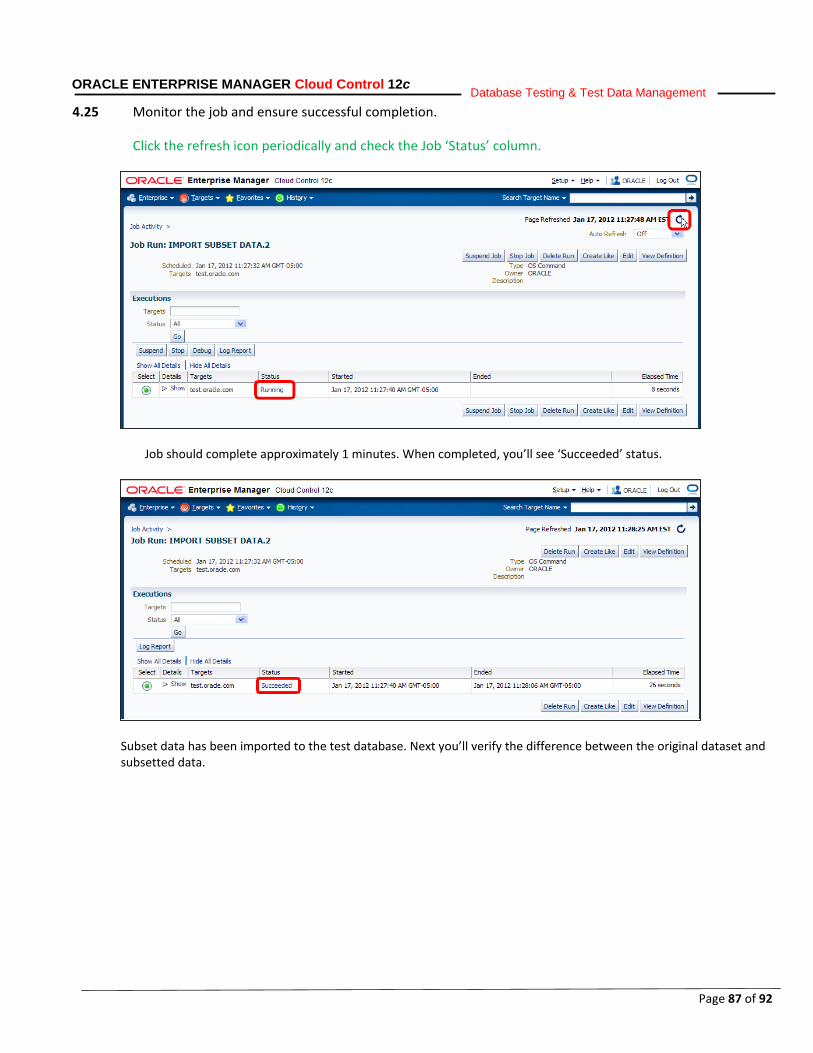
4.25 Monitor the job and ensure successful completion.
Click the refresh icon periodically and check the Job ‘Status’ column.
Job should complete approximately 1 minutes. When completed, you’ll see ‘Succeeded’ status.
Subset data has been imported to the test database. Next you’ll verify the difference between the original dataset and subsetted data.
Page 88 of 92
ORACLE ENTERPRISE MANAGER Cloud Control 12c Database Testing & Test Data Management
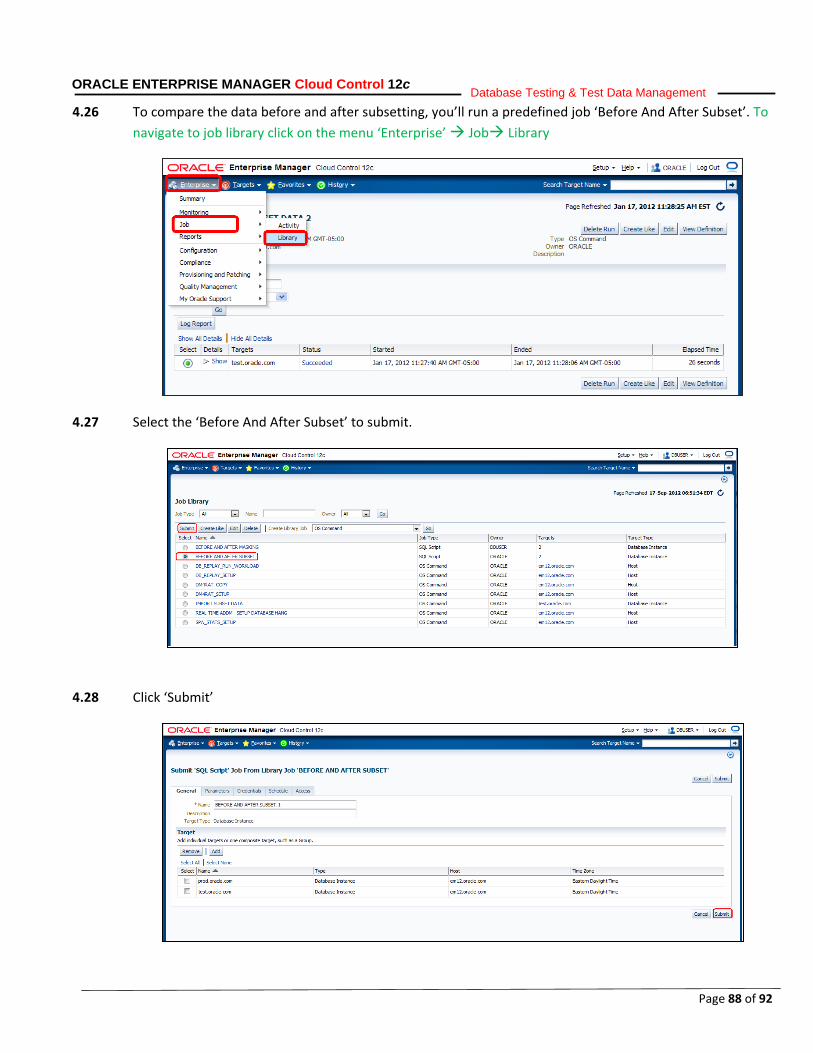
4.26 To compare the data before and after subsetting, you’ll run a predefined job ‘Before And After Subset’. To navigate to job library click on the menu ‘Enterprise’ Job Library
4.27 Select the ‘Before And After Subset’ to submit.
4.28 Click ‘Submit’

Page 89 of 92
ORACLE ENTERPRISE MANAGER Cloud Control 12c Database Testing & Test Data Management
Page 90 of 92
ORACLE ENTERPRISE MANAGER Cloud Control 12c Database Testing & Test Data Management
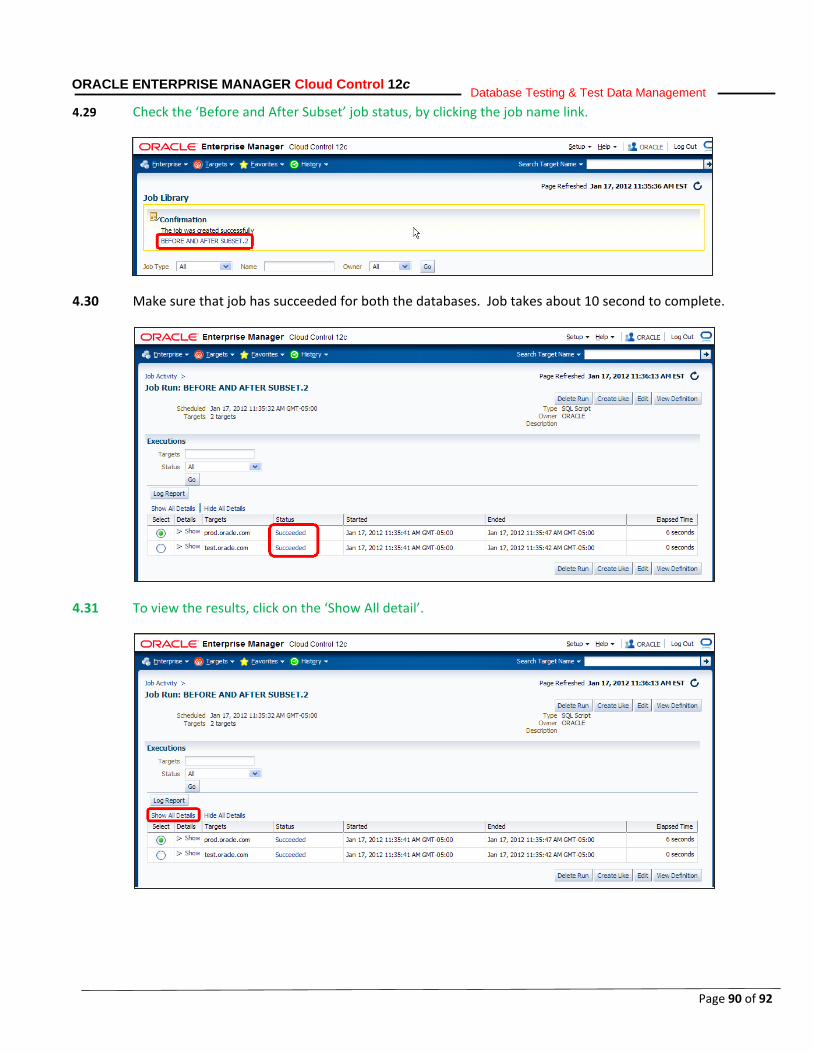
4.29 Check the ‘Before and After Subset’ job status, by clicking the job name link.
4.30 Make sure that job has succeeded for both the databases. Job takes about 10 second to complete.
4.31 To view the results, click on the ‘Show All detail’.
Page 91 of 92
ORACLE ENTERPRISE MANAGER Cloud Control 12c Database Testing & Test Data Management
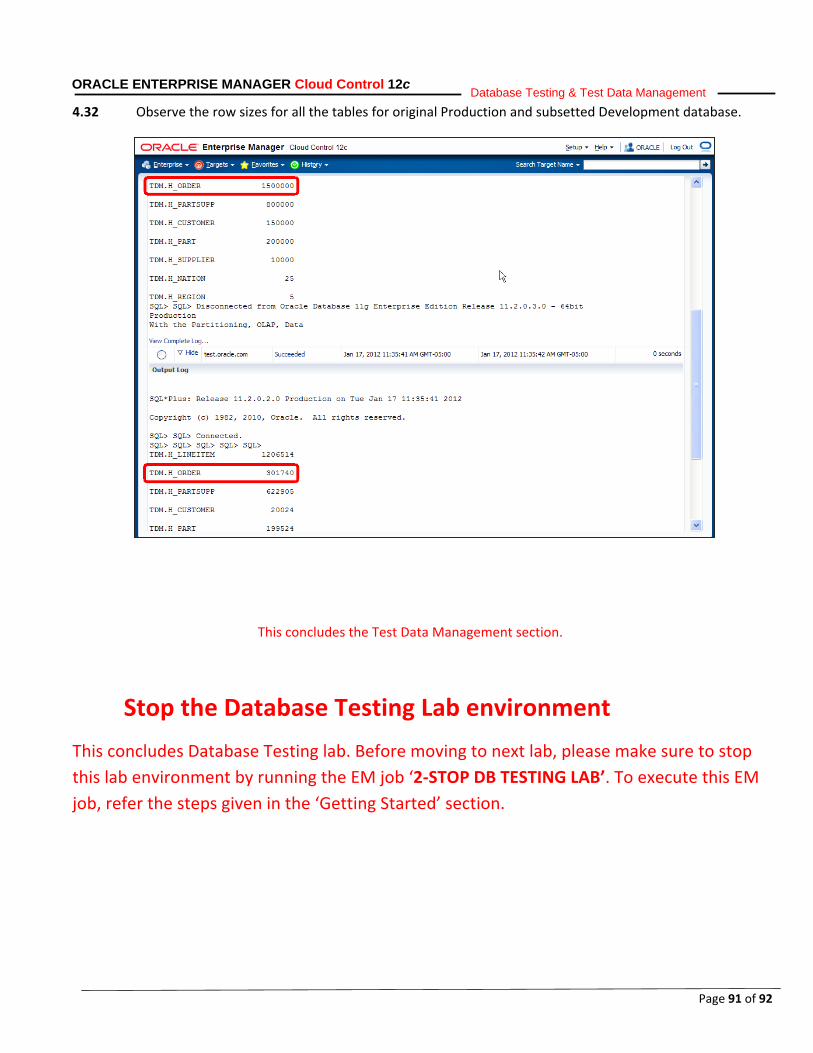
4.32 Observe the row sizes for all the tables for original Production and subsetted Development database.
This concludes the Test Data Management section.
Stop the Database Testing Lab environment This concludes Database Testing lab. Before moving to next lab, please make sure to stop this lab environment by running the EM job ‘2-STOP DB TESTING LAB’. To execute this EM job, refer the steps given in the ‘Getting Started’ section.
Page 92 of 92
ORACLE ENTERPRISE MANAGER Cloud Control 12c Database Testing & Test Data Management
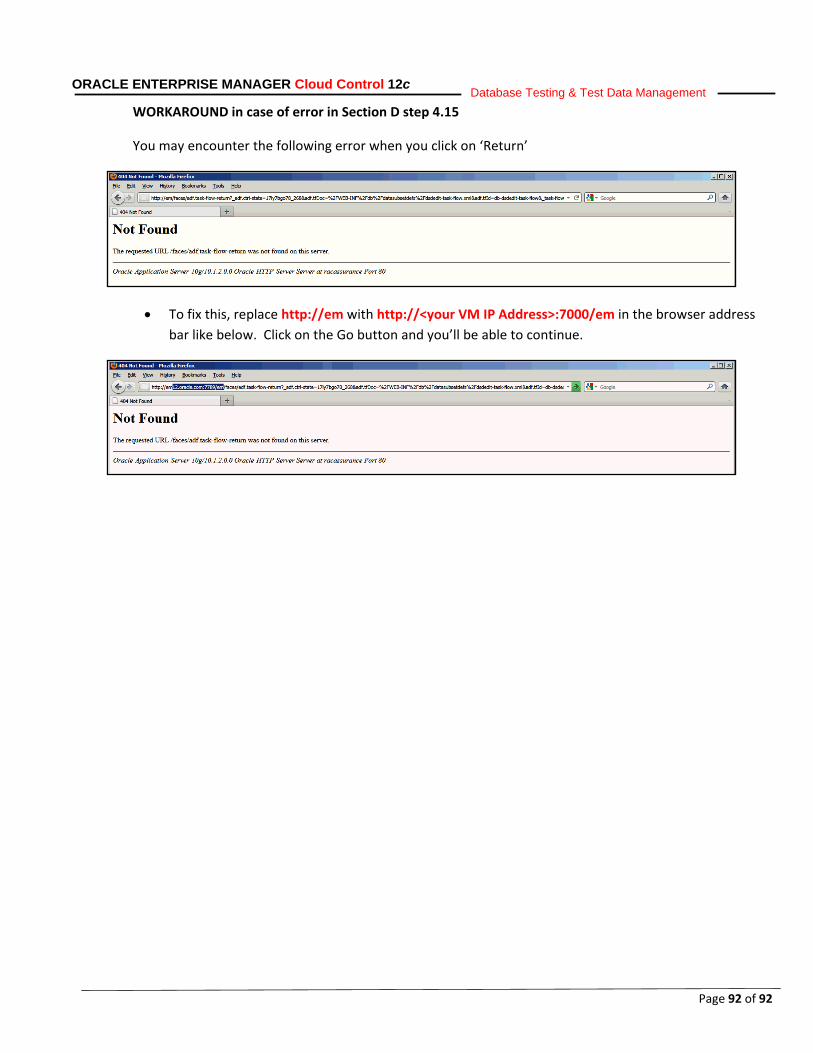
WORKAROUND in case of error in Section D step 4.15
You may encounter the following error when you click on ‘Return’
• To fix this, replace http://em with http://<your VM IP Address>:7000/em in the browser address bar like below. Click on the Go button and you’ll be able to continue.
Oracle EM12c Cloud Control Database Performance Testing, Data Masking, and Data Subsetting Workshop February, 2013 Author: Bjorn Bolltoft Contributing Authors: Ankur Gupta
Oracle Corporation World Headquarters 500 Oracle Parkway Redwood Shores, CA 94065 U.S.A.
Worldwide Inquiries: Phone: +1.650.506.7000 Fax: +1.650.506.7200
oracle.com
Copyright © 2013, Oracle and/or its affiliates. All rights reserved. This document is provided for information purposes only and the contents hereof are subject to change without notice. This document is not warranted to be error-free, nor subject to any other warranties or conditions, whether expressed orally or implied in law, including implied warranties and conditions of merchantability or fitness for a particular purpose. We specifically disclaim any liability with respect to this document and no contractual obligations are formed either directly or indirectly by this document. This document may not be reproduced or transmitted in any form or by any means, electronic or mechanical, for any purpose, without our prior written permission.
Oracle and Java are registered trademarks of Oracle and/or its affiliates. Other names may be trademarks of their respective owners.
AMD, Opteron, the AMD logo, and the AMD Opteron logo are trademarks or registered trademarks of Advanced Micro Devices. Intel and Intel Xeon are trademarks or registered trademarks of Intel Corporation. All SPARC trademarks are used under license and are trademarks or registered trademarks of SPARC International, Inc. UNIX is a registered trademark licensed through X/Open Company, Ltd. 1010