data tracking system (dts) - fws
TRANSCRIPT

DTS User Manual i
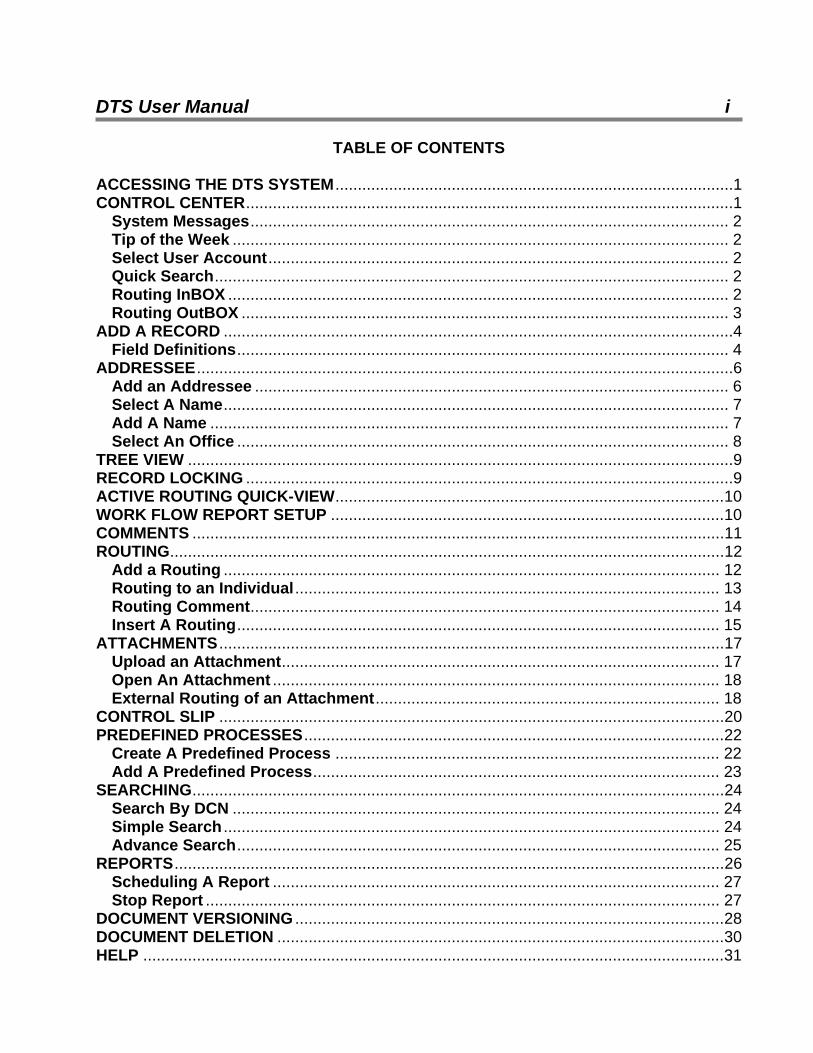
TABLE OF CONTENTS
ACCESSING THE DTS SYSTEM .........................................................................................1 CONTROL CENTER.............................................................................................................1
System Messages........................................................................................................... 2 Tip of the Week ............................................................................................................... 2 Select User Account....................................................................................................... 2 Quick Search................................................................................................................... 2 Routing InBOX ................................................................................................................ 2 Routing OutBOX ............................................................................................................. 3
ADD A RECORD ..................................................................................................................4 Field Definitions.............................................................................................................. 4
ADDRESSEE........................................................................................................................6 Add an Addressee .......................................................................................................... 6 Select A Name................................................................................................................. 7 Add A Name .................................................................................................................... 7 Select An Office .............................................................................................................. 8
TREE VIEW ..........................................................................................................................9 RECORD LOCKING .............................................................................................................9 ACTIVE ROUTING QUICK-VIEW.......................................................................................10 WORK FLOW REPORT SETUP ........................................................................................10 COMMENTS .......................................................................................................................11 ROUTING............................................................................................................................12
Add a Routing ............................................................................................................... 12 Routing to an Individual ............................................................................................... 13 Routing Comment......................................................................................................... 14 Insert A Routing............................................................................................................ 15
ATTACHMENTS .................................................................................................................17 Upload an Attachment.................................................................................................. 17 Open An Attachment .................................................................................................... 18 External Routing of an Attachment............................................................................. 18
CONTROL SLIP .................................................................................................................20 PREDEFINED PROCESSES..............................................................................................22
Create A Predefined Process ...................................................................................... 22 Add A Predefined Process........................................................................................... 23
SEARCHING.......................................................................................................................24 Search By DCN ............................................................................................................. 24 Simple Search ............................................................................................................... 24 Advance Search............................................................................................................ 25
REPORTS...........................................................................................................................26 Scheduling A Report .................................................................................................... 27 Stop Report ................................................................................................................... 27
DOCUMENT VERSIONING ................................................................................................28 DOCUMENT DELETION ....................................................................................................30 HELP ..................................................................................................................................31

DTS User Manual 1 ACCESSING THE DTS SYSTEM (Use Internet Explorer 6) *Please remember to deactivate any Pop-up Blocker software before using the application.
Step (1) Go to the following link: http://dts.fws.net (intranet SWAN access) https://dts.fws.gov (internet access—from home)
Step (2) Enter your email address and Active Directory password and click OK. Step (3) Press Enter or click Continue at the Welcome Page Step (4) If you have more than one User Account, select the one you want to use and press
Enter or click Continue.
CONTROL CENTER Navigation Bar 1. Home button takes the user to the Control Center 2. Back button returns the user to the previous screen 3. Forward button takes the user to the next screen 4. Refresh button reloads the screen 5. Add New Record button takes the user to the Main Information Screen 6. Search button takes the user to the Simple Search Screen 7. Predefined Process button to create/edit predefined routings 8. Reports button takes the user to the Reports Screen to create and schedule reports
1. 2. 3. 4. 5. 6. 7. 8.
DTS User Manual 2
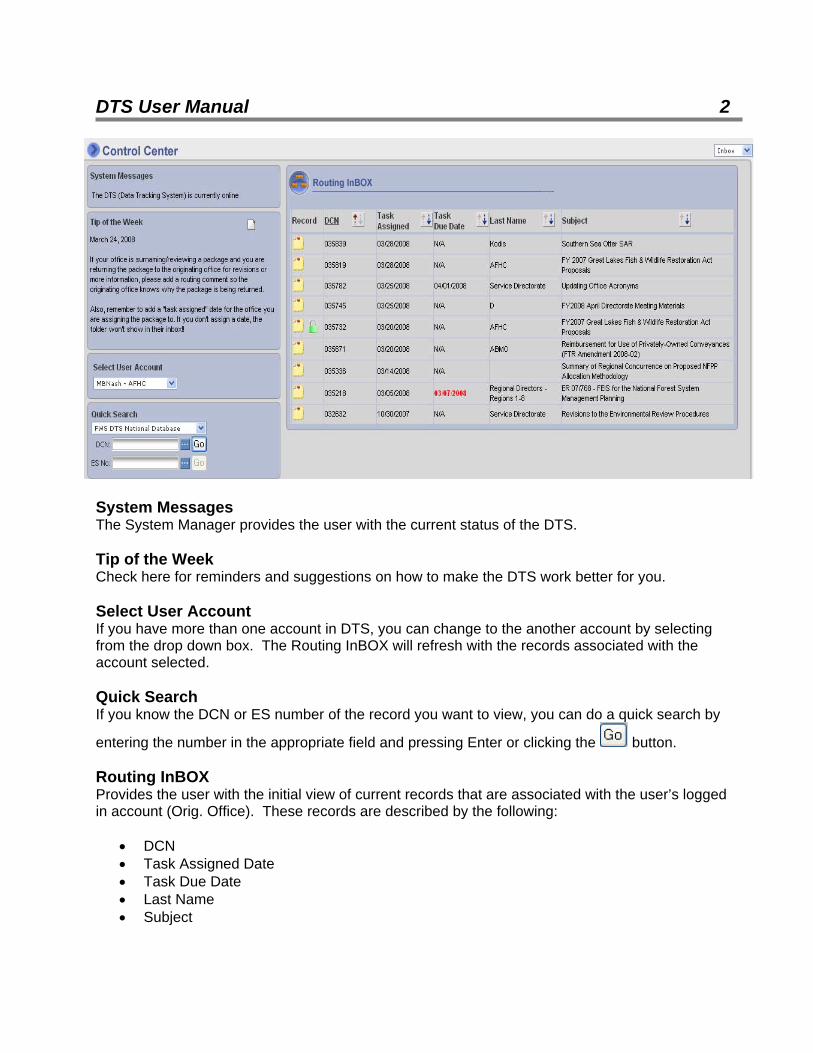
System Messages The System Manager provides the user with the current status of the DTS. Tip of the Week Check here for reminders and suggestions on how to make the DTS work better for you. Select User Account If you have more than one account in DTS, you can change to the another account by selecting from the drop down box. The Routing InBOX will refresh with the records associated with the account selected. Quick Search If you know the DCN or ES number of the record you want to view, you can do a quick search by
entering the number in the appropriate field and pressing Enter or clicking the button. Routing InBOX Provides the user with the initial view of current records that are associated with the user’s logged in account (Orig. Office). These records are described by the following:
• DCN • Task Assigned Date • Task Due Date • Last Name • Subject

DTS User Manual 3 From your Routing InBOX, you may click on the:
• Record button to access a record assigned to your office and take appropriate action
• Up/Down arrows to reverse order of presentation
Routing OutBOX In the upper right hand corner of the Control Center, you can select your Routing OutBox from the dropdown menu. This provides the user with all records the user’s Originating Office has entered that are open. These records are described by the following:
• DCN • Subject • Input Date • Due Date (if any) • Last Name • Number of Tasks Completed • Current Office Assigned To • Date Task Assigned • Task Due Date • Close DCN
If all tasks have been completed and the record is still open (no date in the Closed Date field), there will be a yellow folder in the Close DCN column of the Routing OutBox. Click on the folder and the system will automatically enter a date in the closed date field of the record.

DTS User Manual 4 ADD A RECORD
Step (1) Click the Add New Record button on the main Navigation Bar. You are now on the Main Information Screen.
Step (2) The FWS National Database is the default. You can select a different database from the dropdown menu (right side of screen).
Step (3) Fill in all appropriate fields. Underlined field labels indicate fields that you must complete.
Step (4) Click the Lock Record checkbox (optional).
Step (5) Click the Save button to save your record.
Field Definitions: DCN - A number assigned by the system automatically when you save the record. You cannot enter any information in this field. Input Date - Required field - Populates with today’s date; press the calendar button and select appropriate date if different than today’s date.
Orig. Office - The system will insert your office when you save the record. You cannot enter information in this field.

DTS User Manual 10 ACTIVE ROUTING QUICK-VIEW Below the Record Locking email link is a quick view of the open routing(s) and the assigned task (e.g., AFHC (3) = assigned to AFHC for surname). If there is more than one open routing, there will be a dropdown box. Clicking on the active routing will open that routing in the Routing Screen.
WORK FLOW REPORT SETUP On the bottom-middle of the Main Information Screen, there is a checkbox to set up a Work Flow Report. Use the work flow to keep track of individual records.
To set up a Work Flow Report: Step (1) Check the box. Step (2) Click on the white envelope and select the names of those you want to receive reports
on this particular record. Click the button and close the screen.

DTS User Manual 11 Step (3) Click on the red clock and select the day and time to receive your report. Click the
button and close the screen.
Step (4) When you no longer wish to receive the Work Flow Report, open the record and uncheck the checkbox. COMMENTS
Step (1) In your current record, click the Comments button located over the Tree View or click on the Comment heading in the tree. The Comments Screen will display below the Main Information Screen. Step (2) The Comment Date and Comment By fields are pre-populated with today’s date and the user’s name; enter your comment in the Comment box. Entered By is automatically entered by DTS upon saving. (If the comment is someone’s other than the user, enter that person’s name in the Comment By field.)
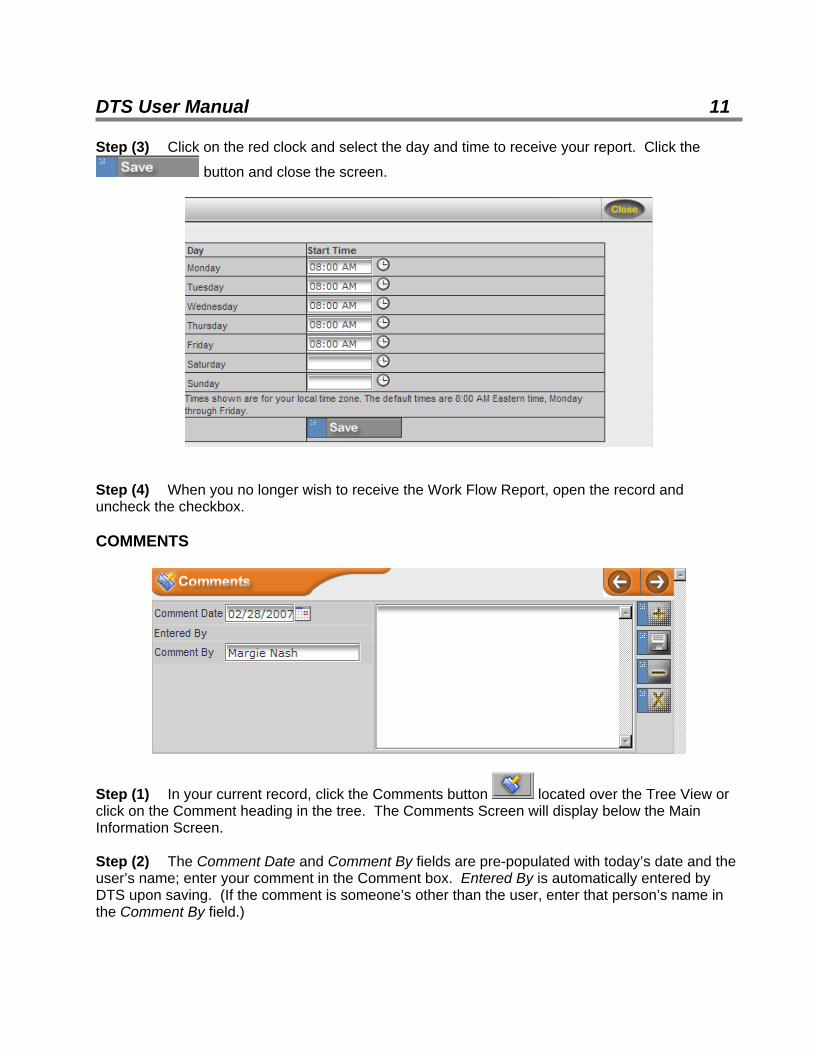
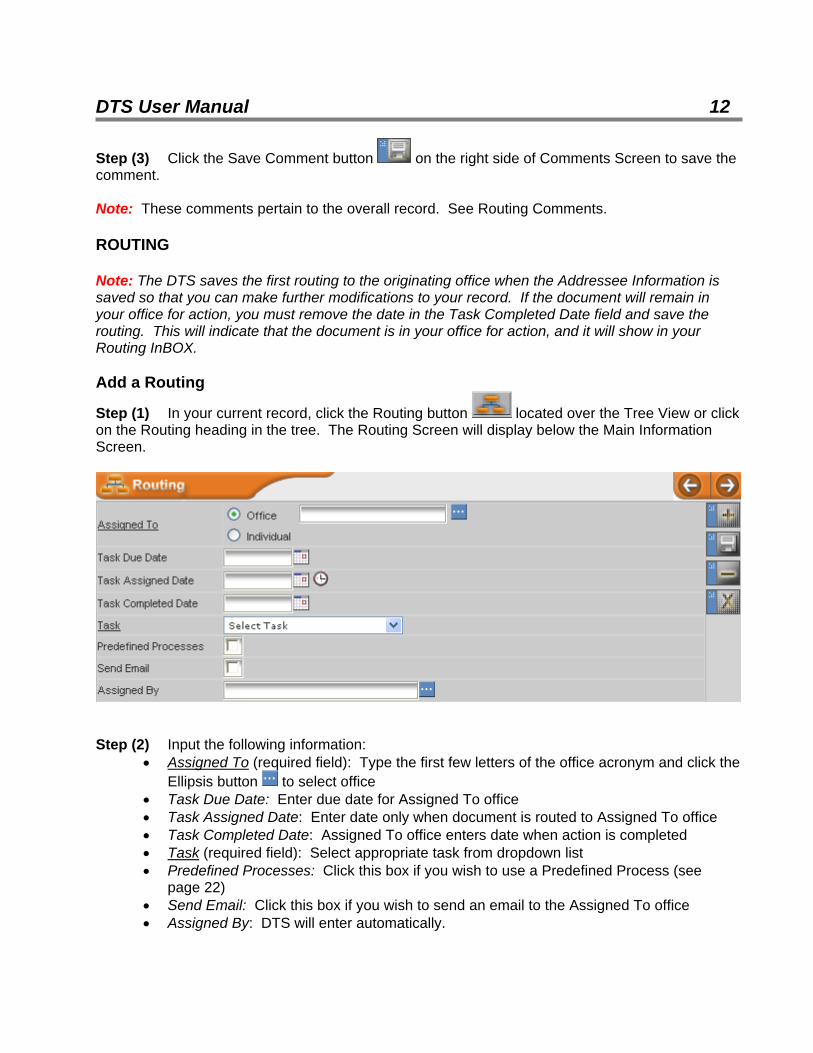
DTS User Manual 12 Step (3) Click the Save Comment button on the right side of Comments Screen to save the comment. Note: These comments pertain to the overall record. See Routing Comments. ROUTING Note: The DTS saves the first routing to the originating office when the Addressee Information is saved so that you can make further modifications to your record. If the document will remain in your office for action, you must remove the date in the Task Completed Date field and save the routing. This will indicate that the document is in your office for action, and it will show in your Routing InBOX. Add a Routing
Step (1) In your current record, click the Routing button located over the Tree View or click on the Routing heading in the tree. The Routing Screen will display below the Main Information Screen.
Step (2) Input the following information:
• Assigned To (required field): Type the first few letters of the office acronym and click the Ellipsis button to select office
• Task Due Date: Enter due date for Assigned To office • Task Assigned Date: Enter date only when document is routed to Assigned To office • Task Completed Date: Assigned To office enters date when action is completed • Task (required field): Select appropriate task from dropdown list • Predefined Processes: Click this box if you wish to use a Predefined Process (see
page 22) • Send Email: Click this box if you wish to send an email to the Assigned To office • Assigned By: DTS will enter automatically.
DTS User Manual 13 Step (3) Click the Save Routing button on the right side of the Routing Screen to save the routing.
Step (4) To add additional routings, click the Add Routing button on the right side of the Routing Screen and repeat Steps (2) and (3). Routing to an Individual
Step (1) In your current record, click the Routing button located over the Tree View or click on the Routing heading in the tree. The Routing Screen will display below the Main Information Screen. Step (2) Select Individual button in the Assigned To field, enter the individual’s last name, and press the ellipsis to select the individual. Step (3) Check the Private box if you do not want the routing viewed by other offices.
Step (4) Fill in the remaining fields and click the Save Routing button on the right side of the Routing Screen to save the routing. Note: A routing to an individual shows in the individual’s InBOX on the Home Screen, not in the individual’s office InBOX. If you click on a private routing to an individual that your office did not create, you will not be able to view it. You will see the following warning.

DTS User Manual 14
Routing Comment Step (1) Click on the Routing in the Tree that you want to add a comment.
Step (2) Click on the tab in the Routing screen.
Step (3) The Comment Date and Comment By (name of person making the comment) fields are pre-populated with today’s date and the user’s name; type your comment in the Comment box. Entered By is automatically entered by DTS upon saving.

DTS User Manual 15 Step (4) Click the Save Comment button on the right side of Comments screen to save your routing comment. Step (5) The Tree will automatically refresh displaying your comment.
Insert A Routing Between Two Existing Routings If you need to insert a routing between two routings in your routing list: Step (1) Click the routing that is below where you want to insert your new routing.
Step (2) In the Routing screen click on the tab. Step (3) Input the following information:
• Assigned To (required field): Type the first few letters of the office acronym and click the Ellipsis button to select office
• Task Due Date: Enter due date for Assigned To office • Task Assigned Date: Enter date only when document is routed to Assigned To office • Task Completed Date: The Assigned To office enters the date when the action is
completed

DTS User Manual 16
• Task (required field): Select appropriate task from dropdown list • Send Email: Click this box if you wish to send an email to the Assigned To office • Assigned By: DTS will enter automatically or you can click Ellipsis button to select
name
Step (4) Click the Save Routing button on the right side of Routing screen to save your inserted routing.
Step (5) The Tree will automatically refresh displaying your inserted routing.

DTS User Manual 17 ATTACHMENTS Upload an Attachment
Step (1) Click the Attachment button located over the Tree View or click on the Attachments heading in the tree. Step (2) Click the tab in the Attachments Screen. Step (3) Input the following information:
• Author (required field): Type name of author • Document Description (required field): Type brief description of file • Key Words: Type keywords (not required) • Document (required field): Click the BROWSE and locate the file you want to attach
Step (4) Press the button, and you will be presented with a confirmation page stating the following:
• File Name: The name of the file you uploaded • File Size: The kilobyte size/count of the uploaded file • Content-Type: The type of file uploaded
Step (5) Click the button.

DTS User Manual 18 Open An Attachment
Step (1) Click on the Attachments heading in the tree. The Attachments screen will display below the Main Information screen.
Step (2) Click on the Attachment button in the View column of the document you want to open. You will be presented with the options of Open or Save the document. Step (3) You can open the document to print or you can download the document to your computer. External Routing of an Attachment An external routing is used to send a document to someone who does not have access to the DTS. Step (1) Click on the Attachments heading in the Tree View.
Step (2) Click on the External Routing button to the right of the document you wish to send.
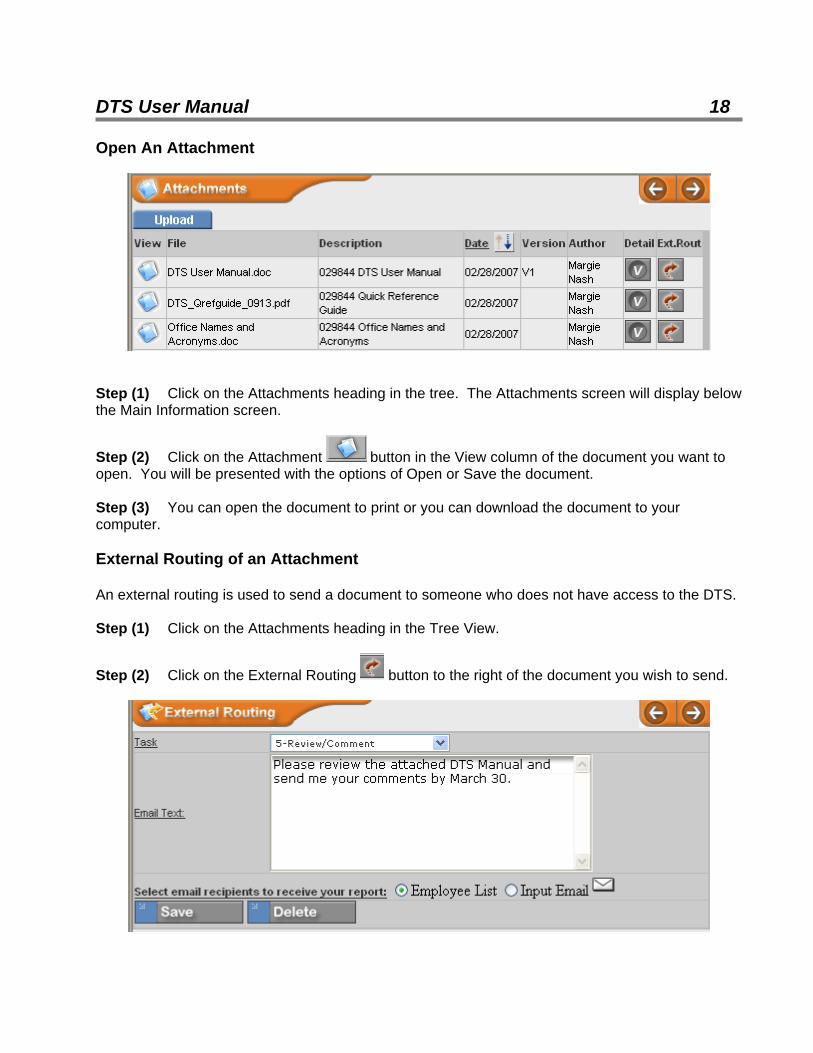
DTS User Manual 19 Step (3) Select the task from the dropdown menu and enter the text to be sent with your email. Step (4) Select recipients from the Employee list or Input Email address.
Step (5) Click the button. Step (6) Click the button.

DTS User Manual 20 Step (7) The Tree will automatically refresh displaying your External routing
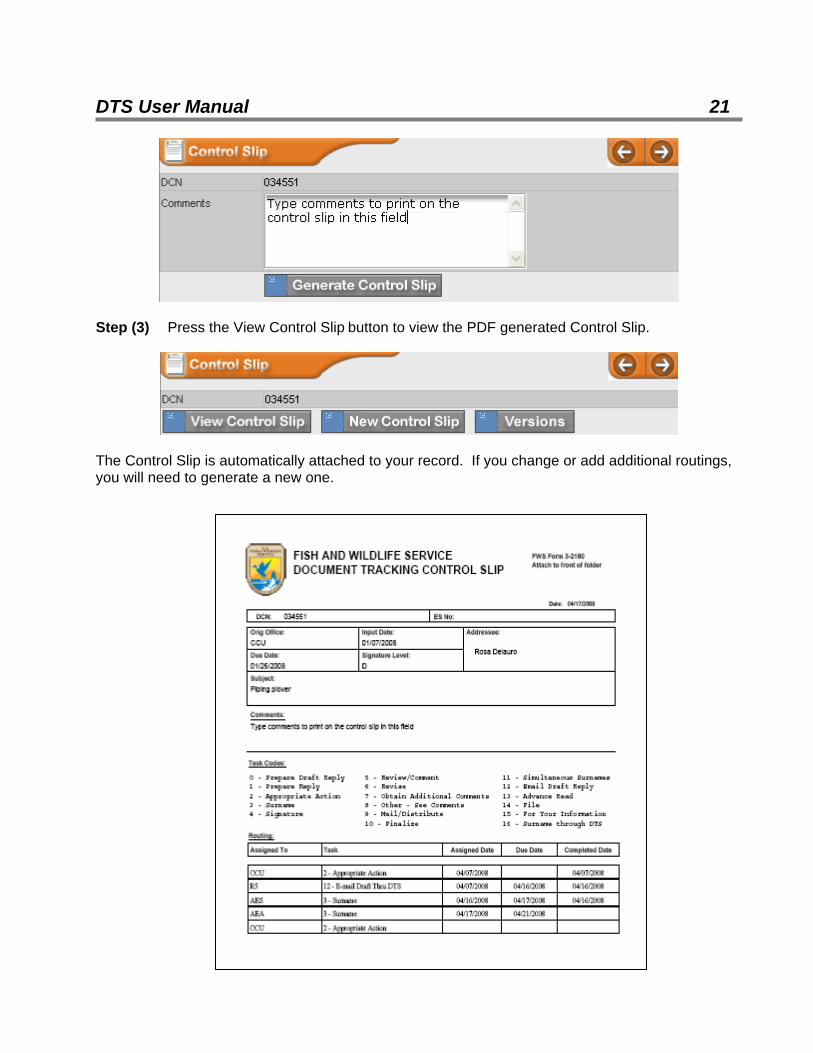
CONTROL SLIP Note: To generate a Control Slip, you must have the record showing in the Main Information Screen.
Step (1) In your current record, click the Control Slip button located in the Tree View or click on the Control Slips heading in the tree. Step (2) If you want to include comments on the Control Slip, type the comments in Comments block and press the Generate Control Slip button. If you do not wish to include comments, just press the Generate Control Slip button.

DTS User Manual 21
Step (3) Press the View Control Slip button to view the PDF generated Control Slip.
The Control Slip is automatically attached to your record. If you change or add additional routings, you will need to generate a new one.
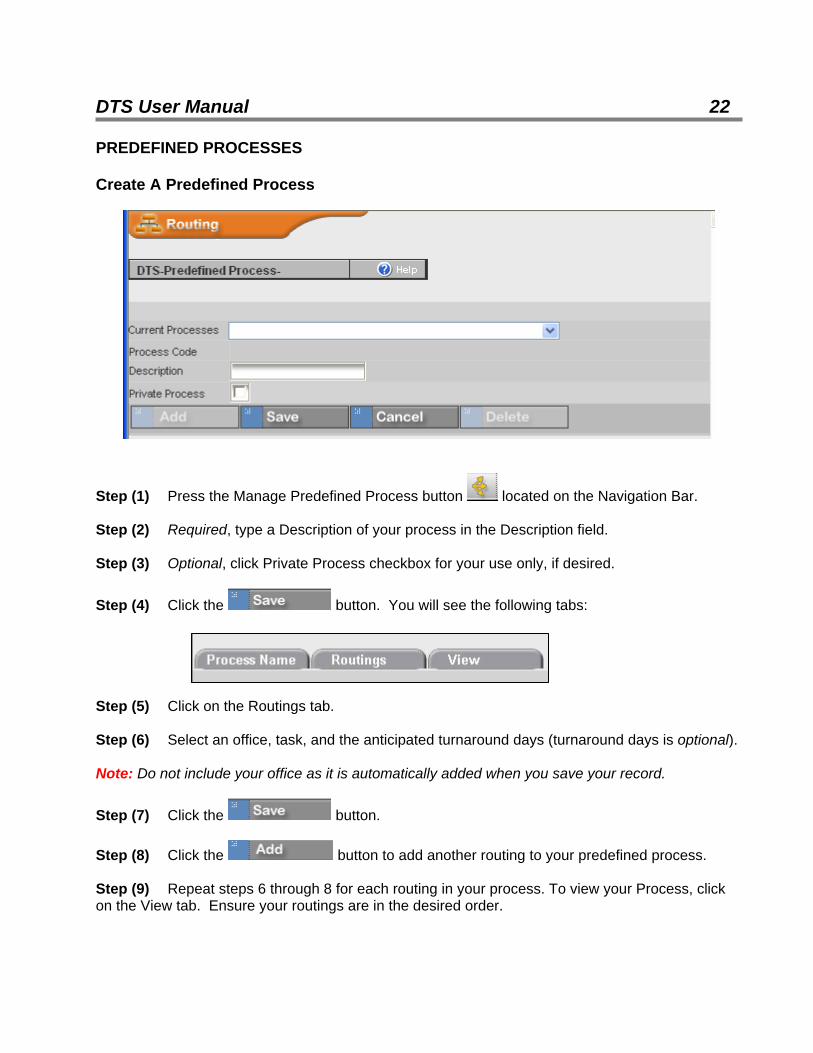
DTS User Manual 22 PREDEFINED PROCESSES Create A Predefined Process
Step (1) Press the Manage Predefined Process button located on the Navigation Bar. Step (2) Required, type a Description of your process in the Description field. Step (3) Optional, click Private Process checkbox for your use only, if desired.
Step (4) Click the button. You will see the following tabs:
Step (5) Click on the Routings tab. Step (6) Select an office, task, and the anticipated turnaround days (turnaround days is optional). Note: Do not include your office as it is automatically added when you save your record.
Step (7) Click the button. Step (8) Click the button to add another routing to your predefined process. Step (9) Repeat steps 6 through 8 for each routing in your process. To view your Process, click on the View tab. Ensure your routings are in the desired order.
DTS User Manual 23
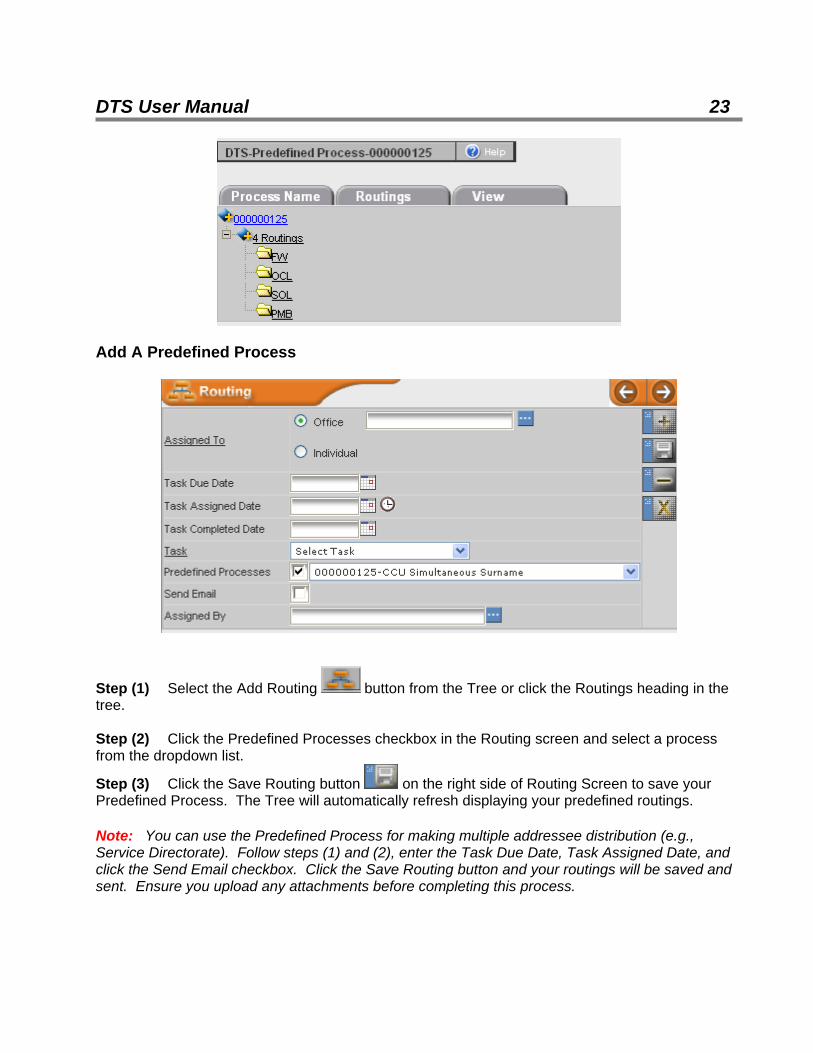
Add A Predefined Process
Step (1) Select the Add Routing button from the Tree or click the Routings heading in the tree. Step (2) Click the Predefined Processes checkbox in the Routing screen and select a process from the dropdown list.
Step (3) Click the Save Routing button on the right side of Routing Screen to save your Predefined Process. The Tree will automatically refresh displaying your predefined routings. Note: You can use the Predefined Process for making multiple addressee distribution (e.g., Service Directorate). Follow steps (1) and (2), enter the Task Due Date, Task Assigned Date, and click the Send Email checkbox. Click the Save Routing button and your routings will be saved and sent. Ensure you upload any attachments before completing this process.
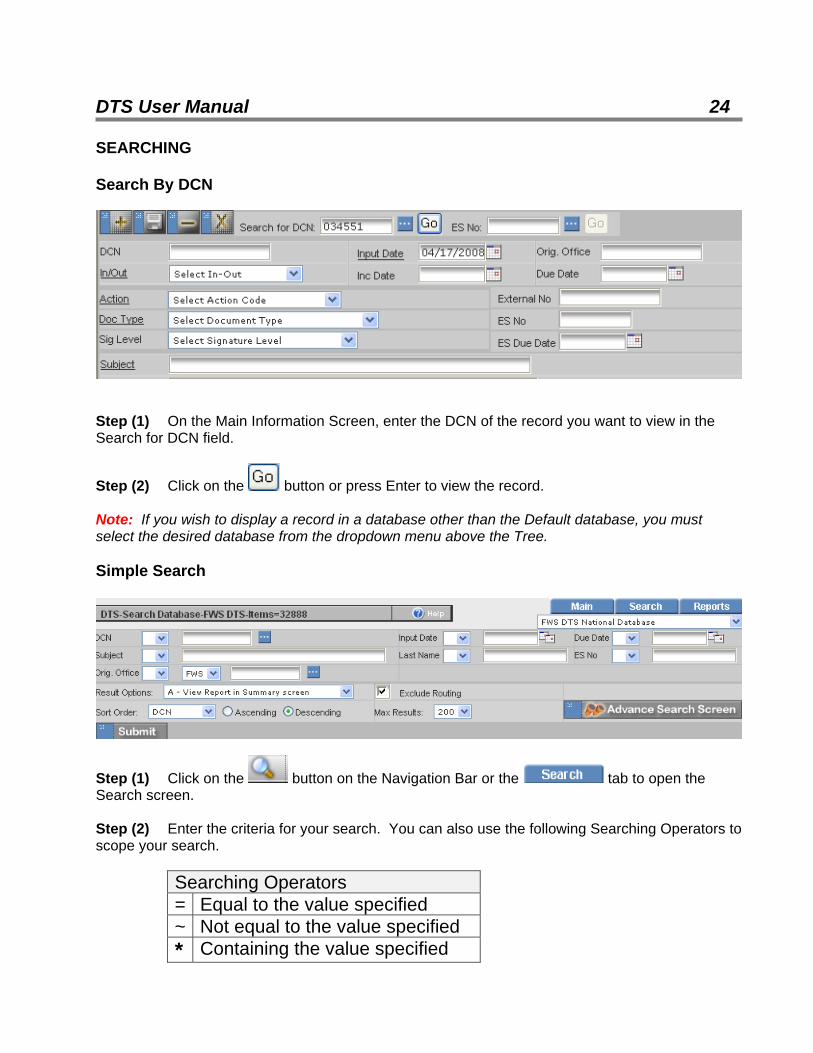
DTS User Manual 24 SEARCHING Search By DCN
Step (1) On the Main Information Screen, enter the DCN of the record you want to view in the Search for DCN field.
Step (2) Click on the button or press Enter to view the record. Note: If you wish to display a record in a database other than the Default database, you must select the desired database from the dropdown menu above the Tree. Simple Search
Step (1) Click on the button on the Navigation Bar or the tab to open the Search screen. Step (2) Enter the criteria for your search. You can also use the following Searching Operators to scope your search.
Searching Operators = Equal to the value specified ~ Not equal to the value specified * Containing the value specified
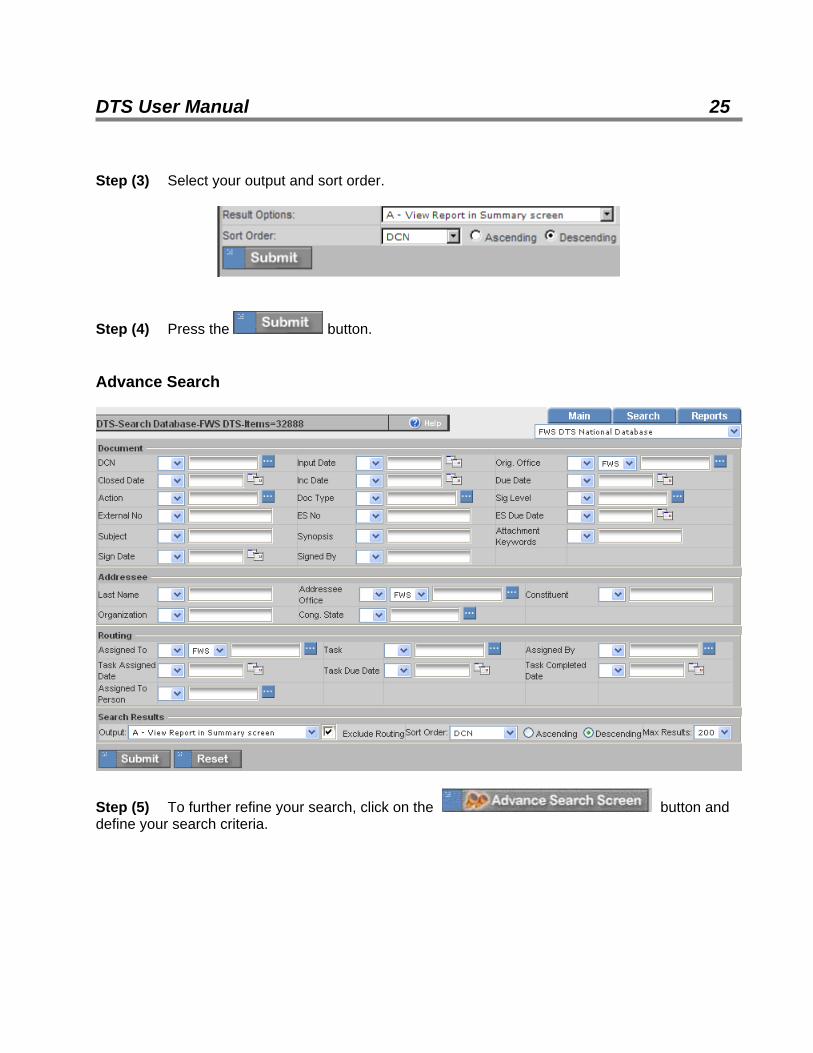
DTS User Manual 25 Step (3) Select your output and sort order.
Step (4) Press the button. Advance Search
Step (5) To further refine your search, click on the button and define your search criteria.
DTS User Manual 26 REPORTS
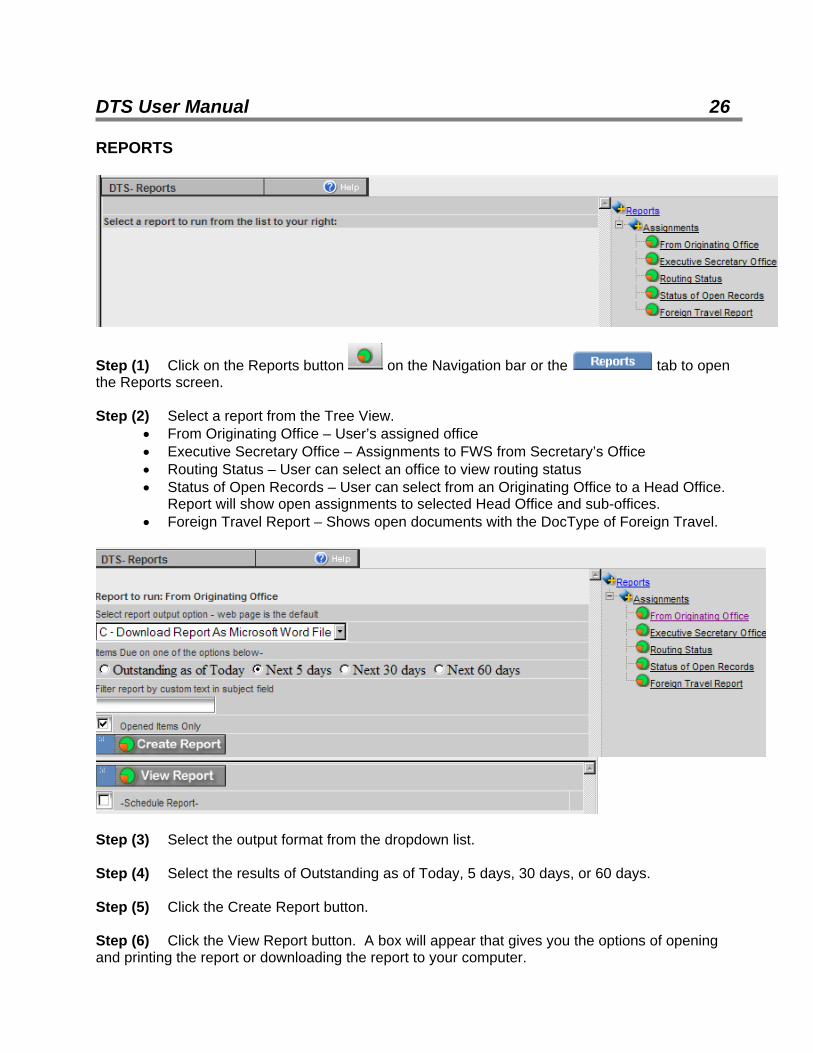
Step (1) Click on the Reports button on the Navigation bar or the tab to open the Reports screen. Step (2) Select a report from the Tree View.
• From Originating Office – User’s assigned office • Executive Secretary Office – Assignments to FWS from Secretary’s Office • Routing Status – User can select an office to view routing status • Status of Open Records – User can select from an Originating Office to a Head Office.
Report will show open assignments to selected Head Office and sub-offices. • Foreign Travel Report – Shows open documents with the DocType of Foreign Travel.
Step (3) Select the output format from the dropdown list. Step (4) Select the results of Outstanding as of Today, 5 days, 30 days, or 60 days. Step (5) Click the Create Report button. Step (6) Click the View Report button. A box will appear that gives you the options of opening and printing the report or downloading the report to your computer.
DTS User Manual 27 Scheduling A Report
Step (1) Click on the Schedule Report checkbox below the View Report button. Step (2) Enter a Name for your report and click the Save button
Step (3) Select the day and time to receive your report by clicking on the red clock. Step (4) Select the email recipients by clicking the on the white envelope. Step (5) Add an email text to send with your report and click the Save button. Stop Report
Step (1) Select the report you want to stop receiving from the dropdown box below the Create Report button.

DTS User Manual 28
Step (2) Click the checkbox to Stop the Scheduled Report or click the Delete button if you no longer want the report. Note: If you are going on leave or travel, you my want to just stop the report for the period you will be away instead of deleting completely. The report can be restarted following steps (1) and (2) and clicking the checkbox. DOCUMENT VERSIONING
Step (1) Click the Attachment button over the Tree or click on the Attachment heading in the tree.
Step (2) Click the View Versions button in the Detail column.

DTS User Manual 29
Step (3) Click the Upload Version tab
Step (4) Enter the following information in the Document Upload screen: Author (required field): Type name of author
• Document Description (required field): Type brief description of file • Key Words: Type keywords (not required) • Document (required field): Click the BROWSE and locate the file you want to attach
Step (5) Press the button, and you will be presented with a confirmation page, stating the following:
• File Name: The name of the file you uploaded • File Size: The kilobyte size/count of the uploaded file • Content-Type: The type of file uploaded
Step (6) Click the button.

DTS User Manual 30
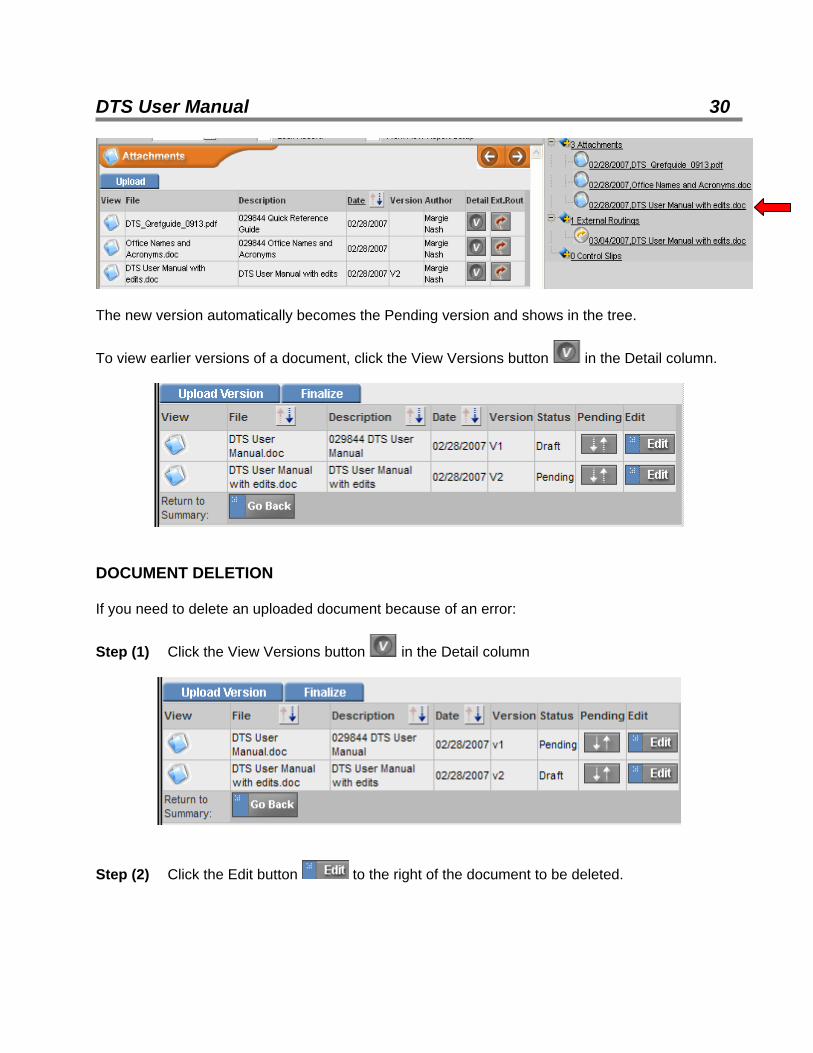
The new version automatically becomes the Pending version and shows in the tree.
To view earlier versions of a document, click the View Versions button in the Detail column.
DOCUMENT DELETION If you need to delete an uploaded document because of an error:
Step (1) Click the View Versions button in the Detail column
Step (2) Click the Edit button to the right of the document to be deleted.
DTS User Manual 31
Step (3) Click the button. A confirmation box will pop up. Select yes or cancel.
Step (4) Click the button HELP In the Main Information Screen, there are three types of Help
Menu Bar Help
Navigation Bar Help
Reference Help

DTS User Manual 32
The Menu Bar Help shows the current version, build, and new features of the DTS, and also who to contact for user support.
The Navigation Bar Help allows the user to turn on/off tool tips:

DTS User Manual 33
The Reference Help allows the user to access the Quick Reference Guide online: