data-at-rest (dar) protection - fort gordon data at rest… · · 2009-10-30data-at-rest (dar)...
TRANSCRIPT
06-EC-O-0008 Issuance date: 12 OCT 2006
Data-At-Rest (DAR) Protection
Mobile Devices using EFS Implementation Version 1.0
1
1. Overview: A. “Data at Rest is Data at Risk”. Laptops, portable notebooks, tablet-PCs, external media, and similar systems; commonly referred to as mobile computing devices (MCD); are highly susceptible to theft and loss. These devices are identified as high-risk when authorized for use in remote computing scenarios. B. Unanticipated travel restrictions imposed in response to potential or actual terrorist events significantly increase the theft potential of MCD while an individual is traveling. These events pose unique security challenges for protection of Data-at-Rest (DAR) on hard drives and removable storage devices. C. Technology exists to prevent the unauthorized access to information stored on a MCD in the event of loss of the device. Immediate implementation of protective measures for any MCDs is necessary to protect DAR to counter the effects of compromised information. D. Commanders, DAAs, and IA managers must be proactive in training users and configuring mobile devices to protect from existing and emerging threats that include: (1) Opportunistic theft - the loss of a MCD primarily to an individual(s) interested in the monetary
value or resale of the device without other motives. (2) Dedicated agent or “hacker” - the loss of a MCD to an individual with the intention of
compromising potential information contained on the MCD, ransoming the device for profit or leveraging the MCD for their own use.
(3) State sponsored, terrorist, or foreign agent(s) - the loss of a MCD to an individual(s) with
dedicated resources and motives to target specific users and MCD devices for the information contained on the MCD.
References: A. OMB Memo on PII B. DoDI 8500.2 Information Assurance Implementation C. AR 25-1 Army Knowledge Management and Information Technology (URL LINK) D. AR 25-2, Information Assurance, numerous paragraphs. (URL LINK) E. Army CIO/G6 Memorandum: SUBJECT: Army Data-At-Rest (DAR) Protection Strategy, DTD: 28 SEP 2006 F. Microsoft Windows XP Professional® Resource Kit (link) G. Managing Certificates in Windows Server 2003; Course Number: 209132_eng (link) 2. Point(s) of Contact (POC): Army Office of Information Assurance and Compliance (OIA&C) Mr. Gary Robison [email protected] 703-602-7395; DSN 332 Greg Weaver (CONT SPT) [email protected] 703-602-7421 DSN 332 Ted Dressel (MS REP SPT) [email protected] 703-602-2468 DSN 332
06-EC-O-0008 Issuance date: 12 OCT 2006
Data-At-Rest (DAR) Protection
Mobile Devices using EFS Implementation Version 1.0
2
3. Description of Former State: Data-at-rest initiatives are already mandated by regulation, yet implementation and enforcement remains at the discretion of local command policy, DAA implementation or federal requirements.
4. Description of Changes Instituted: This BBP establishes Data-at-Rest (DAR) security standards
and procedures for the use of Microsoft® Encrypting File System (EFS) on Windows® XP Pro high-risk or unprotected mobile devices until an enterprise solution is made available.
5. Description of End State: The following end-state standards can be effectively achieved: A. Protection for sensitive data-at-rest in mobile devices. B. Standardized procedures and guidance for initially securing DAR on MCD with EFS. 6. Description of Required Resources: Authorized tools are obtained from the identified sources and installed IAW DAA approved Certification and Accreditation procedures. Microsoft® Encrypting File System (EFS) is natively installed as part of the Windows® XP Pro operating system. Laptops with Windows® XP Pro operating system shall have SP 1 or later as a mandatory configuration for windows-based systems used for traveling. 7. Description of Derived Benefits Resulting from Implementation: Uniform application of DAR security across the Army enterprise will decrease the associated threats to MCD usage and increase the security posture for all Army MCDs, ultimately including all Army workstations across the enterprise. 8. Administrative Requirements: A. This BBP provides the requirements for DAR protection for unprotected Windows® mobile computers using EFS initially. Appendix A describes as a minimum the types of data that must be protected. B. Users are the weakest link in MCD physical security. The laptop contains critical operational, security, or sensitive information that’s a valuable foreign-intelligence resource. Users must be given the tools and training to support mobile IS security initiatives, such as DAR protection, and subsequently held accountable for such security while traveling. C. Proper security and configuration of DAR protection on the laptop will prevent or hinder access and exploitation of the information on the MCD. D. All MCD devices authorized for removal from any facility will be appropriately marked within locally established procedures to indicate DAR compliance. All MCDs must implement DAR protections regardless of their operating systems. E. The DAA, appointed in accordance with (IAW) AR 25-2, is responsible for the security configuration of MCDs and ensuring that all users adhere to the requirements outlined in AR 25-2 and this BBP. Commanders and DAAs shall include MCDs security configuration and use authorizations in their Acceptable Use Policies. F. Commanders, DAA, PMs or PEOs will validate that contractors and vendors providing support to Army contracts or development; or storing and managing Army information provide equivalent protective measures for the information they process.

06-EC-O-0008 Issuance date: 12 OCT 2006
Data-At-Rest (DAR) Protection
Mobile Devices using EFS Implementation Version 1.0
3
G. Currently fielded MCD technologies that are using an approved DAR solution can continue to use these products. Commanders, DAA, PMs and PEOs will verify the implementation and usage of these capabilities. H. Currently fielded MCD technologies that are not in compliance with this BBP must have a Plan of Action and Milestones (POA&M) migration strategy developed for critical MCDs within 90 days. I. Commanders, DAA, PMs and PEOs will identify technically competent personnel to act as their EFS recovery agents and ensure proper security containers are available. 9. Related BBPs: (URL LINK) 06-EC-O-0007 “Road Warrior” Laptop Security 03-EC-M-0003 BBP Wireless Security Standards 10. Products: The OIA&C Directorate has identified 3rd party IA products that enable MCDs to meet the requirements of this BBP via the Army Information Assurance Approved Products List (AIAAPL). Check this list often as changes will occur frequently. AIAAPL: https://informationassurance.us.army.mil/ia_tools/IAProducts.xls 11. Description:
A. DAR security requirements:
(1) DAAs/SAs shall ensure that approved encryption is used for protecting data-at-rest on all mobile ISs. While this can be accomplished by using “whole disk” encryption tools or “file system” encryption tools, this BBP addresses the immediate use of EFS for those that do not have a third party encryption capability for sensitive or unclassified information as available on the AIAAPL.
(2) All ISs processing Army information in a mobile computing environment shall provide a capability
to protect data at rest and in transit. Both Windows 2000 and XP Pro ship with Encrypting File System (EFS), an encryption system that adds an extra layer of security for drives, folders, or files. However, only XP Pro with SP1 or later has an enhanced cryptographic strength needed to protect files and is the only authorized Windows OS for MCDs using EFS capabilities. This will help deter an attackers’ ability to access files such as physically mounting the hard drive on another PC and taking ownership. When EFS is used, be sure to enable encryption on Folders, not just files as all files that are placed in that folder will then be encrypted.
(3) Notice: There are significant issues associated with the implementation of EFS and the creation
and maintenance of EFS certificates that the DAA and the data-owner must address as part of this solution. Commanders, DAA, and systems administrators must ensure that a viable key recovery process has been implemented, tested, and verified before mandating the use of EFS in their MCDs.
(4) In all situations, users shall take the “least risk” approach when transporting information
contained on MCDs as follows:
a. Never travel with information if an alternative secure transmission capability exists or a secure site or repository is available to pre-position the information before or during travel.

06-EC-O-0008 Issuance date: 12 OCT 2006
Data-At-Rest (DAR) Protection
Mobile Devices using EFS Implementation Version 1.0
4
b. Users are reminded that AKO serves as a repository for information sharing and availability. c. Users are reminded that their CAC and email provides for secure transmission and non-
repudiation using DoD PKI infrastructure. d. Only travel with the information absolutely necessary for mission objectives.
(5) The MCD computer must be a domain-joined computer, in a Windows 2000 or higher domain. If
you use your CAC to log onto your computer, your computer is “domain joined”. (6) Users must initialize EFS and encrypt documents using their domain user account. (7) Exception: In the case of special purpose devices; for example testing and diagnostics of special
equipment or utilized in special data collection and analysis missions; if the MCD is always employed as a special purpose standalone device, that does not connect to any portion of the LANDWARNET, as certified and documented in writing by the DAA of the special purpose stand alone device, the system owner will develop special written procedures for DAR protection for the system for review and approval of the system DAA to be implemented by users.
B. EFS Implementation Guidance:
(1) Quick Guide to Enable EFS (link) (2) Quick Guide to Create Recovery Media (link) (3) Quick Guide to Enable EFS on USB Media (link) (4) Detailed Steps to Enable EFS and Encrypting Files (link) (5) Simple test of EFS (link) (6) Create Recovery Media (PFX Backup) File to CD (link) (7) Validating the EFS Backup File (link) (8) Detailed Steps to Enable EFS on USB Removable Devices (link) (9) Turning-off EFS (Un-encrypting Files & Folders) (link) (10) Use of EFSInfo.exe for File/Folder Analysis (link) (11) Required Content Security (link)

06-EC-O-0008 Issuance date: 12 OCT 2006
Data-At-Rest (DAR) Protection
Quick Guide to Enable EFS
5
REQUIREMENTS:
Windows® XP PRO (SP1 or later); AD domain joined MCD using a CAC enabled login.
1. Choose a folder in your My Documents folder to be EFS protected.
2. Right-click and choose Properties.
3. Click the Advanced button.
4. Check the checkbox labeled Encrypt contents to secure data.
5. Click OK.
6. Click Apply.
7. When the Confirm Attribute Changes dialog appears, select the Apply changes to this folder, subfolders and files radio button.
8. Click OK.
9. Click OK on Folder Properties.
10. Windows Explorer shows different colors for the following:
a. Black – normal files on the file system.
b. Green – files and/or folders are EFS encrypted.
c. Blue – files and/or folders are compressed.
11. Move or copy at least one file or record into the EFS protected folder.
12. Create and verify recovery media.
13. Move sensitive and protected information to the EFS protected folder(s).

06-EC-O-0008 Issuance date: 12 OCT 2006
Data-At-Rest (DAR) Protection
Quick Guide to Create Recovery Media
6
1. Critical - You will be creating two recovery media,
a. 1 password protected personal recovery capability
b. 1 non-password protected Administrative recovery capability
2. Start an instance of the MMC (Start | Run | type MMC)
3. Click on File, Add/Remove Snap-in,
4. Click the Add button
5. Choose the snap-in labeled Certificates
6. Click the Add button then Close then OK
7. Double-click the Certificates folder
8. Double-click the Personal folder
9. Then click on the Certificates folder
10. Select the certificate issued to your user ID account with the Intended purpose entry of: Encrypting File System (scroll to right to view Intended Purposes column if not shown)
11. Select that certificate, right-click, choose All Tasks, then Export
12. Click Next on the Certificate Export Wizard. Then select the Yes, export the private key radio button
13. Click Next
14. Leave the default settings on the Export File Format display (PFX, Enable strong protection) and click Next
15. Type in a password (for personal use) or leave blank Admin use depending on recovery media being created; (See Notes above) click Next
16. Specify a filename and path where the PFX file is to be created then click Next. On the Completing the Certificate Export Wizard display, review to ensure that the file name is created onto an authorized removable media (a non-EFS protected directory), and that the Export Keys entry is Yes. Then click Finish
17. Write the personal recovery PFX files to an authorized removable media. Ensure this is the password protected file. Do NOT include a text file on this media. Store this in a protected environment accessible only to you for your recovery.
WARNING: DO NOT STORE WITH THE INFORMATION SYSTEM DURING TRAVEL.
WARNING: NEVER FORGET THE PASSWORD.
18. Repeat the process for exporting the certificates and write the admin recovery PFX file to an authorized removable media (CD or floppy recommended).
19. Label the media and include the required text document.
WARNING: Ensure that this is the no-password protected recovery file.
20. Validate the existence of the PFX file on all media.
21. Give the administrative recovery media to your SA or identified recovery agent.

06-EC-O-0008 Issuance date: 12 OCT 2006
Data-At-Rest (DAR) Protection
Quick Guide to Enable EFS on USB Media
7
NOTE: To run EFS on a USB device (thumb drive) – it needs to be formatted with the NTFS files system. However, by default, only FAT32 and FAT are selectable.
NOTE: If the NTFS file system is an available choice, simply format the USB device as NTFS
WARNING: Always properly “dismount” or remove the device first. Otherwise, corruption of files on the USB device could result. Simply select the Safely Remove Hardware icon in the system tray and eject the drive.
1. To run EFS on a USB device (thumb drive) – it needs to be formatted with the NTFS files system. However, by default, only FAT32 and FAT are selectable.
2. Using Windows Explorer, format the USB device with FAT32.
3. Once the formatting is complete, right click the device and check properties. Verify that the file format is FAT32.
4. At a command prompt, run the CONVERT command. Example: CONVERT E: /FS:NTFS (Where “E:” represents the USB device drive)
5. Once the CONVERT command finishes, the USB device will have a NTFS file system on it which can now accept EFS protected data. Using Windows Explorer, select Properties of the USB device to validate that file format is NTFS.

06-EC-O-0008 Issuance date: 12 OCT 2006
Data-At-Rest (DAR) Protection
Detailed Steps to Enable EFS & Encrypting Files
8
A. The steps included here show how to encrypt folder contents with EFS (Encrypting File System) from an end-user’s perspective. There are multiple ways in which EFS could be used enterprise wide. For now, though, it is to be used by individuals.
B. Please take the time to run through all the instructions. A file is created containing the user’s private key for encryption (the necessary information to encrypt/decrypt data). With it, anyone can decrypt your data. Therefore, it’s important that once the file is created, that the instructions be followed to safely remove and store it, and that the recovery media be absolutely secured.
1. Create a Folder titled EFS Protected or create a sub folder in your My Documents folder.
a. For novice users:
b. Click Start | Programs | Accessories | Windows Explorer
c. Select the My Documents folder
d. Click the File menu | New | Folder
e. Name the folder EFSProtected (suggested name)
2. Select the EFSProtected folder
a. Right-click and choose Properties
b. Click the Advanced button
Figure 1: Folder Advanced Properties
3. Check the checkbox labeled Encrypt contents to secure data and click OK, then click OK or Apply
Figure 2: Encrypting Folder via EFS
4. If converting an existing folder, the Confirm Attribute Changes dialog appears, select the Apply changes to this folder, subfolders and files radio button and click OK

06-EC-O-0008 Issuance date: 12 OCT 2006
Data-At-Rest (DAR) Protection
Detailed Steps to Enable EFS & Encrypting Files
9
5. If any dialogs appear (e.g. “Error applying attributes”), make sure all your document files are closed, choose Retry, and if the errors still occur, choose the Ignore or Ignore All button
6. In Windows Explorer, the EFSProtected directory will appear in green text.
The Windows Explorer shows different colors for the following:
i. Black – normal files on the file system
ii. Green – EFS encrypted files and/or folders
iii. Blue – compressed files and/or folders
Figure 3: Example EFS Protected Directory
06-EC-O-0008 Issuance date: 12 OCT 2006
Data-At-Rest (DAR) Protection
Simple Test of EFS
10
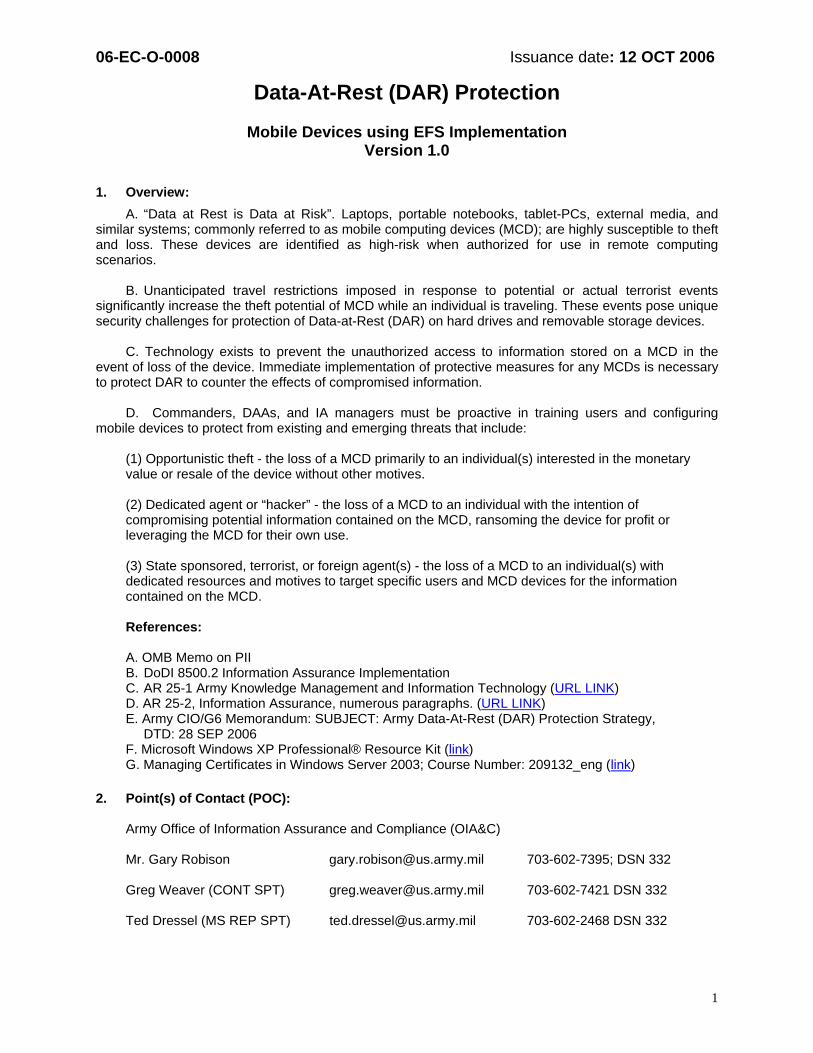
Before backing up the EFS private key, EFS has to be used. This can be accomplished by creating or dragging a file into the EFS Protected directory. The directions below will instruct you on creating a simple file and saving in the EFS Protected directory.
1. Select a test file and do one of the following:
a. Execute a Copy/Paste Action to move a document into EFS Protected directory
b. Drag/Drop an existing file or folder to the new EFS Protected directory
c. Create and save a new file into an EFS Protected directory.
2. NOVICE USERS: Run Notepad and create a text file (HelloWorld.txt) with “Hello World” in it.
a. Click Start | Programs | Accessories | Notepad
b. Type “Hello World” into the Notepad editor
c. File | Save | My Documents | EFSProtected | HelloWorld.txt
Figure 4: Sample File to Encrypt
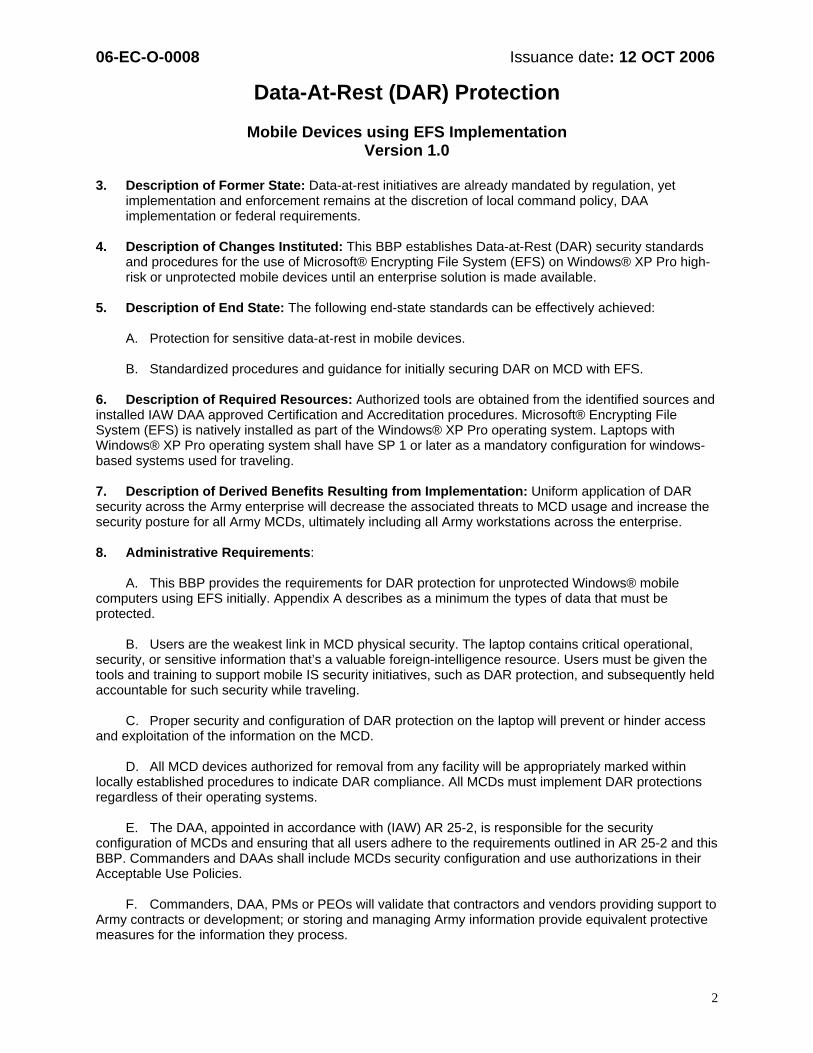
3. Using Windows Explorer, ensure that the file just created shows up in green text. Do not proceed to the next section until this is accomplished.
4. In the EFS Protected directory, double click on a file that is protected. The associated application should run displaying the contents of the file. This indicates that the EFS certificate is correctly in place and functioning normally. [To completely validate, log out of the account and then back in again and access the file. The logging out action will remove the cached credentials.]
5. Practice moving different files types into and out of the EFS Protected folder and verify EFS operations before continuing, to gain confidence in the process.
Figure 5: Contents of EFS Protected File Are Viewable
06-EC-O-0008 Issuance date: 12 OCT 2006
Data-At-Rest (DAR) Protection
Create Recovery Media (PFX Backup) File to CD
11
A. In an enterprise deployment, a Recovery Agent certificate is automatically stored on the end computer (installed via Group Policy Object). Each time a file is encrypted via EFS, both the user’s certificate and the Recovery Agent’s certificate would be used to encrypt a copy of the EFS key.
B. It’s important to point out that the action to recover access to a user’s data can be accomplished with the organization-wide data recovery certificate. Hence, the Army enterprise will then not need to depend on the end-user to create a backup of their private key.
C. The intention of backing up the user’s certificate keys is to allow the end-user the ability to recover data while away from any networks in which you are a domain account.
D. For the initial EFS effort, no GPO’s will be applied. The backup file produced here is a “poor man’s” method of providing data recovery should it be necessary during this EFS interim period.
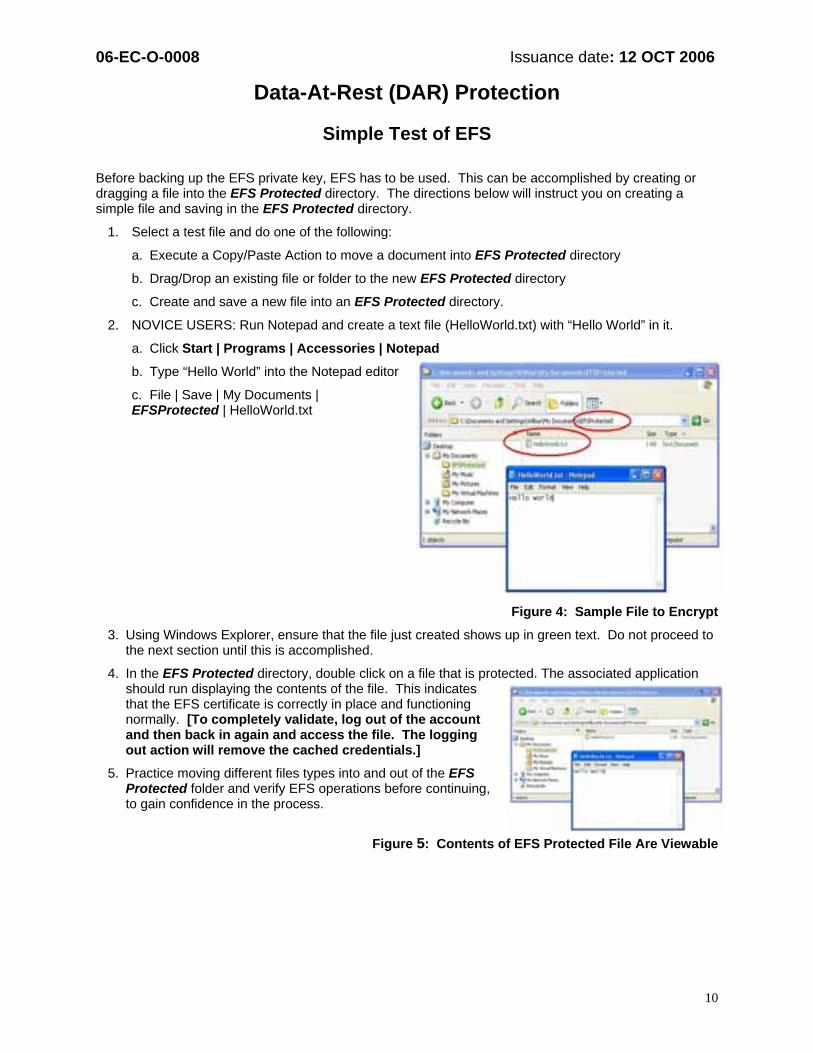
1. Once you’ve encrypted at least one file on your hard drive, you’ll have created a set of EFS keys
and corresponding digital certificate. The certificate created is what will be backed up. The certificate used to protect files via EFS is located in the user’s local certificate store. In order to back it up, use the Certificates MMC to accomplish this task:
2. Start an instance of the MMC (Start | Run | MMC)
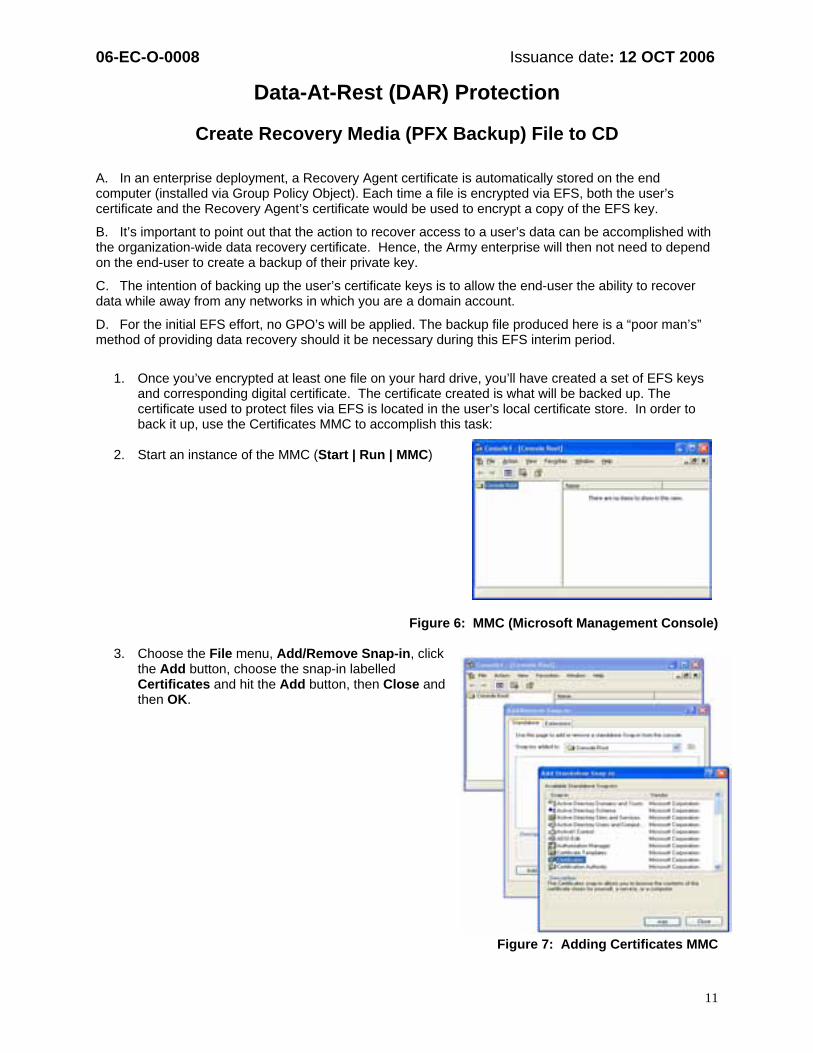
Figure 6: MMC (Microsoft Management Console) 3. Choose the File menu, Add/Remove Snap-in, click
the Add button, choose the snap-in labelled Certificates and hit the Add button, then Close and then OK.
Figure 7: Adding Certificates MMC

06-EC-O-0008 Issuance date: 12 OCT 2006
Data-At-Rest (DAR) Protection
Create Recovery Media (PFX Backup) File to CD
12
4. Double-click the Certificates folder, then double-click the Personal folder, then click on the
Certificates folder
5. Look at the 4th column, Intended Purposes; and locate the certificate having the entry: Encrypting File System. (NOTE THE EFS certificate is tied to your domain userid, not your CAC ID. The Issued To: and the Issued By: will be identical.) (scroll to right to view Intended Purposes column if not shown)
Figure 8: User Certificate Store 6. Select that certificate, right-
click and choose All Tasks, then Export
Figure 9: Exporting Certificate Used For EFS Encryption
7. On the Welcome display, click Next. Select the Yes, export the private key radio button and click Next
Figure 10: Be Sure to Export Private Key

06-EC-O-0008 Issuance date: 12 OCT 2006
Data-At-Rest (DAR) Protection
Create Recovery Media (PFX Backup) File to CD
13
8. Leave the default settings on the Export File Format display (PFX, Enable strong protection) and
click Next.
NOTE: EFS recovery depends on the security and separation of the private key from the system. The recovery keys are normally protected by your AD domain profile. However, they are now being backed up to a file and the only protection on that file is physical security and a password. When you create a backup copy of the keys for your use, the only thing standing between a laptop thief (who has your laptop and happens to have the backup file) and having full access to your encrypted files is the strength of the password you use to protect the key backup file.
Figure 11: Leave the Default Settings NOTE: The check on the password protecting a certificate backup file does not enforce password strength (complexity, length, duration, etc.). The two values (Password and Confirm password) need to be the same. Two blanks are allowed! Therefore use at least 12 or more characters. Use at least two Uppercase, two Lowercase, two Numbers and two special characters. For example: Army.6157.Blue
9. Type in a password for the personal recovery media (See Notes above) click Next. If the password is not the same for both values, you will be alerted and have an additional chance to type in a password.
Figure 12: Be Sure to use Matching & Complex Password
10. Click the Browse button, select an external media
device folder in which to save this backup of your keys (do NOT choose a folder you intend to encrypt or the EFS Protected directory). Give it a filename representing your DOMAIN ID alias or AKO alias. Click Save, then Next.
Figure 13: Name of file is to be DomainID or AKO Alias Name

06-EC-O-0008 Issuance date: 12 OCT 2006
Data-At-Rest (DAR) Protection
Create Recovery Media (PFX Backup) File to CD
14
11. On the Completing the Certificate Export Wizard display, review to ensure that the file name is
to be created in a non-EFS protected directory, and that the Export Keys entry is Yes. Then click Finish
Figure 14: PFX File Settings
12. If all goes well, a success display will be shown indicating success. This password protected file is your personal recovery media. Write protect the media, eject or remove the external media. Safeguard this media and store in a protected environment.
Figure 15: Certificate Successfully Exported
13. Create a second administrative recovery media as described above. This is the Administrative Recovery media that will be a non-password protected PFX file. Perform Steps 1 - 12 as above, with the exception in Step 9; do NOT enter a password in the blocks.
14. Include the following information in an unencrypted text file on this media.
a. Name:
b. Organization location/facility/address or other identifier:
c. DomainID and AKO Alias:
d. Subject: EFS BU Key
e. Date created:
2. Label the external media with the following information:
a. User Name:
b. Organization:
c. Subject: EFS BU Key
d. Date created:
3. Personally hand the media to your administrator or identified data recovery agent. The media shall be immediately secured in a controlled access device (i.e. safe) and locked up.

06-EC-O-0008 Issuance date: 12 OCT 2006
Data-At-Rest (DAR) Protection
Validating the EFS Backup File
15
NOTE: Perform this test prior to using the EFS protected directory operationally. Once this step is accomplished, and the user is proficient, you can be sure that should your EFS encryption certificate be damaged and the EFS protected files are not accessible, you will be able to recover access to your EFS protected files using the backup file on the secured CD.
NOTE: It’s important in this section that the proper certificate (the EFS certificate) be deleted and then reinstalled. In most cases, should another certificate be deleted in the directory of interest, it will most likely be the certificates from the CAC. Simply log out of your computer and re-authenticate with your CAC to regain those certificates. The smartcard middle-ware will automatically reload the CAC certificates.
If the steps above have been accomplished, the following prerequisites should be true:
1. The EFS backup file has been created on a removable media.
2. The EFS Certificate is still in place in the end-user’s certificate store:
3. The password is known on the recovery media.
4. The user has validated the testing of their EFS Protected directory.
DELETING THE PRIVATE CERTIFICATE:
1. Close the file and close all applications except the Certificates MMC. If you logged out and restarted the machine, follow the directions in Create Recovery Media (PFX Backup) File to CD to initialize the MMC console again and add certificates.
2. Identify the certificate issued to your user ID account with the Intended purpose entry of: Encrypting File System
Figure 16: Certificate MMC
3. In the Certificates MMC:
a. Using the user id value identified, click Certificates – Current User tree on the left hand side. Right click and select Find Certificates
Figure 17: Searching for Certificates

06-EC-O-0008 Issuance date: 12 OCT 2006
Data-At-Rest (DAR) Protection
Validating the EFS Backup File
16
b. Ensure that the Find In: field reflects Personal
c. In the Contains: line: Type in the DomainID value
d. In the Look in Field: select “Issued To” from the drop down menu.
e. Click Find Now
f. Ensure that the Intended Purposes column lists only certificates with Encrypting File System.
g. Select only those certificates where the Intended Purposes column lists only certificates with Encrypting File System.
Figure 18: Search Results
h. Shift and click to highlight the certificates. Right click on the selected certificates and click Delete
Figure 19: Only select Encrypting File System Certificates
i. Select Yes to confirm the deleting of the EFS Certificates
Figure 20: Confirm Deletion
4. Repeat the search through Find Certificates to ensure the certificates were deleted.
5. Close the Find Certificates display

06-EC-O-0008 Issuance date: 12 OCT 2006
Data-At-Rest (DAR) Protection
Validating the EFS Backup File
17
6. Using Windows Explorer, browse to your EFSProtected directory created above. It should still be green in color indicating that the content is still encrypted
7. Double click on the encrypted file. Chances are good that the file will open though the certificates have been deleted. This is because they are cached in memory and flushed on logout.
8. Logout of the account and then log back into the same account.
9. Using Windows Explorer, browse to the EFSProtected directory. It should still be green in color indicating that the content is still encrypted
10. Double click on an encrypted file. This time, an Access Denied error should occur. This indicates that the file is indeed encrypted and that the private key to the certificate protecting the file is not present in the user context of the user logged in.
Figure 21: Expected Denied Access to File Contents
11. To remedy this, insert the recovery CD (or removable media) but DO NOT copy the file to the computer.
12. Using Windows Explorer, browse to the CD (or removable media) and double click on the PFX file.
13. The Certificate Import Wizard will be automatically displayed. Click Next.
14. On the File to Import display, it should have the name and path of the file you double clicked on – click Next.
15. On the Password display, supply the password.
16. CRITICAL: Check the Mark this key as exportable and click Next.
Figure 22: Mark the Key as Exportable

06-EC-O-0008 Issuance date: 12 OCT 2006
Data-At-Rest (DAR) Protection
Validating the EFS Backup File
18
17. On the Certificate Store display, allow the wizard to automatically select the location and click Next.
Figure 23: Location in Certificate Store
18. Click Finish to end the process
19. If all goes well, the Certificate Import Wizard will indicate success.
Figure 24: Success Message
20. Lastly, browse to the EFSProtected directory and double click on the same file as in Step 10 above. The file should come up correctly and display its contents.
21. This concludes the test of the EFS Certificate recovery process – close all applications.
06-EC-O-0008 Issuance date: 12 OCT 2006
Data-At-Rest (DAR) Protection
Detailed Steps to Enable EFS on USB Removable Devices
19
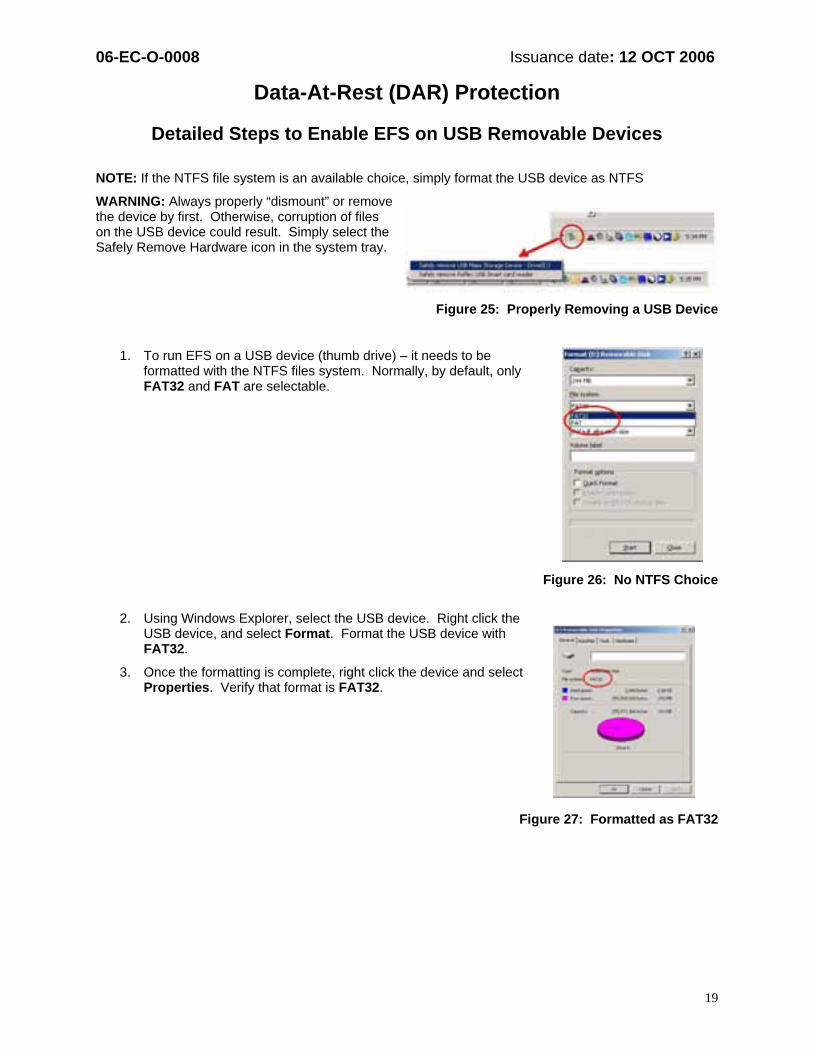
NOTE: If the NTFS file system is an available choice, simply format the USB device as NTFS
WARNING: Always properly “dismount” or remove the device by first. Otherwise, corruption of files on the USB device could result. Simply select the Safely Remove Hardware icon in the system tray.
Figure 25: Properly Removing a USB Device
1. To run EFS on a USB device (thumb drive) – it needs to be formatted with the NTFS files system. Normally, by default, only FAT32 and FAT are selectable.
Figure 26: No NTFS Choice
2. Using Windows Explorer, select the USB device. Right click the USB device, and select Format. Format the USB device with FAT32.
3. Once the formatting is complete, right click the device and select Properties. Verify that format is FAT32.
Figure 27: Formatted as FAT32

06-EC-O-0008 Issuance date: 12 OCT 2006
Data-At-Rest (DAR) Protection
Detailed Steps to Enable EFS on USB Removable Devices
20
4. At a command prompt, run the CONVERT command. Example: CONVERT E: /FS:NTFS (Where “E:” represents the USB device)
Figure 28: Convert Command
5. Once the CONVERT command finishes, the USB device will have a NTFS file system on it which can now accept EFS protected data.
Figure 29: Formatted as NTFS

06-EC-O-0008 Issuance date: 12 OCT 2006
Data-At-Rest (DAR) Protection
Turning Off EFS (Un-encrypting Files & Folders)
21
NOTE: If another file/folder type encryption product is to be used in lieu of EFS, best practice dictates that files and folders be un-encrypted with EFS. This is not necessary with Full Disk Encryption type products.
Perform the following steps for each folder that has been protected via EFS.
1. Select the EFS protected folder
2. Right-click and choose Properties.
3. Click the Advanced button.
4. Un-check the checkbox labeled Encrypt contents to secure data.
Figure 30: Decrypting EFS Protected Files and Folders
5. Click OK.
6. Click Apply.
7. When the Confirm Attribute Changes dialog appears, select the Apply changes to this folder, subfolders and files radio button.
Figure 31: Confirm Decrypting of Subfolders and files
8. Click OK.
9. Click OK on Folder Properties.

06-EC-O-0008 Issuance date: 12 OCT 2006
Data-At-Rest (DAR) Protection
Use of EFSInfo.exe for File/Folder Analysis
22
NOTE: In this section, the Data Recovery Agent (DRA) refers to the ability to assign one or more certificates to a GPO (Group Policy Object) which would be downloaded to the computer. These DRA certificates are used in Enterprise EFS solutions to recover data without the need of the end-user’s certificate. The installation and configuration of a DRA is not covered in this document.
When troubleshooting EFS, use EFSInfo.exe to understand which certificates were used to encrypt a specific file(s). In addition, if the computer received any GPO’s (Group Policy Objects) which defined a Recovery Policy, then files are encrypted with an additional certificate(s) which are Data Recovery Agent (DRA) certificates. Additionally, information such as the encryption algorithm and strength are also displayed.
Obtain the EFSInfo program from Microsoft available at this location:
http://www.microsoft.com/downloads/details.aspx?FamilyID=9c70306d-0ef3-4b0c-ab61-81da208f5c47&DisplayLang=en
Directions for the use of EFSInfo can be obtained at this link: http://support.microsoft.com/?kbid=243026
1. Install EFSInfo by running the efsinfo_setup.exe obtained from the Microsoft link above. Accept the license agreement and installation location
2. Using a command prompt, change directories to the EFS file(s) that are to be analyzed
3. Run EFSInfo and supply the various parameters as explained in the link given above
Figure 32: EFSInfo.exe Example Usage
In the example above, the user’s EFS certificate (thumbnail) is displayed. This is followed by listing (by thumbnail) those who can decrypt the EFS protected file as well which DRA Recovery Agents can decrypt the data. DRA certificates are the results of GPO’s applied to the computer.

06-EC-O-0008 Issuance date: 12 OCT 2006 Appendix A
Data-At-Rest (DAR) Protection
Required Content Security
23
A. Commanders and supervisors will ensure that any user who travels with MCD inclusive of the following types of information shall have DAR protection installed and utilized or will be prohibited from carrying such information on the MCD devices: B. Content that shall be protected as a minimum on any MCD:
1. Information that is required to be protected by the Privacy Act (5 USC 552a). 2. Information considered as “For Official Use Only” (FOUO). 3. Information protected under HIPAA. 4. Unclassified information that requires special handling (i.e. Encrypt For Transmission Only, Limited Distribution, and scientific, research and development, or technical information protected under the Technology Transfer Laws). 5. Sensitive information such as proprietary information, pre-decisional documents, and information that must be protected under legal conditions. 6. Documents or information protected by a copyright. 7. Draft publications. 8. Plans or lessons learned that would reveal military operations, exercises, or vulnerabilities. 9. Sensitive movements of military assets or the location of units, installations, or personnel where uncertainty regarding location is an element of the security of a military plan or program. 10. Personal information about U.S. citizens, DOD employees, and military personnel, such as—
a. Social security account numbers. b. Dates of birth. c. Home addresses. d. Biographies. e. Family support activities. f. Phone directories. g. Lists of personnel. h. Directories containing name, duty assignment, and home telephone numbers. i. Names, locations, or any other identifying information about family members of DOD
employees or military personnel. j. Personnel travel (personal and official business). k. Attendance at planning conferences. l. Commercial support contracts.
11. Technological data such as—
a. Weapon schematics. b. Weapon system vulnerabilities. c. Electronic wire diagrams. d. Frequency spectrum data. e. Network design, architecture, vulnerabilities, and capabilities
06-EC-O-0008 Issuance date: 12 OCT 2006 Appendix A
Data-At-Rest (DAR) Protection
Required Content Security
24
12. Operations, plans, and training data such as—
a. Operational orders and plans. b. Mission-specific training. c. Exercise and simulations activity. d. Exercise, deployment or training schedules. e. Unit relocation/deployment. f. Inspection results, findings, deficiencies. g. Unit vulnerabilities or weaknesses. h. Duty rosters. i. Exercise plans. j. Contingency plans. k. Training schedules.
13. Communications data such as—
a. Spectrum emissions and associated documentation. b. Changes in activity or communications patterns. c. Use of Internet and/or e-mail by unit personnel (personal or official business). d. Availability of secure communications. e. Links with other agencies or units. f. Family support plans. g. Bulletin board/messages between soldiers and family members.
14. Logistics/maintenance data such as—
a. Supply and equipment orders/deliveries. b. Transportation plans. c. Mapping, imagery, and special documentation support. d. Maintenance and logistics requirements. e. Order, receipt or installation of special equipment.
