data acquisition system gm first step guidecdn2.us.yokogawa.com/im04l55b01-02en_011.pdf · users...
TRANSCRIPT

UserʼsManual
IM 04L55B01-02EN 1
IntroductionThank you for purchasing the SMARTDAC+ GM Data Acquisition System (hereafter referred to as the GM). This manual explains the basic operation, installation, and wiring of the GM.This manual covers the following products and I/O modules (GX90 series).Model Product nameGM10 Data Acquisition Module for SMARTDAC+ GMGM90PS Power Supply Module for SMARTDAC+ GMGM90MB Module Base for SMARTDAC+ GM
This manual denotes devices with their product names or model (e.g. GM10).To ensure correct use, please read this manual and the following manuals thoroughly before beginning operation.Paper Manuals
Manual Title Manual No.Data Acquisition System GMFirst Step Guide
IM 04L55B01-02EN(this manual)
Precaution on the use of SMARTDAC+ IM 04L51B01-91EN(included)
Regarding the Downloading and Installing for the Software, Manuals and LabelsAbout the Usage of Open Source Software
IM 04L61B01-11EN(included)
Electronic Manuals and General SpecificationsYou can download these documents from the following web page:http://www.smartdacplus.com/manual/en/ See page 4 in Precaution on the use of SMARTDAC+ (IM
04L51B01-91EN).
Genaral SpecificationsTitle General
Specifications No.Data Acquisition System GM GS 04L55B01-01ENGX90XA/GX90XD/GX90YD/GX90WD I/O modules GS 04L53B01-01ENGX60 I/O Base Unit (Expandable I/O) / GX90EX Expansion Module GS 04L53B00-01EN
User RegistrationThank you for purchasing YOKOGAWA products. We invite you to register your products in order to receive the most up to date product information. To register, visit the following URL.http://www.yokogawa.com/ns/reg/
Notes● The contents of this manual are subject to change without
prior notice as a result of continuing improvements to the instrument’s performance and functions.
● Every effort has been made in the preparation of this manual to ensure the accuracy of its contents. However, should you have any questions or find any errors, please contact your nearest YOKOGAWA dealer.
● Copying or reproducing all or any part of the contents of this manual without YOKOGAWA’s permission is strictly prohibited.
RevisionsDecember 2014 1st Edition
Trademarks● vigilantplant and SMARTDAC+ are registered trademark of
Yokogawa Electric Corporation.● Microsoft and Windows are registered trademarks or
trademarks of Microsoft Corporation in the United States and other countries.
● Pentium is a registered trademark of Intel Corporation.● Adobe and Acrobat are registered trademarks or trademarks
of Adobe Systems Incorporated.● The SD logo is a registered trademark of the SD association.● Bluetooth is a trademark or registered trademark of Bluetooth
SIG, Inc.● Company and product names that appear in this manual
are registered trademarks or trademarks of their respective holders.
● The company and product names used in this manual are not accompanied by the registered trademark or trademark symbols (® and ™).
Safety Precautions• Read this manual and “Precaution on the use of
SMARTDAC+” (IM04L51B01-91EN) thoroughly and have a clear understanding of the product before operation.
• This manual explains the functions of the product. It does not guarantee that the product will suit a particular purpose of the user.
• Keep “Precaution on the use of SMARTDAC+” and all the related manuals with SMARTDAC+ GM until the end of the use of the product.
• When SMARTDAC+ GM contains GM10 with the optinal code of /C8, SMARTDAC+ GM is built in compliance with requirements of R&TTE Derective:
We, Yokogawa Electric Corporation hereby declare that this equipment, model GM Data Acquisition system is in compliance with the essential requirements and other relevant provisions of Directive 1999/5/EC.
The EU declaration of conformity for R&TTE for this product can be found at < http://www.smartdacplus.com/manual/en/ >
Handling Precautions• Use care when cleaning this instrument, especially its plastic
parts. Use a soft dry cloth. Do not use organic solvents, such as benzene or thinner, or other cleansers. They may cause discoloring and deformation.
• Keep electrically charged objects away from the signal terminals. Doing so may damage the GM.
• Do not apply volatile chemicals to the display, panel keys, etc. Do not allow rubber and vinyl products to remain in contact with the GM for long periods of time. Doing so may damage the GM.
• When not in use, make sure to turn off the power switch.• If there are any symptoms of trouble such as strange odors or
smoke coming from the GM, immediately turn off the power switch and the power supply source. Then, contact your nearest YOKOGAWA dealer.
SD Card Handling Precautions• SD cards are delicate and should be handled with caution.• Yokogawa provides no warranty for damage to, or loss of data
recorded on the SD card, regardless of the cause of such damage or loss. Please always make backup copies of your data.
• Do not store or use the SD card in places with static electricity, near electrically charged objects, or where electrical noise is present. Doing so can result in electric shock or damage.
• Do not disassemble or modify the SD card. Doing so can result in damage.
• Do not physically shock, bend, or pinch the SD card. Doing so can lead to malfunction.
• During reading/writing of data, do not turn OFF the power, apply vibration or shock, or pull out the card. Data can become corrupt or permanently lost.
• Only use Yokogawa SD cards. Operation cannot be guaranteed with other brands of card.
• When inserting the SD card into the instrument, make sure you orient the card correctly (face up or down) and that you insert it securely. If not inserted correctly, the card will not be recognized by the instrument.
• Never touch the SD card with wet hands. Doing so can lead to electric shock or malfunction.
• Never use the SD card if it is dusty or dirty. Doing so can lead to electric shock or malfunction.
• The SD card comes formatted. SD cards must be formatted according to the standard
established by the SD Association (https://www.sdcard.org/home). If using a PC to perform the formatting, use the SD card formatter software available from the above SD Association.
• You can use SD/SDHC cards (up to 32 GB) on the GM.
SD Card Specifications and CharacteristicsElectrical specifications Operating voltage: 2.7 V to 3.6 VOperating temperature/humidity -25 to 85°C/20 to 85%RH (no condensation)Storage temperature/humidity -40 to 85°C/5 to 95%RH (no condensation)
Unit: mm (approx. inch)
32±0.1
24±0.1
WP
SD
Writable
Write-protected
Checking the Package ContentsAfter receiving the product and opening the package, check the items described below. If the wrong items have been delivered, if items are missing, or if there is a problem with the appearance of the items, contact your nearest YOKOGAWA dealer.Check that the product that you received is what you ordered by referring to the model name and suffix code given on the nameplate on the GM.
No. (Instrument number)When contacting the dealer from which you purchased the instrument, please give them the instrument number. The number is inscribed on the nameplate.
MODEL and SUFFIX CodesGM10Model Suffix Code Optional
CodeDescription
GM10 Data Acquisition Module for SMARTDAC+ GMType -1 Standard (max. no. of measurement ch: 100)
-2 Large Memory (max. no. of measurement ch: 500)
Area J General- 0 Always zeroOptions /C3 RS-422/485
/C8 Bluetooth1
/MT Mathematical function (with report function)/MC Communication channel function/LG LOG scale/E1 EtherNet/IP communication/E2 WT communication2
1 Regions in which Bluetooth can be used are restricted by the Radio Waves Act of each country. For details, contact the appropriate authority.
2 If you specify WT communication, you must also specify the communication channel function (/MC option).
GM90PSModel Suffix Code Description
GM90PS Power Supply Module for SMARTDAC+ GMType -1 Always –1Area N GeneralSupply voltage 1 100-240V ACPower supply connection D Power inlet with UL/CSA cable
F Power inlet with VDE cableH Power inlet with GB cableN Power inlet with NBR cableQ Power inlet with BS cableR Power inlet with AS cableW Screw terminal (without cable)
- 0 Always zero
GM90MBModel Suffix Code Description
GM90MB Module Base for SMARTDAC+ GMType -01 Always -01Language N General- 0 Always 0
GX90EXModel Suffix Code DescriptionGX90EX I/O Expansion ModulePorts -02 2 portsType -TP1 Twisted pair cable- N Always NArea -N General
I/O moduleGX90XAModel Suffix Code DescriptionGX90XA Analog Input ModuleChannels -10 10 channels
Type
-C1 Current, scanner type (isolated between channels)
-L1 DCV/TC/DI (400 VAC, 1 min), Scanner type (isolated between channels)
-U2 Universal, Solid state relay scanner type (3-wire RTD b-terminal common)
-T1 DCV/TC/DI, Electromagnetic relay scanner type (Isolated between channels)
- N Always N
Terminal type -3 Screw terminal (M3)-C Clamp terminal
Area N General
Please Read This First
Data Acquisition System GMFirst Step Guide
IM 04L55B01-02EN

IM 04L55B01-02EN 2
GX90XDModel Suffix Code DescriptionGX90XD Digital Input Module Channels -16 16 channels
Type -11 Open collector/voltage-free, contact (shared common), Rated 5 VDC
- N Always N
Terminal type -3 Screw terminal (M3)-C Clamp terminal
Area N General
GX90YDModel Suffix Code DescriptionGX90YD Digital Output ModuleChannels -06 6 channelsType -11 Relay, SPDT(NO-C-NC)- N Always NTerminal type -3 Screw terminal (M3)Area N General
GX90WDModel Suffix Code DescriptionGX90WD Digital Input/Output Module Channels -0806 Input 8 channels, Output 6 channels
Type -01Open collector/voltage-free, contact (shared common), Rated 5 VDCRelay, SPDT(NO-C-NC)
- N Always NTerminal type -3 Screw terminal (M3)Area N General
* When the GM10 has the /MT option, GX90XD and GX90WD can receive pulse input.
Standard AccessoriesThe instrument is shipped with the following accessories. Make sure that all accessories are present and undamaged.
4 5
1 2 3
No. Name Part Number/Model Qty. Notes1 SD card 773001 1 1 GB (included with the
GM10)2 Connector cover B8740GN 1 Included with the GM90PS3 Screws Y9310LB 4 M3 screws for linking
modules (included)1
4 Power cord A1073WD 1 Included with the GM90PS2
5 Manual IM 04L55B01-02EN 1 This manual.IM 04L51B01-91EN 1IM 04L61B01-11EN 1
12
Four screws included with GM90PS or GM90MBWhen the suffix code of the power supply connection is not W
Optional Accessories (Sold separately)Name Part Number/Model Minimum. Q’ty NotesSD card 773001 1 1GBShunt resistor(for M3 screw terminal)
X010-250-3 1 250Ω±0.1%X010-100-3 1 100Ω±0.1%X010-010-3 1 10Ω±0.1%
Shunt resistor(for clamp terminal)
438920 1 250Ω±0.1%438921 1 100Ω±0.1%438922 1 10Ω±0.1%
GM10 Style Number, Release Number, and Firmware Version NumberStyle number: The GM hardware ID number. This number
is written on the nameplate (H column).Release number: The GM firmware ID number. This number
is written on the nameplate (S column). This number matches with the integer part of the firmware version number.
Example: If the firmware version number is 1.01, the release number is 1.
Firmware version number:You can check this number on the system information screen of the GM.For the procedure, see the User’s Manual (IM 04L55B01-01EN).
Conventions Used in This Manual• This manual covers information regarding GMs whose display
language is English.• For details on the language setting, see the SMARTDAC+ GM
Data Acquisition System User’s Manual (IM04L55B01-01EN).UnitK: Denotes 1024. Example: 768K (file size)k: Denotes 1000.
The notes and cautions in this manual are indicated using the following symbols.
Improper handling or use can lead to injury to the user or damage to the instrument. This symbol appears on the instrument to indicate that the user must refer to the user’s manual for special instructions. The same symbol appears in the corresponding place in the user’s manual to identify those instructions. In the manual, the symbol is used in conjunction with the word “WARNING” or “CAUTION.”WARNINGCalls attention to actions or conditions that could cause serious or fatal injury to the user, and precautions that can be taken to prevent such occurrences.
CAUTIONCalls attention to actions or conditions that could cause light injury to the user or cause damage to the instrument or user’s data, and precautions that can be taken to prevent such occurrences.NoteCalls attention to information that is important for the proper operation of the instrument.
GM OverviewThe GM Data Acquisition System is a data logger that excels in versatility and expandability. The GM10 contains memory for data acquisition and also supports SD cards for external storage.The system consists of a Data Acquisition Module (GM10), Power Supply Module (GM90PS), and Module Base (GM90MB), which houses various modules.GM can operate with SMARTDAC+ series modules.
GM ConfigurationThe GM configures a system with a combination of various modules.The unit that includes the GM10 is called the main unit. A unit connected to the main unit via a GX90EX expansion module is called a sub unit. Modules in a unit can be connected by installing a GM90MB.
Main Unit (single unit system) A unit consisting of a GM10 and a GM90PS. Up to 10 I/O
modules can be connected to a unit.
Main Unit (multi unit system) A unit consisting of a GM10, a GM90PS and a GX90EX. Up
to six I/O modules can be connected to a unit. Up to six sub units can be connected via the GX90EX.
Sub Unit (multi unit system) A unit consisting of a GM90PS and a GX90EX. Up to six
I/O modules can be connected to a unit. The main unit and sub units are connected using LAN cables. The maximum connection distance between two units is 100 m.
Module Version and Notes on LinkingModule Version
1. The firmware version of I/O modules that can be used with the GM must be R1.04.01 or later.
2. The firmware version of the GX90EX that can be used with the GM must be R1.02.01 or later.
Notes on Linking Modules For the notes on linking modules, see “Installation” on page 5
of this guide.
Channel NamesOperations such as measurement, computation, and recording are performed on channels.A channel name is assigned a 4-digit number consisting of a unit number, slot number, and channel number.• Channel names are specific to the system, so they cannot be
changed.• By setting tags or tag numbers to the channels, you can use
any names you like.
Channel name
Unit number
Slot number
Channel numberI/O module
Main Unit (single unit system)
Main unit: 0Sub unit: 1 to 6
0 to 9
Main unit (multi unit system)
Sub unit (multi unit system)
0123456
012345
012345
789
GX90XAGX90XDGX90YDGX90WD
Analog inputDigital inputDigital outputDigital inputDigital output
01 to 1001 to 1601 to 0601 to 0809 to 14
Model I/O Channel number
0 to 5
0 to 5
Example: If 10 GX90XAs are linked to the main unit (single unit system), the channel name of channel 3 of slot 5 is “0503.”
Please Read This First

IM 04L55B01-02EN 3
Operating ProcedureI/O modules1 (without the terminal covers)
Configure functions as necessary.
Turn on the power.
Prepare modules.
Check the modules.
Install the module base.
Link the modules.
Installation
Installing the Module BaseChecking the Modules Linking the Module Base (Module)
Set the date and time.
Set signal inputs.
Reconfigure.
Set the GM10 IP address.
Configure the GM settings.
Connect I/O signals and power.
Configure the system.System Configuration
Multi Unit System
GX90EX linking position
Single Unit System
Configuration
EthernetUSB
Bluetooth(/C8)
Main unit
Sub unit
Hub
Main unit
Sub unit
Sub unit
Sub unit
Indicates a reference.
“Wiring”
“Wiring”
“Basic Operations”
“Basic Operations” Start recording/measuring.
URL: www.smartdacplus.com/manual/ja/
URL: www.smartdacplus.com/software/ja/
User’s Manual(IM 04L55B01-01EN)
“Operating Procedure”“Installation”
GM10
GX90EX2
GX90EX
GM90MB GM90PS
GM90MBGM90MB
Module
Latch
GX90EX
Slide locks (vertical)
Lock Unlock
Slide locks (vertical)
Screw (M3)
Connector
M3 screws for linking (included)(top and bottom; 4)
Insert the module from the front of the GM90MB until a click is heard. Then, fasten the screw.(Recommended tightening torque: 0.6 N•m)
GM supports both standalone operation and data acquisition using a PC.Use a PC to configure the GM settings. To download the dedicated software application, you need to connect to the Internet.
Download the following software applications.SMARTDAC+ Standard Hardware ConfiguratorSMARTDAC+ Standard IP Address Configurator
See the list of electronic manuals on page 4 of IM 04L51B01-91EN, and download them if necessary.
Hardware Configurator is required for USB communication or Bluetooth communication (/C8 option).
A dedicated software application is not required for Ethernet connections.(IP Address Configurator is used during installation.)
• Search for GM10s in the same network segment and list them.• Set the IP address and other parameters of the GM10.
• GM settings can be configured offline from a Web browser.
IP Address Configurator Screen Example Hardware Configurator Screen Example
Configuration of settings and real time monitoring are possible using a Web application.A PC with Internet Explorer installed is required.
A system configured with a main unit connected to sub units.Up to six sub units can be connected to a main unit. Each unit can connect up to six modules.* There is a limitation on the number of channels
based on the GM10 specifications (see IM 04L55B01-01EN).
A system configured with only a main unit. The multi unit system support only cascaded connections.If connected in a ring, none of the sub units will be identified.
Link the GX90EX to the left end on a main unit and next to the GM90PS on a sub unit.
Do not connect to avoid a ring connection.
For wall mounting, mount the GM90MB to the wall first, and then install the modules.
Protrusion (top and bottom; 4)
Guides (top and bottom; 4)
1. Check that the slide lock (vertical) is released (see below), align the four protrusions of the GM90MB to the guide, and push it in.
Removing a Module1. Loosen the screw at the bottom section of the module.2. While pressing down on the latch at the top of the module,
pull the module out.
1 The firmware version of I/O modules that can be used with the GM must be R1.04.01 or later.
2 The GX90EX is used to configure a multi unit system.The firmware version of the GX90EX that can be used with the GM must be R1.02.01 or later.
2. After linking the module base, fix in place using the slide lock or the supplied screw.(Recommended tightening torque: 0.4 to 0.5 N•m)
Push in
When carrying the unit, be sure that the modules are securely installed.
Lock: Slide toward the back of the module.Unlock: Slide toward the front of the module.
You will hear a click both when locking and when unlocking.
Product user’s manuals can be downloaded from the following URL.
You can download the latest version of the software from the following URL.
Power supply connection:Inlet or M4 screw terminal
PC
PC
Operations on the GM
Operations on the PC
Maximum connection distance between two units is 100 m.
Maximum connection distance between two units is 100 m.
A document number is indicated for manuals other than this manual.
Operating Procedure
IM 04L55B01-02EN 4
Basic O
perationBasic Operation
The basic operation of the GM is explained briefly here. For details, see the user’s manuals.
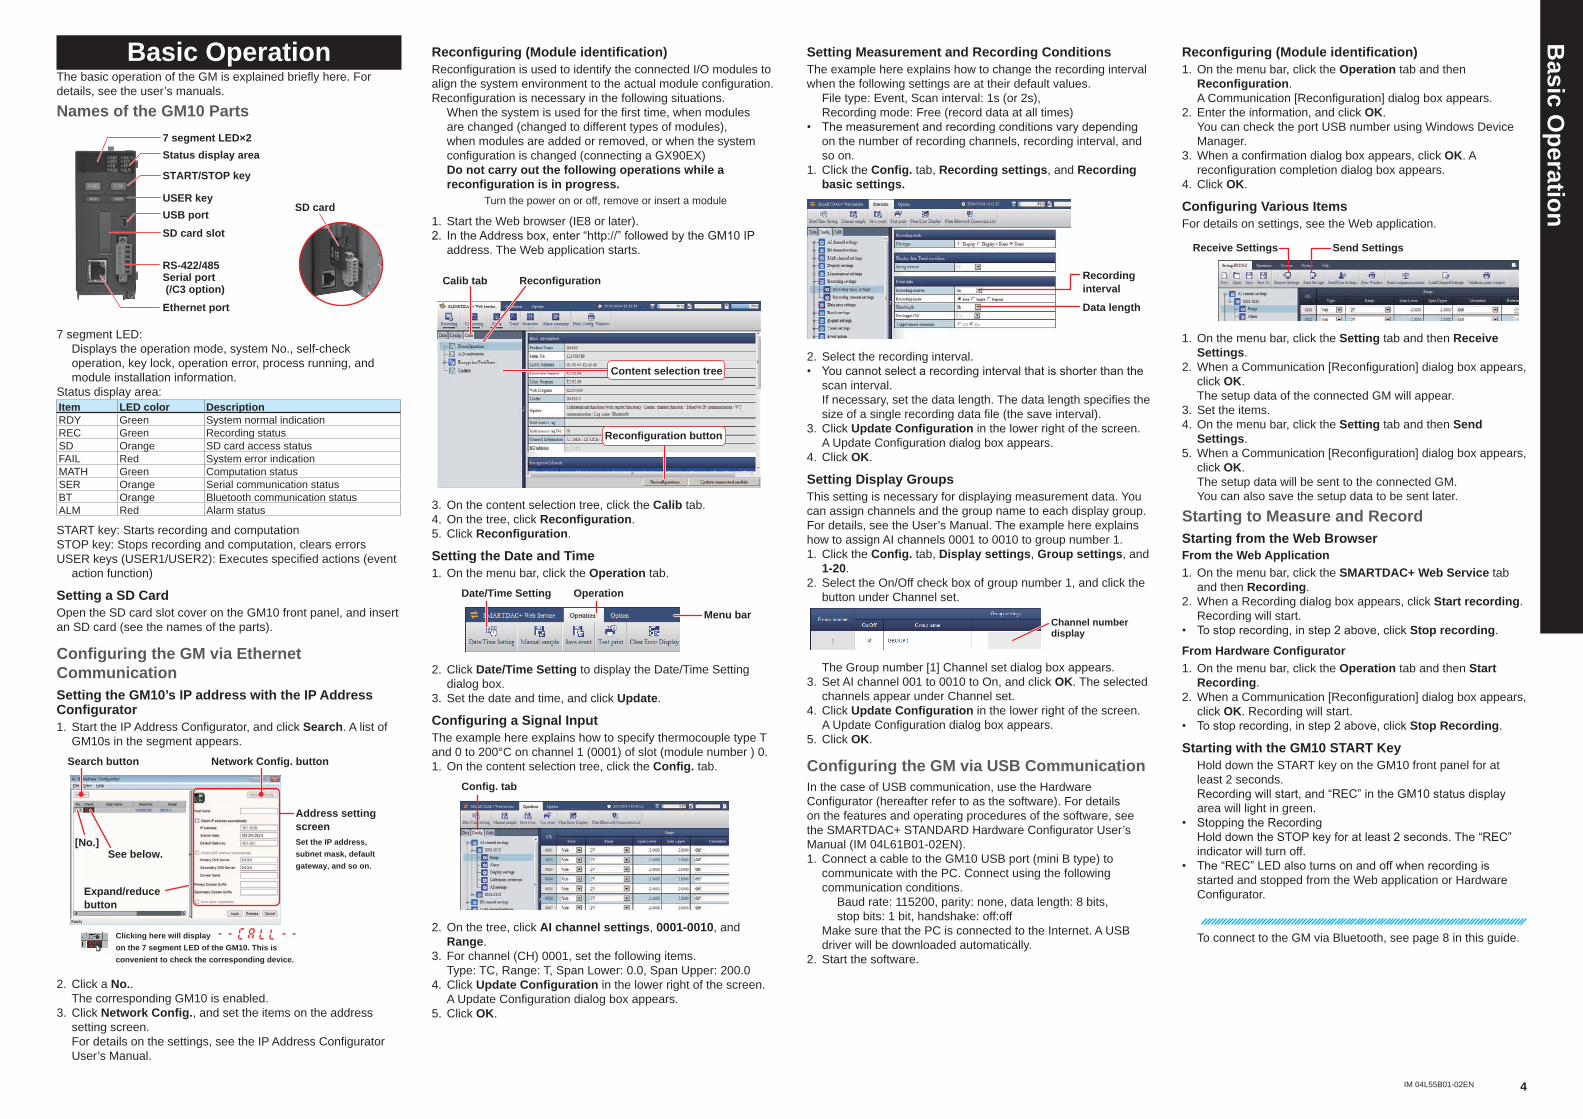
Names of the GM10 Parts
START/STOP key
USER key
SD card slot
SD cardUSB port
Ethernet port
RS-422/485Serial port (/C3 option)
Status display area7 segment LED×2
7 segment LED: Displays the operation mode, system No., self-check
operation, key lock, operation error, process running, and module installation information.
Status display area:Item LED color DescriptionRDY Green System normal indicationREC Green Recording statusSD Orange SD card access statusFAIL Red System error indicationMATH Green Computation statusSER Orange Serial communication statusBT Orange Bluetooth communication statusALM Red Alarm status
START key: Starts recording and computationSTOP key: Stops recording and computation, clears errorsUSER keys (USER1/USER2): Executes specified actions (event
action function)
Setting a SD CardOpen the SD card slot cover on the GM10 front panel, and insert an SD card (see the names of the parts).
Configuring the GM via Ethernet CommunicationSetting the GM10’s IP address with the IP Address Configurator1. Start the IP Address Configurator, and click Search. A list of
GM10s in the segment appears.Search button Network Config. button
Address setting screen
[No.]See below.
Set the IP address, subnet mask, default gateway, and so on.
Clicking here will display on the 7 segment LED of the GM10. This is convenient to check the corresponding device.
Expand/reduce button
2. Click a No.. The corresponding GM10 is enabled.3. Click Network Config., and set the items on the address
setting screen. For details on the settings, see the IP Address Configurator
User’s Manual.
Reconfiguring (Module identification)Reconfiguration is used to identify the connected I/O modules to align the system environment to the actual module configuration.Reconfiguration is necessary in the following situations. When the system is used for the first time, when modules
are changed (changed to different types of modules), when modules are added or removed, or when the system configuration is changed (connecting a GX90EX)
Do not carry out the following operations while a reconfiguration is in progress.
Turn the power on or off, remove or insert a module
1. Start the Web browser (IE8 or later).2. In the Address box, enter “http://” followed by the GM10 IP
address. The Web application starts.
Calib tab Reconfiguration
Content selection tree
Reconfiguration button
3. On the content selection tree, click the Calib tab.4. On the tree, click Reconfiguration.5. Click Reconfiguration.
Setting the Date and Time1. On the menu bar, click the Operation tab.
Menu bar
Date/Time Setting Operation
2. Click Date/Time Setting to display the Date/Time Setting dialog box.
3. Set the date and time, and click Update.
Configuring a Signal InputThe example here explains how to specify thermocouple type T and 0 to 200°C on channel 1 (0001) of slot (module number ) 0.1. On the content selection tree, click the Config. tab.
Config. tab
2. On the tree, click AI channel settings, 0001-0010, and Range.
3. For channel (CH) 0001, set the following items. Type: TC, Range: T, Span Lower: 0.0, Span Upper: 200.04. Click Update Configuration in the lower right of the screen. A Update Configuration dialog box appears.5. Click OK.
Setting Measurement and Recording ConditionsThe example here explains how to change the recording interval when the following settings are at their default values. File type: Event, Scan interval: 1s (or 2s), Recording mode: Free (record data at all times)• The measurement and recording conditions vary depending
on the number of recording channels, recording interval, and so on.
1. Click the Config. tab, Recording settings, and Recording basic settings.
Recording interval
Data length
2. Select the recording interval.• You cannot select a recording interval that is shorter than the
scan interval. If necessary, set the data length. The data length specifies the
size of a single recording data file (the save interval).3. Click Update Configuration in the lower right of the screen. A Update Configuration dialog box appears.4. Click OK.
Setting Display GroupsThis setting is necessary for displaying measurement data. You can assign channels and the group name to each display group. For details, see the User’s Manual. The example here explains how to assign AI channels 0001 to 0010 to group number 1.1. Click the Config. tab, Display settings, Group settings, and
1-20.2. Select the On/Off check box of group number 1, and click the
button under Channel set.
Channel number display
The Group number [1] Channel set dialog box appears.3. Set AI channel 001 to 0010 to On, and click OK. The selected
channels appear under Channel set.4. Click Update Configuration in the lower right of the screen. A Update Configuration dialog box appears.5. Click OK.
Configuring the GM via USB CommunicationIn the case of USB communication, use the Hardware Configurator (hereafter refer to as the software). For details on the features and operating procedures of the software, see the SMARTDAC+ STANDARD Hardware Configurator User’s Manual (IM 04L61B01-02EN).1. Connect a cable to the GM10 USB port (mini B type) to
communicate with the PC. Connect using the following communication conditions. Baud rate: 115200, parity: none, data length: 8 bits, stop bits: 1 bit, handshake: off:off
Make sure that the PC is connected to the Internet. A USB driver will be downloaded automatically.
2. Start the software.
Reconfiguring (Module identification)1. On the menu bar, click the Operation tab and then
Reconfiguration. A Communication [Reconfiguration] dialog box appears.2. Enter the information, and click OK. You can check the port USB number using Windows Device
Manager.3. When a confirmation dialog box appears, click OK. A
reconfiguration completion dialog box appears.4. Click OK.
Configuring Various ItemsFor details on settings, see the Web application.
Send SettingsReceive Settings
1. On the menu bar, click the Setting tab and then Receive Settings.
2. When a Communication [Reconfiguration] dialog box appears, click OK.
The setup data of the connected GM will appear.3. Set the items.4. On the menu bar, click the Setting tab and then Send
Settings.5. When a Communication [Reconfiguration] dialog box appears,
click OK. The setup data will be sent to the connected GM. You can also save the setup data to be sent later.
Starting to Measure and RecordStarting from the Web BrowserFrom the Web Application1. On the menu bar, click the SMARTDAC+ Web Service tab
and then Recording.2. When a Recording dialog box appears, click Start recording.
Recording will start.• To stop recording, in step 2 above, click Stop recording.
From Hardware Configurator1. On the menu bar, click the Operation tab and then Start
Recording.2. When a Communication [Reconfiguration] dialog box appears,
click OK. Recording will start.• To stop recording, in step 2 above, click Stop Recording.
Starting with the GM10 START Key Hold down the START key on the GM10 front panel for at
least 2 seconds. Recording will start, and “REC” in the GM10 status display
area will light in green.• Stopping the Recording Hold down the STOP key for at least 2 seconds. The “REC”
indicator will turn off.• The “REC” LED also turns on and off when recording is
started and stopped from the Web application or Hardware Configurator.
To connect to the GM via Bluetooth, see page 8 in this guide.

IM 04L55B01-02EN 5
Installation
● BeforeinstallingtheGM,linkingmodules,andinstallingmodules, be sure to turn off the power.
● Applymoretorquethanwhatisrecommendedtotightenthe screws can deform the case or cause other damage.
Installation LocationInstall the GM indoors in an environment that meets the following conditions:• Ambient temperature range between -20 to 60°C (but -20 to
50°C when any of the following modules and the GM10 (/C8 option) are used)• GX90YD, GX90WD, or GX90XA-T1 (electromagnetic relay
type)• Ambient humidity between 20 to 85%RH No condensation should be present.
NoteCondensation may form when moving the GM from a low temperature or humidity environment to a high temperature or humidity environment, or when there is a sudden change in temperature. Temperature or humidity changes may also result in thermocouple measurement errors. In these kinds of circumstances, wait for at least an hour before using the GM, to acclimate it to the surrounding environment.
• Well-Ventilated Location To prevent overheating, install the GM in a well-ventilated
location.• Minimal Mechanical Vibrations Install the GM in a location that has minimal mechanical
vibrations. Installing the GM in a location that is subject to large levels of mechanical vibration will not only put added stress on its components, it may also impede ordinary measurement.
• Level Location Install the GM in a level location so that it is not slanted to the
left or the right.Do not install the instrument in the following kinds of places.• Outdoors• In Direct Sunlight or Near Heat Sources Install the GM in a place that is near room temperature (23°C)
and that is not subject to large temperature fluctuations. Placing the GM in direct sunlight or near heat sources can cause adverse effects on the internal circuitry.
• Where an excessive amount of soot, steam, moisture, dust, or corrosive gases are present Soot, steam, moisture, dust, and corrosive gases will adversely affect the GM. Avoid installing the GM in such locations.
• Near Strong Magnetic Field Sources Do not bring magnets or instruments that produce
electromagnetic fields close to the GM. Operating the GM near strong magnetic fields can cause measurement errors.
Installation ProcedureThe GM can be installed on a desktop or floor, mounted on a DIN rail, or mounted on a wall. Regardless of the installation method, be sure to install it in an upright orientation.
Linking the Module BaseAll modules except the GM90PS can be linked together by attaching GM90MBs. To wall mount the GM, mount the GM90MBs to the wall first, and then install the modules.For the linking procedure, see “Operating Procedure” on page 3.
Notes on Linking ModulesNote
• If a GX90XA (electromagnetic relay type: -T1) is connected, the main unit (single unit system) can connect up to eight I/O modules.
• If you want to use reference junction compensation on a thermocouple input of a GX90XA, do not install the following module to the right of the GX90XA as seen from the front. Doing so may cause the reference junction compensation accuracy to deviate from the guaranteed range.
GX90XA-10-C1 (for mA) or GX90WD• Up to a total of 10 GX90YDs and GX90WDs can be
connected in each system.• One GX90WD can be installed in each unit.• If the maximum number of I/O channels are assigned and
the last channel is assigned to an intermediate channel of a connected I/O module, that module and subsequent modules will not be identified.
n
• • •
1
10
1
:
81
90
:
91
100
106
:
:Maximum number of I/O channels
This module will not be detected.
GM10-1
• Do not link modules in a way that violates the specifications. Doing so can cause the GM system to crash. For details on the ways modules could be linked to crash the GM system, see the User’s Manual.
Unit External Dimensions (Unit: mm)Depth: 146 mm max.Main Unit (single unit system)
88
138188238288338388438488538588638
GM90PSI/O module GM10GM90MB
Main Unit (multi unit system)
GM90PSGX90EX I/O module GM10
88
138188238288338388438488
GM90MB
Sub Unit (multi unit system)
GM90PSGX90EXI/O module
88
138188238288338388438
GM90MB
Installing on a Desktop or FloorThe system can be placed upright because the GM90PS and GM90MB have legs. For the module installation procedure, see “Operating Procedure.”
Legs
Mounting on a DIN Rail
When mounting on a DIN rail, place screws at 70 mm intervals or less. This is necessary to ensure adequate support.
1. Hook the top section of the DIN rail mounting groove on the rear panel of the GM (GM90PS or GM90MB) to the DIN rail.
2. Push the bottom section of the GM until you hear a click. The GM is fixed in place with the latches on the rear panel of
the GM.
DIN rail mounting groove
Latch
Lower the latch to remove.
Hook
Push in from the front.
DIN rail
DIN rail
Rear of GM
Click!
Check that all the latches are securely fastened to the DIN rail.Removing from the DIN Rail1. Lower the latch on the rear panel of the GM using a flat-blade
screwdriver or the like. Lower it until you hear a click; the latch will be fixed in place at
that position.2. Pull the GM slightly toward you, and lift up to remove.
Vertical Dimensions for DIN Rail Mounting
DIN rail Unit: mm
68.6
185
Mounting on a WallWall Mount Dimensions
88
185
M4 depth 3 mm or more
90.5
120.5
GM90PSGM90MB
170.5220.5
Unit: mm(Tolerance: ±0.3 mm)
270.5320.5
370.5420.5
470.5520.5
570.5620.5
140.5190.5
240.5290.5
340.5390.5
440.5490.5
540.5590.5
Prepare enough M4 screws (4 mm or longer) (hereafter referred simply as screws) for wall mounting the modules. You need two screws for each module. Recommended tightening torque: 0.6 to 0.7 N•m
In wall mounting, the GM90PS is the reference. First, as shown in the figure below, fix the GM90PS securely
in place with two screws. Next, link GM90MBs to the GM90PS.
Screw
Link GM90MBs to the right of the GM90PS as seen from the front. While pressing the GM90MB against the GM90PS, fasten in place with screws.
• GM90MBs can be fixed in place one at a time or at once after they have been linked.
Holes for wall mounting
GM90MB GM90PS
For the linking procedure, see “Operating Procedure” on page 3.After fixing the GM90MBs in place, install the modules.
NoteInstall so that nameplate on the right side of the GM90PS is visible.
Installation

IM 04L55B01-02EN 6
Wiring
Wiring
● Topreventelectricshockwhilewiring,makesurethatthepower supply is turned off.
● Ifavoltageofmorethan30VACor60VDCistobeap-plied to the output terminals, use ring-tongue crimp-on lugs with insulation sleeves on all terminals to prevent the signal cables from slipping out when the screws become loose. Furthermore, use double-insulated cables (dielectric strength of 2300 VAC or more) for the signal cables on which a voltage of 30 VAC or 60 VDC or more is to be applied. For all other signal cables, use basic insu-lated cables (dielectric strength of 1390 VAC). To prevent electric shock, attach the terminal cover after wiring and make sure not to touch the terminals.
● Applyingastrongtensiontotheinputandoutputsignalcables connected to the GM may damage the cables or the GM terminals. To avoid applying tension directly to theterminals,fixallcablestothemountingpanel.
● Topreventfire,usesignalcableswithatemperaturerat-ing of 70°C or more.
● Donotapplyvoltagesthatexceedthefollowingvaluesto the input terminals. Doing so may damage the instru-ment.GX90XA• Maximum input voltage: ±60 VDC (±10 VDC when the type
suffix code is -C1• Maximum common mode voltage: ±60 VDC (under mea-
surement category II conditions)GX90XD• Maximum input voltage: +10 VDC• Maximum common mode voltage: ±50 VDC
● TheGMisaninstallationcategoryIIproduct.
Precautions to Be Taken While WiringTake the following precautions when wiring the input signal cables.● With a screw terminal, we recommend that you use a crimp-
on lug with an insulation sleeve (M4 for power supply wiring, M3 for signal wiring).
Crimp-on lug with an insulation sleeve
Recommended signal wiring crimp-on lug
N1.25-MS3 (JST Mfg. Co., Ltd.)
● With a clamp terminal, we recommend the following wire.GX90XACross-sectional area 0.05 mm2 to 1.5 mm2 (AWG30 to 16)Stripped wire length 5 to 6 mmGX90XDCross-sectional area 0.2 mm2 to 1.5 mm2 (AWG24 to 16)Stripped wire length 9 to 10 mmRS-422/485 (/C3 option)Cross-sectional area 0.08 mm2 to 1.5 mm2 (AWG28 to 16)Stripped wire length 6 to 7 mm
● Take measures to prevent noise from entering the measurement circuit.• Move the measurement circuit away from the power cable
(power circuit) and ground circuit.• Ideally, the object being measured should not generate
noise. However, if this is unavoidable, isolate the measurement circuit from the object. Also, ground the object being measured.
• Shielded wires should be used to minimize the noise caused by electrostatic induction. Connect the shield to the ground terminal of the GM as necessary (make sure you are not grounding at two points).
• To minimize noise caused by electromagnetic induction, twist the measurement circuit wires at short, equal intervals.
• Make sure to earth ground the protective ground terminal through minimum resistance.
● When using internal reference junction compensation on the thermocouple input, take measures to stabilize the temperature at the input terminal.• Always use the terminal cover.• Do not use thick wires which may cause large heat
dissipation (we recommend a cross sectional area of 0.5 mm2 or less).
• Make sure that the ambient temperature remains reasonably stable. Large temperature fluctuations can occur if a nearby fan turns on or off.
● Connecting the input wires in parallel with other devices can cause signal degradation, affecting all connected devices. If you need to make a parallel connection, then• Turn the burnout detection function off.• Ground the instruments to the same point.• Do not turn other instruments on or off during operation.
This can have adverse effects on the other instruments.• RTDs cannot be wired in parallel.
Removing and Attaching a Terminal CoverRemoving the Terminal Cover Loosen the screw at the bottom section of the terminal cover,
and remove the cover.Attaching the Terminal Cover
A
The shape of the cover varies depending on the module, but the procedure is the same.
1. Insert the two hooks at the top section on the inside of the terminal cover into A, and push the bottom section of the terminal cover.
2. Fasten the screw at the bottom section of the terminal cover to fix the cover in place.Recommended tightening torque: 0.6 N•m
Removing and Attaching a Terminal BlockRemoving the GX90XA Terminal Block Push down on the lever at the bottom section of the module,
and pull the terminal block out.Attaching the GX90XA Terminal Block Insert the terminal block into the module, and push the lever
firmly against the module (at the position indicated by the arrow in the figure).
Terminal block release lever
Side view of module
For modules other than the GX90XA, you can use the attachment screw to remove and attach them.
Terminal block attachment screw
Recommended torque for tightening the terminal block attachment screws: 0.1 N•m
Wiring ProcedureA terminal cover is screwed in place on the I/O terminal block. A label indicating the terminal arrangement is affixed to the cover.1. Turn off the power, and remove the terminal cover.2. Connect the signal cables to the terminals.
Recommended torque for tightening the screws
Screw terminal (M3) 0.5 to 0.6 N•mClamp terminal GX90XA: 0.4N•m
GX90XD: 0.5N•m
3. Replace the terminal cover and fasten it with screws. The recommended tightening torque for the screws is 0.6 N•m.
NoteWith a clamp terminal, if you use a single wire whose diameter is 0.3 mm or less, you may not be able to clamp the wire securely to the terminal. Take measures to securely clamp the wire such as by folding the conductor section that will be connected to the clamp terminal in half.
Internal dimensions of the M3 screw terminal (unit: mm)
6 0
−0.1
Wiring to a GX90XA Analog Input ModuleTerminal Diagram
CH1301/201/101 101
102103
113114115
310/210/110
M3 screw terminal Clamp terminal
Wiring direction
CH10
201202203
213214215
CH1
CH3
CH5CH7CH9
CH2
CH4
CH6CH8
CH10
Wiring direction
+−
DC voltage input/DI/current input
+−
DC current input (with an external shunt resistor)
A
A
B
B
b
b
RTD input
++
−
−
TC input
Terminal ArrangementM3 screw terminal
CHNo.
Term. No.
Symbol Term. No.
Symbol Term. No.
Symbol
CH1 301 b1 201 -/B 101 +/ACH2 302 b1 202 -/B 102 +/ACH3 303 b1 203 -/B 103 +/ACH4 304 b1 204 -/B 104 +/ACH5 305 b1 205 -/B 105 +/ACH6 306 b1 206 -/B 106 +/ACH7 307 b1 207 -/B 107 +/ACH8 308 b1 208 -/B 108 +/ACH9 309 b1 209 -/B 109 +/ACH10 310 b1 210 -/B 110 +/A
1 There are no symbol indications for the electromagnetic relay type, current input type, or low withstand voltage relay type.
Clamp terminalCHNo.
Term. No.
Symbol CHNo.
Term. No.
Symbol
201 +/A 101 +/ACH2 202 -/B CH1 102 -/B
203 b1 103 b1
204 +/A 104 +/ACH4 205 -/B CH3 105 -/B
206 b1 106 b1
207 +/A 107 +/ACH6 208 -/B CH5 108 -/B
209 b1 109 b1
210 +/A 110 +/ACH8 211 -/B CH7 111 -/B
212 b1 112 b1
213 +/A 113 +/ACH10 214 -/B CH9 114 -/B
215 b1 115 b1
1 There are no symbol indications for the current input type or low withstand voltage relay type.
The RTD b terminal is connected internally.There are no RTD inputs on the electromagnetic relay type.
Wiring to a GX90XD Digital Input ModuleTerminal Diagram
DI1
M3 screw terminal Clamp terminal
DI8COMCOM
DI9
DI16 COM
DI9
DI16
DI1
DI8COM
Wiring direction Wiring direction
(11)
(19)
(11)
(19)
(21)
(29)
(21)
(29)
Terminal ArrangementTerm. No. Symbol Term. No. Symbol21 DI9 11 DI122 DI10 12 DI223 DI11 13 DI324 DI12 14 DI425 DI13 15 DI526 DI14 16 DI627 DI15 17 DI728 DI16 18 DI829 COM 19 COM30 - 20 -

IM 04L55B01-02EN 7
Wiring (continued)
Wiring (continued)Wiring to a GX90YD Digital Output ModuleTerminal Diagram
DO1N.C.COMN.O.N.C.COMN.O.N.C.COMN.O.
N.C.COMN.O.N.C.COMN.O.N.C.COMN.O.
M3 screw terminal
DO2
DO3
DO4
DO5
DO6
Wiring direction
111213141516171819
212223242526272829
Terminal ArrangementDO No. Term. No. Symbol DO No. Term. No. Symbol
21 NC 11 NCDO4 22 COM DO1 12 COM
23 NO 13 NO24 NC 14 NC
DO5 25 COM DO2 15 COM26 NO 16 NO27 NC 17 NC
DO6 28 COM DO3 18 COM29 NO 19 NO30 - 20 -
Wiring to a GX90WD Digital I/O ModuleTerminal Diagram
CH1301/201/101
310/210/110
M3 screw terminal
Wiring direction
CH10
Terminal ArrangementCHNo.
Term. No.
Symbol Term. No.
Symbol Term. No.
Symbol
DI1 to DI8
301 DI3 201 DI2 101 DI1302 DI6 202 DI5 102 DI4303 DICOM 203 DI8 103 DI7
— 304 - 204 - 104 -DO1 305 DO1NO 205 DO1COM 105 DO1NCDO2 306 DO2NO 206 DO2COM 106 DO2NCDO3 307 DO3NO 207 DO3COM 107 DO3NCDO4 308 DO4NO 208 DO4COM 108 DO4NCDO5 309 DO5NO 209 DO5COM 109 DO5NCDO6 310 DO6NO 210 DO6COM 110 DO6NC
Recommended torque for tightening the screws: 0.5 N•m
Connecting to the RS-422/485 Connector (/C3 option)
Two-wire systemFour-wire system
Electric potential of the shield
Shield
FG
SDB+SG
SDA−RDB+RDA−
Electric potential of the shield
Shield
FG
SDB+SG
SDA−
FG (Frame Ground) Case ground of the GM main unitSG (Signal Ground) Signal groundSDB+ (Send Data B+) Send data B (+)SDA− (Send Data A−) Send data A (–)RDB+ (Received Data B+) Receive data B (+)RDA− (Received Data A−) Receive data A (–)
Recommended torque for tightening the screws: 0.2 N•m
Connecting to the USB PortA USB2.0 port (mini B type) is available.Using a dedicated protocol, you can operate and configure the GM10 and output data.
Connecting to the Ethernet PortChecking the Connection and Communication StatusYou can use the indicators that are located above the GM10 Ethernet port to check the connection status of the Ethernet interface.
Indicators
Yellow green
Orange
Indicators Connection Status of the Ethernet InterfaceLit (yellow-green) The Ethernet link is established.Off (yellow-green) The Ethernet link is not established.Blinking (yellow-green) Receiving dataLit (orange) Connected at 100 MbpsOff (orange) Connected at 10 Mbps
Wiring the Power SupplyUse a power supply that meets the following conditions:Item ConditionRated supply voltage 100 to 240 VAC ± 10%Allowable power supply voltage range
90 to 132 VAC, 180 to 264 VAC
Rated power supply frequency 50/60HzPermitted power supplyfrequency range
50/60Hz ± 2%
Power consumption
Supply voltage100V AC
25 VA (normal operation*)
45 VA (maximum)
Supply voltage240V AC
35 VA (normal operation*)
60 VA (maximum)
* When 10 GX90XAs are connected
Note• Do not use a supply voltage of 132 to 180 VAC, as this may
have adverse effects on the measuring accuracy.Notes on the Functional Ground Terminal• To reduce noise, use a shielded cable for wiring. Connect the
shield to the functional ground terminal or the ground terminal of the GM.
• Do not wire the protective grounding cord to the functional ground terminal.
Functional ground terminal
Precautions to Be Taken While Wiring the Power Supply (power supply M4 screw terminals)Make sure to follow the warnings below when wiring the power supply. Failure to do so may cause electric shock or damage to the instrument.
● Topreventelectricshock,ensurethatthepowersupplyisturned off.
● Topreventfire,use600VPVCinsulatedwires(AWG20toAWG16; JISC3307) or wires or cables with equivalent or better performance.
● Makesuretoearthgroundtheprotectivegroundterminalthrough minimum resistance before you turn on the pow-er.
● Usecrimp-onlugs(designedfor4mmscrews)within-sulation sleeves to connect both the power cord and the protective ground.
● Topreventelectricshock,besuretoclosethetranspar-ent cover for the power supply wires.
● Provideapowerswitch(double-poletype)onthepowersupply line to separate the GM from the main power sup-ply. Use labels to indicate that this switch is for cutting off the power supply to the GM and to indicate ON and OFF.Switch specificationsSteady-state current rating 3 A or moreInrush current rating 70 A or moreMust comply with IEC60947-1 and IEC60947-3.
● Donotaddaswitchorfusetothegroundline.
Wiring Procedure1. Turn off the GM90PS power supply, and then remove the
transparent power supply terminal cover.2. Connect the power cord and the protective ground cord to the
power supply terminal. Use ring-tongue crimp-on lugs (for M4 screws) with insulation sleeves. The recommended torque for tightening the screws is 1.4 to 1.5 N•m.
Protective groundL(+) N(−)
3. Attach the transparent power supply terminal cover, and fasten it with screws.
Precautions to Be Taken When Connecting the Power Supply (Power inlet)Make sure to follow the warnings below when connecting the power supply. Failure to do so may cause electric shock or damage to the instrument.
● Beforeconnectingthepowercord,ensurethatthesourcevoltage matches the rated supply voltage of the GM90PS and that it is within the maximum rated voltage range of the provided power cord.
● Connectthepowercordaftercheckingthatthepowerswitch of the GM90PS is turned OFF.
● Topreventelectricshockandfire,besuretouseapowercord purchased from Yokogawa Electric Corporation.
● Makesuretoconnectprotectiveearthgroundingtopre-vent electric shock. Insert the power cord into a grounded three-prong outlet.
● Donotuseanextensioncordwithoutaprotectiveearthground. If you do, the instrument will not be grounded.
Connection Procedure1. Check that the GM90PS power switch is off.2. Connect the supplied power cord plug to the power inlet.
3. Make that the source voltage is within the maximum rated
voltage range of the provided power cord. Then, connect the other end of the cord to the outlet. Use a grounded three-prong outlet.
Turning the Power On and Off
Check the following points before turning on the power switch.● Thepowercordorwiresareconnectedproperly.● TheGMisconnectedtothecorrectpowersupply.If the input wiring is connected in parallel with another instrument, do not turn on or off the GM or other instrument during operation. If you do, measured values may be affected.Check the following points before turning off the power switch.● TheGM10isnotaccessingtheexternalstoragemedium.
You can turn the power on and off using the power switch on the front panel of the GM90PS.
A self-test takes place for a few seconds, and then the GM will be running.
Power switch
IM 04L55B01-02EN 8
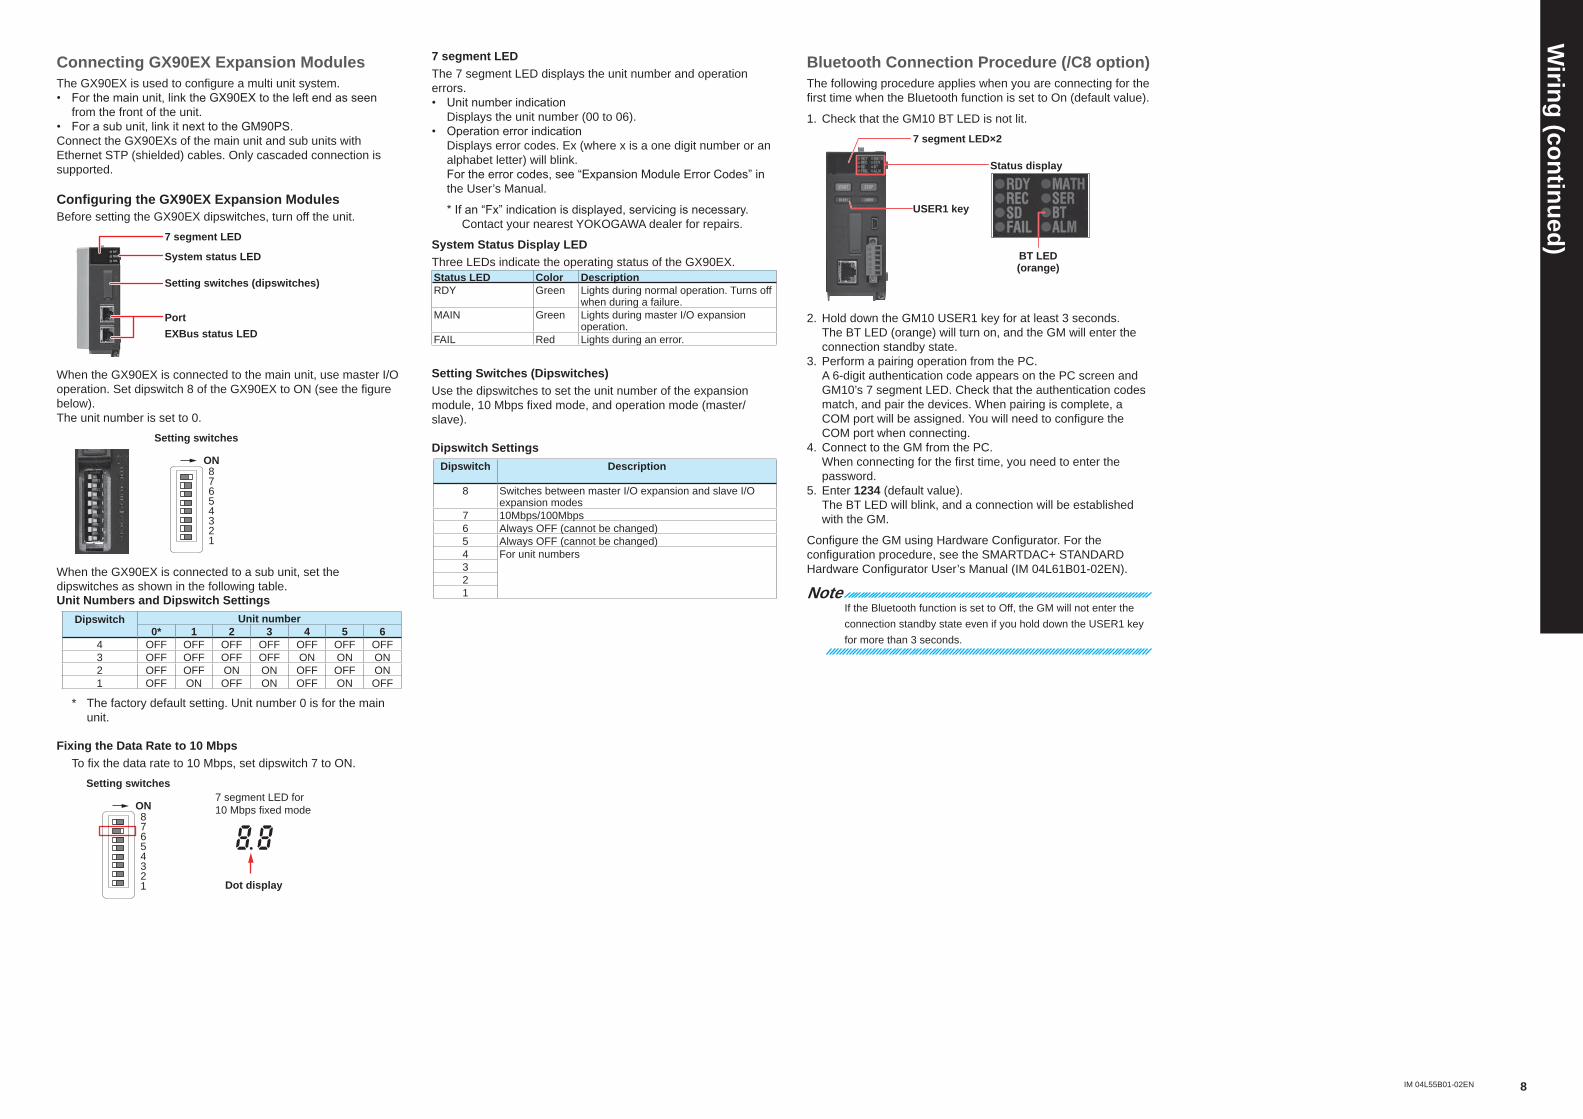
Connecting GX90EX Expansion ModulesThe GX90EX is used to configure a multi unit system.• For the main unit, link the GX90EX to the left end as seen
from the front of the unit.• For a sub unit, link it next to the GM90PS.Connect the GX90EXs of the main unit and sub units with Ethernet STP (shielded) cables. Only cascaded connection is supported.
Configuring the GX90EX Expansion ModulesBefore setting the GX90EX dipswitches, turn off the unit.
Port
Setting switches (dipswitches)
System status LED
EXBus status LED
7 segment LED
When the GX90EX is connected to the main unit, use master I/O operation. Set dipswitch 8 of the GX90EX to ON (see the figure below).The unit number is set to 0.
12345678
ON
Setting switches
When the GX90EX is connected to a sub unit, set the dipswitches as shown in the following table.Unit Numbers and Dipswitch Settings
Dipswitch Unit number0* 1 2 3 4 5 6
4 OFF OFF OFF OFF OFF OFF OFF3 OFF OFF OFF OFF ON ON ON2 OFF OFF ON ON OFF OFF ON1 OFF ON OFF ON OFF ON OFF
* The factory default setting. Unit number 0 is for the main unit.
Fixing the Data Rate to 10 Mbps To fix the data rate to 10 Mbps, set dipswitch 7 to ON.
7 segment LED for 10 Mbps fixed mode
Dot display12345678
ON
Setting switches
7 segment LEDThe 7 segment LED displays the unit number and operation errors.• Unit number indication Displays the unit number (00 to 06).• Operation error indication Displays error codes. Ex (where x is a one digit number or an
alphabet letter) will blink. For the error codes, see “Expansion Module Error Codes” in
the User’s Manual.
* If an “Fx” indication is displayed, servicing is necessary. Contact your nearest YOKOGAWA dealer for repairs.
System Status Display LEDThree LEDs indicate the operating status of the GX90EX.Status LED Color DescriptionRDY Green Lights during normal operation. Turns off
when during a failure.MAIN Green Lights during master I/O expansion
operation.FAIL Red Lights during an error.
Setting Switches (Dipswitches)Use the dipswitches to set the unit number of the expansion module, 10 Mbps fixed mode, and operation mode (master/slave).
Dipswitch SettingsDipswitch Description
8 Switches between master I/O expansion and slave I/O expansion modes
7 10Mbps/100Mbps6 Always OFF (cannot be changed)5 Always OFF (cannot be changed)4 For unit numbers321
Bluetooth Connection Procedure (/C8 option)The following procedure applies when you are connecting for the first time when the Bluetooth function is set to On (default value).
1. Check that the GM10 BT LED is not lit.
USER1 key
Status display
7 segment LED×2
BT LED(orange)
2. Hold down the GM10 USER1 key for at least 3 seconds. The BT LED (orange) will turn on, and the GM will enter the
connection standby state.3. Perform a pairing operation from the PC. A 6-digit authentication code appears on the PC screen and
GM10’s 7 segment LED. Check that the authentication codes match, and pair the devices. When pairing is complete, a COM port will be assigned. You will need to configure the COM port when connecting.
4. Connect to the GM from the PC. When connecting for the first time, you need to enter the
password.5. Enter 1234 (default value). The BT LED will blink, and a connection will be established
with the GM.
Configure the GM using Hardware Configurator. For the configuration procedure, see the SMARTDAC+ STANDARD Hardware Configurator User’s Manual (IM 04L61B01-02EN).
NoteIf the Bluetooth function is set to Off, the GM will not enter the connection standby state even if you hold down the USER1 key for more than 3 seconds.
Wiring (continued)