dante-my16-aud & rio series ha remote control · pdf filedante-my16-aud & rio series...
TRANSCRIPT

Dante-MY16-AUD & Rio series HA Remote Control Guide
2nd Edition: March 2013

Yamaha Commercial Audio Dante-MY16-AUD HA Remote Control Guide
2 www.yamahaproaudio.com
This guide describes the examples and setting procedures of a system where you remote-control the head amplifier (hereafter called the HA) of an I/O rack (Rio3224-D, Rio1608-D, Ri8-D, etc.) connected with the Dante audio network, via the Dante-MY16-AUD card inserted in a slot in a Yamaha digital mixer (PM5D, M7CL, LS9, etc.). This solution allows you to remote-control it in a system where a Dante-compatible I/O rack is added and incorporated, using your favorite digital mixer as it is. The setting procedure for a digital mixer varies with the model. For details, please also refer to the Owner’s Manual of the applicable model. Table of Contents
System Examples ................................................................................... 3
Equipment List ........................................................................................ 6
Connections for HA Control .................................................................. 7
Settings for Rio ....................................................................................... 8
Settings by Dante Controller ............................................................... 11
Settings for the Digital Mixer ............................................................... 12
Yamaha Commercial Audio Dante-MY16-AUD HA Remote Control Guide
3 www.yamahaproaudio.com
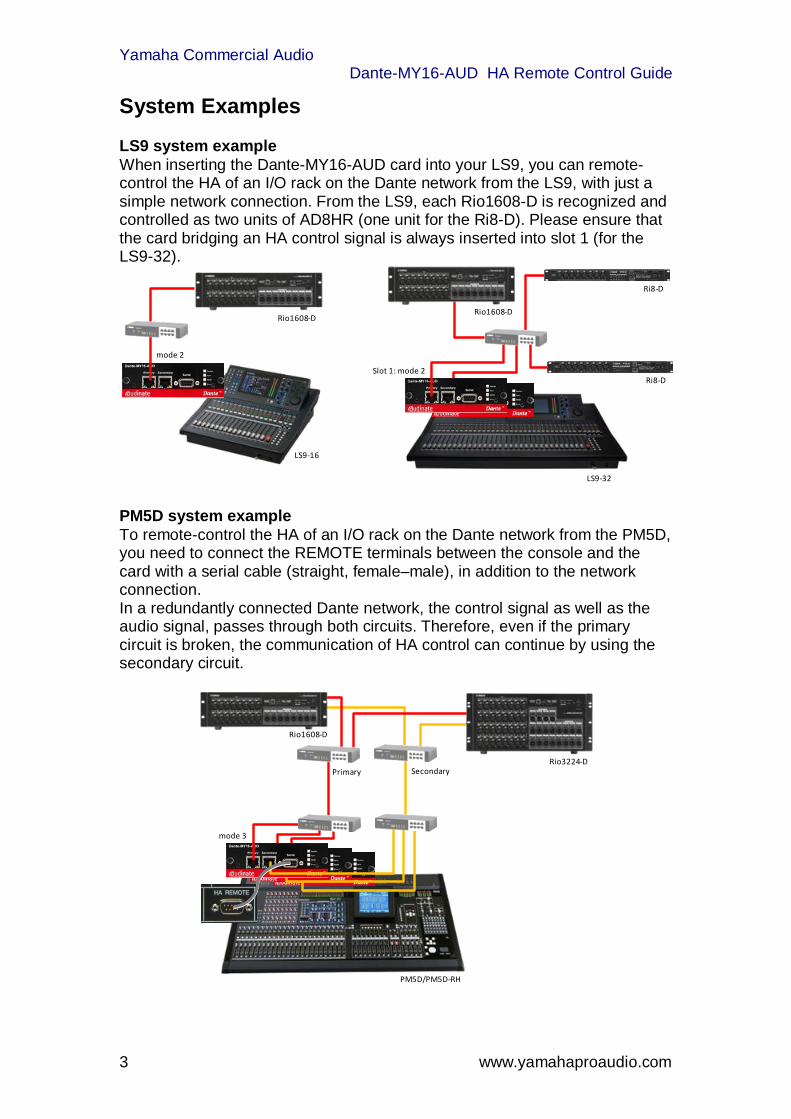
System Examples LS9 system example When inserting the Dante-MY16-AUD card into your LS9, you can remote-control the HA of an I/O rack on the Dante network from the LS9, with just a simple network connection. From the LS9, each Rio1608-D is recognized and controlled as two units of AD8HR (one unit for the Ri8-D). Please ensure that the card bridging an HA control signal is always inserted into slot 1 (for the LS9-32).
PM5D system example To remote-control the HA of an I/O rack on the Dante network from the PM5D, you need to connect the REMOTE terminals between the console and the card with a serial cable (straight, female–male), in addition to the network connection. In a redundantly connected Dante network, the control signal as well as the audio signal, passes through both circuits. Therefore, even if the primary circuit is broken, the communication of HA control can continue by using the secondary circuit.
Slot 1: mode 2
mode 2
LS9-16
LS9-32
Rio1608-DRio1608-D
Ri8-D
Ri8-D
mode 3
Rio1608-D
Rio3224-DPrimary Secondary
PM5D/PM5D-RH

Yamaha Commercial Audio Dante-MY16-AUD HA Remote Control Guide
4 www.yamahaproaudio.com
Multiple console system example You can also connect multiple consoles onto the Dante network to share an I/O rack. In this case, although an audio signal can be distributed to multiple consoles from the same I/O rack by patching with the Dante Controller, the HA can only be controlled from one of the consoles. In the following example, the HA is controlled from the PM5D only, and the CL5 only shares an audio signal. Please see below for details about the system with multiple consoles.
When you connect multiple consoles onto the Dante network to share an I/O rack, an audio signal can be distributed to multiple consoles from the same I/O rack, but the HA of the same I/O rack cannot be controlled from multiple consoles.
It is only when the Rio series (in NATIVE mode) is controlled from the CL series that the same I/O rack can be controlled from multiple consoles (in this case, also the Gain Compensation function can be used). However, even on the same network, the HA of a different I/O rack can be controlled from other consoles.
mode 3
PM5D/PM5D-RH
CL5
Rio3224-DRio3224-D
Primary Secondary
CL Other Consoles Other Consoles Other Consoles
GainCompensation
GainCompensation
Native mode AD8HR modeNative mode
CL CL CL Other Consoles

Yamaha Commercial Audio Dante-MY16-AUD HA Remote Control Guide
5 www.yamahaproaudio.com
When the HA is controlled from the CL series, gain of the signal passing through the network can be kept constant by the Gain Compensation function. That is, in the example below, even if the HA gain is changed from the CL series, the level of the audio signal to be input to the PM5D will not fluctuate. When the HA is controlled from other consoles, the Rio series is operated in AD8HR mode; therefore, the Gain Compensation function cannot be used.
Note: To control nine or more units of Rio series from one CL series console, you can also control the Rio series (in AD8HR mode) via a Dante-MY16-AUD inserted in slot 1.
Examples of the system mixed with AD8HR The HA can be controlled even in the system mixed with such HA equipment as the Rio series, the AD8HR, and the DME24N. However, when you control these HAs, please ensure that their IDs are unique to each other. The ID of an AD8HR is automatically assigned in the order of daisy chain connection, and the ID of a DME24N is set with the DME Designer software. As for the Rio series, its virtual AD8HR ID is set from the front panel rotary switch (cf. page 8).
GainCompensation
Native mode AD8HR mode
CL CL Other ConsolesOther Consoles
Unit ID: 2 = Virtual ID 3, 4
Auto = ID 1, 2AD8HR
Rio1608-D

Yamaha Commercial Audio Dante-MY16-AUD HA Remote Control Guide
6 www.yamahaproaudio.com
Equipment List
1. Yamaha digital mixer (PM5D/PM5D-RH, M7CL-32/48, M7CL-48ES, LS9, DM2000, DM1000) or digital mixing engine (DME64N/24N)
2. Dante-MY16-AUD card (firmware v3.3.9 or later) 3. Dante-compatible Yamaha HA equipment (Rio3224-D, Rio1608-D, Ri8-
D, etc.) 4. PC or Mac where Dante Controller v3.2.9 or later is installed 5. Gigabit network switch, network cable of CAT5e or better 6. D-sub 9-pin straight serial cable (male–female)*
*Precautions for a serial cable: ・ This is not required when you control the HA via the Dante network from
the M7CL-48ES, the LS9, or the CL series. To control the HA from another digital mixer, a serial cable is required. Moreover, it is required when you control such HA equipment as the AD8HR from the REMOTE terminal of the Dante-MY16-AUD card.
・ The serial cable to use is a D-sub 9-pin straight cable, of male–female type. As an alternative, you can use a straight cable of female–female type with a gender changer (conversion adapter) of male–male type.
or
Female Male
Straight
StraightStraight
Female Female Male - Male
Yamaha Commercial Audio Dante-MY16-AUD HA Remote Control Guide
7 www.yamahaproaudio.com
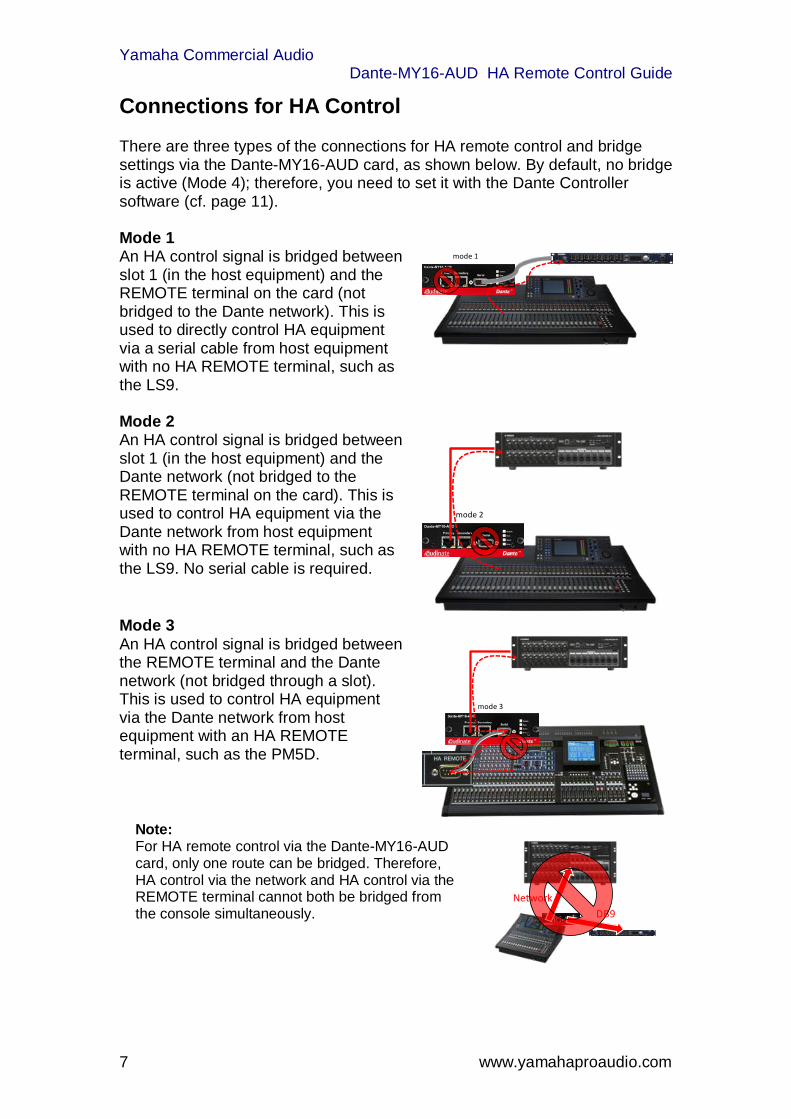
Connections for HA Control There are three types of the connections for HA remote control and bridge settings via the Dante-MY16-AUD card, as shown below. By default, no bridge is active (Mode 4); therefore, you need to set it with the Dante Controller software (cf. page 11). Mode 1 An HA control signal is bridged between slot 1 (in the host equipment) and the REMOTE terminal on the card (not bridged to the Dante network). This is used to directly control HA equipment via a serial cable from host equipment with no HA REMOTE terminal, such as the LS9.
Mode 2 An HA control signal is bridged between slot 1 (in the host equipment) and the Dante network (not bridged to the REMOTE terminal on the card). This is used to control HA equipment via the Dante network from host equipment with no HA REMOTE terminal, such as the LS9. No serial cable is required.
Mode 3 An HA control signal is bridged between the REMOTE terminal and the Dante network (not bridged through a slot). This is used to control HA equipment via the Dante network from host equipment with an HA REMOTE terminal, such as the PM5D.
Note: For HA remote control via the Dante-MY16-AUD card, only one route can be bridged. Therefore, HA control via the network and HA control via the REMOTE terminal cannot both be bridged from the console simultaneously.
mode 1
mode 2
mode 3
DB9Network
Yamaha Commercial Audio Dante-MY16-AUD HA Remote Control Guide
8 www.yamahaproaudio.com
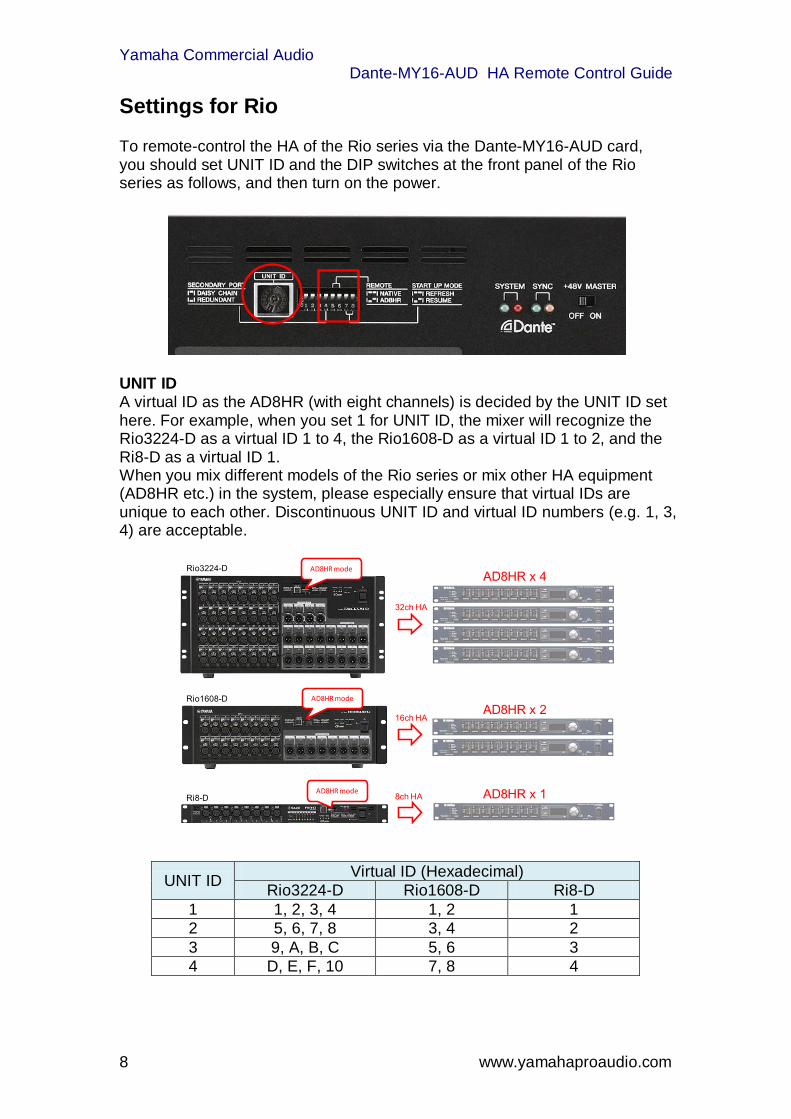
Settings for Rio To remote-control the HA of the Rio series via the Dante-MY16-AUD card, you should set UNIT ID and the DIP switches at the front panel of the Rio series as follows, and then turn on the power.
UNIT ID A virtual ID as the AD8HR (with eight channels) is decided by the UNIT ID set here. For example, when you set 1 for UNIT ID, the mixer will recognize the Rio3224-D as a virtual ID 1 to 4, the Rio1608-D as a virtual ID 1 to 2, and the Ri8-D as a virtual ID 1. When you mix different models of the Rio series or mix other HA equipment (AD8HR etc.) in the system, please especially ensure that virtual IDs are unique to each other. Discontinuous UNIT ID and virtual ID numbers (e.g. 1, 3, 4) are acceptable.
UNIT ID Virtual ID (Hexadecimal) Rio3224-D Rio1608-D Ri8-D
1 1, 2, 3, 4 1, 2 1 2 5, 6, 7, 8 3, 4 2 3 9, A, B, C 5, 6 3 4 D, E, F, 10 7, 8 4
AD8HR mode
AD8HR mode
AD8HR mode
32ch HA
AD8HR x 4
AD8HR x 2
AD8HR x 1
16ch HA
8ch HA
Rio3224-D
Rio1608-D
Ri8-D

Yamaha Commercial Audio Dante-MY16-AUD HA Remote Control Guide
9 www.yamahaproaudio.com
Setting examples of mixed models:
System Inputs
I/O Rack Configuration
UNIT ID settings (The numbers in parentheses are virtual IDs) Rio3224-D
Rio1608-D
Ri8-D
32 ins
Rio1608-D x1 Ri8-D x2 1
(1, 2) 3, 4 (3, 4)
48 ins
Rio3224-D x1 Rio1608-D x1
1 (1-4)
3 (5, 6)
Rio3224-D x1 Ri8-D x2
1 (1-4) 5, 6
(5, 6)
Rio1608-D x2 Ri8-D x2 1, 2
(1-4) 5, 6 (5, 6)
Rio1608-D x1 Ri8-D x4 1
(1, 2) 3-6 (3-6)
64 ins
Rio3224-D x1 Rio1608-D x2
1 (1-4)
3, 4 (5-8)
Rio3224-D x1 Rio1608-D x1 Ri8-D x2
1 (1-4)
3 (5, 6)
7, 8 (7, 8)
Rio3224-D x1 Ri8-D x4
1 (1-4) 5-8
(5-8)
Rio1608-D x3 Ri8-D x2 1-3
(1-6) 7, 8 (7, 8)
Rio1608-D x2 Ri8-D x4 1, 2
(1-4) 5-8 (5-8)
Rio1608-D x1 Ri8-D x6 1
(1, 2) 3-8 (3-8)
Setting examples of a special case: As for the system where each single unit of the Rio3224-D, the Rio1608-D, the Ri8-D, and the AD8HR coexist, if you set UNIT IDs as follows, they will be recognized as eight units of AD8HR with their IDs unique to each other. ・ AD8HR: ID 1 (automatically assigned in order of daisy chain connection) ・ Ri8-D: UNIT ID 2 (virtual ID 2) ・ Rio1608-D: UNIT ID 2 (virtual ID 3, 4) ・ Rio3224-D: UNIT ID 2 (virtual ID 5 to 8)
Note: ・ The number of units of controllable HA equipment (virtual IDs of AD8HR)
varies with the digital mixer, which can be checked at the EXTERNAL HA screen etc. The PM5D, the M7CL, the LS9-32, the LS9-16, the DM2000, and the DM1000 support eight, six, four, two, twelve, and four units, respectively. Patching of an audio signal is limited only by the number of channels due to that of cards used, regardless of the limitations above.
Yamaha Commercial Audio Dante-MY16-AUD HA Remote Control Guide
10 www.yamahaproaudio.com
・ If the Rio series in NATIVE mode and that in AD8HR mode coexist within one network, a duplicated UNIT ID between the different modes is acceptable (with the CL and Rio series firmware v1.5 or later).
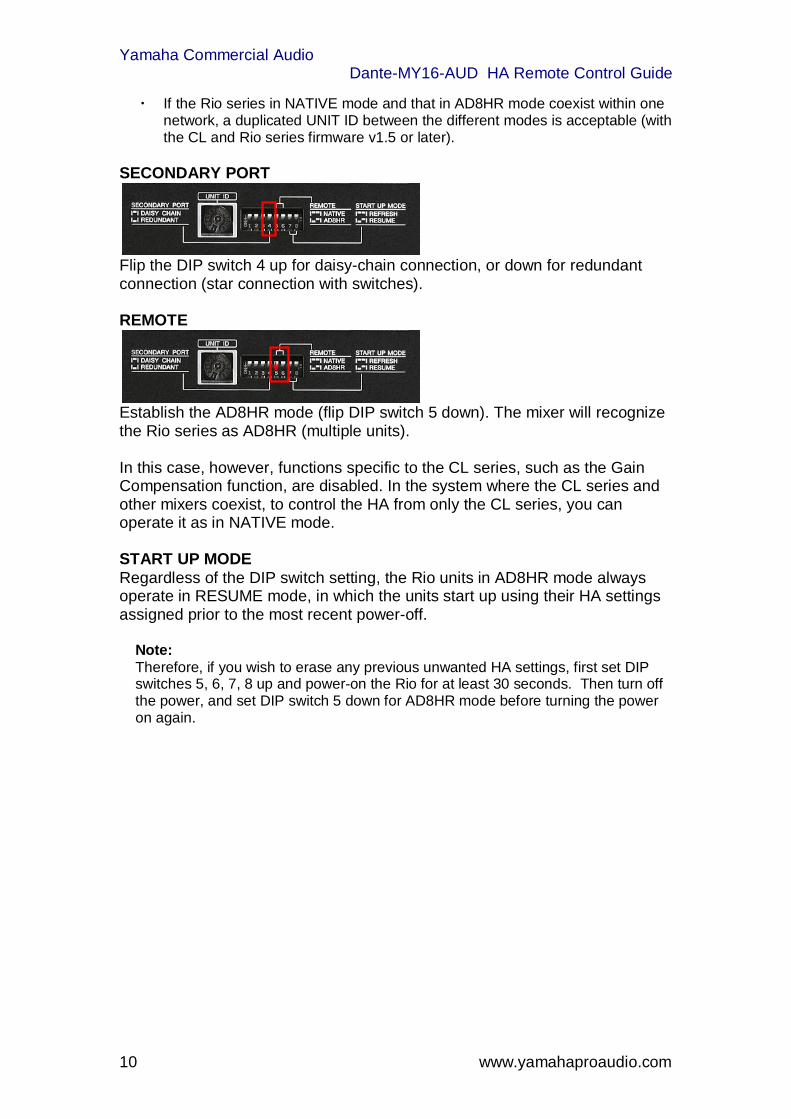
SECONDARY PORT
Flip the DIP switch 4 up for daisy-chain connection, or down for redundant connection (star connection with switches). REMOTE
Establish the AD8HR mode (flip DIP switch 5 down). The mixer will recognize the Rio series as AD8HR (multiple units). In this case, however, functions specific to the CL series, such as the Gain Compensation function, are disabled. In the system where the CL series and other mixers coexist, to control the HA from only the CL series, you can operate it as in NATIVE mode. START UP MODE Regardless of the DIP switch setting, the Rio units in AD8HR mode always operate in RESUME mode, in which the units start up using their HA settings assigned prior to the most recent power-off.
Note: Therefore, if you wish to erase any previous unwanted HA settings, first set DIP switches 5, 6, 7, 8 up and power-on the Rio for at least 30 seconds. Then turn off the power, and set DIP switch 5 down for AD8HR mode before turning the power on again.

Yamaha Commercial Audio Dante-MY16-AUD HA Remote Control Guide
11 www.yamahaproaudio.com
Settings by Dante Controller When you start Dante Controller, the Network View opens first, and all the Dante equipment on the network appear. This allows you to set the audio routing between Dante devices. Click a cell in the intersection of transmit and receive channels to set an audio route from the upper-right transmit channel to the lower-left receive channel. When the route is set, a green icon appears. For details, please refer to the Dante Controller user manual.
Double-click a device name of the Dante-MY16-AUD card (communicating an HA control signal with host equipment) to open the Device View window. On the HA Remote page, choose Mode 1, Mode 2, or Mode 3 as a serial bridge mode for HA remote of the Dante-MY16-AUD card. For details about each mode, please see “Connections for HA Control” (on page 7).
Note: If the HA Remote page is not displayed on the Device View window, please check that Dante Controller v3.2.9 or later and the Dante-MY16-AUD firmware v3.3.9 or later are used.

Yamaha Commercial Audio Dante-MY16-AUD HA Remote Control Guide
12 www.yamahaproaudio.com
Settings for the Digital Mixer On the digital mixer, configure the same settings as those for remote-controlling other external HA equipment. For details, please also refer to the Owner’s Manual of the applicable digital mixer. WORD CLOCK Settings There are three possibilities for configuring the word clock settings of the system:
• Use Dante as the master clock. This is the best option when there are multiple consoles in one network.
• Use the console as the master clock. This is a convenient option when there is only one console in the system.
• Use an external word clock generator as the master clock. This can be necessary in studios and broadcast environments when there are other digital audio systems to synchronize to.
Using Dante as the Master Clock In the Word Clock menu of each mixer, select any slot input in which a Dante-MY16-AUD card is installed as the clock source. The Dante network will automatically select a clock master device to keep the whole network in sync.
Using the Console as the Master Clock In the Word Clock menu of the mixer, select “Internal 48k” as the clock source (this is the default selection). Open Dante Controller software and select the Clock Status tab. Set “Slave to External Clock” for just one of the Dante-MY16-AUD cards that are installed in the mixer. For the same card, check the “Preferred Master” option, and this card will transmit the word clock to the rest of the network.

Yamaha Commercial Audio Dante-MY16-AUD HA Remote Control Guide
13 www.yamahaproaudio.com
Using an External Word Clock Generator In the Word Clock menu of the mixer, select “Word Clock In” as the clock source. Open Dante Controller software and select the Clock Status tab. Set “Slave to External Clock” for just one of the Dante-MY16-AUD cards that are installed in the mixer. For the same card, check the “Preferred Master” option, and this card will transmit the word clock to the rest of the network.
EXTERNAL HA Settings Next, on your digital mixer, open the EXTERNAL HA screen (or the REMOTE screen). At this screen, you can see the connected external HA equipment (the Rio series in this description) virtually mounted onto the rack as AD8HR.
M7CL-48: RACK -> EXTERNAL HA screen LS9-32: RACK -> EXTERNAL HA screen
COMM PORT Select a port that transmits/receives an HA control signal. For the LS9 or the M7CL-48ES, choose SLOT 1. The other equipment (such as the M7CL-48/32 and the PM5D) has no setting (only the HA REMOTE terminal is available). EXTERNAL HA PORT Select an audio input port (for eight channels of a slot) for each virtual rack. Make sure to match the rack number with the virtual ID on the HA device.
When configuring the above settings, you can open a rack from the EXTERNAL HA screen to control the HA. Moreover, when patching a corresponding slot input to an input channel, you can adjust the external HA from the input channel controls.

Yamaha Commercial Audio Dante-MY16-AUD HA Remote Control Guide
14 www.yamahaproaudio.com
Note: If the mixer cannot recognize HA equipment and the HA equipment does not appear on the screen of the mixer, please check the following. ・ Are the Dante-MY16-AUD firmware and Dante Controller updated to a version
that supports the HA remote function? Firmware V3.3.9 or later and Dante Controller V3.2.9 or later are required.
・ (In the case where a serial cable is used) Are you using a straight cable? ・ (In the case where control is done via the Mini-YGDAI slot) Have you inserted
the Dante-MY16-AUD in SLOT1? Those other than SLOT1 cannot transmit HA control signals.
・ Is the HA Remote bridge mode of Dante-MY16-AUD set properly? ・ Is AD8HR mode set on the front panel of the Rio series? Are all the virtual unit
IDs unique to each other? ・ Ensure that a port other than REMOTE and SLOT1 is selected as a MIDI port
on the MIDI SETUP screen of the digital mixer.