¤dagogischeforschungsstell… · phenomenological organic chemistry an introduction based on the...
TRANSCRIPT
PhenomenologicalOrganic Chemistry
An Introduction Based on the Inner Nature of Substance in the Plant World
Class 9 Chemistry Main Lesson Demonstration /Classroom Material
andLaboratory Projects
Included are experimental descriptions, Discussion of Deeper Themes
and Methodology for Carrying Out a Student Laboratory Project in Home-Medicine making
Dr. Manfred von Mackensen
Freely Translated by Peter Glasby
Mt Barker,
South Australia, 2009
and unrevised by the Author.
The translation was made from the original:Vom Kohlenstoff zum Aether
Materialen fuer den Chemieunterricht der 9. Klasse, mit Versuchsbeshreibungen und Vertiefungen von Einzelthemen,
zugleich eine Einfuhrung aus phaenmenologischem Ansatz unter dem Begriff innere Naturen.
Manfred von Mackensen
A manuscript published byPaedogogischen Forshungstelle
Beim Bund der Freien Waldorfschulen, Abt. KasselBrabanterstraβe 43, 3500 Kassel, Germany
The following web site is the web site for the
Kassel Educational Research Institute
http://www.lehrerseminar-forschung.de/index.html
This institution conducts research, teacher seminars and sells apparatus and literature.
Published by the Pedagogical Section of the Anthroposophical Society in Australia with
generous fi nancial Assistance from the RSSA (Rudolf Steiner Schools Association of Australia)
September 2009
TRANSLATORS NOTEThis book is long overdue and has had a
complex history of translation which began at Mt Barker , to and froed between the USA and Mt Barker, during the 1990’s and now has finally come to fruition. People involved at different times, whom I sincerely thank, include, Bob Lathe and Nancy Whittaker as well as John Petering. I ,who have had it on my conscience all that time am relieved that at last it is in print and has taken the form that it has, which includes the second part, a laboratory project for 9th class students which involves making wine, distilling it and then going on to use it to make simple home medicines.
Draft versions of the translation have been made available for some years to teachers for their own private use, however, not in as full a form as this completed edition.
Special thanks needs to be made to Dr Manfred von Mackensen who has been so generous in giving permission to translate his valuable work so freely. His main question has been: “Have you done the experiments?”. The answer to that is: “Yes, many times”. As you will read in his own Forward to the book on page 1, he never intended the book to be the final word on the subject but rather “ a guideline and standard for what can be done.”
I can only hope that the many other works on Chemistry, written by Dr Mackensen can also be made available to the English speaking world. They include: comprehensive descriptions as this one for the chemistry main lesson blocks for classes 7 - 12.
I would like to draw particular attention to the work on the eleventh class chemistry, where he attempts, in my opinion successfully, to lay down a basis for phenomenological chemistry based on a spiritual view of the human being within a spiritual cosmos. Chemistry is in many ways the subject which faces the greatest difficulty in being taught within the Waldorf Schools. After all in the still commonly accepted paradigm, matter is the primary phenomena of the cosmos. Life, Soul and Spirit are derivative from it. The spiritual philosophy developed by Rudolf Steiner could not
have a more radical departure from this paradigm with the position that spirit is primary in the cosmos and all else is derivative of that.
The reader will need to encounter this difference in approach in this work and hopefully will experience its merit in understanding substance in life and process. The Translation is unrevised by the Author; and all responsibility rests with the translator.
I would also like to thank the RSSA (Rudolf Steiner Schools Association of Australia) for a grant of $2500 towards the publication of this work.
Peter Glasby, September , 2009([email protected])
Table of ContentsPART 1: MAIN LESSON -CLASSROOM WORK
CHAPTER I - InTRoduCTIon
WHAT HAs bEEn THE InTEnTIon .........................1I. Curriculum & Pedagogy ...................................3
1.1. The Curriculum Indications And Its Orientation In Understanding ..................................3
2. On The “Inner Nature” Of Substance ..........................42.1. Metamorphosis2.2 The “Inner Nature2.3 Uniqueness2.4 Imprint of the Whole of Nature
3. Possible Approaches To The Block ............................53.1. Transformations In Living Nature3.2. Origin Of Combustible Substances3.3. Earth Coal vs Sugar
4. Overview Of The Syllabus ................................95. Pedagogy & Methodology ...............................106. Literature ...............................12
CHAPTER II - sTAgEs of REfInEmEnT
1. Carbon Dioxide .................................14Experiments on Carbon dioxide .................................14
Exp. 1: The Amount Of Exhaled AirExp. 2: The Composition Of Exhaled AirExp. 3: Characteristics Of Carbon DioxideExp. 4: Separating The Remaining NitrogenExp. 5: Products Of Combustion
2. Wood And Sugar .................................18Pedagogical Remarks .................................19Experiments (cellulose & sugar) .................................18
Exp. 6: Version A Simple Charring Of WoodExp. 6 Version B: Charring Wood With A GasometerExp. 7, Version A (Usually Done In The Eighth Grade) CaramelExp. 7: Version B Sugar Charring (Carbonizing)
3. Alcohol ...............................................20Content Of Alcoholic Beverages (table) .....................23Experiments (Alcohol) .......................................20
Exp. 8: Raisin WineExp. 9: Mulled WineExp. 10: DistillationExp. 11: RectificationExp. 12a: Alcohol As A Destroyer Of LifeExp. 12b: The Density Of AlcoholExp. 12c: Flowing FireExp. 13: Other AlcoholsPart A: MiscibilityPart B: Alcohol FlamesExp. 14: Destruction Of Sugar By Acid
4. Ether . ...............................25Anesthetics: ..................................28Experiments(Ether) .................................25
Exp. 15: Ether ProductionExp. 16: Ether And WaterExp. 17a: Ether Vapor TroughExp. 17b: Ether Vapor In A Bowl
5. Vinegar ..................................29Experiments (Vinegar/acetic acid) ........ .............29
Exp. 19: Producing VinegarPart A. With An Oxidant
Part B. Open FermentationPart C. Quick Method For Producing VinegarExp. 20a: Acetic Acid SaltsExp. 20b: Flammability Of Vinegar
CHAPTER III. fuRTHER ConsIdERATIons
1. Products Of Combustion .......................322. What Should We Cover? ........................323. One Possibility: Teaching About Hydrogen ............... 32
Experiments (Hydrogen) .......................33Exp. 21: The Total Dehydration Of Ethanol To EthyleneExp. 22: Hydrogen From WaterExp. 23: The Fiery Nature Of HydrogenExp. 24: The Volatile Nature Of HydrogenExp. 25: Inverted Filling Exp. 26: Combustion Products Of Hydrogen
CHAPTER IV. dEComPosITIon-fumEs ComPAREd To floWER
fRAgRAnCEs 1. Butyric Acid ...........................................352. Esters ..............................................373. Caproic Acid ...........................................394. Glycerin ...........................................395. Matter And Living Organisms ............................406. Pharmaceuticals And Fragrances ............................ .407. Summary Of The Relevance To Nature ......................44
Experiments (Esters) .............................................35Exp. 27: Butyric Acid Fermentation .......................35Exp. 28: Making Butyric Acid From ButterExp. 29: Butyric Acid SaltsExp. 30: Butyric Acid EstersPart A. Ethyl EsterPart B. Isoamyl EsterExp. 31: Synthetic Candy Flavors Exp. 32: Distillation Of ResinExp. 33: Essential Oils Produced By Steam DistillationExp. 34: Extracting Essential Oils—Flower Fragrances
CHAPTER V. somETHIng AbouT PETRolEum
1. Introduction ............................................452. Petroleum Products ..............................................453. Oil And Power ..............................................46
APPEndIX: dEEPEnIng of IndIVIduAl ToPICs
Making Charcoal ..............................................47The Ascent ............................................47The Charcoal Mound .............................................47Igniting The Mound ...........................................50The Burning-Through ..............................................51Concluding The Burn ..............................................52Forces Of Nature ....................................................53
Wood Distillation (Charring)-Technology .......................547. Alcohol .................................................... 57
History ...................................................... 57Physiological Effects ..............................................60Technical Information ...............................................61Alcohol As Fuel ...............................................61Increased Productivity ...............................................62The Agricultural Sector Without Ethanol From 1985 to 1990 .........................................63The Agricultural Sector From 1985 To 1990 With Ethanol ............................................ 63
Tractors With An Alcohol Motor ................................ 64Conclusions ................................... .64
Specifying Alcoholic Content .....................................64Making Champagne ....................................658. Fusel Oil ...................................689. Anesthetics ....................................68
The Situation Before The Discovery Of AnestheticsEarly History
Humphrey Davy (1778-1829, England)Michael Faraday (1791-1867, England)Henry Hill Hickman (1800-1830, England) Crawford Williamson Long (1815-1878, Usa)Horace Wells (1815-1848, Usa)The BreakthroughWilliam Thomas Green Morton (1819-1868, USA)John Snow (1813-1858, England)
Competitors Of Ether ....................................70James Young Simpson (1811-1870, England)Joseph T. Clover (1852-1881, England)
Further Historical Data ....................................71Modern Anesthetics ....................................72 Vinegar ..................................... 74Old Methods Of Producing Vinegar .............................74Modern Methods Of Producing Vinegar ........................76Laws Regarding Vinegar ..... .............................76Types Of VinegarBrandy VinegarWine VinegarSpecial VinegarsSynthetic VinegarUses Of Vinegar
11. Essential Oils ................................... 77Occurrence And Composition ....................................77How Plants Make Essential Oils ....................................79Distillation Methods ....................................81Extraction ....................................81Specific Oils ....................................82
AngelicaAnise Oil .....................................83Pine Needle Oil .....................................84Silver Fir OilDwarf Pine OilRed Fir OilRose Oil .....................................85Turpentine Oil ....................................87Chamomile Oil
CHEmICAl lIsT: .....................................88
APPARATus lIsT .....................................89
PART 2: LABORATORY PROJECT
Class 9 Lab Project .....................................90Teaching time Setting up the Fermentation Distillation .....................................91Determining the Alcohol concentration ........................93Difficulties .....................................94Recording the Lab lessons .....................................95Further Steps in the Process Steam Distillation Rectification .....................................96Making a Glass Hydrometer .....................................98
Home Medicine Suggestions Melissa Tincture ...................................100 Calendula Ointment ...................................100
Apparatus List ...................................102
APPENDIX
Essay by the Translator - Peter GlasbyRecognising what is Human in Practice in Education - The Structure of the School Day, Styles of Teaching and Ideals of Education ...................................103

2
1
PART 1 MAIN LESSON - CLASSROOM WORK
INTRODUCTION: WhAT hAS BEEN ThE INTENTION?
My hope for a volume such as presented here is that it will be useful to beginning teachers. Nevertheless, these teachers will soon realize that Rudolf Steiner’s works and indications in pedagogy and natural science offers them a vast ocean of material within which to plot their own course ever anew. After some time, teachers will leave behind my presentation, or perhaps take it apart and rebuild it their own way. That is why it seemed irrational to publish a detailed, more worked-out presentation of the text and pictures.
At the same time as striving to introduce the content, methods, and conceptual basis of the lessons, this text also attempts to show concretely how the main lesson can be built up. Individual experiments, with an explanation of the way that concepts can be formed based on them, as well as descriptions of related natural phenomena leading further afield, are arranged sequentially in such a way that a teacher looking for an ongoing guideline can base his or her instruction upon them. To that extent, the text is not only a series of suggestions, but also an example of what a teacher can actually do as instruction. But, I wince as I write this: the essence of a teacher’s activity, even the specialist teacher, can’t be given in a book. On the contrary, a text that strives to be objective can most particularly lull the reader into the belief that this is all there is. Necessarily, a book such as this is foreign to the special characteristics of the class, the teacher, or, in fact, that whole school. Lesson plans depend upon the concrete way the teacher lives into the students’ experience. In this sense, each teacher will need to carefully choose and shorten what to teach. How and where that happens, can be left up to the trained specialist teacher. Indeed, the more individual creativity that comes into play in pulling together a lesson, the more the students will feel how the teacher, together with the class, is forming out of the whole. In the end, this presentation can only hope to act as a guideline and standard for what can be done.
In general, I want to give an example of how we can use the “goethean method,” that is, a sense-based phenomenological method, to begin to build chemical knowledge. In doing so, we are able to extend in various directions the conventionally rather limited area of chemistry. If we teach only the chemical [molecular] makeup of materials, our view will be too narrow. It will lead to a kind of topological and mechanical instruction. What substance is and what composition means phenomenologically, needs to be shown in a new way.
In addition, to enable a deeper understanding of some of the central areas of chemistry, amongst others–charcoal formation, alcohol, vinegar, anesthetics and essential oils–I have given examples of these areas partly from my own experience and knowledge and partly by drawing on the illustrative examples of other competent authors. In this way, the teacher can experience the “lesson’s object” in a totality of historical, economic, and physiological aspects which is necessary in the preparation for teaching the class so that competent answers can be given to the wide-ranging questions of the students. These in-depth presentations are printed as separate supplementary chapters of this book. The main text contains only brief references to them.
As to the question of which areas of chemistry should be included in this main lesson, I have used Rudolf Steiner’s suggestions for the curriculum wherever possible. The presentation of F. Julius can be seen as a

2
precursor to this presentation. An active 9th class can be guided with just a few, powerful experiences, and a few simple feeling-saturated considerations. They need content made up of a few overseeable major facts and which have a strong and unmistakable connection to work associated activities. Their personal
judgement does not need to fully comprehend the entire subject area, but can be exercised on relating one area to another: for example, the relationship of alcohol to ether. In such relationships, fine perceptions of the plant world are interwoven and there are echoes of a more pictorial knowledge of living nature.
The preface to my seventh grade chemistry text offers a thorough explanation of the emotional and motivational perspectives underlying my division of the subject matter (didactic) and my methods for creating experiments (methodology), not as ornaments, but as guiding principles for the experiences of the entire course. I do not need to repeat that here.
I wish to thank my fellow researcher Reinhard Schoppmann for his work on some of the material, his critical review of this new edition, and the additions he made from his own experience.
Sabine Scherer and Roswitha Eberle worked to prepare the manuscript and integrated the changes to the 1986 edition. I would like to thank them for the quick publication of this new edition.
Manfred von Mackensen
Independent Waldorf school of kassel
March 1993
3
1.1 ThE CURRICULUM INDICATIONS AND ITS EPISTEMOLOgICAL DIRECTION
The outline for the chemistry block curriculum in class 8, based on Rudolf Steiner’s indications, is as follows:
“... extend the simple chemical concepts so that the child learns to understand how industrial processes are connected with chemistry. Using chemical concepts you try to develop a link with substances which build up the organic bodies: starch, sugars, proteins and fats.”1
And, for the 9th class, he has suggested:
“Chemistry: That which we have established for class 8 -- the first elements of an organic chemistry, what an alcohol is, what an ether is -- these should now be carried further in the 9th class.”2
The First Elements - Organic Chemistry. The conventional textbook approach to chemistry introduces so-called “organic3 chemistry” by considering the completely non-living hydrocarbons of petroleum; however, Steiner clearly placed great value on the block having a truly organic, living architecture, specifically connecting to the substances indicated for study in 8th class (starches, sugars, proteins and lipids). However, the class 8 students didn’t just learn about these substances as mere names for isolated substances, but rather as members of a series, by experiencing the intimate connections between natural forces and human nutrition.4
1 Discussions with Teachers, Lect. II, on 9-6-1919, pg. 167 (in German edition); GA No. 295.2 Conferences with Teachers, 9-22-1920; Vol I, pp. 223, GA No. 300; 4th Ed. 1975.3 Today, meaning carbon-based, rather than prod-ucts of living organism, as was its meaning in antiquity.4 Compare the section introducing the Class 8
So also in class 9, it is not our task to learn to understand the “chemistry of the organic” as separate from life, or systematized according to formulae, nor to treat the substances as a series based on “homologous structures” or “functional groups;” rather, the goal is to pursue the traces of life. For, the imprints of life we see on the earth’s surface always flow out of higher organizational principles, by which they must be understood, not only (in an additive sense) out of lower, non-living precursors (substances, molecules) which [are thought to be the cause of] the living substances and so explain them.
Certainly, it is also clear that by “first elements” of organic chemistry, Steiner did not mean chemical elements (constituent substances); in that case, we would have to study elemental analysis and inorganic chemistry in general. This, however, is deferred until grade 11. It is not material elements which are meant, but the elements of understanding.
The block should not be fashioned out of a mere sequential treatment of the properties of substances, nor from an examination of manufacturing-industrial processes, nor technical applications. Rather, we should examine just a very few phenomena, and therefore really study them thoroughly. The students should practice a thoughtful consideration of the qualities chemically interwoven in each substance. Thereby, the more factual knowledge developed in class 8 can be understood in retrospect in the light of new questions and new activities of soul in the students at this age.
Plainly, these ‘new elements of understanding’ (going beyond the four food substances indicated for class 8, perhaps) are given preference by studying the transformations of the substances indicated by Steiner for the 9th class: alcohols, ethers (esters), and the like [aldehydes, carboxylic acids]. So, if we take up sugar and starches from the class 8 syllabus, then
chemistry block in my book: Chemistry blocks in Class-es 7 and 8, 1976, p. 107
I. CURRICULUM & PEDAgOgy
4
we deal with a clear series from most solid to most volatile. [emphasizing transformations of qualities]
We must note that when Steiner speaks of “an ether,” right up to the beginning of the 20th century, esters were still termed “ethers.” Thus, a chemist of that time writes “It is quite deplorable, that although it is on the best grounds that we now think of these as esters, nevertheless many of them are still called ethers.”5 Even today, the aromatic branch deals with various ‘fruity ethers’, which are systematically arranged as esters of lower fatty acids and simple alcohols. So it is not entirely wrong if we introduce the preparation of strong-smelling esters out of acid and alcohol, in order to focus our gaze from that starting point on the variety of fragrant/aromatic etheric oils, which we typically obtain from the plant world.
2. ON ThE “INNER NATURE” Of SUBSTANCE
The “inner nature” of a substance has three aspects in the way it moves our thoughts: metamorphosis, uniqueness, and overall imprint of the four elemental qualities from the whole world of Nature.
2.1. METAMORPhOSIS
The first aspect is metamorphosis or transformations of qualities; e.g., an increase in the characteristic we could call “the watery-nature” can be seen in the sequence from wood to sugar (clarity, solubility, ease of melting). This is also shown in the large quantity of water vapor given off with thermal decomposition of sugars. With sugars, the carbon nature (solidity, structure, form) decreases a little, although a carbon residue and soot still persist. The chemist can now play with these inner qualities: imagine an increase in the flammability (the fiery-volatile quality) of sugar -- we come into the domain of “fire water”, the alcohols. Now, remove its watery nature in our imagination, and we come to something like an ether -- a fire liquid. (A more precise treatment 5. Lassar-Cohn, Methods for Organic Chemistry Labo-ratories, Leopold-Voss Publisher., Hamburg, 1907.
follows, below). In this way we work in our thinking with qualitative principles which can metamorphose one with the other; not as a mere additive juxtaposition in the manner of summary-formulae of organic chemistry, nor assembled in a material-spatial arrangement like structural formulae.
Such a type of thinking-in-metamorphosis is indicated by R. Steiner by the word “is” (“... what an alcohol is ...”). Therefore, we should not simply go through a mere sequence of the occurrence, preparation, characteristics and commercial uses of a family of substances, say, methyl alcohol, then ethyl alcohol, etc., in order to extract those characteristics which occur repeatedly, and in general explain ‘alcohol’ [i.e., the term ‘alcohol’ as meaning a combination of all the characteristics common to this group].6 Rather, in the above metamorphic sense, it is a question of conceiving of each alcohol as one particular example or a step in a series of transformations from solidity (wood, starches) towards volatility (ether, aromatic substances) - alcohol as movement. The idea of a ‘substance’ should arise out of such a transformation, inwardly grasped, not just outwardly defined. In what follows, it is important to show how this step-by-step path in thought, from rigidity to volatility, reveals itself to the students in worked-through experimental observations, initially unconnected; but later, demanding connection. For it is essential that the students can look back later on their mastery of clear steps in learning and pithily formulated connections cannot be left out of schooling.
2.2 ThE “INNER NATURE”The “inner nature” of a substance is a
phenomenological measure, a way of characterizing. Initially this ‘nature’ is something physical which doesn’t disappear but remains in physical space. The “inner nature” is however, more than a material component, and should not be thought of in a mechanistic sense. It is not matter, but rather a type
6. See Bortoft on “Authentic and Counterfeit wholes.”
5
of activity which can be transposed from one space to another.
Such a notion is foreign to our way of speaking nowadays. But, still, we could change the words we use to describe things; but as a teacher, we will simply speak about the subject as we have experienced it in our own perception. Some words which might be used to stand for the impressions of the “nature” of substances are: “aspect, quality, inclination, characteristic tendency, affinity, relationship, impression or ‘imprinted by’, action or activity.”
So that the mobility in thinking which has been achieved, isn’t allowed to run away into uncertainties, when we put up descriptions on the black-board, with a more schematic presentation of the transformations of a substance, or in comparing various substances, we can make sure that each particular ‘nature’ is always written with the same color; for example, the “solid-burable” (as in carbon-nature) written in black-gray or brown, the “balanced, extinguishing” watery-nature (of sugar) written in green, the “fiery-volatile” nature, in red.
2.3 UniqUeness
A second aspect of the transformation of the “inner natures” of plant substances is their uniqueness according to their origin. The simple diethyl ether with its recognizable smell and physiologic effects, and still more the aromatic substances found in all sorts of plant organs, are each unique; they could never be derived definitively from a mere intermingling of the “solid” and fluid” natures discussed above. Here a connection with the (unique) wholeness of the individual plant must be brought into consideration: its location, environment, cultivation, season it ripens, etc. Then, chemistry leads to individual plant species and to new botanical questions.
2.4 IMPRINT Of ThE WhOLE Of NATURE
The substances studied here, are arranged from wood to etheric oils, relating to the growth and development of plants and how qualities like the various Greek elements interweave, from moist earth
up into the warm air. From this arises the third aspect: the four elemental qualities, an idea which gives a real picture of the overall process of Nature over the surface of the earth. Warmth and light indicate the region of Nature in which a sugar or an ether (ester) is ‘at home.’ Individual substances are representatives of the cosmic working of nature-processes. The precise, thoughtful penetration of chemical activities in the laboratory (which is important for young people at this age), is therefore combined with a comprehensive, experiential understanding of Nature.
So, we have the three main points:
· The transformation of qualities, like solid,
volatile, fiery, etc. in the laboratory; the overall
‘inner nature;’
· The originality of individual substances and
individual plants, the uniqueness of the aroma
of a substance, the therapeutic action etc.
· The ‘impulse’ or imprint given by outer nature
through the whole cycle of seasons in forming
substances.
3. POSSIBLE APPROAChES TO ThE BLOCK
3.1. TRANSfORMATIONS IN LIvINg NATURE
The introductory topics could build on a discussion of the environment, or raw material issues; e.g., about burning fossil fuels, or the waste heat from atomic reactors. From this whole cluster of issues about how the human being rightfully stands within nature (and how he is imperiled), we take up the idea of breathing. Various gaseous components of the atmosphere are demonstrated and named (carbon-dioxide tester experiment). The carbonic acid which arises from carbon compounds (charred) leads us back to class 7 where we considered burning, albeit in a much more imaginative manner, and which we now interpret at a new level. Oxygen is mentioned, but comes in with the experiments (see below) simply as a
6
component of the air, initially. For only then can we enter into the chief theme of the block: the transformations of plant substances arising from building-up, constructive life-processes; and, we won’t get lost in the chemistry of oxygen, which by itself leads to tearing-down and decomposition processes, to oxidation agents (and explosives) [themes for class 10 and 11]. The theories of burning, from phlogiston to the stoichiometric (weight analysis) ideas of Lavoisier have, in short, followed a path towards the inorganic-mechanistic. We should not pursue these in this block, but rather work on the qualitative transformation of substances in the fertile, pure realm of plant life. We could learn a preliminary classification of the substances of interest into: ‘enkindling’ (able to ignite things, promote burning), ‘burnable’, and ‘balanced’. All substances in the world are, finally, various interweaving and aspects of these three principles (three natures).
The class 9 main lesson block primarily takes up “burnable” substances, class 10 focuses on the “balanced” (salts), and the 11th or 12th class main lesson blocks investigate the “enkindling” ones, experimenting with pure oxygen, nitrates, explosives, or halogens.
3.2 ORIgIN Of COMBUSTIBLE SUBSTANCES
Now, we have to ask: how do burnable substances arise in Nature? The rigid crust of the earth is sealed up, stony, chemically stable and in equilibrium with the conditions at the surface of the earth. Only where the enlivened loose earth turns toward the mantle of air, can a mantle of plants begin to grow, and it is their remains that provides us with combustible materials. All aspects of the growth of plants are an image of the cycle of the year, i.e., an occurrence outside on the earth’s surface. And together with humankind, they stand in a reciprocal relationship to the air. True, they do not have a sentient consciousness, no reaction from
an inner life (e.g. with lack of air), and no ability for self-movement provided by appendages. Rather they move gently in the wind with all other plants, and give themselves over to the free air outside and to the rhythms of the environment. Just this makes them able to supply combustible material (class 7) and nutrition (class 8).
Thus, it is even less thinkable that we would enclose the plant mantle that covers the earth in a glass jar, than we would enclose our own breathing. To plants belong the above-mentioned openness to the environment. Indeed, we may decide to intervene in this way and demonstrate rising oxygen concentration. We shouldn’t go too quickly into the usual study of carbon-dioxide assimilation which, in the final analysis, views the plants as a chemical machine. The reality of assimilation is the illumined plant leaf, is seasonally given multitude of forms, which grow and become larger. Systole and diastole, in growing aloft, developing/maturing in the course of the year – this we experience in an eternal rhythm of densification and out-streaming. Certainly, assimilation is a sort of densification process, but of such a kind as leads back again in rhythmic transformations to an out-streaming in the blossom’s fragrance. The whole path of plant development from leaf right up to blossom and fruit is the reality of assimilation, not concepts of gas-exchange or bio-mass accumulation. All the substances we work with (wood, resin, sweet sap, aromatic oils) simply portray this path in nature in an image of true assimilation, as we enhance one or another aspect of it by manipulating one or another of these substances in our laboratory. The capacity to transform, not to accumulate mass, characterizes the “activity” of carbon substances (the ‘carbon principle’). Here lies the field of study for this main lesson block; experimental realities, which through concrete, qualitative thinking, can be led over by the feelings into a deeper participation with processes of nature. For, there could be no

7
plant world without these perpetual transformations of phenomena and organs from stiff and dense below, to fluid/volatile above. Within this field of transformations is presented to thinking a field of activity, which can open up a spiritual, yet content-rich, reality based chemistry. Schematics and diagrams of environmental cycles of a mere material assimilation theory cannot accomplish this. They hold the thinking rigidly in mere concepts and abstractions, and thereby, finally in non-understanding. Only in the end would it permit us to clearly reflect on how, out of the growth of plants, the air can possess a gentle increase in its stimulating/enlivening quality, its refreshing character, and how these qualities are connected with the up-building course of the yearly cycle of plant growth.
A very accessible arrangement of topics for the main lesson block is provided -- as indicated above -- by starting from carbon and carbon dioxide and the question of the special appearance of burnable substances including wood, and then on to sugar, alcohol, ethers & esters.
3.3. EARTh COAL vS SUgAR
If we took our starting point from hard-black coal, or soft-brown peat from the earth, then we would have the consequences of a one-sided process on our hands. Although coal arose from plants which–albeit over immeasurably long time–had their fiery-volatile nature and watery-balanced nature reduced or removed, natural coal now shows only the slightest trace of these two natures. However, if we ourselves bring this process to completion with distillation (coking) of wood, to achieve the transformation in a shorter time, then we get charcoal, which is practically pure carbon. When heated anew, this wood-coal (in contrast to mined coal) no longer produces any water vapor as a secondary combustion product. On the other hand, we can isolate a related plant
substance by pressing the fluid sap out of the solid plant fibers, and allow something with a more watery-balanced nature in this sap to come to expression: sugar. We encounter sugar as transparent, water-soluble solid crystals, which, however, combine within it the solid-burnable and the fiery-volatile. Through various technical means, we can increase or suppress each of these natures. One of these processes is fermentation, which leads us to alcohol. With alcohol (and its subsequent products ether and esters), the carbon-nature is so intensively transformed through either the watery or the fiery-volatile, that with heating a sooty residue is no longer formed. Remnant influences of carbon-nature are shown by the more or less yellow or sooty flame. The products of burning too reveal which ‘natures’ are to consider in the reactions. For example, if a great deal of water vapor arises, which is lighter than air (upward cloud form ation), the fiery-volatile nature is correspondingly strong (hydrogen-nature). With this study of decomposition products, we attempt a truly chemical concept formation. We don’t merely view together outer qualities, but rather take hold in a clear way of natural processes, leading them to accelerated and inten sified new phenomena, such as distillation, coking, combustion, or fermentation.
Refinement. The plants themselves – next to the solidifying process leading to wood – provide an example of such a “refinement” (c.f. Goethe), as the watery-leafy middle part of the plant leads up to the flower. There we find, above all, the fiery-volatile fragrant substances, which barely have any mass. If we imagine the refinement process carried so far that every trace of both of the other two qualities is overcome, then we would arrive at hydrogen as the quintessential fiery-volatile. It is not the basis, but only a variation of ‘hydrogen-nature’ taken to the extreme. Again, the study of combustion products (pure water vapor) makes this
8
inner nature manifest but, in this case, in its one-sidedness. [See class 11 syllabus; hydrogen as an element in the Human Being and in the World]
If, in contrast, we consider the formation of fruit, we can recognize a kind of about-face into the watery forming realm, or also transformations of the solidifying type in the formation of skins, acids and oils. In the fatty oils, the fiery-volatile has been seized by a new variation of the carbon-nature, so that volatility has disappeared and there remains only a muffled-fiery quality: the fats and waxes.
PetRoleUm & life. In contemporary petroleum chemistry, usually
treated as “organic chemistry,” we can also discover all these tendencies and specialization of characteristics. We also find here more or less volatile, gaseous, fluid, and even solid black or aromatic products. These facts, mirror the origin of petroleum oil from the living kingdom. Still, won’t all these characteristics only act like ghosts of the archetypal, living qualities, which in petroleum will be awakened to a ‘transplanted’ virtual-life, only through an out-of-joint / dislocated technology? Students should certainly be offered a glimpse into this virtual-world; nevertheless, petroleum chemistry such as the homologous series of the alkanes cannot serve as the starting point for our main lesson block, for then we would find ourselves with the deadest substances without any images from nature, and would understand nothing of the living connections.
foUR elements. If to the carbon-nature (solidity), to water-nature
(non-flammability), and to the fiery-volatile nature (hydrogen), we add a fourth: an airy-nature, making a non-flammable but volatile gas (carbon dioxide), then these inner natures can be thought of as images of the four elements. The activity of the Elements over the whole earth is indicated in further detail
by Steiner in Lecture 6 of the “Supplementary Course”7 [Here Steiner contrasts the modern, abstract image of the human being proffered by natural science, with the Greek conception of things, which still incorporated an inner conception of the Life of Nature, and the importance of a living image for the growing youth. Translator’s Note]
It is interesting that in the Conferences, immediately following the above indication about the chemistry syllabus, Steiner continues on unprompted to speak about the Study of Man: “Anthropology – continue the study of the human being in order that a true anthropology is taught to the students. This must grow in concentric circles from class to class and the usual natural sciences be arranged about it.” So, chemistry too orients itself about the central study of the human being, and needs no systematic of its own – but is connected into an existing order. As teachers, we ask ourselves how we should grasp the way hydrogen-activity (as a non-material “force”) takes effect in the whole of Nature and in the human being. Deeper explanations by Steiner in the Agriculture Course,8 in the workman’s lecture on Bees,9 and in the medical lectures10 will prove useful The same applies for carbon.11 There, in addition to the simple material interconnections, much is said about the effects on and within living beings, and in the whole of nature. We could also say that the substances discussed there are those that approach the etheric, or still more the spiritual. In contrast, in the chemistry main lesson block, we initially keep our focus completely on the physical substances and their outer characteristics, and the reaction-principles which appear in the laboratory.
7 Waldorf Education for Adolescence; Supplementary Course - the Upper School; Stuttgart, June 1921, GA 3028 Agriculture Course, Lecture 5?; 11/06/1924; GA 327.9 Nine Lectures on Bees, GA 351-a; Lecture on 10/20/1923.10 Spiritual Relations in the Human Being, Lect. 2, 10/22/22; Mercury Press, 1978; Science & Medicine, 1st Medical Course, Lect 12, 4/01/20, GA 218; Steiner Press, London, 1975.11 Agriculture Course, GA 327; Bees, GA 351; 1st and 2nd Medical Courses, GA 312 & GA 313
9
However, it can still warm the teacher to consider the wider aspects, even if at first, it is expressed in a form which is not immediately suitable for the lessons. An absolutely beginning consideration might be the following: we meet the fiery-volatile in our upwelling warmth; we live in it. We live in the solidifying-permanence, in our solid body. The watery streams through us, from the mouth inward. We experience it with every wound and also, in the plasticity of our body. The point is not to arrive at a ‘perfect analogy,’ but rather to return to the human being by thinking about such qualities.
4. OvERvIEW Of ThE SyLLABUS
main themes. If we survey the preceding thoughts, we can
arrive at the following themes for this block:
· carbon dioxide and combustion (total
oxidation), as a balancing of ‘enkindling’ with
burnable qualities;
· Coking (enclosed destructive distillation) as
liberation of the volatile-burnable from the
solid-burnable;
· sugar, treated in class 8, and here again by
liquefaction (making-watery) and thereby
activation to alcohol, so-called ‘fire-water;’
· formation of ethers as a loss of the watery-
nature;
· acetic acid (vinegar) fermentation, a partial
oxidation, i.e., the onset of a balancing out and
aeration;
· formation of esters as another variant of the
overcoming the watery-nature;
· etheric oils and the resins of plants.
BackgRoUnd to PRactical WoRk. The prelude could form a fundamentally inorganic theme (carbon-dioxide and combustion). Although
that does not yet resonate with the actual theme of the block, namely the delicate metamorphosis of the inner nature, it has still proved useful to a certain degree as an entry point for the beginner. Probably this has more to do with teacher and students finding the right mood together about the more objective, merely material aspects (occurrence, characteristics, composition in the air, etc.) and how they work together. The feeling of meeting something concrete and learning something important (e.g., the components of the air) is beneficial for the beginning of the main lesson block. The specific steps in thinking the transformations of the inner qualities of the organic, where the will must penetrate the thinking more vigorously, are then recruited into an already begun learning process . With well-defined concepts we stimulate a spiritual mobility, which then is led over via the subsequent delicate phenomena into investigating and dealing with more open-ended concepts.
Each teacher will have to decide whether this sequence is necessary. Where it isn’t, I have begun directly with burning and then coking (closed distillation, charring) of wood. The composition of the air is then tied in without any sort of special experiments, and carbon dioxide is briefly characterized as a waste gas of burning charcoal.
Consider carefully the sequence of introducing the three ‘natures.’ Perhaps it is advisable to shift the emphasis in stages from day to day. The smoldering-solid nature is developed initially along with the various combustion residues of carbon; the watery-nature is investigated after the coking-water [very watery initial distillation product from wood coking]; with the fiery-volatile nature, we show the ‘wood-gas’ [flammable gases produced in the middle part of a wood distillation run], and then back to the wood. For the transition cellulose to sugar and sugar to alcohol, all three qualities are available, as they are for the transformation to ether
10
etc. If exceptionally little time is available for the
main lesson block or for preparation, it could start with fermentation and alcohol. The smoldering-solid and the watery nature investigated in sugar and also with wood are related in afterwards. We must then be careful that the concepts are formed rightly - the teacher has a more difficult task. This jump right into the center of the main lesson block can, however, be a great stimulus for the students!
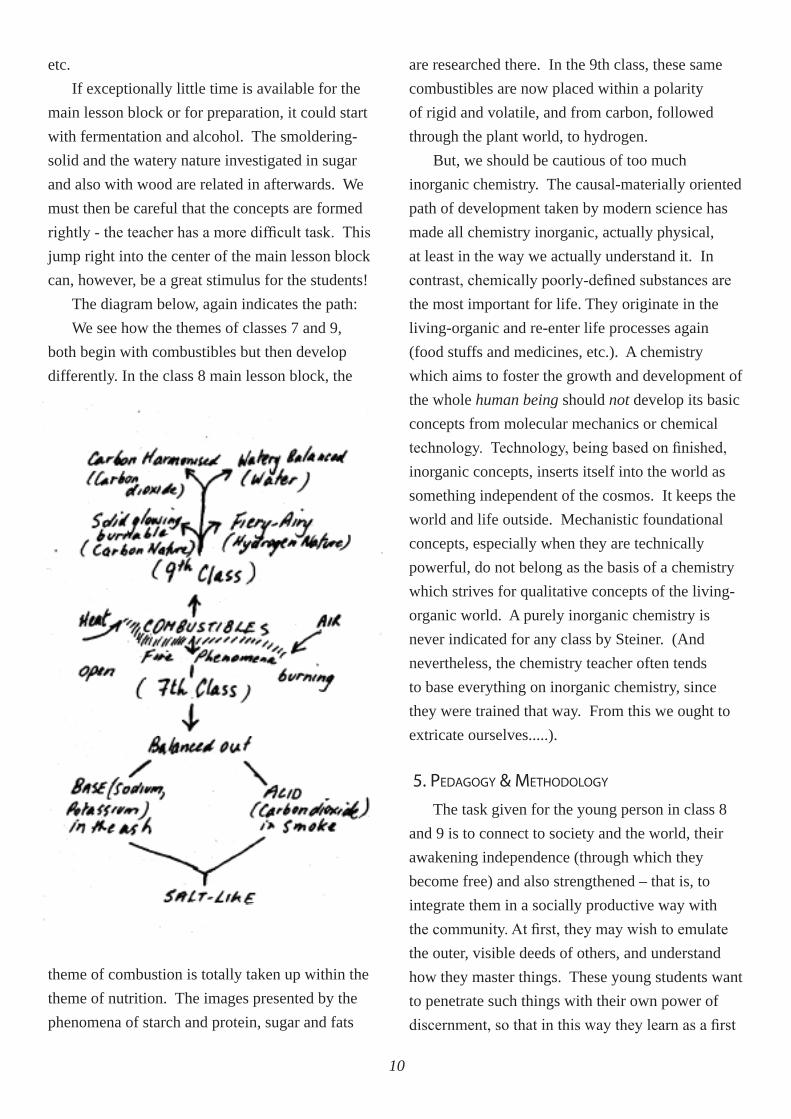
The diagram below, again indicates the path:We see how the themes of classes 7 and 9,
both begin with combustibles but then develop differently. In the class 8 main lesson block, the
theme of combustion is totally taken up within the theme of nutrition. The images presented by the phenomena of starch and protein, sugar and fats
are researched there. In the 9th class, these same combustibles are now placed within a polarity of rigid and volatile, and from carbon, followed through the plant world, to hydrogen.
But, we should be cautious of too much inorganic chemistry. The causal-materially oriented path of development taken by modern science has made all chemistry inorganic, actually physical, at least in the way we actually understand it. In contrast, chemically poorly-defined substances are the most important for life. They originate in the living-organic and re-enter life processes again (food stuffs and medicines, etc.). A chemistry which aims to foster the growth and development of the whole human being should not develop its basic concepts from molecular mechanics or chemical technology. Technology, being based on finished, inorganic concepts, inserts itself into the world as something independent of the cosmos. It keeps the world and life outside. Mechanistic foundational concepts, especially when they are technically powerful, do not belong as the basis of a chemistry which strives for qualitative concepts of the living-organic world. A purely inorganic chemistry is never indicated for any class by Steiner. (And nevertheless, the chemistry teacher often tends to base everything on inorganic chemistry, since they were trained that way. From this we ought to extricate ourselves.....).
5. PEDAgOgy & METhODOLOgy
The task given for the young person in class 8 and 9 is to connect to society and the world, their awakening independence (through which they become free) and also strengthened – that is, to integrate them in a socially productive way with the community. At first, they may wish to emulate the outer, visible deeds of others, and understand how they master things. These young students want to penetrate such things with their own power of discernment, so that in this way they learn as a first

11
step how to grasp the most external aspects of the world–the world of technology. As Rudolf Steiner says in the curriculum lectures of September 6, 1919, “An interest for everything worldly and for everything human” comes to life. Young souls feel a newly awakened power to exercise control and are also completely given up to the forces of personal desires (the urge towards power and eroticism—see Rudolf Steiner’s lectures on June 21 and 22, 1922). Such young people exhibit a new physical strength, independence, and resistance to the established order of previous generations, as well as a desire to try new things. If the school and home do not harness these forces and attempt to integrate them into life, then, depending upon the student’s natural tendencies, it is possible that depression or even suicidal tendencies arise in boys’ young souls, while girls escape into an external, superficial world.
The help that teaching can offer consists at least partly in providing a thorough understanding of technology, transportation, and business. How have these things changed our life together, that is, the way one person interacts with another? We think of the telephone and the locomotive in physics. Here we encounter a world made by human beings. In this case, intellectuality and cleverness act in the service of comfort and make human beings independent of the limitations of nature. Technology arises from technically specialized but outwardly highly effective human thoughts, and today is maintained only by such thoughts. Although, in relation to the phenomena of nature, these thoughts may be very incomplete and restricted to the quantitative, nevertheless they are a very accessible sequence of thoughts; and have in fact become decisive in the events of the external world!
Whereas in physics, the discussion revolves more around finished technical devices, in chemistry our concern is more with technology in the laboratory, for instance working with gases
or simple devices such as a fire extinguisher or a pressure relief valve. Our discussion in the ninth class is much less connected with the chemical industry–which we might present in twelfth grade chemical technology. The entire way we perform experiments undergoes a characteristic transformation in class nine in comparison to class seven. In the class 7, we present large, open experiments, ones in which air plays an unhindered role–like an unlimited sea of air in these experiments, e.g., in combustion, or in dissolving lime with acid, or in its re-solidification in mortar. Even in class 8, things are still cooked or decomposed while exposed to open air. We begin quite simply by growing grain and go on to grind it, sift it, and rinse out the starch, which we then make into paste. Open smoldering experiments such as caramelization, vapors from boiling fat, and boiling coagulated egg white, belong to this series of open experiments. However, in class 9 the vessels are closed up. The distillation flask forms a small hollow sphere, the setup of condensers and receiving flasks look more like labyrinths. Unknown vapors, neither the air nor a smoke from our world, fill these chambers and tubes. The students should live into them through their feeling. This occurs in numerous new variations from simple distillation and reflux heating to rectification and steam distillation.
The transformation to the volatile oils, the freeing of “spirit” from murky, watery brews, pictorially shows the students a purification and enrichment, a sublimation. Something like an inner soul process can thereby be seen externally. Such distillations also occur through smoldering/charring, during which, especially in class 9, we catch and contain the gases thus released. The situation is similar for fermentation, in which we collect carbon dioxide.
During puberty, young people have an impulse to learn about objective things without taking the

12
circumstances surrounding them into account. Thus, they penetrate into their surroundings only through their own conceptual images (as technology generally does). At first, the student can comprehend only the separated part, that is, the technical aspect; through that they then come to their own judgements. Students are somewhat passive when presented with the broad pictures of nature; their will cannot yet draw together those pictures into a self-sufficient thought-framework. Thus, what they seek, runs away.
If you present only nature-pictures, then the result would be a chaotic discharge of the students’ energies of will. On the other hand, much in the details of the apparatus of conventional school experiments, amounts to giving children of this age a bone to chew on—which we are supposed to get them to gnaw on, but it is still only a bone. The teacher needs to continually guide them towards the deeper and softer phenomenological connections. At first, they are kept in mind, but left unspoken; then later, mentioned in a short overview. And, finally presented in the way the teacher illuminates objective science on the basis of the phenomena, and never by means of [theoretical] model-concepts of particles and their “bonding,” which only provides an inventory of the object and how and where specific elements exist within it.
6. LITERATURE
The following books may be useful for obtaining a deeper and firmer understanding as part
of your preparation [many are specific to German-speaking countries].
Fritz H. Julius attempts to give a comprehensive phenomenological description of chemistry instruction in Waldorf schools in his booklet “The World of Matter and Human Development,” Book I, Stuttgart, 1978, 2nd edition; English translation by Steiner Schools Fellowship. See also, his book II, “A Phenomenological Study of Chemistry,” translated by AWSNA Publications, Sacramento CA.
Gerhard Ott gives a number of good experiments and interesting thoughts in his 2-volume work “Outline of Chemistry by Phenomenological Methods,” Basel, 1960 [not translated].
You can find a discussion of carbon and hydrogen similar to that presented in this volume together with a complete overview of chemistry in Rudolf Hauschka’s, “The Nature of Substance,” Frankfurt, 1976, 6th edition.
For its clear, systematic presentation and the amount of reference information it contains about chemistry, we should mention Beyer’s standard university textbook of organic chemistry: Textbook of organic chemistry). [see also, Seyhan Ege’s Organic Chemistry, UofM text, Houghton-Mifflin, 2000]
You can find a broad description of the chemistry discussed in this book in: Winnacker-Küchler, Chemische Technologie (Chemical technology), vol. 3, Munich, 1972, 3rd edition. [Often a valuable resource is older editions of “industrial chemistry” texts which give details of processes, no longer mentioned in the more theoretically-oriented modern texts.]
13
Exact descriptions of experiments, particularly for presenting specific materials can be found in Arndt-Dörmer, Technik der Experimentalchemie (Techniques of experimental chemistry), Quelle & Meyer Verlag, Heidelberg, 1969, 8th edition.
The following two volumes contain interesting information about nutrition and intoxicants:
F. Hauschild, Pharmakologie und Grundlagen der Toxikologie (Pharmacology and the basic elements of toxicology), Georg Thieme Verlag, Leipsig, 1960, 2nd edition;
and also in J. Schormüller, Lehrbuch der Lebensmittelchemie (Textbook of nutritional chemistry), Springer Verlag, Berlin, 1974, 2nd edition.
You can also use the following books for learning about how to obtain essential oils, their characteristics and uses.
H. Janistyn, Handbuch der Kosmetika und Riechstoffe (Handbook of cosmetics and fragrances), vol. 2, Alfred Hüthig Verlag, Heidelberg, 1969;
and in K. Bournot, Rohstoffe des Pflanzenreichs: Ätherische Öle (Raw materials from the plant kingdom: Essential Oils), J. Kramer Verlag, [place not given] 1968.
Concerning the themes presented in class 8 and 9 chemistry, I have developed two projects.
The first one is for producing alcohol—distillation, rectification—with the resulting cologne or mellisengeist using raisins as a starting point.
The second project is soap-making, coloring, and perfuming of the soft soap.
Both of these projects are in my volume
“Laboratory Projects in Chemistry” [See PART 2 in this volume for the first project. The second project has not been translated yet.]

14
1. CARBON DIOxIDE
The first experiments of the main lesson block demonstrate that a person can exhale a maximum of 4-5 liters of air (Exp. 1), and that we can extract (or absorb) part of that exhaled air in a limewater solution (Exp. 2). In that process, the lime solution becomes cloudy and even precipitates a solid. We can see the same behavior from “carbonic acid” that comes from a fire extinguisher.
At this time we can take the opportunity to explain the construction and function of a fire extinguisher and explain its valves through a cross-section diagram. We can also repeat work from class 7 to demonstrate how carbon dioxide extinguishes a flame and how we can transfer this ‘heavy gas’ from one vessel to another through pouring (Exp. 3).
By working with carbon dioxide, we can
II. Stages of Refinement
ExP. 1: ThE AMOUNT Of ExhALED
Place a 4-5-liter graduated cylinder with a tube in it
upside down in a somewhat larger graduated cylinder. Now
place both vessels in a larger plastic tub filled completely with
water. Put all this on a table.
If we blow through the tubing, we can see how much air
our lungs hold in one breath. It is exciting for the students to
compare between the boys (four to four and a half liters) and
the girls (three to three and a half liters). In the same way, we
can now fill a smaller cylinder with our exhaled air so that it
bubbles out of the cylinder; then we cover it with a piece of
wood. We then test it by placing a lit candle in it and seeing
that the flame hardly weakens. Thus, we see that we do not
actually use all the oxygen in the air. ExP. 2: ThE COMPOSITION Of ExhALED AIR
Attach a glass tube to a small balloon, then blown it
up, but not too strongly. Have one of the students breath
the air in this balloon four times through his or her mouth.
If the student does it six times or so, she will feel a little
strange. Then fill a 100mL syringe with the air from the
balloon. Connect this to a second syringe to capture the
air after it passes through a flask containing lime solution.
(Both syringes should be made air tight and easily moveable
by using a little lightweight oil.) Now pass the 100mL of
exhaled air slowly through the lime solution from one
syringe to the other, then back again until you can no longer
detect any diminution of the volume. We can then see that
four to eight percent of the air has disappeared (depending
upon temperature and humidity). We also see that the lime
solution has become cloudy.ExP. 3: ChARACTERISTICS Of CARBON DIOxIDE
Fill a one-liter beaker with carbon dioxide from a fire
extinguisher or gas tank and then draw it through a lime
solution. You can use an Erlenmeyer flask as a carbon
dioxide testing device to show the cloudiness.
With a small burning wood splint, you can then show
(as has been described) that a
burning candle or match would
go out when put into the
beaker. Now pour this invisible
gas into a smaller container,
just as you would water, and
check it again with a candle.
You could also pour the gas
down a paper trough that
“empties” onto a candle flame
or simply pour it onto a litmus
paper-lined tray of a balance
scale. You can show the acidic effect of the water in the
Erlenmeyer flask after you have shaken it with carbon
dioxide and thus explain the name carbon-acid (literally in
German “carbonic acid” transliterates as “carbon acid.”)
EXPERIMENTS
15
become acquainted with a balanced nature, one which, in contrast to other gases, does not rise. Carbon dioxide has what we might call a chilling behavior in regard to fire. We find no flammability, nor does it feed the flame. Rather, it has the same extinguishing quality as we find in the similarly balanced nature of water. We could call carbon dioxide the “water of the atmosphere.” As with liquid water, we can pour it from one vessel into another. There is even carbon dioxide snow and ice. The strong stream from a fire extinguisher is carbon dioxide snow. Perhaps you can obtain some dry ice and show it also. You can make a freezing ‘brine’ in acetone with a temperature of about –80°C, and you can make frozen hardened rubber and similar things with it. Plants need carbon dioxide to live as much as they need water.
You can also mention some of the following characteristics of carbon dioxide. It is 1.5 times heavier than air. When cooled, it does not first liquefy but most often solidifies to something like snow at about the temperature of -78.5°C You can demonstrate this by spraying a fire extinguisher upon a piece of rough sawn wood. Dry ice also sublimates at the same temperature, a characteristic that is used, for example, to cool ice cream carts because of its the large capacity of cooling and the fact that it does not melt. It is possible, however, to liquefy carbon dioxide at a temperature below -20° C, if the atmospheric pressure is at or above fifty-five atmospheres. For that reason, carbon dioxide gas tanks indicate a pressure of 55 atmospheres as long as liquid carbon dioxide is in them.
The oceans contain about 50 times more dissolved carbon dioxide than in the air, and thus they act as a balancing reservoir. In prehistoric times, the atmosphere contained about 0.025% by volume of carbon dioxide, but today that has risen to about 0.038% and that fraction continues to increase [with industrialization]. Some people
believe there will be an increase in temperature over the entire Earth in the early 21st century, which would mean an extension of the deserts and a rise in the level of the oceans. All plant mass develops through the retention of carbon dioxide in light. The amount of retained carbon dioxide is given off through burning or decomposition. The increase in carbon dioxide due to the burning of fossil fuels can therefore never be balanced.
Carbon dioxide is produced industrially by gas generators or by capturing naturally occurring carbon dioxide wells. It is used for producing soda water, fire extinguishers, and as a coolant for chemical reactions, e.g., in the production of soda, methanol, and urea.
Since this lesson should provide not only practice in recognition, but also bring together valuable information, you should provide at least an overview or table of such facts. In most of the material that follows, the collection of such data is left to the reader.
Finally, we endeavor to make our understanding so precise that we can make quantitative statements. We can formulate them in the following way:
“Combustion requires something from the air that has an enkindling nature, and then forms carbon dioxide, which lacks that. Burning consumes the enkindling nature of air leaving the larger part that does not enkindle, but suffocates. The ratio of enkindling to suffocating (which is nitrogen and the noble gases) is about 1:4.” (Exp. 4)
We can now go on to show that we can find carbon dioxide everywhere plant material is burned (Exp. 5).
The only place we find it in a pure form, however, is in charcoal. There, the combustion of charcoal results only in carbon dioxide.
The tendency to produce carbon dioxide through combustion is what we call carbon nature. Carbon is completely of the this nature, while wood is not completely of a carbonic nature, having other
16
natures as well. By “carbon nature,” we understand primarily a
characteristic tendency of that substance. You can introduce it in a simple way through the following characteristics:
· Brittle and solid, sometimes not even meltable· Contained in the fibers and pores of plants· Gives a dark to black color· In the process of combustion, produces carbon
dioxideCarbon-nature is not a clearly-defined,
closed concept. Rather, it becomes more precise
as we work and look at it. It never means a specific material, nor is it a specific characteristic like measurable size. For now it is simply an intellectual construct, a perspective through which we can observe various effects.
You will find a particular tendency in the characteristics and transformations, a character which however metamorphoses to other tendencies given ever-changing conditions of origin and treatment. The only thing “dependable” is the production of carbon dioxide. Seen in a superficial way, we could also say that this sort of inner
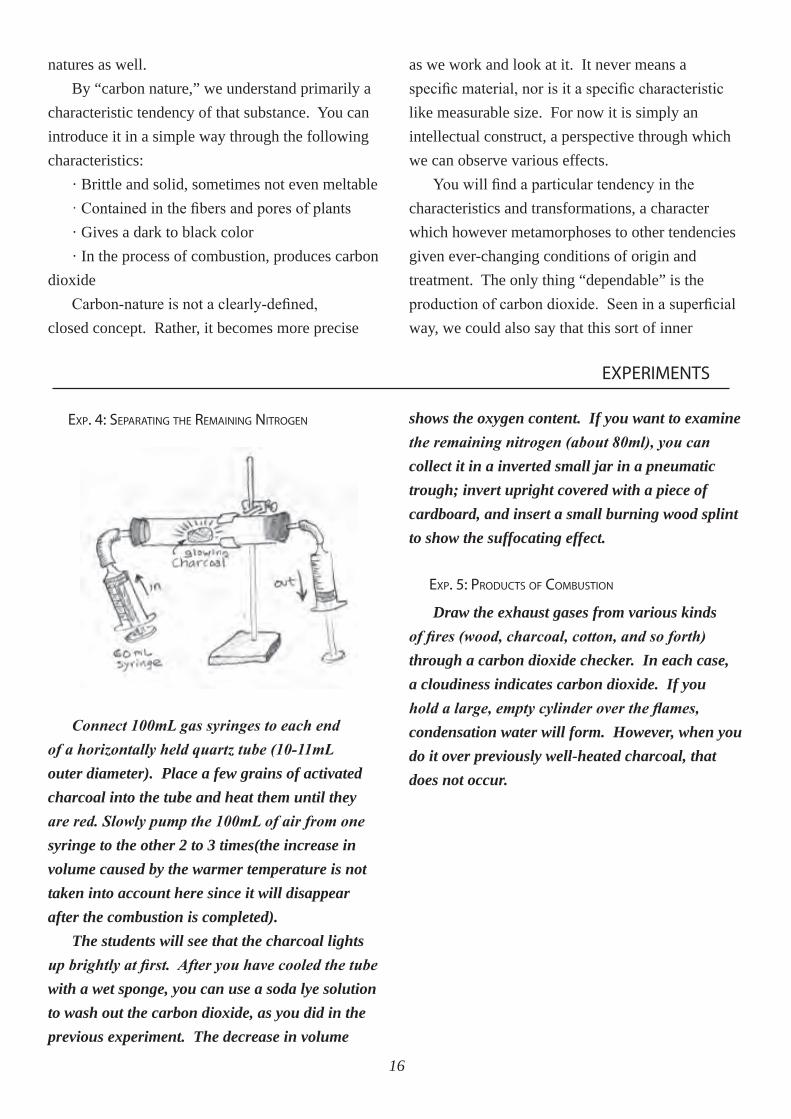
ExP. 4: SEPARATINg ThE REMAININg NITROgEN
Connect 100mL gas syringes to each end of a horizontally held quartz tube (10-11mL outer diameter). Place a few grains of activated charcoal into the tube and heat them until they are red. Slowly pump the 100mL of air from one syringe to the other 2 to 3 times(the increase in volume caused by the warmer temperature is not taken into account here since it will disappear after the combustion is completed).
The students will see that the charcoal lights up brightly at first. After you have cooled the tube with a wet sponge, you can use a soda lye solution to wash out the carbon dioxide, as you did in the previous experiment. The decrease in volume
shows the oxygen content. If you want to examine the remaining nitrogen (about 80ml), you can collect it in a inverted small jar in a pneumatic trough; invert upright covered with a piece of cardboard, and insert a small burning wood splint to show the suffocating effect.
ExP. 5: PRODUCTS Of COMBUSTION
Draw the exhaust gases from various kinds of fires (wood, charcoal, cotton, and so forth) through a carbon dioxide checker. In each case, a cloudiness indicates carbon dioxide. If you hold a large, empty cylinder over the flames, condensation water will form. However, when you do it over previously well-heated charcoal, that does not occur.
EXPERIMENTS
17
nature is a tendency toward certain characteristics associated with resulting products. When we follow the transformations of the inner natures through the materials of this block, we realize that what we see happening externally, we comprehend from within. We see that we are asked to make our thinking ever richer and more pliable in order to penetrate further effects. We can see that carbon nature results from a series of things that provide a total perspective. This is something that is not firm before we begin our considerations. It is not the same as, for instance, the “carbon content” of “organic” compounds. Even charcoal is only one variation of carbon-nature that is transformed into a solid thing. In the end, it is what we call “carbon,” since there is a parallel between the carbon-nature and the possibility of arriving at pure carbon through coking or carbonizing to soot, achieving solid pure carbon which only glows in embers. Thus, we can also speak of the “burnable-solid” nature of such materials.
When we burn wood or straw, we can also discover another product of combustion, namely water vapor, that we can see as fine droplets that condense on cold surfaces. We will demonstrate that relationship only later. The relationship is:
· It is a product of charring (roasting) through dry heat;
· It is a product of combustion of the fiery-volatile, that is, from substances with a watery-nature.
Analytically, water vapor can arise for two very different reasons. In both cases, however, there is a certain external plasticity present that we often find as a capacity of melting, dissolving, volatility, or in connection with the carbon nature, charring. When teaching, we do not at first differentiate the various ways hydrogen and watery nature can occur. Only later do we relate the creation of water to the fiery-volatile nature, and then seek the initial burnable components. In that way, we come to the unburnt-out watery-tendency, that is, to the hydrogen nature.

18
2. WOOD AND SUgAR
In order to study inner natures, we heat some wood shavings in a tube closed off from the air, that is, we carbonize them (Exp. 6). At first, we see no flames. Instead, we see the originally light-colored wood darken. We see steam then tars, and gases form. We can ignite them and observe that they burn with an active, partially blue with yellow tip flame. For more information, see the supplementary section on coking, (page 54). What remains in the test tube is black, porous charcoal.
We then attempt to burn that. We experience something quite different than with wood. We can ignite charcoal only with considerable difficulty.
To burn, it needs to be in a large pile and have a great deal of air. It appears to resist fire. As soon as we stop providing additional air, for instance, if we no longer blow upon it, the weak flame dies and only a dark glow lives under layers of ash. When we check the products of combustion, we discover only carbon dioxide and no water.
ExP. 6: vERSION A SIMPLE ChARRINg Of WOOD
Char some wood shavings in a normal test tube. After
the wood begins to
brown, you see white
smoke and, later, some
droplets in the neck of
the test tube. Soon
afterward, you can
ignite the rising smoke
and the flame will dance at the end of the test tube for a
short time. After extinguishing the flame, you can have the
students smell the smoke and compare it with the almost
odorless gas emitted from the flame. After you remove the
burner from under the test tube, the flame slowly dies. You
can then show the incompletely charred wood shavings and
use them for drawing. (This can be repeated for starch and
then sugar.)
ExP. 6 vERSION B: ChARRINg WOOD WITh A gASOMETER
First connect a gasometer (a glass cylinder with a
valve, set in a water-filled cylinder) to a large test tube (30
to 200mm). Fill the horizontally held test tube halfway with
wood shavings. After you have heated the shavings for a
while and smoke begins to come out of the tube, connect the
tube to the gasometer valve and then cool the tubing with
a beaker of water. After the shavings are done charring,
you can have the students check the smell of the collected
wood gas. Then burn the wood gas and have the students
check the smell once again. You should also test it for water
vapor and carbon dioxide as in Exp. 5. Check the charring
scrubber water for acidity, and possibly heat it so that the
students can smell the vapor. (You can also show them
methanol: the smell, the color of the flame, how the flame
changes when water is added until it extinguishes, and how
it floats upon gently poured water.) They can smell the tar
and possibly even taste a small amount. When absorbed in
a piece of cloth, it burns and produces soot. When wet, the
result is an asphalt-like pitch.
ExP. 7, vERSION A (USUALLy DONE IN CLASS 8) CARAMEL
Fill a 400mL (tall) beaker approximately half full
with normal crystal sugar. Then, heat it with a strong
flame. (Place it upon a wire screen, do not use an asbestos
mat.) Have the students observe all the states of melting,
carmelization, vaporizing and carbonization, so that they
smell it and observe how it “boils over” and, finally, how it
bursts into flames and then burns out. At several points they
can check it for water vapor with an empty beaker.
ExP. 7: vERSION B SUgAR ChARRINg (CARBONIzINg)
Heat some glucose in a long-necked flask so that the
carbonized mass rises into the neck. After it cools, heat
the neck only to the point where a firm block of carbonized
sugar forms there. You can connect it to a gas jet through
an intervening U-tube and ignite the gas. Considerable
water will condense in the tube.
EXPERIMENTS
19
We also find a large amount of carbon dioxide when we check the gases from a coal gas flame. Apparently the dry heating of wood produces something that is easily ignited and at the same time something else that is dark and burns only without a flame (refer to the diagram on page 10).
The easily burnable products are balanced by everything else in the resulting smoke, and the result of the burning is primarily carbon dioxide and water. Everything, even the gas, appears permeated by carbon nature. Yet, something else must also be affecting the gaseous materials. Here we have partial oxygenation resulting in a monoxide as well as the fiery-volatile, namely, hydrogen.
Jung-Stilling, a friend of Goethe’s, wrote a lively description of eighteenth century charcoal making complete with diagrams and all the details of a charcoal pile. I have included some excerpts of his description in the supplement on deeper understanding (pages 47-53), followed by a description of modern techniques (page 54).
Regarding the inner natures of wood, we have primarily demonstrated the solid. There are four resulting product groups. The first is charcoal, with 1-2% ash and approximately 10% other materials that our experimental temperature of 500-600° C could not drive out, namely the volatile materials (oxygen, hydrogen, and nitrogen). Industrial charcoal making processes do drive them out. Thus, in general, very dry charcoal contains only 85-90% carbon. When exposed to air, it absorbs 5-8% water. The second group of products is wood tar. It has a fiery, oily nature. When there is a shortage of petroleum, it can be used to produce diesel and lubricating oils. The third group of products is called “smoldering water,” or so-called “wood vinegar.” Additional products are wood alcohol (methyl alcohol) and acetone. Therefore, what we have is a water with many fiery-volatile and carbon characteristics. The fourth group of products is wood gas. It is damp with
a poisonous, suffocating quality. Wood gas has the qualities of water and carbon dioxide, and the fiery-volatile nature is reduced. Its heating value is correspondingly small.
We regain the idea of wood—whole, smooth, flexible, and easily ignited—only when we think of porous, brittle and barely ignitable charcoal as being filled with a fiery oily quality as well as a watery quality and a very small amount of fiery-volatility.
It is really astonishing that something like firm, dead wood can produce a miraculous world of an almost uncountable number of materials. It is simply heating without air that produces all these differences slumbering in the simple external appearance of wood. In contrast, heating wood with air results in an open flame that makes everything the same and results only in a monotonous carbon dioxide.
PEDAgOgICAL REMARKS
For classes weak in imaginative capacity, the development of inner natures by bringing together the numerous reaction tendencies and characteristics into, for example, the concept of the fiery-volatile, can be radically objectified. This is done by introducing these inner natures, such as the carbon nature, by using the material you are thinking about, namely, hydrogen, as a basis. In this case, we do not think from the qualitative to a principle, instead we think from one material into another. Instead of coming into the spiritual, we combine objects. In that way, the situation is short circuited and, from a cognitive perspective, trivial. Under some circumstances, though, it is necessary in order that substance relationships come into thought movement. Later, we can work towards something more ideal from objects by considering the transformations of qualities. In such a case, we would go directly from wood gas and its composition to the experiments with hydrogen on page 32, and only after that would we present sugar and alcohol.
20
We are not promoting abandoning the way thinking being attempted in this work, but rather emphasizing the need to pedagogically adapt to the class’s way of thinking. Many classes are strongly into puberty and want to think only in terms of the tangible. That is something we need to take into account, at least at first.
We obtain sugar from the middle portion of the plant, that is, from the flowing sap of the stem and leaf. In the class 8, we already taught about the history, sources, characteristics and seductive nature of sugar. Now, in the ninth class, we want to add some new concepts. This is similar to what is done in other subjects, for instance, in history, where we reconsider from a different perspective what the students previously learned. When we heat sugar, we primarily experience the watery nature. This is something we can develop from glucose, which results from the decomposition of starches and cellulose. We encounter the balanced watery nature of sugar in the clarity of the crystals, their easy solubility in water, poor flammability, and clear melting which produces clouds of water vapor. At higher temperatures, the gases emitted begin to ignite like lightening and burn for just a short time with a very bright flame.
Once again, we encounter the flammable-volatile nature. At the same time, a foamy, black sugar-carbon forms that behaves much like charcoal and also tastes and looks like it (burnable, solid nature). However, the solid nature seems to go along with the disappearing, watery nature. Sugar has too little substance and thus forms the billowing foam. When we char starches, the carbon remains primarily at the bottom; in wood it even pulls together. We can see that the solid nature of sugar is weaker, and, in contrast, the watery nature is stronger.
3. ALCOhOL
We can experience something different with the sweet parts of a plant if we crush them and place them in some water. We can put some raisins in water and allow this mixture to stand open to the air. To speed up the process, add a little baker’s yeast, a microorganism that would otherwise have to come from the air. Yeast is a fungus that forms spores carried by the air. Soon we see small bubbles rising which we can demonstrate are carbon dioxide (Exp. 8).
ExP. 8: RAISIN WINE
Place one pound of raisins in a 2 liter round flask. Add about 1 liter lukewarm water and a package of baker’s yeast (about 10g) dissolved in a little warm water. Close the flask with a rubber stopper through which you have inserted a piece of glass tubing and put it someplace where it will be warm, about 30-35°C (near a heater or on a heating pad). Use some rubber tubing to connect the glass tube running from the flask to a bubble counter (a flask filled with lime water). Gas production will begin after about half an hour. You can see this in the developing cloudiness of the lime water, some precipitation of calcium, and its re-solution
(formation of bicarbonate) if the lime water is not too concentrated. Collect the gas in an Erlenmeyer flask after it has gone through the lime water overnight. You can test it and identify it the next day by tasting and with a candle. (See also Part 2 of this book - a wine making project. Page 90)
EXPERIMENTS
21
After the production of gas slows, we can have one of the students taste a little of the liquid. The sweetness has disappeared, replaced by a yeast-like taste and something new that has a burning taste. We also notice the changed appearance of the liquid. Previously, it had a deep brown color, but now it is a pale gray-brown, and the raisins float at the top of the cloudy liquid like bloated corpses. Wine is made through this sort of controlled “decomposition,” though in this case, it does not taste very good.
DISTILLATION
The class is now faced with the same situation that confronted humanity before the Middle Ages. They know alcoholic fermentation exists, but cannot yet isolate the alcohol itself. How did people discover how to distill alcohol? Observing wine when it is heated and when it is cold offers us a clue as to how we could separate the mixture using its differing volatilities. You can see that a much stronger “cloud” forms when wine is heated than when it is cold (Exp. 9). Further technical and historical information on alchol can be found on pages 57 - 68).
ExP. 9: MULLED WINE
Place some 10% alcohol (wine, not denatured alcohol) in a 250mL beaker and warm it on an electric hot plate. Have the students first smell the mixture while it is cold; they will notice only a weak smell. As it warms, the students will see that at about 50°C the smell of the mixture will attack the mucus membranes in their noses much more strongly. They may describe the sensation as irritating, cooling, or intoxicating. When the mixture is nearly boiling, darken the room and light the vapors. You will see a flurry of dancing flames that seem to blow away toward the end. The flame is a pale blue. You can also experiment with the raisin wine from Exp. 8 after it has fermented for about 24 hours.
EXPERIMENTS
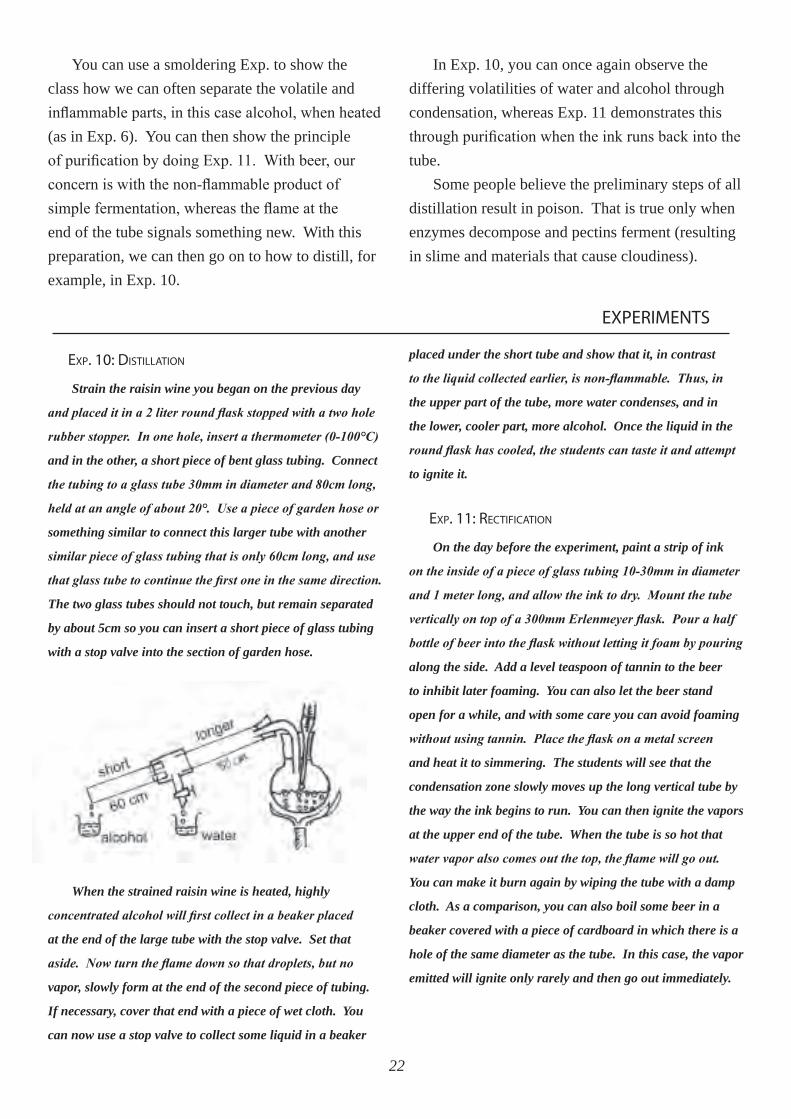
22
You can use a smoldering Exp. to show the class how we can often separate the volatile and inflammable parts, in this case alcohol, when heated (as in Exp. 6). You can then show the principle of purification by doing Exp. 11. With beer, our concern is with the non-flammable product of simple fermentation, whereas the flame at the end of the tube signals something new. With this preparation, we can then go on to how to distill, for example, in Exp. 10.
In Exp. 10, you can once again observe the differing volatilities of water and alcohol through condensation, whereas Exp. 11 demonstrates this through purification when the ink runs back into the tube.
Some people believe the preliminary steps of all distillation result in poison. That is true only when enzymes decompose and pectins ferment (resulting in slime and materials that cause cloudiness).
ExP. 10: DISTILLATION
Strain the raisin wine you began on the previous day
and placed it in a 2 liter round flask stopped with a two hole
rubber stopper. In one hole, insert a thermometer (0-100°C)
and in the other, a short piece of bent glass tubing. Connect
the tubing to a glass tube 30mm in diameter and 80cm long,
held at an angle of about 20°. Use a piece of garden hose or
something similar to connect this larger tube with another
similar piece of glass tubing that is only 60cm long, and use
that glass tube to continue the first one in the same direction.
The two glass tubes should not touch, but remain separated
by about 5cm so you can insert a short piece of glass tubing
with a stop valve into the section of garden hose.
When the strained raisin wine is heated, highly
concentrated alcohol will first collect in a beaker placed
at the end of the large tube with the stop valve. Set that
aside. Now turn the flame down so that droplets, but no
vapor, slowly form at the end of the second piece of tubing.
If necessary, cover that end with a piece of wet cloth. You
can now use a stop valve to collect some liquid in a beaker
placed under the short tube and show that it, in contrast
to the liquid collected earlier, is non-flammable. Thus, in
the upper part of the tube, more water condenses, and in
the lower, cooler part, more alcohol. Once the liquid in the
round flask has cooled, the students can taste it and attempt
to ignite it.
ExP. 11: RECTIfICATION
On the day before the experiment, paint a strip of ink
on the inside of a piece of glass tubing 10-30mm in diameter
and 1 meter long, and allow the ink to dry. Mount the tube
vertically on top of a 300mm Erlenmeyer flask. Pour a half
bottle of beer into the flask without letting it foam by pouring
along the side. Add a level teaspoon of tannin to the beer
to inhibit later foaming. You can also let the beer stand
open for a while, and with some care you can avoid foaming
without using tannin. Place the flask on a metal screen
and heat it to simmering. The students will see that the
condensation zone slowly moves up the long vertical tube by
the way the ink begins to run. You can then ignite the vapors
at the upper end of the tube. When the tube is so hot that
water vapor also comes out the top, the flame will go out.
You can make it burn again by wiping the tube with a damp
cloth. As a comparison, you can also boil some beer in a
beaker covered with a piece of cardboard in which there is a
hole of the same diameter as the tube. In this case, the vapor
emitted will ignite only rarely and then go out immediately.
EXPERIMENTS
23
For example, when pomace (the pressings of a variety of fruits) ferments it forms a large amount of methanol, only 0.2g per liter of which, if wine, and 4g per liter, if brandy, are allowed by German law. Cherry and plum brandy contain that amount naturally. The problem of after-run is discussed below in connection with fusel oil.
After using this process to derive an enriched form of alcohol using the inflammability of the distillate as our criteria, we need to discuss its characteristics (Exp. 12) and even more so its effects upon living organisms, individuals, and society. You can do this, for instance, with student reports about alcohol consumption and misuse. The section on deeper understanding of alcohol discusses this further, page 57.
At this point, you can give the students the following summary:
CONTENT Of ALCOhOLIC BEvERAgES
Beverage Approx. Content (% vol)Beer 3.5% Fruit wine 5% Moselle wine (cheap), and wines from northern regions) 7% Wine from southern German regions 9% Sec and Alsace (warmer regions) 11% southern European 15% Port (Portugal), Madeira up to 20% Kiwi Liquor (cheap) 16% Schnapps (corn) 32% strong-corn liquor 38% Vodka 40% Whisky, Cognac 43% Rum 54-80%
Note: The supplementary chapter on a deeper understanding of alcohol gives instructions for converting percent volume to volume by weight, see page 57.
ExP. 12A: ALCOhOL AS A DESTROyER Of LIfE
You can demonstrate the hostility of alcohol to life by mixing the white from a fresh egg into 200mL of 1% salt (table salt) solution. After the white is well mixed, slowly pour denatured alcohol into it. The solution will very quickly become cloudy, and the egg white will look as though it is cooked (denatured).
ExP. 12B: ThE DENSITy Of ALCOhOL
We can show the low specific gravity of alcohol with a stick we have made heavier at one end by wrapping it with some wire or rubber. The stick will float in water, but sink in denatured alcohol. You can also show how to use a hydrometer in this connection.
ExP. 12C: fLOWINg fIRE
This Exp. is often done in class 7. Ignite denatured alcohol in a dark room and then thin it with water in a ratio of 1:0.8. You then pour the burning fluid on a desk or board, possibly even a sleeve. The result is a darting sea of flames. Only the wetness remains, with no carbonized residue.
EXPERIMENTS
24
It is interesting to note that fermentation can bring the alcohol content to at most 18% by weight. However, it is usually significantly below that value in practice. At higher alcoholic concentrations, yeast activity ceases. The same is true when the sugar content is over 30% or the temperature is below 0°C or above 50°C, also when the carbon dioxide pressure is above six atmospheres. The temperature range in industrial fermentation is even narrower: between 15°C and 30°C. There is no danger the mash will begin to mold above a 4% concentration of alcohol. In contrast to this, the distillation to gain flammable alcohol concentrations is a purely technical process known only since about 1200 AD.
One kilogram of glucose provides about one-half kilogram alcohol and the same amount of carbon dioxide. However, half that amount consumed at one time, that is 250g of pure alcohol, is enough to kill a person. That would result in a blood alcohol level of approximately 5%. Other alcohols are even more poisonous. Methanol is about ten times as poisonous and even small amounts can result in permanent blindness.
I have found it important to offer a kind of counterbalance to these flexible thoughts about inner natures by giving the students a data summary about ethyl alcohol. You can substitute such information in place of the consolidation of knowledge we often see when students learn formulas. You can give them such information as: density, boiling point, azeotropy, viscosity, maximum contraction, flash point, solubility, lethal doses, the amount humans can consume without ill effect (for men and women), legal blood alcohol content, cost of production, retail price, taxes, and industrial uses. The chapter on deeper understanding has some information about these things, page 57.
We can show through some types of alcohol, in particular, wood alcohol, ethyl alcohol, and fusel oil, how the balanced and, later, the fiery-volatile nature decrease as the density and viscosity, which expresses carbon nature, increases (Exp. 13).
ExP. 13: OThER ALCOhOLS
PART A: MISCIBILITy
Mix equal parts fusel oil, methanol, and water one at a time in this order. This demonstrates separation and miscibility respectively. In a 100mL graduated cylinder mix the same volume of methanol and fusel oil; add one part water, and you will observe no cloudiness. Slowly add a second part of water until the total amount of water is equal to the total amount of the two alcohols together. You will then observe an oily liquid rising to the top which you can identify by its smell as fusel oil. Another possibility is to take a mixture of equal parts methanol and water and then slowly pour in the same amount of fusel oil. Only when you have poured in the total amount
of fusel oil can you detect a significant cloudiness. When more fusel oil is added, it rises to the top. Commercially available fusel oil is a mixture of 70% 3-methylbutanol-1 and 30% 2-methylbutanol-1. It boils between 129° and 130°C
PART B: ALCOhOL fLAMES
Pour the same amounts of methyl, ethyl, butyl, and amyl alcohols into separate small heat-proof glass bowls and ignite them. Then observe the flames and formation of soot. The flash point of alcohols above butyl is above normal room temperature, so we will need to heat the surface of the amyl alcohol with some matches first or place a burning match in the alcohol as a wick.
EXPERIMENTS

25
We can see this in the way its water solubility decreases, how the flame is more difficult to ignite and becomes more yellow or red, more pointed and flickering, and how, finally, the flame produces soot (refer to the section on fusel oil in the chapter on deeper understanding, page 68). The higher alcohols that occur in nature, beginning with hexanol, usually have an unbranched, simple structure, are not well known, and do not play a particularly large role.
A book by Paul Arauner, “Weine und Säfte, Liköre & Sekt selbstgemacht” (“Making wine, juices, liqueurs and champagne yourself”) provides some practical instruction on these themes (Falken Verlag, Niederhausen/Taunus, 1985).
4. EThER
The methods of producing ether will be more understandable if you first demonstrate the effects of concentrated sulfuric acid upon sugar (Exp. 14). This Exp. also shows what happens when the watery nature is forcefully driven out of sugar: only black coal remains. The carbon is driven out of the volatile gases; afterwards it is completely rigid and as lifeless as ash.
The effects of sulfuric acid are not as obvious in the production of ether (Exp. 15). Nevertheless, you can see them in the dark color of the distillation residues.
ExP. 14: DESTRUCTION Of SUgAR By ACID
A 600-mL beaker (high form) is filled about 1/4 full
with sugar, then the sugar layer is covered with concentrated
sulfuric acid. We first notice a browning, and after sitting
a little while (especially with finely-powdered sugar, or else
with slight heating in one spot with a match) one spot on the
beaker bottom shows a bubbling and blackening or charring,
where a columnar, black form shoves itself up from the
beaker glass. It smells pungent like ‘[‘maggi”?]
ExP. 15: EThER PRODUCTION
You can produce ether relatively easily in a reflux
distillation apparatus from equal parts denatured alcohol
and conc. sulfuric acid (CARE exothermic reaction!). If you
slowly pour the acid into the alcohol, the students can note
the beginning of the reaction by the darkening color and
see how sulfuric acid attacks alcohol with heat and boiling.
Add boiling chips, to the flask and heat to 135-145° C (keep
the thermometer in the liquid). Condense the product with a
well-cooled condenser. Add more ethanol (from a dropping
funnel) at the same rate as the condensed product drips out
of the condenser into the receiving flask. Note: 100mL of
alcohol and an equal amount of sulfuric acid will produce
approx. 10-20mL of ether. Then mix the distillate with
water, so the ether floats to the top where it can be smelled
and ignited.
EXPERIMENTS
Closed (vapor-sealed) reflux apparatus
Here are shown two types of apparatus in which ether can be produced. The lower one is not quick fit glass and is cheaper. Both give the opportunity to fill ether into a bucket below the bench.
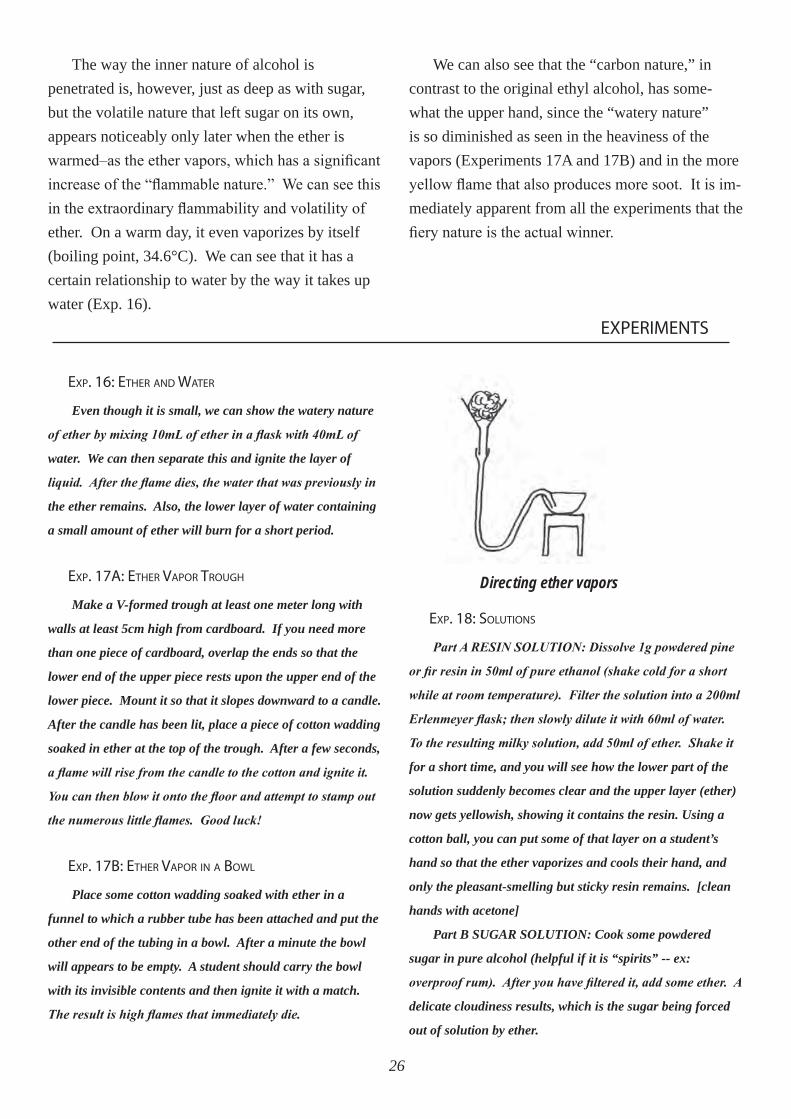
26
The way the inner nature of alcohol is penetrated is, however, just as deep as with sugar, but the volatile nature that left sugar on its own, appears noticeably only later when the ether is warmed–as the ether vapors, which has a significant increase of the “flammable nature.” We can see this in the extraordinary flammability and volatility of ether. On a warm day, it even vaporizes by itself (boiling point, 34.6°C). We can see that it has a certain relationship to water by the way it takes up water (Exp. 16).
We can also see that the “carbon nature,” in contrast to the original ethyl alcohol, has some-what the upper hand, since the “watery nature” is so diminished as seen in the heaviness of the vapors (Experiments 17A and 17B) and in the more yellow flame that also produces more soot. It is im-mediately apparent from all the experiments that the fiery nature is the actual winner.
ExP. 16: EThER AND WATER
Even though it is small, we can show the watery nature
of ether by mixing 10mL of ether in a flask with 40mL of
water. We can then separate this and ignite the layer of
liquid. After the flame dies, the water that was previously in
the ether remains. Also, the lower layer of water containing
a small amount of ether will burn for a short period.
ExP. 17A: EThER vAPOR TROUgh
Make a V-formed trough at least one meter long with
walls at least 5cm high from cardboard. If you need more
than one piece of cardboard, overlap the ends so that the
lower end of the upper piece rests upon the upper end of the
lower piece. Mount it so that it slopes downward to a candle.
After the candle has been lit, place a piece of cotton wadding
soaked in ether at the top of the trough. After a few seconds,
a flame will rise from the candle to the cotton and ignite it.
You can then blow it onto the floor and attempt to stamp out
the numerous little flames. Good luck!
ExP. 17B: EThER vAPOR IN A BOWL
Place some cotton wadding soaked with ether in a
funnel to which a rubber tube has been attached and put the
other end of the tubing in a bowl. After a minute the bowl
will appears to be empty. A student should carry the bowl
with its invisible contents and then ignite it with a match.
The result is high flames that immediately die.
Directing ether vapors
ExP. 18: SOLUTIONS
Part A RESIN SOLUTION: Dissolve 1g powdered pine
or fir resin in 50ml of pure ethanol (shake cold for a short
while at room temperature). Filter the solution into a 200ml
Erlenmeyer flask; then slowly dilute it with 60ml of water.
To the resulting milky solution, add 50ml of ether. Shake it
for a short time, and you will see how the lower part of the
solution suddenly becomes clear and the upper layer (ether)
now gets yellowish, showing it contains the resin. Using a
cotton ball, you can put some of that layer on a student’s
hand so that the ether vaporizes and cools their hand, and
only the pleasant-smelling but sticky resin remains. [clean
hands with acetone]
Part B SUGAR SOLUTION: Cook some powdered
sugar in pure alcohol (helpful if it is “spirits” -- ex:
overproof rum). After you have filtered it, add some ether. A
delicate cloudiness results, which is the sugar being forced
out of solution by ether.
EXPERIMENTS
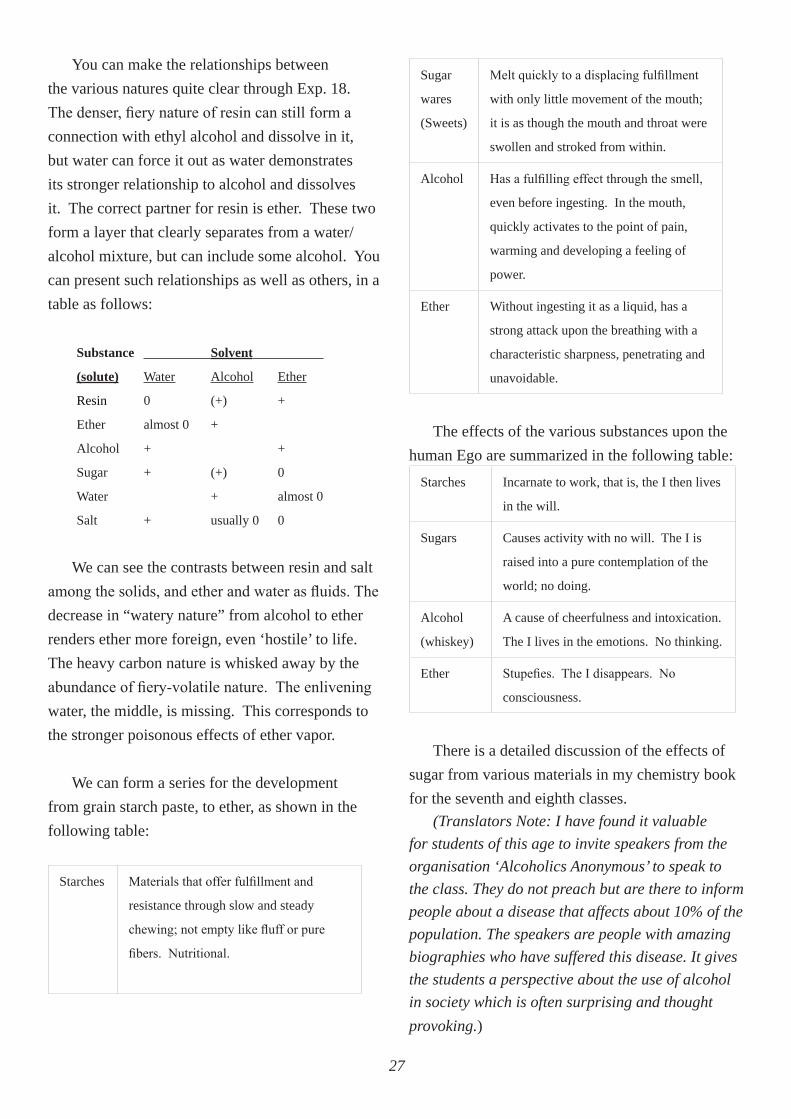
27
You can make the relationships between the various natures quite clear through Exp. 18. The denser, fiery nature of resin can still form a connection with ethyl alcohol and dissolve in it, but water can force it out as water demonstrates its stronger relationship to alcohol and dissolves it. The correct partner for resin is ether. These two form a layer that clearly separates from a water/alcohol mixture, but can include some alcohol. You can present such relationships as well as others, in a table as follows:
Substance Solvent (solute) Water Alcohol Ether
Resin 0 (+) +
Ether almost 0 + Alcohol + +
Sugar + (+) 0
Water + almost 0
Salt + usually 0 0
We can see the contrasts between resin and salt among the solids, and ether and water as fluids. The decrease in “watery nature” from alcohol to ether renders ether more foreign, even ‘hostile’ to life. The heavy carbon nature is whisked away by the abundance of fiery-volatile nature. The enlivening water, the middle, is missing. This corresponds to the stronger poisonous effects of ether vapor.
We can form a series for the development from grain starch paste, to ether, as shown in the following table:
Starches Materials that offer fulfillment and
resistance through slow and steady
chewing; not empty like fluff or pure
fibers. Nutritional.
Sugar
wares
(Sweets)
Melt quickly to a displacing fulfillment
with only little movement of the mouth;
it is as though the mouth and throat were
swollen and stroked from within.
Alcohol Has a fulfilling effect through the smell,
even before ingesting. In the mouth,
quickly activates to the point of pain,
warming and developing a feeling of
power.
Ether Without ingesting it as a liquid, has a
strong attack upon the breathing with a
characteristic sharpness, penetrating and
unavoidable.
The effects of the various substances upon the human Ego are summarized in the following table:
Starches Incarnate to work, that is, the I then lives
in the will.
Sugars Causes activity with no will. The I is
raised into a pure contemplation of the
world; no doing.
Alcohol
(whiskey)
A cause of cheerfulness and intoxication.
The I lives in the emotions. No thinking.
Ether Stupefies. The I disappears. No
consciousness.
There is a detailed discussion of the effects of
sugar from various materials in my chemistry book for the seventh and eighth classes.
(Translators Note: I have found it valuable for students of this age to invite speakers from the organisation ‘Alcoholics Anonymous’ to speak to the class. They do not preach but are there to inform people about a disease that affects about 10% of the population. The speakers are people with amazing biographies who have suffered this disease. It gives the students a perspective about the use of alcohol in society which is often surprising and thought provoking.)
28
It is significant that the use of general anesthesia began in the middle of the last century and quickly became common. At that time, there was a predominate cultural perspective about scientific materialism (see the forward by C. J. Schröer in Goethe’s Natural-Scientific Letters, vol. 1, edited by Rudolf Steiner, Troxler Verlag, Bern, 1947). Anesthesia with ether was discovered and put into practice in America.
ANESThETICS:In 1846, the Boston dentist Morton announced
the use of ether for eliminating pain. Until that time, only laughing gas (N2O) and, for a very long time, whiskey, had been used. Soon afterwards, ether was used as an anesthetic everywhere in Western medicine. Chloroform, a non-explosive anesthetic, was used for a time, but was difficult to give in the right dose. That is, very small overdoses were deadly or led to liver damage. The same is true of chlorethyl (monochlorethane). Curiously enough, the more acceptable and more appropriate form of ether, ethylene, appeared to be difficult to administer as a gas. Following the intravenously administered barbiturates developed in the 1930s, evipane, methohexital, and others, in the 1950s more acceptable fast-acting and easily controlled general anesthetics, in contrast to local anesthetics, came into use. In particular, cyclopropane (vapor point: -34°C) and divinyl ether (vapor point: 23°C); somewhat later, halothane (2-brom-2-chlor-1,1,1-trifluorethane, vapor point: 50°C). Today, most anesthetics are combinations of various drugs to which ether is usually added. “Ether is still the safest and most useful anesthetic,” (J. A. Lee and R. S. Atkinson, “Synopsis of Anesthetics,” 1978). In general, most organic distillates, from petrol to fruit esters, have a more or less intoxicating, sometimes even numbing effect. Many people enjoy sniffing them.
An average sized adult needs about 50mL of ether to achieve complete unconsciousness, which
is about 1% ether in the blood. This is given in a period of fifteen minutes in the form of 8-14% by volume ether in the air inhaled. With the same amount of alcohol, an adult would be only slightly tipsy. To maintain the anesthesia over a longer time, the amount mixed into the air which is inhaled needs to be drastically reduced to, for example, about 4% by volume, otherwise breathing will stop. If only 8% were mixed into the inhaled air, that would occur after just a few hours.
The increase in the ether level of the blood to 2-3% occurs rather quickly, within about two hours. Low concentrations, however, remain for many days. Ether is expelled primarily through breathing. After the patient awakens from anesthesia, he or she often feels nauseated and sometimes vomits. The section about anesthetics contains more information, page 68-74.
29
5. vINEgAR
Alcohol easily transforms into acetic acid in the presence of oxidants such as potassium permanganate, chromium trioxide, or dichromate with the help of concentrated sulfuric acid (Exp. 19A). Whenever possible, however, we want to avoid that path as it is foreign to biological activity. In this block, vinegar fermentation, which experimentally demonstrates the aeration of alcohols, is more appropriate (Experiments 19B and 19C).
The air overcomes the intoxicating effects of a low concentration of alcohol, and a refreshing, sour taste is created. The smell of vinegar can be used to counteract fainting spells. It has an awakening, rather than numbing, effect. Vinegar, the result of a complete fermentation process, thus creates a new beginning and the acid can be transformed into a number of things such as ester and hydrides and salts (Exp. 20A). Activity and movement thus receive a new direction.
EXPERIMENTS
ExP. 19: PRODUCINg vINEgAR
PART A. WITh AN OxIDANT.
It is pedagogically best to use an oxide known to be made by combining something with oxygen. In this case, we use oxygen enriched chromium trioxide. Prior to the Exp. you can show that, when mixed carefully with some sugar and heated moderately, the result is a large, explosive flame. When mixed with alcohol, that occurs directly upon contact. To produce vinegar, we take about one to two tablespoons each of caustic soda and chromium trioxide and put them into a flask. We then put in enough water to cover the mixture, which results in a quick bubbling. After it has cooled for a short time, add half as much concentrated sulfuric acid as water and a fourth as much denatured alcohol as water. The mixture then smells like vinegar. If you use potassium dichromate, the flames produced with sugar are weaker, and you do not need any caustic soda to make vinegar. You can identify the resulting reduced chromium oxide by its green color. The tendency of alcohol when it is aerated, as it is in this reaction, is the basis for the alcohol tests used in testing the blood alcohol level of drivers.
PART B. OPEN fERMENTATION.
Place a layer of fresh birch shavings and a small amount of fruit wine in a large glass bowl and leave it open to the air. The wine should not quite cover the shavings. After about three days, the liquid will be covered with a white skin and taste and react sour (uncertain experiment).
PART C. QUICK METhOD fOR PRODUCINg vINEgAR
Chemicals: 10% ethyl alcohol red beech shavings, natural vinegar (not synthetic or prepared from vinegar essence, since the bacteria in vinegar is what is important), sugar yeast extract
Fill a large reaction tube with beech shavings. Pour enough of the natural vinegar onto them to thoroughly soak the shavings keep them in place. It is good to add some sugar and a tiny amount
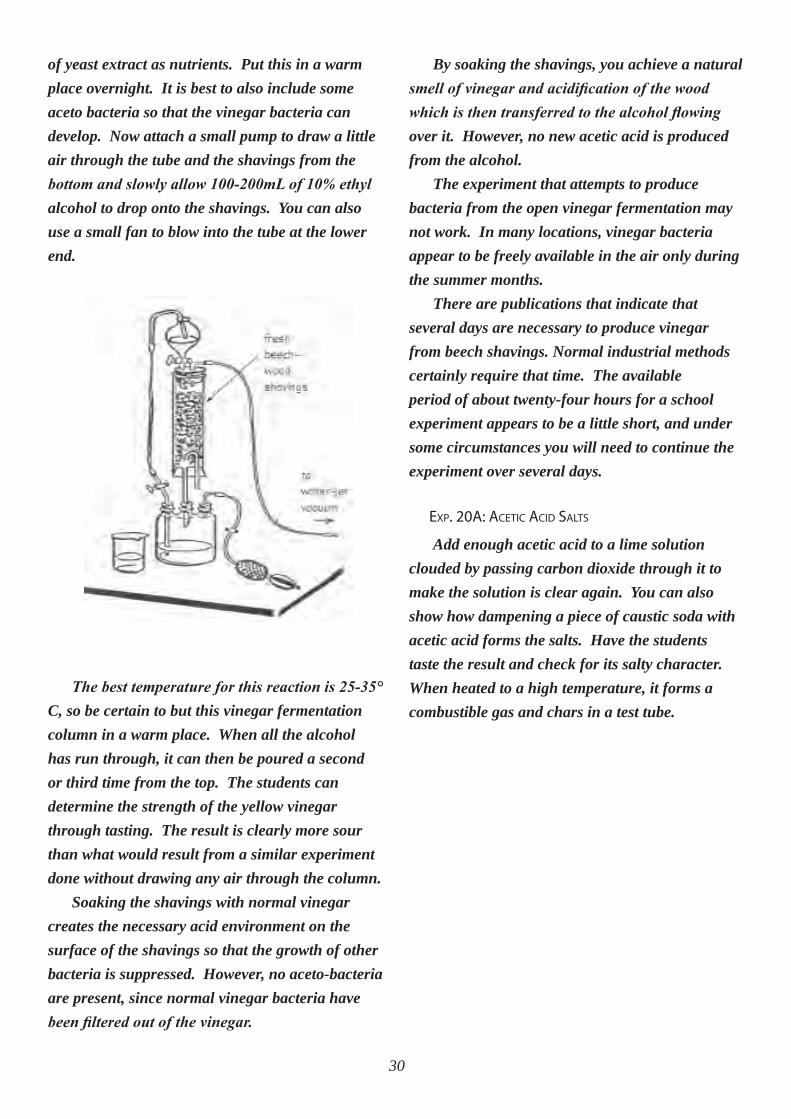
30
of yeast extract as nutrients. Put this in a warm place overnight. It is best to also include some aceto bacteria so that the vinegar bacteria can develop. Now attach a small pump to draw a little air through the tube and the shavings from the bottom and slowly allow 100-200mL of 10% ethyl alcohol to drop onto the shavings. You can also use a small fan to blow into the tube at the lower end.
The best temperature for this reaction is 25-35° C, so be certain to but this vinegar fermentation column in a warm place. When all the alcohol has run through, it can then be poured a second or third time from the top. The students can determine the strength of the yellow vinegar through tasting. The result is clearly more sour than what would result from a similar experiment done without drawing any air through the column.
Soaking the shavings with normal vinegar creates the necessary acid environment on the surface of the shavings so that the growth of other bacteria is suppressed. However, no aceto-bacteria are present, since normal vinegar bacteria have been filtered out of the vinegar.
By soaking the shavings, you achieve a natural smell of vinegar and acidification of the wood which is then transferred to the alcohol flowing over it. However, no new acetic acid is produced from the alcohol.
The experiment that attempts to produce bacteria from the open vinegar fermentation may not work. In many locations, vinegar bacteria appear to be freely available in the air only during the summer months.
There are publications that indicate that several days are necessary to produce vinegar from beech shavings. Normal industrial methods certainly require that time. The available period of about twenty-four hours for a school experiment appears to be a little short, and under some circumstances you will need to continue the experiment over several days.
ExP. 20A: ACETIC ACID SALTS
Add enough acetic acid to a lime solution clouded by passing carbon dioxide through it to make the solution is clear again. You can also show how dampening a piece of caustic soda with acetic acid forms the salts. Have the students taste the result and check for its salty character. When heated to a high temperature, it forms a combustible gas and chars in a test tube.
31
We should understand aeration as partial combustion and partial oxidation and as only a limited step in the direction of carbon dioxide. While the forceful removal of a watery element from a material separates and makes volatile through partial aeration, the acid remains connected with the watery liquid. The result is an intensely acidic liquid. How close acetic acid is to water is shown by the fact that under normal atmospheric pressure it cannot be separated through distillation because it vaporizes with the water. It is also always hydroscopic and freezes at 16°C to ice-like crystals, the so-called glacial acetic acid. Alcohol loses its fiery-volatile nature through aeration. Acetic acid has a higher boiling point of 118°C It can also freeze and is less volatile. The flammability of acetic acid is less; it cannot be ignited when cold. In chemical synthesis, acetic acid is well-known for its stability in relationship to oxidants. In it, we encounter something that is nearly completely burned out. When we heat it to boiling, it gives an impressive appearance: the flame jumps to the side and dances around the glass since the liquid must first be bubbled up and partially vaporized before it will burn (Exp. 20B).
If we check for soot, we can see what the blue flame already suggests, namely, that the carbon nature is not strong. The small amount of soot we observe in burning alcohol is completely missing. Apparently, the partial aeration which is measured by the amount of oxygen used affects not only the fiery-volatile nature, but also the burnable solid, the carbon nature. This approaches carbon dioxide and can no longer form soot. If the fiery-volatile nature were all that was affected, then it would produce either twice as much water or a very water-like substance that is not sour and has less tendency toward solidifying, that is, it would have a lower freezing point.
The salts of acetic acid show the mobility and organic nature of vinegar, on the one hand, in its taste, and on the other, in its flammability, namely, a gas (fiery-flammable) and carbon result. Thus, the basic natures once again appear. The chapter on deeper understanding describes the industrial work with vinegar, pages 70-76.
ExP. 20B: fLAMMABILITy Of vINEgAR
Attempt to ignite glacial acetic acid in a small beaker. That is possible only after it has been well-heated. Simply hold the beaker over a Bunsen burner with a crucible tongs.
EXPERIMENTS

32
1. PRODUCTS Of COMBUSTION
At this point in the block, you could give the students the following table:
Table of Combustion Products (average values)
Burnt Material
Water vapor % by
volume 1
Carbon dioxide % by
volume 2
X 100 0
Methane, methyl alcohol
67 33
Ethyl alcohol
60 40
Amyl alcohol
55 45
Sugar cane 50 50
Resin 46 54
Starches 45 55
Diethyl ether 44 56
Dry wood 43 57
Charcoal, dry
0 100
1) arises out of the ‘water-soluble’ or ‘fiery-volatile’
nature
2) arises out of the carbon-dioxide or the carbon-
nature, the ‘glowing-solid’ nature
Is there perhaps a material X that generates only water vapor? To find that we would have to make our alcohols ever more volatile and fiery. The transformation of ethyl alcohol into vinegar showed, at least at first, a quite different development. In
that case, the watery nature was completely retained and only flammability and burnability receded. It appeared to be more balanced. With the addition of aeration, we discovered a new characteristic: acidity, which brought a completely different kind of reaction into play, something more reactive and mobile.
2. WhAT ShOULD WE COvER?
The pedagogical remarks following the discussion of wood and sugar in Part 2 raised the question of whether we should teach the class about hydrogen at the beginning of the block, and how this question relates to the mental development of the class. If you have not taught the class about hydrogen, you now need to undertake a similar consideration. In a conventional presentation, you would now turn to hydrogen, but in doing so, you move away from a study based upon plant materials and their changes and into a more technical area concerned with the production and use of such gases. The reactions and occurrence of such gases have little to do with living plants and animals. Also, what the class learned in the ninth class hardly makes it possible for them to form an understandable picture of this element in the processes of the Earth and natural organisms. Thus, you can leave the element hydrogen aside and teach it as a short topic at the end of the block if you have sufficient time.
Another possibility appears to be preferable, namely, to move on to the esters and the higher types of carbon-based acids and extractable natural materials. To do that, however, you will need somewhat more time. Both of these possibilities are described in the following section.
3. ONE POSSIBILITy: TEAChINg ABOUT hyDROgEN
We can see what happens if, instead of the partial removal that occurs when we produce ethane, we completely remove the watery nature
III. Further Considerations
33
from alcohol (Experiment 21). The result is a gas that burns with a sooty flame.
In this case we have something which is very one-sided, a pure hydrocarbon. Ethane or ethylene is most commonly associated with petroleum and natural gas, where it is found in small amounts. It has nothing to do with materials generated by life or returned to life, such as nutrients. On the other hand, though, there is one curious example, namely, that as apples mature, they produce trace amounts of ethylene. By removing the ethylene through good ventilation from the coolers in which apples are stored, we can significantly increase the storage time of apples.
The reverse is also true, namely, that by adding ethylene to the air in very small amounts, we can cause the stored apples to mature more rapidly. We can also bring bananas and lemons to maturity by the same means after harvesting.
The only gas that does not produce soot when
burned is hydrogen. In this regard, we can destroy the balance in water with the aid of metallic iron (Experiment 22). We can create an even greater impression of this by cracking ethylene by passing a spark through a test tube filled with it.
Now we do some experiments with hydrogen, primarily to demonstrate how easily it is to ignite without a flame or heat (Experiment 23) and its high volatility (Experiment 24 and 25). Of course, we will also check to see what the products of combustion are in those experiments.
In nature, hydrogen never occurs in heavy concentrations, but only in trace amounts. Air, for instance, contains only 0.5 ppm by volume of hydrogen. Since hydrogen never interacts chemically, it could accumulate since it is produced in small amounts through decomposition of volcanic activity and petroleum gas. Most probably, however, it diffuses continually into space out of the atmosphere.
ExP. 21: ThE TOTAL DEhyDRATION Of EThANOL TO EThyLENE
This experiment is similar to the production of ether in Experiment 15, but with double the amount of concentrated sulfuric acid. Also, you must raise the temperature to 170° C. Cooling is unnecessary. After you have expelled all the air from the apparatus, collect the gas in a gasometer (see Experiment 6b). Then insert a pipette filled with steel wool to prevent flash-back into the tube, and you can study its flammability and color of the flame. You can also study the weight of the gas by forming soap bubbles.
ExP. 22: hyDROgEN fROM WATER
Put two teaspoons of iron filings into a quartz test tube which has been mounted nearly horizontally. Place the first teaspoon in the bottom
of the tube and add enough water so that it is wet but does not run out. Spread the other teaspoon of iron filings roughly in the middle of the test tube. These should stay dry. First heat the filings in the middle until they are glowing red with a Bunsen burner. Now, carefully warm the wet filings with a second burner. You can observe the gas that develops by collecting it in a gasometer connected to the test tube through a washing bottle containing some concentrated sulfuric acid. Collect the hydrogen in the gasometer only after all the air has been expelled. You can check this by igniting the gas emitted from the gasometer.
(See Diagram on next page)
EXPERIMENTS
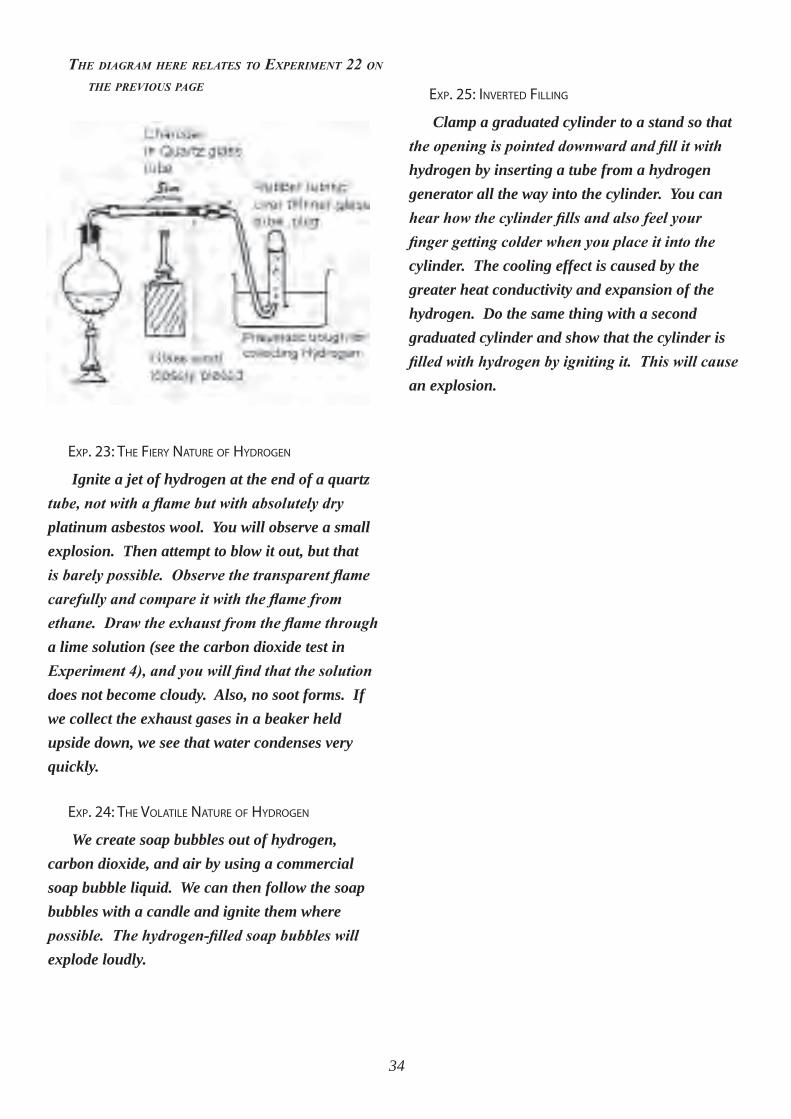
34
The diagram here relaTes To experimenT 22 on The previous page
ExP. 23: ThE fIERy NATURE Of hyDROgEN
Ignite a jet of hydrogen at the end of a quartz tube, not with a flame but with absolutely dry platinum asbestos wool. You will observe a small explosion. Then attempt to blow it out, but that is barely possible. Observe the transparent flame carefully and compare it with the flame from ethane. Draw the exhaust from the flame through a lime solution (see the carbon dioxide test in Experiment 4), and you will find that the solution does not become cloudy. Also, no soot forms. If we collect the exhaust gases in a beaker held upside down, we see that water condenses very quickly.
ExP. 24: ThE vOLATILE NATURE Of hyDROgEN
We create soap bubbles out of hydrogen, carbon dioxide, and air by using a commercial soap bubble liquid. We can then follow the soap bubbles with a candle and ignite them where possible. The hydrogen-filled soap bubbles will explode loudly.
ExP. 25: INvERTED fILLINg
Clamp a graduated cylinder to a stand so that the opening is pointed downward and fill it with hydrogen by inserting a tube from a hydrogen generator all the way into the cylinder. You can hear how the cylinder fills and also feel your finger getting colder when you place it into the cylinder. The cooling effect is caused by the greater heat conductivity and expansion of the hydrogen. Do the same thing with a second graduated cylinder and show that the cylinder is filled with hydrogen by igniting it. This will cause an explosion.
35
1. BUTyRIC ACID
Until now we have investigated only acetic acid, but we should also treat butyric acid experimentally, at least briefly, since it demonstrates very radical changes in smell. Later, we will also work with glycerin. In that way, we can contrast three areas of nature:
· The transformation of acidic odors into the fruity fragrances of esters
· How the glycerides of butter completely overcome acidic odors through the constructive, lively metabolism of cows
· How we can rediscover the stench of acids in the life processes of goats which are more connected with decomposition and dryness, or in the decomposition processes of sweat and stomach contents.
We first need to consider the individual materials. We can produce butyric acid through two different methods that create its odor. We can use a butyric fermentation of starches (Experiment 27) or we can make soap from butter (see Experiment 28). Among the fats, butter is the most complicated. We can obtain fourteen different fatty acids from butter:
Acid Percent of Total Acid
Butyric Acid 3%
Caproic Acid 1.4%
Caprylic Acid 1.5%
Capric Acid 2.7%
Lauric Acid 3.7%
Myristic Acid 12.1%
Palmitic Acid 25.3%
Stearic Acid 9.2%
Arachidic Acid 1.3%
Lauroleic Acid 0.4%
Myristoleic Acid 1.6%
Palmitoleic Acid 4%
Oleic Acid 29.6%
Linoleic Acid 3.6%
First, we show that the odor of concentrated butyric acid still has a little of the biting-acidic, to some extent it even has the fresh quality of acetic acid. The more repulsive, decaying, heavy odors
IV. Decomposition-Fumes Compared to Flower Fragrances
EXPERIMENTSExP. 27: BUTyRIC ACID fERMENTATION
Place an unwashed potato that has been punctured deeply in a number of places into a graduated cylinder filled with water, and allow it to stand for several days at a temperature of 30° C. The gas that emits from where the potato is punctured, the foam which forms on the surface of the water, and, finally, the fact that potato begins to float all demonstrate the process of fermentation. The center of the potato becomes soft and smells like butyric acid.
ExP. 28: MAKINg BUTyRIC ACID fROM BUTTER
Mix a dab of butter with 1ml of ethanol, then add two small pieces of potassium hydroxide. Boil this for two minutes. The fats are hydrolyzed. After they have been thinned with water, you can acidify the mixture with hydrochloric acid. You can then observe the rancid smell of butyric acid.
36
are more apparent in less concentrated forms of butyric acid. We should, therefore, take care that no drops of butyric acid fall on absorbent surfaces like wood or in cracks in the floor because it will stink for weeks. It is very penetrating and can cause nausea. Our first experiment is an attempt to ignite butyric acid. We find it will burn only with a wick or while it is boiling.
The next thing we show is its solubility in petrol. Pour some butyric acid from a small beaker into a larger one containing water. We can see that the liquid first becomes streaky, then mixes completely when stirred. Butyric acid is just like acetic acid, soluble both in petrol and in water. We can use an indicator to show its medium acidity when mixed with an equal part of water (about pH 3) and when mixed with soda and chalk.
Indicator paper shows that pure butyric acid has only a pH 4 and foams much more slowly. We
can see how water emphasizes its acidic nature. We can also demonstrate that when it is mixed with a sodium solution, the result is something that, although it is called a salt, does not have the usual hard, salt-like characteristics. The result is more like wax, something that tends toward a kind of clotting, and that when washed with surgical alcohol, hardly smells like butyric acid at all. When it is mixed with hydrochloric acid, however, it immediately smells again (Experiment 29).
In the context of a school experiment, we can most easily obtain a usable amount of butyric acid from its ester. However, that would preclude showing the wonderful way esters eliminate the stench of butyric acid. Thus, we begin our research with pure butyric acid from the bottle.
ExP. 29: BUTyRIC ACID SALTS
If you pour concentrated oily sodium hydroxide into butyric acid, sodium butyrate immediately precipitates, then dissolves when stirred. Then add some more sodium hydroxide. Bring the solution to a full boil. As it cools, it forms a white mass that smells strongly of butyric acid. Break this mass into small pieces and bring it to a full boil in petrol. You can then filter it, wash it, and pulverize it again. Then boil it once again in petrol. The smell of butyric acid will disappear only slowly.
Commercially available sodium butyrate hardly smells like butyric acid, but when covered with weak hydrochloric acid in a test tube, the smell is immediately apparent and a film of butyric acid will float on top. The film will quickly dissolve in water. The hydrochloric acid and resulting sodium chloride at first cause the butyric
acid to precipitate out of the solution. You can demonstrate this quite well by placing a piece of sodium butyrate in a petri dish and pouring a weak solution of hydrochloric acid on it. It will immediately begin to stink and will be eaten up from below. At the same time, oil droplets will form upon the acid which will move toward the edge during the solution process.
EXPERIMENTS
37
2. ESTERS
The main experiment in this section is the production of ethyl-butyrate ester. The way it is produced is more impressive and characteristic than the way ethyl-acetate esters are produced and should be demonstrated instead (Experiment 30A). Through this experiment the students experience how such reactions take time when we transform delicate materials, close to life, but still very much permeated by the burnable. Pass around the
resulting ethyl-butyrate ester, along with isobutyl-butyrate ester so the students can smell them. Afterwards, you can make a synthetic pineapple fragrance, “Eau de Pineapple,” out of three parts ethyl ester, one part isobutyl ester, and one part di isoamyl ether. The aroma, of course, is only an approximation, and you can certainly think up some other tropical fruit with special colors to go with it. You could also compare it with a similar aroma found in some candy (Experiment 31).
ExP. 30: BUTyRIC ACID ESTERS
PART A. EThyL ESTER Mix 50ml butyric acid and 50ml pure alcohol (ethanol,
at least 96%) or denatured alcohol with 25ml concentrated
sulfuric acid in a 200-300ml Erlenmeyer flask. Simmer the
mixture for about 10 minutes, using the glass tube from
Experiment 12 as a primitive condensation cooler. Pour
the mixture into a 500ml separating drop funnel you have
previously filled with 250ml water. After you have shaken
this mixture, the ester that floats to the top should be free of
any butyric acid smell. If that is not the case, shake it again
several times with a caustic soda solution and, if necessary,
rectify it.
If this process takes too long, you can also begin the
experiment with 25ml butyric acid, 35ml ethanol, and 15ml
concentrated sulfuric acid. Place these into an Erlenmeyer
flask and let them stand for half and hour. Have the
students check for the change in smell.
PART B. ISOAMyL ESTER.The products of this experiment are diisoamyl ether and
isoamyl alcohol which has a lower boiling point. The whole
process produces sharp, bad but interesting smells that, after
the condensed vapors have been rinsed with water, result in
a complex, enticing and fruity smell, a little bit like gummy
bears or flavored yogurt.
Place 50ml butyric acid, 60ml isoamyl alcohol, and 50ml
concentrated sulfuric acid, in that order, into a 500ml flask.
Boil the liquid for about five minutes, allowing the vapor
to re-condense back through a short piece of glass tubing.
Now distill the vapors in a long, air-cooled distillation
tube until you have about 20ml of distillate. Mix that with
500ml water. After you have shown the students the results,
pour the upper half of the liquid into a separating drop
funnel where the ester will float to the top. After it has been
separated, vaporize some of it into a gasometer. The vapor
will be clear and its sharp, volatile smells will disappear. It
is interesting to see how, from the black, thick, boiling and
biting witches’ brew in the flask, a pleasant, harmonious
fragrance results.
ExP. 31: SyNThETIC CANDy fLAvORS
Place 30ml fine crystal sugar and 30ml glucose, dextrose
or fructose in a one-liter flask. Add 1 teaspoon each butyric
acid ethyl ester and acetic acid isoamyl ester, then heat it
until the mixture melts while continuously swirling the flask.
To keep the ester from escaping, you can close the flask with
a rubber stopper that you previously boiled in an acetic acid
solution. Be sure to wear safety glasses. Pour the hot, light
brown syrup onto a piece of aluminum foil. After it has
cooled, break it into small pieces so the students can taste it.
EXPERIMENTS
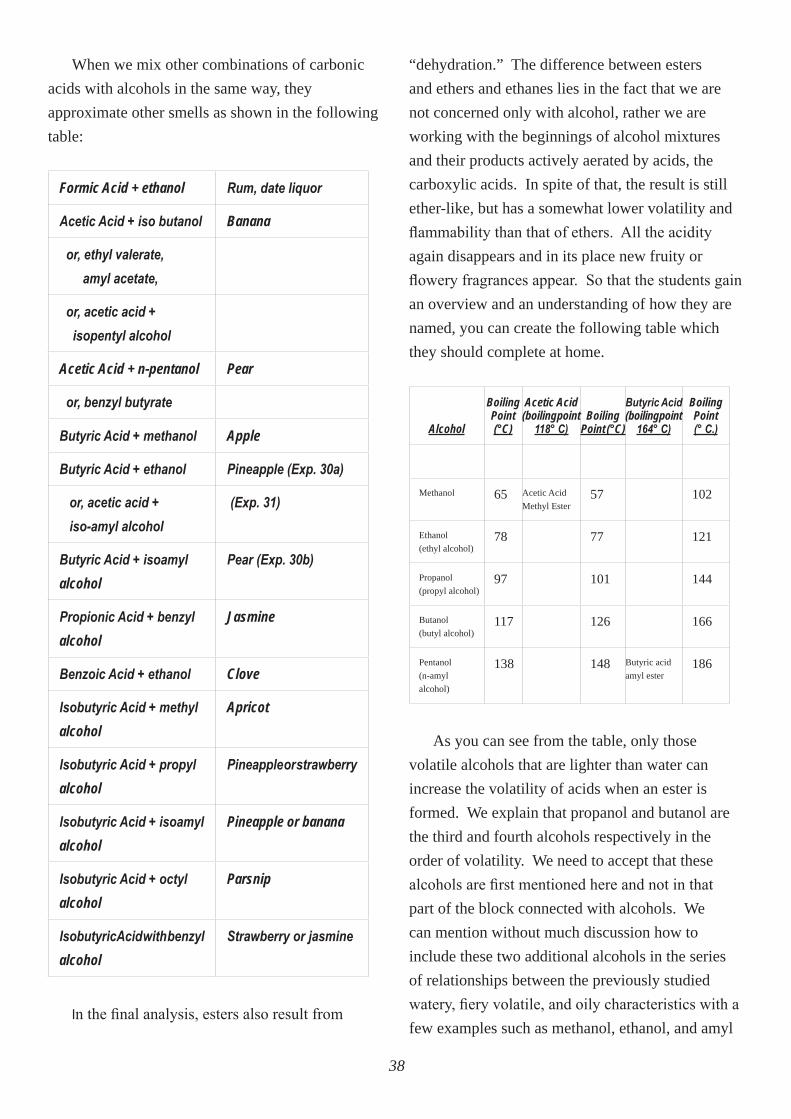
38
When we mix other combinations of carbonic acids with alcohols in the same way, they approximate other smells as shown in the following table:
Formic Acid + ethanol Rum, date liquor
Acetic Acid + iso butanol Banana
or, ethyl valerate, amyl acetate,
or, acetic acid + isopentyl alcohol
Acetic Acid + n-pentanol Pear
or, benzyl butyrate
Butyric Acid + methanol Apple
Butyric Acid + ethanol Pineapple (Exp. 30a)
or, acetic acid + iso-amyl alcohol
(Exp. 31)
Butyric Acid + isoamyl alcohol
Pear (Exp. 30b)
Propionic Acid + benzyl alcohol
Jasmine
Benzoic Acid + ethanol Clove
Isobutyric Acid + methyl alcohol
Apricot
Isobutyric Acid + propyl alcohol
Pineapple or strawberry
Isobutyric Acid + isoamyl alcohol
Pineapple or banana
Isobutyric Acid + octyl alcohol
Parsnip
Isobutyric Acid with benzyl alcohol
Strawberry or jasmine
In the final analysis, esters also result from
“dehydration.” The difference between esters and ethers and ethanes lies in the fact that we are not concerned only with alcohol, rather we are working with the beginnings of alcohol mixtures and their products actively aerated by acids, the carboxylic acids. In spite of that, the result is still ether-like, but has a somewhat lower volatility and flammability than that of ethers. All the acidity again disappears and in its place new fruity or flowery fragrances appear. So that the students gain an overview and an understanding of how they are named, you can create the following table which they should complete at home.
Alcohol
Boiling Point (°C)
Acetic Acid (boiling point
118° C)
Boiling
Point (°C)
Butyric Acid (boiling point
164° C)
Boiling Point (° C.)
Methanol 65 Acetic Acid Methyl Ester
57 102
Ethanol (ethyl alcohol)
78 77 121
Propanol (propyl alcohol)
97 101 144
Butanol (butyl alcohol)
117 126 166
Pentanol (n-amyl alcohol)
138 148 Butyric acid amyl ester
186
As you can see from the table, only those volatile alcohols that are lighter than water can increase the volatility of acids when an ester is formed. We explain that propanol and butanol are the third and fourth alcohols respectively in the order of volatility. We need to accept that these alcohols are first mentioned here and not in that part of the block connected with alcohols. We can mention without much discussion how to include these two additional alcohols in the series of relationships between the previously studied watery, fiery volatile, and oily characteristics with a few examples such as methanol, ethanol, and amyl
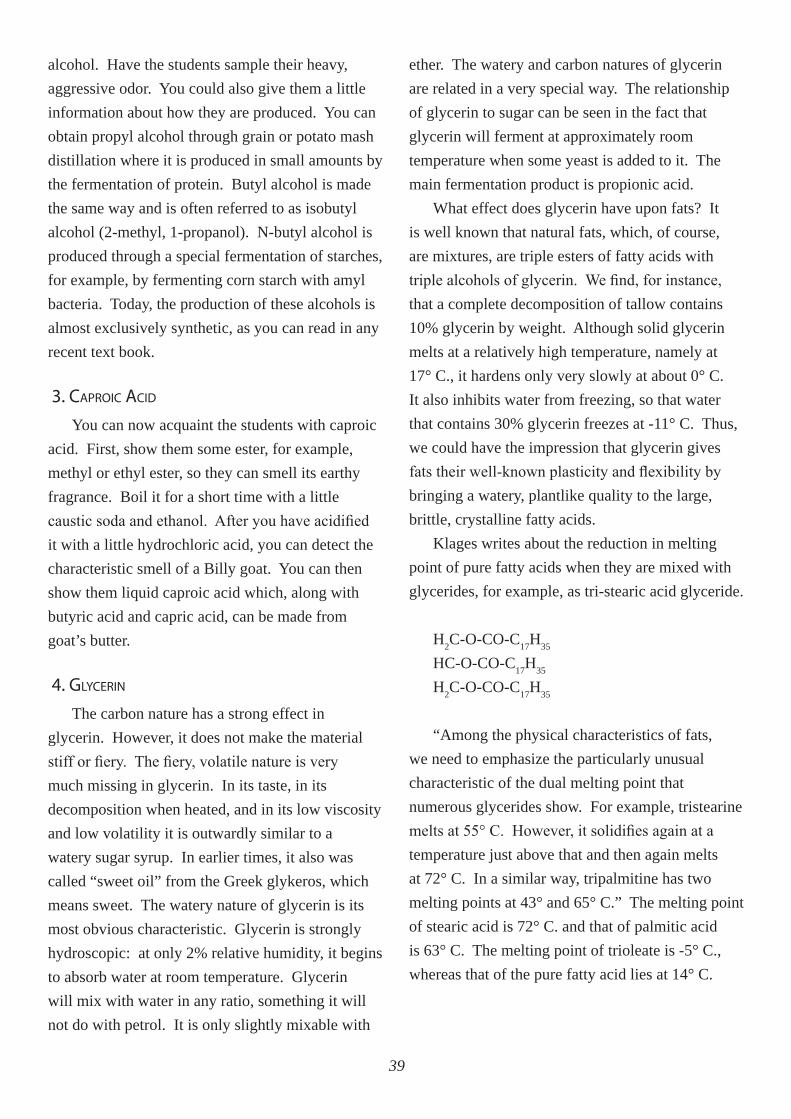
39
alcohol. Have the students sample their heavy, aggressive odor. You could also give them a little information about how they are produced. You can obtain propyl alcohol through grain or potato mash distillation where it is produced in small amounts by the fermentation of protein. Butyl alcohol is made the same way and is often referred to as isobutyl alcohol (2-methyl, 1-propanol). N-butyl alcohol is produced through a special fermentation of starches, for example, by fermenting corn starch with amyl bacteria. Today, the production of these alcohols is almost exclusively synthetic, as you can read in any recent text book.
3. CAPROIC ACID
You can now acquaint the students with caproic acid. First, show them some ester, for example, methyl or ethyl ester, so they can smell its earthy fragrance. Boil it for a short time with a little caustic soda and ethanol. After you have acidified it with a little hydrochloric acid, you can detect the characteristic smell of a Billy goat. You can then show them liquid caproic acid which, along with butyric acid and capric acid, can be made from goat’s butter.
4. gLyCERIN
The carbon nature has a strong effect in glycerin. However, it does not make the material stiff or fiery. The fiery, volatile nature is very much missing in glycerin. In its taste, in its decomposition when heated, and in its low viscosity and low volatility it is outwardly similar to a watery sugar syrup. In earlier times, it also was called “sweet oil” from the Greek glykeros, which means sweet. The watery nature of glycerin is its most obvious characteristic. Glycerin is strongly hydroscopic: at only 2% relative humidity, it begins to absorb water at room temperature. Glycerin will mix with water in any ratio, something it will not do with petrol. It is only slightly mixable with
ether. The watery and carbon natures of glycerin are related in a very special way. The relationship of glycerin to sugar can be seen in the fact that glycerin will ferment at approximately room temperature when some yeast is added to it. The main fermentation product is propionic acid.
What effect does glycerin have upon fats? It is well known that natural fats, which, of course, are mixtures, are triple esters of fatty acids with triple alcohols of glycerin. We find, for instance, that a complete decomposition of tallow contains 10% glycerin by weight. Although solid glycerin melts at a relatively high temperature, namely at 17° C., it hardens only very slowly at about 0° C. It also inhibits water from freezing, so that water that contains 30% glycerin freezes at -11° C. Thus, we could have the impression that glycerin gives fats their well-known plasticity and flexibility by bringing a watery, plantlike quality to the large, brittle, crystalline fatty acids.
Klages writes about the reduction in melting point of pure fatty acids when they are mixed with glycerides, for example, as tri-stearic acid glyceride.
H2C-O-CO-C17H35
HC-O-CO-C17H35
H2C-O-CO-C17H35
“Among the physical characteristics of fats, we need to emphasize the particularly unusual characteristic of the dual melting point that numerous glycerides show. For example, tristearine melts at 55° C. However, it solidifies again at a temperature just above that and then again melts at 72° C. In a similar way, tripalmitine has two melting points at 43° and 65° C.” The melting point of stearic acid is 72° C. and that of palmitic acid is 63° C. The melting point of trioleate is -5° C., whereas that of the pure fatty acid lies at 14° C.
40
5. MATTER AND LIvINg ORgANISMS
We can look at the relationship of glycerin and fats so as to see in a subtle way how glycerin reflects the liveliness and mobility that the fats have to a small but necessary extent for the living organism. The tendency of fats, on the other hand, is to collect and die, which the more paraffin-like fatty acids express. We should take such pictures into account when considering the middle carboxylic acids, such as butyric and caproic acid. We see these acids, as we mentioned at the beginning, in three different manifestations:
Various mixtures with esters and ethanol, isobutanol and so forth result in a fruity, earthy fragrance, in the blooming and fruiting plant life.
Various mixtures of esters with glycerin result in mild, almost odorless, fats. The products of development, of metabolism absorbed into the fluids, particularly of bovines.
Decomposition ↓ ↓ Decomposition
Very small amounts of smelly acids which occur in less
constructive and drier metabolism, for instance in goats. Also in decomposition of sweat and in butyric acid fermentation
6. PhARMACEUTICALS AND fRAgRANCES
We experienced a number of odors in the previous sections. What do they mean? In the inorganic or mineral realm, there are no odors, or at most those of pitch and sulfur. We do not perceive carbon, water, or air by themselves through our sense of smell. We find little enjoyment in animal products, especially after they have been separated from the producer for some days. The fragrance of a ham comes from the woods and herbs used to cure it. Almost the only exception to this is the almost flowery odor of some cheeses. Milk is most closely associated with plant qualities. What we call fragrance is most at home with the pure form of life in the world that is not very strongly connected with the soul. We need only think about the differences between a goat and a cow. Even a healthy infant has a fragrance.
In contrast to plants, the typical smell of synthetic, organic chemicals, as we saw with our esterification experiments, has something that is usually sweet and penetrating, something we perceive as artificially intensified and usually not very pleasant. It has the quality of a caricature of plant fragrances. The students can experience that difference when we move from artificially produced esters to genuine essential plant oils.. There we find only subtle differences that depend upon the part of the plant from which the oils originate, that is, whether it is a root or wood or resin oil (Experiment 32) or possibly when the aroma is derived from
EXPERIMENTS
ExP. 32: DISTILLATION Of RESIN
Carefully heat to 110° to 130° C. some resin you have gathered from conifers in a distillation apparatus you can make from two test tubes and a glass tube bent at a right angle. Arrange the apparatus so that the distillate flows through the glass tube into the bottom of the second test tube
that is fixed vertically in a beaker of water. What you will gather is the more volatile turpentine oil; what remains is an impure resin which, when further decomposed, can result in an unpleasant, fishy smell (if you use spruce or hemlock resin).
41
ExP. 33: ESSENTIAL OILS PRODUCED By STEAM DISTILLATION
Place 50gm dried chamomile flowers and ½ liter of water in a 1000ml flask and heat it until it boils. Condense the vapors in an efficient distillation tube. The result will be a milky fluid with very fine oil droplets and some blue specks (azulene). Shaking the fluid with a little ether will result in a pale blue layer at the top and a nearly clear layer of liquid at the bottom. What remains after the ether evaporates smells strongly of chamomile. This process will yield about 2%, or 3 drops per 100mg of chamomile.
Further possibilities for producing essential oils by vapor distillation are:
Seeds 100gms anise or fennel—be sure to crush them first—produces about 4%. This is the best alternative
Fruits Use the outer layer of the rind of unsprayed oranges or lemons. This is an unusual example.
Leaves Rosemary, sage, or peppermint which are available as dry teas produce about 2%.
Buds Whole cloves are also a good alternatives.
EXPERIMENTS
leaves or needles, flowers, fruit, or seed. You should produce some oils from some of these parts of plants, then pass them around so the students can train their sense of smell (Experiment 33).
Experience has shown that it is advantageous to begin the block and each day by presenting a new essential oil to the students, for example, the various conifer essential oils. Have them smell the oil and describe it, then give a brief pictorial comparison of the plant for comparison. In any event, you should have them smell rose water, or if possible, rose oil and lavender oil. As we already saw in connection with butyric acid, we first notice the full fragrance when it is thinned in the air. This is also true of the wafting plant fragrances in nature.
In addition to fragrances produced through steam distillation, you can also show the extraction of various flowers available in the garden or forests during the time you are teaching the block. Some possibilities are linden flowers, lavender, fresh freesia, and hyacinth, or other varieties from garden or market to the extent they have fragrances in a significant amount. In such cases,
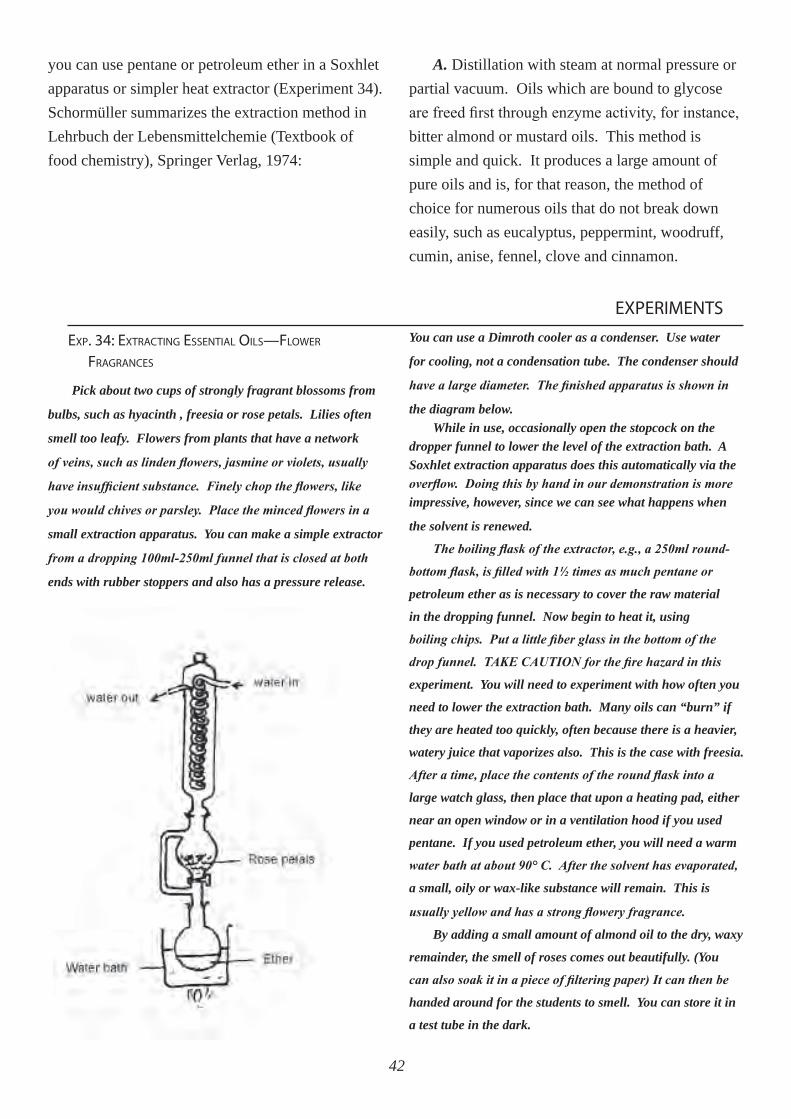
42
EXPERIMENTS
ExP. 34: ExTRACTINg ESSENTIAL OILS—fLOWER fRAgRANCES
Pick about two cups of strongly fragrant blossoms from
bulbs, such as hyacinth , freesia or rose petals. Lilies often
smell too leafy. Flowers from plants that have a network
of veins, such as linden flowers, jasmine or violets, usually
have insufficient substance. Finely chop the flowers, like
you would chives or parsley. Place the minced flowers in a
small extraction apparatus. You can make a simple extractor
from a dropping 100ml-250ml funnel that is closed at both
ends with rubber stoppers and also has a pressure release.
You can use a Dimroth cooler as a condenser. Use water
for cooling, not a condensation tube. The condenser should
have a large diameter. The finished apparatus is shown in
the diagram below. While in use, occasionally open the stopcock on the
dropper funnel to lower the level of the extraction bath. A Soxhlet extraction apparatus does this automatically via the overflow. Doing this by hand in our demonstration is more impressive, however, since we can see what happens when
the solvent is renewed.
The boiling flask of the extractor, e.g., a 250ml round-
bottom flask, is filled with 1½ times as much pentane or
petroleum ether as is necessary to cover the raw material
in the dropping funnel. Now begin to heat it, using
boiling chips. Put a little fiber glass in the bottom of the
drop funnel. TAKE CAUTION for the fire hazard in this
experiment. You will need to experiment with how often you
need to lower the extraction bath. Many oils can “burn” if
they are heated too quickly, often because there is a heavier,
watery juice that vaporizes also. This is the case with freesia.
After a time, place the contents of the round flask into a
large watch glass, then place that upon a heating pad, either
near an open window or in a ventilation hood if you used
pentane. If you used petroleum ether, you will need a warm
water bath at about 90° C. After the solvent has evaporated,
a small, oily or wax-like substance will remain. This is
usually yellow and has a strong flowery fragrance.
By adding a small amount of almond oil to the dry, waxy
remainder, the smell of roses comes out beautifully. (You
can also soak it in a piece of filtering paper) It can then be
handed around for the students to smell. You can store it in
a test tube in the dark.
you can use pentane or petroleum ether in a Soxhlet apparatus or simpler heat extractor (Experiment 34). Schormüller summarizes the extraction method in Lehrbuch der Lebensmittelchemie (Textbook of food chemistry), Springer Verlag, 1974:
A. Distillation with steam at normal pressure or partial vacuum. Oils which are bound to glycose are freed first through enzyme activity, for instance, bitter almond or mustard oils. This method is simple and quick. It produces a large amount of pure oils and is, for that reason, the method of choice for numerous oils that do not break down easily, such as eucalyptus, peppermint, woodruff, cumin, anise, fennel, clove and cinnamon.
43
B. Solvents (alcohol, petrol, or petrol ether) can be used to extract the more sensitive flower oils.
C. Fats can be used in the same way. This method is called “Enflourage”- where fresh flowers are strewn upon glass plates that have been covered with fat and then enclosed. The melted, oily fat can then be used as a flower paste or the etheric oils can be extracted with alcohol. This is useful for producing rose, violet, or jasmine oils. The amount of oil produced is relatively high because the flowers produce more fragrances in the fat after some time.
D. You can press oils from the skin or rinds of various citrus fruits, such as lemon, oranges or grapefruit.
E. Grinding or maceration, that is, an infusion and then heat extraction process, is used primarily for producing oils from flowers. In this case, the flowers are treated with fat at a temperature of 50° to 70° C., and the fat which contains the oils is further treated as described under C above.
In the chapter on deeper understanding, I have included some descriptive passages from a book written in the 1960s. (pages 77-87) They provide a consideration from the chemical and biological perspective of essential oils and will give you some information about the possible results when you are deciding whether to do a particular experiment.
If we look into essential oils with the techniques we have used thus far, we find they are rightly called etheric oils. We find strong odors and high flammability paired with insolubility in water. The etheric becomes even more sublime. When they create an odor, whole amounts do not vaporize in a few seconds (ether). Instead, the odor is nearly non-material. It is most complete at extremely low
concentrations. The fragrances of such substances nearly escape the physical.
The high viscosity and sooty flame of such oils indicate their carbon nature. We find a colorful palate of effects upon human beings, ranging from numbing and calming to stimulating and aggravating. Not one of them leaves us completely “cold.” We can see their connections with and origins from warmth in their inner and external use in treating colds and other such “cool” illnesses. In contrast, the non-fragrant fatty oils have an enveloping character, something similar to a descent into a denser, heavier relationship. There, the volatile etheric recedes. The plants that provide oils are not those with strong fragrances. There we more commonly find hard shells, as in nuts, and compact fruit, as in olives. Vegetable oils are more appropriate as salves and oils for enveloping the human body with a protective coating.
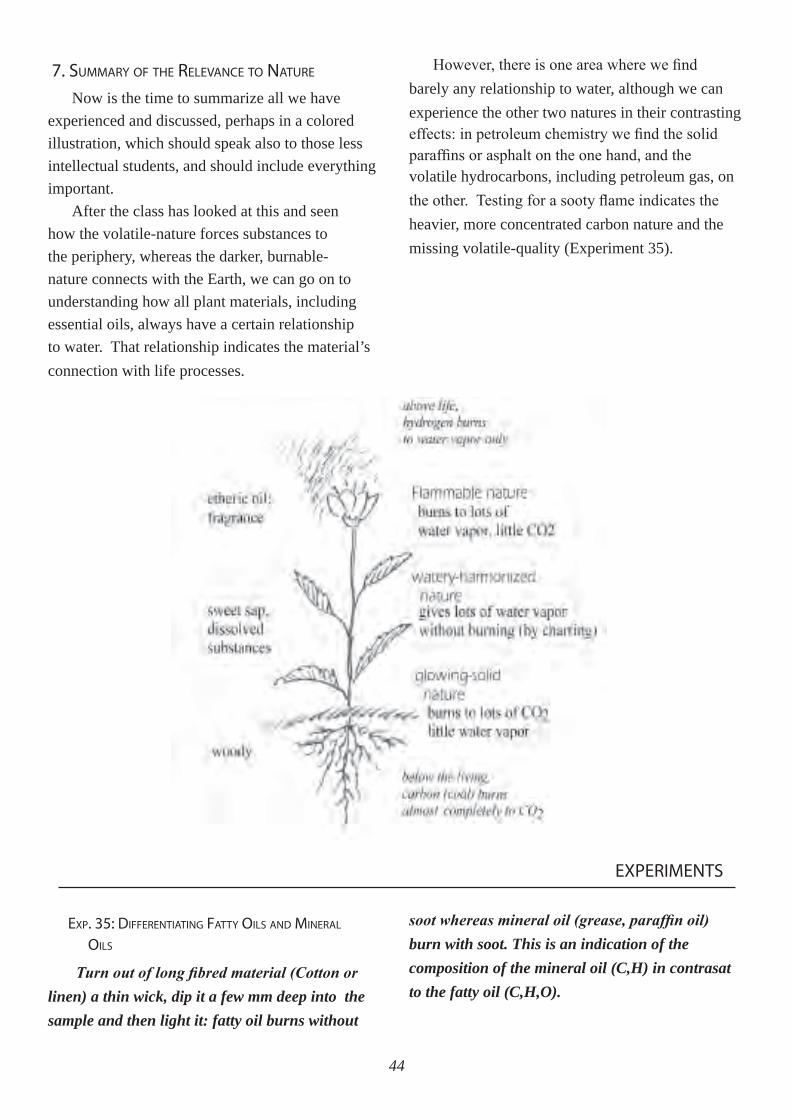
44
EXPERIMENTS
ExP. 35: DIffERENTIATINg fATTy OILS AND MINERAL OILS
Turn out of long fibred material (Cotton or linen) a thin wick, dip it a few mm deep into the sample and then light it: fatty oil burns without
soot whereas mineral oil (grease, paraffin oil) burn with soot. This is an indication of the composition of the mineral oil (C,H) in contrasat to the fatty oil (C,H,O).
7. SUMMARy Of ThE RELEvANCE TO NATURE
Now is the time to summarize all we have experienced and discussed, perhaps in a colored illustration, which should speak also to those less intellectual students, and should include everything important.
After the class has looked at this and seen how the volatile-nature forces substances to the periphery, whereas the darker, burnable-nature connects with the Earth, we can go on to understanding how all plant materials, including essential oils, always have a certain relationship to water. That relationship indicates the material’s connection with life processes.
However, there is one area where we find barely any relationship to water, although we can experience the other two natures in their contrasting effects: in petroleum chemistry we find the solid paraffins or asphalt on the one hand, and the volatile hydrocarbons, including petroleum gas, on the other. Testing for a sooty flame indicates the heavier, more concentrated carbon nature and the missing volatile-quality (Experiment 35).
45
1. INTRODUCTION
You could first give the students an overview of where petroleum is found and of some of the theories about its origins. They may also be surprised to learn that the first well drilled for petroleum was in 1858 near Hanover. You should, perhaps, also give them a short description of John D. Rockefeller, the “king of petroleum” and founder of the Standard Oil Co. You could then describe to them about how a petroleum refinery operates, about the simple raw material and the resulting wide range of products. Another important theme is how crude oil is transported in pipelines and tankers. What is important is that the students have an experience of how different that world is in comparison to the world of plants. In the world of plants, our concern is with a constant and quiet living growth which can be seen by everyone. Whereas, in connection with petroleum we are dealing with ancient deposits (cadavers) in only a few locations which have become in the last hundred years the goal of a hectic activity of a few people. Such deposits can be utilized only with large technical investments and when the deposit itself is large. These deposits are also something that will clearly disappear.
Although petroleum most probably originated in connection with large expanses of water, it has distanced itself considerably from water. It is through that distancing that it gained its own individual nature. When plant material is burned, a sooty flame is the exception, whereas with petroleum products, it is the rule (the deficiency or total lack of oxygen).
2. PETROLEUM PRODUCTS
Another characteristic difference is that in order to transform plant materials, we need to use deep-reaching chemical processes, such as smoldering or
partial burning, whereas the separation of petroleum products out of fruit oil is done through a distillation process, a process which is more external and more physical and which does not destroy the actual form. This is an indication that petroleum contains a large number of various substances without any organizing unity and that these need only be separated. You could discuss cracking or fractionating crude oil and then demonstrate the various levels of the products which result from individual fractions on their ability to burst into flames and to smolder. You should also mention that all the boiling points in regard to petroleum and petroleum products are only an arbitrary designation based only upon technical needs. They are not closed in an inner way in the same way that alcohol and water are separate.
Aside from the relatively unimportant homogeneous hydrocarbons, there are numerous mixtures used in laboratories and technology which are obtained through processing petroleum and, more recently, also through the various ways of synthesizing. Separating the individual compounds is possible only with significant difficulties and, due to the great similarity of most of the components has little practical significance. Aside from those higher fractions of petroleum which are used as fuel, the following five products are of importance for chemists:1. Those fractions which have a boiling point between 30°
and 80°C (according to some references, between 40°
and 70°C) which primarily contain the isomeric pen-
tanes and hexanes. For the chemist, these compound
are important since they are most strongly hydropho-
bic and are also selective solvents. They are divided
sometimes between those which have a relatively low
boiling point (30° to 50°C) and the petroleum ethers
with a higher boiling point (50° to 80°C).
2. The fraction with a boiling point between 60° and
180°C which consists primarily of the heptanes to
V. Something about Petroleum
46
decanes, which in analogy to the approximately same
boiling point benzol fraction of coal tar are referred to
as benzene. For chemical purposes they are divided
into light petrol with a boiling point between 60° and
110°C, heavy petrol with a boiling point between 100°
and 150°C, and petroleum naphtha, or lacquer thinner,
which has a boiling point between 150° and 180°C All
of these fractions are essentially lipophylic and hydro-
phobic solvents. They have, however, primarily as a
result of being able to be processed at higher tempera-
tures, an increased capacity as solvents in comparison
to petroleum ether and a reduced selectivity. Today,
the mixtures given in this and the previous group are
often referred to simply as benzene and are differenti-
ated by their boiling points.
3. The fraction which has a boiling point between 150°
and 280° provides what was earlier referred to as pe-
troleum for lamps. Today, it is called kerosene and is
used as fuel for jet engines and the boiling point there
has been raised slightly to 175° to 325°C This mate-
rial is primarily made up of C10 to C16.
4. The mixtures of higher normal paraffins are solid and
due to the possibility of forming crystals of mixtures
between paraffins of differing chain lengths, they do
not have any specific melting point in comparison to
the pure paraffins. Technically, the most important
product is one which is composed primarily out of
N-paraffins with 24 to 40 carbon atoms and which has
a melting point of 50° to 60°C (hard paraffin) used pri-
marily for manufacturing candles and as a raw mate-
rial for paraffin oxidation. Soft paraffin, with a melting
point of 40° to 50°C is also a mixture which contains a
smaller proportion of branched hydrocarbons.
5. When the number of branches on the chains is greater,
then the higher paraffins can no longer be obtained
in a crystalline from and thus we come to a rather
viscous paraffin oil which is due to the size of its mol-
ecules. The major portion of all petroleum lubricants
is made up of these large molecule isoparaffins.
In this connection, we could think of performing
some experiments which would demonstrate the relatively high flammability of petroleum gases (methane). The more solid paraffins which are more related to carbon stand in contrast to them, something we can see in experiments showing the flaming point and the tendency to form soot by their flames. The compounds from pentane to hexadecane (C16 with a melting point of 18°C) represent a middle area as liquids between methane and butane on the one side and the paraffin hydrocarbons above heptadecane (C17, melting point 23°C) to hexacontane (C60, melting point 100°C) on the other side. You could perhaps also show the differences in the amount of water vapor formed by similarly long or similarly large flames of the various materials when you hold a glass plate near the flames. Such a presentation, however, with its quantitative, analytical background would tend to go too far into the way of working in the twelfth class.
3. OIL AND POWER
In conclusion, we might also say something about the differing attitudes that people who work with plants, on the one hand, and those who work with petroleum, on the other, have in their souls. The riches which can be found in plants need to be achieved again each year through the various individual steps. In contrast, the owners of oil fields became rich primarily through maintaining pumps and oil lines. Agriculture arose out of thousands of years of cultivating the land, whereas the exploitation of petroleum arose more through an international capitalistic monopoly and the political power and uncertain luxury of petro-dollars.
The miserable fate of many oil barons, such as Rockefeller, is somehow characteristic. You can read about the billionaire J. Paul Getty (1892-1976) in Russell Miller’s book, The House of Getty, Henry Holt & Co. or in Robert Lenzer’s book, The Great Getty, Crown Publishers.
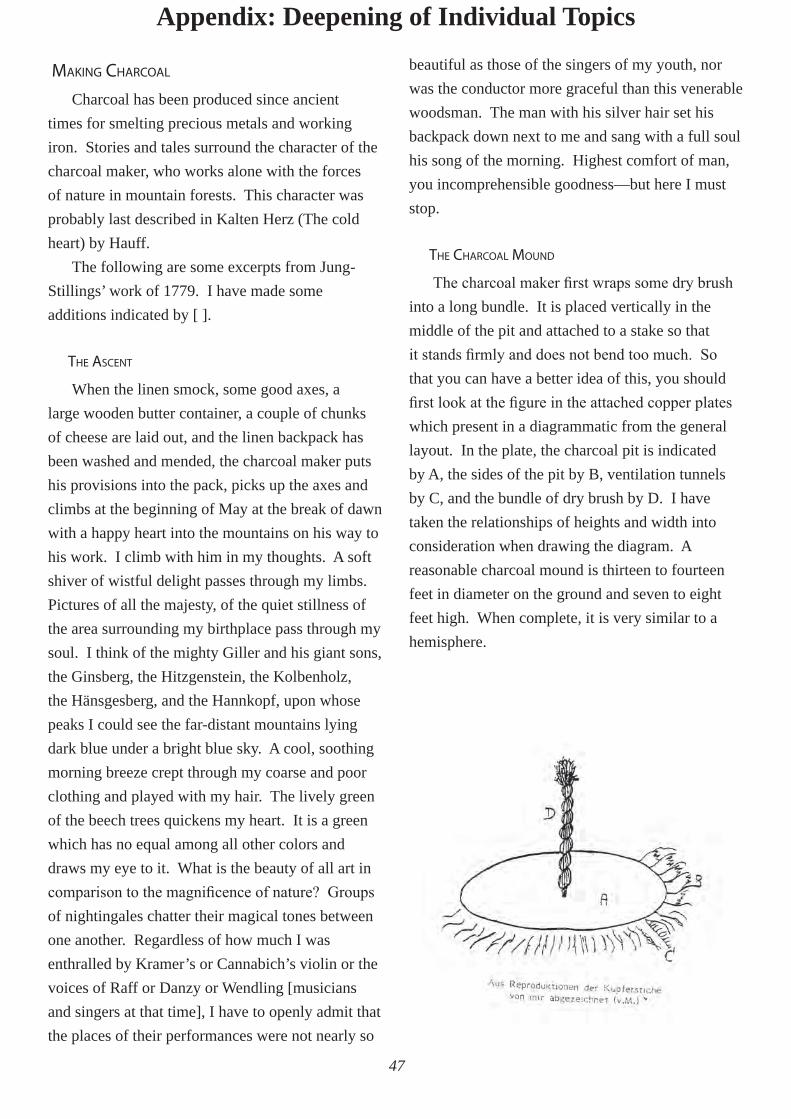
47
MAKINg ChARCOAL
Charcoal has been produced since ancient times for smelting precious metals and working iron. Stories and tales surround the character of the charcoal maker, who works alone with the forces of nature in mountain forests. This character was probably last described in Kalten Herz (The cold heart) by Hauff.
The following are some excerpts from Jung-Stillings’ work of 1779. I have made some additions indicated by [ ].
ThE ASCENT
When the linen smock, some good axes, a large wooden butter container, a couple of chunks of cheese are laid out, and the linen backpack has been washed and mended, the charcoal maker puts his provisions into the pack, picks up the axes and climbs at the beginning of May at the break of dawn with a happy heart into the mountains on his way to his work. I climb with him in my thoughts. A soft shiver of wistful delight passes through my limbs. Pictures of all the majesty, of the quiet stillness of the area surrounding my birthplace pass through my soul. I think of the mighty Giller and his giant sons, the Ginsberg, the Hitzgenstein, the Kolbenholz, the Hänsgesberg, and the Hannkopf, upon whose peaks I could see the far-distant mountains lying dark blue under a bright blue sky. A cool, soothing morning breeze crept through my coarse and poor clothing and played with my hair. The lively green of the beech trees quickens my heart. It is a green which has no equal among all other colors and draws my eye to it. What is the beauty of all art in comparison to the magnificence of nature? Groups of nightingales chatter their magical tones between one another. Regardless of how much I was enthralled by Kramer’s or Cannabich’s violin or the voices of Raff or Danzy or Wendling [musicians and singers at that time], I have to openly admit that the places of their performances were not nearly so
beautiful as those of the singers of my youth, nor was the conductor more graceful than this venerable woodsman. The man with his silver hair set his backpack down next to me and sang with a full soul his song of the morning. Highest comfort of man, you incomprehensible goodness—but here I must stop.
ThE ChARCOAL MOUND
The charcoal maker first wraps some dry brush into a long bundle. It is placed vertically in the middle of the pit and attached to a stake so that it stands firmly and does not bend too much. So that you can have a better idea of this, you should first look at the figure in the attached copper plates which present in a diagrammatic from the general layout. In the plate, the charcoal pit is indicated by A, the sides of the pit by B, ventilation tunnels by C, and the bundle of dry brush by D. I have taken the relationships of heights and width into consideration when drawing the diagram. A reasonable charcoal mound is thirteen to fourteen feet in diameter on the ground and seven to eight feet high. When complete, it is very similar to a hemisphere.
Appendix: Deepening of Individual Topics
48
After the bundle, which has the thickness indicated in the diagram, has been set vertically in the middle of the pit, the charcoal maker then uses the bundle as a measurement for the length of the wood to be used, so that the bundle is about one foot longer than the wood. He then uses his ax to chop the wood in that length. Pieces which are thicker than a man’s thigh just under the hip are split so that none of the pieces of wood are thicker than the thigh just above the knee. If that were not the case, then it would not be transformed into charcoal at the same time as the thinner pieces of wood.
On the other hand, lengths of wood which are thinner than the wrist are laid to one side. Such pieces are then later used to fill in the holes between the larger pieces and to cover the whole mound. As soon as the wood is all chopped, he then places it vertically against the bundle in the middle, so that the pieces do not have too much distance at the bottom. This is done so that when the bundle has been burnt, the wood does not collapse and fill the hole in the center, and also so that there is not too much empty space near the bottom. As the mound grows in diameter, the length of the wood becomes shorter, so that the upper surface becomes more spherical and not flat. The thicker ends of the wood are placed upward since that is where the force of the fire is stronger than it is near the bottom close to the earth. It is also more efficient when the thicker end of the wood is near the top, since there always remain pieces of wood of approximately a half foot long after the fire and these pieces are not completely charcoal. It is therefore more advisable that it be the smaller end of the wood than on the thicker end. The empty spaces which exist between the pieces of wood are filled with thin sticks. This is done so that more charcoal is achieved with essentially the same effort and also so that there is less air which can enter the pile and cause damage.
The second figure represents a completed
charcoal mound and clearly shows its proportions and form. In that diagram, E is the bundle of brush which sticks out above the wood. There is no particular order in regard to the thickness of the wood. It is unimportant whether thicker pieces are placed closer or further away from the middle. The pieces of wood are simply mixed together in regard to their thickness. It is actually better if the thicker pieces of wood are distributed throughout the entire mound so that they are not concentrated in one area. It is easy to understand the intent of doing that, namely, that the charcoal fire burns evenly and reaches the ground at about the same time. The thicker wood burns longer than the thinner, of course. It is, of course, also necessary that there is as much wood on one side of the brush in the middle as there is on the other, that is, the brush should be exactly in the middle. This should be carefully observed, since where the brush is placed in the middle and empty space will result after it has burned, and it is through that location that the fire is fed. It is thus understandable that the wood around this hole has the same thickness so that it burns to the earth at the same time and is not extinguished on one side while it is still burning on the other. There is one other remark that I need to make about placing the wood, namely, that you should not use any dry or, even worse, rotten pieces. All of the wood used in the charcoal mound should be cut at about the same time and be roughly the same age. The less sap there is in the wood, the less resistance is offered to the fire and the more quickly it will penetrate through the wood and transform it into charcoal. Thus, if dry wood is mixed in among the green wood, the fire remains in the green wood longer than it does in the dry so that the latter is subjected to a stronger firing than is necessary for converting it to charcoal. The fire thus attacks the mixture of wood and begins to destroy it so that the charcoal is lighter and less useful the closer the wood is to being rotten.

49
After the mound has been constructed, it needs to be covered. The mound is given a three layered covering. First, it is covered with sticks, then with grasses and moss, and finally with dirt. We want to look at all three of these covers.
The mound must be covered with some moist black charcoal dirt [from the previous mound], a half-foot thick. We cannot place this Earth directly upon the wood, however, as it would fall down between the pieces of wood and fill up the spaces between them. In that instance, the fire could not reach the wood, and it would thus remain unburned. Aside from that, as can be seen in the drawing, the sides of the mound are rather steep, so the dirt would not stick to the sides, it would slip off, particularly when it is raining and storming. Aside from that, the dirt covering which would be wet from rain and smoke would keep the wood on the outside of the mound wet, and thus hinder its conversion to charcoal. For that reason, the mound is first covered with sticks and then with moss and grass, and then as the charcoal makers say, finally covered with earth.
The moss covering lies directly under the dirt covering. It is made up of grasses and moss, but if it were placed directly upon the wood of the mound, it would also slip into the cracks and crevices,
particularly when the heavy dirt covering is placed upon it. It would, thus, also inhibit the fire from reaching some of the wood of the mound, and for that reason, the mound first needs to be covered with sticks.
The sticks used by the charcoal maker are pieces of wood which were too thin to be used in constructing the mound, pieces which are thinner than the arm directly behind the hand. They are chopped into small lengths, never less than a third and never longer than a whole foot. The charcoal maker covers the entire mound with such pieces of wood, fills all the nooks and crannies and attempts to give it a completely hemispherical form with them [that is, these pieces of wood are heaped around the base to complete the form of a hemisphere].
After the mound has been covered with this first roof, it is then covered with moss and grass. The part of the mound which is more or less flat, that is, the area represented by the ends of the wood pieces in the mound, is carefully covered with grasses. This is done by beginning at the outside and laying bundles of grass, one over the other, so that it forms a roof similar to a thatched roof. Thus, these grasses shield the underlying wood from rain and wetness and guide the water to the outside. Grasses are used because they are not easily penetrated by water. After that has been done, the remainder of the mound is covered with leaves and moss a few inches thick right down to the ground. This is called the rough roof and it holds the dirt better than can be done by the smooth kindling wood. The mound is now prepared to receive its covering of dirt and to achieve its final form.
The charcoal maker takes a wide shovel and scoops the earth between the mound and the edges of the pit up against the mound. This earth is the black, charcoal dirt and it is placed against the foot of the mound about a half foot thick. It is packed firmly with the back of the shovel so that it holds
50
together better. After the entire mound has been covered in a similar way, right up to the bundle of straw in the middle, after it has been packed and smoothed and given a round form, it is ready to be ignited.
Until this point in time, the charcoal maker goes home every evening, if he did not live too far away. Now, however, he needs to gather provisions and make preparations to be away for three to four weeks. As soon as he has prepared everything, he then takes his leave of his family and friends and goes out into the wilderness, where he builds himself a small hut which will serve as his home for the next few weeks. The charcoal maker takes three sticks and places them in a triangle so large that he has space within it to lie down. The sticks are bound together at the top at such a height that he can stand up within them. He then covers this pyramid shaped frame with a number of other sticks placed close to one another. This structure is then covered with brush and then with grasses. At the top, there is a small smoke hole. However, that is partially covered with grasses so that it is safe from the rain.
IgNITINg ThE MOUND
Everything I have described about preparing the mound can certainly properly be called the preparatory work, as now the main work begins. The charcoal maker ignites the mound in the following way. First, he takes a wooden stick about an inch and a half thick and sharpens a point on one end. He then pokes holes all over the mound with this stick, beginning about a foot away from the central bundle of brush. The holes are poked through the earthen covering and the grass and moss, down to the covering of small sticks underlying them. Such holes are poked into the mound at an angle about a foot apart. The charcoal maker makes three such rows of holes around the head of the mound, and each row is about a foot
apart. After he has done this, he ignites the bundle of brush and as soon as thick white vapor or smoke starts to come out of the three rows of holes, and much smoke is emitted, he covers the hole at the top with a large bundle of grass so that it damps the fire.
[Jung-Stilling now considers how the fire within the mound can be controlled so that charcoal results which can later be used in a iron smelter.] So that when it is ignited and provided with air the high temperatures of a smelting fire can be reached because the charcoal contains nothing which would resist fire, yet at the same time contains everything that will feed it. This level of fire that transforms organic material into charcoal is called a dampened fire because it is attained when the fire is damped.
Since flames arise when air streams across a burning object, it is clear that the flames can be inhibited if the object is covered so that the air cannot reach it. At the same time, the oily and acidic portions cannot be carried away. They remain and concentrate. So that the fire does not go out, air must have free access. However, the circulation of the air must be more horizontal than vertical. At the same time, though, it must have some rise as otherwise the smoke could not be emitted freely, it would instead result in more water and the temperature of the fire would be insufficient. I mentioned above that after the charcoal maker has seen that the brush burnt into the mound, he firmly covered the opening at the top with grass, thus stopping the flames. The circulation of the air through the holes surrounding the center of the mound caused the flame of the fire to burn through the central hole, but such a burning would transform all the wood into ashes, not charcoal. For that reason, the hole in the center is filled and suddenly the flaming fire is transformed into a dampened fire. The air streams into one of the holes and out of another, or when there is no wind, it slips past and between the smoke particles, in one hole and out another. In this way, the stream
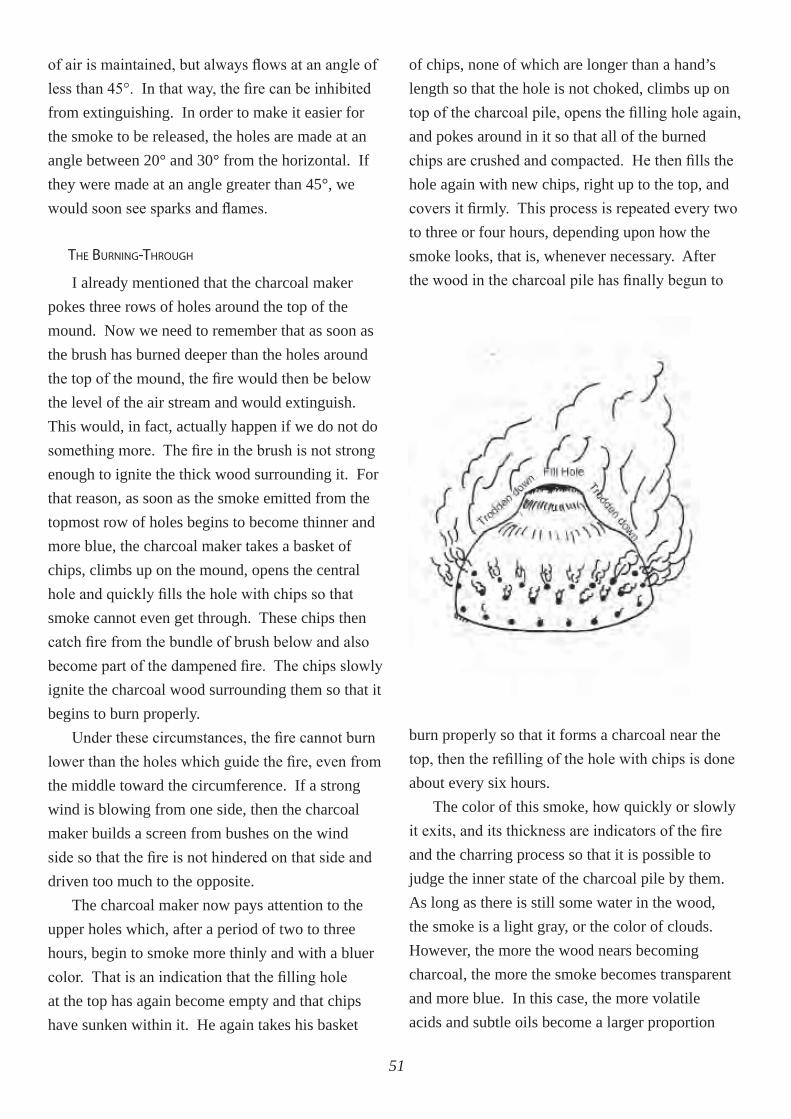
51
of air is maintained, but always flows at an angle of less than 45°. In that way, the fire can be inhibited from extinguishing. In order to make it easier for the smoke to be released, the holes are made at an angle between 20° and 30° from the horizontal. If they were made at an angle greater than 45°, we would soon see sparks and flames.
ThE BURNINg-ThROUgh
I already mentioned that the charcoal maker pokes three rows of holes around the top of the mound. Now we need to remember that as soon as the brush has burned deeper than the holes around the top of the mound, the fire would then be below the level of the air stream and would extinguish. This would, in fact, actually happen if we do not do something more. The fire in the brush is not strong enough to ignite the thick wood surrounding it. For that reason, as soon as the smoke emitted from the topmost row of holes begins to become thinner and more blue, the charcoal maker takes a basket of chips, climbs up on the mound, opens the central hole and quickly fills the hole with chips so that smoke cannot even get through. These chips then catch fire from the bundle of brush below and also become part of the dampened fire. The chips slowly ignite the charcoal wood surrounding them so that it begins to burn properly.
Under these circumstances, the fire cannot burn lower than the holes which guide the fire, even from the middle toward the circumference. If a strong wind is blowing from one side, then the charcoal maker builds a screen from bushes on the wind side so that the fire is not hindered on that side and driven too much to the opposite.
The charcoal maker now pays attention to the upper holes which, after a period of two to three hours, begin to smoke more thinly and with a bluer color. That is an indication that the filling hole at the top has again become empty and that chips have sunken within it. He again takes his basket
of chips, none of which are longer than a hand’s length so that the hole is not choked, climbs up on top of the charcoal pile, opens the filling hole again, and pokes around in it so that all of the burned chips are crushed and compacted. He then fills the hole again with new chips, right up to the top, and covers it firmly. This process is repeated every two to three or four hours, depending upon how the smoke looks, that is, whenever necessary. After the wood in the charcoal pile has finally begun to
burn properly so that it forms a charcoal near the top, then the refilling of the hole with chips is done about every six hours.
The color of this smoke, how quickly or slowly it exits, and its thickness are indicators of the fire and the charring process so that it is possible to judge the inner state of the charcoal pile by them. As long as there is still some water in the wood, the smoke is a light gray, or the color of clouds. However, the more the wood nears becoming charcoal, the more the smoke becomes transparent and more blue. In this case, the more volatile acids and subtle oils become a larger proportion
52
and water a smaller proportion. Thus, the smoke becomes thinner and more transparent. When the fire is burning heavily, then the smoke rushes out of the holes at high speed and is very thick. On the other hand, when the fire is burning slowly, then only a thin, white colored smoke arises slowly from the holes. The charcoal maker uses these signs to direct the fire and the other conditions of burning.
When the highest holes give only a thin, blue smoke, even though the filling hole was filled shortly before so that this smoke has only a little white color from the most recent filling of chips, then that is a sign that the damped fire has burned below the level of the top. The charcoal maker then makes a third row of holes, about a foot apart and about one foot lower than the previous row. As soon as that is done, the fire picks up again and begins to move deeper. The bundle of brush in the middle, as well as the chips, follow the fire and sink further, thus setting the wood surrounding them in flames also. Thus, the wood surrounding the chips and brush slowly catches fire and begins to move deeper. After a time, the top two rows of holes give only a thin, blue smoke and it is now time to close them. The charcoal maker continues to watch the burning and when the third row of holes also begins to give only a blue smoke, he again pokes a row of holes a foot below the third row. He then climbs up on the charcoal pile and with the back of his shovel beats upon the pile to close the highest row of holes. After he has filled the center hole with more chips, he then begins to stamp on the second row of holes with his feet. This is done only after a filling with chips so that the central hole does not collapse.
As this process continues, the wood being transformed into charcoal is no longer as thick as it was earlier. It has shrunken to a considerable extent and thus there is more space in the charcoal pile for air. So, the charcoal could begin to glow and burst into flames which would come out of the uppermost holes. For that reason, it is necessary
to stuff the empty spaces. Since, however, through the charcoal process the wood loses its flexibility because water and oils are driven out, the ratio of the more earthy and pitch-containing portions becomes enormously greater. The wood, now transformed into charcoal, easily breaks. When the charcoal maker goes around the neck of the pile and stamps it with his feet, the coals beneath him break. It is possible to hear the dull thuds when they break, and through that process, the dampened fire is maintained since all of the air space around the top of the pile becomes filled. That, however, is not the only advantage of stamping the pile. The charcoal maker can tell by the sounds whether the wood has been transformed into charcoal or not. As long as there is even just one finger thickness of uncharred wood in the middle of one of the logs in the pile, it will resist breaking and when it finally breaks under great effort, it does it with a sharp “crack,” much as dry wood and not in the same way as does charcoal. When, during the process of stamping upon the pile, the charcoal maker finds such a place, he pokes a couple of holes into the pile at that location and watches the smoke as it comes out. He then occasionally checks by stamping on the pile whether the wood has turned to charcoal or not. The covering of the pile which was made of grasses also inhibits the possibility that the charcoal maker could fall into the pile while stamping upon it with his feet, a situation in which he would be horribly burned, since the grasses are tough and resist breaking. Through this stamping upon the pile which the charcoal maker continues right out to the outermost logs in the pile, the pile changes in form and looks more like the third figure (shown above).
CONCLUDINg ThE BURN
It can easily be seen from the description above how the charcoal maker works with the pile further. As soon as the topmost row of holes begins to
53
smoke bluer and more thinly, he pokes a new row lower and closes the uppermost row. This continues until the lowest row is as the foot of the pile. In that way there are always three or at most four rows of smoke holes. When there are only two rows left at the foot of the pile and these also begin to emit blue, thin smoke, then the charcoal is finished and all of the wood has been transformed into charcoal. It should be remarked that during the entire time that the pile is burning, chips are continually filled through the top. The charcoal maker follows a certain order. As soon as the fire has reached the neck of the pile (letter A in the above drawing), he can be certain that the fire will no longer go out. at that time he fills it with chips exactly every six hours: at midnight, six in the morning, midday, and six in the evening. The remainder of the day he spends chopping chips and watching the pile. He may also spend some time making some household utensils.
It may not be clear to every reader why the refilling must continue. Someone might think that as soon as it is clear that the fire can no longer go out that the charcoal maker could save himself the wood and work. There are, however, other important reasons why the filling is necessary. The space which the central bundle of brush originally filled becomes empty as soon as the brush is burnt. The central hole has the same characteristics as all other empty spaces within the pile, that if left unfilled, the fire would burn too strongly and would consume the wood surrounding the center. That central space would therefore continually grow and thus the fire continually become more strong so that in the end the pile would collapse and everything would be transformed into embers and ashes. When, however, that space is filled with fresh wood and the fire is fed again, then, due to a lack of air, the fire never grows larger than a dampened fire and at the same time it cannot attack the actual wood of the charcoal pile since the chips are sufficient to
keep the dampened fire going. The charcoal does not change at the temperature of a dampened fire. It has already withstood that temperature. However, as soon as the temperature rises, it begins to be destroyed. When, however, the chips have all burnt and no new chips are added, then the space filled with air grows and the force of the fire increases and thus destroys the surrounding charcoal.
Filling the pile with chips also protects the fire from going out. as long as the wood surrounding the filling hole is not completely burning, it is quite easy for it to extinguish if the fire is not fed with lighter and more easily ignitable chips.
fORCES Of NATURE
I very much enjoyed describing the lonely home of the charcoal maker. I never experienced such a peaceful time and will certainly never experience it again as that time which I spent with the old man and slept in his charcoal maker’s hut: the lonely natural surroundings, untouched by human hands, forests, nothing but green forests, and occasionally a green area with a crystal clear spring, water that flowed forth as in Eden. Shadowy bushes followed by giant trees where I could freely walk. Everywhere a sacred silence and a ceremonious darkness with only the song of the nightingale. The sun rises, preceded by the sparkling Venus, winking through the leaves. Winds and soft breezes, the angels of God whispering among the tops of ancient oaks and beech trees. Flocks of birds feel the presence of God and sing their praises with a thousand voices. The majestic elk stands up where he has lain, stretches and rubs his antlers on smaller trees. The Sun now appears and everything which was previously a dark green turns to gold. A cool breeze freshens everything and over the streams there are still clouds of fog where the moles glisten in each grassy area. The dark shadows of the forest give protection from the heat of the Sun. there is nothing so beautiful as a thunderstorm. The whole
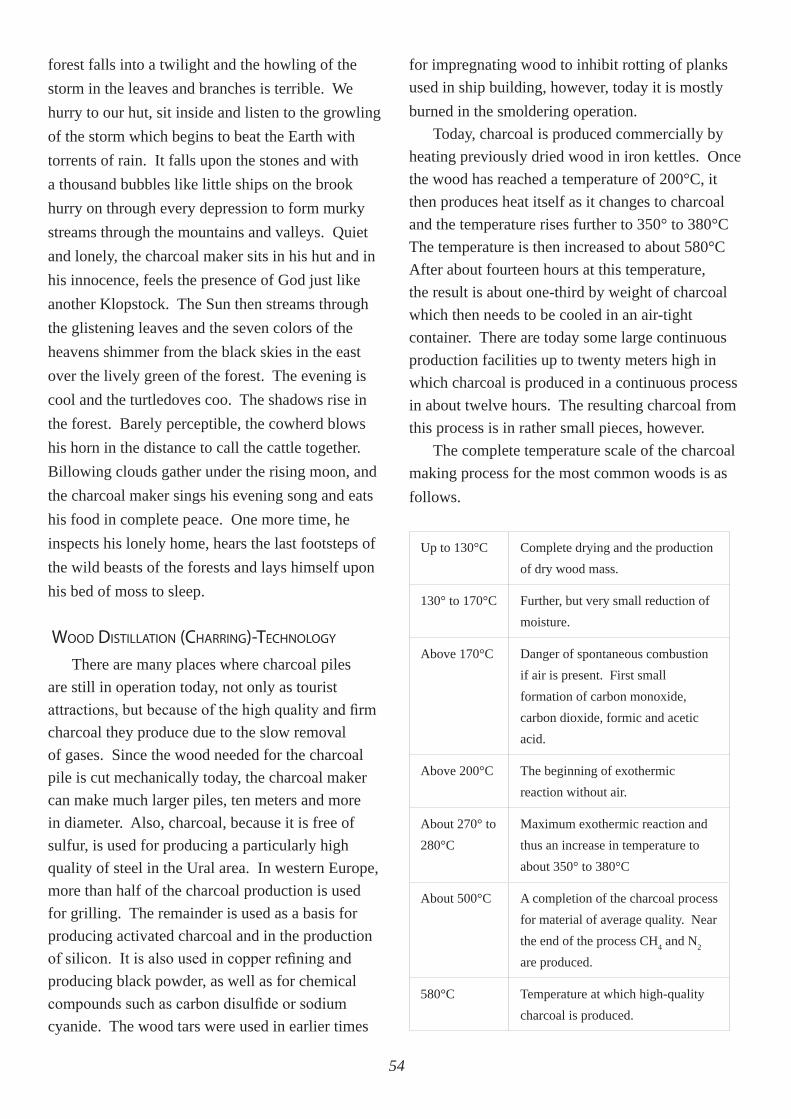
54
forest falls into a twilight and the howling of the storm in the leaves and branches is terrible. We hurry to our hut, sit inside and listen to the growling of the storm which begins to beat the Earth with torrents of rain. It falls upon the stones and with a thousand bubbles like little ships on the brook hurry on through every depression to form murky streams through the mountains and valleys. Quiet and lonely, the charcoal maker sits in his hut and in his innocence, feels the presence of God just like another Klopstock. The Sun then streams through the glistening leaves and the seven colors of the heavens shimmer from the black skies in the east over the lively green of the forest. The evening is cool and the turtledoves coo. The shadows rise in the forest. Barely perceptible, the cowherd blows his horn in the distance to call the cattle together. Billowing clouds gather under the rising moon, and the charcoal maker sings his evening song and eats his food in complete peace. One more time, he inspects his lonely home, hears the last footsteps of the wild beasts of the forests and lays himself upon his bed of moss to sleep.
WOOD DISTILLATION (ChARRINg)-TEChNOLOgy
There are many places where charcoal piles are still in operation today, not only as tourist attractions, but because of the high quality and firm charcoal they produce due to the slow removal of gases. Since the wood needed for the charcoal pile is cut mechanically today, the charcoal maker can make much larger piles, ten meters and more in diameter. Also, charcoal, because it is free of sulfur, is used for producing a particularly high quality of steel in the Ural area. In western Europe, more than half of the charcoal production is used for grilling. The remainder is used as a basis for producing activated charcoal and in the production of silicon. It is also used in copper refining and producing black powder, as well as for chemical compounds such as carbon disulfide or sodium cyanide. The wood tars were used in earlier times
for impregnating wood to inhibit rotting of planks used in ship building, however, today it is mostly burned in the smoldering operation.
Today, charcoal is produced commercially by heating previously dried wood in iron kettles. Once the wood has reached a temperature of 200°C, it then produces heat itself as it changes to charcoal and the temperature rises further to 350° to 380°C The temperature is then increased to about 580°C After about fourteen hours at this temperature, the result is about one-third by weight of charcoal which then needs to be cooled in an air-tight container. There are today some large continuous production facilities up to twenty meters high in which charcoal is produced in a continuous process in about twelve hours. The resulting charcoal from this process is in rather small pieces, however.
The complete temperature scale of the charcoal making process for the most common woods is as follows.
Up to 130°C Complete drying and the production
of dry wood mass.
130° to 170°C Further, but very small reduction of moisture.
Above 170°C Danger of spontaneous combustion if air is present. First small formation of carbon monoxide, carbon dioxide, formic and acetic acid.
Above 200°C The beginning of exothermic reaction without air.
About 270° to 280°C
Maximum exothermic reaction and thus an increase in temperature to about 350° to 380°C
About 500°C A completion of the charcoal process for material of average quality. Near the end of the process CH4 and N2 are produced.
580°C Temperature at which high-quality charcoal is produced.
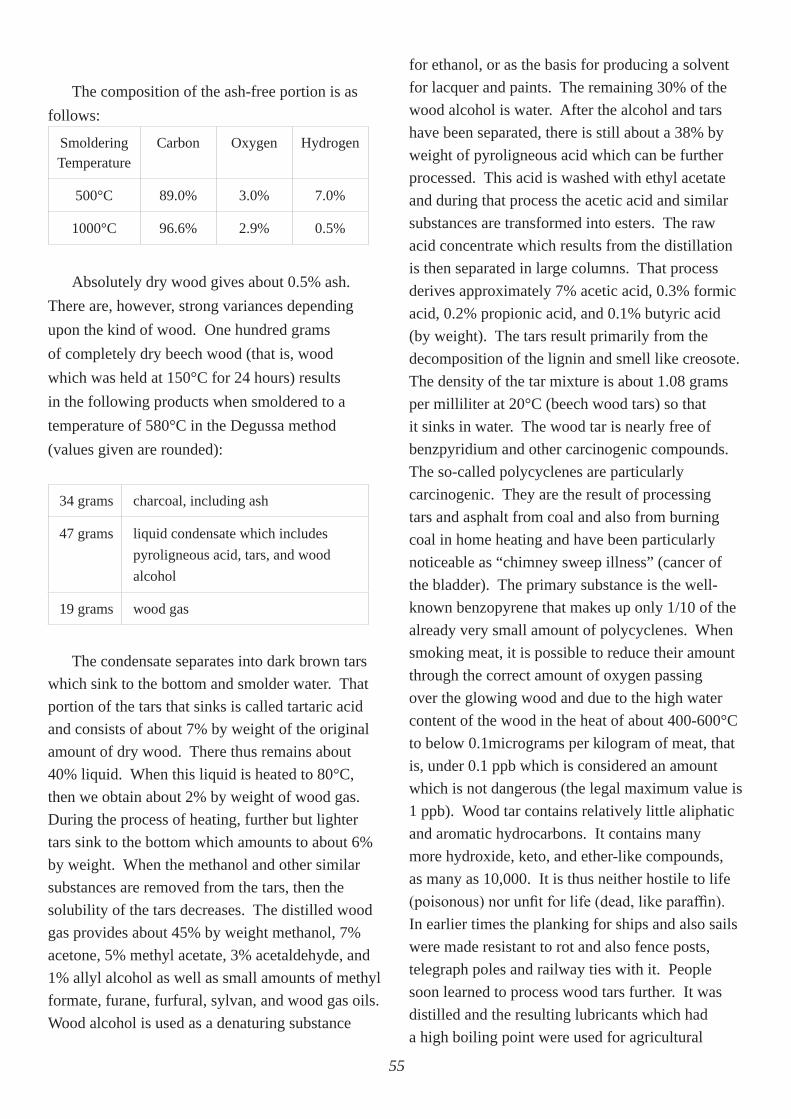
55
The composition of the ash-free portion is as follows:
Smoldering Temperature
Carbon Oxygen Hydrogen
500°C 89.0% 3.0% 7.0%
1000°C 96.6% 2.9% 0.5%
Absolutely dry wood gives about 0.5% ash. There are, however, strong variances depending upon the kind of wood. One hundred grams of completely dry beech wood (that is, wood which was held at 150°C for 24 hours) results in the following products when smoldered to a temperature of 580°C in the Degussa method (values given are rounded):
34 grams charcoal, including ash
47 grams liquid condensate which includes pyroligneous acid, tars, and wood alcohol
19 grams wood gas
The condensate separates into dark brown tars which sink to the bottom and smolder water. That portion of the tars that sinks is called tartaric acid and consists of about 7% by weight of the original amount of dry wood. There thus remains about 40% liquid. When this liquid is heated to 80°C, then we obtain about 2% by weight of wood gas. During the process of heating, further but lighter tars sink to the bottom which amounts to about 6% by weight. When the methanol and other similar substances are removed from the tars, then the solubility of the tars decreases. The distilled wood gas provides about 45% by weight methanol, 7% acetone, 5% methyl acetate, 3% acetaldehyde, and 1% allyl alcohol as well as small amounts of methyl formate, furane, furfural, sylvan, and wood gas oils. Wood alcohol is used as a denaturing substance
for ethanol, or as the basis for producing a solvent for lacquer and paints. The remaining 30% of the wood alcohol is water. After the alcohol and tars have been separated, there is still about a 38% by weight of pyroligneous acid which can be further processed. This acid is washed with ethyl acetate and during that process the acetic acid and similar substances are transformed into esters. The raw acid concentrate which results from the distillation is then separated in large columns. That process derives approximately 7% acetic acid, 0.3% formic acid, 0.2% propionic acid, and 0.1% butyric acid (by weight). The tars result primarily from the decomposition of the lignin and smell like creosote. The density of the tar mixture is about 1.08 grams per milliliter at 20°C (beech wood tars) so that it sinks in water. The wood tar is nearly free of benzpyridium and other carcinogenic compounds. The so-called polycyclenes are particularly carcinogenic. They are the result of processing tars and asphalt from coal and also from burning coal in home heating and have been particularly noticeable as “chimney sweep illness” (cancer of the bladder). The primary substance is the well-known benzopyrene that makes up only 1/10 of the already very small amount of polycyclenes. When smoking meat, it is possible to reduce their amount through the correct amount of oxygen passing over the glowing wood and due to the high water content of the wood in the heat of about 400-600°C to below 0.1micrograms per kilogram of meat, that is, under 0.1 ppb which is considered an amount which is not dangerous (the legal maximum value is 1 ppb). Wood tar contains relatively little aliphatic and aromatic hydrocarbons. It contains many more hydroxide, keto, and ether-like compounds, as many as 10,000. It is thus neither hostile to life (poisonous) nor unfit for life (dead, like paraffin). In earlier times the planking for ships and also sails were made resistant to rot and also fence posts, telegraph poles and railway ties with it. People soon learned to process wood tars further. It was distilled and the resulting lubricants which had a high boiling point were used for agricultural
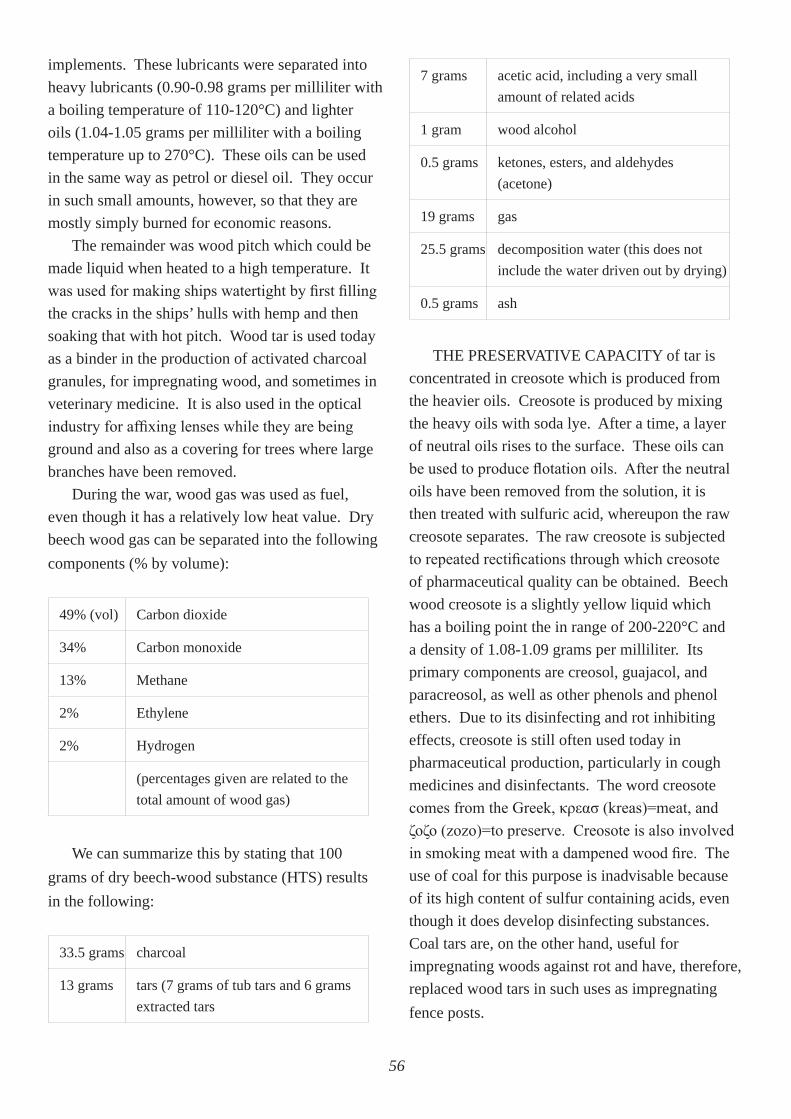
56
implements. These lubricants were separated into heavy lubricants (0.90-0.98 grams per milliliter with a boiling temperature of 110-120°C) and lighter oils (1.04-1.05 grams per milliliter with a boiling temperature up to 270°C). These oils can be used in the same way as petrol or diesel oil. They occur in such small amounts, however, so that they are mostly simply burned for economic reasons.
The remainder was wood pitch which could be made liquid when heated to a high temperature. It was used for making ships watertight by first filling the cracks in the ships’ hulls with hemp and then soaking that with hot pitch. Wood tar is used today as a binder in the production of activated charcoal granules, for impregnating wood, and sometimes in veterinary medicine. It is also used in the optical industry for affixing lenses while they are being ground and also as a covering for trees where large branches have been removed.
During the war, wood gas was used as fuel, even though it has a relatively low heat value. Dry beech wood gas can be separated into the following components (% by volume):
49% (vol) Carbon dioxide
34% Carbon monoxide
13% Methane
2% Ethylene
2% Hydrogen
(percentages given are related to the total amount of wood gas)
We can summarize this by stating that 100 grams of dry beech-wood substance (HTS) results in the following:
33.5 grams charcoal
13 grams tars (7 grams of tub tars and 6 grams extracted tars
7 grams acetic acid, including a very small amount of related acids
1 gram wood alcohol
0.5 grams ketones, esters, and aldehydes (acetone)
19 grams gas
25.5 grams decomposition water (this does not include the water driven out by drying)
0.5 grams ash
THE PRESERVATIVE CAPACITY of tar is concentrated in creosote which is produced from the heavier oils. Creosote is produced by mixing the heavy oils with soda lye. After a time, a layer of neutral oils rises to the surface. These oils can be used to produce flotation oils. After the neutral oils have been removed from the solution, it is then treated with sulfuric acid, whereupon the raw creosote separates. The raw creosote is subjected to repeated rectifications through which creosote of pharmaceutical quality can be obtained. Beech wood creosote is a slightly yellow liquid which has a boiling point the in range of 200-220°C and a density of 1.08-1.09 grams per milliliter. Its primary components are creosol, guajacol, and paracreosol, as well as other phenols and phenol ethers. Due to its disinfecting and rot inhibiting effects, creosote is still often used today in pharmaceutical production, particularly in cough medicines and disinfectants. The word creosote comes from the Greek, κρεασ (kreas)=meat, and ζοζο (zozo)=to preserve. Creosote is also involved in smoking meat with a dampened wood fire. The use of coal for this purpose is inadvisable because of its high content of sulfur containing acids, even though it does develop disinfecting substances. Coal tars are, on the other hand, useful for impregnating woods against rot and have, therefore, replaced wood tars in such uses as impregnating fence posts.
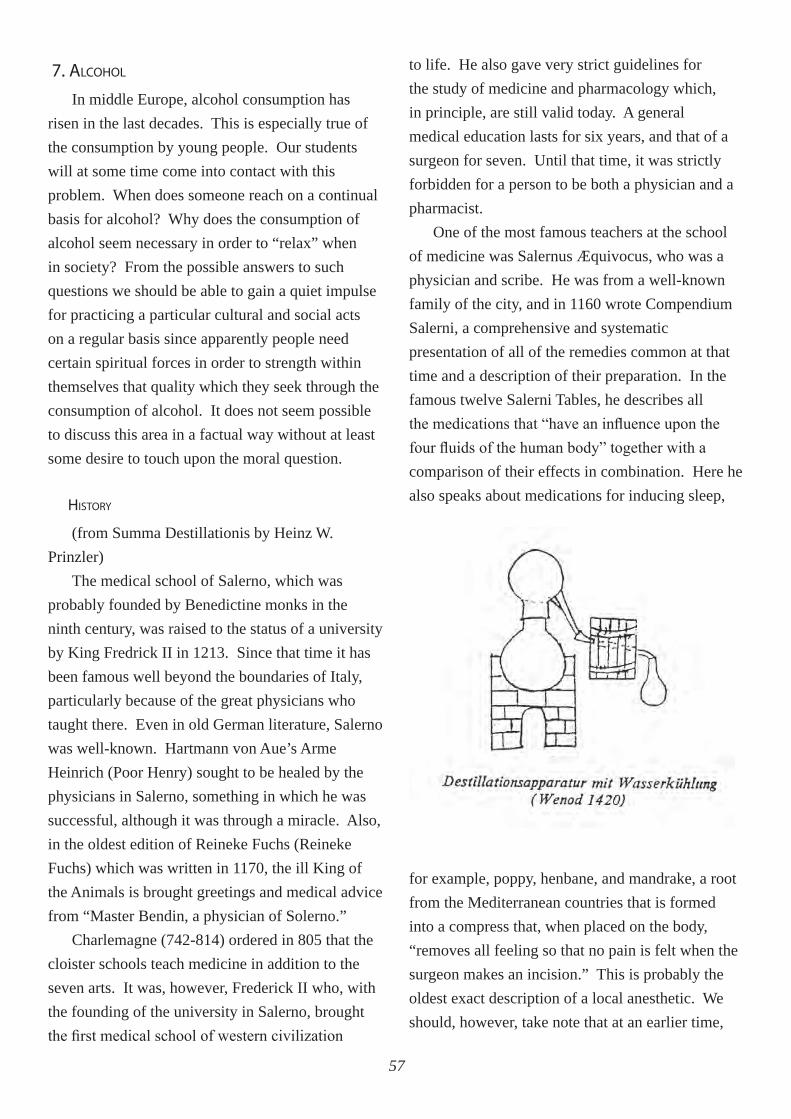
57
7. ALCOhOL
In middle Europe, alcohol consumption has risen in the last decades. This is especially true of the consumption by young people. Our students will at some time come into contact with this problem. When does someone reach on a continual basis for alcohol? Why does the consumption of alcohol seem necessary in order to “relax” when in society? From the possible answers to such questions we should be able to gain a quiet impulse for practicing a particular cultural and social acts on a regular basis since apparently people need certain spiritual forces in order to strength within themselves that quality which they seek through the consumption of alcohol. It does not seem possible to discuss this area in a factual way without at least some desire to touch upon the moral question.
hISTORy
(from Summa Destillationis by Heinz W. Prinzler)
The medical school of Salerno, which was probably founded by Benedictine monks in the ninth century, was raised to the status of a university by King Fredrick II in 1213. Since that time it has been famous well beyond the boundaries of Italy, particularly because of the great physicians who taught there. Even in old German literature, Salerno was well-known. Hartmann von Aue’s Arme Heinrich (Poor Henry) sought to be healed by the physicians in Salerno, something in which he was successful, although it was through a miracle. Also, in the oldest edition of Reineke Fuchs (Reineke Fuchs) which was written in 1170, the ill King of the Animals is brought greetings and medical advice from “Master Bendin, a physician of Solerno.”
Charlemagne (742-814) ordered in 805 that the cloister schools teach medicine in addition to the seven arts. It was, however, Frederick II who, with the founding of the university in Salerno, brought the first medical school of western civilization
to life. He also gave very strict guidelines for the study of medicine and pharmacology which, in principle, are still valid today. A general medical education lasts for six years, and that of a surgeon for seven. Until that time, it was strictly forbidden for a person to be both a physician and a pharmacist.
One of the most famous teachers at the school of medicine was Salernus Æquivocus, who was a physician and scribe. He was from a well-known family of the city, and in 1160 wrote Compendium Salerni, a comprehensive and systematic presentation of all of the remedies common at that time and a description of their preparation. In the famous twelve Salerni Tables, he describes all the medications that “have an influence upon the four fluids of the human body” together with a comparison of their effects in combination. Here he also speaks about medications for inducing sleep,
for example, poppy, henbane, and mandrake, a root from the Mediterranean countries that is formed into a compress that, when placed on the body, “removes all feeling so that no pain is felt when the surgeon makes an incision.” This is probably the oldest exact description of a local anesthetic. We should, however, take note that at an earlier time,
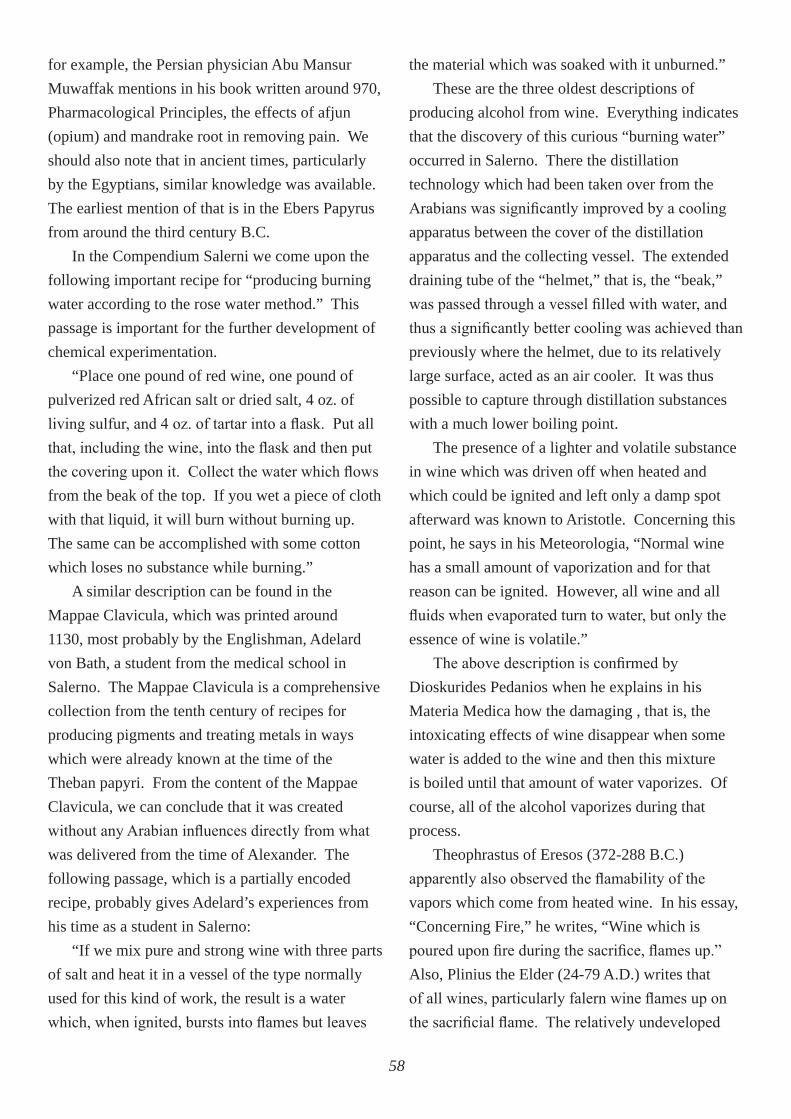
58
for example, the Persian physician Abu Mansur Muwaffak mentions in his book written around 970, Pharmacological Principles, the effects of afjun (opium) and mandrake root in removing pain. We should also note that in ancient times, particularly by the Egyptians, similar knowledge was available. The earliest mention of that is in the Ebers Papyrus from around the third century B.C.
In the Compendium Salerni we come upon the following important recipe for “producing burning water according to the rose water method.” This passage is important for the further development of chemical experimentation.
“Place one pound of red wine, one pound of pulverized red African salt or dried salt, 4 oz. of living sulfur, and 4 oz. of tartar into a flask. Put all that, including the wine, into the flask and then put the covering upon it. Collect the water which flows from the beak of the top. If you wet a piece of cloth with that liquid, it will burn without burning up. The same can be accomplished with some cotton which loses no substance while burning.”
A similar description can be found in the Mappae Clavicula, which was printed around 1130, most probably by the Englishman, Adelard von Bath, a student from the medical school in Salerno. The Mappae Clavicula is a comprehensive collection from the tenth century of recipes for producing pigments and treating metals in ways which were already known at the time of the Theban papyri. From the content of the Mappae Clavicula, we can conclude that it was created without any Arabian influences directly from what was delivered from the time of Alexander. The following passage, which is a partially encoded recipe, probably gives Adelard’s experiences from his time as a student in Salerno:
“If we mix pure and strong wine with three parts of salt and heat it in a vessel of the type normally used for this kind of work, the result is a water which, when ignited, bursts into flames but leaves
the material which was soaked with it unburned.”These are the three oldest descriptions of
producing alcohol from wine. Everything indicates that the discovery of this curious “burning water” occurred in Salerno. There the distillation technology which had been taken over from the Arabians was significantly improved by a cooling apparatus between the cover of the distillation apparatus and the collecting vessel. The extended draining tube of the “helmet,” that is, the “beak,” was passed through a vessel filled with water, and thus a significantly better cooling was achieved than previously where the helmet, due to its relatively large surface, acted as an air cooler. It was thus possible to capture through distillation substances with a much lower boiling point.
The presence of a lighter and volatile substance in wine which was driven off when heated and which could be ignited and left only a damp spot afterward was known to Aristotle. Concerning this point, he says in his Meteorologia, “Normal wine has a small amount of vaporization and for that reason can be ignited. However, all wine and all fluids when evaporated turn to water, but only the essence of wine is volatile.”
The above description is confirmed by Dioskurides Pedanios when he explains in his Materia Medica how the damaging , that is, the intoxicating effects of wine disappear when some water is added to the wine and then this mixture is boiled until that amount of water vaporizes. Of course, all of the alcohol vaporizes during that process.
Theophrastus of Eresos (372-288 B.C.) apparently also observed the flamability of the vapors which come from heated wine. In his essay, “Concerning Fire,” he writes, “Wine which is poured upon fire during the sacrifice, flames up.” Also, Plinius the Elder (24-79 A.D.) writes that of all wines, particularly falern wine flames up on the sacrificial flame. The relatively undeveloped
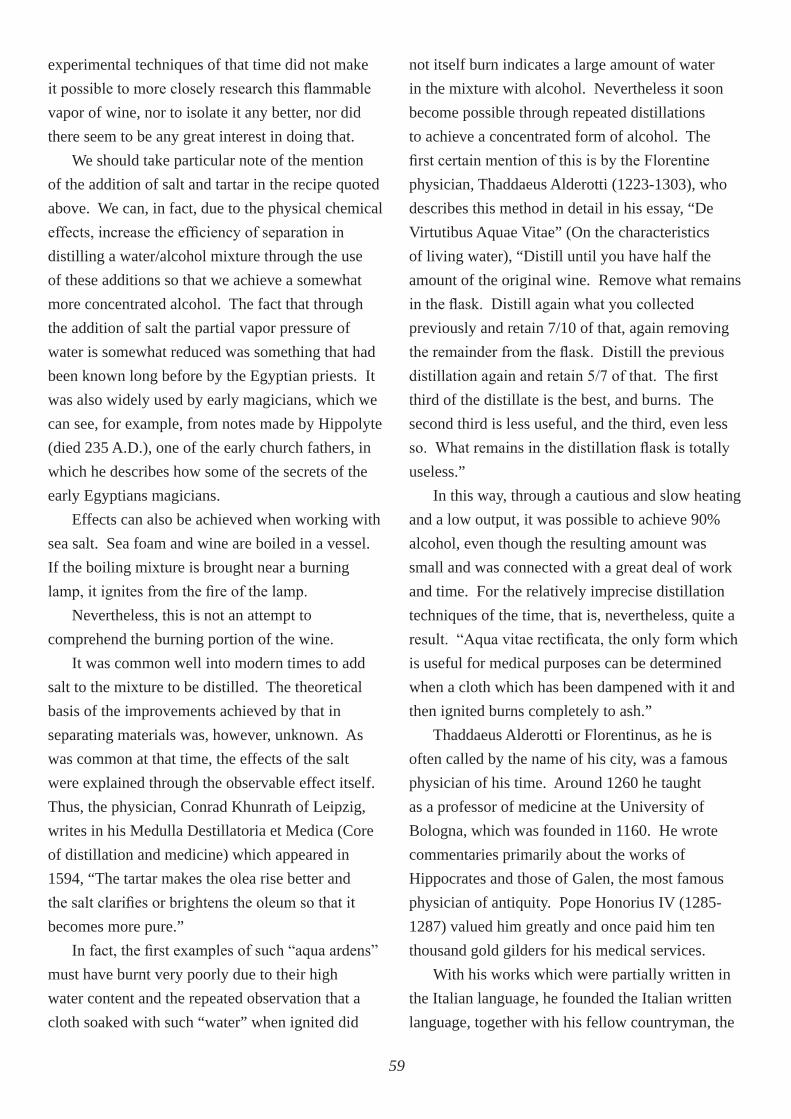
59
experimental techniques of that time did not make it possible to more closely research this flammable vapor of wine, nor to isolate it any better, nor did there seem to be any great interest in doing that.
We should take particular note of the mention of the addition of salt and tartar in the recipe quoted above. We can, in fact, due to the physical chemical effects, increase the efficiency of separation in distilling a water/alcohol mixture through the use of these additions so that we achieve a somewhat more concentrated alcohol. The fact that through the addition of salt the partial vapor pressure of water is somewhat reduced was something that had been known long before by the Egyptian priests. It was also widely used by early magicians, which we can see, for example, from notes made by Hippolyte (died 235 A.D.), one of the early church fathers, in which he describes how some of the secrets of the early Egyptians magicians.
Effects can also be achieved when working with sea salt. Sea foam and wine are boiled in a vessel. If the boiling mixture is brought near a burning lamp, it ignites from the fire of the lamp.
Nevertheless, this is not an attempt to comprehend the burning portion of the wine.
It was common well into modern times to add salt to the mixture to be distilled. The theoretical basis of the improvements achieved by that in separating materials was, however, unknown. As was common at that time, the effects of the salt were explained through the observable effect itself. Thus, the physician, Conrad Khunrath of Leipzig, writes in his Medulla Destillatoria et Medica (Core of distillation and medicine) which appeared in 1594, “The tartar makes the olea rise better and the salt clarifies or brightens the oleum so that it becomes more pure.”
In fact, the first examples of such “aqua ardens” must have burnt very poorly due to their high water content and the repeated observation that a cloth soaked with such “water” when ignited did
not itself burn indicates a large amount of water in the mixture with alcohol. Nevertheless it soon become possible through repeated distillations to achieve a concentrated form of alcohol. The first certain mention of this is by the Florentine physician, Thaddaeus Alderotti (1223-1303), who describes this method in detail in his essay, “De Virtutibus Aquae Vitae” (On the characteristics of living water), “Distill until you have half the amount of the original wine. Remove what remains in the flask. Distill again what you collected previously and retain 7/10 of that, again removing the remainder from the flask. Distill the previous distillation again and retain 5/7 of that. The first third of the distillate is the best, and burns. The second third is less useful, and the third, even less so. What remains in the distillation flask is totally useless.”
In this way, through a cautious and slow heating and a low output, it was possible to achieve 90% alcohol, even though the resulting amount was small and was connected with a great deal of work and time. For the relatively imprecise distillation techniques of the time, that is, nevertheless, quite a result. “Aqua vitae rectificata, the only form which is useful for medical purposes can be determined when a cloth which has been dampened with it and then ignited burns completely to ash.”
Thaddaeus Alderotti or Florentinus, as he is often called by the name of his city, was a famous physician of his time. Around 1260 he taught as a professor of medicine at the University of Bologna, which was founded in 1160. He wrote commentaries primarily about the works of Hippocrates and those of Galen, the most famous physician of antiquity. Pope Honorius IV (1285-1287) valued him greatly and once paid him ten thousand gold gilders for his medical services.
With his works which were partially written in the Italian language, he founded the Italian written language, together with his fellow countryman, the
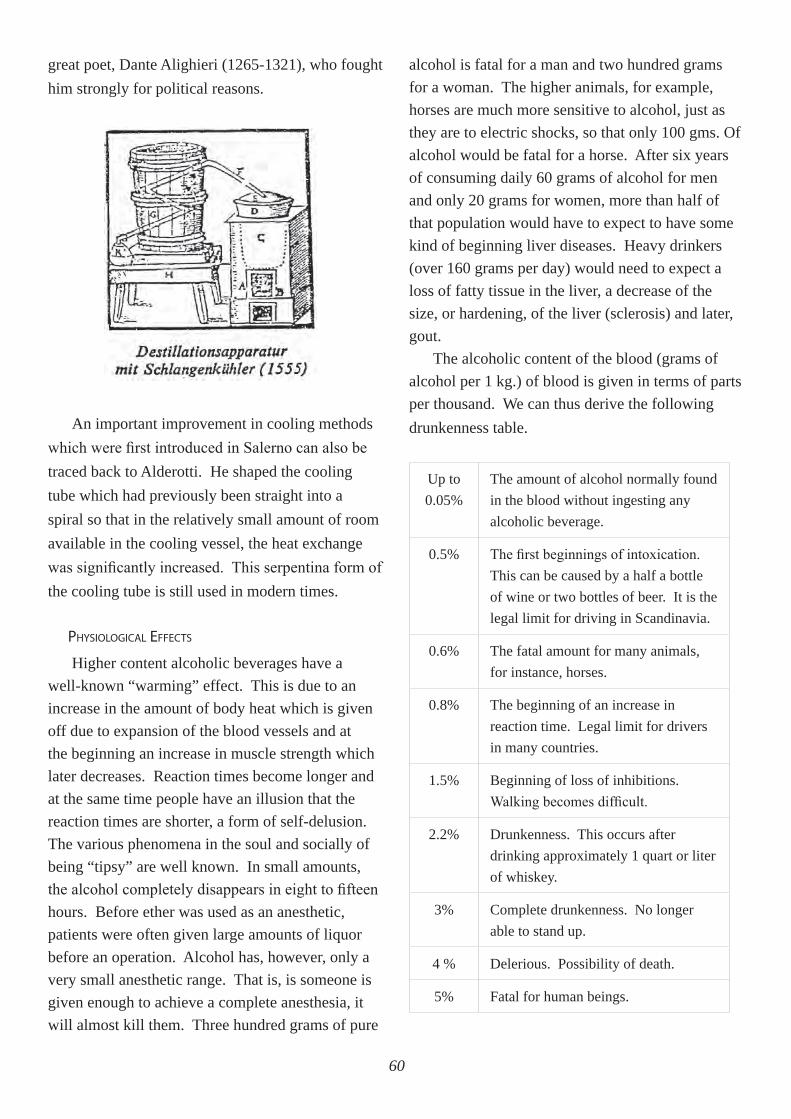
60
great poet, Dante Alighieri (1265-1321), who fought him strongly for political reasons.
An important improvement in cooling methods which were first introduced in Salerno can also be traced back to Alderotti. He shaped the cooling tube which had previously been straight into a spiral so that in the relatively small amount of room available in the cooling vessel, the heat exchange was significantly increased. This serpentina form of the cooling tube is still used in modern times.
PhySIOLOgICAL EffECTS
Higher content alcoholic beverages have a well-known “warming” effect. This is due to an increase in the amount of body heat which is given off due to expansion of the blood vessels and at the beginning an increase in muscle strength which later decreases. Reaction times become longer and at the same time people have an illusion that the reaction times are shorter, a form of self-delusion. The various phenomena in the soul and socially of being “tipsy” are well known. In small amounts, the alcohol completely disappears in eight to fifteen hours. Before ether was used as an anesthetic, patients were often given large amounts of liquor before an operation. Alcohol has, however, only a very small anesthetic range. That is, is someone is given enough to achieve a complete anesthesia, it will almost kill them. Three hundred grams of pure
alcohol is fatal for a man and two hundred grams for a woman. The higher animals, for example, horses are much more sensitive to alcohol, just as they are to electric shocks, so that only 100 gms. Of alcohol would be fatal for a horse. After six years of consuming daily 60 grams of alcohol for men and only 20 grams for women, more than half of that population would have to expect to have some kind of beginning liver diseases. Heavy drinkers (over 160 grams per day) would need to expect a loss of fatty tissue in the liver, a decrease of the size, or hardening, of the liver (sclerosis) and later, gout.
The alcoholic content of the blood (grams of alcohol per 1 kg.) of blood is given in terms of parts per thousand. We can thus derive the following drunkenness table.
Up to 0.05%
The amount of alcohol normally found in the blood without ingesting any alcoholic beverage.
0.5% The first beginnings of intoxication. This can be caused by a half a bottle of wine or two bottles of beer. It is the legal limit for driving in Scandinavia.
0.6% The fatal amount for many animals, for instance, horses.
0.8% The beginning of an increase in reaction time. Legal limit for drivers in many countries.
1.5% Beginning of loss of inhibitions. Walking becomes difficult.
2.2% Drunkenness. This occurs after drinking approximately 1 quart or liter of whiskey.
3% Complete drunkenness. No longer able to stand up.
4 % Delerious. Possibility of death.
5% Fatal for human beings.
61
There seems to be little reason for concern when the amount of alcohol intake is less than 60 gms. per day and the blood alcohol level does not go over 0.5%. The normal blood alcohol content, since people always have some alcohol due to metabolism, is about 0.15 ml., or 6 drops of pure alcohol in the complete volume of blood. People always have some amount of dreaminess and silliness in them.
Alcohol consumption in Germany has more than tripled since 1950. The per capita consumption of pure alcohol was at the time of the major alcoholism epidemic and high living around 1900, 10.1 liters per person per year. In 1950 the per capita consumption was 3.6 liters per year, 1977 12.5 liters per year, and 1984, 11.9 liters per year. That amounts to about 35 billion marks worth of alcohol. By comparison, the complete budget of German is 270 billion marks.
TEChNICAL INfORMATION
Chemically pure alcohol (instead of ethyl alcohol, we normally write simply “alcohol”) is a fluid with low viscosity, colorless, water clear, pleasant, almost flowery smell, and a burning taste. It boils at 78.3°C and becomes solid around -112°C (freezing point, -114°C). It burns easily with a blue flame and produces carbon dioxide and water. It has 7000 kcal per kilogram. The flash point of pure alcohol is at 11°C and its vapors will ignite at 400-500°C If air is mixed with about 3-12% by volume of alcohol vapor, an explosion will occur when ignited. Besides fermentation, alcohol is also produced today from ethylene by catalytic hydration or by the sulfuric acid method. Most alcohol is used in other processes in a 96% by volume distilled form.
If we want to produce alcohol in the laboratory, then we will distill it through slaked lime. Industrially, alcohol is produced through the addition of benzol (boiling point, 80.1°C) which is
used as a distillation carrier. This process is begun with a mixture of 19% alcohol, 7% water, and 74% benzol which is heated to 64.9°. That results in a mixture of 68% benzol and 32% alcohol at a temperature of 69°C which is then further heated to 78.3°C, thereby producing pure alcohol. Denatured alcohol contains 91% alcohol by weight, or 94% by volume and is mixed with a denaturing substance. This substance is most commonly derived from the smoldering of charcoal and is the middle fraction of wood alcohol which consists of methanol, methyl acetate, and acetone. Another fraction of wood alcohol, namely, the pyridine, is added to give it a distasteful smell. In Germany, alcohol for drinking is taxed at the rate of DM 22.50 per liter, so that it has approximately fifteen times the cost of its production. Approximately half the alcohol production in Germany, that is, some 130 million liters, comes from ethylene derived from petroleum. This synthetic alcohol cannot be used for drinking, though it is very cheap: It costs about DM 1 per liter.
ALCOhOL AS fUEL
For some time, primarily in Brazil, ethyl alcohol or, as it is often written today, ethanol, has been used as a fuel additive. In western Europe, it is still quite expensive. The following exerpt shows how the over production of grains that has occurred in spite of a decrease in grain prices has increased until 1990. In spite of the enormous monetary costs to the European Community, this was allowed to continue and alcohol was produced from it.
“The agricultural over production and the costs associated with it represent the single largest economic burden in the European Community. According to the E.C. Commission, if this continues, then we will have to assume a grain over production of 80 million tons per year by the beginning of the 1990s. In the last ten years, expenses to the E.C. for agriculture have risen 7%
62
per year, when corrected for inflation. Fundamental decisions about the future of agricultural policy within the E.C. are long overdue.
In the last thirty years, the gross productivity in Germany measured in terms of grain units has risen from 3 to nearly 5 ¼ tons per hectare, which represents an average yearly increase of about 2.5%. There are numerous reasons for the increase in gross production depending upon the product. The increase in land used for the production of grain from 55% to over 70% is particularly noticeable. In contrast, there has been only a slight increase in the demand for grain for purposes of nutrition of about ½% per year, and this increase is primarily in the area of high quality products. The same development is, at least in its tendencies, observable throughout the E.C., since self-sufficiency in nearly all important agricultural products has been achieved and, in fact, exceeded. The so-called market regulating functions have generated a significant burden upon the European economy (in 1985, already it was DM 42 billion) without achieving the general goal of bettering personal income.
INCREASED PRODUCTIvITy
The causes of the increase in productivity are increases of intensity of farming practices and technical improvements. Such improvements were more easily put into practice due to the very favorable price/cost relationships. We can certainly assume that if the agricultural policies remain unchanged, productivity will increase at a similar rate. There is also no reason to believe that, at least in the near future, price drops for grain on the order of 2-3% per year will change the situation. Such drops will, of course, cause marginal operations to stop production, however, their lands will be purchased by other more stable agricultural operations, and thus the production will continue. The only alternative to this is to place the
land on hold through enormously expensive public programs.
The developments in grain production are a particularly difficult problem, especially regarding the possibilities of controlling it and the implications of an increase in exports of overproduction on the world market. There seems to be general agreement that the grain production within the European community will be more than 153 million tons in 1990, and thus be some 5 million tons above the record production of 1984. If the domestic consumption and imports remain unchanged, this would result in the need to export about 43 million tons of surplus grain which would mean that there was 8.7 million hectares more land in production than is necessary, assuming an average production of 5 tons per hectare. Some sources assume that when looking at the increase in production in some member states of the European Community, the amount of surplus will be even higher. Interventions undertaken to limit the production of other products, particularly sugar beets, milk, and rape have led to additional land being used for grain.
The future development of the costs of subsidies is even less certain than the projections of production. In this connection, there are three possible paths of development which could be discussed and that present the full spectrum of possibilities. First is the possibility that the world market is capable of receiving the increase in production while maintaining prices. The second possibility is that the world market could take up the increase in production at a constant price, but this would occur only over a longer period of time, so grain would need to be subsidized to some extent. The third possibility is that the world market could only accept about 25 million tons per year while still maintaining price.
The amount of money necessary to subsidize grain production at the current levels would,
63
depending upon which of the above possibilities actually occurs, be between 4.5 and 11.5 billion marks per year. Additionally, it is influenced by the exchange rate of dollars and the price of grain on the world market. Both of these developments are also very uncertain. There is some reason to believe that developments will tend to be somewhere between the second and third alternatives mentioned above. Therefore, continuation of the present agricultural policies would mean not only a significant risk, but would probably also be connected with increased costs. For this reason the ECC states in the so-called “green book” that the grain market needs to be assisted through alternative uses of agricultural ground. The alternatives suggested are: first, increase in the planting of other kinds of plants; second, an increase in voluntary withdrawal of land from grain production; and third, utilization of grain in the chemical industry.
If we assume that these actions can be undertaken at a cost similar to that which would result in subsidizing grain exports, then some 8 million tons of grain, or 1.6 million hectares of land, could be removed from grain production without any additional costs. Seen from the market perspective, that area of land could well be used for the production of grain which would be converted into ethanol for use in fueling automobiles
ThE AgRICULTURAL SECTOR WIThOUT EThANOL fROM 1985 TO 1990
Under the assumption of nominally constant prices and increase in operating costs, including energy, until 1990, additional income in the agriculture can essentially be achieved only under the conditions of a saturated domestic market through an increase in surplus and savings in capital expenditures. Grain production will expand by about 12% as a result of the increase in land used for grain production and higher production per unit of land. Since at the same time the efficiency in
producing feed will increase and the replacement of domestic grain by lower costs substitutes will also continue, the grain surplus will increase by nearly a factor of three, and thus also the costs of subsidies.
If we assume a price reduction in grain of 3.7% per year and the consumption of sugar is also reduced, then the following developments seem plausible. In order to meet the demands of domestic consumption, the amount of land used for agricultural purposes could be reduced by six hundred thousand hectares of meadow land, since the decrease in production of hay from that land could be made up by land removed from the production of grain. Thus, in the following model we assume a moderate decrease in the price of grain of about 1.7% per year which would correspond to 394 marks per ton in 1990.
ThE AgRICULTURAL SECTOR fROM 1985 TO 1990 WITh EThANOL
Under the assumption that the required conversion technology can fulfill the demands made of it and that the agricultural sector can provide the necessary raw materials at reasonable costs, the cost of producing ethanol would be about 1.24 DM per liter. This price is somewhat higher than the current market price of alcohol for technical purposes which is primarily determined by the costs of producing alcohol from molasses. An increase in the amount of alcohol which can be produced at current prices cannot be assumed due to the limited amount of molasses available. Without including the operating costs, there would be a price difference of 0.48 to 0.58 marks per liter of alcohol in comparison with the subsidized costs which when included in the cost of producing petrol for automobiles would result in an increase of about 0.3 marks per liter for the consumer. Since we can hardly assume that the consumer under current market conditions would be willing to pay more, although there would be a positive effect in regard
64
to air quality and acceleration of the automobile, we are thus confronted with the problem of how it is possible to cover these costs.
If we assume that production will increase, as mentioned above, and that the cost of energy will increase by about 1.3% per year, the cost of producing ethanol from grain would be about 1.143 to 1.063 marks per liter in 1990.
TRACTORS WITh AN ALCOhOL MOTOR
The Mannheim Motor Works has developed a four-cylinder alcohol-powered diesel motor which could be put into production. Ethanol and diesel oil are injected directly into the combustion chamber through separate fuel injectors. Depending upon the output of the motor, ethanol is used to replace 75-90% of the diesel oil. A Fendt tractor which has been converted to use ethanol has a stainless steel ethanol tank with a capacity of 108 liters and a normal 25 liter diesel tank.
A 75 horsepower tractor has been operating since 1981 at the test grounds of the University of Stuttgart and another in actual agricultural use by the Südzucker Company near Würzburg. Research done on these motors indicates that the exhaust of an ethanol motor is environmentally more sound, in particular the levels of nitrogen dioxide and smoke.
Through their work, the Mannheim Motor Works and Fendt have shown that it is technically possible to power a tractor with alcohol. At the present time, however, the use of alcohol derived from renewable resources to replace diesel oil is not yet economically competitive with normal fuels according to the Fendt Company.
CONCLUSIONS
It should be clear that the financial burdens as a result of increase in the surplus production of grains can be eased for some time by decreases in price, as described above so that the domestic use of the grain for feed would be increased, for instance, and thus the price supports can decrease. This assumes,
of course, that the price of imported grain does not decrease as rapidly as the price for that grain produced with the European Community.
We have also seen that the production of ethanol would not be significantly more costly in 1990 than other uses of the grain. There are even some reasons for assuming that the total financial burden could even decrease in this case. In view of the expected grain surplus with the EC for 1990, in our opinion the best strategy would be a combination of these actions which would be directed toward solving this problem.
A combination of increased imports, decrease in the amount of land under production in connection with a reasonable price policy could minimize the total risk in comparison with using only one approach”.
In Brazil there are already large facilities for the continuous fermentation of grains. In these industrial facilities, sweet mash is continually fed into the fermentor and the fermented mash along with some of the yeast continually flows into the distillation part of the process. Thus, the minimum level of sugar and maximum alcohol concentration remains constant within the fermenting vats and the incoming sweet mash is immediately fermented. In order to replace the yeast lost, aerobic conditions need to be present within the fermentor. For that reason, the yeast is continuously processed through oxygen-rich and oxygen-free sections, and thus the fermentation runs through a series of aerobic and anaerobic environmental conditions.
SPECIfyINg ALCOhOLIC CONTENT
The content of a water and alcohol mixture is normally given in percent by volume (vol.%). What is meant for tax purposes is the amount of pure alcohol contained in a 100ml mixture. In contrast, the percent by weight is defined as the number of grams in a 100g mixture. One hundred percent
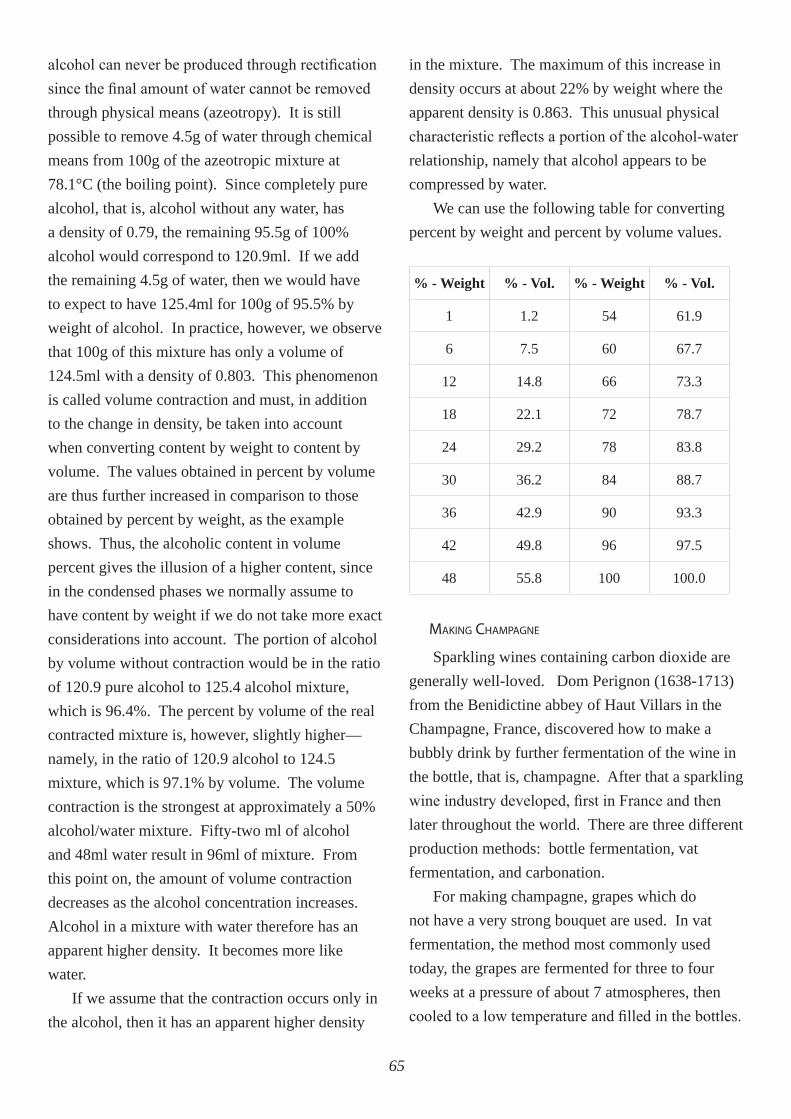
65
alcohol can never be produced through rectification since the final amount of water cannot be removed through physical means (azeotropy). It is still possible to remove 4.5g of water through chemical means from 100g of the azeotropic mixture at 78.1°C (the boiling point). Since completely pure alcohol, that is, alcohol without any water, has a density of 0.79, the remaining 95.5g of 100% alcohol would correspond to 120.9ml. If we add the remaining 4.5g of water, then we would have to expect to have 125.4ml for 100g of 95.5% by weight of alcohol. In practice, however, we observe that 100g of this mixture has only a volume of 124.5ml with a density of 0.803. This phenomenon is called volume contraction and must, in addition to the change in density, be taken into account when converting content by weight to content by volume. The values obtained in percent by volume are thus further increased in comparison to those obtained by percent by weight, as the example shows. Thus, the alcoholic content in volume percent gives the illusion of a higher content, since in the condensed phases we normally assume to have content by weight if we do not take more exact considerations into account. The portion of alcohol by volume without contraction would be in the ratio of 120.9 pure alcohol to 125.4 alcohol mixture, which is 96.4%. The percent by volume of the real contracted mixture is, however, slightly higher—namely, in the ratio of 120.9 alcohol to 124.5 mixture, which is 97.1% by volume. The volume contraction is the strongest at approximately a 50% alcohol/water mixture. Fifty-two ml of alcohol and 48ml water result in 96ml of mixture. From this point on, the amount of volume contraction decreases as the alcohol concentration increases. Alcohol in a mixture with water therefore has an apparent higher density. It becomes more like water.
If we assume that the contraction occurs only in the alcohol, then it has an apparent higher density
in the mixture. The maximum of this increase in density occurs at about 22% by weight where the apparent density is 0.863. This unusual physical characteristic reflects a portion of the alcohol-water relationship, namely that alcohol appears to be compressed by water.
We can use the following table for converting percent by weight and percent by volume values.
% - Weight % - Vol. % - Weight % - Vol.
1 1.2 54 61.9
6 7.5 60 67.7
12 14.8 66 73.3
18 22.1 72 78.7
24 29.2 78 83.8
30 36.2 84 88.7
36 42.9 90 93.3
42 49.8 96 97.5
48 55.8 100 100.0
MAKINg ChAMPAgNE
Sparkling wines containing carbon dioxide are generally well-loved. Dom Perignon (1638-1713) from the Benidictine abbey of Haut Villars in the Champagne, France, discovered how to make a bubbly drink by further fermentation of the wine in the bottle, that is, champagne. After that a sparkling wine industry developed, first in France and then later throughout the world. There are three different production methods: bottle fermentation, vat fermentation, and carbonation.
For making champagne, grapes which do not have a very strong bouquet are used. In vat fermentation, the method most commonly used today, the grapes are fermented for three to four weeks at a pressure of about 7 atmospheres, then cooled to a low temperature and filled in the bottles.
66
The classic, that is, bottle fermentation is more illustrative and will be described in the following. The grapes are freed of protein material and tartar by mixing them in large, cooled vats. They are then collected into what is today called the Couvée. The grapes to be used must fulfill the following conditions. They must be healthy, they may not contain lactic acid or any vinegar. If the vinegar content is higher than 8g per liter, an amount which can be tasted, then the yeast cells do not develop their proper activity, so that at best only a small amount of fermentation occurs, and thus there is insufficient carbon dioxide pressure. The alcohol content should not be above 10-11% by volume. Only table wines may be used; desert wines are inappropriate. A higher alcohol content inhibits the fermentation. The acid content may not be too low. Acid values of 7-10g per liter are optimal since this amount helps maintain the health of the yeast and wines with more acid clear better and have a more harmonious taste. A high acid content is a sign of a good champagne. Champagne or other sparkling wines with a low acid content taste flat.
In order to tranform this clarified “young” wine into a sparkling drink, it undergoes a second fermentation by adding the necessary amount of sugar (about 20-25g per liter) for achieving the desired final alcoholic content (85-108g per liter) and carbon dioxide (about 4.5 atmospheres at 20°C.). Special strains of yeast which produce strong fermentation and are not sensitive to high carbon dioxide concentrations, and which also precipitate into a firm sediment (depot) are selected. A good sparkling wine should have at least 7g per liter of carbon dioxide dissolved in it which corresponds to a pressure of 2 atmospheres at 10°C In general, the actual carbon dioxide content is somewhat higher. Occasionally, the bottles break, although they must weigh at least 650g and be tested at 20 atmospheres. Due to the high pressure, the bottles are capped with corks which are 32-
34mm in diameter and these are then wrapped with wire. In more recent times, so-called crown corks are commonly used. Originally the wine bottles were filled with the yeast and sugar solution (tirage) so that only a small amount of air remained in the bottle. The bottles were then capped with a cork held fast with a temporary wire wrapping. Today, since specially cultured yeasts are used, it is possible to store the bottles at a normal wine cellar temperature (9-12°C). The fermentation continues for several months and the final formation of traditional champagne can last as long as three to five years. Through the decomposition of amino acids, the yeast provides a certain bouquet to the champagne. The pressure of the carbon dioxide increases drastically, and in France, sparkling wines are differentiated between the pressure of the carbon dioxide. Those with higher pressure (4-4.5 atmospheres) are referred to as mousseux, and those with a lower pressure (under 4 atmospheres) are referred to as cremant.
During the fermentation, the wine in the bottle becomes cloudy, and this cloudiness must be removed. The bottles of incompletely fermented wine are stored in racks so that the bottle lies at a slant with the cork end downward. These bottles are shaken daily by giving them a small turn. During this very labor intensive period which lasts 6-8 weeks, the yeast collects on the cork. This shaking process ends as soon as the wine is completely clear.
In the modern production of champagne, the neck of the bottle is cooled by placing it in a cooling bath at -20°C so that the yeast freezes upon the cork and can thus be removed in one step, which is called degorging. Skilled workers cautiously remove the cork so that the carbon dioxide in the wine expels the yeast at the top of the bottle. The problem now is that there is a threat that the entire bottle of wine will be emptied by this sudden release of pressure on the carbon dioxide. In earlier
67
times, before the cooling bath was used, the bottles were held downward so that the yeast could flow out and the workers reclosed the bottles while outside during winter so that the temperature was below freezing while doing the work, and thus the pressure of the carbon dioxide was reduced. During this process, the workers re-corked the bottle with one hand while at the same time wiping the inside of the neck clear of all remaining yeast with a finger of the other hand. During this process, just before the cork is replaced in the neck of the bottle, the wine is dosed with liqueur or sugar dissolved in wine. This whole process is, of course, a very nerve wracking. Today, the champagne is usually frozen into a thick soup so that the process is not quite so nerve wracking.
The dose given to the sparkling wine after it all the yeast has been removed gives the wine a particular taste. In order to fully integrate the dose with the remainder of the wine, it is allowed to rest for another three to six months, or sometimes several years. Champagne which has received only a small dose (about 10g of sugar per liter) is referred to as dry. Those with more sugar are referred to as medium, and those champagnes which have received a great deal of sugar (up to 50g per liter) are called sweet. Special champagnes, sweetened with saccharine, are produced for people with diabetes.
The vat fermentation method (produit en cuvée close) is used in order to simplify the expensive and long classical process of producing champagne. In this process, wine containing carbon dioxide is fermented in steel tanks. It is then dosed and after it is clarified and filtered, it is bottled. In the vat fermentation process, the fermentation lasts for three to four weeks at a pressure of about 7 atmospheres.
In the carbonation process (vin mousseux gazéfié), carbon dioxide is injected into the finished product. Thus, it does not develop in the wine naturally through fermentation, but is artificially
inserted in much the way that carbon dioxide is injected into mineral water. In this process, the second fermentation along with the addition of more sugar and the degorging are not carried out. The wine is, however, sweetened in the same way, corked and bound with wire. When carbon dioxide is added in this way, it must be declared as having carbon dioxide added.
Champagne is that kind of wine which is fermented in the bottle from grapes in a particular area of France, the Champagne. In Europe, this term can properly be applied only to such wines. In Europe, champagne refers to the area where the wine was produced and as such can be applied only to those wines produced in that area of France.
When we drink champagne, we experience a refreshing, cooling feeling which is caused by the freeing of the carbon dioxide gas in the mouth. The carbon dioxide is quickly freed in the mouth due to our body temperature which causes us to perceive a coolness. In addition, the carbon dioxide bubbles which should be as fine as possible, something that is possible only in very clear sparkling wines, allow us to perceive the aromas more intensely. The aromas are carried on the carbon dioxide bubbles to the nerve endings in the nose and on the tongue, thus giving a more intense taste than other non-sparkling wines. In the stomach, the carbon dioxide assists the absorption of the alcohol through the stomach wall, so that champagne more quickly gives us a feeling of being tipsy. In addition, there are further effects due to the carbon dioxide ethyl esters (C2H5HCO3) contained in the sparkling wine. The quality of the champagne is less dependent upon the bottle fermentation process than it is upon the quality of the grape from which it is produced.
In Germany, a three-quarter liter bottle of champagne is taxed with 2 marks (1982). In 1970, the total taxes collected amounted to 233 million marks.
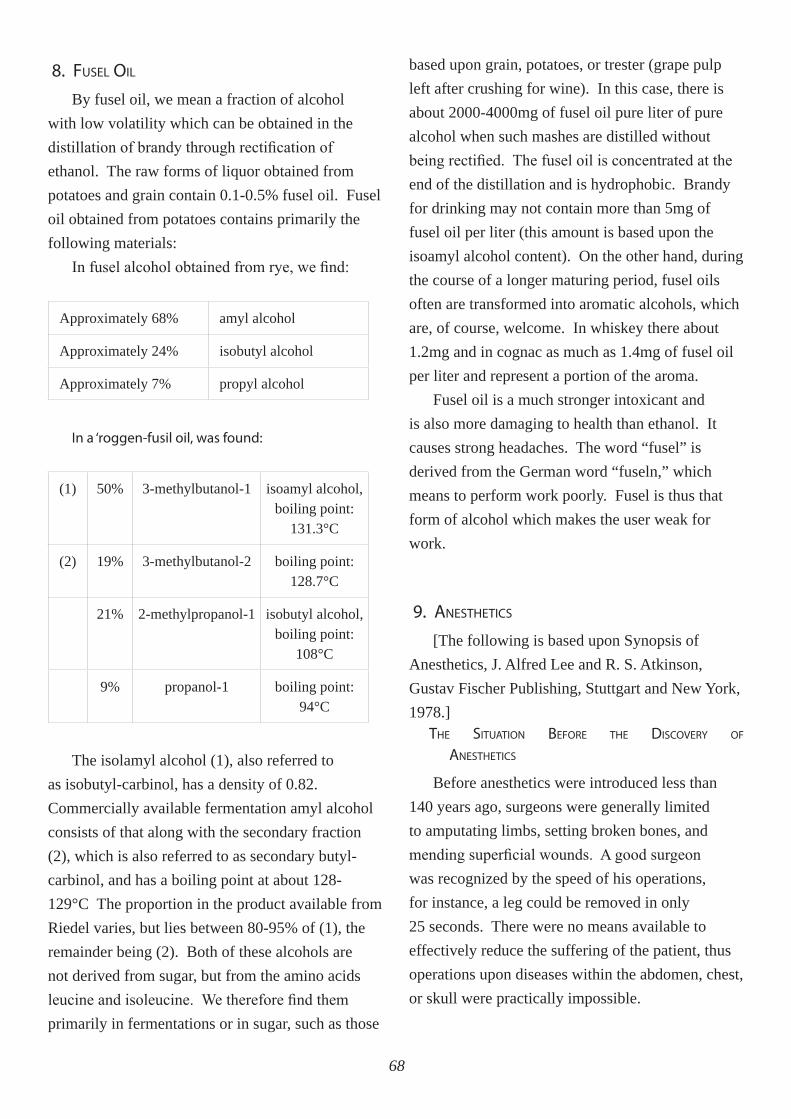
68
8. fUSEL OIL
By fusel oil, we mean a fraction of alcohol with low volatility which can be obtained in the distillation of brandy through rectification of ethanol. The raw forms of liquor obtained from potatoes and grain contain 0.1-0.5% fusel oil. Fusel oil obtained from potatoes contains primarily the following materials:
In fusel alcohol obtained from rye, we find:
Approximately 68% amyl alcohol
Approximately 24% isobutyl alcohol
Approximately 7% propyl alcohol
In a ‘roggen-fusil oil, was found:
(1) 50% 3-methylbutanol-1 isoamyl alcohol, boiling point:
131.3°C
(2) 19% 3-methylbutanol-2 boiling point: 128.7°C
21% 2-methylpropanol-1 isobutyl alcohol, boiling point:
108°C
9% propanol-1 boiling point: 94°C
The isolamyl alcohol (1), also referred to as isobutyl-carbinol, has a density of 0.82. Commercially available fermentation amyl alcohol consists of that along with the secondary fraction (2), which is also referred to as secondary butyl-carbinol, and has a boiling point at about 128-129°C The proportion in the product available from Riedel varies, but lies between 80-95% of (1), the remainder being (2). Both of these alcohols are not derived from sugar, but from the amino acids leucine and isoleucine. We therefore find them primarily in fermentations or in sugar, such as those
based upon grain, potatoes, or trester (grape pulp left after crushing for wine). In this case, there is about 2000-4000mg of fusel oil pure liter of pure alcohol when such mashes are distilled without being rectified. The fusel oil is concentrated at the end of the distillation and is hydrophobic. Brandy for drinking may not contain more than 5mg of fusel oil per liter (this amount is based upon the isoamyl alcohol content). On the other hand, during the course of a longer maturing period, fusel oils often are transformed into aromatic alcohols, which are, of course, welcome. In whiskey there about 1.2mg and in cognac as much as 1.4mg of fusel oil per liter and represent a portion of the aroma.
Fusel oil is a much stronger intoxicant and is also more damaging to health than ethanol. It causes strong headaches. The word “fusel” is derived from the German word “fuseln,” which means to perform work poorly. Fusel is thus that form of alcohol which makes the user weak for work.
9. ANESThETICS
[The following is based upon Synopsis of Anesthetics, J. Alfred Lee and R. S. Atkinson, Gustav Fischer Publishing, Stuttgart and New York, 1978.]
ThE SITUATION BEfORE ThE DISCOvERy Of ANESThETICS
Before anesthetics were introduced less than 140 years ago, surgeons were generally limited to amputating limbs, setting broken bones, and mending superficial wounds. A good surgeon was recognized by the speed of his operations, for instance, a leg could be removed in only 25 seconds. There were no means available to effectively reduce the suffering of the patient, thus operations upon diseases within the abdomen, chest, or skull were practically impossible.
69
EARLy hISTORy
Various methods were tried, some of which were even partially effective, but they were not generally accepted.
hUMPhREy DAvy (1778-1829, ENgLAND)Humphrey Davy was the son of a woodcutter in
Cornwall. At the age of 17, he experimented with nitrous oxide and the effects it had when inhaled. In 1798, Davy became the Director of the Thomas Beddoes Medical Pneumatic Institute in Cliffton, Bristol. In the following year, he published his book, Researches, Chemical and Philosophical: Chiefly Concerning Nitrous Oxide, in which he writes, “On the day that the inflammation was most painful, I inhaled three large doses of nitrous oxide. After the first four or five breaths, the pain reduced each time.” Davy thought that inhaling nitrous oxide could be used to reduce pain during surgical operations. He referred to it as “laughing gas.” In 1799, James Watt designed a nitrous oxide container for use in Davy’s research.
MIChAEL fARADAy (1791-1867, ENgLAND)It is said of Faraday that he was the first to
discover the anesthetic effects of ether. However, this is questionable. In any event, though, ether, laughing gas, and chloroform were known to practicing physicians since 1831. It is strange, however, that the first experiments using them as anesthetics were undertaken by dentists and, as such, remained relatively unknown.
hENRy hILL hICKMAN (1800-1830, ENgLAND)Henry Hill Hickman was acquainted with
the pioneering work done by Davy, Priestly, and Faraday. He began experiments on animals and could perform surgical operations after they had inhaled carbon dioxide. His results were published and represent the first published work about the inhalation of a gas for use as surgical anesthetic.
His book, Report on an Apparent Death (Ironbridge, 1824), was, however, ignored by scientists in England.
CRAWfORD WILLIAMSON LONg (1815-1878, USA)
Long carried out one of the first operations while using ether. The operation was concerned with removing a tumor from the neck of a young man who was used to the effects of ether. The operation was done on March 20, 1842, and the patient felt no pain. This operation was reported seven years later, in 1849. However, the first use of ether by Morton was reported in a letter from H. J. Bigalow to the Boston Medical and Surgical Journal on November 11, 1846.
hORACE WELLS (1815-1848, USA)On December 10, 1844, the chemist Gardener
Q. Colton gave a demonstration of the effects of inhaling nitrous oxide in Hartford, Connecticut. Wells, who was a local dentist, was present and noticed how the young salesman, Samuel Cooley, while under the influence of the gas, reported feeling no pain when he struck his shin so hard that it bled. Wells convinced Colton to use the gas during the extraction of a tooth, and on the following day, December 11, 1844, the experiment was carried out with Colton as the anesthesiologist and Wells as the patient. It was a great success and, in Wells’ words, ushered in “a new era of tooth extraction.” Wells learned from Colton how to produce laughing gas and used it in his practice afterward. The gas was fed into the patients mouth through a wooden tube from an animal bladder while the nostrils were held closed. Later, Wells went to Boston to demonstrate his discovery before a large audience. He showed his methods to the medical students at Harvard University, but the patient complained of pain. The demonstration was a fiasco and Wells was thrown out of lecture
70
room as an impostor. Morton was present at this operation in January of 1845. Wells returned to Hartford and continued to use the gas, however, the introduction of ether slowly replaced the use of nitrous oxide. Wells published his work in 1847 in a report titled, “The History of the Discovery and Use of Nitrous Oxide, Ether, and Other Vapors in Surgical Operations,” Hartford, Connecticut, 1847.
ThE BREAKThROUgh
WILLIAM ThOMAS gREEN MORTON (1819-1868, USA)
Morton is given credit for introducing ether as an anesthetic, although W. E. Clark from Rochester, New York already had used ether in January 1842 for a tooth extraction and Long had removed a tumor two months later. Morton experimented with dogs in order to determine the effects of inhaling ether vapors. Based upon the results of his experiments, he gave ether vapor on September 30, 1846 while extracting a tooth. The operation was painless. After he had gained further experience, Morton, who was a medical student, gave a demonstration at the Massachusetts General Hospital on October 18, 1846. In this demonstration, Dr. J. C. Warren removed a tumor from the lower jaw of a patient and the patient reported experiencing no pain. The term “anesthetic” was suggested by Oliver Wendell Holmes and the reports about the use of ether spread quickly throughout all parts of the civilized world.
JOhN SNOW (1813-1858, ENgLAND)Snow was the first professional anesthesiologist.
He received his Doctor of Medicine in 1844 and became a professor of forensic medicine at the Aldersgate School of Medicine. Snow was an active participant in the discussions of the Medical Society of London and became its President in 1855. In 1841, he held a lecture about resuscitating
newborns. He became interested in ether shortly after it was introduced and quickly determined that the general methods for administering it were not without problems. In order to eliminate the problems, he developed an ether inhaling device. He also experimented with many substances to determine if they had anesthetic qualities. He carried out many of these experiments on himself. Snow quickly became the leading anesthesiologist in London and wrote a book in 1847, On the Inhalation of Ether in Surgical Operations. He performed many experiments regarding the physiology of anesthetics and described five states of anesthesia. He later gave up ether in favor of chloroform, he was quite aware of the danger of this new anesthetic and believed that if the concentration were too high, it could lead to heart failure. In order to avoid that danger, he developed a chloroform vapor device in which the vapors could be regulated in terms of percent by volume. Altogether, he undertook over 4000 cases of anesthesia using chloroform without any incidence of death. In 1853, Snow discovered a method of administering chloroform “à la reine” when he was requested by Sir James Clark to be the anesthesiologist at the birth of Queen Victoria’s eighth child, Prince Leopold, and again in 1857 at the birth of Princess Beatrice. These events in the royal house helped gain recognition for the use of anesthesiology in childbirth. He gave his royal patient 0.9ml of chloroform intermittently dropped on a handkerchief. The entire process lasted 53 minutes. The Queen stated afterward, “Dr. Snow gave me that blessed chloroform and the effects were completely peaceful and pleasant.” Snow’s last book, On Chloroform and Other Anesthetics, appeared in 1858, after his death.
COMPETITORS Of EThER
JAMES yOUNg SIMPSON (1811-1870, ENgLAND)A Liverpool chemist by the name of Walbie
71
(1813-1889) recommended to Simpson that he try the effects of inhaling chloroform for reducing birth pains. On November 4, 1847, Simpson, along with his assistants Matthews Duncan and George Keith undertook an experiment on himself and then four days later used chloroform for the first time in a clinical setting. On November 10 of the same year he present a report of this experience to the Edinburgh Medical and Surgical Society. Although Simpson was the first physician to use ether in childbirth in January 1847, he saw that chloroform had the following advantages over ether. First, it had a quicker, more complete, and longer effect. Second, smaller amounts of chloroform were needed. Third, it was more pleasant for the patient, and fourth, it was cheaper.
JOSEPh T. CLOvER (1852-1881, ENgLAND)After Snow’s death, Clover became the leading
researcher in the area of anesthesiology, and at the same time was a practicing anesthesiologist in Great Britain. In 1850 he became a member of the Royal College of Surgeons. In 1862 he developed a chloroform vapor device which enabled the administration of a precise amount and mixture of chloroform and air. The device was formed like a large bag which was carried upon the anesthesiologist’s back and which contained a 4.5% by volume of chloroform mixed with air. Since Clover was aware of the danger of chloroform, he attempted to make the administration of ether simpler and easier. He achieved this by beginning the anesthesia with laughing gas to which he later added ether. In 1877 he described his mobile regulated ether vapor device in The British Medical Journal. His work led to a more widespread use of ether at the cost of chloroform. He also spread the opinion that it is possible to administer ether over a longer period of time once a certain level of anesthesia is reached.
fURThER hISTORICAL DATA
1800 Discovery of the analgesic qualities of nitrous oxide by Davy. He called it laughing gas.
1806 Isolation of morphine from opium by Fredrick Wilhelm Adam Sertüner (1783-1841), a pharmacist in Hanover.
1807 Baron Larrey carries out a painless amputation on the battlefield by using ice.
1816 René Laennec (1781-1826) invents the stethescope. A stethescope for both ears was invented in 1855 by Cammann.
1818 Faraday is credited with discovering the anesthetic qualities of ether vapor.
1822 Majendie shows that the anterior portion of the spinal cord is connected with motor activity and the posterior portion with sensory activity.
1824 Henry Hill Hickman carries out pain-free operations on animals by using carbon dioxide and thus forms the principle of inhalation anesthesiology.
1825 Charles Waterton (1782-1865) publishes his Travels in South America which contains a report of the effects of curare.
1831 Chloroform was indepedently discover by Lievig (1803-1873) in German and Guthrie (1782-1848) in New York and Soubeiran (1793-1858) in France. Atropin was isolated from atropa belladona by Mein as well as Geiger and Hesse.
1834 Jean Baptiste Dumas (1800-1884) describes the chemical composition of chloroform which he also named.
1842 Ether was used by W. E. Clark for a tooth extraction and also Crawford W. Long. Marie Jean Pierre Flourens (1794-1867) discovers for the first time the center of breathing in the medulla oblongata.
1844 Horace Wells begins using laughing gas as an anesthestic in tooth extraction.
1846 On October 16, William T. G. Morton successfully demonstrates the anesthetic qualities of ether. Oliver Wendell Holmes proposes “anesthesia” as a term for this process. On December 21, the first surgical operation using ether anesthesia is performed by Robert Liston in England. Peter Squire provided the anesthesia to Fredrick Churchill while his leg was amputated at University College Hospital.
1847 Flourens describes the anesthetic qualities of chloroform and chlorethyl vapors on animals. In November, James Y. Simpson begins using chloroform to reduce birth pains in the Edinburgh Clinic. John Snow publishes his book, On the Inhalation of Ether in Surgical Operations, the first scientific description of the clinical use of ether as well as its physical and pharmacological characteristics. Grantham and Colchester report upon deaths caused by ether.
1848 Hannah Greener died on January 28 at the age of 15 due to the administration of chloroform by Dr. Meggison. This is the first description of a death. Heyfelder uses chlorethylene for the first time on human beings.
72
MODERN ANESThESIA
How complicated anesthesia has become today- with special anesthetists - is shown by the following extract out of Spektrum der Wissenschaft 1985 (6), p.88, about a gall bladder operation on an otherwise healthy, middle aged woman:
“ The work of the anesthetists begins on the day of the operation preparing the instruments they will need to monitor vital body functions in the operating theatre. This information has to supplied to them so rapidly and accurately during the operation, that at any moment they are informed about the condition of the patient. To the fundamental instruments belongs the stethoscope, for the continuing monitoring of heart and lung function either on the chest of the patient or - after anaesthesia - inserted in the esophagus. Further a sphygmomanometer, for the measurement of of arterial blood pressure, a temperature sensor in the esophagus, an electric stimulator on the wrist or temple to monitor muscle function and an ECG-instrument, whose output (electrocardiogram) is followed continuously on a screen. In addition the anaesthetist introduces one or more thin catheters into peripheral veins. Through this direct access to the circulatory system he can inject medicines, equilibrate blood volume or electrolyte loss and, if necessary give a blood transfusion ....... Before the administration of the anaesthetic, the patient receives pure oxygen (O2)briefly through a gas mask. The oxygen drives out the breathed in nitrogen (N2) from the lungs. This lengthens the time which the patient can, without danger, survive without the respirator during the introduction of the anaesthetic, from 30 seconds to 2 minutes. The anesthetist uses two groups of substances for the anesthetic. The first contains pharmaka which work quickly but briefly. They serve as short term anesthetics for the introduction of the anesthesia and as a muscle relaxant, which facilitates the connection of the patient to the respirator
(intubation). These short term anesthetics are injected directly into a vein and are characterized by a rapid onset. This allows an elation stage to be skipped by the introduction of the inhalation anesthetic. In principle the short term anesthesia could be maintained by constant injection, however, the toxic effects of the drug are made more evident by repeated dosing. This is the main reason that the short term anesthetics are less suitable for maintaining anesthesia than the substances of the second type.
To them belong all inhalation anesthetics (volatile and gaseous), in addition the longer working sedative - and muscle relaxant agents as well as a series of other substances. These pharmaka generally work more slowly. They must be so administered that their effect begins when the other agents effects are waning.
In our example, the anesthetist introduces the anesthesia, typically in four steps. At first he gives a low dose of a muscle relaxant such as Curare. Such pharmaka work on the neuromuscular synapse, the switching location between nerves and muscles. Normally an electric nerve impulse spreads on the motor nerve up to the synapse, where it stimulates the release of the neurotransmitter Acetylcholine. This crosses the synapse gap, occupies the Acetylcholine receptors on the muscle which then releases a muscle contraction. Curare blocks the receptors and lames in the process. In our case the reduced curare dose hinders the painful muscle contractions which would otherwise appear in the early stages of another muscle relaxant, Succinylcholine. These are necessary later to completely relax the muscles during the time of intubation. Succinylcholine has another action mechanism to Acetylcholine, but in the end hinders the occupation of the receptors.
In a second step, a fast working Barbiturate acid preparation, such as Sodium-thiopental, is injected into a vein, at first in low dose. This will

73
show the anesthetist, if a full dose will cause a too great blood pressure drop or anesthetic low. If this is not the case then, in the third step, he injects the full anesthetic dose of 3mg per kilogram of body weight.
Because both the muscle relaxants and the inhalant anesthetics, which the patient receives during the operation, make breathing impossible, she has to be artificially respirated. For intubation, Succinylcholine is given as a fourth step. It only works for a few minutes and in this time completely relaxes all the skeletal muscles.This is necessary so that the anesthetist can use all the instruments which make it possible to introduce the air tubes into the breathing passages under visual control. By inflating a small elastic ring at the lower end of the tube, the transition from the tube to breathing passage is sealed, so that by occasional reflex vomitting, no stomach contents reach the lungs. Such an occurrence could be deadly. In addition, the patient can now with pressure, have her lungs ‘inflated’ and be respirated in a controlled way.
For the actual anesthesia, the anesthetist connects the breathing tube onto the anesthetic machine, which allows it to compose the the respired air according to the needs of the anesthesia. Usually a mixture of laughing gas (Dinitrogen oxide) and Oxygen is used, as in our case. As both the anesthetic as well as the surgery influence the function of the lungs, the Oxygen component of the air is seldom set lower than 30%. Normally air contains around 21% Oxygen. Because in our example, the upper part of the abdomen is being operated on, the Oxygen component was lifted to 50%, to give additional safety margin in the case that there were problems with breathing.
As the surgeons of the 19th Century discovered to their shock, laughing gas works to reduce pain but only weakly as an anesthetic. Thats why with it alone no operation anesthesia is achieved. With a normal pressure of 1 atmosphere, an Oxygen
mixture with 50% Laughing gas, in fact contains only about half the required amount. (More than 80% is not delivered due to the danger of Oxygen starvation). For this reason, the gas must have a stronger working substance, usually Halothan, Enfluran or Isofluran, mixed with it. They all are organic compounds which contain the Halogens Bromine, Chlorine and Fluorine. The side effects of these substances work particularly on the heart -circulatory system and the lungs. The constrict the the heat beat volume, the b lood pressure, the resistance of the peripheral blood vessels and the respiratory volume. They must therefore be administered with utmost care. Changes in the order of from only one percent can already cause disturbances to the function of these organs. With patients with heart disease or other medical indications, replacement anesthetics can be used.
Finally the patient receives a still higher dose of Curare or similar medication so that the stomach muscles relax and the surgeon can have good access to the operation area. Because the dose completely lames the breathing muscles, the patient is completely artificially respirated, usually by connection to a respirator bellows.
The operation can now begin. During the whole operation, the anesthetist monitors the patient and regulates painstakingly the effects of the anesthesia and surgery on the physiological equilibrium.
Towards the end of the operation, the anesthetist has to prepare the exit from anesthesia. The effects of practically all the pharmaka must be reversed or lifted. This process is as involuted and critical as the introduction, The lamed muscles must regain their normal function, so that the patient can breathe on their own. The various agents that have been used to block pain or switch off consciousness and to maintain this state, must now with the required speed and in the correct sequence be got rid of and made inactive. The volume and composition of the blood must be monitored, to be sure that everything
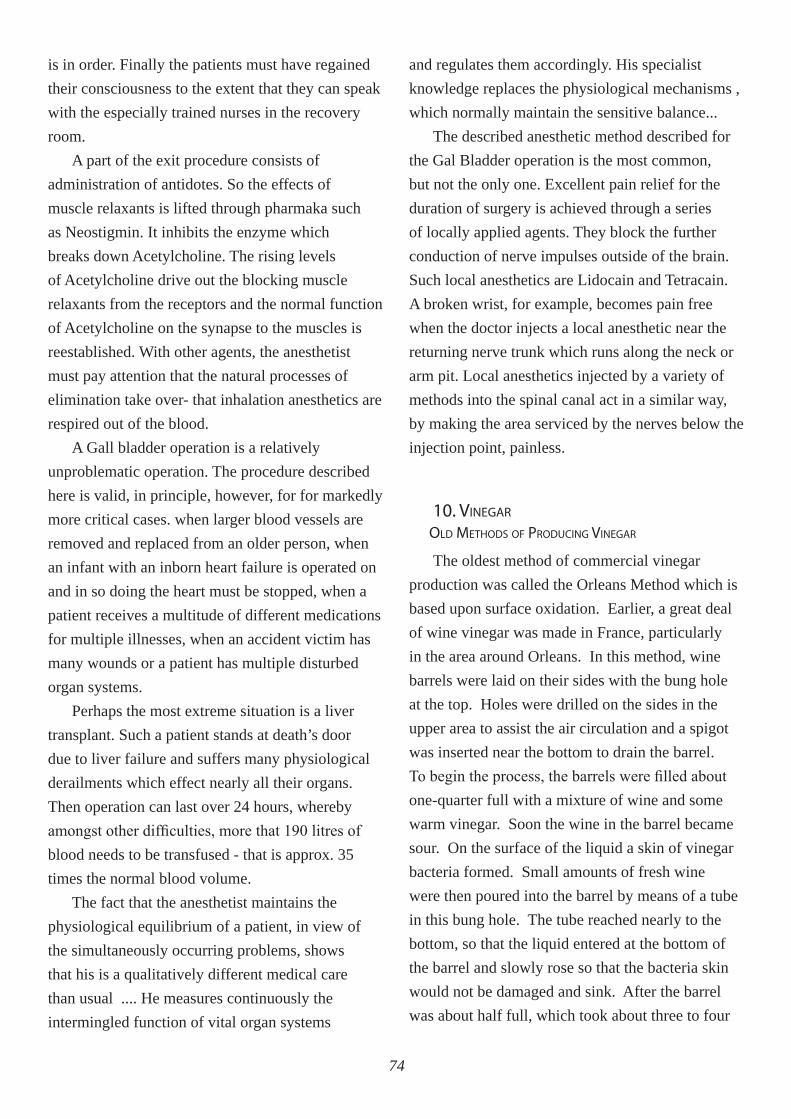
74
is in order. Finally the patients must have regained their consciousness to the extent that they can speak with the especially trained nurses in the recovery room.
A part of the exit procedure consists of administration of antidotes. So the effects of muscle relaxants is lifted through pharmaka such as Neostigmin. It inhibits the enzyme which breaks down Acetylcholine. The rising levels of Acetylcholine drive out the blocking muscle relaxants from the receptors and the normal function of Acetylcholine on the synapse to the muscles is reestablished. With other agents, the anesthetist must pay attention that the natural processes of elimination take over- that inhalation anesthetics are respired out of the blood.
A Gall bladder operation is a relatively unproblematic operation. The procedure described here is valid, in principle, however, for for markedly more critical cases. when larger blood vessels are removed and replaced from an older person, when an infant with an inborn heart failure is operated on and in so doing the heart must be stopped, when a patient receives a multitude of different medications for multiple illnesses, when an accident victim has many wounds or a patient has multiple disturbed organ systems.
Perhaps the most extreme situation is a liver transplant. Such a patient stands at death’s door due to liver failure and suffers many physiological derailments which effect nearly all their organs. Then operation can last over 24 hours, whereby amongst other difficulties, more that 190 litres of blood needs to be transfused - that is approx. 35 times the normal blood volume.
The fact that the anesthetist maintains the physiological equilibrium of a patient, in view of the simultaneously occurring problems, shows that his is a qualitatively different medical care than usual .... He measures continuously the intermingled function of vital organ systems
and regulates them accordingly. His specialist knowledge replaces the physiological mechanisms , which normally maintain the sensitive balance...
The described anesthetic method described for the Gal Bladder operation is the most common, but not the only one. Excellent pain relief for the duration of surgery is achieved through a series of locally applied agents. They block the further conduction of nerve impulses outside of the brain. Such local anesthetics are Lidocain and Tetracain. A broken wrist, for example, becomes pain free when the doctor injects a local anesthetic near the returning nerve trunk which runs along the neck or arm pit. Local anesthetics injected by a variety of methods into the spinal canal act in a similar way, by making the area serviced by the nerves below the injection point, painless.
10. vINEgAR
OLD METhODS Of PRODUCINg vINEgAR
The oldest method of commercial vinegar production was called the Orleans Method which is based upon surface oxidation. Earlier, a great deal of wine vinegar was made in France, particularly in the area around Orleans. In this method, wine barrels were laid on their sides with the bung hole at the top. Holes were drilled on the sides in the upper area to assist the air circulation and a spigot was inserted near the bottom to drain the barrel. To begin the process, the barrels were filled about one-quarter full with a mixture of wine and some warm vinegar. Soon the wine in the barrel became sour. On the surface of the liquid a skin of vinegar bacteria formed. Small amounts of fresh wine were then poured into the barrel by means of a tube in this bung hole. The tube reached nearly to the bottom, so that the liquid entered at the bottom of the barrel and slowly rose so that the bacteria skin would not be damaged and sink. After the barrel was about half full, which took about three to four
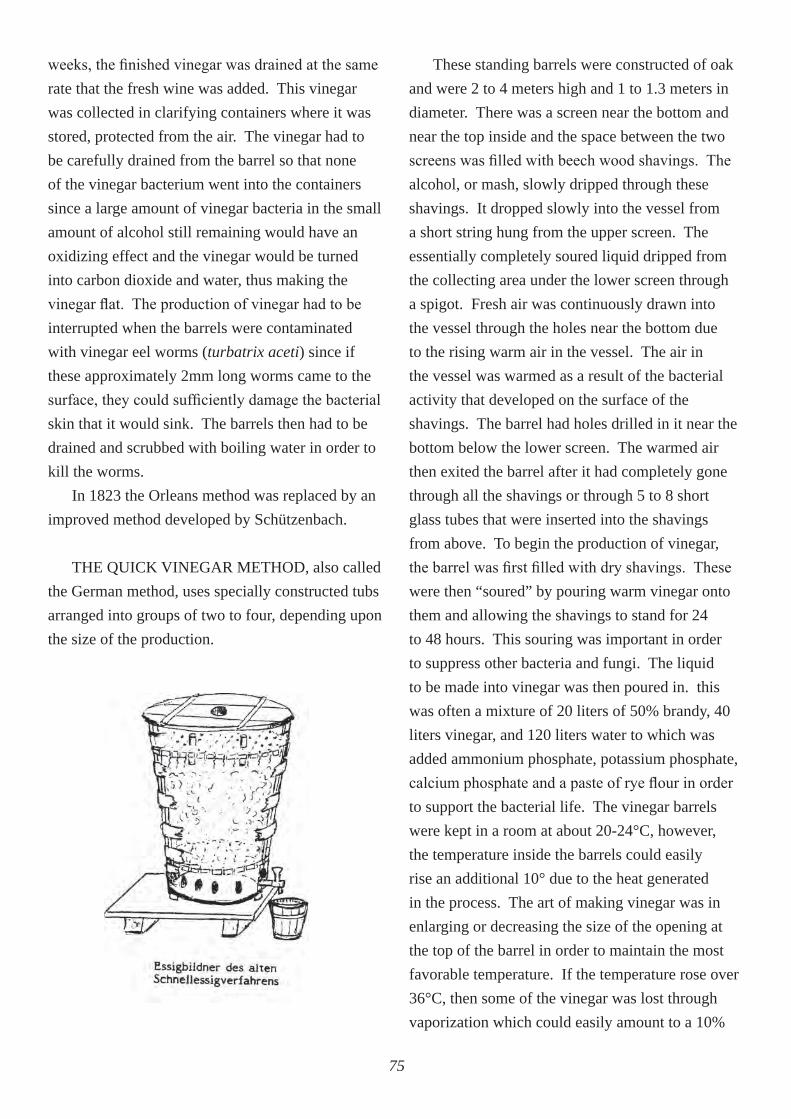
75
weeks, the finished vinegar was drained at the same rate that the fresh wine was added. This vinegar was collected in clarifying containers where it was stored, protected from the air. The vinegar had to be carefully drained from the barrel so that none of the vinegar bacterium went into the containers since a large amount of vinegar bacteria in the small amount of alcohol still remaining would have an oxidizing effect and the vinegar would be turned into carbon dioxide and water, thus making the vinegar flat. The production of vinegar had to be interrupted when the barrels were contaminated with vinegar eel worms (turbatrix aceti) since if these approximately 2mm long worms came to the surface, they could sufficiently damage the bacterial skin that it would sink. The barrels then had to be drained and scrubbed with boiling water in order to kill the worms.
In 1823 the Orleans method was replaced by an improved method developed by Schützenbach.
THE QUICK VINEGAR METHOD, also called the German method, uses specially constructed tubs arranged into groups of two to four, depending upon the size of the production.
These standing barrels were constructed of oak and were 2 to 4 meters high and 1 to 1.3 meters in diameter. There was a screen near the bottom and near the top inside and the space between the two screens was filled with beech wood shavings. The alcohol, or mash, slowly dripped through these shavings. It dropped slowly into the vessel from a short string hung from the upper screen. The essentially completely soured liquid dripped from the collecting area under the lower screen through a spigot. Fresh air was continuously drawn into the vessel through the holes near the bottom due to the rising warm air in the vessel. The air in the vessel was warmed as a result of the bacterial activity that developed on the surface of the shavings. The barrel had holes drilled in it near the bottom below the lower screen. The warmed air then exited the barrel after it had completely gone through all the shavings or through 5 to 8 short glass tubes that were inserted into the shavings from above. To begin the production of vinegar, the barrel was first filled with dry shavings. These were then “soured” by pouring warm vinegar onto them and allowing the shavings to stand for 24 to 48 hours. This souring was important in order to suppress other bacteria and fungi. The liquid to be made into vinegar was then poured in. this was often a mixture of 20 liters of 50% brandy, 40 liters vinegar, and 120 liters water to which was added ammonium phosphate, potassium phosphate, calcium phosphate and a paste of rye flour in order to support the bacterial life. The vinegar barrels were kept in a room at about 20-24°C, however, the temperature inside the barrels could easily rise an additional 10° due to the heat generated in the process. The art of making vinegar was in enlarging or decreasing the size of the opening at the top of the barrel in order to maintain the most favorable temperature. If the temperature rose over 36°C, then some of the vinegar was lost through vaporization which could easily amount to a 10%
76
loss. Still higher temperatures were dangerous to the bacterial activity. The liquid that slowly drained from the first vinegar barrel then went into a second, and possibly a third. When the alcohol content was not more than 3-4%, the vinegar was considered done. This required 2-3 days.
MODERN METhODS Of PRODUCINg vINEgAR
The circulating pump method which is the most common method used today for producing vinegar from brandy is similar to Schützenbach’s quick vinegar method, at least to the extent that the mash drops through a column of wood shavings.
In this method, the mash is pumped several times through the column. Excess heat is removed from the liquid by means of a cooling coil placed in the bottom of the tank. In addition, the convective air circulation is replaced by a blower. The tanks are also considerably larger and have a height of 4-5 meters and a diameter of 3.5-4 meters, thus the column of wood shavings has a volume of some 60 cubic meters. The mash is circulated so long until the alcoholic content is reduced to about 0.3%, an amount necessary to avoid over-oxidation. This process lasts 8-10 days and then the finished
vinegar is pumped out and replaced with new mash in a relationship of 10% alcohol to 1% acid. The replacement mash also contains malt extract and salts. It is then mixed by the pumping process with the vinegar remaining in the wood shavings, and thus has the favorable mixture of 4.5% alcohol and 6.5% acid. If the alcohol content is above 5%, it tends to destroy the bacterial activity. The bacteria die at an alcohol level of about 14%, or an acid level of about 15%. The alcohol is transformed into vinegar at the rate of about 5 liters per cubic meter of wood shavings per day. The efficiency of this method is about 90%. In practice, 2.4 liters of air are required to transform 1 gram of alcohol into 1.26 grams of vinegar.
In the submersion method, the vinegar bacteria are suspended in the liquid which is foamed by injecting compressed air. The acidification process is completed within 24-36 hours in these so-called acetators. Thirty times as much vinegar can be produced in the same amount of time by this method as can be produced by the circulation pump method. The danger of a production stoppage is, however, larger, since the vinegar bacteria floating in the liquid would die within a few minutes by a power outage. Thus, emergency power generators are required.
After the souring process is completed in any of the modern methods, the fresh vinegar is stored so that it can develop more aroma and taste. After several weeks, or possibly months, the vinegar is filtered, pasteurized, and the acid content adjusted.
LAWS REgARDINg vINEgAR
A regulation ordered in Germany in 1972 differentiates between vinegar and vinegar essence according to the acid content per 100 grams of liquid. Vinegar contains between 5 and 15.5g of acid per 100g of liquid. Vinegar essence contains more than 15.5g of acid. There are safety measures with regard to the sale of vinegar with more than
77
11g and vinegar essence with more than 25g of acid per 100g of liquid.
TyPES Of vINEgAR
BRANDy vINEgAR
This is a type of fermented vinegar produced from thin, distilled alcohol. Potatoes, grain, molasses, sugar beets, as well as honey and whey are used as the basis for the alcohol. As an edible vinegar, it has an acid content of 5%.
WINE vINEgAR
This is a vinegar made from a mixture of wine and brandy. The lowest quality is made from 20% by volume of wine and 80% by volume of brandy. The label “pure wine vinegar” on the bottle indicates a fermented vinegar made from 100% wine. In Germany, wine vinegar is made mostly from high alcohol content imported wines.
SPECIAL vINEgARS
Vinegar is also made from many fruits, such as apples, pears, even bananas and citrus fruit. It has a 5% content. The so-called lemon vinegar is made from at least 1/3 lemon juice. Malt vinegar is made from malted barley and has a 7% content. Herb vinegars are those vinegars in which parts of different herbs are soaked in the vinegar. Vinegar from acetic acid and some vinegar essences are thinned acetic acid derived from charcoal smoldering which has been tested for safe human consumption.
SyNThETIC vINEgAR
Until about 1960, acetic acid was produced from acetylene and since then primarily from olefins and paraffins. These may also thinned for human consumption.
USES Of vINEgAR
Vinegar is frequently used in the textile and leather industries, in dyeing, and in medicine.
Vinegar esters are produced in large quantities as solvents for resins and lacquer. Vinegar is used in medicine for reducing the burning and inflammation of insect bites. Dioscurides writes about vinegar that it “cools and draws together,” and praised its value as a help for external wounds, sometimes in connection with the appropriate herbs. Vinegar also stimulates the appetite and is helpful for fainting spells.
Vinegar is also used to bring brilliance back to tarnished metal when mixed with table salt. It is used for conserving food such as pickles and for giving additional flavor to other foods such as mayonnaise, mustard, and salad.
11. ESSENTIAL OILS
The series Die Rohstoffe des Pflanzenreichs (Raw materials of the plant kingdom), edited by J. Wiesner is difficult to find at the time of this writing. However, the volume by Konrad Bournot contains an enormous number of interesting descriptions of phenomena and relationships which show him to be a true student of the subject. For that reason, some passages are directly quoted in the following. (K. Bournot, Ätherische Öle [Essential oils], J. Kramer Verlag, Lehre bei Braunschweig, 1968.)
OCCURRENCE AND COMPOSITION
In general, the oils from the gymnosperms have a different chemical composition than the oils from the angiosperms. The oils from the gymnosperms contain primarily hydrocarbons from the terpene (C-10) and sesquiterpene (C-15) series, relatively little compounds with oxygen, and no nitrogen or sulfur compounds.
In contrast, the essential oils from the angiosperms are characterized by their great variety of compounds. In these oils, we find, in addition to the terpenes and sesquiterpenes, the most varied
78
representatives of chemical compounds of the classes described above, which in most cases are characterized by a more or less strong smell, and for this reason are often referred to as aromatics. The differences in the oils derived from monocots and dicots are similar, since in the oils for monocots, just as in those from gymnosperms, aromatic compounds occur only rarely. For example, in gymnosperm oils we find p-cymol in the oil from cupressus sempervirens, sequoien in the oil derived from needles of the sequoias (sequoia sempervirens), phenylethyl alcohol in the oils derived from needles of the alleppo pine (pinus halepensis), methylegenol in the oil from dacrydium franklinii, carvacol and thymohydrochinon in the oil from callitris quadrivalvis. In the monocot oils we find 3, 4-dimethoxy-acetophenon in concrete iris oil, ar-turmeron in the oil from curcuma longa, and calamol which is allyl-tri-methoxybenzol in calmus root oil. In contrast, the oils from dicots have, in addition to the terpene compounds and polyterpenes, also a large number of aromatic compounds. Oils from the families lauracae, leguminosae, geraniacae, rutacae, myrtacae, labiatae, umbeliferae, and compositae. The essential oils which are found in only very small amounts in the cryptogams have, until the present, hardly any practical use. One exception, though, is the oil from oak moss which is obtained from evernia prunastri and evernia furfuracae and also from some varieties of ramalina.
The TERPENES are acyclic (with 3 double bonds), monocyclic (with 2 double bonds) or bicyclic (with 1 double bond) compounds. Even though they may belong to very different classes, they are closely connected with one another through numerous chemical and biological transitions. Olefin terpenes can become cyclic terpenes through the closing of the ring and cyclic terpenes can move into the olefin series by breaking the ring. Bicyclic terpenes can be brought into monocyclic
terpenes (caren in silvestrin or pinene in dipenten). Tricyclic terpenes without a double bond have been produced only synthetically (tricylen or cyclofenchen). They have not been found in the essential oils. In nature, with the exception of the inactive terpenes, the terpenes are found mostly in the two optically active forms. They have a number of common characteristics which for the most part are based upon their unsaturated character. They can be polymerized by heat or chemical activities and isomerized by acids. They have other common characteristics such as the capacity to be oxidized or to bond to hydrogen, halogens, halides, nitrogen, and nitrosylchlorides.
The terpenes are colorless liquids that burn with a bright light, and only a few, such as the camphors, are solid at normal temperatures. They boil between 150-180°C and are volatile with water vapor. Usually they have a weak but characteristic and often pleasant smell.
The decomposition product obtained from terpenes (C10H16) is isoprene (C5H8). The isoprenes can then be joined into C10H16 again through dimerization of two molecules and become either acyclic or monocyclic terpenes. Theoretically, the sesquiterpenes, diterpenes, and polyterpenes which occur in the essential oils can also be formed from isoprene.
The SESQUITERPENES which also are quite common in essential oils occur in the fraction with a higher boiling point between 250 and 280°C. They have a specific gravity between 0.84 and 0.90. Mostly, they have little color and are more viscous than the terpenes. They have a weak odor, easily become resinous, and are soluble in alcohol. As unsaturated carbohydrates, they can bind to halogens, nitrous oxide, and nitrosylchlorides. To an extent, they form crystal compounds which are useful for identifying them.
In the essential oils, acyclic, monocyclic, bicyclic, and tricyclic sesquiterpenes with 4, 3, 2,
79
and 1 double bonds have been found. The DITERPENES (C20H32) are yellow, viscous
oils that boil above 300°C and only to a small extent are volatile with water vapor. For that reason, they are seldom found in essential oils.
The AZULENES cause the blue color observed in some essential oils such as those from chamomile, yarrow, and wormwood. The azulenes are bicyclic compounds with one cycloheptane ring and one penta ring. The azulenes found in nature have a total formula of C15H18 with the exception of chamazulen which is C14H16 and contain as substitutes 1 isopropyl group and 2 methyl groups. The various azulenes are differentiated by their color, blue, violet, green. The essential oils do not contain genuine azulenes, but their colorless sesquiterpene pre-stages from which they spontaneously form azulene when heated or treated with acids. In the presence of chloroform containing bromium the sesquiterpene and sesquiterpene alcohols turn blue just as the essential oils containing these compounds do. In order to carry out the reaction, we need to dissolve five drops of essential oil in 1 to 2 cubic cm. of chloroform and then add ½ to 1 cu. cm. of chloroform containing 5-10% of bromium. After a few minutes, the color will change to green, blue, or violet.
The oils obtained from freshly gathered raw material often have very different physical constants, for example, lower density, greater solubility in alcohol, or a smaller residue from distillation than those oils from dry materials since the oils often turn to resin when the material is dried and stored.
Synthetic products are often used as a replacement for the essential oils derived from plants, particularly in making perfumes and for technical purposes. Such synthetic materials are derived from coal tar and include the various aromatics such as benzaldehyde (bitter almond
aroma), cinnamaldehyde (cinnamon aroma), vanillin (vanilla aroma), novo vanillin, cumarin (woodruff aroma), diacetyl (butter aroma), amyl-acetate (fruit aroma), α-amyl-cinnamaldehyde (jasmine scent), bromstyrol (hyacinth scent), phenylacetaldehyde (hyacinth scent), phenylethyl alcohol (rose scent), crataegon (hawthorn scent), anthranilacid methyl ester (orange flower scent), and neroli (orange flower scent).
hOW PLANTS MAKE ESSENTIAL OILS
A number of researchers have experimentally shown that there is a continual formation and destruction of the chemical materials found in essential oils in plant cells. E. Charabot showed that with increasing maturity of bergamot oranges the amount of esters and terpenes in the essential oils increases. In caraway oil, the content of d-carvone increased with increased maturity at the cost of limonene. In lavender, the amount of esters in the oil increased as the plant developed until the flower began to fade and then decreased during the course of the formation of the seed while the alcohols increased. Before blooming, the basil plant was poor in methyl-chavicol and rich in terpene compounds, whereas during the blooming period, it was richer in methyl-chavicol. During the blooming period of the peppermint, a portion of the menthols in the blossom was oxidized to menthone. The leaves of the plant following the blooming period contained less free menthol, but somewhat more methyl-ester than before blooming. The wood of a young chamae cyparis formosana contained a great deal of d-myrtenol and only small amounts of α- and β-myrtenol and traces of d-dihydromyrtenol, but the wood oil from older trees had d-dihydromyrtenol as its primary component and neither myrtenol nor pinene were detectable.
C. Cleber, A. Chiris, B. Rutowski and A. Trawin, I. Esdorn, and others have carried out
80
numerous experiments on the formation of menthol and menthone in developing peppermint plants. It is apparent from the work of most researchers that the menthol content of peppermint oil increases with the increasing maturity of the plant until the time of blossoming, whereas the menthon content decreases.
In fennel (foeniculum officinale) the amount of carbohydrates in the leaf oil increases with increasing age, whereas the content of oxygen-containing compounds increases in the seed oil. In the needle oil from juniperus excelsa, the amount of oxygen-containing compounds (cedrol) decreased following a beginning increase until the seeds were ripe and then increased again. In contrast, the oil of the plant changes slowly and continually. In this instance, the oxidation processes play a role which is at its maximum until the blooming and seed formation are achieved.
Coriander oil was analyzed during four different periods of life of the coriander. At first, carboxyl groups were formed. Then aldehydes and ketones of the form CH3-CO-R formed which then slowly disappeared while at the same time alcohols, particularly linaloöl and carbohydrates, primarily cyclic terpenes formed. There was a continuous reduction process which was influenced by secondary processes.
In camphor plants, the youngest leaves contained the most oil, but with only a small amount of camphor, and the oldest leaves had the smallest amount of oil, but with the highest camphor content. Thus, in the course of the plant’s development, the composition of the essential oils changes. It is clear that at the beginning reduction processes are present and later oxidation processes.
In the legumes there is a connection between ursol acid and the essential oils. In plants in which there are no essential oils, and thus no terpenes or sesquiterpenes, there is also no ursol acid. Thus, it is possible to assume that the terpene compounds
as well as ursolic acid are formed from previously formed sesquiterpenes. The synthesis of squalene from two molecules of farnesylbromide speaks for this assumption. In some legumes, the content of ursolic acid and oil varies considerably, and the content of the these two is in an inverse relationship. At the beginning, there was a high essential oil content and a low content of ursolic acid. As the latter increases, the former decreases. Probably oxytriterpene acid is formed from portion of the essential oils.
F. Fujita showed experimentally that plants could transform chemical compounds injected into their juices into other compounds. He injected d-citronellal into the sap of a living ficus retusa L.. After 18 months, he was able to obtain 16% of the citronellal, 30% of the oil remaining in the plant was d-citronella (limonene). Working in the same way, but injecting citral, the plant contained after 19 months geraniol, 1-citronellol, methylheptenone, and d-methylheptenol. Apparently citral forms geraniol through reduction at first. This is then transformed into 1-citronellol (terpinol form), and then into limonene, methylheptenon, and d-methylheptenol. An injection of 200cc of geraniol produced d-citronellol, 1-methylheptenol, and citral. Injections of d-citronellal produced after 15 months d-citronellol, geraniol, neroli, and 1-limonen.
The formation of essential oils in the plant is not always connected with the living plasma. As I. Esdorn showed on frozen and blanched material, the last phases of the formation of essential oils occur after the plant dies. With faded jasmine flowers, for example, there is a strong metabolic change which occurs during which essential oils are further developed. This process occurred also with flowers which had previously been frozen to a temperature of -18°C and then afterward quickly steamed. In this case, thermal resistant ferments such as lipase, phosphatase, and peroxydase were probably
81
involved. Flück also observed the formation of essential oils in the oil from umbelliferae roots after the plant had died. The rise in oil content in dead basil leaves was particularly high and the oil content also increased at first in wilted leaves from thyme and mint.
The essential oils do not play a role in the development of the plant. They are the product of a still unknown dissimilation process which may begin either with carbohydrates or protein.
DISTILLATION METhODS
In WATER DISTILLATION, the material to be distilled is placed in the still with water which is then heated either directly or indirectly to boiling and the development of steam. Earlier essential oils were generally distilled in this way. However, today the water distillation method is used only with some specific plant materials. It is used with very fine powders. Those plant materials containing a great deal of water and portions of plants which are very open, such as many blossoms.
In southern France there are still water distillation operations for obtaining the oils from lavender, thyme, and French lavender. In Spain, water distillation is used for obtaining oils from rosemary, French lavender, marjoram, sage, thyme, pennyroyal and myrtle, and also to obtain serum for producing cajaput oil. In southern China they are used for producing cassia oil. In France, for pine cone oil. On the island of Java for canna flower oil, and in Mexico as a part of the distillation process for linseed oil.
In the WATER and STEAM DISTILLATION process, the dry plant material is placed upon a screen in the still. Water underneath the screen is heated to boiling. This method has the advantage over the steam distillation method described below that the steam is wetter and is distributed evenly throughout the volume of the still and the plant material and rises. It does not dry out or burn the
plant material and produces fewer pyro-compounds. This method is not practical for those plant materials whose essential oils are very viscous or require a longer distillation period since the material would slowly become too wet and the remaining essential oils are then difficult to obtain. Water and steam distillation methods are still used in China for obtaining star anise oil, in Taiwan for camphor oil, and in Japan for peppermint.
In the STEAM DISTILLATION process, the dry plant material is placed on a screen or sometimes several screens stacked on upon the other with some space in between. It is then distilled with steam which is produced outside the still. In this case steam is injected into the still at the bottom through a number of nozzles attached to a ring-shaped tube. The steam then rises through the screen and takes all the volatile substances with it and then goes into the cooler where the mixture of oil and steam is condensed. The distillation water is then distilled again in another still to remove the still remaining essentials. Since this method is the best for most plant materials, it is the one most widely used.
ExTRACTIOn
Volatile liquids with a low boiling point such as benzol, petroleum ether, and butane are used for extraction. These materials are placed along with the flowers in a sealed apparatus for several hours. These extractors are connected in such a way that the solvent can be pumped through the different vessels so that a complete extraction of the flowers is obtained.
These rows of vessels require a rather complicated plumbing system and a great deal of solvent. They are the only method to use with materials which collapse and form a solid ball, such as geranium, lavender, mimosa, violets, and rock roses. With the devices developed by Garnier and Boudon-Dumont the extraction process is much quicker and the loss of solvents, much less.
82
The solvent saturated with the scented material is allowed to stand and then the watery layer is separated. The solvent is then filtered and placed in a partial vacuum of 150mm. Finally, the remainder is stored in glass vessels or tinned copper vessels. In order to remove the final traces of solvent, the liquid is blown with alcohol. That is, alcohol is sprayed into the liquid from below and under the low pressure is quickly vaporizes above.
The CONCRETE OILS obtained in this manner have very different consistencies. Some are more like paste and others very hard. The colors are also quite different, for instance, light yellow from mimosa or a chestnut brown from broom or dark green from violet leaves. These concrete oils, aside from the aromatics, also contain waxes which makes them difficult to use in producing perfumes. When the concrete oils are treated with alcohol in which the wax is insoluble, then the waxes can be removed and then by removing the alcohol, the absolute oils are obtained. The amount of absolute oils obtained from the concrete oils depends upon the amount of waxes in the concrete oil. It can be as little as 12% in clove oil and as much as 85-90% in lavender oil. By treating the absolute oils with absorbents or steam, sometimes also in connection with glycol, products can be produced with less coloring. These are the so-called colorless absolute oils.
Today, extraction with volatile solvents is used to produce large amounts of oils from jasmine, rose, orange blossoms, and lavender. Other products are produced in smaller amounts in Grasse, France from white mimosa, narcissus, daffodils, carnations, broom, begonias, sage, everlastings, cassia, violets, and rock rose.
SPECIfIC OILS
ANgELICA
ORIGIN: Angelica archangelica is an umbelliferous plant found throughout northern
Europe as far east as Siberia. It occurs in three major forms. The variety litoralis agardh, norwegica rupr., and sativa mill., is cultivated for use in medicines and preparing liqueurs. The main growing areas of this perennial plant are in northern Germany, France, Belgium, Holland, and to a lesser extent, Hungary.
HISTORY: The oil from the angelica root was first placed in the Frankfort appraiser’s registry in 1582 and into the Dispensatorium Noricum in 1589. It appears that angelica archangelicum first came into use as an herbal plant in the fifteenth century. It was used then for, among other things, preparing angelica water, a schnapps.
EXTRACTION: The oil is extracted by the water vapor method from the auxiliary roots of the cultivated angelica plant (sativa mill.). Plants are grown primarily for this purpose in Thuringia and in Franken in Germany as well as in Czechoslovakia. The efficiency of the extraction is about 0.35-1% for dried material and 0.1-3.7% for fresh material.
CHARACTERISTICS: When freshly distilled, the oil is a almost colorless, pleasant-smelling liquid which, when stored in contact with the air and light turns yellow to nearly brown. The smell of the oil is similar to that of pepper with a slightly musky tone. It has a bitter root-like taste. The following constants have been observed: d15 0.859-0.918 down to 0.853; αD+16° to 41°; nD20 1.476 to 1.488; S.Z. to 5; E.Z. 12 to 39; E.Z. according to Actig 30 to 75; soluble in 0.5 to 6 volume of 90% alcohol, sometimes with slight cloudiness. When the oil is stored, there is sometimes a diminishment of the helix apparently due to the presence of phellandren in the oil.
CHEMICAL COMPONENTS: The following chemicals have been shown to be present in the oil: d-α-phellandren (the largest component), α-pinene and probably other terpenes, a secondary alcohol, probably borneol, the lactone of α-oxypentadecylic acid and probably others which
83
cause the musky smell of the oil, osthenol, osthol, angelicin, inactive methylethylacetic acid which is a sesquiterpene. The following have been found in the distillation water: methyl alcohol, ethyl alcohol, diacetylfurfurol, and a base which smells like pyridine.
USES: The oil is used in the pharmacology industry and for producing liqueurs and perfumes.
ANISE OIL
ORIGIN: The umbelliferous plant, anise pimpinella anisum, has been cultivated in Europe primarily in the eastern Mediterranean area (Greece), in the southern part of the former USSR, in Holland, Italy, Spain, and Bulgaria. It is also cultivated in North Africa, India, China, Japan, Chili, Mexico and some parts of the US. The plant was probably native to the eastern Mediterranean area (Cypress and Egypt).
HISTORY: Anise is one of the herbs which was already in use in ancient times. The essential oil was first described by Hieronymous Brunschwig at the end of the fifteenth century.
EXTRACTION: The oil is obtained through a water vapor distillation of chopped fruit from the plant. Depending upon the origins of the raw material, the efficiency of an extraction is between 1.5-6.0%. It is interesting to notice the development of sulfuric acid which occurs in the distillation process. The material which remains from the distillation of anise provides a high protein and high fat content feed for cattle.
VARIETIES: Until the first World War, the main variety cultivated in Germany was Russian anise which had an extraction efficiency of 2.2-3.2%. It was also used in Russia for producing essential oils. Other varieties used for extracting oil came from Bulgaria (extraction efficiency 2.4%), the Italian (extraction efficiency 2.7-3.5%), the Spanish (extraction efficiency 3%) and Syrian (extraction efficiency 1.5-6%).
STATISTICS: Anise oil is no longer as significant as it was previously, since it has been widely replaced by the cheaper star anise oil which has been accepted in various medical texts. In 1939, there were over 11,000kg of anise oil produced in Russia, whereas in 1956, the production was only 6,000kg in Bulgaria which is used there primarily for producing anethol.
CHARACTERISTICS: Above 20°C, anise oil is a colorless, light-sensitive, sweet tasting liquid. When cooled to below 15°C, it forms snow white crystals. The constants of the oil are: first phase, 15-19% C., and with good quality oil, 18°; d20 0.980 to 0.990; αD 0 to 1° 50; nD20 1.552 to 1.559; soluble in 1.5-3 volume 90% alcohol. Star anise oil can be differentiated from anise oil through its milder smell and taste. The oil is changed by contact with air and light, since oxidation products (anisaldehyde and anise acid) are formed as well as polymers (di-p-methoxystibes).
The oil consists of up to 90% of the alkali anethol, a phenol-like compound, 4-propenyl-methyl-phenylether (boiling point 235°C). In addition, it also contains a few percent of anisaldehyde which is an oxidation product of anethol, and p-methoxybenzaldehyde (boiling point 248°C), which is synthetically formed from anethol for use as an aroma.
USES: Anise oil is used internally for loosening phlegm and for coughing as well as for producing lozenges which are used to increase the production of saliva. It is also used as a means for reducing gas. Externally, when dissolved in fatty oils it can be used as a protection against insects. It is also used in producing liqueurs and in baking. And for weather-proofing pigeon lofts. Anise tea can be used for reducing cramps and increasing the production of milk and is in general supportive in excretory processes of all sorts.
Star anise oil, oleum anisi estellati, is obtained from the fruit of illicium verum. It is only
84
insignificantly different in appearance, smell and taste from anise oil, and is used primarily in the production of liqueurs.
PINE NEEDLE OIL
INTRODUCTION: Pine needle oil is a general term for all those products that are derived through water vapor distillation of the fresh leaves, twigs, and cones of the abies family which includes firs, spruce, pine, and larch. The most important commercially available pine needle oils come from silver fir needles, silver fir cones, dwarf pine needles, red fir needles, and Siberian spruce needles.
SILvER fIR OIL
EXTRACTION: The oil is obtained by water vapor distillation from the needles and branch tips of the silver fir. It is produced primarily in Yugoslavia near Carniola, in Tirol, Austria, and in the Black Forest in Germany. The extraction efficiency is 0.2-0.3%. Additionally, after the oil has been extracted in the still, hot water is poured on the material and when this liquid is then concentrated it is sold as pine oil extract. During the years between 1930 and 1940, about 4000kg per year were produced in Yugoslavia, 500kg in Tirol, and 1000kg in the Black Forest.
CHARACTERISTICS: The colorless, pleasant smelling oil has these constants: d15 0.867 to 0.886; αD -34° to -60°; nD20 1.473 to 1.476; S.Z. usually 0.0 to 2.0; bornyl acetate 4.5 to 11%; soluble in 4-7 volume 90% alcohol, sometimes cloudy.
CHEMICAL COMPONENTS: 1-α-pinene, 1-limonen, 1-bornyl acetate, laurinaldehyde (small amounts), decylaldehyde (trace amounts), santen, and 1 sesquiterpene.
USES: Used in medicine in expectorants and as an addition to bath water.
DWARf PINE OIL
EXTRACTION: Dwarf pine oil is produced by water vapor distillation of the needles and branch tips of the dwarf pine, pinus montana mill., primarily in the Alp region of Austria. The extraction efficiency is about 0.12-0.71%. In 1947 and 1948 about 6000kg of this oil were distilled in Tirol.
CHARACTERISTICS: This pleasant smelling oil has these constants: d15 0.863-0.875; αD -4° to -9°; nD20 1.457-1.480; S.Z. as much as 1.0; ester content (as bornyl acetate) 3-8%; soluble in 4.5-8 volume 90% alcohol, sometimes with a small amount of cloudiness.
CHEMICAL COMPONENTS: 1-α-pinene, β-pinene, 1-phellandren, silvestren or A3-caren, 1-limonen, dipentene, 1 monocyclic simple unsaturated alcohol C10H18O, bornyl acetate, bornyl propionate, bornylcapronate, capronaldehyde, anisaldehyde, cuminaldehyde, 1-aldehyde C15H26O, λ2-isopropyl-4-cyclohexenon, 1 sesquiterpene, pumilol, and tertiary terpene and sesquiterpene alcohols.
COUNTERFEITS: Terpentine oil, camphor oil, and dipentenes are sometimes sold as dwarf pine oil.
USES: This oil is used medically as an inhalant for lung infections.
RED fIR OIL
EXTRACTION: Red fir oil is produced by water vapor distillation from the needles and branch tips of the red fir, picea excelsa lk. The extraction efficiency is between 0.15 and 0.25%. It is produced primarily in Tirol, Yugoslavia, and in the Black Forest.
CHARACTERISTICS: This pleasantly aromatic oil has the constants: d15 0.874-0.888; αD -20° to -40°; nD20 1.474 to 1.478; soluble in 3 to 6 volume 90% alcohol, sometimes with clouding. The distillate from the Black Forest contains 10.5%

85
ester (bornyl acetate). CHEMICAL COMPONENTS: 1-α-pinene,
1-phellandren, dipentene, 1-bornyl acetate, cadinen and santen.
USES: Used medically for respiratory illnesses and neuralgia.
ROSE OIL
ORIGINS: The primary source of material for producing rose oil are roses from the rosa centifolia group: rosa damascena, rosa centefolia, rosa gallica, and rosa alba. Those varieties that come into question for producing rose oil must be winter-hardy and produce many flowers. In Bulgaria, Anatolia, France, and Germany, as well as some other countries, the variety used for producing rose oil is rosa damascena mill. forma trigintipetala dieck. This is apparently a bastard form of rosa gallica and rosa canina, and is found growing wild in the Caucasus, in Syria, in the Campana.
HISTORY: Rose water, which is distilled from roses, was an important article of trade in the eighth and ninth centuries and was produced by the Arabs. In the Middle Ages, the cultivation of roses and the distillation of rose water was an important occupation in Persia. There are reports from the middle of the fifteenth century about the production of rose oil through distillation in the Compendium Aromatariorum written by Saladin and Asculi. After the eighteenth century, the production of rose oil and rose water which was at that time primarily produced in Persia moved into Asia Minor, Turkey and Bulgaria. In Bulgaria, the cultivation of roses and production of rose oil has been important since the seventeenth century. The Bulgarian rose oil industry first achieved major importance, however, in the nineteenth century. Rose oil has also been produced since the middle of the nineteenth century in France and in Germany from 1883 to 1932.
PRODUCTION: The major portion of the world production of rose oil is in Bulgaria. There,
rose bushes, primarily rosa damascena mill. forma trigintipetala and also rosa alba are grown in relatively thick hedges. These roses which are resistant to the influence of storm and insects are grown as borders for fields. These plantings are found on the slopes of the Sredna Gora mountains and extend for some 120 kilometers. They are concentrated in the Struma Valley, centered around Levskigrad. The rose blossoms are usually gathered in the period from the end of May until the middle of June and are gathered daily between 5 and 9 a.m. The flowers are immediately brought to the distillation factory and processed into essential oil.
In early years, the roses were processed by the farmers themselves in numerous primitive distilleries, the so-called giulapanas. However, now the distillation is performed primarily in modern devices which are heated either with an open fire or with steam. A portion of the roses is also processed into concrete oil which is drawn off with volatile solvents. The vessels used for distillation vary in size from 1500 to 6000 liters. In many instances, several such vessels are connected together so that the oil produced by several vessels is collected together in one Florentine flask. In the first stage, the rose blossoms which lie in water in the boilers produce 1/3 of the oil contained in the blossoms. The remainder of the oil remains as an emulsion or solution in the distillation water and is obtained from that in a second process through re-distillation. When these two oils are mixed, a complete product is produced. Today, rose oil is produced under governmental supervision by cooperative and state producers and then sold. Under favorable weather conditions, approximately 1kg of rose oil can be obtained from 2600-2800kg of flowers. On days which are very warm, 7000-8000kg are required to produce 1kg of rose oil. In addition to the distilled rose oil, large amounts of rose extract oil are produced in Bulgaria by soaking the flowers with a volatile solvent, for example, petroleum ether or
86
benzol. The extraction efficiency is about 0.22-0.25% of concrete oil from which 50-60% absolute oil can be obtained by treating it with alcohol. The distillation operations used primarily for obtaining rose water have been nearly completely given up in France. Now, rosa centifolia is extracted using petroleum ether to produce concrete oil (400-500kg of rose flowers produce 1kg oil) from which 500-600g of absolute rose oil are obtained. In Germany near Leipzig several years ago, rosa centifolia, which was imported from Bulgaria was used to produce small amounts of rose oil through water distillation and at a later time by treating it them with a volatile solvent. In the distillation process, 5000-6000kg of flowers produced 1kg of oil. In 1932, the cultivation of roses near Leipzig which had been underway since 1888 was given up and the production of German rose oil ceased. Attempts were also made to produce rose oil in other countries such as Italy, Hungary, Greece, Persia, India, Pakistan, and the US, with varying success.
TRADE AND STATISTICS: The yearly average production of rose oil in Bulgaria is about 1000kg of which 10-15% are obtained from rosa alba. In Anatolia, the yearly production is about 250kg. In 1953 136kg of rose oil were produced in Georgia, USSR, more recent production records are not available. Between 1950 and 1954, 330,000-700,000kg of roses were processed into rose oil in France.
CHARACTERISTICS: Commercially available rose oil from Bulgaria and Anatolia is light yellow, sometimes with a tinge of green. At a temperature of 21-25°C, it has the consistency of thick almond oil and a strong smell of roses. When dissolved in water, it has a somewhat acidic taste. At a temperature of 18-21°C, spear-like or plate-like shiny, iridescent crystals precipitate which then rise to the top of the oil. When cooled still further, the oil thickens to a translucent, soft mass which then liquefies again when touched.
The constants of rose oil are: d30 0.8480-0.8610; αD -2.2° to -4.8°; nD25 1.4530-1.4640; solidification point 16.5° to 23.5°; S.Z. 0.92-3.75; E.Z. 7.2-17.2; E.Z. according to Actlg. 197-233.3; free alcohol (based on geraniol) 62.9-75.5%; bound alcohol 2.0-4.7%; total alcohol 65.8-78.2%; stearopten 15-23%. Oil obtained from rosa alba has the following constants: d30 0.8496; αD -3°4; nD30 1.4530; solidification point 18.1°; S.Z. 0.37; E.Z. 7.65; E.Z. according to Actlg. 198.65; free alcohol (based on geraniol) 61.3%; bound alcohol 2.1%. Rose extract or concrete oils are different from the normal oils produced through water vapor distillation in their higher density, stronger refraction, a right-handed spiral, and a higher acid and ester count.
CHEMICAL COMPONENTS: Distilled rose oil contains the following compounds: ethyl alcohol, phenylethyl alcohol, geraniol (30-40%), neroli (5-10%), 1-citronellol (34-55%), 1-linalool, esters of the above alcohols (2.5-6% based upon geranyl acetate), nonylaldehyde, citral (0.5-1%), carvone, eugenol (about 1%), eugenolmethylether (1-1.2%), farnesol, carbohydrates of the paraffin group CnH2n+2 (8-20%), and an azulene-like sesquiterpene. Chromatographic analysis has shown that the stearoptens in rose oil contain heptadecane, nonadecane, eicosane, heneicosane, and eicosen (10). A chromatographic analysis also showed that the following were present in minor amounts: acetaldehyde, proprionaldehyde, valeraldehyde, nonylaldehyde, citral, cinnamonaldehyde, salicylaldehyde, and phenylaldehyde.
COUNTERFEITS: In determining rose oil counterfeits, the solidification point, the content of stearoptens, and an analysis of citronellols are used. Rose oil has been diluted with palm rose oil, geranium oil, geraniol, citronellol, phenylethyl alcohol, paraffin, ethyl alcohol, pock wood oil, phtalic acid ester, sperm whale oil, and others.

87
USES: Rose oil is used in perfume and food industries as well as in pharmacology.
TURPENTINE OIL
ORIGINS: Turpentine oil is usually obtained from various varieties of pinus. In the US, the primary source is pinus palustris, however, other varieties such as pinus heterophylla, pinus echinata, pinus ponderosa douglasia, and other kinds of Douglas firs are used. In France and Spain, pinus pinaster sol., in Austria pinus laricio poir or pinus nigra, and in Germany, pinus silvestris are used. In the Soviet Union, the primary source is pinus silvestris, however, other pinus varieties and the Siberian pine abies Siberica ledeb. are also used. In Greece and Algeria, turpentine oil is derived from pinus halepensis, and in Mexico from pinus ayacahuite ehrbg. and other pinus varieties and in India pinus longifolia roxb. are used. In a few instances, turpentine oil is also produced from abies, picea, and larix varieties.
HISTORY: Turpentine oil, that is, those products obtain through water distillation from the turpentine of various abies varieties were already known and in use during the Greco-Roman period. In North American, particularly North Carolina and Virginia and in France, turpentine oil was produced beginning in the second half of the eighteenth century.
EXTRACTION: Originally, and up until the last few decades, turpentine oil was obtained in the US by drawing off the sap of the living tree and then distilled over an open fire in simple stills. Today, modern stills which use steam passing through ventilated tubing are used. Prior to distillation, the turpentine is usually cleaned. The extraction efficiency for turpentine oil lies between 16-22% of the turpentine. In addition to the sap, the stumps and wood from firs and spruce are often used for producing turpentine oil. In France, just as in Spain, stills are used which are heated over
an open fire as well as those heated with steam. In addition, there are continuous process stills in which turpentine is added as the rosin is drawn off. In such instances, up to 25% turpentine oil is obtained and some 70% rosin remains.
VARIETIES: The most important commercials turpentine oils are those which come from America, France, and Spain. In contrast to those, the composition of the oils from the former USSR, India, Sweden and Finland is significantly different since they contain only small amounts of pinene and have λ3- and λ4-caren as their main component. All turpentine oils resinify as they evaporate, leaving only a resinous mass behind.
CHEMICAL COMPOSITION: American commercial turpentine oil contains α-pinene (approximately 64%); α-pinene (approximately 33%); 1-camphen; dipentene; terpinolen; bornyl acetate; pinocarvol; and methylchavicol in small amounts. French turpentine oil contains α-pinene (63%); α-pinene (26.5%); dipentene; d-limonene; caryophyllen; longifolen; pinolhydrate; cadinen; and cadinol. Turpentine oil from the former Soviet Union contains d-α-pinene (up to 87%); 1-α-pinene (0-6%); dipenten; 1-limonen; d-λ3-caren (14-32.5%); 1-camphen (5%); 1-phelandren (1.5%); α-myrcen; terpinol; and acetone. Turpentine oil from India contains α-pinene in small amounts; α-pinene; d-λ3-caren; longifolien (approximately 20%).
USES: Turpentine oil is used as a solvent for lacquer, shellac, and paints, and also for producing polishing waxes. It is used in medicine and in the production of aromas, for instance, synthetic camphor.
ChAMOMILE OIL
The best chamomile oil is made by plants that grow at the lower levels of the central mountains in Germany. Apparently a brisk climate has a good effect. The oil is bright blue. The plants which
88
grow near in Mediterranean area, particularly in Egypt, contain much oil, but of a lesser quality. It has a dark blue, rather expressionless color. The German chamomile contains 0.6-1.0% azulene, whereas that from Hungary, which grows in a warmer climate contains 0.3-0.5%.
When taken internally, chamomile sometimes in combination with linden or elderberry acts as a diaphoretic (causes sweating) and also has a positive effect upon the heart and circulatory systems with fevers from colds. It has a calming and cramp-eliminating effect on colic pains and stomach cramps. It can be used to eliminate flatulence. It has a disinfecting effect and reduces inflammation, particularly in the mucus membranes of the mouth, throat, eyes, and ears as well as being a diuretic. Externally, chamomile can be used for inflamed wounds and sores, for itching or weeping skin rashes or eczema, and also for hemorrhoids. For rheumatic symptoms or pains in the face or teeth cause by colds, chamomile has been successfully used in the form of wraps or baths. The inhalation of hot chamomile tea vapors is a well-known use for sniffles, runny nose, and sore throats. Chamomile teas are used as enemas with intestinal inflammation as well as for gargling and inflamed eyes. Chamomile extracts are also used in cosmetics for hair care and in soaps and creams for cleansing the skin.
When preparing chamomile tea, care should be taken that the chamomile never boils, it should only steep in just boiled water and then be allowed to stand for a time in a hot, closed vessel. In this way, the chamomile oil does not boil off.
Chemical List:Acetic acid, reagent, 500 mLamyl (pentyl) alcohol, 500 mLanise or fennel, seedsBenedict’s solution, qualitativebutyric acid, reagent grade, 100 mLbeer
carbon dioxide (fire extinguisher ok)caproic acidcharcoal, small pieces chamomile flowers, driedcitric acid, 100gcotton battingethyl (“grain”) alcohol
(reagent, anhydrous, denatured)ethyl alcohol (not denatured -- overproof rum)ether, diethyl (HAZARD do not store)essential oils, various natural;
orange, lime, l-carvone (spearmint), d-carvone (caraway); anise, cinnamon, citronella, etc.
esters, acid anhydride of itself??flammable materials
(straw, wood shavings & splints, candles)glycerin, 100 mL min.hydrochloric acid, reagent 500 mLhydrogen, gas cylindereggsisoamyl (iso-pentyl) alcohol (from fermentation) 500 mLn-butyl alcoholn-propyl alcohol (1-propanol)methyl (“wood”) alcoholpetroleum oil, unrefined; 1 pintquicklime for making limewater raisinsresin, fir or pine rosin or resinsage leaves, driedsalicylic acid, 100gsoap for making soap bubblesstarch, potatosugars (glucose/dextrose, fructose/levulose,
maltose, sucrose, lactose C12H22O11)sulfuric acid, conc. (96%) reagent grade, 1 pinttanninvinegar (99% conc.)wine, grape or fruit, naturally fermented yeast (beer-making)
89
Apparatus listaluminum foilballoons, children’s balance, single-pan, 200g capacity minimum,
(0.01g sensitivity needed later)beakers, various (50-1000 mL)bossheads & clampsbottles, polyethylene (storage, dropping, etc.)burners, meeker (at least two, 19 mm tall)carbon dioxide in lecture bottle (or fire
extinguisher)condenser, back-flow (Liebig)condenser, intensivecork borer, setdistillation apparatus (flask, column, condenser)distillation head (for thermometer, and
connection to condenser)fermentation air-lock or bubble counterfilter paper, qualitative (15 cm for 72° funnel,
9 cm for Büchner vacuum filter funnel)flask, Kjeldal (long-necked), 500 mlflasks, Erlenmeyer (conical)
(various: 250 - 2000 ml)flasks, round bottom, 50-2000 ml. (when
possible with several and/or long necks)flask, volumetric (250mL, 1000mL)funnel, filter gasometer* (cylindrical glass flask with valve on
top, a water cylinder just a bit larger)glass dishes (heat proof porcelain crucibles) 25-
50 mlglass tubes, 10-30 mm diameter, 40-100 cm longglass tubing, various, bent glass tubing cutterGraduated cylinders, with base
(100 mL, to 5 liter sizes)heating mantlehot plate, electric (with magnetic stirring if
possible)hydrometerindicators (universal, brom-thymol blue)
laboratory stands (60cm)mortar and pestle, 100mL“organic chemistry glassware” kit (for steam
distillation setup)pipette, dropping (disposable serological)quartz* reaction tubes
(10-11 mm diameter, 200 mm long)quartz* test tubesseparatory funnel (100ml - 500ml, with pressure
equalizer)spatulastoppers (#4-#8 rubber, 1 & 2-hole)syringe, 60 mL, glass or plastictest tube holderstest tubes, large, 25 x 200 mmtest tubes, small, 18 x 150 mmthermometertongs, crucible tripodtubing, rubber universal indicatorU-tubeswash bottles (squeeze squirt)watch glass, wide (5”)water jet (aspirator) vacuum pumpweighing disheswire tripod netswoulffian flask
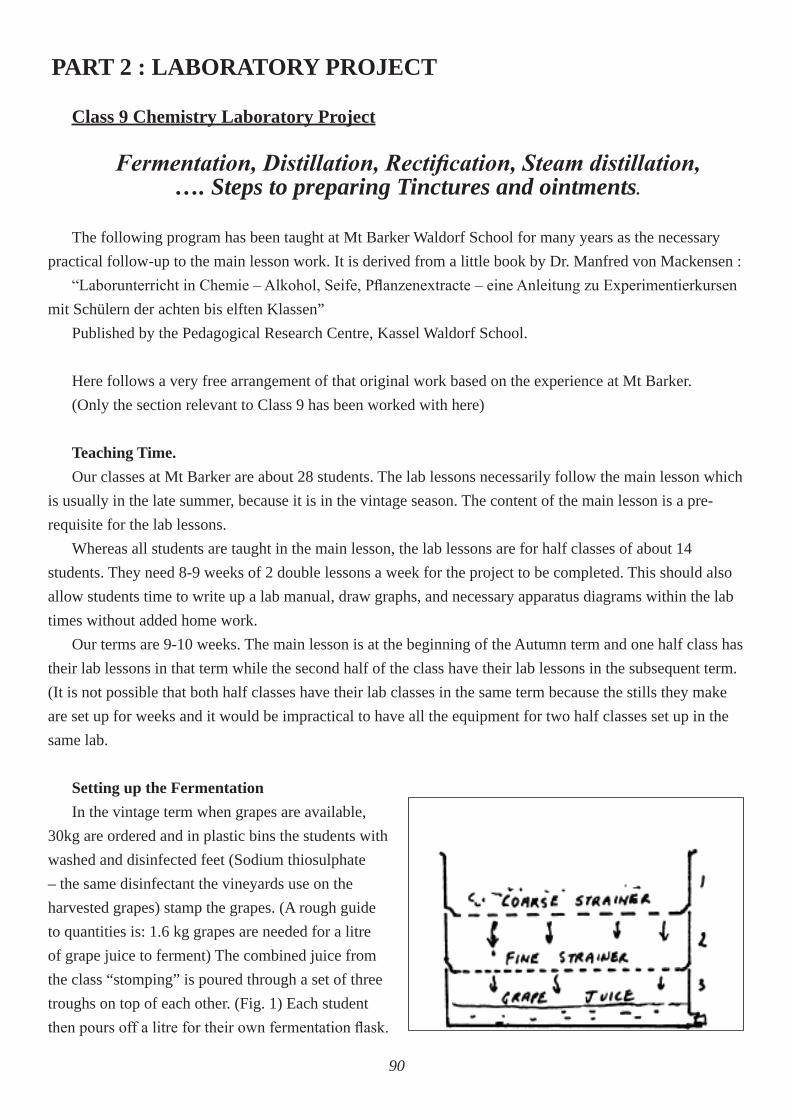
90
PART 2 : LABORATORY PROJECT
Class 9 Chemistry Laboratory Project
Fermentation, Distillation, Rectification, Steam distillation, …. Steps to preparing Tinctures and ointments.
The following program has been taught at Mt Barker Waldorf School for many years as the necessary practical follow-up to the main lesson work. It is derived from a little book by Dr. Manfred von Mackensen :
“Laborunterricht in Chemie – Alkohol, Seife, Pflanzenextracte – eine Anleitung zu Experimentierkursen mit Schülern der achten bis elften Klassen”
Published by the Pedagogical Research Centre, Kassel Waldorf School.
Here follows a very free arrangement of that original work based on the experience at Mt Barker. (Only the section relevant to Class 9 has been worked with here)
Teaching Time.Our classes at Mt Barker are about 28 students. The lab lessons necessarily follow the main lesson which
is usually in the late summer, because it is in the vintage season. The content of the main lesson is a pre-requisite for the lab lessons.
Whereas all students are taught in the main lesson, the lab lessons are for half classes of about 14 students. They need 8-9 weeks of 2 double lessons a week for the project to be completed. This should also allow students time to write up a lab manual, draw graphs, and necessary apparatus diagrams within the lab times without added home work.
Our terms are 9-10 weeks. The main lesson is at the beginning of the Autumn term and one half class has their lab lessons in that term while the second half of the class have their lab lessons in the subsequent term. (It is not possible that both half classes have their lab classes in the same term because the stills they make are set up for weeks and it would be impractical to have all the equipment for two half classes set up in the same lab.
Setting up the FermentationIn the vintage term when grapes are available,
30kg are ordered and in plastic bins the students with washed and disinfected feet (Sodium thiosulphate – the same disinfectant the vineyards use on the harvested grapes) stamp the grapes. (A rough guide to quantities is: 1.6 kg grapes are needed for a litre of grape juice to ferment) The combined juice from the class “stomping” is poured through a set of three troughs on top of each other. (Fig. 1) Each student then pours off a litre for their own fermentation flask.
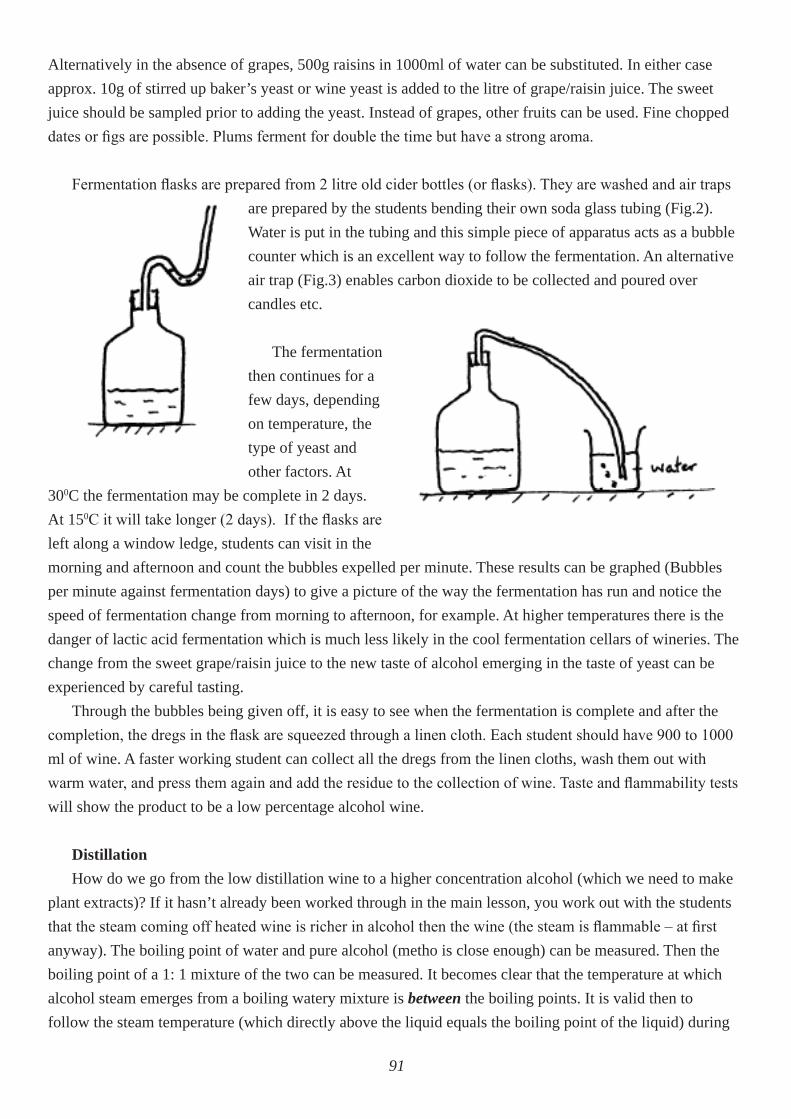
91
Alternatively in the absence of grapes, 500g raisins in 1000ml of water can be substituted. In either case approx. 10g of stirred up baker’s yeast or wine yeast is added to the litre of grape/raisin juice. The sweet juice should be sampled prior to adding the yeast. Instead of grapes, other fruits can be used. Fine chopped dates or figs are possible. Plums ferment for double the time but have a strong aroma.
Fermentation flasks are prepared from 2 litre old cider bottles (or flasks). They are washed and air traps are prepared by the students bending their own soda glass tubing (Fig.2). Water is put in the tubing and this simple piece of apparatus acts as a bubble counter which is an excellent way to follow the fermentation. An alternative air trap (Fig.3) enables carbon dioxide to be collected and poured over candles etc.
The fermentation then continues for a few days, depending on temperature, the type of yeast and other factors. At
300C the fermentation may be complete in 2 days. At 150C it will take longer (2 days). If the flasks are left along a window ledge, students can visit in the morning and afternoon and count the bubbles expelled per minute. These results can be graphed (Bubbles per minute against fermentation days) to give a picture of the way the fermentation has run and notice the speed of fermentation change from morning to afternoon, for example. At higher temperatures there is the danger of lactic acid fermentation which is much less likely in the cool fermentation cellars of wineries. The change from the sweet grape/raisin juice to the new taste of alcohol emerging in the taste of yeast can be experienced by careful tasting.
Through the bubbles being given off, it is easy to see when the fermentation is complete and after the completion, the dregs in the flask are squeezed through a linen cloth. Each student should have 900 to 1000 ml of wine. A faster working student can collect all the dregs from the linen cloths, wash them out with warm water, and press them again and add the residue to the collection of wine. Taste and flammability tests will show the product to be a low percentage alcohol wine.
DistillationHow do we go from the low distillation wine to a higher concentration alcohol (which we need to make
plant extracts)? If it hasn’t already been worked through in the main lesson, you work out with the students that the steam coming off heated wine is richer in alcohol then the wine (the steam is flammable – at first anyway). The boiling point of water and pure alcohol (metho is close enough) can be measured. Then the boiling point of a 1: 1 mixture of the two can be measured. It becomes clear that the temperature at which alcohol steam emerges from a boiling watery mixture is between the boiling points. It is valid then to follow the steam temperature (which directly above the liquid equals the boiling point of the liquid) during
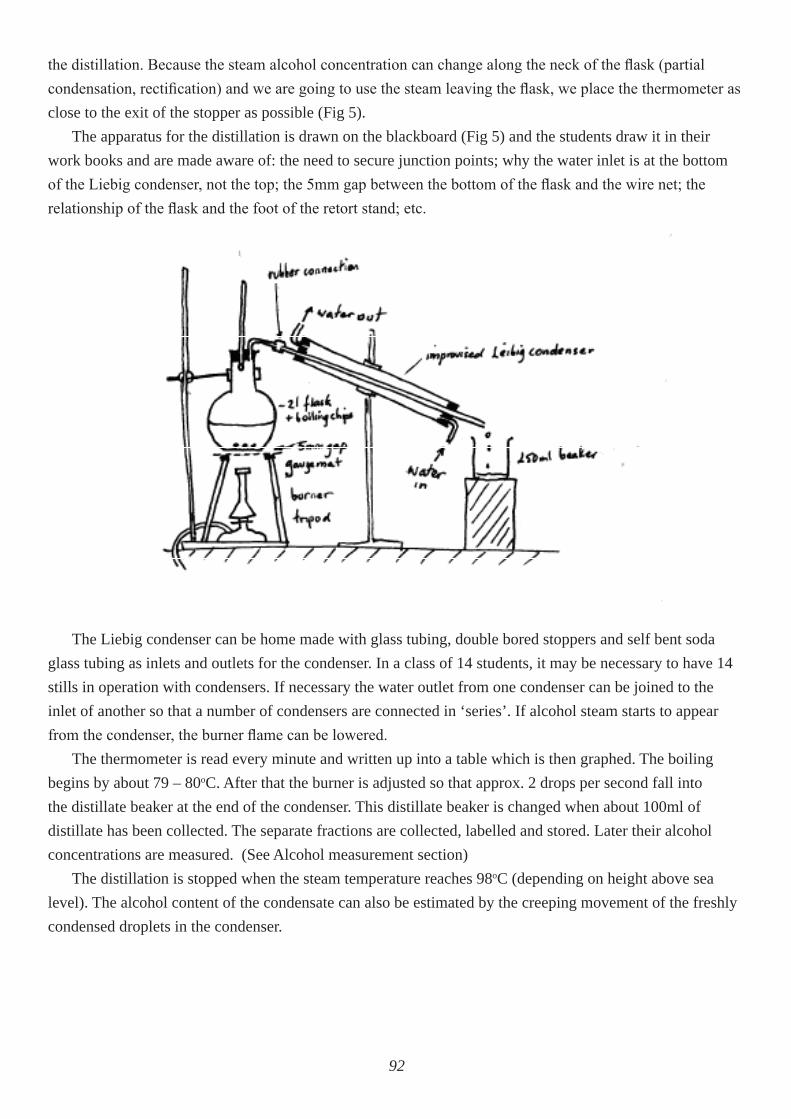
92
the distillation. Because the steam alcohol concentration can change along the neck of the flask (partial condensation, rectification) and we are going to use the steam leaving the flask, we place the thermometer as close to the exit of the stopper as possible (Fig 5).
The apparatus for the distillation is drawn on the blackboard (Fig 5) and the students draw it in their work books and are made aware of: the need to secure junction points; why the water inlet is at the bottom of the Liebig condenser, not the top; the 5mm gap between the bottom of the flask and the wire net; the relationship of the flask and the foot of the retort stand; etc.
The Liebig condenser can be home made with glass tubing, double bored stoppers and self bent soda glass tubing as inlets and outlets for the condenser. In a class of 14 students, it may be necessary to have 14 stills in operation with condensers. If necessary the water outlet from one condenser can be joined to the inlet of another so that a number of condensers are connected in ‘series’. If alcohol steam starts to appear from the condenser, the burner flame can be lowered.
The thermometer is read every minute and written up into a table which is then graphed. The boiling begins by about 79 – 80oC. After that the burner is adjusted so that approx. 2 drops per second fall into the distillate beaker at the end of the condenser. This distillate beaker is changed when about 100ml of distillate has been collected. The separate fractions are collected, labelled and stored. Later their alcohol concentrations are measured. (See Alcohol measurement section)
The distillation is stopped when the steam temperature reaches 98oC (depending on height above sea level). The alcohol content of the condensate can also be estimated by the creeping movement of the freshly condensed droplets in the condenser.

93
Example of a Distillation Set of Results890ml of raisin wine was used and the temperature was read every 2 min.
26oC 52oC 90oC 94oC 96oC 27 59 90 94 End fract.2 9730 66 91 End fract.1 95 9734 80 Boiling begin 92 95 97 End fract.340 87 92 96 9746 89 93 96 97 98
98 End fract.4
Concentration results
1. Fraction 96 ml 60% ------ 58 ml pure alcohol2. Fraction 91 ml 45% ------ 38 ml pure alcohol3. Fraction 102 ml 20% ------ 22 ml pure alcohol4. Fraction 50 ml 5% 118 ml without fraction 4 339 ml distillate
We can calculate, rounding up: 60% or the more than half of the raisins is sugar. Half of the mass of sugar appears as carbon dioxide, the other half as alcohol. The maximal result of alcohol weight from the raisin weight is 30%.
Determining the Alcohol amount for the single fractions:
1. Water test (easy)Pipette approx. 2 ml
of the distillate onto a watch glass. Students can make if necessary a pipette (Fig.6). It is important that the same amount of alcohol is used for each measurement. The alcohol is lit with a match and the burn time measured with the second hand. (40% alcohol only lights after a few attempts at lighting it, during which time the alcohol is warmed). After the flame goes out, there is a non flammable leftover in the watch glass, which is mainly water. Strips of filter paper, tissues or
94
paper towels 1.5 x 15 cm are used to suck up the left over. The used area of the strips is cut out and the outline traced on graph paper to measure the area. This is, relative to the area covered by 2ml of water when sucked up, an approximate measure for the water content of the sample. (Some water is evaporated with the burning but at the same time about as much alcohol is present in the left over fluid) This method is usable for alcohol concentrations of 40 – 90%.
Comparison of our measurements with exactly measured mixtures
Fract. Burning time Filter paper area calc. Water cont. exact Water cont.1 45 sec 45.5 squares 36 % 37 %2 40 sec 54 squares 44 % 43 %3 32 sec 60 squares 49 % 50 %
2. Flame test (hard)Weaker concentrations can be differentiated by taste:Burning taste with concentrations of 12 -15 %. Between diluted fractions (e.g. fraction 4 from the table above and the left over) can be
differentiated in the following way. The sample is boiled in a beaker and the steam is tested immediately for flammability.
More exactly:In a 150 ml low form beaker 40 ml of the sample is heated on a very small flame. It is stirred
with the thermometer which is not allowed to remain on the base of the beaker. After every 5o rise in temperature the steam is tested for flammability. So that an equilibrated steam mixture can be formed the heating must happen very slowly, the mixture must be well stirred and the beaker covered with a card cover through which the thermometer is inserted. A burning match is placed into the steam and observed.
A table records every 5o: no flicker, weak lighting up, clear lighting. One doesn’t need to go higher than this with the temperature. A calibration curve is made with methylated spirits / water mixtures of 10, 20, 20, 40 %.
DifficultiesStudents need to be shown how to clean the glass ware using correctly bent bottle washers and energetic
brushing of the sides with half dry Ajax or something similar.
Putting together glass tubing into and withdrawing them from stoppers can pose difficulties and students need to be shown how to gently knead the stopper to release the glass tube from it. For insertion, spit or water can help with lubrication, although the very best is a 1:1 mixture glycerine and methylated spirits. Glassware and rubber connections shouldn’t be left connected too long otherwise they tend to stick and can be difficult to separate. In separating glass tubing it shouldn’t be turned or bent but pulled so that the risk of breakage and then cutting yourself is avoided.

95
Recording the Lab LessonsIt can happen in the afternoon lab lessons, which generally do not generate home work that the students
regards them somehow as second rate in comparison to the main lessons in the morning. This would be a mistake and it helps if the students are requires to keep a lab book which records the results of their work and the steps of protocol for the various processes they carry out. They could include:
1. Weight of pressed grapes and derived volume of with the characteristics of taste, buoyancy (measured with a hydrometer).
2. Table of bubble counts , morning and afternoon for the fermentation, over 4-5 days;3. Characteristics of the fermented grapes after completion of fermentation;4. Diagram of distillation apparatus;5. Table of temperature measurements during distillation; 6. Graph of temperature/ time during distillation;7. Table of fraction volumes and concentrations;8. Diagram of steam distillation apparatus;9. Diagram of rectification apparatus;10. Diagram for Steam Distillation11. Method for making a hydrometer12. Recipes for the various products
Further Steps in the ProcessAfter the fermentation and distillation the further steps involve refining the rough brandy to a more
concentrated alcohol to be used in plant extraction. This involves the process of rectification. Here the work becomes specialised and requires specialization of ‘labour’. Some students use combined portions of the ‘brandy’ for the rectification step and others take on the steam distillation of particular plants to produce the oils for tinctures and ointments. All students, however, are asked to draw the apparatus set up diagrams for their lab books and also to record and graph the rectification results.
Oils can be extracted from plants by a solvent (alcohol) or as an oil infusion where olive oil, for example, is placed in a glass jar, in the sun, with the yellow flowers of St John’s Wort (Hypericum). The red oil of the flowers is then dissolved by the warmth into the olive oil which becomes a brilliant red and can then be used in ointments or other healing compounds. Most volatile (essential) oils, with boiling points below that of water, are extracted by steam distillation.
Steam Distillation
Two setups for the steam distillation are shown here (Fig. 7). To experience the differences of the extracted essential oils, they are extracted individually. Even Lemon Melissa is sometimes best extracted in this way. The water carries out here, with the help of outer warmth, what the alcohol does in the cool. For each plant type as much is extracted so that afterwards, each student has about 2-3 drops of the essential oil.
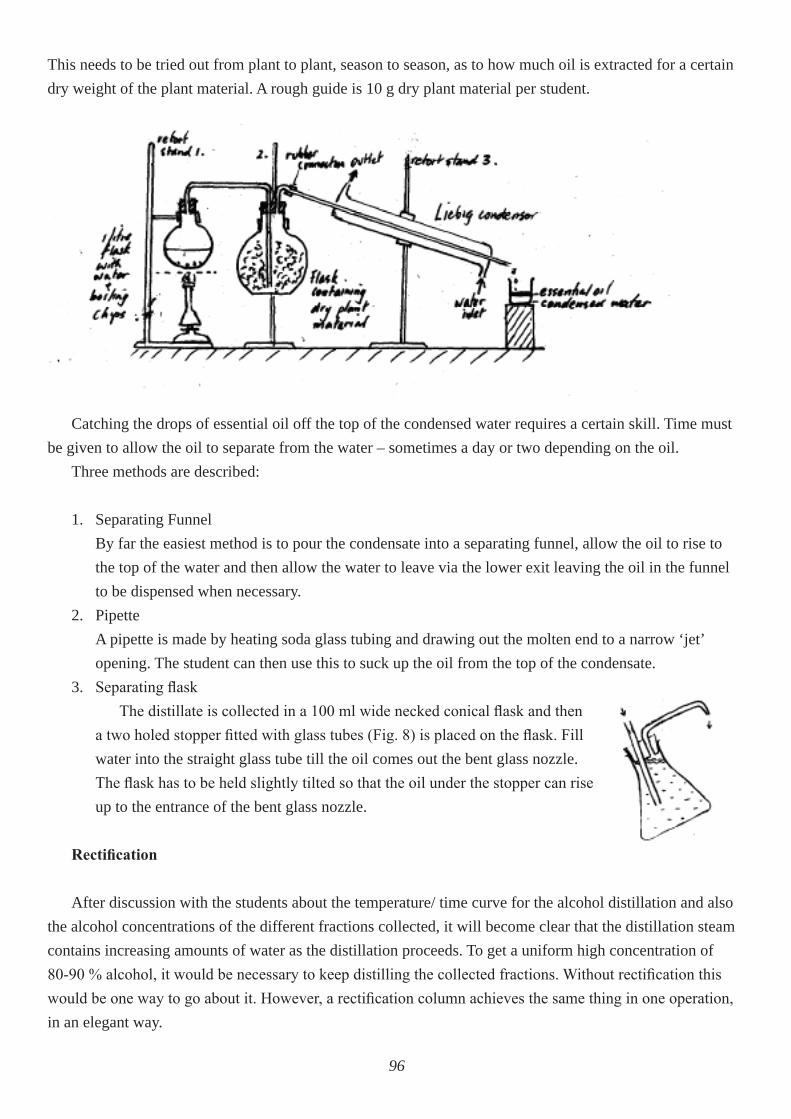
96
This needs to be tried out from plant to plant, season to season, as to how much oil is extracted for a certain dry weight of the plant material. A rough guide is 10 g dry plant material per student.
Catching the drops of essential oil off the top of the condensed water requires a certain skill. Time must be given to allow the oil to separate from the water – sometimes a day or two depending on the oil.
Three methods are described:
1. Separating Funnel By far the easiest method is to pour the condensate into a separating funnel, allow the oil to rise to the top of the water and then allow the water to leave via the lower exit leaving the oil in the funnel to be dispensed when necessary.
2. Pipette A pipette is made by heating soda glass tubing and drawing out the molten end to a narrow ‘jet’ opening. The student can then use this to suck up the oil from the top of the condensate.
3. Separating flaskThe distillate is collected in a 100 ml wide necked conical flask and then
a two holed stopper fitted with glass tubes (Fig. 8) is placed on the flask. Fill water into the straight glass tube till the oil comes out the bent glass nozzle. The flask has to be held slightly tilted so that the oil under the stopper can rise up to the entrance of the bent glass nozzle.
Rectification
After discussion with the students about the temperature/ time curve for the alcohol distillation and also the alcohol concentrations of the different fractions collected, it will become clear that the distillation steam contains increasing amounts of water as the distillation proceeds. To get a uniform high concentration of 80-90 % alcohol, it would be necessary to keep distilling the collected fractions. Without rectification this would be one way to go about it. However, a rectification column achieves the same thing in one operation, in an elegant way.

97
The steam over wine is, from the beginning, richer in alcohol; otherwise the distillation wouldn’t work at all. If this first steam is carefully cooled then it can be made richer in alcohol by carefully, preferentially condensing some of the water from the steam. The water condenses more easily than the alcohol from the steam as it has a higher boiling point than the alcohol. This kind of partial condensation can be performed many times on the same stream of steam within a “rectification column”. The partial condensations happen one above the other in the column. The partial condensate (richer in water than the steam) runs back down to the condensation place beneath it. In this way a new effect occurs: the lower condensation place achieves higher alcohol content relative to the original mixture in the flask at the base. The steam passing this position not only contributes water to the fluid but also extracts alcohol from this back flow fluid. The fluid dropping out of the column at the bottom (Fig. 9b) has nearly the same water rich mixture which is boiling in the flask. Above, nearly pure alcohol rises to the top of the column and enters the condenser. (The concentration is at the best 97.2 Vol % = 95.5 Weight %, due to azeotropy). The column works with a back flow which is ‘washed out’ by the rising steam. This happens best, which can be theoretically shown, when the column tube is warmth isolated from the outside. The back flow, which is washed out of the rising steam, should work on the whole steam, i.e. drop onto the head of the column. Professionally this happens with an extra cooler (so-called
Dephlegmator). We haven’t done this, instead we leave about a hand breadth at the top of the column unfilled (air cooler).
Method: The 2 l round flask on top of which the column sits (Fig
9a) is fitted with a 3-holed stopper (Fig 9b). Through 2 of the holes are glass tubes. One has a tight bend which acts as a siphon which fills with the back flow and also blocks the steam rising so that it has to rise through the other tube. The third hole has a thermometer for measuring the boiling temperature.
A glass tube (~ 50cm long with a diameter of 45mm) filled with broken soda glass tubing (each ~25mm long). It is fitted with a 2 holed stopper at the top and the bottom. The
lower stopper has two glass tubes fitted so that one of them, the siphon is level with the top of the stopper, whereas the second rises about 10mm into the column. The back flow returns to the flask through the siphon and the steam rises into the column through the second tube. The upper stopper is the same as that used in the first distillation of the wine. The flask has a few

98
boiling chips added with the ‘brandy fractions’ that have a greater than 15% alcohol concentration. It is sensible at this stage of the project that two students each are responsible for the one to two columns needed in the class. The remainder of the students can be involved with steam distillation. One of the students reads both the thermometers while the other writes up the results and changes the collection flask. The best collection rate is 100 drops per minute into the collection flask. For the putting together of the apparatus one needs a device for lengthening the retort stands.
The high percentage alcohol that is derived from this process is used in preparing plant extracts. Its concentration can be measured using calibrated hydrometers made by the students which offer a challenging but rewarding glass blowing experience.
Making a glass Hydrometer A ~20cm length of soda glass is melted together at one end. To do this, the end of the tube is heated to
red heat over the hot part of the burner flame and then clamped together with needle nosed pliers or tongs. The melted end is again heated and carefully blown to a diameter of approx. 20mm. One can attach a rubber tube to the open end of the tube to blow through. The molten end should be rotated in the flame while blowing gently so that it is evenly molten around the end being blown. Differential melting leads to ‘blow outs’.
Then the tube is held horizontally over the hot blue cone of the burner, so that ~ 5cm from the sealed end the glass becomes soft. All the time the tube is being turned. When it is soft, the tube is removed from the flame quickly, held vertically and carefully pulled. We aim for a long, even tip. At the thinnest point it is melted through and the long capillary like tube bent to a hook. The glass piece should now be able to be floated in water and alcohol. In pure alcohol – e.g. methylated spirits it should float the lowest but not over the capillary end. In water it should float the highest but still with the bulb below the surface.
To calibrate the hydrometer, float it within a measuring cylinder, in known, prepared mixtures of alcohol and water. The different floating depths are marked on the glass with a water proof

99
(and alcohol proof), quick drying varnish or other marker.The calibrated hydrometer can now be used to measure the concentration of the rectified alcohol.
Example of a RectificationFor this example 520ml of approx. 50% alcohol was used.
Time Temperature Temperature(minutes) in flask (oC) at the top of column (oC)
1 29 243 37 245 50 247 60 248 72 Boiling begins 2410 82 7712 81 7714 81 7816 81 7818 81 7820 81 Fraction 1 78 Fraction 122 81 78.5 82ml 90% Vol24 87 78.526 82 78.528 83 78.529 85 Fraction 2 79 Fraction 2 31 82 79 83ml 90% Vol33 82 7935 82 7937 82 7939 82 7941 83 7943 83.5 7945 84.5 7947 86 79 Fraction 3
49 87 79 79ml 86% Vol51 88 79.553 88.5 8054 89 80 Fraction 4 56 90 80 50ml 84% Vol
100
Home Medicine SuggestionsThe use of the hard won high concentration alcohol in the hands of students can be a cause for concern.
It has proved successful to use the alcohol in the preparation of plant extracts which are then further processed into simple home medicines. In this way finer qualities and effects come into experience.
1. Melissa tinctureThis can be used externally by rubbing in the case of head ache and tension. Internally it can be
taken with some sugar or with water for stomach upset, nervousness and unquiet.The following plants lend to the tincture its effect:
- Lemon Melissa was used in Ancient Greece as a medicinal plant. It is known in Europe since the Middle Ages and was treasured in monastery gardens. It works especially through its pleasant scented etheric oil, in a way that refreshes and invigorates but also is soothing for cramps and quietening. It can in decisive moments lead to healing processes. Used externally it is good for the hearts activity.
- The etheric oils from the rinds of unsprayed oranges and lemons stimulate blood building and detoxify the gut.
- Coriander seeds are a good agent for nausea and vomiting.- Cinnamon works to stimulate the appetite, strengthen the nervous system and dampens decay.- Nutmeg works against circulatory ailments and low blood pressure.- Cloves (Flower buds of a tree in the Myrtaceae family) used externally work calmingly (to
sedatively). Used internally, it works to warm and support the breathing.- Fennel seeds give the taste of the distillate a harmonizing sweetness. It is an ancient gut
medicine.
For the extraction of oil one needs a high percent alcohol (over 60%). For example the colourful skin of the citrus is pulverized with mortar and pestle in the alcohol. The same can happen with the Melissa. Steam distillation will win oils from the other ingredients.
2. Calendula OintmentIn making an ointment a fat phase and a water phase need to be emulsified into a homogenous
mixture. To facilitate this warmth and emulsifying agents are needed. The outline of the two phases follows.
Fat Phase Water Phase10g Beeswax 70g (~75ml) Calendula / Lemon tincture10g Spermaceti~5g Cetyl alcohol90g Oil infusion of Calendula/Hypericum Lavender oil drops
Total: 115g 70g
101
Preparation of ingredients:Spermaceti and Cetyl Alcohol will need to bought at a chemist supply. They are emulsifiers and allow
the fat and water phases to mix.
The beeswax is a protecting, solidifying and healing agent. If the school does not keep bees then it will have to be bought from a bee keeper.
The tincture is made by soaking the dried Calendula flowers in > 60% alcohol. This step can be done with the whole classes alcohol collection. Approximate guidelines are 80g of dried Calendula to 400 mls of 60% alcohol. Grinding in a mortar and pestle under the alcohol will give a more complete extraction. Leave for a week and then filter with Number 1 filter paper to give a clear, golden tincture. Lemon rinds or lavender flowers can be added to the extracting tincture with the Calendula as both promote healing of the skin.
The oil infusion can be made with olive or almond oil placed in covered glass in the sun with Calendula, Hypericum or Lavender flowers in it, either as one infusion or as separate infusions.
The lavender oil drops are extracted from dried lavender flowers using steam distillation.
Method:The ingredients are weighed out and preparedThe water phase is heated to 75oC in a beaker.The fat phase ingredients are combined and heated to 75oC in a beaker, stirring steadily.Pour the 75oC water phase into the 75oC fat phase while stirring.Stirring continues until the cream has cooled.Just before stirring stops at about body temperature, add the drops of Lavender essential oil.
The creams or tinctures are poured into glass containers and the students prepare neat labels for them which have the name of the preparation, ingredients, uses, manufacture date and storage needs.
102
Apparatus ListFor each student is needed:Duran 2 l Round flask or flat bottomed round flaskRubber stoppers for the flask: 46mm (lower diam.) x 54mm ( upper diam.) with bored holes to match
the soda glass tubing which usually has an outside diam. 8mm.Thermometer to 100 oC with an outside diam. 7-8mm.Distillation tube 40cm long, ~27mm inner diam., wall strength ~2.5mmSoda glass tubing, 8mm outside diam. ( 2 pieces 50cm long)13mm Teclu burner with gas tubing2 retort stands2 boss heads, 2 clampsWater tubing ~ 3m3 Conical flasks to 200-300ml ( a couple could be 100 ml)3 stoppers for the flasksTripod, wire gauze netsBeaker 150ml, low formParts for steam distillation and rectification (see text)

103
Recognising what is Human in Practice in Education
The Structure of the School Day, Styles of Teaching and Ideals of Education
Peter Glasby
IntroductionThe union of wisdom and skill that is highlighted
in the Jewish story of Solomon and Hiram, between the great King with access to the heights of starry wisdom and the master craftsman with knowledge of the earth and its substances, to build a temple, the likes of which the world had never seen before. Their union of wisdom and skill, of priest and craftsman, is also what we strive for in Waldorf Education. How do we meet this ideal in our structure of the school day and in our teaching styles?
The way the school day is formed contributes to the quality of life and learning for both teachers and students. Very often, at Waldorf schools, considerable thought is given to the form of the school day and its effect on the students of different ages who attend these schools. In Australia, the day is often divided into three sessions – a morning block of about 2 hours, often called the Main Lesson; the middle lessons between recess and lunch; and the afternoon lessons until the end of the school day.
Over the last ten years or so, it has not been uncommon amongst colleagues from Waldorf Schools to raise questions and debate about issues
which concern the structure of the day; for example, “Aren’t main lessons too long?; “Shouldn’t we be getting away from a teacher centred class room?” ; “Isn’t there too much chalk and talk in Waldorf school?”; “Shouldn’t there be much more activity in the main lesson, such as clay work, making things etc.?” “Shouldn’t there be more group activity and ‘discovery learning’?”
To answer these questions in a way that does justice to the ideals of education, there needs to be an understanding of the different ways that people learn, and also what the ideals of education are.
Ideals of education in relation to thinking, feeling and willing
So what are the ideals of education.? Like many ideals, those which support the
notion of educating students can be put simply. I would hope that one of them would be: To educate a young person to be a free1 human being, able to discern what is happening in the world and to deal with those situations skilfully, responsibly and with enthusiasm. Secondly, I would hope that education is about developing a love in the students for the world, other people and themselves.
And how do people learn? One could just as relevantly ask : “In which ways do people relate to the world?”
We recognise in the human being three fundamental activities that connect us to ourselves and to the world in varying and deep ways –
1 Freedom is meant here in the sense of “ The Philosophy of Freedom” R. Steiner, 1919
The following essay is included here as a contribution to the understanding of the roles of the main lesson way of teaching as distinct from the laboratory way of teaching. In conversations with colleagues
in the English speaking world, there is sometimes, a critique of a perceived lack of lab work in the German speaking Waldorf Schools and this is used to justify making the science main lessons into lab
lessons. That each has a distinct and important role is the thesis of the following essay.
104
thinking, feeling and willing.In our thinking we experience a conscious
activity that brings an ordering and understanding of our experiences, both inner and outer.
In our feeling we experience something that rises up in us more dimly, as in a dream, which connects us more deeply to an experience in sympathy or repels us in antipathy.
In our willing we experience an activity that at first is like magic. It brings about effects without our full conscious participation2.
An example to illustrate these three is as follows. Imagine that you see a round, furry, red, orange, pink and green object on a bench. You bring order into these experiences with the concepts: a fruit, a peach and so on. Your memory of a peach from past experience leads to an impulse to pick it up and smell it. You breathe in the fragrance of the peach that fills you with a rich experience tinged with the subjectivity of past experiences. There is an urge to unite more fully with the peach to the point that your mouth begins to water and you bite into the soft firm flesh, savouring the texture and flavour of the fruit. You can be almost drunk with the pleasure of the peach in mouth. Then comes a moment when the flavour and texture have diminished. The mouth begins a voluntary action of swallowing and then the voluntary action passes over into unconsciousness as the food passes into the digestive system. There remains a feeling of weight in the stomach and a renewed strength for work.
In the recognition of the object and our memories of it we have an aspect of the thinking activity. In the interest, the memories, the desires
2 Of course one can say there is a conscious side to the will where I say “I am going to pick up the pen and write”, and then I do it. The ‘magic’ is in the unconscious metabolic activity that moves and coordinates the muscles, bones, nerves etc.
and the enjoyment of the qualities of the fruit we have the feeling activity, and in the actions of grasping, chewing, swallowing and digesting we have expressions of the will.
The example is deliberately simple to demonstrate the fundamental nature of the three activities. Children can refer back to these kinds of basic experiences and it is our job, to educate and influence these activities so that the children entrusted to our care can leave school as independent, skilful, responsible adults who are able to take their place in the world in creative and fulfilling ways.
Thinking and willing are both involved with movement but in very different ways. In willing with our limbs or our metabolic system we are moving substance with weight: we are shovelling dirt or digesting food. In our thought life we are moving ‘pictures’: they are weightless and insubstantial. As different as these two activities are they are also connected with each other in a fascinating way whereby we can bring will into our thinking. Instead of receiving thought s passively, we can change them, compare them with our own experience, bring them into new connections with other thoughts and fill our thought life with will activity. This will in our thinking is the basis of developing independence and freedom rather than being passive recipients of what experience impresses on us.
We can also bring thought into our will life. Picture yourself in the act of creating something. Out of interest and focus in what we are doing with our hands or limbs we can bring order and skill into the activity, which results in the product being more
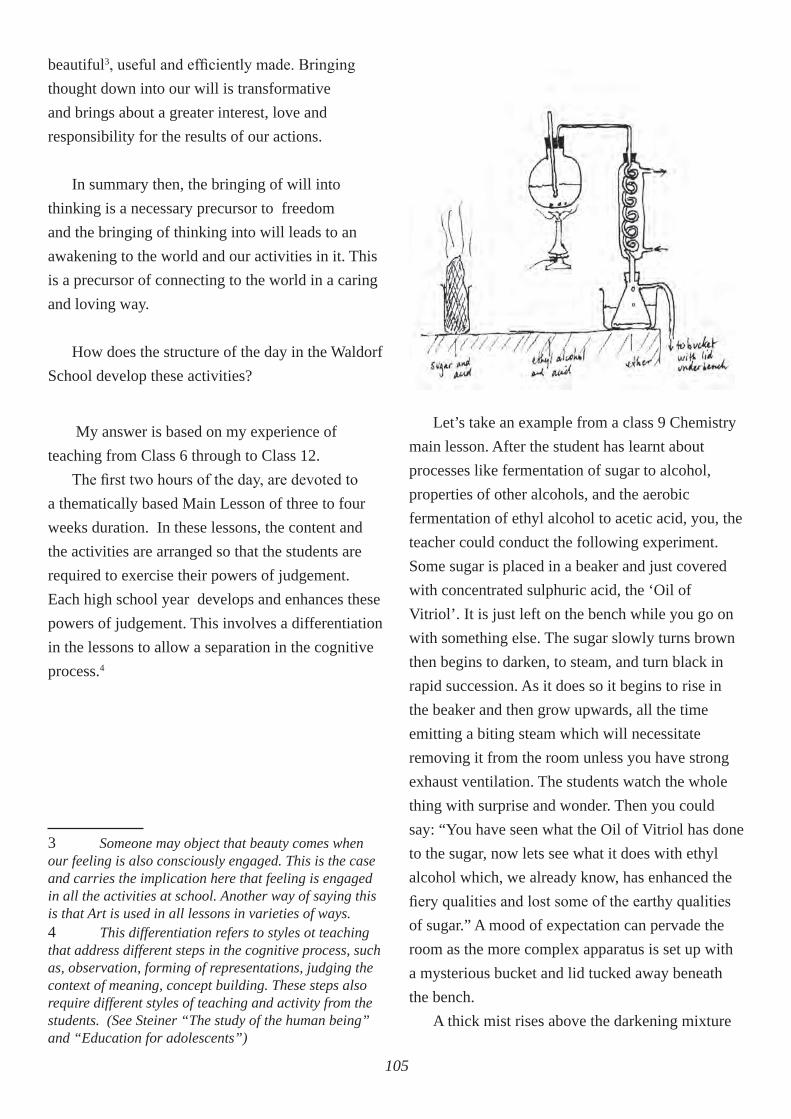
105
beautiful3, useful and efficiently made. Bringing thought down into our will is transformative and brings about a greater interest, love and responsibility for the results of our actions.
In summary then, the bringing of will into thinking is a necessary precursor to freedom and the bringing of thinking into will leads to an awakening to the world and our activities in it. This is a precursor of connecting to the world in a caring and loving way.
How does the structure of the day in the Waldorf School develop these activities?
My answer is based on my experience of teaching from Class 6 through to Class 12.
The first two hours of the day, are devoted to a thematically based Main Lesson of three to four weeks duration. In these lessons, the content and the activities are arranged so that the students are required to exercise their powers of judgement. Each high school year develops and enhances these powers of judgement. This involves a differentiation in the lessons to allow a separation in the cognitive process.4
3 Someone may object that beauty comes when our feeling is also consciously engaged. This is the case and carries the implication here that feeling is engaged in all the activities at school. Another way of saying this is that Art is used in all lessons in varieties of ways.4 This differentiation refers to styles ot teaching that address different steps in the cognitive process, such as, observation, forming of representations, judging the context of meaning, concept building. These steps also require different styles of teaching and activity from the students. (See Steiner “The study of the human being” and “Education for adolescents”)
Let’s take an example from a class 9 Chemistry main lesson. After the student has learnt about processes like fermentation of sugar to alcohol, properties of other alcohols, and the aerobic fermentation of ethyl alcohol to acetic acid, you, the teacher could conduct the following experiment. Some sugar is placed in a beaker and just covered with concentrated sulphuric acid, the ‘Oil of Vitriol’. It is just left on the bench while you go on with something else. The sugar slowly turns brown then begins to darken, to steam, and turn black in rapid succession. As it does so it begins to rise in the beaker and then grow upwards, all the time emitting a biting steam which will necessitate removing it from the room unless you have strong exhaust ventilation. The students watch the whole thing with surprise and wonder. Then you could say: “You have seen what the Oil of Vitriol has done to the sugar, now lets see what it does with ethyl alcohol which, we already know, has enhanced the fiery qualities and lost some of the earthy qualities of sugar.” A mood of expectation can pervade the room as the more complex apparatus is set up with a mysterious bucket and lid tucked away beneath the bench.
A thick mist rises above the darkening mixture
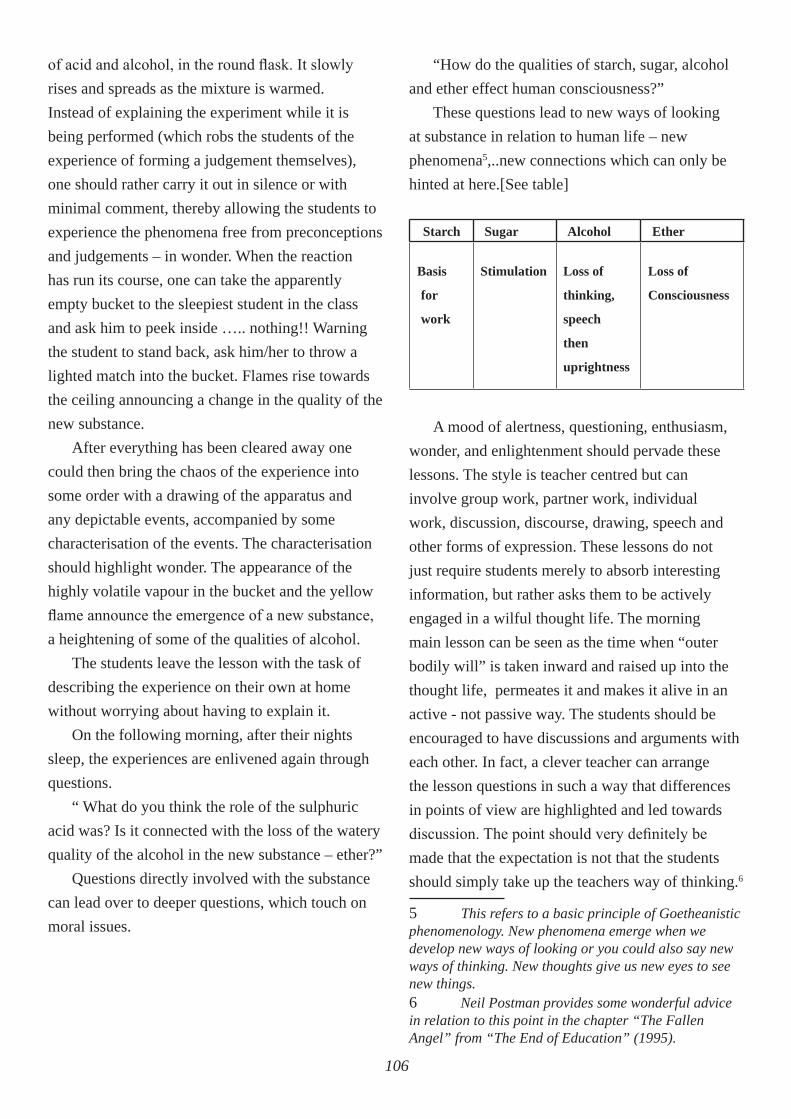
106
of acid and alcohol, in the round flask. It slowly rises and spreads as the mixture is warmed. Instead of explaining the experiment while it is being performed (which robs the students of the experience of forming a judgement themselves), one should rather carry it out in silence or with minimal comment, thereby allowing the students to experience the phenomena free from preconceptions and judgements – in wonder. When the reaction has run its course, one can take the apparently empty bucket to the sleepiest student in the class and ask him to peek inside ….. nothing!! Warning the student to stand back, ask him/her to throw a lighted match into the bucket. Flames rise towards the ceiling announcing a change in the quality of the new substance.
After everything has been cleared away one could then bring the chaos of the experience into some order with a drawing of the apparatus and any depictable events, accompanied by some characterisation of the events. The characterisation should highlight wonder. The appearance of the highly volatile vapour in the bucket and the yellow flame announce the emergence of a new substance, a heightening of some of the qualities of alcohol.
The students leave the lesson with the task of describing the experience on their own at home without worrying about having to explain it.
On the following morning, after their nights sleep, the experiences are enlivened again through questions.
“ What do you think the role of the sulphuric acid was? Is it connected with the loss of the watery quality of the alcohol in the new substance – ether?”
Questions directly involved with the substance can lead over to deeper questions, which touch on moral issues.
“How do the qualities of starch, sugar, alcohol and ether effect human consciousness?”
These questions lead to new ways of looking at substance in relation to human life – new phenomena5,..new connections which can only be hinted at here.[See table]
Starch Sugar Alcohol Ether
Basis
for
work
Stimulation Loss of
thinking,
speech
then
uprightness
Loss of
Consciousness
A mood of alertness, questioning, enthusiasm, wonder, and enlightenment should pervade these lessons. The style is teacher centred but can involve group work, partner work, individual work, discussion, discourse, drawing, speech and other forms of expression. These lessons do not just require students merely to absorb interesting information, but rather asks them to be actively engaged in a wilful thought life. The morning main lesson can be seen as the time when “outer bodily will” is taken inward and raised up into the thought life, permeates it and makes it alive in an active - not passive way. The students should be encouraged to have discussions and arguments with each other. In fact, a clever teacher can arrange the lesson questions in such a way that differences in points of view are highlighted and led towards discussion. The point should very definitely be made that the expectation is not that the students should simply take up the teachers way of thinking.6
5 This refers to a basic principle of Goetheanistic phenomenology. New phenomena emerge when we develop new ways of looking or you could also say new ways of thinking. New thoughts give us new eyes to see new things.6 Neil Postman provides some wonderful advice in relation to this point in the chapter “The Fallen Angel” from “The End of Education” (1995).
107
This independence in our thought life is the basis for freedom and can be practiced everyday in an endless variety of subject material, each of which challenges the human soul in new, subject specific ways7.
The afternoon lessons such as woodwork or physical education are devoted to the activities of the limbs, in particular bringing the light and order of thinking into the limb activity chaos. In this setting students are rarely seated at desks but rather are in workshop, lab, garden or gymnasium. The classes are run not with a teacher out the front but within the room, participating and helping the students with their own projects which might be glass blowing in the lab, cutting a mortice and tenon joint for a piece of furniture, or making a particular movement in a gymnasium. . Here the thought process precedes the activity … as a plan, a sketch, or a guide for the physical activity. The emphasis is on the bringing of conscious thought activity into the more unconscious, ‘asleep’ process of physical will.
If we look at the class 9 Chemistry example and compare it with an afternoon chemistry activity then we can ask the question:
“How is a Chemistry laboratory lesson pursued with a different teaching style based on bringing the ordering power of thought into the chaotic will?”
Here the answer is that the learning is project based. The task is outlined and discussed prior to action. The class 9 students, for example, are given a task over a term to make home medicines. The Main Lesson lead from starting experiences, to descriptions to questions which fostered understanding but now we start with a thought plan which is discussed and outlined to the students.
“To make a medicine you need to extract essences from plants, such as Calendula or
7 This means chemistry challenges us in a different way to history or to mathematics or to literature.
Lavender. You will need a solvent such as ethyl alcohol for this. It has been used since ancient times in medicine for its solvent, antiseptic and conserving properties…” And so on……….
These projects need to be broken down into manageable tasks, some individual, some group based. These tasks include a variety of steps, such as crushing grapes underfoot, glassblowing, fermenting, making hydrometers, setting up stills for distillation, rectification and steam distillation, making labels, making ointment emulsions and tinctures. Each task needs to be clarified before beginning, and then the students are left to confront them with their own skill and to learn from their mistakes. The gradual refining of substance accompanies an inner refining process. The final product after a term’s work might be a little labelled jar or bottle that represents hours of careful and skilful work. A love for the detail of life is cultivated.
The middle day lessons have a special role in which thinking, feeling and willing are in dynamic movement and exchange. During the middle lessons, amongst other subjects the pure arts are practiced, which exercise a reciprocal activity between the deed and reflection –Balance. Imagine standing before a paint easel applying colour with a brush. As you paint the colour you are making judgements that flow into actions, all mediated by the feeling. The arts provide an area of work where all three areas of thinking, feeling and willing, flow and constantly weave together. These artistic activities can and should find a place in all the lessons both morning and afternoon but in different ways.8
We can go further in appreciating the richness of this structure.
8 The idea of the artistic needs expanding to include artistic thinking, artistic movement, artistic speech…and more, not only the pure arts.
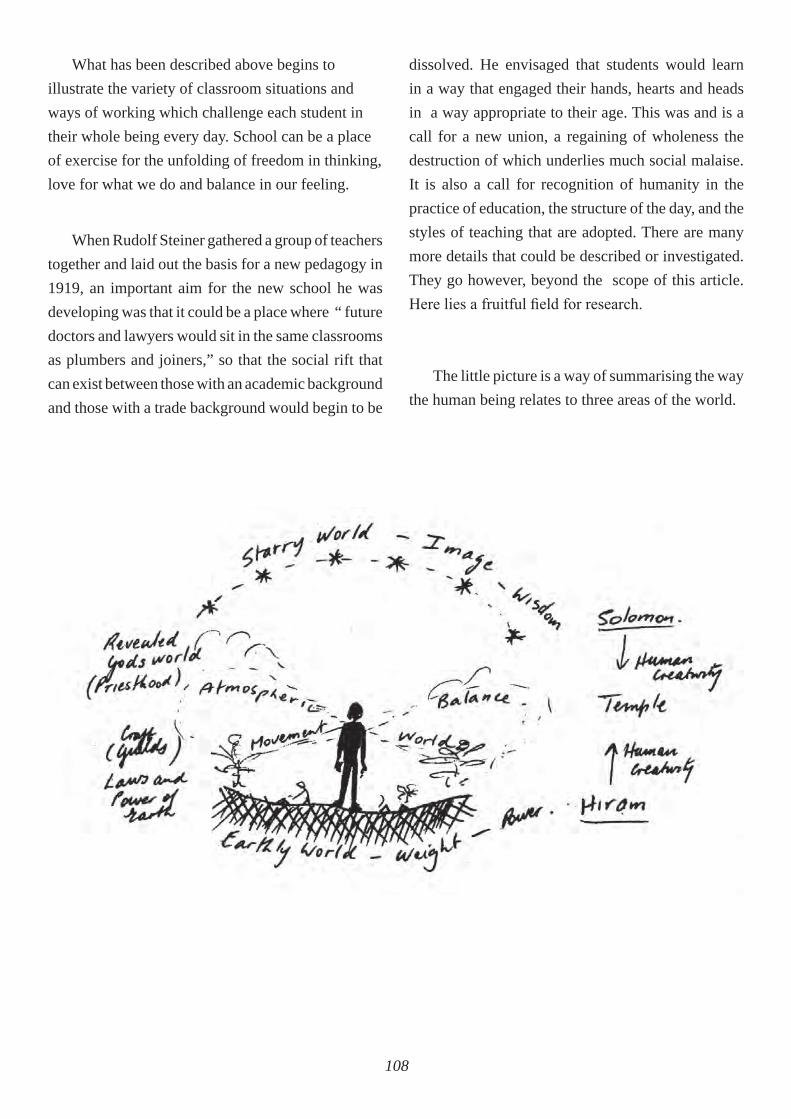
108
What has been described above begins to illustrate the variety of classroom situations and ways of working which challenge each student in their whole being every day. School can be a place of exercise for the unfolding of freedom in thinking, love for what we do and balance in our feeling.
When Rudolf Steiner gathered a group of teachers together and laid out the basis for a new pedagogy in 1919, an important aim for the new school he was developing was that it could be a place where “ future doctors and lawyers would sit in the same classrooms as plumbers and joiners,” so that the social rift that can exist between those with an academic background and those with a trade background would begin to be
dissolved. He envisaged that students would learn in a way that engaged their hands, hearts and heads in a way appropriate to their age. This was and is a call for a new union, a regaining of wholeness the destruction of which underlies much social malaise. It is also a call for recognition of humanity in the practice of education, the structure of the day, and the styles of teaching that are adopted. There are many more details that could be described or investigated. They go however, beyond the scope of this article. Here lies a fruitful field for research.
The little picture is a way of summarising the way the human being relates to three areas of the world.

