da vinci - the geniusnmnaturalhistory.org/sites/default/files/documents/education/temp... · the...
TRANSCRIPT
Da Vinci - The GeniusActivities Guide
Researched and written by Amanda Thomas
Grande ExhibitionsDa Vinci – The Genius activities
Grande Exhibitions – Da Vinci The Genius Activities 1
TABLE OF CONTENTS PAGE Book Binding 3
Activity Goal: To talk about the construction of Da Vinci’s notebooks and to give visitors an opportunity to try making a small notebook of their own.
Eye See It 7 Activity Goal: To explain some aspects of how eyes work by doing visual activities.
How Far Is It? 11 Activity Goal: To explain the function of Da Vinci’s Odometer and give visitors a chance to try their hand (or rather, feet) at measuring distances.
How Fast Does the Wind Blow? 15 Activity Goal: To explain the function of Da Vinci’s Anemometer and its use in determining wind speed.
It’s All A Matter of Perspective 20 Activity Goal: To explain linear and one‐point perspective and give visitors an opportunity to draw objects using those principles. Atmospheric perspective can also be described and possibly included in visitor exercises (see Extensions and Additional Activity Ideas).
It’s the Humidity 25 Activity Goal: To explain the function of Da Vinci’s Wax Hygrometer and its use in determining humidity in the air.
Face It 31 Activity Goal: To demonstrate how there are proportional relationships to the features of human faces and how Da Vinci and other artists used those to draw life‐like images.
Make Your Own Paint 36 Activity Goal: To explain and show how paint was made during the Renaissance.
Mirror Writing 39 Activity Goal: To have visitors try their hands at writing backwards like Da Vinci did in his notebooks.
Modern Day Da Vinci 42 Activity Goal: Relate Da Vinci’s machines and inventions to modern‐day devices. Part or all of this activity can be handed out at the beginning of the exhibit and used as guide, game, or tool to enhance the visitors’ study and understanding of each of the machines.
Parachute = Falling Gracefully 57 Activity Goal: To make a model of Da Vinci’s Parachute and see how well it works (or not!).
The Physics of Flight, or, Why Da Vinci’s Wings Don’t Work 62 Activity Goal: To demonstrate how modern‐day flight works explain why Da Vinci’s flying machines wouldn’t get off the ground.
Vitruvian Visitor 66 Activity Goal: To demonstrate how there are proportional relationships to the features of human bodies and how Da Vinci and other artists used those to draw life‐like images. Also, to give a real‐life version of the proportions described in the Vitruvian Man.

Grande ExhibitionsDa Vinci – The Genius activities
Grande Exhibitions – Da Vinci The Genius Activities 2
Will It Float? 72 Activity Goal: Discover why some things float and why other things sink by learning about density, volume, and positive, neutral, and negative buoyancy.
Anatomy in Real Life 76 Activity Goal: To relate Da Vinci’s anatomical drawings to visitors’ own bodies.
Build a Catapult 83 Activity Goal: To build and test one or more versions of a catapult.
Build a Trebuchet 92 Activity Goal: To build and test one or more versions of a trebuchet.
It’s Your Density 101 Activity Goal: To teach visitors about density by using a tool called a hydrometer.
Lifting Weights 104 Activity Goal: To explain how pulleys work and relate them to some of Da Vinci’s inventions.
Rolling Around 110 Activity Goal: This activity teaches about the uses and design of ball bearings.
Make Your Own Paintbrush 113 Activity Goal: To learn about paintbrushes and let visitors make and test out their own.
Mathematical Shapes 117 Activity Goal: To learn about Da Vinci’s mathematical drawings and have a chance to see and create his figures in three dimensions.
Mirror, Mirror On The Wall 131 Activity Goal: To challenge visitors’ intuition and encourage them to think critically.
The Ideal City 134 Activity Goal: To teach visitors about Da Vinci’s plans for an ideal city, and to give them a chance to design one of their own.
Additional Activity Ideas 138 Listed below are a few additional activity ideas that can be used in the Da Vinci exhibition.
Art Conservation 139 Activity Goal: To introduce the idea of the electromagnetic spectrum and how different lights can be used to help with art conservation.
Art Conservation Challenges 142
ANNEXURE 1 Da Vinci Anatomical Drawings 153 Please refer to attached Powerpoint Document

Grande ExhibitionsDa Vinci – The Genius activities
Grande Exhibitions – Da Vinci The Genius Activities 3
Book Binding
Activity Goal:
To talk about the construction of Da Vinci’s notebooks and to give visitors an opportunity to try making a small notebook of their own.
Related Area in Da Vinci Exhibit Codices
History and Context of Activity (background information for museum staff) Leonardo da Vinci began keeping a notebook sometime in the mid 1480s. It is not known exactly why he decided to do this but since Da Vinci was involved in so many different areas of study – anatomy, flight, hydraulics, painting, and urban planning to name a few – one can imagine him wanting some place to write down all of his inspirations before getting distracted with another ingenious invention. “The notebooks are his intellectual autobiography, the dwelling place of the Leonardo who fascinates us today. Here we encounter the working scientist-engineer.”1
Bound books existed well before the invention of printing, and the earliest books known date back to the Roman times or earlier. Those books were extremely precious, not only because they had to be hand-written, but also because their pages were made of animal skin such as sheep, goats, and cows. During the middle ages, techniques for making paper out of rags became more popular and paper and books became more affordable and easier to get.
Da Vinci’s notebooks are made out of paper, though it is not clear if he bought the paper and made his own books, or if he bought the books pre-made. Regardless, making books by hand is a time-honored tradition that is still used today.
Supplies This activity may work best as a demonstration showing the stages of the process or with a small group of visitors who have a bit of time to commit to the project. Or, pre-punching holes in the book spines so that they can be threaded without needles may make this activity go more quickly and work with a larger number of visitors.
There are many variations on how to make hand-made books, one of which will be listed in the Extensions and Additional Activity Ideas section below. A Google search for terms such as “Hand Book Binding”, (or Bookbinding – one word), may give additional ideas. The activity as written here will give basic instructions for how to make a simple book with a paper cover.
Book • 5-10 sheets of blank paper per person. Can be drawing paper or regular printer paper. No
specific size required, though the finished book will be half the size of the paper you started with.• One hand-sewing needle per person. Be aware that smaller, thinner needles may have trouble
going through several sheets of paper. Safety Notice: Use caution if using needles with smallchildren. A variation of this activity using the hole punch and yarn may be more appropriate.
• Thread, string, or yarn. Be sure to choose a size of string that will work with the needle.• Scissors• (Optional, but useful) Thimbles

Grande ExhibitionsDa Vinci – The Genius activities
Grande Exhibitions – Da Vinci The Genius Activities 4
Book Cover • Option 1: Simply leave the outside sheet of paper as the cover• Option 2: One sheet of card stock or other thick paper, the same size or slightly larger than the 5-
10 sheets of blank paper that will be the book’s pages.• (Optional) Decorations for book cover, such as glitter and colored pens/pencils.
Additional supplies • (Optional) Hole punch. Sewing the book’s spine can be made quicker and easier by punching
holes at several points along the crease. Using pre-punched holes can make it so that needlesare not necessary at all.
• (Optional) Pencils for visitors to use to sketch throughout the exhibit. A basket can be placed atthe end of the exhibit for visitors to return their pencils.
Advance Preparation Try making a book before trying it with visitors since the technique may be slightly different based on the materials at hand. It will be useful to try sewing a book with the needles and thread you have available so you can give visitors an indication how to do it and how close to make the stitches. For example, 0.5 inch (~1 cm) long stitches may make the binding very strong but may take a long time to complete, while 3 inch (7.5 cm) stitches may allow you to finish the book more quickly but may let the pages slide around too much.
Also, if you decide to use a hole punch to make sewing the spine will be quicker and easier, you may choose to pre-fold and pre-punch the papers. You can also bring the hole punch out and let the visitors do that themselves.
Introducing the Activity (background information for visitors) Da Vinci had several notebooks that he used to record his thoughts and make sketches of his ideas. He may have bought a blank book in a shop, or he may have bought paper and made his own books. Either way, the books that Da Vinci used for his notebooks were hand made. This activity is a chance to make a book, and maybe even use it to record your own thoughts and ideas!
Doing the Activity Take a stack of 5-10 sheets of paper and fold it in half (all the sheets together). These will form the pages of your book. If you are using card stock (thicker paper) as a cover, fold that in half and slip the rest of the pages inside.
Diagram 1

Grande ExhibitionsDa Vinci – The Genius activities
Grande Exhibitions – Da Vinci The Genius Activities 5
Thread the needle and tie a knot in the end of the thread. The knot should be bigger than the diameter of the needle so it won’t slip through the hole. Begin sewing along the line of the fold, pushing the needle all the way through all sheets of paper and the cover. Using the thimble may make it easier to push the needle through the pages. It may be simpler to leave the book folded, or it may be easier to keep it flat. Either way is fine; just be sure that your line of stitches is fairly straight up the line of the fold.
If you wish to use the hole punch instead of sewing needles, follow the same instructions for folding the papers. Punch the holes down the center fold, and use yarn or string to tie the papers together.
Once the entire fold has been sewn (from top to bottom), tie it off the end and cut off the remaining thread. Close the book along the fold, color or decorate the cover (if desired), and your book is finished!
Encourage visitors to use their new notebooks in the way Da Vinci did, namely by sketching what they see and writing down their thoughts. You may want to provide pencils for the visitors to use while they are in the exhibit, and encourage them to use Da Vinci’s designs as inspiration. You may even want to suggest that they try writing in Da Vinci’s distinctive mirror writing style (see “Mirror Writing” activity for ideas.)
Questions to Ask Visitors Why do you think Da Vinci kept notebooks?
Do you think Da Vinci made his own books? Why or why not?
Do you regularly use a notebook? Do you think it will be useful to you?
Extensions and Additional Activity Ideas
1. Cardboard and fabric book cover
Use cardboard and fabric or decorated paper to make fancy cover for your book.2
Supplies • Paper book as described in activity above• Ruler
• Scissors• Three pieces of cardboard:
o Two pieces of cardboard that are each 1 inch (2.5 cm) both wider and taller than yourfinished book. These will be the front and back covers.
o One piece of cardboard that is 0.5 inch (1.25 cm) wide and as tall as your book. This isthe spine.
Grande ExhibitionsDa Vinci – The Genius activities
Grande Exhibitions – Da Vinci The Genius Activities 6
• A piece of fabric or decorated paper, at least 2 inches (5 cm) wider and taller than your book whenit is laid out flat.
• Glue (white glue, PVA, or fabric glue should work)• Pencil
Create a paper book made using the activity above, with or without the card stock cover. Next, arrange the layers of the book:
• Lay the fabric or decorated paper flat on a surface (decorated side down)• Lay the three pieces of cardboard down next (from left to right: cover, spine, cover), but leave a
little gap of space between them so the notebook will be easily opened and closed.• Finally, open your paper book flat and lay it on top, to make sure positioning of the cardboard and
fabric is all right.
Once the cardboard and paper positions have been arranged, gently remove the paper book and glue the cardboard pieces to the fabric. You may want to wait a few minutes for the glue to set.
Cut the fabric so that it about 0.5 inch (1.25 cm) wider than the cardboard (cut the fabric with a wider edge if you have thick cardboard). Set your paper book on top of the cardboard with the bend of the fold centered along the cardboard spine. Open the first page of the paper book and glue it down to the cardboard. Fold the fabric up over the edge of the cardboard and glue it down to the paper, giving the book a clean, fabric-covered edge.
Wait for the glue to dry and your book is finished!
2. Make Your Own PaperThis activity would work best as either a demonstration piece or with a group of visitors who can spend a significant amount of time working on the project. The paper made in this activity could then be used by the visitors to make their own books.
There are several online resources for instructions on how to make handmade paper such as:
http://homeschoolhelperonline.com/blog/2009/05/how-to-hand-make-paper/ -- With step-by-step photos
http://www.pioneerthinking.com/makingpaper.html -- Very detailed instructions
http://www.easyfunschool.com/article1609.html -- Basic instructions
A Google search for “How to make paper” will come up with many other examples.
_______________________
1Atalay, Bulent; and Wamsley, Keith. Leonardo’s Universe: The Renaissance World of Leonardo da Vinci. (National Geographic, 2009) 121.
2”Idea 1” is largely based on the activity “A Discovery Notebook:, by Herbert, Janis. Leonardo da Vinci for Kids. (Chicago Review Press, Inc

Grande ExhibitionsDa Vinci – The Genius activities
Grande Exhibitions – Da Vinci The Genius Activities 7
Eye See It
Activity Goal: To explain some aspects of how eyes work by doing visual activities.
Related Area in Da Vinci Exhibit This activity can be used near Anatomy Sketches Codices, and Painting Reproductions.
History and Context of Activity (background information for museum staff) Starting in the early 1500s, Leonardo da Vinci studied human anatomy up close and personal by dissecting numerous human cadavers. He drew their inner workings in great detail while he searched for understanding of how the body functions. At the time Da Vinci was working, contemporary anatomical knowledge was based on anatomical texts by Galen, a Greek physician who lived until about the year 200 A.D. The problem was that Galen hadn’t actually dissected human bodies since human dissection wasn’t permitted at the time. Rather, he extrapolated his human anatomy drawings from looking at monkeys, dogs, and other animals, which not only look different on the outside, but often have very different anatomical structures on the inside as well. Despite this shortcoming, much of the anatomical knowledge in the western world was based on Galen’s writings for more than 1,000 years.
Da Vinci chose to actually dissect human bodies to learn how they work, rather than base assumptions from an outdated book. In his studies, he saw how the muscles and tendons connect, intricate details of inner organs, and even the results of age and thickening of blood vessels through arteriosclerosis. His drawings and observations even inspire modern-day physicians, and in 2005 a leading British surgeon “had taken Leonardo’s lead in revising a procedure commonly used in modern heart surgery….. [Leonardo] inspired Wells to revisit the conventional surgical approach to mitral valve repair.”1
The eye was the part that fascinated Da Vinci more than any other part of the body, and he wrote hundreds of pages worth of notes and drawings. Conventional wisdom of the time was that the eye sent out light rays that illuminated objects that then bounced back and allowed the person to see. Da Vinci felt that was wrong, and set about to study the eye to figure out how it actually works. “In order to understand the anatomy of this aqueous, mysterious organ – especially difficult to take apart because of its fluid interior – Leonardo had to perform minute dissections. To do so, he invented the technique of holding the eyeball fixed in a glutamate formed by a hard-boiled egg. (The eyeball was immersed in egg white and hard-boiled within it.) The technique of embedding the eyeball in a coagulant before slicing is routinely used today…Debunking the prevailing view of the eye as an active organ that sends out invisible rays, he proposed that the eye is a purely receptive organ that ‘sees’ by means of reflected light”. 2
Supplies
Option 1: Depth Perception • Two identical small objects, such as two cups or two blocks• Long, thin device to use as a pointer, such as a meter stick or dowel
Option 2: Blind Spot • Printed copies of optical illusions on page “Eye See It Activities: Blind Spot”• (Optional) Plastic sheet cover or lamination to protect paper
Option 3: Dominant Eye • No supplies needed, other than the visitor’s two hands and something to look at
Introducing the Activity (background information for visitors) Da Vinci was interested in figuring out how the body worked and learned through hands-on human cadaver dissection. One part of the body that fascinated him most was the eye. People at the time thought that our
Grande ExhibitionsDa Vinci – The Genius activities
Grande Exhibitions – Da Vinci The Genius Activities 8
eyes shot out rays of light that then bounced off objects and came back to our eyes, allowing us to “see” what was out there. Da Vinci knew this was wrong, and through his dissections and studies of eyes, he realized our eyes actually need light to be reflected from a light source (like the sun) rather than producing their own.
These activities are to show a few of the many different ways our eyes work.
Doing the Activity
Option 1: Depth Perception Da Vinci “discovered that having two eyes working together allows us to judge distance and depth. Each one of our eyes sees an object from a slightly different viewpoint. An image travels from each eye to our brain, which uses the combined images to calculate the exact shape and placement of the object we’re looking at.” 3 We need both eyes to judge distance, and when we close one of them, it’s more difficult to determine the distance to an object.
Place the two similarly sized objects next to each on a table or flat surface, with one of the objects further back than the other by an inch or two, or a few centimeters. Step back a few feet (approximately 1 meter), and bend or squat so that the objects are at eye level. With both eyes open, take the pointer stick and try to touch the object that is further back. Then, close one eye, and try to touch the same object with the pointer stick. Switch eyes, and try it again.
Ask the visitors if it is easier or harder to touch the object with one of their eyes closed; it will probably be more difficult with only one eye. Since each of our eyes sees objects from a slightly different angle, our brain interprets that difference as depth. With one eye closed, our brain only has one source of visual information and nothing to compare it with.
Option 2: Blind Spot
Each of our eyes has a “blind spot” in the center. It’s the place at the back of the eyeball where the optic nerve exits the eye and eventually attaches to the brain, and there are no receptor nerves at that spot to receive input from the outside world. Normally our brains can fill in the gaps from the blind spots and we don’t even notice. However, when we do some simple tests, we can see just where our blind spot exists.
Print out the sheet marked “Eye See It Activities: Blind Spot”, and give a copy to visitors. (It may be useful to laminate the paper or put it in a plastic sheet protector to make it last longer.) Instructions are on the sheet but are basically as follows: ask the visitor to close his right eye and stare at the shape on the right (a circle in Activity 1, a square in Activity 2). Have the visitor move his head closer or farther away from the paper, and at a certain point, the brain will fill in the missing information. In Activity 1, the line will appear to be unbroken. In Activity 2, the white circle will appear to go away and the vertical lines will all be unbroken.
Option 3: Dominant Eye
Have the visitors hold his arms out straight in front of them, and form a triangle with the forefingers and thumbs. With both eyes open, have them line up his finger triangle so that it frames an object. It makes the demonstration more dramatic if you look at an object farther away, and make sure it’s not an object that will likely move, (like a person).
Have the visitors close one eye and look through the finger triangle, then open that one and close the other eye. With one of the eyes closed, the object will appear to stay in the same place within the finger triangle. However, with the other eye closed, the object will move out of the triangle.
This happens because we usually have one dominant eye, meaning that our brain favors the visual input from one eye over the other. We don’t usually notice it until someone points it out. Most people are right-eye dominant, some are left-eye dominant, and a very few people do not have a dominant eye. When we line an object up using both eyes, our brain favors our dominant eye. When that eye is closed, we see more clearly the different angle through which our non-dominant eye sees the world.

Grande ExhibitionsDa Vinci – The Genius activities
Grande Exhibitions – Da Vinci The Genius Activities 9
Questions to Ask Visitors Did any of these eye activities surprise you?
(If the visitor has glasses) Did any of these activities change when you took your glasses off? Why, or why not?
Extensions and Additional Activity Ideas
1. Other Optical Activities Online
For many suggestions for other optical activities and demonstrations, visit: http://faculty.washington.edu/chudler/chvision.html
Do a Google search for “Optical Illusions” and the options are endless! Wikimedia Commons has many copyright-free possibilities: http://commons.wikimedia.org/wiki/Optical_illusion
_______________________
1Atalay, Bulent; and Wamsley, Keith. Leonardo’s Universe: The Renaissance World of Leonardo da Vinci. (National Geographic, 2009) 246.
2 Ibid, 254.
3 Herbert, Janis. Leonardo da Vinci for Kids. (Chicago: Chicago Review Press, Incorporated, 1998) 42.
“Eye See It Activities: Blind Spot” are based on images from: http://faculty.washington.edu/chudler/chvision.html

Grande ExhibitionsDa Vinci – The Genius activities
Grande Exhibitions – Da Vinci The Genius Activities 10
Eye See It Activities: Blind Spot
Activity 1 Close your right eye, and look at the black dot on the right using only your left eye. Move your head closer or farther away from the paper until the black line does not look broken.
Activity 2 Close your right eye, and look at the black square on the right using only your left eye. Move your head closer or farther away from the paper until the white circle is filled in and all the vertical lines are continuous.

Grande ExhibitionsDa Vinci – The Genius activities
Grande Exhibitions – Da Vinci The Genius Activities 11
How Far Is It?
Activity Goal:
To explain the function of Da Vinci’s Odometer and give visitors a chance to try their hand (or rather, feet) at measuring distances.
Related Area in Da Vinci Exhibit Civil Machines, specifically the Odometer
History and Context of Activity (background information for museum staff) Odometers are devices that measure distances and have been in use since the ancient Greek and Roman eras. Some of the stories about Alexander the Great (d. 323 B.C.) record distances between cities so accurately – some less than 5% off of modern measurements over hundreds of miles – that it is assumed that they used some sort of mechanical device even though no evidence of one has been found.
The first known description of an odometer was by Vitruvius, the Roman architect from the first century B.C. whose writings on architectural and human proportions were the inspiration for Da Vinci’s Vitruvian Man. Vitruvius’s odometer was based on a wheel with a diameter of 4 feet (1.2 meters) that would turn 400 times in a Roman mile (about 1400m), and Da Vinci based his odometer on Vitruvius’s description.
The odometer had a wheel that would turn as it was pushed along the road. Above it was a gear mechanism with cavity that was filled with small stones or balls. The wheel and gear mechanism were interlocked so that for every revolution of the wheel, the gear would click forward to line up with a hole, and the small stone or ball would fall into the box. At the end of the journey one would just have to count the number of stones, multiply by the circumference of the wheel, and they’d have the distance traveled.
Supplies • Measuring tape, yardstick, or meter stick• Colored tape, such as masking, painter’s, or duct tape. The tape will be used for marking
distances on the floor, so be sure that it can be removed without leaving residue.• Paper and pen or pencil for recording distances.• Calculator(s)
Advance Preparation Find a 10 foot (3 meter) space (at minimum) within the exhibition along a wall or somewhere else that visitors can walk along without blocking others’ view of the pieces on exhibit. Use the tape to put a starting point on one end of the designated space. Use the measuring tape, yardstick, or meter stick to mark out a distance of 10 feet (3 meters) or more (preferably more, if you have room). Mark the end point with tape. You can choose to indicate the distance by writing on the tape or in some other way, or you may prefer to leave the distance blank so visitors are challenged to figure it out. You may also want to mark intervals (quarter of the way, halfway, etc), but that’s not required.
Grande ExhibitionsDa Vinci – The Genius activities
Grande Exhibitions – Da Vinci The Genius Activities 12
Introducing the Activity (background information for visitors) An odometer is a device that measures distance, and Da Vinci’s odometer was based on a description of the machine ancient writings of the Roman architect Vitruvius (the same person who was the inspiration for the Vitruvian Man). Da Vinci’s odometer has a wheel at the front with a known diameter and circumference, some interlocking gears above that have special cavities that are filled small stones or balls, and handles to push the whole thing along like a modern-day wheelbarrow. The idea is that as someone pushes it along, the wheel at the front turns. Each time the wheel turns all the way around (completes a revolution) the gears at the top turn too. Each time the gears at the top turn, one of the small stones or balls drops into a container below. At the end of the journey, you count the number of stones or balls that have dropped through, multiply that times the size of the wheel, and you have your distance.
This activity will allow you to turn yourself into an odometer. With Da Vinci’s odometer, you multiply a known length (wheel circumference) times the number of turns, and you have calculated a distance. With the step odometer in this activity, you multiply a known length (foot or stride length) times the number of steps, and you have calculated a distance.
Doing the Activity Use the distance taped/marked off in the Advance Preparation section above. You may choose to tell the visitors the length of the distance (e.g. “10 feet”), or you may choose to keep that secret and see how close the visitors get using their own measurements.
Lay the measuring tape, yardstick, or meter stick on the floor and use it to measure: 1) The length of the visitor’s foot (shoes on or off, their choice)- OR - 2) The length of the visitor’s stride. Start with the toes at the beginning line. (Starting with the heel at
the beginning line will make the first stride length inaccurate). The visitor may want to do a fewsteps to get an average stride length.
You can also measure both foot and stride length and have the visitor try the activity more than once.
Once the foot or stride length has been determined, have the visitor start at the beginning line and walk in a straight line to the end. Count the number of steps and record them.
• If using the length of the visitor’s foot as the measure, make sure he or she steps heel to toe (onefoot right in front of the other with the front and back touching) so that the distance can bemeasured accurately.
• If the visitor is using the stride as measure, make sure he or she uses roughly the same length ofstride while walking the distance.
Use a calculator (if necessary) and multiply the length of the foot or stride times the number of steps. See if that matches the length of the distance set up at the beginning.
Examples: 1) Foot length: 9.25 in (23.5 cm)
Steps taken: 13.259.25 in x 13.25 steps = 122.5 in, about 10 feet - OR - 23.5 cm x 13.25 steps = 311 cm
2) Stride length: 22 in (56 cm)Steps taken: 5.5
22 in x 5.5 steps = 121 in, about 10 feet - OR – 56 cm x 5.5 steps = 308 cm
Grande ExhibitionsDa Vinci – The Genius activities
Grande Exhibitions – Da Vinci The Genius Activities 13
Questions to Ask Visitors Can you think of a reason that Da Vinci would have wanted to know distances?
Can you think of a time when using steps to measure a distance would be useful in your own life? (For example: trying to measure the size of a room without a measuring tape)
Do we use odometers today? Where? (For example: in cars or bikes)
Extensions and Additional Activity Ideas
1. Calculate the Circumference of Da Vinci’s Odometer, and Use That to Calculate Distance
Supplies • Measuring tape• Calculator• Paper, pens or pencils
Advance Preparation Measure the diameter of the wheel on Da Vinci’s odometer. Because of the delicacy of the exhibits and the fact that visitors are not allowed to touch the exhibits, measure the diameter of the wheel gently when the exhibition is not open to the public. Record the diameter and just tell visitors the measurement.
Doing the Activity Calculate the circumference of the wheel on Da Vinci’s odometer by using the formula:
Π x D = C Pi x Diameter = Circumference
Example: If the diameter of the wheel is 45 cm * 3.14 x 45 cm = 141.3 cm
You can then ask visitors questions to get them to think about how the odometer would be used. Such as:
• If the odometer’s wheel turns 1000 times, how far will the odometer have traveled?141.3 cm (circumference) x 1000 turns = 141,300 cm, or 1.413 km
• How many turns will the odometer make in 1 kilometer?1 km = 100,000 cm100,000 cm / 141.3 cm (circumference) = 707.7 turns
*Note: The odometer was not available for measure when this activity was written, so 45 cm is anestimated value. Measure the odometer in person for an accurate number.
2. Calculate the Circumference of Soda Can and Use That to Measure Distance
Supplies • Soda can (or other cylindrical or wheel-shaped object, such as a paper tube)• Measuring tape• Calculator• Paper, pens or pencils
Measure the diameter of the soda can (or other cylindrical object). Calculate the circumference using the formula described in Extension Activity 1:
Π x D = C

Grande Exhibitions
Da Vinci – The Genius activities
Grande Exhibitions – Da Vinci The Genius Activities 14
Pi x Diameter = Circumference Measure a few feet or a meter or two on a flat surface, such as a tabletop or a small area on the floor. Starting at one end of the space, roll the can to the other end of the space and count how many revolutions the can makes. Multiply the number of revolutions times the circumference of the can to calculate the distance.
Grande Exhibitions
Da Vinci – The Genius activities
Grande Exhibitions – Da Vinci The Genius Activities 15
How Fast Does the Wind Blow?
Activity Goal:
To explain the function of Da Vinci’s Anemometer and its use in determining wind speed. Related Area in Da Vinci Exhibit Flight Studies Machines, specifically the Anemometer. History and Context of Activity (background information for museum staff) Da Vinci was fascinated with flight and longed to create a method for humans to fly. Many of the sketches in his notebooks are dedicated to flying machines and other related inventions for measuring the “quality and thickness of the air”. One such invention was the Anemometer, a device used to determine how fast the wind was blowing. By calculating wind speed and using other measurements, Da Vinci hoped that someday he would design a machine that would allow people to achieve flight. Da Vinci was not the first to invent an anemometer; it was first created around 1450 by another man working in Florence, the architect Leon Battista Alberti. Alberti’s mechanical disk anemometer was an inspiration to Da Vinci who took the design and added a suggestion for determining wind speed over time. Supplies
• Cardboard box, such as a shoebox (or similar size) • Scissors • Adhesive tape • Ruler • Pen or pencil • Playing card, bookmark, or strip of thick paper (such as card stock) • Fan, either handheld, or electric with a low speed
Advance Preparation This activity can be done in several different ways for different audiences, such as:
• A demonstration by museum staff to visitors (staff person using a pre-built anemometer). • An activity in a classroom setting with a group of visitors (each person or small groups is given
supplies and makes their own anemometer). • A communal activity with multiple visitors (each visitor gets to help in the building process).
In any of the above methods for doing this activity, visitors can be involved in testing the anemometer by using the fan and observing the results. Try building an anemometer first before building one with visitors. There will be some variance in design based on the cardboard box or other materials on hand, and it will be useful to test what size and kind of paper works best for the thin sheet that hangs down in the front of the anemometer. It is also a good idea to test the fan (either handheld or electric) to see what kinds of wind speed are produced and how easily they are measured.
Introducing the Activity (background information for visitors) Da Vinci had a lifelong ambition to figure out a way to fly, and many of his machines and inventions were tools created to help make flight possible. Knowing the speed of the wind is an important thing to know if you’re trying get airborne, and Da Vinci’s anemometer is a way to measure how fast the wind is blowing.

Grande Exhibitions
Da Vinci – The Genius activities
Grande Exhibitions – Da Vinci The Genius Activities 16
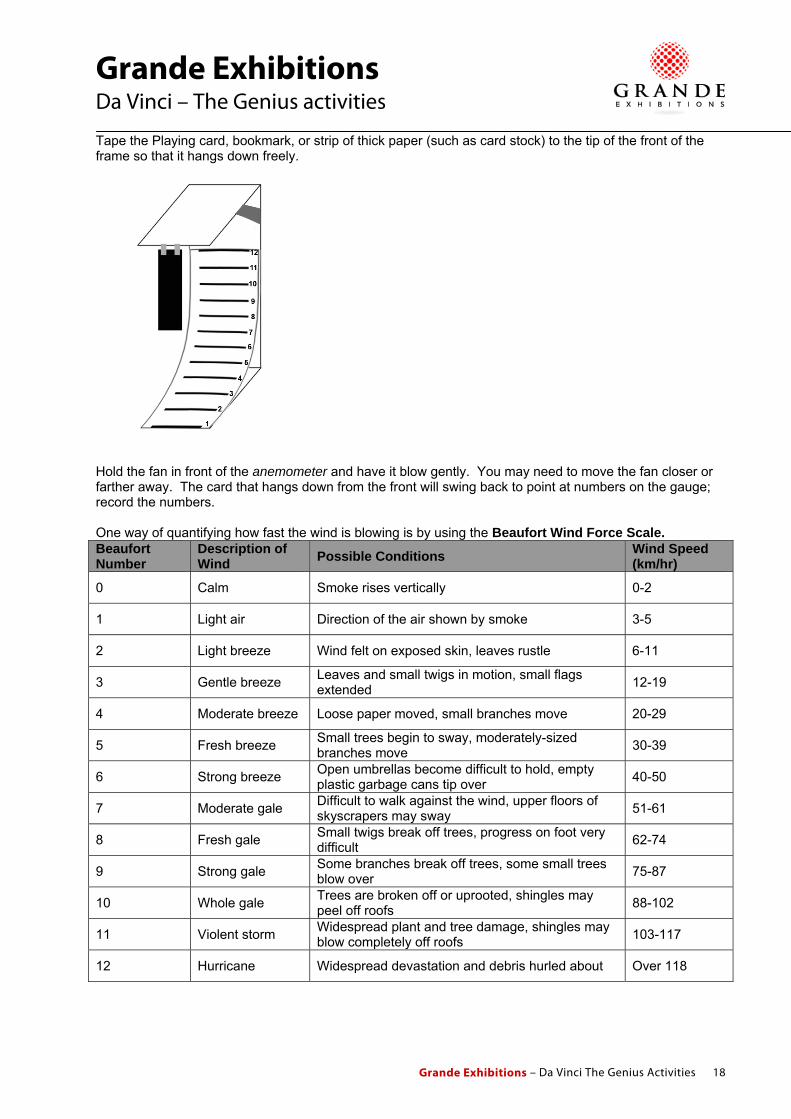
The anemometer has a free-hanging card that is attached at one end, and a numbered scale. When the wind blows, it blows the card so that it swings back and points towards the numbers on the scale. By recording which number the card points to, you can estimate the wind speed. Doing the Activity Cut off the top and bottom of the box, leaving four sides.
Cut along one of the corners. This will be the anemometer frame.

Grande Exhibitions
Da Vinci – The Genius activities
Grande Exhibitions – Da Vinci The Genius Activities 17
Measure, mark, and number equal lengths along the long open side.
Turn it up on its side, bend the gauge towards the back of the frame, and attach it with tape.
(Optional) The frame top may need to be reinforced with a cardboard brace. Create a brace as necessary.
Grande Exhibitions
Da Vinci – The Genius activities
Grande Exhibitions – Da Vinci The Genius Activities 18
Tape the Playing card, bookmark, or strip of thick paper (such as card stock) to the tip of the front of the frame so that it hangs down freely.
Hold the fan in front of the anemometer and have it blow gently. You may need to move the fan closer or farther away. The card that hangs down from the front will swing back to point at numbers on the gauge; record the numbers. One way of quantifying how fast the wind is blowing is by using the Beaufort Wind Force Scale. Beaufort Number
Description of Wind Possible Conditions Wind Speed
(km/hr)
0 Calm Smoke rises vertically 0-2
1 Light air Direction of the air shown by smoke 3-5
2 Light breeze Wind felt on exposed skin, leaves rustle 6-11
3 Gentle breeze Leaves and small twigs in motion, small flags extended 12-19
4 Moderate breeze Loose paper moved, small branches move 20-29
5 Fresh breeze Small trees begin to sway, moderately-sized branches move 30-39
6 Strong breeze Open umbrellas become difficult to hold, empty plastic garbage cans tip over 40-50
7 Moderate gale Difficult to walk against the wind, upper floors of skyscrapers may sway 51-61
8 Fresh gale Small twigs break off trees, progress on foot very difficult 62-74
9 Strong gale Some branches break off trees, some small trees blow over 75-87
10 Whole gale Trees are broken off or uprooted, shingles may peel off roofs 88-102
11 Violent storm Widespread plant and tree damage, shingles may blow completely off roofs 103-117
12 Hurricane Widespread devastation and debris hurled about Over 118
Grande Exhibitions
Da Vinci – The Genius activities
Grande Exhibitions – Da Vinci The Genius Activities 19
The fan may make the anemometer record Strong Gale or above, depending on how hard the fan is blowing. Obviously, the anemometer is measuring only a small area of wind and it doesn’t mean that there is a Strong Gale throughout the exhibition. If visitors ask about this, have the visitor stand in front of the fan and ask them to imagine being in that kind of wind outside. It may be a good opportunity to talk to the visitors about how scientific models can’t always take all variables into account, but the data collected using scientific models can still be useful. Questions to Ask Visitors
Why would knowing the wind speed be useful when trying to fly? Do you think Da Vinci’s anemometer works? Why or why not? Have you ever experienced a strong wind?
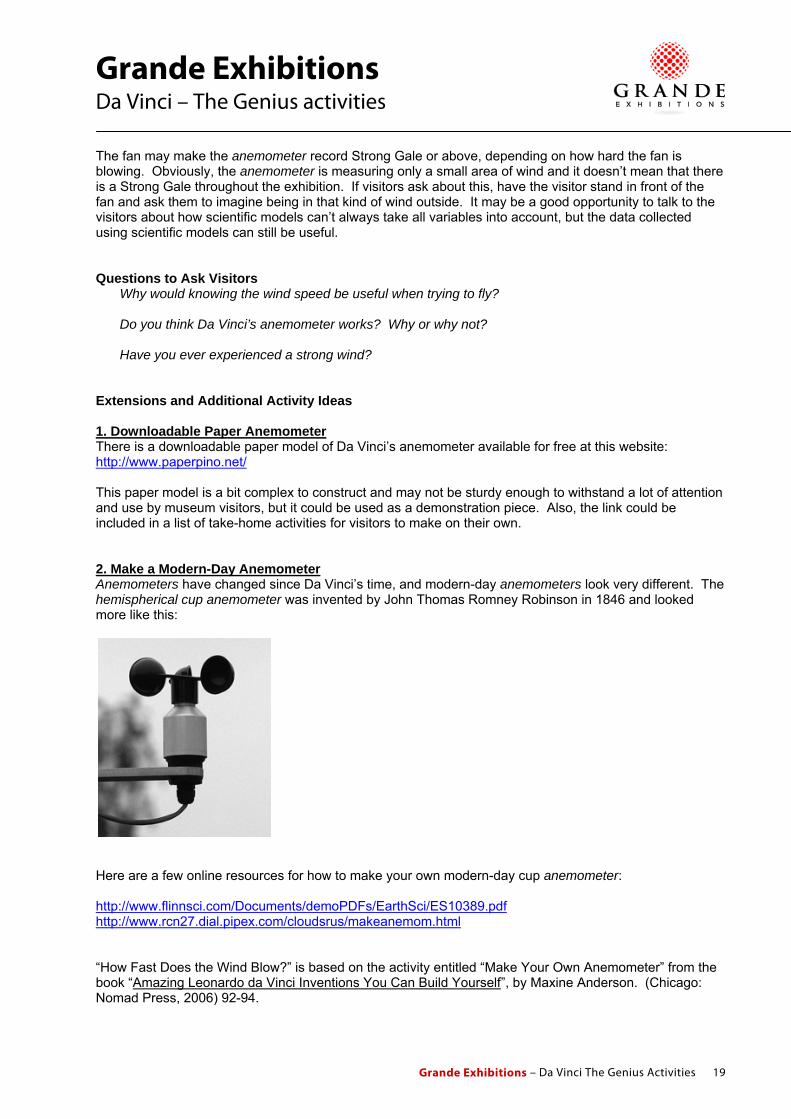
Extensions and Additional Activity Ideas 1. Downloadable Paper Anemometer There is a downloadable paper model of Da Vinci’s anemometer available for free at this website: http://www.paperpino.net/ This paper model is a bit complex to construct and may not be sturdy enough to withstand a lot of attention and use by museum visitors, but it could be used as a demonstration piece. Also, the link could be included in a list of take-home activities for visitors to make on their own. 2. Make a Modern-Day Anemometer Anemometers have changed since Da Vinci’s time, and modern-day anemometers look very different. The hemispherical cup anemometer was invented by John Thomas Romney Robinson in 1846 and looked more like this:
Here are a few online resources for how to make your own modern-day cup anemometer: http://www.flinnsci.com/Documents/demoPDFs/EarthSci/ES10389.pdf http://www.rcn27.dial.pipex.com/cloudsrus/makeanemom.html “How Fast Does the Wind Blow?” is based on the activity entitled “Make Your Own Anemometer” from the book “Amazing Leonardo da Vinci Inventions You Can Build Yourself”, by Maxine Anderson. (Chicago: Nomad Press, 2006) 92-94.

Grande Exhibitions
Da Vinci – The Genius activities
Grande Exhibitions – Da Vinci The Genius Activities 20
It’s All A Matter of Perspective
Activity Goal:
To explain linear and one-point perspective and give visitors an opportunity to draw objects using those principles. Atmospheric perspective can also be described and possibly included in visitor exercises (see Extensions and Additional Activity Ideas). Related Area in Da Vinci Exhibit Musical, Optical, and Time Instruments, specifically the Prospectograph. This activity can also be used near Painting Reproductions, Secrets of the Mona Lisa, and the video and reproduction of The Last Supper. History and Context of Activity (background information for museum staff) The Renaissance was an age of new discoveries and techniques in art, and the use of perspective sets apart Renaissance paintings from those that came before. Where medieval painters depicted people as flat, two-dimensional figures that often floated on gold backgrounds, Renaissance artists tried to give their figures weight and depict them as if they existed in real space. Some Renaissance artists got so good at making their paintings look real that it is almost as if you are looking through a window at a real-life scene on the other side of the glass. Da Vinci said, “Perspective, with respect to painting, is divided into three principle parts, of which the first is the diminution in size of bodies at various distances; the second part is that which deals with the diminishing in color of these bodies; the third is the diminution in distinctness of the shapes and boundaries which the bodies exhibit at various distances.” In other words, Da Vinci was saying that in order to have a painting look like it exists in real space, that:
• Objects that are closer are bigger, and objects farther away are smaller • Objects that are closer are brighter, and objects farther away are darker • Objects that are closer are clearer, and objects farther away are blurrier
Linear perspective is the term used to describe the structure or grid (either real or imaginary) that an artist uses to create the relative sizes and closeness of objects in a painting. Atmospheric perspective is the term used to describe the color and clarity shift that helps indicate how far back into the distance an object in a painting lies. Da Vinci designed a device called Prospectograph that could help him to draw objects using linear perspective. You can see examples of linear perspective in several of his paintings, especially The Last Supper, and The Annunciation. He also used atmospheric perspective to give his paintings a sense of depth, and this is apparent in several of his paintings, including Mona Lisa, The Last Supper, The Annunciation, The Virgin of the Rocks, The Litta Madonna, and The Benois Madonna. Supplies
• Table and chairs for visitors to use while doing activity. • Flat, rigid, clear sheet of plastic, anywhere from 5 in (12 cm) square to letter or A4 paper-sized (or
larger). Anything from Plexiglas to the clear cover of a CD case can be used. A piece of glass can also be used, but there is the danger that it could break.
• Some sort of device to keep the plastic sheet mentioned above in a vertical position. There are many ways of doing this, depending on materials at hand. It can be supported between heavy books, propped up in a picture frame, a piece of wood can be cut with a small groove for the plastic to be slotted inside, or the visitor or staff person could simply put a hand on the top and keep it vertical and stable while drawing.

Grande Exhibitions
Da Vinci – The Genius activities
Grande Exhibitions – Da Vinci The Genius Activities 21
• A board or some sort of rigid, opaque material with a hole or slot cut into it near the top (see diagram below). This board will need to sit vertically in a position where visitors can look through the hole with one eye.
• Dry erase pens, or other markers that can be used on plastic and wiped off between visitors. • Small objects such as blocks, balls, flower vases, cups, or other objects that have defined, clear
shapes and that would be simple to draw. Try to pick items with one or two colors only, since objects with distinct or busy patterns may distract from the activity.
• A white or neutral background to place behind the objects. Foam core, poster board or just a blank wall is fine.
• Towels to clean off plastic sheet. (Spray cleaner may be useful too.)
http://plus.maths.org/issue23/features/criminisi/index.html
Advance Preparation
• Gather supplies • It may be useful to print (and possibly laminate) some pictures showing linear or one-point
perspective to show visitors. City scenes with straight streets going off into the distance are good. There are several useful copyright-free images in Wikimedia Commons: http://commons.wikimedia.org
• If you do print pictures, it may be helpful to take a clear plastic sheet, such as a page protector or overhead transparency, and trace the linear perspective lines in the picture. The clear plastic sheet can be laid over the picture to emphasize the lines and vanishing point to the visitors.
Grande Exhibitions
Da Vinci – The Genius activities
Grande Exhibitions – Da Vinci The Genius Activities 22
Example:
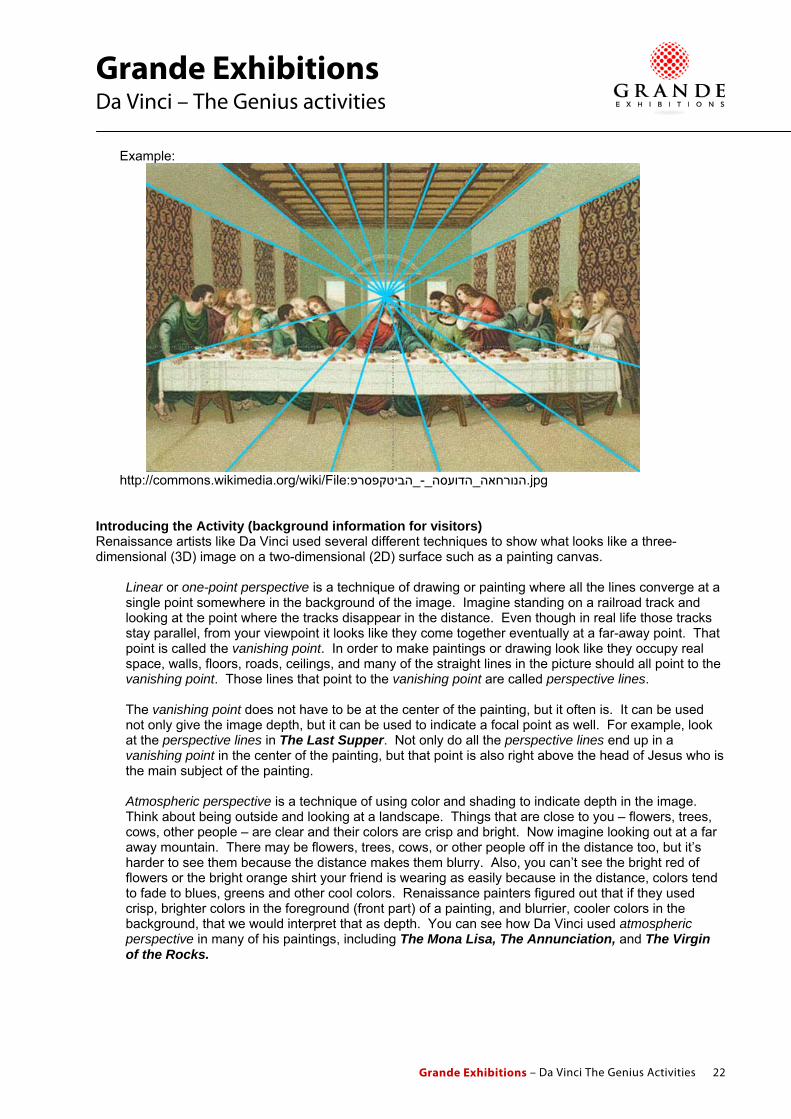
http://commons.wikimedia.org/wiki/File:הנורחאה_הדועסה_-_הביטקפסרפ.jpg Introducing the Activity (background information for visitors) Renaissance artists like Da Vinci used several different techniques to show what looks like a three-dimensional (3D) image on a two-dimensional (2D) surface such as a painting canvas.
Linear or one-point perspective is a technique of drawing or painting where all the lines converge at a single point somewhere in the background of the image. Imagine standing on a railroad track and looking at the point where the tracks disappear in the distance. Even though in real life those tracks stay parallel, from your viewpoint it looks like they come together eventually at a far-away point. That point is called the vanishing point. In order to make paintings or drawing look like they occupy real space, walls, floors, roads, ceilings, and many of the straight lines in the picture should all point to the vanishing point. Those lines that point to the vanishing point are called perspective lines. The vanishing point does not have to be at the center of the painting, but it often is. It can be used not only give the image depth, but it can be used to indicate a focal point as well. For example, look at the perspective lines in The Last Supper. Not only do all the perspective lines end up in a vanishing point in the center of the painting, but that point is also right above the head of Jesus who is the main subject of the painting. Atmospheric perspective is a technique of using color and shading to indicate depth in the image. Think about being outside and looking at a landscape. Things that are close to you – flowers, trees, cows, other people – are clear and their colors are crisp and bright. Now imagine looking out at a far away mountain. There may be flowers, trees, cows, or other people off in the distance too, but it’s harder to see them because the distance makes them blurry. Also, you can’t see the bright red of flowers or the bright orange shirt your friend is wearing as easily because in the distance, colors tend to fade to blues, greens and other cool colors. Renaissance painters figured out that if they used crisp, brighter colors in the foreground (front part) of a painting, and blurrier, cooler colors in the background, that we would interpret that as depth. You can see how Da Vinci used atmospheric perspective in many of his paintings, including The Mona Lisa, The Annunciation, and The Virgin of the Rocks.
Grande Exhibitions
Da Vinci – The Genius activities
Grande Exhibitions – Da Vinci The Genius Activities 23
Doing the Activity Set up the small objects (block, ball, etc.) so that they are visible when looking through the hole in the board. Put one or more of the objects up close, and other objects further back. (The visitors may want to arrange the items themselves.) Have the visitor sit in the chair and look through the hole in the board with one eye. With one of the dry-erase pens, have them draw/trace the outlines of the objects on the plastic sheet. Make sure that they draw what they see, not what they think a block or ball should look like. Note: the color of the pen is not important in this part of the activity. If the visitor wishes to use different colored pens, that’s fine, but not required. Atmospheric perspective may be a bit difficult to get across in this activity because of the relative shallowness of the scene, but it could be emphasized by using red or orange pens to outline the closest objects and blue or green pens to outline those in the background. The extension activity Atmospheric Perspective Coloring will expand on that technique. Once the visitor finishes drawing the outlines of the objects, have him or her sit back and look at the drawing. It should show an accurate representation of what they saw from their viewpoint. The visitors can draw in the perspective lines and find the vanishing point in their drawing if they wish. Questions to Ask Visitors
Can you find any examples of linear perspective in Da Vinci’s paintings? • Do things in the front of the scene look larger or smaller than things in the back of the scene? • Can you find lines that lead to a vanishing point, and if so, where is the vanishing point?
• Can you find any examples of atmospheric perspective in Da Vinci’s paintings?
• Do things in the front of the scene look brighter or darker than things in the back of the scene?
• Do things in the front of the scene look clearer or blurrier than in the back of the scene?

Grande Exhibitions
Da Vinci – The Genius activities
Grande Exhibitions – Da Vinci The Genius Activities 24
Extensions and Additional Activity Ideas 1. Atmospheric Perspective Coloring Supplies
• Colored pencils, pens, or crayons • Paper; either blank or with black & white outline drawing of an outdoor scene or one of Da Vinci’s
paintings. A Google image search for “coloring pages” and other words such as “landscape”, “outdoor”, or a specific painter’s name may be useful.
A full-size black & white drawing of the Mona Lisa designed specifically for coloring is available at this website: http://arthistory.about.com/od/coloring_pages/l/n_mona_lisa_cp.htm
© 2008 Margaret Esaak; Licensed to About.com. http://arthistory.about.com/ Instructions Describe atmospheric perspective – brighter, warmer colors such as red and yellow up close, darker, cooler colors such as blue and green in the background – and let visitors try their hands at it. Visitors can use a blank piece of paper and trace their drawing that they created in the main activity (above), or they can color in a pre-printed black & white coloring pages drawing. _______________________

Grande Exhibitions
Da Vinci – The Genius activities
Grande Exhibitions – Da Vinci The Genius Activities 25
It’s the Humidity
Activity Goal:
To explain the function of Da Vinci’s Wax Hygrometer and its use in determining humidity in the air. Related Area in Da Vinci Exhibit Flight Studies Machines, specifically the Wax Hygrometer. History and Context of Activity (background information for museum staff) Da Vinci was fascinated with flight and longed to create a method for humans to fly. Many of the sketches in his notebooks are dedicated to flying machines and other related inventions. One such invention was the Wax Hygrometer, a device used to determine the amount of humidity in the air. Calculating and recording humidity can help predict weather patterns and aid in the preparation for flight. Supplies The measurements made with this device are most dramatically different when it can be tested over time, or when it can be tested in two spaces that have different levels of humidity. One suggestion for creating a humid box is included below. Otherwise, it can simply be used a hands-on version of the Wax Hygrometer exhibit, or as a suggestion for an activity for visitors to do at home.
• Two small containers that are equal in size and weight, such as two plastic cups • A small piece of wax; you can cut up a candle (example: a quarter or half of a tea light candle), or
melt a small bit of wax into the bottom of only one of the small containers listed above • Cotton balls or a small sponge • String • Scissors • Tape • Clothes hanger, either wire or plastic • Small weight for a plumb bob, (a key or something similar size and weight works well) • (Optional) Pen and ruler • (Optional) Humid box for demonstration
o Large clear plastic box (example: Plexiglass display case or large aquarium), with one side open and the open side down. Must be big enough to hold a humidifier (or container of hot water) as well as the hygrometer when finished
o Some way for the hygrometer to hang from the inside of the plastic box, such as a hook attached the inside top of the box.
o A small humidifier and water, or a container of hot water (Safety notice: be careful not to spill or splash the hot water because it can easily burn visitors.)
o Large, flat plastic tub or plastic sheeting to collect water that drips down inside the plastic box

Grande Exhibitions
Da Vinci – The Genius activities
Grande Exhibitions – Da Vinci The Genius Activities 26
Advance Preparation
• Build a hygrometer and test how much wax and cotton/sponge is needed in each container to make it hang level.
• If you are using the optional humid space (plastic box), build one and test it to see how much water is needed and how different the measurements are when compared to the ambient humidity in the exhibition hall.
Introducing the Activity (background information for visitors) Da Vinci had a lifelong ambition to figure out a way to fly, and many of his machines and inventions were tools created to help make flight possible. His Wax Hygrometer was designed to test and measure the humidity in the air. Being able to tell the amount of humidity (water) in the air is an important thing to know if you’re trying get airborne. Measuring the humidity in the air over time can also help predict the weather and tell you when flying conditions will be best. The Wax Hygrometer is essentially a scale that balances a piece of wax with pieces of cotton. On a dry day, put a piece of wax on one side of the Wax Hygrometer scale, and a bunch of cotton on the other side so they balance. Over time, as the humidity in the air increases, the cotton will absorb the water in the air and will become heavier, while the wax will not absorb water and will stay the same. When the cotton is heavier because it is full of water, the Wax Hygrometer scale will tip so that the cotton will hang below the wax. When it becomes drier again (less humid), the cotton will also dry out and will be level with the wax once more. In general, higher humidity indicates that a storm or rain is more likely. Doing the Activity
• Cut five pieces of string of equal length, around 12 in (30 cm) long. Set one piece of string aside. • Take one piece of string and tape one end to the top of a cup, loop the string over the horizontal
bar of the hanger, and tape the other end of the string to the cup so the cup hangs from the hanger. Do the same thing with the second piece of string on the same cup so it hangs from four supports. Tape the other two pieces of string to the other cup in the same way. (See Diagram 1)
Diagram 1 • Tie one end of the remaining piece of string to the top of the hanger and attach a small weight to
the other end to make a plumb bob. (See Diagram 2)

Grande Exhibitions
Da Vinci – The Genius activities
Grande Exhibitions – Da Vinci The Genius Activities 27
Diagram 2
• Hang the hanger from a hook • Put the pieces of wax in one of the containers (or use a match and melt a bit of wax into the bottom
of one of the containers). • Put the cotton (or sponge) into the other container. Add or subtract cotton so that the hanger is
level and the plumb bob marks the center of the horizontal bar of the hanger. • (Optional) Use the pen and ruler to mark the center of the horizontal bar as 0, and measure and
mark in small increments in both directions from the center point. Adjust the amount of cotton in the container so that the string for the plumb bob hangs at 0.
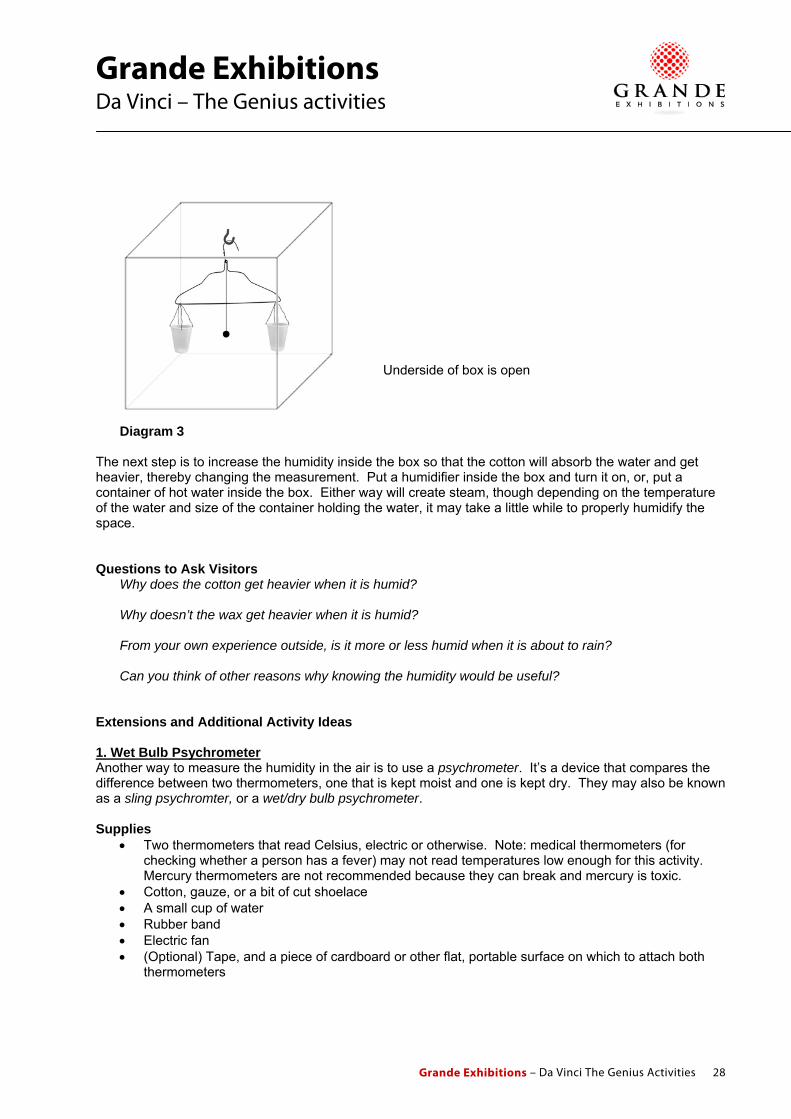
At this point, your hygrometer is finished. This activity can end here and your hygrometer can simply serve as a hands-on demonstration piece to explain Da Vinci’s Wax Hygrometer works. If you want to show your hygrometer in action, however, you will have to view the hygrometer in a space that is more, or less humid. This can be done in a couple of ways. Option 1: Hang your hygrometer in a visible, but safe place where it will not be disturbed. Every few hours or once every day, check the hygrometer to see if it has shifted and record the measurements. Option 2: Test the hygrometer inside the exhibition space. Take it outside of the building and test to see if the outside air is more or less humid than inside. Option 3: Create a humid space (supplies included in Supply List above). The box should have one open side that will face down inside the plastic tub or plastic sheet, completely enclosing the hygrometer with some area to spare. Attach a hook in the middle of the top of the plastic box, and hang the hygrometer from the hook. It may be tricky, but make sure the container with the wax and the container with the cotton are even (the plumb bob is at 0). (See Diagram 3)
Grande Exhibitions
Da Vinci – The Genius activities
Grande Exhibitions – Da Vinci The Genius Activities 28
Underside of box is open Diagram 3 The next step is to increase the humidity inside the box so that the cotton will absorb the water and get heavier, thereby changing the measurement. Put a humidifier inside the box and turn it on, or, put a container of hot water inside the box. Either way will create steam, though depending on the temperature of the water and size of the container holding the water, it may take a little while to properly humidify the space. Questions to Ask Visitors
Why does the cotton get heavier when it is humid? Why doesn’t the wax get heavier when it is humid? From your own experience outside, is it more or less humid when it is about to rain? Can you think of other reasons why knowing the humidity would be useful?
Extensions and Additional Activity Ideas 1. Wet Bulb Psychrometer Another way to measure the humidity in the air is to use a psychrometer. It’s a device that compares the difference between two thermometers, one that is kept moist and one is kept dry. They may also be known as a sling psychromter, or a wet/dry bulb psychrometer. Supplies
• Two thermometers that read Celsius, electric or otherwise. Note: medical thermometers (for checking whether a person has a fever) may not read temperatures low enough for this activity. Mercury thermometers are not recommended because they can break and mercury is toxic.
• Cotton, gauze, or a bit of cut shoelace • A small cup of water • Rubber band • Electric fan • (Optional) Tape, and a piece of cardboard or other flat, portable surface on which to attach both
thermometers
Grande Exhibitions
Da Vinci – The Genius activities
Grande Exhibitions – Da Vinci The Genius Activities 29
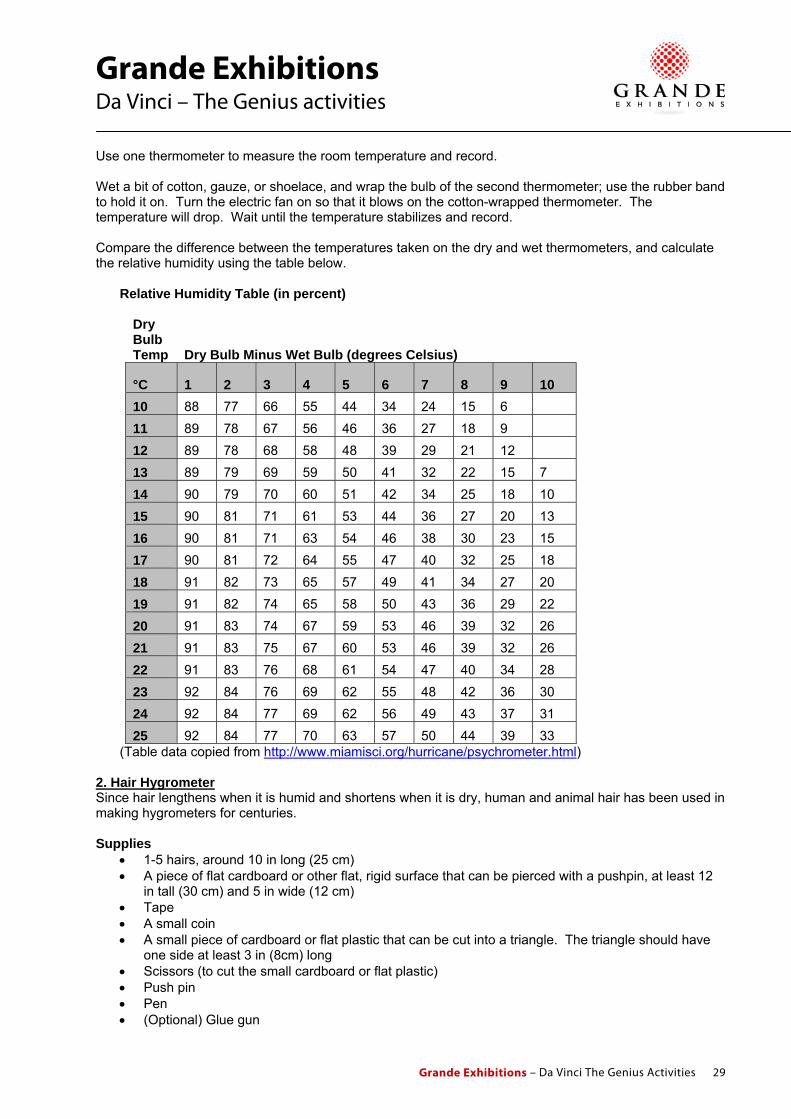
Use one thermometer to measure the room temperature and record. Wet a bit of cotton, gauze, or shoelace, and wrap the bulb of the second thermometer; use the rubber band to hold it on. Turn the electric fan on so that it blows on the cotton-wrapped thermometer. The temperature will drop. Wait until the temperature stabilizes and record. Compare the difference between the temperatures taken on the dry and wet thermometers, and calculate the relative humidity using the table below. Relative Humidity Table (in percent)
Dry Bulb Temp Dry Bulb Minus Wet Bulb (degrees Celsius)
°C 1 2 3 4 5 6 7 8 9 10
10 88 77 66 55 44 34 24 15 6
11 89 78 67 56 46 36 27 18 9
12 89 78 68 58 48 39 29 21 12
13 89 79 69 59 50 41 32 22 15 7
14 90 79 70 60 51 42 34 25 18 10
15 90 81 71 61 53 44 36 27 20 13
16 90 81 71 63 54 46 38 30 23 15
17 90 81 72 64 55 47 40 32 25 18
18 91 82 73 65 57 49 41 34 27 20
19 91 82 74 65 58 50 43 36 29 22
20 91 83 74 67 59 53 46 39 32 26
21 91 83 75 67 60 53 46 39 32 26
22 91 83 76 68 61 54 47 40 34 28
23 92 84 76 69 62 55 48 42 36 30
24 92 84 77 69 62 56 49 43 37 31
25 92 84 77 70 63 57 50 44 39 33 (Table data copied from http://www.miamisci.org/hurricane/psychrometer.html) 2. Hair Hygrometer Since hair lengthens when it is humid and shortens when it is dry, human and animal hair has been used in making hygrometers for centuries. Supplies
• 1-5 hairs, around 10 in long (25 cm) • A piece of flat cardboard or other flat, rigid surface that can be pierced with a pushpin, at least 12
in tall (30 cm) and 5 in wide (12 cm) • Tape • A small coin • A small piece of cardboard or flat plastic that can be cut into a triangle. The triangle should have
one side at least 3 in (8cm) long • Scissors (to cut the small cardboard or flat plastic) • Push pin • Pen • (Optional) Glue gun

Grande Exhibitions
Da Vinci – The Genius activities
Grande Exhibitions – Da Vinci The Genius Activities 30
Doing the Activity (see Diagram 4)
• Tape one end of the hairs to the top of the flat piece of cardboard. Make sure they are taped well so they don’t slip through. (You may want to use a glue gun.)
• Tape the coin near the pointiest end of the triangle (it acts as a weight). • Tape the other end of the hairs in the middle of the triangle pointer. Make sure they are taped well
so they don’t slip through. (You may want to use a glue gun.) • Lay the triangle pointer so that the top edge is parallel to the top and bottom of the large piece of
cardboard. • Stick the push pin through the pointer triangle about 0.5 in (1 cm) in from the edge, and into the
cardboard. Make sure the pointer triangle can turn easily around the push pin (it acts as a pivot). • Stand the cardboard up vertically, and use the pen to mark the spot where the end of the triangle
pointer indicates. The hair hygrometer will indicate a change in humidity, specifically:
• When it is more humid, the hair will lengthen and the pointer will dip down. • When it is drier, the hair will shorten and the pointer will tip up.
If you used the humid box (as described in the main activity above), you can put the hair hygrometer in it and test it there as well.
Diagram 4 _______________________

Grande Exhibitions
Da Vinci – The Genius activities
Grande Exhibitions – Da Vinci The Genius Activities 31
Face It
Activity Goal:
To demonstrate how there are proportional relationships to the features of human faces and how Da Vinci and other artists used those to draw life-like images. Related Area in Da Vinci Exhibit Anatomy Sketches. This activity can also be used near Painting Reproductions, Secrets of the Mona Lisa, and the video and reproduction of Vitruvian Man. History and Context of Activity (background information for museum staff) Leonardo da Vinci was both an artist and a scientist, and he searched for patterns and relationships in the objects he was studying. “He felt compelled to imbue his art with the precision of the results springing from his scientific inquiry.”1 He spent a great deal of time studying the human body, and knew that some basic proportions held true for general human body construction. By using those similar proportions when drawing or painting, he could create more realistic and lifelike images of people. Da Vinci was not the first to realize that human bodies were proportional. The Roman architect Vitruvius who lived in the first century B.C. knew that the proportions of bodies would be ideal guidelines to design architecture. Da Vinci’s Vitruvian Man was drawn in response to, and in honor of, the Roman Vitruvius. Supplies
• One (or more) sheets of clear, rigid plastic (Plexiglas or similar), around 11”x14” (28cm x 36cm). The sheet should be big enough to draw a life-sized human head. (Glass panes can be used, but are not preferred because they can break or have sharp edges.)
• Pens or pencils that can be erased immediately, such as dry-erase pens or grease pencils/china markers.
• Ruler or measuring tape, one per sheet of clear plastic. • Towels and/or erasers • (Optional) Cleaning spray • (Optional) Chair or stool for visitors to sit on while doing activity
Advance Preparation
• Test the pens and/or pencils to make sure they will fully erase from the plastic sheet. • Print out one or more of Da Vinci’s drawings of the proportions of a head (see below) to help
demonstrate idea to visitors; laminate, or put in plastic sleeve.
http://www.drawingsofleonardo.org/images/faceandeye.jpg

Grande Exhibitions
Da Vinci – The Genius activities
Grande Exhibitions – Da Vinci The Genius Activities 32
http://www.drawingsofleonardo.org/images/blue_head.jpg Introducing the Activity (background information for visitors) Through Da Vinci’s detailed study of human bodies, he realized that humans generally have similar body proportions. For example, if a person spreads out his arms, the width from the fingertip on one hand across to the fingertips on the other will be the same as his height regardless of how tall or short he may be. Da Vinci drew many faces and realized that faces have general proportions as well. By learning and using those proportions he could draw faces that were realistic and lifelike. Other artists in the Renaissance and later used those same ideal proportions in their drawings and paintings, and even now artists and art students learn from and use those proportions to create art that looks like real people. Doing the Activity This activity requires two people to complete: either two visitors, or one visitor and one museum staff person. Have one person (the model) hold the sheet of rigid plastic up to his or her face as if looking through a window. The plastic should be parallel to the plane of the face, and should barely touch the model’s nose. The model’s nose should be in the middle of the sheet of plastic so that the plastic extends beyond the head in all directions. The second person (the artist) then takes one of the pens and outlines the model’s head. The drawing should go all the way to the top of the head, and not just to the hairline. Key facial features the artist should include are:
• Eyes • Ears • Nose • Mouth
The artist can add whatever other details he or she wants. Once the artist is finished outlining/drawing the model’s face, put the plastic on a table and measure the face and its features to see how closely it matches the artistic ideal proportions:
• The face is divided into thirds: from the hairline to the eyebrows; from the eyebrows to the tip of the nose; and from the tip of the nose to the chin
• The eyes are halfway between the top of the head and the chin • The bottom of the nose is halfway between the eyes and the chin • The mouth is halfway between the tip of the nose and the chin • The top of the ears line up with the eyebrows • The ears and the nose are the same length • The bottom of the ears line up with the tip of the nose • The corners of the mouth line up with the center of the eye
It may be useful to pick just a few of the proportions to test with visitors rather than doing them all with each visitor.

Grande Exhibitions
Da Vinci – The Genius activities
Grande Exhibitions – Da Vinci The Genius Activities 33
Note about terminology: This activity is meant to be fun and to communicate some general principles of human proportion and anatomical similarity, though museum staff should be aware that there is the potential for visitors to be uncomfortable with the outcome if their faces don’t quite fit the standard. Museum staff should use caution when using terms like “ideal proportions” and when measuring the artist’s drawings of their models. Not everyone’s faces exactly fit the standards, and it needs to be made clear to visitors that there is a lot of variation. Also, some artists (especially small children) won’t be as skilled at drawing their models’ faces, so the drawings may not be an accurate representation of what the models look like anyway. A skilled museum staff person can anticipate a poor drawing, and highlight some of the proportions that likely will match up with Da Vinci’s guidelines, while ignoring others that might not fit. Tips for items on supplies list:
• One sheet of clear plastic will only serve one pair of people, so having several sheets of plastic is ideal.
• If desired, plastic (or glass) sheets can be put in a picture frame for a more decorative look. • Make sure the pens will fully erase from the clear plastic or be sure to have cleaning supplies on
hand. Questions to Ask Visitors
Do you see any other proportions or relationships between facial features?
Extensions and Additional Activity Ideas 1. Photo examples (Note: A similar extension is also used in the “Vitruvian Visitor” activity) Supplies
• Large (life-size, or near) photos or printouts of people’s faces. The people in the photos can be famous, or not. Laminating the photos or putting them in plastic sleeves can help them last longer.
• Rulers Use the introduction of the activity above, but rather than having the visitors draw each others’ faces on plastic sheets, measure the proportions of the faces in the photos instead.

Grande Exhibitions
Da Vinci – The Genius activities
Grande Exhibitions – Da Vinci The Genius Activities 34
2. Architecture examples (Note: This extension is also used in the “Vitruvian Visitor” activity) Supplies
• Full- or half-page printout of the façade of the church Santa Maria Novella in Florence, Italy.
Image from http://www.britannica.com/ (note, make sure a photo with a straight-on view is used. One that is photographed from an angle won’t work.)
• Rulers Many artists during the Renaissance also believed that “the proportions found in the human body were ideal for designing buildings”, an idea first put forth by the architect Vitruvius in the first century B.C. An example of using proportions in building design can be seen in the façade of Santa Maria Novella, a church in Florence, Italy. Florence was home to Da Vinci during his early years, and the architect, Leon Battista Alberti, was designing and building the church’s façade right at the same time Da Vinci was an artist’s apprentice in that city. It is also known that Alberti’s book from 1453 called “On Painting”, was among Da Vinci’s cherished collection of books.2
Alberti used mathematical proportions such as 1:1, 1:2, 1:3, 2:3, etc., to design his buildings. Using a ruler, measure the areas of the façade of the church and compare them. There are many proportional relationships, but some of the easiest to find are:
• From the ground level to the top of the peak and side-to-side, the façade forms a square.
Diagram 1

Grande Exhibitions
Da Vinci – The Genius activities
Grande Exhibitions – Da Vinci The Genius Activities 35
• The top square section is one half of the bottom.
Diagram 2
• From the bottom to the top of the cornice is one third of the entire height
Diagram 3
• The areas to the right and left of the door that are outlined by columns are each one third of the width of the façade.
Diagram 4 Ask visitors if they can find any other proportional relationships on the façade. _______________________ 1Atalay, Bulent; and Wamsley, Keith. Leonardo’s Universe: The Renaissance World of Leonardo da Vinci. (National Geographic, 2009) 128. 2Ibid.

Grande Exhibitions
Da Vinci – The Genius activities
Grande Exhibitions – Da Vinci The Genius Activities 36
Make Your Own Paint
Activity Goal:
To explain and show how paint was made during the Renaissance. Related Area in Da Vinci Exhibit Painting Reproductions. Related to Secrets of the Mona Lisa and The Last Supper. History and Context of Activity (background information for museum staff) Tempera is a kind of paint that uses pigment for color and egg yolk as a binder. The method for creating tempera paint is simple: grind up a substance to use for pigment (color), mix it with egg yolk, and pick up your brush and start painting. Tempera painting has been around for millennia, from ancient Egyptian sarcophagi to modern times, and was used widely during the early years of the Renaissance. Oil paints were introduced in the 1500s and they became popular with artists for many reasons, not least of which was that they dried more slowly than tempera did so artists didn’t have to work as quickly. A similar method is used for making oil paints; a pigment is ground up, but it is mixed with an oil (typically linseed) instead of egg yolk. Leonardo da Vinci was working right around the time that oil paint became more widely used, and while he painted some of his most famous works such as the Mona Lisa with oils, he used tempera paint in some of his other works and would have been familiar with how to make it. In fact, Da Vinci used a very similar technique of grinding up the semi-precious rock lapis lazuli to create the blue background in the Mona Lisa. Special note: Da Vinci used tempera to paint The Last Supper, with somewhat disastrous results. The reason the tempera didn’t work for The Last Supper was that the paint didn’t bond with the surface. Usually a painting on plaster (called fresco) was done while the plaster was still wet, so when the wall dried the pigments bonded with the plaster and literally became part of the wall. The Last Supper was done with tempera paint on top of dry plaster, which made it very susceptible to damage. (Tempera paintings on wood or other surfaces are generally safe and can last a long time.) Supplies
• Eggs • Charcoal, for pigment (more pigment suggestions in Extensions and Additional Activity Ideas
section below) • Mortar and pestle (if possible), or other tools for crushing pigment into powder, such as:
o A bowl and the back of a spoon o Put the pigment between two sheets of paper and crush with flat object o Put the pigment in a plastic zip-top plastic bag and crush
• Several small bowls or containers • A small amount of water • Paint brush(es) • Paper • (Optional) Drop cloth, large sheet of paper, or other kind of material to protect the surface • (Optional) Liquid dish soap • (Optional) Gloves to keep charcoal off hands
Grande Exhibitions
Da Vinci – The Genius activities
Grande Exhibitions – Da Vinci The Genius Activities 37
Advance Preparation This activity can be done in several different ways for different audiences, such as:
• A demonstration by museum staff to visitors (staff person is the only one mixing paint). • An activity in a classroom setting with a group of visitors (each person or small groups of people
mixing paint). • An activity with multiple visitors (each visitor gets to mix paint). This last version may be difficult to
do because it can be messy and because it can take a lot of eggs. Setting aside a demonstration space with ample drop cloths (to protect the floor and/or surfaces), and pre-separating the yolks would be ideal in this case.
Regardless of the way this activity is performed and for which audience, it should be tried out by museum staff before showing it to the public. Charcoal is an easy pigment source, but testing out the process and getting the powder/egg/water proportions right may take a bit of practice. Also, it is useful to get a feel for how powdery the charcoal needs to be to make the paint smoother (less clumped).
Introducing the Activity (background information for visitors) Da Vinci couldn’t go to the art store and pick up tubes of paint, so he had to make his own. One of the most popular ways of making paint during Da Vinci’s time was to mix pigment made from ground up rocks (or other colored substances) with egg yolks. The egg yolks acted as a binding agent: they would make the pigment stick to the surface it was painted on and stay stuck after it dried so the color would be permanent. Doing the Activity Pigment can be made from many different substances, but this activity will focus on using charcoal. (See Extensions and Additional Activity Ideas section below for more pigment ideas.)
• Grind up a few small pieces of charcoal with a mortar and pestle until you have a fine powder. Set aside.
• Separate the egg yolks from 1-2 eggs. Put the yolk into a bowl and discard the whites. o Tips for separating egg yolks: while holding the egg over a bowl or sink, crack the egg
gently so that the white can run out. Do not let the egg yolk run out, and avoid piercing the yolk. You can also use your fingers like a strainer and pour the egg contents into your hand and letting the white run through while holding on to the yolk, but that can be a bit messy so have a towel nearby to wipe your hands.
• Mix some of the egg yolk into the powdered charcoal until you get a liquid that resembles the texture of regular latex or acrylic paint. It may help to add a few drops of water.
• Use the paintbrush to spread some of the charcoal paint onto a sheet of paper. The more powdery the charcoal was to begin with, the smoother the paint will be.
• Let the paint dry, and you have a painting! Note: unused tempera paint will dry fairly quickly (a few hours at most), so only make as much paint as you can use during one demonstration. Dried egg yolks are very tough and difficult to clean, so be sure to clean up spills quickly and promptly rinse the bowls used in this activity. Tip: a drop or two of liquid dish soap in the tempera paint mixture can help make it easier to remove from clothes in case there are any spills onto fabrics.

Grande Exhibitions
Da Vinci – The Genius activities
Grande Exhibitions – Da Vinci The Genius Activities 38
Questions to Ask Visitors
What do you think would make good pigments? Why do you think artists began using oil paints instead of tempera? Possible answers:
• Oil paints last longer/stay wet longer • They ran out of eggs
Extensions and Additional Activity Ideas 1. Pigment suggestions There are many things that can be used to give color to tempera paint, but the main thing to remember is that it must be ground up into a very fine powder to work properly. Some ideas:
• Dirt (it is easier to grind up if it is completely dry first). Some iron-rich dirt may give more reddish paint, while other dirt may be dark brown or potentially other colors as well. There are a wide variety of color possibilities with dirt, so try different kinds from different locations.
• Powdered spices, such as cinnamon or saffron • Coffee grounds. Depending on the kind of coffee, the grounds may need to be ground up even
more (make sure they’re dry before grinding further). • Pollen from flowers (lilies work especially well, though make sure to collect enough). • Pigment powder (can be purchased at art supply stores).
Other things that can be used as pigment:
• Grape juice (may not need to add water to egg mixture) • Squeezed green leaves. Make sure the plant they came from has been recently watered or soak
the leaves in water for a few minutes, then squeeze the leaves to extract drops of green chlorophyll. Crushing the leaves with the mortar and pestle may help release their color. Tomato plant leaves work well, though other leaves will work too.
• Food coloring 2. Painting suggestions Print copies of the Vitruvian Man or one of the simpler anatomy drawings. Use that image as a template on which to paint. _______________________

Grande Exhibitions
Da Vinci – The Genius activities
Grande Exhibitions – Da Vinci The Genius Activities 39
Mirror Writing
Activity Goal:
To have visitors try their hands at writing backwards like Da Vinci did in his notebooks. Related Area in Da Vinci Exhibit Codices, Anatomy Sketches (the writing on the anatomy panels) History and Context of Activity (background information for museum staff) Leonardo da Vinci was unconventional in many ways, not least of which was how he wrote. He was unashamed about being left-handed at a time when those who were left-handed either hid their ability or learned how to write with their right hands. The word for “left” in Italian is sinistro, which also means “sinister” and can conjure up thoughts of wickedness and evil, and those who were naturally left-handed were often thought of as somehow dangerous. But Da Vinci did not try to hide his left-handedness, and even developed the skill of being able to write backwards with his left hand. He knew how to write forwards too, but he chose to use this backwards writing in his own notebooks. It’s been speculated that he was trying to be secretive about his notes and make it more difficult for other people to read them. However, a more likely reason is that since he was left-handed, if he wrote from right to left (backwards), his hand would not smear the wet ink he had just written. Da Vinci’s writings can still be easily read if you hold a mirror up to the page, (and if you read 15th century Italian!). Supplies
• Strips or full sheets of paper • Pens or pencils • Small mirrors
Advance Preparation
• It may be useful to enlarge and print out some examples of Da Vinci’s writing so that visitors can more easily see his reversed writing. Laminating the printouts or putting them in plastic sheet protector sleeves will make them last longer.
Introducing the Activity (background information for visitors) When Da Vinci was writing up his personal thoughts and observations in his notebooks, he often wrote the letters and lines backwards (right to left). The most likely reason he did this is because since he was left-handed, it was easier to move the quill across the page and he would not smear the fresh ink with his hand. This activity will give visitors an opportunity to think like Da Vinci and try a couple of different techniques for writing backwards.
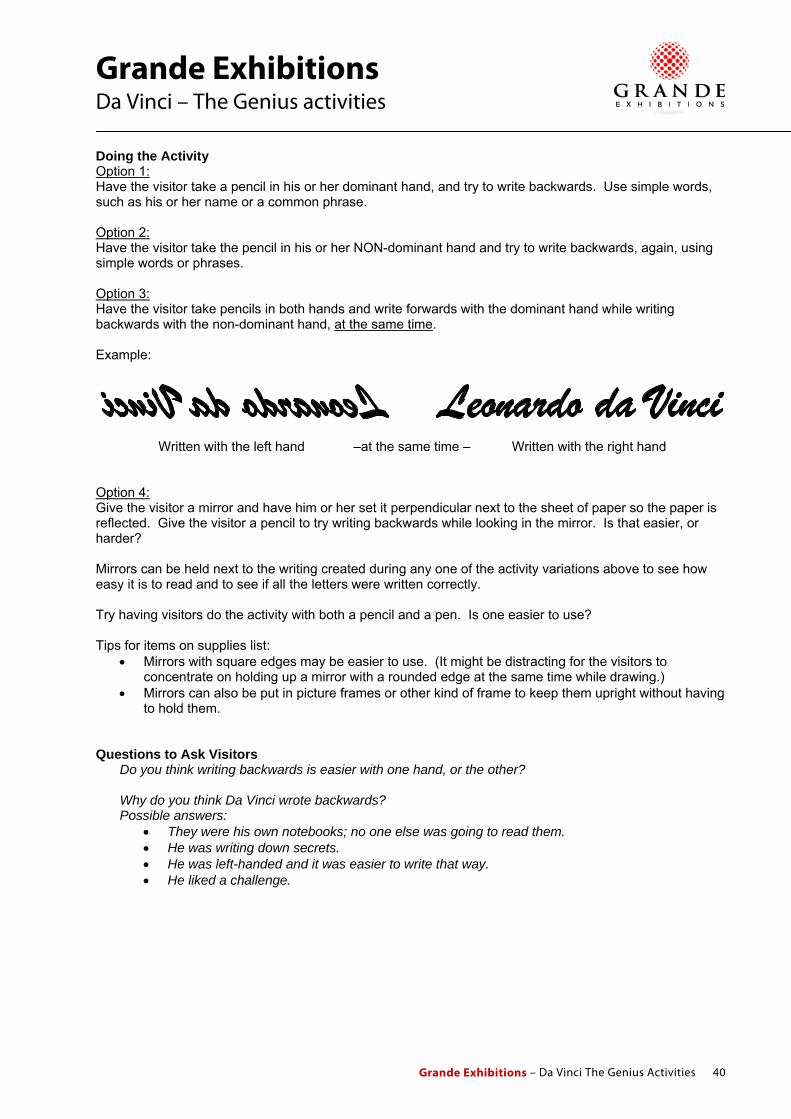
Grande Exhibitions
Da Vinci – The Genius activities
Grande Exhibitions – Da Vinci The Genius Activities 40
Doing the Activity Option 1: Have the visitor take a pencil in his or her dominant hand, and try to write backwards. Use simple words, such as his or her name or a common phrase. Option 2: Have the visitor take the pencil in his or her NON-dominant hand and try to write backwards, again, using simple words or phrases. Option 3: Have the visitor take pencils in both hands and write forwards with the dominant hand while writing backwards with the non-dominant hand, at the same time. Example: Written with the left hand –at the same time – Written with the right hand Option 4: Give the visitor a mirror and have him or her set it perpendicular next to the sheet of paper so the paper is reflected. Give the visitor a pencil to try writing backwards while looking in the mirror. Is that easier, or harder? Mirrors can be held next to the writing created during any one of the activity variations above to see how easy it is to read and to see if all the letters were written correctly. Try having visitors do the activity with both a pencil and a pen. Is one easier to use? Tips for items on supplies list:
• Mirrors with square edges may be easier to use. (It might be distracting for the visitors to concentrate on holding up a mirror with a rounded edge at the same time while drawing.)
• Mirrors can also be put in picture frames or other kind of frame to keep them upright without having to hold them.
Questions to Ask Visitors
Do you think writing backwards is easier with one hand, or the other? Why do you think Da Vinci wrote backwards? Possible answers:
• They were his own notebooks; no one else was going to read them. • He was writing down secrets. • He was left-handed and it was easier to write that way. • He liked a challenge.

Grande Exhibitions
Da Vinci – The Genius activities
Grande Exhibitions – Da Vinci The Genius Activities 41
Extensions and Additional Activity Ideas 1. Identifying shades of Da Vinci Supplies
• Print outs of some of Da Vinci’s sketches, such as: o Aerial Screw o Study for the Sforza Monument o Many of the anatomical sketches
(Lamination or covering with a plastic sheet protector sleeve will help the printouts last longer.) In addition to writing backwards, Da Vinci often showed his left-handedness in his sketches. Typically, right-handed artists will shade their figures with strokes from the lower left to the upper right. Da Vinci’s figures, however, are often shaded with strokes that go from the lower right to upper left1. Show some of the print outs of Da Vinci’s drawings, and see if visitors can identify the left-handed shading. _______________________ 1Atalay, Bulent; and Wamsley, Keith. Leonardo’s Universe: The Renaissance World of Leonardo da Vinci. (National Geographic, 2009) 121.

Grande Exhibitions
Da Vinci – The Genius activities
Grande Exhibitions – Da Vinci The Genius Activities 42
Modern Day Da Vinci
Activity Goal:
Relate Da Vinci’s machines and inventions to modern-day devices. Part or all of this activity can be handed out at the beginning of the exhibit and used as guide, game, or tool to enhance the visitors’ study and understanding of each of the machines. Related Area in Da Vinci Exhibit Most areas, see below History and Context of Activity (background information for museum staff) Da Vinci had a prolific imagination and designed many inventions that the world wasn’t quite ready to embrace. Some of his inventions have led directly to modern-day devices, while other ideas stayed hidden in their notebook pages only to be independently discovered by others. Either way, the number of Da Vinci’s machines that have similar modern-day counterparts is astonishing, and shows how forward-thinking and ahead of his time Da Vinci really was. Supplies This activity can be done in one of several different ways. All of them listed here will require:
• Photocopied list(s) • (Optional) Pencils and pencil receptacle at the end of exhibition
Option 1: Print out the written list of equivalent modern-day inventions (see below). Give list to visitors and let them use it in their exploration of the exhibition. List can be written in sections based on the areas of the exhibition, or they can be mixed randomly. Option 2: Print out the written list of equivalent modern-day inventions, and add pictures to give visual clues (see below). Give list to visitors and let them use it in their exploration of the exhibit. Option 3: Use the written list, description, or pictures of modern-day inventions to create a game, such as a scavenger hunt (see below). It may be useful to have a small prize (such as a pencil with the museum’s name on it) at the end for visitors who complete the game. Advance Preparation
• Decide which option (or options) of this activity you will do, and make photocopies as applicable. Introducing the Activity (background information for visitors) Da Vinci was one of the greatest minds the world has ever known. His notebooks are full of drawings of machines and inventions that had never been seen before, and in some cases, no one else would dream them up again for several hundred years. While he didn’t get everything right -- his flying machines wouldn’t get off the ground, and his tank would have been nearly impossible to maneuver – he was remarkably ahead of this time. Many of his designs and ideas inspired more recent inventors and are very similar to objects that are used today. This activity will prompt visitors to study Da Vinci’s machines more closely and compare them to objects that we use in our modern lives.

Grande Exhibitions
Da Vinci – The Genius activities
Grande Exhibitions – Da Vinci The Genius Activities 43
Doing the Activity Option 1: Here is a list of modern-day inventions and their Da Vinci equivalents (written in bold italics). If you give the list to visitors, you can either leave the Da Vinci exhibit titles, or delete them so the visitors are obliged to study the exhibits more closely. This list is organized by areas within the exhibition, though the list can be mixed up and made random. Civil Machines
• Bicycle (Bicicletta) • Crane (Gru Girevole, Gru a Piattaforma Anulare, or Gru ad Argano Centrale) • Drill (Perforatrice Orizzontale) • Excavator (Macchina Scavatrice) • Odometer (Odometro)
Flight Studies Machines
• Anemometer/Wind speed measure (Anemometro) • Glider (Aliante) • Hang Glider (Deltaplano) • Helicopter (Orntottero Verticale, or Vite Aerea) • Parachute (Paracadute) • Weather vane (Anemoscopio)
Military Engineering
• Cannon (Bombarda, or Cannone a Vapore) • Tank (Carro Armato)
Aquatic and Hydraulic Machines
• Double-hulled boat (Scafo a Doppia Carena) • Life ring/Life belt (Salvagente) • Paddle boat (Battello a Pale a Manovella) • Scuba equipment (Scafandro) • Submarine (Sottomarino) • Suspension bridge (Ponte Sospeso Girevole) • Water gloves (Guanti Pinnati)
Musical, Optical, and Time Instruments
• Portable keyboard (Pianola Portatile) • Spotlight (Proiettore)
Physics and Mechanical Principles
• Ball bearings (Cuscinetto as Sfere in Sezione, Cuscinetto a Sfere e a Rulli and Cuscinetto a Sfere)
• Bicycle chain (Carter a Catena) • Block and tackle (Studio dei Pesi o Tirare Composto) • Jack (Martinetto o Crick) • Piston (Trasformazione del Moto Circolare) • Rolling mill (Calandra o Laminatoio)

Grande Exhibitions
Da Vinci – The Genius activities
Grande Exhibitions – Da Vinci The Genius Activities 44
Option 2: Here is a list, with pictures, of modern-day inventions and their Da Vinci equivalents (written in bold italics). If you give the list to visitors, you can either leave the Da Vinci exhibit titles, or delete them so the visitors are obliged to study the exhibits more closely. This list is organized by areas within the exhibition, though the list can be mixed up and made random. All images are taken from copyright-free sources, such as Wikipedia. These have been cropped slightly and adjusted so they are in black & white (for easier photocopying). Civil Machines
• Bicycle (Bicicletta)
http://commons.wikimedia.org/wiki/File:Cykel.JPG
• Crane (Gru Girevole, Gru a Piattaforma Anulare, or Gru ad Argano Centrale)
http://upload.wikimedia.org/wikipedia/commons/2/28/Norweski_kran_2004_ubt.jpeg • Drill (Perforatrice Orizzontale)
http://en.wikipedia.org/wiki/File:Geared_drill_press.jpg

Grande Exhibitions
Da Vinci – The Genius activities
Grande Exhibitions – Da Vinci The Genius Activities 45
• Excavator (Macchina Scavatrice)
http://en.wikipedia.org/wiki/File:Kettenbagger_CAT_325C_LN.jpeg • Odometer (Odometro)
http://commons.wikimedia.org/wiki/File:Odometer2.jpg Flight Studies Machines
• Anemometer/Wind speed measure (Anemometro)
http://commons.wikimedia.org/wiki/File:Anemometer.jpg
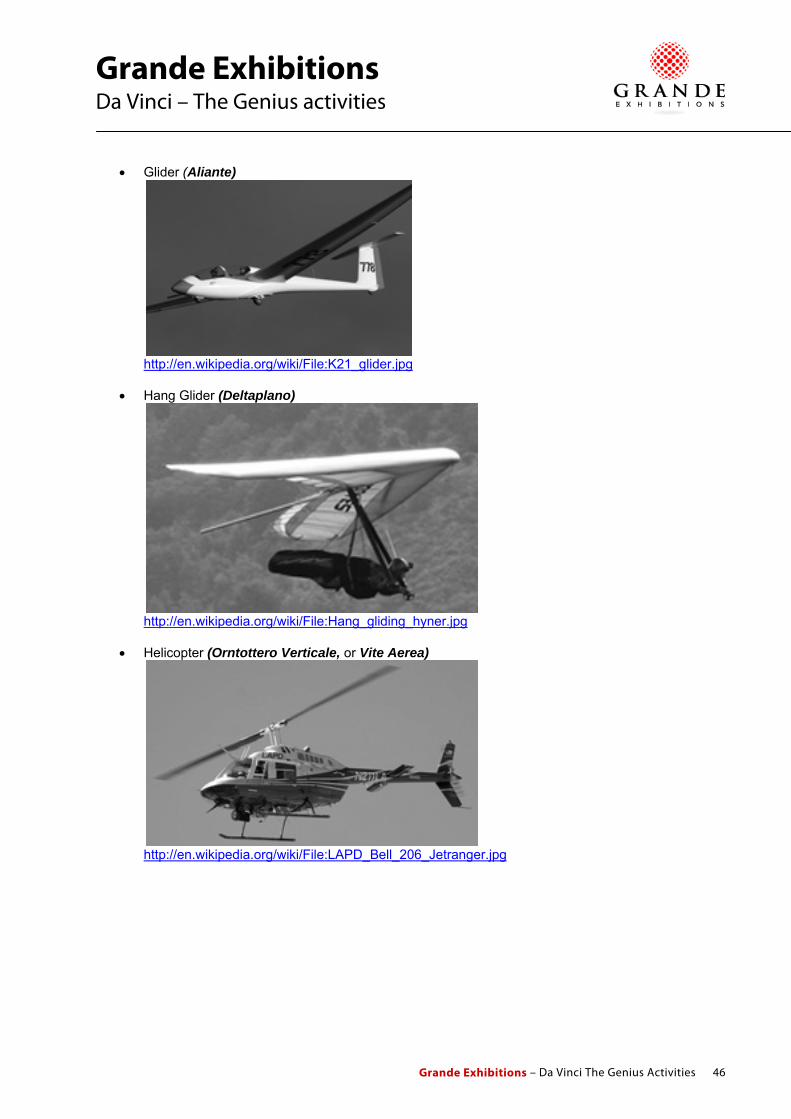
Grande Exhibitions
Da Vinci – The Genius activities
Grande Exhibitions – Da Vinci The Genius Activities 46
• Glider (Aliante)
http://en.wikipedia.org/wiki/File:K21_glider.jpg
• Hang Glider (Deltaplano)
http://en.wikipedia.org/wiki/File:Hang_gliding_hyner.jpg
• Helicopter (Orntottero Verticale, or Vite Aerea)
http://en.wikipedia.org/wiki/File:LAPD_Bell_206_Jetranger.jpg

Grande Exhibitions
Da Vinci – The Genius activities
Grande Exhibitions – Da Vinci The Genius Activities 47
• Parachute (Paracadute)
http://commons.wikimedia.org/wiki/File:Parapente-cap-Carteret2.JPG
• Weather vane (Anemoscopio)
http://upload.wikimedia.org/wikipedia/commons/b/bf/Windrichtungsgeber.jpg Military Engineering
• Cannon (Bombarda, or Cannone a Vapore)
http://commons.wikimedia.org/wiki/File:16inch-howitzer.gif

Grande Exhibitions
Da Vinci – The Genius activities
Grande Exhibitions – Da Vinci The Genius Activities 48
• Tank (Carro Armato)
http://commons.wikimedia.org/wiki/File:AmericanTank.jpg
Aquatic and Hydraulic Machines
• Double-hulled boat (Scafo a Doppia Carena)
http://en.wikipedia.org/wiki/File:Oil_tanker_(side_view).PNG
• Life ring/Life belt (Salvagente)
http://commons.wikimedia.org/wiki/File:Life_belt.jpg

Grande Exhibitions
Da Vinci – The Genius activities
Grande Exhibitions – Da Vinci The Genius Activities 49
• Paddle boat (Battello a Pale a Manovella)
http://commons.wikimedia.org/wiki/File:Jagienka_Warta.jpg • Scuba equipment (Scafandro)
http://en.wikipedia.org/wiki/Scuba_diving

Grande Exhibitions
Da Vinci – The Genius activities
Grande Exhibitions – Da Vinci The Genius Activities 50
• Submarine (Sottomarino)
http://en.wikipedia.org/wiki/File:HMCS_Windsor_SSK_877.jpg • Suspension bridge (Ponte Sospeso Girevole)
http://en.wikipedia.org/wiki/File:GoldenGateBridge.jpg • Water gloves (Guanti Pinnati)
http://ecx.images-amazon.com/images/I/51VEBV47XYL._AA280_.jpg

Grande Exhibitions
Da Vinci – The Genius activities
Grande Exhibitions – Da Vinci The Genius Activities 51
Musical, Optical, and Time Instruments • Portable keyboard (Pianola Portatile)
http://commons.wikimedia.org/wiki/File:Dss1.jpg • Spotlight (Proiettore)
http://en.wikipedia.org/wiki/File:Follow_Spot.jpg
Physics and Mechanical Principles
• Ball bearings (Cuscinetto as Sfere in Sezione, Cuscinetto a Sfere e a Rulli and Cuscinetto a Sfere)
http://commons.wikimedia.org/wiki/File:Ball_bearing.jpg
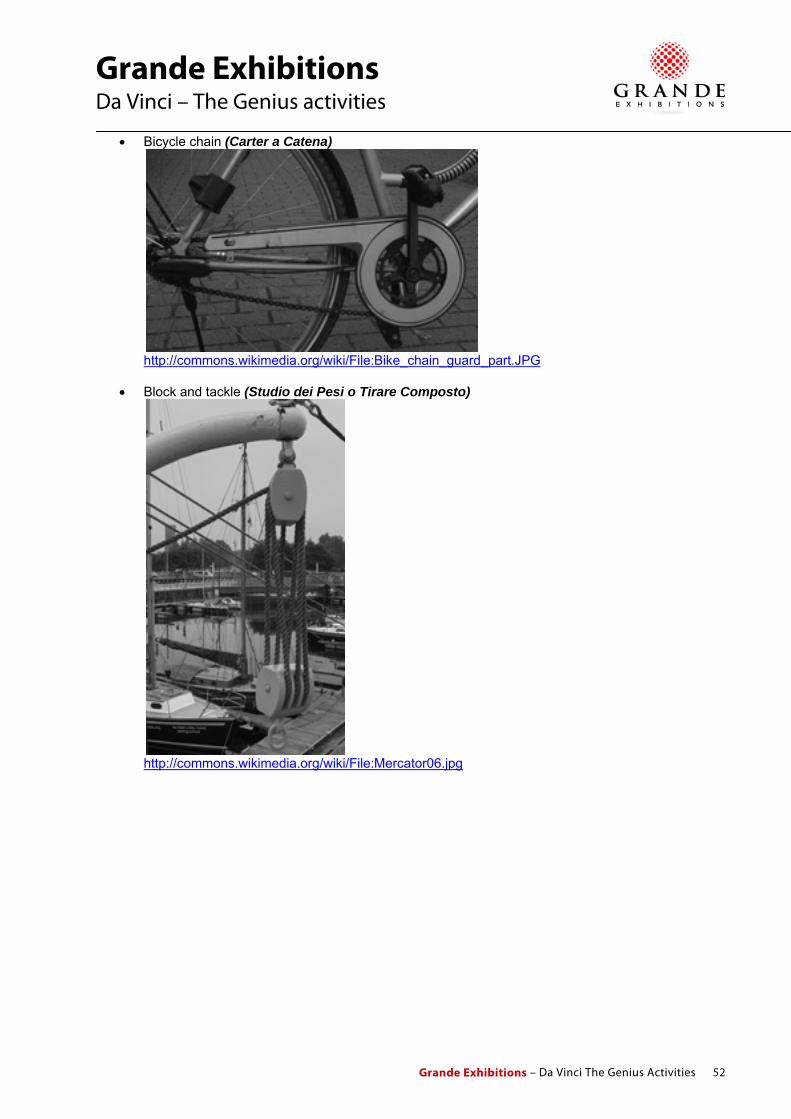
Grande Exhibitions
Da Vinci – The Genius activities
Grande Exhibitions – Da Vinci The Genius Activities 52
• Bicycle chain (Carter a Catena)
http://commons.wikimedia.org/wiki/File:Bike_chain_guard_part.JPG • Block and tackle (Studio dei Pesi o Tirare Composto)
http://commons.wikimedia.org/wiki/File:Mercator06.jpg
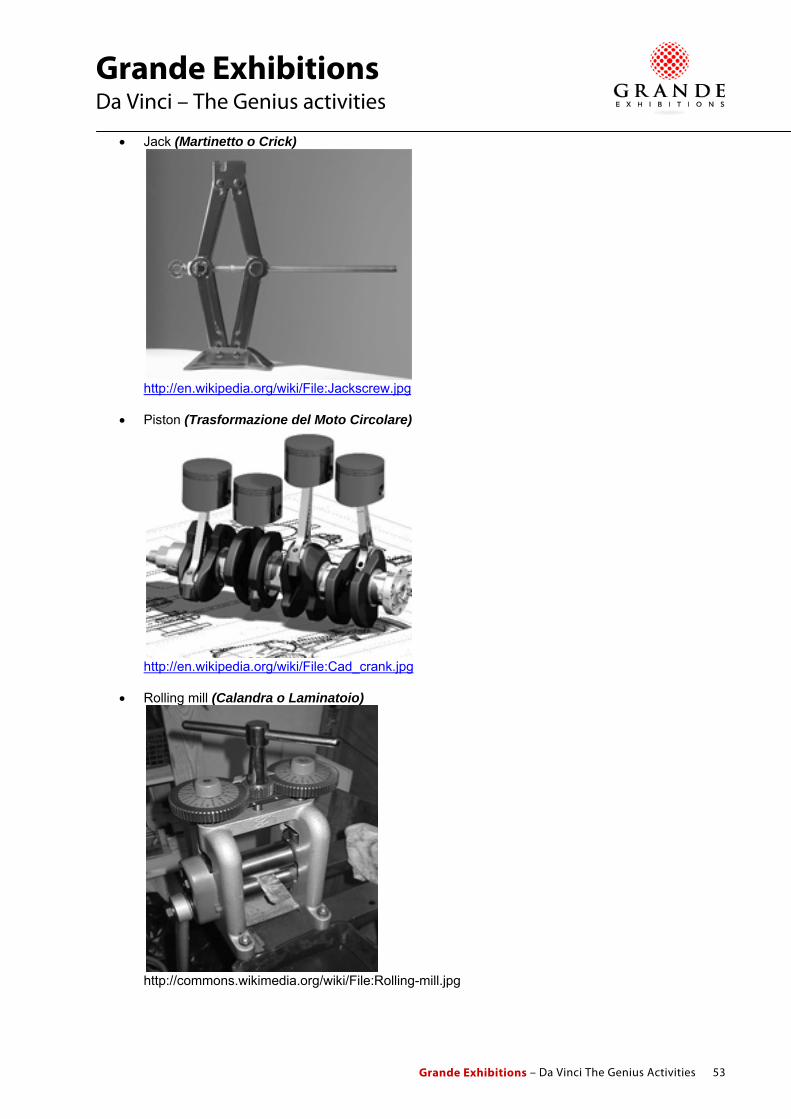
Grande Exhibitions
Da Vinci – The Genius activities
Grande Exhibitions – Da Vinci The Genius Activities 53
• Jack (Martinetto o Crick)
http://en.wikipedia.org/wiki/File:Jackscrew.jpg
• Piston (Trasformazione del Moto Circolare)
http://en.wikipedia.org/wiki/File:Cad_crank.jpg • Rolling mill (Calandra o Laminatoio)
http://commons.wikimedia.org/wiki/File:Rolling-mill.jpg

Grande Exhibitions
Da Vinci – The Genius activities
Grande Exhibitions – Da Vinci The Genius Activities 54
Option 3: Use the written list, description, or pictures of modern-day inventions to create a game, such as a scavenger hunt. It may be useful to have a small prize (such as a pencil with the museum’s name on it) at the end for visitors who complete the game. This is only a partial list of the machines in the exhibition. Da Vinci Scavenger Hunt! The goal is to find as many of Da Vinci’s machines and inventions that fit the descriptions below. You can participate by yourself or in a group.
1. This equipment will allow you to breathe under water:
2. A device that will let you jump from a high place and float safely to the ground:
3. A machine that will measure how far of a distance you have traveled:
4. An invention that will help light up a stage:
5. A machine that allows soldiers to fire on the enemy, but protects them if they get shot at:
6. You want someone to throw this to you if you fall overboard on a boat:
7. This tool will make holes in wood so you can build things:
8. This will allow you to make music anywhere:
9. This machine will help lift heavy loads:
10. A device that tells which direction the wind blows:
11. This allows you and your crew to travel under water:

Grande Exhibitions
Da Vinci – The Genius activities
Grande Exhibitions – Da Vinci The Genius Activities 55
12. This helps transfer pedal power to get you going:
13. These help things roll along smoothly:
14. With a machine like this, you can dig deep holes:
15. A device that tells you how fast the wind is blowing:
Da Vinci Scavenger Hunt! (Possible answers)
1. This equipment will allow you to breathe under water:
Scuba equipment (Scafandro)
2. A device that will let you jump from a high place and float safely to the ground:
Hang Glider (Deltaplano), and/or Parachute (Paracadute)
3. A machine that will measure how far of a distance you have traveled:
Odometer (Odometro)
4. An invention that will help light up a stage:
Spotlight (Proiettore) 5. A machine that allows soldiers to fire on the enemy, but protects them if they get shot at:
Tank (Carro Armato) 6. You want someone to throw this to you if you fall overboard on a boat:
Life ring/Life belt (Salvagente) 7. This tool will make holes in wood so you can build things:
Drill (Perforatrice Orizzontale) 8. This will allow you to make music anywhere:
Portable keyboard (Pianola Portatile) and/or Double Flute (Flauto Doppio) 9. This machine will help lift heavy loads:
Crane (Gru Girevole, Gru a Piattaforma Anulare, or Gru ad Argano Centrale), and/or Block and tackle (Studio dei Pesi o Tirare Composto), and/or Jack (Martinetto o Crick)
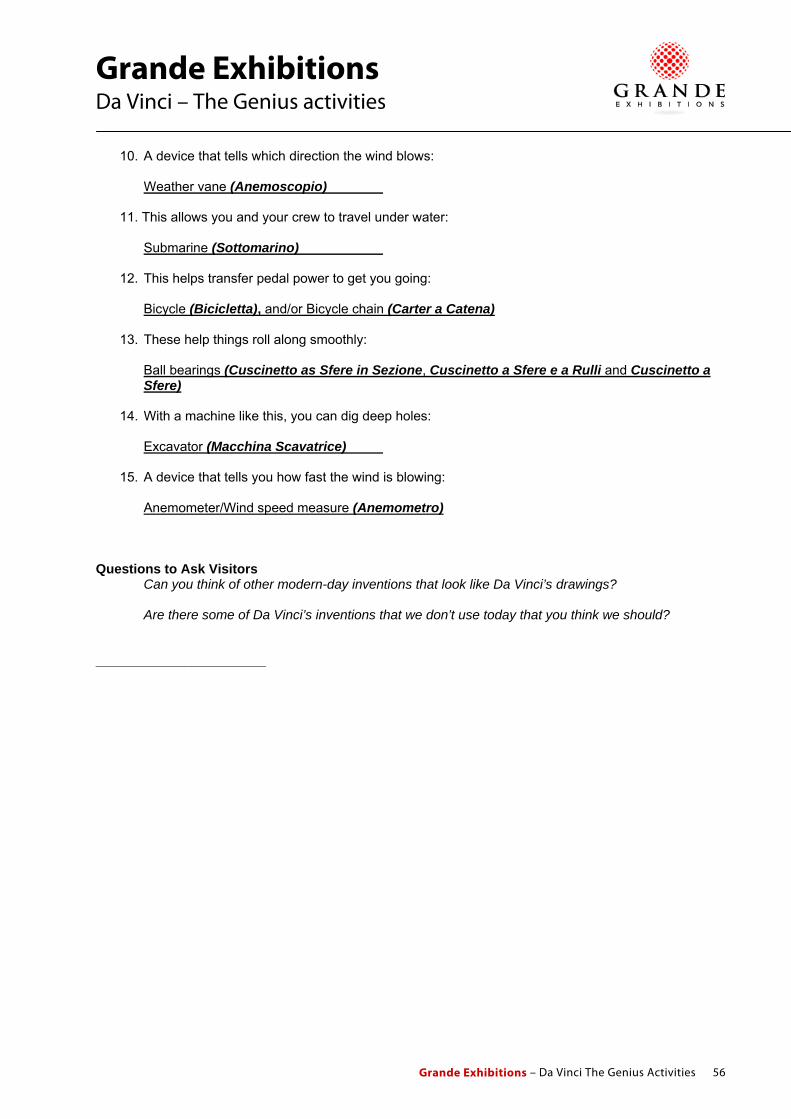
Grande Exhibitions
Da Vinci – The Genius activities
Grande Exhibitions – Da Vinci The Genius Activities 56
10. A device that tells which direction the wind blows:
Weather vane (Anemoscopio) 11. This allows you and your crew to travel under water:
Submarine (Sottomarino) 12. This helps transfer pedal power to get you going:
Bicycle (Bicicletta), and/or Bicycle chain (Carter a Catena) 13. These help things roll along smoothly:
Ball bearings (Cuscinetto as Sfere in Sezione, Cuscinetto a Sfere e a Rulli and Cuscinetto a Sfere)
14. With a machine like this, you can dig deep holes:
Excavator (Macchina Scavatrice)
15. A device that tells you how fast the wind is blowing:
Anemometer/Wind speed measure (Anemometro) Questions to Ask Visitors
Can you think of other modern-day inventions that look like Da Vinci’s drawings? Are there some of Da Vinci’s inventions that we don’t use today that you think we should?
_______________________

Grande Exhibitions
Da Vinci – The Genius activities
Grande Exhibitions – Da Vinci The Genius Activities 57
Parachute = Falling Gracefully
Activity Goal:
To make a model of Da Vinci’s Parachute and see how well it works (or not!). Related Area in Da Vinci Exhibit Flight Studies Machines, specifically the Parachute. History and Context of Activity (background information for museum staff) Leonardo da Vinci devoted much of his thought and notebook drawings to figuring out a way to fly. One of these attempts was “an unusually rough sketch of a fleeting idea for a parachute, a pyramidlike, four-cornered, wood-and-fabric structure with a man hanging from lines attached to each corner. An annotation explains its purpose: ‘If a man have a tent made of linen of which the apertures have all been stopped up, and if it be twelve braccia across and twelve in depth [in modern terms, an area of 70 square feet], he will be able to throw himself down from any great height without suffering any injury.’” 1
There is no evidence that Da Vinci ever tried out his parachute, but in 2000, a skydiver named Adrian Nicholas tested out a parachute based on Da Vinci’s ideas. Made of canvas and wood, at 187 pounds it was much heavier than modern-day parachutes and Nicholas was cautioned that it would never work. Despite reservations, in July 2000 he was strapped into the parachute and dropped from a height of nearly 10,000 feet (3,000 meters) and fell with a slow descent for five minutes. Nicholas cut his ties and used a modern parachute for the last 2,000 feet because he didn’t want to be injured if Da Vinci’s parachute landed on him. He said, "I was able to stare out at the river below, with the wind rattling through my ears. As I landed, I thanked Leonardo for a wonderful ride."2 Special note: the Italian name for parachute, paracadute, literally translated means “for falls”. Supplies (per person) The parachute canopy can be made from four individual sheets of paper taped together, or from one sheet cut into the appropriate shape (see Appendix A). Choose one of the following, or have both available and let visitors decide on their level of complexity.
• Four pieces of paper o Pencil o Ruler or straight edge
• One piece printed with Parachute Template (see Appendix A) The following supplies are required, regardless which method is used for creating the canopy:
• Scissors • Tape • Fishing line, string, dental floss, or similar, cut into four equal lengths • A small weight, such as a paperclip (for small parachutes), or a plastic toy action figure (for larger
parachutes). Other things such as a bolt or a key would work, and it may be easier if it has a loop or something to tie onto.
• (optional) Decorations for the outside of the parachutes, such as glitter or colored pens/pencils. Colored paper can also be used for the canopy.

Grande Exhibitions
Da Vinci – The Genius activities
Grande Exhibitions – Da Vinci The Genius Activities 58
Advance Preparation This activity works best if the parachutes are made with four same-sized triangles that have at least two sides of equal length. Museum staff can pre-cut paper, photocopy a triangle onto sheets for visitors to cut out (see Appendix A) or simply provide visitors with instructions, a ruler, and some scissors. Younger children may benefit from pre-cut triangles, while older children and adults may want to make their own. A stool or ladder may be useful so that the parachutes can be dropped and tested from a higher point. Safety notice: refer to your institution’s safety guidelines about letting visitors stand on stools or ladders. It may be that museum staff are the only ones allowed to drop the parachutes while standing on a stool or ladder.
Introducing the Activity (background information for visitors) Da Vinci came up with the idea for a parachute several hundred years before history records the first one actually being built and tested. He wrote that if someone had a tent of linen about 12 meters by 12 meters, that “he can jump from any great height whatsoever without injury”. It’s not known if Da Vinci actually built and tested his parachute or not, but we know that it works: in 2000, a skydiver using a parachute made with Da Vinci’s design and with materials like Da Vinci would have had, was dropped from almost 10,000 feet (3,000 meters). He had a gentle descent and landed safely. Doing the Activity Visitors will need four same-sized triangles that have at least two sides that are equal length. The triangles can be isosceles (two of the three sizes are the same length), or equilateral (all three sizes are the same length). As described in the Advance Preparation section above, the triangles can be pre-cut, pre-printed (see Appendix A), or designed by the visitors. If visitors wish to decorate their parachutes, it is easier for them to do it before they put the parachutes together (while the canopy is still flat).
• Lay the four triangles out on a table with equal sides touching, and tape them together at their edges (see Diagram 1). (Note: the diagram below only shows equilateral triangles. If using isosceles triangles, the longer edges should be touching, and the short edge will form the base of the parachute.)
Solid lines are the outside edges of the triangles, dotted lines indicate where to tape together.
Diagram 1

Grande Exhibitions
Da Vinci – The Genius activities
Grande Exhibitions – Da Vinci The Genius Activities 59
• Once the four triangles are taped together flat, fold at the dotted lines and tape the last two edges together as indicated by the arrows (see Diagram 2), creating a pyramid.
Diagram 2
• Reinforce taped seams, if needed. • Take fishing line, string, or floss and attach one piece at each bottom corner of the pyramid. It can
be attached using tape or by piercing a hole in the paper and tying it. • Tie or connect the four loose ends of the string, and attach a weight.
The parachute is finished and ready to fly! Questions to Ask Visitors
Do you think Da Vinci’s parachute would work? • If so, why? • If not, how would you improve it?
If you were building Da Vinci’s parachute today, what kinds of materials would you use?
Extensions and Additional Activity Ideas 1. Timed descents Supplies
• Parachutes designed by visitors using activity above • Stopwatch
Drop the parachutes from a standard height and time how long it takes them to reach the ground. Change and test variables such as:
• Triangle/parachute canopy size • Heavier or lighter weight • Cut holes or seal up holes already in the parachute • Lengthen or shorten the strings
Grande Exhibitions
Da Vinci – The Genius activities
Grande Exhibitions – Da Vinci The Genius Activities 60
2. Heat rises Supplies
• Parachutes designed by visitors using activity above • Hair dryer with a low setting or other heated blower, with stand or some kind of mechanism to hold
it pointing upwards Put the hair dryer (or blower) on the floor and use whatever method is available to hold it in place pointing upwards. Turn it on so that the heated air is going from the floor towards the ceiling. Hold the Da Vinci parachute over the heated air and release. Does the parachute descend at the same rate as when dropped normally? Does the parachute rise at all? Discuss how heated air rises and its use in hot-air balloons. Safety Note: Be careful when using a hair dryer or heated blower that it is put in a position so that visitors will not be burned by touching it. Also, be cautious of getting paper parachutes or other flammable materials near a heat source since they could potentially catch fire. Do NOT use a heat gun for this activity. 3. Do Materials Matter? Try to create parachute canopies using different materials and compare them to the pyramid-shaped parachute designed by Da Vinci. Do they fly better, or worse? You’ll need some of the same supplies as above, such as:
• Scissors • Tape • Fishing line, string, dental floss, or similar, cut into four equal lengths • A small weight, such as a paperclip (for small parachutes), or a plastic toy action figure (for larger
parachutes). Other things such a bolt or a key would work, and it may be easier if it has a loop or something to tie onto.
Try some different canopy materials, such as:
• A square, unfolded piece of paper. Tape the string to each of the four corners. • A square piece of fabric. Instead of using tape, you may want to use a needle to attach thread, or
tie string around the corners. • A square piece of plastic, like from a plastic bag. • Try making Da Vinci’s parachute using cardboard.
“Parachute = Falling Gracefully” is based in part on the activity entitled “Make Leonardo’s Parachute” from the book “Amazing Leonardo da Vinci Inventions You Can Build Yourself”, by Maxine Anderson. (Chicago: Nomad Press, 2006) 90-91. 1Atalay, Bulent; and Wamsley, Keith. Leonardo’s Universe: The Renaissance World of Leonardo da Vinci. (National Geographic, 2009) 136. 2 “Adrian Nicholas Proves Da Vinci Chute Works”, http://www.dropzone.com/cgi-bin/safety/detail_page.cgi?ID=150, July, 2000.
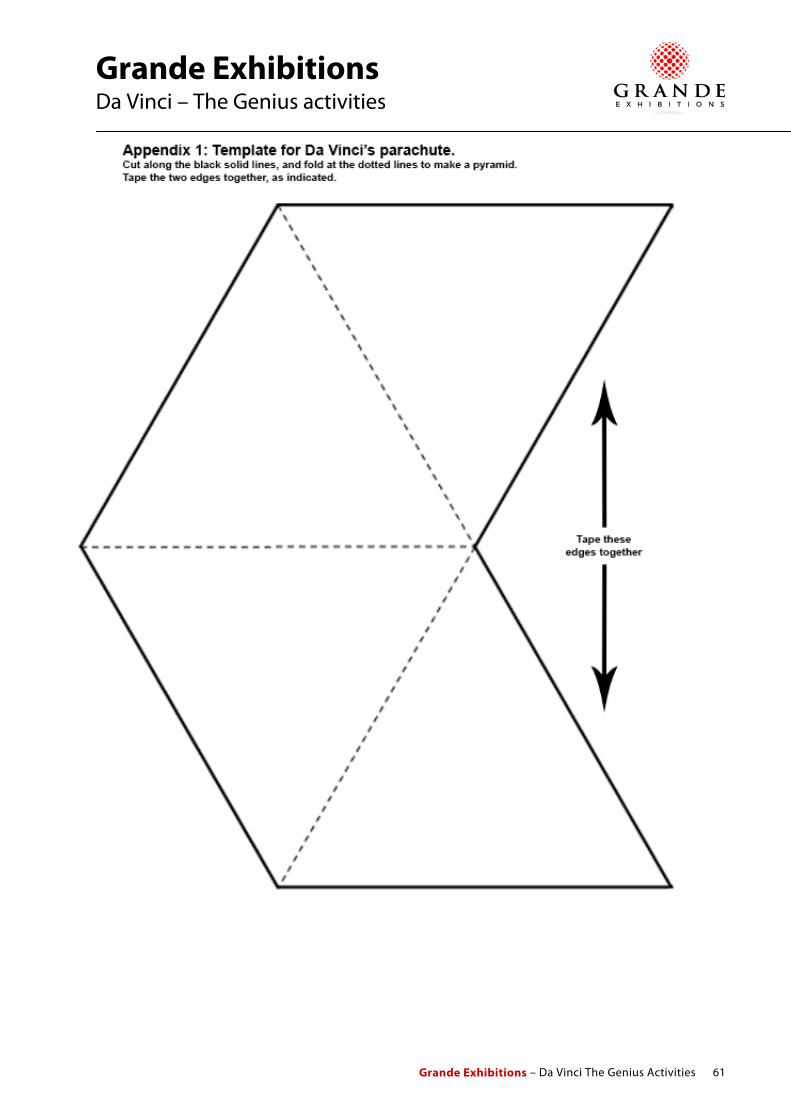
Grande Exhibitions
Da Vinci – The Genius activities
Grande Exhibitions – Da Vinci The Genius Activities 61

Grande Exhibitions
Da Vinci – The Genius activities
Grande Exhibitions – Da Vinci The Genius Activities 62
The Physics of Flight, or, Why Da Vinci’s Wings Don’t Work
Activity Goal:
To demonstrate how modern-day flight works explain why Da Vinci’s flying machines wouldn’t get off the ground. Related Area in Da Vinci Exhibit Flight Studies Machines History and Context of Activity (background information for museum staff) Da Vinci had a lifelong interest in flight, and notes and drawings of flying machines are found in his earliest known notebook. Inspired by watching things in nature such as birds in flight and spinning seedpods, Da Vinci dreamed up the first versions of many kinds of flying machines. We can see the early inspirations for airplanes, hang gliders, and even helicopters in his sketches. Yet, Da Vinci’s flying machines don’t really work…”they are examples of magnificent failures; first ideas, while not successful, still tell us what changes the next version should incorporate or what new questions should be asked and answered. Leonardo never realized his dream of human flight, but he learned a lot about aerodynamics along the way. And his unwillingness to abandon the study of flight – or the possibility of human flight, despite lack of any positive result – is an expression of his belief that nature, even if she doesn’t always yield easily, will eventually give up her secrets to the curious, persistent questioner. He had, in other words, something nearly unique in his time; a modern scientific temperament that saw failure to be as great an opportunity as success.”1
While Da Vinci made many attempts at achieving flight, he was missing some key physics knowledge that hadn’t been discovered yet. In the early 1700s, a mathematician named Daniel Bernoulli published a book where he describes how when the speed of a fluid or a gas (like air) increases, the pressure decreases. What does that have to do with flight? If you look at a modern-day airplane wing, notice how it is fairly flat on the bottom, while the top of it is curved. (Notice how an airplane wing looks similar to the profile of a bird wing.) When air flows over the wing, the air that goes underneath the bottom flat surface of the wing stays at a constant speed. The air that goes over the top, however, speeds up because of the change in shape, and when the speed increases, the pressure on that side of the wing drops. Since the pressure on the bottom side of the wing stayed the same while the pressure on the top side of the wing decreased, the pressure on the bottom side is enough to push the airplane into the air. (Of course, the airplane has to be moving fast enough to make the air move over the wing at all…that’s why airplanes have engines.) The activities described below are examples that show Bernoulli’s principle in action. It’s this principle – that when flowing air changes speed, it also changes pressure – that allows planes to fly. Despite the fact that Da Vinci spent a lot of time and effort in attempting to achieve human flight, his wings were not designed using this principle and so never truly worked. Note: Alone among his flying machines, the parachute actually DID work. In 2000, an accomplished parachutist created a version of Da Vinci’s parachute to scale and using similar materials to what Da Vinci would have had available. He was strapped to the parachute and dropped from about 10,000 feet (3,000 meters) and floated slowly and safely to ground. (An activity in this packet entitled “Parachute = Falling Gracefully” has more information about this parachute and instructions for creating small paper versions.) Though the parachute was a success, it did not achieve Da Vinci’s goal of taking off from the ground and achieving flight like a bird, rather, it kept someone alive if he fell from a high place. Supplies There are several different activities to demonstrate the Bernoulli principle and help explain the physics of flight, and supplies for each are listed individually below. You can do one or multiple activities.

Grande Exhibitions
Da Vinci – The Genius activities
Grande Exhibitions – Da Vinci The Genius Activities 63
Bernoulli 1: Paper (2 activities)
• 2 sheets of regular printer paper Bernoulli 2: Cans
• 2 empty soda cans • 1 straw
Bernoulli 3: Balloons • 2 balloons • A small amount of water • (optional) string
Bernoulli 4: Spool
• A small spool, such as for thread (thread can still be on it). There should only be one hole through the center of the spool, any other holes should be taped off
• A small piece of paper, around 4 in (10 cm) square • 1 straight pin
Advance Preparation For Bernoulli 3: Balloons
• It may be easier to prepare the balloons before taking the activity out on the exhibition floor. Pour a small amount of water (about a spoonful) in each balloon. This will provide a bit of stability. Blow up the balloons to equal size and tie them each closed. Tie a short string to each of them, if desired.
Introducing the Activity (background information for visitors) Da Vinci spent years trying to find a way to fly. He sketched early versions of wings, hang gliders, and even helicopters, but none of them worked to lift a person off the ground and fly through the air. Da Vinci was missing a key piece of information that wouldn’t be discovered until several hundred years later. In the early 1700s, a mathematician named Bernoulli would come up with the idea that when a fluid or air increases in speed, it’s pressure decreases. What does this have to do with flying? Imagine the wing of a modern airplane: it is flat on the bottom and curved on the top. When the engines on the plane make it speed down the runway, the wing goes through the air and it pushes the air out of the way. That air has to go somewhere. The air that goes beneath the flat surface of the wing stays at the same speed and the same pressure. The air that goes over the top of the wing gets compressed and slips over the top of the wing faster than the air below. Since the air on the top of the wing is moving faster, it loses pressure and the air on the bottom pushes the wing and the airplane up into the sky. These activities are to demonstrate Bernoulli’s principle that when air speeds up, it loses pressure.

Grande Exhibitions
Da Vinci – The Genius activities
Grande Exhibitions – Da Vinci The Genius Activities 64
Doing the Activity Bernoulli 1: Paper. There are two activities to demonstrate Bernoulli’s principle using paper.
• First activity: Take two sheets of paper and hold one in each hand at the top so they hang down vertically. Hold them a couple of inches/centimeters apart. Blow down directly between the two sheets. Because the air between the sheets of paper is moving faster, its pressure decreases and the air pressure on the outside of the sheets of paper will push them together.
(Note: Before blowing between the sheets of paper, ask visitors what they think will happen. Will the papers move apart, together, or stay the same?)
• Second activity: Take just one sheet of paper and hold the two corners on the shorter side. Hold the edge of the paper up by your mouth, letting the rest of the paper hang down. Blow down hard onto the top surface of the paper. (Using a lip position like when playing a flute is helpful.) Because the air on the top of the paper is moving faster, the pressure on the top will decrease. The pressure on the bottom of paper will push the paper up, and depending on how fast you blow, may even make the paper stick out completely horizontal.
(Note: Before blowing on the top of the paper, ask visitors what they think will happen. Will the paper move up, down, or stay the same?)
Bernoulli 2: Cans
• Take the two empty soda cans and lay them down on their sides (so they can roll) a few inches/centimeters apart. The cans should be parallel to each other. Hold the straw near one end of the gap between the cans, and blow air into the straw and through the gap. If the straw is positioned correctly, the air will move so quickly between the cans and the pressure between them will drop so quickly that the air pressure on the outside of the cans will push them so that they roll together.
(Note: Before blowing into the straw, ask visitors what they think will happen. Will the cans roll together, roll apart, or will they stay in the same position?)
Bernoulli 3: Balloons
• Prepare the balloons (if not already done in advance.) Put a small spoonful of water into each of the empty balloons, and then blow up the balloons so they’re equal size. Tie off the ends, and attach string (if desired). Hold the balloons by the stem or string so that they’re a few inches/centimeters apart, then blow into the space between. The air will move so quickly between the balloons and the pressure between them will drop so quickly that the air pressure on the outside of the balloons will push them together.
(Note: Before blowing between the balloons, ask visitors what they think will happen. Will the balloons fly apart, come together, or stay the same?)

Grande Exhibitions
Da Vinci – The Genius activities
Grande Exhibitions – Da Vinci The Genius Activities 65
Bernoulli 4: Spool
• Stick a pin through the center of the card, then stick the pointy part of the pin into the hole in the middle of the spool. The card should lie flat under the bottom of the spool. Hold the spool up with one hand, and the card up with the other. Blow hard through the hole in the spool and release the card. The air going through the hole in the card and out the gap between the spool and the card is speeding up, and therefore losing pressure. Therefore, the pressure on the outside of the card can keep it held in place against the spool. Notice, that once you stop blowing that the card drops off. (Be careful not to lose the pin!)
(Note: Before blowing through the hole in the spool, ask visitors what they think will happen. Will the card fly off, or stay in place?)
_______________________ 1Atalay, Bulent; and Wamsley, Keith. Leonardo’s Universe: The Renaissance World of Leonardo da Vinci. (National Geographic, 2009) 127, 132.

Grande Exhibitions
Da Vinci – The Genius activities
Grande Exhibitions – Da Vinci The Genius Activities 66
Vitruvian Visitor
Activity Goal:
To demonstrate how there are proportional relationships to the features of human bodies and how Da Vinci and other artists used those to draw life-like images. Also, to give a real-life version of the proportions described in the Vitruvian Man. Related Area in Da Vinci Exhibit Vitruvian Man video and paper reproduction. Can also be used near Anatomy Sketches. History and Context of Activity (background information for museum staff) Leonardo da Vinci was both an artist and a scientist, and he searched for patterns and relationships in the objects he was studying. “He felt compelled to imbue his art with the precision of the results springing from his scientific inquiry.”1 He spent a great deal of time studying the human body, and knew that some basic proportions held true for general human body construction. By using those similar proportions when drawing or painting, he could create more realistic and lifelike images of people. Da Vinci was not the first to realize that human bodies were proportional. The Roman architect Vitruvius who lived in the first century B.C. felt that the proportions of bodies would be ideal guidelines to design architecture. Da Vinci’s Vitruvian Man was drawn in response to, and in honor of, the Roman Vitruvius. “Leonardo sought to achieve correct perspective and proportion, but also to infuse the work with the spiritual symbolism prevailing at the time. The square was to represent the earth and the mundane, and the circle heaven and the spiritual. For Leonardo, the Vitruvian Man, representing the mechanism of the human body, was emblematic of the mechanism of the universe itself….”2 Supplies There are a few different options for how this activity can be done and different supplies required for each: Option 1
• Measuring tape • Note paper for recording measurements • Pen or pencil for recording measurements
Option 2
• Erasable white board that is big enough to trace a person’s outline (head to toe) with arms outstretched. Two or more boards can be connected together to make enough surface area. White boards can be attached to a wall or used on the floor if there is sufficient space.
• Erasable markers for use on white board • Measuring tape • Note paper for recording measurements • Pen or pencil for recording measurements • Eraser, towels, and/or cleaning spray for cleaning pen off the white board between visitors
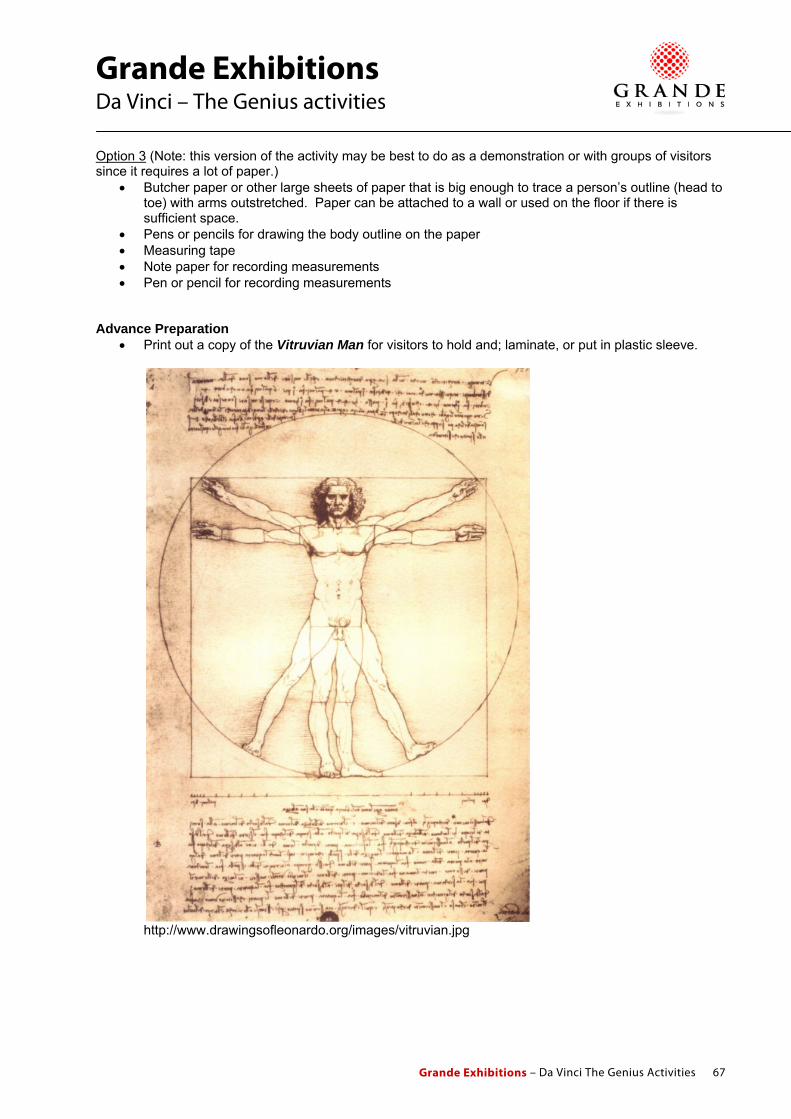
Grande Exhibitions
Da Vinci – The Genius activities
Grande Exhibitions – Da Vinci The Genius Activities 67
Option 3 (Note: this version of the activity may be best to do as a demonstration or with groups of visitors since it requires a lot of paper.)
• Butcher paper or other large sheets of paper that is big enough to trace a person’s outline (head to toe) with arms outstretched. Paper can be attached to a wall or used on the floor if there is sufficient space.
• Pens or pencils for drawing the body outline on the paper • Measuring tape • Note paper for recording measurements • Pen or pencil for recording measurements
Advance Preparation
• Print out a copy of the Vitruvian Man for visitors to hold and; laminate, or put in plastic sleeve.
http://www.drawingsofleonardo.org/images/vitruvian.jpg

Grande Exhibitions
Da Vinci – The Genius activities
Grande Exhibitions – Da Vinci The Genius Activities 68
Introducing the Activity (background information for visitors) Through Da Vinci’s detailed study of human bodies, he realized that humans generally have similar body proportions. For example, if a person spreads out his arms, the width from the fingertip on one hand across to the fingertips on the other will be the same as his height regardless of how tall or short he may be. The Roman architect Vitruvius knew that human bodies were proportional and suggested that one should use those ideal proportions when designing architecture. Da Vinci knew of Vitruvius’ writings on proportion and drew the Vitruvian Man to demonstrate those ideals. Doing the Activity This activity requires at least two people to complete: either two visitors, or one visitor and one museum staff person. One person will be the model, and the other, the artists. It may be helpful to have a third person available to record measurements. You don’t have to do all the suggested measurements, but at least two or three will need to be done for the activity to work. Note: Describe the activity to prospective models and use caution when taking measurements or drawing the outline of the model’s body, as some models may feel uncomfortable with a stranger getting up close and measuring their bodies. Try, if possible, to involve models and artists from the same group of visitors so they are familiar with each other.
Option 1 It is suggested to measure models on their backsides (when appropriate) rather than measuring on their front. Either the artist or a third person should record the measurements to compare later, or you can do comparison measurements at the same time (i.e. measure the model’s height, then immediately measure the width from fingertip to fingertip, and compare.)
• Have the model stand up straight and measure his or her height • Have the model hold his arms out straight and measure the width from fingertip to fingertip • Measure the height of the model’s head (chin to top) • Measure the length of the calf from the heel to the knee. Have the model remove a shoe and
measure the length of a foot. (You can have the model leave the shoe on, but know that your measurement will be a bit long.)
• Measure the length of the forearm, from fingertip to elbow • Measure the length of the forearm from wrist to elbow, as well as the length of the thigh from knee
to hip.
Options 2 and 3 These two methods use slightly different materials but are similar in execution. Have the model stand against the whiteboard/paper (if it is attached to the wall) or lie on the whiteboard/paper (if it is on the ground). The model should stand or lie as straight as possible with arms outstretched. You may want the model to position his legs/feet so that at least one is pointing sideways (see the Vitruvian Man’s left foot for an example.) The artist can do an outline drawing of the model’s body, or simply make lines or arrows to indicate specific points, such as:
• Overall height of the model • Overall width of the model’s open arms, from fingertip to fingertip • Height of the head, from chin to top • Length of a foot (without a shoe) • Length of the calf from heel to knee • Length of the forearm, from fingertip to elbow • Length of the forearm, from wrist to elbow • Length of the thigh, from knee to hip
Grande Exhibitions
Da Vinci – The Genius activities
Grande Exhibitions – Da Vinci The Genius Activities 69
For Options 1, 2, and 3 Once the artist is finished drawing and/or recording measurements, you can compare those to some standard human proportions:
• The height of the body is equal to the width from fingertip to fingertip • The average person’s height is 7 to 8 heads tall (from chin to top) • The foot is half the length of the heel to the knee • The forearm from wrist to elbow is half the length of the thigh (from knee to hip)
It may be useful to pick just a few of the proportions to test with visitors rather than doing them all with each visitor. Note about terminology: This activity is meant to be fun and to communicate some general principles of human proportion and anatomical similarity, though museum staff should be aware that there is the potential for visitors to be uncomfortable with the outcome if their bodies don’t quite fit the standard. Museum staff should use caution when using terms like “ideal proportions” and when measuring the artist’s drawings of their models. Not everyone’s bodies exactly fit the standards, and it needs to be made clear to visitors that there is a lot of variation. Also, some artists (especially small children) won’t be as skilled at outlining their models’ bodies, so the drawings may not be an accurate representation of what the models look like anyway. A skilled museum staff person can anticipate a poor drawing, and highlight some of the proportions that likely will match up with Da Vinci’s guidelines, while ignoring others that might not fit. Questions to Ask Visitors
Watch the video about the Vitruvian Man. Do any of the other proportions described in the video fit with the drawing?
Extensions and Additional Activity Ideas 1. Photo examples (Note: A similar extension is also used in the “Face It” activity) Supplies
• Large photos or printouts of people’s bodies that show a fair amount of anatomical detail. (The person in the photo can be clothed, but showing someone in a heavy winter jacket won’t get the point of the activity across as well.) The people can be famous, or not. Laminating the photos or putting them in plastic sleeves can help them last longer.
• Rulers Use the introduction of the activity above, but rather than having the visitors draw or measure each others’ bodies, measure the proportions of the bodies in the photos instead.

Grande Exhibitions
Da Vinci – The Genius activities
Grande Exhibitions – Da Vinci The Genius Activities 70
2. Architecture examples (Note: This extension is also used in the “Face It” activity) Supplies
• Full- or half-page printout of the façade of the church Santa Maria Novella in Florence, Italy.
Image from http://www.britannica.com/ (note, make sure a photo with a straight-on view is used. One that is photographed from an angle won’t work.)
• Rulers Many artists during the Renaissance also believed that “the proportions found in the human body were ideal for designing buildings”, an idea first put forth by the architect Vitruvius in the first century B.C. An example of using proportions in building design can be seen in the façade of Santa Maria Novella, a church in Florence, Italy. Florence was home to Da Vinci during his early years, and the architect, Leon Battista Alberti, was designing and building the church’s façade right at the same time Da Vinci was an artist’s apprentice in that city. It is also known that Alberti’s book from 1453 called “On Painting”, was among Da Vinci’s cherished collection of books.3
Alberti used mathematical proportions such as 1:1, 1:2, 1:3, 2:3, etc., to design his buildings. Using a ruler, measure the areas of the façade of the church and compare them. There are many proportional relationships, but some of the easiest to find are:
• From the ground level to the top of the peak and side-to-side, the façade forms a square.
Diagram 1
• The top square section is one half of the bottom.

Grande Exhibitions
Da Vinci – The Genius activities
Grande Exhibitions – Da Vinci The Genius Activities 71
Diagram 2
• From the bottom to the top of the cornice is one third of the entire height
Diagram 3
• The areas to the right and left of the door that are outlined by columns are each one third of the width of the façade.
Diagram 4 Ask visitors if they can find any other proportional relationships on the façade. 1Atalay, Bulent; and Wamsley, Keith. Leonardo’s Universe: The Renaissance World of Leonardo da Vinci. (National Geographic, 2009) 128. 2Ibid. 3Ibid.

Grande Exhibitions
Da Vinci – The Genius activities
Grande Exhibitions – Da Vinci The Genius Activities 72
Will It Float?
Activity Goal:
Discover why some things float and why other things sink by learning about density, volume, and positive, neutral, and negative buoyancy. Related Area in Da Vinci Exhibit Aquatic and Hydraulic Machines History and Context of Activity (background information for museum staff) Leonardo Da Vinci was deeply interested in how the world worked around him. “What fascinated him his whole life long, perhaps more consistently than any other natural phenomenon, was the behavior of water, and his notebooks abound with schemes for providing it in abundance to cities, rendering it useful and free of obstruction in harbors, making it a safe means of transportation in rivers and canals. For such purposes one has to know how water works….” 1 This activity will give visitors an opportunity to learn more about one of the fascinating aspects of water – buoyancy – and will also explain its relationship to density and volume. It is an open-ended activity where visitors will be able to make and test hypotheses about what will float, and what won’t. Da Vinci used the principles of and his understanding of buoyancy in designing several of the pieces in the exhibit, particularly (but not limited to) the Double-Bottom Hull boat, Paddle Boat, the Floating Equipment (water shoes), the Scuba-diving Equipment with the Breathing Equipment, and the Life Buoy. Special additional connection: There is a legend that the ancient Greek mathematician and inventor Archimedes discovered the relationship between volume, density, and water displacement while sitting in his bathtub, and was so excited that he ran from his house naked yelling “Eureka!” (“I have found it!”). Whether the story is true or not, Archimedes did indeed make discoveries and create inventions using water, and is the namesake of another one of the pieces in the exhibit, Archimede’s Screw. Supplies
• Small bucket or other container for water. The container should be able to have water inside that is at around 5 in (12 cm) deep, and wide enough for objects such as apples or oranges to float freely and for hands to easily reach inside. Clear sides are ideal, but not required. Buckets, small aquarium tanks, pitchers, or 1- or 2-liter bottles with the tops cut off are all good choices.
• Water • Assortment of objects to put into the water and test whether they float, such as:
o Modeling clay o Aluminum foil o Apples, oranges, or other fruit o Can of regular soda (with sugar) and can of diet (sugar-free) soda o Small pieces of pumice rock o Anything lying around that is small and you don’t mind getting wet (paperclips, buttons, rubber
balls, etc.) • Paper or cloth towels for cleaning up spills
Grande Exhibitions
Da Vinci – The Genius activities
Grande Exhibitions – Da Vinci The Genius Activities 73
Safety Notice: Do not leave container of water unattended! It is possible for small children to drown in even a few inches or centimeters of water, and containers should not be left in locations where small children can easily access them. Also, it is very likely that water spills will happen with this activity. Be sure to clean up spills quickly to prevent slips, especially when on a non-carpeted floor. Advance Preparation
• Gather supplies • Fill container with water • If using modeling clay and/or aluminum foil, you may want to divide them into several same-sized
pieces • Before doing activity in public for the first time, it may be useful to test out all the objects in the
water to see if they float (or not), so as not to be surprised in front of visitors or give incorrect information.
Introducing the Activity (background information for visitors) Why do some things float on top of water and some things sink to the bottom? It all depends on volume, mass, density and buoyancy. Volume is the amount of space something takes up.
Mass is (roughly) the weight of an object. (Note: mass and weight are not technically the same thing. Weight is a measure of force that is the result of how gravity acts on a mass, while mass is the same regardless of gravity. However, for this activity, they can be used interchangeably.)
Density is the ratio of mass to volume of an object, or put another way, a measure of how compact something is. Even if they’re the same size, a rock is denser (heavier) than a feather pillow because there’s more stuff (mass) packed into that area.
Buoyancy is the upward force that keeps things afloat.
When you put something in water, its density and volume will determine whether it is buoyant. Take an object and compare it to the same volume of water. If the object is less dense (lighter) than the volume of water it displaces, it will float and is called positively buoyant. If the object is denser (heavier) than the volume of water it displaces, then it will sink and is called negatively buoyant. If the object has the same density of the volume of water it displaces, the object will neither sink nor float, but will stay somewhere in the middle and is called neutrally buoyant. However, if you change the volume of the object, you can change the amount of water it displaces and change its buoyancy.
Example #1: A big solid ball of dense metal will sink in water. If you increase its volume by changing its shape into a ship, it will float. Example #2: You can float on (or near) the surface of a swimming pool by spreading out your arms and legs and making yourself as flat as possible. If you curl up into a ball, you will probably sink.

Grande Exhibitions
Da Vinci – The Genius activities
Grande Exhibitions – Da Vinci The Genius Activities 74
Doing the Activity Set out the assortment of objects (fruit, clay, etc.) next to the container of water. Have the visitors hypothesize which items will float, sink, or stay somewhere in the middle (be neutrally buoyant). Museum staff can either place the items in the container of water themselves, or they can let visitors do it. (Have towels nearby!) Tips for items on supplies list:
• Modeling clay Give small balls of clay to visitors to have them test their buoyancy. A compact ball of clay should not float. However, if you flatten the clay into a boat shape, thereby increasing its volume, it should float. Visitors can mold the clay different shapes and sizes and test them. Try having them put other objects in their little clay boats as well. Give the same-sized clay balls to more than one visitor and see who can make theirs the most buoyant and carry the heaviest load.
• Aluminum foil Give same-sized pieces of foil to visitors and see who can make a boat that can hold the most weight.
• Apples, oranges, or other fruit Some fruit, like apples and cranberries, should float. Others may not…you may be surprised!
• Can of regular soda (with sugar) and can of diet (sugar-free) soda
This is a good opportunity to talk about the difference between density and volume. Get a can of regular soda and a can of the same brand of diet soda, and ask visitors if they think they will sink or float, and why. Place the cans in the water. The regular soda will sink, and the diet soda will float. They have the same volume, but since the regular soda has sugar in it, the liquid inside the can is more dense (heavier). The diet soda is sweetened with something other than sugar, and is therefore less dense (lighter).
• Small pieces of pumice rock Pumice is a volcanic rock that is very porous (has lots of holes in it), and is not very dense. Because of its low density and trapped air within the rock, pumice will usually float on top of water. Find a denser rock with the same volume (the same size) and compare their buoyancies.
Questions to Ask Visitors Do you think this object will float? Why or why not? Did it surprise you that this object did (or did not) float? Why? Were you able to change the shape of an object to make it float or sink?
Do you think the Double-Bottom Hull boat or the Paddle Boat would float? Why or why not?
Do you think the Floating Equipment (water shoes) would work? Would you design them differently? If so, how?
What do you think the Breathing Equipment float for the Scuba-diving Equipment should be made of to keep it above the surface of the water? The Life-Buoy looks similar to life rings you can find on boats today. What are modern-day life rings and life jackets made of?

Grande Exhibitions
Da Vinci – The Genius activities
Grande Exhibitions – Da Vinci The Genius Activities 75
Extensions and Additional Activity Ideas 1. Raisins and Soda Supplies
• Clear carbonated beverage • Raisins • Clear glass or plastic cups
Pour the carbonated beverage into the cup, and drop a few raisins in the cup. The raisins will sink to the bottom at first. Soon, however, bubbles will form on the raisins, and the raisins will float to the top. When they reach the top, the bubbles will burst and the raisins will sink again. This will continue until the carbonation is gone. 2. Density Column Supplies
• Graduated cylinder • Several (2 or more) liquids with different densities. These can include corn syrup, vegetable oil,
fresh water, and salt water. • (Optional) Object that will float on denser liquid, but sink in less dense liquid. These can include a
golf ball, cork, or small coins. • (Optional) Food coloring/dye
Pour the heavier liquid into the bottom of the graduated cylinder. Then, with care, gently pour the less dense liquid on top (you can do this by pouring down the inside wall of the cylinder, or by pouring over the back of a spoon). The two liquids should settle into two distinct layers. It is possible to suspend an object between the two layers; for example, a golf ball will float on top of salt water but will sink in fresh water, and will remain in the middle of the cylinder between the two layers. Adding different colors of food coloring/dye to the two liquids can emphasize the difference between their densities. For an additional experiment that will take more time, pour the less dense liquid on the bottom and the denser liquid on top, and see what happens. _______________________ “Will It Float?” is based, in part, on the activity entitled “Oh Buoy” from the Expedition Northwest curriculum developed by the Oregon Museum of Science and Industry in 2006. 1Hartt, Frederick. History of Italian Renaissance Art. 3rd ed. (New York: Harry N. Abrams, Incorporated, 1987) 437.

Grande Exhibitions
Da Vinci – The Genius activities
Grande Exhibitions – Da Vinci The Genius Activities 76
Anatomy in Real Life
Activity Goal:
To relate Da Vinci’s anatomical drawings to visitors’ own bodies. Related Area in Da Vinci Exhibit Anatomical Sketches and Vitruvian Man History and Context of Activity (background information for museum staff) The leading anatomical textbook during Da Vinci’s time was a book by Galen, a Greek physician and philosopher from the 2nd century A.D. It’s likely that Galen never actually dissected a human body, and he made a lot of assumptions about the human anatomy based on similar structures in other animals like dogs, monkeys, and pigs. Everyone who studied anatomy up to the Renaissance took Galen’s word as law and didn’t question what it said in the book, even if what was written contradicted what they actually saw in humans. “For example, the surgeon would display an arrow-straight humerus (the bone of the upper arm), while the professor of surgery would explain an optical illusion at play, that’ it is one of nature’s jokes to make the bone seem straight when in reality it is curved [just as Galen had described it]. (Never mind that Galen had based his description on the humerus of a pig.) The professor would reiterate that Galen was the true authority, and more so than nature.”1 Da Vinci was never one to take the “accepted” view of reality as true without exploring it for himself. Though in his early years he may have clung to the common assumption that Galen was infallible, he soon started doing some anatomical studies of his own by dissecting cadavers. It is estimated that Da Vinci dissected at least 50 corpses of all kinds of people, including men, women, old, and young. He also drew one of the first (if not THE first) anatomically correct depiction of a fetus in the womb. In his anatomical drawings, “Leonardo was struggling for a technique that would allow a thorough display of the body’s structures, both their surface detail and their inner workings. He settled on showing features from as many as eight different angles, in cross section and in multiple cutaway views that successively peel back layers of muscle and tissue to reveal the levels of structure. Anatomical drawings of the time were crude compared to Leonardo’s drawings; depictions of the female body in the literature of that time could have been mistaken for schematic drawings of the anatomy of a frog.2 Through careful study and observation, Da Vinci was able to give an accurate view inside the human body. These are not idealized figures; rather, they are drawn from real people, reflecting the real wear and tear on a person. Though one can picture Da Vinci being very serious in his dissection and anatomical sketching, he also drew some people in what seems a more lighthearted way. There are many “grotesque caricatures” throughout his notebooks; drawings of somewhat oddly shaped people with ridiculous expressions on their faces. It’s not known exactly why he drew these – perhaps they were a simple sketching exercise – or maybe he drew them to amuse himself. Whatever their original intent, modern viewers will probably find them funny. Supplies
• Computer • Projector • White wall or screen in a space that is:
o Large enough for the projector/computer to be back from the wall a ways without impeding the flow of the exhibit
o Dark enough so the projected slides can be seen. • Slides (see accompanying Annexure 1, “Da Vinci Anatomical Drawings” • (Optional) Rolling cart for projector and computer

Grande Exhibitions
Da Vinci – The Genius activities
Grande Exhibitions – Da Vinci The Genius Activities 77
• (Optional) Printouts of Da Vinci’s anatomical drawings. Laminating them or putting them in sheet protectors will help them last longer. (See below)
Vitruvian Man
http://commons.wikimedia.org/wiki/Da_Vinci View of a skull
http://commons.wikimedia.org/wiki/Da_Vinci

Grande Exhibitions
Da Vinci – The Genius activities
Grande Exhibitions – Da Vinci The Genius Activities 78
Views of the shoulder
http://sites.google.com/site/hsci3013webprojectfun/Home/episode-1/episode-3---once--twice--three-times-a-man Studies of the arm showing the movements made by biceps
http://commons.wikimedia.org/wiki/Da_Vinci The Principle organs and vascular and Urino-genital systems of a woman
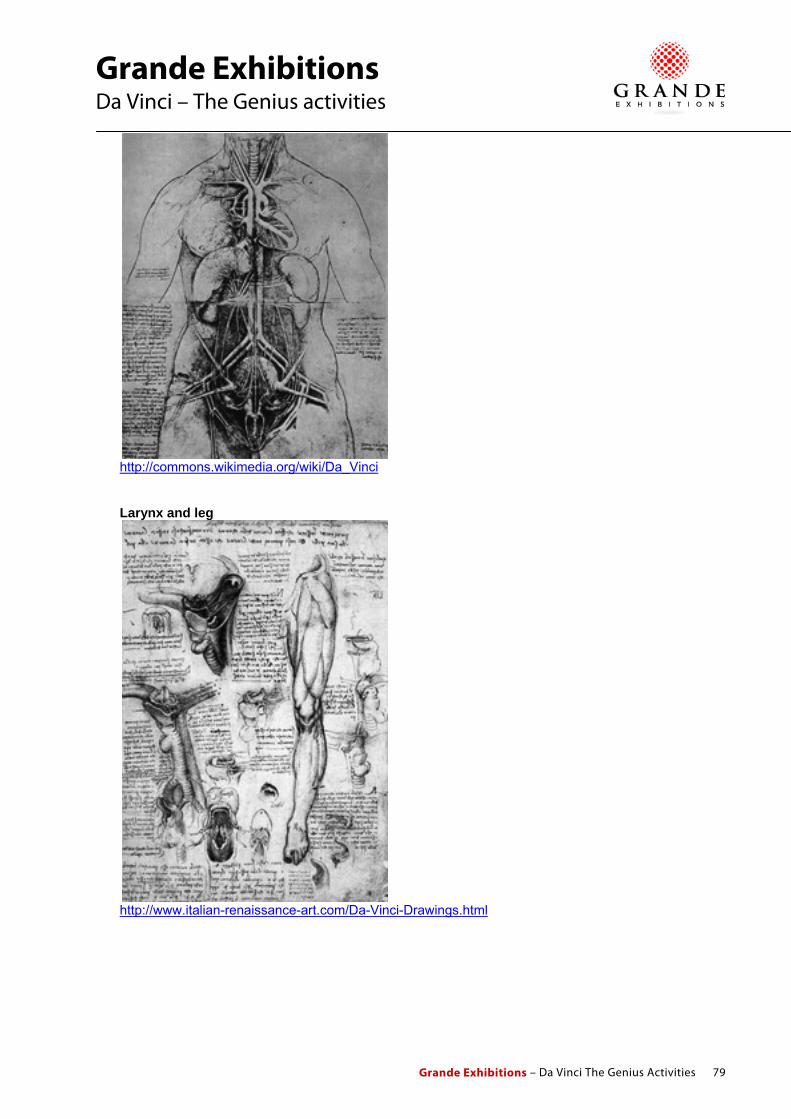
Grande Exhibitions
Da Vinci – The Genius activities
Grande Exhibitions – Da Vinci The Genius Activities 79
http://commons.wikimedia.org/wiki/Da_Vinci Larynx and leg
http://www.italian-renaissance-art.com/Da-Vinci-Drawings.html
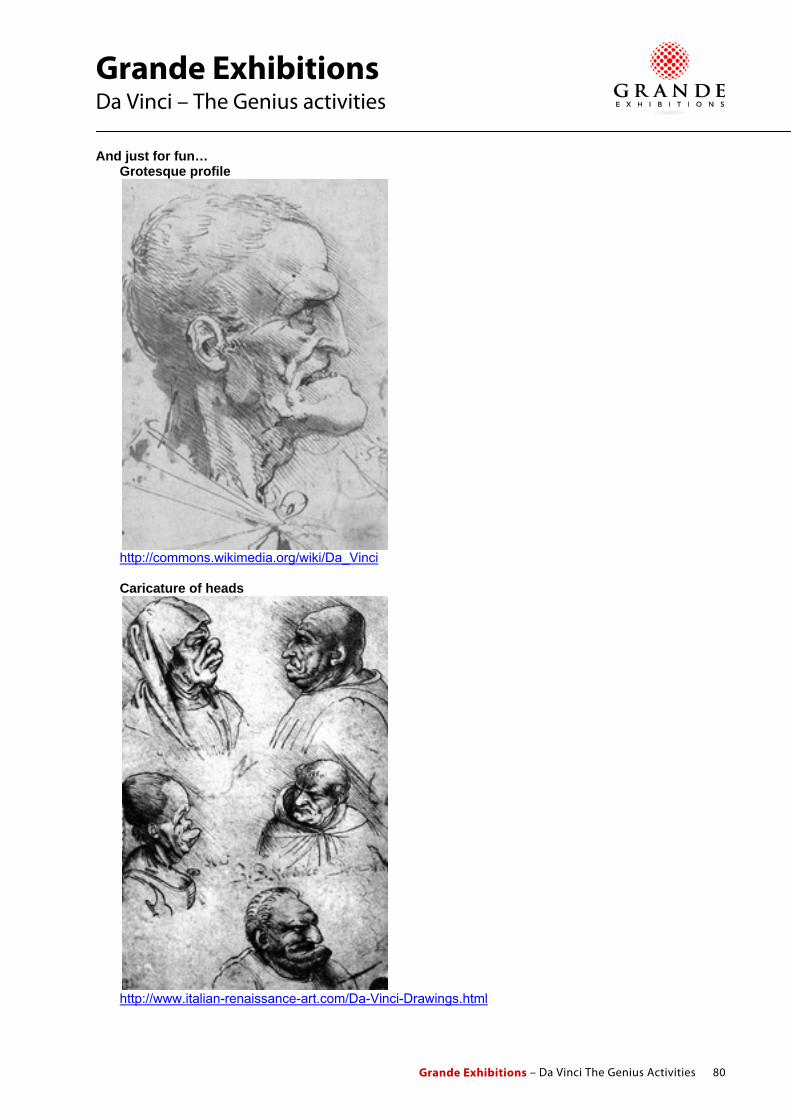
Grande Exhibitions
Da Vinci – The Genius activities
Grande Exhibitions – Da Vinci The Genius Activities 80
And just for fun… Grotesque profile
http://commons.wikimedia.org/wiki/Da_Vinci Caricature of heads
http://www.italian-renaissance-art.com/Da-Vinci-Drawings.html

Grande Exhibitions
Da Vinci – The Genius activities
Grande Exhibitions – Da Vinci The Genius Activities 81
Advance Preparation Load the Annexure images onto the computer and connect it to the projector. Set up the computer and projector in front of the white wall or screen. Move and/or focus the projector accordingly so that the first slide in the presentation, the Vitruvian Man, shows up on the wall at around life size. Each of the following slides should line up with the various body parts of the Vitruvian Man and should be projected in the about the same spot and at the same height on the wall. Introducing the Activity (background information for visitors) Da Vinci was both an artist and a scientist, and he used his artistic skills to record what he saw in his scientific studies. One of the scientific areas that fascinated him most was human anatomy. Doctors and other anatomy experts of the time based their knowledge on a textbook that was more than 1000 years old during the time of Da Vinci, and since the author of that book (Galen) hadn’t actually dissected humans to see what was on the inside, that book had information that was flat out wrong. Da Vinci decided that he wanted to know how the body was put together first-hand. He wanted to see for himself how tendons and muscles and bones fit together so he could understand how it all worked. To do that, he got permission to dissect dead bodies. It’s estimated that he dissected at least 50 men and women of all ages, and he made many anatomical drawings to describe what he saw about how human bodies move and function. Doing the Activity Project the Annexure images onto the wall and adjust it so that the image is about the same height as the visitor. Have the visitor stand next to the projected image and compare him or herself to Da Vinci’s drawing. You can also try having the visitor stand directly in front of the image so that the image is projected directly onto the visitor. There are several slides in the Annexure show different anatomical sketches. The final slide shows several of the grotesque caricature faces. You can set the presentation to automatically progress through the slides every few minutes, or you can advance the slides by hand. Questions to Ask Visitors
How does your body compare to Da Vinci’s sketches? Is it similar, or different? Does anything about Da Vinci’s drawing surprise you when you compare it to your own body?
Extensions and Additional Activity Ideas 1. Modern anatomical drawings Find images of modern anatomical drawings with the body parts labeled (examples below). Print out the images and have them available to discuss with visitors, or add the images to the Annexure images to compare with Da Vinci’s sketches.

Grande Exhibitions
Da Vinci – The Genius activities
Grande Exhibitions – Da Vinci The Genius Activities 82
Anatomy of the arms and shoulders
http://commons.wikimedia.org/wiki/File:Human_arm_bones_diagram.svg Abdomen
http://www.uptodate.com/online/content/image.do?imageKey=gast_pix/abdome1.htm&title=Abdomen%20anatomy%20adult _______________________ 1Atalay, Bulent; and Wamsley, Keith. Leonardo’s Universe: The Renaissance World of Leonardo da Vinci. (National Geographic, 2009) 241. 2Ibid, 249.

Grande Exhibitions
Da Vinci – The Genius activities
Grande Exhibitions – Da Vinci The Genius Activities 83
Build a Catapult
Activity Goal:
To build and test one or more versions of a catapult. Related Area in Da Vinci Exhibit Military Engineering, specifically Catapult History and Context of Activity (background information for museum staff) (Note: This activity is very similar in background and instructions to the activity Build a Trebuchet. However, the two activities differ in the Doing the Activity section below with links and online resources specific to either catapults or trebuchets, respectively.) Leonardo da Vinci was a man of many interests, including art, science, flight, and even war. Despite the fact that he was a pacifist, the times in which he lived were often not very peaceful. He worked for several powerful men, such as Ludovico Sforza in Milan, for whom war and the military were a way of life. As a result, Da Vinci designed several horrific war machines such as cannon, chariots with rotating scythes, an armored car, and catapults. There are several different kinds of catapults, but the main object of all of them is to throw and object through the air. Typically those objects are thrown at an enemy army or fortress, and they can be anything from stones for breaking down walls, to shells filled with gunpowder that explode on impact. Catapults have been around since ancient Greek and Roman times, so Da Vinci did not come up with the original idea. However, he expanded on the existing ideas for catapults and trebuchets and designed new mechanisms for them. (See activity Build a Trebuchet.) “Though never leading to the actual production of equipment the military drawings were a valuable exercise for Leonardo. Even the unorthodox catapults and the repeating crossbow, though looking to the past, were for Leonardo the start of his encounter with complex devices and their relation to the forces of nature.” 1 Catapults and trebuchets are similar in that they are both weapons used to throw projectiles, but they are different in the mechanics. Catapults work on the principles of tension and release. The catapult’s power is created by attaching the throwing arm to some kind of spring (such as twisted ropes), and then loading the spring with a great deal of tension by tightening or winding it. The tension is then released all at once, causing the throwing arm to fling forward and throw the projectile. Trebuchets use the principles of leverage, gravity, and momentum. The trebuchet’s power is created by attaching a heavy counterweight to one end of a throwing arm, and then dropping the weight all at once. That causes the free end of the throwing arm to pivot forward rapidly and throw the projectile. Sometimes in literature (and in some of the writings about Da Vinci), the terms “catapult” and “trebuchet” are used interchangeably. For the purposes of these activities, however, they will have different meanings as described in the paragraph above.

Grande Exhibitions
Da Vinci – The Genius activities
Grande Exhibitions – Da Vinci The Genius Activities 84
Supplies There are many options for catapult design and supplies. See Doing the Activity below for specifics. These supplies are suggested regardless of catapult design:
• It is highly recommended to set up an area for a catapult firing range. Visitors (and museum staff!) will undoubtedly want to launch things with the catapult, so block off an area in front of the catapult so no one will get hit. Also, depending on the number of visitors, you may also want to set aside a small queuing area for people who want to launch the catapult(s).
• Choose projectiles that are relatively soft and safe, such as marshmallows or ping pong balls (for small catapults), and tennis balls or small bean bags (for larger catapults).
• (Optional) A target. Targets suggestions include: o A bullseye o A basket or a box on the floor o A frame with a net (like a smaller version of a soccer or football goal) to slow and catch
oncoming projectiles o Stacked foam or cardboard blocks to mimic a castle wall. (Note: if the catapult’s aim is
good, staff will have to re-set up the blocks between firings). • (Optional) Printout of Da Vinci’s catapult designs (see below for images and links). Laminating the
printouts or putting them in sheet protectors will help them last longer. Advance Preparation This activity can be done in a couple of different ways, such as:
• A permanent demonstration piece. Build a tabletop or larger scale catapult that can be moved on the museum floor for activities, and moved off the floor when not in use.
• Have supplies available for visitors to make one of the smaller tabletop catapults themselves. Safety Notices:
• Catapults are weapons that throw projectiles at a very high velocity! Be sure to set aside a safe area to keep staff and visitors out of the line of fire.
• NEVER lean over the catapult’s arm when the spring is tightened and it is ready to fire. • Test all catapult designs before using them on the museum floor so there’s a clear idea of how far
and how fast they launch. • Practice good safety habits, such as having visitors and staff stand back from the catapult when
firing. • Do not leave the catapult unattended when it is on the exhibit floor!
Introducing the Activity (background information for visitors) A catapult is a large-scale weapon that is used to throw objects. It can be used defensively to repel oncoming attackers, or it can be used offensively to break down walls or fortifications. Catapults have a few basic parts: the base, the arm, and the spring. The base gives the catapult a stable structure. The arm is the long straight part with an area at the free end to hold the object being thrown. The spring is the part of the catapult that gives it energy. It can be made of a many different things – rope, metal bands, rubber, etc. –, which are tightened or wound up to store energy. It’s the sudden release of the stored energy in the spring that makes the arm fling forward and the catapult hurl the projectile into the air. Steps to launch a catapult:
• Pull the arm down by tightening or winding the spring • Load the catapult by putting an object in the space at the end of the arm • Using some sort of firing mechanism, release the tension on the spring all at once
Da Vinci didn’t invent catapults; they have been around since the days of the ancient Greeks. However, in addition to being a great inventor, he was often explored ideas for how to improve designs of the machines of his day. There are several catapult designs included in his notebooks, and while there is no record of
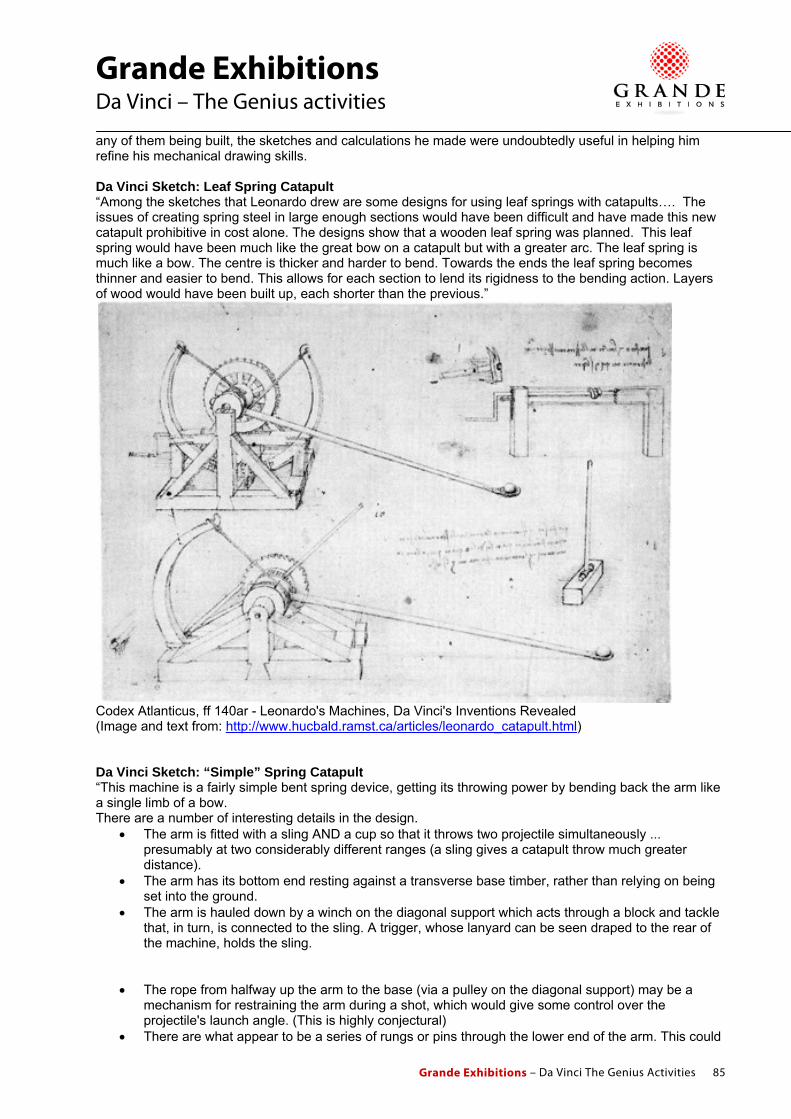
Grande Exhibitions
Da Vinci – The Genius activities
Grande Exhibitions – Da Vinci The Genius Activities 85
any of them being built, the sketches and calculations he made were undoubtedly useful in helping him refine his mechanical drawing skills. Da Vinci Sketch: Leaf Spring Catapult “Among the sketches that Leonardo drew are some designs for using leaf springs with catapults…. The issues of creating spring steel in large enough sections would have been difficult and have made this new catapult prohibitive in cost alone. The designs show that a wooden leaf spring was planned. This leaf spring would have been much like the great bow on a catapult but with a greater arc. The leaf spring is much like a bow. The centre is thicker and harder to bend. Towards the ends the leaf spring becomes thinner and easier to bend. This allows for each section to lend its rigidness to the bending action. Layers of wood would have been built up, each shorter than the previous.”
Codex Atlanticus, ff 140ar - Leonardo's Machines, Da Vinci's Inventions Revealed (Image and text from: http://www.hucbald.ramst.ca/articles/leonardo_catapult.html) Da Vinci Sketch: “Simple” Spring Catapult “This machine is a fairly simple bent spring device, getting its throwing power by bending back the arm like a single limb of a bow. There are a number of interesting details in the design.
• The arm is fitted with a sling AND a cup so that it throws two projectile simultaneously ... presumably at two considerably different ranges (a sling gives a catapult throw much greater distance).
• The arm has its bottom end resting against a transverse base timber, rather than relying on being set into the ground.
• The arm is hauled down by a winch on the diagonal support which acts through a block and tackle that, in turn, is connected to the sling. A trigger, whose lanyard can be seen draped to the rear of the machine, holds the sling.
• The rope from halfway up the arm to the base (via a pulley on the diagonal support) may be a mechanism for restraining the arm during a shot, which would give some control over the projectile's launch angle. (This is highly conjectural)
• There are what appear to be a series of rungs or pins through the lower end of the arm. This could
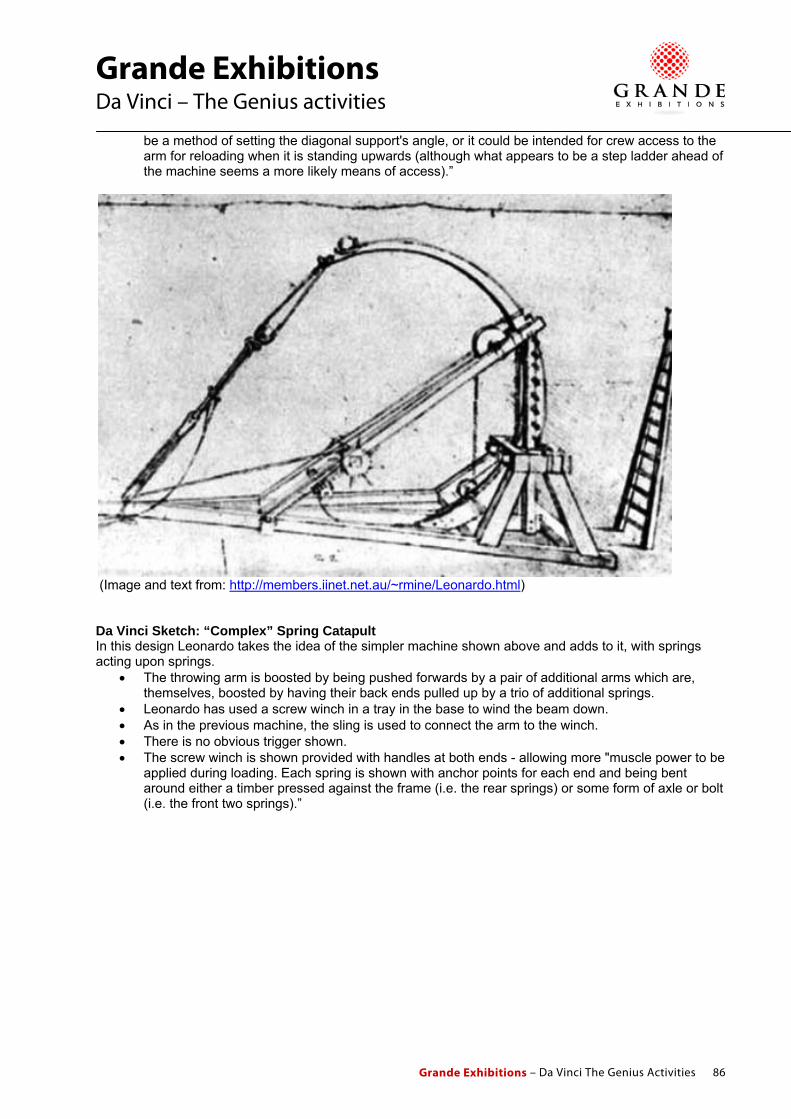
Grande Exhibitions
Da Vinci – The Genius activities
Grande Exhibitions – Da Vinci The Genius Activities 86
be a method of setting the diagonal support's angle, or it could be intended for crew access to the arm for reloading when it is standing upwards (although what appears to be a step ladder ahead of the machine seems a more likely means of access).”
(Image and text from: http://members.iinet.net.au/~rmine/Leonardo.html) Da Vinci Sketch: “Complex” Spring Catapult In this design Leonardo takes the idea of the simpler machine shown above and adds to it, with springs acting upon springs.
• The throwing arm is boosted by being pushed forwards by a pair of additional arms which are, themselves, boosted by having their back ends pulled up by a trio of additional springs.
• Leonardo has used a screw winch in a tray in the base to wind the beam down. • As in the previous machine, the sling is used to connect the arm to the winch. • There is no obvious trigger shown. • The screw winch is shown provided with handles at both ends - allowing more "muscle power to be
applied during loading. Each spring is shown with anchor points for each end and being bent around either a timber pressed against the frame (i.e. the rear springs) or some form of axle or bolt (i.e. the front two springs).”

Grande Exhibitions
Da Vinci – The Genius activities
Grande Exhibitions – Da Vinci The Genius Activities 87
(Image and text from: http://members.iinet.net.au/~rmine/Leonardo.html) Doing the Activity Because every museum will have different supplies and tools available, as well as different areas in which to launch the catapults, no one catapult design will work for all museum settings. There are a large number of catapult plans and pre-made kits available online. Below you will find links and images from several sites with detailed catapult plans and/or kits for sale. If these links are broken or unavailable in your country, or if the plans don’t work for your museum, simply do a Google search for “catapult” or “catapult plans”. Regardless of which catapult is chosen, by providing several suitable projectiles and suggesting different levels of tension for the spring, this can turn into a very engaging open-ended activity. 1. General tips, video, and links on how to make both small and large scale catapults http://hubpages.com/hub/How-to-Build-a-Catapult---An-Illustrated-Guide

Grande Exhibitions
Da Vinci – The Genius activities
Grande Exhibitions – Da Vinci The Genius Activities 88
2. Catapult made from popsicle sticks and rubber bands: Fairly light weight, but could be used as a design for visitors to build their own catapults.
http://www.stormthecastle.com/catapult/popsiclestick-catapult.htm Video of this catapult firing: http://www.stormthecastle.com/catapult/000_0505.MOV 3. Wooden tabletop catapult Sturdier and more detailed and takes more time and tools to complete. Would work as a tabletop permanent demonstration.
http://www.stormthecastle.com/catapult/how-to-build-a-catapult.htm Detailed plan for wooden tabletop catapult: http://www.stormthecastle.com/catapult/catapult-assembly1.htm

Grande Exhibitions
Da Vinci – The Genius activities
Grande Exhibitions – Da Vinci The Genius Activities 89
4. Da Vinci Leaf Spring Catapult See Da Vinci sketch in Introducing the Activity section above.
http://www.hucbald.ramst.ca/articles/leonardo_catapult.html Catapult kits for sale: 1. Catapult Kit Kit uses only wood, rope, and leather.
http://www.stevespanglerscience.com/product/1830

Grande Exhibitions
Da Vinci – The Genius activities
Grande Exhibitions – Da Vinci The Genius Activities 90
2. Catapult/Trebuchet Kit This kit can be used to make either a catapult or a counterbalanced trebuchet.
http://scientificsonline.com/product.asp?pn=3151348&bhcd2=1253855790 3. Numerous catapult and trebuchet plans for sale
http://www.howtobuildcatapults.com/catapultplans.html
Grande Exhibitions
Da Vinci – The Genius activities
Grande Exhibitions – Da Vinci The Genius Activities 91
Questions to Ask Visitors
What kinds of things (projectiles) do you think soldiers would fire using a catapult? Do you think a catapult would be an effective weapon against: A castle? Ground troops? A city wall? Why or why not? Da Vinci was generally a very peaceful man. Why do you think that he designed these weapons of war? How would you improve on this catapult? Can you find the base, arm, and spring on the exhibit of Da Vinci’s catapult? Can you find them on Da Vinci’s catapult sketches?
_______________________ 1Atalay, Bulent; and Wamsley, Keith. Leonardo’s Universe: The Renaissance World of Leonardo da Vinci. (National Geographic, 2009) 157.
Grande Exhibitions
Da Vinci – The Genius activities
Grande Exhibitions – Da Vinci The Genius Activities 92
Build a Trebuchet
Activity Goal:
To build and test one or more versions of a trebuchet.
Related Area in Da Vinci Exhibit Military Engineering History and Context of Activity (background information for museum staff) (Note: This activity is very similar in background and instructions to the activity Build a Catapult. However, the two activities differ in the Doing the Activity section below with links and online resources specific to either catapults or trebuchets, respectively.) Leonardo da Vinci was a man of many interests, including art, science, flight, and even war. Despite the fact that he was a pacifist, the times in which he lived were often not very peaceful. He worked for several powerful men, such as Ludovico Sforza in Milan, for whom war and the military were a way of life. As a result, Da Vinci designed several horrific war machines such as cannon, chariots with rotating scythes, an armored car, and trebuchets. There are several different kinds of trebuchets, but the main object of all of them is to throw and object through the air. Typically those objects are thrown at an enemy army or fortress, and they can be anything from stones for breaking down walls, to shells filled with gunpowder that explode on impact. Trebuchets have been around since at least the middle ages, so Da Vinci did not come up with the original idea. However, he expanded on the existing ideas for catapults and trebuchets and designed new mechanisms for them. (See activity Build a Catapult.) “Though never leading to the actual production of equipment the military drawings were a valuable exercise for Leonardo. Even the unorthodox catapults and the repeating crossbow, though looking to the past, were for Leonardo the start of his encounter with complex devices and their relation to the forces of nature.” 1 Trebuchets and catapults are similar in that they are both weapons used to throw projectiles, but they are different in the mechanics. Trebuchets use the principles of leverage, gravity, and momentum. The trebuchet’s power is created by attaching a heavy counterweight to one end of a throwing arm, and then dropping the weight all at once. That causes the free end of the throwing arm to pivot forward rapidly and throw the projectile. Catapults work on the principles of tension and release. The catapult’s power is created by attaching the throwing arm to some kind of spring (such as twisted ropes), and then loading the spring with a great deal of tension by tightening or winding it. The tension is then released all at once, causing the throwing arm to fling forward and throw the projectile. Sometimes in literature (and in some of the writings about Da Vinci), the terms “catapult” and “trebuchet” are used interchangeably. For the purposes of these activities, however, they will have different meanings as described in the paragraph above.

Grande Exhibitions
Da Vinci – The Genius activities
Grande Exhibitions – Da Vinci The Genius Activities 93
Supplies There are many options for trebuchet design and supplies. See Doing the Activity below for specifics. These supplies are suggested regardless of trebuchet design:
• It is highly recommended to set up an area for a trebuchet firing range. Visitors (and museum staff!) will undoubtedly want to launch things with the trebuchet, so block off an area in front of the trebuchet so no one will get hit. Also, depending on the number of visitors, you may also want to set aside a small queuing area for people who want to launch the trebuchet.
• Choose projectiles that are relatively soft and safe, such as marshmallows or ping pong balls (for small trebuchets), and tennis balls or small bean bags (for larger trebuchets).
• (Optional) A target. Targets suggestions include: o A bullseye o A basket or a box on the floor o A frame with a net (like a smaller version of a soccer or football goal) to slow and catch
oncoming projectiles o Stacked foam or cardboard blocks to mimic a castle wall. (Note, if the trebuchet’s aim is
good, staff will have to re-set up the blocks between firings). • (Optional) Printout of Da Vinci’s catapult designs (see below for images and links). Laminating the
printouts or putting them in sheet protectors will help them last longer. Advance Preparation This activity can be done in a couple of different ways, such as:
• A permanent demonstration piece. Build a tabletop or larger scale trebuchet that can be moved on the museum floor for activities, and moved off the floor when not in use.
• Have supplies available for visitors to make one of the smaller tabletop trebuchets themselves. Safety Notices:
• Trebuchets are weapons that throw projectiles at a very high velocity! Be sure to set aside a safe area to keep staff and visitors out of the line of fire.
• NEVER lean over the trebuchet arm when it is loaded and ready to fire. • Test all trebuchet designs before using them on the museum floor so there’s a clear idea of how
far and how fast they launch. • Practice good safety habits, such as having visitors and staff stand back from the trebuchet when
firing. • Do not leave the trebuchet unattended when it is on the exhibit floor!
Introducing the Activity (background information for visitors) A trebuchet is a large-scale weapon that is used to throw objects. It can be used defensively to repel oncoming attackers, or it can be used offensively to break down walls or fortifications. Trebuchets have a few basic parts: the base, the arm, and the counterweight. The base gives the trebuchet a stable structure. The arm is the long straight part with an area at the free end to hold the object being thrown. Often there will be a sling attached to the end of the arm and the projectile will be put in there instead. The counterweight is the part of the trebuchet that gives it momentum. The counterweight is raised into the air, either by ratcheting down on the free end of the arm, or by propping up the counterweight. Once the arm in loaded with the projectile, the tension keeping the counterweight in the air is released all at once, and the arm swings forward and releases the projectile.

Grande Exhibitions
Da Vinci – The Genius activities
Grande Exhibitions – Da Vinci The Genius Activities 94
Steps to launch a trebuchet:
• Pull the arm down by ratcheting down on the free end of the arm, or by propping up the counterweight
• Load the trebuchet by putting an object in the space at the end of the arm or in the sling • Using some sort of firing mechanism, release the counterweight so the arm swings forward with
great force all at once Da Vinci didn’t invent trebuchets; they have been around since at least the 12th century and were used in medieval warfare. However, in addition to being a great inventor, Da Vinci was often explored ideas for how to improve designs of the machines of his day. There are several trebuchet designs included in his notebooks, and while there is no record of any of them being built, the sketches and calculations he made were undoubtedly useful in helping him refine his mechanical drawing skills. Da Vinci Sketch: Fixed Counter-weight Trebuchet “Here Leonardo presents a light fixed-counterweight trebuchet (i.e. the counterweight is rigidly attached to the beam). The axle pivots at the top of tall posts which are supported and steadied by timbers projecting back from the top of the wall. “The trebuchet's sling appears to simply lie on the ground, although he has drawn something on the ground as well. It may be shadow, or it may be some sort of sliding surface for the sling. There is a device drawn to the left of the trebuchet that may be an idea for winding the beam down to load the catapult. It shows a toothed wheel with an arm attached and something below it. It's very tempting to see this as a "worm gear" screw winch (a device he uses elsewhere)... If this is the case it would require two other things: a method of removing the screw from the toothed wheel to allow the trebuchet to shoot - and a method of holding the trebuchet from shooting while this was done. In this little sketch the toothed wheel appears to be prevented from turning by a piece of wood propped up in front of it. “Trebuchet enthusiasts have pointed out that the clever use of the fortification's wall to achieve a high axle means that this design can be given an almost vertical "cocked" position - maximising the height through which the counterweight can fall. The very high ratio of throwing arm length to counterweight arm length (nearly 8:1) and the light beam construction all point to Leonardo intending this machine as a way of throwing fairly light projectiles. “As this trebuchet was draw sometime around the end of the 15th century, it seems likely that it was intended to fling "grenades" or other gunpowder-filled devices into a besieging force's ranks... although a simple rock travelling at speed (and launched from a considerable height) could do serious damage to an attacker.”
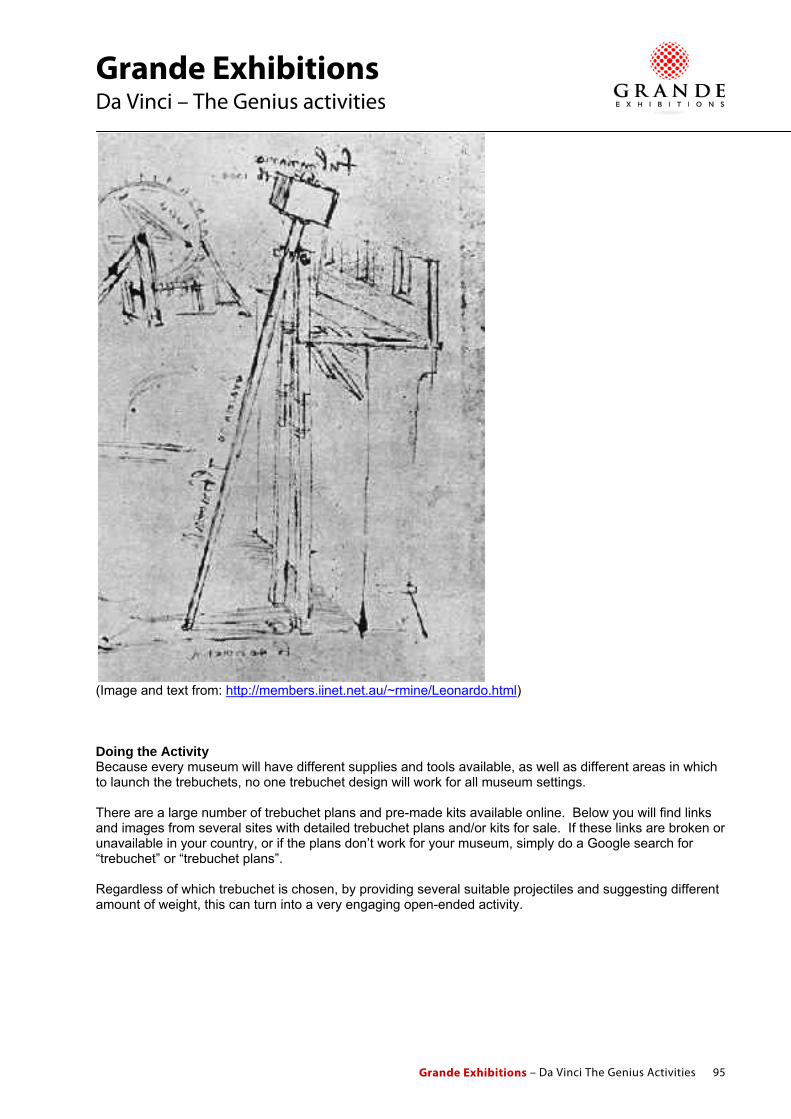
Grande Exhibitions
Da Vinci – The Genius activities
Grande Exhibitions – Da Vinci The Genius Activities 95
(Image and text from: http://members.iinet.net.au/~rmine/Leonardo.html) Doing the Activity Because every museum will have different supplies and tools available, as well as different areas in which to launch the trebuchets, no one trebuchet design will work for all museum settings. There are a large number of trebuchet plans and pre-made kits available online. Below you will find links and images from several sites with detailed trebuchet plans and/or kits for sale. If these links are broken or unavailable in your country, or if the plans don’t work for your museum, simply do a Google search for “trebuchet” or “trebuchet plans”. Regardless of which trebuchet is chosen, by providing several suitable projectiles and suggesting different amount of weight, this can turn into a very engaging open-ended activity.

Grande Exhibitions
Da Vinci – The Genius activities
Grande Exhibitions – Da Vinci The Genius Activities 96
1. Small wooden trebuchet with instructions and pictures:
http://www.io.com/~beckerdo/other/trebuchet.html 2. Basic plans for tabletop trebuchet:
http://www.stormthecastle.com/trebuchet/trebuchet-plan.htm
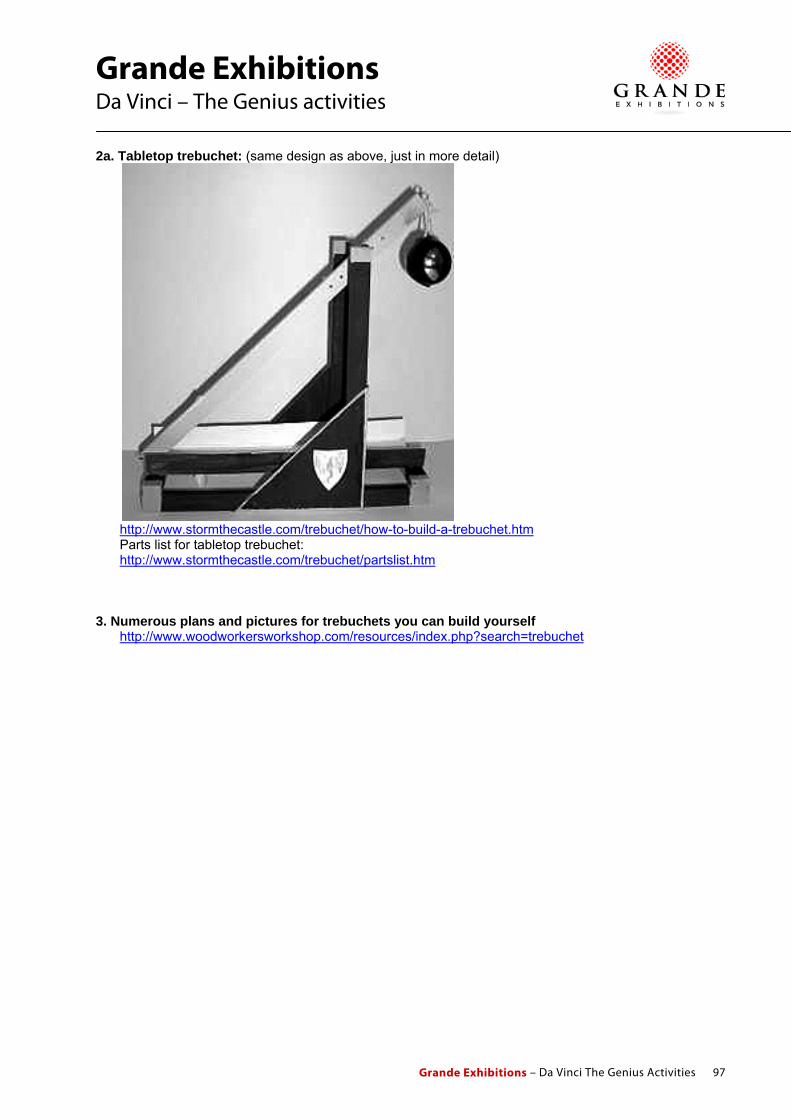
Grande Exhibitions
Da Vinci – The Genius activities
Grande Exhibitions – Da Vinci The Genius Activities 97
2a. Tabletop trebuchet: (same design as above, just in more detail)
http://www.stormthecastle.com/trebuchet/how-to-build-a-trebuchet.htm Parts list for tabletop trebuchet: http://www.stormthecastle.com/trebuchet/partslist.htm 3. Numerous plans and pictures for trebuchets you can build yourself http://www.woodworkersworkshop.com/resources/index.php?search=trebuchet

Grande Exhibitions
Da Vinci – The Genius activities
Grande Exhibitions – Da Vinci The Genius Activities 98
Trebuchet kits for sale: 1. Da Vinci trebuchet kit
http://www.redstoneprojects.com/trebuchetstore/davinci_trebuchet_plans.html 2. Basic trebuchet kit
http://scientificsonline.com/product.asp?pn=3083063

Grande Exhibitions
Da Vinci – The Genius activities
Grande Exhibitions – Da Vinci The Genius Activities 99
3. Catapult/Trebuchet Kit This kit can be used to make either a catapult or a counterbalanced trebuchet.
http://scientificsonline.com/product.asp?pn=3151348&bhcd2=1253855790 4. Desktop trebuchet
http://www.trebuchet.com/10421
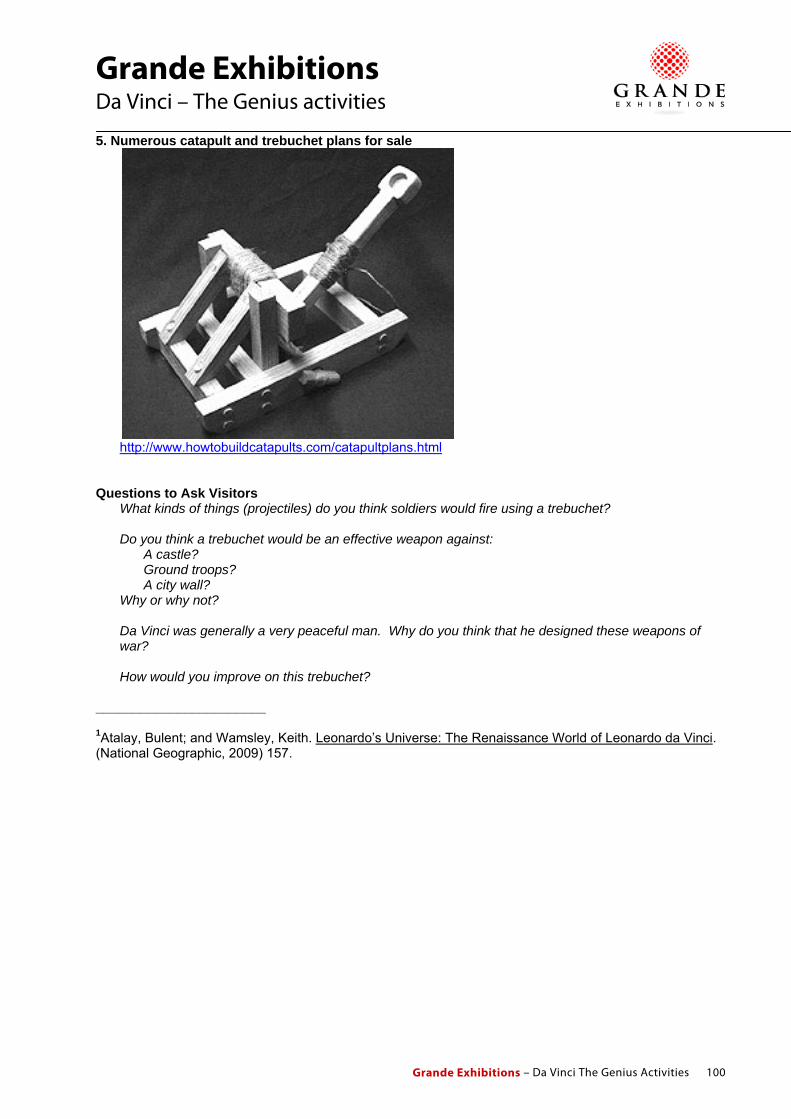
Grande Exhibitions
Da Vinci – The Genius activities
Grande Exhibitions – Da Vinci The Genius Activities 100
5. Numerous catapult and trebuchet plans for sale
http://www.howtobuildcatapults.com/catapultplans.html Questions to Ask Visitors
What kinds of things (projectiles) do you think soldiers would fire using a trebuchet? Do you think a trebuchet would be an effective weapon against: A castle? Ground troops? A city wall? Why or why not? Da Vinci was generally a very peaceful man. Why do you think that he designed these weapons of war? How would you improve on this trebuchet?
_______________________ 1Atalay, Bulent; and Wamsley, Keith. Leonardo’s Universe: The Renaissance World of Leonardo da Vinci. (National Geographic, 2009) 157.

Grande Exhibitions
Da Vinci – The Genius activities
Grande Exhibitions – Da Vinci The Genius Activities 101
It’s Your Density
Activity Goal:
To teach visitors about density by using a tool called a hydrometer. Related Area in Da Vinci Exhibit Aquatic and Hydraulic Machines History and Context of Activity (background information for museum staff) Leonardo Da Vinci was deeply interested in how the world worked around him. “What fascinated him his whole life long, perhaps more consistently than any other natural phenomenon, was the behavior of water, and his notebooks abound with schemes for providing it in abundance to cities, rendering it useful and free of obstruction in harbors, making it a safe means of transportation in rivers and canals. For such purposes one has to know how water works….” 1 This activity will give visitors an opportunity to test out the relative densities of several different liquids by making and using a hydrometer. Visitors may have heard of or ask questions about the term “specific gravity” because it is sometime used in cooking or other activities like home beer brewing or winemaking. It is not used in the Introducing the Activity or Doing the Activity sections below because the term may be confusing for younger visitors or those struggling with the general idea of density. However, to encourage a fuller knowledge base for museum staff, a basic explanation follows.
Specific gravity is the ratio of the density of a substance compared to the density of a given reference material. In the case of liquids, the reference material is usually water. When comparing a dense liquid (such as cooking oil) to water, the specific gravity of the oil will be higher than water and the hydrometer will float at a higher level than it does in water. When comparing a less dense liquid (such as isopropyl alcohol) to water, the specific gravity of the alcohol will be lower than water and the hydrometer will float at a lower level than it does in water.
(Note: A hydrometer is used for measuring the density of liquid and is the focus of this activity. A hygrometer is a different instrument used to measure the humidity of the air. Instructions for how to make a hygrometer and activities measuring water vapor in the air are included in the activity It’s the Humidity.) Supplies
• Straight drinking straw • Small piece of clay • A small nail or other small weight that will fit inside the straw • Ruler (either inches or centimeters will work) • Fine-tip permanent marker • At least three identical glasses, or another kind of vessel that is tall with a fairly narrow opening,
each filled with a different liquid. Each liquid should have a different density, and options include: o Regular tap water o Salt water o Water mixed with liquid dish or hand soap o Vegetable oil, or other type of cooking oil o Corn syrup o Isopropyl alcohol, or a mixture of isopropyl alcohol and water. (Safety Notice: Isopropyl
alcohol can be dangerous if inhaled, and is very flammable! Keep out of reach of visitors and ignition sources.)

Grande Exhibitions
Da Vinci – The Genius activities
Grande Exhibitions – Da Vinci The Genius Activities 102
o Filtered or distilled water (Note: Depending on the tap water in your area, filtered or distilled water may not give a reading that is dramatically different than your regular water.)
• Paper or cloth towels for cleaning the hydrometer between tests, and for cleaning up spills Advance Preparation Test out some of the liquid options listed above, or think of new ones. Test them out before taking them on the floor, so you know how the liquids will behave relative to each other and how much weight to use in the straws. This activity is probably best done with only one set of glasses full of the various liquids, rather than each visitor having his or her own sets of glasses. Some of the liquids could be irritating or dangerous if splashed on the skin or ingested, and having only one set of glasses will let the museum staff monitor them more closely. However, visitors can make their own straw hydrometers and, with staff supervision, the visitors can try them out in each of the various liquids. This activity could be done in conjunction with the activity Will It Float?. Be aware, however, of possible confusion if combining the two activities. Will It Float? features testing the densities (positive, negative, and neutral buoyancy) of various objects in a bucket of water. This activity features testing the various densities of types of water or other liquids, and the change from testing objects IN water to testing water itself may be confusing. However, with skilled explanation from museum staff, visitors should understand. Introducing the Activity (background information for visitors) Density is the ratio of mass to volume of an object, or put another way, a measure of how compact something is. Even if they’re the same size, a rock is denser (heavier) than a feather pillow because there’s more stuff (mass) packed into that area. Liquids can have different densities too. The hydrometer is a tool to test how dense a liquid is. The hydrometer has a weight (mass), and when it is put into a liquid, the same weight (mass) of liquid will have to be pushed out of the way (displaced) in order for the hydrometer to float. So the denser (heavier) a liquid, the less amount of it will have to be pushed out of the way to make the hydrometer float. A cup of oil is more dense than water because there’s more stuff (mass) in the oil than there is the water. Therefore, the hydrometer will float in the oil at a higher level than it will in water, because it takes less oil to match the weight of the hydrometer. A cup of isopropyl alcohol is less dense than water because there’s less stuff (mass) in the alcohol than there is in water. Therefore, the hydrometer will float in the isopropyl alcohol at a lower level than it will in water because it takes more alcohol to match the weight of the hydrometer. Doing the Activity
• Prepare a set of three (or more) glasses with different liquids, filling them so they are all full to the same level.
• Starting at the top of the straw and using the ruler as a guide, make marks along the straw every 0.25 inch or 0.50 centimeter about ¾ way down the length of the straw. This makes a scale so visitors can see where the straw floats in the liquid.
• Plug the bottom of the straw with clay so that no water can get into the straw. • Drop the nails or small weights into the straw so that they sit at the bottom on the clay. The
hydrometer is now complete. • Gently place the hydrometer into one of the glasses, clay end down. The hydrometer should float
(adjust the nails/weights/amount of clay if it doesn’t). • Note the line where the top of the liquid touches the hydrometer. • Clean the hydrometer and try it in another glass with a different liquid, and compare the levels
where it floats.
Grande Exhibitions
Da Vinci – The Genius activities
Grande Exhibitions – Da Vinci The Genius Activities 103
Questions to Ask Visitors
Which liquid is most dense? Which liquid is the least dense? How do you know? Why do you think (liquid A) is more dense than (liquid B)? What other kinds of liquids can you think of that are more or less dense? Have you ever experienced being in water that was less or more dense? (Swimming pool vs. ocean) Do you think Da Vinci’s inventions like the Double-Bottom Hull boat, Paddle Boat, and the Floating Equipment (water shoes) would work better in water that is more dense, or less dense? Why?
Extensions and Additional Activity Ideas 1. Scientific Equipment: the Hydrometer Do the same activity above using a glass hydrometer. http://en.wikipedia.org/wiki/Hydrometer They can be found at scientific supply stores, and often through suppliers for home beer brewing. 2. Density Column *Note: This extension is also used in the “Will It Float” activity) Supplies
• Graduated cylinder • Several (2 or more) liquids with different densities. These can include corn syrup, vegetable oil,
fresh water, and salt water. • (Optional) Object that will float on denser liquid, but sink in less dense liquid. These can include a
golf ball, cork, or small coins. • (Optional) Food coloring/dye
Pour the heavier liquid into the bottom of the graduated cylinder. Then, with care, gently pour the less dense liquid on top (you can do this by pouring down the inside wall of the cylinder, or by pouring over the back of a spoon). The two liquids should settle into two distinct layers. It is possible to suspend an object between the two layers; for example, a golf ball will float on top of salt water but will sink in fresh water, and will remain in the middle of the cylinder between the two layers. Adding different colors of food coloring/dye to the two liquids can emphasize the difference between their densities. For an additional experiment that will take more time, pour the less dense liquid on the bottom and the denser liquid on top, and see what happens. _______________________ 1Hartt, Frederick. History of Italian Renaissance Art. 3rd ed. (New York: Harry N. Abrams, Incorporated, 1987) 437. This activity is largely based on the activity “Leonardo’s Hydrometer”, by Anderson, Maxine. Amazing Leonardo da Vinci Inventions You Can Build Yourself. (Nomad Press, 2006), 61-62.

Grande Exhibitions
Da Vinci – The Genius activities
Grande Exhibitions – Da Vinci The Genius Activities 104
Lifting Weights
Activity Goal: To explain how pulleys work and relate them to some of Da Vinci’s inventions. Related Area in Da Vinci Exhibit Civil Machines, specifically the Turning Crane, Annular Platform Crane, and Central Winch Crane. Also the inventions in Physics and Mechanical Principals, specifically the Weight Study Mechanism or Compound Hoist, and Automatic Blocking Mechanism History and Context of Activity (background information for museum staff) Lifting a heavy object by simply pushing or lifting it can sometimes be very tough, but using a tool such as a pulley can make it much less difficult. “A pulley is a simple machine that can be used to change the amount or direction of a pulling force to make work easier. It is made from a rope or cable that is looped around a support, usually a wheel.”1 Pulleys are used in all sorts of everyday machines, from cranes and elevators, to fishing reels and flagpoles. There are different kinds of pulleys:
• Simple pulleys only have one wheel and only change the direction of the force. They do nothing to magnify force or make the weight easier to lift.
• More complex pulleys use two or more wheels to magnify force, thereby making the weight easier to lift. However, more rope or cable must be used to lift the weight to the same height.
The following diagrams show different ways of lifting a 100-pound (45.4kg) weight.
1. To lift the weight straight up without a pulley, you have to apply the same amount of upward force on the rope. Also, if you want to lift the weight up to 100 feet (30.5 meters), you have to pull up 100 feet (30.5 m) of rope.
Diagram 1 2. By adding only one pulley, the only thing that has been changed is the direction of the force. In order to lift the weight you still have to pull 100 feet (30.5 m) of rope, but instead of pulling upwards, the pulley allows you to apply 100 lbs (45.4 kg) of downward force.
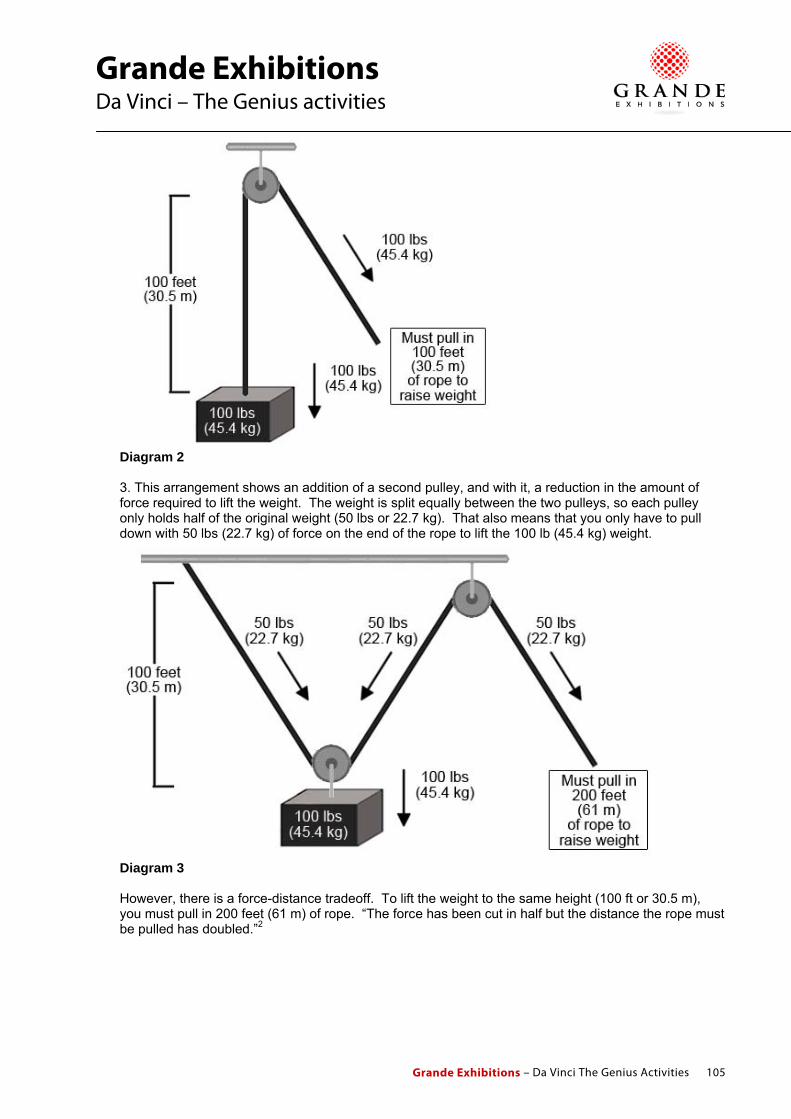
Grande Exhibitions
Da Vinci – The Genius activities
Grande Exhibitions – Da Vinci The Genius Activities 105
Diagram 2
3. This arrangement shows an addition of a second pulley, and with it, a reduction in the amount of force required to lift the weight. The weight is split equally between the two pulleys, so each pulley only holds half of the original weight (50 lbs or 22.7 kg). That also means that you only have to pull down with 50 lbs (22.7 kg) of force on the end of the rope to lift the 100 lb (45.4 kg) weight.
Diagram 3 However, there is a force-distance tradeoff. To lift the weight to the same height (100 ft or 30.5 m), you must pull in 200 feet (61 m) of rope. “The force has been cut in half but the distance the rope must be pulled has doubled.”2

Grande Exhibitions
Da Vinci – The Genius activities
Grande Exhibitions – Da Vinci The Genius Activities 106
Supplies
• A dowel, broom handle, or other cylindrical rod • A stand to hold the dowel horizontal at around 1-2 feet (30-61cm) high. Suggestions for a stand
include: o Two stacks of books o Two chairs o Building a wooden frame to hold the dowel
• Two wooden or plastic spools. Make sure there is a lip on both the top and bottom of the spool (it will keep the string from falling off the pulley). If you are using a spool of thread, it is easiest if the thread is removed.
• Two pieces of wire that is bendable but will keep its shape, (such as a wire coat hanger), cut to about 8 inches (20 cm) long. Make sure there are no sharp edges.
• Several yards/meters of string, twine, or thin rope • A weight. It can be an actual weight (no more than a few pounds or kilograms) or it can be a small
book or other object. Make sure the weight is not breakable, and can be easily tied up with string. Small buckets, mugs, padlocks work well since they have a handle/loop that’s easy to tie onto. Whatever weight you use, make sure it is not so heavy that it will break the string or twine you are using.
Advance Preparation It is best to set up the dowel and stand setup first. Then you can let visitors put the pulley systems together and test them. Note: the spools in the two activities below will probably not spin; rather, the string will just slide over them. Introducing the Activity (background information for visitors) Pulleys are simple machines that can be used to lift very heavy loads. Simple pulleys use only one wheel and change the direction of the force needed to lift a weight. Complex pulleys use more than one wheel and not only can change direction of the force, but can reduce the force needed to lift the weight, making it easier to lift. This activity will give you a chance to test two different kinds of pulleys to see how they work. Doing the Activity Simple Pulley
• Set up the stand and place the dowel across it so it lies horizontal (you may have already built something as mentioned in the Advance Preparation section above).
• Take one of the pieces of wire and bend it in a triangular shape with the two ends meet in the middle of one of the sides.
• Hang the wire over the dowel, and hang one of the spools by poking the ends of the wire into the center hole in the spool.
• Tie one end of the string to the weight. Pick up the weight to see how much force it takes to lift it. • Hang the free end of the string over the spool. You have now made a simple pulley. Pull the
string. o Is it harder or easier to lift the weight using the pulley than it was to just lift the weight up
by itself?
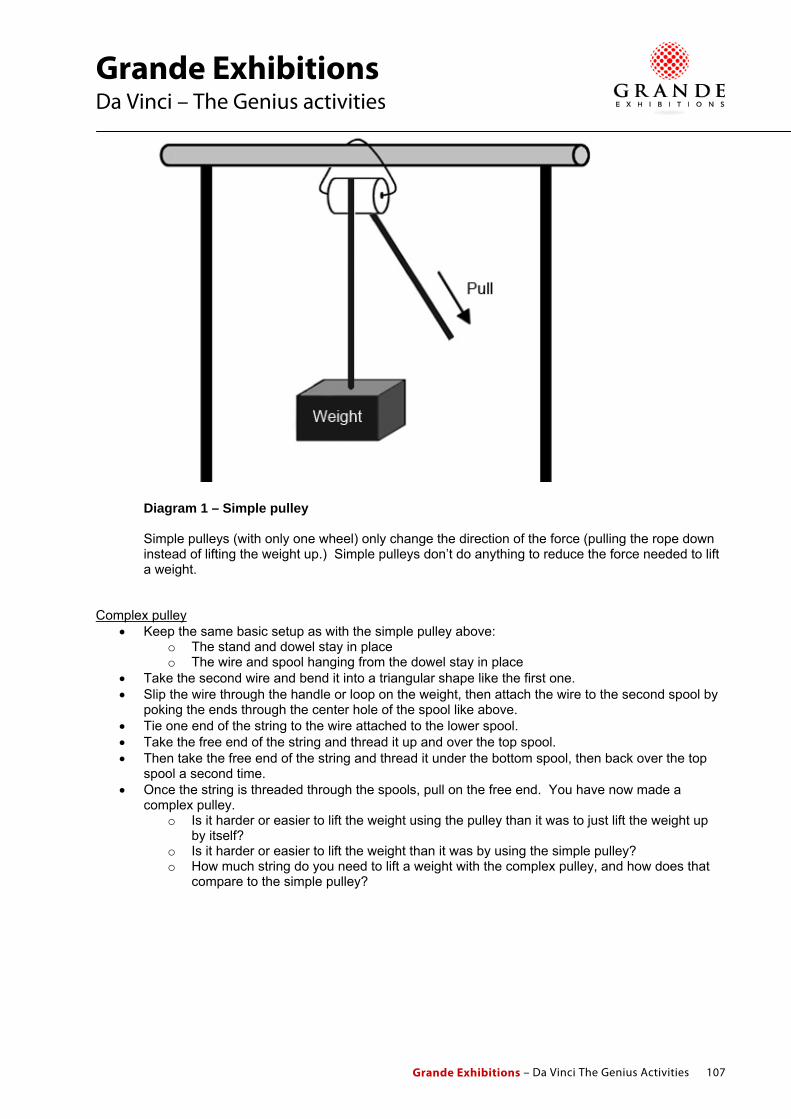
Grande Exhibitions
Da Vinci – The Genius activities
Grande Exhibitions – Da Vinci The Genius Activities 107
Diagram 1 – Simple pulley
Simple pulleys (with only one wheel) only change the direction of the force (pulling the rope down instead of lifting the weight up.) Simple pulleys don’t do anything to reduce the force needed to lift a weight.
Complex pulley
• Keep the same basic setup as with the simple pulley above: o The stand and dowel stay in place o The wire and spool hanging from the dowel stay in place
• Take the second wire and bend it into a triangular shape like the first one. • Slip the wire through the handle or loop on the weight, then attach the wire to the second spool by
poking the ends through the center hole of the spool like above. • Tie one end of the string to the wire attached to the lower spool. • Take the free end of the string and thread it up and over the top spool. • Then take the free end of the string and thread it under the bottom spool, then back over the top
spool a second time. • Once the string is threaded through the spools, pull on the free end. You have now made a
complex pulley. o Is it harder or easier to lift the weight using the pulley than it was to just lift the weight up
by itself? o Is it harder or easier to lift the weight than it was by using the simple pulley? o How much string do you need to lift a weight with the complex pulley, and how does that
compare to the simple pulley?

Grande Exhibitions
Da Vinci – The Genius activities
Grande Exhibitions – Da Vinci The Genius Activities 108
Diagram 2 – Complex pulley Complex pulleys use two or more wheels to help distribute the weight, making it so that less force is required to lift the weight so it’s easier to do. In the pulley in Diagram 2 – Complex Pulley, the string goes over a pulley wheel three times: over the top spool, under the bottom spool, and then over the top spool again. This means that the weight is evenly spread between the three spools, so the force required to pull the weight up is only 1/3 of the original weight. But there is a tradeoff. In order to pull with less effort you have to pull farther, meaning that you have to pull more string. Try experimenting with more spools, and other pulley configurations. Can you design ways to make lifting the weight even easier?
Questions to Ask Visitors What kind of heavy things would you lift using a pulley? Which of Da Vinci’s inventions include pulleys? Which of them are simple (only one wheel) and which are more complex (two or more wheels)? Which ones do you think could lift the heaviest loads?

Grande Exhibitions
Da Vinci – The Genius activities
Grande Exhibitions – Da Vinci The Genius Activities 109
Extensions and Additional Activity Ideas 1. Measure the Force Supplies
• A hanging or spring scale. They are commonly used to weigh fish or produce: http://en.wikipedia.org/wiki/Spring_scale
Once the pulley and weight are set up, attach the hanging scale to the free end of the string. Pull down, and measure the force required.
• For a simple pulley (one wheel), the force should be about the same as the weight. • For a complex pulley (two or more wheels), divide the weight by the number of times the string
goes over one of the wheels. For example: o Two wheels = half of the original weight o Three wheels = 1/3 of the original weight o Four wheels = 1/4 of the original weight
Note: because there is friction on the wheels, the force required to pull the weight up may be slightly different, however, it should be relatively close to the same amount.
_______________________ This activity is based on the activity “Spool Pulley” in the book Rocket Science, by Jim Wiese. (John Wiley & Sons, Inc., 1995) 12-15 1Wiese, Jim. Rocket Science. (John Wiley & Sons, Inc., 1995) 11. 2Brian, Marshall. "How a Block and Tackle Works." 01 April 2000. HowStuffWorks.com. <http://www.howstuffworks.com/pulley.htm> 21 October 2009. 2Lafferty, Peter. Eyewitness Science: Force & Motion. (Dorling Kindersley, Inc., 1992) 10. “As in any machine, a small force moving a large distance can produce a large force moving a small distance.”2
Grande Exhibitions
Da Vinci – The Genius activities
Grande Exhibitions – Da Vinci The Genius Activities 110
Rolling Around
Activity Goal:
This activity teaches about the uses and design of ball bearings. Related Area in Da Vinci Exhibit Physics and Mechanical Principals, specifically Ball Bearing on Section, Ball Bearing, and Rolling Ball Bearing. History and Context of Activity (background information for museum staff) The idea for ball bearings can be traced to ancient Rome, but it is thought that Da Vinci was the first to come up with a practical design. However, like so many of Da Vinci’s ideas, ball bearings didn’t become a reality until several hundred years later. The first time ball bearings were put into significant use was when a Welsh inventor named Philip Vaughn patented the idea in the early 1790s. Ball bearings are a simple device which reduce friction between two objects by using balls or rollers to minimize rubbing. “One of the most common examples of ball bearings in action is the roller skate. Four wheels are attached to two axles on the bottom of a boot. A closer inspection of these wheels reveals a collection of small metal balls which surround the axle. As the skater places his or her full weight on the wheels, each ball bearing absorbs the load temporarily. As the skater pushes forward, the ball bearings roll in a track around the axle. Because the ball bearings are perfectly round and smooth, there is very little friction generated between them. The ball bearings allow the skater to move in a straight line with little resistance.1
Sometimes lubricants such as oil or grease are added to the ball bearings to make them even slipperier and reduce friction even more. Incidentally, the Italian word for “ball bearing” is “cuscinetto”, which can also mean “small pillow”. Supplies
• Two metal food cans of the same size • 10-20 marbles or round beads • (Optional) Cut paper to cover the labels on the cans, or simply remove the labels • (Optional) Open and empty contents from cans, leaving either the top or bottom intact. Make sure
there are no sharp edges. • (Optional) Modern examples of items that use ball bearings, such as:
o Roller skate or skateboard wheels o Lazy Susan/revolving tray http://en.wikipedia.org/wiki/Lazy_Susan
Safety notice: Marbles or small beads can be a choking hazard for small children. Introducing the Activity (background information for visitors) Friction is the resistance you feel when you try to rub one thing over another. Smooth surfaces are easier to rub against each other because there is less friction, while rough surfaces are more difficult to rub against each other because there is more friction. Also, if you rub two rough surfaces together, you can create heat. One way to reduce friction is by placing small balls (called “ball bearings”) between the two objects you want to move. That way, instead of rubbing against each other, they will roll along freely the ball bearings.
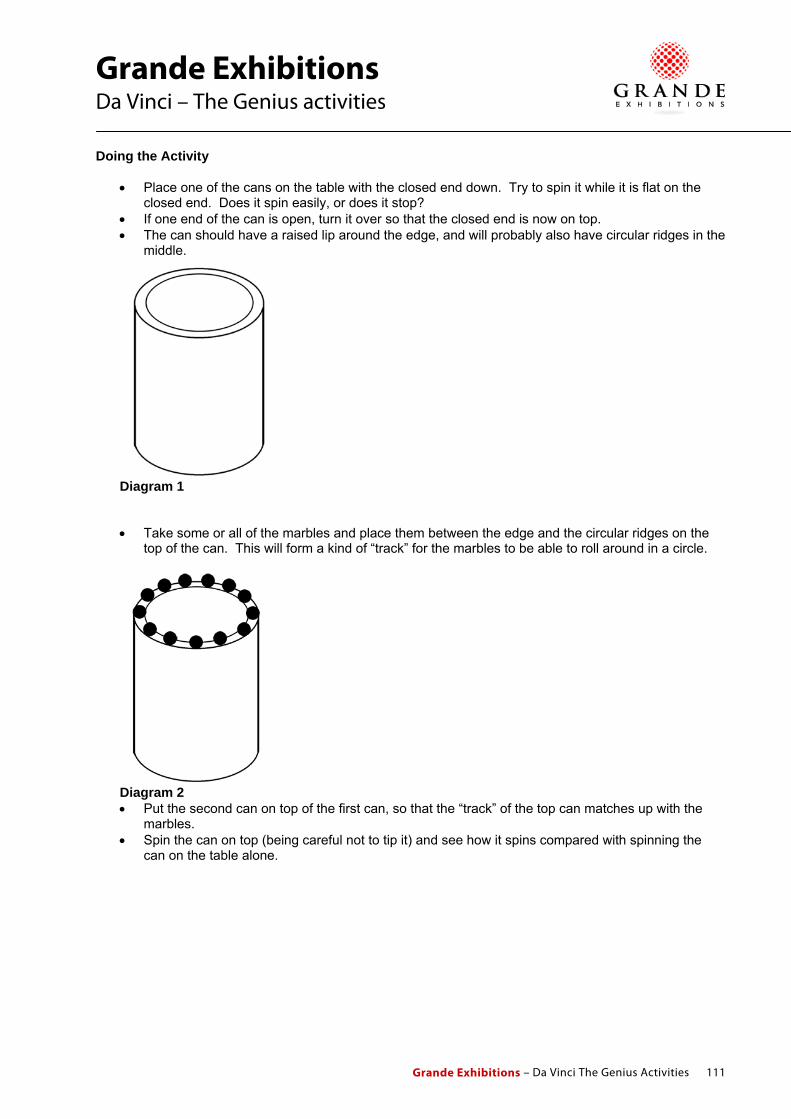
Grande Exhibitions
Da Vinci – The Genius activities
Grande Exhibitions – Da Vinci The Genius Activities 111
Doing the Activity
• Place one of the cans on the table with the closed end down. Try to spin it while it is flat on the
closed end. Does it spin easily, or does it stop? • If one end of the can is open, turn it over so that the closed end is now on top. • The can should have a raised lip around the edge, and will probably also have circular ridges in the
middle.
Diagram 1
• Take some or all of the marbles and place them between the edge and the circular ridges on the top of the can. This will form a kind of “track” for the marbles to be able to roll around in a circle.
Diagram 2 • Put the second can on top of the first can, so that the “track” of the top can matches up with the
marbles. • Spin the can on top (being careful not to tip it) and see how it spins compared with spinning the
can on the table alone.
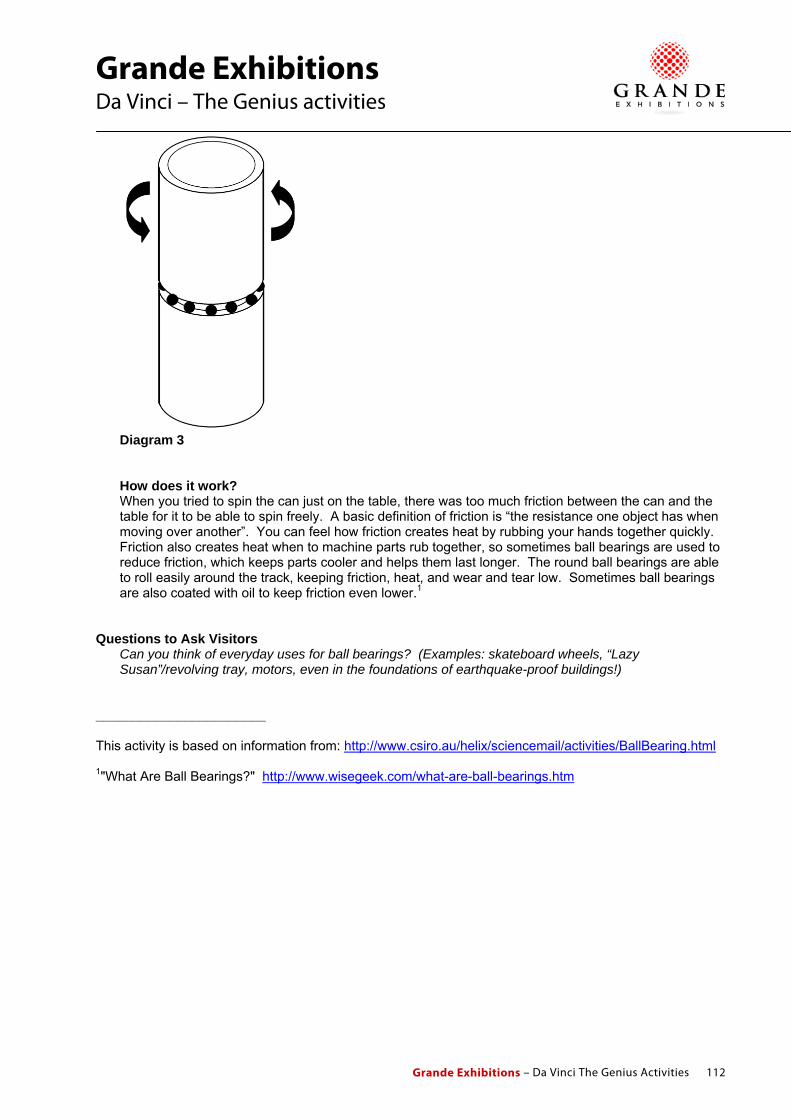
Grande Exhibitions
Da Vinci – The Genius activities
Grande Exhibitions – Da Vinci The Genius Activities 112
Diagram 3 How does it work?
When you tried to spin the can just on the table, there was too much friction between the can and the table for it to be able to spin freely. A basic definition of friction is “the resistance one object has when moving over another”. You can feel how friction creates heat by rubbing your hands together quickly. Friction also creates heat when to machine parts rub together, so sometimes ball bearings are used to reduce friction, which keeps parts cooler and helps them last longer. The round ball bearings are able to roll easily around the track, keeping friction, heat, and wear and tear low. Sometimes ball bearings are also coated with oil to keep friction even lower.1
Questions to Ask Visitors
Can you think of everyday uses for ball bearings? (Examples: skateboard wheels, “Lazy Susan”/revolving tray, motors, even in the foundations of earthquake-proof buildings!)
_______________________ This activity is based on information from: http://www.csiro.au/helix/sciencemail/activities/BallBearing.html 1"What Are Ball Bearings?" http://www.wisegeek.com/what-are-ball-bearings.htm
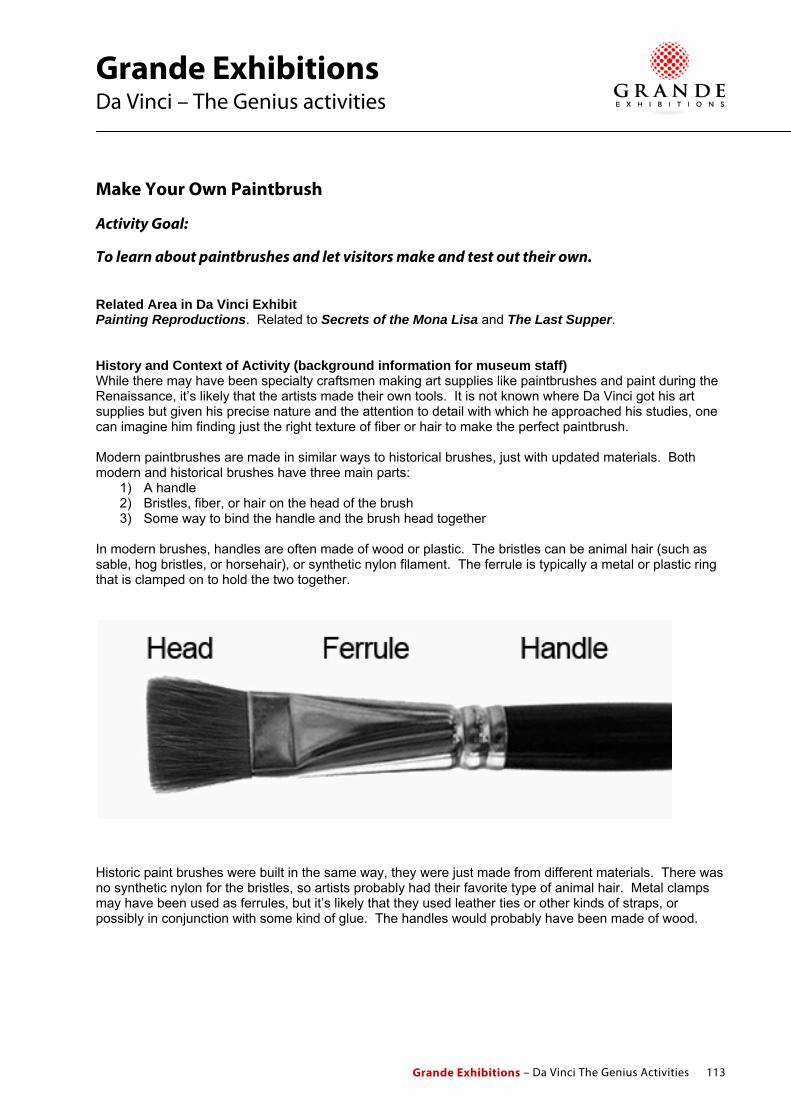
Grande Exhibitions
Da Vinci – The Genius activities
Grande Exhibitions – Da Vinci The Genius Activities 113
Make Your Own Paintbrush
Activity Goal:
To learn about paintbrushes and let visitors make and test out their own. Related Area in Da Vinci Exhibit Painting Reproductions. Related to Secrets of the Mona Lisa and The Last Supper. History and Context of Activity (background information for museum staff) While there may have been specialty craftsmen making art supplies like paintbrushes and paint during the Renaissance, it’s likely that the artists made their own tools. It is not known where Da Vinci got his art supplies but given his precise nature and the attention to detail with which he approached his studies, one can imagine him finding just the right texture of fiber or hair to make the perfect paintbrush. Modern paintbrushes are made in similar ways to historical brushes, just with updated materials. Both modern and historical brushes have three main parts:
1) A handle 2) Bristles, fiber, or hair on the head of the brush 3) Some way to bind the handle and the brush head together
In modern brushes, handles are often made of wood or plastic. The bristles can be animal hair (such as sable, hog bristles, or horsehair), or synthetic nylon filament. The ferrule is typically a metal or plastic ring that is clamped on to hold the two together.
Historic paint brushes were built in the same way, they were just made from different materials. There was no synthetic nylon for the bristles, so artists probably had their favorite type of animal hair. Metal clamps may have been used as ferrules, but it’s likely that they used leather ties or other kinds of straps, or possibly in conjunction with some kind of glue. The handles would probably have been made of wood.
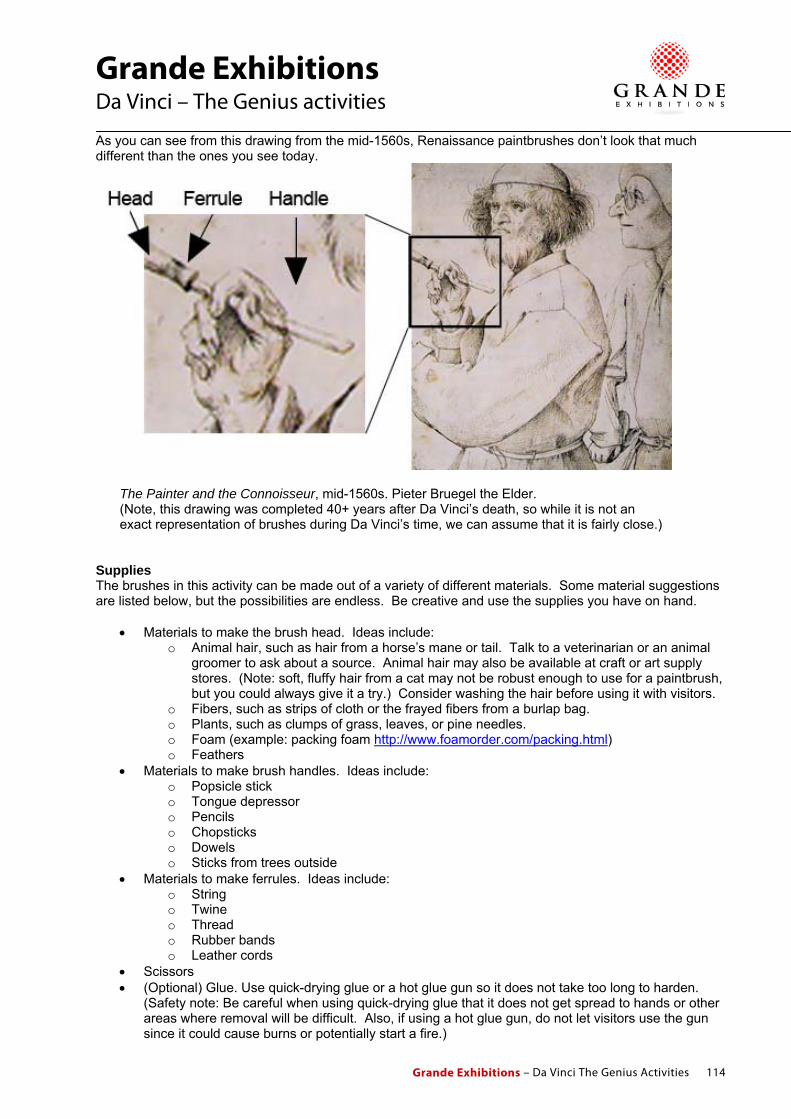
Grande Exhibitions
Da Vinci – The Genius activities
Grande Exhibitions – Da Vinci The Genius Activities 114
As you can see from this drawing from the mid-1560s, Renaissance paintbrushes don’t look that much different than the ones you see today.
The Painter and the Connoisseur, mid-1560s. Pieter Bruegel the Elder. (Note, this drawing was completed 40+ years after Da Vinci’s death, so while it is not an exact representation of brushes during Da Vinci’s time, we can assume that it is fairly close.) Supplies The brushes in this activity can be made out of a variety of different materials. Some material suggestions are listed below, but the possibilities are endless. Be creative and use the supplies you have on hand.
• Materials to make the brush head. Ideas include: o Animal hair, such as hair from a horse’s mane or tail. Talk to a veterinarian or an animal
groomer to ask about a source. Animal hair may also be available at craft or art supply stores. (Note: soft, fluffy hair from a cat may not be robust enough to use for a paintbrush, but you could always give it a try.) Consider washing the hair before using it with visitors.
o Fibers, such as strips of cloth or the frayed fibers from a burlap bag. o Plants, such as clumps of grass, leaves, or pine needles. o Foam (example: packing foam http://www.foamorder.com/packing.html) o Feathers
• Materials to make brush handles. Ideas include: o Popsicle stick o Tongue depressor o Pencils o Chopsticks o Dowels o Sticks from trees outside
• Materials to make ferrules. Ideas include: o String o Twine o Thread o Rubber bands o Leather cords
• Scissors • (Optional) Glue. Use quick-drying glue or a hot glue gun so it does not take too long to harden.
(Safety note: Be careful when using quick-drying glue that it does not get spread to hands or other areas where removal will be difficult. Also, if using a hot glue gun, do not let visitors use the gun since it could cause burns or potentially start a fire.)

Grande Exhibitions
Da Vinci – The Genius activities
Grande Exhibitions – Da Vinci The Genius Activities 115
• (Optional) Egg tempera paint from the activity Make Your Own Paint • (Optional) Watercolor or other washable paints • (Optional) Paper on which to paint • (Optional) Bowl of water and towels to clean used paintbrushes
Advance Preparation Try making a few paintbrushes before doing the activity with visitors. That will help tell which materials work best for the brush head, what works well for the ferrule, and whether or not you should use glue. This activity can be done in conjunction with the activity Make Your Own Paint, so that the visitors use their new handmade paintbrushes to create paintings with handmade egg tempera paint. Introducing the Activity (background information for visitors) When Da Vinci wanted to make a painting, specialized art supply stores didn’t exist so he couldn’t go buy paintbrushes and paints. It is not known exactly where Da Vinci got his art supplies, but it’s likely that he made them himself, like many other artists at the time. This activity will show how to make a paintbrush, and how simple, everyday things can be turned into art supplies. Doing the Activity This activity can be as open as you want to make it. You can provide a wide range of materials and let visitors choose, or you can provide one set of options and let all visitors make the same kind of paintbrush. Also, if your supplies allow, you can let visitors take their paintbrushes home with them (provided that they don’t paint anything in the exhibition!), or you can disassemble the paintbrushes and reuse the materials. Do whatever way works best with your supplies and your staff.
• Choose the materials for the brush head, the handle, and the ferrule. • If using glue, put a dab of glue on the bottom of the handle where the brush head will go (about ½
inch, 1cm) • Gather the brush head material and bunch one end together. • Place the bunched end of the brush head material on the tip of the handle, and tie it together using
the string, rubber band, or whatever you’re using as the ferrule. • Test to make sure the brush head is securely fastened to the handle, and tie and/or glue
accordingly. • Cut and shape the brush head as desired, and start painting!

Grande Exhibitions
Da Vinci – The Genius activities
Grande Exhibitions – Da Vinci The Genius Activities 116
Common paintbrush shapes
http://commons.wikimedia.org/wiki/File:Brushtypes.jpg Questions to Ask Visitors
What kinds of things could Da Vinci have used to make his paintbrushes? What other kinds of things do you think you could use to make a paintbrush?

Grande Exhibitions
Da Vinci – The Genius activities
Grande Exhibitions – Da Vinci The Genius Activities 117
Mathematical Shapes
Activity Goal:
To learn about Da Vinci’s mathematical drawings and have a chance to see and create his figures in three dimensions. Related Area in Da Vinci Exhibit Codices History and Context of Activity (background information for museum staff) In addition to being an artist and scientist, Leonardo da Vinci also set his mind to understanding and describing mathematics. While living in Milan he met, worked with, and learned from Luca Pacioli, one of the most famous mathematicians of the day. It is assumed that it is through Pacioli’s guidance that Da Vinci began to study Euclid, Archimedes, and other ancient mathematicians. Pacioli is also the author of an influential math book, On the Divine Proportion (De Divina Proportione), and he asked Da Vinci to illustrate some of the concepts he was describing in the text. Da Vinci provided 60 drawings that show complex three-dimensional forms or “polyhedrons”. Not only was this one of the first time such detailed mathematical drawings had been made, but Da Vinci drew them with open or pierced form; that is, that the flat planes of the polyhedrons are transparent so you can see the structure through to the other side. This activity will give visitors an opportunity to see some of Da Vinci’s polyhedron drawings in real three-dimensional form. Supplies This activity can be done as a demonstration piece for visitors, or the supplies can be given to visitors to have them build some themselves. The amount of supplies required will need to be adjusted accordingly; minimal supplies will be needed for a demonstration, but a significant number of supplies will be required if more than one visitor is working on the activity at once. Also note that visitors may want to take their polyhedrons with them, which means those supplies would need to be replaced. Decide beforehand whether visitors will be allowed to keep their polyhedrons or not.
• Toothpicks (round are preferred since flat may break more easily). If no toothpicks are available, other small sticks around 2-3 in (5-8 cm) will work, such as:
o Small straws or coffee stir sticks; cut all of them to the same length. o Wooden skewer sticks, cut all of them to the same length. o Wooden kitchen matches (the ones that come in a box, not in a book). BE SURE TO CUT
OFF THE MATCH HEAD so they don’t accidentally catch fire! • Small or mini marshmallows, (and the more stale/old they are, the better they will work)
– AND/OR – small jellybeans. If no marshmallows or jellybeans are available, other options include:
o Small balls of clay (stiffer clay is better than soft). o Other gummi candies similar in size to jelly beans
• (Optional, but recommended) Damp towels to clean up sticky sugary hands • (Optional) Printouts of some of Da Vinci’s polyhedrons or other images showing polyhedron
shapes. Putting them in sheet protectors or laminating them will help them last longer. o A copyright-free image of one of Da Vinci’s polyhedrons (a Rhombicuboctahedron; see
Introducing the Activity below) is available here: http://commons.wikimedia.org/wiki/File:Leonardo_polyhedra.png
o Other images of Da Vinci’s polyhedrons are available here: http://www.georgehart.com/virtual-polyhedra/leonardo.html (copyright status unsure)

Grande Exhibitions
Da Vinci – The Genius activities
Grande Exhibitions – Da Vinci The Genius Activities 118
o General polyhedron images available here: http://commons.wikimedia.org/wiki/Polyhedron • (Optional) Dice used in Role Playing Games (such as Dungeons and Dragons) are good examples
of polyhedron shapes, and the 8-sided and 20-sided dice can be used as models of the activities below. Note: dice are small and may not be the best examples to use in large groups. They may also pose a choking hazard to small children.
Safety Notice 1: Do not let visitors eat the marshmallows, jellybeans, or other candy! Many hands will have touched them and they won’t be hygienic. Also, they shouldn’t be eating in the exhibit anyway. Safety Notice 2: This activity may not be appropriate for small children because of choking hazards (marshmallows and jelly beans), as well as sharp ends on toothpicks or other sticks. Pay special attention to any children or other visitors who might injure themselves with the supplies. Advance Preparation Try creating one or all of the polyhedrons before taking this activity on the floor, both to give staff an understanding how to do it, and also to provide an example piece for visitors. Introducing the Activity (background information for visitors) Da Vinci was not only an artist and a scientist, but he studied mathematics as well. He collaborated with his good friend, the Renaissance mathematician Luca Pacioli, to create the book On the Divine Proportion (De Divina Proportione). In this book Pacioli used words to describe complex forms and shapes, and Da Vinci drew them so that they look three-dimensional (3-D). Da Vinci’s drawings were special in a couple of ways: first, it was the first time someone had drawn such complicated shapes in a math book before; and second, he drew them so that the sides were open as if you were looking through an object in real space and could see how it was constructed. This kind of multi-sided object is known as a “polyhedron” (plural “polyhedrons” or “polyhedra”). The word “polyhedron” comes from Greek and means “many” (poly-) “faces” (-edron). Together it describes a multi-sided geometric shape. The names for the different kinds of polyhedrons generally come from how many sides they have. For example:
• Tetrahedron – 4 sides • Pentahedron – 5 sides • Octahedron – 8 sides • Icsahedron - 20 sides
This image is of a Rhombicuboctahedron, a polyhedron with eight triangular faces and eighteen square faces. This is the sketch by Da Vinci that appeared in On the Divine Proportion. (Instructions to make this polyhedron are in the Extensions and Additional Activity Ideas.)
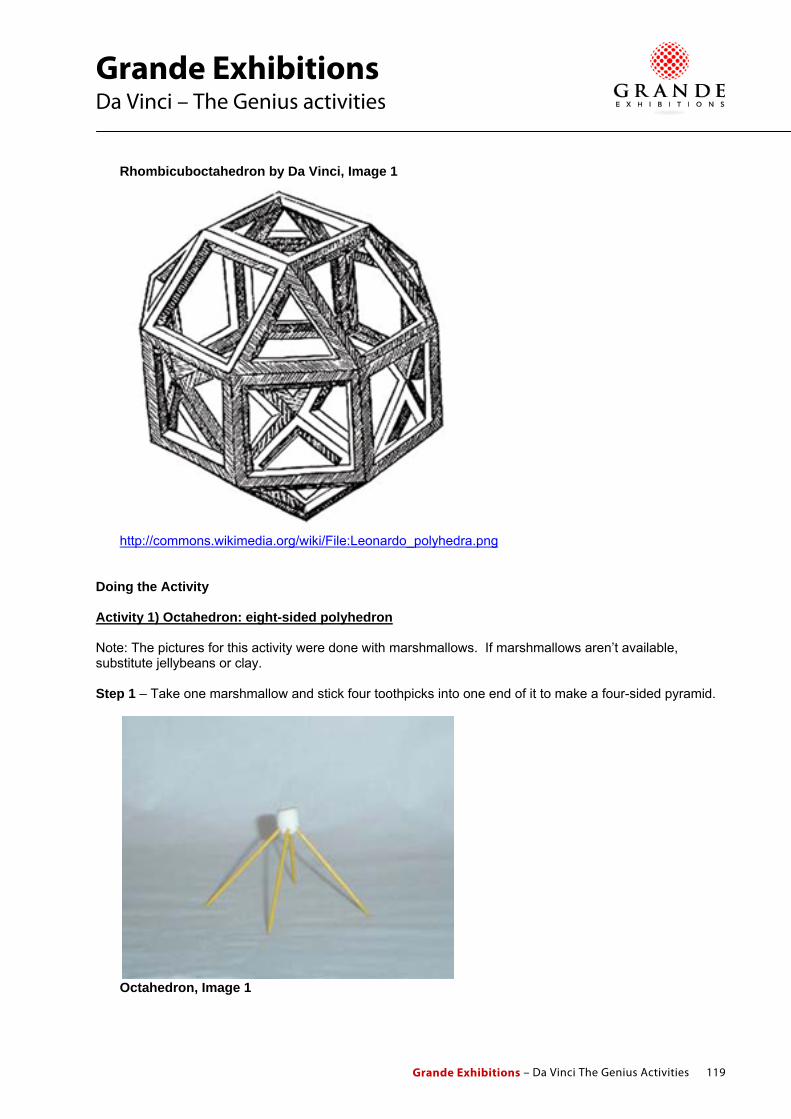
Grande Exhibitions
Da Vinci – The Genius activities
Grande Exhibitions – Da Vinci The Genius Activities 119
Rhombicuboctahedron by Da Vinci, Image 1
http://commons.wikimedia.org/wiki/File:Leonardo_polyhedra.png Doing the Activity Activity 1) Octahedron: eight-sided polyhedron Note: The pictures for this activity were done with marshmallows. If marshmallows aren’t available, substitute jellybeans or clay. Step 1 – Take one marshmallow and stick four toothpicks into one end of it to make a four-sided pyramid.
Octahedron, Image 1

Grande Exhibitions
Da Vinci – The Genius activities
Grande Exhibitions – Da Vinci The Genius Activities 120
Step 2 – Take four more marshmallows and stick one each onto the ends of the four toothpicks.
Octahedron, Image 2 Step 3 – Stick toothpicks between the four new marshmallows, making a base for the pyramid.
Octahedron, Image 3 Step 4 – Repeat Step 1 and make a second pyramid using one marshmallow and four toothpicks.
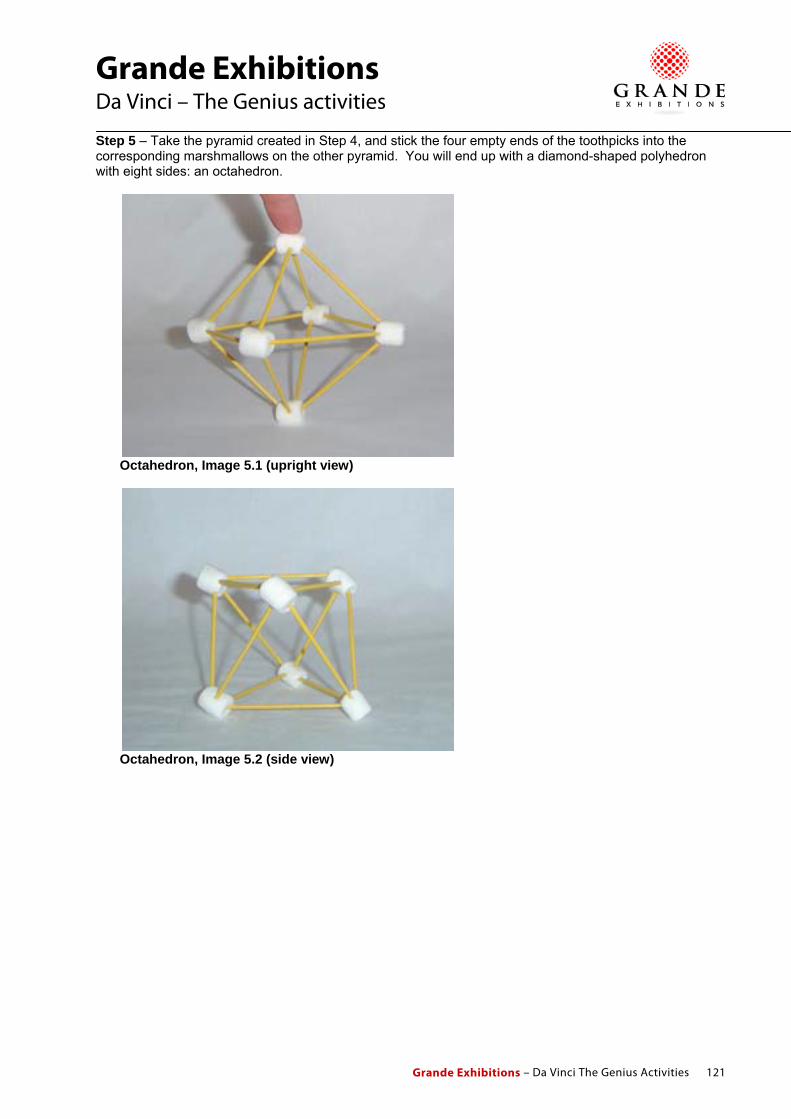
Grande Exhibitions
Da Vinci – The Genius activities
Grande Exhibitions – Da Vinci The Genius Activities 121
Step 5 – Take the pyramid created in Step 4, and stick the four empty ends of the toothpicks into the corresponding marshmallows on the other pyramid. You will end up with a diamond-shaped polyhedron with eight sides: an octahedron.
Octahedron, Image 5.1 (upright view)
Octahedron, Image 5.2 (side view)
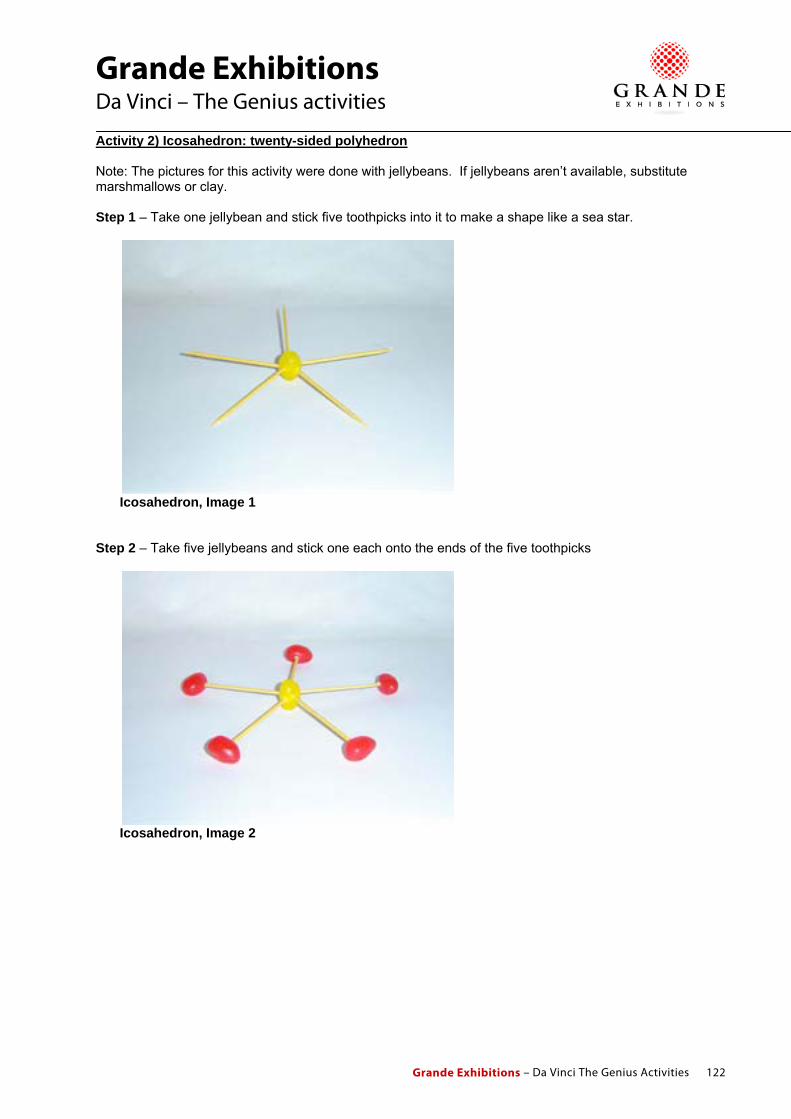
Grande Exhibitions
Da Vinci – The Genius activities
Grande Exhibitions – Da Vinci The Genius Activities 122
Activity 2) Icosahedron: twenty-sided polyhedron Note: The pictures for this activity were done with jellybeans. If jellybeans aren’t available, substitute marshmallows or clay. Step 1 – Take one jellybean and stick five toothpicks into it to make a shape like a sea star.
Icosahedron, Image 1 Step 2 – Take five jellybeans and stick one each onto the ends of the five toothpicks
Icosahedron, Image 2

Grande Exhibitions
Da Vinci – The Genius activities
Grande Exhibitions – Da Vinci The Genius Activities 123
Step 3 – Take five more toothpicks and stick them between the new jellybeans, making a pentagon. Note: the toothpicks will not reach between the jellybeans if the pentagon is laying flat. You will have to form it into a concave/cupped shape to get all the toothpicks to connect.
Icosahedron, Image 3.1 (view from one side)
Icosahedron, Image 3.2 (view from another side)

Grande Exhibitions
Da Vinci – The Genius activities
Grande Exhibitions – Da Vinci The Genius Activities 124
Step 4 – Repeat the first three steps to create a second pentagon
Icosahedron, Image 4 Step 5 – Take one of the pentagons and 10 more toothpicks by sticking two toothpicks into each of the jellybeans on the outside of the pentagon to make a star shape.
Icosahedron, Image 5

Grande Exhibitions
Da Vinci – The Genius activities
Grande Exhibitions – Da Vinci The Genius Activities 125
Step 6 – In this step, you will attach the two pentagons together. Take the pentagon without the extra toothpicks, and attach the outside jellybeans to the other pentagon where the two empty ends of the toothpicks come together to make the points of the star. You may have to reposition the toothpicks in some of the jellybeans a bit to make it all come together. You will end up with a round polyhedron with twenty sides: an icosahedron.
Icosahedron, Image 6.1 (view from one side)
Icosahedron, Image 6.2 (view from another side) Questions to Ask Visitors
How do you think Da Vinci drew the polyhedrons? Did he make models first and draw those, or did he just envision them in his mind? Why do you think Da Vinci drew “open” polyhedrons? (That is, with open sides so you can see all the way through the shape?) How do you think polyhedrons would be useful to studying math?

Grande Exhibitions
Da Vinci – The Genius activities
Grande Exhibitions – Da Vinci The Genius Activities 126
Extensions and Additional Activity Ideas 1. Sketching Polyhedron Shapes Supplies
• Blank paper • Pencils • Erasers • (Optional) Copies of Da Vinci’s polyhedron drawings
Set out a finished version of a polyedron and let visitors sketch it. Encourage them to view it from one point and sketch what they see, i.e. don’t move around and draw it from different vantage points. Use Da Vinci’s polyhedron drawings to show how he showed depth and three-dimensional space. 2. Make a Rhombicuboctahedron This activity would work best as either a demonstration piece or with more mature visitors who can handle complexity. Rhombicuboctahedron: a polyhedron with eight triangular faces and eighteen square faces Note: The pictures for this activity were done with jellybeans. If jellybeans aren’t available, substitute marshmallows or clay. Step 1 – Take four jellybeans and four toothpicks and stick them together to make a square
Rhombicuboctahedron, Image 1

Grande Exhibitions
Da Vinci – The Genius activities
Grande Exhibitions – Da Vinci The Genius Activities 127
Step 2 – Take a total of eight toothpicks. Stick two toothpicks into each jellybean, at right angles to each other and to the other toothpicks.
Rhombicuboctahedron, Image 2 Step 3 – Take eight more jellybeans and four more toothpicks. Stick the jellybeans on the ends of the toothpicks, and put the new toothpicks between them to create four more squares. The end result should look like a cross or a plus sign.
Rhombicuboctahedron, Image 3

Grande Exhibitions
Da Vinci – The Genius activities
Grande Exhibitions – Da Vinci The Genius Activities 128
Step 4 – Repeat steps 1-3 to create a second cross shape. You should have two total.
Rhombicuboctahedron, Image 4 Step 5 – Take four toothpicks and one of the cross shapes. Stick one the toothpicks in one of the outside corner jellybeans and attach it to the other corner jellybean, creating a triangle. Repeat with the other three toothpicks and outside corner jellybeans. Take four more toothpicks and the other cross shape, and repeat. Note: the toothpicks will not reach between the jellybeans if the cross shape is laying flat. You will have to form it into a concave/cupped shape to get all the toothpicks to connect.
Rhombicuboctahedron, Image 5 (view from one side)

Grande Exhibitions
Da Vinci – The Genius activities
Grande Exhibitions – Da Vinci The Genius Activities 129
Rhombicuboctahedron, Image 5 (view from another side) Step 6 – Take eight more toothpicks and one of the (now) concave shapes. Stick one toothpick in each of the outer rim jellybeans at a right angle to the toothpicks on either side.
Rhombicuboctahedron, Image 6

Grande Exhibitions
Da Vinci – The Genius activities
Grande Exhibitions – Da Vinci The Genius Activities 130
Step 7 – Stick the bare ends of the toothpicks into the corresponding jellybeans on the other concave shape. You may have to reposition the toothpicks in some of the jellybeans a bit to make it all come together. You will end up with a round polyhedron with eight triangular faces and eighteen square faces: a Rhombicuboctahedron.
Rhombicuboctahedron, Image 7 (view from one side)
Rhombicuboctahedron, Image 7 (view from another side) _______________________ This activity is largely based on the activity “Make Your Own Open-Faced Geometric Figures”, by Anderson, Maxine. Amazing Leonardo da Vinci Inventions You Can Build Yourself. (Nomad Press, 2006), 34-36. All polyhedron photographs are by Amanda Thomas and may be reproduced for educational purposes.

Grande Exhibitions
Da Vinci – The Genius activities
Grande Exhibitions – Da Vinci The Genius Activities 131
Mirror, Mirror On The Wall
Activity Goal:
To challenge visitors’ intuition and encourage them to think critically.
Related Area in Da Vinci Exhibit Musical, Optical, and Time Instruments, specifically Mirror Room History and Context of Activity (background information for museum staff) There is a small sketch on a page of one of Da Vinci’s notebooks (Manuscript B, folio 28r) that shows a figure in an octagonal room. From what he wrote under the sketch, it’s clear that he meant for each of the inside walls to be covered in mirrors. “If you have eight flat mirrors... and have them placed in a circle so as to form eight sides … that man who will stand inside will be able to see each side of himself an infinite number of times. The person standing inside this contraption is confronted very directly – through infinite reflections on all sides – with his or her self.”1 Rooms with multiple mirrors on them were not unheard of in Da Vinci’s day, so he was putting his own spin on an existing idea. It’s not clear if he meant to use glass mirrors, but technology of the day did not allow for manufacture of full-length glass mirrors yet. However, it is known that Da Vinci experimented and used mirrors in other applications so he could have been sketching an idea for another one of his inventions. Stepping into a mirror room such as this allows the person inside to see him or herself from angles that are otherwise impossible for them to see. One could use such a mirror room for simple things like checking one’s clothing or fashion, but it’s likely that Da Vinci would have used such a room for further discovery and exploration of the human body. He could have entered the room and drawn images of himself, or he could have cut a small hole in the side and looked in at someone else inside. It is known that he drew anatomical drawings from multiple angles, and it’s possible that he could have used a room such as this to pose a model and draw several sides at once. Whatever goal Da Vinci had in mind, he was clearly interested in how mirrors worked and how they can help us gain a better understanding of ourselves. Supplies
• Small mirror, around 10 inches or 25 centimeters square (or larger) • (Optional) A piece of opaque cloth big enough to drape over the mirror • (Optional) Hanging wire on the back of the mirror and hook (or hooks) on the wall at average eye
level(s) • (Optional) Masking or other tape on the floor marking distance
Advance Preparation Set aside a demonstration area where there is a bit of room for visitors to stand back around 5-10 feet/ 1.5-3 meters. (Optional) Put a nail or hook in the wall at average eye level, but do not hang the mirror on the hook yet. (Optional) Mark off distances with tape on the floor.

Grande Exhibitions
Da Vinci – The Genius activities
Grande Exhibitions – Da Vinci The Genius Activities 132
Introducing the Activity (background information for visitors) Da Vinci looked at the world in many different ways, and he liked to test what people thought was “normal”. He did this by asking questions about things around him. If he wanted to know about how water flows, he watched water and sketched what he saw. He watched birds in flight to see how they did it. He dissected corpses and looked at live humans in order to see how bodies move and function. One of the ways he could have used to examine the human body was to create a Mirror Room. It’s an eight-sided room with mirrors on each wall so that the person inside can see all angles of him or her self from head to toe. Or, an artist looking through a small hole in one of the mirrors could sketch all sides of the person in the room. Da Vinci liked to challenge perceptions, and that’s what this activity is all about. Doing the Activity This activity is designed to get people thinking more critically about what they see in everyday life. Most people look in mirrors several times a day, but they may not give much thought to what they see other than whether their hair looks okay or their clothes match. This activity will challenge their intuition and memory, and will hopefully encourage them to analyze some of their perceptions more closely. Leave the mirror covered or turned upside down at first. Ask visitors to imagine that they see their face in small mirror mounted flat against the wall. Then ask them if they wanted to see their whole body, would they move closer to the mirror, step back from the mirror, or does the distance matter? If there are a group of visitors, you may want to ask them to vote on their choice. (Chances are that a majority of people will say that if you step back from the mirror that you’ll see more of yourself. This is incorrect as we’ll see below, but don’t say anything yet. Let the visitors discover that for themselves.) Once the visitors have made their predictions, have the visitor(s) stand close to you. Uncover the mirror and hold it up at eye level (or hang it on the wall), so that the visitor(s) can see their faces. Make sure the mirror is vertical. Then, ask them to step back 5-10 feet/1.5-3 meters and look in the mirror again. Again, make sure the mirror is vertical. (Marking the floor with tape may help visitors judge how far back to go.) What they will find is that it doesn’t matter how close or far you are from the mirror, it will show the same amount of your body. Distance has nothing to do with it. If the visitors stand way back, for example across the exhibit hall, they may begin to see a greater amount of themselves. However at a relatively close range – less than 15 feet or 4.5 meters – they should still only see the same part of themselves that they saw up close. This activity has less to do with the specific mathematical equations or ratios describing how much is reflected in the mirror. Rather, this activity’s goal is to point out that peoples’ intuition can be incorrect, and sometimes deeper thought and scientific testing is needed to prove a concept.

Grande Exhibitions
Da Vinci – The Genius activities
Grande Exhibitions – Da Vinci The Genius Activities 133
Questions to Ask Visitors How many times a day do you look in the mirror? Did the outcome of this activity surprise you? What could you do to see more of yourself in the mirror? (Hint: tilt it) Does this change the way you think about other things in everyday life? If so, what? Do you think it will in the future?
_______________________ 1Elkins, James. Renaissance Theory. (Routledge, 2008) 398. Accessed online through http://books.google.com/ This activity is based in part on an activity in the film: A Private Universe, Minds of Our Own. Harvard-Smithsonian Center for Astrophysics. 1997. Funded in part by The National Science Foundation and Annenberg/CPB.
Grande Exhibitions
Da Vinci – The Genius activities
Grande Exhibitions – Da Vinci The Genius Activities 134
The Ideal City
Activity Goal:
To teach visitors about Da Vinci’s plans for an ideal city, and to give them a chance to design one of their own. Related Area in Da Vinci Exhibit Civil Machines, specifically Ideal City History and Context of Activity (background information for museum staff) Da Vinci was living in Milan in 1485 when the bubonic plague swept through the city and killed an estimated quarter of the city’s inhabitants. Milan, and most other cities of the time, was made up of narrow, filth-covered streets, crowded quarters, and open-air sewers, all of which are good breeding ground for a number of different diseases. Fortunate as he was to have been spared by the plague himself, he set about thinking about how city planning and design could be improved to prevent or lessen the severity of future illnesses. Da Vinci’s city plan was an improvement in many ways. He planned a two-tiered city laid out on a grid pattern, where the upper section was dedicated to homes and businesses, large open-air piazzas (squares), and broad avenues. He also suggested that “chimneys should be high enough to carry smoke away from the eyes and lungs of the residents…[and] staircases are circular in order to eliminate the corners often used as public urinals.” 1 The lower level of his ideal city would be used for transportation of goods, animal traffic, and as a sewer for the disposal of all kinds of waste. The city was also designed to make good use of water. It was planned around a series of canals that would aid in transportation and in waste disposal, and he suggested that the city be situated near a strong-flowing river to keep water moving through the canals. Da Vinci also “conceived of buildings as hydraulic machines which distributed water in all the rooms of the house as well as in the artisan workshops through a mechanical lifting system. In the workshops the energy released in this way was used to drive various types of machines. 2 Finally, ever the artist, “Da Vinci’s city also would be a vision to behold, with elegant buildings featuring large arches and pillars. Da Vinci said of his style of urban planning: "Only let that which is good looking be seen on the surface of the city." 3
Da Vinci’s ideal city would have required the complete rebuilding of a city, or starting a brand new city in an ideal location. Since either option would have required a great deal of effort and money, Da Vinci’s ideal city was never built in real life Supplies
• A large set of wooden building blocks, such as: o “Architectural Unit Blocks” from Melissa & Doug company
http://www.melissaanddoug.com/dyn_prod.php?p=4201&k=86024&name=Architectural%20Unit%20Blocks
o “Standard Unit Blocks” from Melissa & Doug company http://www.melissaanddoug.com/dyn_prod.php?p=503&k=86024&name=Standard%20Unit%20Blocks
o “Tabletop Wooden Blocks” from Stacks and Stacks http://www.stacksandstacks.com/tabletop-wooden-building-blocks
o Various kits available at Barclay Woods (link to “Standard” size kits) http://www.barclaywoods.com/wooden_blocks_standard.htm
• (Optional) A large table or large mat (to put on the floor)

Grande Exhibitions
Da Vinci – The Genius activities
Grande Exhibitions – Da Vinci The Genius Activities 135
• (Optional) A large sheet of paper with a grid pattern drawn or printed on it, in proportion to the size of the wooden blocks. This can give some framework for visitors to use when designing their ideal city. You can even add a river somewhere on the paper and see if/how visitors use it in their design.
• (Optional) Box or other storage to put blocks when not in use • (Optional) Printouts of some of Da Vinci’s designs for buildings and structures within his Ideal City
(see below) From Manuscript B
http://mr_sedivy.tripod.com/davinci/idealct2.jpg From Manuscript B, Folio 36
http://digilander.libero.it/debibliotheca/Arte/Leonardoarch_file/page_01.htm

Grande Exhibitions
Da Vinci – The Genius activities
Grande Exhibitions – Da Vinci The Genius Activities 136
From Manuscript B, Folio 39 r.
http://digilander.libero.it/debibliotheca/Arte/Leonardoarch_file/page_01.htm Introducing the Activity (background information for visitors) There was an outbreak of bubonic plague in 1485 when Da Vinci was living in Milan. That plague was probably made worse by how the cities in those days were built: there were no sewers so the filth, waste, and rats ran through the streets, and there were lots of people living in close quarters with very little sunlight and air circulation. Da Vinci felt that the plague and other diseases could be prevented in the future by redesigning cities so they were more open, hygienic, and beautiful. He sketched plans for a city with two tiers. The upper tier was for well-designed homes, wide streets, and fresh air. The lower tier was for transporting animals and goods, and was connected by a series of canals that would help in transportation and would flush out all the waste. He also suggested that the city be situated next to a river to provide fresh water to supply the homes and buildings, to flow through the canals, and to help power hydraulic machines in the buildings. Da Vinci’s ideal city was never built, but you can build your own ideal city using these blocks. Doing the Activity This is an open-ended activity that gives visitors an opportunity to play and create with no specific outcome required. Set the blocks out in an accessible area (on a table or on the floor), and let visitors use the blocks to design their cities however they want to. You can set out a grid pattern and/or show Da Vinci’s drawings for his ideal city and buildings, or you can just leave them on their own. This is a great activity to engage younger visitors, but don’t be surprised if you see adults playing with the blocks too!

Grande Exhibitions
Da Vinci – The Genius activities
Grande Exhibitions – Da Vinci The Genius Activities 137
Questions to Ask Visitors
If you could design an ideal city, what kinds of things would you have in it? Why do you think Da Vinci’s ideal city was never actually built?
_______________________ 1Text from http://www.universalleonardo.org/work.php?id=519 2Atalay, Bulent; and Wamsley, Keith. Leonardo’s Universe: The Renaissance World of Leonardo da Vinci. (National Geographic, 2009) 123. 3Text from http://www.da-vinci-inventions.com/ideal-city.aspx
Grande Exhibitions
Da Vinci – The Genius activities
Grande Exhibitions – Da Vinci The Genius Activities 138
Additional Activity Ideas
Listed below are a few additional activity ideas that can be used in the Da Vinci exhibition. 1. Dress-up Area for Children/ Puppet Show Related Area in Da Vinci Exhibit: Musical, Optical, and Time Instruments Have Renaissance costumes and/or puppets available for children. Set up a small stage or spotlight for children to play-act. This can help highlight Da Vinci’s connections to theater. 2. Clay Sculpture Related Area in Da Vinci Exhibit: Leonardo The Sculptor Fashion a wire armature in the shape of a four-legged animal (or other figure), and let visitors use clay or Play Dough to create a sculpture. Point out the designs for the Sforza Monument and see if they can create something that looks like it. 3. Dissection Related Area in Da Vinci Exhibit: Anatomical Studies Perform an in-person frog (or other small animal) dissection to highlight skills and methods Da Vinci may have used when dissecting human bodies. It may be wise to locate the dissection in an area slightly removed from the main flow of traffic in case some visitors don’t want to view the dissection. It may also be useful to have pens/pencils and paper available for those visitors who want to sketch the anatomy. Steps and directions for a frog dissection can be found by doing a Google search for “Frog Dissection Instructions”. (Note: there are many virtual dissection activities available online, but that’s not what you need for this activity.) Here are several printable examples of frog dissection instructions: • http://www.biologycorner.com/worksheets/frog-dissection.html • http://www.biologyjunction.com/frog_dissection.htm • http://www.hometrainingtools.com/article.asp?ai=1571&bhcd2=1257188769 4. Human Anatomy Floor Puzzle Related Area in Da Vinci Exhibit: Anatomical Studies Purchase a simple jigsaw puzzle that shows the human body so that children can play and learn about anatomy. Example: • http://www.melissaanddoug.com/dyn_prod.php?p=445
Grande Exhibitions
Da Vinci – The Genius activities
Grande Exhibitions – Da Vinci The Genius Activities 139
Art Conservation
Activity Goal:
To introduce the idea of the electromagnetic spectrum and how different lights can be used to help with art conservation. Related Area in Da Vinci Exhibit Secrets of Mona Lisa History and Context of Activity (background information for museum staff) This activity does not focus on Da Vinci’s art or inventions; rather, the goal of this activity is explore the work done by Pascal Cotte and his use of different light wavelengths to investigate the Mona Lisa. Visitors will learn how art conservators use infrared (IR), visible light, ultraviolet (UV), and X-rays to reveal different aspects of the artworks and can give a clue to how the artwork has been treated over the years. Infrared, ultraviolet, and X-rays are all part of the electromagnetic spectrum, which is the range of radiation wavelengths that includes invisible and visible light. It ranges from large wavelength radio waves, through visible light (the colors of the rainbow), to very short wavelength gamma rays. A diagram of the electromagnetic spectrum is included in a separate document titled Art Conservation Images. Here are basic descriptions of four different wavelengths of light, where they exist on the electromagnetic spectrum and how they are used in art conservation.1
• Infrared radiation (IR) has wavelengths that are longer than visible light, and can reveal an underdrawing that lies below the paint surface. Conservators will often use infrared reflectography, which is set up as a closed-circuit television system. A light source is directed at the painting, and the camera detects reflected infrared radiation. This signal is converted into a black and white image on a television monitor. Underdrawings executed in infrared-absorbing materials, such as black chalk or bone black, will appear dark on the screen, because they do not reflect infrared light. 2
• Visible light can be seen with the naked eye. Discoloration, pigment change, and structural
damage are often first seen this way.
• Ultraviolet radiation (UV) has wavelengths just a bit shorter than visible light. Ultraviolet radiation, also referred to as ultraviolet light, is used generally in conservation to differentiate types of paints. For example, newer in-painting will appear dark under UV light, making it easier for the conservator to identify. Similarly, some varnishes and pigments will fluoresce or phosphoresce (glow) differently depending on the chemical make-up of the substance, thereby helping the conservator identify the material in the artwork.
• X-rays are located on the electromagnetic spectrum between ultraviolet and gamma rays. The
depth of penetration of x-rays through a material depends on the material’s density. A common use of x-rays in museums is to photograph density variations in composite materials, i.e., to examine painting pigments and sculpture structures.3 For example, if a ceramic sculpture is suspected of having a crack, an x-ray will be taken to determine the severity of the crack.
Note: “Art conservation” and “art restoration” do not mean the same thing. Art conservators work to assess the current state of a work of art and stabilize it so there is no further decay. They use various scientific methods, such as examining the artwork under different kinds of light (IR, UV, and X-ray) to identify damaged areas or areas that have been re-touched by earlier restorers. They will often remove varnish or
Grande Exhibitions
Da Vinci – The Genius activities
Grande Exhibitions – Da Vinci The Genius Activities 140
earlier touch-ups, using methods that to do not damage the original artwork. They may then choose to in-paint areas where original paint has been lost to help make the artwork aesthetically pleasing, but the paint they use will be easily visible and removable by future conservators. In general, art conservators make minimal interventions and leave artworks in their original state when possible. Art restorers may employ art conservation techniques, but the primary goal is to “restore” the artwork to the artist’s original intent. That can sometimes mean recreating or rebuilding sections that no longer exist. Supplies
• Print outs of images included in document titled Art Conservation Images, preferably on color printer. Protect printed images by laminating or putting them in plastic sheet protectors. Images include:
o Electromagnetic Spectrum Note: This image is a combination of two different diagrams the electromagnetic spectrum, available at these websites: http://commons.wikimedia.org/wiki/File:EM_Spectrum_Properties_edit.svg
http://commons.wikimedia.org/wiki/File:Electromagnetic_spectrum_(es).gif o Art Conservation Challenge #1 and Art Conservation Challenge #1 – Answer: portrait
of Judith Langley o Art Conservation Challenge #2 and Art Conservation Challenge #2 – Answer:
sculpture Glory, Glory
o Art Conservation Challenge #3 and Art Conservation Challenge #3 – Answer: portrait of A Member of the Livingston Family
Suggestion: for all three Art Conservation Challenges, print on both front and back of one paper, or print two papers and attach them front to back.
Introducing the Activity (background information for visitors) Many artworks that are hundreds or thousands of years old have been damaged over time, and not always because they were accidentally dropped. Sometimes the damage was done by a well-meaning person in the past who tried to “fix” a painting by putting a fresh layer of varnish on it to liven up the colors, not knowing that the varnish will darken and crack later on. Other times, parts of the original may have been destroyed, so another well-meaning person painted over areas to add details where they had been lost. Art conservation is a field that uses science to study and protect artworks and to preserve what is left of original artworks. One of the methods that art conservators use to find out the condition of an artwork is looking at them using different kinds of light. This activity focuses on four different wavelengths of light – infrared (IR), ultraviolet (UV), visible light, and X-ray – and the different things those different lights can show. Infrared, ultraviolet, visible light, and X-rays are all part of the electromagnetic spectrum. The electromagnetic spectrum is a range of radiation wavelengths that includes invisible and visible light. It ranges from large wavelength radio waves on one side of the spectrum, through visible light (the colors of the rainbow) somewhere in the middle, to very short wavelength gamma rays on the other side of the spectrum. Take a look at the image Electromagnetic Spectrum to see where infrared, ultraviolet, and X-rays are located. Notice that the section of visible light, the light that we can see with our eyes, if very small in comparison to the whole spectrum.

Grande Exhibitions
Da Vinci – The Genius activities
Grande Exhibitions – Da Vinci The Genius Activities 141
Doing the Activity Look at one of the three Art Conservation Challenges. Follow directions to see if you can figure out which kind of light to use to examine the three artworks. Questions to Ask Visitors
Can you find examples where a different kind of light (infrared, ultraviolet, or X-ray) was used to examine the Mona Lisa? What are some of the secrets that have been revealed by looking at the Mona Lisa with different kinds of light? Can you think of other tools that art conservators might use? (Examples: microscope, chemicals, brushes, watercolor paint for in-painting damaged areas.)
Can you think of other uses for infrared, ultraviolet, or X-ray?
o Examples for infrared: night vision goggles, temperature sensing such as used in weather forecasting or astronomy
o Examples for ultraviolet: black lights, viewing security images or watermarks on currency, sun tanning, forensic investigation (some body fluids glow under UV light)
o Examples for X-ray: medical X-rays, airport security
Extensions and Additional Activity Ideas 1. One Painting, Four Lights Print out the four pages at the end of the document titled Art Conservation Images. Laminate pages or put in sheet protectors. The four pages show one Italian Renaissance painting, Madonna Suckling the Child, in four kinds of light (visible, infrared, ultraviolet, and X-ray), thus highlighting the differences and the unique information provided by each of them. _______________________ This activity is based on “Art and the Electromagnetic Spectrum: A Classroom Lesson”, developed by the Lunder Conservation Center at the Smithsonian American Art Museum, and available at: http://americanart.si.edu/education/pdf/Conservation_Electromagnetism_Lesson.pdf.
1The four following bullet points are taken from “Art and the Electromagnetic Spectrum: A Classroom Lesson”, http://americanart.si.edu/education/pdf/Conservation_Electromagnetism_Lesson.pdf, page 2. 2Spronk, R. (n.d.) Investigating the Renaissance. Retrieved September 9, 2008, from The Fogg Museum’s Investigating the Renaissance Site: http://www.artmuseums.harvard.edu/Renaissance/iframes.html 3CAMEO: Conservation & Art Material Encyclopedia Online, http://cameo.mfa.org/index.asp

Grande Exhibitions
Da Vinci – The Genius activities
Grande Exhibitions – Da Vinci The Genius Activities 142
Art Conservation Challenges
This image is a combination of two different diagrams the electromagnetic spectrum, available at these websites: http://commons.wikimedia.org/wiki/File:EM_Spectrum_Properties_edit.svg http://commons.wikimedia.org/wiki/File:Electromagnetic_spectrum_(es).gif

Grande Exhibitions
Da Vinci – The Genius activities
Grande Exhibitions – Da Vinci The Genius Activities 143
Art Conservation Challenge #1 This portrait of Judith Langley has been brought to the conservation lab. There is a heavy coat of varnish on the surface that shows discoloration in visible light. The texture of the surface of the painting and the thickness of the discolored varnish leads you to believe there might be something hidden beneath the layers of varnish in the upper left-hand corner of the portrait. What kind of light could you use to find out if there is something underneath?
Judith Langley (no date) Attributed to Jan Anthonisz van Ravesteyn Oil on canvas 23 x 19 in. (58.4 x 48.3 cm.) Smithsonian American Art Museum Bequest of Mabel Johnson Langhorne
Option 1: X-rays will allow me to see if there are any damages to the structure of the artwork. The x-rays show differences in density (thickness) to find places that need special handling care. Option 2: Ultraviolet light (UV) can reveal in-painting or previous conservation work. New paint or varnish that has been applied over the original paint may show up as dark areas under UV light. Option 3: Visible light is simply looking at the artwork with the naked eye. Discoloration, pigment/color change, and structural damage are often first seen this way. Option 4: Infrared radiation will allow me to see if there are underlying drawings (underdrawings) beneath the surface of the painting.
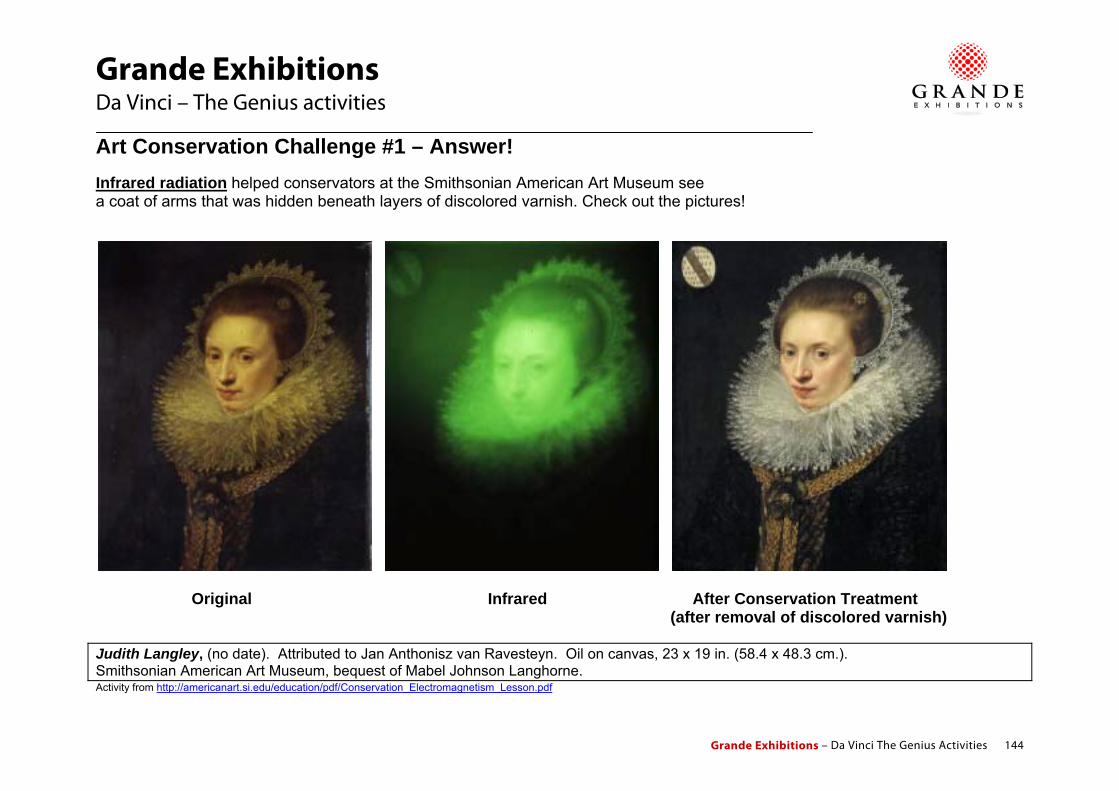
Grande Exhibitions
Da Vinci – The Genius activities
Grande Exhibitions – Da Vinci The Genius Activities 144
Art Conservation Challenge #1 – Answer! Infrared radiation helped conservators at the Smithsonian American Art Museum see a coat of arms that was hidden beneath layers of discolored varnish. Check out the pictures!
Original Infrared After Conservation Treatment (after removal of discolored varnish) Judith Langley, (no date). Attributed to Jan Anthonisz van Ravesteyn. Oil on canvas, 23 x 19 in. (58.4 x 48.3 cm.). Smithsonian American Art Museum, bequest of Mabel Johnson Langhorne. Activity from http://americanart.si.edu/education/pdf/Conservation_Electromagnetism_Lesson.pdf

Grande Exhibitions
Da Vinci – The Genius activities
Grande Exhibitions – Da Vinci The Genius Activities 145
Art Conservation Challenge #2 Museums often lend artwork to other places. In this case, the sculpture Glory, Glory has been requested for a multi-venue loan. That means that it will travel to many places. Before this is packaged and sent, you must be sure that there are no cracks or structural damage that you cannot see. What kind of light could you use to find out if this sculpture is damaged or cracked?
Glory, Glory 1938 Viktor Schrekengost Modeled and glazed terra cotta with engobe 18 5/8 x 10 3/8 x 9 in. (47.3 x 26.3 x 22.9 cm.) Smithsonian American Art Museum Gift of the artist
Option 1: X-rays will allow me to see if there are any damages to the structure of the artwork. The x-rays show differences in density (thickness) to find places that need special handling care. Option 2: Ultraviolet light (UV) can reveal in-painting or previous conservation work. New paint or varnish that has been applied over the original paint may show up as dark areas under UV light. Option 3: Visible light is simply looking at the artwork with the naked eye. Discoloration, pigment/color change, and structural damage are often first seen this way. Option 4: Infrared radiation will allow me to see if there are underlying drawings (underdrawings) beneath the surface of the painting.

Grande Exhibitions
Da Vinci – The Genius activities
Grande Exhibitions – Da Vinci The Genius Activities 146
Art Conservation Challenge #2 – Answer! X-rays allowed conservators at the Smithsonian American Art Museum to look for cracks and areas of weakness in the sculpture. Just like in a medical x-ray, the dense places are white and the less dense places are black. The conservators could tell that the heads and arms were hollowed out. The line through the center of the sculpture means that it was created in two pieces. A special crate will be made in order to ship the sculpture.
Original X-ray Glory, Glory, 1938. Viktor Schrekengost. Modeled and glazed terra cotta with engobe. 18 5/8 x 10 3/8 x 9 in. (47.3 x 26.3 x 22.9 cm.) Smithsonian American Art Museum. Gift of the artist. Activity from http://americanart.si.edu/education/pdf/Conservation_Electromagnetism_Lesson.pdf

Grande Exhibitions
Da Vinci – The Genius activities
Grande Exhibitions – Da Vinci The Genius Activities 147
Art Conservation Challenge #3 A group of siblings has graciously offered to donate a family portrait to the museum in memory of their mother. Scholars have confirmed that the painting is by John Smibert, a famous early American colonial portraitist. Examination in visible light makes you think there is discolored varnish on the surface of the painting. You would also like to check more closely for paint loss and previous conservation. What kind of light could you use to find out if there is discolored varnish or paint loss?
A Member of the Livingston Family 1740’s John Smibert oil on canvas 42 x 30 in. (106.7 x 76.2 cm) Smithsonian American Art Museum Gift of the Amirkhan children in memory of their mother, Babette Keeler Amirkhan, Educator, and Livingston Family Descendant
Option 1: X-rays will allow me to see if there are any damages to the structure of the artwork. The x-rays show differences in density (thickness) to find places that need special handling care. Option 2: Ultraviolet light (UV) can reveal in-painting or previous conservation work. New paint or varnish that has been applied over the original paint may show up as dark areas under UV light. Option 3: Visible light is simply looking at the artwork with the naked eye. Discoloration, pigment/color change, and structural damage are often first seen this way. Option 4: Infrared radiation will allow me to see if there are underlying drawings (underdrawings) beneath the surface of the painting.

GD
A Ud
ASL A
GrandeDa Vinci – T
Art ConserUltraviolet raddiscolored varn
A Member of thSmithsonian AmLivingston Family
Activity from http://ame
e ExhibiThe Genius
rvation Chaiation allowed
nish and areas
e Livingston Faerican Art Musey Descendant
ericanart.si.edu/educat
tions
activities
allenge #3 conservators of in-painting, t
Origina
amily, 1740’s. Jeum. Gift of the A
tion/pdf/Conservation_
– Answerat the Smithsothat show up a
l
ohn Smibert. OAmirkhan childre
_Electromagnetism_L
r! nian American
as darkened are
Un
Oil on canvas, 42en in memory of
esson.pdf
n Art Museum toeas under ultra
nder ultraviole
2 x 30 in. (106.7 their mother, Ba
Grande Exhibition
o identify aviolet light.
et light
x 76.2 cm). abette Keeler Am
ns – Da Vinci The Ge
mirkhan, Educat
enius Activities 14
tor, and
48
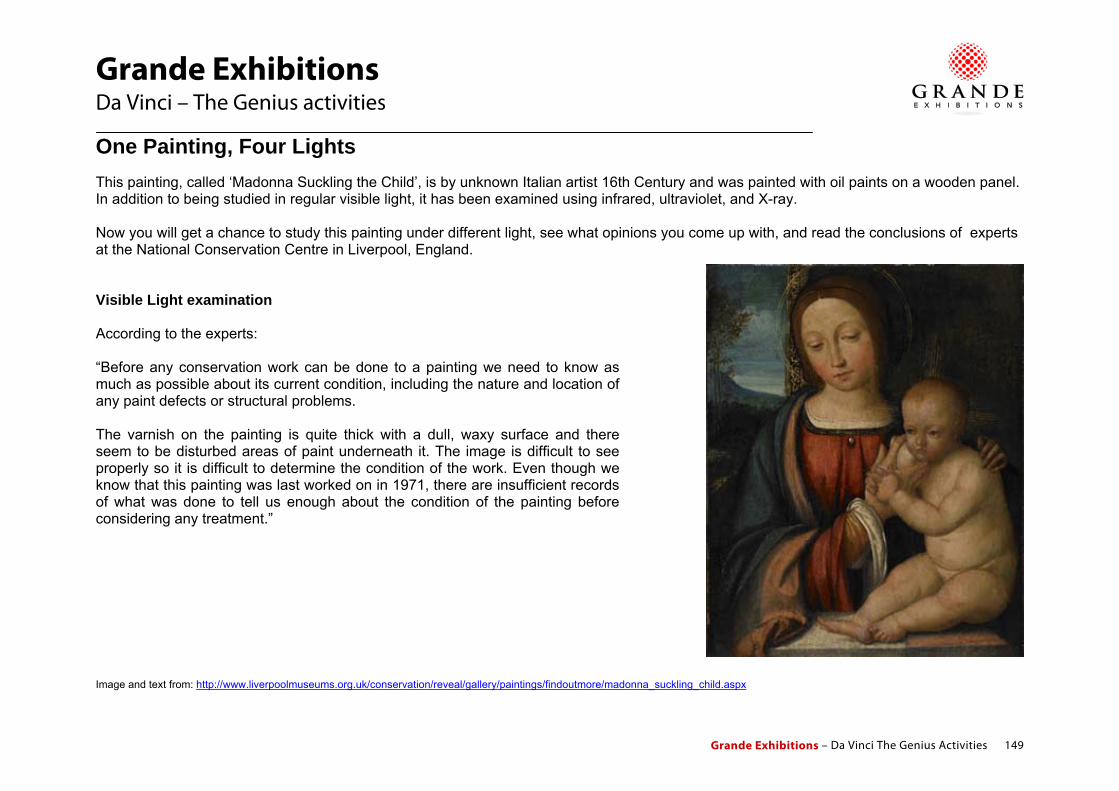
Grande Exhibitions
Da Vinci – The Genius activities
Grande Exhibitions – Da Vinci The Genius Activities 149
One Painting, Four Lights This painting, called ‘Madonna Suckling the Child’, is by unknown Italian artist 16th Century and was painted with oil paints on a wooden panel. In addition to being studied in regular visible light, it has been examined using infrared, ultraviolet, and X-ray. Now you will get a chance to study this painting under different light, see what opinions you come up with, and read the conclusions of experts at the National Conservation Centre in Liverpool, England. Visible Light examination According to the experts: “Before any conservation work can be done to a painting we need to know as much as possible about its current condition, including the nature and location of any paint defects or structural problems. The varnish on the painting is quite thick with a dull, waxy surface and there seem to be disturbed areas of paint underneath it. The image is difficult to see properly so it is difficult to determine the condition of the work. Even though we know that this painting was last worked on in 1971, there are insufficient records of what was done to tell us enough about the condition of the painting before considering any treatment.” Image and text from: http://www.liverpoolmuseums.org.uk/conservation/reveal/gallery/paintings/findoutmore/madonna_suckling_child.aspx

Grande Exhibitions
Da Vinci – The Genius activities
Grande Exhibitions – Da Vinci The Genius Activities 150
One Painting, Four Lights Infrared (IR) examination According to the experts: “Infrared (IR) radiation can penetrate very slightly below some varnish and paint layers and is most often used to identify underdrawing on an image that may not be visible to the naked eye. The success of the technique depends on materials or layers that absorb the IR wavelengths lying below layers that are transparent to IR. Carbon used for underdrawing usually absorbs IR and appears dark, while paint and varnish are usually transparent under IR. Therefore carbon line drawing beneath paint or varnish may show up. The IR source is usually a tungsten bulb and the resultant reflected image can not be seen by the naked eye. It must be recorded with a special camera with an IR sensitive tube and viewed on a screen, or by a special digital camera. The IR image gives a different view of the painting and a new layer of information. Of specific interest is the drawn outline that is visible around the body of the Child, particularly distinct on the legs and arms. This is the underdrawing, or outline preparation of the design, which may have been taken from a pattern or cartoon, or drawn freehand. There are few other distinct lines visible, apart from the edges of the Virgin’s proper right hand. This is quite a simple example of underdrawing, though other examples can reveal very complex preparatory outlines." Image and text from: http://www.liverpoolmuseums.org.uk/conservation/reveal/gallery/paintings/findoutmore/madonna_suckling_child.aspx

Grande Exhibitions
Da Vinci – The Genius activities
Grande Exhibitions – Da Vinci The Genius Activities 151
One Painting, Four Lights Ultraviolet (UV) examination According to the experts: “Ultra-violet (UV) light is used as a surface identification technique. It relies on the fact that UV light, which is invisible to the human eye, can induce visible fluorescence in some materials. This can show up a number of features, including the presence of natural resin varnishes, as these often fluoresce (glow) with a milky green colour under UV light. Retouchings on top of a varnish can also be identified, as oil paint does not fluoresce under UV, so retouchings appear as dark patches on the varnish surface. Anything else on the surface masking the fluorescence of the varnish will also appear dark. Certain pigments also fluoresce with different colours under UV, so this may help to show where they have been used. The colour UV image shows a number of significant features. There is an overall pale milky green fluorescing layer, probably indicating the presence of a resin varnish. There are darker areas masking the fluorescence over this, which represent retouchings applied by the last restorer who worked on the painting in 1971. In addition to these patches of applied paint there are some paler additions visible, particularly on the Child’s body and the Virgin’s face. These probably represent older retouchings which appear to be under the natural resin varnish. We know from the X-ray (see below) that there are large losses to the original paint in the area adjacent to the Child’s head, so it is interesting that retouchings and repaint in these areas do not appear to show under UV, because they are hidden by the varnish. These restorations may be much earlier. The painting may also have a modern synthetic varnish coating, which does not fluoresce in the same way and is therefore not visible under UV.” Image and text from: http://www.liverpoolmuseums.org.uk/conservation/reveal/gallery/paintings/findoutmore/madonna_suckling_child.aspx

Grande Exhibitions
Da Vinci – The Genius activities
Grande Exhibitions – Da Vinci The Genius Activities 152
One Painting, Four Lights X-ray examination According to the experts: “As with medical radiography, this technique employs radiation that can entirely penetrate the materials of a painting. This can often show internal structural features, as well as features of the paint layers themselves. The success of examination using X-ray radiation is dependent on there being materials of differing densities present in the structure, without any one layer being of too high a density. The x-ray image shows all the different densities of the materials in the painting. The most striking features are the iron nails around the sides of the panel, which show up as very dense (white) on the image. These have been used to attach wooden strips at the side of the panel and iron strips along the top and bottom edges. The iron strips were intended to prevent the panel from warping but are probably causing stress to the wood. The side strips were applied to help fit the painting into its frame. Over the rest of the image most of the painted design can be seen but there are darker areas (lower left corner and right of the Child’s head) where the original paint has been lost. Some of the smaller dark losses follow the wood grain of the panel. This is a common feature of panel paintings, where movement of the wood causes paint losses along the grain. These losses have been filled and retouched in the past, so the X-ray is the only way of identifying where they are. Another noticeable feature is the thick pale white line running up the centre of the image. It is not certain what this is. It doesn't appear to be damage or a later addition but could be a filling applied to a flaw in the panel before even the gesso or paint layers were applied. Over much of the surface the network of very fine age cracks in the paint show up as thin dark lines in the paint, again mainly following the wood grain of the panel.” Image and text from: http://www.liverpoolmuseums.org.uk/conservation/reveal/gallery/paintings/findoutmore/madonna_suckling_child.aspx

Grande Exhibitions
Da Vinci – The Genius activities
Grande Exhibitions – Da Vinci The Genius Activities 153
ANNEXURE 1 Da Vinci Anatomical Drawings
Please refer to attached Powerpoint Document