c.ymcdn.com€¦ · web viewto create a hyperlink, choose a word or phrase you want to use as a...
TRANSCRIPT

MembershipDirector

Logging In:
1. Go to https://shrmjax.site-ym.com/admin/Login.aspx?redir=%2fadmin%2fdashboard.aspx2. Enter your User ID3. Enter your password4. Click on “Login”

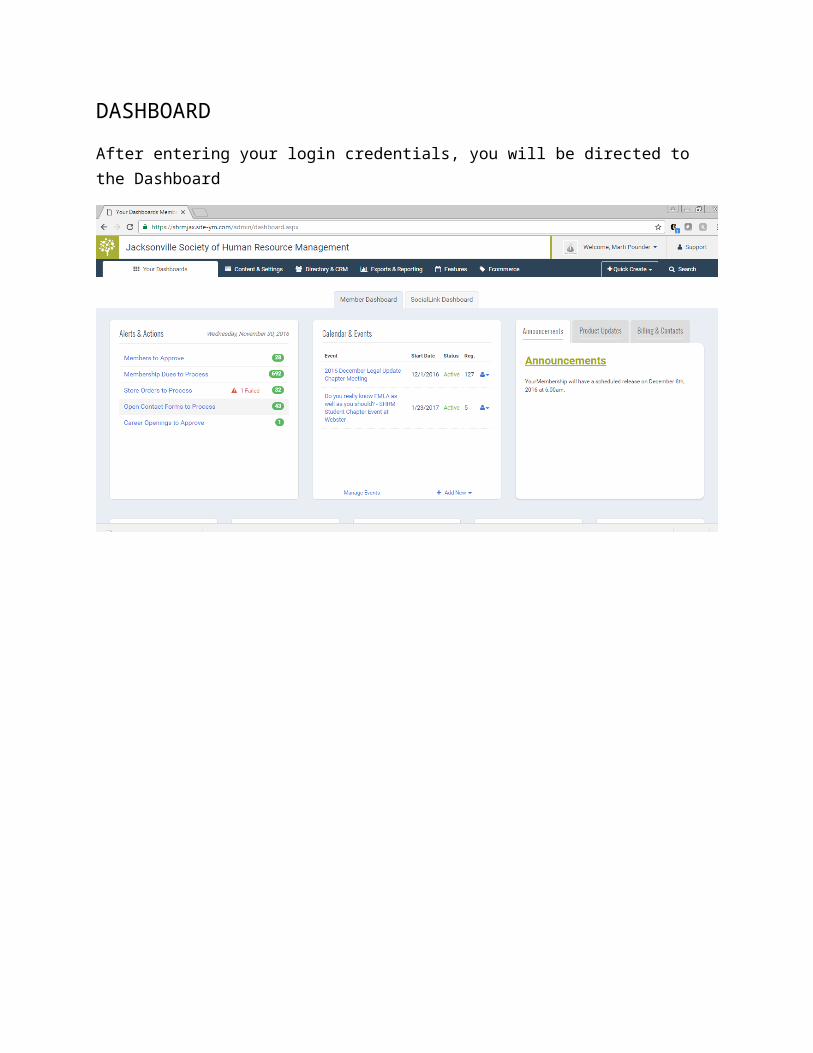
DASHBOARD
After entering your login credentials, you will be directed to the Dashboard
Maintaining Your Page(s)
Click on the “Content and Settings” tab where a listing of all of the pages can be found. Opening the tab will default you to the first menu item, “Custom Pages”.

The Membership Director is responsible for the following pages:
1. Benefits of Membership2. In Transition Memberships3. Join SHRM Jacksonville4. Membership5. Membership Types6. New Member Orientation7. Why Join SHRM
When performing edits to your page(s), there are 3 different options to choose from
This option allows you to edit the page
This option allows you to preview the page on the front end
This option allows you to duplicate the page

Editing Your Page(s)
1. Your pages are referred to as Custom Pages. You will not be responsible for the creation of pages however, you will be responsible for maintaining and updating your pages. Each Custom Page has a category; to view which pages belong to you, filter on the Membership category
Click on the pencil icon to begin the editing function

A video tutorial is available by clicking on the video tutorial icon – it lasts about 30 minutes but it goes through the content management features – specifically creating custom pages and maintaining the site content areas. It is recommended that you take the time to view this.
Every custom page has a configuration page as shown below.
Scroll down to the bottom of this page where you will find the editor where you can create and edit the content of the page.

There are two tabs on the editor page:
1. Editor (the default page) which is a rich text editor with tools that can help format your content.
2. Advanced Editor – plain text editor html code can be entered directly3. For training purposes, we will only be showing the Editor page.

This page has 2 tabs – Home and Insert
Home – This tab has all of the tools to help format the text
The most important tool here is the clipboard with the – this is the paste from Word tool. We recommend that content be copied over to word, edited, then use this tool to paste it back into this tab because it is much easier to control the editing in Word and then copy it back here (rather than trying to edit and especially format in the Editor. Be sure to paste this way because it will strip out any extraneous coding that would normally be copied over with the text.
To edit, copy the current text over to word…make any changes in text and formatting and save the file.
To copy it back to the Editor, select the content in the Word document, place the
cursor at the appropriate place. Click on which will pull up a dialogue box.

Paste the content in the box, then click Paste. The extraneous coding is stripped out and the formatting is retained.

Insert Tab
Insert tab allows you to insert files, hyperlinks, tables, etc.
This is where you will find:
table tools hyperlink tools
You can insert
videos Windows Media files insert images.

You will first want to upload files to the resource manager. Click on the “Upload a file” icon
Click on your folder (Membership)

Click to upload, and navigate to where the file you want to upload is located.
Click on the file to load

Then click on “Upload File(s)
Place your cursor where you want the file or image to go
Then click on the – this will take you to the resource manager. Find your folder (Membership), find your file and click insert to upload it.

To create a hyperlink, choose a word or phrase you want to use as a hyperlink, go to the hyperlink icon which will take you to the hyperlink manager where you can link to files or external sites.

Before you can submit any changes or updates, you will need to choose a version label and version notes and hit “Submit”. This will create a history of all edits on the custom page. If you ever need to revert back to a previous version, you will be able to do so by clicking on the blue arrow beside the version you want to be displayed.

Content areas
Content pages are prebuilt pages that are standard on most YM websites.
These pages include:
Home page(s). There are many areas of the home page and the following content areas comprise the home page
Most of these have 2 icons. The first is the edit icon which will allow you to edit the page
The 2nd icon allows you to view where that section is the page