cyber recruiter 7.0 - · pdf file- sage abra hrms (foxpro & sql) navigation of admin ......
TRANSCRIPT

Visibility Software Cyber Recruiter 7.0: HR/Payroll Guide P a g e | 1
CYBER RECRUITER 7.0: HR/PAYROLL GUIDE DECEMBER 2009

Visibility Software Cyber Recruiter 7.0: HR/Payroll Guide P a g e | 2
TABLE OF CONTENTS Getting Started ................................................................................................................................. 7
Terms .........................................................................................................................................................7 Available Interfaces ....................................................................................................................................8 Navigation of Admin ...................................................................................................................................8
ADP –File Export ............................................................................................................................. 10
Admin Setup – Enabling ADP HR ............................................................................................................... 10 Step 1: Setting Global Defaults -------------------------------------------------------------------------------------------------------------------- 10 Step 2: Verifying Code Tables --------------------------------------------------------------------------------------------------------------------- 11
Daily Use – Transferring Applicants to ADP ................................................................................................ 11 Step 1: Prepare the Applicant & Verify Required Fields ------------------------------------------------------------------------------------ 11 Step 2: Add Record to the Export File ----------------------------------------------------------------------------------------------------------- 12 Step 3: Generate the Export File ------------------------------------------------------------------------------------------------------------------ 12 Step 4: Verify Results -------------------------------------------------------------------------------------------------------------------------------- 13 Step 5: Prepare Export List for Next Batch ----------------------------------------------------------------------------------------------------- 14 Step 6: Import into ADP ----------------------------------------------------------------------------------------------------------------------------- 15
DAta Mapping- ADP .................................................................................................................................. 15
Ascentis HR Office – File Export ....................................................................................................... 18
Admin Setup – Enabling HR Office HR System ............................................................................................ 18 Step 1: Setting Global Defaults -------------------------------------------------------------------------------------------------------------------- 18 Step 2: Verifying Code Tables --------------------------------------------------------------------------------------------------------------------- 18
Daily Use – Transferring Applicants to HR Office ........................................................................................ 18 Step 1: Prepare the Applicant & Verify Required Fields ------------------------------------------------------------------------------------ 18 Step 2: Add Record to the Export File ----------------------------------------------------------------------------------------------------------- 19 Step 3: Generate Export File ----------------------------------------------------------------------------------------------------------------------- 20 Step 4: Verify Results -------------------------------------------------------------------------------------------------------------------------------- 21 Step 5: Prepare Export List for Next Batch ----------------------------------------------------------------------------------------------------- 22 Step 6: Import into HR Office ---------------------------------------------------------------------------------------------------------------------- 22
Data Mapping ........................................................................................................................................... 22 Personal Information Fields ------------------------------------------------------------------------------------------------------------------------ 23 Job Information Fields ------------------------------------------------------------------------------------------------------------------------------- 23
Deltek Costpoint –File Export .......................................................................................................... 25
Admin Setup – Enabling the costpoint interface ........................................................................................ 25 Step 1: Setting Global Defaults -------------------------------------------------------------------------------------------------------------------- 25 Step 2: Building Code Tables ----------------------------------------------------------------------------------------------------------------------- 25 Step 3: Setting Data Options ----------------------------------------------------------------------------------------------------------------------- 26 Step 4: Setting Costpoint Defaults --------------------------------------------------------------------------------------------------------------- 28 Step 5: Define Required Fields -------------------------------------------------------------------------------------------------------------------- 28
Daily Use – Transferring Applicants to Costpoint ....................................................................................... 29 Step 1: Prepare the individual & Verify Required Fields ----------------------------------------------------------------------------------- 29
Visibility Software Cyber Recruiter 7.0: HR/Payroll Guide P a g e | 3
Step 2: Complete Costpoint Page ---------------------------------------------------------------------------------------------------------------- 29 Step 3: Add Record to the Export File ----------------------------------------------------------------------------------------------------------- 30 Step 4: Generate Export File ----------------------------------------------------------------------------------------------------------------------- 30 Step 5: Verify Results -------------------------------------------------------------------------------------------------------------------------------- 31 Step 6: Prepare Export List for Next Batch ----------------------------------------------------------------------------------------------------- 32 Step 7: Import into Costpoint --------------------------------------------------------------------------------------------------------------------- 33
Data Mapping - Costpoint ......................................................................................................................... 33
Deltek GCS Premier –File Export ...................................................................................................... 35
Admin Setup – Enabling GCS Premier HR ................................................................................................... 35 Step 1: Setting Global Defaults -------------------------------------------------------------------------------------------------------------------- 35 Step 2: Verifying Code Tables --------------------------------------------------------------------------------------------------------------------- 36 step 3: Define Required Fields -------------------------------------------------------------------------------------------------------------------- 36
Daily Use – Transferring Applicants to GCS Premier ................................................................................... 36 Step 1: Prepare the Applicant & Complete Required Fields ------------------------------------------------------------------------------- 36 Step 2: Add Record to the Export File ----------------------------------------------------------------------------------------------------------- 37 Step 3: Generate Export File ----------------------------------------------------------------------------------------------------------------------- 38 Step 4: VERIFY Results ------------------------------------------------------------------------------------------------------------------------------- 39 Step 5: Prepare Export List for Next Batch ----------------------------------------------------------------------------------------------------- 39 Step 6: Import into GCS premier ----------------------------------------------------------------------------------------------------------------- 40
Data Mapping ........................................................................................................................................... 40
Deltek Vision –Dynamic link ............................................................................................................ 42
Establishing Connectivity .......................................................................................................................... 42 Admin Setup – Enabling Deltek Vision ....................................................................................................... 42
Step 1: Setting Global Defaults -------------------------------------------------------------------------------------------------------------------- 42
Daily Use – Transferring Applicants to Deltek Vision .................................................................................. 43 Step 1: Find the Applicant -------------------------------------------------------------------------------------------------------------------------- 43 Step 2: Enter Employee Identifiers --------------------------------------------------------------------------------------------------------------- 44 Step 3: VERIFY Information ------------------------------------------------------------------------------------------------------------------------ 44
Where the Data Goes................................................................................................................................ 45
Microsoft Dynamics GP (Great Plains) –File Export .......................................................................... 48
Admin Setup – Enabling Great Plains ......................................................................................................... 48 Step 1: Setting Global Defaults -------------------------------------------------------------------------------------------------------------------- 48 Step 2: Verifying Code Tables --------------------------------------------------------------------------------------------------------------------- 49
Daily Use – Transferring Applicants to Great Plains .................................................................................... 49 Step 1: Prepare the Applicant & Verify Required Fields ------------------------------------------------------------------------------------ 49 Step 2: Add Record to the Export File ----------------------------------------------------------------------------------------------------------- 50 Step 3: Generate Export File ----------------------------------------------------------------------------------------------------------------------- 50 Step 4: Verify Results -------------------------------------------------------------------------------------------------------------------------------- 51 Step 5: Prepare Export List for Next Batch ----------------------------------------------------------------------------------------------------- 51 Step 6: Import into great Plains ------------------------------------------------------------------------------------------------------------------- 52
Data Mapping ........................................................................................................................................... 52
Sage Abra HRMS “Abra” –Dynamic Link .......................................................................................... 54
Establishing Connectivity .......................................................................................................................... 54

Visibility Software Cyber Recruiter 7.0: HR/Payroll Guide P a g e | 4
Linking to Foxpro ------------------------------------------------------------------------------------------------------------------------------------- 54
AWC Connection ....................................................................................................................................... 54 Setup for Cyber Recruiter -------------------------------------------------------------------------------------------------------------------------- 54 Setup for Abra Workforce Connections -------------------------------------------------------------------------------------------------------- 55
Admin Setup – Enabling Abra .................................................................................................................... 61 Step 1: Setting Global Defaults -------------------------------------------------------------------------------------------------------------------- 61 Step 2: Setting the Data Source ------------------------------------------------------------------------------------------------------------------- 61 Step 3: Defining Misc Fields ------------------------------------------------------------------------------------------------------------------------ 62
Daily Use – Transferring New Hires to Abra ............................................................................................... 62 Step 1: Find the Applicant -------------------------------------------------------------------------------------------------------------------------- 62 Step 2: Identify the Company & Action in Abra ---------------------------------------------------------------------------------------------- 63 Step 3: Enter Employee Identifiers --------------------------------------------------------------------------------------------------------------- 63 Step 4: Verify Information -------------------------------------------------------------------------------------------------------------------------- 64 Step 5: Send information --------------------------------------------------------------------------------------------------------------------------- 65
Daily Use – Rehiring Previous Employees................................................................................................... 65 Step 1: Find the Applicant -------------------------------------------------------------------------------------------------------------------------- 65 Step 2: Identify the Company & Action in Abra ---------------------------------------------------------------------------------------------- 67 Step 3: Enter Rehire Date --------------------------------------------------------------------------------------------------------------------------- 67 Step 4: Verify Information -------------------------------------------------------------------------------------------------------------------------- 67 Step 5: Send information --------------------------------------------------------------------------------------------------------------------------- 67
Daily Use – Job Change ............................................................................................................................. 68 Step 1: Find the Applicant -------------------------------------------------------------------------------------------------------------------------- 68 Step 2: Identify the Company & Action in Abra ---------------------------------------------------------------------------------------------- 69 Step 3: Enter Job change Date -------------------------------------------------------------------------------------------------------------------- 69 Step 4: Verify Information -------------------------------------------------------------------------------------------------------------------------- 69 Step 5: Send information --------------------------------------------------------------------------------------------------------------------------- 69
Where the Data Goes ............................................................................................................................... 70 General -------------------------------------------------------------------------------------------------------------------------------------------------- 70 Demographics ----------------------------------------------------------------------------------------------------------------------------------------- 70 Personal Information -------------------------------------------------------------------------------------------------------------------------------- 70 Job / Salary --------------------------------------------------------------------------------------------------------------------------------------------- 71 Payroll Info --------------------------------------------------------------------------------------------------------------------------------------------- 71 Payroll Processing ------------------------------------------------------------------------------------------------------------------------------------ 72
Sage Abra HRMS “Abra” –File Export .............................................................................................. 73
Establishing Connectivity .......................................................................................................................... 73 ODBC Connetion to Foxpro ------------------------------------------------------------------------------------------------------------------------ 73 ODBC Connetion to SQL ----------------------------------------------------------------------------------------------------------------------------- 73 Installing Cyber Recruiter to Abra Import Tool ----------------------------------------------------------------------------------------------- 74
Admin Setup – Enabling Abra .................................................................................................................... 74 Step 1: Setting Global Defaults -------------------------------------------------------------------------------------------------------------------- 75 Step 2: Defining Misc fields ------------------------------------------------------------------------------------------------------------------------ 75 Step 3: Verifying Code Tables --------------------------------------------------------------------------------------------------------------------- 76
Daily Use – Transferring Applicants to Abra ............................................................................................... 76 Step 1: Prepare the Applicant & Verify Required Fields ------------------------------------------------------------------------------------ 76 Step 2: Add Record to the Export File ----------------------------------------------------------------------------------------------------------- 76 Step 3: Generate the Export File ------------------------------------------------------------------------------------------------------------------ 76
Visibility Software Cyber Recruiter 7.0: HR/Payroll Guide P a g e | 5
Step 4: Verify Results -------------------------------------------------------------------------------------------------------------------------------- 77 Step 5: Prepare Export List for Next Batch ----------------------------------------------------------------------------------------------------- 78 Step 6: Import into Abra ---------------------------------------------------------------------------------------------------------------------------- 78
Where the Data Goes................................................................................................................................ 78 General -------------------------------------------------------------------------------------------------------------------------------------------------- 78 Demographics ----------------------------------------------------------------------------------------------------------------------------------------- 78 personal Information -------------------------------------------------------------------------------------------------------------------------------- 79 Job / Salary --------------------------------------------------------------------------------------------------------------------------------------------- 79 Payroll Info --------------------------------------------------------------------------------------------------------------------------------------------- 80 Payroll Processing ------------------------------------------------------------------------------------------------------------------------------------ 80
Sage Fund Accounting – Dynamic Link ............................................................................................ 81
Configuring Web Services ......................................................................................................................... 81 Admin Setup – Enabling SAGe Fund Accounting ......................................................................................... 81 Hiring an Applicant ................................................................................................................................... 82
HR-XML (Non Product Specific) ....................................................................................................... 83
Admin Setup – Enabling HR-XML HR System .............................................................................................. 83 Step 1: Turning HR-XML On - ---------------------------------------------------------------------------------------------------------------------- 83 Step 2: Verifying Code Tables --------------------------------------------------------------------------------------------------------------------- 83
Daily Use – Transferring Applicants to HR-XML .......................................................................................... 83 Step 1: Prepare the Applicant & Verify Required Fields ------------------------------------------------------------------------------------ 83 Step 2: Add Record to the Export File ----------------------------------------------------------------------------------------------------------- 84 Step 3: Generate Export File ----------------------------------------------------------------------------------------------------------------------- 84 Step 4: Verify Results -------------------------------------------------------------------------------------------------------------------------------- 85 Step 5: Prepare Export List for Next Batch ----------------------------------------------------------------------------------------------------- 86 Step 6: Import into HR-XML SupportED Product --------------------------------------------------------------------------------------------- 86
Appendix A – Importing Code Tables ............................................................................................... 87

Visibility Software Cyber Recruiter 7.0: HR/Payroll Guide P a g e | 6

Visibility Software Cyber Recruiter 7.0: HR/Payroll Guide P a g e | 7
GETTING STARTED Thank you for purchasing the Cyber Recruiter Applicant Tracking System from Visibility Software, LLC. This guide is designed to provide Administrators of the system the knowledge needed to configure integration to the various HR or Payroll systems your organization may use and provide the daily user of Cyber Recruiter with the necessary knowledge to transfer information from Cyber Recruiter to your HR or Payroll system. If your organization has more than one system (ADP for Payroll and Abra for HR, for example) more than one of these integration paths may be activated.
TERMS
Integrate: Products which integrate typically require no further action on a user’s part outside of setup in order to move data from one product to another. For example, if pressing the ‘Save’ button in one system adds a record in another system then the two systems are ‘integrated’. Interface: Products which interface require an action to be performed by a user on a routine basis to keep the two systems in sync. Links between Cyber Recruiter and your HR/Payroll system will be an interface and will require an action by a user of your system. Interface by File Export: Cyber Recruiter will gather information and consolidate it into a file which is exported from Cyber Recruiter and will be imported into the HR/Payroll system. This process is a multiple step process which includes completing a page in Cyber Recruiter with specific information for the HR/Payroll system, exporting the file and then importing the file into the HR/Payroll system. This process will have two pages to complete during the daily use of this interface. The first page is stored in the Applicant file. The second is accessed under the Applicant menu item. Each page will reference the HR/Payroll module to which you are interfacing. Interface by Dynamic Link: Cyber Recruiter and the HR/Payroll system are connected via an ODBC or OLE DB connection which allows for a page in Cyber Recruiter to collect information and push the information into the HR/Payroll system. This is a one step process; however it does require direct connection between the two systems. This process will have one page to complete during the daily use of this interface. The page will be under the Applicant menu item. The page will reference the HR/Payroll module to which you are interfacing. Admin Setup: Instruction for the Administrator of the system which will require access to the Admin menu item. Each interface has a section that gives more information about what is transferred and lists all the user-defined code tables for each system. The first part of this manual is indicates how to setup of the interface. Various ones might have appendices that will provide further information. Each interface will have a component which must be configured under “Admin > Links > Pre-Defined Links”. For interfaces which are exports (see definition above) an additional component will need to be configured under “Admin > Codes” under the specific HR/Payroll module. Daily Use: Instruction for the everyday user of Cyber Recruiter who will need to incorporate these pieces into his/her daily recruiting processes. It walks the User through completing the data to the Applicant File, exporting the file and what to look for by ways of errors/successful transfers.

Visibility Software Cyber Recruiter 7.0: HR/Payroll Guide P a g e | 8
AVAILABLE INTERFACES
Dynamic Links - Deltek Vision - Sage Abra HRMS (FoxPro & SQL) - Sage MIP
File Export - ADP (Payroll Only) - Deltek CostPoint 5.0 - Deltek CostPoint 6.0 - Deltek CostPoint 6.1 - Deltek GCS Premier - Great Plains - HR Office - HR XML - Sage Abra HRMS (FoxPro & SQL)
NAVIGATION OF ADMIN
Configuration for these additional interface pieces are all under Admin > Links > Pre-Defined.
Once in one of the setup pages you will know where you are by the drop-down title at the top of the page.

Visibility Software Cyber Recruiter 7.0: HR/Payroll Guide P a g e | 9
Some HR/Payroll systems require additional codes to be configured as part of Cyber Recruiter. When navigating through the codes section, only the HR/Payroll system which has been enabled will show as valid options for the code setup and the option will appear in alphabetical order in the drop-down list:
Within the codes section for HR/Payroll system, the drop-down list shown will provide the user with quick access to the other codes related to that system.
Visibility Software Cyber Recruiter 7.0: HR/Payroll Guide P a g e | 10
ADP –FILE EXPORT
ADMIN SETUP – ENABLING ADP HR
The process for transferring new hires from Cyber Recruiter to the ADP product involves exporting the information to an ASCII Text file in a CSV format and importing that file into ADP product. Setup for this interface is required under Admin > Links > Pre-Defined > ADP and Admin > Codes > ADP
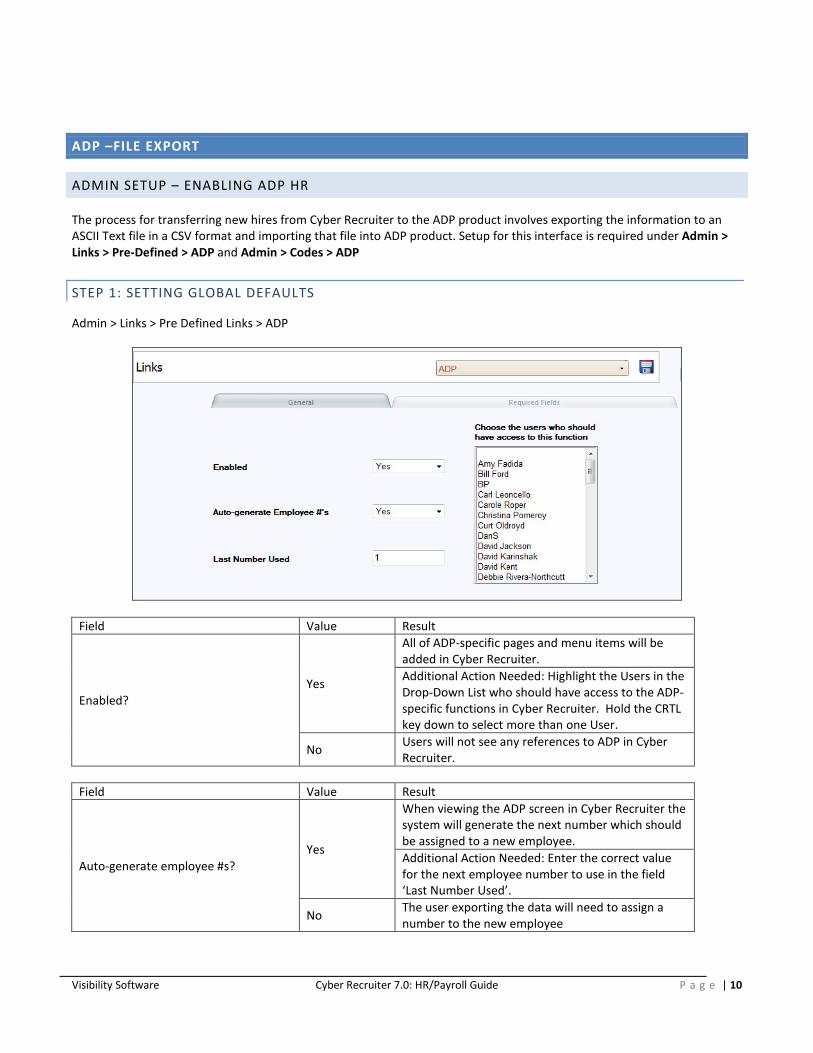
STEP 1: SETTING GLOBAL DEFAULTS
Admin > Links > Pre Defined Links > ADP
Field Value Result
Enabled? Yes
All of ADP-specific pages and menu items will be added in Cyber Recruiter. Additional Action Needed: Highlight the Users in the Drop-Down List who should have access to the ADP-specific functions in Cyber Recruiter. Hold the CRTL key down to select more than one User.
No Users will not see any references to ADP in Cyber Recruiter.
Field Value Result
Auto-generate employee #s? Yes
When viewing the ADP screen in Cyber Recruiter the system will generate the next number which should be assigned to a new employee. Additional Action Needed: Enter the correct value for the next employee number to use in the field ‘Last Number Used’.
No The user exporting the data will need to assign a number to the new employee
Visibility Software Cyber Recruiter 7.0: HR/Payroll Guide P a g e | 11
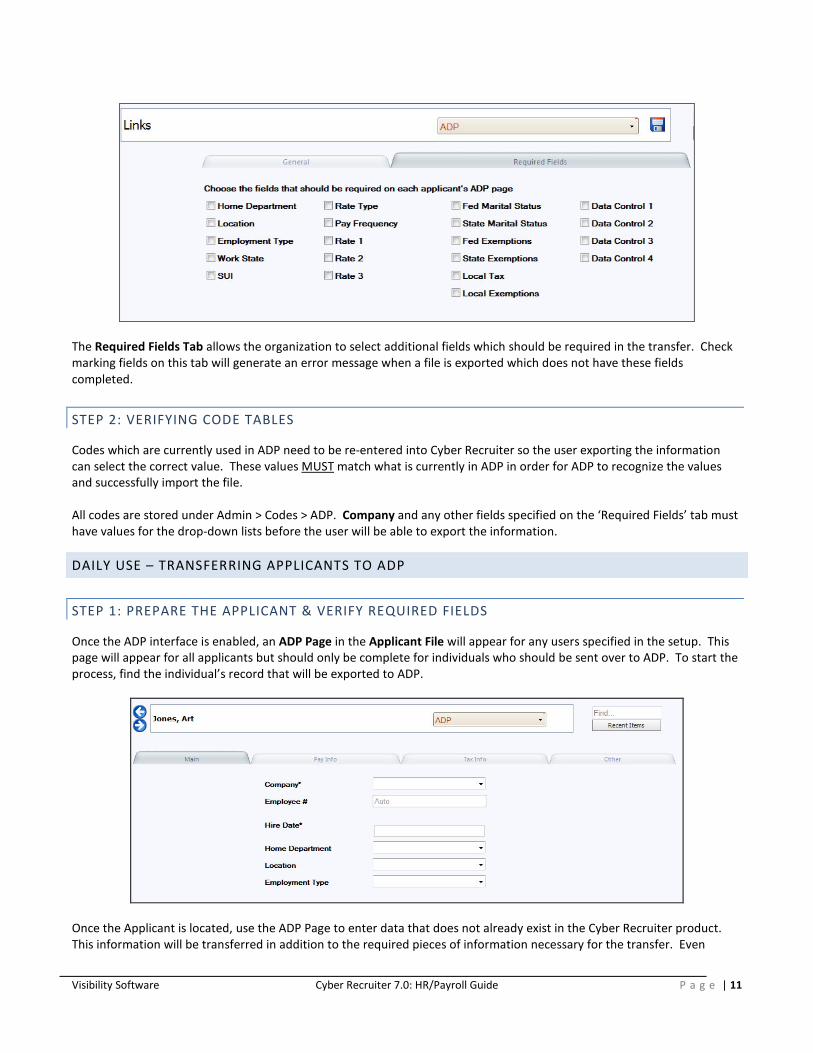
The Required Fields Tab allows the organization to select additional fields which should be required in the transfer. Check marking fields on this tab will generate an error message when a file is exported which does not have these fields completed.
STEP 2: VERIFYING CODE TABLES
Codes which are currently used in ADP need to be re-entered into Cyber Recruiter so the user exporting the information can select the correct value. These values MUST match what is currently in ADP in order for ADP to recognize the values and successfully import the file. All codes are stored under Admin > Codes > ADP. Company and any other fields specified on the ‘Required Fields’ tab must have values for the drop-down lists before the user will be able to export the information.
DAILY USE – TRANSFERRING APPLICANTS TO ADP
STEP 1: PREPARE THE APPLICANT & VERIFY REQUIRED FIELDS
Once the ADP interface is enabled, an ADP Page in the Applicant File will appear for any users specified in the setup. This page will appear for all applicants but should only be complete for individuals who should be sent over to ADP. To start the process, find the individual’s record that will be exported to ADP.
Once the Applicant is located, use the ADP Page to enter data that does not already exist in the Cyber Recruiter product. This information will be transferred in addition to the required pieces of information necessary for the transfer. Even
Visibility Software Cyber Recruiter 7.0: HR/Payroll Guide P a g e | 12
though some of these fields on these tabs are not required it is good practice to fill out as much as possible to have the most complete record. On the Pay Info Tab if a value is not selected for the Rate Type, the default will be ‘None’. On the Tax Info Tab if values are not selected for the following fields, the below information will be the default: Federal Exemption = 0 Federal Marital Status = Single
Employee Status = A Gender = N (Not specified) Pay Group = 1 (Period End 1)
Be sure to save your changes after completing this page.
STEP 2: ADD RECORD TO THE EXPORT FILE
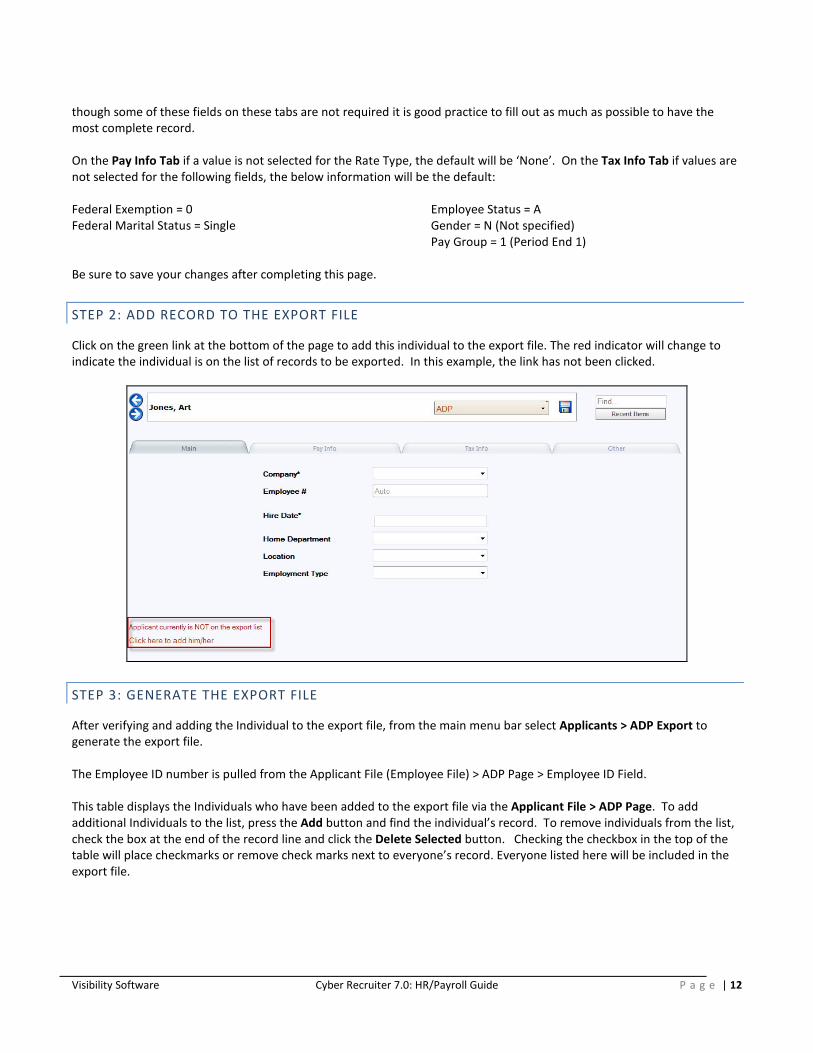
Click on the green link at the bottom of the page to add this individual to the export file. The red indicator will change to indicate the individual is on the list of records to be exported. In this example, the link has not been clicked.
STEP 3: GENERATE THE EXPORT FILE
After verifying and adding the Individual to the export file, from the main menu bar select Applicants > ADP Export to generate the export file. The Employee ID number is pulled from the Applicant File (Employee File) > ADP Page > Employee ID Field. This table displays the Individuals who have been added to the export file via the Applicant File > ADP Page. To add additional Individuals to the list, press the Add button and find the individual’s record. To remove individuals from the list, check the box at the end of the record line and click the Delete Selected button. Checking the checkbox in the top of the table will place checkmarks or remove check marks next to everyone’s record. Everyone listed here will be included in the export file.

Visibility Software Cyber Recruiter 7.0: HR/Payroll Guide P a g e | 13
Click the Export button to create the export file. Enter the name of the file in the Filename field. The Filename field will have the following sequence: PRcccEMP.CSV. The ‘ccc’ is the company assigned code from ADP. For 2-position Company codes, use the ‘cc’ followed by an underscore ‘cc_’. Cyber Recruiter will save the last export file created. However, this file will be overwritten each time the export process is run.
STEP 4: VERIFY RESULTS
The page which appears allows you to verify the results and eventually to save the file generated to a network or disk location.
CORRECTING ERRORS
The error log indicates that some individuals are missing information, the information for those individuals should be entered and another export performed. Click the Print link to print a report as needed and click the individual’s name to enter the file or make the necessary changes. The export process can be run as many times as needed to obtain an error free file.
Visibility Software Cyber Recruiter 7.0: HR/Payroll Guide P a g e | 14
SAVING THE FILE
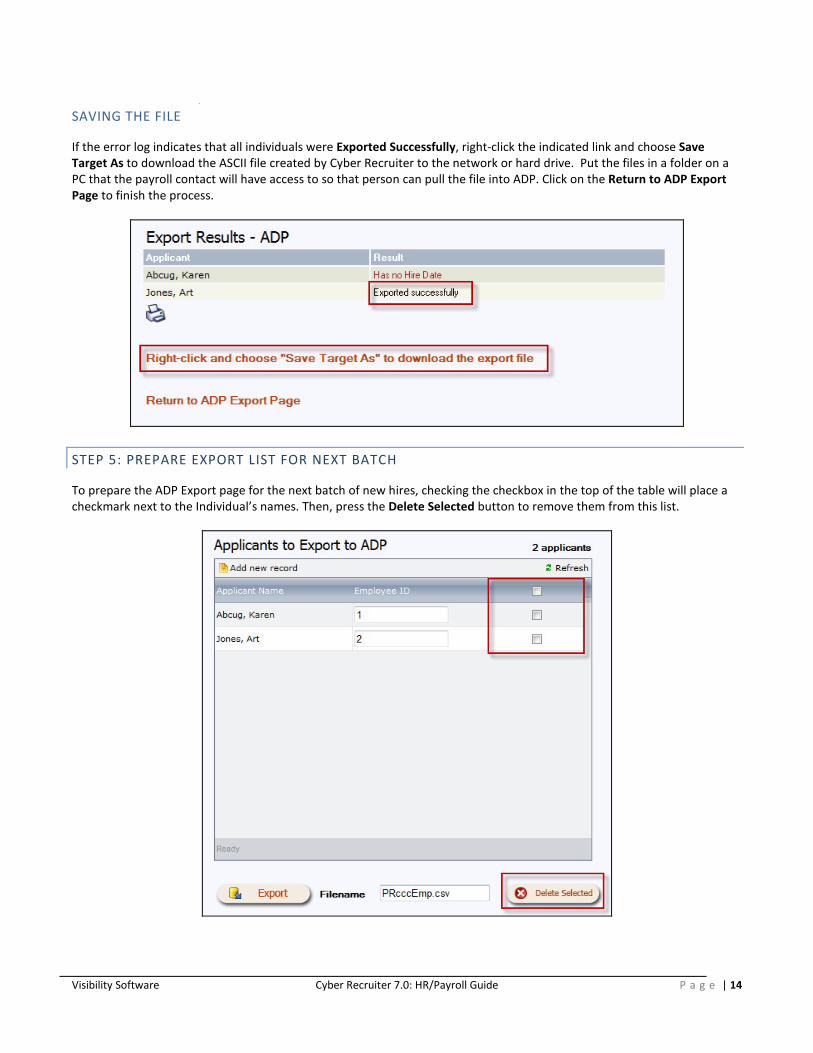
If the error log indicates that all individuals were Exported Successfully, right-click the indicated link and choose Save Target As to download the ASCII file created by Cyber Recruiter to the network or hard drive. Put the files in a folder on a PC that the payroll contact will have access to so that person can pull the file into ADP. Click on the Return to ADP Export Page to finish the process.
STEP 5: PREPARE EXPORT LIST FOR NEXT BATCH
To prepare the ADP Export page for the next batch of new hires, checking the checkbox in the top of the table will place a checkmark next to the Individual’s names. Then, press the Delete Selected button to remove them from this list.

Visibility Software Cyber Recruiter 7.0: HR/Payroll Guide P a g e | 15
STEP 6: IMPORT INTO ADP
Using the tools available in ADP, browse to the file generated by Cyber Recruiter. Using the error log verify no errors occurred and the file was imported successfully.
DATA MAPPING- ADP Field Name/ Description
Length Valid Values Requirements/Conditions
Co Code
2-3
A-Z, 0-9, &, - This is the company code. The code must match the company code in the import file-name, except for 2-position company codes. A 2-position code requires an underscore in the third position of the import filename. The underscore is not allowed in the Co Code field in the import file.
File #
2-6
51-999999
This is the employee number put in Cyber Recruiter.
Social Security Number
9 (without dashes) or 11 (with dashes)
0-9, dash Invalid values1st digit = 8 or 91st three digits = 6661st through 3rd digits = 0004th and 5th digits = 006th through 9th digits = 0000111111111333333333123456789
Must exactly match the value in the database for an existing employee.
Employee Last Name
1-30 A-Z, 0-9, space$ @ [ \ ] ^_ ` { | } ! # % & ' ( ) * + - . / : < = > ?
Employee First Name
1-30 A-Z, 0-9, space$ @ [ \ ] ^_ ` { | } ! # % & ' ( ) * + - . / : < = > ?
Address Line 1
0-20
A-Z, 0-9, space$ @ [ \ ] ^_ ` { | } ! # % & '( ) * + , - . / : ; < = > ? "
Address Line 2
0-20
A-Z, 0-9, space$ @ [ \ ] ^_ ` { | } ! # % & '( ) * + , - . / : ; < = > ? "
City
6 or 7 (alphanu-meric) 5, 9, or 10 (numeric)
Alphanumeric A-Z, 0-9, dash. Format must be ANANAN or ANA-NAN. Numeric 0-9, dash. Format must be: NNNNN,NNNNNNNNN or NNNNN-NNNN
State Postal Code
2 Valid postal abbreviation
ip Code
6 or 7 (alphanu-meric) 5, 9, or 10 (numeric)
AlphanumericA-Z, 0-9, dashFormat must be ANANAN or ANA-NAN. Numeric0-9, dashFormat must be: NNNNN,NNNNNNNNN or NNNNN-NNNN
Home Phone Number
10
A dash is permitted between positions 3 and 4. Paired parentheses are permitted around positions 1-3.
If a Home Area Code value is not in the header record, the length must be 10.
Visibility Software Cyber Recruiter 7.0: HR/Payroll Guide P a g e | 16
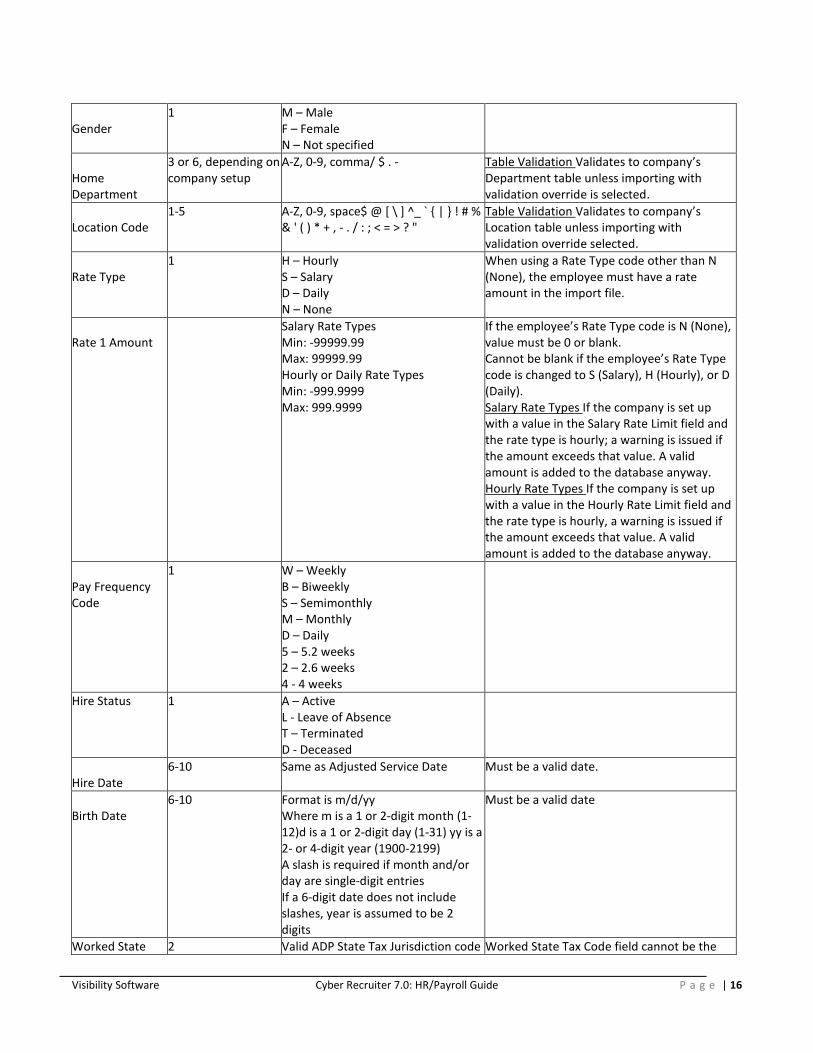
Gender
1 M – Male F – Female N – Not specified
Home Department
3 or 6, depending on company setup
A-Z, 0-9, comma/ $ . - Table Validation Validates to company’s Department table unless importing with validation override is selected.
Location Code
1-5 A-Z, 0-9, space$ @ [ \ ] ^_ ` { | } ! # % & ' ( ) * + , - . / : ; < = > ? "
Table Validation Validates to company’s Location table unless importing with validation override selected.
Rate Type
1 H – Hourly S – Salary D – Daily N – None
When using a Rate Type code other than N (None), the employee must have a rate amount in the import file.
Rate 1 Amount
Salary Rate Types Min: -99999.99 Max: 99999.99 Hourly or Daily Rate Types Min: -999.9999 Max: 999.9999
If the employee’s Rate Type code is N (None), value must be 0 or blank. Cannot be blank if the employee’s Rate Type code is changed to S (Salary), H (Hourly), or D (Daily). Salary Rate Types If the company is set up with a value in the Salary Rate Limit field and the rate type is hourly; a warning is issued if the amount exceeds that value. A valid amount is added to the database anyway. Hourly Rate Types If the company is set up with a value in the Hourly Rate Limit field and the rate type is hourly, a warning is issued if the amount exceeds that value. A valid amount is added to the database anyway.
Pay Frequency Code
1 W – Weekly B – Biweekly S – Semimonthly M – Monthly D – Daily 5 – 5.2 weeks 2 – 2.6 weeks 4 - 4 weeks
Hire Status 1 A – Active L - Leave of Absence T – Terminated D - Deceased
Hire Date
6-10 Same as Adjusted Service Date Must be a valid date.
Birth Date
6-10 Format is m/d/yy Where m is a 1 or 2-digit month (1-12)d is a 1 or 2-digit day (1-31) yy is a 2- or 4-digit year (1900-2199) A slash is required if month and/or day are single-digit entries If a 6-digit date does not include slashes, year is assumed to be 2 digits
Must be a valid date
Worked State 2 Valid ADP State Tax Jurisdiction code Worked State Tax Code field cannot be the

Visibility Software Cyber Recruiter 7.0: HR/Payroll Guide P a g e | 17
Tax Code same as the Lived State Tax Code field. Table Validation The code must be in the company’s State Tax Jurisdiction table.
SUI/SDI Tax Jurisdiction Code
2 Valid ADP SUI/SDI Tax Jurisdiction code
Table Validation The code must be in the company’s SUI/SDI Tax Jurisdiction table.
Federal Marital Status
1 M – Married S – Single
State Marital Status
1 M - Married (one income) S – Single T - Single head of household R - Single head of household and qualifying dependent Y - Married head of household (two incomes) N - Married head of household (one income) X - Married (two incomes)
Must follow either a Worked State Tax Code or a Lived State Tax Code field. Can also follow a State Tax Code field (and entry) if the company uses Multi-Jurisdiction.
Federal Exemptions
1-2 0-99
State Exemptions 1-2 0-99 0, 1, 2 - If state is Louisiana
Must follow either a Worked State Tax Code or a Lived State Tax Code field. Can also follow a State Tax Code field (and entry) if the company uses Multi-Jurisdiction. Entry is not allowed for non-taxing states.
Local Tax Code 4 Positions 1, 2, 3: 001-255, 301-799 excluding 325, 400, 425, 500, 525, 600, 625, 700, and 725 Position 4: A-Z, 0-9
Table Validation The code must be in the company’s Local Tax Jurisdiction table.
Local Exemptions 1-2 Min: 0 Max: 99
Must follow either a Worked Local Tax Code or a Lived Local Tax Code field. Can also follow a Local Tax Code field (and entry) if the company uses Multi-Jurisdiction. Entry is not allowed for non-taxing localities.
Data Control Position 1
1 A-Z, 0-9, space$ @ [ \ ] ^_ ` { | } ! # % & '( ) * + , - . / : ; < = > ? "
Delete Use the tilde character (~) to delete a single data control position.
Data Control Position 2
1 Same as Data Control Position 1
Same as Data Control Position 1.
Data Control Position 3
1 Same as Data Control Position 1
Same as Data Control Position 1.
Data Control Position 4
1
Same as Data Control Position 1
Same as Data Control Position 1.
EEO Ethnic Code 1 1 – White 2 – Black 3 – Hispanic only 4 – Asian/Pacific Islander 5 – Native American
Employee Type 1-4 A-Z, 0-9, space$ @ [ \ ] ^_ ` { | } ! # % & '( ) * + , - . / : ; < = > ? "
Table Validation Validates to the company’s Employee Type table unless importing with validation override selected.

Visibility Software Cyber Recruiter 7.0: HR/Payroll Guide P a g e | 18
ASCENTIS HR OFFICE – FILE EXPORT
ADMIN SETUP – ENABLING HR OFFICE HR SYSTEM
The process for transferring new hires from Cyber Recruiter to the HR Office product involves exporting the information to an XML file and importing that file into HR Office. Cyber Recruiter automates this task by creating the file from within Cyber Recruiter itself. It requires no extra software or work outside of the HR Office pages within Cyber Recruiter. HR Office enabled in Admin > Links > Pre-Defined > HR Office
STEP 1: SETTING GLOBAL DEFAULTS
Admin > Links > Pre-Defined Links > HR Office
Question Response Result
Enabled?
Yes All of HR Office-specific pages and menu items will be added in Cyber Recruiter. Additional Action Needed: Highlight the Users in the Drop-Down List who should have access to the HR Office-specific functions in Cyber Recruiter. Hold the CRTL key down to select more than one User.
No Users will not see any references to HR Office in Cyber Recruiter.
STEP 2: VERIFYING CODE TABLES To accomplish this step, the Administrator needs verify the HR Office code tables are up-to-date in Admin > Codes > HR Office. The six (6) code tables: Companies, Employment Status, Location, Division, Department, & Veteran Status. Only the Companies code table is required, but they are all recommended.
DAILY USE – TRANSFERRING APPLICANTS TO HR OFFICE
STEP 1: PREPARE THE APPLICANT & VERIFY REQUIRED FIELDS
Once the HR Office setup is enabled, a HR Office Page in the Applicant File will default. Find the Applicant to export - Applicants > Find Applicant. Once the Applicant is located, use the HR Office Page to enter data that does not already exist in the Cyber Recruiter product.

Visibility Software Cyber Recruiter 7.0: HR/Payroll Guide P a g e | 19
There are only two (2) fields required on this page: Company and Country. However, Employee #, Hire Date, and Employment Status, are typically required for any HR product. Fill out the fields on this page as needed and click the Save Changes button when finished. If the Company field is not filled in, Users will not be able to Save Changes
STEP 2: ADD RECORD TO THE EXPORT FILE
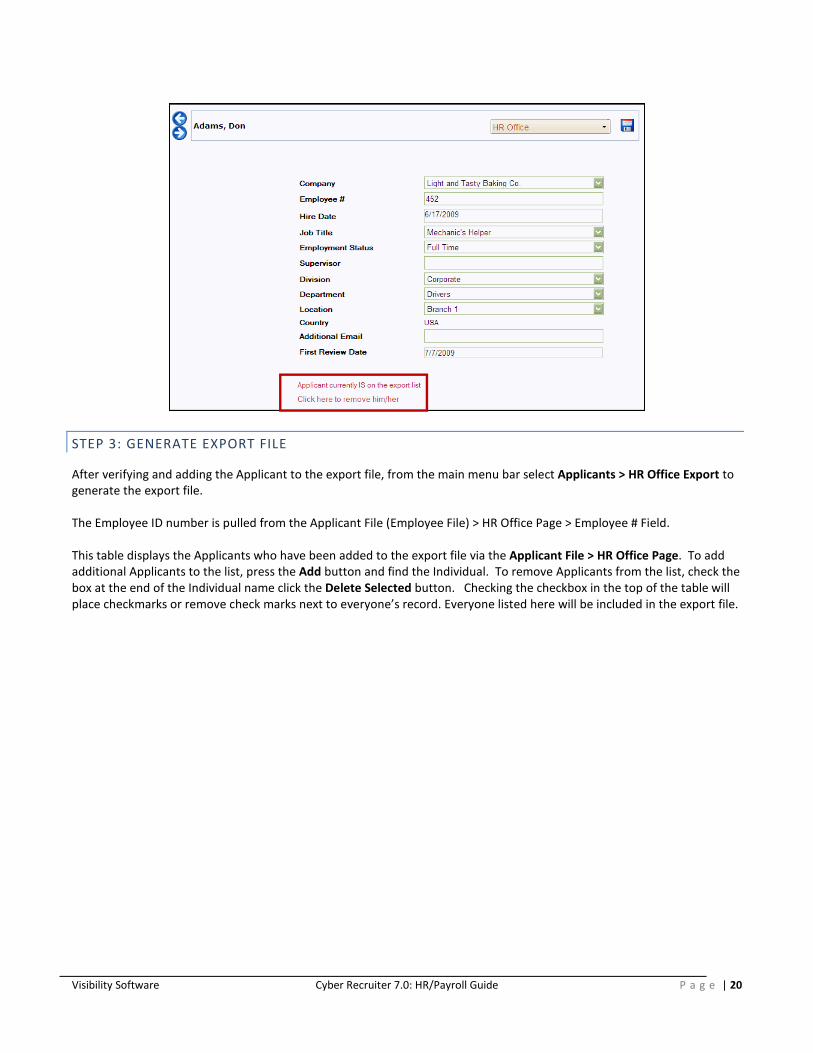
Click on the link at the bottom of the page to add this Applicant to the export file. The red indicator will change to indicate whether the applicant is on the list of applicants to be exported. In this example, the link has been clicked. NOTE: Once the Applicant is on the export list, if the Applicant does not have the read-only Country field filled in, a warning message at the bottom of the page. The Country field pulls from the Applicant File > Demographics Page. Thus, Users will need to go back to the Demographics Page to fill this field in before attempting the export.
Visibility Software Cyber Recruiter 7.0: HR/Payroll Guide P a g e | 20
STEP 3: GENERATE EXPORT FILE
After verifying and adding the Applicant to the export file, from the main menu bar select Applicants > HR Office Export to generate the export file. The Employee ID number is pulled from the Applicant File (Employee File) > HR Office Page > Employee # Field. This table displays the Applicants who have been added to the export file via the Applicant File > HR Office Page. To add additional Applicants to the list, press the Add button and find the Individual. To remove Applicants from the list, check the box at the end of the Individual name click the Delete Selected button. Checking the checkbox in the top of the table will place checkmarks or remove check marks next to everyone’s record. Everyone listed here will be included in the export file.
Visibility Software Cyber Recruiter 7.0: HR/Payroll Guide P a g e | 21
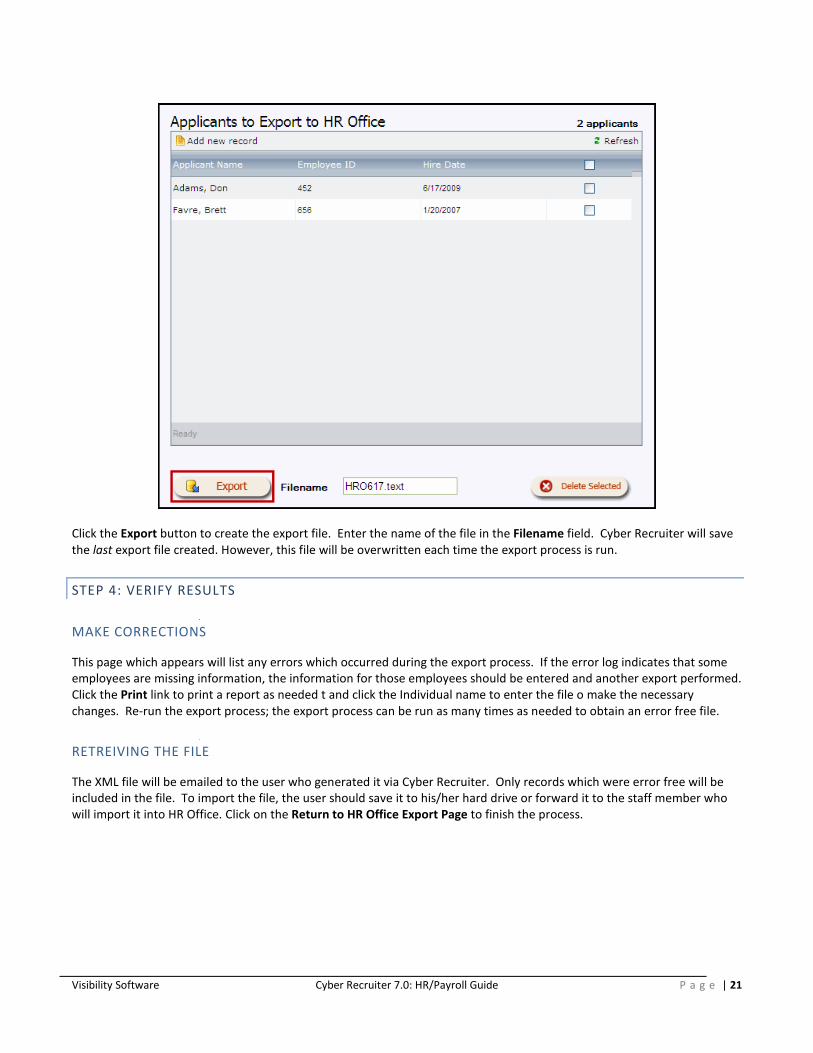
Click the Export button to create the export file. Enter the name of the file in the Filename field. Cyber Recruiter will save the last export file created. However, this file will be overwritten each time the export process is run.
STEP 4: VERIFY RESULTS
MAKE CORRECTIONS
This page which appears will list any errors which occurred during the export process. If the error log indicates that some employees are missing information, the information for those employees should be entered and another export performed. Click the Print link to print a report as needed t and click the Individual name to enter the file o make the necessary changes. Re-run the export process; the export process can be run as many times as needed to obtain an error free file.
RETREIVING THE FILE
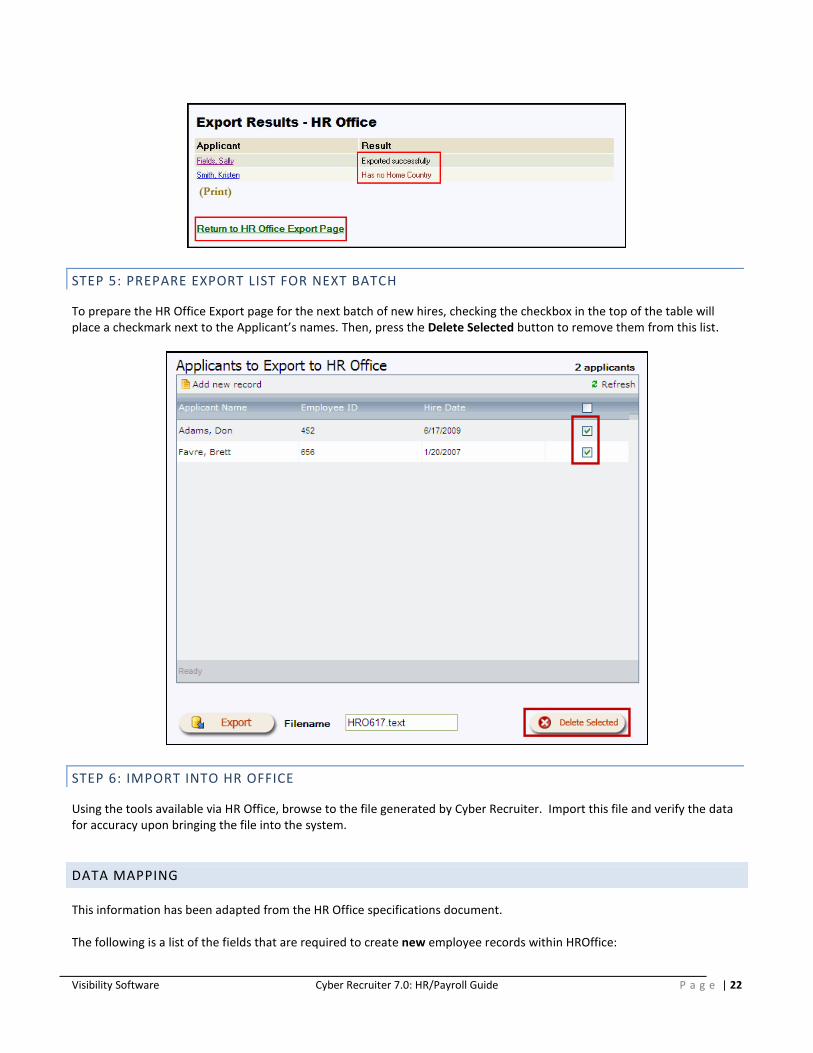
The XML file will be emailed to the user who generated it via Cyber Recruiter. Only records which were error free will be included in the file. To import the file, the user should save it to his/her hard drive or forward it to the staff member who will import it into HR Office. Click on the Return to HR Office Export Page to finish the process.
Visibility Software Cyber Recruiter 7.0: HR/Payroll Guide P a g e | 22
STEP 5: PREPARE EXPORT LIST FOR NEXT BATCH
To prepare the HR Office Export page for the next batch of new hires, checking the checkbox in the top of the table will place a checkmark next to the Applicant’s names. Then, press the Delete Selected button to remove them from this list.
STEP 6: IMPORT INTO HR OFFICE
Using the tools available via HR Office, browse to the file generated by Cyber Recruiter. Import this file and verify the data for accuracy upon bringing the file into the system.
DATA MAPPING
This information has been adapted from the HR Office specifications document. The following is a list of the fields that are required to create new employee records within HROffice:

Visibility Software Cyber Recruiter 7.0: HR/Payroll Guide P a g e | 23
- Social Security or Canadian Social Insurance Number must be numeric and include 9 numbers. If dashes are entered the program will recognize it as a SSN or SIN number. (123-123-123 for a SIN or 123-12-1234 for a SSN). If there are no dashes the number will be treated as an Other ID.
- Full Alternative to Last Name and First Name. Full Name combines the employee’s full name into one field in the form of "Last, First, Middle" or "First, Middle, Last."
- Last Employee’s last name with a maximum of 40 letters. - First Employee’s first name with a maximum of 40 letters. - Hire Date Employee’s hire date in Month-Day-Year (4-14-01) or Day-Month-Year (14-4-01) format.
PERSONAL INFORMATION FIELDS
The following Personal Information fields can be imported using the QuickStart Data Import Utility. - Social Security or Canadian Social Insurance Number must be numeric and can include up to 25 numbers. The
dashes will be filled in automatically for you. This can be in either a formatted form (999-99-9999, 999-999-999), or an unformatted form (999999999) depending on the choice you make.
- Full Name Alternative to Last Name and First Name. Full Name combines the employee’s full name into one field in the form of "Last, First, Middle" or "First, Middle, Last." Maximum of 120 characters.
- Employee’s Last Name Maximum of 40 letters. - Employee’s First Name Maximum of 40 letters. - Employee’s Middle Name or Initial Maximum of 40 letters. - Nickname Employee’s nickname with up to a maximum of 40 letters. - Previous Name Employee’s previous name with up to a maximum of 40 letters. - Birth Date Employee’s date of birth in Month-Day-Year (4-14-01) or Day-Month-Year (14-4-01) format. - Employee ID Employee’s identifier with a maximum of 15 characters. If used, this identifier must be unique for
each employee. This can be all numbers, all letters, or a combination of letters and numbers. - Address Employee’s home address with a maximum of 40 characters. - Address - Line 2 Optional second line for employee’s home address with a maximum of 40 characters. - City Employee’s home address city name, with a maximum of 40 letters. - State or Province Employee’s home address state or Province abbreviation, with a standard two-letter
abbreviation. You also have the option of setting a default value for any empty field in this column. For example, if you set the default to WA, the blank field would be imported as WA for any employee that does not have a state designated in the address.
- Zip or Postal Code Employee’s home address zip or postal code, with five to nine digit zip code format (93333 or 93333-1234; or for Canadian mail codes A1B C2D).
- Country Country in which employee’s home address is located. - Sex Employee’s sex. You will need to translate your information to match the information used in HROffice. (F
converts to Female, M converts to Male.) - Marital Status Employee’s current marital status, such as Single, Married, Divorced, etc. You will need to
translate your information to match the information used in HROffice. (M may convert to Married, S may convert to Single, etc.)
- Home Phone Employee’s home phone number. - Work Phone Employee’s work phone number, which may include up to a five-digit extension number. - Email Address Employee’s Email address with a maximum of 80 characters. - Smoker Is this employee a smoker? Use Yes or No to answer this question. This may be used in calculating any
benefit premiums that have different rates for smokers. You will need to translate your information to match the information used in HROffice if you use Y or N.
- Employee Personal Comments This field is for any general comments with a limit of 16,000 characters, and will be imported to the Comments field.
JOB INFORMATION FIELDS
Visibility Software Cyber Recruiter 7.0: HR/Payroll Guide P a g e | 24
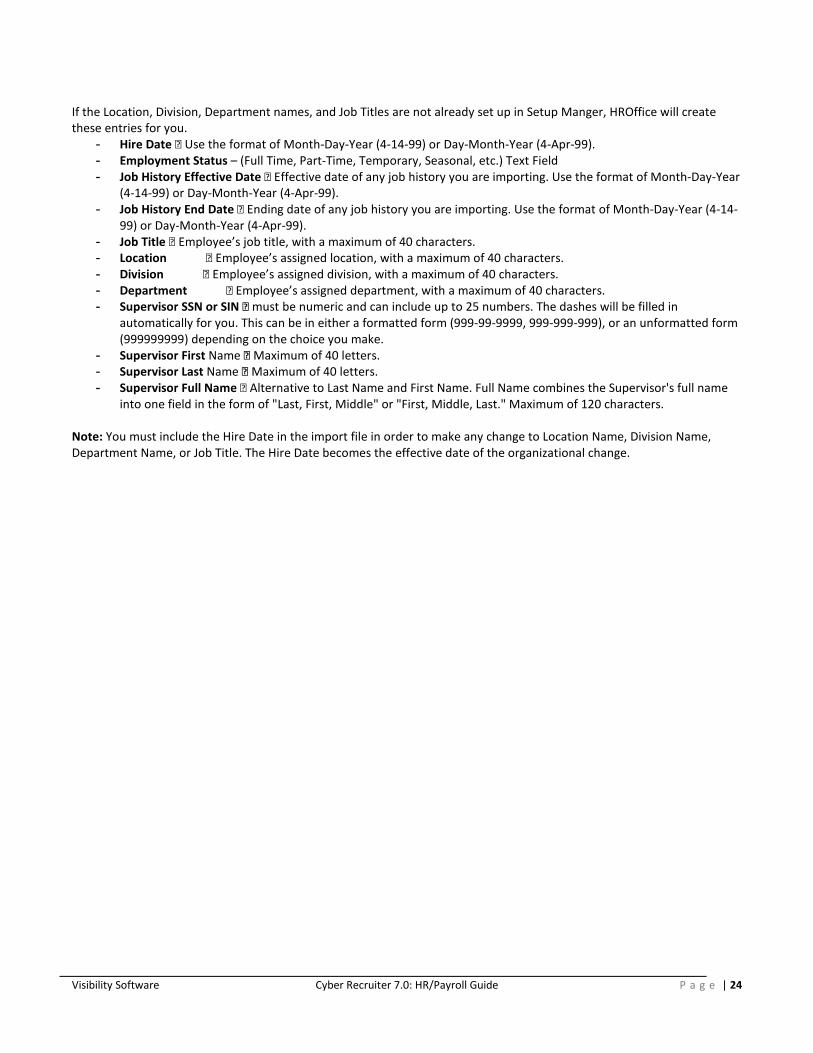
If the Location, Division, Department names, and Job Titles are not already set up in Setup Manger, HROffice will create these entries for you.
- Hire Date Use the format of Month-Day-Year (4-14-99) or Day-Month-Year (4-Apr-99). - Employment Status – (Full Time, Part-Time, Temporary, Seasonal, etc.) Text Field - Job History Effective Date Effective date of any job history you are importing. Use the format of Month-Day-Year
(4-14-99) or Day-Month-Year (4-Apr-99). - Job History End Date Ending date of any job history you are importing. Use the format of Month-Day-Year (4-14-
99) or Day-Month-Year (4-Apr-99). - Job Title Employee’s job title, with a maximum of 40 characters. - Location Name Employee’s assigned location, with a maximum of 40 characters. - Division Name Employee’s assigned division, with a maximum of 40 characters. - Department Name Employee’s assigned department, with a maximum of 40 characters. - Supervisor SSN or SIN must be numeric and can include up to 25 numbers. The dashes will be filled in
automatically for you. This can be in either a formatted form (999-99-9999, 999-999-999), or an unformatted form (999999999) depending on the choice you make.
- Supervisor First Name Maximum of 40 letters. - Supervisor Last Name Maximum of 40 letters. - Supervisor Full Name Alternative to Last Name and First Name. Full Name combines the Supervisor's full name
into one field in the form of "Last, First, Middle" or "First, Middle, Last." Maximum of 120 characters. Note: You must include the Hire Date in the import file in order to make any change to Location Name, Division Name, Department Name, or Job Title. The Hire Date becomes the effective date of the organizational change.

Visibility Software Cyber Recruiter 7.0: HR/Payroll Guide P a g e | 25
DELTEK COSTPOINT –FILE EXPORT
ADMIN SETUP – ENABLING THE COSTPOINT INTERFACE
The process for transferring new hires from Cyber Recruiter to the Costpoint product involves exporting the information to an ASCII Text file in a CSV format and importing that file into Costpoint product via the Employee Preprocessor. If you do not have the Employee Preprocessor as part of your package with Deltek, this interface requires additional custom programming to allow for the file to be read by Costpoint. Setup for this interface is required under Admin > Links > Pre-Defined > Deltek Costpoint and Admin > Codes > Costpoint.
STEP 1: SETTING GLOBAL DEFAULTS
Admin > Links > Pre Defined Links > Deltek Costpoint
Question Response Result
Enable Costpoint Link?
Yes All of Costpoint-specific pages and menu items will be added in Cyber Recruiter. Additional Action Needed: Highlight Users in the Drop-Down List who should have access to the Costpoint-specific functions in Cyber Recruiter. Hold the CRTL key down to select more than one.
No Users will not see any references to Costpoint in Cyber Recruiter.
STEP 2: BUILDING CODE TABLES Once you have enabled the interface a menu item under Admin > Codes will be accessible. Move to this location to enter the necessary codes to complete the setup and to use the interface on a daily basis. All code tables must be populated with

Visibility Software Cyber Recruiter 7.0: HR/Payroll Guide P a g e | 26
valid codes from the Deltek Costpoint system (they must match exactly). If your codes can be placed into a comma delimited file they can be imported into the system via Admin > Processes > Import Code Table. See appendix A for information on this option. To manually enter codes, go to Admin > Codes > Costpoint Set Prior to Completing “Defaults” in the setup page:
- Employee Class - Leave Cycle - Pay Type
- Timesheet Cycle - Worker’s Comp
Set Prior to Using the Interface on a Daily Basis:
- Companies - GLC - Home Department - Job Titles - Labor Location
- Labor Group - Locator - Reasons - Security Org ID - Visa Type
Most of the codes in the setup section are independent of each other. However, three (3) codes build upon each other. It is best to populate these codes in the following order:
1.) Workers Comp 2.) Job Codes / Job Title 3.) GLC Code (Labor Category)
STEP 3: SETTING DATA OPTIONS
Move back to Admin > Links > Pre-Defined Links > Deltek Costpoint to complete the setup. The Costpoint setup with Cyber Recruiter allows for the passing of HR information. There are system settings, defaults and code tables to be set.
Visibility Software Cyber Recruiter 7.0: HR/Payroll Guide P a g e | 27
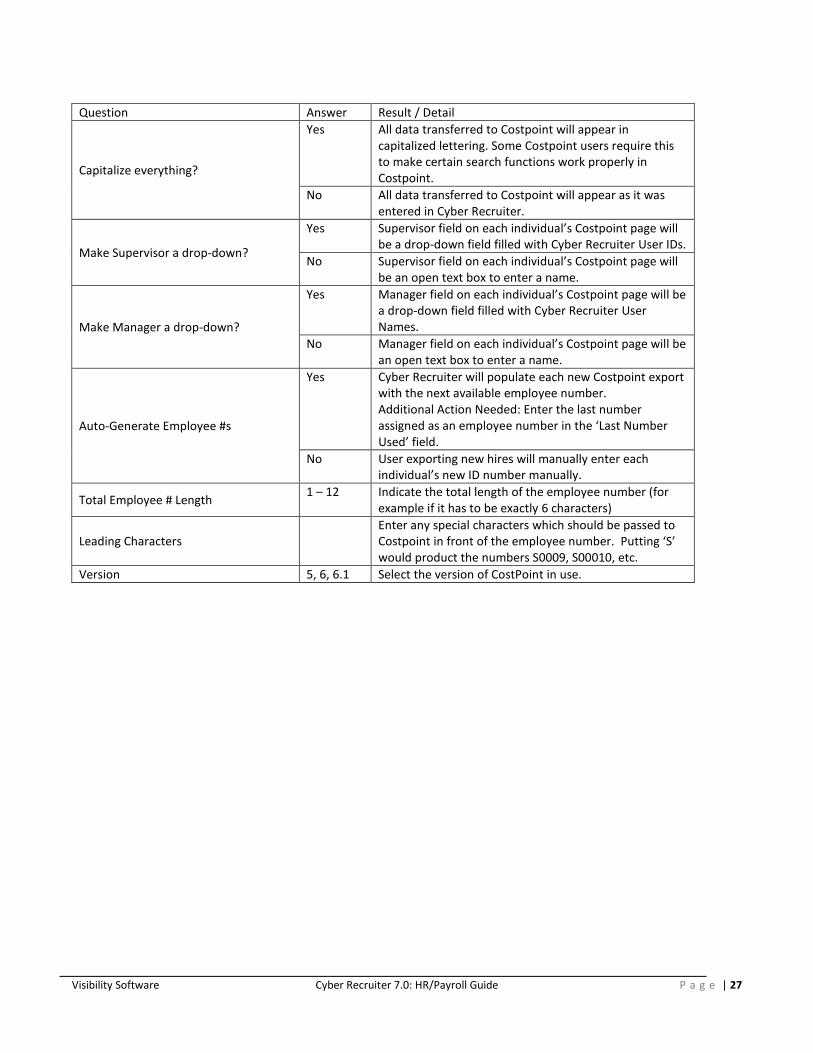
Question Answer Result / Detail
Capitalize everything?
Yes All data transferred to Costpoint will appear in capitalized lettering. Some Costpoint users require this to make certain search functions work properly in Costpoint.
No All data transferred to Costpoint will appear as it was entered in Cyber Recruiter.
Make Supervisor a drop-down?
Yes Supervisor field on each individual’s Costpoint page will be a drop-down field filled with Cyber Recruiter User IDs.
No Supervisor field on each individual’s Costpoint page will be an open text box to enter a name.
Make Manager a drop-down?
Yes Manager field on each individual’s Costpoint page will be a drop-down field filled with Cyber Recruiter User Names.
No Manager field on each individual’s Costpoint page will be an open text box to enter a name.
Auto-Generate Employee #s
Yes Cyber Recruiter will populate each new Costpoint export with the next available employee number. Additional Action Needed: Enter the last number assigned as an employee number in the ‘Last Number Used’ field.
No User exporting new hires will manually enter each individual’s new ID number manually.
Total Employee # Length 1 – 12 Indicate the total length of the employee number (for
example if it has to be exactly 6 characters)
Leading Characters Enter any special characters which should be passed to
Costpoint in front of the employee number. Putting ‘S’ would product the numbers S0009, S00010, etc.
Version 5, 6, 6.1 Select the version of CostPoint in use.

Visibility Software Cyber Recruiter 7.0: HR/Payroll Guide P a g e | 28
STEP 4: SETTING COSTPOINT DEFAULTS Enter field defaults as Users should see them when transferring Employees to Costpoint. The default value always overrides whatever is stored for any particular Individual. If no default is entered, it can be entered on the Applicant File > Costpoint Page.
STEP 5: DEFINE REQUIRED FIELDS
The Required Fields Tab allows the Administrator to indicate which fields are required during the completion of the export process to Costpoint. If a field is checked on this page and a particular individual does not have that field populated when an export is run, that particular individual will not be exported and an error will appear on the export error log indicating that the person was missing a piece of required information.

Visibility Software Cyber Recruiter 7.0: HR/Payroll Guide P a g e | 29
DAILY USE – TRANSFERRING APPLICANTS TO COSTPOINT
STEP 1: PREPARE THE INDIVIDUAL & VERIFY REQUIRED FIELDS
Once the Costpoint interface is enabled a Costpoint Page in the Applicant File will appear for any users specified in the setup. This page will appear for all applicants but should only be complete for individuals who should be sent over to Costpoint. To start the process, find the individual’s record that will be exported to Costpoint.
STEP 2: COMPLETE COSTPOINT PAGE
This page is necessary to transfer Individuals into Costpoint because it contains information that doesn’t already exist in Cyber Recruiter. The data from this page in addition to standard data that Cyber Recruiter stores (name, address, phone number, etc…) are transferred for new hires. Before transferring an individual from Cyber Recruiter to Costpoint, ensure this page is complete and contains all the required information for that Individual.
Once the Individual is located, there are six (6) fields required for the transfer to Costpoint, three (3) are on the Demographics Page and three (3) are on the Costpoint Page. If you are using this page in conjunction with the ‘New Hire Process’ you can activated the Demographics page to appear before this page to ensure total accuracy of information. Demographics Page: First Name, Last Name, Country (defaults to US if blank) Costpoint Page: Employee ID, Hire Date, Pay Rate Main Tab – Basic information about the Individual such as pay and labor information. If the Administrator set up this page to assign Employee ID automatically, leave the field blank on this screen. Timesheet Tab –Information regarding this Individual’s timesheet. Secondary Tab – Information regarding this individual’s employment with the organization. All User-Defined codes must be set in Admin > Codes prior to being used on this page. All fields set as required fields must be completed on this screen prior to export or the file will generate an error and this individual’s file will not be included in the export to Costpoint. Defaults will occur as the Administrator setup them to apply.

Visibility Software Cyber Recruiter 7.0: HR/Payroll Guide P a g e | 30
STEP 3: ADD RECORD TO THE EXPORT FILE
Click on the green link at the bottom of the page to add this individual to the export file. The red indicator will change to indicate whether the individual is on the list of people to be exported. In this example, the link has not been clicked yet.
STEP 4: GENERATE EXPORT FILE
After verifying and adding the individual to the export file, from the main menu bar select Applicants > Costpoint Export to generate the export file. If the Cyber Recruiter Administrator setup to automatically generate the Employee ID number, when the individual is added to the list, he/she will be assigned an ID number. This ID number will also show on the Applicant File (Employee File) > Costpoint Page. If the Employee ID number is not set up to automatically generate, the number at this point will pull from the Applicant File (Employee File) > Costpoint Page > Employee ID Field. The table that displays lists the individuals who have been flagged to be added to the export file via the Applicant File > Costpoint Page. To add additional records to the list, press the Add button and find the Individual. To remove records from the list, check the box at the end of the line and then click the Delete Selected button. Checking the checkbox in the top of the table will place checkmarks or remove check marks next to everyone’s record. Checkmark everyone who should be exported prior to pressing export.

Visibility Software Cyber Recruiter 7.0: HR/Payroll Guide P a g e | 31
Enter the name of the file in the Filename field and click the Export button to create the export file. Cyber Recruiter will save the last export file created. However, this file will be overwritten each time the export process is run.
STEP 5: VERIFY RESULTS
The page which appears allows you to verify the results and eventually to save the file generated to a network or disk location.
CORRECTING ERRORS
If the error log indicates that some individuals are missing information, the information for those records should be entered and another export performed. Click the Print link to print a report as needed t and click the Individual name to enter the file o make the necessary changes. Re-run the export process; the export process can be run as many times as needed to obtain an error free file.

Visibility Software Cyber Recruiter 7.0: HR/Payroll Guide P a g e | 32
SAVING THE FILE
If the error log indicates that all individuals were Exported Successfully, right-click the indicated link and choose Save Target As to download the ASCII text file created to the network or hard drive. Put the files in a folder on a PC that the Costpoint contact will have access to so that person can pull the file into Costpoint using the Employee Preprocessor. Click on the Return to Costpoint Export Page to finish the process.
STEP 6: PREPARE EXPORT LIST FOR NEXT BATCH
To prepare the Costpoint Export page for the next batch of new hires, checking the checkbox in the top of the table will link to place a checkmark next to the Applicant’s names. Then, press the Delete Selected button to remove them from this list.
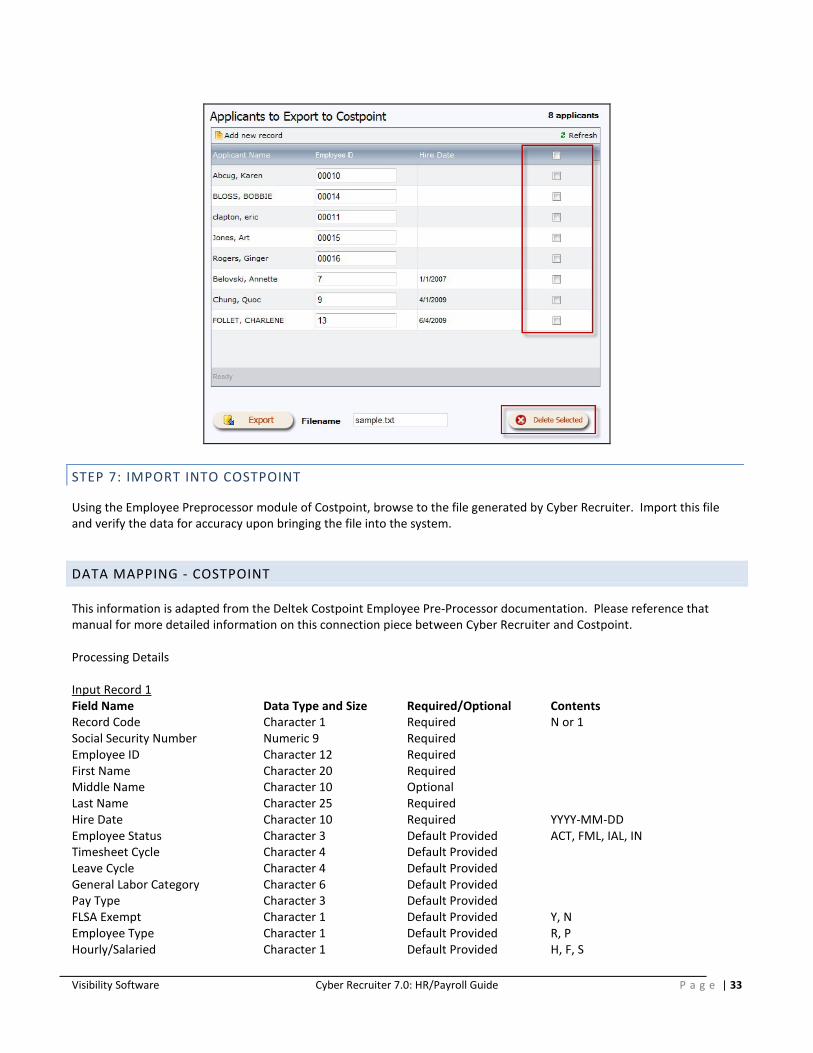
Visibility Software Cyber Recruiter 7.0: HR/Payroll Guide P a g e | 33
STEP 7: IMPORT INTO COSTPOINT
Using the Employee Preprocessor module of Costpoint, browse to the file generated by Cyber Recruiter. Import this file and verify the data for accuracy upon bringing the file into the system.
DATA MAPPING - COSTPOINT
This information is adapted from the Deltek Costpoint Employee Pre-Processor documentation. Please reference that manual for more detailed information on this connection piece between Cyber Recruiter and Costpoint. Processing Details Input Record 1 Field Name Data Type and Size Required/Optional Contents Record Code Character 1 Required N or 1 Social Security Number Numeric 9 Required Employee ID Character 12 Required First Name Character 20 Required Middle Name Character 10 Optional Last Name Character 25 Required Hire Date Character 10 Required YYYY-MM-DD Employee Status Character 3 Default Provided ACT, FML, IAL, IN Timesheet Cycle Character 4 Default Provided Leave Cycle Character 4 Default Provided General Labor Category Character 6 Default Provided Pay Type Character 3 Default Provided FLSA Exempt Character 1 Default Provided Y, N Employee Type Character 1 Default Provided R, P Hourly/Salaried Character 1 Default Provided H, F, S

Visibility Software Cyber Recruiter 7.0: HR/Payroll Guide P a g e | 34
Home Organization Character 20 Default Provided Home Reference 1 Character 20 Optional Home Reference 2 Character 20 Optional Default OT State Character 2 Default Provided Worker's Comp Character 6 Default Provided Effective Date Character 10 Required YYYY-MM-DD Rate Type Character 1 Default Provided A, H, S Rate Numeric 14 Required Account Character 15 Optional Organization Character 20 Optional Project Character 30 Optional Reference 1 Character 20 Optional Reference 2 Character 20 Optional Labor Location Character 6 Optional Address Line 1 Character 30 Optional Address Line 2 Character 30 Optional Address Line 3 Character 30 Optional City Character 25 Optional State Character 15 Optional Country Character 8 Optional Postal Code Character 10 Optional Home Telephone Character 20 Optional Emergency Telephone Character 20 Optional Locator Character 6 Optional Date Of Birth Character 10 Optional YYYY-MM-DD Marital Status Character 1 Optional Gender Character 1 Optional M, F Employee Class Character 12 Optional Union Employee Flag Character 1 Required Y, N Input Record 2 Field Name Data Type and Size Required/Optional Contents Record Code Character 1 Required 2 Employee ID Character 12 Required Company Character 10 Default Provided Adjusted Hire Date Character 10 Optional YYYY-MM-DD Termination Date Character 10 Optional YYYY-MM-DD Supervisor Name Character 25 Optional Preferred Name Character 10 Optional Name Prefix Character 6 Optional Name Suffix Character 6 Optional Prior Name Character 25 Optional Eligible for Auto Pay Character 1 Default Provided Y, N Email ID Character 20 Optional PR Service Employee ID Character 12 Optional Job Title Description Character 30 Optional Estimated Hours Numeric 10 Optional Labor Group Character 3 Optional Reason Character 30 Optional Security Organization ID Character 20 Default Provided Work Hours in Year Character 4 Default Provided Visa Type Character 10 Optional Check Costpoint for values Comments Character 254 Default Provided
Visibility Software Cyber Recruiter 7.0: HR/Payroll Guide P a g e | 35
DELTEK GCS PREMIER –FILE EXPORT
ADMIN SETUP – ENABLING GCS PREMIER HR
The process for transferring new hires from Cyber Recruiter to the GCS Premier product involves exporting the information to an ASCII Text file and importing that file into GCS Premier via its Employee Preprocessor utility. Cyber Recruiter automates this task by creating the file from within Cyber Recruiter itself.
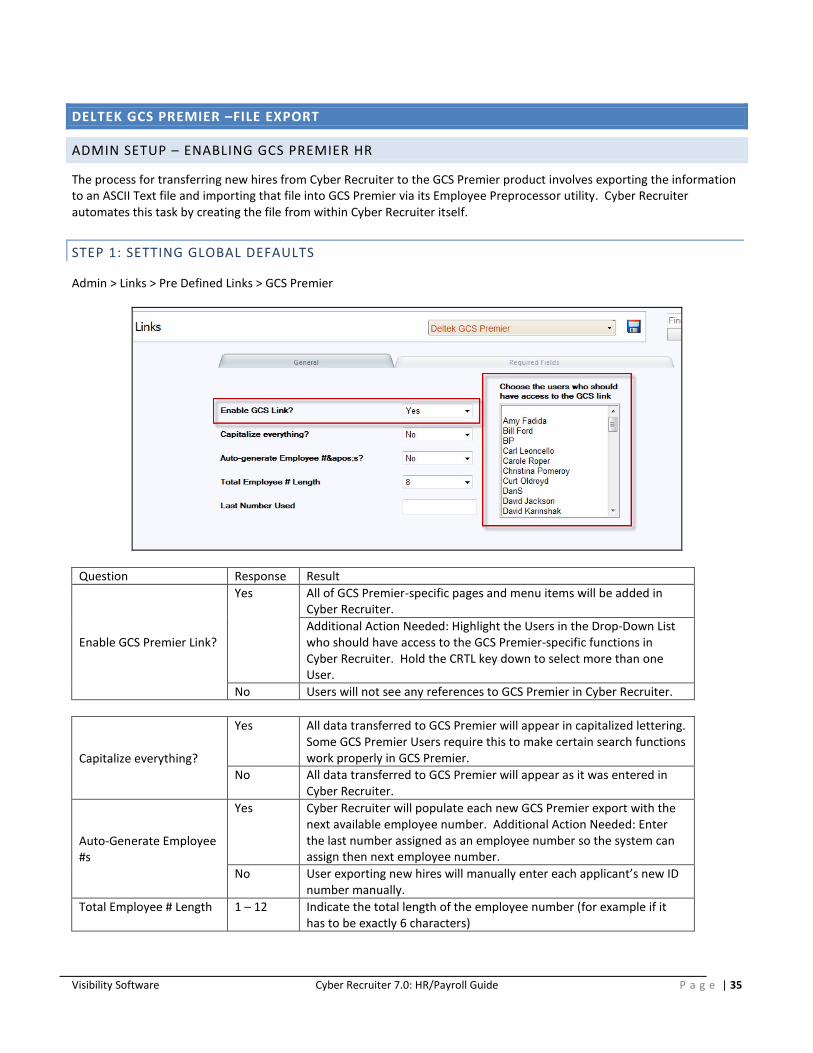
STEP 1: SETTING GLOBAL DEFAULTS
Admin > Links > Pre Defined Links > GCS Premier
Question Response Result
Enable GCS Premier Link?
Yes All of GCS Premier-specific pages and menu items will be added in Cyber Recruiter. Additional Action Needed: Highlight the Users in the Drop-Down List who should have access to the GCS Premier-specific functions in Cyber Recruiter. Hold the CRTL key down to select more than one User.
No Users will not see any references to GCS Premier in Cyber Recruiter.
Capitalize everything?
Yes All data transferred to GCS Premier will appear in capitalized lettering. Some GCS Premier Users require this to make certain search functions work properly in GCS Premier.
No All data transferred to GCS Premier will appear as it was entered in Cyber Recruiter.
Auto-Generate Employee #s
Yes Cyber Recruiter will populate each new GCS Premier export with the next available employee number. Additional Action Needed: Enter the last number assigned as an employee number so the system can assign then next employee number.
No User exporting new hires will manually enter each applicant’s new ID number manually.
Total Employee # Length 1 – 12 Indicate the total length of the employee number (for example if it has to be exactly 6 characters)

Visibility Software Cyber Recruiter 7.0: HR/Payroll Guide P a g e | 36
STEP 2: VERIFYING CODE TABLES
To accomplish this step, the Administrator needs verify the GCS Premier code tables are up-to-date in Admin > Codes > GCS Premier as some of the default depend on this these code table.
- Division - Department - OBS Number - Employee Type - Rate Type
- Pay Frequency - Labor Category - Fed Filing Status - State Filing Status
All code tables must be populated with valid codes from the GCS Premier system. Alternatively, codes can be imported from an ASCII text file of codes directly into Cyber Recruiter’s code tables under Admin > Processes > Import Code Table. See the Cyber Recruiter Admin Guide for more information on this process.
STEP 3: DEFINE REQUIRED FIELDS
The Required Fields Tab allows the Administrator to indicate which fields are required during the completion of the export process to GCS Premier. If a field is checked on this page and a particular applicant does not have that field populated when an export is run, that particular applicant will not be exported and an error will appear on the export error log indicating that the person was missing a piece of required information.
DAILY USE – TRANSFERRING APPLICANTS TO GCS PREMIER
The transfer process (Cyber Recruiter to GCS Premier) is done one at a time from the Applicants > GCS Premier Export process in Cyber Recruiter.
STEP 1: PREPARE THE APPLICANT & COMPLETE REQUIRED FIELDS
This page is necessary to transfer Applicants into GCS Premier because it contains information that doesn’t already exist in Cyber Recruiter. The data from this page in addition to standard data that Cyber Recruiter stores are transferred for new hires. Before transferring an applicant from Cyber Recruiter to GCS Premier, ensure that this page is complete and contains all the required information for that Applicant. Find the Applicant to export - Applicants > Find Applicant. Once the Applicant is located enter the necessary information as needed in the Main Tab and the Tax Info Tab.
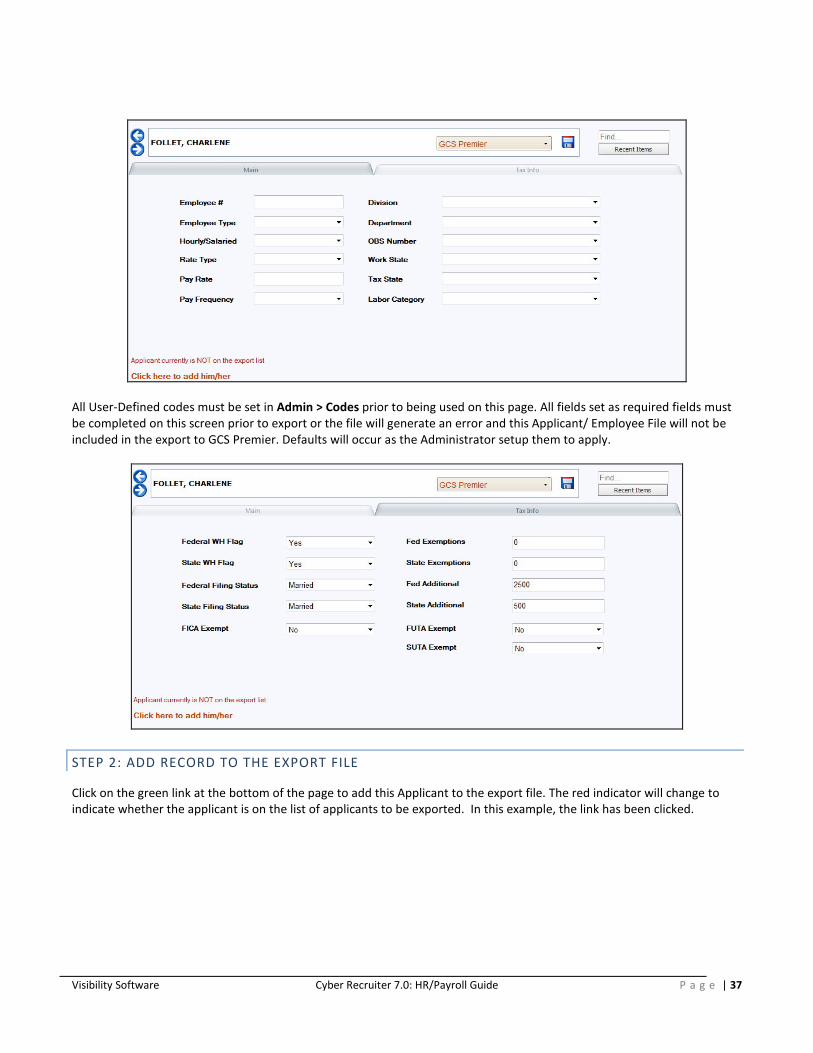
Visibility Software Cyber Recruiter 7.0: HR/Payroll Guide P a g e | 37
All User-Defined codes must be set in Admin > Codes prior to being used on this page. All fields set as required fields must be completed on this screen prior to export or the file will generate an error and this Applicant/ Employee File will not be included in the export to GCS Premier. Defaults will occur as the Administrator setup them to apply.
STEP 2: ADD RECORD TO THE EXPORT FILE
Click on the green link at the bottom of the page to add this Applicant to the export file. The red indicator will change to indicate whether the applicant is on the list of applicants to be exported. In this example, the link has been clicked.
Visibility Software Cyber Recruiter 7.0: HR/Payroll Guide P a g e | 38
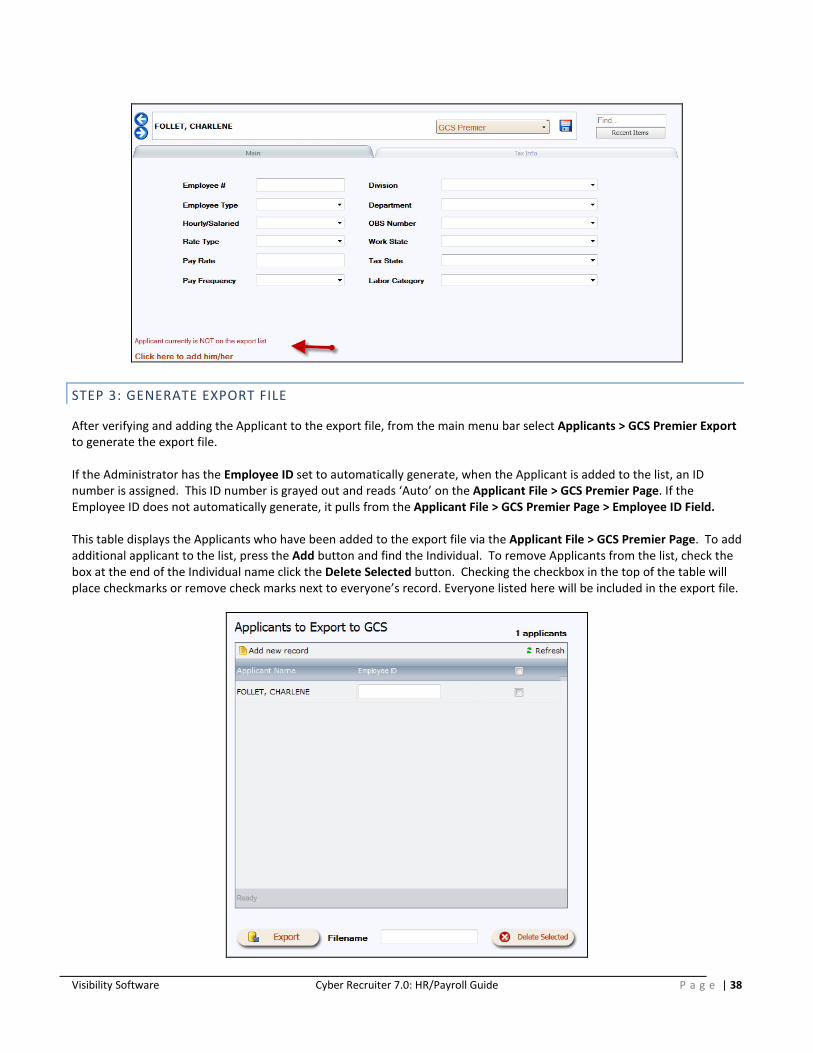
STEP 3: GENERATE EXPORT FILE
After verifying and adding the Applicant to the export file, from the main menu bar select Applicants > GCS Premier Export to generate the export file. If the Administrator has the Employee ID set to automatically generate, when the Applicant is added to the list, an ID number is assigned. This ID number is grayed out and reads ‘Auto’ on the Applicant File > GCS Premier Page. If the Employee ID does not automatically generate, it pulls from the Applicant File > GCS Premier Page > Employee ID Field. This table displays the Applicants who have been added to the export file via the Applicant File > GCS Premier Page. To add additional applicant to the list, press the Add button and find the Individual. To remove Applicants from the list, check the box at the end of the Individual name click the Delete Selected button. Checking the checkbox in the top of the table will place checkmarks or remove check marks next to everyone’s record. Everyone listed here will be included in the export file.
Visibility Software Cyber Recruiter 7.0: HR/Payroll Guide P a g e | 39
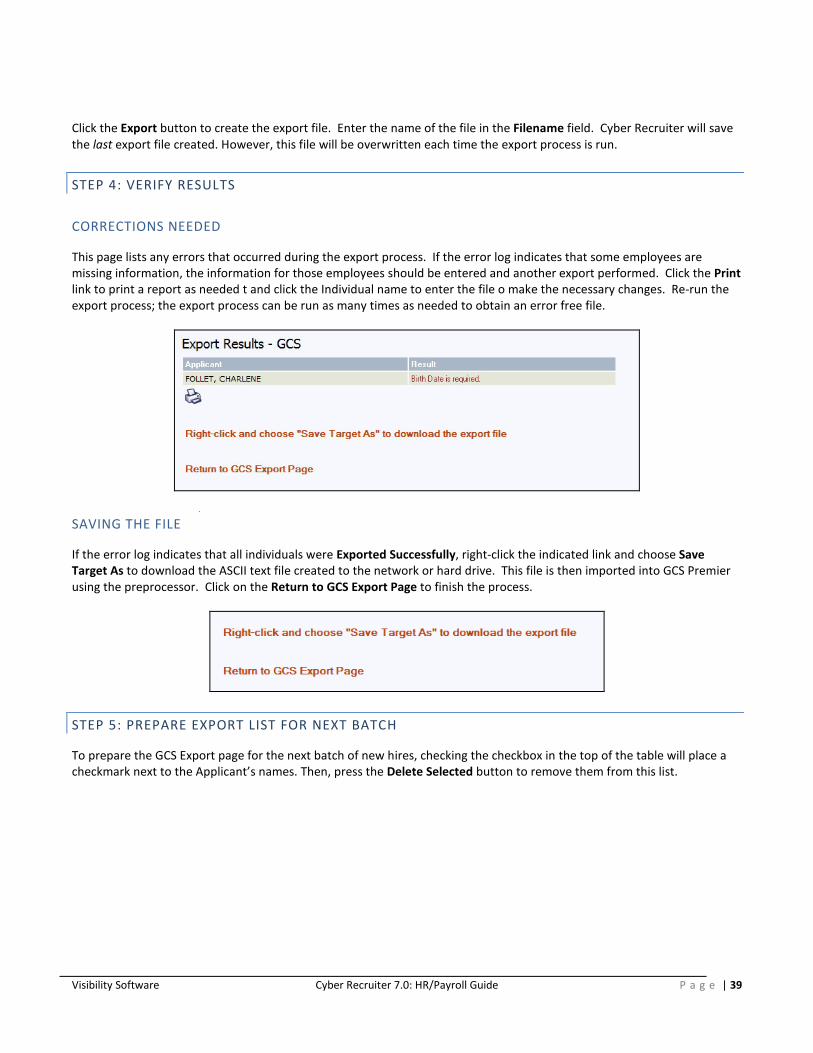
Click the Export button to create the export file. Enter the name of the file in the Filename field. Cyber Recruiter will save the last export file created. However, this file will be overwritten each time the export process is run.
STEP 4: VERIFY RESULTS
CORRECTIONS NEEDED
This page lists any errors that occurred during the export process. If the error log indicates that some employees are missing information, the information for those employees should be entered and another export performed. Click the Print link to print a report as needed t and click the Individual name to enter the file o make the necessary changes. Re-run the export process; the export process can be run as many times as needed to obtain an error free file.
SAVING THE FILE
If the error log indicates that all individuals were Exported Successfully, right-click the indicated link and choose Save Target As to download the ASCII text file created to the network or hard drive. This file is then imported into GCS Premier using the preprocessor. Click on the Return to GCS Export Page to finish the process.
STEP 5: PREPARE EXPORT LIST FOR NEXT BATCH
To prepare the GCS Export page for the next batch of new hires, checking the checkbox in the top of the table will place a checkmark next to the Applicant’s names. Then, press the Delete Selected button to remove them from this list.

Visibility Software Cyber Recruiter 7.0: HR/Payroll Guide P a g e | 40
STEP 6: IMPORT INTO GCS PREMIER
Using the Employee Preprocessor module of GCS Premier, browse to the file generated by Cyber Recruiter. Import this file and verify the data for accuracy upon bringing the file into the system.
DATA MAPPING
** This information was adapted from the Deltek GCS Premier Specification document ***This program will update existing records and add new records, but will not delete records. "Deletes" must be performed manually through the Deltek GCS Premier program. The Input Data file should contain new employees and employees with changes, but may contain all employees if desired. All input will be validated as follows: Field Defaults Validations Employee ID None Must be unique. Division Number 01 Must be numeric. Must be less than or equal to number of
divisions set up in the General Ledger Control File. Department Number 00 Must be in Deltek GCS Premier's Department/Transaction Code
File. Last Name, First Name & Middle Initial
None Must be unique in the Deltek GCS Premier Employee Master File. New employees must have both a First and Last Name.
OBS Number Zeros If OBS numbers are used, must be in proper format (XX.XX.XX.XX.XX.XX). They must also exist in the Deltek GCS Premier.
Social Security Number None Must be in format 999-99-9999. Required for new employees. Sex None Must be Male or Female. May be blank for consultants. Marital Status None Must be Single, Married, Divorced or Widowed. May be blank for

Visibility Software Cyber Recruiter 7.0: HR/Payroll Guide P a g e | 41
consultants. Status A Must be Active or Inactive. Employee Type R Must be Regular, Part Time or Consultant. Exempt None Must be Yes or No. Rate Type (Single record format only)
None Must be Annual, Salaried, or Hourly.
Rate None Must be numeric. Pay Frequency None Must be Weekly, Bi-Weekly, Semi-Monthly or Monthly. May be
blank for consultants. Working State None Must exist in the Deltek GCS Premier State Name Table (uses
Postal abbreviations). May be blank for consultants. Default Suffix 39 Must be 00, 39, 40, 41, or 42. Hourly or Salaried Flag None Must be Hourly or Salaried. May be blank for consultants Labor Category None Must exist in the Deltek GCS Premier Job Category Table. May be
blank for consultants. Earned Income Credit Flag
N Must be Full, Half, Single or No
Federal Withholding Flag Y Must be Yes or No. N for consultants. Federal Filing Status None Must be Single or Married. Required if Federal Withholding Flag =
Y State Filing Status None Must be Single, Married, 1, 2, 3, 4. Required if State Withholding
Flag = Y Number of Federal Exemptions
Zero Must be numeric.
Number of State Exemptions
Zero Must be numeric.
Additional Federal Withholding
Zero Must be numeric.
Additional State Withholdings
Zero Must be numeric.
Taxing State Working State Must exist in Deltek GCS Premier’s State Name Table (use Postal abbreviations). May be blank for consultants.
FICA Exempt Flag N for Regular or Part-Time Employees. Y for consultants
Must be Yes or No.
FUTA Exempt Flag N for Regular or Part-Time Employees. Y for consultants
Must be Yes or No.
SUTA Exempt Flag N for Regular or Part-Time Employees. Y for consultants
Must be Yes or No.
Date of Birth Zeros Must be a valid date or zeros. Must be in the YYYYMMDD format. Street None None Street Line 2 None None City None None State None None Zip Code (first five) None None Zip Code (last four) None None High Compensation Flag L Must be High, Low, or Ineligible Key Employee Flag N Must be Yes or No

Visibility Software Cyber Recruiter 7.0: HR/Payroll Guide P a g e | 42
DELTEK VISION –DYNAMIC LINK
ESTABLISHING CONNECTIVITY
The process for transferring new hires from Cyber Recruiter to Deltek vision using the dynamic requires knowledge of the SQL information to connect to the Vision database. Once you have obtain this information, move to the setup regarding setting up the Admin section in Cyber Recruiter.
ADMIN SETUP – ENABLING DELTEK VISION
STEP 1: SETTING GLOBAL DEFAULTS
Admin > Links > Pre Defined Links > Deltek Vision
Question Response Result
Integration to Vision enabled?
Yes All of Vision-specific pages and menu items will be added in Cyber Recruiter. Additional Action Needed: Highlight the Users in the Drop-Down List who should have access to the Vision-specific functions in Cyber Recruiter. Hold the CRTL key down to select more than one User.
No Users will not see any references to Vision in Cyber Recruiter.
SQL Server Open Text SQL Server where Deltek Vision is located Database Name Open Text Deltek Vision’s database name User ID Open Text SQL Login ID to Visions Password Open Text SQL Password to Visions
Once the information is set on the General page, change the tab to Required Fields. Highlight the fields on this page which should be required prior to transferring information to Vision.

Visibility Software Cyber Recruiter 7.0: HR/Payroll Guide P a g e | 43
Once the information is set on the Required Fields page is complete use the drop-down list to change the page to Custom Fields. Identify any fields currently in Cyber Recruiter which can be passed to Vision’s custom fields. Use the pick list box to identify the location of the information in Cyber Recruiter.
DAILY USE – TRANSFERRING APPLICANTS TO DELTEK VISION
The transfer process (Cyber Recruiter to Deltek Vision) replaces the New Hire Action in Deltek. When an applicant needs to be ‘hired’ into Deltek, this is done one at a time from the Applicants > Hire into Deltek Vision process in Cyber Recruiter.
STEP 1: FIND THE APPLICANT
If you are using the option to ‘Process New Hire’ you can skip this step as the system will already know which individual you are working with. From the Applicant’s menu, select Hire into Vision. Find the desired individual to move into Vision by identifying the individual via his/her Last Name, Email, Applicant ID #, Overall Status or Range (Application Date).
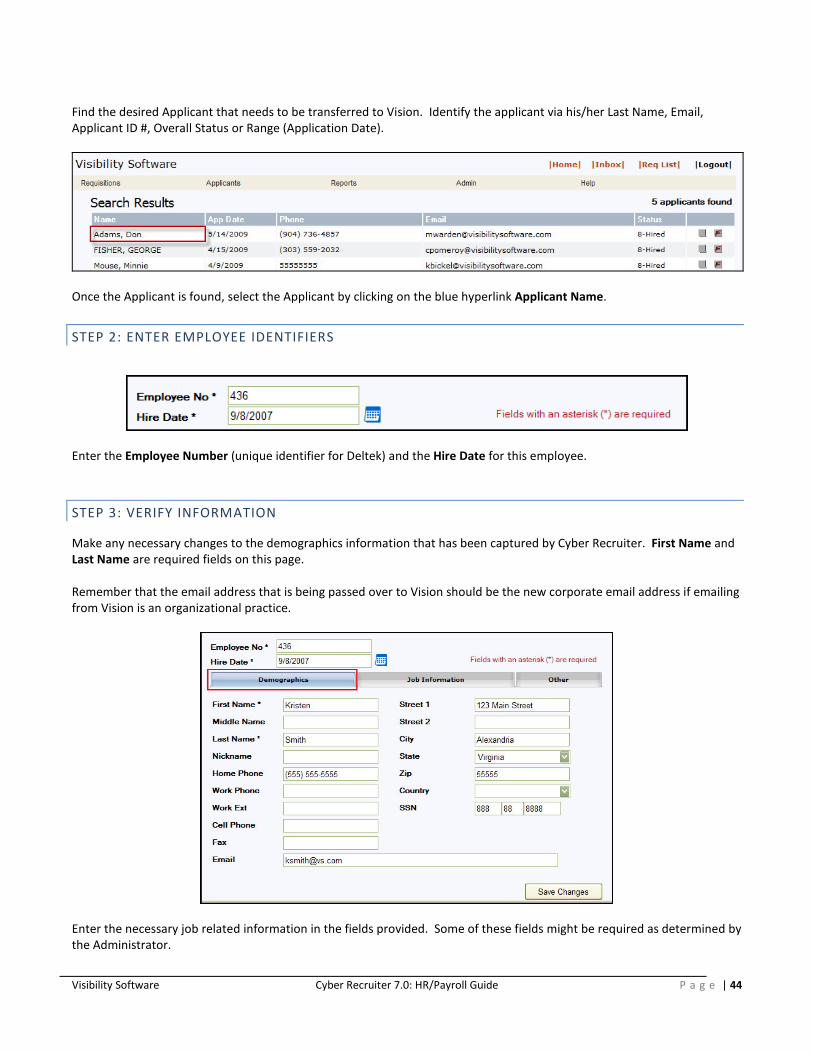
Visibility Software Cyber Recruiter 7.0: HR/Payroll Guide P a g e | 44
Find the desired Applicant that needs to be transferred to Vision. Identify the applicant via his/her Last Name, Email, Applicant ID #, Overall Status or Range (Application Date).
Once the Applicant is found, select the Applicant by clicking on the blue hyperlink Applicant Name.
STEP 2: ENTER EMPLOYEE IDENTIFIERS
Enter the Employee Number (unique identifier for Deltek) and the Hire Date for this employee.
STEP 3: VERIFY INFORMATION
Make any necessary changes to the demographics information that has been captured by Cyber Recruiter. First Name and Last Name are required fields on this page. Remember that the email address that is being passed over to Vision should be the new corporate email address if emailing from Vision is an organizational practice.
Enter the necessary job related information in the fields provided. Some of these fields might be required as determined by the Administrator.

Visibility Software Cyber Recruiter 7.0: HR/Payroll Guide P a g e | 45
Enter the necessary other information in the fields provided. Some of these fields might be required as determined by the Administrator.
WHERE THE DATA GOES In addition to the following information, skills and education are also added to the appropriate tables/views in Vision. ** This information was adapted from the Deltek Vision specification document *** Vision Field Name Cyber Recruiter Field Name Employee Employee ID from Applicant File > Vision Page Lastname Last name Firstname First name
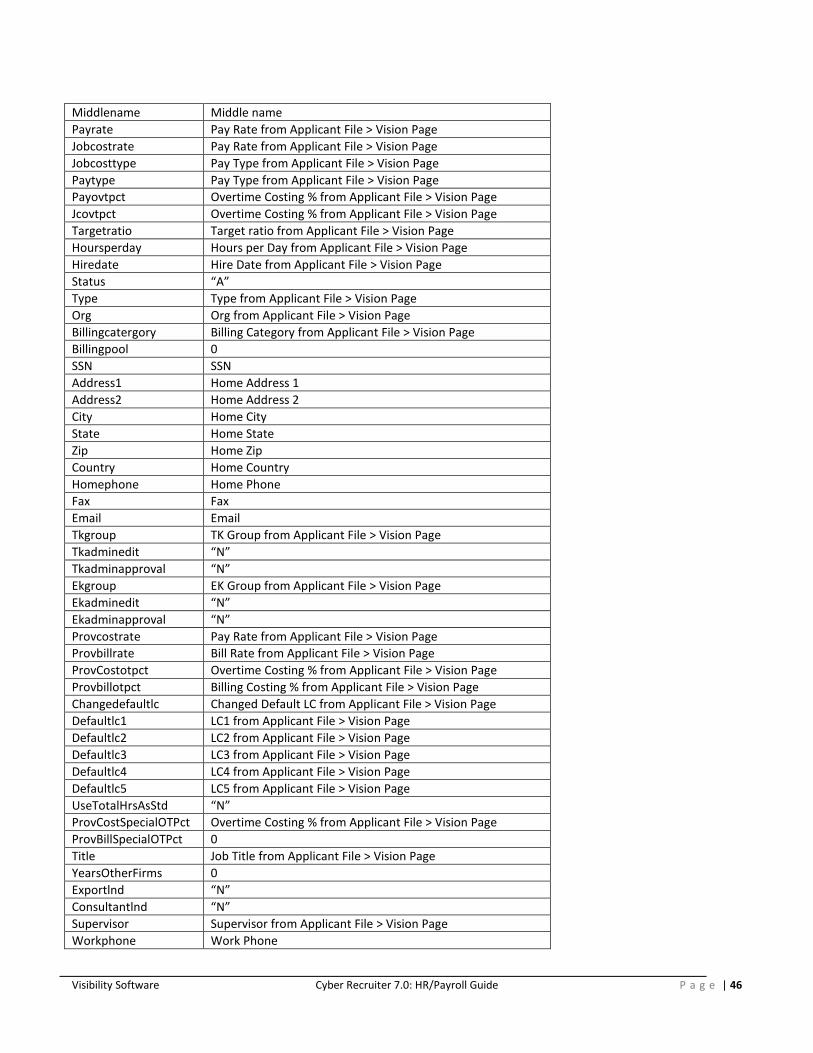
Visibility Software Cyber Recruiter 7.0: HR/Payroll Guide P a g e | 46
Middlename Middle name Payrate Pay Rate from Applicant File > Vision Page Jobcostrate Pay Rate from Applicant File > Vision Page Jobcosttype Pay Type from Applicant File > Vision Page Paytype Pay Type from Applicant File > Vision Page Payovtpct Overtime Costing % from Applicant File > Vision Page Jcovtpct Overtime Costing % from Applicant File > Vision Page Targetratio Target ratio from Applicant File > Vision Page Hoursperday Hours per Day from Applicant File > Vision Page Hiredate Hire Date from Applicant File > Vision Page Status “A” Type Type from Applicant File > Vision Page Org Org from Applicant File > Vision Page Billingcatergory Billing Category from Applicant File > Vision Page Billingpool 0 SSN SSN Address1 Home Address 1 Address2 Home Address 2 City Home City State Home State Zip Home Zip Country Home Country Homephone Home Phone Fax Fax Email Email Tkgroup TK Group from Applicant File > Vision Page Tkadminedit “N” Tkadminapproval “N” Ekgroup EK Group from Applicant File > Vision Page Ekadminedit “N” Ekadminapproval “N” Provcostrate Pay Rate from Applicant File > Vision Page Provbillrate Bill Rate from Applicant File > Vision Page ProvCostotpct Overtime Costing % from Applicant File > Vision Page Provbillotpct Billing Costing % from Applicant File > Vision Page Changedefaultlc Changed Default LC from Applicant File > Vision Page Defaultlc1 LC1 from Applicant File > Vision Page Defaultlc2 LC2 from Applicant File > Vision Page Defaultlc3 LC3 from Applicant File > Vision Page Defaultlc4 LC4 from Applicant File > Vision Page Defaultlc5 LC5 from Applicant File > Vision Page UseTotalHrsAsStd “N” ProvCostSpecialOTPct Overtime Costing % from Applicant File > Vision Page ProvBillSpecialOTPct 0 Title Job Title from Applicant File > Vision Page YearsOtherFirms 0 Exportlnd “N” Consultantlnd “N” Supervisor Supervisor from Applicant File > Vision Page Workphone Work Phone

Visibility Software Cyber Recruiter 7.0: HR/Payroll Guide P a g e | 47
Workphonext Work Extension Mobilephone Cell Phone Createuser “CR” Createdate Current Date AvailableForCRM “Y” ReadyForApproval “Y” ReadyForProcessing “Y” Moduser “CR” Moddate Current Date LocaleMethod 0 Otherpay 0 Otherpay2 0 Otherpay3 0 Otherpay4 0 Otherpay5 0 CostRateMeth 0 CostRateTableNo 0 PayRateMeth 0 UtilizationRatio 0 PriorYearsFirm 0 IncludeLocalJurisOnly “N” Payspecialovtpct Special Overtime % from Applicant File > Vision Page Jcspecialovtpct Special Overtime % from Applicant File > Vision Page PreferredName Nickname

Visibility Software Cyber Recruiter 7.0: HR/Payroll Guide P a g e | 48
MICROSOFT DYNAMICS GP (GREAT PLAINS) –FILE EXPORT
ADMIN SETUP – ENABLING GREAT PLAINS
The process for transferring new hires from Cyber Recruiter to the Great Plains product involves exporting the information to an ASCII Text file and importing that file into Great Plains. Cyber Recruiter automates this task by creating the file from within Cyber Recruiter itself.
STEP 1: SETTING GLOBAL DEFAULTS
Admin > Links> Pre Defined Links > Great Plains
Question Response Result
Enable Great Plains Link?
Yes All of Great Plains-specific pages and menu items will be added in Cyber Recruiter. Additional Action Needed: Highlight the Users in the Drop-Down List who should have access to the Great Plains-specific functions in Cyber Recruiter. Hold the CRTL key down to select more than one User.
No Users will not see any references to Great Plains in Cyber Recruiter.
Default Employment Type? Hard Coded Table
Value entered here will default in when transferring New Hires into the Great Plains product.
Hours/Year Default Open Text Field
Value entered here will default in when transferring New Hires into the Great Plains product.
Division Code Table Division field on each Applicant’s Great Plains Page will be a drop-down field.
Department Code Table Department field on each Applicant’s Great Plains Page will be a drop-down field.
Location Code Table Location field on each Applicant’s Great Plains Page will be a

Visibility Software Cyber Recruiter 7.0: HR/Payroll Guide P a g e | 49
drop-down field. Driver’s License Field Misc Field or
Open Text Pulls the License number from a pre-determined misc field or it is an open text on the Great Plains Page
Driver’s License State Misc Field or Open Text
Pulls the License number from a pre-determined misc field or it is an open text on the Great Plains Page
Job Title Req Job Title or Open Text
Pulls the Requisition Job Title from the Main Page or it is an open text field on the Great Plains Page
Last Emp # Open Text Field
Stores the last Great Plains employee number assigned to Applicants exported from Cyber Recruiter. Reset as necessary.
STEP 2: VERIFYING CODE TABLES
To accomplish this step, the Administrator needs verify the Great Plains tables are up-to-date in Admin > Codes > Great Plains. All of these code tables are required for transferring data to Great Plains. You only need to populate the Employment Classes, Divisions, Departments, Locations, Job Titles, and Supervisor Codes. Set these tables up as they are set up in Great Plains.
DAILY USE – TRANSFERRING APPLICANTS TO GREAT PLAINS
The transfer process (Cyber Recruiter to Great Plains) is done one at a time from the Applicants > Great Plains Export process in Cyber Recruiter.
STEP 1: PREPARE THE APPLICANT & VERIFY REQUIRED FIELDS
Once the Great Plains is enabled, a Great Plains Page in the Applicant File will default.
Find the Applicant to export - Applicants > Find Applicant. Once the Applicant is located, use the Great Plains Page to enter data that does not already exist in the Cyber Recruiter product. This information will be transferred in addition to the required pieces of information necessary for the transfer. Before transferring an Individual from Cyber Recruiter to Great Plains, ensure that this page is complete and contains all the required information for that applicant.
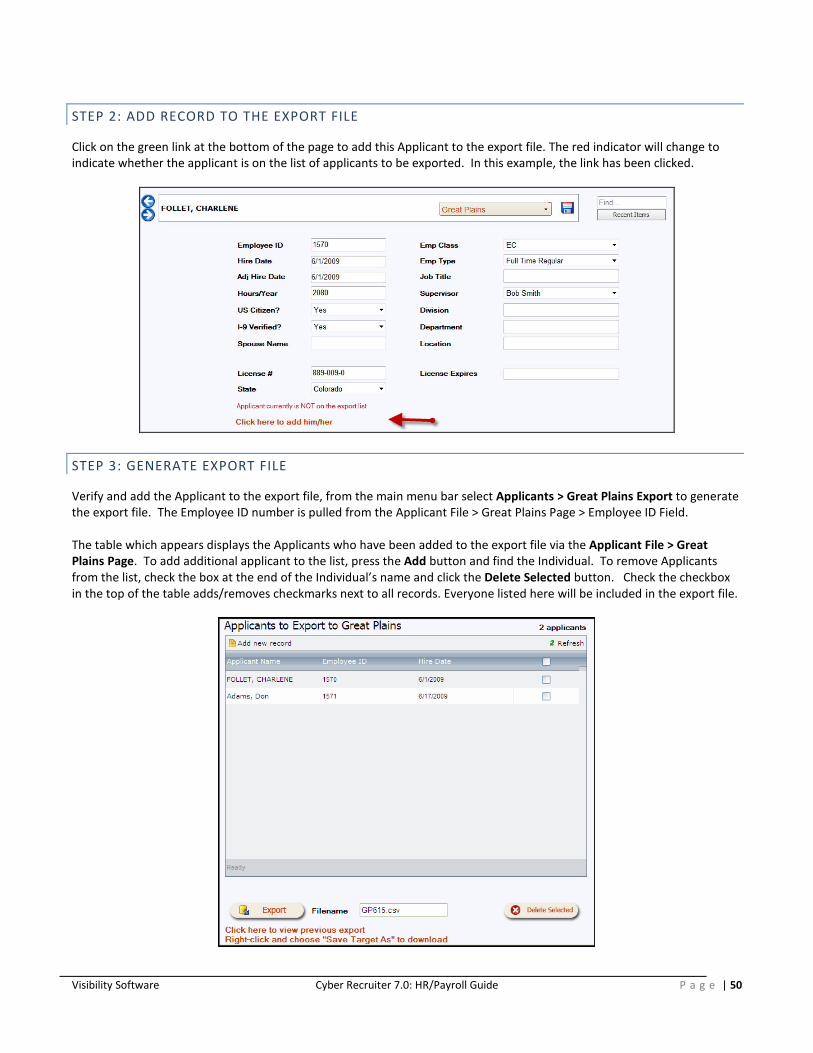
Visibility Software Cyber Recruiter 7.0: HR/Payroll Guide P a g e | 50
STEP 2: ADD RECORD TO THE EXPORT FILE
Click on the green link at the bottom of the page to add this Applicant to the export file. The red indicator will change to indicate whether the applicant is on the list of applicants to be exported. In this example, the link has been clicked.
STEP 3: GENERATE EXPORT FILE
Verify and add the Applicant to the export file, from the main menu bar select Applicants > Great Plains Export to generate the export file. The Employee ID number is pulled from the Applicant File > Great Plains Page > Employee ID Field. The table which appears displays the Applicants who have been added to the export file via the Applicant File > Great Plains Page. To add additional applicant to the list, press the Add button and find the Individual. To remove Applicants from the list, check the box at the end of the Individual’s name and click the Delete Selected button. Check the checkbox in the top of the table adds/removes checkmarks next to all records. Everyone listed here will be included in the export file.

Visibility Software Cyber Recruiter 7.0: HR/Payroll Guide P a g e | 51
STEP 4: VERIFY RESULTS
Click the Export button to create the export file. Enter the name of the file in the Filename field. Cyber Recruiter will save the last export file created. However, this file will be overwritten each time the export process is run.
MAKE CORRECTIONS
Using the page which appears, verify no errors occurred. If the error log indicates that some records are missing information, the information for those individuals should be entered and another export performed. Click the Print link to print a report as needed to and click the Individual name to enter the file to make the necessary changes. Re-run the export process; the export process can be run as many times as needed to obtain an error free file.
SAVE FILE
If the warning section indicates an issues like below, the Exported with warning(s) message appears for the New Hire who is not going to be exported successfully as is if the file is imported into Great Plains. If the export results indicate that all Applicants/Employees were Exported Successfully, right-click the indicated link and choose Save Target As to download the ASCII text file created to the network or hard drive. This file is then imported into Great Plains as necessary. Click on the Return to Great Plains Export Page to finish the process.
STEP 5: PREPARE EXPORT LIST FOR NEXT BATCH
To prepare the Great Plains Export page for the next batch of new hires, checking the checkbox in the top of the table will place a checkmark next to the individual’s names. Then, press the Delete Selected button to remove them from this list.

Visibility Software Cyber Recruiter 7.0: HR/Payroll Guide P a g e | 52
STEP 6: IMPORT INTO GREAT PLAINS
Using the tools available via Great Plains, browse to the file generated by Cyber Recruiter. Import this file and verify the data for accuracy upon bringing the file into the system.
DATA MAPPING
The table below lists each of the field exported from Cyber Recruiter into the .csv file created. Field Notes Employee ID As entered on applicant’s Great Plains page. Employee Class As entered on applicant’s Great Plains page. Code entered under
Admin/Codes/Great Plains Last Name First Name Middle Name “PRIMARY” Address Code, always hard-coded as PRIMARY SSN SSN without dashes Birth Date Gender 1-Male, 2-Female, 3-N/A Ethnic Origin 1- White, 2 - American Indian or Alaska Native, 3- Black, 4 - Asian or Pacific Islander,
5- Hispanic, 6 - Other, 7 - N/A Marital Status 1- Married, 2- Single, 3- N/A Spouse Name As entered on applicant’s Great Plains page. Hire Date As entered on applicant’s Great Plains page.

Visibility Software Cyber Recruiter 7.0: HR/Payroll Guide P a g e | 53
Adjusted Hire Date As entered on applicant’s Great Plains page. Employment Type As entered on applicant’s Great Plains page. Code entered under
Admin/Codes/Great Plains Division As entered on applicant’s Great Plains page OR pulled from a requisition field for the
applicants HIRED req. Code entered under Admin/Codes/Great Plains Department As entered on applicant’s Great Plains page OR pulled from a requisition field for the
applicants HIRED req. Code entered under Admin/Codes/Great Plains Job Title As entered on applicant’s Great Plains page OR pulled from a requisition field for the
applicants HIRED req. Code entered under Admin/Codes/Great Plains Location As entered on applicant’s Great Plains page OR pulled from a requisition field for the
applicants HIRED req. Code entered under Admin/Codes/Great Plains Is Veteran? Equals 1 if applicants is a disabled vet, Vietnam vet, or other vet Home Street 1 Home Street 2 Home City Home State Home Zip Home Country Defaults to USA if empty Home Phone All numbers, no punctuation Work Phone All numbers, no punctuation Cell Phone All numbers, no punctuation Hours/Year As entered on applicant’s Great Plains page. Email Citizen As entered on applicant’s Great Plains page. I-9 Verified As entered on applicant’s Great Plains page. Disabled? Disabled Vet? Vietnam Vet? Other Eligible Vet? Education Top 3 education records for applicant, each has school, degree, major, GPA, and
graduation year Driver’s License Info State, a space, then Driver’s License # Driver’s License Exp Date Driver’s License Exp date as entered on applicant’s Great Plains page.
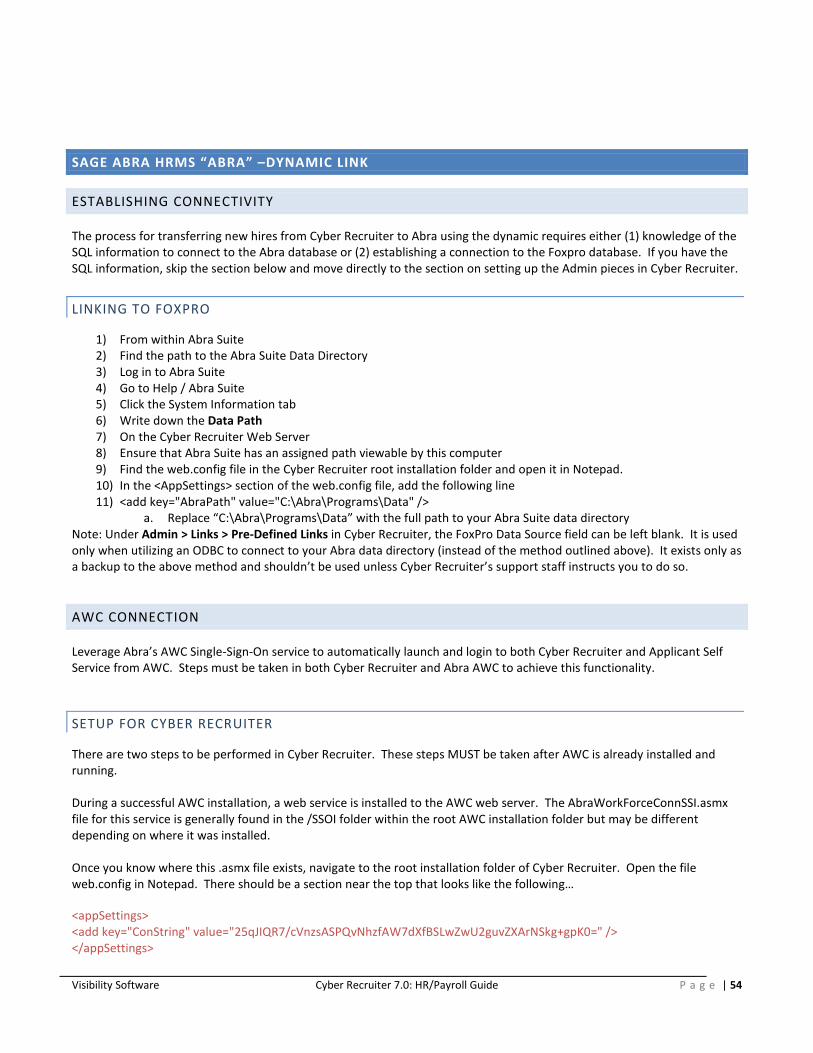
Visibility Software Cyber Recruiter 7.0: HR/Payroll Guide P a g e | 54
SAGE ABRA HRMS “ABRA” –DYNAMIC LINK
ESTABLISHING CONNECTIVITY
The process for transferring new hires from Cyber Recruiter to Abra using the dynamic requires either (1) knowledge of the SQL information to connect to the Abra database or (2) establishing a connection to the Foxpro database. If you have the SQL information, skip the section below and move directly to the section on setting up the Admin pieces in Cyber Recruiter.
LINKING TO FOXPRO
1) From within Abra Suite 2) Find the path to the Abra Suite Data Directory 3) Log in to Abra Suite 4) Go to Help / Abra Suite 5) Click the System Information tab 6) Write down the Data Path 7) On the Cyber Recruiter Web Server 8) Ensure that Abra Suite has an assigned path viewable by this computer 9) Find the web.config file in the Cyber Recruiter root installation folder and open it in Notepad. 10) In the <AppSettings> section of the web.config file, add the following line 11) <add key="AbraPath" value="C:\Abra\Programs\Data" />
a. Replace “C:\Abra\Programs\Data” with the full path to your Abra Suite data directory Note: Under Admin > Links > Pre-Defined Links in Cyber Recruiter, the FoxPro Data Source field can be left blank. It is used only when utilizing an ODBC to connect to your Abra data directory (instead of the method outlined above). It exists only as a backup to the above method and shouldn’t be used unless Cyber Recruiter’s support staff instructs you to do so.
AWC CONNECTION
Leverage Abra’s AWC Single-Sign-On service to automatically launch and login to both Cyber Recruiter and Applicant Self Service from AWC. Steps must be taken in both Cyber Recruiter and Abra AWC to achieve this functionality.
SETUP FOR CYBER RECRUITER
There are two steps to be performed in Cyber Recruiter. These steps MUST be taken after AWC is already installed and running. During a successful AWC installation, a web service is installed to the AWC web server. The AbraWorkForceConnSSI.asmx file for this service is generally found in the /SSOI folder within the root AWC installation folder but may be different depending on where it was installed. Once you know where this .asmx file exists, navigate to the root installation folder of Cyber Recruiter. Open the file web.config in Notepad. There should be a section near the top that looks like the following…
<appSettings> <add key="ConString" value="25qJIQR7/cVnzsASPQvNhzfAW7dXfBSLwZwU2guvZXArNSkg+gpK0=" /> </appSettings>

Visibility Software Cyber Recruiter 7.0: HR/Payroll Guide P a g e | 55
You’ll need to add a line to this <appSettings> block that looks like this <add key="AbraAWCSSOI" value="http://other/AWC/SSOI/AbraWorkForceConnSSI.asmx" /> Except replace http://other/AWC/SSOI/AbraWorkForceConnSSI.asmx with the path to your AWC AbraWorkForceConnSSI.asmx file. Notice this is a web path to that file, not a file system path. Your final <appSettings> block should look similar to the following… <appSettings> <add key="ConString" value="25qJIQR7/cVnzsASPQvNhzfAW7dXfBSLwZwU2guvZXArNSkg+gpK0=" /> <add key="AbraAWCSSOI" value="http://other/AWC/SSOI/AbraWorkForceConnSSI.asmx" /> </appSettings> The same changes need to be made in the web.config file in the root of the Careers folder. There is nothing to configure by logging in to Cyber Recruiter.
SETUP FOR ABRA WORKFORCE CONNECTIONS
There are two possible links to setup from AWC to Cyber Recruiter. Which one(s) you decide to use are up to you. You may create a link that allows AWC users to automatically login to their Applicant Self Service account, or you may create a link that allows AWC users who also happen to be managers in your organization to login to the Cyber Recruiter admin application. The steps to create either are similar.

Visibility Software Cyber Recruiter 7.0: HR/Payroll Guide P a g e | 56
CONNECTING TO EMPLOYEE SELF SERVICE
For Applicant Self Service Single Sign-on to function, a user’s AWC login must exactly match his/her Self Service Login on the Cyber Recruiter Application page.
STEP 1
1. Login to AWC as a master user 2. Go to Custom Content/Create Web Links 3. Click on +New 4. For both the name and description type in Careers or Employment, whichever you prefer. 5. For the URL, type in the URL to your Careers site’s AppSelfService.aspx page, for example
http://www.YourCompany.com/Careers/AppSelfService.aspx
6. Set Single Sign-On to Yes and click Save
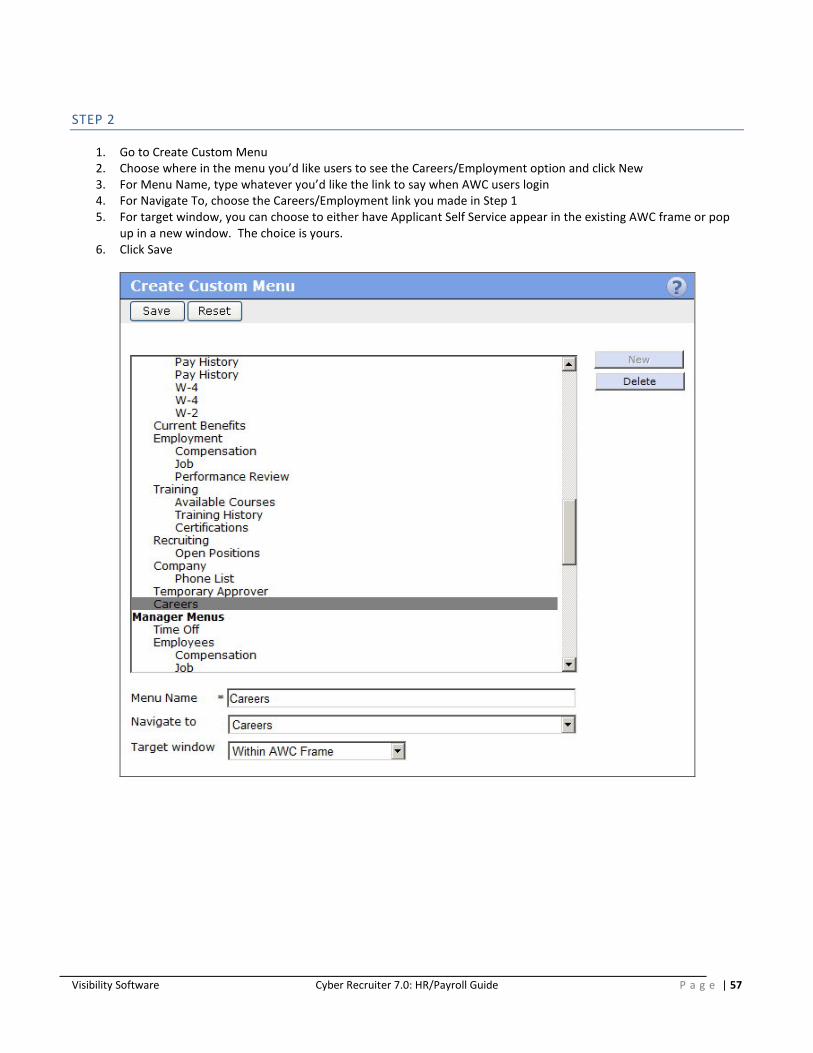
Visibility Software Cyber Recruiter 7.0: HR/Payroll Guide P a g e | 57
STEP 2
1. Go to Create Custom Menu 2. Choose where in the menu you’d like users to see the Careers/Employment option and click New 3. For Menu Name, type whatever you’d like the link to say when AWC users login 4. For Navigate To, choose the Careers/Employment link you made in Step 1 5. For target window, you can choose to either have Applicant Self Service appear in the existing AWC frame or pop
up in a new window. The choice is yours. 6. Click Save
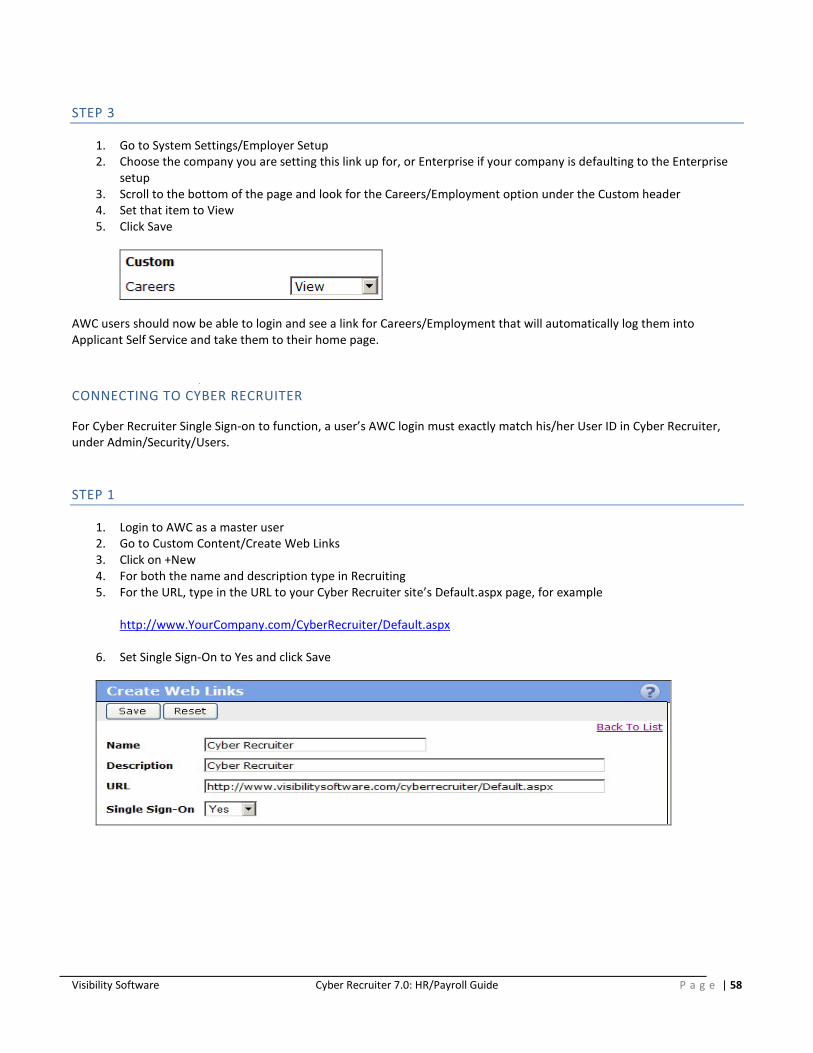
Visibility Software Cyber Recruiter 7.0: HR/Payroll Guide P a g e | 58
STEP 3
1. Go to System Settings/Employer Setup 2. Choose the company you are setting this link up for, or Enterprise if your company is defaulting to the Enterprise
setup 3. Scroll to the bottom of the page and look for the Careers/Employment option under the Custom header 4. Set that item to View 5. Click Save
AWC users should now be able to login and see a link for Careers/Employment that will automatically log them into Applicant Self Service and take them to their home page.
CONNECTING TO CYBER RECRUITER
For Cyber Recruiter Single Sign-on to function, a user’s AWC login must exactly match his/her User ID in Cyber Recruiter, under Admin/Security/Users.
STEP 1
1. Login to AWC as a master user 2. Go to Custom Content/Create Web Links 3. Click on +New 4. For both the name and description type in Recruiting 5. For the URL, type in the URL to your Cyber Recruiter site’s Default.aspx page, for example
http://www.YourCompany.com/CyberRecruiter/Default.aspx
6. Set Single Sign-On to Yes and click Save
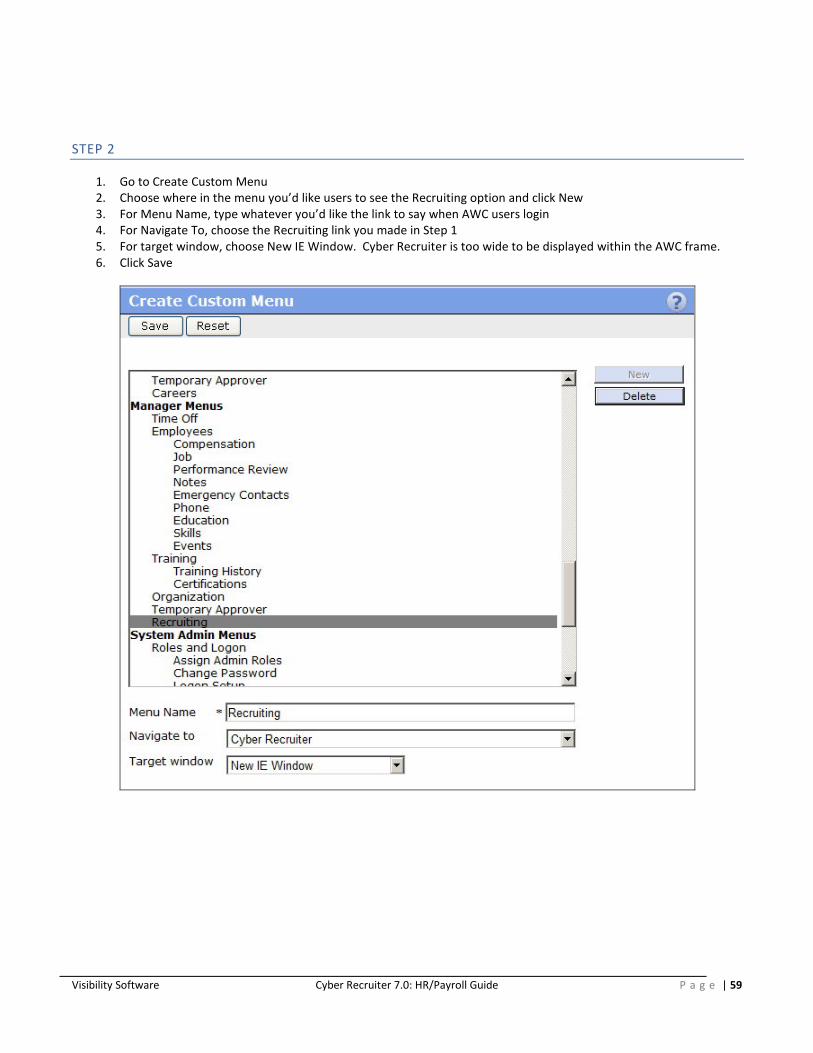
Visibility Software Cyber Recruiter 7.0: HR/Payroll Guide P a g e | 59
STEP 2
1. Go to Create Custom Menu 2. Choose where in the menu you’d like users to see the Recruiting option and click New 3. For Menu Name, type whatever you’d like the link to say when AWC users login 4. For Navigate To, choose the Recruiting link you made in Step 1 5. For target window, choose New IE Window. Cyber Recruiter is too wide to be displayed within the AWC frame. 6. Click Save

Visibility Software Cyber Recruiter 7.0: HR/Payroll Guide P a g e | 60
STEP 3
1. Go to System Settings/Employer Setup 2. Choose the company you are setting this link up for, or Enterprise if your company is defaulting to the Enterprise
setup 3. Scroll to the bottom of the page and look for the Recruiting option under the Custom header 4. Set that item to View 5. Click Save
AWC users should now be able to login and see a link for Recruiting that will automatically log them into Cyber Recruiter and take them to their home page.

Visibility Software Cyber Recruiter 7.0: HR/Payroll Guide P a g e | 61
ADMIN SETUP – ENABLING ABRA
Once the connection information is obtained, take the following steps in the admin section to activate this interface.
STEP 1: SETTING GLOBAL DEFAULTS
Admin > Links > Pre Defined Links > Abra Suite
Question Response Result
Integration to Abra enabled?
Yes
Abra-specific page and menu items will be added in Cyber Recruiter. Action Needed: Highlight the Users in the Drop-Down List who should have access to the Abra-specific functions in Cyber Recruiter. Hold the CRTL key down to select more than one User.
No Users will not see any references to Abra in Cyber Recruiter. Do you use Abra Payroll?
Yes All Abra Payroll-specific fields will appear in Cyber Recruiter during the transfer process. No Only HR Related fields will appear during the transfer process.
Transfer Method
FoxPro, SQL or File Transfer. See step 2 for FoxPro or SQL. See next section for File Transfer
Capitalize everything?
Yes All data transferred to Abra will appear in capitalized lettering. No All data transferred to Abra will appear as it was entered in Cyber Recruiter.
Transfer Benefits
Yes Upon transferring the file into Abra, the system will verify any benefits set to ‘Auto Add’ and compare against the qualifications. If the individual meets the pre-set qualifications, the benefit will be added.
No No benefits will be added when transferring the file.
Transfer Deductions
Yes Upon transferring the file into Abra, the system will verify any deductions set to ‘Auto Add’ and add those deductions.
No No deductions will be added when transferring the file.
Transfer Taxes
Yes Upon transferring the file into Abra, the system verifies any taxes set to ‘Auto Add’ and compare against the home state & timesheet work code to determine which taxes to add.
No No taxes will be added when transferring the file.
STEP 2: SETTING THE DATA SOURCE

Visibility Software Cyber Recruiter 7.0: HR/Payroll Guide P a g e | 62
Use the information from the ‘Establishing Connectivity’ section to complete the following setup pieces. Selecting FoxPro or SQL will refresh the bottom of the page to specify only the information necessary for that data source type.
Question Answer Result
What version of Abra do you use?
FoxPro Cyber Recruiter will reference the web config file to locate the Abra data for the file transfer.
SQL
Cyber Recruiter will expect to post to an SQL database for the transfer. Additional Action Needed: Using the tabs at the bottom of the page, enter in the SQL information to connect to your Abra system. Should you wish to take an action upon completing the new hire process, enter that command in the ‘Advanced’ tab.
STEP 3: DEFINING MISC FIELDS
Identify any fields currently in Cyber Recruiter which can be passed to Abra’s misc. fields. Use the drop-down menus to identify the location of the information in Cyber Recruiter.
DAILY USE – TRANSFERRING NEW HIRES TO ABRA
The transfer process (Cyber Recruiter to Abra) replaces the New Hire Action in Abra. When an applicant needs to be ‘hired’ into Abra, this is done one at a time from the Applicants > Hire into Abra Suite process in Cyber Recruiter.
STEP 1: FIND THE APPLICANT
If you are using the option to ‘Process New Hire’ you can skip this step as the system will already know which individual you are working with. From the Applicant’s menu, select Hire into Abra Suite. Find the desired individual to move into Abra by identifying the individual via his/her Last Name, Email, Applicant ID #, Overall Status or Range (Application Date).

Visibility Software Cyber Recruiter 7.0: HR/Payroll Guide P a g e | 63
Once the Applicant is found, select the Applicant by clicking on the Applicant Name.
STEP 2: IDENTIFY THE COMPANY & ACTION IN ABRA
Should there be more than one company set up in Abra, choose the appropriate company for which this individual is being hired. This will dictate last employee number used and the drop-down options in the follow screens. In addition, select what action to take from the drop-down list. Options include New Hire, Rehire & Job Change. For this option select “New Hire”.
STEP 3: ENTER EMPLOYEE IDENTIFIERS
Enter the Employee Number (unique identifier for Abra) and the Hire Date for this employee. If employee number in Abra is a numeric value, the Last Employee # will be generated to help determine what the next number should be. If the employee number is alphanumeric, Cannot Determine will show instead.
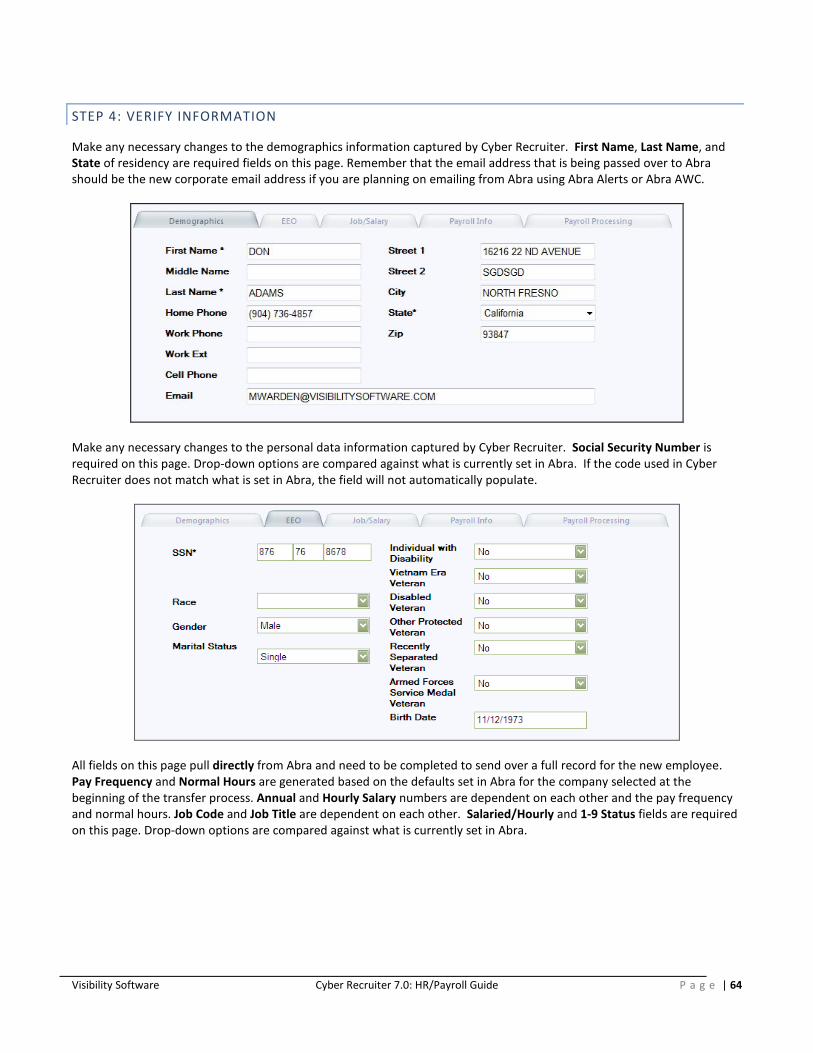
Visibility Software Cyber Recruiter 7.0: HR/Payroll Guide P a g e | 64
STEP 4: VERIFY INFORMATION
Make any necessary changes to the demographics information captured by Cyber Recruiter. First Name, Last Name, and State of residency are required fields on this page. Remember that the email address that is being passed over to Abra should be the new corporate email address if you are planning on emailing from Abra using Abra Alerts or Abra AWC.
Make any necessary changes to the personal data information captured by Cyber Recruiter. Social Security Number is required on this page. Drop-down options are compared against what is currently set in Abra. If the code used in Cyber Recruiter does not match what is set in Abra, the field will not automatically populate.
All fields on this page pull directly from Abra and need to be completed to send over a full record for the new employee. Pay Frequency and Normal Hours are generated based on the defaults set in Abra for the company selected at the beginning of the transfer process. Annual and Hourly Salary numbers are dependent on each other and the pay frequency and normal hours. Job Code and Job Title are dependent on each other. Salaried/Hourly and 1-9 Status fields are required on this page. Drop-down options are compared against what is currently set in Abra.

Visibility Software Cyber Recruiter 7.0: HR/Payroll Guide P a g e | 65
If the payroll module in Abra is activated, additional information is needed when processing a new hire. Enter the necessary information to complete this employee’s payroll record. Defaults: Payroll Status Active (changing this will affect the payroll process) Job Type R-Regular (changing this will affect the 941) EIC Filing Status Not Eligible (change this only if the employee is eligible for EIC) Statutory No (change this only if the person should not have any taxes withheld) If the payroll module in Abra is activated, additional information is needed when processing a new hire. Enter the necessary information to complete this employee’s payroll record for processing. Pay Group will list the available pay groups based on the company selected, Regular and Holiday earnings are used if this person will receive an automatic timesheet for payroll. Time Sheet Work Code should be the state in which the employee will be working and will determine the state to which unemployment taxes will be calculated.
STEP 5: SEND INFORMATION
Press the Save Changes button in the system to forward the information to the Abra database. The information can now be located in Abra. The information is NOT saved in Cyber Recruiter.
DAILY USE – REHIRING PREVIOUS EMPLOYEES
The transfer process (Cyber Recruiter to Abra) replaces the Rehire Action in Abra. When an applicant needs to be ‘hired’ into Abra, this is done one at a time from the Applicants > Hire into Abra Suite process in Cyber Recruiter.
STEP 1: FIND THE APPLICANT

Visibility Software Cyber Recruiter 7.0: HR/Payroll Guide P a g e | 66
If you are using the option to ‘Process New Hire’ you can skip this step as the system will already know which individual you are working with. From the Applicant’s menu, select Hire into Abra Suite. Find the desired individual to move into Abra by identifying the individual via his/her Last Name, Email, Applicant ID #, Overall Status or Range (Application Date).
Once the Applicant is found, select the Applicant by clicking on the Applicant Name.

Visibility Software Cyber Recruiter 7.0: HR/Payroll Guide P a g e | 67
STEP 2: IDENTIFY THE COMPANY & ACTION IN ABRA
The system will compare the employee list from the company selected and search to find the individual you wish to hire based the Social Security Number matching between Abra and Cyber Recruiter and will automatically select Rehire. Should there be more than one company set up in Abra, choose the appropriate company for which this individual is being rehired.
STEP 3: ENTER REHIRE DATE
The Employee Number will automatically fill in based on the number previously assigned to this individual. Enter in the date of the Rehire Date for this employee.
STEP 4: VERIFY INFORMATION
Make any necessary changes to the demographic and job information based on the new position this employee is being rehired to fill.
STEP 5: SEND INFORMATION
Press the Save Changes button in the system to forward the information to the Abra database. The information can now be located in Abra. The information is NOT saved in Cyber Recruiter.

Visibility Software Cyber Recruiter 7.0: HR/Payroll Guide P a g e | 68
DAILY USE – JOB CHANGE
The transfer process (Cyber Recruiter to Abra) replaces the Job Change Action in Abra. When an employee takes a new position the action and new information can be pushed to Abra, this is done one at a time from the Applicants > Hire into Abra Suite process in Cyber Recruiter.
STEP 1: FIND THE APPLICANT
If you are using the option to ‘Process New Hire’ you can skip this step as the system will already know which individual you are working with. From the Applicant’s menu, select Hire into Abra Suite. Find the desired individual to move into Abra by identifying the individual via his/her Last Name, Email, Applicant ID #, Overall Status or Range (Application Date).
Once the Applicant is found, select the Applicant by clicking on the Applicant Name.
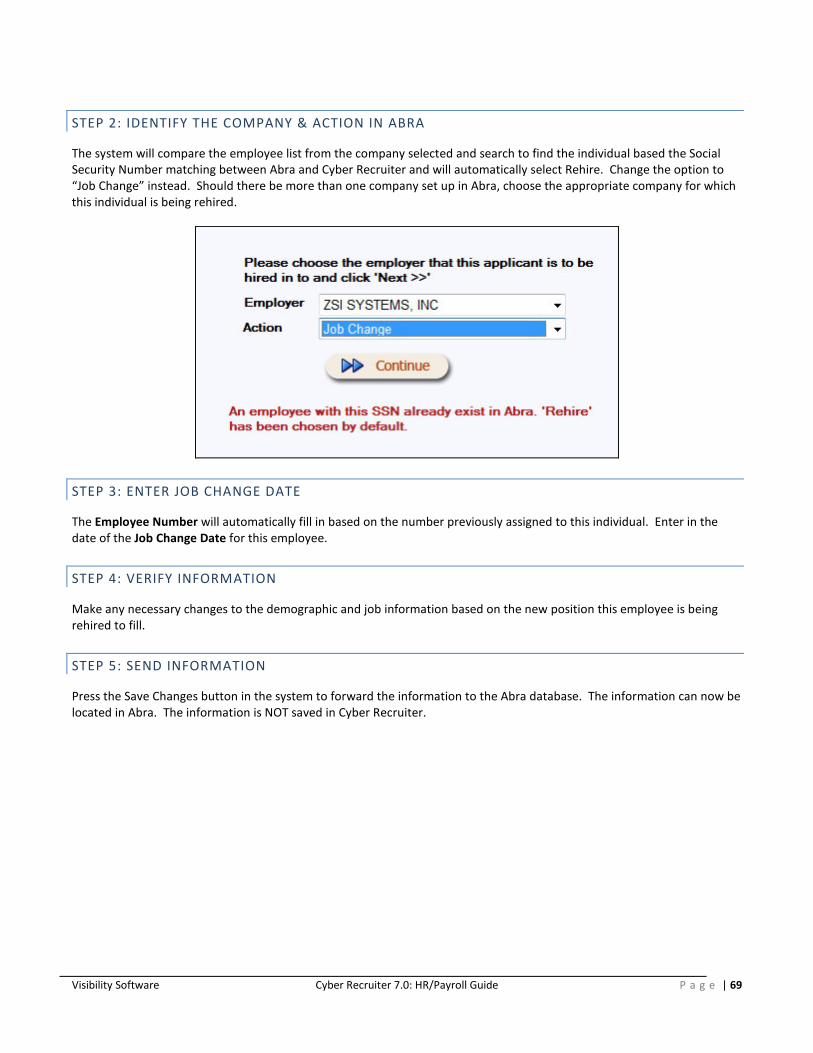
Visibility Software Cyber Recruiter 7.0: HR/Payroll Guide P a g e | 69
STEP 2: IDENTIFY THE COMPANY & ACTION IN ABRA
The system will compare the employee list from the company selected and search to find the individual based the Social Security Number matching between Abra and Cyber Recruiter and will automatically select Rehire. Change the option to “Job Change” instead. Should there be more than one company set up in Abra, choose the appropriate company for which this individual is being rehired.
STEP 3: ENTER JOB CHANGE DATE
The Employee Number will automatically fill in based on the number previously assigned to this individual. Enter in the date of the Job Change Date for this employee.
STEP 4: VERIFY INFORMATION
Make any necessary changes to the demographic and job information based on the new position this employee is being rehired to fill.
STEP 5: SEND INFORMATION
Press the Save Changes button in the system to forward the information to the Abra database. The information can now be located in Abra. The information is NOT saved in Cyber Recruiter.

Visibility Software Cyber Recruiter 7.0: HR/Payroll Guide P a g e | 70
WHERE THE DATA GOES
This section links the tabs used in the Abra Data Transfer of Cyber Recruiter to the Abra HR & Payroll system. It is also important to note that the interface:
- Checks the benefits setup to determine if any automatically added benefits should be add to this employee’s record
- Passes formal education to the Education screen in Abra - Passes previous employment to the Previous Employment screen in Abra - Passes skills to the Skills screen in Abra (skills code must be the same in the two systems)
GENERAL Field Name Abra Screen and Field Abra Database Name Company Each Screen P_company Employee ID Each Screen P_empno Hire Date HR Status / Original Hire
HR Status / Last Hire HR Status / Seniority Date Current Job / Job Date Current Pay / Pay Effective Date
P_orighire P_lasthire P_sendate P_jobdate P_paydate
Current Job / Employee Status P_active
DEMOGRAPHICS Information that appears on this page is pulled from the Cyber Recruiter Applicant Demographics Page. It should be verified as the employee is hired into Abra. Field Name Abra Screen and Field Abra Database Name First Name Demographics / First Name P_fname Middle Name Demographics /Middle Name P_mi Last Name Demographics / Last Name P_lname Home Phone Demographics / Home Phone P_hphone Work Phone Demographics / Business Phone P_busphone Work Ext. Demographics / Extension P_busext Cell Phone Demographics / Cell Phone P_cellphone Email Demographics / Email P_email Street 1 Demographics / Home Street 1 P_hstreet1 Street 2 Demographics / Home Street 2 P_hstreet2 City Demographics / Home City P_hcity State Demographics / Home State P_hstate Zip Demographics / Home Zip P_hzip
PERSONAL INFORMATION Information that appears on this page is pulled from the Cyber Recruiter Applicant Demographics Page under the EEO section. It should be verified as the employee is hired into Abra.

Visibility Software Cyber Recruiter 7.0: HR/Payroll Guide P a g e | 71
Field Name Abra Screen and Field Abra Database Name SSN Demographics / Social Security Number P_ssn Race Demographics / Ethnic Origin P_race Gender Demographics / Gender P_sex Marital Status Demographics / Marital Status P_married Birth Date Demographics / Birth Date P_birth Disabled Demographics / Disabled P_handicap Vietnam Vet HR Status / Vietnam Era Veteran P_Vietnam Disabled Vet HR Status / Disabled Veteran P_disvet Other Vet HR Status / Other Eligible Veteran P_othervet Service Medal Vet HR Status / Service Medal Veteran P_ AFMEDVET
JOB / SALARY Information that is captured on this page is pulling from the Abra drop-down options. All information needs to be verified and selected from the drop-down options. Field Name Abra Screen and Field Abra Database Name Job Title Current Job / Job Title P_jobtitle
P_jobcode (based on Abra setup) P_eeoclass (based on Abra setup) P_exempt (based on Abra setup) P_jobgroup (based on Abra setup) P_salgrade (based on Abra seteup)
Employee Type Current Job / Employee Type P_employ Salaried/Hourly Current Pay / Salaried Hourly P_salhour Annual Salary Current Pay / Annual Pay P_annual
P_salary (based on pay frequency and normal hours) Hourly Salary Current Pay / Unit Pay Rate P_unitrate Pay Frequency Current Pay / Pay Frequency P_payfreq Supervisor Current Job / Supervisor P_supervis Secondary Sup Current Job / Manager P_supervis2 Division/ Department/ Location/
Current Job / Division (based on Abra Setup) Current Job / Department (based on Abra Setup) Current Job / Location (based on Abra Setup)
P_level1 P_level2 P_level3
Normal Hours Current Pay / Hours Per Pay Period P_normunit I-9 Status HR Status / I-9 Verification Status P_i9verif
PAYROLL INFO Information that is captured on this page is pulling from the Abra drop-down options. All information needs to be verified and selected from the drop-down options. This tab will only be activated if the set up in the Cyber Recruiter Admin section is set to track payroll information for Abra. Field Name Abra Screen and Field Abra Database Name Payroll Status Payroll Status / Payroll Status P_paystat Job Type Current Job (Pay) / Job Type P_emptype WC Category Current Job (Pay) / Workers Comp P_workcomp
P_workrate (based on Abra setup)

Visibility Software Cyber Recruiter 7.0: HR/Payroll Guide P a g e | 72
Direct/Indirect Current Job (Pay) / Direct P_direct EIC Filing Status Tax Withholding / EIC P_eicmstat Statutory Tax Withholding / Statutory P_statute
PAYROLL PROCESSING Information that is captured on this page is pulling from the Abra drop-down options. All information needs to be verified and selected from the drop-down options. This tab will only be activated if the set up in the Cyber Recruiter Admin section is set to track payroll information for Abra. Field Name Abra Screen and Field Abra Database Name Pay Group Payroll Status / Pay Group P_paygroup Regular Earnings Code Payroll Status / Regular Pay P_autoreg Holiday Earnings Code Payroll Status / Holiday Pay P_autohol Time Sheet Work Code Tax Withholding / Timesheet Work Code P_workcode Auto Timesheet Payroll Status / Auto Timesheet P_autopay
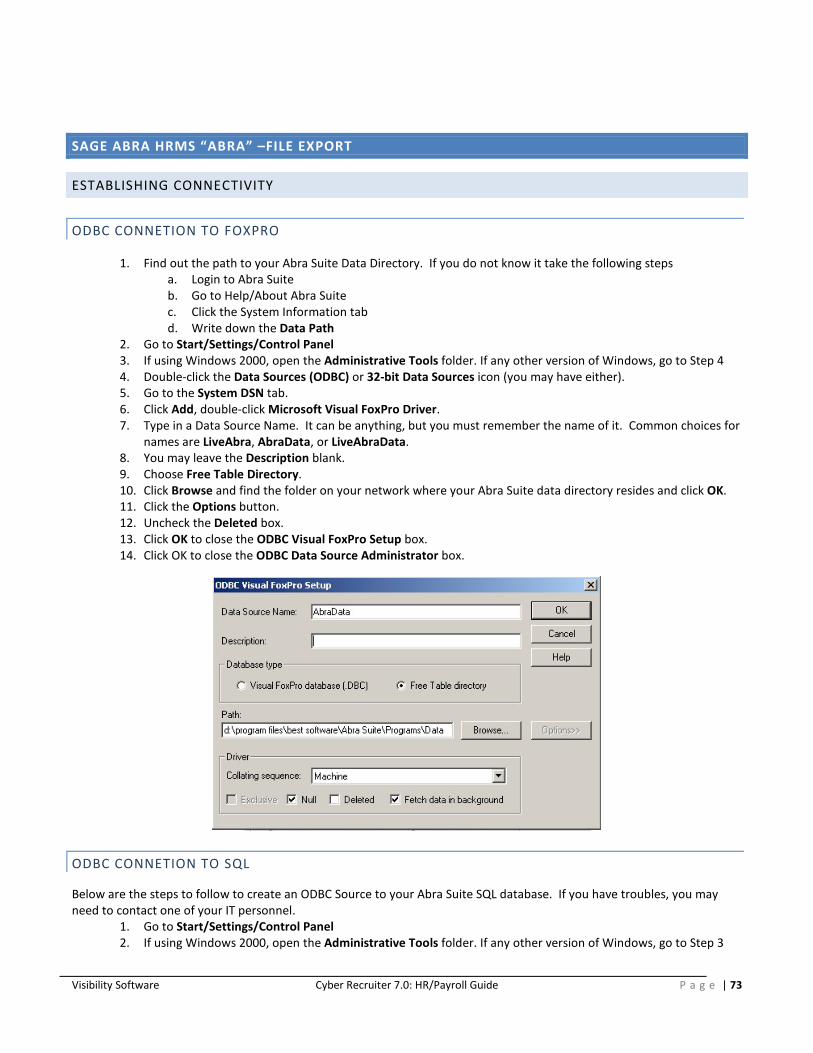
Visibility Software Cyber Recruiter 7.0: HR/Payroll Guide P a g e | 73
SAGE ABRA HRMS “ABRA” –FILE EXPORT
ESTABLISHING CONNECTIVITY
ODBC CONNETION TO FOXPRO
1. Find out the path to your Abra Suite Data Directory. If you do not know it take the following steps a. Login to Abra Suite b. Go to Help/About Abra Suite c. Click the System Information tab d. Write down the Data Path
2. Go to Start/Settings/Control Panel 3. If using Windows 2000, open the Administrative Tools folder. If any other version of Windows, go to Step 4 4. Double-click the Data Sources (ODBC) or 32-bit Data Sources icon (you may have either). 5. Go to the System DSN tab. 6. Click Add, double-click Microsoft Visual FoxPro Driver. 7. Type in a Data Source Name. It can be anything, but you must remember the name of it. Common choices for
names are LiveAbra, AbraData, or LiveAbraData. 8. You may leave the Description blank. 9. Choose Free Table Directory. 10. Click Browse and find the folder on your network where your Abra Suite data directory resides and click OK. 11. Click the Options button. 12. Uncheck the Deleted box. 13. Click OK to close the ODBC Visual FoxPro Setup box. 14. Click OK to close the ODBC Data Source Administrator box.
ODBC CONNETION TO SQL
Below are the steps to follow to create an ODBC Source to your Abra Suite SQL database. If you have troubles, you may need to contact one of your IT personnel.
1. Go to Start/Settings/Control Panel 2. If using Windows 2000, open the Administrative Tools folder. If any other version of Windows, go to Step 3

Visibility Software Cyber Recruiter 7.0: HR/Payroll Guide P a g e | 74
3. Double-click the Data Sources(ODBC) or 32-bit Data Sources icon (you may have either). 4. Go to the System DSN tab. 5. Click Add, double-click SQL Server. 6. Type in a Name. It can be anything, but you must remember the name of it. Common choices for names are
LiveAbra, AbraData, or LiveAbraData. 7. You may leave the Description blank. 8. Enter the name of the Abra SQL Server and click Next.
Check the ‘With SQL Server authentication using a login ID and password enter by the user’ radio button Check the ‘Connect to SQL Server to obtain default settings for the addition configuration options’ checkbox
INSTALLING CYBER RECRUITER TO ABRA IMPORT TOOL
1. Download the import utility from www.VisibilitySoftware.com/CRUpdates/AbraImport.zip into a blank folder on any machine that has the .NET Framework 1.1 installed and has access to the Abra Suite data (either Foxpro or SQL).
2. Unzip the downloaded file into that same folder, there is only one .exe inside. 3. Create an ODBC connection from that machine to the Abra Suite data. See the previous section for information on
setting up connections to FoxPro or SQL. 4. Launch the import utility by double-clicking AbraImport.exe. 5. Click the Setup button 6. Choose whether you use Abra Foxpro or SQL. 7. If you use Abra Foxpro, also choose whether or not you use Abra’s payroll product. 8. Enter the name of the ODBC Source created in step 3 above. 9. Click OK to save your changes.
ADMIN SETUP – ENABLING ABRA
Once the connection information is obtained the following steps in the admin section should be taken to activate this interface.

Visibility Software Cyber Recruiter 7.0: HR/Payroll Guide P a g e | 75
STEP 1: SETTING GLOBAL DEFAULTS
Admin > Links > Pre Defined Links > Abra Suite
Question Response Result
Integration to Abra enabled?
Yes
Abra-specific page and menu items will be added in Cyber Recruiter. Action Needed: Highlight the Users in the Drop-Down List who should have access to the Abra-specific functions in Cyber Recruiter. Hold the CRTL key down to select more than one User.
No Users will not see any references to Abra in Cyber Recruiter. Do you use Abra Payroll?
Yes All Abra Payroll-specific fields will appear in Cyber Recruiter during the transfer process. No Only HR Related fields will appear during the transfer process.
Transfer Method FoxPro, SQL or File Transfer. See previous section for steps regarding FoxPro or SQL. Capitalize everything?
Yes All data transferred to Abra will appear in capitalized lettering. No All data transferred to Abra will appear as it was entered in Cyber Recruiter.
Transfer Benefits N/A – benefits are not compared / added during the file transfer process
Transfer Deductions
N/A – deductions are not compared / added during the file transfer process
Transfer Taxes N/A – taxes are not compared / added during the file transfer process
STEP 2: DEFINING MISC FIELDS
Identify any fields currently in Cyber Recruiter which can be passed to Abra’s misc. fields. Use the drop-down menus to identify the location of the information in Cyber Recruiter.

Visibility Software Cyber Recruiter 7.0: HR/Payroll Guide P a g e | 76
STEP 3: VERIFYING CODE TABLES
Codes which are currently used in Abra need to be re-entered into Cyber Recruiter so the user exporting the information can select the correct value. These values MUST match what is currently in Abra in order for Abra to recognize the values and successfully import the file. All codes are stored under Admin > Codes > Abra.
DAILY USE – TRANSFERRING APPLICANTS TO ABRA
STEP 1: PREPARE THE APPLICANT & VERIFY REQUIRED FIELDS
Once the Abra interface is enabled, an Abra Page in the Applicant File will appear for any users specified in the setup. This page will appear for all applicants but should only be complete for individuals who should be sent over to Abra. To start the process, find the individual’s record that will be exported to Abra.
Once the individual is located, use the Abra Page to enter data that does not already exist in the Cyber Recruiter product. This information will be transferred in addition to the required pieces of information necessary for the transfer. Even though some of these fields on these tabs are not required it is good practice to fill out as much as possible to have the most complete record. Be sure to save your changes after completing this page.
STEP 2: ADD RECORD TO THE EXPORT FILE
Click on the red link at the bottom of the page to add this individual to the export file. The red indicator will change to indicate the individual is on the list of records to be exported. In this example, the link has not been clicked.
STEP 3: GENERATE THE EXPORT FILE
After verifying and adding the Individual to the export file, from the main menu bar select Applicants > Create Abra Suite Export File to generate the export file.

Visibility Software Cyber Recruiter 7.0: HR/Payroll Guide P a g e | 77
The Employee ID number is pulled from the Applicant File (Employee File) > Abra Page > Employee ID Field. This table displays the Individuals who have been added to the export file via the Applicant File > Abra Page. To add additional Individuals to the list, press the Add button and find the individual’s record. To remove individuals from the list, check the box at the end of the record line and click the Delete Selected button. Checking the checkbox in the top of the table will place checkmarks or remove check marks next to everyone’s record. Everyone listed here will be included in the export file.
Click the Export button to create the export file. Enter the name of the file in the Filename field. Cyber Recruiter will save the last export file created. However, this file will be overwritten each time the export process is run.
STEP 4: VERIFY RESULTS
The page which appears allows you to verify the results and eventually to save the file generated to a network or disk location.
CORRECTING ERRORS
The error log indicates that some individuals are missing information, the information for those individuals should be entered and another export performed. Click the Print link to print a report as needed and click the individual’s name to enter the file or make the necessary changes. The export process can be run as many times as needed to obtain an error free file.
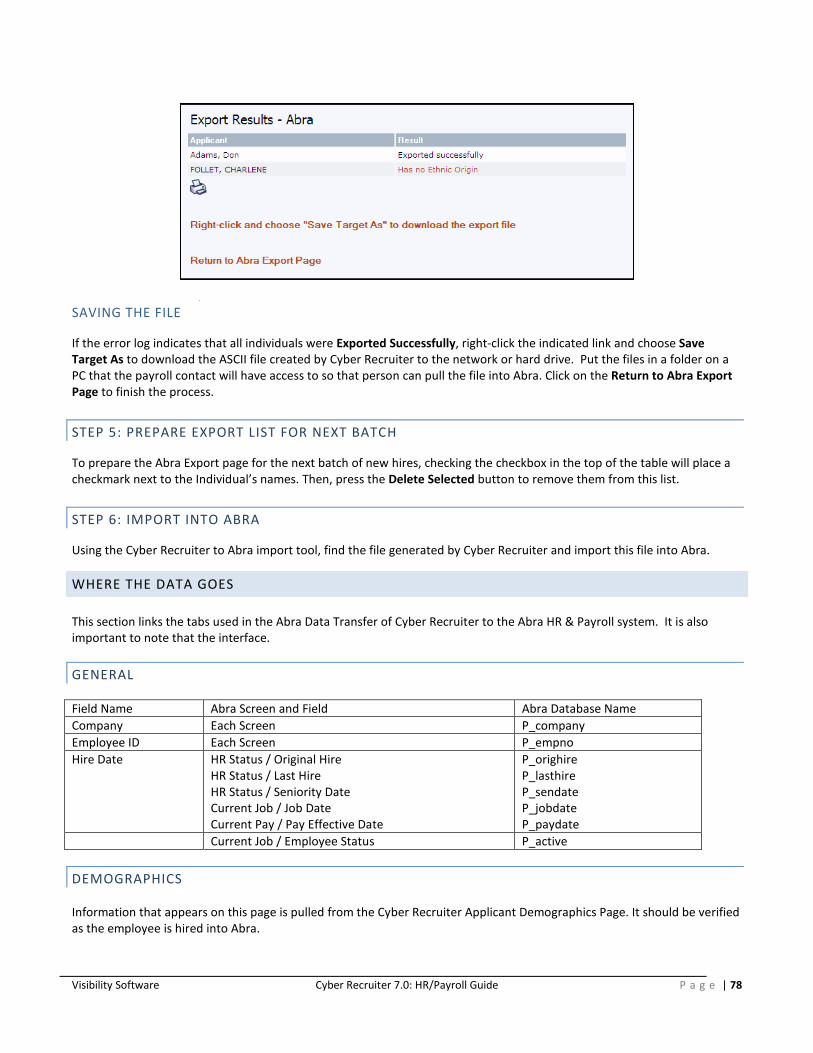
Visibility Software Cyber Recruiter 7.0: HR/Payroll Guide P a g e | 78
SAVING THE FILE
If the error log indicates that all individuals were Exported Successfully, right-click the indicated link and choose Save Target As to download the ASCII file created by Cyber Recruiter to the network or hard drive. Put the files in a folder on a PC that the payroll contact will have access to so that person can pull the file into Abra. Click on the Return to Abra Export Page to finish the process.
STEP 5: PREPARE EXPORT LIST FOR NEXT BATCH
To prepare the Abra Export page for the next batch of new hires, checking the checkbox in the top of the table will place a checkmark next to the Individual’s names. Then, press the Delete Selected button to remove them from this list.
STEP 6: IMPORT INTO ABRA
Using the Cyber Recruiter to Abra import tool, find the file generated by Cyber Recruiter and import this file into Abra.
WHERE THE DATA GOES This section links the tabs used in the Abra Data Transfer of Cyber Recruiter to the Abra HR & Payroll system. It is also important to note that the interface.
GENERAL Field Name Abra Screen and Field Abra Database Name Company Each Screen P_company Employee ID Each Screen P_empno Hire Date HR Status / Original Hire
HR Status / Last Hire HR Status / Seniority Date Current Job / Job Date Current Pay / Pay Effective Date
P_orighire P_lasthire P_sendate P_jobdate P_paydate
Current Job / Employee Status P_active
DEMOGRAPHICS Information that appears on this page is pulled from the Cyber Recruiter Applicant Demographics Page. It should be verified as the employee is hired into Abra.

Visibility Software Cyber Recruiter 7.0: HR/Payroll Guide P a g e | 79
Field Name Abra Screen and Field Abra Database Name First Name Demographics / First Name P_fname Middle Name Demographics /Middle Name P_mi Last Name Demographics / Last Name P_lname Home Phone Demographics / Home Phone P_hphone Work Phone Demographics / Business Phone P_busphone Work Ext. Demographics / Extension P_busext Cell Phone Demographics / Cell Phone P_cellphone Email Demographics / Email P_email Street 1 Demographics / Home Street 1 P_hstreet1 Street 2 Demographics / Home Street 2 P_hstreet2 City Demographics / Home City P_hcity State Demographics / Home State P_hstate Zip Demographics / Home Zip P_hzip
PERSONAL INFORMATION Information that appears on this page is pulled from the Cyber Recruiter Applicant Demographics Page under the EEO section. It should be verified as the employee is hired into Abra. Field Name Abra Screen and Field Abra Database Name SSN Demographics / Social Security Number P_ssn Race Demographics / Ethnic Origin P_race Gender Demographics / Gender P_sex Marital Status Demographics / Marital Status P_married Birth Date Demographics / Birth Date P_birth Disabled Demographics / Disabled P_handicap Vietnam Vet HR Status / Vietnam Era Veteran P_Vietnam Disabled Vet HR Status / Disabled Veteran P_disvet Other Vet HR Status / Other Eligible Veteran P_othervet
JOB / SALARY Information that is captured on this page is pulling from the Abra drop-down options. All information needs to be verified and selected from the drop-down options. Field Name Abra Screen and Field Abra Database Name Job Title Current Job / Job Title P_jobtitle
P_jobcode (based on Abra setup) P_eeoclass (based on Abra setup) P_exempt (based on Abra setup) P_jobgroup (based on Abra setup) P_salgrade (based on Abra seteup)
Employee Type Current Job / Employee Type P_employ Salaried/Hourly Current Pay / Salaried Hourly P_salhour Annual Salary Current Pay / Annual Pay P_annual
P_salary (based on pay frequency and normal hours)
Hourly Salary Current Pay / Unit Pay Rate P_unitrate Pay Frequency Current Pay / Pay Frequency P_payfreq

Visibility Software Cyber Recruiter 7.0: HR/Payroll Guide P a g e | 80
Org Level 1-5 Based on Abra Setup P_level1 – p_level5 Normal Hours Current Pay / Hours Per Pay Period P_normunit I-9 Status HR Status / I-9 Verification Status P_i9verif
PAYROLL INFO Information that is captured on this page is pulling from the Abra drop-down options. All information needs to be verified and selected from the drop-down options. This tab will only be activated if the set up in the Cyber Recruiter Admin section is set to track payroll information for Abra. Field Name Abra Screen and Field Abra Database Name Payroll Status Payroll Status / Payroll Status P_paystat Job Type Current Job (Pay) / Job Type P_emptype WC Category Current Job (Pay) / Workers Comp P_workcomp
P_workrate (based on Abra setup) Direct/Indirect Current Job (Pay) / Direct P_direct Statutory Tax Withholding / Statutory P_statute
PAYROLL PROCESSING Information that is captured on this page is pulling from the Abra drop-down options. All information needs to be verified and selected from the drop-down options. This tab will only be activated if the set up in the Cyber Recruiter Admin section is set to track payroll information for Abra. Field Name Abra Screen and Field Abra Database Name Pay Group Payroll Status / Pay Group P_paygroup Regular Earnings Code Payroll Status / Regular Pay P_autoreg Holiday Earnings Code Payroll Status / Holiday Pay P_autohol Time Sheet Work Code Tax Withholding / Timesheet Work Code P_workcode Auto Timesheet Payroll Status / Auto Timesheet P_autopay
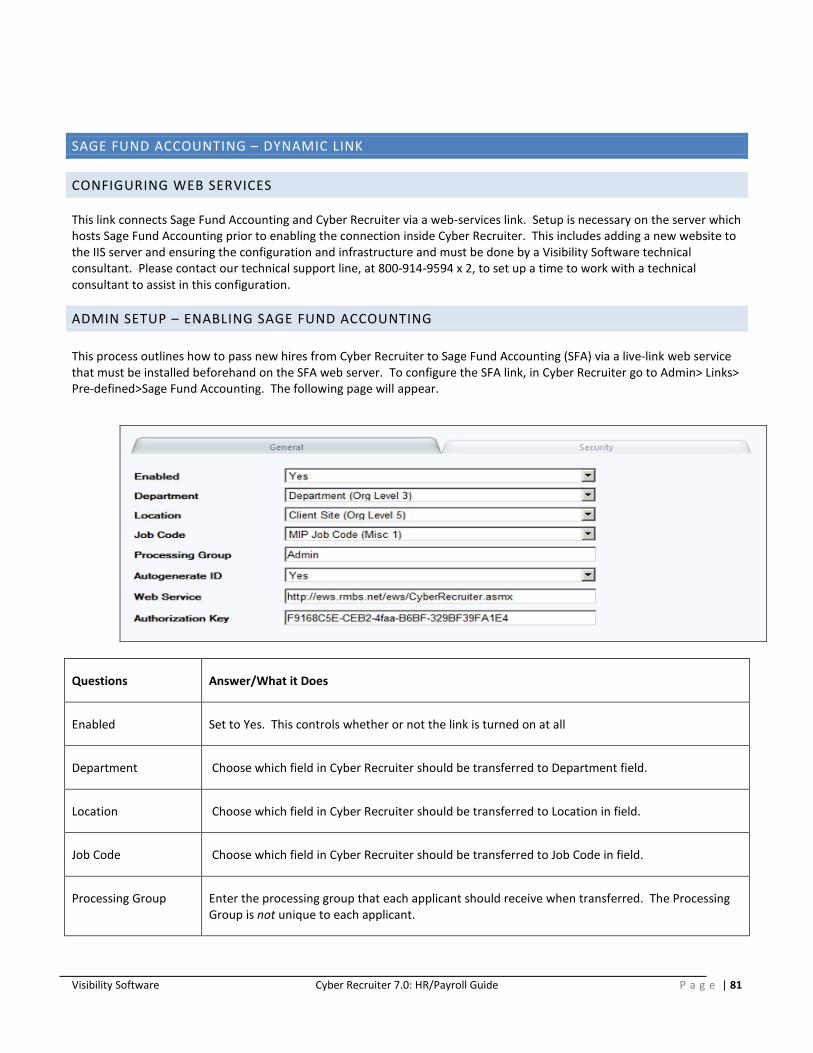
Visibility Software Cyber Recruiter 7.0: HR/Payroll Guide P a g e | 81
SAGE FUND ACCOUNTING – DYNAMIC LINK
CONFIGURING WEB SERVICES
This link connects Sage Fund Accounting and Cyber Recruiter via a web-services link. Setup is necessary on the server which hosts Sage Fund Accounting prior to enabling the connection inside Cyber Recruiter. This includes adding a new website to the IIS server and ensuring the configuration and infrastructure and must be done by a Visibility Software technical consultant. Please contact our technical support line, at 800-914-9594 x 2, to set up a time to work with a technical consultant to assist in this configuration.
ADMIN SETUP – ENABLING SAGE FUND ACCOUNTING This process outlines how to pass new hires from Cyber Recruiter to Sage Fund Accounting (SFA) via a live-link web service that must be installed beforehand on the SFA web server. To configure the SFA link, in Cyber Recruiter go to Admin> Links> Pre-defined>Sage Fund Accounting. The following page will appear.
Questions Answer/What it Does
Enabled Set to Yes. This controls whether or not the link is turned on at all
Department Choose which field in Cyber Recruiter should be transferred to Department field.
Location Choose which field in Cyber Recruiter should be transferred to Location in field.
Job Code Choose which field in Cyber Recruiter should be transferred to Job Code in field.
Processing Group Enter the processing group that each applicant should receive when transferred. The Processing Group is not unique to each applicant.
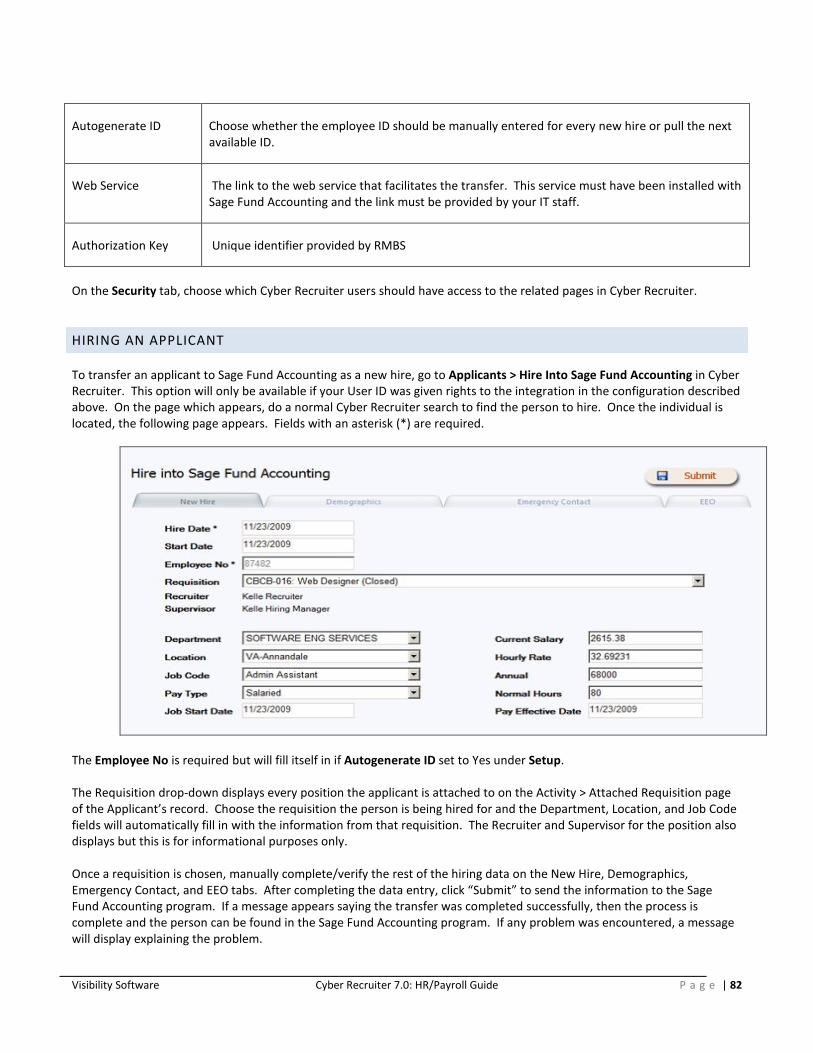
Visibility Software Cyber Recruiter 7.0: HR/Payroll Guide P a g e | 82
Autogenerate ID Choose whether the employee ID should be manually entered for every new hire or pull the next available ID.
Web Service The link to the web service that facilitates the transfer. This service must have been installed with Sage Fund Accounting and the link must be provided by your IT staff.
Authorization Key Unique identifier provided by RMBS
On the Security tab, choose which Cyber Recruiter users should have access to the related pages in Cyber Recruiter.
HIRING AN APPLICANT
To transfer an applicant to Sage Fund Accounting as a new hire, go to Applicants > Hire Into Sage Fund Accounting in Cyber Recruiter. This option will only be available if your User ID was given rights to the integration in the configuration described above. On the page which appears, do a normal Cyber Recruiter search to find the person to hire. Once the individual is located, the following page appears. Fields with an asterisk (*) are required.
The Employee No is required but will fill itself in if Autogenerate ID set to Yes under Setup. The Requisition drop-down displays every position the applicant is attached to on the Activity > Attached Requisition page of the Applicant’s record. Choose the requisition the person is being hired for and the Department, Location, and Job Code fields will automatically fill in with the information from that requisition. The Recruiter and Supervisor for the position also displays but this is for informational purposes only. Once a requisition is chosen, manually complete/verify the rest of the hiring data on the New Hire, Demographics, Emergency Contact, and EEO tabs. After completing the data entry, click “Submit” to send the information to the Sage Fund Accounting program. If a message appears saying the transfer was completed successfully, then the process is complete and the person can be found in the Sage Fund Accounting program. If any problem was encountered, a message will display explaining the problem.
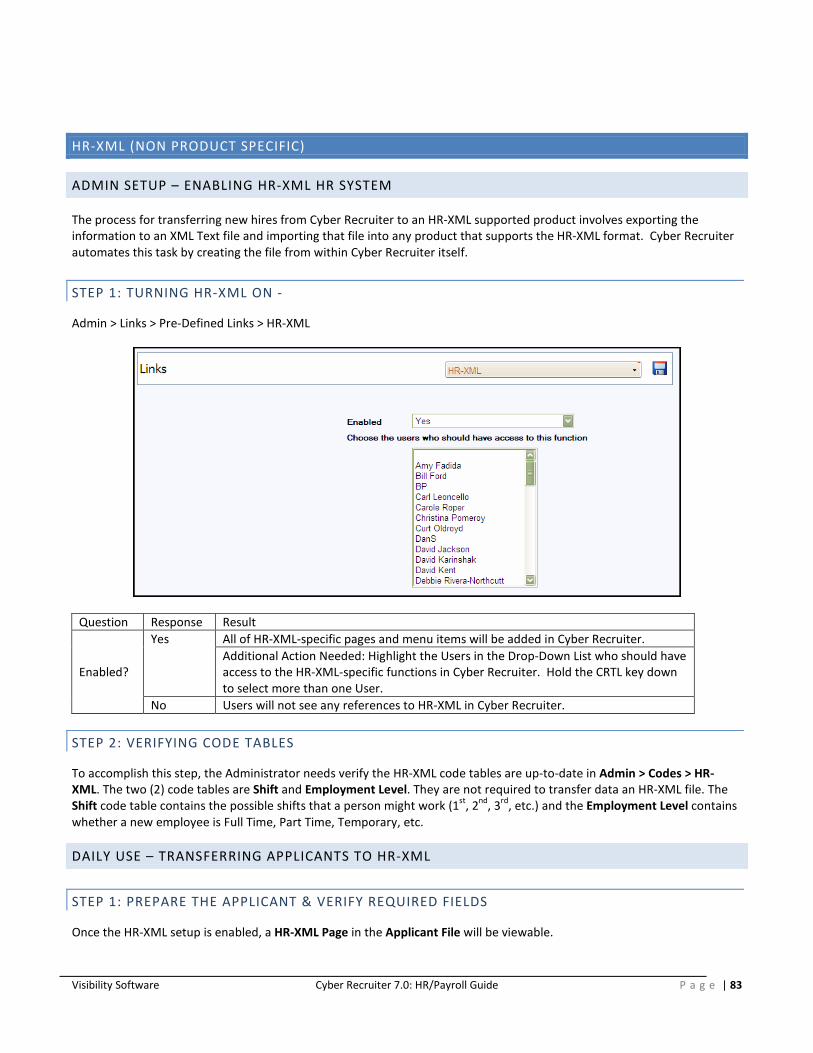
Visibility Software Cyber Recruiter 7.0: HR/Payroll Guide P a g e | 83
HR-XML (NON PRODUCT SPECIFIC)
ADMIN SETUP – ENABLING HR-XML HR SYSTEM
The process for transferring new hires from Cyber Recruiter to an HR-XML supported product involves exporting the information to an XML Text file and importing that file into any product that supports the HR-XML format. Cyber Recruiter automates this task by creating the file from within Cyber Recruiter itself.
STEP 1: TURNING HR-XML ON -
Admin > Links > Pre-Defined Links > HR-XML
Question Response Result
Enabled?
Yes All of HR-XML-specific pages and menu items will be added in Cyber Recruiter. Additional Action Needed: Highlight the Users in the Drop-Down List who should have access to the HR-XML-specific functions in Cyber Recruiter. Hold the CRTL key down to select more than one User.
No Users will not see any references to HR-XML in Cyber Recruiter.
STEP 2: VERIFYING CODE TABLES
To accomplish this step, the Administrator needs verify the HR-XML code tables are up-to-date in Admin > Codes > HR-XML. The two (2) code tables are Shift and Employment Level. They are not required to transfer data an HR-XML file. The Shift code table contains the possible shifts that a person might work (1st, 2nd, 3rd, etc.) and the Employment Level contains whether a new employee is Full Time, Part Time, Temporary, etc.
DAILY USE – TRANSFERRING APPLICANTS TO HR-XML
STEP 1: PREPARE THE APPLICANT & VERIFY REQUIRED FIELDS
Once the HR-XML setup is enabled, a HR-XML Page in the Applicant File will be viewable.

Visibility Software Cyber Recruiter 7.0: HR/Payroll Guide P a g e | 84
Find the Applicant to export - Applicants > Find Applicant. Once the Applicant is located, use the HR-XML Page to enter data that does not already exist in the Cyber Recruiter product. Even though these fields are not required, Employee #, Hire Date, Employment Level, and Annual Salary are typically required for any HR product.
STEP 2: ADD RECORD TO THE EXPORT FILE
Click on the green link at the bottom of the page to add this Applicant to the export file. The red indicator will change to indicate whether the applicant is on the list of applicants to be exported. In this example, the link has been clicked.
STEP 3: GENERATE EXPORT FILE
After verifying and adding the Applicant to the export file, from the main menu bar select Applicants > HR-XML Export to generate the export file. The Employee ID number is pulled from the Applicant File (Employee File) > HR-XML Page > Employee ID Field. This table displays the Applicants who have been added to the export file via the Applicant File > HR-XML Page. To add additional applicant to the list, press the Add button and find the Individual. To remove Applicants from the list, check the box at the end of the Individual name click the Delete Selected button. Checking the checkbox in the top of the table will place checkmarks or remove check marks next to everyone’s record. Everyone listed here will be included in the export file.
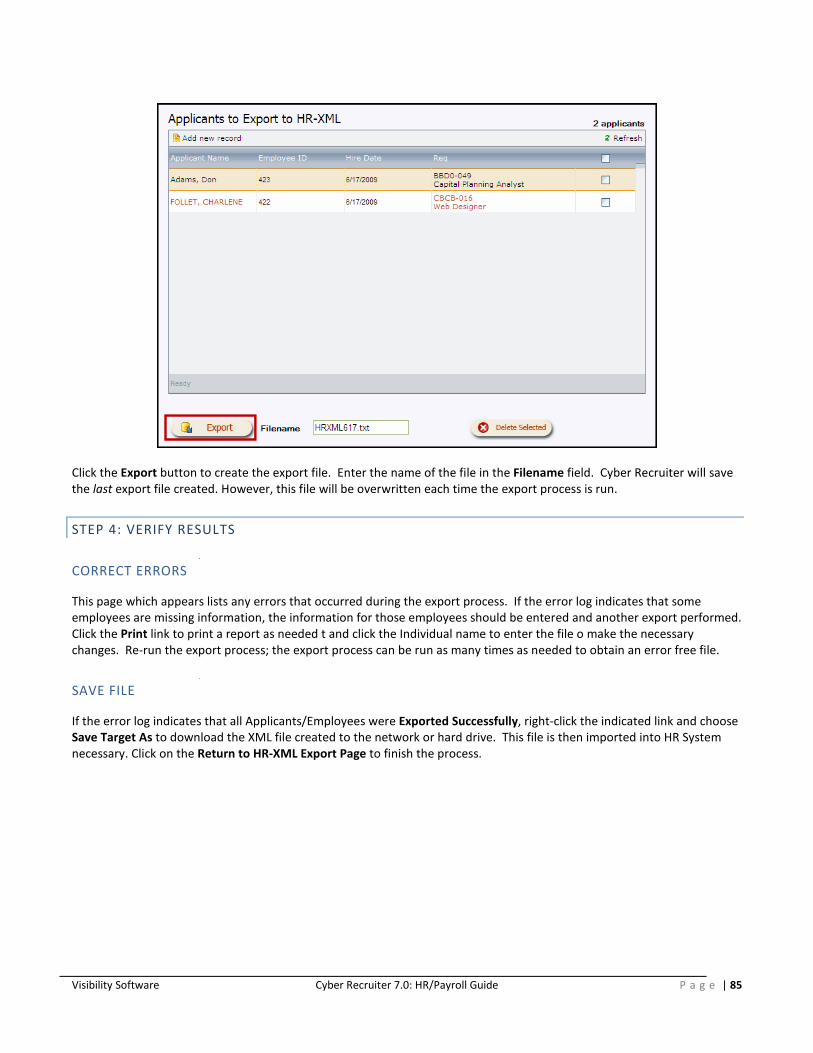
Visibility Software Cyber Recruiter 7.0: HR/Payroll Guide P a g e | 85
Click the Export button to create the export file. Enter the name of the file in the Filename field. Cyber Recruiter will save the last export file created. However, this file will be overwritten each time the export process is run.
STEP 4: VERIFY RESULTS
CORRECT ERRORS
This page which appears lists any errors that occurred during the export process. If the error log indicates that some employees are missing information, the information for those employees should be entered and another export performed. Click the Print link to print a report as needed t and click the Individual name to enter the file o make the necessary changes. Re-run the export process; the export process can be run as many times as needed to obtain an error free file.
SAVE FILE
If the error log indicates that all Applicants/Employees were Exported Successfully, right-click the indicated link and choose Save Target As to download the XML file created to the network or hard drive. This file is then imported into HR System necessary. Click on the Return to HR-XML Export Page to finish the process.
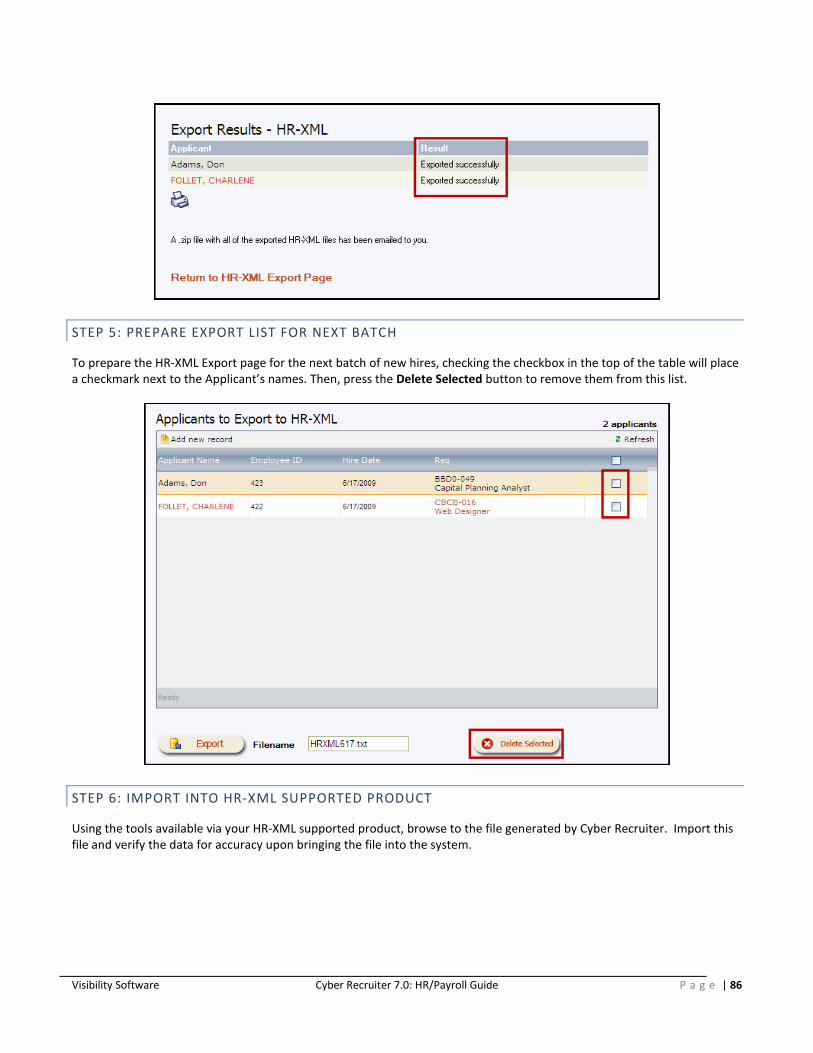
Visibility Software Cyber Recruiter 7.0: HR/Payroll Guide P a g e | 86
STEP 5: PREPARE EXPORT LIST FOR NEXT BATCH
To prepare the HR-XML Export page for the next batch of new hires, checking the checkbox in the top of the table will place a checkmark next to the Applicant’s names. Then, press the Delete Selected button to remove them from this list.
STEP 6: IMPORT INTO HR-XML SUPPORTED PRODUCT
Using the tools available via your HR-XML supported product, browse to the file generated by Cyber Recruiter. Import this file and verify the data for accuracy upon bringing the file into the system.
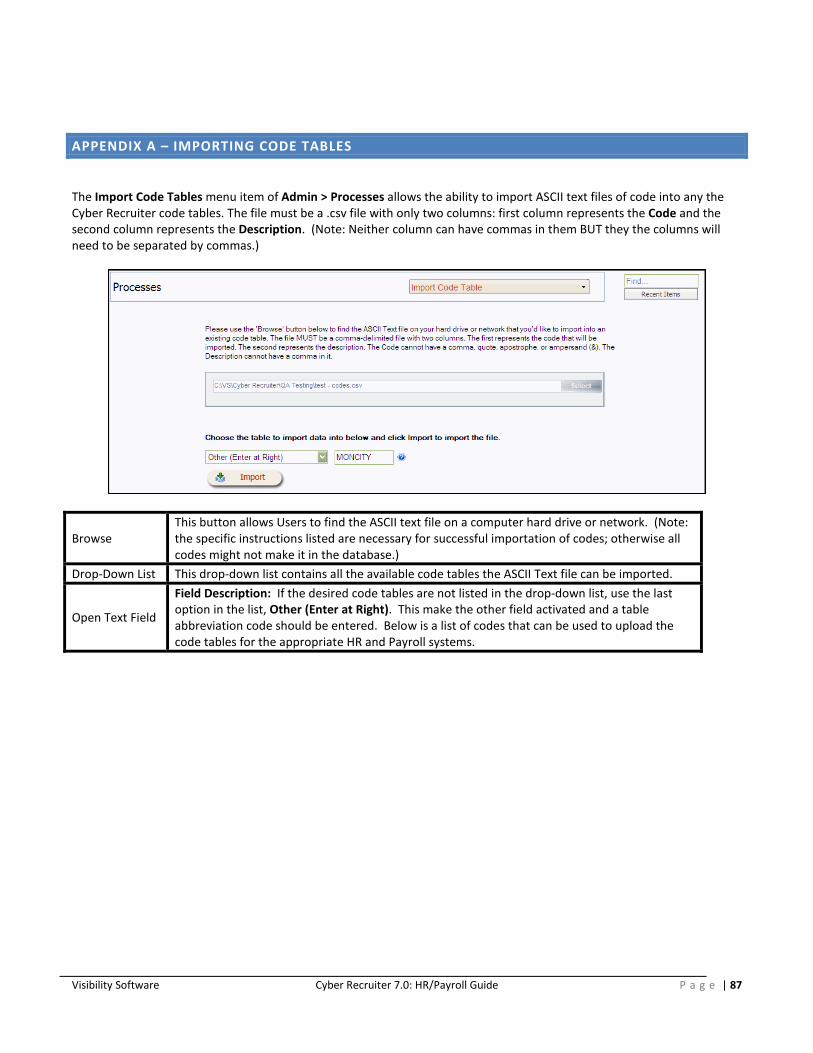
Visibility Software Cyber Recruiter 7.0: HR/Payroll Guide P a g e | 87
APPENDIX A – IMPORTING CODE TABLES
The Import Code Tables menu item of Admin > Processes allows the ability to import ASCII text files of code into any the Cyber Recruiter code tables. The file must be a .csv file with only two columns: first column represents the Code and the second column represents the Description. (Note: Neither column can have commas in them BUT they the columns will need to be separated by commas.)
Browse This button allows Users to find the ASCII text file on a computer hard drive or network. (Note: the specific instructions listed are necessary for successful importation of codes; otherwise all codes might not make it in the database.)
Drop-Down List This drop-down list contains all the available code tables the ASCII Text file can be imported.
Open Text Field
Field Description: If the desired code tables are not listed in the drop-down list, use the last option in the list, Other (Enter at Right). This make the other field activated and a table abbreviation code should be entered. Below is a list of codes that can be used to upload the code tables for the appropriate HR and Payroll systems.