cyber protection guide - mobotix.com · password of at least one user of the admins group. without...
TRANSCRIPT

© MOBOTIX AG • www.mobotix.com • 02/2018Cyber Protection Guide
Cyber Protection Guide
How To Harden Your MOBOTIX Video System
Camera • VMS • NAS
ww
w.c
actu
scon
cept
.com

About This GuideCyber-attacks against internet connected software and hardware is a growing problem. In recent years, attackers are increasingly focused on exploiting the weakest links within a security perimeter to gain access to critical applications and sensitive data.
With video surveillance technology as a vital part of site security that often inhabits a shared corporate network; video surveillance devices are increasingly becoming the target of directed cyber-attacks.
Recognising this emerging trend, MOBOTIX has developed a set of built-in tools and features allowing IT security administrators to configure each device as part of a multi-layered approach to cyber security.
These tools when used alongside other security elements such as firewalls and network segmentation can reduce the attack surface presented by MOBOTIX devices as part of a secure access policy for administrators and users.
This guide provides practical advice on how to configure MOBOTIX devices to offer the most protection against cyber-attack along with best practice guidance on building a secure video surveillance infrastructure.
Please note: This document is intended to give the responsible admin a complete overview of all possible measurements to harden the MOBOTIX system. Regarding the individual application and to avoid reconfigurations, it may not be useful to carry out every single procedure explained in this guide.
General information: MOBOTIX assumes no liability for technical errors, printing errors or omissions.
Copyright Notices: All rights reserved. MOBOTIX, the logo of MOBOTIX AG and MxAnalytics are registered trademarks of MOBOTIX AG in the European Union, the USA and other countries. © MOBOTIX AG 2018
Cyber Protection Guide
© MOBOTIX AG • www.mobotix.com • 02/2018Cyber Protection Guide • Page 2

Camera Configuration
1. Keep the firmware of the cameras up-to-dateMOBOTIX firmware can be downloaded for free from our web site: www.mobotix.com > Support > Download CenterNot sure how to to proceed? Please refer to this compact guide: www.mobotix.com > Support > Download Center > Documentation > Brochures & Guides > Compact Guides > Mx_CG_FirmwareUpdate.pdf
2. Reset the configuration to factory defaultsAdmin Menu > Configuration > Reset configuration to factory defaults
Cyber Protection Guide
© MOBOTIX AG • www.mobotix.com • 02/2018Cyber Protection Guide • Page 3

3. Change the default admin passwordAdmin Menu > Security > Users and Passwords
It is strongly recommended to change the “admin” user name and the default password “meinsm”.Once you have finished configuring users, passwords and groups, you should always store the settings in the camera's permanent memory. Otherwise, the modified configuration will only be used until the next camera reboot. Use the Close button at the end of the dialog as it will automatically ask you to store the camera configuration to the camera's permanent memory.
Make sure that you store your password information in a secure place. Special care should be taken to retain the password of at least one user of the admins group. Without the password, administrative access to the camera is not possible any more and there is no possibility to circumvent the password. It is likewise impossible to retrieve the password from a permanently saved configuration.
How to create a strong password:• Use 8 or more characters (up to 99)• At least one upper-case character• At least one lower-case character• At least one digit• At least one special character: ! “ # $ % & ' ( ) * + , - . / : ; < = > ? @ [ \ ] ^ _ `{ | } ~• Avoid common words and dates
Password reset policy: If the administrator password is no longer available, you will have to send the camera back to MOBOTIX for a factory reset!
4. Create different user groups with different user rightsAdmin Menu > Security > Users and PasswordsGenerally speaking, not all the users need the same rights. You can create up to 25 different users group from the page Admin Menu > Group Access Control List
5. Create different users and assign them to the right groupsAdmin Menu > Security > Users and PasswordsIt’s always advisable to create a user for each person who is authorized to access the camera. Up to 100 users can be created. Actions performed by authorized users are tracked in the Web Server Log file; this helps to determine “who did what” in case of disputes.
Refer to the description above to create strong passwords.
Cyber Protection Guide
© MOBOTIX AG • www.mobotix.com • 02/2018Cyber Protection Guide • Page 4
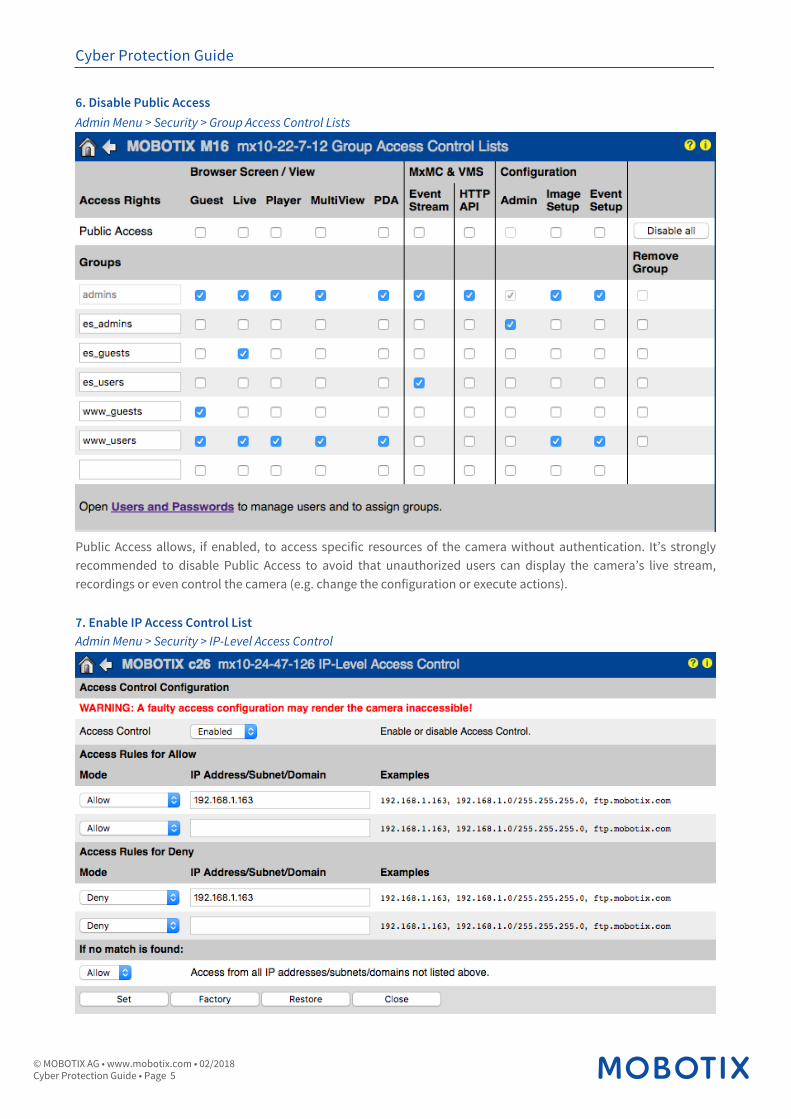
6. Disable Public AccessAdmin Menu > Security > Group Access Control Lists
Public Access allows, if enabled, to access specific resources of the camera without authentication. It’s strongly recommended to disable Public Access to avoid that unauthorized users can display the camera’s live stream, recordings or even control the camera (e.g. change the configuration or execute actions).
7. Enable IP Access Control ListAdmin Menu > Security > IP-Level Access Control
Cyber Protection Guide
© MOBOTIX AG • www.mobotix.com • 02/2018Cyber Protection Guide • Page 5

The Access Control dialog allows managing the IP addresses, subnets and domain names, which are allowed to access the camera or which are prevented from accessing the camera. This possibility to control access to the camera uses the IP protocol level, is independent of password-based user authentication on HTTP protocol level and supersedes password-based authentication. If a computer does not have IP-level access to the camera, there is no possibility to reach the camera from that computer. If a computer has IP-level access to the camera, password-based user authentication follows as next step, as specified in the Users and Passwords dialog.
8. Enable the Intrusion Detection with notification and block of offending IP addressAdmin Menu > Network Setup > Web Server (for experts) > Intrusion Detection Settings
This feature provides an automatic defense against attacks. If an intruder should try to access the camera using "brute force" methods to guess user names and passwords, the camera can send an alert and automatically lock out the offending IP address after a certain number of failed attempts.
9. Check that Web Crawling is forbiddenAdmin Menu > Page Administration > Language and Start Page > Page Options
Using this parameter, you can prevent Web search engines, other automatic robots and web crawlers from scanning the contents of the camera's Web server. Usually, you would not want a search engine to index all the images and pages found on a camera. Make sure that you only allow crawling if you are aware of the additional security risks and the extra network traffic generated by the crawlers.
Cyber Protection Guide
© MOBOTIX AG • www.mobotix.com • 02/2018Cyber Protection Guide • Page 6

10. Enable Digest AuthenticationAdmin Menu > Network Setup > Web Server (for experts) > Web Server
Digest access authentication is one of the agreed-upon methods a web server (i.e. MOBOTIX camera) can use to negotiate credentials, such as username or password, with a client (i.e. web browser). Wish Digest Authentication the password is never sent in the clear, and the username can be hashed.
11. Set an encryption key for recordingsAdmin Menu > Storage > Storage on External File Server / Flash Device
An encryption key can be set to encrypt the recordings stored onto the internal storage (microSD card / USB flash drive) as well as for the recording archived to the external File Server (SMB / NFS).
12. Change default password for MxMessage (if enabled)Admin Menu > MxMessageSystem > Network Distribution of Messages
MxMessageSystem allows the transfer of messages between cameras over the network. A password (symmetrical key) of at least 6 characters, should be defined to encrypt the transferred messages.
Cyber Protection Guide
© MOBOTIX AG • www.mobotix.com • 02/2018Cyber Protection Guide • Page 7
13. Enable Error NotificationAdmin Menu > System Information > Error NotificationThe Error Notification dialog provides several options for getting notifications (e-mail, IP notifications, VoIP calls, etc...) in case of reboot or errors that are detected within the different systems of the camera. This tool can help system administrators make sure that all the MOBOTIX cameras are functioning properly.
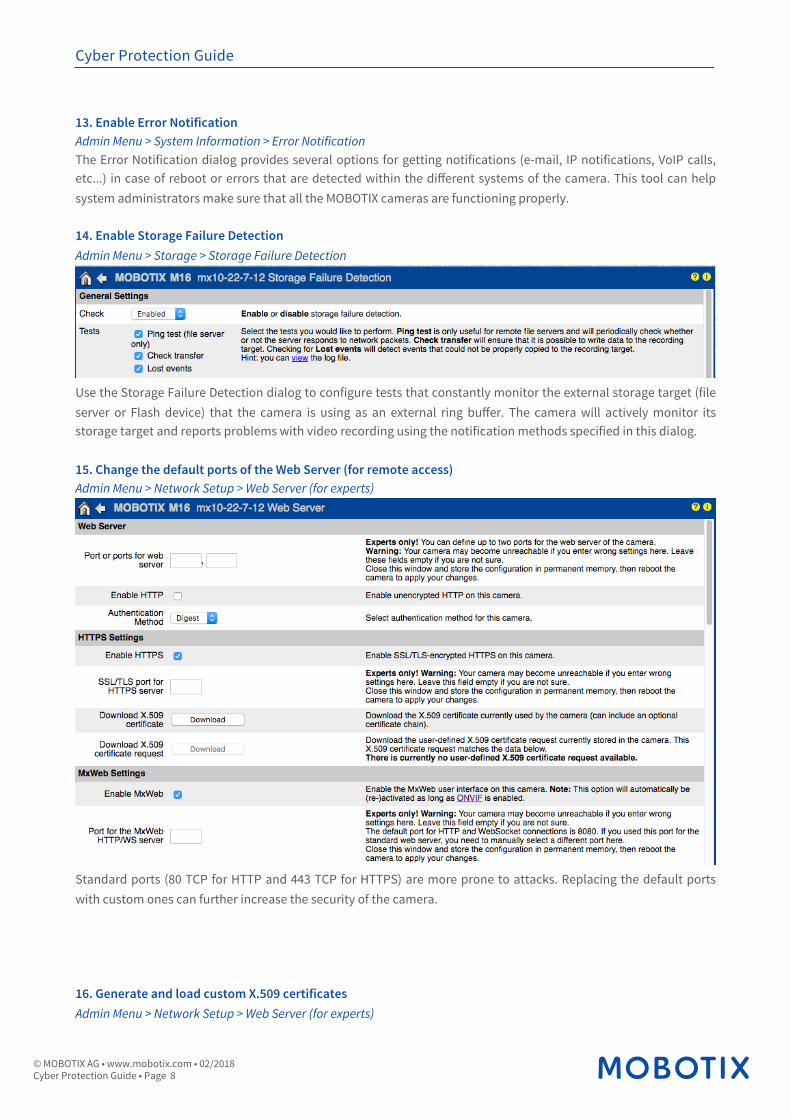
14. Enable Storage Failure DetectionAdmin Menu > Storage > Storage Failure Detection
Use the Storage Failure Detection dialog to configure tests that constantly monitor the external storage target (file server or Flash device) that the camera is using as an external ring buffer. The camera will actively monitor its storage target and reports problems with video recording using the notification methods specified in this dialog.
15. Change the default ports of the Web Server (for remote access)Admin Menu > Network Setup > Web Server (for experts)
Standard ports (80 TCP for HTTP and 443 TCP for HTTPS) are more prone to attacks. Replacing the default ports with custom ones can further increase the security of the camera.
16. Generate and load custom X.509 certificatesAdmin Menu > Network Setup > Web Server (for experts)
Cyber Protection Guide
© MOBOTIX AG • www.mobotix.com • 02/2018Cyber Protection Guide • Page 8

Loading a custom certificate signed by a trusted CA (Certificate Authority) will ensure confidentiality and authenticity to all the connections established via HTTPS (SSL/TLS).
17. Configure OpenVPN client for remote connectionsAdmin Menu > Network Setup > OpenVPN Client Settings
To optimize the security in case of remote connections it’s possible to leverage the embedded OpenVPN client to establish a VPN (Virtual Private Network) tunnel between the camera and the remote host.
Creating an OpenVPN connection requires a corresponding server, which provides secure access to the camera. To do so, you could run your own OpenVPN server or use the service from an OpenVPN provider. For more information about OpenVPN, visit the OpenVPN Community website.
18. Avoid to expose the camera to the Internet unless strictly necessaryRemote access to the camera should granted consciously to reduce the risk of attacks. If a remote access is necessary, please make sure to observe the aforementioned rules to limit the possibility to connect to the intended users only.
19. Make use of VLANs to separate the CCTV network (enterprise security level)In enterprise environments it’s good practice to keep the CCTV network (IP cameras, NVR and VMS workstations) separated from the rest of the hosts to prevent unauthorized accesses and avoid traffic congestion.
20. Enable IEEE 802.1X (enterprise security level)Admin Menu > Network Setup > Ethernet Interface (for experts) > IEEE 802.1XThis international standard is used for port-based network access control (NAC). This procedure requires that all network devices (i.e., also the MOBOTIX camera) need to authenticate themselves at the switch to obtain a network connection. Network devices without proper authentication will be rejected.
Ask your network administrator whether IEEE 802.1X is supported or required. Make sure that the switch to which the camera is connected (authenticator) has been configured accordingly. In general, the switch (authenticator) also needs an authentication server, such as a RADIUS server. The authentication procedure is controlled by the authentication server. Make sure that the camera and the authentication server always use the same procedure.
21. Check the Web Server log file on a regular basisAdmin Menu > Security > Web Server Logfile
Cyber Protection Guide
© MOBOTIX AG • www.mobotix.com • 02/2018Cyber Protection Guide • Page 9

The Web Server Logfile presents all access attempts and the date/time information with the corresponding status messages of the web server as well as the host name of the accessing computer. Unauthorized access attempts could be the the alarm bell for System Administrators that may want to revise the strength of their network.
22. Store backup configuration files in a safe placeAdmin Menu > Configuration > Save current configuration to local computer
Although camera credentials (user passwords) are hashed within the camera configuration file, any configuration backup file should be kept in a safe place; moreover it’s advisable to encrypt the file with a passphrase for further security.
Congratulations – your MOBOTIX camera is cyber secure now!
Cyber Protection Guide
© MOBOTIX AG • www.mobotix.com • 02/2018Cyber Protection Guide • Page 10

VMS Configuration (Video Management System)
1. Create User Accounts on the computer in use
2. Create User Accounts on MxMC
3. Limit rights to VMS users
4. Avoid using admin account to access cameras via MxMC
5. Enable the "Auto log-off"
Congratulations – your Video Management System is cyber secure now!
Cyber Protection Guide
© MOBOTIX AG • www.mobotix.com • 02/2018Cyber Protection Guide • Page 11

NAS Configuration (Network Attached Storage)
1. Place the device used to store the footage in a safe place
2. Set a strong password for the administrative account
3. Set a standard user account (limited rights) for MOBOTIX devices
4. Encrypt the volumes
5. Use a RAID level that ensures data redundancy
Congratulations – your Network Attached Storage System is cyber secure now!
Cyber Protection Guide
© MOBOTIX AG • www.mobotix.com • 02/2018Cyber Protection Guide • Page 12