customer portal user guide - murex. access to the system murex customer portal url: sign in using...
TRANSCRIPT
CUSTOMER PORTAL USER GUIDE
FEBRUARY 2007

CONTENTS INTRODUCTION
The Murex Customer Portal has been designed and implemented to enhance Mu-rex support services and create a more interactive relationship with our clients and their reprensentatives.
The main features are :
A concise and systematic approach to reporting and managing a problem by the Client.The possibility to add or retrieve information, mainly for communication purpo-
ses, facilitating problem resolution from and to the Client.
2
1. Access to the system
2. Case Management 2.1 Create a case
2.2 Review & Access existing cases
2.3 Update a Case 2.4 Resolve and Close a Case 2.5 Notification Rules
3. Generate Reports
4. Maintain User Information
5. Personalizing the Portal Home Page
6. Personalizing Navigation and Display options
7. Portal Administration 7.1 Consulting existing Portal Users
7.2 Administering Portal Users
7.3 Configuring the Portal General settings

1. Access to the system
Murex Customer Portal URL: http://www.murex.com
Sign in using your User ID and Password to access the Menu.
Enter the Case ID then press ENTER to directly open the Case
Latest significant news about the portal : maintenance works, new features.
Get the last 10 Cases with the Status Closed-Awaiting Client Test.
Get the last 10 posted Cases for your company
Get the last 10 modified Cases, displaying who last modified the Case and when.
Get the last 10 Cases with Status Open-awaiting Client Feedback.
Note : At any time, click on Home
(top of Portal screen) to display the home page
Reporting: To execute reports on Cases.Customer Care: To create and manage Cases.User Administration: To consult the list of portal
users and, for administrator only, to edit or create new accounts.
Portal General Settings: To customize case entry with default values and define the case classification dedicated to your company.
Profile: To maintain user information and change password.
My personalizations: To modify navigation and display options.
Documentation Support: To refresh your current documentation set from within the Java Murex Doc Browser (JMDBrowser v2.02 and higher).
Portal FAQ: Answers to Frequently Asked Questions as well as general guidelines for the use of the Portal.
User Guide: direct link to this Customer Portal User Guide.
3 4

2. case management
Reporting a problem implies creating a Case. You are only required to enter data relevant to the Case :
2.1 Create a case
1- Click on Customer Care2- Click on Create a Case
The following page opens :
Contact Details : You can change the contact by clicking on the icon. This function is used when you submit a Case on behalf of
someone else.
Problem Details : Product, Version and Release are automatically filled
with the details of the last environments declared to Mu-rex. Select the Product/ Version/ Release which apply to the Case.
Murex support Group: specifies which support group should be in charge of your Case. This is a pre-assign-ment. The list of Support Groups is defined at the outset according to your organisation (projects, support teams) and Murex support teams involved for your company. When a Case is created, a pool of Murex consultants staffed to this group are warned by email, then one of them will be assigned to the Case. This field can be de-faulted by the Portal administrator for quick case entry (see section 7.3 on Portal General Settings).
Problem Type: contains a generic problem classifica-tion used to efficiently route the Case within Murex sup-port teams and to categorize your request for reporting.
Case Type: used to categorize the Case; you can se-
lect amongst the predefined list of values: ‘Support’, ‘En-hancement request’, ‘Possible defect’, ‘Change request’, or ‘Documentation’.
Customer Reference (1): free text field used to enter your own reference for this Case. This field can be used in Case searches to directly access your cases with your own identifier.
Asset class (optional): Select the appropriate asset class concerned by the problem. If this is not applica-ble, leave the field blank. This field can be defaulted by the Portal administrator for quick case entry (see section 7.3).
User Fields 1 & 2 (1): areas used to categorize the case with your company classifications (for example problem type, project, phase, test status, systems impacted, etc.).You can use up to six user fields, and enter free text or select one of the predefined values for those fields, accor-ding to the general settings defined by the Portal adminis-trator. (see section 7.3).
Priority: determines the importance and reactivity nee-ded to solve the problem. This field contains four generic levels of priority : ‘0-Critical’ when production is stopped/blocking problem.‘1-High’ when production is affected.‘2-Medium’.‘3-Low’.
In any Case, priority meaning should be clearly defined early with Murex support teams for more efficiency.
Requested date: delivery date requested by the client, will be aproved or modified by Murex.
Subject: enter the subject of the Case with keywords such as Asset, Module and the type of request (problem, request for information, etc.).
Details: Enter as many details as you can to describe your problem including the following content : Issue, Bac-kground / Context / Environment, Possible Cause / Solu-tion.
Clients Comments: Use this field to enter any note that can help you follow up Case progress. (1)
(1) These fields can be updated at any time during the Case
Attachments: Click on Attach a File to attach any type of file (e.g. screenshot, log file -small size- or HTML emails).
Submit: Clicking on Submit will validate Case creation. At this point, you get a reference number for the Case at the top of
the page in red, and an email is automatically sent to the Murex support group to inform them that a Case has been created.
5 6
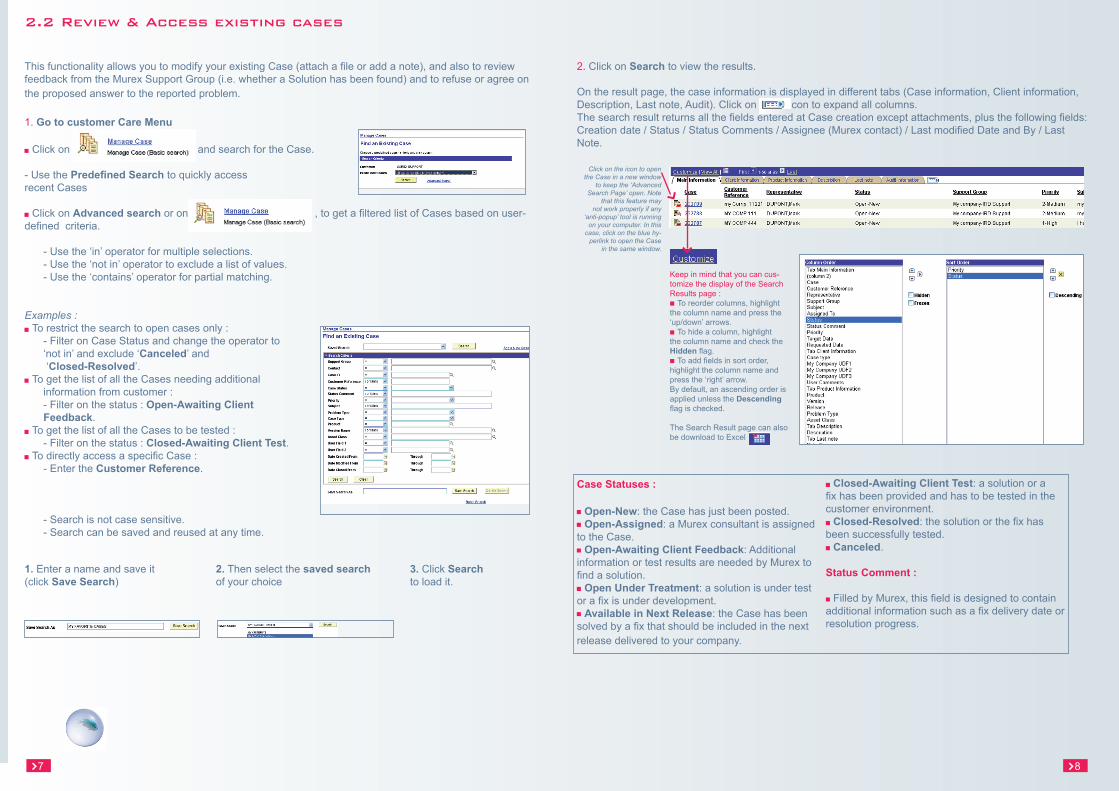
2.2 Review & Access existing cases
This functionality allows you to modify your existing Case (attach a file or add a note), and also to review feedback from the Murex Support Group (i.e. whether a Solution has been found) and to refuse or agree on the proposed answer to the reported problem.
1. Go to customer Care Menu
Click on and search for the Case.
- Use the Predefined Search to quickly access recent Cases
Click on Advanced search or on , to get a filtered list of Cases based on user-defined criteria.
- Use the ‘in’ operator for multiple selections.- Use the ‘not in’ operator to exclude a list of values.- Use the ‘contains’ operator for partial matching.
Examples : To restrict the search to open cases only :
- Filter on Case Status and change the operator to ‘not in’ and exclude ‘Canceled’ and ‘Closed-Resolved’.
To get the list of all the Cases needing additional information from customer : - Filter on the status : Open-Awaiting Client Feedback.
To get the list of all the Cases to be tested : - Filter on the status : Closed-Awaiting Client Test.
To directly access a specific Case : - Enter the Customer Reference.
- Search is not case sensitive.- Search can be saved and reused at any time.
1. Enter a name and save it(click Save Search)
2. Then select the saved searchof your choice
3. Click Searchto load it.
2. Click on Search to view the results.
On the result page, the case information is displayed in different tabs (Case information, Client information, Description, Last note, Audit). Click on icon to expand all columns.The search result returns all the fields entered at Case creation except attachments, plus the following fields: Creation date / Status / Status Comments / Assignee (Murex contact) / Last modified Date and By / Last Note.
Click on the icon to open the Case in a new window
to keep the ‘Advanced Search Page’ open. Note
that this feature may not work properly if any
‘anti-popup’ tool is running on your computer. In this
case, click on the blue hy-perlink to open the Case
in the same window.
Keep in mind that you can cus-tomize the display of the Search Results page :
To reorder columns, highlight the column name and press the ‘up/down’ arrows.
To hide a column, highlight the column name and check the Hidden flag.
To add fields in sort order, highlight the column name and press the ‘right’ arrow.By default, an ascending order is applied unless the Descending flag is checked.
The Search Result page can also be download to Excel
Case Statuses :
Open-New: the Case has just been posted.Open-Assigned: a Murex consultant is assigned
to the Case.Open-Awaiting Client Feedback: Additional
information or test results are needed by Murex to find a solution.
Open Under Treatment: a solution is under test or a fix is under development.
Available in Next Release: the Case has been solved by a fix that should be included in the next release delivered to your company.
Closed-Awaiting Client Test: a solution or a fix has been provided and has to be tested in the customer environment.
Closed-Resolved: the solution or the fix has been successfully tested.
Canceled.
Status Comment :
Filled by Murex, this field is designed to contain additional information such as a fix delivery date or resolution progress.
7 8
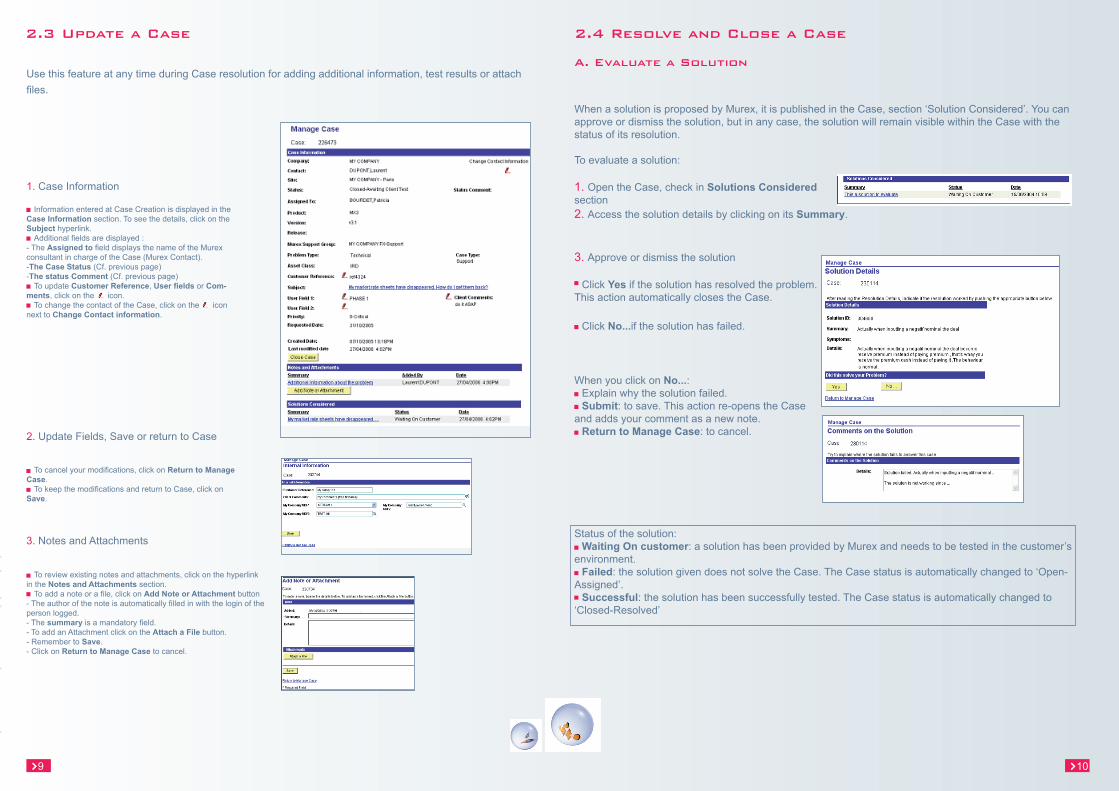
Use this feature at any time during Case resolution for adding additional information, test results or attach files.
2.3 Update a Case
1. Case Information
Information entered at Case Creation is displayed in the Case Information section. To see the details, click on the Subject hyperlink.
Additional fields are displayed : - The Assigned to field displays the name of the Murex consultant in charge of the Case (Murex Contact).-The Case Status (Cf. previous page)-The status Comment (Cf. previous page)
To update Customer Reference, User fields or Com-ments, click on the icon.
To change the contact of the Case, click on the icon next to Change Contact information.
2. Update Fields, Save or return to Case
To cancel your modifications, click on Return to Manage Case.
To keep the modifications and return to Case, click on Save.
3. Notes and Attachments
To review existing notes and attachments, click on the hyperlink in the Notes and Attachments section.
To add a note or a file, click on Add Note or Attachment button- The author of the note is automatically filled in with the login of the person logged.- The summary is a mandatory field.- To add an Attachment click on the Attach a File button.- Remember to Save.- Click on Return to Manage Case to cancel.
2.4 Resolve and Close a Case
A. Evaluate a Solution
When a solution is proposed by Murex, it is published in the Case, section ‘Solution Considered’. You can approve or dismiss the solution, but in any case, the solution will remain visible within the Case with the status of its resolution.
To evaluate a solution:
1. Open the Case, check in Solutions Consideredsection2. Access the solution details by clicking on its Summary.
3. Approve or dismiss the solution
Click Yes if the solution has resolved the problem.This action automatically closes the Case.
Click No...if the solution has failed.
When you click on No...: Explain why the solution failed.Submit: to save. This action re-opens the Case
and adds your comment as a new note.Return to Manage Case: to cancel.
Status of the solution: Waiting On customer: a solution has been provided by Murex and needs to be tested in the customer’s
environment.Failed: the solution given does not solve the Case. The Case status is automatically changed to ‘Open-
Assigned’.Successful: the solution has been successfully tested. The Case status is automatically changed to
‘Closed-Resolved’
9 10

B. Close the Case
Predefined Reasons
- Cannot Reproduce: - Duplicate Case:
- Fixed by patch:
- No longer pursue:
- Recommendation resolved:
- Resolved on own:
1. From the Case Page
The Case can be manually closed for many reasons. For this, click on Close on the Case page then enter a Closing Reason and Submit to save or Return to Manage Case to cancel.
2. From the Search Result Page
It is also possible to close Cases successively. For this, filter on the Cases to be closed then click on the Close button on the Search Result page. Please make sure there is no pop-up blocker activated in your internet Browser, otherwise the Close Case function will not work.
Clicking on Close opens the Close page in a new window. When submitting your closing reasons, you will be invited to close this new window, in order to return to the Search Result page.
C. Reopen a Case
A closed Case may be reopened. For this, click on the Reopen button in the Case page.
Predefined Reasons
- Reproduce: The problem is now reproductible
- Not Fixed by patch: The fix sent by Murex has failed in your environment.
- Don’t Agree with Solution: The solution finally does not work or is not appropriate in your context.
- Recommendation didn’t help: The suggestion finally does not work or is not appropriate in your context.
- Recurring problem: Use this reason when a problem that has already been fixed occurs again.
2.5 Notification Rules
At Case creation, a notification is automatically sent to the Murex Support Group email address. By default, this email address corresponds to the Murex Team email address but it can also include a client mailing list.
At Case update, the consultant assigned to the Case automatically receives email notification.
When the Case status is changed to Open-Awaiting Client Feedback, notification is automatically sent to the person who has created the Case.
The Case status is automatically changed from Open-Awaiting Client Feedback to Open-Assigned when a note is added from the Murex Customer Portal.
When the Case status is changed to Closed-Awaiting Client Test, notification is automatically sent to the person who has created the Case.
11 12
The problem cannot be reproduced.
The Case has been created twice, or the problem is related to an existing Case
A new release sent by Murex contains a Fix that corrects the problem.
Use this reason when you consider that the request / problem does not need to be resolved.
Use this reason if the recommendation provided by Murex has resolved the problem.
Use this reason if you have resolved the probleme by yourself.
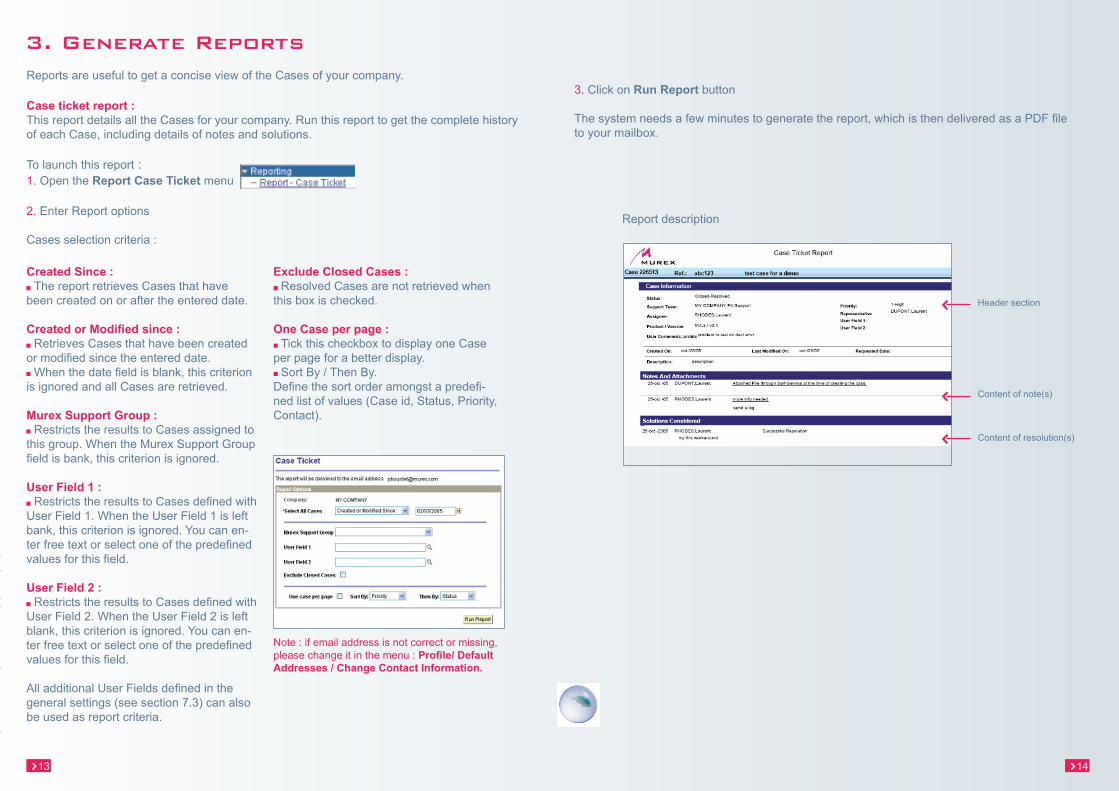
3. Generate ReportsReports are useful to get a concise view of the Cases of your company.
Case ticket report : This report details all the Cases for your company. Run this report to get the complete history of each Case, including details of notes and solutions.
To launch this report : 1. Open the Report Case Ticket menu
2. Enter Report options
Cases selection criteria :
Created Since : The report retrieves Cases that have
been created on or after the entered date.
Created or Modified since : Retrieves Cases that have been created
or modified since the entered date.When the date field is blank, this criterion
is ignored and all Cases are retrieved.
Murex Support Group : Restricts the results to Cases assigned to
this group. When the Murex Support Group field is bank, this criterion is ignored.
User Field 1 : Restricts the results to Cases defined with
User Field 1. When the User Field 1 is left bank, this criterion is ignored. You can en-ter free text or select one of the predefined values for this field.
User Field 2 : Restricts the results to Cases defined with
User Field 2. When the User Field 2 is left blank, this criterion is ignored. You can en-ter free text or select one of the predefined values for this field.
All additional User Fields defined in the general settings (see section 7.3) can also be used as report criteria.
Exclude Closed Cases : Resolved Cases are not retrieved when
this box is checked.
One Case per page : Tick this checkbox to display one Case
per page for a better display.Sort By / Then By.
Define the sort order amongst a predefi-ned list of values (Case id, Status, Priority, Contact).
Note : if email address is not correct or missing, please change it in the menu : Profile/ Default Addresses / Change Contact Information.
3. Click on Run Report button
The system needs a few minutes to generate the report, which is then delivered as a PDF file to your mailbox.
Report description
Header section
Content of note(s)
Content of resolution(s)
13 14
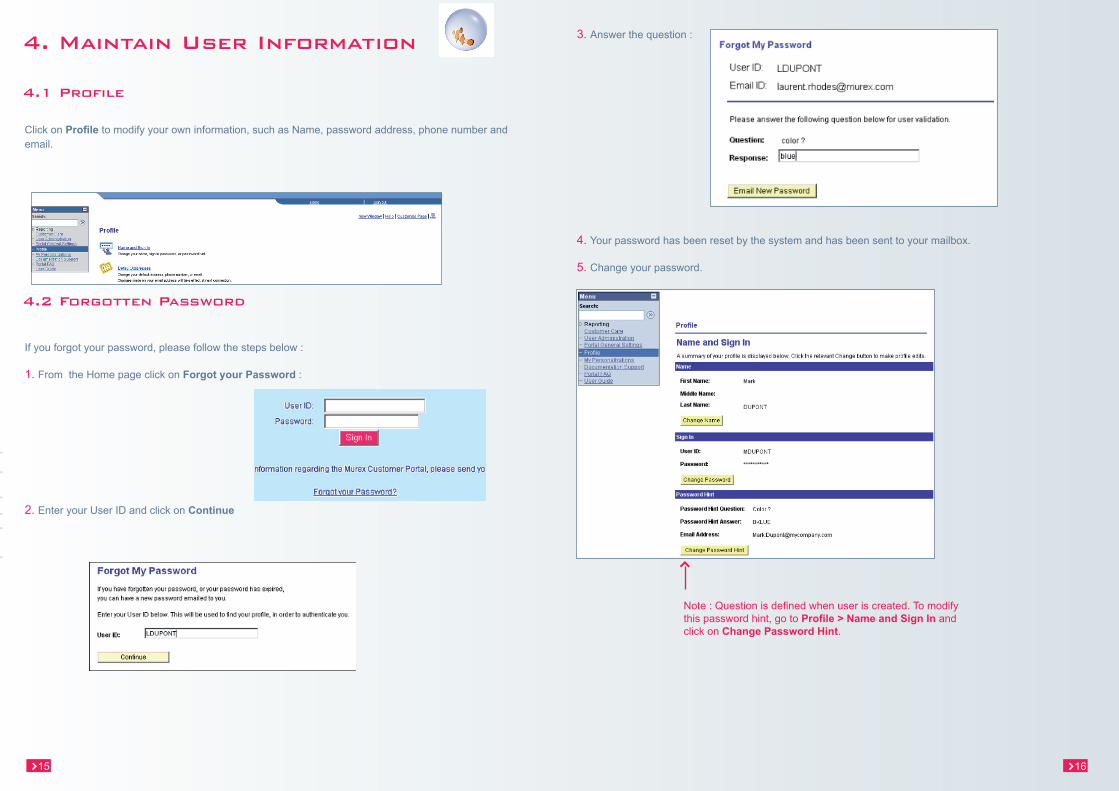
4. Maintain User Information
4.1 Profile
Click on Profile to modify your own information, such as Name, password address, phone number and email.
4.2 Forgotten Password
If you forgot your password, please follow the steps below : 1. From the Home page click on Forgot your Password :
2. Enter your User ID and click on Continue
3. Answer the question :
4. Your password has been reset by the system and has been sent to your mailbox.
5. Change your password.
Note : Question is defined when user is created. To modify this password hint, go to Profile > Name and Sign In and click on Change Password Hint.
15 16
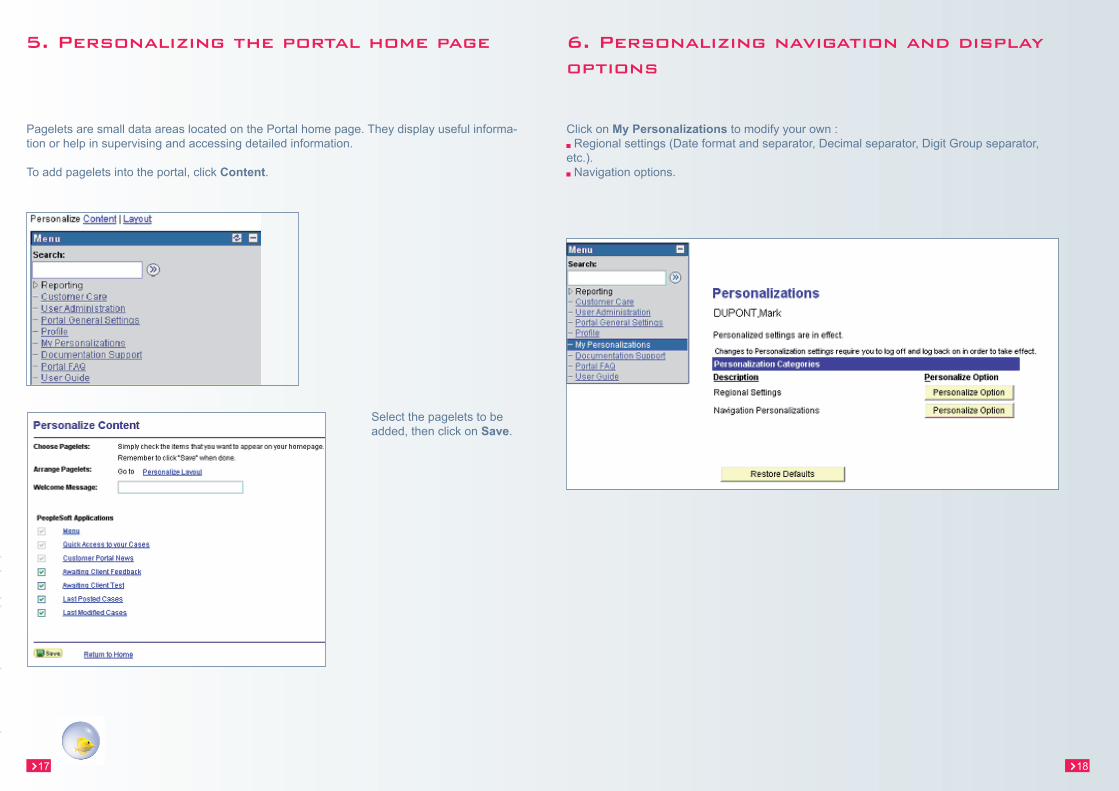
5. Personalizing the portal home page
Pagelets are small data areas located on the Portal home page. They display useful informa-tion or help in supervising and accessing detailed information.
To add pagelets into the portal, click Content.
Select the pagelets to be added, then click on Save.
6. Personalizing navigation and display options
Click on My Personalizations to modify your own : Regional settings (Date format and separator, Decimal separator, Digit Group separator,
etc.).Navigation options.
17 18

7. Portal Administration
7.1 Consulting existing Portal Users
Standard users can access the list of existing users : Click on User Administration
The following page opens :
7.2 Administering Portal Users
3. Click on or to disable user accounts - Click on Delete to confirm - Click on Cancel and Return to Profile to suspend the action.
The Registration form then appears.
Please note that the User ID must be in uppercase.
4. Click on Add New Portal User to registeradditional users.
The following page opens
- Enter Company Code and Key providedby Murex- Click on Continue
19 20
Portal administrators have additional privileges : they can maintain user accounts and register new users.
1. Click on User Administration
The following page opens :
2. Click on or to access the user profile for modification.
The following page opens :
- Click Set Read Only Right orSet Update Right to change the User Profile to restricted or additional access. -’Read Only Right’ restrict user access to Case consultation - ‘Update Right’ enable users to create and manage cases.
Hints : - by default users are crea-ted with ‘update rights’.- to set Administrator rights, please ask :

7.3 Configuring the portal general settings
Portal administrator can customize Case entry by defining : the number of additional user fields availabletheir Labeltheir list of valuessome default values to simplify Case Creation.
1. Click on Portal General Settings
2. Click on SearchThe following page opens
3. Click on Add User Field to define additional user fields. Up to 6 user fieldscan be defined4. Click on to remove a user field.
5. Check Mandatory, if this field is required inthe case. Otherwise, leave it unselected. 6. Check Free Text disabled, if the user fielddefined in the case should always be selected amongst a predefined list.7. Enter a Label to define the field name.
8. Press Save.
9. Click Define Values to edit values. - Click ‘+’ to add a new value. - Click ‘-’ to remove an existing value. - Select Default to define as default value in Case Creation.
21