crowded single lea symbols visual acuity test at 5 feet · 1.800.362.3860 1.888.362.2576 fax vip...
TRANSCRIPT

www.good-lite.com1.800.362.38601.888.362.2576 Faxwww.good-lite.com �
VIP Crowded Acuity Test
1.800.362.38601.888.362.2576 Fax4
Crowded Single LEA Symbols® Visual Acuity Test at 5 feet
1155 Jansen Farm DriveElgin, IL 60123
Phone: 800-362-3860 Fax: 888-362-2576Phone: 847-841-1145 Fax: 847-841-1149
www.good-lite.com
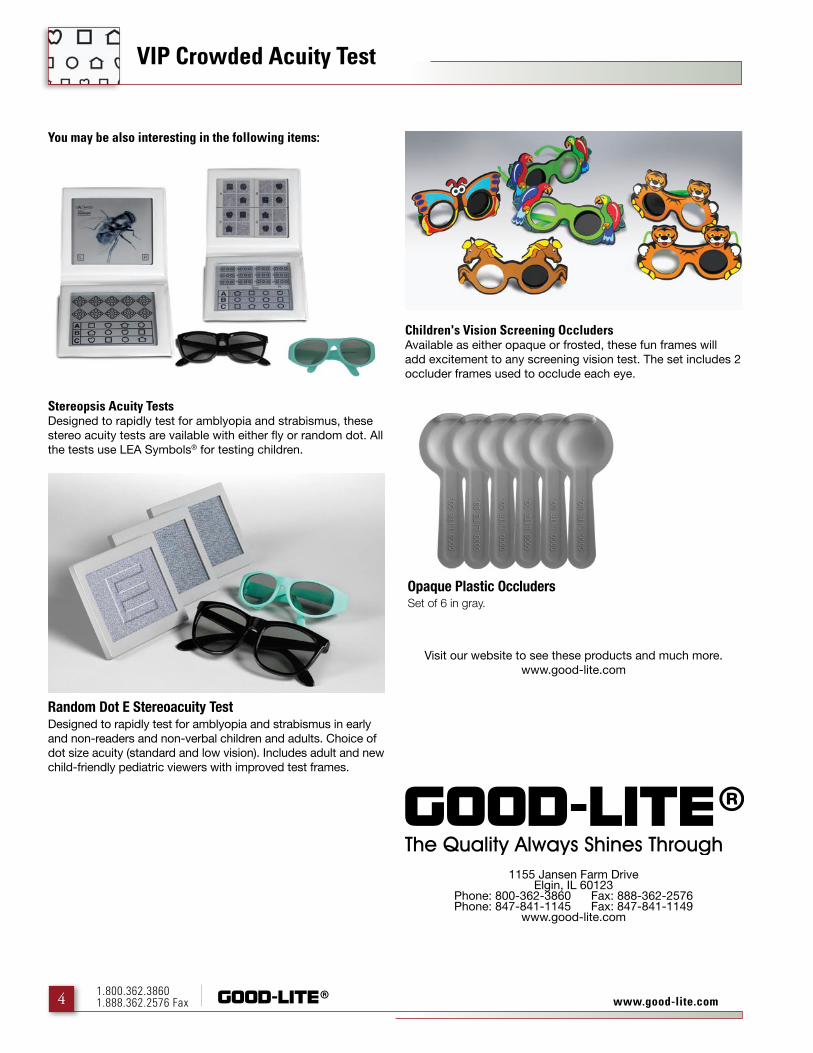
You may be also interesting in the following items:
Children's Vision Screening OccludersAvailable as either opaque or frosted, these fun frames will add excitement to any screening vision test. The set includes 2 occluder frames used to occlude each eye.
Stereopsis Acuity TestsDesigned to rapidly test for amblyopia and strabismus, these stereo acuity tests are vailable with either fly or random dot. All the tests use LEA Symbols® for testing children.
What Does the Screening Test Evaluate?
Visual acuity screening tests evaluate how well the child sees small objects far away.
What You Need to Do the Test:1. Two crowded Single Lea Symbols Visual Acuity test cards
(Disk cards). One card is for 3-year-olds and one card is for 4- and 5-year-olds. At each age level, one side is for testing the right eye and one side is for testing the left eye so children don’t memorize the order of symbols. The masking window displays one symbol at a time. The wheel rotates from one symbol to the next. Each side of each card contains 8 symbols (combinations of an apple, house, circle and square) surrounded by crowding bars (lines around each symbol).
2. Lap card which displays each of the 4 symbols (with crowding bars).
3. Single, large symbols (one each of the apple, house, circle and square) with crowding bars for pre-testing.
4. Baseline flip book for testing the right eye and left eye at 5 feet.
5. Two pair of occluder glasses (one for testing the right eye and one for testing the left eye). Micropore tape or junior size eye patches (e.g. Opticlude patches).
6. VIP illuminator with power supply and measuring cord.
7. Tissues to wipe the ear pieces and nose area of the occluder glasses.
8. Antibacterial wipes to clean the lap card.
9. A sturdy table or chair to set the lamp stand on.
10. Chairs for the child and the screener.
11. Recording form and pen.
12. A small hand-held mirror (optional)
Getting Ready:
1. Place the lamp stand on a table or chair and turn the lamp on.
2. Select the disk card and recording form that are appropriate for the age of the child to be tested.
3. Slide the disk card for the child’s age into the slot on the lamp (right eye side towards the child). (Assure that no symbol is visible through the window.)
4. Use the measuring cord to position the child’s chair so that the card is 5 feet from the child’s eyes. Place one end of the measuring cord in the notch on the lower right side of the lamp stand (see right). The other end of the cord marks the position of the child’s eyes. The child should be looking straight ahead at the cards and the cards should be at the same level/height as the child’s eyes. If possible, mark this spot on the wall or floor with tape to facilitate monitoring test distance during testing.
5. Record the screener’s name and child’s name and age on the form.
Measuring Cord Notch
Random Dot E Stereoacuity TestDesigned to rapidly test for amblyopia and strabismus in early and non-readers and non-verbal children and adults. Choice of dot size acuity (standard and low vision). Includes adult and new child-friendly pediatric viewers with improved test frames.
Opaque Plastic OccludersSet of 6 in gray.
Visit our website to see these products and much more. www.good-lite.com

1.800.362.38601.888.362.2576 Fax www.good-lite.com�
1.800.362.38601.888.362.2576 Faxwww.good-lite.com
VIP Crowded Acuity Test VIP Crowded Acuity Test
3
How You Do the Test:1. If the child is wearing glasses, do not remove them.
2. Position the child 5 feet from the card.
3. Complete Pretesting to find out whether the child is able to perform the test:
a. Place the Lea lap card on the child’s lap with the symbols right side up as the child is looking at them. The lap card should be flat on the child’s lap so the examiner can see the symbol the child is pointing to.
b. Hold up one of the pretesting cards about 1.5 to 3 feet from the child. Ask the child to name or point to (“touch”) the symbol on the lap card that is the same. Continue this procedure until all 4 symbols have been correctly named or matched. Each symbol can be presented up to 2 times. If the child cannot identify all of the symbols by matching or naming, check the “Unable” box on the recording form and stop testing. Continue testing if the child is able to match or name all of the symbols.
c. Note: Other names for the symbols are acceptable as long as the child uses them consistently. For example, the child may call the apple a heart or the circle an “O” or the rectangle a window. However, if the child ever starts using a new name or there is ever any question about which symbol the child is referring to, the child should be asked to point to the symbol on the lap card.
4. Complete Testing at 5 Feet: Right eye disk
a. Occlude the left eye:
i. Place the occluder glasses on the child so that the left eye is covered. If you have difficulty getting the child to wear the occluder glasses, try letting the child admire himself/herself with the glasses on using a hand-held mirror.
ii. If the child is unable or refuses to wear the occluder glasses, attempt to cover the left eye with micropore tape (make sure to protect the eye from the adhesive on the tape) or an eye patch.
iii. If the child refuses to wear the occluder glasses, micropore tape, or eye patch, have a helper cover the child’s eye with the palm of his/her hand. The examiner must monitor the child carefully to make sure he/she is not peeking and that the palm is not pressing against the child’s eye. Covering the eye with fingers is not allowed because peeking is too easy with only fingers in front of the eye. If the child refuses to allow a helper to cover the eye, the child can cover his/her own eye with the palm of his/her hand.
b. Check the position of the child for testing. The child’s eyes will need to be at the same height as the cards.
c. Begin Age-specific visual acuity testing
i. Turn the wheel until the first symbol (numbered 3R1 for 3-year-olds or 4R1 for 4- and 5-year-olds) is in the window. Have the child name or match the corresponding Lea symbol. After the child gives his/her response, rotate the wheel clockwise to the next symbol (numbered 3R2 for 3-year-olds or 4R2 for 4- and 5-year-olds).
ii. Whenever the child gets a symbol wrong, place an ‘X’ on the corresponding symbol on the recording form.
iii. If the child misses 1 or none of the first 4 symbols (R1, R2, R3, and R4) continue testing successive symbols (R5-R8) until a child gets 2 symbols wrong on a line of symbols on the recording form or completes testing on all symbols.
1. If the child completes all the symbols without getting any X’s, check the box on the recording form stating that all symbols were identified correctly.
iv. If the child misses 2 or more of the first 4 symbols, complete the baseline flip book testing as follows:
1. Remove the disk card from the slot on the lamp stand.
2. Place the baseline flip book on the front ledge of the lamp stand.
3. Have the child name or match each symbol for the right eye. If the child incorrectly identifies a symbol, put an X on the corresponding symbol on the recording form.
4. If the child gets 2 or more wrong (2 or more X’s on the line on the recording form), STOP and test the left eye (See Step 5 below).
5. If the child correctly identifies all the symbols or only gets 1 of the symbols on the baseline flip book wrong (1 X on the line on the recording form), put the disk card for the child’s age back into the slot on the lamp (right eye disk side towards the child). Turn the wheel until the first symbol (numbered 3R1 for 3-year-olds or 4R1 for 4- and 5-year-olds) is in the window. Have the child name or match the corresponding Lea symbol. Continue testing the right eye with successive symbols until the child gets 2 or more wrong on a line (2 or more X’s on the line on the recording form).
5. Testing at 5 Feet: Left eye
a. Occlude the right eye and flip the visual acuity testing card (disk) over so that the left eye side of the card (disk) is facing the child.
b. Begin age-specific acuity testing for the left eye (as in step 4c, above) beginning with the first symbol for the left eye (numbered 3L1 for 3-year-olds or 4L1 for 4- and 5-year-olds).
6. Wipe the ear pieces and nose area of the occluder glasses with a tissue after each child is tested.
7. Clean the lap card with an antibacterial wipe as needed.
8. When you are finished testing, the testing materials can be stored in the storage compartment on the back of the lamp stand.
What You Tell the Child:1. Encourage the child by saying “Good job!” even if the child
names or matches the symbols incorrectly.
2. Urge the child to keep naming or matching the symbols even if the child must guess.
3. Remind the child to stay in the same position and look straight ahead at the cards.
Remember!:
1. Keep the child’s attention focused on the task.
2. Maintain the appropriate distance during the test.
3. Make sure the child does not peek.
4. Continue to the next line only if the child names or matches at least three of the four symbols on a line.
Interpretation and Recording of Results:
1. Check the “PASS” box at the bottom of the recording sheet if a child correctly names or matches at least three of four of the smallest age-specific LEA Symbols (symbols 5-8). (For 3-year-olds, the smallest symbols are equivalent to 20/50, and for 4- and 5-year-olds, they are equivalent to 20/40).
2. Check the “REFER” box at the bottom of the recording sheet if a child is:
a. Unable to match the LEA Symbols at 3 feet (pretesting step)
b. Uncooperative for testing
c. Refuses to wear the glasses (or occlusion by the other means discussed)
d. Unable to match at least 3 of 4 symbols on any line with either eye
• Baseline Card (if tested)
• LEA Symbols 1 through 4
• LEA Symbols 5 through 8 (smallest age specific line)
Passing Criteria
Child's Age Passing Criterion*
3-year-olds 5/12.5 Line (20/50)
4-year-olds 5/10 Line (20/40)
5-year-olds 5/10 Line (20/40)
* Child must correctly name or match at least three of four symbols of this size (which is the smallest line of age-specific Lea Symbols (symbols 5-8))
4L 4
4L 3
4L 2
4L 1
4L 8
4L 7
4L 6
4L 5
4YO L
EFT
#300
502
developed by Lea Hyvärinen, MDPhone: 847-841-1145 Fax: 847-841-1149Phone: 800-362-3860 Fax: 888-362-2576
www.good-lite.comThe Quality Always Shines Through
4- and 5-Year-OldsLeft Eye
Produced exclusively by:
As used in the Vision In Preschoolers (VIP) Study (sponsoredby the National Eye Institute of the National Institutes of Health
of the Department of Health and Human Services)
Part #300504
For Testing at 1.5 Meters (5 Feet)
LEA Symbol
Symbol Number
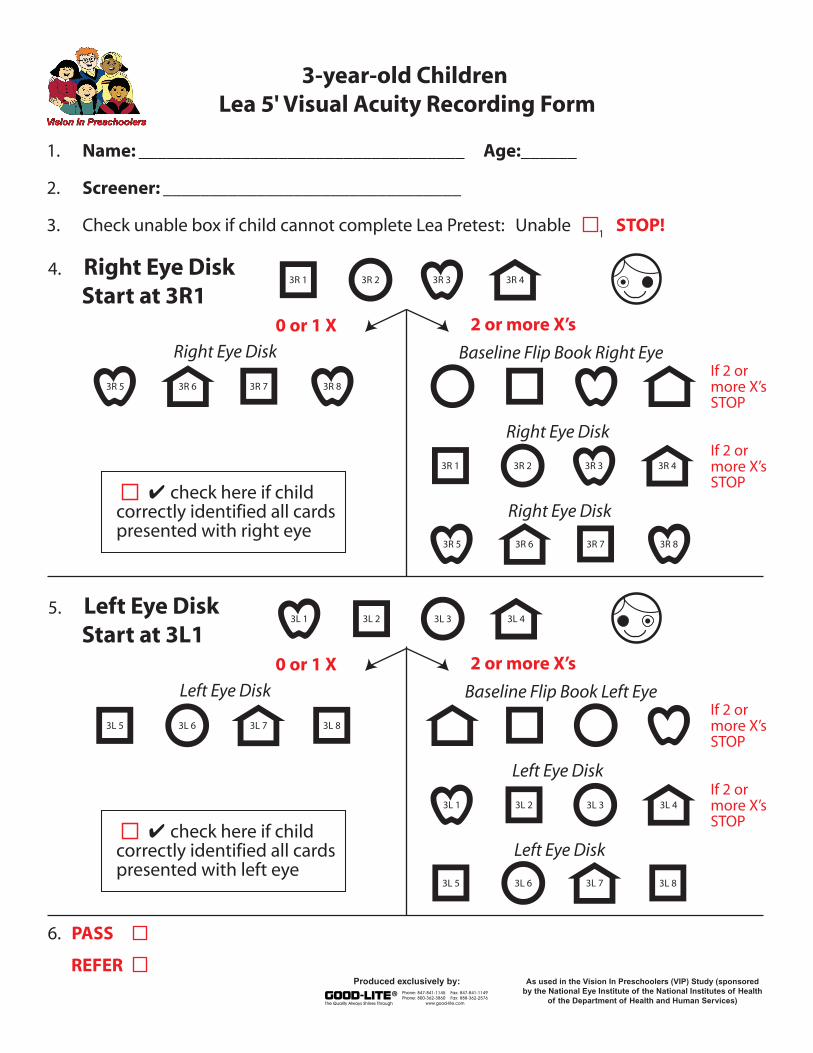
3-year-old Children Lea 5' Visual Acuity Recording Form
1. Name: ___________________________________ Age:______ 2. Screener: ________________________________
3. Check unable box if child cannot complete Lea Pretest: Unable 1 STOP!
Baseline Flip Book Right Eye
0 or 1 X
✔ check here if child correctly identified all cardspresented with right eye
3R 1 3R 2 3R 3 3R 4
3R 5 3R 6 3R 7 3R 8
3L 1 3L 2 3L 3 3L 4
3L 5 3L 6 3L 7 3L 8
Phone: 847-841-1145 Fax: 847-841-1149Phone: 800-362-3860 Fax: 888-362-2576
www.good-lite.comGOOD-LITEThe Quality Always Shines Through
Produced exclusively by: As used in the Vision In Preschoolers (VIP) Study (sponsoredby the National Eye Institute of the National Institutes of Health
of the Department of Health and Human Services)
2 or more X’s
3R 5 3R 6 3R 7 3R 8
Right Eye Disk
If 2 ormore X’sSTOP
If 2 ormore X’sSTOP
4. Right Eye Disk Start at 3R1
Right Eye Disk
3R 1 3R 2 3R 3 3R 4
Right Eye Disk
Baseline Flip Book Left Eye
0 or 1 X 2 or more X’s
Left Eye Disk
If 2 ormore X’sSTOP
If 2 ormore X’sSTOP
5. Left Eye Disk Start at 3L1
Left Eye Disk
Left Eye Disk
3L 1 3L 2 3L 3 3L 4
3L 5 3L 6 3L 7 3L 8
6. PASS REFER
✔ check here if child correctly identified all cardspresented with left eye

4-5-year-old Children Lea 5' Visual Acuity Recording Form
1. Name: ___________________________________ Age:______ 2. Screener: ________________________________
3. Check unable box if child cannot complete Lea Pretest: Unable 1 STOP!
Baseline Flip Book Right Eye
0 or 1 X
✔ check here if child correctly identified all cardspresented with right eye
Phone: 847-841-1145 Fax: 847-841-1149Phone: 800-362-3860 Fax: 888-362-2576
www.good-lite.comGOOD-LITEThe Quality Always Shines Through
Produced exclusively by: As used in the Vision In Preschoolers (VIP) Study (sponsoredby the National Eye Institute of the National Institutes of Health
of the Department of Health and Human Services)
2 or more X’s
Right Eye Disk
If 2 ormore X’sSTOP
If 2 ormore X’sSTOP
4. Right Eye Disk Start at 4R1
Right Eye Disk
Right Eye Disk
Baseline Flip Book Left Eye
0 or 1 X 2 or more X’s
Left Eye Disk
If 2 ormore X’sSTOP
If 2 ormore X’sSTOP
5. Left Eye Disk Start at 4L1
Left Eye Disk
6. PASS REFER
✔ check here if child correctly identified all cardspresented with left eye
4R 1 4R 34R 2
4R 54R 5 4R 7
4L 1 4L 2 4L 3
4L 6 4L 7
4R 4
4R 6 4R 8
4L 4
4L 5 4L 8
4R 1 4R 34R 2 4R 4
4R 54R 5 4R 74R 6 4R 8
4L 1 4L 2 4L 3 4L 4
4L 6 4L 74L 5 4L 8
www.good-lite.com1.800.362.38601.888.362.2576 Faxwww.good-lite.com �
VIP Crowded Acuity Test
1.800.362.38601.888.362.2576 Fax4
Crowded Single LEA Symbols® Visual Acuity Test at 5 feet
1155 Jansen Farm DriveElgin, IL 60123
Phone: 800-362-3860 Fax: 888-362-2576Phone: 847-841-1145 Fax: 847-841-1149
www.good-lite.com
You may be also interesting in the following items:
Children's Vision Screening OccludersAvailable as either opaque or frosted, these fun frames will add excitement to any screening vision test. The set includes 2 occluder frames used to occlude each eye.
Stereopsis Acuity TestsDesigned to rapidly test for amblyopia and strabismus, these stereo acuity tests are vailable with either fly or random dot. All the tests use LEA Symbols® for testing children.
What Does the Screening Test Evaluate?
Visual acuity screening tests evaluate how well the child sees small objects far away.
What You Need to Do the Test:1. Two crowded Single Lea Symbols Visual Acuity test cards
(Disk cards). One card is for 3-year-olds and one card is for 4- and 5-year-olds. At each age level, one side is for testing the right eye and one side is for testing the left eye so children don’t memorize the order of symbols. The masking window displays one symbol at a time. The wheel rotates from one symbol to the next. Each side of each card contains 8 symbols (combinations of an apple, house, circle and square) surrounded by crowding bars (lines around each symbol).
2. Lap card which displays each of the 4 symbols (with crowding bars).
3. Single, large symbols (one each of the apple, house, circle and square) with crowding bars for pre-testing.
4. Baseline flip book for testing the right eye and left eye at 5 feet.
5. Two pair of occluder glasses (one for testing the right eye and one for testing the left eye). Micropore tape or junior size eye patches (e.g. Opticlude patches).
6. VIP illuminator with power supply and measuring cord.
7. Tissues to wipe the ear pieces and nose area of the occluder glasses.
8. Antibacterial wipes to clean the lap card.
9. A sturdy table or chair to set the lamp stand on.
10. Chairs for the child and the screener.
11. Recording form and pen.
12. A small hand-held mirror (optional)
Getting Ready:
1. Place the lamp stand on a table or chair and turn the lamp on.
2. Select the disk card and recording form that are appropriate for the age of the child to be tested.
3. Slide the disk card for the child’s age into the slot on the lamp (right eye side towards the child). (Assure that no symbol is visible through the window.)
4. Use the measuring cord to position the child’s chair so that the card is 5 feet from the child’s eyes. Place one end of the measuring cord in the notch on the lower right side of the lamp stand (see right). The other end of the cord marks the position of the child’s eyes. The child should be looking straight ahead at the cards and the cards should be at the same level/height as the child’s eyes. If possible, mark this spot on the wall or floor with tape to facilitate monitoring test distance during testing.
5. Record the screener’s name and child’s name and age on the form.
Measuring Cord Notch
Random Dot E Stereoacuity TestDesigned to rapidly test for amblyopia and strabismus in early and non-readers and non-verbal children and adults. Choice of dot size acuity (standard and low vision). Includes adult and new child-friendly pediatric viewers with improved test frames.
Opaque Plastic OccludersSet of 6 in gray.
Visit our website to see these products and much more. www.good-lite.com