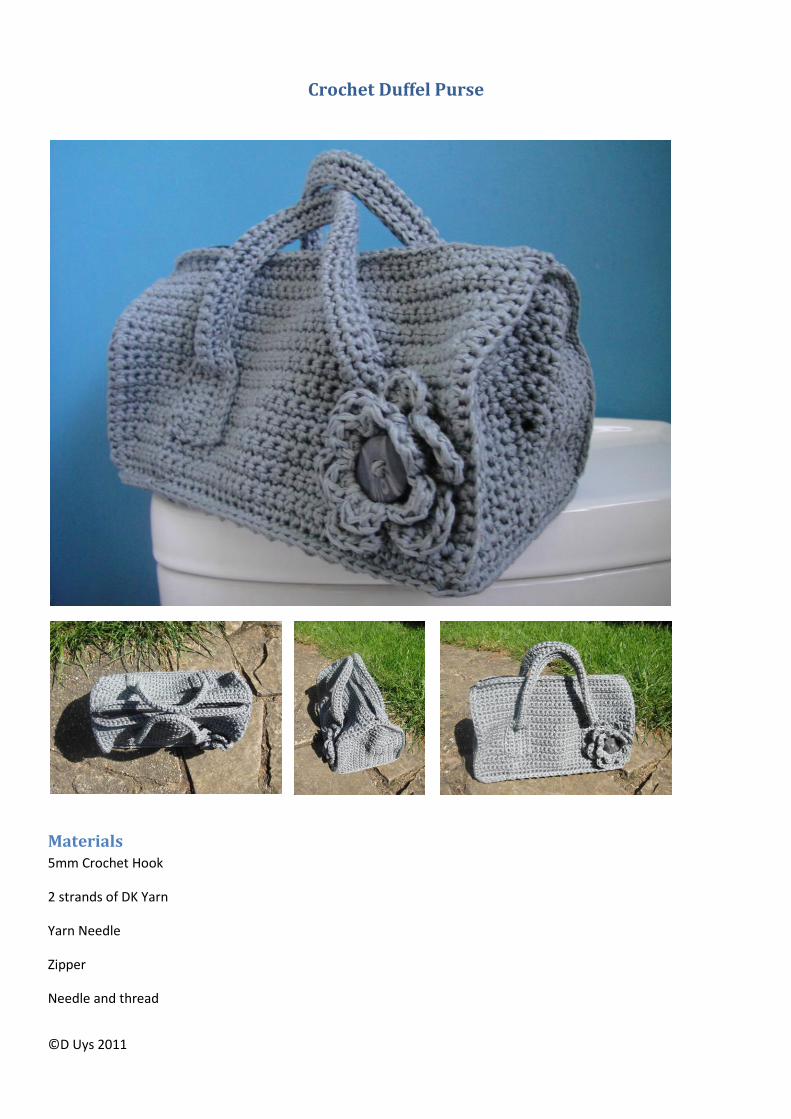
crochet duffel purse · 2011-04-09 · crochet duffel purse materials 5mm crochet hook 2 strands of...
TRANSCRIPT
©D Uys 2011
Crochet Duffel Purse
Materials 5mm Crochet Hook
2 strands of DK Yarn
Yarn Needle
Zipper
Needle and thread
©D Uys 2011
Abbreviations
Instructions
Bag ends
Make 2
1. Chain 10.
2. Working in one loop only of foundation chain, make 3 sc’s in 2nd ch from hook. Sc in each of the remaining 8
st’s. Ch 1 and turn.
3. Sc in first 8 st’s. Sc inc in next 3 st’s. Sc through both loops of remaining 9 st’s. Ch 1 and turn.
4. Sc in 9 st’s, *sc inc, sc* x 2, sc inc. Sc in last 9 st’s. Ch 1 and turn.
5. Sc in 9 st’s, *sc inc, sc in next 2* x 2, sc inc. Sc in last 10 st’s. Ch 1 and turn.
6. Sc in 10 st’s, *sc inc, sc in next 3* x 2, sc inc. Sc in last 10 st’s. Ch 1 and turn.
7. Sc in 10 st’s, *sc inc, sc in next 4* x 2, sc inc. Sc in last 11 st’s. Ch 1 and turn.
8. Sc in 11 st’s, *sc inc, sc in next 5* x 2, sc inc. Sc in last 11 st’s. Ch 1 and turn.
9. Sc in 11 st’s, *sc inc, sc in next 6* x 2, sc inc. Sc in last 12 st’s. Ch 1 and turn.
10. Sc in 12 st’s, *sc inc, sc in next 7* x 2, sc inc. Sc in last 12 st’s. Ch 1 and turn.
11. Sc in 12 st’s, *sc inc, sc in next 8* x 2, sc inc. Sc in last 13 st’s. Ch 1 and turn.
12. Sc in 13 st’s, sc inc, sc in next 19, sc inc. Sc in last 13 st’s. Ch 1 and bind off. (50)
Bag Bottom
Make 1*
1. Ch 23.
2. Working in one loop only, sc in 2nd ch from hook and every other st across. Ch 1 and turn.
3 – 36. Sc in each st across. Ch 1 and turn
37. Sc in each st across. Ch 1 and bind off.
* If you are going to make a double layer bottom so that you can slip something hard in between the layers to give
your bag a sturdy base, you should make 2 of these. Make the 2nd piece only 36 rows long.
Bag Sides
Make 2
1. Ch 38.
2. Working in one loop only, sc in 2nd ch from hook and every other st across. Ch 1 and turn.
3 – 25. Sc in each st across. Ch 1 and turn
Sc single crochet
Sc inc single crochet increase: 2 sc’s in same stitch
Sl st Slip stitch
Flo Front loop only
©D Uys 2011
26. Sc in flo of each st across. When you get to the
end, turn your work and continue working one sc in each
remaining loop of round 25. When you get to the end,
ch 1 and bind off. This will give you a double layer of sc
at the top of your side panel. The zipper will be attached
to the inside row of sc’s.
Handles
Make 2
1. Ch 60.
2. Working in one loop only, sc in 2nd ch from hook
and in every other st across. Ch 1 and turn.
3 – 6. Sc in each st across. Ch 1 and turn.
7. Sl st in first 10 st’s. Fold the handle in half width wise. Join by working a sl st through the 11th st of both
layers. Make 38 more sl st’s through both layers. Ch 1 and bind off. You should now have 10 st’s on either end that
have not been joined.
Slip stitch in each of the first 10 st's Sl st through both layers from the 11th st
Work 1 sc into each remaining loop of round 25

©D Uys 2011
Assembly
Attaching the handles
With some pins, mark 7 st’s from the side of the side panels and 6 rows from the bottom (including foundation
chain).
With the sl st edge of your handle facing the side panel, line the bottom and outside of one end of your handle up
with the pins.
Sew the handle to your side panel. The best way to do this is to use a running stitch. Working one st in every row
and st: work 8 st’s up, 6 rows across, 8 down and 6 across again.
Repeat this for both sides of both handles.
Mark 7 st's from side, 6 rows from the bottom Line outside and bottom edges of handle up with pins
Sew the handles to the side panel using a running stitch
©D Uys 2011
Joining sides and ends of bag
Sew your zipper onto the inside edge of the inside row of sc’s at the
top of the side panel.
Now put your dome-shaped end on top of the side panel, lining up
the bottoms of both. Sc through each st of the end piece and each
row of the side panel for 25 st’s. This will bring you up to the double-
layered last row. Skip the two double layers and sc into the st
beneath the double layer on the other side panel and the next st on
the end-piece. Continue working one sc in each st and row for 23
more st’s. Ch 1 and bind off.
Repeat on the other side.
Attaching the bottom
Line the side of the bag up with the side of the bottom piece. Sc through the first foundation st of the side panel and
the first row of the bottom piece. Sc in every st and row across. When you get to the end, turn your work clockwise
by 90 degrees. Sc in the first row of the end panel (this row will already have an sc worked into it from joining the
end to the side panel) and the first st of the bottom piece.
NOTE: You will work into the first and last stitches of all pieces twice during assembly because you will work into
them to end one row of your sc seam AND to begin the next.
Continue working one sc into each st and row around, turning at every corner. When you reach the beginning of
your “seam”, ch 1 and bind off.
Attaching a double layer bottom
Same as above, but working through all 3 layers. Sandwich the two bottom pieces together with the foundation
chains lined up. Work through both layers on every st except for the one row where the inside piece is one row
shorter than the outside piece.
Sew zipper into inside row of sc's at top of side panel
Sl st through both layers to attach end piece to side panel Side piece attached
©D Uys 2011
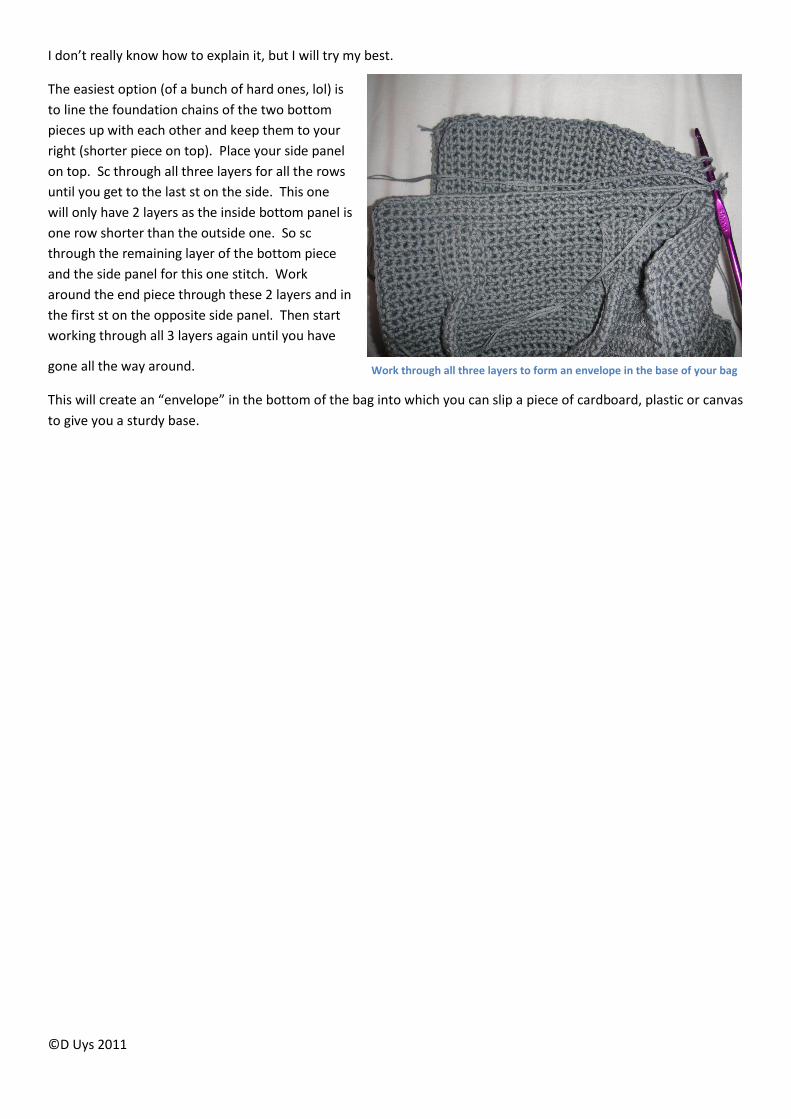
I don’t really know how to explain it, but I will try my best.
The easiest option (of a bunch of hard ones, lol) is
to line the foundation chains of the two bottom
pieces up with each other and keep them to your
right (shorter piece on top). Place your side panel
on top. Sc through all three layers for all the rows
until you get to the last st on the side. This one
will only have 2 layers as the inside bottom panel is
one row shorter than the outside one. So sc
through the remaining layer of the bottom piece
and the side panel for this one stitch. Work
around the end piece through these 2 layers and in
the first st on the opposite side panel. Then start
working through all 3 layers again until you have
gone all the way around.
This will create an “envelope” in the bottom of the bag into which you can slip a piece of cardboard, plastic or canvas
to give you a sturdy base.
Work through all three layers to form an envelope in the base of your bag