crm 102 - university of cincinnati 102 training... · crm 102 table of contents ... $250 sylvia $50...
TRANSCRIPT
CRM 102

© 2011, Blackbaud, Inc. This material may not be reproduced or transmitted in any way. Template redesign by UC Foundation. 2
CRM 102
TABLE OF CONTENTS
Query 3 Lesson Objectives 3
Overview and Definitions 4
Building Queries 4
Information Library 7
Ad-Hoc Queries 8
Source View 10
Parameters 12
Output 17
Results Display 20
Preview Results/Save a Query 22
Query Tasks 26
Browse Query Results 26
Query Combining Operators 27
Selections - Overview 28
Create a Selection from a Query 29
Use Selections in a Query 30

NOTES
© 2011, Blackbaud, Inc. This material may not be reproduced or transmitted in any way. Template redesign by UC Foundation. 3
CRM 102
QUERY In this lesson, you will learn how to create and export queries.
Lesson Objectives
After you complete this lesson, you will be able to:
o Navigate the Information Library page.
o Navigate the query window.
o Describe the difference between an ad-hoc query and a smart query.
o List ways queries are used in other areas of Blackbaud CRM.
o Create an ad-hoc query.
o Access and Browse Records from Query Results.

© 2011, Blackbaud, Inc. This material may not be reproduced or transmitted in any way. Template redesign by UC Foundation. 4
CRM 102
Overview and Definitions
What is Query?
Query is a tool that you use to flag, group, and list selected records from the database that meet certain criteria
you define.
List vs. Report
Typically, queries build lists. The query result (or “output”) will be a list of information such as constituents or
revenue transactions that meet a certain set of criteria. (Example – all individuals who graduated from Arts &
Sciences in the last 10 years who have given $100 or more). The output will be a list of these individuals.
Lists are different than reports. Reports typically aggregate information and perform calculations behind the
scenes. Due to the limitations of Advance, here at UC Foundation we are in the habit of calling everything a
report (even if it only a list).
Super Users and SMEs will have the ability to run ad-hoc queries that generate lists of information.
Types of Queries
In CRM, there are two types of queries you can use to extract data:
Query Type
Information
Ad-hoc Can include numerous output fields and allow you to browse through
specific records based on the information you provide. This is typically a
list.
Smart Perform complex calculations that would be difficult to achieve using ad-
hoc queries, and are based on templates included in the program. This is
more complex – like a report. Covered in CRM 201.
Building Queries:
The first step to building a query is to think about the records that you want to see. At the simplest level, a query
answers four basic questions. These correspond to the four main components of a query: source view,
filters, output, and sort/group options. When you answer these four questions in a query, you should have
results that match your statement about the records you want to see.

NOTES
© 2011, Blackbaud, Inc. This material may not be reproduced or transmitted in any way. Template redesign by UC Foundation. 5
CRM 102
A good starting place to answer these questions is to form a statement, such as “I want to see the names of all
constituents who live in Cincinnati and have given a gift last quarter, listed alphabetically by last name” or “I
want to see all the revenue that came in last month, grouped by date.” Be as specific as possible. Writing down
your statement can help you begin to build your query. Forming this statement will help you get a clear idea of
records that you want to group – the most important part of building a query.
Using our example “the names of all constituents who live in Cincinnati and have given a gift last quarter, listed
alphabetically by last name” we will break down the components of the query. Then we will walk through the
mechanics of building the query in the system.
The names
This tells us we want to see names in the results. This is the query’s Output.

© 2011, Blackbaud, Inc. This material may not be reproduced or transmitted in any way. Template redesign by UC Foundation. 6
CRM 102
Of all constituents
This tells us that we need a constituent query, which means we’ll use the Constituents Source View to
create the query.
Who live in Cincinnati and have given a gift last quarter
We want to see those who live in Cincinnati, so the state is a filter. Looking at the rest of it. “...and have
given a gift last quarter” makes things a little more complicated. So we’ll need another filter to find the
gifts in that time frame.
Listed alphabetically by last name
This tells us how we want to Sort the results.

NOTES
© 2011, Blackbaud, Inc. This material may not be reproduced or transmitted in any way. Template redesign by UC Foundation. 7
CRM 102
Where to Build Queries: the Information Library
Queries appear in the Information Library. The Information Library is part of the Analysis tab on the blue
navigation bar. The information library offers features to organize and navigate your queries.
To Access the Information Library:
1. On the navigation bar, click Analysis.
2. In the Information library task group, click Information library.

© 2011, Blackbaud, Inc. This material may not be reproduced or transmitted in any way. Template redesign by UC Foundation. 8
CRM 102
When you open query in the Information Library, you will see a screen similar to this:
View Options: The left-side pane allows you to view queries by folder, category, owner, or record type, Select an option from the View by field, and the results display below.
List Updates: The list of queries is easy to navigate. Use the Search field to quickly search for a query. Click the filter icon on each column, and then select the columns to see. To view different columns, click Columns and select the columns you want to display.
Manage Folders: To organize your queries by folders, click the Manage folders icon. The Manage Folders window displays, use the up and down arrows to move folders and queries up or down in your
tree view.
Favorites: To mark queries and as favorites, click the star next to the query name.
Ad-Hoc Queries
Create an Ad-Hoc Query
Ad-hoc queries allow you to select, group, and list records that meet conditions you define. They are a quick
way to display data filtered to your needs, and they allow you to produce selections for use in other processes
throughout the program. An ad-hoc query can be the basis for a more advanced “smart query”, which are
covered in CRM 201.
Overview of the Process for an Ad-Hoc Query:
View Options
Search Options
Manage
Folders
Favorites

NOTES
© 2011, Blackbaud, Inc. This material may not be reproduced or transmitted in any way. Template redesign by UC Foundation. 9
CRM 102
To start an ad-hoc query: the first step is to select “Add and ad hoc query”. That opens a screen to prompt
you to select your source view and follow the process listed below.
Select source view
Define filters to specify which
records to include
Select fields to
display in results
Define sort order
Define criteria for summary
fields
View results
Save query

© 2011, Blackbaud, Inc. This material may not be reproduced or transmitted in any way. Template redesign by UC Foundation. 10
CRM 102
Step 1: Source View
Thinking about our 4 key questions to building a query, the first question relates to the Source View.
Select a Source View
The source view determines the field categories that are available and the type of records to include in the
query. The record type on which a query is based determines where the query is available and how it is used in
the program.
Source views are the first step in narrowing down the information in a query. From our example above of:
“I want to see the names of all constituents who live in Cincinnati and have given a gift last quarter, listed
alphabetically by last name.” The source view is constituents.
Frequently Used Source View and Query Types:
The most frequently used query type is constituent. Constituent queries give you a picture from the constituent
record, including information about gifts, relationships, memberships, and actions. Revenue queries are also

NOTES
© 2011, Blackbaud, Inc. This material may not be reproduced or transmitted in any way. Template redesign by UC Foundation. 11
CRM 102
frequently used because they draw from transaction records. The others are recognition groups, events, and
designations. You will notices these are conveniently listed in CRM as ‘Most commonly used’.
A constituent query holds constituent records so that if one constituent has more than one gift, the constituent is
still only stored once. With a revenue query, on the other hand, the constituent is stored as many times as there
are gifts because the query is looking at gift records only.
Example:
Query on the constituent will show each constituent only one time. (Fig. 1)
Query on the revenue, and the same constituent will be listed multiple times for each revenue
transaction. (Fig. 2)
Fig. 1: Constituent Query
James $25
$25
$25
Sarah $100
Matthew $50
$250
Sylvia $50
Fig. 2: Revenue Query
$25 James
$25 James
$25 James
$100 Sarah
$50 Matthew
$250 Matthew
$50 Sylvia

© 2011, Blackbaud, Inc. This material may not be reproduced or transmitted in any way. Template redesign by UC Foundation. 12
CRM 102
To Select a Source View for an Ad-Hoc Query:
1. On the Navigation bar, click Analysis.
2. In the Information library task group, click Information library.
3. On the Queries tab, click Add an Ad-hoc query.
4. Select the source view you would like to use for your query.
5. Click OK.
The New Ad-hoc Query window displays the Select filter and output fields tab.
Try It…
Following the steps above, navigate to the Information Library and select ‘add a new ad-hoc query’. Select the constituent source view.
Step 2: What Specific Parameters Do You Have?
In our four key questions, the next question is to determine our filters. Parameters, criteria, filters all mean the same thing
here: these are the pieces of our statement that help us narrow down the results to see only the specific things we want.
Define Filters and Output for a Query
Once you select your Source View, you will see a screen that looks similar to the one displayed on the following
page – it is the Select filter and output fields tab. This is where you select your parameters or filters.
The fields relate to the pieces of information that you want to display for each record in the query output and the
criteria to determine which records are included in that output. Fields are incredibly important to query. Query is
basically a big list of all fields on all of the different records of the system. Each field relates back to a record
somewhere on the system. For example, the birth date that is on the personal tab of a constituent is
“Constituent: Birth Date” field in a query.
You need to know where to look on the list for the information that you need.

NOTES
© 2011, Blackbaud, Inc. This material may not be reproduced or transmitted in any way. Template redesign by UC Foundation. 13
CRM 102
It is a lot of information, and it can be overwhelming at first.
Here is a quick guide to the different parts of the tab and how it relates to your query.
The mechanics of building the query: At a basic level, you make selections of fields and either drag and drop them or use
the arrows to move them into the “Include Records Where” window.
As you do this, you will be automatically asked to make a few more decisions along the way through Criteria Operators,
as shown in the visual below. These are additional filters that are built right in to help pull the records that you want to see
Find field:
search for query
fields.
View the tables
available for your
source view. You can
expand a node to
drill down to specific
groups of fields.
This middle column relates to
the table of your selection from
the 'Browse for fields in’ tab.
For example, all of the fields
associated with constituencies
are grouped together under
the Constituencies node.
When you select
Constituencies under “Browse
for fields in” these fields
appear in this center column.
Here you select fields and criteria operators to what
records to include.
These fields correspond to
your query results.

© 2011, Blackbaud, Inc. This material may not be reproduced or transmitted in any way. Template redesign by UC Foundation. 14
CRM 102
in your results. When this window opens, expand the drop down and make the selection that you are looking for, then
click ok.
Example: If we’re searching for all constituents in Cincinnati. We select ‘Address’ from the fields. Then from the middle
column we choose city and drag it over to ‘Select Records Where.” When the criteria operator box opens, we enter
‘Cincinnati’ as the value.
Criteria Operator:
Use the drop down to
select the appropriate
option, and then enter the
Value.
Sometimes it will be a
drop-down menu for
another selection; other
times you will type your
specific value.

NOTES
© 2011, Blackbaud, Inc. This material may not be reproduced or transmitted in any way. Template redesign by UC Foundation. 15
CRM 102
Tip: when building queries an important constituent filter is ‘deceased’. You need to tell the
system to filter based on this criteria.

© 2011, Blackbaud, Inc. This material may not be reproduced or transmitted in any way. Template redesign by UC Foundation. 16
CRM 102
How To Define Filters and Output for a Query:
1. On the Select filter and output fields tab, select the table in the Browse for fields in frame that
contains the fields you want to use to define for output or filtering.
2. In the middle frame, select the field to query on and drag the field to the Include records where frame.
The Apply Criteria window will appear.
3. On the Apply Criteria window, enter criteria operators to determine which records to include in the query
and then click OK.
4. In the middle frame, select the field to include in the results and drag the field into the Include records
where frame.
5. Click Save to save your changes. Provide a name for the query if prompted.
Wildcard Characters
Some criteria operators allow you to use special characters or a series of characters to define conditions a
record must meet in order to be selected. These special characters are called “wildcards.”
o Use the asterisk (*) or percent sign (%) to take the place of a group of characters.
o Use the question mark (?) or underscore (_) to take the place of an individual character.
o Use brackets ([ ]) to find a range of characters, or several specific values. For example, use the
criteria Last name “begins with” [A-C] to locate all records with a last name beginning with A through
C. When commas are used within brackets, the search is for specific values. For example, Last name
“begins with” [A,F,L] returns all records with last names beginning with A, F and L and skips those
beginning with all other letters.
Try It…
Using our example, add an ad-hoc query. In the select filter and output fields, make selections for the following
filters:
1. All constituents who live in Cincinnati (refer to visual above).
2. Who made a gift. (The field is Contituent – Revenue – Application Details – Type is Equal to Gift)
3. In the last quarter. (Revenue – Date – Last Quarter)

NOTES
© 2011, Blackbaud, Inc. This material may not be reproduced or transmitted in any way. Template redesign by UC Foundation. 17
CRM 102
Step 3: Choose What You Want to See in the Output
Here is where you choose what you will see in the output of your query. Your filters/parameters will determine
which records get pulled, but then you need to make decision about what information you need to see about
those records. The system will always default to name. You add the additional information you want to see.
In our example, we’re looking for all constituents who live in Cincinnati who made a gift last quarter. You need
to decide – do you want to see ‘City’ as an output field? Or the entire address? Or maybe that isn’t important to
you, and the only thing you want to see is the name and amount of the gift(s) in the last quarter. Following the
same process as choosing the fields to filter, you choose your outputs.

© 2011, Blackbaud, Inc. This material may not be reproduced or transmitted in any way. Template redesign by UC Foundation. 18
CRM 102
Try It:
1. Drag and drop the fields you want to display into ‘Result Fields to Display’. Select Address, City, State, Zip,
and Amount.
Drag and drop the fields you
want to see in your results
over to this window,
following the same process
you used to apply filters to
records.
Right click on any of your
filters to edit or delete them.
Helpful hint: you can right click on your filters to edit them - you can choose to expand
the date selection (i.e., this quarter, this year, last year, etc.), change the college, etc.

NOTES
© 2011, Blackbaud, Inc. This material may not be reproduced or transmitted in any way. Template redesign by UC Foundation. 19
CRM 102
2. Now, add another filter: educational college. This information is located on the Education (Primary) field.
The selection for the field is ‘Additional Information’ and then ‘Educational College.’ Choose a college from
the drop down.
A note about names:
If you want to be able to sort by last name, you need to make sure you add ‘First Name’ and
‘Last/Organizational/Household Name’ to the “Results Fields to Display” frame.

© 2011, Blackbaud, Inc. This material may not be reproduced or transmitted in any way. Template redesign by UC Foundation. 20
CRM 102
Step 4: How do You Want Your Results Displayed?
This is the place where you determine how you want to see your results. Do you want constituents listed in
alphabetical order? By college name? By revenue date?
You can only sort your results by the fields that you included in your output. This means if you don’t see a field
listed in “Result Fields to Display” it will not show up in the sort tab.
The “Set sort and group options” tab is where you make the decision to sort your results.
NOTES
© 2011, Blackbaud, Inc. This material may not be reproduced or transmitted in any way. Template redesign by UC Foundation. 21
CRM 102
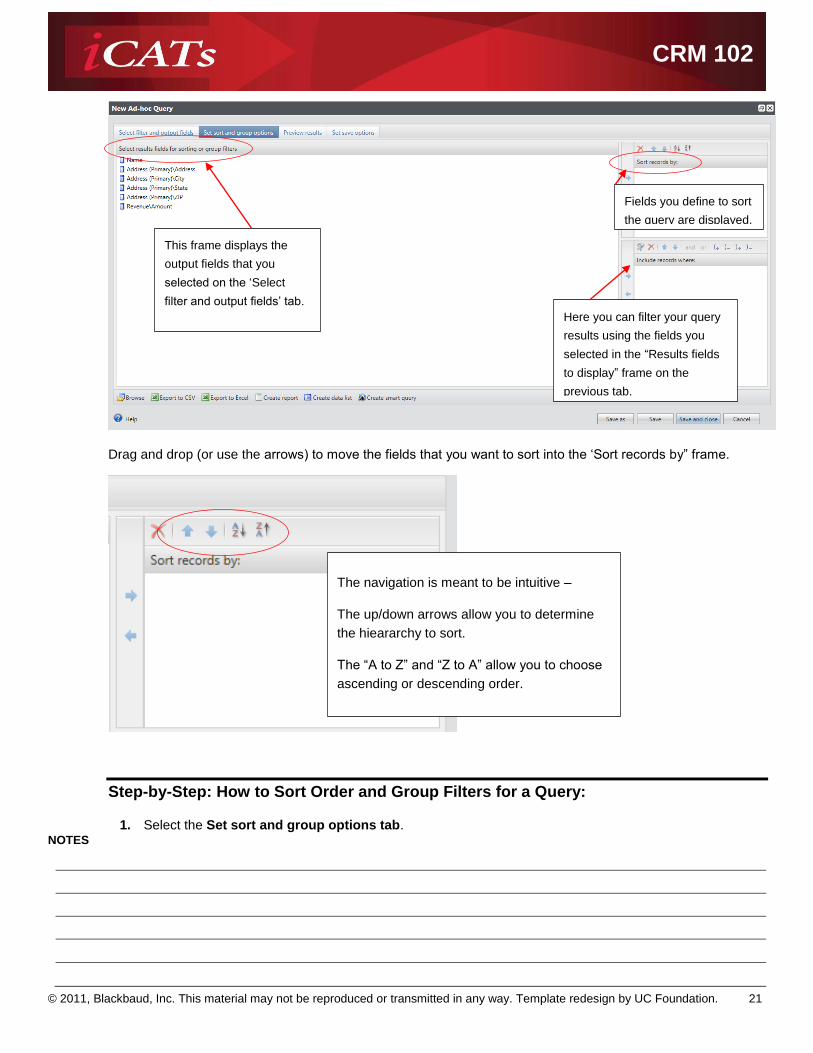
Drag and drop (or use the arrows) to move the fields that you want to sort into the ‘Sort records by” frame.
Step-by-Step: How to Sort Order and Group Filters for a Query:
1. Select the Set sort and group options tab.
Here you can filter your query
results using the fields you
selected in the “Results fields
to display” frame on the
previous tab.
This frame displays the
output fields that you
selected on the ‘Select
filter and output fields’ tab.
Fields you define to sort
the query are displayed.
The navigation is meant to be intuitive –
The up/down arrows allow you to determine
the hieararchy to sort.
The “A to Z” and “Z to A” allow you to choose
ascending or descending order.

© 2011, Blackbaud, Inc. This material may not be reproduced or transmitted in any way. Template redesign by UC Foundation. 22
CRM 102
2. On the Select results fields for sorting or group filters frame, select the fields you want to sort by and
drag them into the Sort records by frame.
3. Use the Ascending and Descending buttons on the Sort records by frame to order the results of the
selected field in ascending or descending order.
4. On the Select results fields for sorting or group filters frame, select the fields you want to group by
and drag them into the Include records where frame.
5. On the Include records where frame, filter on aggregate values of filter fields.
6. Click Save to save your changes. Provide a name for the query if prompted.
Try It…
Using the query you have started, choose fields that you want to use to sort the results of your query. Try
sorting by last name in alphabetical order.
Final Step: Preview Results and Save a Query
The last 2 tabs are where you can view your results and save your query.
Your results display on the Preview results tab. If your query contains more than 500 records, only the first 500
rows of results display here. To see all records, you can click the “Export to CSV” or “Export to Excel” options to
export all records. Export is also used if you want to use your query results outside of the program (send list to
mail house, share with a dean, etc.)
As you preview your results, you can go back and any adjustments to your criteria on the other tabs as
necessary. The image below shows how results display in the preview tab.

NOTES
© 2011, Blackbaud, Inc. This material may not be reproduced or transmitted in any way. Template redesign by UC Foundation. 23
CRM 102
On the Set save options tab, you define the query name and other query properties. You can save your query
to a folder.
Full names and addresses
redacted for donor privacy.
Where you export your results.

© 2011, Blackbaud, Inc. This material may not be reproduced or transmitted in any way. Template redesign by UC Foundation. 24
CRM 102
All Super Users should create a folder with your unit and first and last name and save all queries to
your own folder. Example: College_First_Last
To Preview Results and Save a Query:
1. Click the Preview results tab to browse the query results.
2. Browse to make sure the criteria and output for the query are running as intended.
3. Click Set save options to define the query name and other options.
o Enter a unique name to identify the query for this report.
o Enter a description that describes the information in the query. For example, explain the criteria used
to create the query.
o Select a category to group the query with similar queries.
o If you use folders to organize your queries, select the folder in which to save this query.
o Mark the Add to my favorite queries folder checkbox to save the query in your favorite folder.
o Mark the Make this query available in Mobile Query checkbox to access the query and its results
from a mobile device.
4. Click Save. The results page appears.
Try It…
Preview the results of the query and then save your query with a name that you will remember and recognize.
Super Users: Go to ‘Manage Folders’
then ‘Add’ to create your own folder.
Save your queries to your folder.

NOTES
© 2011, Blackbaud, Inc. This material may not be reproduced or transmitted in any way. Template redesign by UC Foundation. 25
CRM 102
View Query Results Page
Once your query is saved, you return to the Information Library to view it. Queries are displayed in a list. You can search
for a query and also use folders to organize queries.
To view query results, click the query and then click ‘view results’ to process the query.
Queries display in a list format. You can
search the queries. Click a query from the
list to open it.

© 2011, Blackbaud, Inc. This material may not be reproduced or transmitted in any way. Template redesign by UC Foundation. 26
CRM 102
Query Tasks
Browse Query Results
From the results page of a query, or from the Queries tab of the Information Library, you can select the page to
view the query results records
In the results frame you can process the
query, view the results, browse records, and
export the results.
In the explorer bar you can
edit the query criteria, view
exports, and assign
permissions.
Click the result you want to
browse. You will be prompted to
choose what page you want to
view the results in.
Once you select the page, the
results will open with the
highlighted record’s page. The
other records are listed below for
you to browse.

NOTES
© 2011, Blackbaud, Inc. This material may not be reproduced or transmitted in any way. Template redesign by UC Foundation. 27
CRM 102
To Browse Query Results:
1. On the navigation bar, click Analysis.
2. In the Information Library task group, click Information Library.
3. On the Queries tab, click the expand icon next to the query that includes the results you want to browse.
4. In the frame that displays below, click Browse.
5. On the Choose page definition window, select the page to use to view the records and click OK. The
selected page appears with a grid of all the records in the query.
6. Click Previous record or Next record to browse through records.
7. To use a different page to view the records, in the View record with field, select the page to use.
Query Combining Operators
You can create relationships between criteria fields with combining operators. The three combining operators
are AND, OR, and Parentheses ( ).
Query Operator Use When…
AND Use between criteria fields to indicate that records must meet
both criteria to be included in the query results. “And” is a
limiting query operator.
OR Use between criteria fields to indicate that records can meet
either criteria to be included in the query results. “Or” will
capture broader results than ‘and’.
Parenthesis ( ) Use to combine multiple criteria so that the query considers
them together before considering other criteria.

© 2011, Blackbaud, Inc. This material may not be reproduced or transmitted in any way. Template redesign by UC Foundation. 28
CRM 102
The Query Operators are found in the ‘Select filter and output fields’ tab, in the ‘include records where’
pane. The system defaults to ‘and’.
Selections - Overview
You can create selections from ad-hoc queries. When you save a query, you have the option of creating a
selection, which makes those records available for use in other areas of the program. A selection is like an
existing list within the database.
Create a Selection from a Query
When you create a selection from a query, you must specify whether the selection will be dynamic or static.
A selection is composed of a unique set of record identifiers
and is often used to filter a business process or report.
Selections are designed to be used by the program in various
features and are optimized for processing speed.
When you save a query or view its
properties, you can create a selection from
it that is available to use in other areas of
the program.
You can also specify that the selection be
available in the query designer to create
output fields and filters for other queries.

NOTES
© 2011, Blackbaud, Inc. This material may not be reproduced or transmitted in any way. Template redesign by UC Foundation. 29
CRM 102
Dynamic: A dynamic selection is automatically refreshed each time it is used. Whenever a dynamic
selection runs, the program searches the database for any new records meeting the criteria of the
selection and adds them to the results. Note: You cannot save an ad-hoc query as a dynamic
selection if the query contains an encrypted field that is being used:
As a filter on the Select filter and output fields tab.
As a sort field or aggregate value filter on the Set sort and group options tab.
Static: A static selection is like a snapshot of your database at the time it is first run. Only the records
included when the selection is first run are included whenever the selection is used in the program.
Note: To save a selection based on an ad-hoc query, the query must either:
Contain no summary output fields.
OR
Contain a unique identifier field of the query view along with the summary field. For example,
the constituent Lookup ID is a unique identifier field.
Selection Type Definition
Static A fixed set of IDs that does not change. It is like a snapshot of the
records at that point in time.
Dynamic It is automatically refreshed each time it is used; it picks up any
new records meeting the criteria.
To Create a Selection from a Query:
1. From an open query, select Set save options tab.
OR
On the Queries tab, click the expand icon next to the query to create a selection and click Properties.
2. Click the Options tab.
3. Mark the Create a Selection checkbox.
4. Mark an option to specify whether the selection will be dynamic or static.
5. Select whether or not the selection can be used outside of the program in the Microsoft SQL Server
Reporting Services Query Designer. If you mark the checkbox, the selection will display in the Selections
folder of the Field Explorer in Query Designer.

© 2011, Blackbaud, Inc. This material may not be reproduced or transmitted in any way. Template redesign by UC Foundation. 30
CRM 102
6. Click OK to save your changes.
Try It…
Using the instructions above, open a query and save your query as a selection. Save it so you will recognize it
later.
Use Selections in a Query
When creating a query, selections that have already been created for that record type can be used to create
output fields and as filters for the query.

NOTES
© 2011, Blackbaud, Inc. This material may not be reproduced or transmitted in any way. Template redesign by UC Foundation. 31
CRM 102
Choosing “Exists In <Selection Name>?” when creating an ad-hoc query enables you to further refine the
criteria based on a previously existing selection. This can save you work recreating filter criteria if the selection
already includes it.
How are Queries Used in Other Parts of CRM?
Queries and query results can be saved in a way that lets you use them in other parts of CRM, such as reports. Since
query is a tool for grouping records, you can run a report from the records that you have grouped together in a query.