creative cards
DESCRIPTION
MANUALIDADTRANSCRIPT

echo park paper co.
{ Ideas for Birthday, Friendship, Thank You, and All Occasion Cards }
{
Creative Cardsidea book
Beautifully Designed CardsFeaturing Collections from Echo Park Paper Co. & Carta Bella Paper Co.24

If you enjoy scrapbooking, it's likely that you also enjoy making cards. There's something extra special about a handmade card delivered to those you love. All that extra work and thought put into each card is evidence of how much you care.
I enjoy the freedom and creativity the card canvas allows. I love adding little embellishments and stickers. I often use the journaling cards found within the collections as a starting point for my cards as they typically contain just the right sentiment for the card I'm creating. One trick I employ is to create a card with the leftover items from my scrapbooking and paper crafting projects. While all of your supplies are still out on your work surface, take the time to make a card as well. Then store it in a safe place until you're ready to send it.
This idea book includes 24 cards in all different shapes and sizes from both the Carta Bella Paper and Echo Park Paper Design Teams. Whether you're looking for a thank you card for a teacher, a birthday card for a friend, or a get well card for someone that's under the weather, this idea book is sure to inspire you!
This issue contains special buttons you can click to view the complete collections highlighted in each project. You can also visit our Facebook pages and company blogs by clicking their respective buttons. And to help you understand the card making process just a bit better, we've included a start-to-finish video for the "Good Stuff " card found on page 5 of this book. Simply click the button to watch the video on our Youtube EP TV channel.
We'd love to see how you've been inspired by this issue. Be sure to share your work with us on our Facebook page telling us which card most inspired you. We can't wait to see what you create!
Jennifer S. GallacherEcho Park Paper Co.
Editor's Note

On the Cover
Use a paper piercer to poke a hole through chipboard stickers. Then add brads for additional interest.
{
"I Love You" by Jennifer Chapin
Echo Park Paper Co.1177 South 1680 WestOrem, Utah 84058
Carta Bella Paper Co.1177 South 1680 WestOrem, Utah 84058
Phone 801-404-5333 Toll 800-701-1115Fax 801-404-5211
Copyright© 2013 Echo Park Paper Co. LLCAll rights reserved. No reproduction of this publication can be made without the expressed permission of Echo Park Paper Co. LLC.
Check out our blogs! http://www.echoparkpaperblog.comhttp://www.cartabellapaper.com/blog/
Credits: Photography Nichole Huntington
Designer Linda Nelson
Contributors Wendy Sue Anderson, Pamella Brown, Jennifer Chapin, Nancy Damiano, Jan Hobbins, Lowri McNabb, Patricia Roebuck, Kandis Smith, Susan Stringfellow, Tamara Tripodi
F r i e n d s h i pYo u ' v e b e e n f r i e n d s f o r e v e r . Te l l t h e m h o w s p e c i a l t h e y a r e w i t h o n e o f t h e s e d e l i g h t f u l c a r d s .
T h a n k sG i v e t h a n k s t o t h o s e w h o m a t t e r m o s t . T h o u g h t f u l , h a n d m a d e c a r d s e x p r e s s h o w m u c h y o u c a r e .
s k e T c h b o o kL o o k i n g f o r a d d i t i o n a l i n s p i r a t i o n ? C h e c k o u t t h e s k e t c h b o o k s e c t i o n w h i c h i n c l u d e s a s k e t c h f o r e a c h c a r d i n c l u d e d i n t h i s i s s u e .
b i r T h d ay C e l e b r a t e i n s t y l e w i t h a s p e c i a l l y d e s i g n e d c a r d f o r t h e b i r t h d a y b o y o r g i r l .
a l l o c c a s i o n M a k e a c a r d f o r e v e r y o t h e r o c c a s i o n . C a r d s i n c l u d e " m i s s y o u , " " g e t w e l l " a n d s e v e r a l a d d i t i o n a l i d e a s .
128
22
4
16
7
24 Beautifully Designed Cards Featuring Collections from Echo Park Paper and Carta Bella Paper
S e e a d d i t i o n a l d e t a i l s f o r t h i s c a r d o n p a g e 1 5 .

4
Birthday
1. Cut a sheet of white cardstock into a 10 1/2" X 5 1/4" rectangle and fold in half to form the card base.
2. Cut a 5" square from the "Birthday Girl Journaling" patterned paper and mount the pink side on the front of the card.
3. Cut a 4 1/2" X 4" rectangle from the "Birthday Girl" patterned paper.4. Cut the crown square from the "Birthday Girl Journaling" patterned
paper and mount on the striped side of the patterned paper.5. Add adhesive foam squares to the back of the sticker numbers "1"
and "6" from the "Birthday Girl Stickers" sheet and mount them on the journaling square.
6. Wrap Yellow Baker's Twine around the striped patterned paper and mount the square on the pink patterned paper.
7. Cut the paper strips from the "Birthday Girl Journaling" patterned paper to 4" wide and mount on the striped patterned paper. Machine stitch in place with pink sewing thread.
8. Mount two of the present stickers from the "Birthday Girl" sticker sheet on the bottom, right corner of the card.
DIMENSIONS: 5 1/4" X 5 1/4"supplies: "Birthday Girl
Journaling" Patterned Paper (Birthday Girl);
"Birthday Girl" Patterned Paper (Birthday Girl);
White Cardstock (Carta Bella Paper); "Birthday Girl
Stickers"; Yellow Baker's Twine; Sewing Machine; Pink
Sewing Thread; Adhesive Foam Squares
16 Birthday by Wendy Sue Anderson
Machine stitch pieces before layering so the stitching doesn't show on the inside of your card.
CLICK HERE to view this collection
CLICK HERE for more ideas

5 5
Use basic shapes as the base for your card including stars, circles, squares, and more.
Good Stuff by Jennifer S. Gallacher DIMENSIONS: 5"supplies: 6x6"
Paper Pad (Scoot); "Element Sticker"
Sheet (Scoot); White Cardstock
(Carta Bella Paper); Green Ribbon; Black
Buttons; Circle Cutter; Adhesive
Foam Squares
Card tutorial video now!
WATCH THIS
1. Cut two 5" circles from the white cardstock.2. Cut a 5" circle from the light blue patterned paper found within the 6x6"
paper pad and mount at the top of one of the circles.3. Cut a 5" circle from the green patterned paper found within the 6x6"
paper pad and cut off 3 1/2" from the top of the circle. Mount the circle at the bottom of the card.
4. Cut a 6" X 1" strip from the yellow patterned paper found within the 6x6" paper pad and notch both ends with scissors. Wrap green ribbon around the strip and tie into a knot. Mount the strip across the top of the green patterned paper half circle.
5. Cut off the final car from the train sticker from the "Element Sticker" sheet and mount at the top of the yellow patterned paper strip.
6. Mount the small white cloud sticker from the "Element Sticker" sheet on the blue patterned paper.
7. Add adhesive foam squares to the back of the blue cloud sticker and mount on the blue patterned paper, slightly overlapping the white cloud.
8. Add three black buttons (small, medium, and slightly larger) on the card so they appear to be the smoke from the train smokestack.
9. Mount the "Good Stuff" sticker from the "Element Sticker" sheet on the card with adhesive foam squares.
10. Mount the "Lots of Fun" sticker from the "Element Sticker" sheet on the card with adhesive foam squares, slightly overlapping the "Good Stuff" sticker.
CLICK HERE to view this collection
CLICK HERE for more ideas
6
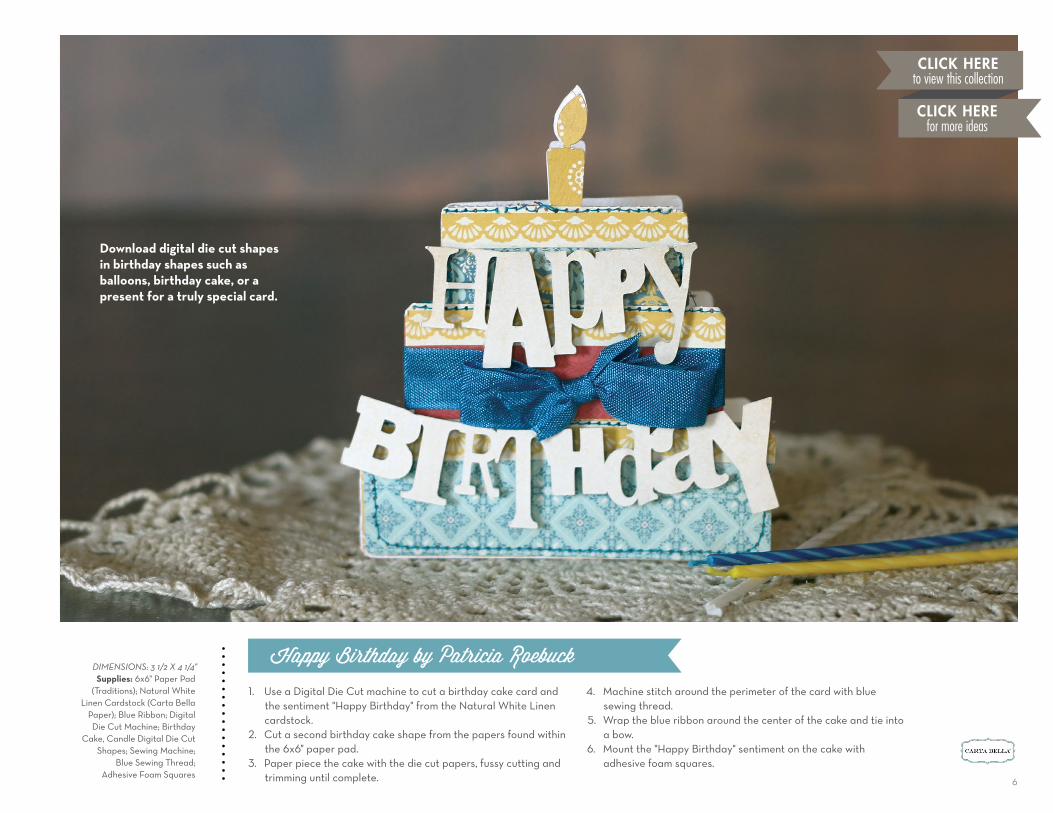
DIMENSIONS: 3 1/2 X 4 1/4" supplies: 6x6" Paper Pad
(Traditions); Natural White Linen Cardstock (Carta Bella
Paper); Blue Ribbon; Digital Die Cut Machine; Birthday
Cake, Candle Digital Die Cut Shapes; Sewing Machine;
Blue Sewing Thread; Adhesive Foam Squares
Happy Birthday by Patricia Roebuck
download digital die cut shapes in birthday shapes such as balloons, birthday cake, or a present for a truly special card.
1. Use a Digital Die Cut machine to cut a birthday cake card and the sentiment "Happy Birthday" from the Natural White Linen cardstock.
2. Cut a second birthday cake shape from the papers found within the 6x6" paper pad.
3. Paper piece the cake with the die cut papers, fussy cutting and trimming until complete.
4. Machine stitch around the perimeter of the card with blue sewing thread.
5. Wrap the blue ribbon around the center of the cake and tie into a bow.
6. Mount the "Happy Birthday" sentiment on the cake with adhesive foam squares.
CLICK HERE to view this collection
CLICK HERE for more ideas

7
DIMENSIONS: 5 1/2"supplies:: "Jump"
Patterned Paper (Toy Box); "Hop" Patterned
Paper (Toy Box); Teal Cardstock; Blue
Ribbon; Green Button; Red Wire; Purple,
Yellow, Blue Eyelets; Corner Rounder Punch; Circle Cutter; Adhesive
Foam Squares
Pop, Pop, Pop by Tamara Tripodi
let the elements found with the collection inspire the card shape such as the push popper image for this card.
1. Cut a 5 1/2" circle from cardstock to use as a template. Place the template on a sheet of 12x12" teal cardstock. Trace the circle on the bottom of the cardstock. Place the template on the top of the first circle slightly overlapping making sure the edges will align when folded. Cut out the card and fold in half.
2. Cut a 5 1/4" circle from the "Jump" patterned paper and mount on the front of the card.
3. Add the three eyelets to the left side of the card.
4. Cut the "pop, pop, pop" journaling card from the "Jump" patterned paper. Round the right corners of the journaling card with corner rounder punch and mount the journaling card on the card front.
5. Cut the circles from the "Hop" patterned paper and mount randomly around the card. Adhere some of the circles with adhesive foam squares.
6. Tie a blue ribbon into a bow and mount at the top of the card.7. Thread red wire through the back of a green button. Twist the ends of
the wire into curls and mount the button in the center of the ribbon.
CLICK HERE to view this collection
CLICK HERE for more ideas
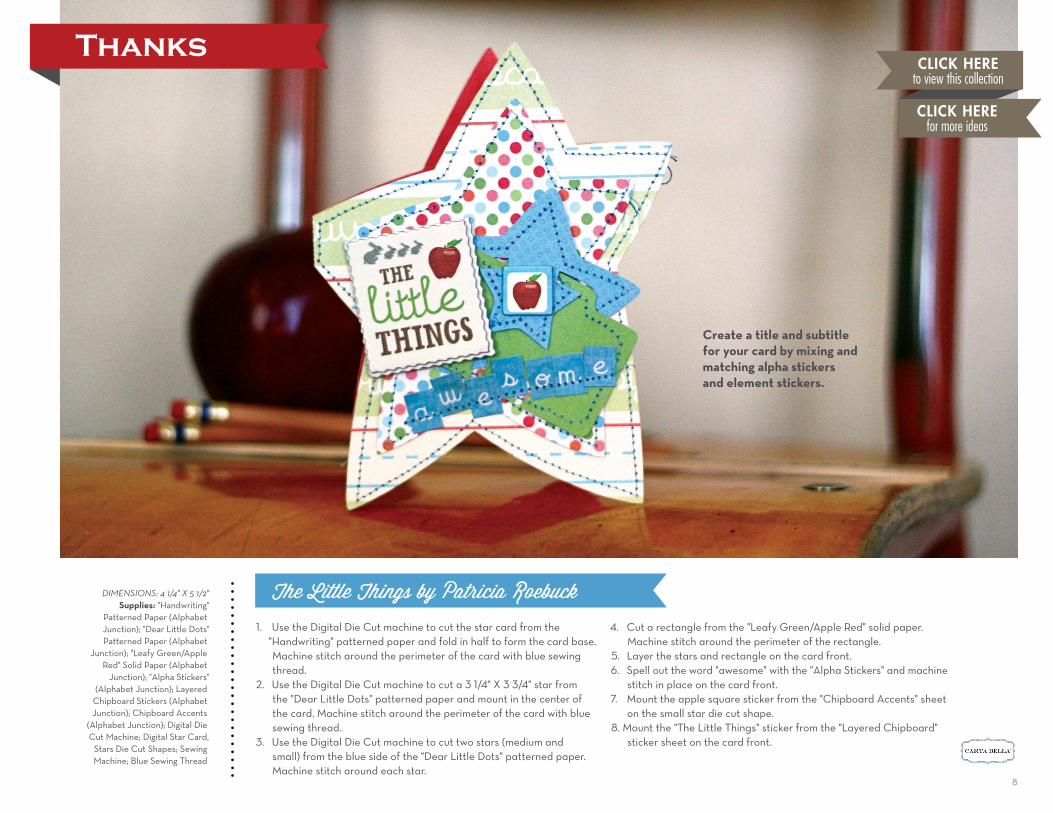
8
The Little Things by Patricia RoebuckDIMENSIONS: 4 1/4" X 5 1/2"supplies: "Handwriting"
Patterned Paper (Alphabet Junction); "Dear Little Dots" Patterned Paper (Alphabet
Junction); "Leafy Green/Apple Red" Solid Paper (Alphabet
Junction); "Alpha Stickers" (Alphabet Junction); Layered
Chipboard Stickers (Alphabet Junction); Chipboard Accents
(Alphabet Junction); Digital Die Cut Machine; Digital Star Card,
Stars Die Cut Shapes; Sewing Machine; Blue Sewing Thread
create a title and subtitle for your card by mixing and matching alpha stickers and element stickers.
CLICK HERE to view this collection
CLICK HERE for more ideas
1. Use the Digital Die Cut machine to cut the star card from the "Handwriting" patterned paper and fold in half to form the card base. Machine stitch around the perimeter of the card with blue sewing thread.
2. Use the Digital Die Cut machine to cut a 3 1/4" X 3 3/4" star from the "Dear Little Dots" patterned paper and mount in the center of the card. Machine stitch around the perimeter of the card with blue sewing thread.
3. Use the Digital Die Cut machine to cut two stars (medium and small) from the blue side of the "Dear Little Dots" patterned paper. Machine stitch around each star.
4. Cut a rectangle from the "Leafy Green/Apple Red" solid paper. Machine stitch around the perimeter of the rectangle.
5. Layer the stars and rectangle on the card front.6. Spell out the word "awesome" with the "Alpha Stickers" and machine
stitch in place on the card front.7. Mount the apple square sticker from the "Chipboard Accents" sheet
on the small star die cut shape.8. Mount the "The Little Things" sticker from the "Layered Chipboard"
sticker sheet on the card front.
Thanks
9
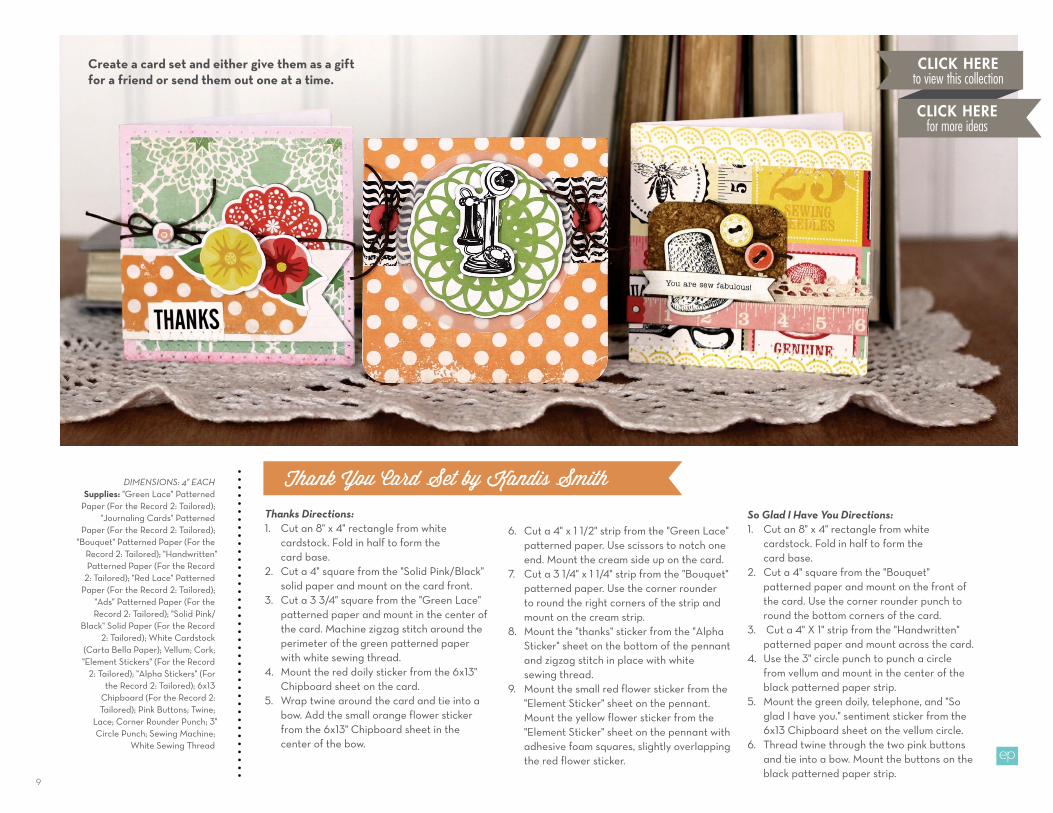
Thank You Card Set by Kandis SmithDIMENSIONS: 4" EaChsupplies: "Green Lace" Patterned
Paper (For the Record 2: Tailored); "Journaling Cards" Patterned
Paper (For the Record 2: Tailored); "Bouquet" Patterned Paper (For the
Record 2: Tailored); "Handwritten" Patterned Paper (For the Record
2: Tailored); "Red Lace" Patterned Paper (For the Record 2: Tailored);
"Ads" Patterned Paper (For the Record 2: Tailored); "Solid Pink/
Black" Solid Paper (For the Record 2: Tailored); White Cardstock
(Carta Bella Paper); Vellum; Cork; "Element Stickers" (For the Record
2: Tailored); "Alpha Stickers" (For the Record 2: Tailored); 6x13
Chipboard (For the Record 2: Tailored); Pink Buttons; Twine;
Lace; Corner Rounder Punch; 3" Circle Punch; Sewing Machine;
White Sewing Thread
create a card set and either give them as a gift for a friend or send them out one at a time.
So Glad I Have You Directions:1. Cut an 8" x 4" rectangle from white
cardstock. Fold in half to form the card base.
2. Cut a 4" square from the "Bouquet" patterned paper and mount on the front of the card. Use the corner rounder punch to round the bottom corners of the card.
3. Cut a 4" X 1" strip from the "Handwritten" patterned paper and mount across the card.
4. Use the 3" circle punch to punch a circle from vellum and mount in the center of the black patterned paper strip.
5. Mount the green doily, telephone, and "So glad I have you." sentiment sticker from the 6x13 Chipboard sheet on the vellum circle.
6. Thread twine through the two pink buttons and tie into a bow. Mount the buttons on the black patterned paper strip.
CLICK HERE to view this collection
CLICK HERE for more ideas
Thanks Directions:1. Cut an 8" x 4" rectangle from white
cardstock. Fold in half to form the card base.
2. Cut a 4" square from the "Solid Pink/Black" solid paper and mount on the card front.
3. Cut a 3 3/4" square from the "Green Lace" patterned paper and mount in the center of the card. Machine zigzag stitch around the perimeter of the green patterned paper with white sewing thread.
4. Mount the red doily sticker from the 6x13" Chipboard sheet on the card.
5. Wrap twine around the card and tie into a bow. Add the small orange flower sticker from the 6x13" Chipboard sheet in the center of the bow.
6. Cut a 4" x 1 1/2" strip from the "Green Lace" patterned paper. Use scissors to notch one end. Mount the cream side up on the card.
7. Cut a 3 1/4" x 1 1/4" strip from the "Bouquet" patterned paper. Use the corner rounder to round the right corners of the strip and mount on the cream strip.
8. Mount the "thanks" sticker from the "Alpha Sticker" sheet on the bottom of the pennant and zigzag stitch in place with white sewing thread.
9. Mount the small red flower sticker from the "Element Sticker" sheet on the pennant. Mount the yellow flower sticker from the "Element Sticker" sheet on the pennant with adhesive foam squares, slightly overlapping the red flower sticker.

10
You Are Sew Fabulous Directions:1. Cut an 8" x 4" rectangle from white cardstock.
Fold in half to form the card base.2. Cut a 4" square from the "Red Lace" patterned
paper and mount the yellow side on the card front.3. Cut a 4" x 3" rectangle from the "Ads" patterned paper and mount the rectangle in the center of the card. Zigzag stitch the top and bottom edges with the sewing machine using white sewing thread.4. Cut a 2 1/2 x 1 1/2" rectangle from cork. Use the
corner rounder to round the top corners of the cork and mount on the card.
5. Mount the measuring tape chipboard sticker from the 6x13 Chipboard sheet below the cork and across the card. Trim off the excess sticker if needed.
6. Mount lace on the top edge of the measuring tape sticker.7. Thread twine through a yellow and red button from
the 6x13 Chipboard sheet and mount on the cork.8. Mount the thimble and "You are sew fabulous!"
sentiment sticker from the 6x13 Chipboard sheet on the card.

11
DIMENSIONS: 4" x 6"supplies: 6x6" Paper
Pad (True Friends); White Cardstock
(Carta Bella Paper); "Element Sticker" (True
Friends); "Alpha Sticker" (True Friends);
Heart Doily; Pearl Stickers; Toothpicks;
Pink Twine; Corner Rounder Punch;
Sewing Machine; White Sewing Thread
Thank You Forever by Jennifer S. Gallacher
Fussy cut the stickers to create your own sentiments.
1. Cut an 8" x 6" rectangle from white cardstock. Fold in half to form the card base.
2. Cut a 4" x 6" rectangle from the green dot patterned paper found within the 6x6 Paper Pad. Mount on the front of the card. Use the corner rounder to round the right corners of the card.
3. Mount the heart doily on the card. Trim off the excess doily.4. Hand cut a heart shape from the blue daisy patterned paper found within
the 6x6 Paper Pad. Mount in the center of the doily. Trim off the excess patterned paper. Machine stitch around the perimeter of the heart with white sewing thread.
5. Cut a 4 1/2" x 1 1/4" strip from the striped paper found within the 6x6" Paper Pad. Use scissors to notch one end. Wrap pink twine around the
strip three times. Tie a green button to the twine. Mount the strip on the scallop sticker from the "Element Stickers" sheet on the bottom of the strip. Trim off the excess sticker. Mount the border on the bottom of the card.
6. Mount the blue doily sticker from the "Element Stickers" sheet behind the green button. Add two blue flower stickers to the border strip.
7. Mount the "BFF" tab sticker from the "Element Sticker" sheet above the border strip.
8. Cut the left edges from the "You" sticker from the "Element Sticker" sheet and the "Best Friends Forever" sticker from the "Alpha Sticker" sheet. Mount each flag on a toothpick and mount them on the card.
9. Add three pearl stickers to the card.
CLICK HERE to view this collection
CLICK HERE for more ideas

12
DIMENSIONS: 6 3/4" X 4"supplies: "Vintage Tags" Patterned
Paper (Traditions); "Moments Like This Word" Patterned Paper (Traditions);
"Peacock's Paradise" Patterned Paper (Traditions); "Botanical" Patterned Paper
(Traditions); "Evening Floral" Patterned Paper (Traditions); "Blue Mist/Pacific Blue" Solid Paper (Traditions); "Cinnamon Red/
Sunset Gold" Solid Paper (Traditions); Digital Die Cut Machine; Tea Cup Card,
Hearts Digital Die Cut Shapes; Brown Stamping Ink; Adhesive Foam Dots
You're My Cup of Tea by Jennifer Chapin
Friendship
cut several of the same die cut shapes from a variety of papers and then paper piece them together for a customized look.
1. Use the Digital Die Cut machine and the Tea Cup Card Digital die cut shapes to cut the tea cup from the "Vintage Tags," "Moments Like This Word," "Peacock's Paradise," and the "Evening Floral" patterned papers. Paper piece the tea cup
as shown.2. Use the Digital Die Cut machine and the large heart shape to
cut a heart from the "Botanical" patterned paper. Use brown stamping ink to ink the edges of the heart. Mount the heart on the card with adhesive foam squares.
3. Use the Digital Die Cut machine to cut a small heart shape from the "Blue Mist/Pacific Blue" solid paper and mount on
the card.4. Print the "You're My Cup of Tea" on the "Cinnamon Red/ Sunset
Gold" solid paper and trim into two paper strips. Mount the sentiment on the green heart shape.
CLICK HERE to view this collection
CLICK HERE for more ideas

13
1. Cut a 7" X 8" rectangle from the kraft cardstock. Fold in half to form the card base and rub edges with the brown stamping ink.
2. Cut a 6 1/4" X 3 3/4" rectangle from the "Frozen Beige/Rouge" solid paper and mount in the center of the card.
3. Cut a 6" x 3 1/4" rectangle from the "Little Sledders" patterned paper and rub the edges with brown stamping ink. Machine stitch around the perimeter of the rectangle and mount on the card front.
4. Mount the red border strip from the "Element Sticker" sheet on the brown ribbon and mount on the bottom of the card.
5. Cut the hexagons from the patterned paper found within the 6x6 paper pad and rub edges with brown stamping ink. Mount a strip of the hexagons on the left side of the card.
6. Mount the "happy all cozy with you" sticker on the right side of the card with adhesive foam squares.
7. Cut a 2" x 3" rectangle from the brown patterned paper found within the 6x6 paper pad. Mount on the left side of the card.
8. Cut a 1 1/2" x 2 1/2" rectangle from the "Frozen Beige/Rouge" solid paper and mount in the center of the brown rectangle with adhesive foam squares.
9. Cut a 1 1/4" X 2 1/4" rectangle from the "Frozen Beige/Rouge" solid paper and rub the beige side with the brown stamping before mount it in the center of the rouge rectangle.
10. Use the digital die cut (or manual) machine to cut three dimensional flowers from the patterned papers found within the 6x6 paper pad. Add a pearl brad to the largest flower and mount them on the beige rectangle.
11. Use the digital die cut machine (or manual) machine to cut three leaves from the tan patterned paper found within the 6x6 paper pad. Mount the leaves on the beige rectangle.
12. Mount the asterisk stickers from the "Element Sticker" sheet on the bottom of the beige rectangle.
13. Cut additional hexagon shapes from the patterned paper found within the 6x6 paper pad and mount on the card with adhesive foam squares, overlapping some of the first hexagon shapes.
Happy All Cozy with You by Jan HobbinsDIMENSIONS: 7" X 4"supplies: "Little Sledders" Patterned Paper (Winter
Fun); "Frozen Beige/ Rouge" Solid Paper
(Winter Fun); 6x6 Paper Pad (Winter Fun); Kraft Cardstock (Carta Bella
Paper); "Element Sticker" (Winter Fun); Pearl
Brads; Digitial Die Cut Machine; Dimensional
Flower, Leaves Die Cut Shapes; Brown Ribbon;
Brown Stamping Ink; Sewing Machine; White
Sewing Thread; Adhesive Foam Squares
Use the 6x6 paper pad for smaller scale patterns from your favorite collections.
CLICK HERE to view this collection
CLICK HERE for more ideas
14
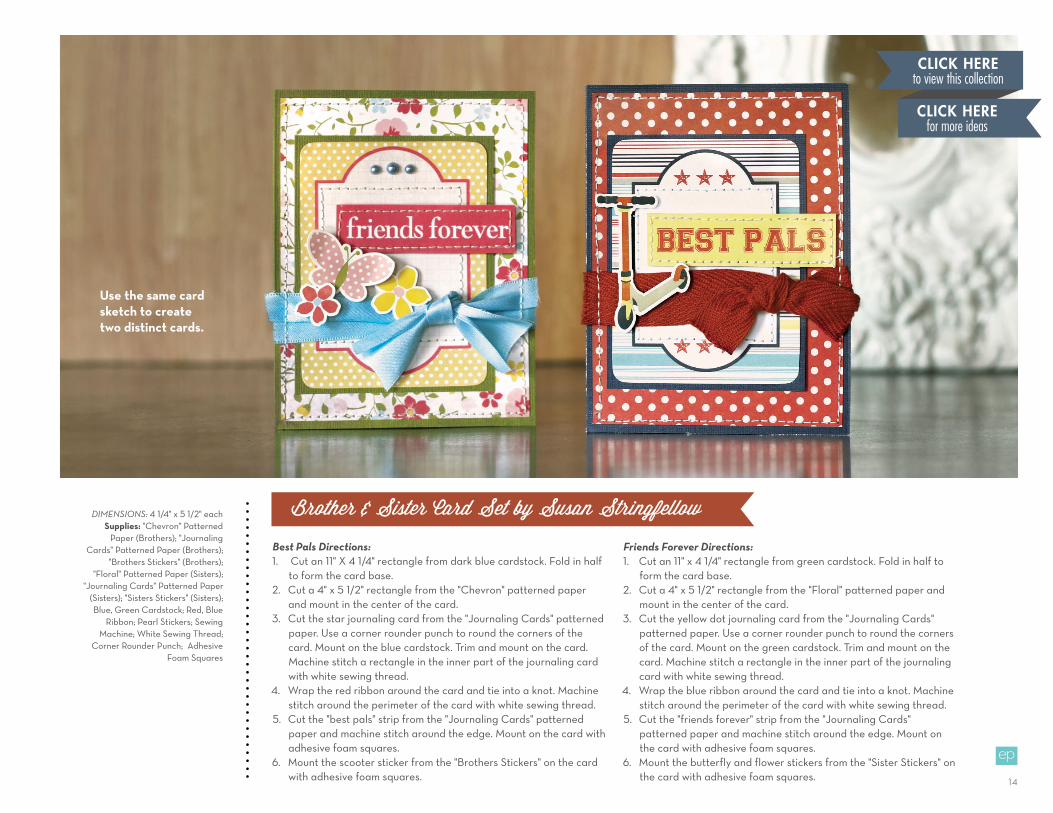
Brother & Sister Card Set by Susan StringfellowDIMENSIONS: 4 1/4" x 5 1/2" each supplies: "Chevron" Patterned
Paper (Brothers); "Journaling Cards" Patterned Paper (Brothers);
"Brothers Stickers" (Brothers); "Floral" Patterned Paper (Sisters);
"Journaling Cards" Patterned Paper (Sisters); "Sisters Stickers" (Sisters); Blue, Green Cardstock; Red, Blue
Ribbon; Pearl Stickers; Sewing Machine; White Sewing Thread;
Corner Rounder Punch; Adhesive Foam Squares
Best Pals Directions:1. Cut an 11" X 4 1/4" rectangle from dark blue cardstock. Fold in half
to form the card base.2. Cut a 4" x 5 1/2" rectangle from the "Chevron" patterned paper
and mount in the center of the card.3. Cut the star journaling card from the "Journaling Cards" patterned
paper. Use a corner rounder punch to round the corners of the card. Mount on the blue cardstock. Trim and mount on the card. Machine stitch a rectangle in the inner part of the journaling card with white sewing thread.
4. Wrap the red ribbon around the card and tie into a knot. Machine stitch around the perimeter of the card with white sewing thread.
5. Cut the "best pals" strip from the "Journaling Cards" patterned paper and machine stitch around the edge. Mount on the card with adhesive foam squares.
6. Mount the scooter sticker from the "Brothers Stickers" on the card with adhesive foam squares.
Friends Forever Directions:1. Cut an 11" x 4 1/4" rectangle from green cardstock. Fold in half to
form the card base.2. Cut a 4" x 5 1/2" rectangle from the "Floral" patterned paper and
mount in the center of the card.3. Cut the yellow dot journaling card from the "Journaling Cards"
patterned paper. Use a corner rounder punch to round the corners of the card. Mount on the green cardstock. Trim and mount on the card. Machine stitch a rectangle in the inner part of the journaling card with white sewing thread.
4. Wrap the blue ribbon around the card and tie into a knot. Machine stitch around the perimeter of the card with white sewing thread.
5. Cut the "friends forever" strip from the "Journaling Cards" patterned paper and machine stitch around the edge. Mount on the card with adhesive foam squares.
6. Mount the butterfly and flower stickers from the "Sister Stickers" on the card with adhesive foam squares.
Use the same card sketch to create two distinct cards.
CLICK HERE to view this collection
CLICK HERE for more ideas

15
DIMENSIONS: 5 1/4"supplies: "Dear Little Dots" Patterned Paper (Alphabet Junction); "Alphabet
Banner" Patterned Paper (Alphabet Junction); "Alpha Cards" Patterned
Paper (Alphabet Junction); "Leafy Green/Apple Red" Solid Paper
(Alphabet Junction); "Nectarine/Whisper White" Solid Paper (Alphabet
Junction); "Strawberry Ice Pink/Berry Blue" Solid Paper (Alphabet Junction);
Chipboard Accents (Alphabet Junction); Brads (Alphabet Junction); Digital Die Cut Machine; Circle Card,
Scallop Circle, Label Digital Die Cut Shapes; Circle Cutter; Sewing
Machine; White Sewing Thread
I Love You by Jennifer Chapin1. Use the Digital Die Cut machine to cut the circle card from the
"Leafy Green/Apple Red" solid paper. Fold in half to form the card base.2. Use the Digital Die Cut machine to cut a 4 1/2" scallop circle from
the "Leafy Green/Apple Red" solid paper and mount in the center of the card.
3. Use a circle cutter to cut a 4" circle from the "Dear Little Dots" patterned paper and mount in the center of the card. Machine stitch around the perimeter of the circle.
4. Cut a 4 1/2" x 1/2" strip from the "Alphabet Banner" patterned paper. Use scissors to notch both ends of the strip and mount on the center of the card.
5. Cut the green alphabet strip from the "Alpha Cards" patterned paper to a 4 1/2" x 1/2" strip. Use scissors to notch both ends of the strip and mount on the center of the card, slightly overlapping the pink strip.
6. Mount the flower, blue heart strip, and "L is for Love" chipboard stickers from the Chipboard Accents sheet on the card. Add brads to the center of the flower stickers.
7. Use the Digital Die Cut machine to cut the label from the "Nectarine/Whisper White" solid paper. Add the "i LOVE you" text to the shape before cutting. Layer a small piece of the
"Strawberry Ice/Berry Blue" solid paper behind the cut and mount on the card. Add a brad to the label die cut shape.
CLICK HERE to view this collection
CLICK HERE for more ideas

16
DIMENSIONS: 8 1/2 X 11"supplies: "Adventure" Patterned Paper (All About a Boy); "Gears"
Patterned Paper (All About a Boy); "4x6 Journaling Cards"
Patterned Paper (All About a Boy); "3x4 Journaling Cards" Patterned Paper (All About a Boy); "Games" Patterned
Paper (All About a Boy); White Cardstock (Carta Bella Paper); "Element Stickers" (All About a
Boy); "Alpha Stickers" (All About a Boy); 6x12" Chipboard (All
About a Boy); Assorted Brads (All About a Boy); Brown Twine;
Adhesive Foam Squares
I Miss You by Wendy Sue Anderson
All Occasion
layer chipboard or sticker elements on top of similar elements found on the patterned paper with adhesive foam dots for dimension.
1. Cut a 10" x 7" rectangle from white cardstock. Fold in half to form the card base.
2. Cut a 4 1/2" x 6 1/2" rectangle from the "Adventure" patterned paper and mount in the center of the card.
3. Cut the orange card from the "4x6 Journaling Cards" patterned paper to 4" wide and mount at the top of the card with adhesive foam dots.
4. Spell out the sentiment "i miss you" with the "Alpha Stickers." Wrap brown twine around the card and tie into a bow.
5. Cut a 4" X 5" strip from the "Gears" patterned paper. Notch the bottom end and mount on the card below the "i miss you" sentiment.
6. Mount the blue zigzag sticker from the "Alpha Stickers" sheet on the top of the wood grain patterned paper. Trim off the excess sticker.
7. Cut the "airplane" journaling card from the "3x4 Journaling Cards" patterned paper and mount on the card.
8. Cut a spinner from the "Games" patterned paper and mount on the upper right corner of the airplane card.
9. Add a brad to the center of the spinner.10. Mount the chipboard airplane sticker from the 6x12" chipboard sheet
on top of the airplane found on the card.11. Mount a small blue star sticker from the "Element Sticker" sheet on
top of the large star found on the airplane card with adhesive foam squares.
CLICK HERE to view this collection
CLICK HERE for more ideas

17
All Occasion Card Set by Kandis SmithDIMENSIONS: 4 1/4" X 5 1/2"supplies: "Seltzer Grey Tiny Dot"
Patterned Paper (Dots & Stripes Soda Fountain); "Seltzer Grey Small Dot"
Patterned Paper (Dots & Stripes Soda Fountain); "Kiwi Tiny Dot" Patterned
Paper (Dots & Stripes Soda Fountain); "Black Licorice Small Dot" Patterned
Paper (Dots & Stripes Soda Fountain); "Aqua Tiny Dot" Patterned Paper (Dots
& Stripes Soda Fountain); "Banana Small Dot" Patterned Paper (Dots & Stripes Soda Fountain); "Strawberry
Tiny Dot" Patterned Paper (Dots & Stripes Soda Fountain); "Teal/
Green" Solid Paper (Hello Summer); Digital Die Cut Machine; Doily, Bow, Strawberry Digital Die Cut Shapes;
Wooden Heart; Black Button; Twine; "Thinking of You," "Hello There," and
"Miss You" Stamps; Black Stamping Ink; Pearls; White Ribbon; Pink Button;
Pink Pearls; Corner Rounder Punch; Sewing Machine; White Sewing
Thread; Adhesive Foam Dots
The dots & stripes collections make great foundational pieces for die cut shapes and cards.
Thinking of You Directions:1. Cut the "Seltzer Grey Tiny Dot" patterned paper
to 8 1/2" x 5 1/2" and fold in half to form the card base.
2. Cut a 3 1/4" x 4 1/4" rectangle from the "Kiwi Tiny Dot" patterned paper. Use the corner rounder to round the left corners of the patterned paper and mount on the right side of the card.
3. Use the black stamping ink to stamp the "Thinking of You" sentiment on the card. Zigzag stitch through the right side of the card with white sewing thread.
4. Use the Digital Die Cut machine to cut a doily from the "Black Licorice Small Dot" patterned paper and mount on the card. Mount the wooden heart in the center of the doily. Thread twine through the black button and mount on the heart.
Miss You Directions:1. Cut the "Kiwi Tiny Dot" patterned paper to 8
1/2" x 5 1/2" and fold in half to form the card base.
2. Wrap white ribbon around the top of the card and tie into a bow. Thread twine through a pink button and tie the button to the center of the bow.
3. Use black stamping ink to stamp the "miss you" sentiment in the bottom right corner of the card.
4. Cut a 5 1/2" X 2" rectangle from the "Kiwi Tiny Dot" patterned paper. Use the corner rounder to round the right corners of the rectangle and mount on the card with adhesive foam dots.
5. Use the Digital Die Cut machine to cut the strawberry shapes from the "Strawberry Tiny Dot" patterned paper and the "Teal/Green" solid paper. Paper piece the berries and mount them on the card with adhesive foam squares.
6. Add pearl stickers to the card.
Hello There Directions:1. Cut the "Seltzer Grey Small Dot" patterned
paper to 8 1/2" x 5 1/2" and fold in half to form the card base.
2. Cut a 2 3/4" square from the "Aqua Tiny Dot" patterned paper and mount at the top of the page. Zigzag stitch through the top of the square with white sewing thread.
3. Cut a 3 1/2" x 2 1/4" rectangle from the "Kiwi Small Dot" patterned paper. Use the corner rounder to round the bottom corners of the rectangle and mount on the card with adhesive foam squares.
4. Use the Digital Die Cut machine to cut a bow from the "Banana Small Dot" patterned paper. Assemble and mount on the card. Place pearl sticker in the center of the bow.
5. Hand cut a 3 1/2" x 1/2" banner from the "Teal/Green" solid paper. Use the black stamping ink to stamp the "Hello There" sentiment onto the banner. Mount the banner on the card with adhesive foam squares.
CLICK HERE to view this collection
CLICK HERE for more ideas
18
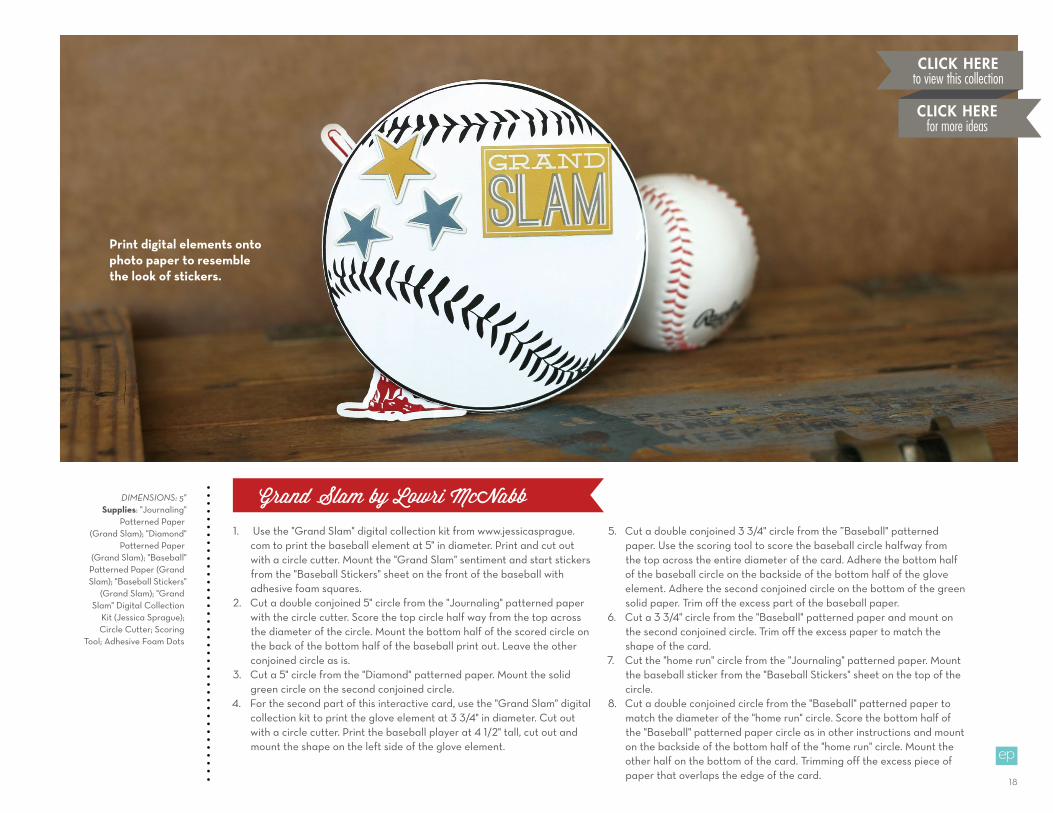
DIMENSIONS: 5"supplies: "Journaling"
Patterned Paper (Grand Slam); "Diamond"
Patterned Paper (Grand Slam); "Baseball"
Patterned Paper (Grand Slam); "Baseball Stickers"
(Grand Slam); "Grand Slam" Digital Collection
Kit (Jessica Sprague); Circle Cutter; Scoring
Tool; Adhesive Foam Dots
1. Use the "Grand Slam" digital collection kit from www.jessicasprague.com to print the baseball element at 5" in diameter. Print and cut out with a circle cutter. Mount the "Grand Slam" sentiment and start stickers from the "Baseball Stickers" sheet on the front of the baseball with adhesive foam squares.
2. Cut a double conjoined 5" circle from the "Journaling" patterned paper with the circle cutter. Score the top circle half way from the top across the diameter of the circle. Mount the bottom half of the scored circle on the back of the bottom half of the baseball print out. Leave the other conjoined circle as is.
3. Cut a 5" circle from the "Diamond" patterned paper. Mount the solid green circle on the second conjoined circle.
4. For the second part of this interactive card, use the "Grand Slam" digital collection kit to print the glove element at 3 3/4" in diameter. Cut out with a circle cutter. Print the baseball player at 4 1/2" tall, cut out and mount the shape on the left side of the glove element.
5. Cut a double conjoined 3 3/4" circle from the ”Baseball" patterned paper. Use the scoring tool to score the baseball circle halfway from the top across the entire diameter of the card. Adhere the bottom half of the baseball circle on the backside of the bottom half of the glove element. Adhere the second conjoined circle on the bottom of the green solid paper. Trim off the excess part of the baseball paper.
6. Cut a 3 3/4" circle from the "Baseball" patterned paper and mount on the second conjoined circle. Trim off the excess paper to match the shape of the card.
7. Cut the "home run" circle from the "Journaling" patterned paper. Mount the baseball sticker from the "Baseball Stickers" sheet on the top of the circle.
8. Cut a double conjoined circle from the "Baseball" patterned paper to match the diameter of the "home run" circle. Score the bottom half of the "Baseball" patterned paper circle as in other instructions and mount on the backside of the bottom half of the "home run" circle. Mount the other half on the bottom of the card. Trimming off the excess piece of paper that overlaps the edge of the card.
Grand Slam by Lowri McNabb
print digital elements onto photo paper to resemble the look of stickers.
CLICK HERE to view this collection
CLICK HERE for more ideas

19
1. Prepare digital elements from the "Grand Slam" kit for printing.
2. Mount patterned paper on the back of the digital baseball print.
3. Create a second conjoined circle with the glove digital element.
4. Create a final conjoined circle with the "home run" journaling card element.
Tutorial:
3.
2.
4.
1.CLICK HEREto visit the
echo park Facebook page

20
Hope You're On the Mend by Jennifer ChapinDIMENSIONS: 4" X 5 1/2"supplies: "Damask" Patterned
Paper (Beautiful Moments); "Happy Thoughts" Patterned Paper
(Beautiful Moments); 6x6" Paper Pad (Beautiful Moments); Pink Cardstock;
Kraft Cardstock (Carta Bella Paper); "Element Stickers" (Beautiful
Moments); Pearl Stickers; Digital Die Cut Machine; Flower Digital Die Cut Shapes; Corner Rounder Punch;
Sewing Machine; White Sewing Thread; Adhesive Foam Dots
1. Cut a sheet of pink cardstock to 8" X 5 1/2" and fold in half to form the card base.
2. Cut a 1 1/4" x 5 1/4" rectangle from the "Damask" patterned paper. Use the corner rounder punch to round the left corners of the rectangle and mount on the left side of the card.
3. Cut a 2" x 5 1/4" rectangle from the "Happy Thoughts" patterned paper. Use the corner rounder punch to round the right corners of the rectangle and mount on the right side of the card.
4. Place the pink border sticker from the "Element Stickers" sheet down the center of the card. Zigzag stitch the sticker on the left side to the card.
5. Mount the ticket and bird stickers from the "Element Stickers" sheet on the card. Mount the lilies sticker from the sticker sheet on the card with adhesive foam squares.
6. Use the Digital Die Cut machine to cut small flowers from the 6x6" paper pad. Mount the flowers on the page. Add pearl stickers to each flower center.
add some bling to your project with pearl or enamel dot stickers.
CLICK HERE to view this collection
CLICK HERE for more ideas

21
DIMENSIONS: 4" X 6" EaChsupplies: "Antique Map" Patterned
Paper (Well Traveled); "Travel Cards" Patterned Paper (Well Traveled);
"Aircraft Ace" Patterned Paper (Well Traveled); "Old World Damask"
Patterned Paper (Well Traveled); "Flying High" Patterned Paper (Well Traveled); "The Express" Patterned
Paper (Well Traveled); "Let's Go" Patterned Paper (Well Traveled);
"World Traveler" Patterned Paper (Well Traveled); "Postage" Patterned
Paper (Well Traveled); "Papyrus/Olive" Solid Paper (Well Traveled);
"Charcoal/Parchment" Solid Paper (Well Traveled); "Element Stickers" (Well Traveled); Layered Stickers (Well Traveled); 6x13 Chipboard
(Well Traveled); Brads (Well Traveled); Decorative Tape (Well
Traveled); Sewing Machine; White Sewing Thread; Adhesive Foam Dots
Travel Postcard Set by Pamella Brown
I Heart Travel Directions:1. Cut a 4" x 6" rectangle from the "Charcoal/
Parchment" solid paper.2. Cut a 3 3/4" x 2" rectangle from the "The Express"
patterned paper and mount at the top of the card. Mount the two red photo corner stickers from the "Element Sticker" sheet in the upper left corners of the rectangle.
3. Cut a 1" x 3 1/4" strip from the "Antique Map," "Let's Go," "World Traveler," and "Postage" patterned papers. Mount them in a row on the bottom of the card. Machine stitch around the perimeter of the card with white sewing thread. Zigzag stitch between the paper strips.
4. Mount the black decorative tape across the center of the card. Machine stitch the tape in place with white sewing thread.
5. Mount the "I heart Travel" layered sticker from the "Layered Stickers" on the left side of the card.
6. Mount the "New York" stamp circle sticker on the upper right corner of the card with adhesive foam squares. Mount a black brad from the "Brads" on the card.
Let's Go Directions:1. Cut a 4" x 6" rectangle from the "Papyrus/Olive"
solid paper.2. Cut a 2" x 2 3/4" rectangle from each of the
"Antique Map," "Aircraft Ace," "Old World Damask," and "Flying High" patterned papers and form a grid. Mount the black decorative tape at the top and the bottom of the card. Machine stitch through each grid, sewing over the tape with white sewing thread.
3. Mount the three stamp stickers from the "Element Sticker" sheet on the postcard with adhesive foam squares. Mount the "Let's Go" sticker from the "Element Sticker" sheet on the bottom of the postcard with adhesive foam squares.
4. Mount the balloon brad from the "Brads" on the top of the postcard.
World Traveler Directions:1. Cut a 4" x 6" rectangle from the "Papyrus/Olive"
solid paper.2. Cut a 2 1/2" X 3 3/4" rectangle from the "Antique
Map" patterned paper and mount on the left side of the postcard. Mount a strip of black decorative tape on the left side of the rectangle.
3. Cut the black map from the "Travel Cards" patterned paper to 3" x 3 3/4" and mount on the right side of the postcard. Machine stitch around the grid of the postcard.
4. Mount the "World Traveler" sticker from the 6x13 Chipboard at the bottom of the postcard.
5. Mount the airplane, and "see" stickers from the "Element Stickers" sheet on the postcard.
6. Mount the "go" stamp from the 6x13 Chipboard in the upper right corner of the postcard.
7. Mount two brads from the "Brads" on athe postcard.
CLICK HERE to view this collection
CLICK HERE for more ideas
22
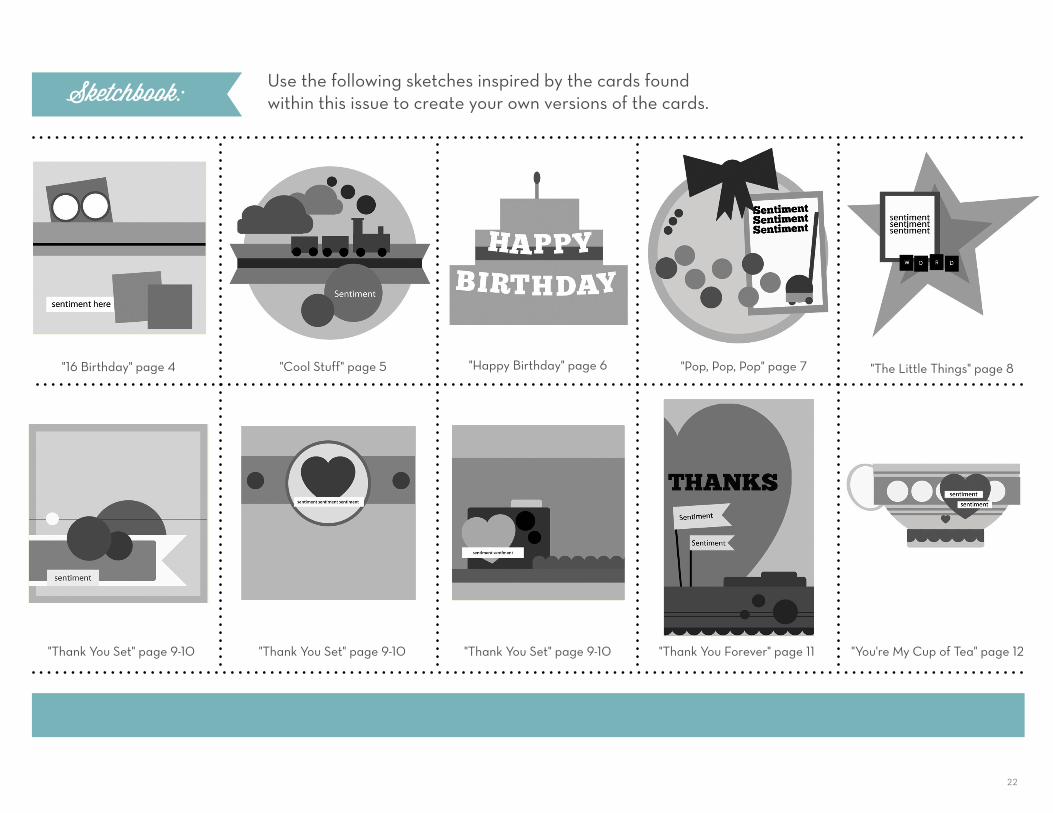
Sketchbook: Use the following sketches inspired by the cards found within this issue to create your own versions of the cards.
"16 Birthday" page 4 "Happy Birthday" page 6 "Pop, Pop, Pop" page 7 "The Little Things" page 8
"Thank You Set" page 9-10 "Thank You Set" page 9-10 "Thank You Set" page 9-10 "Thank You Forever" page 11 "You're My Cup of Tea" page 12
"Cool Stuff" page 5

23
"Happy All Cozy with You" page 13
"Brother & Sister Set" page 14 "I Love You" page 15
"Grand Slam" page 18
"I Miss You" page 16
"All Occasion Set" page 17 "All Occasion Set" page 17
"All Occasion Set" page 17
"Travel Postcard Set" page 21 "Travel Postcard Set" page 21 "Travel Postcard Set" page 21
"Hope You're On the Mend" page 20
Stretch the Sketch:A card or layout sketch can be used multiple times. To stretch the sketch, simply turn it on its side. You can also rotate or flip it. Try using different elements or shapes than suggested on the sketch. Just by making a few changes, one sketch can make multiple cards. Allow each sketch to serve as an inspiration starting point.

24
It's playtime! Introducing two new collections which highlight both little girls and little boys. While the "all about a boy" collection is rough and tough and full of adventurous imagery, the "sweet Girl" collection is devoted to little girl playthings. Both collections are playful, charming, and sweet as can be. Document your little darlings from their perspective with this delightful release.
Coming Soon!
echo park paper co.
available Mid-February

25
Your vacation memories will be as beautiful as the trip that you take in this "Well Traveled" collection. The rich colors and well-worn patterns are sophisticated and timeless. See the world and do it in style! Taken from the pages of your favorite books, the "So Noted" collection is rich in Regency period imagery, including silhouettes, musical notes, and vintage lace. Capture your thoughts, your memories, and your dreams while journaling on the pages of this notable collection. Both of these collections have a vintage vibe that is sure to charm you.
COMING SOON!
Available Mid-February

26
echo park paper co.
© 201 3 Echo Park Paper Co. LLC | www . e c h o p a r k p a p e r . c o m
For more information regarding our current products visit our website or find us on facebook at facebook.com/echoparkpaper.
1 177 South 1680 West Orem, Utah 84058 | 800.701. 1 1 1 5