creating your own worksheet formats in exporttoxl · (a) (b) (c) figure 3: copying the file for...
TRANSCRIPT
023-2009
Creating Your Own Worksheet Formats in exportToXL
Nathaniel Derby, Statis Pro Data Analytics, Seattle, WA
ABSTRACT
%exportToXL is a freely available SAS R© macro which allows the user to create custom-formatted Excel R© worksheets, usingDynamic Data Exchange (DDE). It works on all versions of PC Base SAS, Windows, and Excel. Using this macro, the usercan create custom-formatted worksheets by either exporting the SAS data onto a pre-formatted Excel worksheet, or by using aworksheet format. This is a set of commands which tells Excel how to format certain aspects of a worksheet such as font sizesand column widths. While %exportToXL comes with a few different pre-programmed worksheet formats, any programmerwith some basic knowledge of the SAS macro language and DDE commands can make his/her own. This paper is a tutorialabout how to do just that.
Keywords: SAS, DDE, Excel, Export, X4ML.
This paper is an excerpt1 from Derby (2008b), which may be updated and can be downloaded for more information. %exportToXLand all examples in this paper can also be downloaded from the project website listed at the end of this paper.
INTRODUCTION
As introduced in Derby (2008a) and thoroughly explained in Derby (2008b), %exportToXL is a freely available SAS macrowhich allows the user to create custom-formatted Excel worksheets, using Dynamic Data Exchange (DDE). It works on allversions of PC Base SAS, Windows, and Excel. Both of these references explain how to install it, and what all the parametersare. Rather than recap that information here, we will assume the reader has installed it properly and will illustrate its usagewith a basic example, recreated from Derby (2008a). The different parts of this example are based on the sashelp.classdata set. We assume the SAS macro variable &outroot refers to the output directory.
BASIC EXAMPLE: EXPORTING ONTO A BASIC WORKSHEET
Let’s begin with a basic export of a data set. sashelp.class is a good example, but since the variables are not formatted,we shall correct for that:
data class;set sashelp.class;format age 3. height weight 6.2;
run;
We export this, naming the worksheet as Class:
%exportToXL( libin=work, dsin=class, savepath=&outroot, savename=Example 1-2, sheet=Class );
Here, libin and dsin define the library and name, respectively, of the SAS data set we wish to export, and savepath andsavename define the directory and name of the outputted Excel file. sheet gives the name we would like to give to ourworksheet. The above command is identical to the following, since work is the default value of libin:
%exportToXL( dsin=class, savepath=&outroot, savename=Example 1-2, sheet=Class );
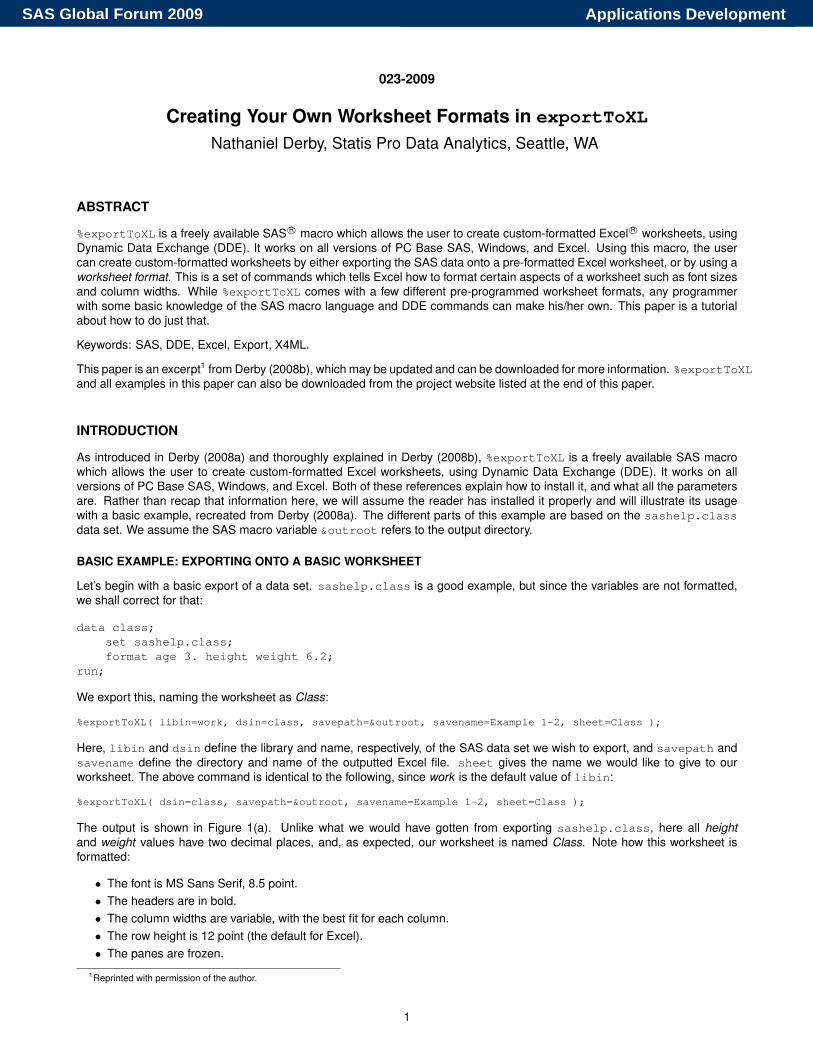
The output is shown in Figure 1(a). Unlike what we would have gotten from exporting sashelp.class, here all heightand weight values have two decimal places, and, as expected, our worksheet is named Class. Note how this worksheet isformatted:
• The font is MS Sans Serif, 8.5 point.• The headers are in bold.• The column widths are variable, with the best fit for each column.• The row height is 12 point (the default for Excel).• The panes are frozen.
1Reprinted with permission of the author.
1
Applications DevelopmentSAS Global Forum 2009
(a) (b)
Figure 1: The SAS data set work.class with two different worksheet formats, as explained in the basic example.
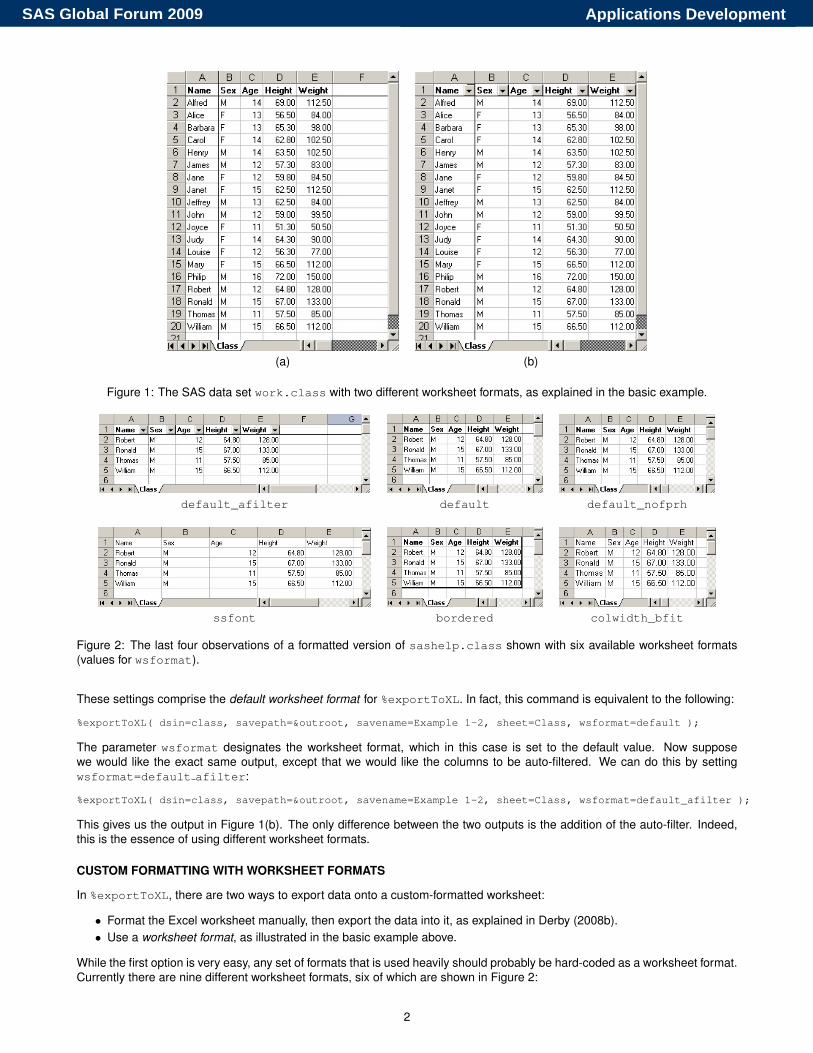
default_afilter default default_nofprh
ssfont bordered colwidth_bfit
Figure 2: The last four observations of a formatted version of sashelp.class shown with six available worksheet formats(values for wsformat).
These settings comprise the default worksheet format for %exportToXL. In fact, this command is equivalent to the following:
%exportToXL( dsin=class, savepath=&outroot, savename=Example 1-2, sheet=Class, wsformat=default );
The parameter wsformat designates the worksheet format, which in this case is set to the default value. Now supposewe would like the exact same output, except that we would like the columns to be auto-filtered. We can do this by settingwsformat=default afilter:
%exportToXL( dsin=class, savepath=&outroot, savename=Example 1-2, sheet=Class, wsformat=default_afilter );
This gives us the output in Figure 1(b). The only difference between the two outputs is the addition of the auto-filter. Indeed,this is the essence of using different worksheet formats.
CUSTOM FORMATTING WITH WORKSHEET FORMATS
In %exportToXL, there are two ways to export data onto a custom-formatted worksheet:
• Format the Excel worksheet manually, then export the data into it, as explained in Derby (2008b).• Use a worksheet format, as illustrated in the basic example above.
While the first option is very easy, any set of formats that is used heavily should probably be hard-coded as a worksheet format.Currently there are nine different worksheet formats, six of which are shown in Figure 2:
2
Applications DevelopmentSAS Global Forum 2009

(a) (b) (c)
Figure 3: Copying the file for the default worksheet function and renaming it, within Windows Explorer.
• default: MS Sans Serif, 8.5pt font with a bold header, best fit column width, 12.00 row height2 and frozen panes.• default_afilter: The same as default, but with an autofilter added in the headings.• default_nofprh: The same as default, but without the frozen panes or the row height set to a particular value.• ssfont: MS Sans Serif, 8.5pt font.• bordered: MS Sans Serif, 8.5pt font with a bold header, best fit column width, 12.00 row height and with the entire data
set bordered with a thick border.• colwidth_bfit: The column width is set to best fit (everything else is unspecified). This is often used when exporting
data into a pre-formatted worksheet.• title (not shown): MS Sans Serif, 8.5pt bold font, centered. This is appropriate for data sets corresponding to titles
(data sets with one variable and one observation, as shown in Example 3 of Derby (2008a)).• title_big (not shown): MS Sans Serif, 18pt bold font, centered. This is appropriate for data sets corresponding to
titles (data sets with one variable and one observation, as with the title data set in Example 3 of Derby (2008a)).• default_pivot (not shown): the same as default, but with an unspecified pivot table shown on another worksheet.
The above list was not intended by any means to be exhaustive! Rather, they are just illustrative of the possibilities. Manyother possibilities exist, and many common ones can be formed simply by editing the code for the default (or any) worksheetformat, as we shall see in the next section.
MAKING A NEW WORKSHEET FORMAT
One of the features of %exportToXL is that making a new worksheet format is actually quite simple for someone with littlebasic knowledge of the SAS macro language. This will be illustrated with a few examples.
2This row height is the default value for Excel, and could have been left out. It is put into the code for ease of modifying to accomodate a different row height.
3
Applications DevelopmentSAS Global Forum 2009
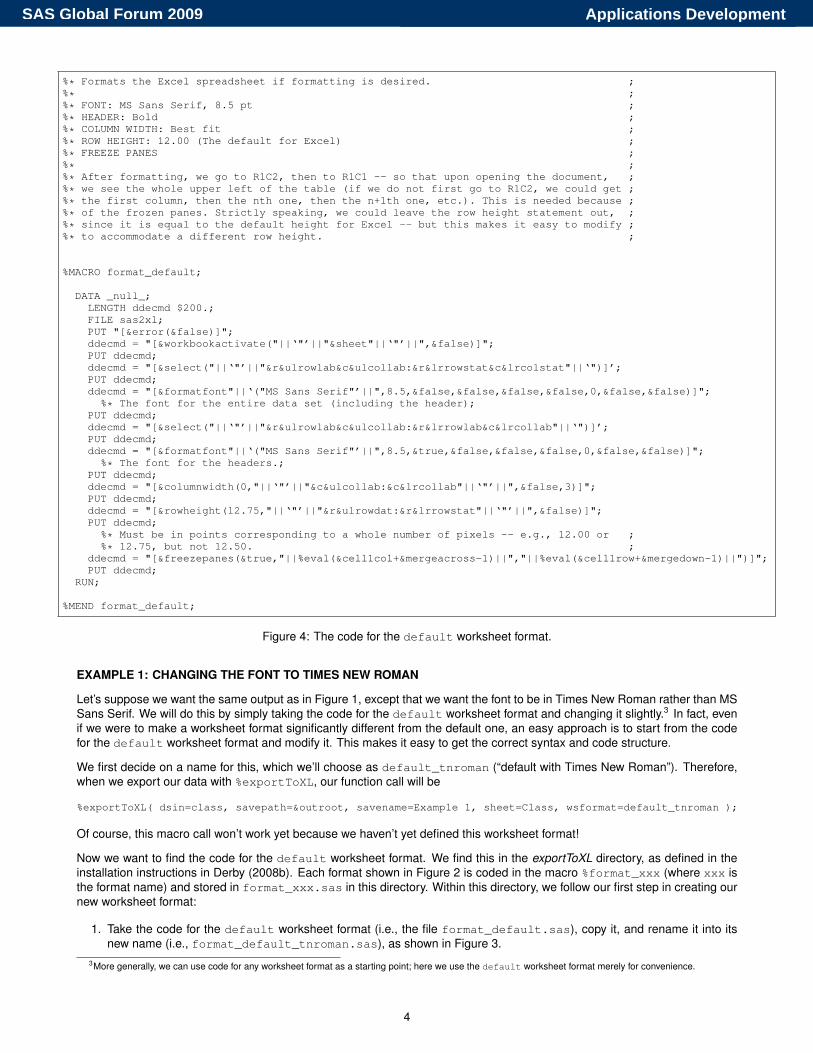
%* Formats the Excel spreadsheet if formatting is desired. ;%* ;%* FONT: MS Sans Serif, 8.5 pt ;%* HEADER: Bold ;%* COLUMN WIDTH: Best fit ;%* ROW HEIGHT: 12.00 (The default for Excel) ;%* FREEZE PANES ;%* ;%* After formatting, we go to R1C2, then to R1C1 -- so that upon opening the document, ;%* we see the whole upper left of the table (if we do not first go to R1C2, we could get ;%* the first column, then the nth one, then the n+1th one, etc.). This is needed because ;%* of the frozen panes. Strictly speaking, we could leave the row height statement out, ;%* since it is equal to the default height for Excel -- but this makes it easy to modify ;%* to accommodate a different row height. ;
%MACRO format_default;
DATA _null_;LENGTH ddecmd $200.;FILE sas2xl;PUT "[&error(&false)]";ddecmd = "[&workbookactivate("||‘"’||"&sheet"||‘"’||",&false)]";PUT ddecmd;ddecmd = "[&select("||‘"’||"&r&ulrowlab&c&ulcollab:&r&lrrowstat&c&lrcolstat"||‘")]’;PUT ddecmd;ddecmd = "[&formatfont"||‘("MS Sans Serif"’||",8.5,&false,&false,&false,&false,0,&false,&false)]";
%* The font for the entire data set (including the header);PUT ddecmd;ddecmd = "[&select("||‘"’||"&r&ulrowlab&c&ulcollab:&r&lrrowlab&c&lrcollab"||‘")]’;PUT ddecmd;ddecmd = "[&formatfont"||‘("MS Sans Serif"’||",8.5,&true,&false,&false,&false,0,&false,&false)]";
%* The font for the headers.;PUT ddecmd;ddecmd = "[&columnwidth(0,"||‘"’||"&c&ulcollab:&c&lrcollab"||‘"’||",&false,3)]";PUT ddecmd;ddecmd = "[&rowheight(12.75,"||‘"’||"&r&ulrowdat:&r&lrrowstat"||‘"’||",&false)]";PUT ddecmd;
%* Must be in points corresponding to a whole number of pixels -- e.g., 12.00 or ;%* 12.75, but not 12.50. ;
ddecmd = "[&freezepanes(&true,"||%eval(&cell1col+&mergeacross-1)||","||%eval(&cell1row+&mergedown-1)||")]";PUT ddecmd;
RUN;
%MEND format_default;
Figure 4: The code for the default worksheet format.
EXAMPLE 1: CHANGING THE FONT TO TIMES NEW ROMAN
Let’s suppose we want the same output as in Figure 1, except that we want the font to be in Times New Roman rather than MSSans Serif. We will do this by simply taking the code for the default worksheet format and changing it slightly.3 In fact, evenif we were to make a worksheet format significantly different from the default one, an easy approach is to start from the codefor the default worksheet format and modify it. This makes it easy to get the correct syntax and code structure.
We first decide on a name for this, which we’ll choose as default_tnroman (“default with Times New Roman”). Therefore,when we export our data with %exportToXL, our function call will be
%exportToXL( dsin=class, savepath=&outroot, savename=Example 1, sheet=Class, wsformat=default_tnroman );
Of course, this macro call won’t work yet because we haven’t yet defined this worksheet format!
Now we want to find the code for the default worksheet format. We find this in the exportToXL directory, as defined in theinstallation instructions in Derby (2008b). Each format shown in Figure 2 is coded in the macro %format_xxx (where xxx isthe format name) and stored in format_xxx.sas in this directory. Within this directory, we follow our first step in creating ournew worksheet format:
1. Take the code for the default worksheet format (i.e., the file format_default.sas), copy it, and rename it into itsnew name (i.e., format_default_tnroman.sas), as shown in Figure 3.
3More generally, we can use code for any worksheet format as a starting point; here we use the default worksheet format merely for convenience.
4
Applications DevelopmentSAS Global Forum 2009

%* Formats the Excel spreadsheet if formatting is desired. ;%* ;%* FONT: Times New Roman, 8.5 pt ;%* HEADER: Bold ;%* COLUMN WIDTH: Best fit ;%* ROW HEIGHT: 12.00 (The default for Excel) ;%* FREEZE PANES ;%* ;%* After formatting, we go to R1C2, then to R1C1 -- so that upon opening the document, ;%* we see the whole upper left of the table (if we do not first go to R1C2, we could get ;%* the first column, then the nth one, then the n+1th one, etc.). This is needed because ;%* of the frozen panes. Strictly speaking, we could leave the row height statement out, ;%* since it is equal to the default height for Excel -- but this makes it easy to modify ;%* to accommodate a different row height. ;
%MACRO format_default_tnroman;
DATA _null_;LENGTH ddecmd $200.;FILE sas2xl;PUT "[&error(&false)]";ddecmd = "[&workbookactivate("||‘"’||"&sheet"||‘"’||",&false)]";PUT ddecmd;ddecmd = "[&select("||‘"’||"&r&ulrowlab&c&ulcollab:&r&lrrowstat&c&lrcolstat"||‘")]’;PUT ddecmd;ddecmd = "[&formatfont"||‘("Times New Roman"’||",8.5,&false,&false,&false,&false,0,&false,&false)]";%* The font for the entire data set (including the header);
PUT ddecmd;ddecmd = "[&select("||‘"’||"&r&ulrowlab&c&ulcollab:&r&lrrowlab&c&lrcollab"||‘")]’;PUT ddecmd;ddecmd = "[&formatfont"||‘("Times New Roman"’||",8.5,&true,&false,&false,&false,0,&false,&false)]";%* The font for the headers.;
PUT ddecmd;ddecmd = "[&columnwidth(0,"||‘"’||"&c&ulcollab:&c&lrcollab"||‘"’||",&false,3)]";PUT ddecmd;ddecmd = "[&rowheight(12.75,"||‘"’||"&r&ulrowdat:&r&lrrowstat"||‘"’||",&false)]";PUT ddecmd;
%* Must be in points corresponding to a whole number of pixels -- e.g., 12.00 or ;%* 12.75, but not 12.50. ;
ddecmd = "[&freezepanes(&true,"||%eval(&cell1col+&mergeacross-1)||","||%eval(&cell1row+&mergedown-1)||")]";PUT ddecmd;
RUN;
%MEND format_default_tnroman;
Figure 5: The code for the default_tnroman worksheet format. The changes from the code in Figure 4 are in bold red.
If we now open this file within SAS, we get the code shown in Figure 4. It may look confusing because it uses DDE commandsand lots of SAS macro language. The good news is that we don’t have to understand much of this code to get it to dowhat we want. The general steps to take from this point are the following:
2. Look specifically for the part of the code that pertains to our desired change. This may involve some creativity, and wemay need the DDE command help file (explained in the next examples) for this. However, this is often quite easy; in thiscase, we simply look for the two places where the font (MS Sans Serif) is found in the code (Figure 4).
3. Change that part of the code to what we want it to do. Here we change MS Sans Serif to Times New Roman in eachof the two spots mentioned in the previous step.
4. At the %MACRO and %MEND statements, change format_default to format_OURNEWNAME (in this case,format_default_tnroman).
5. (Optional) Change the relevant information in the commented header, so that we remember what this code does whenwe look at it again.
After these changes are implemented, the code should look like that in Figure 5. Lastly,
6. Run the code (by clicking on the run icon or by pushing F3 or F8) to put it into the SAS macro library.
Now we are done setting this up. If we invoke %exportToXL as below, we get the results shown in Figure 6(b).
%exportToXL( dsin=class, savepath=&outroot, savename=Example 1, sheet=Class, wsformat=default_tnroman );
5
Applications DevelopmentSAS Global Forum 2009
(a) (b) (c) (d)
Figure 6: The first four columns of the SAS data set work.class with the default (a), default_tnroman (b),default_10fontrhead (c) and default_centered (d) worksheet formats, as explained in Examples 1, 2 and 3.
While we got our results without understanding the code in Figure 4, there are a few basic concepts from the code that we canlearn to help us later on:
• For the reader who understands the SAS macro language and who is curious how this worksheet format code fits inwithin the context of %exportToXL, it is called above the %mquit: line in Figure 8 of Derby (2008b).
• All DDE commands are within a DATA _NULL_ statement, issued through a PUT statement. This is standard for allDDE commands between SAS and Excel (or any application). What makes this work with Excel is the FILE sas2xlstatement, which refers to the DDE connection (defined elsewhere within the %exportToXL component macros).
• The DDE commands given in the PUT statements must all be given within quotes (single or double), or be a concatenationof quotes. While this is very simple in the case of PUT "[&error(&false)]" in Figure 4, most of the time we follow atwo-step process, where we first define a character string, ddecmd, to be equal to what will become our DDE command,and then we issue that command via PUT ddecmd. This is done in two steps because usually the DDE command, whichmust all be within quotes, itself contains quotes. Furthermore, as shown by the ampersands (&), we must resolve somemacro variables (explained below), which also must be used within quotes. All this resolving of macro variables anddefining commands with quotes within them is done when defining ddecmd.
• The macro variables used here (i.e., those with an ampersand at the beginning, like &false) refer to translationsof DDE commands into the language of the Excel application. For example, when %exportToXL is run with thelanguage parameter set to English (lang=en, the default), &false resolves to false; but when the language is German(lang=de), it resolves to falsch. This is necessary, since most DDE commands must be in the language of the Excelapplication. However, each of these macro variables are given the names of their English translations, so &formatfontis the command for formatting the font (i.e., format.font). See the section for the %setVariables component macroin Derby (2008b) for more details.
EXAMPLE 2: CHANGING THE FONT SIZE AND HEADER COLOR
Now suppose we want to change the font size from 8.5pt to 10 pt, and change the header font color to red. We follow the sameprocess as for Example 1:
1. Copy format_default.sas and rename it to something like format_default_10fontrhead.sas, as shown inFigure 3.
2. Open the file format_default_10fontrhead.sas within SAS, then look for the part of the code that pertains to ourdesired changes. For the font size, it looks like we will need to change the 8.5 entry after MS Sans Serif in Figure 4.Changing the font color is explained below.
3. Change that part of the code to what we want it to do. Here we change 8.5 to 10 in each of the two spots mentioned inthe previous step, plus change the font color as explained below.
6
Applications DevelopmentSAS Global Forum 2009

(a) (b)
Figure 7: In the Microsoft help file for DDE commands, Macrofun.hlp, the search function (a) and information page (b), forthe function format.font.
4. At the %MACRO and %MEND statements, change format_default to format_default_10fontrhead.
5. (Optional) Change the relevant information in the commented header.
6. Run the code to enter it into the SAS macro library.
To change the color of the header, our visual inspection of the code doesn’t help us much. However, we have a startingpoint: in the code for the default worksheet format in Figure 4, we note that the second instance of &formatfont is for theheader. Could a part of that statement be applied to the font color? To answer this question, we turn to the Macrofun.hlp fileincluded in the %exportToXL download package. This is the help file from Microsoft which includes information on all DDEcommands.4 To use this, simply double click on the file from within Windows Explorer, then click on the Search function tosearch for the command in question, as shown in Figure 7(a). The information shown in that file (Figure 7(b)) tells us that the7th parameter (equal to 0 in the default worksheet format of Figure 4) of &formatfont tells us the font color. The Excelcolor map shown on page 7 of Watts (2004) gives which numbers correspond to which color: Red is 3.
With this code written, we can now run it with the code below, thus creating the Excel output shown in Figure 6(c):
%exportToXL( dsin=class, savepath=&outroot, savename=Example 2, sheet=Class, wsformat=default_10fontrhead );
EXAMPLE 3: CENTERING THE CELL ENTRIES
Now suppose we want to try to not change what’s in the default worksheet function, but instead add a function to it. In thiscase, we want to center all the cell entries. Once again, we can follow the six-step process used in Examples 1 and 2:
1. Copy format_default.sas and rename it to something like format_default_centered.sas, as shown in Figure3.
2. Open the file format_default_centered.sas within SAS, then look for the part of the code that pertains to ourdesired changes. Since we are now trying to add something, look for the place where it would be best to add the code.In Figure 4, it looks like it would be after the first &formatfont, while we have the entire data set selected.
3. Change that part of the code to what we want it to do. We don’t know how to do this yet - it is explained below.
4. At the %MACRO and %MEND statements, change format_default to format_default_centered.
5. (Optional) Change the relevant information in the commented header.
6. Run the code to enter it into the SAS macro library.4These commands are actually in the language of X4ML, the predecessor to VBA.
7
Applications DevelopmentSAS Global Forum 2009
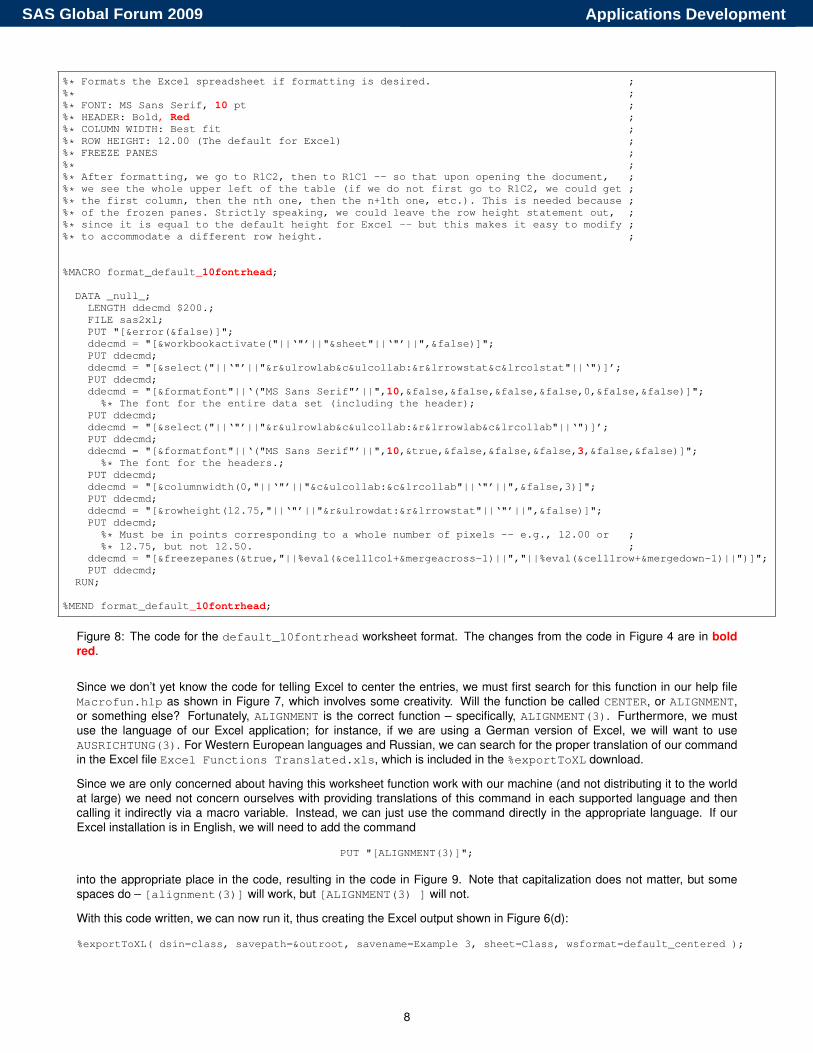
%* Formats the Excel spreadsheet if formatting is desired. ;%* ;%* FONT: MS Sans Serif, 10 pt ;%* HEADER: Bold, Red ;%* COLUMN WIDTH: Best fit ;%* ROW HEIGHT: 12.00 (The default for Excel) ;%* FREEZE PANES ;%* ;%* After formatting, we go to R1C2, then to R1C1 -- so that upon opening the document, ;%* we see the whole upper left of the table (if we do not first go to R1C2, we could get ;%* the first column, then the nth one, then the n+1th one, etc.). This is needed because ;%* of the frozen panes. Strictly speaking, we could leave the row height statement out, ;%* since it is equal to the default height for Excel -- but this makes it easy to modify ;%* to accommodate a different row height. ;
%MACRO format_default_10fontrhead;
DATA _null_;LENGTH ddecmd $200.;FILE sas2xl;PUT "[&error(&false)]";ddecmd = "[&workbookactivate("||‘"’||"&sheet"||‘"’||",&false)]";PUT ddecmd;ddecmd = "[&select("||‘"’||"&r&ulrowlab&c&ulcollab:&r&lrrowstat&c&lrcolstat"||‘")]’;PUT ddecmd;ddecmd = "[&formatfont"||‘("MS Sans Serif"’||",10,&false,&false,&false,&false,0,&false,&false)]";%* The font for the entire data set (including the header);
PUT ddecmd;ddecmd = "[&select("||‘"’||"&r&ulrowlab&c&ulcollab:&r&lrrowlab&c&lrcollab"||‘")]’;PUT ddecmd;ddecmd = "[&formatfont"||‘("MS Sans Serif"’||",10,&true,&false,&false,&false,3,&false,&false)]";%* The font for the headers.;
PUT ddecmd;ddecmd = "[&columnwidth(0,"||‘"’||"&c&ulcollab:&c&lrcollab"||‘"’||",&false,3)]";PUT ddecmd;ddecmd = "[&rowheight(12.75,"||‘"’||"&r&ulrowdat:&r&lrrowstat"||‘"’||",&false)]";PUT ddecmd;
%* Must be in points corresponding to a whole number of pixels -- e.g., 12.00 or ;%* 12.75, but not 12.50. ;
ddecmd = "[&freezepanes(&true,"||%eval(&cell1col+&mergeacross-1)||","||%eval(&cell1row+&mergedown-1)||")]";PUT ddecmd;
RUN;
%MEND format_default_10fontrhead;
Figure 8: The code for the default_10fontrhead worksheet format. The changes from the code in Figure 4 are in boldred.
Since we don’t yet know the code for telling Excel to center the entries, we must first search for this function in our help fileMacrofun.hlp as shown in Figure 7, which involves some creativity. Will the function be called CENTER, or ALIGNMENT,or something else? Fortunately, ALIGNMENT is the correct function – specifically, ALIGNMENT(3). Furthermore, we mustuse the language of our Excel application; for instance, if we are using a German version of Excel, we will want to useAUSRICHTUNG(3). For Western European languages and Russian, we can search for the proper translation of our commandin the Excel file Excel Functions Translated.xls, which is included in the %exportToXL download.
Since we are only concerned about having this worksheet function work with our machine (and not distributing it to the worldat large) we need not concern ourselves with providing translations of this command in each supported language and thencalling it indirectly via a macro variable. Instead, we can just use the command directly in the appropriate language. If ourExcel installation is in English, we will need to add the command
PUT "[ALIGNMENT(3)]";
into the appropriate place in the code, resulting in the code in Figure 9. Note that capitalization does not matter, but somespaces do – [alignment(3)] will work, but [ALIGNMENT(3) ] will not.
With this code written, we can now run it, thus creating the Excel output shown in Figure 6(d):
%exportToXL( dsin=class, savepath=&outroot, savename=Example 3, sheet=Class, wsformat=default_centered );
8
Applications DevelopmentSAS Global Forum 2009
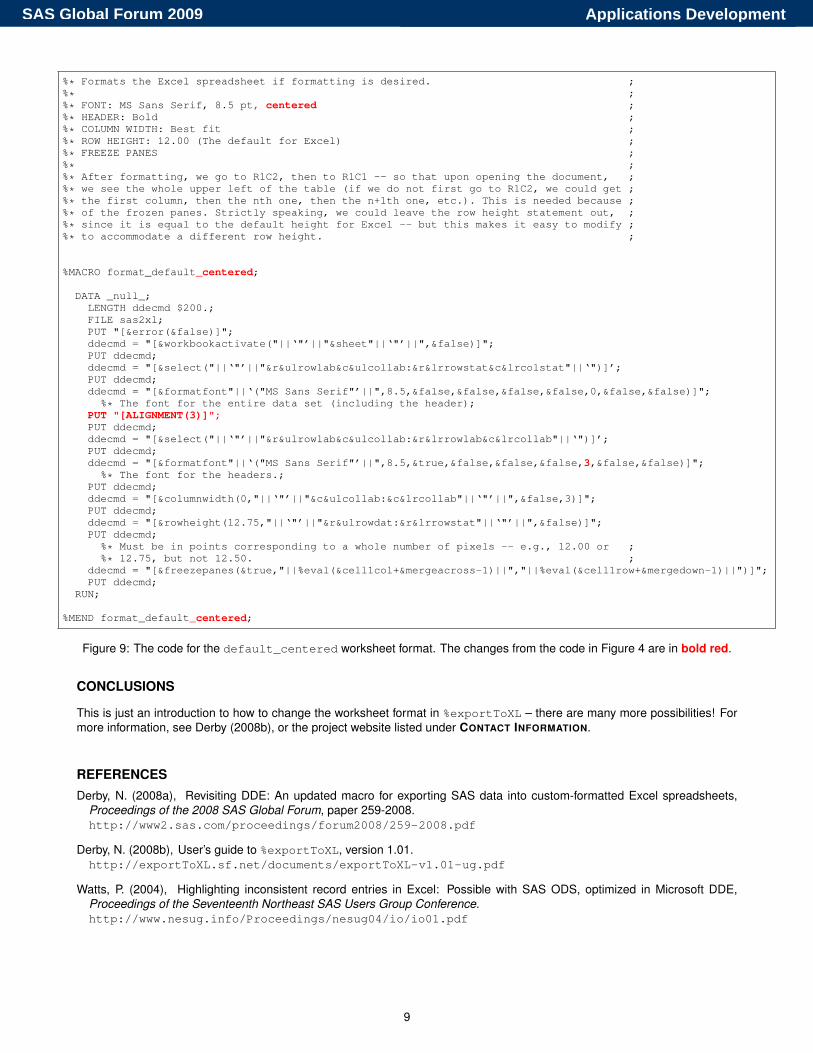
%* Formats the Excel spreadsheet if formatting is desired. ;%* ;%* FONT: MS Sans Serif, 8.5 pt, centered ;%* HEADER: Bold ;%* COLUMN WIDTH: Best fit ;%* ROW HEIGHT: 12.00 (The default for Excel) ;%* FREEZE PANES ;%* ;%* After formatting, we go to R1C2, then to R1C1 -- so that upon opening the document, ;%* we see the whole upper left of the table (if we do not first go to R1C2, we could get ;%* the first column, then the nth one, then the n+1th one, etc.). This is needed because ;%* of the frozen panes. Strictly speaking, we could leave the row height statement out, ;%* since it is equal to the default height for Excel -- but this makes it easy to modify ;%* to accommodate a different row height. ;
%MACRO format_default_centered;
DATA _null_;LENGTH ddecmd $200.;FILE sas2xl;PUT "[&error(&false)]";ddecmd = "[&workbookactivate("||‘"’||"&sheet"||‘"’||",&false)]";PUT ddecmd;ddecmd = "[&select("||‘"’||"&r&ulrowlab&c&ulcollab:&r&lrrowstat&c&lrcolstat"||‘")]’;PUT ddecmd;ddecmd = "[&formatfont"||‘("MS Sans Serif"’||",8.5,&false,&false,&false,&false,0,&false,&false)]";
%* The font for the entire data set (including the header);PUT "[ALIGNMENT(3)]";PUT ddecmd;ddecmd = "[&select("||‘"’||"&r&ulrowlab&c&ulcollab:&r&lrrowlab&c&lrcollab"||‘")]’;PUT ddecmd;ddecmd = "[&formatfont"||‘("MS Sans Serif"’||",8.5,&true,&false,&false,&false,3,&false,&false)]";
%* The font for the headers.;PUT ddecmd;ddecmd = "[&columnwidth(0,"||‘"’||"&c&ulcollab:&c&lrcollab"||‘"’||",&false,3)]";PUT ddecmd;ddecmd = "[&rowheight(12.75,"||‘"’||"&r&ulrowdat:&r&lrrowstat"||‘"’||",&false)]";PUT ddecmd;
%* Must be in points corresponding to a whole number of pixels -- e.g., 12.00 or ;%* 12.75, but not 12.50. ;
ddecmd = "[&freezepanes(&true,"||%eval(&cell1col+&mergeacross-1)||","||%eval(&cell1row+&mergedown-1)||")]";PUT ddecmd;
RUN;
%MEND format_default_centered;
Figure 9: The code for the default_centered worksheet format. The changes from the code in Figure 4 are in bold red.
CONCLUSIONS
This is just an introduction to how to change the worksheet format in %exportToXL – there are many more possibilities! Formore information, see Derby (2008b), or the project website listed under CONTACT INFORMATION.
REFERENCESDerby, N. (2008a), Revisiting DDE: An updated macro for exporting SAS data into custom-formatted Excel spreadsheets,
Proceedings of the 2008 SAS Global Forum, paper 259-2008.http://www2.sas.com/proceedings/forum2008/259-2008.pdf
Derby, N. (2008b), User’s guide to %exportToXL, version 1.01.http://exportToXL.sf.net/documents/exportToXL-v1.01-ug.pdf
Watts, P. (2004), Highlighting inconsistent record entries in Excel: Possible with SAS ODS, optimized in Microsoft DDE,Proceedings of the Seventeenth Northeast SAS Users Group Conference.http://www.nesug.info/Proceedings/nesug04/io/io01.pdf
9
Applications DevelopmentSAS Global Forum 2009
ACKNOWLEDGMENTS
I am deeply indebted to Koen Vyverman and Perry Watts for their earlier works on this subject – in particular, for Vyverman’swork on %sastoxl, which is the basis for %exportToXL. I merely filled in the details to their big ideas.
Furthermore, I thank many of the good people at SAS technical support, who kept me going when I got stuck – especiallyPeter Ruzsa (who made me realize that X4ML commands are language-specific), Russ Tyndall (who helped me with macrovariables and made %makeExcelFormats functional) and Jennifer B (who answered my ODBC and OLE questions).
At SAS I also thank Eric Gebhart for checking my facts on the ExcelXP tagset, and Jim Simon for making my basic version of%makeExcelFormats much cleaner.
I thank Ron Fehd for providing me with a LATEX template for SAS conference papers (used here).
I thank whomever first composed the list of Excel function translations (original source unknown).
Lastly, and most importantly, I thank Charles for his patience and support.
CONTACT INFORMATION
Comments and questions are valued and encouraged. Contact the author:
Nathaniel DerbyStatis Pro LLC815 First Ave., Suite 287Seattle, WA [email protected]://exportToXL.sf.net
SAS and all other SAS Institute Inc. product or service names are registered trademarks or trademarks of SAS Institute Inc. inthe USA and other countries. R© indicates USA registration.
Other brand and product names are trademarks of their respective companies.
10
Applications DevelopmentSAS Global Forum 2009