creating rmf postprocessor xml reports...xslt engine to create the html document from the xml input...
TRANSCRIPT

12 IBM Corporation ©
Creating RMF Postprocessor XML Reports
Set up the IBM HTTP Server for Remote RMF Report Access
Peter Muench IBM Corporation
Friday, March 6, 2015 Session 16799
- 2 - ©
Trademarks The following are trademarks of the International Business Machines Corporation in the United States, other countries, or both.
Not all common law marks used by IBM are listed on this page. Failure of a mark to appear does not mean that IBM does not use the mark nor does it mean that the product is not actively marketed or is not significant within its relevant market. Those trademarks followed by ® are registered trademarks of IBM in the United States; all others are trademarks or common law marks of IBM in the United States.
For a complete list of IBM Trademarks, see www.ibm.com/legal/copytrade.shtml: *, AS/400®, e business(logo)®, DBE, ESCO, eServer, FICON, IBM®, IBM (logo)®, iSeries®, MVS, OS/390®, pSeries®, RS/6000®, S/30, VM/ESA®, VSE/ESA, WebSphere®, xSeries®, z/OS®, zSeries®, z/VM®, System i, System i5, System p, System p5, System x, System z, System z9®, BladeCenter®
The following are trademarks or registered trademarks of other companies.
Adobe, the Adobe logo, PostScript, and the PostScript logo are either registered trademarks or trademarks of Adobe Systems Incorporated in the United States, and/or other countries. Cell Broadband Engine is a trademark of Sony Computer Entertainment, Inc. in the United States, other countries, or both and is used under license therefrom. Java and all Java-based trademarks are trademarks of Sun Microsystems, Inc. in the United States, other countries, or both. Microsoft, Windows, Windows NT, and the Windows logo are trademarks of Microsoft Corporation in the United States, other countries, or both. Intel, Intel logo, Intel Inside, Intel Inside logo, Intel Centrino, Intel Centrino logo, Celeron, Intel Xeon, Intel SpeedStep, Itanium, and Pentium are trademarks or registered trademarks of Intel Corporation or its subsidiaries in the United States and other countries. UNIX is a registered trademark of The Open Group in the United States and other countries. Linux is a registered trademark of Linus Torvalds in the United States, other countries, or both. ITIL is a registered trademark, and a registered community trademark of the Office of Government Commerce, and is registered in the U.S. Patent and Trademark Office. IT Infrastructure Library is a registered trademark of the Central Computer and Telecommunications Agency, which is now part of the Office of Government Commerce.
* All other products may be trademarks or registered trademarks of their respective companies. Notes: Performance is in Internal Throughput Rate (ITR) ratio based on measurements and projections using standard IBM benchmarks in a controlled environment. The actual throughput that any user will experience will vary depending upon considerations such as the amount of multiprogramming in the user's job stream, the I/O configuration, the storage configuration, and the workload processed. Therefore, no assurance can be given that an individual user will achieve throughput improvements equivalent to the performance ratios stated here. IBM hardware products are manufactured from new parts, or new and serviceable used parts. Regardless, our warranty terms apply. All customer examples cited or described in this presentation are presented as illustrations of the manner in which some customers have used IBM products and the results they may have achieved. Actual environmental costs and performance characteristics will vary depending on individual customer configurations and conditions. This publication was produced in the United States. IBM may not offer the products, services or features discussed in this document in other countries, and the information may be subject to change without notice. Consult your local IBM business contact for information on the product or services available in your area. All statements regarding IBM's future direction and intent are subject to change or withdrawal without notice, and represent goals and objectives only. Information about non-IBM products is obtained from the manufacturers of those products or their published announcements. IBM has not tested those products and cannot confirm the performance, compatibility, or any other claims related to non-IBM products. Questions on the capabilities of non-IBM products should be addressed to the suppliers of those products. Prices subject to change without notice. Contact your IBM representative or Business Partner for the most current pricing in your geography.

- 3 - ©
Content: Introduction .....................................................................................................................4 Lesson 1 – The RMF Postprocessor XML Toolkit............................................................5 Lesson 2 – Upload the stylesheet files to the z/OS System.............................................7 Lesson 3 – Create Postprocessor XML Reports..............................................................8 Lesson 4 – Configure the IBM HTTP Server..................................................................11 Lesson 5 – Remote Access to Postprocessor XML Reports..........................................13 Lesson 6 – Create frequent Postprocessor Realtime Reports (Optional Lesson) ..........14 Lesson 7 – Cleanup ......................................................................................................19
Figures: Figure 1: Postprocessor XML Toolkit – Serialization Delay Report ..................................5 Figure 2: Postprocessor DDNames for XML report format...............................................8 Figure 3: Postprocessor JCL Example for XML Reports..................................................9 Figure 4: Postprocessor XML Toolkit – CPU Activity Report..........................................10 Figure 5: Started Task Procedure for the IBM HTTP Server..........................................11 Figure 6: Postprocessor XML Reports – Directory Structure .........................................14 Figure 7: New Subdirectories with XML Reports ...........................................................18
- 4 - ©
Introduction The plain text format has been the standard output format of RMF Postprocessor Reports for decades. Even though this format was well accepted, it implicates a couple of drawbacks:
• The standard text output is limited to a width of 132 characters. Therefore, depending on the report contents, some reports appeared squeezed.
• The basic text format doesn‘t exploit today’s presentation capabilities like resizing windows, scrolling back and forth etc.
• Depending on the report type, the report layouts are quite different. Hence, API programs need to supply specific logic in order to extract metrics from the reports.
Hence, starting with z/OS V1R11 RMF, the Postprocessor is able to generate performance reports alternatively in XML format. Since the reports are pure XML, an arbitrary web browser is perfectly suited to display the reports in a state-of-the art fashion. Once you have created a USS directory with XML reports by means of a Postprocessor job, you can use the IBM HTTP Server instantly as gateway. The reports can remain in the USS directory of your z/OS system and you can forget about cumbersome downloads. In this lab you will learn how to create RMF Postprocessor XML reports and how to direct the report output to your USS file system. Then you will review and adapt a couple of parameters in the configuration file of the IBM HTTP Server. Finally, just restart your IBM HTTP Server and enjoy the RMF reports in your browser window. Navigate through the reports, expand and collapse individual report sections and explore the built-in sort capability. And last not least, since the lab script is organized as cookbook, you can implement everything in your home installation in less than an hour!
- 5 - ©
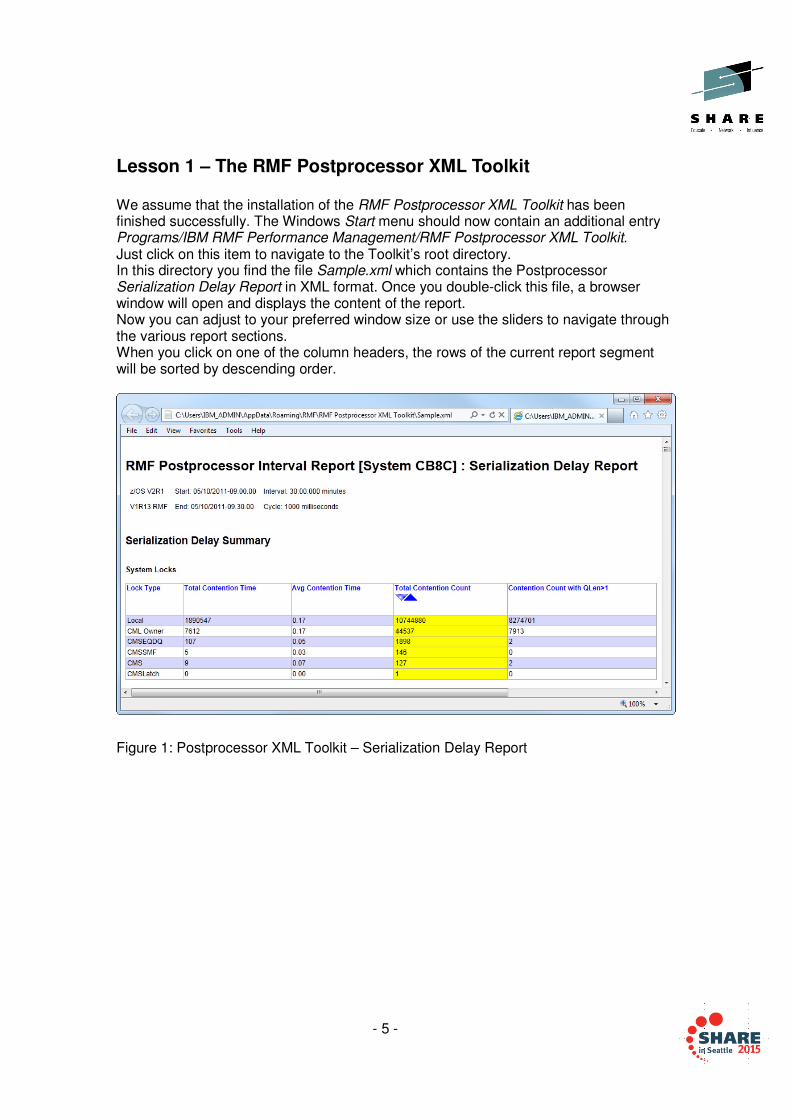
Lesson 1 – The RMF Postprocessor XML Toolkit We assume that the installation of the RMF Postprocessor XML Toolkit has been finished successfully. The Windows Start menu should now contain an additional entry Programs/IBM RMF Performance Management/RMF Postprocessor XML Toolkit. Just click on this item to navigate to the Toolkit’s root directory. In this directory you find the file Sample.xml which contains the Postprocessor Serialization Delay Report in XML format. Once you double-click this file, a browser window will open and displays the content of the report. Now you can adjust to your preferred window size or use the sliders to navigate through the various report sections. When you click on one of the column headers, the rows of the current report segment will be sorted by descending order.
Figure 1: Postprocessor XML Toolkit – Serialization Delay Report
- 6 - ©
Basically all XML documents which are visualized by means of a web browser need some formatting directives in terms of some supplemental files. These files are located in the include subdirectory of the Postprocessor XML Toolkit. Navigate to this subdirectory and verify the following filetypes:
• XSL main XSL stylesheet with formatting directives. It is used by the browsers XSLT engine to create the HTML document from the XML input
• CSS cascading stylesheet with additional settings (e.g. fonts, colors)
• JS java script file with specific processing directives
• GIF graphical elements like buttons, arrows etc. Using the Postprocessor XML Toolkit everything is playing pretty well together and the XML reports are displayed properly in our browser window. However, up to now everything is executed just locally on our workstation. In other words, once we want to view additional XML reports with the browser we would need to download the report files manually to the XML Toolkit root directory on our workstation. Since this can become very cumbersome…wouldn’t it be cute to have a well defined procedure where we can add frequently new reports to our report repository without any download processing?
- 7 - ©
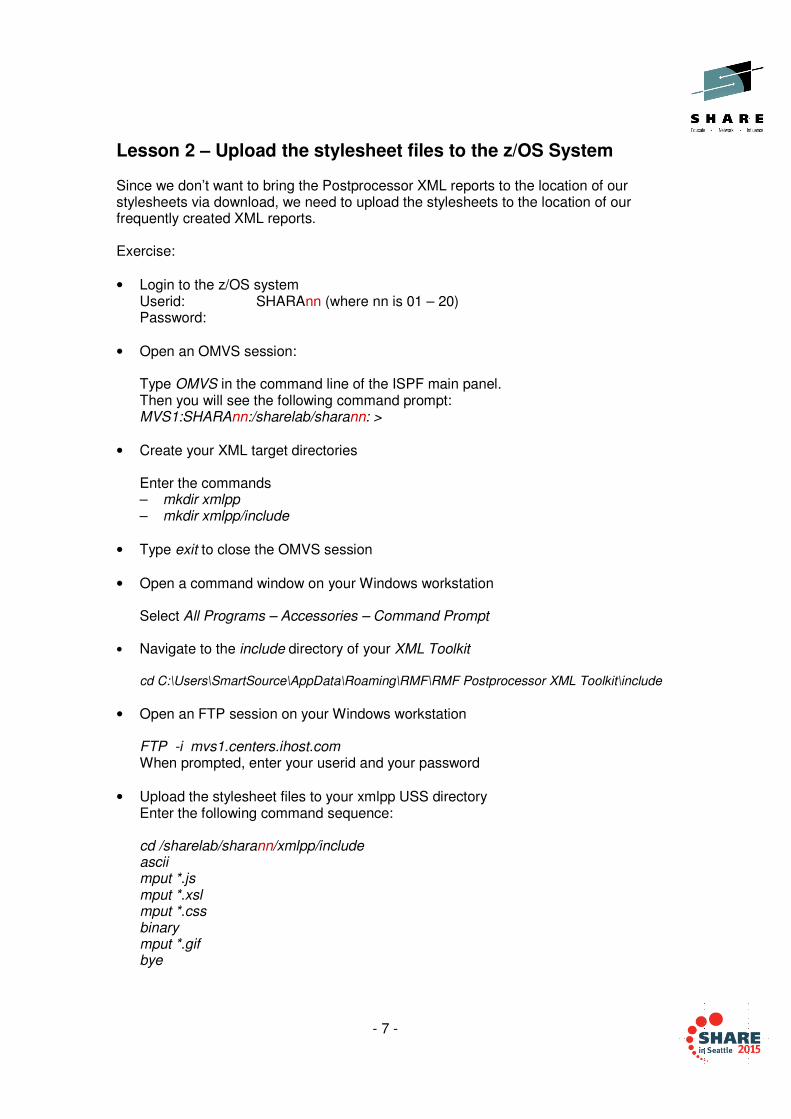
Lesson 2 – Upload the stylesheet files to the z/OS System Since we don’t want to bring the Postprocessor XML reports to the location of our stylesheets via download, we need to upload the stylesheets to the location of our frequently created XML reports. Exercise:
• Login to the z/OS system Userid: SHARAnn (where nn is 01 – 20) Password:
• Open an OMVS session: Type OMVS in the command line of the ISPF main panel. Then you will see the following command prompt: MVS1:SHARAnn:/sharelab/sharann: >
• Create your XML target directories Enter the commands – mkdir xmlpp – mkdir xmlpp/include
• Type exit to close the OMVS session
• Open a command window on your Windows workstation Select All Programs – Accessories – Command Prompt
• Navigate to the include directory of your XML Toolkit cd C:\Users\SmartSource\AppData\Roaming\RMF\RMF Postprocessor XML Toolkit\include
• Open an FTP session on your Windows workstation FTP -i mvs1.centers.ihost.com When prompted, enter your userid and your password
• Upload the stylesheet files to your xmlpp USS directory Enter the following command sequence: cd /sharelab/sharann/xmlpp/include ascii mput *.js mput *.xsl mput *.css binary mput *.gif bye
- 8 - ©
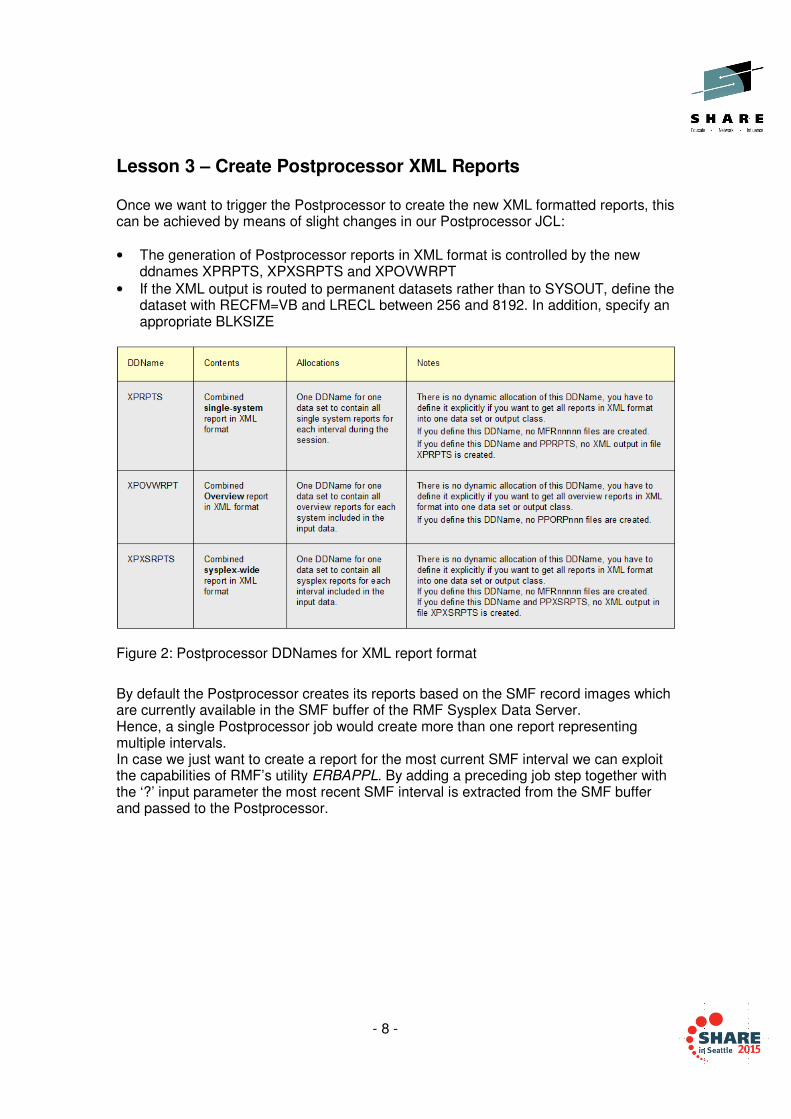
Lesson 3 – Create Postprocessor XML Reports Once we want to trigger the Postprocessor to create the new XML formatted reports, this can be achieved by means of slight changes in our Postprocessor JCL:
• The generation of Postprocessor reports in XML format is controlled by the new ddnames XPRPTS, XPXSRPTS and XPOVWRPT
• If the XML output is routed to permanent datasets rather than to SYSOUT, define the dataset with RECFM=VB and LRECL between 256 and 8192. In addition, specify an appropriate BLKSIZE
Figure 2: Postprocessor DDNames for XML report format
By default the Postprocessor creates its reports based on the SMF record images which are currently available in the SMF buffer of the RMF Sysplex Data Server. Hence, a single Postprocessor job would create more than one report representing multiple intervals. In case we just want to create a report for the most current SMF interval we can exploit the capabilities of RMF’s utility ERBAPPL. By adding a preceding job step together with the ‘?’ input parameter the most recent SMF interval is extracted from the SMF buffer and passed to the Postprocessor.

- 9 - ©
Altogether, our Postprocessor JCL may now look like as follows:
Figure 3: Postprocessor JCL Example for XML Reports
Exercise:
• Login to the z/OS system
• Open the dataset SHARAnn.RMF.CNTL(XMLPP) with the ISPF Editor
• Review and adjust the content of the JCL (update nn )
• Submit the Job
• Once the Job is complete, check the job output with the SDSF application (type SDSF in the command line of the ISPF primary panel)
• Open an OMVS session and navigate to your xmlpp subdirectory Type OMVS in the command line of the ISPF main panel. cd /sharelab/sharann/xmlpp
//SHARAnnX JOB (DE03141,,),'SHARAnn',CLASS=A,USER=SHARAnn, // MSGCLASS=H,MSGLEVEL=(1,1),NOTIFY=SHARAnn //* //XMLPP PROC SMF=,REPORT= //GETSMF EXEC PGM=ERBAPPL,PARM='?/*/&SMF' //SMFDATA DD DISP=(NEW,PASS),UNIT=SYSDA,SPACE=(CYL,(20,20)) //ERBLIST DD SYSOUT=* //* //RMFPP EXEC PGM=ERBRMFPP,COND=(4,LT,GETSMF) //MFPINPUT DD DISP=(OLD,PASS),DSN=*.GETSMF.SMFDATA //MFPMSGDS DD SYSOUT=* //XPRPTS DD PATH='/sharelab/sharann/xmlpp/&REPORT..xml', // PATHOPTS=(OWRONLY,OCREAT,OTRUNC), // PATHMODE=(SIRUSR,SIWUSR,SIRGRP),FILEDATA=TEXT //XPXSRPTS DD PATH='/sharelab/sharann/xmlpp/&REPORT..xml', // PATHOPTS=(OWRONLY,OCREAT,OTRUNC), // PATHMODE=(SIRUSR,SIWUSR,SIRGRP),FILEDATA=TEXT // PEND //PPCPU EXEC PROC=XMLPP,SMF=70,REPORT=CPU //RMFPP.SYSIN DD * REPORTS(CPU) //PPSDELAY EXEC PROC=XMLPP,SMF=72,REPORT=SDELAY //RMFPP.SYSIN DD * REPORTS(SDELAY) //PPWLMGL EXEC PROC=XMLPP,SMF=72,REPORT=WLMGL //RMFPP.SYSIN DD * SYSRPTS(WLMGL(SCPER,POLICY)) //
- 10 - ©
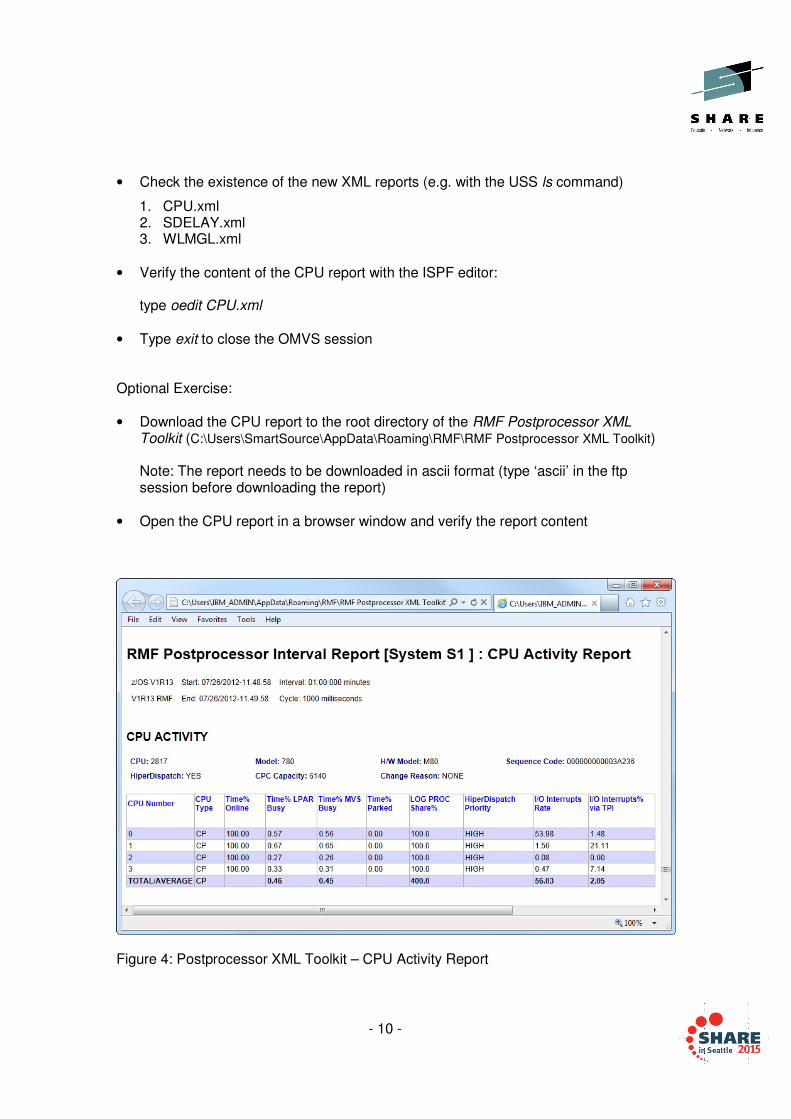
• Check the existence of the new XML reports (e.g. with the USS ls command)
1. CPU.xml 2. SDELAY.xml 3. WLMGL.xml
• Verify the content of the CPU report with the ISPF editor: type oedit CPU.xml
• Type exit to close the OMVS session Optional Exercise: • Download the CPU report to the root directory of the RMF Postprocessor XML
Toolkit (C:\Users\SmartSource\AppData\Roaming\RMF\RMF Postprocessor XML Toolkit) Note: The report needs to be downloaded in ascii format (type ‘ascii’ in the ftp session before downloading the report)
• Open the CPU report in a browser window and verify the report content
Figure 4: Postprocessor XML Toolkit – CPU Activity Report
- 11 - ©
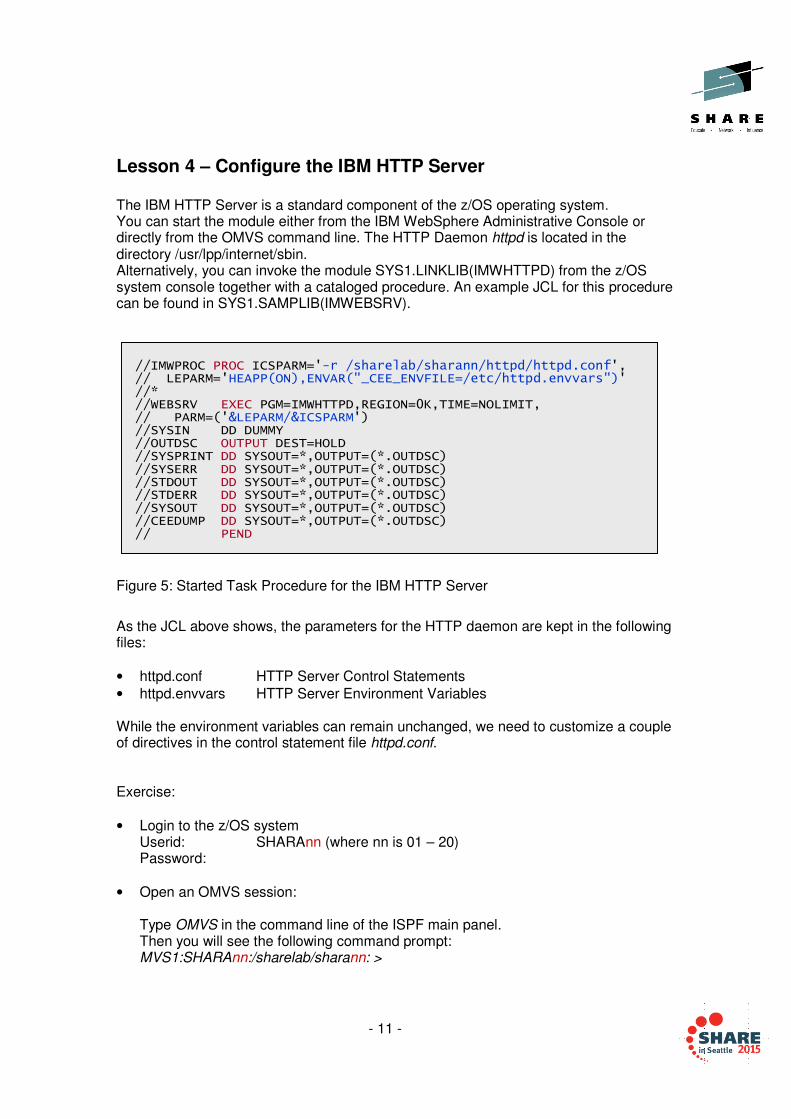
Lesson 4 – Configure the IBM HTTP Server The IBM HTTP Server is a standard component of the z/OS operating system. You can start the module either from the IBM WebSphere Administrative Console or directly from the OMVS command line. The HTTP Daemon httpd is located in the directory /usr/lpp/internet/sbin. Alternatively, you can invoke the module SYS1.LINKLIB(IMWHTTPD) from the z/OS system console together with a cataloged procedure. An example JCL for this procedure can be found in SYS1.SAMPLIB(IMWEBSRV).
Figure 5: Started Task Procedure for the IBM HTTP Server
As the JCL above shows, the parameters for the HTTP daemon are kept in the following files:
• httpd.conf HTTP Server Control Statements
• httpd.envvars HTTP Server Environment Variables While the environment variables can remain unchanged, we need to customize a couple of directives in the control statement file httpd.conf. Exercise:
• Login to the z/OS system Userid: SHARAnn (where nn is 01 – 20) Password:
• Open an OMVS session: Type OMVS in the command line of the ISPF main panel. Then you will see the following command prompt: MVS1:SHARAnn:/sharelab/sharann: >
//IMWPROC PROC ICSPARM='-r /sharelab/sharann/httpd/httpd.conf', // LEPARM='HEAPP(ON),ENVAR("_CEE_ENVFILE=/etc/httpd.envvars")' //* //WEBSRV EXEC PGM=IMWHTTPD,REGION=0K,TIME=NOLIMIT, // PARM=('&LEPARM/&ICSPARM') //SYSIN DD DUMMY //OUTDSC OUTPUT DEST=HOLD //SYSPRINT DD SYSOUT=*,OUTPUT=(*.OUTDSC) //SYSERR DD SYSOUT=*,OUTPUT=(*.OUTDSC) //STDOUT DD SYSOUT=*,OUTPUT=(*.OUTDSC) //STDERR DD SYSOUT=*,OUTPUT=(*.OUTDSC) //SYSOUT DD SYSOUT=*,OUTPUT=(*.OUTDSC) //CEEDUMP DD SYSOUT=*,OUTPUT=(*.OUTDSC) // PEND
- 12 - ©
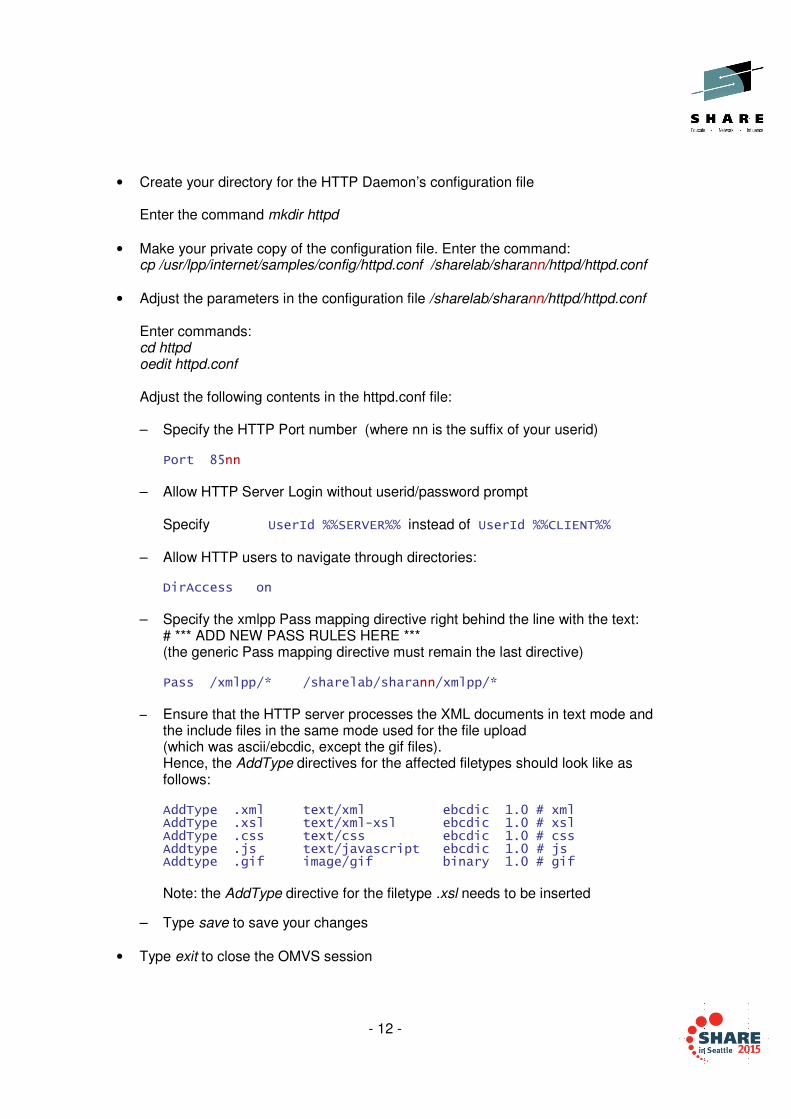
• Create your directory for the HTTP Daemon’s configuration file Enter the command mkdir httpd
• Make your private copy of the configuration file. Enter the command: cp /usr/lpp/internet/samples/config/httpd.conf /sharelab/sharann/httpd/httpd.conf
• Adjust the parameters in the configuration file /sharelab/sharann/httpd/httpd.conf
Enter commands: cd httpd oedit httpd.conf Adjust the following contents in the httpd.conf file: – Specify the HTTP Port number (where nn is the suffix of your userid)
Port 85nn
– Allow HTTP Server Login without userid/password prompt
Specify UserId %%SERVER%% instead of UserId %%CLIENT%%
– Allow HTTP users to navigate through directories: DirAccess on
– Specify the xmlpp Pass mapping directive right behind the line with the text:
# *** ADD NEW PASS RULES HERE *** (the generic Pass mapping directive must remain the last directive) Pass /xmlpp/* /sharelab/sharann/xmlpp/*
– Ensure that the HTTP server processes the XML documents in text mode and the include files in the same mode used for the file upload (which was ascii/ebcdic, except the gif files). Hence, the AddType directives for the affected filetypes should look like as follows: AddType .xml text/xml ebcdic 1.0 # xml AddType .xsl text/xml-xsl ebcdic 1.0 # xsl AddType .css text/css ebcdic 1.0 # css Addtype .js text/javascript ebcdic 1.0 # js Addtype .gif image/gif binary 1.0 # gif
Note: the AddType directive for the filetype .xsl needs to be inserted
– Type save to save your changes
• Type exit to close the OMVS session
- 13 - ©
Lesson 5 – Remote Access to Postprocessor XML Reports Now everything should be ready to access and display the XML reports that we have created in Lesson 3 by means of our web browser. Exercise:
• Start the HTTP Daemon – Login to the z/OS system
– Open the dataset SHARAnn.RMF.CNTL(IMWEBSRV) with the ISPF Editor
– Review and adjust the parameters of the JCL (update nn )
– Submit the Job
• View the remote XML Reports – Open your preferred web browser
– Type in the address bar: http://mvs1.centers.ihost.com:85nn/xmlpp
– Select your preferred report and check the report content
All done – Congratulations! In case you have performed the previous lessons without errors, you should now be able to view your remote Postprocessor reports properly by means of your web browser.
- 14 - ©
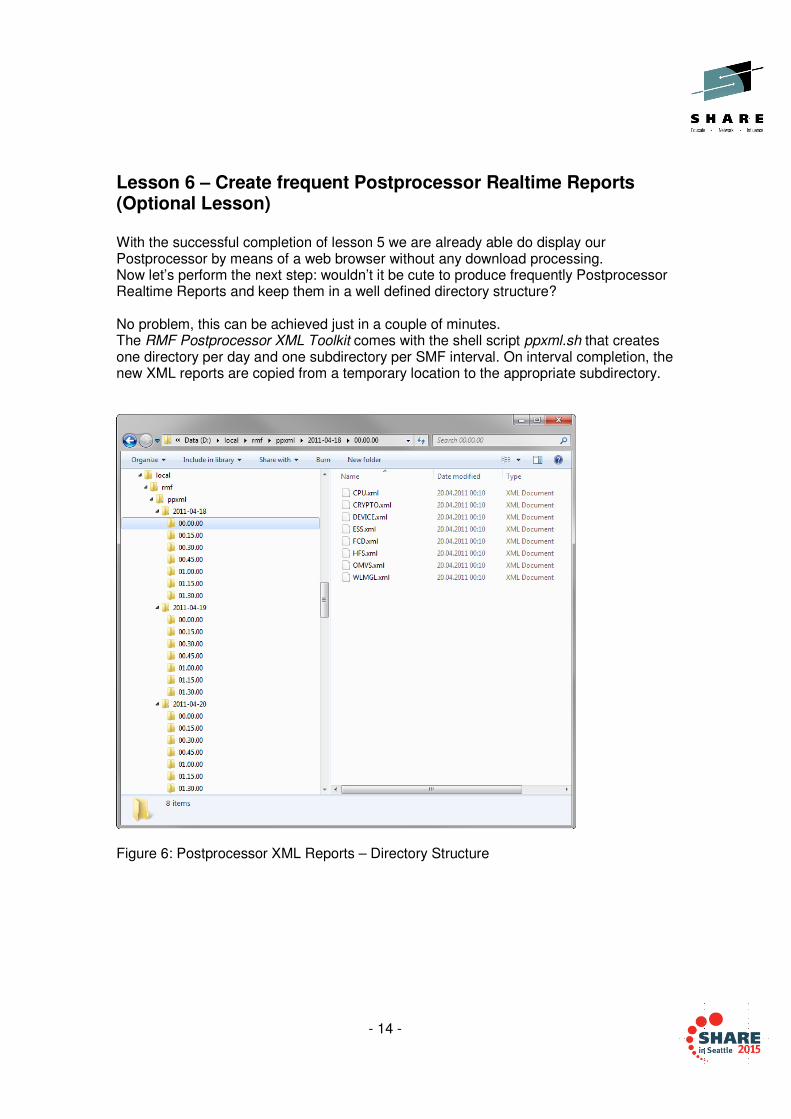
Lesson 6 – Create frequent Postprocessor Realtime Reports (Optional Lesson) With the successful completion of lesson 5 we are already able do display our Postprocessor by means of a web browser without any download processing. Now let’s perform the next step: wouldn’t it be cute to produce frequently Postprocessor Realtime Reports and keep them in a well defined directory structure? No problem, this can be achieved just in a couple of minutes. The RMF Postprocessor XML Toolkit comes with the shell script ppxml.sh that creates one directory per day and one subdirectory per SMF interval. On interval completion, the new XML reports are copied from a temporary location to the appropriate subdirectory.
Figure 6: Postprocessor XML Reports – Directory Structure
- 15 - ©
Since the ppxml.sh shell script needs to be executed on our z/OS system, we have to upload the file from the workstation in ASCII mode. Exercise:
• Open a command window on your Windows workstation Select All Programs – Accessories – Command Prompt
• Navigate to the example directory of your XML Toolkit cd C:\Users\SmartSource\AppData\Roaming\RMF\RMF Postprocessor XML Toolkit\example
• Open an FTP session on your Windows workstation FTP mvs1.centers.ihost.com When prompted, enter your userid and your password
• Upload the stylesheet files to your xmlpp USS directory Enter the following command sequence: ascii cd /sharelab/sharann/xmlpp/ put ppxml.sh quote site chmod 755 ppxml.sh bye
In lesson 2 we have already copied the stylesheet files to the /xmlpp/include subdirectory. Hence the stylesheets are at the proper location as long as the XML reports reside in the /xmlpp parent directory. But in this lesson we will create frequently a set of XML reports and copy the reports to new subdirectories. For this reason we need to place a symbolic link in each new subdirectory which points to the true location of the stylesheet files. This symbolic link is created by the ppxml.sh shell script too.
- 16 - ©
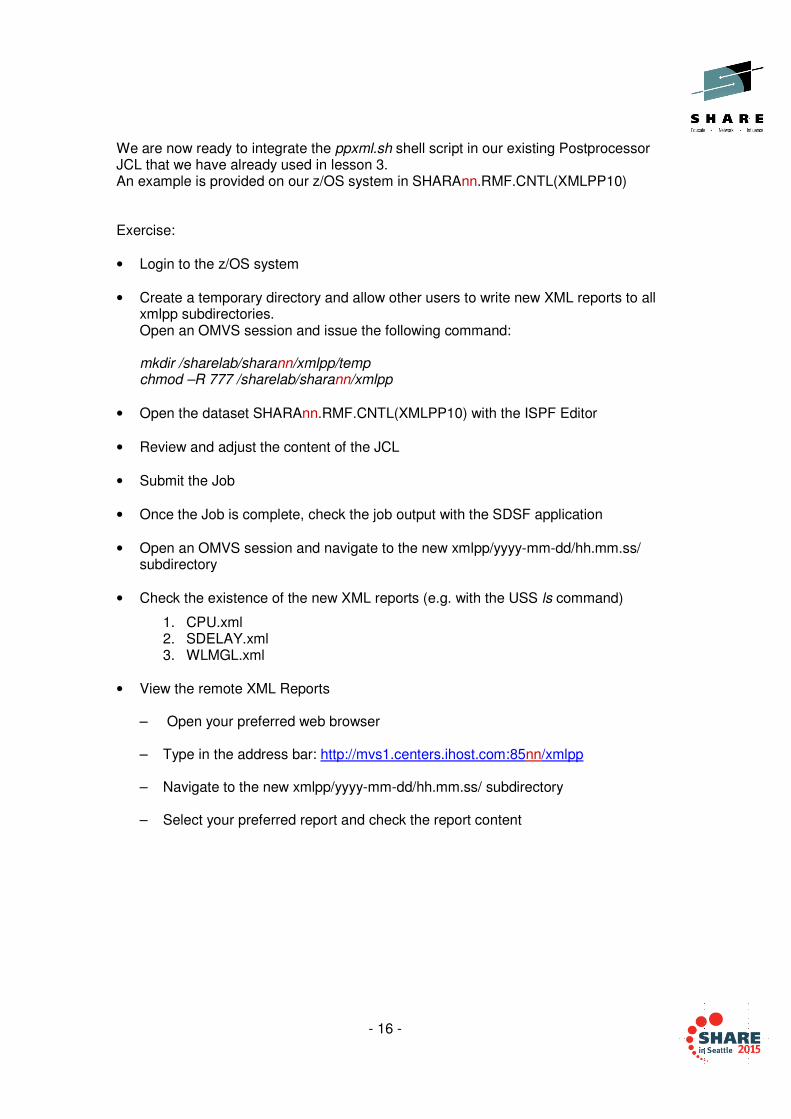
We are now ready to integrate the ppxml.sh shell script in our existing Postprocessor JCL that we have already used in lesson 3. An example is provided on our z/OS system in SHARAnn.RMF.CNTL(XMLPP10) Exercise:
• Login to the z/OS system
• Create a temporary directory and allow other users to write new XML reports to all xmlpp subdirectories. Open an OMVS session and issue the following command: mkdir /sharelab/sharann/xmlpp/temp chmod –R 777 /sharelab/sharann/xmlpp
• Open the dataset SHARAnn.RMF.CNTL(XMLPP10) with the ISPF Editor
• Review and adjust the content of the JCL
• Submit the Job
• Once the Job is complete, check the job output with the SDSF application
• Open an OMVS session and navigate to the new xmlpp/yyyy-mm-dd/hh.mm.ss/ subdirectory
• Check the existence of the new XML reports (e.g. with the USS ls command)
1. CPU.xml 2. SDELAY.xml 3. WLMGL.xml
• View the remote XML Reports – Open your preferred web browser
– Type in the address bar: http://mvs1.centers.ihost.com:85nn/xmlpp
– Navigate to the new xmlpp/yyyy-mm-dd/hh.mm.ss/ subdirectory
– Select your preferred report and check the report content
- 17 - ©
So far, so good. But there is one task remaining: How we can achieve that our JCL is frequently submitted right after each SMF interval completion? Exercise: • Check the SMF interval length with the D SMF,O console command
The value of the INTVAL directive (e.g. INTVAL(10) – PARMLIB) displays the length in minutes. On our SHARE system, the SMF Interval length is set to 10 minutes resp. 600 seconds
• Schedule the automatic submission of the Postprocessor JCL using the JES2 Automatic Command Facility. With the following command the JCL will be passed to the JES2 internal reader and executed every 600 seconds: $TAnn,I=600,'$VS,''S JOBRDR,DS=SHARAnn.RMF.CNTL(XMLPP10)'''
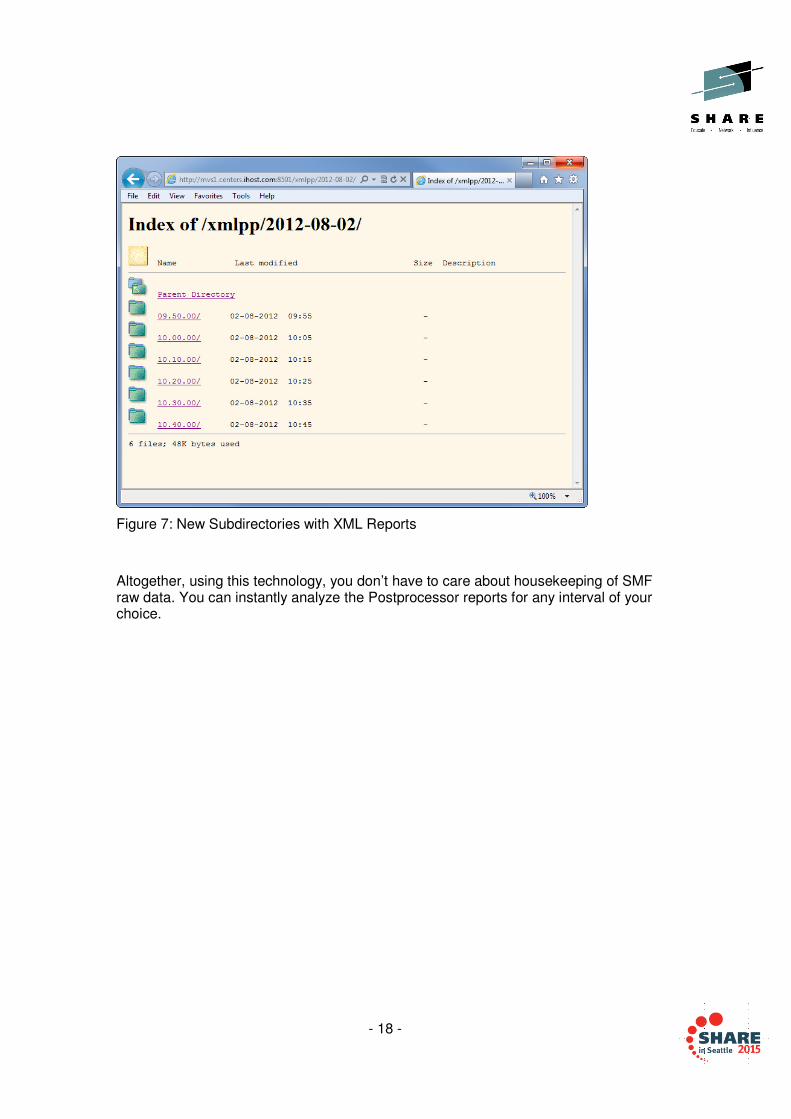
As response you might see on the SHARE lab system the following console messages: ICH408I USER(SHARAnn ) GROUP(SHARUSER) NAME(SHARE USER JES2.VS CL(OPERCMDS) INSUFFICIENT ACCESS AUTHORITY FROM JES%.** (G) ACCESS INTENT(CONTROL) ACCESS ALLOWED(UPDATE ) $HASP249 COMMAND RECEIVED FROM AUTO COMMAND ID=01 768 $VS,'S JOBRDR,DS=SHARAnn.RMF.CNTL(XMLPP10)' $HASP690 COMMAND REJECTED - AUTHORIZATION FAILURE However, with the proper authorization in your home installation everything should work fine: from now on your XMLPP10 JCL will be submitted every 10 minutes. That means a comprehensive repository with XML reports will be established and extended automatically. Hence, if you have enough time to wait for at least one hour ☺ your directory for the current day should contain 6 new subdirectories. Once you navigate with your web browser to the day’s directory, your window should look similar than shown in Figure 7.
- 18 - ©
Figure 7: New Subdirectories with XML Reports
Altogether, using this technology, you don’t have to care about housekeeping of SMF raw data. You can instantly analyze the Postprocessor reports for any interval of your choice.
- 19 - ©
Lesson 7 – Cleanup We have used the JES2 Automatic Command Facility in lesson 6 in order to submit our Postprocessor JCL frequently after SMF interval completion. If you have performed lesson 6 successfully, the timer is still active and the JCL will still be submitted unless we don’t remove the timer. Then we will throw away all the fruits of our hard work completely and remove our xmlpp and httpd directories including all subdirectories. Finally we should not forget to stop our HTTP server instance. Exercise:
• Cleanup your timer: Issue the console command $CAnn
• Reset your changes in the dataset SHARAnn.RMF.CNTL: Exchange your sequence number against the characters ‘nn’ in all members
• Cleanup your xmlpp and httpd subdirectories Open an OMVS session and issue the commands rm –R xmlpp and rm –R httpd
• Shutdown your HTTP Server: Issue the console command P SHARAnnH