creating chiptunes with - witchmaster creations · creating chiptunes with sid-wizard second...
TRANSCRIPT

Creating Chiptunes with
SID-WIZARD
SECOND EDITION
written by
Mikael Norrgård (WitchMaster)
and
Mihaly Horvath (Hermit)1
This is version 1.0 of the document
11. February 2014
1 The creator of SID-Wizard

1. INTRODUCTION ..............................................................................6
1.1 WHAT IS SID-WIZARD?................................................................ 6 1.2 FEATURES OF SID-WIZARD ............................................................ 7
NEW FEATURES/IMPROVEMENTS IN SID-WIZARD VERSION 1.2...................... 9 NEW FEATURES IN SID-WIZARD VERSION 1.4........................................10 NEW FEATURES IN AND CHANGES TO SID-WIZARD VERSION 1.5 ...................10 NEW FEATURES AND FIXES IN SID-WIZARD VERSION 1.6 ...........................10 PLAYER COMPARISONS (BARE / LIGHT / MEDIUM / FULL / EXTRA) .................11
1.3 PRINCIPLE OF SOUND SYNTHESIS.....................................................11 1.4 THE SID (6581/8580) CHIP........................................................12
WAVEFORM: TRIANGLE ...................................................................13 WAVEFORM: SAW TOOTH.................................................................13 WAVEFORM: PULSE .......................................................................13 WAVEFORM: NOISE .......................................................................13 HARD SYNC ................................................................................14 RING MODULATION .......................................................................14 FILTER ......................................................................................14
1.5 2SID (TWO SID CHIPS)...............................................................14 1.6 HEXADECIMAL NUMERAL SYSTEM .....................................................15
NIBBLE .....................................................................................16 1.7 A WORD ABOUT KEYBOARD SHORTCUTS ............................................16
2. RUNNING SID-WIZARD ON COMMODORE 64 ......................................16
X1541 CABLE + SOFTWARE ............................................................16 SD2IEC (μIEC / MMC2IEC) ..............................................................17 1541 ULTIMATE ..........................................................................17 TURBO CHAMELEON 64...................................................................17
2.1 TESTING THE SID CHIP IN YOUR COMMODORE......................................18 2.2 DEALING WITH NOISE ..................................................................18
GROUNDING AUDIO INPUT................................................................18 DISCONNECTING AUDIO INPUT...........................................................19
2.3 2SID VERSION..........................................................................19 3. USING SID-WIZARD IN VICE (C64 EMULATOR) .................................20
3.1 DOWNLOADS ............................................................................20 3.2 SETTING UP VICE .......................................................................20 3.3 MAKING EVERYTHING SIMPLE (USING .PRG FILE) .................................21 3.4 MAKING EVERYTHING SIMPLE (USING .D64 IMAGES) .............................21 3.5 2SID VERSION..........................................................................22
4. USER INTERFACE ..........................................................................22
4.1 START-UP MENU ........................................................................22 4.2 USER INTERFACE OVERVIEW ..........................................................23
INFO AREA .................................................................................24 PATTERN EDITOR ..........................................................................25 ORDER LIST................................................................................25 INSTRUMENT EDITOR .....................................................................25 CHORD TABLE .............................................................................25
3
TEMPO-PROGRAM TABLE .................................................................25 SUBTUNE AND TEMPO.....................................................................25
5. INSTRUMENT EDITOR.....................................................................26
5.1 WAVEFORMS.............................................................................26 WF-COLUMN ..............................................................................27 WAVEFORM / CONTROL FIRST NIBBLE ..................................................28 WAVEFORM / CONTROL SECOND NIBBLE ...............................................28 ARP-COLUMN .............................................................................29 DT-COLUMN (DETUNE)...................................................................29
5.2 PULSE WIDTH ...........................................................................30 PULSE VALUES (TWO FIRST COLUMNS) ................................................31
5.3 ADSR ENVELOPE .......................................................................31 5.4 VIBRATO .................................................................................33 5.5 THE FILTER ..............................................................................33 5.6 OTHER INSTRUMENT PARAMETERS ....................................................36
1ST FRAME’S WAVEFORM-REGISTER....................................................36 HARD-RESTART ADSR...................................................................36 HARD-RESTART TIMER / TYPE ...........................................................37 DEFAULT ARPEGGIO TABLE SPEED ......................................................37 DEFAULT CHORD ..........................................................................37 OCTAVE-TRANSPOSE AMOUNT ...........................................................38 INSTRUMENT NAME ........................................................................38
5.7 SAVING AND LOADING INSTRUMENTS ................................................38 6. THE CHORD TABLE ........................................................................39 7. INSTRUMENT EXAMPLES .................................................................40
7.1 BAZZ .....................................................................................40 7.2 SNARE ...................................................................................41 7.3 ARPEGGIO ...............................................................................42
8. PATTERN EDITOR..........................................................................43
8.1 NOTE-COLUMN EFFECTS ...............................................................45 8.2 INSTRUMENT-COLUMN EFFECTS.......................................................46 8.3 EFFECT-COLUMN SMALL EFFECTS....................................................47 8.4 EFFECT-COLUMN BIG EFFECTS .......................................................48 8.5 PATTERN EXAMPLE ......................................................................49
9. ORDERLIST..................................................................................50
9.1 ORDERLIST EFFECTS ...................................................................51 10. TEMPOS AND MULTISPEED ............................................................52
10.1 TEMPO-PROGRAM TABLE .............................................................52 10.2 MULTISPEED ...........................................................................53 10.3 TEMPO -> BPM.......................................................................54
PAL MACHINE..............................................................................54 NTSC MACHINE ...........................................................................54
4
11. MAIN MENU AND FILE OPERATIONS ................................................55 11.1 SIMPLE SETTINGS.....................................................................56
SELECT DRIVE .............................................................................56 FRAMESPEED...............................................................................56 DEF.PATT.LEN.............................................................................56 KILL TUNE AND TEMPO ...................................................................56 KILL INST&CHORD........................................................................56 COLOR......................................................................................56 KEY-LAYOUT ...............................................................................56 AUTO-INSTR ...............................................................................57 AUTOFOLLOW ..............................................................................57 HIDE RBARS...............................................................................57 CHORD-NOTE..............................................................................57 MIDIDEV....................................................................................57 MIDICHANNEL .............................................................................57 SID2 ADDR (ONLY FOR 2SID VERSION)...............................................57 SAVE CONFIG..............................................................................58 INSTANT HELP! ............................................................................58
11.2 LOAD/SAVE TUNE (WORK FILE) OR INSTRUMENT..................................58 USABLE KEYS IN THE FILE-DIALOG .....................................................59 THE SWM AND SWS FILE FORMATS ...................................................59
12. MIDI ......................................................................................60
12.1 HERMIDI ..............................................................................61 13. SID-MAKER (EXPORT YOUR TUNES) ..............................................61 14. SWM-CONVERT AND OTHER TOOLS .................................................63
14.1 CONVERTING .S00 FILE TO .SID WITH SWM-CONVERT ........................64 14.2 SNG2SWM (GOATTRACKER CONVERTER)...........................................64 14.3 EDITING METADATA IN YOUR SID-FILE.............................................64
15. APPLICATION NOTE TO THE PLAYER ROUTINE (TO EMBED IN PROGRAMS)..65
15.1 SFX ....................................................................................66 APPENDICES. (REFERENCE TABLES)......................................................66
APPENDIX 1. GENERAL PURPOSE AND GLOBALLY USABLE KEYS ........................67 APPENDIX 2. PATTERN EDITOR RELATED KEYS ...........................................68 APPENDIX 3. ORDERLIST RELATED KEYS..................................................69 APPENDIX 4. INSTRUMENT EDITOR RELATED KEYS ......................................70 APPENDIX 5. CHORD TABLE / TEMPO TABLE RELATED KEYS............................70 APPENDIX 6. FILE SELECTOR KEYS ........................................................71 APPENDIX 7. SDI KEYBOARD LAYOUT DIFFERENCES AND ADD-ONS ....................71 APPENDIX 8. DECIMAL TO HEXADECIMAL CONVERSION TABLE .........................71 APPENDIX 9. EXACT NOTES FOR ARP-COLUMN ..........................................73 APPENDIX 10. ATTACK / DECAY / RELEASE TIMINGS ....................................73 APPENDIX 11. TEMPO > BPM TABLE FOR PAL C64.....................................74 APPENDIX 12. TEMPO > BPM TABLE FOR NTSC C64 ..................................75
5

1. INTRODUCTION Welcome to this revised expanded manual for the excellent music tracker SID-Wizard2 for Commodore 64. I will try to go into detail of most aspects of the tracker and I will also try to explain the functions of the wonderful SID chip as we go along. The reason why I expanded the work of Mihaly's manual is that there is some stuff left out that SID gurus know but beginners don't. Please don't hesitate to give comments about anything that you think is unclear or could be explained in a better way. My email address is mikael.norrgard @ gmail.com and my CSDB user name is witchmaster. Possible new editions of this e-book will be released on my webpage: http://www.witchmastercreations.com. The next two chapters (1.1 and 1.2) are entirely written by Mihaly Horvath (the creator of SID-Wizard), taken from the SID-Wizard Manual 1.2. Other chapters are also a mix of my writings and that of Mihaly, some chapters are more or less identical to the SID-Wizard Manual 1.2 / 1.4. I have been mailing questions to Mihaly about features I didn't really understand, so I give him thanks here for his patience and help. If you are not used to SID trackers you shouldn't get stuck on the feature list of SID-Wizard, you will start to understand all of this in time.
1.1 WHAT IS SID-WIZARD?3
Hey folks, I'm Hermit! If you wonder what SID-Wizard is, I have a short answer: yet another tracker application for the famous Commodore 64 personal computer of the eighties. More specifically, a music editor for its sound chip called SID (Sound Interface Device). As you may know, there is still an evolving culture and technical background behind this machine - that's why demo musicians are still welcome to join the scene and compose wonderful SID tunes. SID-Wizard is an open-source project from the very 1st release, and everyone is welcome to help in further developments of my extensively commented source-code.
2 SID-Wizard version 1.6 at the time of writing. 3 This chapter is taken from the manual of SID-Wizard 1.2
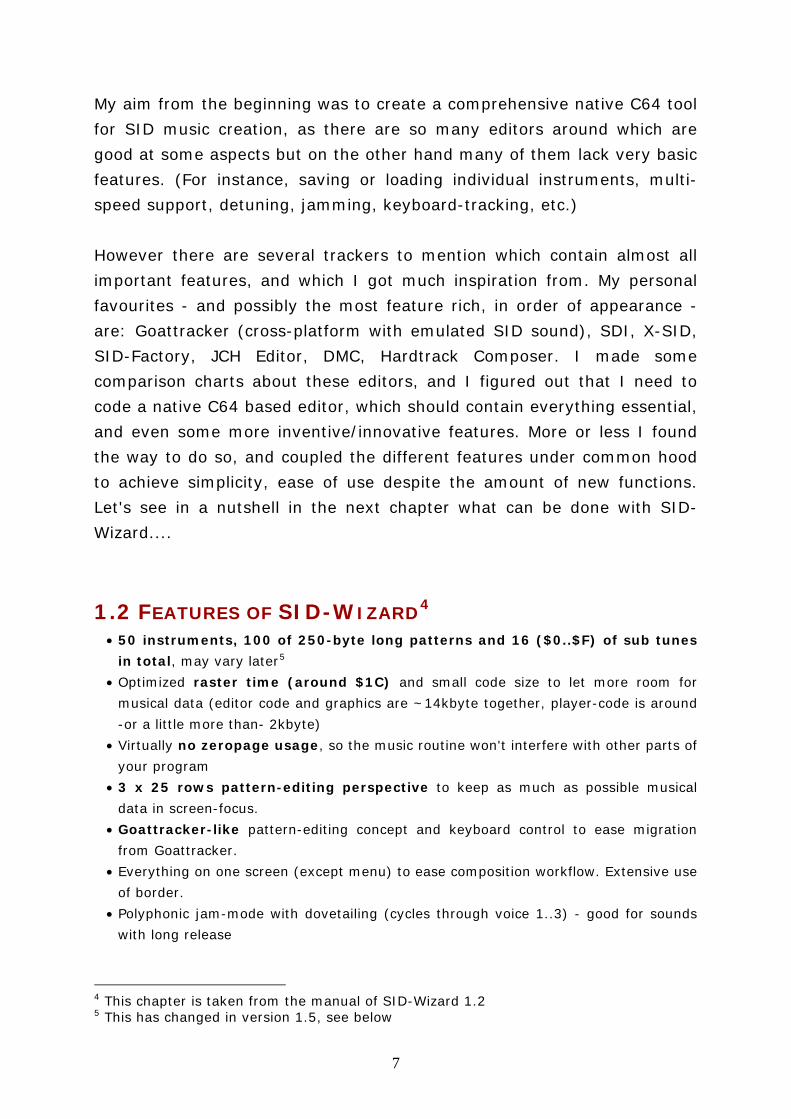
My aim from the beginning was to create a comprehensive native C64 tool for SID music creation, as there are so many editors around which are good at some aspects but on the other hand many of them lack very basic features. (For instance, saving or loading individual instruments, multi-speed support, detuning, jamming, keyboard-tracking, etc.) However there are several trackers to mention which contain almost all important features, and which I got much inspiration from. My personal favourites - and possibly the most feature rich, in order of appearance - are: Goattracker (cross-platform with emulated SID sound), SDI, X-SID, SID-Factory, JCH Editor, DMC, Hardtrack Composer. I made some comparison charts about these editors, and I figured out that I need to code a native C64 based editor, which should contain everything essential, and even some more inventive/innovative features. More or less I found the way to do so, and coupled the different features under common hood to achieve simplicity, ease of use despite the amount of new functions. Let's see in a nutshell in the next chapter what can be done with SID-Wizard....
1.2 FEATURES OF SID-WIZARD4
• 50 instruments, 100 of 250-byte long patterns and 16 ($0..$F) of sub tunes in total, may vary later5
• Optimized raster time (around $1C) and small code size to let more room for musical data (editor code and graphics are ~14kbyte together, player-code is around -or a little more than- 2kbyte)
• Virtually no zeropage usage, so the music routine won't interfere with other parts of your program
• 3 x 25 rows pattern-editing perspective to keep as much as possible musical data in screen-focus.
• Goattracker-like pattern-editing concept and keyboard control to ease migration from Goattracker.
• Everything on one screen (except menu) to ease composition workflow. Extensive use of border.
• Polyphonic jam-mode with dovetailing (cycles through voice 1..3) - good for sounds with long release
4 This chapter is taken from the manual of SID-Wizard 1.2 5 This has changed in version 1.5, see below
7
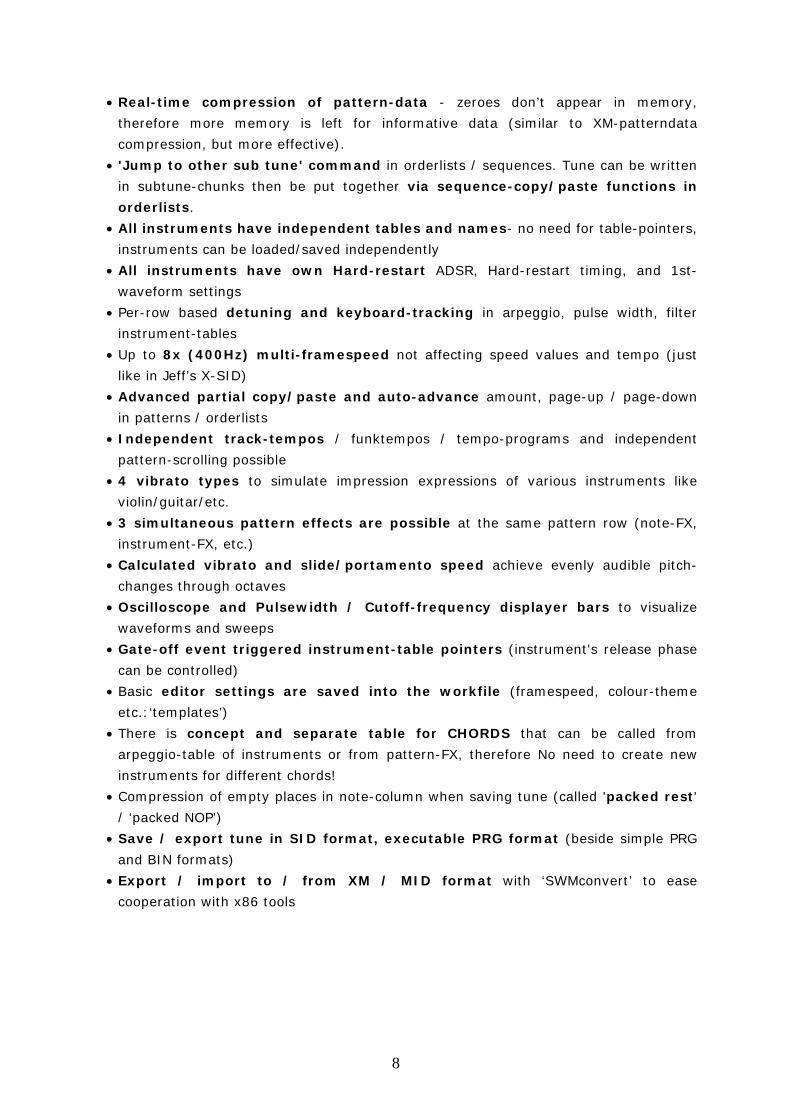
• Real-time compression of pattern-data - zeroes don’t appear in memory, therefore more memory is left for informative data (similar to XM-patterndata compression, but more effective).
• 'Jump to other sub tune' command in orderlists / sequences. Tune can be written in subtune-chunks then be put together via sequence-copy/paste functions in orderlists.
• All instruments have independent tables and names- no need for table-pointers, instruments can be loaded/saved independently
• All instruments have own Hard-restart ADSR, Hard-restart timing, and 1st-waveform settings
• Per-row based detuning and keyboard-tracking in arpeggio, pulse width, filter instrument-tables
• Up to 8x (400Hz) multi-framespeed not affecting speed values and tempo (just like in Jeff’s X-SID)
• Advanced partial copy/paste and auto-advance amount, page-up / page-down in patterns / orderlists
• Independent track-tempos / funktempos / tempo-programs and independent pattern-scrolling possible
• 4 vibrato types to simulate impression expressions of various instruments like violin/guitar/etc.
• 3 simultaneous pattern effects are possible at the same pattern row (note-FX, instrument-FX, etc.)
• Calculated vibrato and slide/portamento speed achieve evenly audible pitch-changes through octaves
• Oscilloscope and Pulsewidth / Cutoff-frequency displayer bars to visualize waveforms and sweeps
• Gate-off event triggered instrument-table pointers (instrument's release phase can be controlled)
• Basic editor settings are saved into the workfile (framespeed, colour-theme etc.:‘templates’)
• There is concept and separate table for CHORDS that can be called from arpeggio-table of instruments or from pattern-FX, therefore No need to create new instruments for different chords!
• Compression of empty places in note-column when saving tune (called 'packed rest' / ‘packed NOP’)
• Save / export tune in SID format, executable PRG format (beside simple PRG and BIN formats)
• Export / import to / from XM / MID format with ‘SWMconvert’ to ease cooperation with x86 tools
8
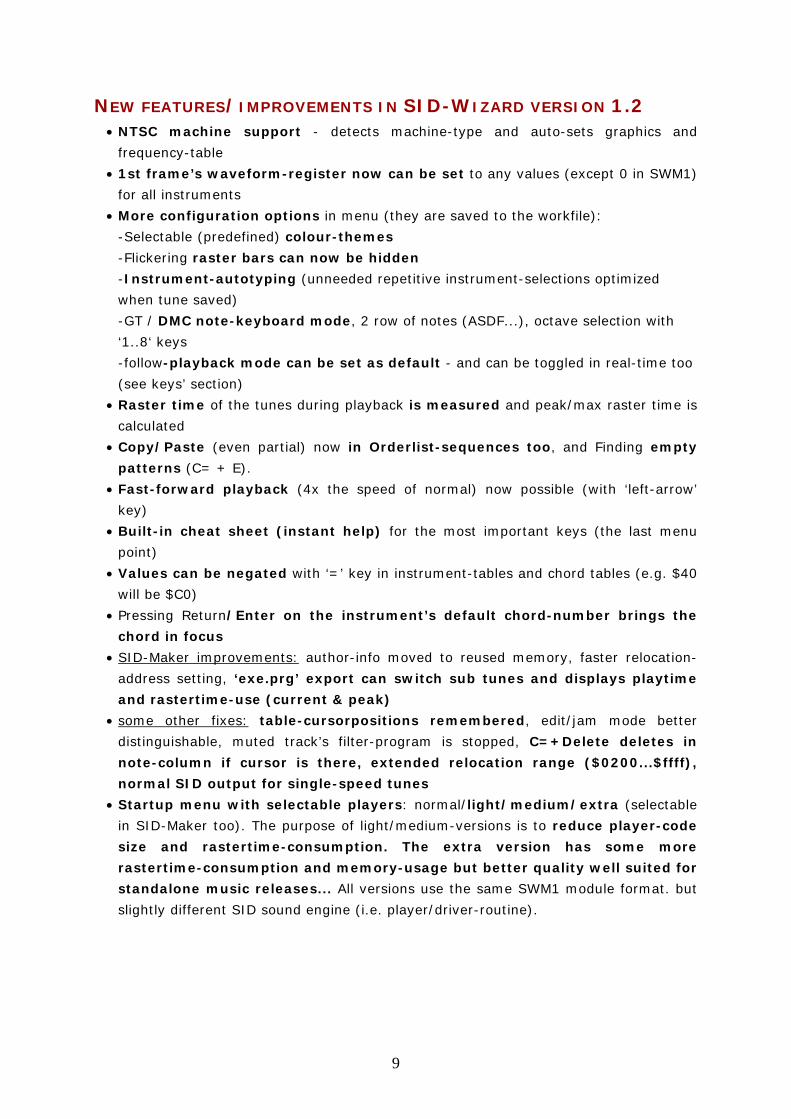
NEW FEATURES/IMPROVEMENTS IN SID-WIZARD VERSION 1.2 • NTSC machine support - detects machine-type and auto-sets graphics and
frequency-table • 1st frame’s waveform-register now can be set to any values (except 0 in SWM1)
for all instruments • More configuration options in menu (they are saved to the workfile):
-Selectable (predefined) colour-themes -Flickering raster bars can now be hidden -Instrument-autotyping (unneeded repetitive instrument-selections optimized when tune saved) -GT / DMC note-keyboard mode, 2 row of notes (ASDF...), octave selection with ‘1..8‘ keys -follow-playback mode can be set as default - and can be toggled in real-time too (see keys’ section)
• Raster time of the tunes during playback is measured and peak/max raster time is calculated
• Copy/Paste (even partial) now in Orderlist-sequences too, and Finding empty patterns (C= + E).
• Fast-forward playback (4x the speed of normal) now possible (with ‘left-arrow’ key)
• Built-in cheat sheet (instant help) for the most important keys (the last menu point)
• Values can be negated with ‘=’ key in instrument-tables and chord tables (e.g. $40 will be $C0)
• Pressing Return/Enter on the instrument’s default chord-number brings the chord in focus
• SID-Maker improvements: author-info moved to reused memory, faster relocation-address setting, ‘exe.prg’ export can switch sub tunes and displays playtime and rastertime-use (current & peak)
• some other fixes: table-cursorpositions remembered, edit/jam mode better distinguishable, muted track’s filter-program is stopped, C=+Delete deletes in note-column if cursor is there, extended relocation range ($0200...$ffff), normal SID output for single-speed tunes
• Startup menu with selectable players: normal/light/medium/extra (selectable in SID-Maker too). The purpose of light/medium-versions is to reduce player-code size and rastertime-consumption. The extra version has some more rastertime-consumption and memory-usage but better quality well suited for standalone music releases... All versions use the same SWM1 module format. but slightly different SID sound engine (i.e. player/driver-routine).
9
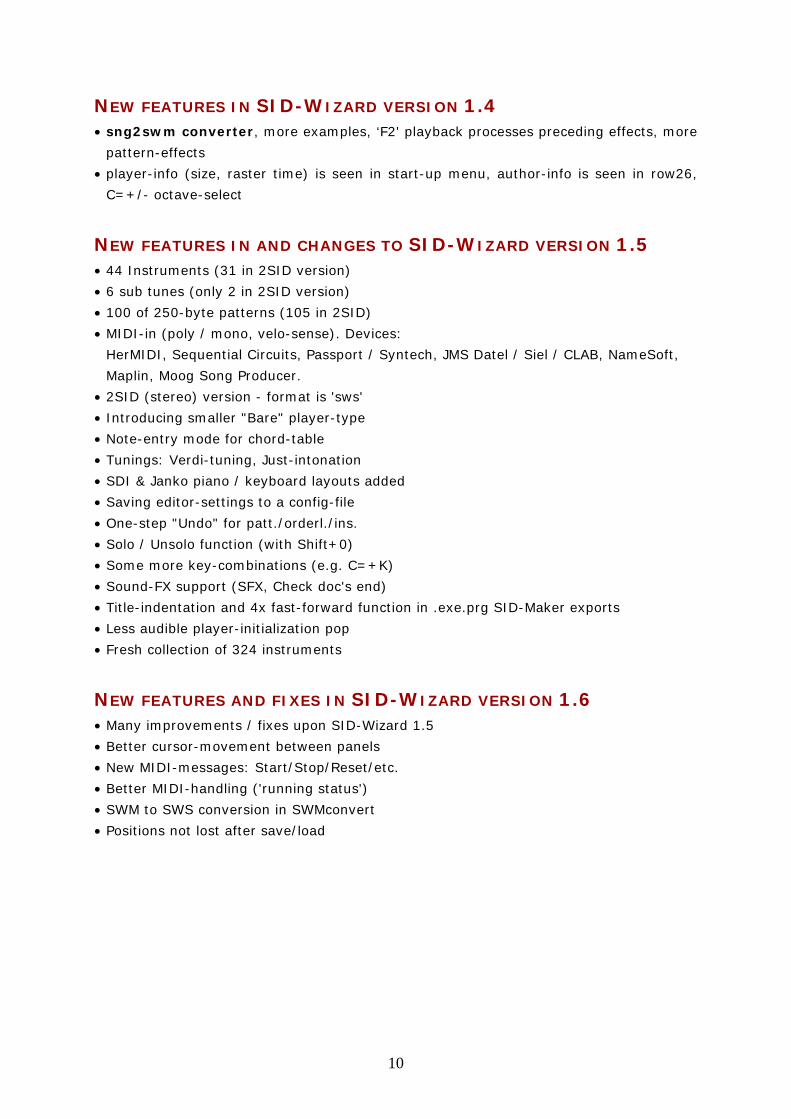
NEW FEATURES IN SID-WIZARD VERSION 1.4 • sng2swm converter, more examples, ‘F2' playback processes preceding effects, more
pattern-effects • player-info (size, raster time) is seen in start-up menu, author-info is seen in row26,
C=+/- octave-select
NEW FEATURES IN AND CHANGES TO SID-WIZARD VERSION 1.5 • 44 Instruments (31 in 2SID version) • 6 sub tunes (only 2 in 2SID version) • 100 of 250-byte patterns (105 in 2SID) • MIDI-in (poly / mono, velo-sense). Devices:
HerMIDI, Sequential Circuits, Passport / Syntech, JMS Datel / Siel / CLAB, NameSoft, Maplin, Moog Song Producer.
• 2SID (stereo) version - format is 'sws' • Introducing smaller "Bare" player-type • Note-entry mode for chord-table • Tunings: Verdi-tuning, Just-intonation • SDI & Janko piano / keyboard layouts added • Saving editor-settings to a config-file • One-step "Undo" for patt./orderl./ins. • Solo / Unsolo function (with Shift+0) • Some more key-combinations (e.g. C=+K) • Sound-FX support (SFX, Check doc's end) • Title-indentation and 4x fast-forward function in .exe.prg SID-Maker exports • Less audible player-initialization pop • Fresh collection of 324 instruments
NEW FEATURES AND FIXES IN SID-WIZARD VERSION 1.6 • Many improvements / fixes upon SID-Wizard 1.5 • Better cursor-movement between panels • New MIDI-messages: Start/Stop/Reset/etc. • Better MIDI-handling ('running status') • SWM to SWS conversion in SWMconvert • Positions not lost after save/load
10
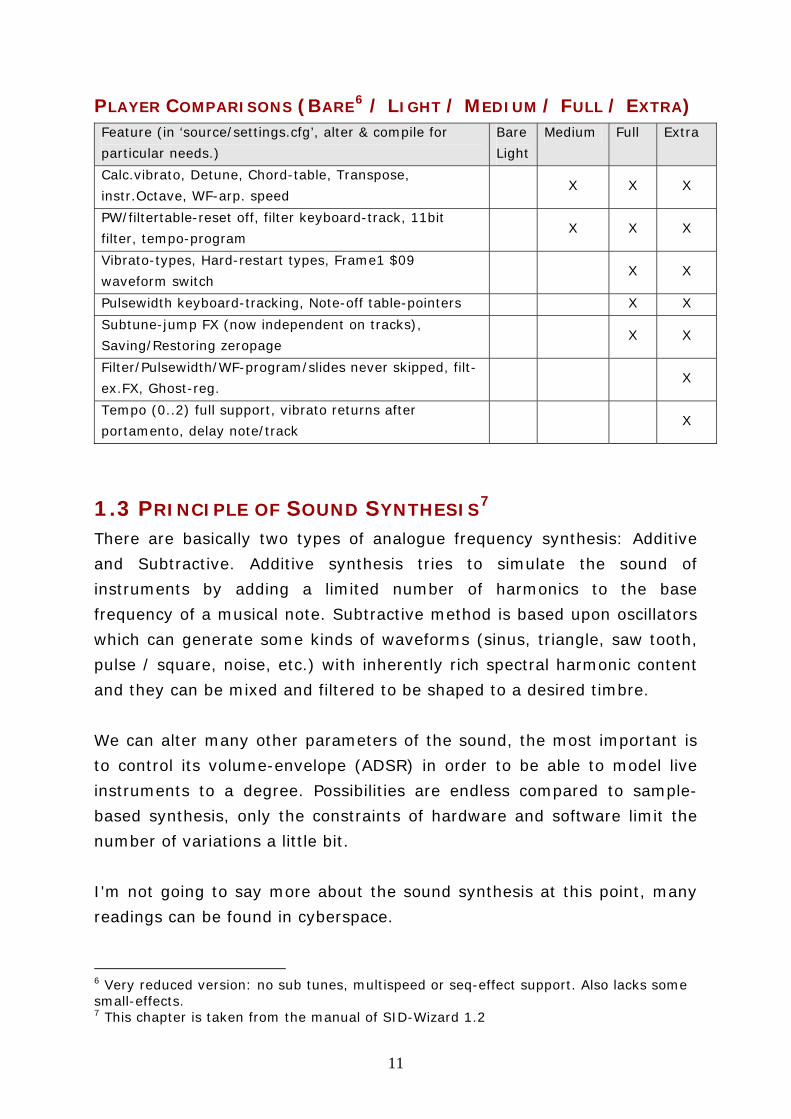
PLAYER COMPARISONS (BARE6 / LIGHT / MEDIUM / FULL / EXTRA) Feature (in ‘source/settings.cfg’, alter & compile for particular needs.)
Bare Light
Medium Full Extra
Calc.vibrato, Detune, Chord-table, Transpose, instr.Octave, WF-arp. speed
X X X
PW/filtertable-reset off, filter keyboard-track, 11bit filter, tempo-program
X X X
Vibrato-types, Hard-restart types, Frame1 $09 waveform switch
X X
Pulsewidth keyboard-tracking, Note-off table-pointers X X
Subtune-jump FX (now independent on tracks), Saving/Restoring zeropage
X X
Filter/Pulsewidth/WF-program/slides never skipped, filt-ex.FX, Ghost-reg.
X
Tempo (0..2) full support, vibrato returns after portamento, delay note/track
X
1.3 PRINCIPLE OF SOUND SYNTHESIS7
There are basically two types of analogue frequency synthesis: Additive and Subtractive. Additive synthesis tries to simulate the sound of instruments by adding a limited number of harmonics to the base frequency of a musical note. Subtractive method is based upon oscillators which can generate some kinds of waveforms (sinus, triangle, saw tooth, pulse / square, noise, etc.) with inherently rich spectral harmonic content and they can be mixed and filtered to be shaped to a desired timbre. We can alter many other parameters of the sound, the most important is to control its volume-envelope (ADSR) in order to be able to model live instruments to a degree. Possibilities are endless compared to sample-based synthesis, only the constraints of hardware and software limit the number of variations a little bit. I'm not going to say more about the sound synthesis at this point, many readings can be found in cyberspace.
6 Very reduced version: no sub tunes, multispeed or seq-effect support. Also lacks some small-effects. 7 This chapter is taken from the manual of SID-Wizard 1.2
11

1.4 THE SID (6581/8580) CHIP "The 6581 Sound Interface Device (SID) is a single-chip, 3-voice electronic music synthesizer/sound effects generator compatible with the 65XX and similar microprocessor families. SID provides wide-range, high-resolution control of pitch (frequency), tone colour (harmonic content) and dynamics (volume). Specialized control circuitry minimizes software overhead, facilitating use in arcade/home video games and low-cost musical instruments."
From the Commodore SID 6581 Datasheet
The MOS technology SID 6581 or 8580 sound chip in C64 is a subtractive sound-synthesis chip designed by Bob Yannes in 1982. It is one of the most important reasons for the C64's popularity. There are many differences between different revisions and types of SID chips produced over the years, maybe due to the shortened development time, and the specification of the chip was somewhat unfinished. The most significant change/improvement has appeared in the 8580 new SID model over the original 6581 SID, but many consider the 6581 better. 8580 has more balanced filter-cutoff frequency control curve and less-distorted resonance, better mixed-waveform support, and maybe more predictable ADSR envelope-handling. It's still a mystery in some aspects what the chip exactly does inside, however there were thorough reverse-engineering projects recently both in software and hardware emulation areas (e.g Resid dll, 1541 Ultimate VHDL code for SID). Even Bob Yannes himself doesn't keep track of the long lifetime of the SID chip and what people do with it. As stated in the citation above, the SID has a three voice polyphony (three sounds can play at one time). These sounds can be generated by combining waveforms and applying effects like modifying the pulse width of the pulse waveform, using a filter (low-pass / high-pass / band-pass), applying ring modulation or hard sync and adding vibrato. Another common way of creating more complex sounds (for example drums) is to use a wave table, i.e. successively changing between different waveforms in a rapid manner. Arpeggios can also be created using a wave table.
12
The SID chip can generate three different waveforms (triangle, saw tooth and pulse) that can be combined or used on their own. There is also a fourth waveform, noise, which can't be combined with the other waveforms. The SID 6581 has a bug (or feature) that results in low volume when waveforms are combined, the SID 8580 can combine the waveforms more effectively. The explanations below are taken from the SID 6581 datasheet. The functionality of Hard Sync and Ring Modulation are described according to voice 1. With both these effects it's the voice to the left that affects these effects (voice 1 => voice 2, voice 2 => voice 3 and voice 3 => voice 1).
WAVEFORM: TRIANGLE The Triangle waveform is low in harmonics and has a mellow, flute-like quality.
WAVEFORM: SAW TOOTH The saw tooth waveform is rich in even and odd harmonics and has a bright, brassy quality.
WAVEFORM: PULSE The harmonic content of this waveform can be adjusted by the pulse width registers, producing tone qualities ranging from a bright, hollow square wave to a nasal, reedy pulse. Sweeping the pulse width in real-time produces a dynamic “phasing” effect which adds a sense of motion to the sound. Rapidly jumping between different pulse widths can produce interesting harmonic sequences.
WAVEFORM: NOISE This output is a random signal which changes at the frequency of the oscillator. The sound quality can be varied from a low rumbling to hissing white noise via the oscillator frequency registers. Noise is useful in creating explosions, gunshots, jet engines, wind, surf and other un-pitched sounds, as well as snare drums and cymbals. Sweeping the oscillator frequency with noise selected produces a dramatic rushing effect.
13

HARD SYNC This synchronizes the fundamental frequency of oscillator 1 with the fundamental frequency of oscillator 3, producing “Hard Sync” effects. Varying the frequency of oscillator 1 with respect to oscillator 3 produces a wide range of complex harmonic structures from voice 1 at the frequency of oscillator 3. In order for sync to occur oscillator 3 must be set to some frequency other than zero but preferably lower than the frequency of oscillator 1. No other parameters of voice 3 have any effect on sync.
RING MODULATION Ring modulation replaces the triangle waveform output of oscillator 1 with a “ring modulated” combination of oscillators 1 and 3. Varying the frequency of oscillator 1 with respect to oscillator 3 produces a wide range of non-harmonic overtone structures for creating bell or gong sounds and for special effects. In order for ring modulation to be audible, the triangle waveform of oscillator 1 must be selected and oscillator 3 must be set to some frequency other than zero. No other parameters of voice 3 have any effect on ring modulation.
FILTER The SID chip has only one filter that must be shared for all three voices. The filter types supported are low-pass, high-pass and band-pass. These types can also be combined. The cut-off frequency and resonance strength can be changed.
1.5 2SID (TWO SID CHIPS) You can install a second SID chip in your Commodore to give you stereo sound or six channels of heavenly waveforms. For this you will need an adapter. There are a few adapters available. You will probably need to build your own adapter but there are ready made PCBs available for SID2SID that are sold by 8bit ventures
14
(http://www.8bitventures.com). If you decide to build this one you can find good documentation on their website. There is another adapter called DualSID that you could buy as a kit or ready made but I'm not sure if that is being sold anymore. To use two SID chips in SID Wizard you need to run the special version just for that, which have "2SID" in the name obviously.
1.6 HEXADECIMAL NUMERAL SYSTEM "In mathematics and computer science, hexadecimal (also base 16, or hex) is a positional numeral system with a radix, or base, of 16. It uses sixteen distinct symbols, most often the symbols 0–9 to represent values zero to nine, and A,B,C,D,E,F (or alternatively a–f) to represent values ten to fifteen."
http://en.wikipedia.org/wiki/Hexadecimal
You should read elsewhere about the hexadecimal numeral system to get a basic understanding of it. For the lazy ones I have included a conversion table in the end of this manual for converting between decimal and hexadecimal values. Both signed and unsigned values are covered in the table for one byte values. This gives the table a range from 0-255 for unsigned values and -128-127 for signed values. Most values in SID-Wizard don’t go beyond this scope with the exception of setting the pulse width, which is a 12-bit number ($000...$FFF). There IS a good feature in SID Wizard that helps a lot with signed values. The feature negates values for you automatically, so if you want the value -30 you write the positive value in hex format ($1E) and press the key '=' to negate the value to -30 ($E2). HEX numbers are written with a dollar sign before the value, so for example $A in hex equals 10 in the normal decimal system.
15
NIBBLE We will use the word nibble in the coming chapters. A nibble is a four-bit aggregation, or half an octet. As a nibble contains 4 bits, there are sixteen possible values, so a nibble corresponds to a single hexadecimal digit. A full byte (octet) is represented by two hexadecimal digits; therefore, it is common to display a byte of information as two nibbles. Take the hex number $4F, the first nibble is 4 and the second is F.
1.7 A WORD ABOUT KEYBOARD SHORTCUTS The shortcuts keys mentioned in this article are for the C64 keyboard. If the key is not the same in the C64 emulator (Vice), then that keyboard shortcut will be shown in parentheses.
2. RUNNING SID-WIZARD ON COMMODORE 64 If you have a Commodore 64 put away in the cabinet, now is the time to take it back into use. Although you can run SID-Wizard in a C64 emulator and the emulation of the SID chip nowadays is ok, the sound quality (e.g. warmth and filter distortion) of the real thing is still unbeatable. There will also be practically no delay (latency) when jamming. There are quite a few options of getting SID-Wizard transferred to you Commodore 64, I will list a few of them here. For a comprehensive list check this link out: http://www.c64-wiki.com/index.php/Data_transfer_hardware.
X1541 CABLE + SOFTWARE This is a series of cables that makes it possible to connect a C64 Floppy disk drive to PC and transfer files to and from floppy disks. You will need software like Star Commander or OpenCBM to use these cables. There are different versions of this cable (X1541, XA1541, XM1541, XMP1541). You will need a parallel port to use these cables. There is even a USB version of the cable (XU1541), I'm not sure how well that works though. Make
16
sure that your version of the cable works with the software you want to use.
Cost: ~10-20€. Requires assembling: Yes, if you don't buy a ready made cable.
SD2IEC (μIEC / MMC2IEC) This is a hardware mass storage device using SD a memory card interfacing with the IEC bus. this means that SD2IEC is an emulation / replacement of a Commodore-1541 disk drive for a C64. You can transfer .D64 images to the SD card and use them as normal floppy disks. This is a really practical, you can then even work with your tunes on a proper Commodore 64 at home and use your .D64 with your emulator (on the laptop on the go).
Cost: ~50€ Requires assembling: Maybe a little bit.
1541 ULTIMATE The 1541 Ultimate is a storage solution for the Commodore 64 (and other models). There are two versions of this cartridge (I and II). The latter even supports USB pen drives.
Cost: ~130€ Requires assembling: No
TURBO CHAMELEON 64 Turbo Chameleon 64 is a user-friendly multipurpose cartridge for the Commodore 64. It has a MMC/SD card slot with MMC64 compatibility and 1541-emulation plus a lot of other features. The Turbo Chameleon 64 cartridge can even be operated as a stand-alone unit (since it's basically an FPGA computer like the C-One or the Minimig8 in a C64 cartridge case, which is really cool).
Cost: ~200€ Requires assembling: No
8 http://en.wikipedia.org/wiki/Minimig
17
2.1 TESTING THE SID CHIP IN YOUR COMMODORE To make sure the SID chip in your C64 is working as it should you can run a test program to test all the waveforms and the filter. You can read more about how to do this in the excellent blog post by plgDavid (Plogue R&D): http://ploguechipsounds.blogspot.fi/2010/05/one-page-basic-sid-benchmark.html There have also been reports about fake SID chips for sale on eBay so be sure to check chips bought from unknown sources.
2.2 DEALING WITH NOISE The audio output of the C64 is a bit noisy. There are some quite simple things you can do to reduce the noise. It seems that these fixes don’t work for everybody but you can give them a try if the noise is bothering you. The noise is coming from the audio input of the SID chip (interference from other circuits) so you need to ground the input or have it floating (not connected). I haven’t tried the second method myself but the first one worked for me.
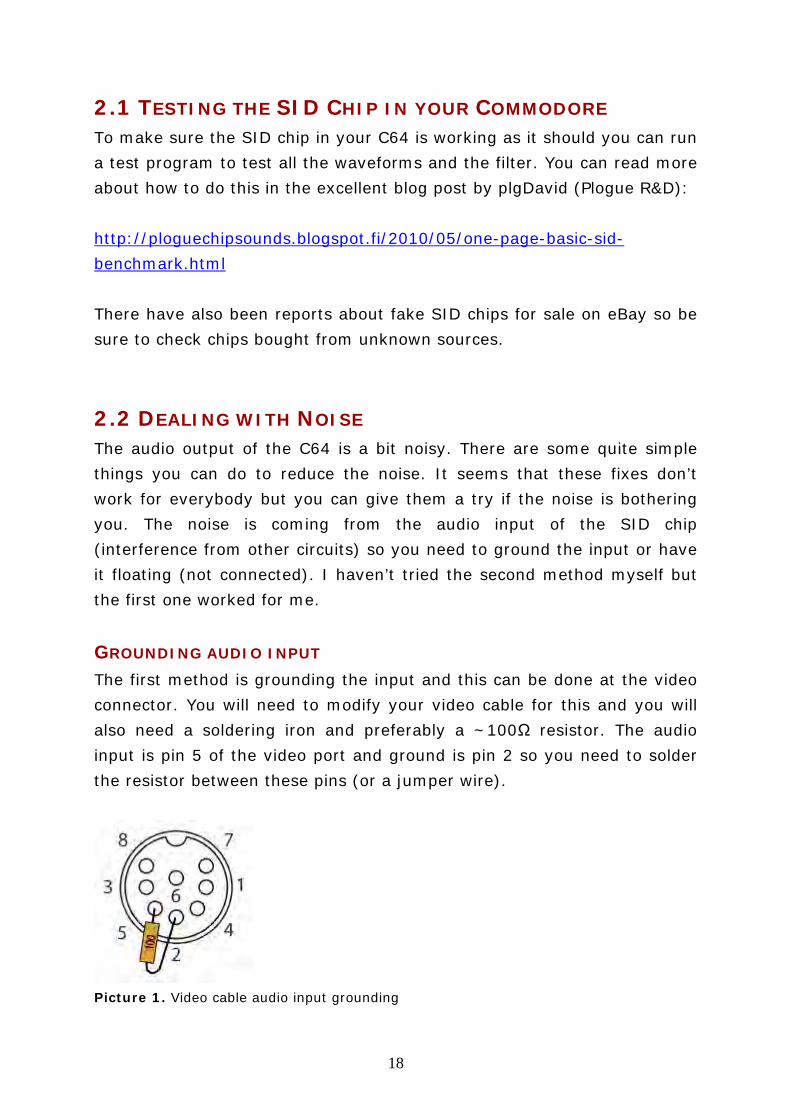
GROUNDING AUDIO INPUT The first method is grounding the input and this can be done at the video connector. You will need to modify your video cable for this and you will also need a soldering iron and preferably a ~100Ω resistor. The audio input is pin 5 of the video port and ground is pin 2 so you need to solder the resistor between these pins (or a jumper wire).
Picture 1. Video cable audio input grounding
18
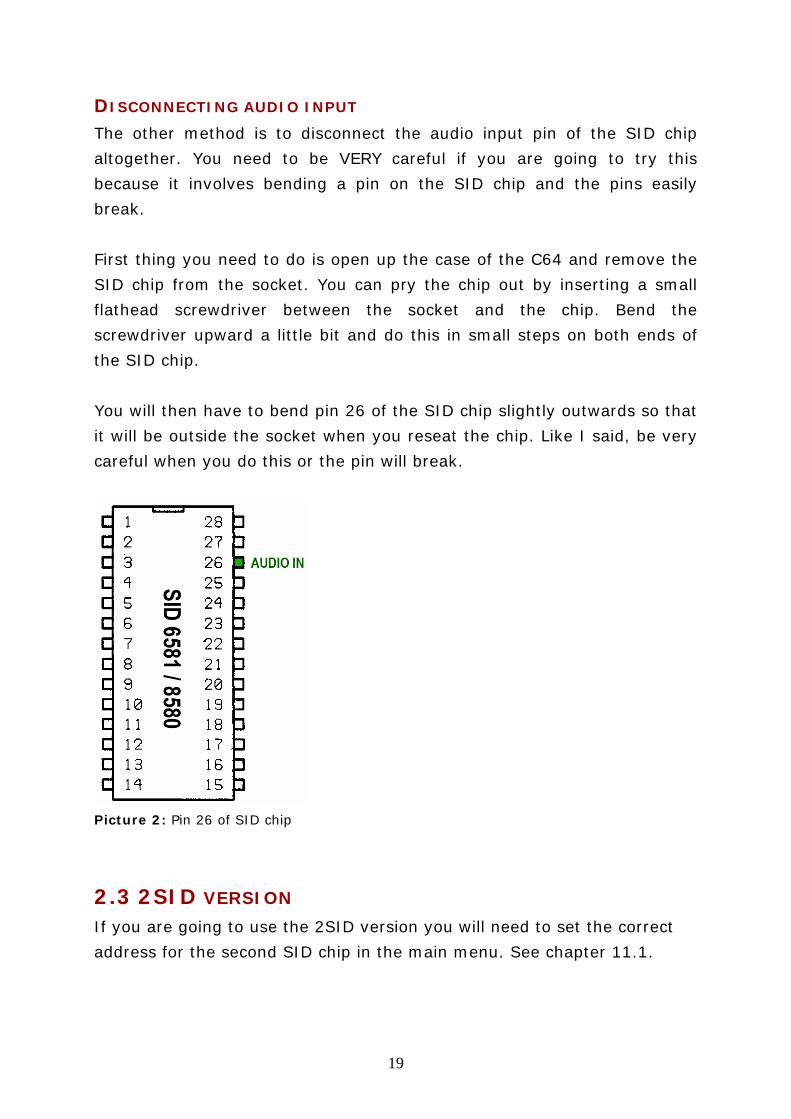
DISCONNECTING AUDIO INPUT The other method is to disconnect the audio input pin of the SID chip altogether. You need to be VERY careful if you are going to try this because it involves bending a pin on the SID chip and the pins easily break. First thing you need to do is open up the case of the C64 and remove the SID chip from the socket. You can pry the chip out by inserting a small flathead screwdriver between the socket and the chip. Bend the screwdriver upward a little bit and do this in small steps on both ends of the SID chip. You will then have to bend pin 26 of the SID chip slightly outwards so that it will be outside the socket when you reseat the chip. Like I said, be very careful when you do this or the pin will break.
Picture 2: Pin 26 of SID chip
2.3 2SID VERSION If you are going to use the 2SID version you will need to set the correct address for the second SID chip in the main menu. See chapter 11.1.
19
3. USING SID-WIZARD IN VICE (C64 EMULATOR) I will here explain how to use SID-Wizard in the emulator Vice, if you are not lucky enough to own a Commodore 64. There will be quite some sound latency when jamming when you use the emulator, compared to the real thing. These next steps are for Windows but I imagine this will work similarly in Linux or Mac OS X.
3.1 DOWNLOADS 1. Download and install Vice64:
http://www.viceteam.org/#download 2. Download SID-Wizard here:
http://csdb.dk/release/?id=129031 or here: http://sourceforge.net/projects/sid-wizard/ You can use the (SID-Wizard-1.6-disk.d64) or you can use the prg-files (SID-Wizard and SID-Maker) if you are going to use seamless folder integration9 in Vice, which is the recommended method and will be used here10.
3.2 SETTING UP VICE 1. Start Vice (x64.exe in Vice folder). 2. Activate Options / Double Size. 3. Make sure that Options / Warp Mode is inactivated and Sound playback
is activated. 4. Go to Settings / SID settings… and choose the SID chip to emulate.
ReSid gives you the most accurate emulation but it also requires more processing power. Which SID chip you choose to emulate is a matter of taste, as a guide, 8580 has more effective filters but a thinner sound than the 6581 (it’s still phat though). For good sound quality in high pitches and thin sounds, you should also change sample method to
9 When loading a prg-file directly in Vice, the folder of the prg-file will be used for saving which is very practical. 10 When using seamless folder integration you need to use SWMconvert to convert .S00 files to .SID, this tool will work in Linux and Windows, so for other operations systems you should use D64-images and extract the sid-files from there.
20

interpolating. Remember that your music will sound different on different versions of the SID chip.
5. This step is optional but will give the user interface a more authentic look, it will make the graphics and characters look better (the user interface is designed to utilize the smoothing effect of PAL-blur); Go to Options and activate PAL Emulation. :)
6. Click Settings / Save current settings.
3.3 MAKING EVERYTHING SIMPLE (USING .PRG FILE) 1. Create a folder for SID-Wizard and copy the .prg files there (tunes and
instruments will also be saved to this folder). 2. Create a shortcut for Vice to the desktop (or wherever you want one). 3. Change the target of the shortcut (right-click and choose properties) to
this: ”Path to x64.exe” -autostart “Path to SID-Wizard-1.6.prg” This will start SID-Wizard automatically and seamless folder integration will be used, so your tunes and instruments will be saved to the same directory as SID-Wizard-1.6.prg.
4. Rename the shortcut to SID-Wizard. 5. Running Vice from the shortcut now should take you into SID-Wizard
automatically. You can go to and from full screen mode with ALT + D.
3.4 MAKING EVERYTHING SIMPLE (USING .D64 IMAGES) 1. Go to Settings / Drive settings… / Drive 9 and choose drive type 1541. 2. Click Settings / Save current settings. 3. Go to File / Attach disk image / Drive 8 (or 9) and create a blank disk
(for saving your music and instruments). 4. Create a shortcut for Vice to the desktop (or wherever you want one). 5. Change the target of the shortcut (right-click and choose properties) to
this:
21

”Path to x64.exe” -autostart “Path to SID-Wizard-1.6-disk.d64:sid-wizard-1.6” -9 “Path to savedisk.d64” -attach9rw This will start SID Wizard automatically and mount your save disk to drive 9. Notice that you can specify which prg to start in the disk image by writing a colon and the name of the prg after the disk image path (as in the case above, sid-wizard).
6. Rename the shortcut to SID Wizard. 7. Running Vice from the shortcut now should take you into SID Wizard
automatically. You can go to and from full screen mode with ALT + D.
3.5 2SID VERSION You can also use the 2SID version of SID Wizard in Vice emulator. For this you need to set up Vice to have a second SID chip enabled. You can do this from Settings / SID settings... There you need to check the SID Stereo checkmark and remember or write down the address. You will need to set the same address in SID Wizard (main menu, chapter 11.1).
4. USER INTERFACE
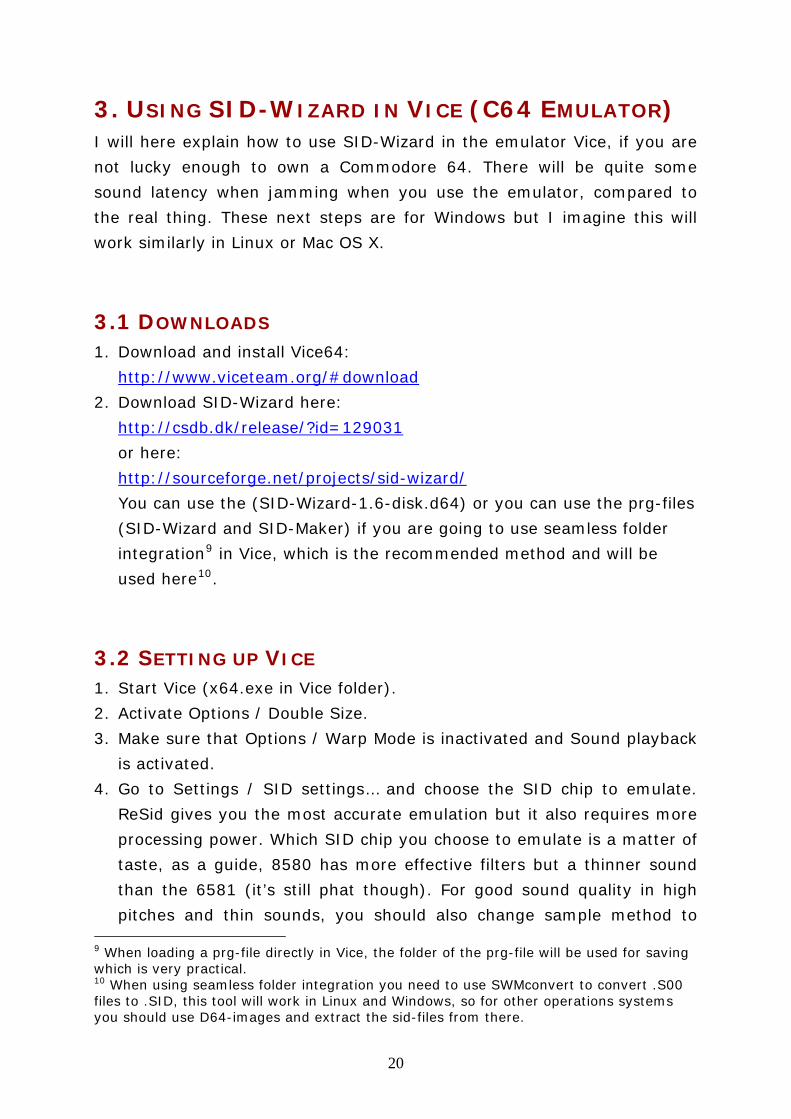
4.1 START-UP MENU When you start SID-Wizard you will first see the start-up menu. Here you can select your preferred player. The purpose of bare / light / medium-versions are to reduce player-code size and rastertime-consumption. The extra version has some more rastertime-consumption and memory-usage but better quality well suited for standalone music releases. All versions use the same SWM1 module format but a slightly different SID sound engine (i.e. player/driver-routine). You can see the features for each player when highlighting a menu point. The disabled features / tables for the chosen player version will appear as dark-grey in the editor after start-up.
22
For PAL machines you can select an alternative pitch-tuning system in Start-up menu: Verdi tuning is equal-tempered but uses A4=432Hz as base-note, while Just-intonation even has note-intervals based on integer ratios to produce pure intervals in key of C. (not other keys).
Picture 3: SID-Wizard 1.6 start-up menu
4.2 USER INTERFACE OVERVIEW The user interface is very intuitive and everything is visible on one screen, there are seven main areas. Picture 4 below shows these areas and the shortcut keys for getting there. You move around the user interface with the keyboard only and most parameters and values are given in the hexadecimal numeral format (read about this in the introduction). For a complete list of keyboard shortcuts in SID-Wizard, refer to the keyboard shortcut tables at the end of the manual.
23

Picture 4: Main screen overview
I will introduce these areas shortly now, the following chapters will explain these more thoroughly. You can use the keys in the picture above to jump between the different sections or you can also just use the cursor keys to move around, the exception being the orderlist and the pattern editor on the 2SID version where the cursor keys will cycle between tracks 1-6. One universal function worth mentioning is the one step undo function that can be used with C=+Z (CTRL+Z). This works in the instrument editor, the pattern editor and the orderlist.
INFO AREA The info area contains the logo, information about selected patterns, jamming octave, raster time, playback time, auto-advance mode / amount, pulse width meter, filter cut-off frequency meter and oscilloscope.
24

PATTERN EDITOR SHORTCUT KEY: F5 This is where you write the actual music. You can edit three different patterns at one time, one for each of the three channels of the SID chip.
ORDER LIST SHORTCUT KEY: F6 This is where you control the whole arrangement of your tune, i.e. the order of the patterns etc.
INSTRUMENT EDITOR SHORTCUT KEY: F7 Here you create the instruments for your tunes. This area consists of four sections; the main area, waveforms-arpeggio table (WFARP), pulse table (PULSE) and filter table (FILT.)
CHORD TABLE SHORTCUT KEY: C=+F5 (CTRL+F5) In this table you can edit and store chords, you can choose which chord is default for an instrument, the chord used can be changed in the pattern editor. Storing the chords separately from the instruments gives you more flexibility (you don't have to create different instruments for different chords).
TEMPO-PROGRAM TABLE SHORTCUT KEY: C=+F7 (CTRL+F7) This table is only used if you need complex tempos, see the chapter about tempos for more information.
SUBTUNE AND TEMPO This area shows the active sub tune and the default tune-tempo / funktempo.
25

5. INSTRUMENT EDITOR The instrument editor consists of four different sections. The first section contains common parameters for the instrument, the second section is for editing waveforms and arpeggios, the third is the pulse width table and the fourth is the filter table. You can change instrument with the + and – keys (also in the pattern editor and orderlist). In the chord-/ tempo-program tables you can change instrument with SHIFT + '+' and SHIFT + '-'. You can move between these sections with the cursor keys or the CONTROL (TAB) key, to move backwards use SHIFT+CONTROL (SHIFT+TAB). To jump to a certain section use SHIFT+S for settings, SHIFT+W for waveform table and SHIFT+P for pulse width table. I will explain these areas in the order I think is most logical, starting with the waveform-arpeggio table, since this is the most fundamental part of creating instruments. Don’t worry if you don’t understand everything directly, in chapter 7 I will guide you through creating a couple of instruments, the information in this chapter will start making more sense then. There is a default instrument in the clipboard when SID-Wizard starts. To use this instrument you navigate to the instrument window and press C=+V (CTRL+V).
5.1 WAVEFORMS The waveforms available are triangle, saw tooth, pulse and noise. These are explained in the introduction. You select waveforms in the waveform-arpeggio (WFARP) table. An instrument requires at least one row in this table, if you are creating a simple instrument then one row is usually enough (waveform doesn't change over time). When more rows are used the table advances to the next row every frame. You insert rows with the SHIFT+DEL (Insert) keys and remove rows with DEL/Pound (Delete/Backspace) keys.
26
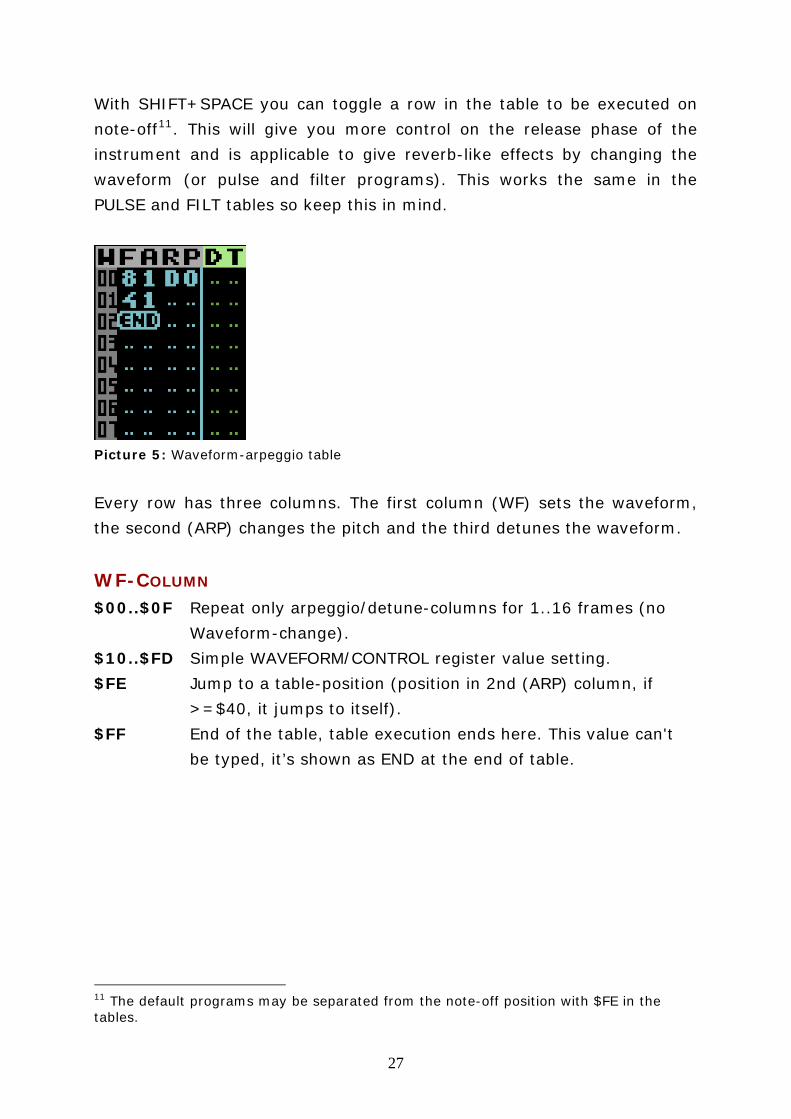
With SHIFT+SPACE you can toggle a row in the table to be executed on note-off11. This will give you more control on the release phase of the instrument and is applicable to give reverb-like effects by changing the waveform (or pulse and filter programs). This works the same in the PULSE and FILT tables so keep this in mind.
Picture 5: Waveform-arpeggio table
Every row has three columns. The first column (WF) sets the waveform, the second (ARP) changes the pitch and the third detunes the waveform.
WF-COLUMN $00..$0F Repeat only arpeggio/detune-columns for 1..16 frames (no
Waveform-change). $10..$FD Simple WAVEFORM/CONTROL register value setting. $FE Jump to a table-position (position in 2nd (ARP) column, if
>=$40, it jumps to itself). $FF End of the table, table execution ends here. This value can't
be typed, it’s shown as END at the end of table.
11 The default programs may be separated from the note-off position with $FE in the tables.
27
WAVEFORM / CONTROL FIRST NIBBLE The first nibble of this value sets the waveform (or combination of waveforms). To combine waveforms, you add the value for one waveform to the other, so to combine Saw tooth and Pulse, the value would be $2 + $4 = $6. Remember that that noise waveform can't be combined with other waveforms. The values for the waveforms are: $1 TRIANGLE $2 SAW TOOTH $4 PULSE
For the pulse waveform to be audible you need to insert at least one row in the PULSE table to set the pulse width.
$8 NOISE
WAVEFORM / CONTROL SECOND NIBBLE The second nibble (control register) sets different options for the waveform. These values can again be combined by adding the ones you want together, so to put gate on (like you would normally do) and enable ring modulation, the result would be $1 + $4 = $5. $1 GATE ON
The gate needs to be on for the waveform to be heard. $2 SYNC To produce “Hard Sync” effects, explained in the introduction. $4 RING MODULATION
This is explained in the introduction. $8 TEST This resets and locks the oscillator at zero until this value is
cleared.
28
ARP-COLUMN $00 Zero pitch-shifting (prime, '0' interval) - regain original note-
pitch $01..$5F Relative pitch-shift upwards in halftones (positive interval) $7F Jump to default or pattern-FX set Chord.
Depending on the chord, the execution of the waveform table may continue after the chord. With this command you can also override the default chord speed by setting the speed value in the (WF) column (values can be $00 - $0F).
$80 No process (useful when you don’t want to touch pitch and detune, just waveform).
$81..$DF Set absolute pitch (frequencies are identical to C-1..A-8 notes, see table at the end of this manual).
$FF..$E0 Relative pitch-shift downwards in negative direction (negative interval).
DT-COLUMN (DETUNE) $00..$FE Set fine-detuning amount. The higher the value the sharper
the pitch will be. $FF No process in detune-table (the previously set detune-value is
retained).
29
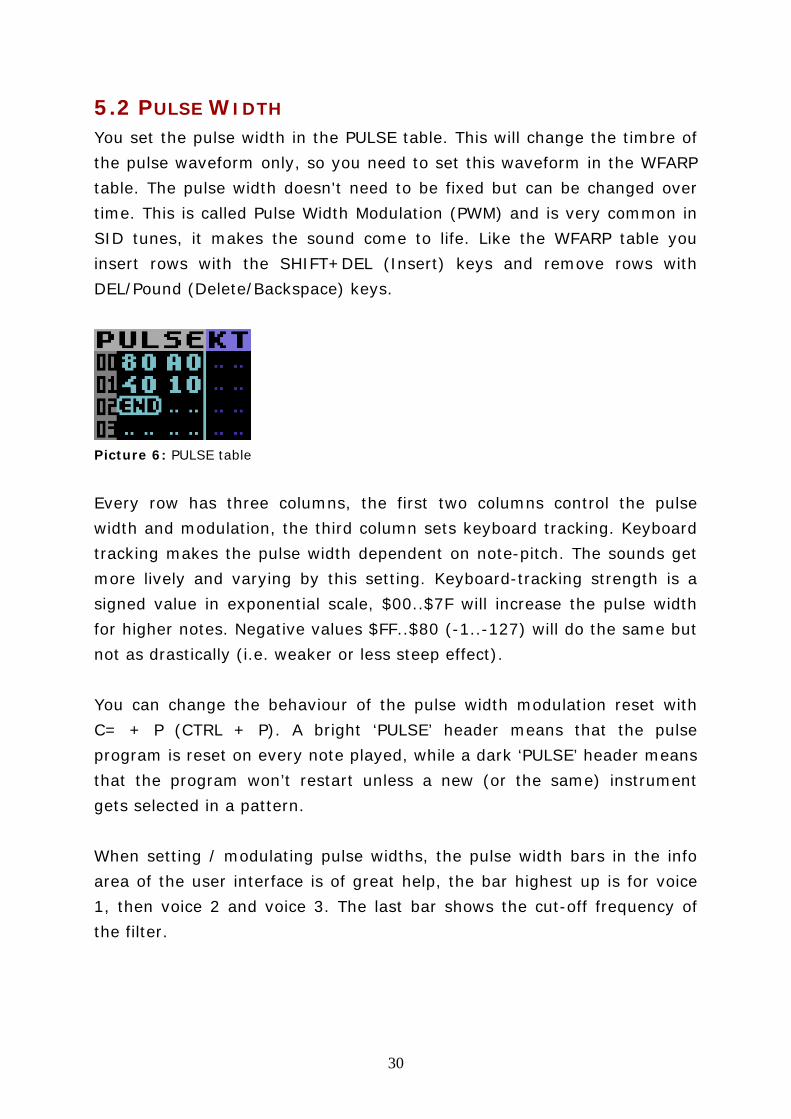
5.2 PULSE WIDTH You set the pulse width in the PULSE table. This will change the timbre of the pulse waveform only, so you need to set this waveform in the WFARP table. The pulse width doesn't need to be fixed but can be changed over time. This is called Pulse Width Modulation (PWM) and is very common in SID tunes, it makes the sound come to life. Like the WFARP table you insert rows with the SHIFT+DEL (Insert) keys and remove rows with DEL/Pound (Delete/Backspace) keys.
Picture 6: PULSE table
Every row has three columns, the first two columns control the pulse width and modulation, the third column sets keyboard tracking. Keyboard tracking makes the pulse width dependent on note-pitch. The sounds get more lively and varying by this setting. Keyboard-tracking strength is a signed value in exponential scale, $00..$7F will increase the pulse width for higher notes. Negative values $FF..$80 (-1..-127) will do the same but not as drastically (i.e. weaker or less steep effect). You can change the behaviour of the pulse width modulation reset with C= + P (CTRL + P). A bright ‘PULSE’ header means that the pulse program is reset on every note played, while a dark ‘PULSE’ header means that the program won’t restart unless a new (or the same) instrument gets selected in a pattern. When setting / modulating pulse widths, the pulse width bars in the info area of the user interface is of great help, the bar highest up is for voice 1, then voice 2 and voice 3. The last bar shows the cut-off frequency of the filter.
30
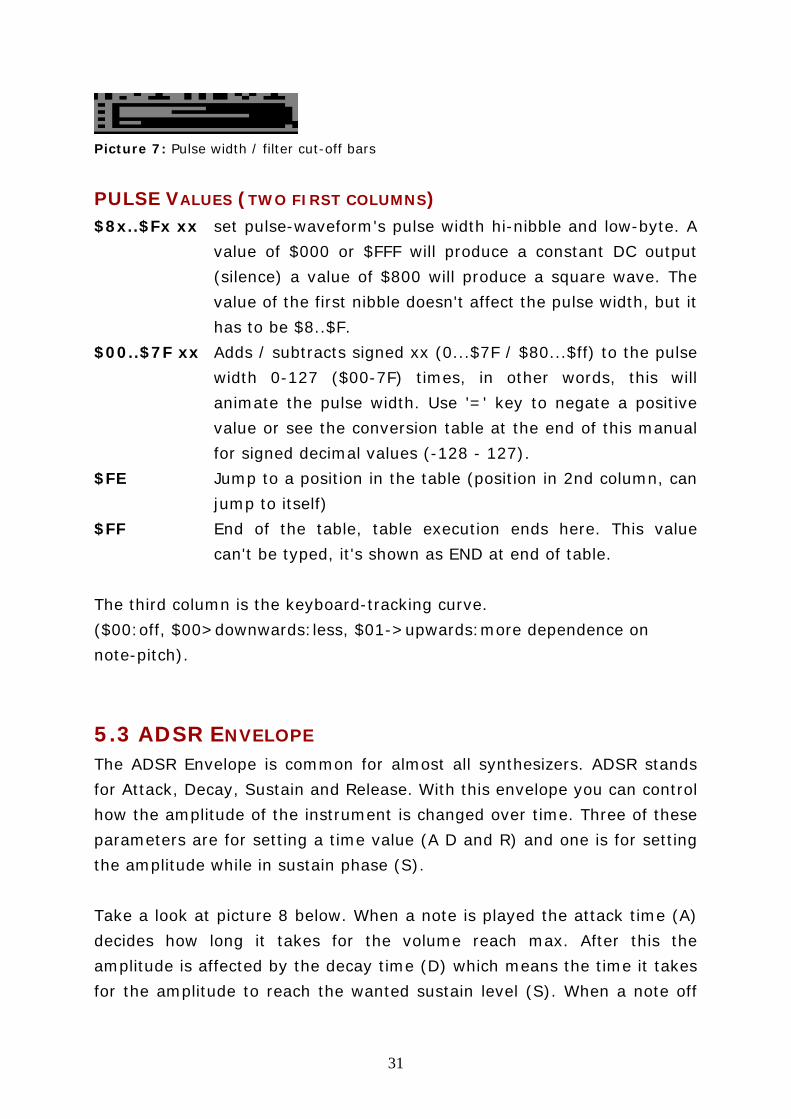
Picture 7: Pulse width / filter cut-off bars
PULSE VALUES (TWO FIRST COLUMNS) $8x..$Fx xx set pulse-waveform's pulse width hi-nibble and low-byte. A
value of $000 or $FFF will produce a constant DC output (silence) a value of $800 will produce a square wave. The value of the first nibble doesn't affect the pulse width, but it has to be $8..$F.
$00..$7F xx Adds / subtracts signed xx (0...$7F / $80...$ff) to the pulse width 0-127 ($00-7F) times, in other words, this will animate the pulse width. Use '=' key to negate a positive value or see the conversion table at the end of this manual for signed decimal values (-128 - 127).
$FE Jump to a position in the table (position in 2nd column, can jump to itself)
$FF End of the table, table execution ends here. This value can't be typed, it's shown as END at end of table.
The third column is the keyboard-tracking curve. ($00:off, $00>downwards:less, $01->upwards:more dependence on note-pitch).
5.3 ADSR ENVELOPE The ADSR Envelope is common for almost all synthesizers. ADSR stands for Attack, Decay, Sustain and Release. With this envelope you can control how the amplitude of the instrument is changed over time. Three of these parameters are for setting a time value (A D and R) and one is for setting the amplitude while in sustain phase (S). Take a look at picture 8 below. When a note is played the attack time (A) decides how long it takes for the volume reach max. After this the amplitude is affected by the decay time (D) which means the time it takes for the amplitude to reach the wanted sustain level (S). When a note off
31
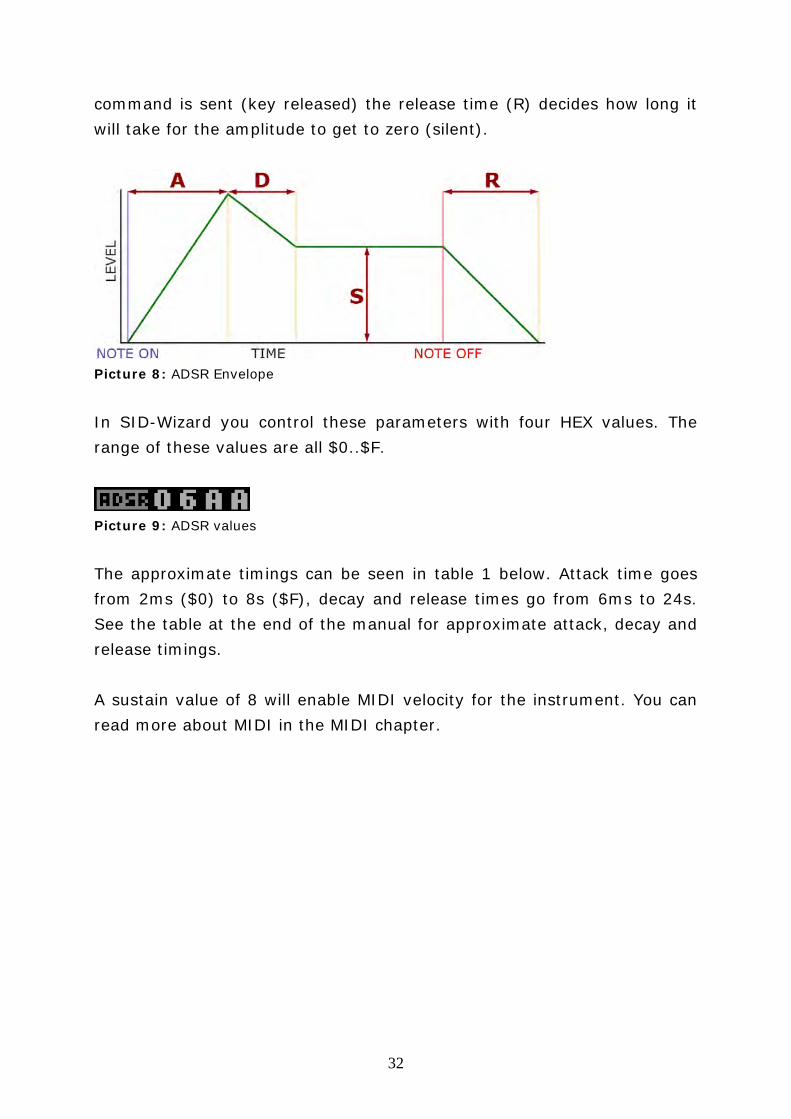
command is sent (key released) the release time (R) decides how long it will take for the amplitude to get to zero (silent).
Picture 8: ADSR Envelope
In SID-Wizard you control these parameters with four HEX values. The range of these values are all $0..$F.
Picture 9: ADSR values
The approximate timings can be seen in table 1 below. Attack time goes from 2ms ($0) to 8s ($F), decay and release times go from 6ms to 24s. See the table at the end of the manual for approximate attack, decay and release timings. A sustain value of 8 will enable MIDI velocity for the instrument. You can read more about MIDI in the MIDI chapter.
32

5.4 VIBRATO SID tunes wouldn't be what they are without vibrato. :) In SID-Wizard there are four vibrato types to choose from, these are:
Delayed 'up-down'
Delayed 'downwards'
Delayed 'upwards'
Incremental (violin style) You set the vibrato parameters with four hex values, see the picture below.
Picture 10: Vibrato parameters
The digit to the left is for setting amplitude, the second one is for the frequency (speed), the second half (two last turquoise digits) is the delay (the time it takes before the vibrato is activated) if a delayed vibrato type is chosen OR the increment speed (for the incremental vibrato type).
5.5 THE FILTER The SID chip has, as explained in the introduction, only one filter that is shared between all three channels. Every channel gets filtered whose instrument has something in its filter-table's 1st row, when the note starts. The instrument which has $00 there, is only filtered but doesn't control the filter, while if there's nonzero in the 1st row, the instrument controls the filter (band, resonance and cut-off frequency). The latest instrument always takes over the control over the common filter-band / resonance / frequency (like with polyphonic jamming in JCH's editor). If there are 2 or 3 notes with filtered instruments starting at the same time, the instrument in the leftmost track controls the filter (if you just insert an empty row in 1st row of the filter table, instrument is filtered but won't control the filter).
33

You edit the filter in the filter table (FILT.) The function of this table is quite similar to the WFARP table. Like in the WFARP and the PULSE tables you insert rows with the SHIFT+DEL (Insert) keys and remove rows with DEL/Pound (Delete/Backspace) keys.
Picture 11: The filter table
You can change the behaviour of the filter modulation reset with C= + F (CTRL + F). A bright ‘FILT.’ header means that the filter program is reset on every note played, while a dark ‘FILT.’ header means that the program won’t restart unless a new (or the same) instrument gets selected in a pattern. $8r..$Fr xx The first nibble sets the filter band, the possible values are
$8 => filter deactivated, $9 => low-pass, $B => low-pass + band pass, $C => high-pass, $D => low-pass + high pass, $E => band-pass + high-pass, $F => all modes together.
The second nibble (r) sets the resonance, this can be any value from $0 to $F, $F giving the strongest resonance of course. If band is set to $F (all modes together) then r can't be set to $F (this is due to the reserved end of table value $FF).
The third and fourth nibbles (xx) sets the cut-off frequency. Valid values are $00 - $FF. The approximate cut-off frequency ranges between 30Hz and 10KHz.
$00..$7F xx Adds / subtracts signed xx (0...$7F / $80...$ff) to the cut-off frequency 0-127 ($00-7F) times, in other words, this will generate a filter sweep. Use '=' key to negate a
34

positive value or see the conversion table in the end of this manual for signed decimal values (-128 - 127).
$FE Jump to a position in the table (position in 2nd column, can jump to itself)
$FF End of the table, table execution ends here. This value can't be typed, it's shown as END at end of table.
The third column is Keyboard-Tracking strength of cut-off frequency. The cut-off frequency gets pitch-dependent with this setting. This effect works in the same way as in pulse width table, and produces more lively sounds which can open in timbre / resonate always near the frequency of the musical tone thus giving impression of live instruments. Keyboard-tracking strength is a signed value in exponential scale, $00..$7F will increase the cut-off frequency the higher a note is played. Negative values $FF..$90 (-1..-127) will do the same but not as drastically (i.e. weaker or less steep effect). Values between $80..$8F are reserved for FilterSwitch-override (to support tunes imported from Goattracker). $81 is channel 1, $82 is channel 2, $84 is channel 4, $88 is filter-extrernal control. These values can be combined (in the same manner as combining waveforms).
35
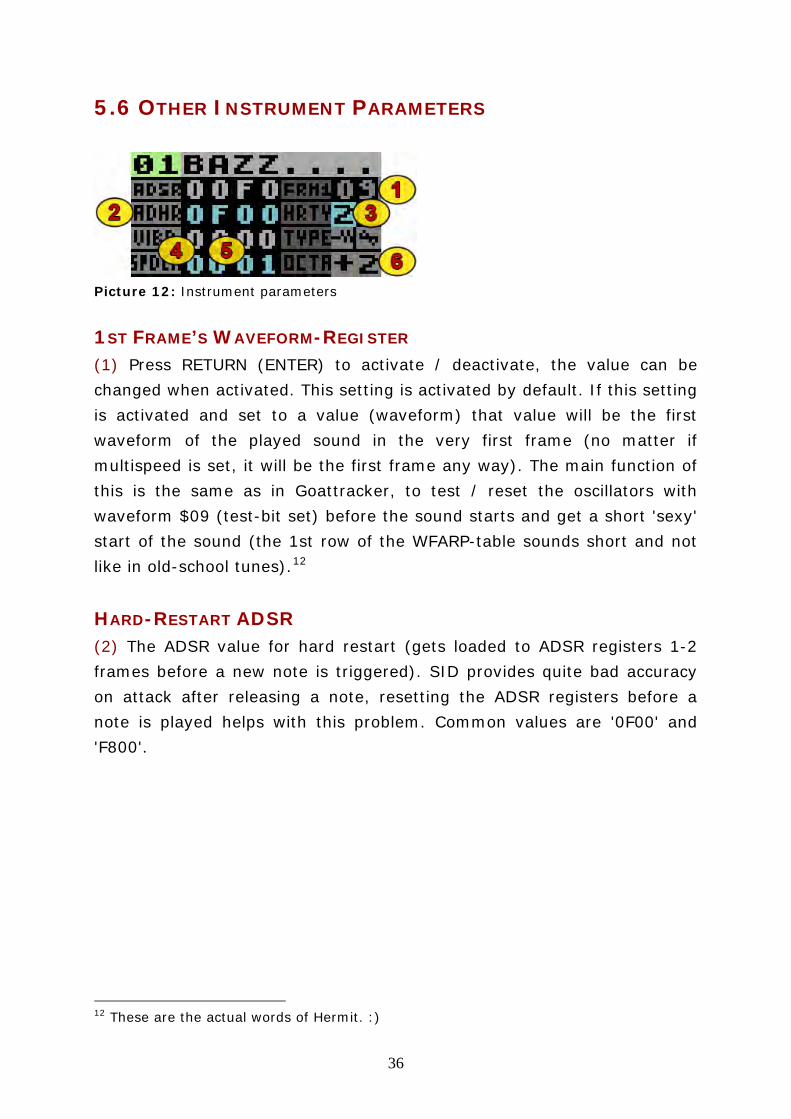
5.6 OTHER INSTRUMENT PARAMETERS
Picture 12: Instrument parameters
1ST FRAME’S WAVEFORM-REGISTER (1) Press RETURN (ENTER) to activate / deactivate, the value can be changed when activated. This setting is activated by default. If this setting is activated and set to a value (waveform) that value will be the first waveform of the played sound in the very first frame (no matter if multispeed is set, it will be the first frame any way). The main function of this is the same as in Goattracker, to test / reset the oscillators with waveform $09 (test-bit set) before the sound starts and get a short 'sexy' start of the sound (the 1st row of the WFARP-table sounds short and not like in old-school tunes).12
HARD-RESTART ADSR
(2) The ADSR value for hard restart (gets loaded to ADSR registers 1-2 frames before a new note is triggered). SID provides quite bad accuracy on attack after releasing a note, resetting the ADSR registers before a note is played helps with this problem. Common values are '0F00' and 'F800'.
12 These are the actual words of Hermit. :)
36
The ADSR bug of the SID chip is a mystery to many (after reading about it in the CSDB forums) This is a citation of a comment from the user Frantic13: "Traditionally... To have access to hard restart in the player one is using — or better yet, actually understanding the ADSR bug and how hard restart works — is what separates the lowlife scums and lamers from the elite and the sages in the world of SID. Hence, using hard restart is a scene sacrament that must be blown out of proportion if order is to be maintained. I vote for continuation of this ritualistic practice."
HARD-RESTART TIMER / TYPE (3) The first box (numeric value) is the 'hard-restart timer' and sets how many frames before a note to reset ADSR-registers of SID. The second box is hard-restart type (normal hard-restart or staccato / aggregated mode). When enabled (toggle with RETURN / ENTER) the TEST-bit is also to be reset at hard-restart. (Adds 1-2 frames of gap between consequent notes.)
DEFAULT ARPEGGIO TABLE SPEED (4) This is especially useful for multispeed to slow down WF-table execution if needed. If the value is >$40 then multispeed will be activated for the pulse width table, if the value is >$80 then multispeed will be activated for both the pulse width table and the filter table for the instrument. Remember that you can leave this value to $00 and set the speed in the WFARP-table (see chapter 5.1 about ARP column).
DEFAULT CHORD (5) The chord chosen here is linked to the instrument by default, but a pattern-FX can change the chord as well. Write the number of the chord (from the chord table) here.
13 http://noname.c64.org/csdb/forums/?roomid=14&topicid=92196&firstpost=2
37
OCTAVE-TRANSPOSE AMOUNT (6) To incorporate bass and high pitched sounds easier - no need to jump between octaves back & forth when jamming. Input a number for the octave transpose and press RETURN (ENTER) with the cursor over the number (or over the box before the number) to switch between + and - (to transpose up or down X octaves).
INSTRUMENT NAME You can change the name of the instrument by pressing the keys (SHIFT+N) or by using the cursor up key from the instrument settings. Press RETURN (ENTER) to finish editing saving the name, or RUN/STOP (ESC) or move out with cursor down to quit editing without saving the name.
5.7 SAVING AND LOADING INSTRUMENTS One really good feature in SID-Wizard is that you can save and load instruments. This makes it easy to re-use your instruments for other tunes. To save an instrument, have the instrument you want to save selected, then press F8 to get to the main menu. Now you just choose SAVE INSTRUMENT, give a name to the instrument and press RETURN (ENTER). Loading is similar, remember that the selected instrument number in your tune will be replaced by the one you load. Instruments and patterns stays in buffer between save and load sessions so if you want to bring one instrument from one tune to another, copy the instrument to the buffer with C=+C (CTRL+C) in the instrument editor and then load the other tune, now paste the instrument from the buffer with C=+V (CTRL+V). You need to be in the instrument editor when pasting. There will be more about file operations and the main menu in chapter 11.
38

6. THE CHORD TABLE14
To the right of instrument tables the thin table contains the selected chord's pitch-list. Chords are essentially arpeggios in SID-Wizard, but they don’t depend on instruments so any one chord can be used by any of the instruments. The main point of using chords is to reduce the number / redundancy of creating more instruments of the same type just because we want them to sound as different chords on a channel. Press C=+F5 (CTRL+F5) or C=+K anytime to get to chord table (or with the cursor keys from the wfarp or pulse tables). The usage is very simple, you select a chord with +/- keys when in the chord table, or SHIFT+K/L keys anywhere else. You can edit the chord table in two ways. Default since version 1.5 is the new note-mode which let you set the base / root note of a chord outside of the chord table15 (you will see the base note displayed over the chord table), then you set the notes of the chord when in the chord table. Editing mode (Space) should be activated to type. If you have a MIDI keyboard connected, you can also add notes to the chord by pressing a key on the keyboard (a new line will be appended automatically). If you play a chord on the keyboard then all the notes pressed will be appended to the chord table. The other traditional way of editing the chord table is typing the relative pitches or intervals (in hexadecimal format) counted in halftones in the order you want them to roll over time. For this you should set the menu option chord-note to off. You can also use C= + N (CTRL + N) to toggle between these two modes or change the default behaviour from the main menu. Insert / Delete keys can expand / shrink size / complexity of the chord. '7F' means looping the chord over, '7E' means returning to the waveform-
14 This chapter is taken from the manual of SID-Wizard 1.2 15 Playing a tune will update the base note if an instrument that calls the chord table is played. If follow-play is activated then the notes of the chord are also displayed.
39
arpeggio table the chord was called from and continuing waveform-arpeggio-table execution with its next row.
7. INSTRUMENT EXAMPLES Now when we know the basics of creating instruments I can walk you through a couple of examples.
7.1 BAZZ Let us first create a "standard" SID bass sound. Go to the WFARP table in the instrument editor, insert a row and write '41' in the first column. This will set the pulse waveform and set gate on. Since we chose the pulse waveform we have to set the pulse width in the pulse width table. Go there, insert a row and write '82' in the first column, now we can try the instrument with the Z or Q key (this will give you a C-note). The octave is too high for a base sound, change the octave transpose amount to -3 and press Z again, better. The sound is a bit boring, go to the PULSE table and add a row after the first one we created. Write '40 20' in the first two columns of the new row. The pulse width is now increased by $20, $40 times. Try the sound again. Take a look at the pulse width bar in the info area of the user interface while you try the instrument. Now you can insert the value '10' to both rows in the KT-column (keyboard tracking), when using keyboard tracking you normally set the same value for every row. Try the sound again, now you can see that the pulse width range changes depending on the note you play. We can tweak the ADSR envelope a little, change the values to '089A' and try the sound, you probably notice that the release is longer. It sound ok but let's add a little vibrato, set the vibrato parameters to '3720' and the vibrato type to delayed up-down (should be default).
40

Now we have a nice base sound, as a last thing we can add a low-pass filter. Go to the filter table and insert two rows. In the first row write '9B 45'. This will create a low-pass filter $9 with $B resonance at the cut-off frequency $45. Try the instrument now, it sounds quite dark. Now, in the second row, write '40 05'. This will add $05 to the cut-off frequency $40 times (this will make the sound increasingly brighter). Now we have created a quite nice bass sound. Go ahead and save this instrument now, we will use it later in the pattern example.
7.2 SNARE A snare sound can be created by creating a wave table. Start with a blank instrument and go to the WFARP table, insert five rows. In the first row, write '81 CE', this will generate a noise wave (gate on) at the precise pitch CE (F-7 according to the table in the end of this manual). In the next row write '41 AD' and in the following '41 AC', this will generate two frames of pulse waves at the pitches G#-4 and G-4. This will give a tone to the snare sound. Now for the two last rows, write '80 C4' and '80 C5', this will generate two more frames of noise, notice that the gate is now set to off, so the sound will start fading out at the fourth row according to the R value in the ADSR envelope, even if you don't send a note off (or release the key while jamming). Since we are using the pulse wave we need to set a pulse width, go to the PULSE table, insert a row and write '88' in the first column. Try the snare now, it stops quite abruptly, we need to edit the ADSR envelope. Change the decay to 'D', the sustain level to 'E' and the release to '9'. The release parameter makes the biggest difference here, now the snare will fade out smoothly to the sound of beautiful noise. Now we have created a
41
snare drum, since we only used exact pitch values in the WFARP table, all notes will sound the same.
7.3 ARPEGGIO As a final instrument example, let's create an arpeggio. Start with an empty instrument again and insert a row in the WFARP table. Write '11 7F', the first column will generate a triangle wave and the value in the second column will start the default chord for the instrument. Now, go to the chord table (C=+F6 or CTRL+F6) and insert six rows. Write (from the top) '00', '03', '07', '0C', '07', '03'. The seventh row should still read '7F', which means that the chord will loop. Check that the chord you edited has the same number as the default chord for the instrument. Now try the instrument with the Z16 key or the Q key. It runs quite fast. There are two ways to fix this. One is changing the chord speed to a higher value (try '02') in the instrument parameters. The second option is leaving chord speed at '00' and overriding that speed with a value (again $02 as an example) in the first column to the left of '7F' we inserted earlier. You can also change the attack to '8' and release to 'B' for a smooth attack and longer release.
16 You can preview the instrument with any of the note keys that isn't in the hex digit range (1..9 and A..F).
42

8. PATTERN EDITOR17
The largest part of the screen is occupied by the pattern-editor window, where you can see and edit patterns corresponding to the 3 tracks / channels that the SID routine can play. See picture 13 below. Each track has 4 columns. The first column (1) is for the notes / pitch control and note-on / note-off (7) (plus several other) effects. The second column's (2) main function is to select instruments or 'legato', or to contain some small pattern effects. The third (3) and fourth (4) columns are explicitly designed for pattern-effects, but the fourth column is only needed when we use the 'BIG' effects, and in that case it contains the effect-value.
Picture 13: Pattern Editor
To go to the pattern-editor window you can press F5 anytime. You can easily navigate between the three tracks using the cursor keys and 'CONTROL' keys (TAB key in Vice emulator), and the other obvious keys like Page-Up / Page-Down (Slash / SHIFT+Slash), Home, etc... If the cursor is located at an instrument number and you press RETURN (Enter), you get to the corresponding instrument's editor panel, the same is true for chord numbers (goes to edit the corresponding chord). The length / size of the patterns can freely be increased / decreased by pressing Insert / Delete keys in the last row of the patterns (showing the '-end-' signal). The pattern number and the size of the pattern can be seen in the info area ((5) and (6)). If you change the 'auto-advance' amount with SHIFT+A (increase) or SHIFT+Z (decrease), the cursor jumps the specified amount of rows after
17 This chapter is mostly taken from the manual of SID-Wizard 1.2
43
you type a note in note-column. If you toggle the 'binding mode' by pressing C=+B, you can scroll each track / pattern independently or otherwise you can move / scroll them together (as long as they're long enough to be scrolled). If you want to mute / solo tracks, press Shift + 1 / 2 / 3 (1..6 for 2SID) accordingly. Shift + 0 will solo / un-solo the active track. To insert notes you place the cursor in the first column at the row you want the note and then you press the corresponding key for the note you want to insert (see 6.1 below). If this doesn't work you need to press SPACE to activate edit-mode (SPACE toggles between edit and jamming mode, cursor will flash slowly in jamming mode). To insert a note-off you press RETURN (Enter) at the row you want note-off to happen. With Shift+RETURN (Shift+Enter) you can insert a note-on (++) which will retrigger the GATE bit of the previous note (other aspects of the sound like slide or pulse width are intact). You can erase notes at the cursor position by pressing 1 or A. You should check out the keyboard layout at the end of this manual for complete summary of keys in the pattern editor.
44
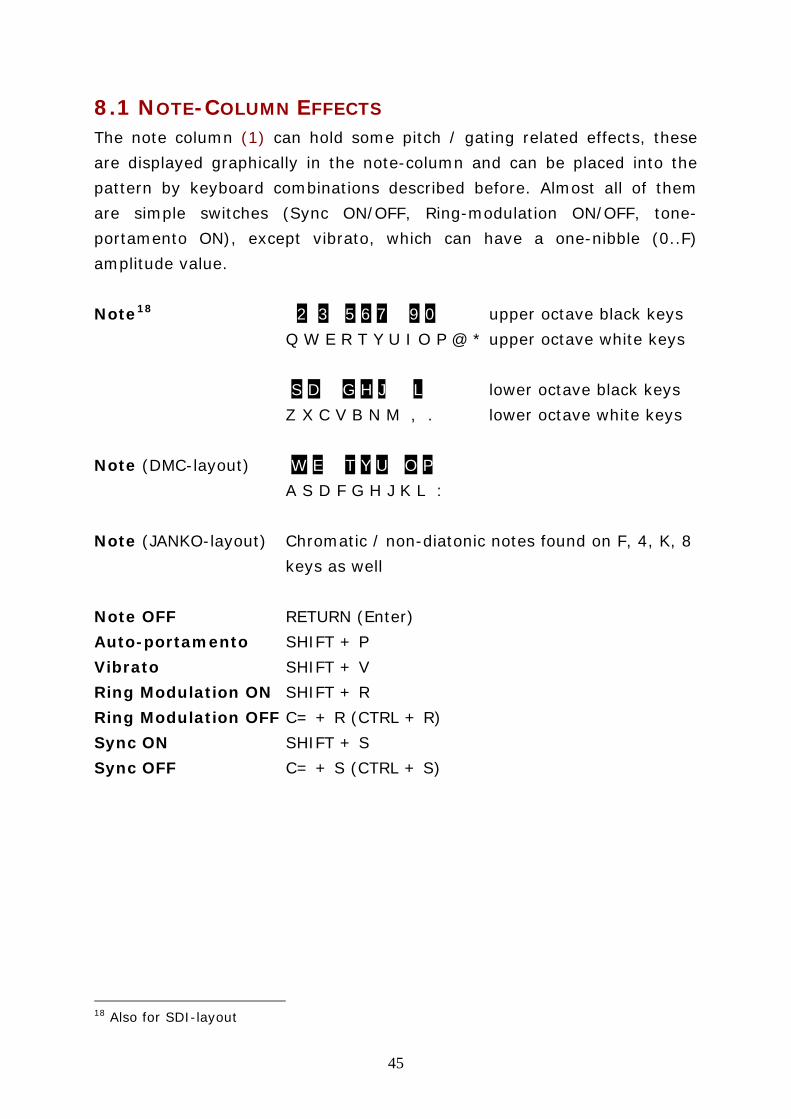
8.1 NOTE-COLUMN EFFECTS The note column (1) can hold some pitch / gating related effects, these are displayed graphically in the note-column and can be placed into the pattern by keyboard combinations described before. Almost all of them are simple switches (Sync ON/OFF, Ring-modulation ON/OFF, tone-portamento ON), except vibrato, which can have a one-nibble (0..F) amplitude value. Note18 2 3 5 6 7 9 0 upper octave black keys
Q W E R T Y U I O P @ * upper octave white keys
S D G H J L lower octave black keys Z X C V B N M , . lower octave white keys
Note (DMC-layout) W E T Y U O P A S D F G H J K L : Note (JANKO-layout) Chromatic / non-diatonic notes found on F, 4, K, 8
keys as well Note OFF RETURN (Enter) Auto-portamento SHIFT + P Vibrato SHIFT + V Ring Modulation ON SHIFT + R Ring Modulation OFF C= + R (CTRL + R) Sync ON SHIFT + S Sync OFF C= + S (CTRL + S)
18 Also for SDI-layout
45

8.2 INSTRUMENT-COLUMN EFFECTS The instrument column (2) can hold some Small effects where the 1st nibble is the effect-type, the 2nd nibble is the corresponding value (0..15 or $0..$F). These Small-FX numbers are almost identical to Small-FX and Big-FX numbers of effect-column, and as such, can be remembered easier. $01..$3E Select an instrument for the current note, which stays
selected until another instrument is selected with this command. This also resets the tables which restart was switched off with C=+P (CTRL+P) or C=+F (CTRL+F), in this case selecting the same instrument again makes sense and the repetitive instrument selections won't get optimized if 'auto.instr' is ON.
$3F Tied note (true legato, the instrument doesn't restart just note-pitch changes)
$40..$4F Waveform (reg.4) nibble adjusting - any subsequent WF-table waveform change overrides it.
$50..$5F Sustain nibble adjusting of ADSR (Small-FX) $60..$6F Release (reg.6) nibble adjusting of ADSR (Small-FX) $70..$7F Select Chord (overriding the default) for the instrument.
(No need to create an instrument for every chord. Instead, create an instrument, call chord-table with $7F from ARP-table, then select the chord with this pattern-FX.)
46

8.3 EFFECT-COLUMN SMALL EFFECTS The Small effects' (3) 1st nibble is their type of operation, the 2nd nibble is the corresponding effect-value / amount. Small-FX numbers $4..$7 are identical in function to Big-FX numbers of the same range, (what's more, the hexa effect-numbers are related to SID-registers and effect-names) to support easier memorization. Unless you are using the 'extra' player version, only one Small-FX ADSR setting is allowed per note. $20..$2F Attack nibble adjusting of ADSR (Small-FX) $30..$3F Decay nibble adjusting of ADSR (Small-FX) $40..$4F Waveform (reg.4) nibble adjusting - any subsequent WF-
table waveform change overrides it. $50..$5F Sustain nibble adjusting of ADSR (Small-FX) $60..$6F Release (SID reg.6) nibble adjusting of ADSR (Small-FX) $70..$7F Select Chord (overriding the default) for the instrument.
(No need to create an instrument for every chord. Instead, create an instrument, call a chord with $7f from ARP-table, then select chord.)
$80..$8F Vibrato Amplitude adjustment - The frequency stays intact.
$90..$9F Vibrato Frequency adjustment - Amplitude stays intact. $A0..$AF Adjust Main volume (low nibble of $d418) $B0..$BF Filter Band (LOW/MID/HI/3OFF) (Filter band can be
overwritten with filter-table execution) $C0..$CF Chord-speed adjustment (arpeggio-speed in case of
explicit arpeggio) $D0..$DF Detune current note with given amount $E0..$EF Enable/disable Test-bit/Ring-bit/Sync-bit/Gate-bit
(Waveform-table can override) $F0..$FF Filter Resonance (strength) nibble setting (Subsequent
filter-table command can override it.)
47
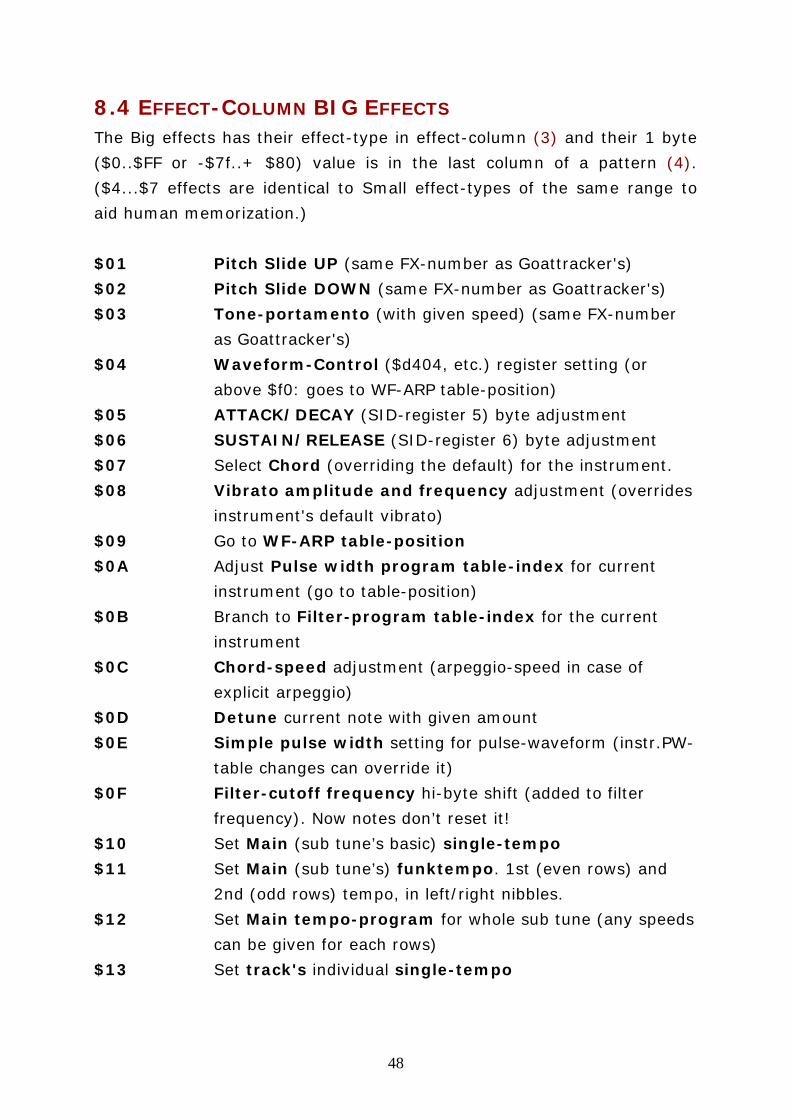
8.4 EFFECT-COLUMN BIG EFFECTS The Big effects has their effect-type in effect-column (3) and their 1 byte ($0..$FF or -$7f..+ $80) value is in the last column of a pattern (4). ($4...$7 effects are identical to Small effect-types of the same range to aid human memorization.) $01 Pitch Slide UP (same FX-number as Goattracker's) $02 Pitch Slide DOWN (same FX-number as Goattracker's) $03 Tone-portamento (with given speed) (same FX-number
as Goattracker's) $04 Waveform-Control ($d404, etc.) register setting (or
above $f0: goes to WF-ARP table-position) $05 ATTACK/DECAY (SID-register 5) byte adjustment $06 SUSTAIN/RELEASE (SID-register 6) byte adjustment $07 Select Chord (overriding the default) for the instrument. $08 Vibrato amplitude and frequency adjustment (overrides
instrument's default vibrato) $09 Go to WF-ARP table-position $0A Adjust Pulse width program table-index for current
instrument (go to table-position) $0B Branch to Filter-program table-index for the current
instrument $0C Chord-speed adjustment (arpeggio-speed in case of
explicit arpeggio) $0D Detune current note with given amount $0E Simple pulse width setting for pulse-waveform (instr.PW-
table changes can override it) $0F Filter-cutoff frequency hi-byte shift (added to filter
frequency). Now notes don’t reset it! $10 Set Main (sub tune’s basic) single-tempo $11 Set Main (sub tune’s) funktempo. 1st (even rows) and
2nd (odd rows) tempo, in left/right nibbles. $12 Set Main tempo-program for whole sub tune (any speeds
can be given for each rows) $13 Set track's individual single-tempo
48

$14 Set the track's funktempo (even and odd rows' in left/right nibbles)
$15 Set the track's individual tempo-program $16 Select vibrato-type (possible values: $00, $10, $20, $30) $1C Shift cutoff hi-byte (permanent) $1D Delay track by $00..$ff (20ms) frames $1E Delay only the current note by $00..$ff frames. $1F Set value of filterswitch / resonance register of SID
(including bit for external source's filter)
8.5 PATTERN EXAMPLE In this chapter I will guide you through creating a simple pattern. You should have the keyboard shortcuts for the pattern editor handy. Remember the edit / jamming mode toggle with SPACE (if the cursor flashes slowly then jamming mode is activated and notes will not be written). First you should load the 'Bazz' sound from chapter 7 if you saved it, otherwise create it. Now, increase the pattern size to '40' (go to the end of the pattern in the first track and press SHIFT+DEL (INSERT) until the last line before the END line has the number '3F'. In the first row, insert a C-6 note (place cursor position over the first column and with a jamming octave setting of 5 press Q). Directly to the right of the C-6 value, write the number of the Bazz instrument. Insert a G#5 (H) at line $10, a F-5 (V) at line $20 and finally a G-5 (B) at line $30. Remember that you don't need to set the instrument number for every note, only when you want to change instrument. Press F3 now to play / loop the pattern (F4 will stop playing). Let's try some portamento and pitch sliding. Go to line $10 and insert a tone portamento big effect ($03) with the speed '25'. Last two columns in
49
row $10 should now say '03 25'. Insert a pitch-slide down big effect ($02) on line $37 with the value '20'. Last two columns of line $37 should now read '02 20'. On line $3C you can insert a note-off command (RETURN/Enter with cursor in first column). Play the pattern again. When using slow portamento (the G#5 note on line 10) you may have to adjust the note to play a bit earlier so it doesn't sound as if the note starts late. So delete the contents on line $10 with DEL (Backspace) and insert the G#5 note and the portamento effect on line $0C instead.
9. ORDERLIST19
The very bottom of the screen in the lower border introduces the Orderlist. This is where you can control the whole arrangement of the tune by putting consequent pattern numbers after each other. In playback the currently played Orderlist positions of the song are blinking. It helps you to follow where you are in the timeline of your music. To get to the Orderlist, press F6 (SHIFT+F5) anywhere or use F5 from pattern editor to toggle between the orderlist and pattern editor. The navigation keys are obvious here, individual track-sequence lengths can be increased / decreased by pressing the Insert / Delete keys on the last 'FF' or 'FE' values. Pressing RETURN (Enter) over a pattern-number in Orderlist will lead you back to the pattern-editor window and selects the pattern for the corresponding track. Pressing SHIFT+RETURN (SHIFT+Enter)) will select all the 3 patterns corresponding to the current Orderlist cursor-position. Pressing C=+RETURN (CTRL+Enter)) anytime selects the patterns that are played at the moment (useful with different track-speeds or lengths). *A new function in version 1.2: Pressing C=+E in the Orderlist will find the first empty (unused) pattern after the existing orderlist. If used over $FE/$FF end-signals, it automatically inserts the empty pattern’s number to the end of the orderlist. The number is incremented upon a new C=+E 19 This chapter is taken from the manual of SID-Wizard 1.2
50
key press, and is refreshed anytime you go to a new pattern to edit it. This way you can expand your tune much faster than before. The value 'FE' means the end of playback for the given track, 'FF' jumps back to a position in pattern-sequence given by the number following it. (As value '00' is reserved for 'no process', you can't use pattern '00', the lowest pattern-value is '01'.) Be aware that these are hexadecimal numbers, so for example, after '09' not '10' but '0A' comes. *There are some effects that can be controlled from Orderlist like transposing the musical key or changing volume / tempo.
9.1 ORDERLIST EFFECTS $00..$7F The values kept for normal pattern-numbers in the
orderlist $80..$8F Transpose key down (e.g.: $8F = half-note down ; $8E =
whole note down...) $90 Switch off transposing (set original key) $91..$9F Transpose key up (e.g.: $91 = half-note up ; $92 =
whole note up....) $A0..$AF Set main volume ($0..$f) $B0..$FD Set track-tempo on the corresponding track ($00..$5d) $FE..$FF These values are reserved to control sequence-flow.
Playbacks stops at $FE and loops when reaching $FF position. If a position number below $80 is written after $FF, it loops to that given position in current sub tune. If the position-number is above $80 in a track, that track jumps to the given (the number minus $80) sub tune’s corresponding track/sequence! (Useful for composing music in smaller chunks for e.g. demo-parts.)
For a complete sub tune-jump you have to type the command for all the tracks, as it’s handled on the tracks independently by now. At sub tune-jumping the current tempo will be retained unless a tempo-change effect is applied in the target sub tune’s orderlist/pattern... (The default sub tune-tempo is only effective for fresh tune-starts.)
51

*Note: An Orderlist-effect shouldn’t be right before a $FF loop-signal. If this happens, the loop command will be ignored to prevent freezing that could be caused by jumping rapidly between orderlist-FX and looping.
10. TEMPOS AND MULTISPEED The default tune tempo can be changed with 'SHIFT+.' and 'SHIFT+,'. You can toggle funktempo on and off with C=+T (CTRL+T) and the change the second part of the funktempo with 'SHIFT+:' and 'SHIFT+;'. Funktempo means that two tempos are alternated every pattern step so with funktempo activated the first tempo is for even rows in the pattern and the second tempo is for odd rows. The tempo of your song is also dependent on how many lines per beat you use in the tracker. If you are writing a song in the common 4/4 time signature you may choose to use four lines per beat which means every line will be a 16th of a whole note. If you instead decide to use eight lines per beat (so you can use 32nd notes) you have to set the tempo to half of that when using four lines per beat. See chapter 10.3 for calculating how many beats per minute different tempo settings will give you. You can also use the tables at the end of this manual. The tempo can also be changed with pattern effects and orderlist effects (see chapters 8 and 9).
10.1 TEMPO-PROGRAM TABLE The table in the bottom-right corner shows the selected tempo-program. For extreme pattern timing / swing / funktempo you can describe complex tempo-programs here. If the tempo-program is selected later from pattern-FX, all of its rows correspond to the timing of consequent rows of the pattern the tempo-program is applied to. Usually we don't need
52
complex tempo-programs, just funktempo, but it might be useful for frequently appearing special rhythms... Press C=+F7 (CTRL+F7) anytime to get to the Tempo-program table. To select a tempo-program, you can press SHIFT+T/Y anytime or +/- in the tempo-program table itself. Editing is similar to that of the chord-table, except there are no numbers allowed more than $7F (hexa) value. The tempo-program automatically rolls over after the last value, there’s no need for special jump-commands.
10.2 MULTISPEED Multispeed gives finer / faster control of the SID by modifying its registers multiple times in a 50Hz PAL (or 60Hz NTSC) frame. With 8x multispeed the SID can be modified in 400Hz frequency, and the waveform / arpeggio tables can run really fast... However the 2x speed (100Hz) can be quite enough for some nice effects. (E.g. Rubicon's title music by Jeroen Tel is 2x, and has drums that are not possible in 1x single-speed at 50Hz). Different programs handle multi-speed differently. In X-SID and SID-Wizard only the tables (waveform / pulse / filter) run at multispeed, the tempo- and vibrato / slide handling is only called in the single-speed part of the player only once in a frame. Opposed to GoatTracker and some others where the whole player is called. Both solutions have advantages and disadvantages. The only disadvantage of the solution in SID-Wizard is that you can't set tune-tempo in a finer scale, but on the other hand in multispeed the tempo / hard restart / vibrato / slide settings can stay the same.... SID-Wizard supports up to 8x (400Hz) multi-framespeed. Using multispeed does not affect speed values and tempo (just like in Jeff’s X-SID). You can change this setting from the main menu (see next chapter).
53
10.3 TEMPO -> BPM If you are going to use your SID-tunes in a DAW like Cubase for further processing you probably want to know the tempo of your tune in beats per minute. You can use the calculation below. If you don’t care where the values come from, just use the final formulas for your PAL or NTSC machine. (The second one is simplified but should give you an exact enough tempo value since you can rarely insert a tempo with more than two decimals.) Variables from your tune are song tempo and pattern lines per beat. If you have a tune with funktempo then you calculate the mean value of the two tempos, so for a funktempo of 0604 you would use 5 in the calculation.
PAL MACHINE Base clock 17734475 Hz System clock Base clock / 18 Raster lines / frame 312 Clock cycles / raster line 63 Clock cycles / frame 312*63 Frames per second 17734475 / (312*63*18) = 50.125 Hz Frames per minute (17734475*60) / (312*63*18) Final formula (PAL): BPM = (17734475*60) / (312*63*18*song tempo*lines per beat) BPM ≈ 3007.4744 / (song tempo*lines per beat)
NTSC MACHINE Base clock 14318180 Hz System clock Base clock / 14 Raster lines / frame 263 Clock cycles / raster line 65 Clock cycles / frame 263*65
54
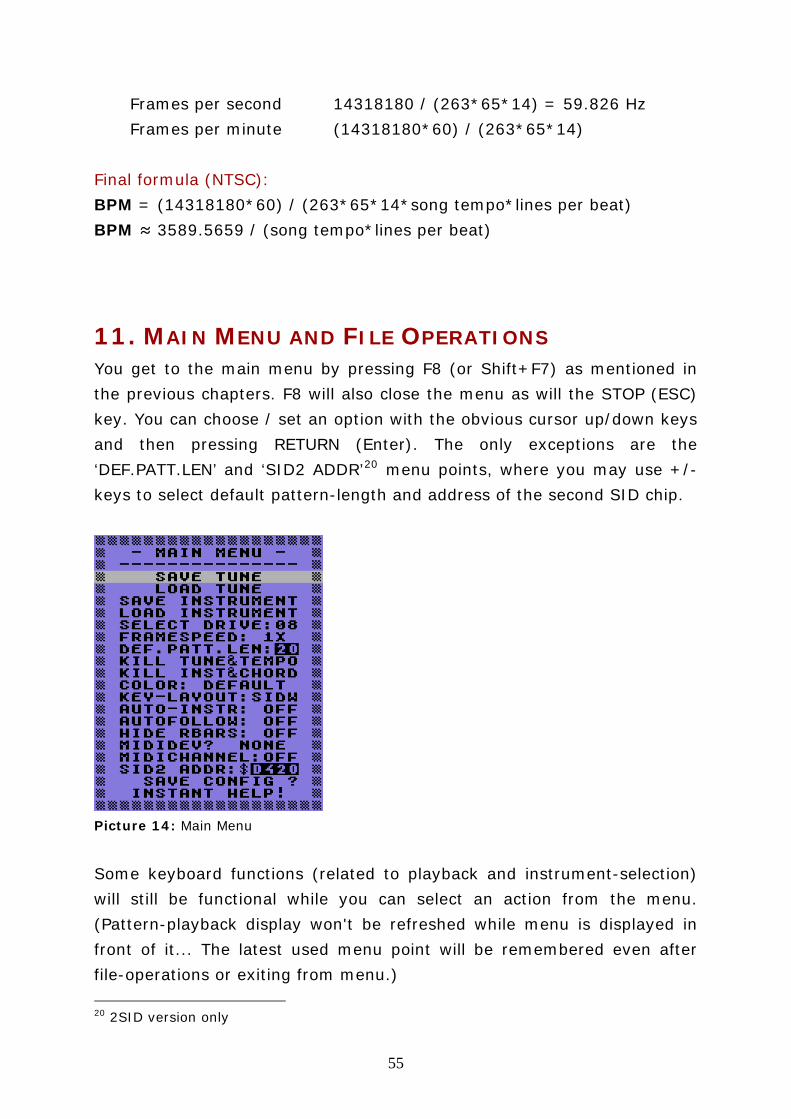
Frames per second 14318180 / (263*65*14) = 59.826 Hz Frames per minute (14318180*60) / (263*65*14) Final formula (NTSC): BPM = (14318180*60) / (263*65*14*song tempo*lines per beat) BPM ≈ 3589.5659 / (song tempo*lines per beat)
11. MAIN MENU AND FILE OPERATIONS
You get to the main menu by pressing F8 (or Shift+F7) as mentioned in the previous chapters. F8 will also close the menu as will the STOP (ESC) key. You can choose / set an option with the obvious cursor up/down keys and then pressing RETURN (Enter). The only exceptions are the ‘DEF.PATT.LEN’ and ‘SID2 ADDR’20 menu points, where you may use +/- keys to select default pattern-length and address of the second SID chip.
Picture 14: Main Menu
Some keyboard functions (related to playback and instrument-selection) will still be functional while you can select an action from the menu. (Pattern-playback display won't be refreshed while menu is displayed in front of it... The latest used menu point will be remembered even after file-operations or exiting from menu.) 20 2SID version only
55
11.1 SIMPLE SETTINGS
SELECT DRIVE Select the active disk drive for file operations (if you are using Vice with seamless folder integration you don't need to care about this).
FRAMESPEED Set multi-framespeed (see chapter 10.2).
DEF.PATT.LEN Default pattern length.
KILL TUNE AND TEMPO Clears the tune and sets tempo to default. Before clearing the tune, you might want to use +/- keys on 'default pattern-length' menu point to give direction for SID-Wizard what pattern-length to use by default when initializing the tune. The default pattern-length will be saved as information in the .SWM work file, so when you load the tune back later, the empty patterns will automatically be sized to that value (but size can be set afterwards manually as well).
KILL INST&CHORD This clears all instruments and chords.
COLOR Change the colour theme of the user interface.
KEY-LAYOUT You can choose from four different keyboard layouts. The layouts to choose from are the normal SID-Wizard layout, SDI-layout, DMC-layout and JANKO-layout. Information about these layouts can be read in other parts of this book.
56

AUTO-INSTR If this setting is ON the currently selected instrument will automatically be appended to the typed note in pattern-editor. If it remains ON at saving, the unneeded successive instrument-selections are cleared to reduce size of the saved tune. If it's OFF (default behaviour in C64 editors), the instrument-selection 'commands' should be typed by hand. In this case no optimization of successive instrument-selection commands is performed when saving the file.
AUTOFOLLOW When set to ON, the cursor will automatically follow the playing position.
HIDE RBARS Hides the raster bars on the sides of the user interface.
CHORD-NOTE If this setting is ON than you can edit the chord table with note names instead of interval numbers. Read about this in chapter 6.
MIDIDEV Select a MIDI device type. Read more about MIDI devices in the chapter about MIDI.
MIDICHANNEL Set the MIDI channel that you want SID-Wizard to receive from.
SID2 ADDR (ONLY FOR 2SID VERSION) The base-address of the 2nd SID can be set to all possible values with +/- but the most commonly used addresses come first. The setting gets performed when you exit from menu or restart tune (F1). (Clash with cartridges can also happen if you try to set $DE00..$DFE0 here.)
57
SAVE CONFIG From version 1.5 SID-Wizard no longer saves editor-specific settings into the work file; you can save your settings with this menu point. This will create a file called '@SWCONFIG.PRG'. That file is loaded at next start-up automatically, on success it is seen in start-up menu, otherwise you'll see a '?' next to this menu point. (If saving the configuration was unsuccessful you'll see a '!' here.)
INSTANT HELP! Well, what could this mean?
11.2 LOAD/SAVE TUNE (WORK FILE) OR INSTRUMENT If you select 'Save' or 'Load' options, they'll invoke the PC-like file-dialog where you can type desired filename directly or select (and further edit) it from the disk directory. (When you want to load or save instrument, make sure the instrument (subject of load/save operation) was selected in the editor/menu beforehand with +/- keys. When disk-directory is read, filenames are filtered and distributed in 3 columns, and you can observe disk name and free disk space (in kilobytes) at the bottom of the screen. Note that only 12 character-long filenames are allowed. That is due to the automatically attached '.SWM' or '.SWI' extension ('M' stands for 'module', 'I' stands for instrument), which SID-Wizard uses to filter the filenames when displaying the disk-directory. The default disk-drive could be selected in advance from the Menu (device 8...15). In the upper-right corner of the file-dialog you can see the editor's player-version number, if you want to load a newer/other module-version (possibly) coming in the future, you'll be warned, because the module's format-version should always match the editor's or exporter's21 version. If you are using .D64 images on a PC you can not overwrite files. For seamless folder integration in Vice; P00 and S00 files will not be 21 Editor: Sid-Wizard, Exporter: SID-Maker
58
overwritten either but a file with the same name but extension (.P01, .P02) will be created, so you should avoid saving files with the same name as existing ones.
USABLE KEYS IN THE FILE-DIALOG F1 Re-read disk-directory, go to its beginning F3/UP-arrow (Page-Down) Page down in directory (if bigger than one-screen) CONTROL (TAB) Cycle between filename-typer / authorinfo-typer /
filename-selector fields. (Author-info is only editable when saving tune.)
Cursor Up/Down/Left/Right Obviously navigating cursor in typer / file-selector fields RETURN (Enter) Perform disk-operation (or leave author-info editor). You'll
notified if problems occur (file exists/file not found). F7/STOP (F7/F8/Esc) Exit from file-dialog back to editor without performing any
file operation.
THE SWM AND SWS FILE FORMATS The .SWM format is an optimized/compressed own format of SID-Wizard, not compatible with any other systems, but must stay compatible through further SID-Wizard versions. (It contains 'SWM1' filetype&version string to notify editor if its version mismatches.) The .SWS (SID-Wizard Stereo) format is similar to the .SWM format but for the 2SID version. You can use SWMconvert to convert a three channel .SWM song into .SWS if you want to extend it to six channels. See chapter 14 about SWMconvert. If ‘auto-instrument-typing’ mode is selected (Shift+I or menu), the unneeded repetitive instrument-selections are deleted / optimized before saving to reduce pattern-sizes. The .SWI format is a copy of one selected instrument (without the empty/unused spaces).
59
12. MIDI An exciting new feature in version 1.5 is MIDI keyboard support. For this you will need a MIDI interface for you Commodore 64. Supported interfaces are: HerMIDI (MIDI interface designed by Hermit, see chapter 12.1), Sequential Circuits, Passport / Syntech, JMS / Datel / Siel / CLAB, NameSoft, Maplin and Moog Song Producer. You can activate MIDI support from the main menu. To activate a MIDI-device first select its type with RETURN, then select the MIDI-channel you want to receive from. (Press Shift+RETURN to disable MIDI.) If a MIDI-device is set successfully you can see ':' before its name, else a '!' notifies you about the issues. Attention: Most MIDI-devices that use $DE00..$DFFF will cause a clash / freeze if you have a cartridge attached to the expansion port. There is currently no workaround except using a HerMIDI interface which doesn't use the expansion-port kept for cartridges. The table below shows the supported MIDI-messages. MIDI message Comments Note on / note off - Pitch wheel Pitch shift +/- 2 semitones Mod wheel (CC 1) Vibrato After touch Vibrato, in monophonic-mode only on
cursor channel Brightness (CC 74) Similar to Big-Fx $1C, shifts (adds to) the
cutoff hi-byte while the filter program can run freely.
Volume (CC 7) Channel volume
Program change Changes instrument
Start Play from beginning Stop Stop playback
Continue Continue playing from current position
When jamming you can toggle between monophonic+legato and polyphonic mode with C= + D (CTRL+D). In polyphonic mode, all three voices are used.
60
It’s worth mentioning again that if you have a sustain value of 8 in the ADSR for the instrument then MIDI-velocity is ON. Don't be surprised if you see some short screen-flashing in the top & bottom borders when you use MIDI-devices. That's caused by the IRQ that MIDI-cartridges generate in arbitrary times and so they disturb raster-interrupt of SID-Wizard.
12.1 HERMIDI
HerMIDI is a MIDI interface designed by Hermit that connects to the serial port of the C64. If you have a disk drive or SD2IEC device you can connect HerMIDI to the serial port on that device (daisy chaining). You can find the files needed to build your own HerMIDI interface in the sources/HerMIDI folder of the SID-Wizard package. Readme.txt in that folder also has a list of currently tested keyboards that work with the interface. For detailed building instructions you can get a pdf-document from the CSDB release page: http://csdb.dk/release/?id=129030.
13. SID-MAKER (EXPORT YOUR TUNES)22
This is a separate executable application file on the SID-Wizard disk (or to be downloaded separately), because relocation could hardly be achieved to memory areas which SID-Wizard editor takes for code. I guess this won't be such a big problem considering that this step will possibly be the last step when a tune is ready to be released. The device (disk drive) will be the one SID-Maker was loaded from. SID-Maker can generate 4 kinds of file outputs at the moment: 3 native C64 formats ('.C64.PRG', '.BIN.SEQ' and executable '.EXE.PRG'), and '.SID.SEQ' (SID) format which enables cross-platform playback, if transferred with a cross-platform file-copier like Star Commander or Total Commander D64 plug-in. (The .PRG and .SEQ are standard extensions appended by CBM-DOS. If you need a SID, you have to rename the '.sid.seq' extension of the exported tune to '.sid' - this might depend on your copier tool.) If you use SID-Maker in
22 Text mostly from SID-Wizard Manual 1.2
61
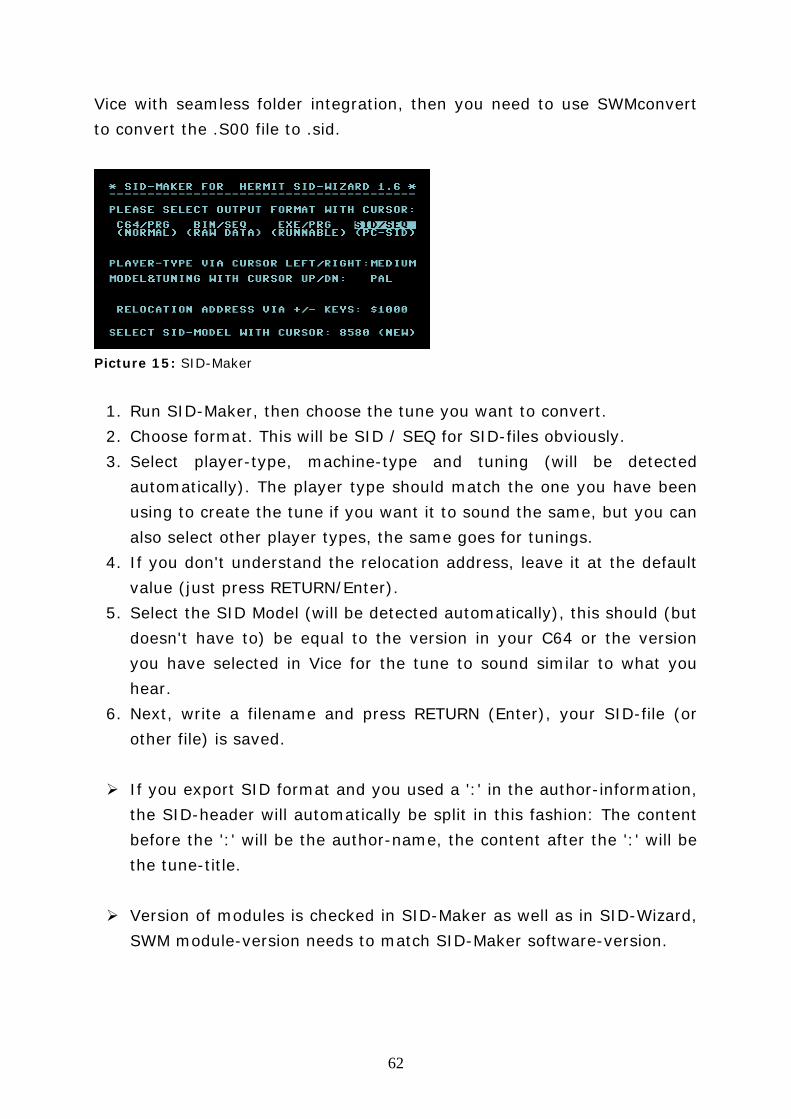
Vice with seamless folder integration, then you need to use SWMconvert to convert the .S00 file to .sid.
Picture 15: SID-Maker
1. Run SID-Maker, then choose the tune you want to convert. 2. Choose format. This will be SID / SEQ for SID-files obviously. 3. Select player-type, machine-type and tuning (will be detected
automatically). The player type should match the one you have been using to create the tune if you want it to sound the same, but you can also select other player types, the same goes for tunings.
4. If you don't understand the relocation address, leave it at the default value (just press RETURN/Enter).
5. Select the SID Model (will be detected automatically), this should (but doesn't have to) be equal to the version in your C64 or the version you have selected in Vice for the tune to sound similar to what you hear.
6. Next, write a filename and press RETURN (Enter), your SID-file (or other file) is saved.
If you export SID format and you used a ':' in the author-information,
the SID-header will automatically be split in this fashion: The content before the ':' will be the author-name, the content after the ':' will be the tune-title.
Version of modules is checked in SID-Maker as well as in SID-Wizard,
SWM module-version needs to match SID-Maker software-version.
62
In case you have 'SAVE ERROR' (with CBM-DOS error code) you might not have a compatible Disk Drive like 1541, so the exporter cannot write SEQ files. If you want a compatible mode anyway, you can still perform a standard compatible 'SAVE' process by exporting in the (1st) C64 PRG format without modifying relocation address. If you set relocation address for PRG or SID format, the exporter will switch to compatible SAVE mode automatically in case of error, but that will involve the exported tune's load-address to be forced to the default $1000 (or $0F82 in case of SID) - however the code itself gets relocated. If this is the case, you should load the relocated tune manually by forcing the desired load-address, when you include the PRG in a program. (In case of SID you might delete the 2 byte load-address with a hex-editor to make the SID compatible.)
There is an additional ‘SID2 address’ setting in the 2SID version
which works the same way as in the editor; the most common addresses come first. All export formats will need this address.
14. SWM-CONVERT AND OTHER TOOLS SWM-Convert lets you convert SWM format to / from XM or MID format in the command-line. You should copy SWMconvert.exe to the Windows\System32 so you can start it easily from the command prompt. The usage and syntax is easy, and described by SWMconvert executable if you run it without command-line parameters or with ‘-help’ parameter. Note that, there are some effects that cannot be transferred between the different formats, e.g. XM doesn’t support tempo-programs or different pattern-lengths; and SWM can’t contain more than 3 channels. Only channels / tracks 1..3 of XM or MID are converted to the SWM format, so you should edit the XM/MID file beforehand. These 3 tracks should even be monophonic for better conversion, because only some notes of polyphonic tracks get converted otherwise. On the other hand, the SWM
63

chords are expanded to more XM/MIDI tracks when converted. If an XM pattern is too big, it will be cropped to the maximum allowed size in SWM...
14.1 CONVERTING .S00 FILE TO .SID WITH SWM-CONVERT
These instructions are for Microsoft Windows (but there is also a binary of SWM-Convert for Linux).
1. Open the Command Prompt and go to the folder where your .S00 file is. In Windows 7 you can do this easily by holding Shift while right-clicking on the folder name (or somewhere in the folder) in Windows Explorer and then choosing Open command window here.
2. Then you just write: SWMconvert inputfilename.S00 outputfilename.sid The other parameter 'outputfilename.sid' is optional since a .S00 will automatically be converted to the sid-format.
14.2 SNG2SWM (GOATTRACKER CONVERTER) There is another converter in the ‘application’ folder called ‘sng2swm’. You can convert Goattracker ‘.sng’ files to SID-Wizard ‘.swm’ files with good precision. Its syntax is the same as SWM-Convert.
14.3 EDITING METADATA IN YOUR SID-FILE To edit metadata (song name, author, date of release etc.) in your SID-file you can use SIDEdit that can be downloaded here: http://www.transbyte.org/SID/SIDedit_download.html
64

15. APPLICATION NOTE TO THE PLAYER ROUTINE (TO
EMBED IN PROGRAMS) The player saves and restores the 2 internally used zeropage bytes (by default $fe and $ff). Therefore inclusion is easy in any programs as virtually no zeropage is affected outside the routine (unless the exporter’s ‘PLAYERZP_VAR’ in settings.cfg was set to nonzero value before compilation). The ‘normal/full’ player-routine's required maximal raster time is around $1A..$1C raster-rows, slightly depending on the number of effects and table commands used simultaneously (in ‘light’ version max. $14..$19 raster lines)... If less than 3 tracks are utilized in the music, raster time of the player routine decreases significantly. The initialize-routine's caller address is the same as the base-address/load-address (e.g. $1000) which requires a sub tune number present in Accumulator (as usual with other routines too). The single-speed playing-address is the init-address plus 3 (e.g $1003). The multispeed playing is done in the same way as XSID's/SDI’s (not as Goattracker's), so the multi-speed routine's calls are to be performed at init-address plus 6 (e.g. $1006) beside the singlespeed routine, on different raster lines of course (and have much less raster time usage). To change volume of the tune externally, put the desired volume (0..F) into the Accumulator and call volume-setter routine at init-address plus 9 (e.g. $1009). You can see the estimated raster time during composing and the final measure in the executable export. The memory footprints of the different player types are displayed in the Start-up menu of the editor.
65

66
15.1 SFX SFX (Sound-FX) can be triggered on channel 3 from your program by calling LoadAddress+12, if you exported the tune with the special SID-Maker-SFX. All FXes are essentially instruments, they override channel 3 notes during execution. You have to set the CPU-registers first: X=Note, Y=Instrument, A=Length (frames) (Check '/sources/SFX-example' folder.)
APPENDICES. (REFERENCE TABLES) Starts on the next page...
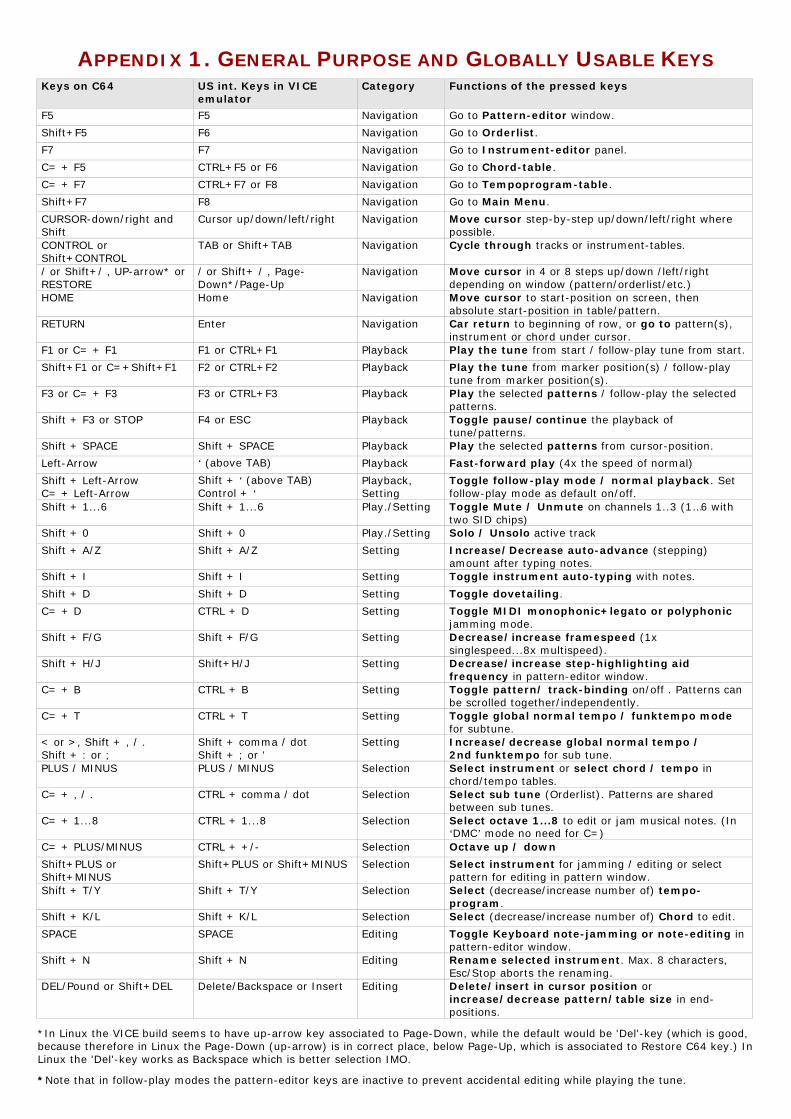
APPENDIX 1. GENERAL PURPOSE AND GLOBALLY USABLE KEYS Keys on C64 US int. Keys in VICE
emulator Category Functions of the pressed keys
F5 F5 Navigation Go to Pattern-editor window.
Shift+F5 F6 Navigation Go to Orderlist. F7 F7 Navigation Go to Instrument-editor panel.
C= + F5 CTRL+F5 or F6 Navigation Go to Chord-table.
C= + F7 CTRL+F7 or F8 Navigation Go to Tempoprogram-table. Shift+F7 F8 Navigation Go to Main Menu.
CURSOR-down/right and Shift
Cursor up/down/left/right Navigation Move cursor step-by-step up/down/left/right where possible.
CONTROL or Shift+CONTROL
TAB or Shift+TAB Navigation Cycle through tracks or instrument-tables.
/ or Shift+/ , UP-arrow* or RESTORE
/ or Shift+ / , Page-Down*/Page-Up
Navigation Move cursor in 4 or 8 steps up/down /left/right depending on window (pattern/orderlist/etc.)
HOME Home Navigation Move cursor to start-position on screen, then absolute start-position in table/pattern.
RETURN Enter Navigation Car return to beginning of row, or go to pattern(s), instrument or chord under cursor.
F1 or C= + F1 F1 or CTRL+F1 Playback Play the tune from start / follow-play tune from start.
Shift+F1 or C=+Shift+F1 F2 or CTRL+F2 Playback Play the tune from marker position(s) / follow-play tune from marker position(s).
F3 or C= + F3 F3 or CTRL+F3 Playback Play the selected patterns / follow-play the selected patterns.
Shift + F3 or STOP F4 or ESC Playback Toggle pause/continue the playback of tune/patterns.
Shift + SPACE Shift + SPACE Playback Play the selected patterns from cursor-position. Left-Arrow ‘ (above TAB) Playback Fast-forward play (4x the speed of normal)
Shift + Left-Arrow C= + Left-Arrow
Shift + ‘ (above TAB) Control + ‘
Playback, Setting
Toggle follow-play mode / normal playback. Set follow-play mode as default on/off.
Shift + 1...6 Shift + 1...6 Play./Setting Toggle Mute / Unmute on channels 1..3 (1…6 with two SID chips)
Shift + 0 Shift + 0 Play./Setting Solo / Unsolo active track
Shift + A/Z Shift + A/Z Setting Increase/Decrease auto-advance (stepping) amount after typing notes.
Shift + I Shift + I Setting Toggle instrument auto-typing with notes.
Shift + D Shift + D Setting Toggle dovetailing. C= + D CTRL + D Setting Toggle MIDI monophonic+legato or polyphonic
jamming mode. Shift + F/G Shift + F/G Setting Decrease/increase framespeed (1x
singlespeed...8x multispeed). Shift + H/J Shift+H/J Setting Decrease/increase step-highlighting aid
frequency in pattern-editor window. C= + B CTRL + B Setting Toggle pattern/ track-binding on/off . Patterns can
be scrolled together/independently. C= + T CTRL + T Setting Toggle global normal tempo / funktempo mode
for subtune. < or >, Shift + , / . Shift + : or ;
Shift + comma / dot Shift + ; or '
Setting Increase/decrease global normal tempo / 2nd funktempo for sub tune.
PLUS / MINUS PLUS / MINUS Selection Select instrument or select chord / tempo in chord/tempo tables.
C= + , / . CTRL + comma / dot Selection Select sub tune (Orderlist). Patterns are shared between sub tunes.
C= + 1...8 CTRL + 1...8 Selection Select octave 1...8 to edit or jam musical notes. (In ‘DMC’ mode no need for C=)
C= + PLUS/MINUS CTRL + +/- Selection Octave up / down Shift+PLUS or Shift+MINUS
Shift+PLUS or Shift+MINUS Selection Select instrument for jamming / editing or select pattern for editing in pattern window.
Shift + T/Y Shift + T/Y Selection Select (decrease/increase number of) tempo-program.
Shift + K/L Shift + K/L Selection Select (decrease/increase number of) Chord to edit.
SPACE SPACE Editing Toggle Keyboard note-jamming or note-editing in pattern-editor window.
Shift + N Shift + N Editing Rename selected instrument. Max. 8 characters, Esc/Stop aborts the renaming.
DEL/Pound or Shift+DEL Delete/Backspace or Insert Editing Delete/insert in cursor position or increase/decrease pattern/table size in end-positions.
*In Linux the VICE build seems to have up-arrow key associated to Page-Down, while the default would be 'Del'-key (which is good, because therefore in Linux the Page-Down (up-arrow) is in correct place, below Page-Up, which is associated to Restore C64 key.) In Linux the 'Del'-key works as Backspace which is better selection IMO.
*Note that in follow-play modes the pattern-editor keys are inactive to prevent accidental editing while playing the tune.
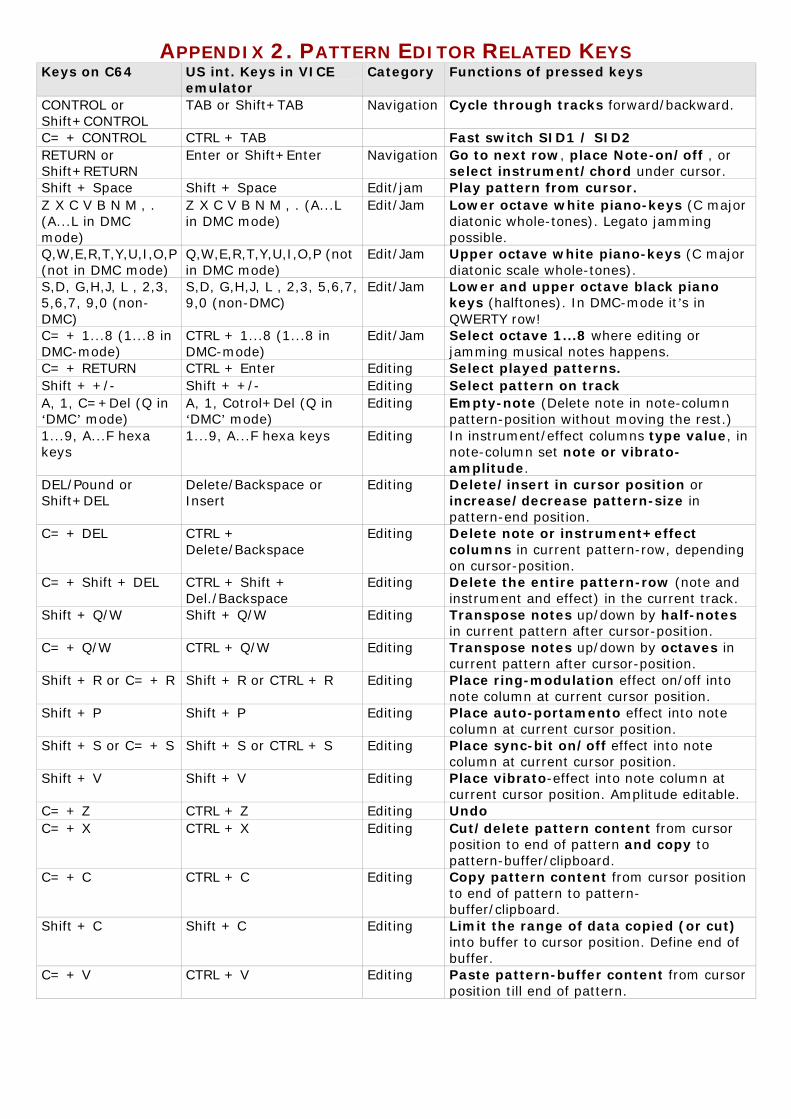
APPENDIX 2. PATTERN EDITOR RELATED KEYS Keys on C64 US int. Keys in VICE
emulator Category Functions of pressed keys
CONTROL or Shift+CONTROL
TAB or Shift+TAB Navigation Cycle through tracks forward/backward.
C= + CONTROL CTRL + TAB Fast switch SID1 / SID2 RETURN or Shift+RETURN
Enter or Shift+Enter Navigation Go to next row, place Note-on/off , or select instrument/chord under cursor.
Shift + Space Shift + Space Edit/jam Play pattern from cursor. Z X C V B N M , . (A...L in DMC mode)
Z X C V B N M , . (A...L in DMC mode)
Edit/Jam Lower octave white piano-keys (C major diatonic whole-tones). Legato jamming possible.
Q,W,E,R,T,Y,U,I,O,P (not in DMC mode)
Q,W,E,R,T,Y,U,I,O,P (not in DMC mode)
Edit/Jam Upper octave white piano-keys (C major diatonic scale whole-tones).
S,D, G,H,J, L , 2,3, 5,6,7, 9,0 (non-DMC)
S,D, G,H,J, L , 2,3, 5,6,7, 9,0 (non-DMC)
Edit/Jam Lower and upper octave black piano keys (halftones). In DMC-mode it’s in QWERTY row!
C= + 1...8 (1...8 in DMC-mode)
CTRL + 1...8 (1...8 in DMC-mode)
Edit/Jam Select octave 1...8 where editing or jamming musical notes happens.
C= + RETURN CTRL + Enter Editing Select played patterns. Shift + +/- Shift + +/- Editing Select pattern on track A, 1, C=+Del (Q in ‘DMC’ mode)
A, 1, Cotrol+Del (Q in ‘DMC’ mode)
Editing Empty-note (Delete note in note-column pattern-position without moving the rest.)
1...9, A...F hexa keys
1...9, A...F hexa keys Editing In instrument/effect columns type value, in note-column set note or vibrato-amplitude.
DEL/Pound or Shift+DEL
Delete/Backspace or Insert
Editing Delete/insert in cursor position or increase/decrease pattern-size in pattern-end position.
C= + DEL CTRL + Delete/Backspace
Editing Delete note or instrument+effect columns in current pattern-row, depending on cursor-position.
C= + Shift + DEL CTRL + Shift + Del./Backspace
Editing Delete the entire pattern-row (note and instrument and effect) in the current track.
Shift + Q/W Shift + Q/W Editing Transpose notes up/down by half-notes in current pattern after cursor-position.
C= + Q/W CTRL + Q/W Editing Transpose notes up/down by octaves in current pattern after cursor-position.
Shift + R or C= + R Shift + R or CTRL + R Editing Place ring-modulation effect on/off into note column at current cursor position.
Shift + P Shift + P Editing Place auto-portamento effect into note column at current cursor position.
Shift + S or C= + S Shift + S or CTRL + S Editing Place sync-bit on/off effect into note column at current cursor position.
Shift + V Shift + V Editing Place vibrato-effect into note column at current cursor position. Amplitude editable.
C= + Z CTRL + Z Editing Undo C= + X CTRL + X Editing Cut/delete pattern content from cursor
position to end of pattern and copy to pattern-buffer/clipboard.
C= + C CTRL + C Editing Copy pattern content from cursor position to end of pattern to pattern-buffer/clipboard.
Shift + C Shift + C Editing Limit the range of data copied (or cut) into buffer to cursor position. Define end of buffer.
C= + V CTRL + V Editing Paste pattern-buffer content from cursor position till end of pattern.

69
APPENDIX 3. ORDERLIST RELATED KEYS Keys on C64 US int. Keys in VICE
emulator Category Functions of pressed keys
RETURN or Shift+RETURN
Enter or Shift+Enter Navigation Selects the pattern(s) under the cursor position in Orderlist and jumps to current track in Pattern-editor.
C= + RETURN CTRL + Enter Navigation Selects the patterns that are currently played and jumps to current track in the Pattern-editor.
Shift+SPACE Shift + Space Playback Sets Orderlist playstart-marker (for F2-playing) to cursor-position for all tracks. Position number gets inverted.
C= + SPACE CTRL + SPACE Playback Sets Orderlist playstart-markers to individual played position for all tracks. Position number of 1st track gets inverted.
1...9, A...F hexa keys
1...9, A...F hexa keys Editing To type hexa pattern-numbers and effect/jump numbers into Orderlist sequences of tracks.
DEL/Pound or Shift+DEL
Delete/Backspace or Insert
Editing Delete/insert in cursor position or increase/decrease Orderlist sequence-size if cursor is in sequence-end/loop position.
C= + Z CTRL + Z Editing Undo C= + C CTRL + C Editing Copy orderlist-sequence from cursor to
buffer. Shift + C Shift + C Editing Set the end of copied data in buffer. (limit
buffer) C= + V CTRL + V Editing Paste buffer to cursor-pos ., appends
existing data C= + E CTRL + E Editing Type and the first Empty (unused)
pattern number. Increased if pressed more times, works on end signal.

70
APPENDIX 4. INSTRUMENT EDITOR RELATED KEYS Keys on C64 US int. Keys in VICE
emulator Category Functions of pressed keys
CONTROL or Shift+CONTROL
TAB or Shift+TAB Navigation Cycle through main instrument-setting panel and instrument-tables.
RETURN or Shift+RETURN
Enter or Shift+Enter Navigation Car return' to beginning of next row in tables (or toggle/cycle some main instrument-parameters.)
Shift + S Shift + S Navigation Go to main instrument settings Shift + W Shift + W Navigation Go to WF-ARP table Shift + P Shift + P Navigation Go to PUlseWidth table + / - + / - Selection Select instrument. The same in
pattern/orderlist/instrument windows, while Shift is needed in Chord/Tempo tables.
RETURN Enter Selection Toggle/cycle some of the instrument's main parameters like HR-type, Vibrato-type, octave-shift sign.. Or goes to default-chord if it’s number is under the cursor.
1...9, A...F hexa keys and F..Z
1...9, A...F hexa keys Editing To type hexa values into instrument-data fields, or type the name of the instrument (some signals allowed too.)
= = Editing Negate value (e.g. $40 will be $C0 = -$40) Shift + N Shift + N Editing Rename selected instrument . Max. 8
characters, Esc/Stop aborts the renaming. DEL/Pound or Shift+DEL
Delete/Backspace or Insert
Editing Delete/insert in cursor position. Increases/decreases table-size.
Shift + Space Shift+Space Editing Set/clear gate-off index to current table-row under the cursor (WFARP/PULSE/FILT)
C= + Z CTRL + Z Editing Undo C= + C CTRL + C Editing Copy the entire selected instrument to
instrument-buffer. C= + X CTRL + X Editing Cut the entire selected instrument to
instrument-buffer C= + V CTRL + V Editing Paste instrument -clipboard content to the
selected instrument. The entire instrument will be overwritten.
C= + P or C= + F CTRL + P / F Editing Toggle pulsewidth-/filter-table reset on note-start. (Selecting instrument resets it.)
APPENDIX 5. CHORD TABLE / TEMPO TABLE RELATED KEYS
Keys on C64 US int. Keys in VICE emulator
Category Functions of pressed keys
CONTROL or Shift+CONTROL
TAB or Shift+TAB Navigation Go to pattern editor or go to instrument-editor.
RETURN or Shift+RETURN
Enter or Shift+Enter Navigation Car return' to beginning of next row in tables (or toggle/cycle some main instrument-parameters.)
+ / - + / - Selection Select chord / tempo-program. Shift+K/L or Shift+T/Y is needed in other windows.
Shift+PLUS or Shift+MINUS
Shift+PLUS or Shift+MINUS
Selection Select instrument for jamming / editing.
C= + N CTRL + N Editing Note-mode / number-mode 1...9, A...F hexa keys
1...9, A...F hexa keys Editing To type hexa values and chord loop/return numbers into chordtable/tempoprogram-table.
= = Editing Negate value (e.g. $04 will be $fb -4 2s’ compl.)
DEL/Pound or Shift+DEL
Delete/Backspace or Insert
Editing Delete/insert in cursor position. Increases/decreases table-size.

71
APPENDIX 6. FILE SELECTOR KEYS Keys on C64 US int. Keys in VICE
emulator Functions of pressed keys
F1 F1 Re-read disk-directory F3 / Up-arrow F3 / Up-arrow Page-down in directory Control TAB Filename/info/selector Return Enter Approve / Perform task F7 / STOP Escape Quit file-dialog
APPENDIX 7. SDI KEYBOARD LAYOUT DIFFERENCES AND ADD-ONS Keys on C64 US int. Keys in VICE emulator Functions of pressed keys Shift + L Shift + L Load music (bring up MENU too) Shift + S Shift + S Save Music (bring up MENU too) F1 F1 Play from orderlist mark(s) F2 F2 Set play-mark in orderlist F3 F3 Stop/Continue playback Z Z Play pattern from current line Return Enter Play pattern from top F4 F4 Edit/Synth mode (toggle) F7 /F8 F7 /F8 Select octave (incr./decr.) STOP, / Escape, / Toggle instrum./pattern-editor Shift + F Shift + F Filter program table Shift + T Shift + T Tempo program table C= + +/- CTRL + +/- Next/Previous song (subtune) C= + 1…3 CTRL + 1…3 Track on/off (mute/unmute) S / K, L S / K, L Tab jump left/right (tracks) , / . , / . Jump up/down 8/4 lines Space Space Delete down (in pattern) G, Shift + G G, Shift + G Gate on/off (--/++ in pattern) > / < > / < Transpose in pattern / Chord+- M, C= + M M, CTRL + M Copy, Paste (at cursor-position) Shift + M Shift + M Set end of copy-mark/selection C= + F CTRL + F Clear pattern (From cursorpos) Shift + Home Shift + Home To start of song (orderlist) H H Hunt next unused in Orderlist N N Name sound/instrument ? ? Set speed calls (framesp.1..8)
APPENDIX 8. DECIMAL TO HEXADECIMAL CONVERSION TABLE Next page ...
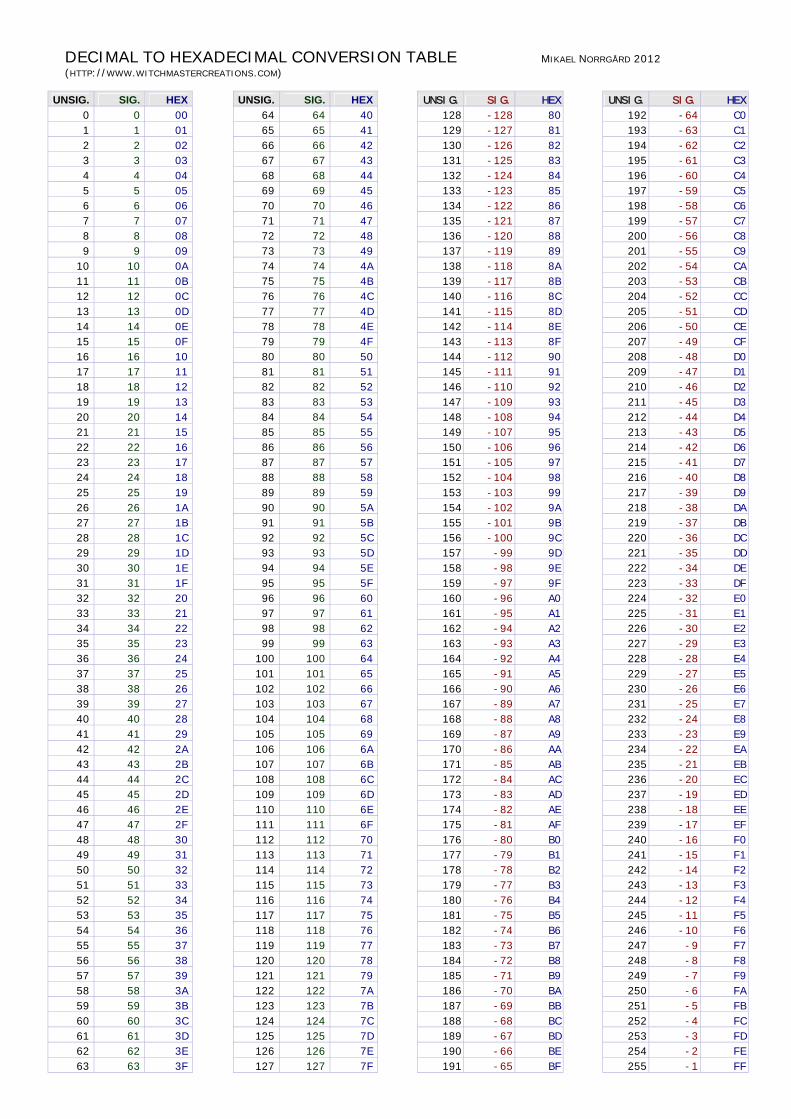
DECIMAL TO HEXADECIMAL CONVERSION TABLE MIKAEL NORRGÅRD 2012 (HTTP://WWW.WITCHMASTERCREATIONS.COM)
UNSIG. SIG. HEX
0 0 00
1 1 01
2 2 02
3 3 03
4 4 04
5 5 05
6 6 06
7 7 07
8 8 08
9 9 09
10 10 0A
11 11 0B
12 12 0C
13 13 0D
14 14 0E
15 15 0F
16 16 10
17 17 11
18 18 12
19 19 13
20 20 14
21 21 15
22 22 16
23 23 17
24 24 18
25 25 19
26 26 1A
27 27 1B
28 28 1C
29 29 1D
30 30 1E
31 31 1F
32 32 20
33 33 21
34 34 22
35 35 23
36 36 24
37 37 25
38 38 26
39 39 27
40 40 28
41 41 29
42 42 2A
43 43 2B
44 44 2C
45 45 2D
46 46 2E
47 47 2F
48 48 30
49 49 31
50 50 32
51 51 33
52 52 34
53 53 35
54 54 36
55 55 37
56 56 38
57 57 39
58 58 3A
59 59 3B
60 60 3C
61 61 3D
62 62 3E
63 63 3F
UNSIG. SIG. HEX64 64 40
65 65 41
66 66 42
67 67 43
68 68 44
69 69 45
70 70 46
71 71 47
72 72 48
73 73 49
74 74 4A
75 75 4B
76 76 4C
77 77 4D
78 78 4E
79 79 4F
80 80 50
81 81 51
82 82 52
83 83 53
84 84 54
85 85 55
86 86 56
87 87 57
88 88 58
89 89 59
90 90 5A
91 91 5B
92 92 5C
93 93 5D
94 94 5E
95 95 5F
96 96 60
97 97 61
98 98 62
99 99 63
100 100 64
101 101 65
102 102 66
103 103 67
104 104 68
105 105 69
106 106 6A
107 107 6B
108 108 6C
109 109 6D
110 110 6E
111 111 6F
112 112 70
113 113 71
114 114 72
115 115 73
116 116 74
117 117 75
118 118 76
119 119 77
120 120 78
121 121 79
122 122 7A
123 123 7B
124 124 7C
125 125 7D
126 126 7E
127 127 7F
UNSIG. SIG. HEX
128 -128 80
129 -127 81
130 -126 82
131 -125 83
132 -124 84
133 -123 85
134 -122 86
135 -121 87
136 -120 88
137 -119 89
138 -118 8A
139 -117 8B
140 -116 8C
141 -115 8D
142 -114 8E
143 -113 8F
144 -112 90
145 -111 91
146 -110 92
147 -109 93
148 -108 94
149 -107 95
150 -106 96
151 -105 97
152 -104 98
153 -103 99
154 -102 9A
155 -101 9B
156 -100 9C
157 -99 9D
158 -98 9E
159 -97 9F
160 -96 A0
161 -95 A1
162 -94 A2
163 -93 A3
164 -92 A4
165 -91 A5
166 -90 A6
167 -89 A7
168 -88 A8
169 -87 A9
170 -86 AA
171 -85 AB
172 -84 AC
173 -83 AD
174 -82 AE
175 -81 AF
176 -80 B0
177 -79 B1
178 -78 B2
179 -77 B3
180 -76 B4
181 -75 B5
182 -74 B6
183 -73 B7
184 -72 B8
185 -71 B9
186 -70 BA
187 -69 BB
188 -68 BC
189 -67 BD
190 -66 BE
191 -65 BF
UNSIG. SIG. HEX
192 -64 C0
193 -63 C1
194 -62 C2
195 -61 C3
196 -60 C4
197 -59 C5
198 -58 C6
199 -57 C7
200 -56 C8
201 -55 C9
202 -54 CA
203 -53 CB
204 -52 CC
205 -51 CD
206 -50 CE
207 -49 CF
208 -48 D0
209 -47 D1
210 -46 D2
211 -45 D3
212 -44 D4
213 -43 D5
214 -42 D6
215 -41 D7
216 -40 D8
217 -39 D9
218 -38 DA
219 -37 DB
220 -36 DC
221 -35 DD
222 -34 DE
223 -33 DF
224 -32 E0
225 -31 E1
226 -30 E2
227 -29 E3
228 -28 E4
229 -27 E5
230 -26 E6
231 -25 E7
232 -24 E8
233 -23 E9
234 -22 EA
235 -21 EB
236 -20 EC
237 -19 ED
238 -18 EE
239 -17 EF
240 -16 F0
241 -15 F1
242 -14 F2
243 -13 F3
244 -12 F4
245 -11 F5
246 -10 F6
247 -9 F7
248 -8 F8
249 -7 F9
250 -6 FA
251 -5 FB
252 -4 FC
253 -3 FD
254 -2 FE
255 -1 FF
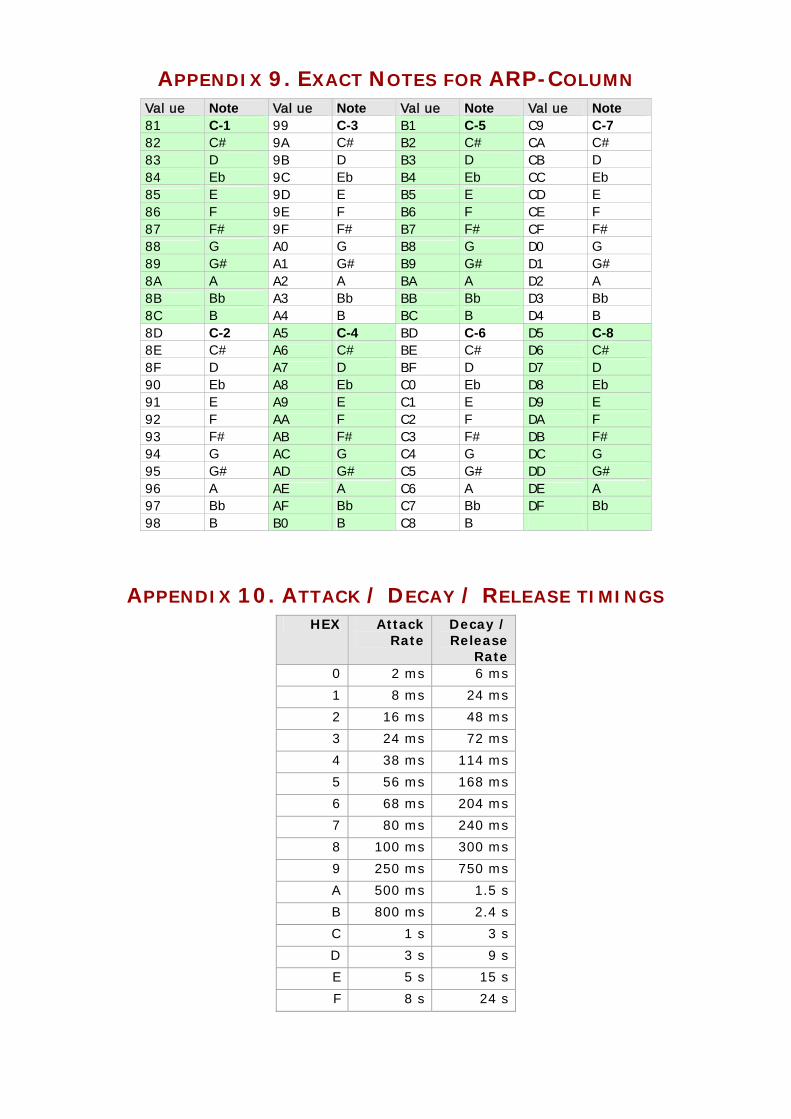
APPENDIX 9. EXACT NOTES FOR ARP-COLUMN
Value Note Value Note Value Note Value Note 81 C-1 99 C-3 B1 C-5 C9 C-7 82 C# 9A C# B2 C# CA C# 83 D 9B D B3 D CB D 84 Eb 9C Eb B4 Eb CC Eb 85 E 9D E B5 E CD E 86 F 9E F B6 F CE F 87 F# 9F F# B7 F# CF F# 88 G A0 G B8 G D0 G 89 G# A1 G# B9 G# D1 G# 8A A A2 A BA A D2 A 8B Bb A3 Bb BB Bb D3 Bb 8C B A4 B BC B D4 B 8D C-2 A5 C-4 BD C-6 D5 C-8 8E C# A6 C# BE C# D6 C# 8F D A7 D BF D D7 D 90 Eb A8 Eb C0 Eb D8 Eb 91 E A9 E C1 E D9 E 92 F AA F C2 F DA F 93 F# AB F# C3 F# DB F# 94 G AC G C4 G DC G 95 G# AD G# C5 G# DD G# 96 A AE A C6 A DE A 97 Bb AF Bb C7 Bb DF Bb 98 B B0 B C8 B
APPENDIX 10. ATTACK / DECAY / RELEASE TIMINGS HEX Attack
Rate Decay / Release
Rate 0 2 ms 6 ms
1 8 ms 24 ms
2 16 ms 48 ms 3 24 ms 72 ms
4 38 ms 114 ms
5 56 ms 168 ms 6 68 ms 204 ms 7 80 ms 240 ms 8 100 ms 300 ms
9 250 ms 750 ms
A 500 ms 1.5 s B 800 ms 2.4 s
C 1 s 3 s
D 3 s 9 s E 5 s 15 s F 8 s 24 s
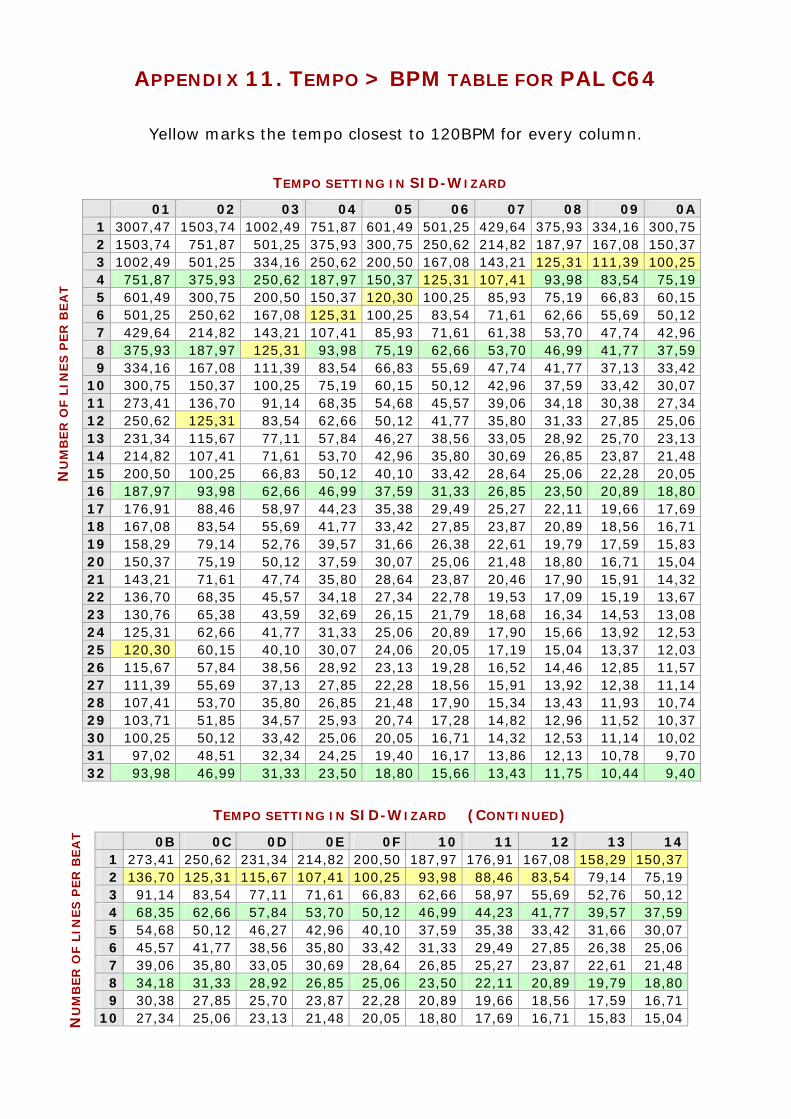
APPENDIX 11. TEMPO > BPM TABLE FOR PAL C64
Yellow marks the tempo closest to 120BPM for every column.
01 02 03 04 05 06 07 08 09
TEMPO SETTING IN SID-WIZARD
0A 1 3007,47 1503,74 1002,49 751,87 601,49 501,25 429,64 375,93 334,16 300,75 2 1503,74 751,87 501,25 375,93 300,75 250,62 214,82 187,97 167,08 150,37 3 1002,49 501,25 334,16 250,62 200,50 167,08 143,21 125,31 111,39 100,25 4 751,87 375,93 250,62 187,97 150,37 125,31 107,41 93,98 83,54 75,19
NU
MB
ER
OF
LIN
ES
PER
BE
AT
5 601,49 300,75 200,50 150,37 120,30 100,25 85,93 75,19 66,83 60,15 6 501,25 250,62 167,08 125,31 100,25 83,54 71,61 62,66 55,69 50,12 7 429,64 214,82 143,21 107,41 85,93 71,61 61,38 53,70 47,74 42,96 8 375,93 187,97 125,31 93,98 75,19 62,66 53,70 46,99 41,77 37,59 9 334,16 167,08 111,39 83,54 66,83 55,69 47,74 41,77 37,13 33,42
10 300,75 150,37 100,25 75,19 60,15 50,12 42,96 37,59 33,42 30,07 11 273,41 136,70 91,14 68,35 54,68 45,57 39,06 34,18 30,38 27,34 12 250,62 125,31 83,54 62,66 50,12 41,77 35,80 31,33 27,85 25,06 13 231,34 115,67 77,11 57,84 46,27 38,56 33,05 28,92 25,70 23,13 14 214,82 107,41 71,61 53,70 42,96 35,80 30,69 26,85 23,87 21,48 15 200,50 100,25 66,83 50,12 40,10 33,42 28,64 25,06 22,28 20,05 16 187,97 93,98 62,66 46,99 37,59 31,33 26,85 23,50 20,89 18,80 17 176,91 88,46 58,97 44,23 35,38 29,49 25,27 22,11 19,66 17,69 18 167,08 83,54 55,69 41,77 33,42 27,85 23,87 20,89 18,56 16,71 19 158,29 79,14 52,76 39,57 31,66 26,38 22,61 19,79 17,59 15,83 20 150,37 75,19 50,12 37,59 30,07 25,06 21,48 18,80 16,71 15,04 21 143,21 71,61 47,74 35,80 28,64 23,87 20,46 17,90 15,91 14,32 22 136,70 68,35 45,57 34,18 27,34 22,78 19,53 17,09 15,19 13,67 23 130,76 65,38 43,59 32,69 26,15 21,79 18,68 16,34 14,53 13,08 24 125,31 62,66 41,77 31,33 25,06 20,89 17,90 15,66 13,92 12,53 25 120,30 60,15 40,10 30,07 24,06 20,05 17,19 15,04 13,37 12,03 26 115,67 57,84 38,56 28,92 23,13 19,28 16,52 14,46 12,85 11,57 27 111,39 55,69 37,13 27,85 22,28 18,56 15,91 13,92 12,38 11,14 28 107,41 53,70 35,80 26,85 21,48 17,90 15,34 13,43 11,93 10,74 29 103,71 51,85 34,57 25,93 20,74 17,28 14,82 12,96 11,52 10,37 30 100,25 50,12 33,42 25,06 20,05 16,71 14,32 12,53 11,14 10,02 31 97,02 48,51 32,34 24,25 19,40 16,17 13,86 12,13 10,78 9,70 32 93,98 46,99 31,33 23,50 18,80 15,66 13,43 11,75 10,44 9,40
0B 0C 0D 0E 0F 10 11 12 13
TEMPO SETTING IN SID-WIZARD (CONTINUED)
NU
MB
ER
OF
LIN
ES
PER
BE
AT
14 1 273,41 250,62 231,34 214,82 200,50 187,97 176,91 167,08 158,29 150,37 2 136,70 125,31 115,67 107,41 100,25 93,98 88,46 83,54 79,14 75,19 3 91,14 83,54 77,11 71,61 66,83 62,66 58,97 55,69 52,76 50,12 4 68,35 62,66 57,84 53,70 50,12 46,99 44,23 41,77 39,57 37,59 5 54,68 50,12 46,27 42,96 40,10 37,59 35,38 33,42 31,66 30,07 6 45,57 41,77 38,56 35,80 33,42 31,33 29,49 27,85 26,38 25,06 7 39,06 35,80 33,05 30,69 28,64 26,85 25,27 23,87 22,61 21,48 8 34,18 31,33 28,92 26,85 25,06 23,50 22,11 20,89 19,79 18,80 9 30,38 27,85 25,70 23,87 22,28 20,89 19,66 18,56 17,59 16,71
10 27,34 25,06 23,13 21,48 20,05 18,80 17,69 16,71 15,83 15,04
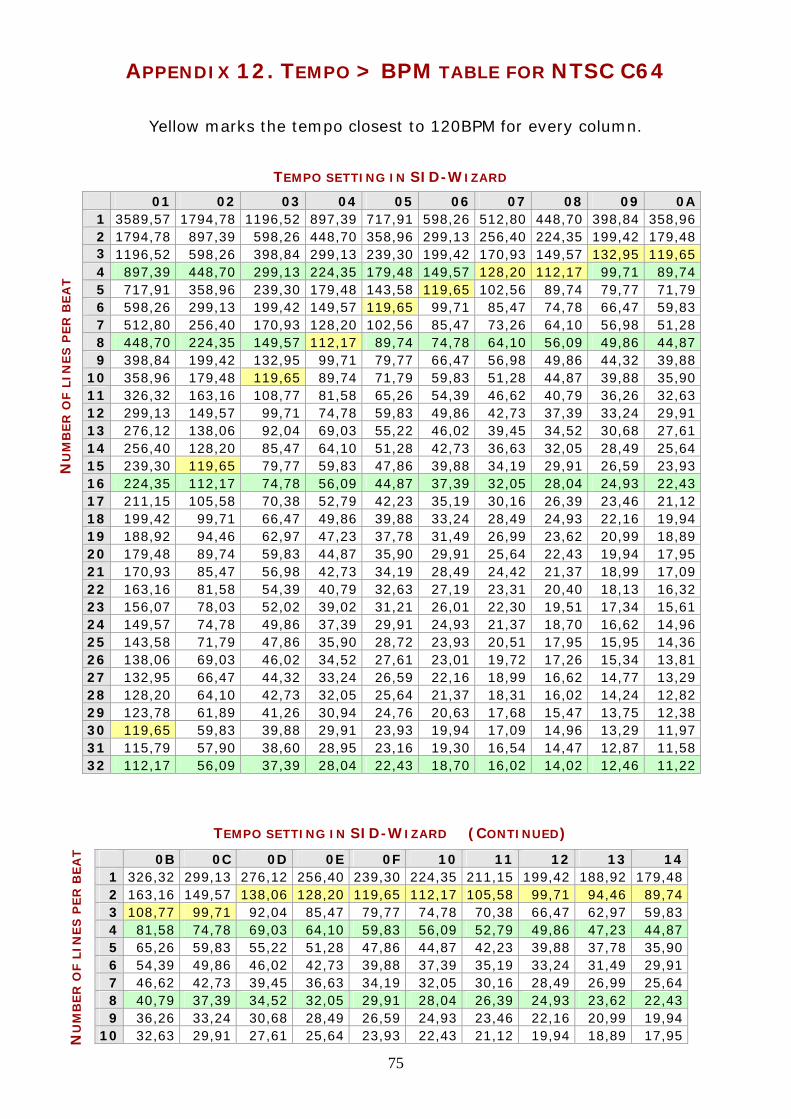
75
APPENDIX 12. TEMPO > BPM TABLE FOR NTSC C64
Yellow marks the tempo closest to 120BPM for every column.
01 02 03 04 05 06 07 08 09
TEMPO SETTING IN SID-WIZARD
0A 1 3589,57 1794,78 1196,52 897,39 717,91 598,26 512,80 448,70 398,84 358,96 2 1794,78 897,39 598,26 448,70 358,96 299,13 256,40 224,35 199,42 179,48 3 1196,52 598,26 398,84 299,13 239,30 199,42 170,93 149,57 132,95 119,65 4 897,39 448,70 299,13 224,35 179,48 149,57 128,20 112,17 99,71 89,74
NU
MB
ER
OF
LIN
ES
PER
BE
AT
5 717,91 358,96 239,30 179,48 143,58 119,65 102,56 89,74 79,77 71,79 6 598,26 299,13 199,42 149,57 119,65 99,71 85,47 74,78 66,47 59,83 7 512,80 256,40 170,93 128,20 102,56 85,47 73,26 64,10 56,98 51,28 8 448,70 224,35 149,57 112,17 89,74 74,78 64,10 56,09 49,86 44,87 9 398,84 199,42 132,95 99,71 79,77 66,47 56,98 49,86 44,32 39,88
10 358,96 179,48 119,65 89,74 71,79 59,83 51,28 44,87 39,88 35,90 11 326,32 163,16 108,77 81,58 65,26 54,39 46,62 40,79 36,26 32,63 12 299,13 149,57 99,71 74,78 59,83 49,86 42,73 37,39 33,24 29,91 13 276,12 138,06 92,04 69,03 55,22 46,02 39,45 34,52 30,68 27,61 14 256,40 128,20 85,47 64,10 51,28 42,73 36,63 32,05 28,49 25,64 15 239,30 119,65 79,77 59,83 47,86 39,88 34,19 29,91 26,59 23,93 16 224,35 112,17 74,78 56,09 44,87 37,39 32,05 28,04 24,93 22,43 17 211,15 105,58 70,38 52,79 42,23 35,19 30,16 26,39 23,46 21,12 18 199,42 99,71 66,47 49,86 39,88 33,24 28,49 24,93 22,16 19,94 19 188,92 94,46 62,97 47,23 37,78 31,49 26,99 23,62 20,99 18,89 20 179,48 89,74 59,83 44,87 35,90 29,91 25,64 22,43 19,94 17,95 21 170,93 85,47 56,98 42,73 34,19 28,49 24,42 21,37 18,99 17,09 22 163,16 81,58 54,39 40,79 32,63 27,19 23,31 20,40 18,13 16,32 23 156,07 78,03 52,02 39,02 31,21 26,01 22,30 19,51 17,34 15,61 24 149,57 74,78 49,86 37,39 29,91 24,93 21,37 18,70 16,62 14,96 25 143,58 71,79 47,86 35,90 28,72 23,93 20,51 17,95 15,95 14,36 26 138,06 69,03 46,02 34,52 27,61 23,01 19,72 17,26 15,34 13,81 27 132,95 66,47 44,32 33,24 26,59 22,16 18,99 16,62 14,77 13,29 28 128,20 64,10 42,73 32,05 25,64 21,37 18,31 16,02 14,24 12,82 29 123,78 61,89 41,26 30,94 24,76 20,63 17,68 15,47 13,75 12,38 30 119,65 59,83 39,88 29,91 23,93 19,94 17,09 14,96 13,29 11,97 31 115,79 57,90 38,60 28,95 23,16 19,30 16,54 14,47 12,87 11,58 32 112,17 56,09 37,39 28,04 22,43 18,70 16,02 14,02 12,46 11,22
0B 0C 0D 0E 0F 10 11 12 13
TEMPO SETTING IN SID-WIZARD (CONTINUED)
NU
MB
ER
OF
LIN
ES
PER
BE
AT
14 1 326,32 299,13 276,12 256,40 239,30 224,35 211,15 199,42 188,92 179,48 2 163,16 149,57 138,06 128,20 119,65 112,17 105,58 99,71 94,46 89,74 3 108,77 99,71 92,04 85,47 79,77 74,78 70,38 66,47 62,97 59,83 4 81,58 74,78 69,03 64,10 59,83 56,09 52,79 49,86 47,23 44,87 5 65,26 59,83 55,22 51,28 47,86 44,87 42,23 39,88 37,78 35,90 6 54,39 49,86 46,02 42,73 39,88 37,39 35,19 33,24 31,49 29,91 7 46,62 42,73 39,45 36,63 34,19 32,05 30,16 28,49 26,99 25,64 8 40,79 37,39 34,52 32,05 29,91 28,04 26,39 24,93 23,62 22,43 9 36,26 33,24 30,68 28,49 26,59 24,93 23,46 22,16 20,99 19,94
10 32,63 29,91 27,61 25,64 23,93 22,43 21,12 19,94 18,89 17,95