creating a sheet layout and title block template in adobe...
TRANSCRIPT

Creating a Sheet Layout and Title Block Template in Adobe InDesign CS2
Tutorial Created in August 2006 by Corinne Stewart ([email protected])
E

GRAPHICS TUTORIAL # E1Creating a Sheet Layout and Title Block Template in Adobe InDesign CS2
CP-208 Plan Preparation Studio - Prof. Elizabeth Macdonald 2
In an earlier exercise, a layout board was set up in Adobe Illustrator in order to reduce the number of programs the students had to learn. In general, it is far superior to set up boards in Adobe InDesign, and students who are planning on continuing on in urban design should make an effort to learn InDesign. In this exercise we will learn to create a sheet layout and title block template, as well as inserting graphics into the layout.
NOTE: Adobe InDesign produces boards that are much smaller in size than Adobe Illustrator. Part of the way the program accomplishes smaller file sizes is by linking files instead of embedding them. Therefore, it is important to maintain the location of the graphics inserted into the file.
A second basic rule is to keep the number of pages down in an InDesign file. This will aid in printing and file handling. In general, boards should be kept in sets of no more than five per document, while reports should be broken into chapters of 25 pages or less.
Other basic concepts essential to the use of Adobe InDesign include the following:
Understanding basic InDesign terminology and concepts:
1. Control Window: The window located just below the main menu. This window toggles between numerical controls when the selection arrow ( ) is chosen, or text controls when the text selection button ( ) is chosen. 2. Text and Image Boxes: Text and Images are contained within boxes subject to various types of controls. In order to add text or images, new boxes must be created first. Text boxes are added by selecting and dragging to the desired shape and size. Image boxes are created in the same way, using the tool. As seen in earlier tutorials, these boxes can be manipulated using the handles at their corners.
3. Selection Tool vs Direct Selection Tool : These arrows are seen at the top of the toolbar. The Selection tool is used to move and resize objects, while the Direct Selection Tool is used to resize and move the imagery within the outer frame, as much of the time, the image frame is cropping some part of the original image. This is only a visual crop, and the entire image is still available, but hidden by the frame.
4. Master Pages: Master Pages are used to create artwork that will be seen on multiple pages, such as page numbers, headers and footers, or title boxes. Artwork placed on Master Pages can only be altered from those masters and not in the body of the document. Multiple master pages can be created in a single document.
5. Tabbed Toolbars: InDesign is the only Adobe program with tabbed toolbars that sit to the right-hand side of the screen. Clicking on the tab you want will cause it to pop out. Click again, and it retracts. Many users like the screen organization this creates, and the toolbars can be shifted about or turned off to best meet the needs of the project at hand.

GRAPHICS TUTORIAL # E1Creating a Sheet Layout and Title Block Template in Adobe InDesign CS2
CP-208 Plan Preparation Studio - Prof. Elizabeth Macdonald �
STEP I: Creating a New InDesign file:
1. Open Adobe InDesign. 2. In the “File Menu” select “New....Document” to create a new InDesign file. 3. A “New Document” dialog box will appear. Select “Custom Page Size”, and type 36 and 24 in the width and height boxes. Select the landscape orientation. 4. Consider adding columns to help align objects on more complex boards. The number of and distance between columns can be altered under the “number’ and “gutter” buttons.5. Choose margins based on what your printer can accommodate as well as the look of the drawing. Sometimes larger margins are preferable on larger boards- here they are left at the default of .5 inches. The LAEP lab plotter can easily accommodate these dimensions.
File Menu New Document Setup Menu1. Custom Page Size
4. Add Columns for Organization
2. Type in size of board
3. Make “Landscape” your orientation
5. Standard .5 inch margins are compatible with the plotter

GRAPHICS TUTORIAL # E1Creating a Sheet Layout and Title Block Template in Adobe InDesign CS2
CP-208 Plan Preparation Studio - Prof. Elizabeth Macdonald 4
STEP II: Creating a New Master Page:As discussed earlier, master pages are used to create artwork that will appear on multiple pages. In this case, we will create a master page with a title block that will appear on all sheets.
1. Select the ‘A Master’ at the bottom of the page, using the pull down menu. 2. In the “File Menu” select “Document Setup” to create a Single-sided master page. 3. In the Document Setup window, unclick the “Facing Pages” box, and click OK.
New Board File..Document Setup
2. Select “Document Setup”
1. Select the Master page 3. Unclick “Facing
Pages” 4. Click OK

GRAPHICS TUTORIAL # E1Creating a Sheet Layout and Title Block Template in Adobe InDesign CS2
CP-208 Plan Preparation Studio - Prof. Elizabeth Macdonald 5
STEP III: Adding Elements to the Master Page :Here we will add a new master title block to appear on all pages, learning how to add and format text.
1. Select the add text button. Start in the lower corner where the two margins meet. Click and drag to the opposite side of the page. 2. Type in the desired text. Here we add the project title, designer’s name, and date. (Note the text size in the control window at the top of the page. This window currently displays the text attributes. If the selection tool is clicked, this will change to the dimensioning controls) 3. First we will center the text. Activate the “Paragraph” menu under “Window...Type and Tables... Paragraph”. This will make the paragraph window open. Select the text, then hit the center paragraph button .
1. Select the Text Tool
2. Click here �. Drag to here
4. Add Text
5. Go to “Window...Type and Tables...Paragraph”
6. Hit Align Center button
7. Text is Aligned

GRAPHICS TUTORIAL # E1Creating a Sheet Layout and Title Block Template in Adobe InDesign CS2
CP-208 Plan Preparation Studio - Prof. Elizabeth Macdonald 6
4. Now we will make the title text bold and larger to emphasize the project name. Click on the Text button , then the control panel will switch to text mode. Select the title text, then use the pull- down menu to change the text type to “bold” and the text size to 48 pt.
5. Finally, we will increase the line spacing between the three lines. This is accomplished by using the “Character” window, docked to the right of the screen. Click on the tab and the window will pop out. Change the spacing to 36 points by selecting the text and using the pull-down menu to increase the spacing. The spacing can also be toggled by using the up and down arrows located to the left of the pulldown menu.
9. Change Text Size to 48 pt
8. Change Text Type to “Bold”
Character Window
10. Change Line Spacing to �6 pt
Note: Spacing can be toggled up and down by using the arrow keys

GRAPHICS TUTORIAL # E1Creating a Sheet Layout and Title Block Template in Adobe InDesign CS2
CP-208 Plan Preparation Studio - Prof. Elizabeth Macdonald �
6. Now we will size the text box using the transform tools located in the measurement control panel. First select the text box using the selection tool . Then go to the measurement panel where the X and Y measurements locate the selected object on the page, while the width and height control its size. Enter in the coordinates and sizes as shown below.
The Master Page is now complete. We will now move back to the body of the document to complete the tutorial. The items on the Master Page will now be seen on Page 1, but can only be edited from the Master Page .
�. Select Page 1 in the pages pulldown to get from the master page to the main body of the document.
Enter these coordinates in to center the text box and locate it at the bottom margin. The size ensures that the text box fits within the margins and the text will be centered on the page
Measurement Control Panel
GRAPHICS TUTORIAL # E1Creating a Sheet Layout and Title Block Template in Adobe InDesign CS2
CP-208 Plan Preparation Studio - Prof. Elizabeth Macdonald 8
STEP IV: Setting up the Main Document :Here we will work with guides, measure distances and add content frames to the board.
Working with Guides is an essential part of InDesign. When we created our document, we added a series of guides that can help line up elements in a complex page layout. It is important to be able to turn guides on and off with ease to preview what your graphics and text will look like.
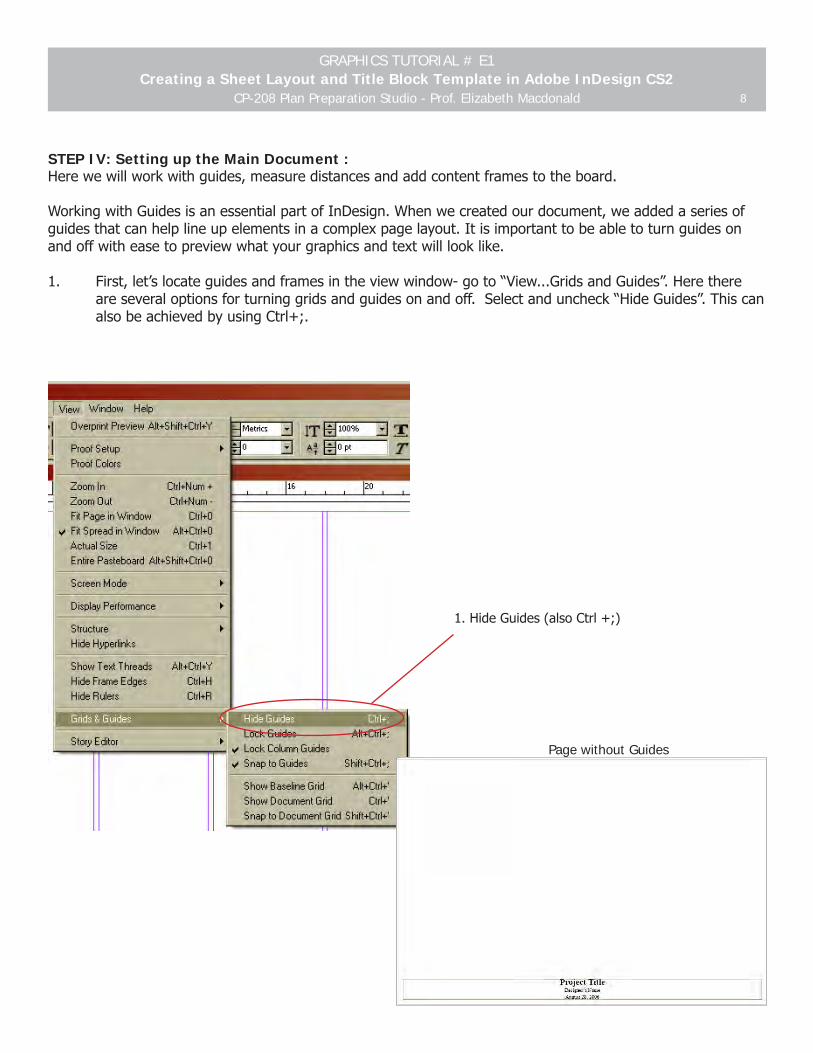
1. First, let’s locate guides and frames in the view window- go to “View...Grids and Guides”. Here there are several options for turning grids and guides on and off. Select and uncheck “Hide Guides”. This can also be achieved by using Ctrl+;.
1. Hide Guides (also Ctrl +;)
Page without Guides

GRAPHICS TUTORIAL # E1Creating a Sheet Layout and Title Block Template in Adobe InDesign CS2
CP-208 Plan Preparation Studio - Prof. Elizabeth Macdonald �
2. We will now add some elements to the board. We will add 4 rectangles, spaced .25” apart. First, however, we will add a new layer to the board to accommodate these graphics.
To do this, click on the Layers tab on the right-hand side of the window. The layers dialog will pop up. Click the add layers button, and a new layer will be created. We use the default name here, but double-clicking on the layer name will allow you to rename the layer to a name of your choice.
1. Click on Layer Tab
2. Create a New Layer by
Clicking
3. Double-Click on layer to change name4. Clicking
here will Lock and Unlock Layers
GRAPHICS TUTORIAL # E1Creating a Sheet Layout and Title Block Template in Adobe InDesign CS2
CP-208 Plan Preparation Studio - Prof. Elizabeth Macdonald 10
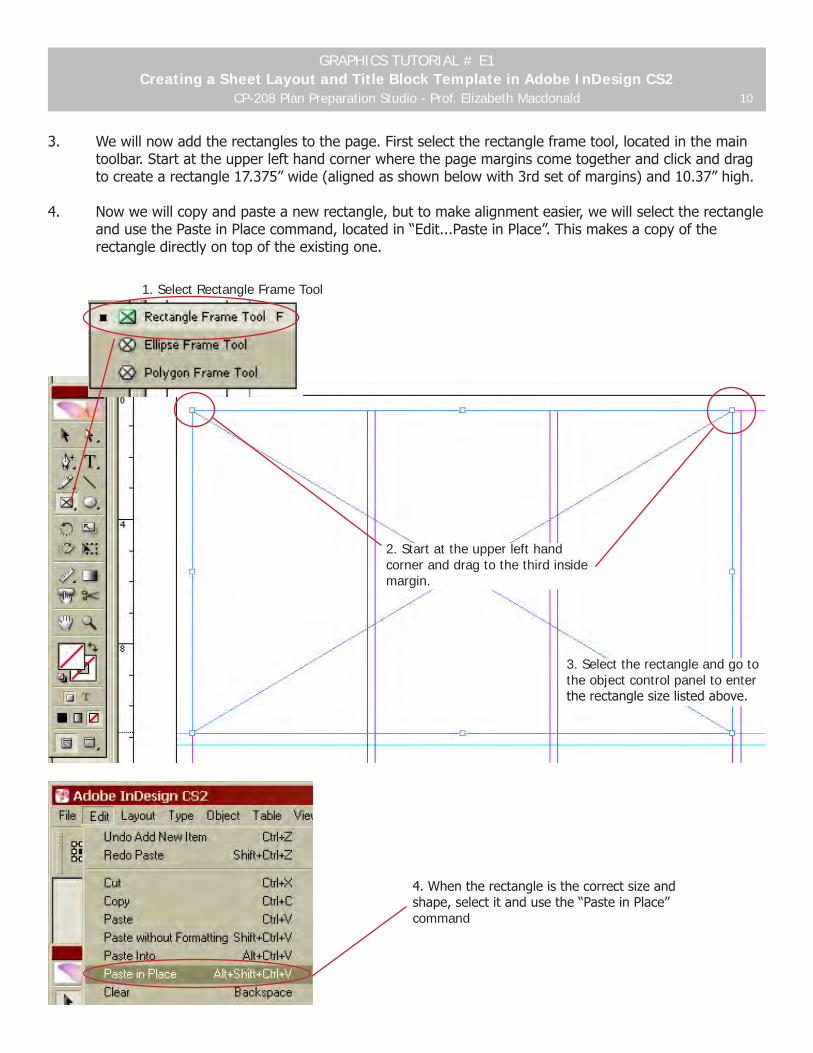
3. We will now add the rectangles to the page. First select the rectangle frame tool, located in the main toolbar. Start at the upper left hand corner where the page margins come together and click and drag to create a rectangle 17.375” wide (aligned as shown below with 3rd set of margins) and 10.37” high.
4. Now we will copy and paste a new rectangle, but to make alignment easier, we will select the rectangle and use the Paste in Place command, located in “Edit...Paste in Place”. This makes a copy of the rectangle directly on top of the existing one.
1. Select Rectangle Frame Tool
2. Start at the upper left hand corner and drag to the third inside margin.
�. Select the rectangle and go to the object control panel to enter the rectangle size listed above.
4. When the rectangle is the correct size and shape, select it and use the “Paste in Place” command

GRAPHICS TUTORIAL # E1Creating a Sheet Layout and Title Block Template in Adobe InDesign CS2
CP-208 Plan Preparation Studio - Prof. Elizabeth Macdonald 11
5. The new rectangle is now selected. Carefully click and drag in the body of the rectangle and drag it while holding the shift key. This allows movement only in a straight line vertically or horizontally. Drag the rectangle to the other margin. The result should be two identical rectangles, separated by the center .25” margin.
6. Now we will create a new .25” margin at the bottom of the new rectangles. This will allow us to copy and paste two more rectangles equidistant from the existing ones. To create a horizontal guide, click and drag the selection tool starting in the ruler area and drag the new guide down until it aligns with the bottom of the newly-created rectangles.
7. Create another guide, and drag it to the same location as the first. Pop out the “Info” tab on the right- hand side of the page. This will show you how far you are dragging the guide. Zoom into the area of the new guides by using the magnifying glass tool. Select one of the guides you created by clicking on it, then drag the guide down while watching the D: on the Info window. This shows you how far you’ve dragged the guide. Drag the guide as close to .25 as possible, then release.
5. Click and Drag the rectangle while holding down the shift key to the opposite corner.
6. The result is seen above: the two rectangles are separated by the .25 middle margin.
Create New Guides
7. To Create New Guides, First zoom into the bot-
tom corner of one rectangle.
8. Create a new guide by clicking and drag-
ging in the ruler field.
�. Drag Guide to bottom of new rectangle
10. Create another guide and drag to same location
11. Click on the “Info” Tab
12. Drag guide .25”, while watching the D: measurement

GRAPHICS TUTORIAL # E1Creating a Sheet Layout and Title Block Template in Adobe InDesign CS2
CP-208 Plan Preparation Studio - Prof. Elizabeth Macdonald 12
8. Now we will copy a second set of rectangles. Using the selection tool, select both of the rectangles, then perform a “Paste in Place” command. Grab those rectangles and pull them down while holding the shift key to align with the new guide you’ve just added. This results in the four rectangles, spaced .25” apart. The result is seen below.

GRAPHICS TUTORIAL # E1Creating a Sheet Layout and Title Block Template in Adobe InDesign CS2
CP-208 Plan Preparation Studio - Prof. Elizabeth Macdonald 1�
STEP V: Adding and Editing Graphic Content :Here we will add graphics to the board by using the place command. We will then see how to scale graphics within frames.
1. First select a frame, then place a graphic within that frame by going to “File...Place”. Navigate to its location and choose a graphic.
Note: InDesign will accept all standard graphic file formats, but it is recommended that graphics used for print should be either the native Photoshop (.psd) or TIFF (.tif) formats.
2. Select the graphic and hit OK.
1. Click within the frame using the Direct
Select Tool.
2. Go to “File...Place” to select graphic
�. Select the image you wish to add
4. Click “Open”
5. Your Image Appears in the Frame
GRAPHICS TUTORIAL # E1Creating a Sheet Layout and Title Block Template in Adobe InDesign CS2
CP-208 Plan Preparation Studio - Prof. Elizabeth Macdonald 14
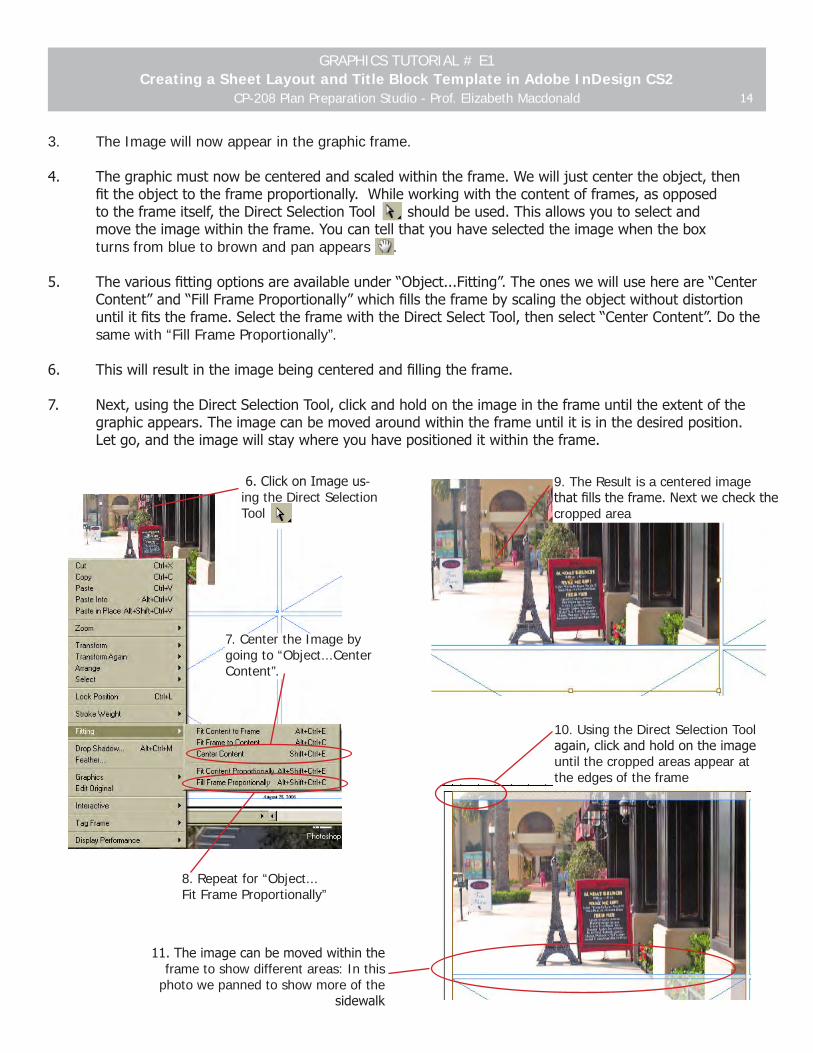
�. The Image will now appear in the graphic frame.
4. The graphic must now be centered and scaled within the frame. We will just center the object, then fit the object to the frame proportionally. While working with the content of frames, as opposed to the frame itself, the Direct Selection Tool should be used. This allows you to select and move the image within the frame. You can tell that you have selected the image when the box turns from blue to brown and pan appears .
5. The various fitting options are available under “Object...Fitting”. The ones we will use here are “Center Content” and “Fill Frame Proportionally” which fills the frame by scaling the object without distortion until it fits the frame. Select the frame with the Direct Select Tool, then select “Center Content”. Do the same with “Fill Frame Proportionally”.
6. This will result in the image being centered and filling the frame.
7. Next, using the Direct Selection Tool, click and hold on the image in the frame until the extent of the graphic appears. The image can be moved around within the frame until it is in the desired position. Let go, and the image will stay where you have positioned it within the frame.
6. Click on Image us-ing the Direct Selection Tool
�. Center the Image by going to “Object...Center Content”.
8. Repeat for “Object...Fit Frame Proportionally”
�. The Result is a centered image that fills the frame. Next we check the cropped area
10. Using the Direct Selection Tool again, click and hold on the image until the cropped areas appear at the edges of the frame
11. The image can be moved within the frame to show different areas: In this
photo we panned to show more of the sidewalk